

Page 1

COLIBRI-SD
STEREO DIGITAL VOICE RECORDER
Technical Description
Operation Manual
Page 2

2
INTRODUCTION
This Operation Manual is intended to study the Colibri-SD product
(hereinafter the product), its principle and components, the order to prepare
them for work and use, as well as to get acquainted with the conditions of
storage and transport.
The device should be maintained by those who:
- studied this Operation Manual;
- have expertise in operating PC in Microsoft Windows operating system.
1. DESCRIPTION AND CHARATERISTICS OF THE PRODUCT
1.1. COMPOSITION OF THE PRODUCT
The device includes:
• Voice Recorder;
• USB adapter (for charging recorder from PC);
• Micro SD card with software;
• Micro SD adapter.
1.2 OVERLOOK
Digital Voice Recorder provides high quality of voice recording in
complicated acoustic environment, including noisy areas and streets. It
features the thickness of only 2.7 mm, high microphones sensitivity, microSD card and battery life up to 20 hours in Record Mode.
Page 3

3
Information recorded onto the Voice Recorder is protected by digital
signature, which makes it possible to identify whether the recorded voice
information has been modified.
This Voice Recorder provides Timer Recording. There have been
implem en ted two ty p es of timers, which are:
• Daily Timer to set daily record start time and record stop time
• Schedule Timer to set time and date of record start and stop
time
These service functions can be activated using software after they are
saved on micro-SD card. For t hat insert SD-card to the appropriate socket and
make initialization of recorder (see detailed description in paragraph 3.4).
Control and indication of the Recorder's modes are carried out using two
hole-buttons and three-color LED (between buttons on the edge of recorder)
on the front side of the device.
Files can be played back in Windows Media of the operating system.
1.3 TECHNICAL CHARACTERISTICS OF THE PRODUCT
• Dimensions: 86 x 54 x 2.7 mm
• Weight: 17 grams.
• Battery life in record mode: at least 20 hours.
• Dynamic range: 80 dB.
• Frequency band: at least 16 kHz (depends on clock frequency).
• Power supply: built-in lithium-polymer rechargeable battery.
• Built-in battery capacity: 120-180 mA·h.
Page 4

4
• Battery life in Power Saving Mode: more than 3000 hours.
• Charging: connecting the product to USB port of the PC using
adapter.
• Charging time: 2 hours.
• The verification of the recorded file to identify any modifications
made since.
• Option to automatically record by two timers:
- Daily Timer to set daily record start time and record stop time
- Schedule Timer to set time and date of record start and stop
time.
• Recording format: WA VE PC M Stereo 8 kHz, 16 kHz, 32 kHz,
44.1 kHz.
• 16-bit audio codec.
• Maximum total record time: depends on SD-card memory
capacity.
• Reading time is determined by mic ro-SD card capacity
.
1.4. OPERATING CONDITIONS
The product should be used in the following modes:
• ambient temperature from -10 ° C to + 40 ° C.
• humidity less than 85% at + 25 ° C.
• pressure of 760 ± 20 mm Hg. Art.
Direct precipitation on the product should be avoided.
Page 5
5
2. PRODUCT DESIGN
2.1 VOICE RECORDER DESIGN
The product is manufactured in the form of USB-flash Dri ve or Access
Card (Pass, RFID card) - thin rectangular plates, the width and height of
which correspond of credit card form factor ID-1 ISO/IEC 7810. Plate
thickness is only 2.7 mm. There are built-in microphones, a mi crocontrol ler,
nonvolatile memory, a lithium-polymer rechargeable battery and slot for
micro-SD card inside the product.
Control of the operation modes and status monitoring is carried out
using the hole-buttons and three-color LED which located between buttons
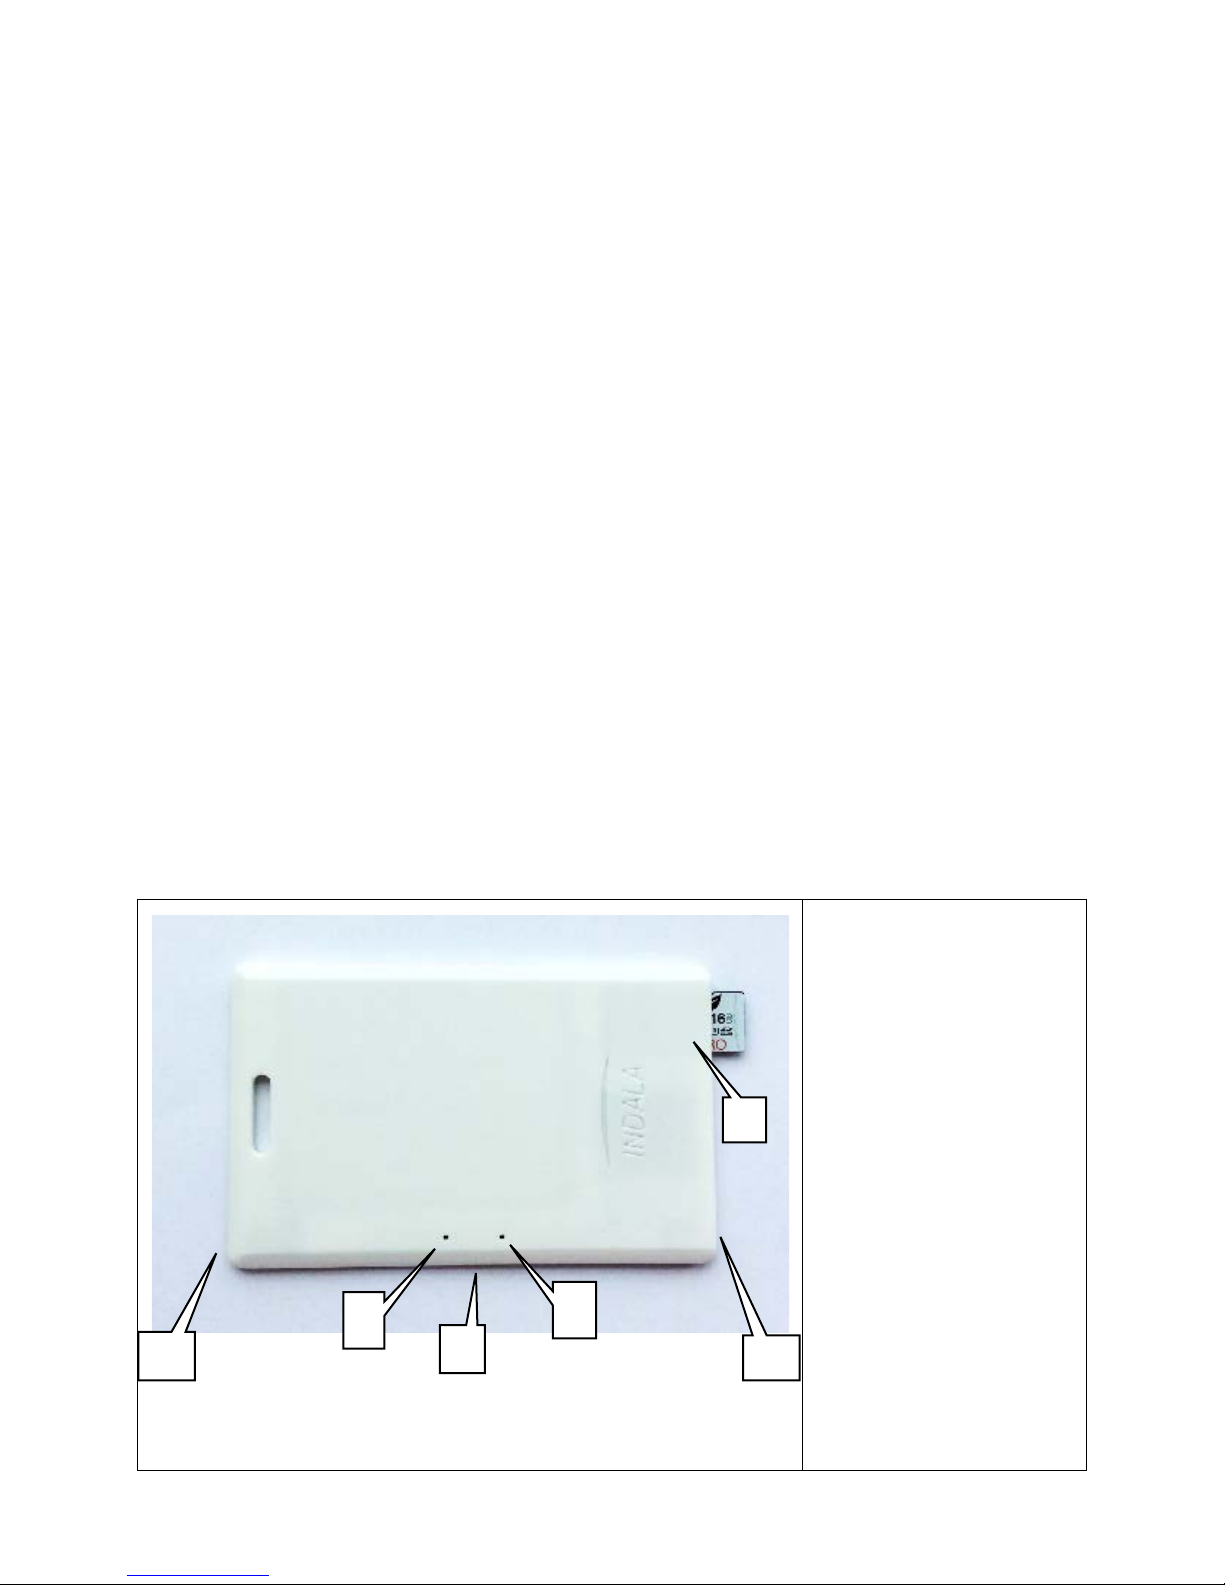
(Flash Dri ve) or on the edge of the device (Access Card) (see pictures below).
For pressing hole-buttons it is recommended to use fine wooden or plastic
stick.
Voice Recorder in form of Pass. Front view.
1. RECORD button.
2. LED of Status
Control.
3. STATUS Button.
4. Microphones
5. Slot for micro SDcard and adapte
r for
charging.
4 1 2
3
Page 6

6
Voice Recorder in form of USB-
flash. Front view.
Opened Recorder. USB-charger.
1. RECORD button.
2. LED of Status Control.
3. STATUS Button.
4. Microphones
5.
To open flash card chip push
down on the right edge of the
outlined rectangular area.
1. Slot for micro SD-
card and
adapter for charging.
2. Micro SD – USB adapter for
connecting to PC for charging.
3. Flash card chip
3. OPERATING THE PRODUCT
Please note! Due to shape of a thin rectangular plate the Recorder must
be handled carefully! Do not place the device into the pants pocket; it
could be damaged when sitting down. Do not bend or hit the Recorder! It
is also recommended to store the device in a protective case.
1
2
1
2
Page 7

7
3.1. GETTING STARTED
To start operating the product, go through the following steps:
• Take the product out of the package. Check the product for
mechanical damage or any swelling of the rechargeable battery.
• Carefully read the instruct i ons.
• Software is sto re d in to the memory of the Recorder.
• Check battery charge level. If pressing the Status b utton , t he LED
doesn't flash – the battery level is low. Charge the battery (see. 3.3
Battery Charging).
• Write configuration to SD-card using supplied software a nd then
to the recorder by inserting micro-SD card and pressing Record
button. This will set correct current time and date.
3.2. VOICE RECORDER MODES
To view the Recorder's status, use Status button. If you press the Status
button, Status Control LED lights up for a moment. LED color corresponds to
mode the Recorder is in at the moment. By default, Recorder is in Power
Saving Mode.
The list of modes and their corresponding LED colors are specified in the
Table below:
Page 8

8
LED color
Mode
Switched
off
Battery is discharged
Red
Voice Recorder is in Record Mode. Information from the Mic is
recorded onto memory
Green
Standby Mode, micro-SD card connected. Recorder is ready to
operate. Power saving Mode is off.
Blue
Power Saving Mode. Micro-SD card memory is off. Maximum
power saving level.
For manual activation of Record Mode, insert micro SD-card and press
the Record button (left one). The LED flashes, its color changing in the
following order: Red → green → off.
To stop recording, press the Record button. The LED flashes red twice, its
color changing in the following order: red → off → red → off.
To playback recorded information pull out micro-SD card and insert it to
card reader (if recording is on, stop it). Then connect card reader with SD card
to PC, open program file and listen to records.
3.3 RECORDER'S BATTERY CHARGING
To charge the built-in rechargeable battery pull out micro-SD card and
insert in this slot Micro SD – USB adapter. Then connect Recorder with
adapter to USB port of computer. After 15-30 seconds green LED lights up.
Page 9

9
Charging takes approximately 1-2 hours. After the LED turns off
disconnect the adapter from the USB port of PC and from the Recorder.
In case of complete discharge of the rechargeable battery, charge it
and re-write configuration onto the Recorder.
3.4 CONFIGURATION RECORDING
To change configuration and to work with recorded files saved on microSD, connect micro-SD card to the PC with Windows operating system via
card reader.
To do this, go through the following steps:
• Insert micro-SD card to PC using adapter
• Change configuration using program (see paragraph 3.6)
• Quickly pull out micro-SD card from PC, insert it to Recorder
and press Status button (right one). LED flashes red then blue and
then turns off. Configuration is written successfully.
3.5 SOFTWARE TO OPERATE THE RECORDER
Specialized software is supplied with the device to change configuration,
set current time and operate with the recorded files (playback, digital
signature check, deletion).
To run this program, launch the Application RegistratorCfg.exe.
The appearance of the main window is shown in Figure 6.
Page 10

10
Figure 6. Colibri.exe Program
Figure notes:
1. Change Configuration Panel
2. List of recorded files
3. Functional buttons to process recorded files
4. Current time
The program has a context menu that is displayed when you right-click on
any window. The user can select one of the built-in color themes (Figure 7, 8).
Page 11

11
Figure 7. Selecting Color Theme
Page 12

12
Figure 8. Several Color Options.
If more than one item is connected to your computer, you can select the
one to operate with. The device with lower volume letter will be active by
default. Under ordinary circumstances, only one Reader with the product is
connected, and we see only one device in the list (Figure 9).
Figure 9. Disk Selection
If your SD card is not connected to PC or it is connected incorrectly, the
program reports the inability to work with the device (Figure 10).
Page 13

13
Figure 10. Device Not Found
For further detail see section 3.4 Connecting to the PC.
Page 14

14
3.6. CONFIGURATION
3.6.1. Schedule Recording
Schedule Recording is the mode of single automatic recording between
two timestamps. Controls of Schedule Recording are shown in Figure 13:
Figure 13. Schedule Recording
Figure notes:
1. ON/OFF Slider.
2. Record start time.
3. Record start date.
4. Record stop time.
5. Record stop date.
By default recording is off. Shift the Switch 1 to enable the mode. Shift
the slider by moving the mouse or left-clicking alongside of the slider, or by
Page 15

15
the arrow keys. The Switch has two positions of the Slider, as specified in the
Table:
Slider in OFF state
Slider in ON state
Time is set in a special editor window (Figure 14). There are three sliders
in the window to set hours, minutes and seconds.
Figure 14. Time Setting.
The Slider is shifted by moving the mouse or left-clicking alongside of the
slider, and by the arrow keys. Entered time is also displayed on the indicator
in the lower left corner.
Date is set in the calendar. There are two groups of buttons in the
calendar's title. One for quick scrolling 1 month forward or backward, the
other for quick scrolling 1 year forward or backward. Calendar has three
display modes that are switched by double-clicking on its title. They are
shown in the Table below:
Page 16

16
Selection of Day
Quick Selection of
Month
Quick Selection of Year
The calendar has hotkeys. The arrows allow it to move around the work
area; «Page Down» and «Page Up» scroll calendar one month backwards and
forwards respectiv ely ; "S pace" is used to quickly select current date.
Time interval less than 10 seconds of recording is not applied.
3.6.2. Daily Recording
Daily Recording is the mode of continuous automatic recording between
two timestamps. Controls of schedule recording are specified in Figure 15:
Figure 15. Daily Recording.
Page 17

17
Figure notes:
1. ON/OFF Slider.
2. Record start time.
3. Record stop time.
If record stop time is less than the start time, the recording stops on the
following day. Time interval less than 10 seconds of recording is not
applied.
3.6.3. Band-pass filter
Band-pass filter is the mode of protecting recorded speech against noises
of audible range. Controls of band-pass filter are shown in Figure 16.
Figure 16. Band-pass filter.
Figure notes:
1. Lower limit of band-pass filter.
2. Upper limit of the band-pass filt er.
The disks are shifted by moving the mouse, selecting disc and scrolling
the mouse wheel or by left-clicking up-down the disk, and by the arrow keys.
Page 18

18
3.7. WORKING WITH RECORDED FILES
Controls to operate with the files recorded onto the SD card's memor y a re
specified in Figure 19:
Figure 19. Files Manager.
Page 19

19
Figure 20 notes:
1. List of files.
2. Shortcut keys.
3. Start playback.
4. Digital signature verifying.
5. Erase files.
All audio files of the Voice Recorder are combined into a single list. For
each file, the parameters of tim e, date, duration and size are specified.
To select or deselect file, left-click its description. The file changes its
color depending on the choice. Two shortcut keys allow it to select all the
files and cancel selection.
Three function buttons initiate processing of the selected files. During
processing, function buttons are replaced by one cancel button (Figure 20).
Figure 20. Cancel Button.
For each file to be processed, there appears a second icon, showing
progress status. Icon values depend on the processing mode.
Page 20

20
3.7.1. File Playback
File playback is enabled by the button "PLAY files" (Figure 19). At the
same time, there appear additional playback controls:
Playback
Pause
Table notes:
1. Pause playback
2. Position in the file
3. Scrolling wheel of playback position
4. Cancel playback
5. Continue Playback
The selected files are played back sequentially one after the other.
Page 21

21
Each played file has its own progress indicator, allowing it to follow
playback process of the whole list of files.
Current position indicator of the played file 2 is located next to the
functional buttons. The position is displayed with an accuracy of 1 ms. The
file can be rewound to any position with an accuracy of 0.1 s. Rewinding
works both in pause mode, and playback mode. It is carried out using the
scroll wheel 3. The position can be adjusted roughly by wheel scrolling. More
precisely, the position can be adjusted using single-click or scrolling mouse
wheel, as well as pressing hotkeys.
You can also specify a timestamp (up to 1 second) manually. To do this,
call the dialog box by double left clicking the displayed position 2. This will
not specify the position more than 24 hours, but the files supported by the
FAT file system have the limit of 2 GB, and hence, cannot be longer than 12
hours.
For each file to be processed there appears a second icon, showing the
progress status. Icon values in playback mode are shown in the Table below:
File successfully
played
File is being
played or paused
Page 22

22
Next file to be
played back.
If several files in a row have been played back in a single operation, there
is a process completion message at the end of the operation (Figure 21):
Figure 21. Playback Completed
3.7.2. Digital Signature Verifying
Digital Signature Verifying Mode is enabled by pressing functional button
VERIFY SIGNATURES (Figure 19). Digital signatures of all the selected
files are verified. Verification results are displayed in the following message
(Figure 22):
Page 23

23
Figure 22. Signature Verification Results
For each file to be processed, there appears a second icon, showing
progress status. Icon values in playback mode are shown in the Table below:
Signature
verified.
Not modified
Error.
Discrepancy
Found
File skipped.
Original File Not
Found
Page 24

24
File Processing
was interrupted
File Processing
is in Progress
File Waiting
Processing
3.7.3. Erasing Files
File Erasing Mode is enabled by pressing functional button ERASE
FILES (Figure 19). The program asks to confirm deletion and simultaneously
specifies the files to be deleted:
Figure 23. Selecting File Deletion Option
Page 25

25
Erasing original files saves disk space, but does not guarantee that the file
has not been modified, since it removes the signed original. You can delete
them both.
When finished, a message displays total number of actually deleted files:
Figure 24. Results of Erasing
3.7.4. Opening files in external program
To extend the functionality of the program, there is a partially supported
context menu of the operating system called by right-clicking an
individu al fi le.
At the same time, regardless of the previous selections, only one file from
the list is selected (under the mouse pointer), and a menu opens (Figure 25).
The menu includes all the operations with this file type, registered in the
programs of your PC. Also, it may be helpful to use "Open With", allowing it
to select program associated with the WAV files (Figure 26).
Page 26

26
Figure 25. Context File Menu.
Figure 26. Selecting Program to Open File.
Using this Menu you can easily save any external program, in order for it
to be used to open this file type. That can be media players Windows Media,
Page 27

27
Winamp, VLC, Foobar, Aimp and audio editors Adobe Audition, Sony Sound
Forge, GoldWave.
4. TECHNICAL MAINTENANCE OF THE PRODUCT
4.1 GENERAL RECOMMENDATIONS
Technical Maintenance of the device should be carried out at least once
every two months and should include rechargeable battery charging and
product functional check in accordance with this Oper ation Manual .
4.2 SAFETY MEASURES
All the operations with the product should be performed by the staff who
have at least secondary education, have the right to work with electrical
installations up to 1000 V and who have studied this Operation Manual.
5. STORAGE
The product should be stored packed in heated and ventilated areas at
temperature from 5° C to 40° С and relative humidity up to 80% at a
temperature of 25° C, a t no vapors of chemically active components in these
premises.
Page 28

28
6. TRANSPORTATION
The product can be transported by private means of transport of any type
in transport package and in low-duty conditions. When transporting the
product, the measures should be taken to avoid displacement of package with
the product in the vehicle body.
Transportation of the packaged product may take place at ambient
temperature of minus 10°C to 60°C.
After transporting, the product must be kept at operating temperature
conditions for 6 hours.
7. ENVIRONMENTAL REQUIREMENTS
Disassembly, recycling and destruction of the product can be carried out
by any method. This however must not be applied to lithium rechargeable
battery. Lithium battery is subject to disposal by the licensed organizations.
8. WARRANTY
The manufacturer guarantees that the product complies with the technical
requirements provided the customer observes operating conditions, as well as
transport and storage conditions, set in the specifications.
Warranty period - 2 years from the date of issue. Issue date is to be
confirmed by the corresponding record in the passport. With the loss of
passport, product warranties become invalid.
Page 29

29
In the event of failure of the product during warranty period, provided the
customer observed maintenance requirements as well as transportation and
storage conditions of the Manual, the supplier is obliged to eliminate failure
free of charge and take measures to avoid these defects in all subsequent
items.
Average operating lifetime (before write-off) - 5 years.
 Loading...