

TSI Incorporated 8525 Operation And Service Manual
ENERGY AND COMFORT
Indoor Air Quality
P-TRAK® Ultrafine
Particle Counter
Model 8525
TRAKPRO™ Data Analysis Software enclosed
Operation and Service Manual
1980380, Revision K
February 2009


ENERGY AND COMFORT
SHIP TO/MAIL TO:
TSI Incorporated
500 Cardigan Road
Shoreview, MN 55126-3996
USA
U.S.
Technical Support:
(800) 874-2811/(651) 490-2811
Fax:
(651) 490-3824
E-mail:
technical.service@tsi.com
Indoor Air Quality
P-TRAK® Ultrafine
Particle Counter
Model 8525
TRAKPRO™ Data Analysis Software enclosed
Operation and Service Manual
1980380, Revision K
February 2009
E-mail address:
answers@tsi.com
Website:
http://www.tsi.com
INTERNATIONAL
Technical Support:
(001 651) 490-2811
Fax:
(001 651) 490-3824
E-mail:
technical.service@tsi.com

Copyright ©
TSI Incorporated / 1999–2009/ All rights reserved.
Address
TSI Incorporated / 500 Cardigan Road / Shoreview, MN 55126 / USA
Fax No.
(651) 490-3824
LIMITATION OF WARRANTY AND LIABILITY (effective July 2000)
Seller warrants the goods sold hereunder, under normal use and service as described in the
operator's manual, shall be free from defects in workmanship and material for twenty-four (24)
months, or the length of time specified in the operator's manual, from the date of shipment to the
customer. This warranty period is inclusive of any statutory warranty. This limited warranty is
subject to the following exclusions:
a. Hot-wire or hot-film sensors used with research anemometers, and certain other
components when indicated in specifications, are warranted for 90 days from the date of
shipment.
b. Parts repaired or replaced as a result of repair services are warranted to be free from
defects in workmanship and material, under normal use, for 90 days from the date of
shipment.
c. Seller does not provide any warranty on finished goods manufactured by others or on any
fuses, batteries or other consumable materials. Only the original manufacturer's warranty
applies.
d. Unless specifically authorized in a separate writing by Seller, Seller makes no warranty
with respect to, and shall have no liability in connection with, goods which are
incorporated into other products or equipment, or which are modified by any person other
than Seller.
The foregoing is IN LIEU OF all other warranties and is subject to the LIMITATIONS stated
herein. NO OTHER EXPRESS OR IMPLIED WARRANTY OF FITNESS FOR
PARTICULAR PURPOSE OR MERCHANTABILITY IS MADE.
TO THE EXTENT PERMITTED BY LAW, THE EXCLUSIVE REMEDY OF THE USER OR
BUYER, AND THE LIMIT OF SELLER'S LIABILITY FOR ANY AND ALL LOSSES,
INJURIES, OR DAMAGES CONCERNING THE GOODS (INCLUDING CLAIMS BASED
ON CONTRACT, NEGLIGENCE, TORT, STRICT LIABILITY OR OTHERWISE) SHALL
BE THE RETURN OF GOODS TO SELLER AND THE REFUND OF THE PURCHASE
PRICE, OR, AT THE OPTION OF SELLER, THE REPAIR OR REPLACEMENT OF THE
GOODS. IN NO EVENT SHALL SELLER BE LIABLE FOR ANY SPECIAL,
CONSEQUENTIAL OR INCIDENTAL DAMAGES. SELLER SHALL NOT BE
RESPONSIBLE FOR INSTALLATION, DISMANTLING OR REINSTALLATION COSTS
OR CHARGES. No Action, regardless of form, may be brought against Seller more than 12
months after a cause of action has accrued. The goods returned under warranty to Seller's
factory shall be at Buyer's risk of loss, and will be returned, if at all, at Seller's risk of loss.
Buyer and all users are deemed to have accepted this LIMITATION OF WARRANTY AND
LIABILITY, which contains the complete and exclusive limited warranty of Seller. This
LIMITATION OF WARRANTY AND LIABILITY may not be amended, modified or its terms
waived, except by writing signed by an Officer of Seller.
Service Policy
Knowing that inoperative or defective instruments are as detrimental to TSI as they are to our
customers, our service policy is designed to give prompt attention to any problems. If any
malfunction is discovered, please contact your nearest sales office or representative, or call TSI
at (800) 874-2811 (USA) or (001 651) 490-2811 (International).
Trademarks
®
P-T
RAK
and TRAKPRO™ are trademarks of TSI Incorporated.
ii

CONTENTS
SAFETY INFORMATION .........................................................................V
1 UNPACKING AND PARTS IDENTIFICATION ..............................1
Unpacking the P-TRAK® Ultrafine Particle Counter ................................1
Optional Accessories ...............................................................................4
Spare/Replacement Parts..........................................................................5
2 SETTING UP .........................................................................................7
Supplying Power to the P-TRAK
®
Particle Counter .................................7
Installing the Batteries..........................................................................7
Using the AC Adapter ..........................................................................8
Charging and Installing the Alcohol Wick ..............................................9
Cautions Before Proceeding.................................................................9
Locating and Identifying Components ...............................................10
Filling the Alcohol Fill Capsule .........................................................10
Installing the Cartridge into the P-TRAK
®
Particle Counter ...............12
Cleaning Up and Final Cautions ........................................................13
Attaching the Inlet Screen Assembly, Sample Tube, and
Telescoping Probe to the Instrument..................................................
14
Instrument Software and Communications Setup..................................16
Setting up TRAKPRO™ Data Analysis Software ................................16
Connecting the P-TRAK
®
Particle Counter to the Computer ..............16
Setting up the Communications Port..................................................16
Connecting the Optional Portable Printer ..............................................17
3 OPERATION ...........................................................................................19
Overview................................................................................................19
Turning the Instrument On.....................................................................19
Tilting the Instrument ............................................................................19
Daily Zero Check...................................................................................21
P-TRAK
®
Particle Counter Keypad.........................................................21
Main Menu.............................................................................................22
Particle Concentration ........................................................................23
Sample Mode......................................................................................23
Recording and Saving a Single Data Point ...................................23
Changing the Location Label........................................................24
Setup Mode ........................................................................................24
Statistics ........................................................................................24
Logged Test Statistics ...............................................................25
Single Point Statistics................................................................26
Log Interval...................................................................................26
Audio.............................................................................................27
Time/Date......................................................................................28
Programming Time/Date Using TRAKPRO™ Software ................29
iii

Backlight....................................................................................... 29
Clear Memory............................................................................... 30
LOG MODE....................................................................................... 31
Log Mode 2 and 3.................................................................................. 31
Sample Protocol for Log Mode 2 or 3................................................... 35
Memory Considerations.........................................................................38
Particle Sampling Configurations..........................................................38
Sampling Through Inlet Screen, Tube, and Probe Assembly ............ 39
Sampling Through Inlet Screen and Sample Tube............................. 39
Sampling Through Inlet Screen Assembly Only................................ 40
4 MAINTENANCE................................................................................. 41
Maintenance Schedule........................................................................... 41
Daily Zero Check................................................................................... 41
Recharging the Alcohol Wick ...............................................................42
Alcohol Cartridge ..................................................................................42
Changing the Alcohol Wick............................................................... 42
Removing the Wick from the Cartridge............................................. 43
Re-assembling the Alcohol Cartridge ................................................44
Cleaning Inlet Screen Assembly............................................................ 45
5 TROUBLESHOOTING ...................................................................... 47
A SPECIFICATIONS ............................................................................. 51
B MATERIAL SAFETY DATA SHEET: ISOPROPYL ALCOHOL53
To obtain any of the listed Application Notes, contact TSI at:
U.S. (800) 874-2811/(651) 490-2811, Fax: (651) 490-3824
International (001 651) 490-2811, Fax: (001 651) 490-3824
These Application Notes can also be found under TSI’s web site:
http://www.tsi.com
iv Contents

Safety Information
When operated according to the manufacturer’s instruction, this device is a
Class I laser product as defined by U.S. Department of Health and Human
Services standards under the Radiation Control for Health and Safety Act of
1968. A certification and identification label like the one shown below is
affixed to each instrument.
CLASS 1 LASER PRODUCT
CLASS 1 LASER PRODUCT
THIS PRODUCT IS IN COMPLETE
THIS PRODUCT IS IN COMPLETE
COMPLIANCE WITH 21 CFR
COMPLIANCE WITH 21 CFR
1040.10 AND 1040.11
1040.10 AND 1040.11
There are no user-serviceable parts inside this instrument. Performing
services other than those described in this manual may result in exposure to
harmful (invisible) laser radiation. A warning label like the one shown
below is affixed to the internal laser device.
DANGER: INVISIBLE LASER
RADIATION WHEN OPEN. AVOID
DIRECT EXPOSURE TO BEAM.
WARNING: NO USER SERVICEABLE
PARTS INSIDE. REFER SERVICING
TO QUALIFIED PERSONNEL.
v

vi Safety Information
Chapter 1
Unpacking and Parts Identification
Unpacking the P-TRAK® Ultrafine Particle Counter
Carefully unpack the Model 8525 P-T
the shipping container. Use the tables and illustrations below to make certain
that there are no missing components. Contact TSI immediately if anything
is missing or damaged.
1
®
RAK
Ultrafine Particle Counter from
3
2
4
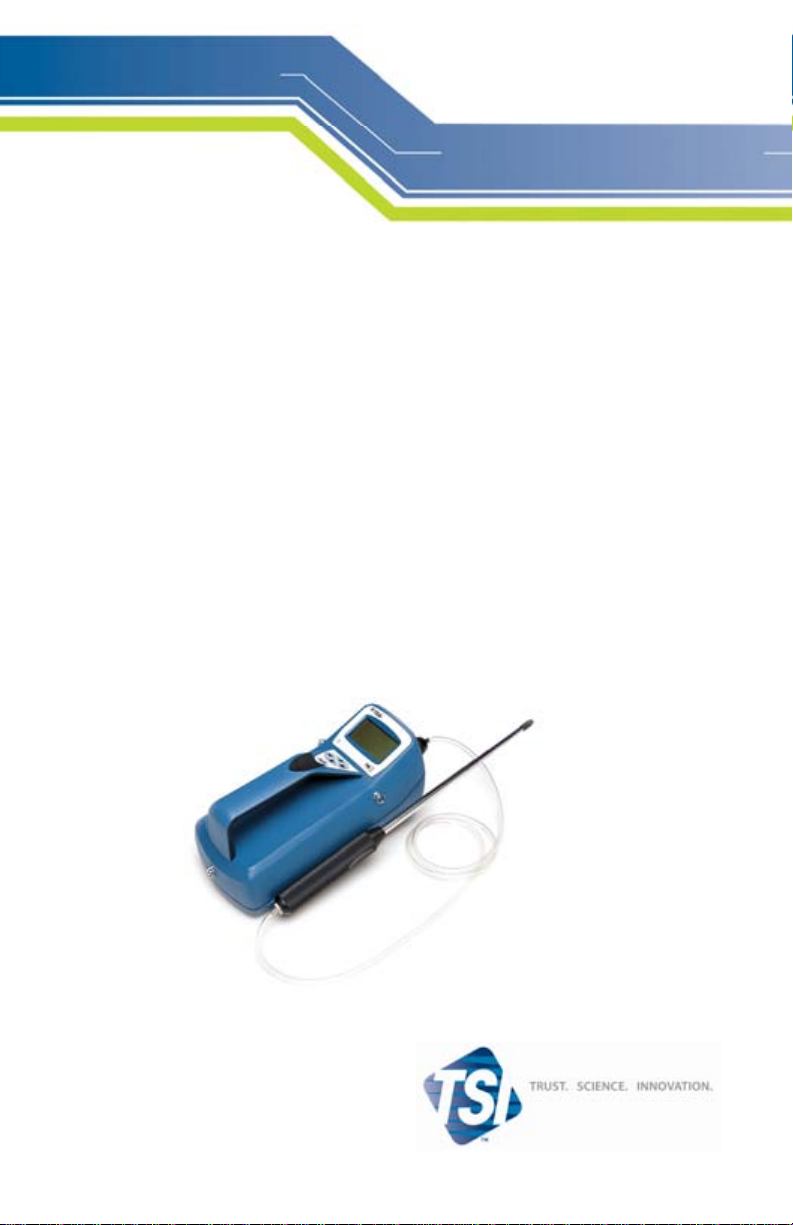
Figure 1-1: Model 8525 P-TRAK® Ultrafine Particle Counter
With Inlet Probe Assembly, Battery Pack, and Batteries
Quantity Item Description Part/Model Reference
1 P-TRAK® Ultrafine Particle Counter N/A 1
1 Probe assembly, consisting of
telescoping probe,
sample tube, and
inlet screen assembly
1 Battery holder 801623 3
6 Battery, AA, alkaline N/A 4
1 Carrying case 801613 (not shown)
801622
801615
801616
2
1
2
1
3
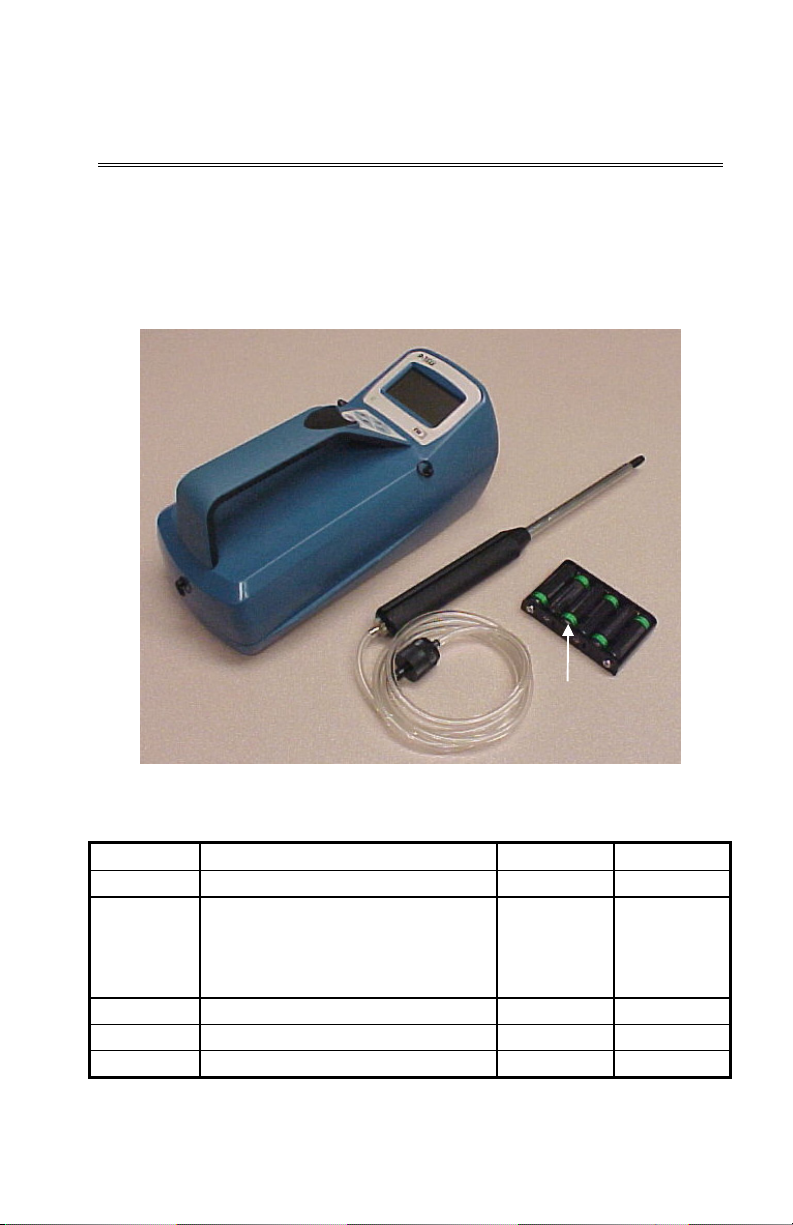
Figure 1-2: Alcohol Fill Capsule with Storage Cap,
Alcohol Cartridge, Alcohol Bottles and Shoulder Strap
Quantity Item Description Part/Model Reference
1 Alcohol fill capsule and storage
cap.
1 Alcohol cartridge 801624 2
16 30 ml alcohol bottles (1 shown) 2918011 3
1083070 1
2
Chapter 1
2
4
3
1
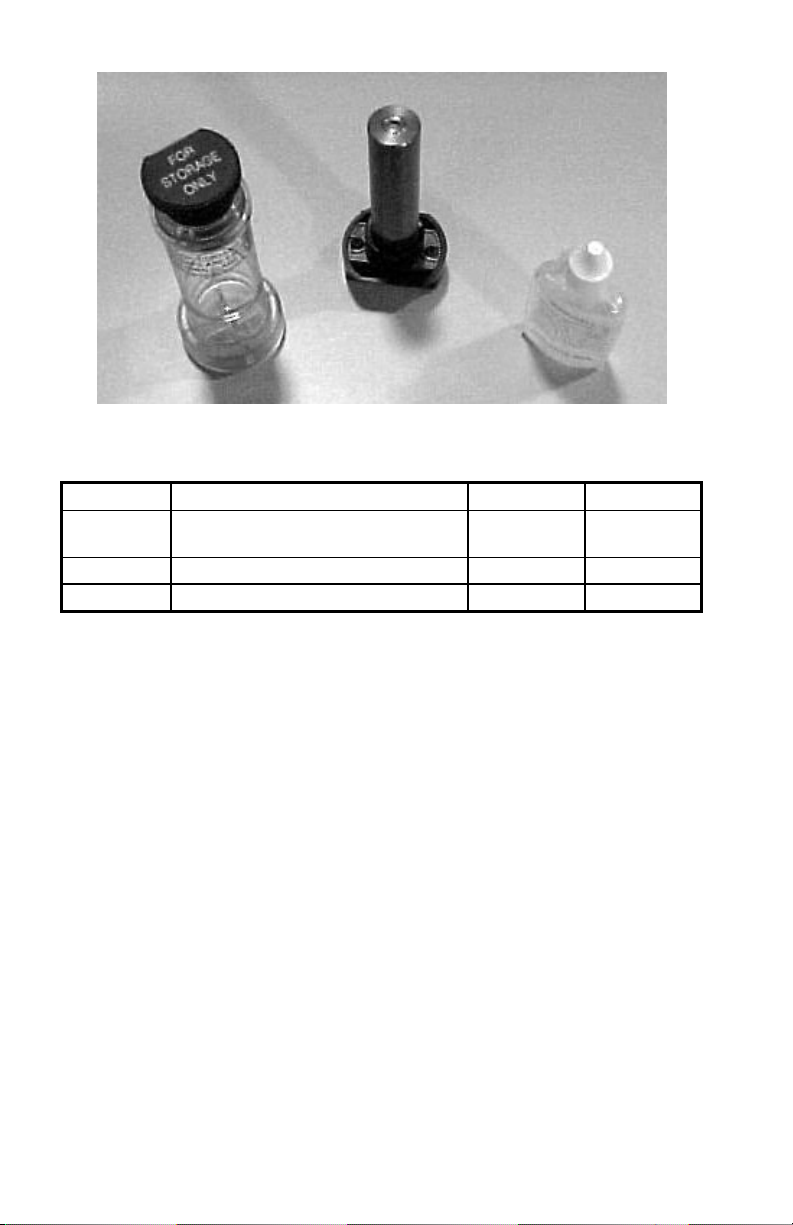
Figure 1-3: Mesh Storage Bag with Spare Wicks, Computer
Cable, Zero Filters and DB9/DB25 Adapter
Quantity Item Description Part/Model Reference
1 Mesh bag N/A 1
2 Spare wick kit N/A 2
1 Computer cable, RJ45/DB9 800563 3
2 HEPA zero filter, with adapter 801625 4
Unpacking and Parts Identification
3

1
3
Figure 1-4: Calibration Certificate, Operation and
Service Manual, T
RAKPRO™ Software
2
Quantity Item Description Part/Model Reference
1 Calibration Certificate N/A 1
1 Operation and Service Manual 1980380 2
1 TRAKPRO™ Software 1090014 3
Optional Accessories
The following table lists optional accessories available for the P-T
RAK
®
Ultrafine Particle Counter.
Quantity Item Description
1 AC adapter for P-TRAK
counter (115V only)
1 Portable printer
®
particle
4
Chapter 1

Spare/Replacement Parts
The following items may be purchased as spare or replacement parts.
Item Description Part Number
Alcohol wicks with screens (Pkg. of 10) 8023
Tubing, sample, 4’ x 1⁄8”, Tygon
Inlet screen assembly 801616
Alcohol, 16 qty., 30 ml bottles 2918011
801615
Unpacking and Parts Identification
5

Chapter 2
Setting Up
Supplying Power to the P-T
The Model 8525 P-T
of two ways. The standard configuration instrument is sold with a battery
holder containing 6, AA alkaline batteries. An optional AC adapter may also
be used to power the instrument when operating in a fixed location.
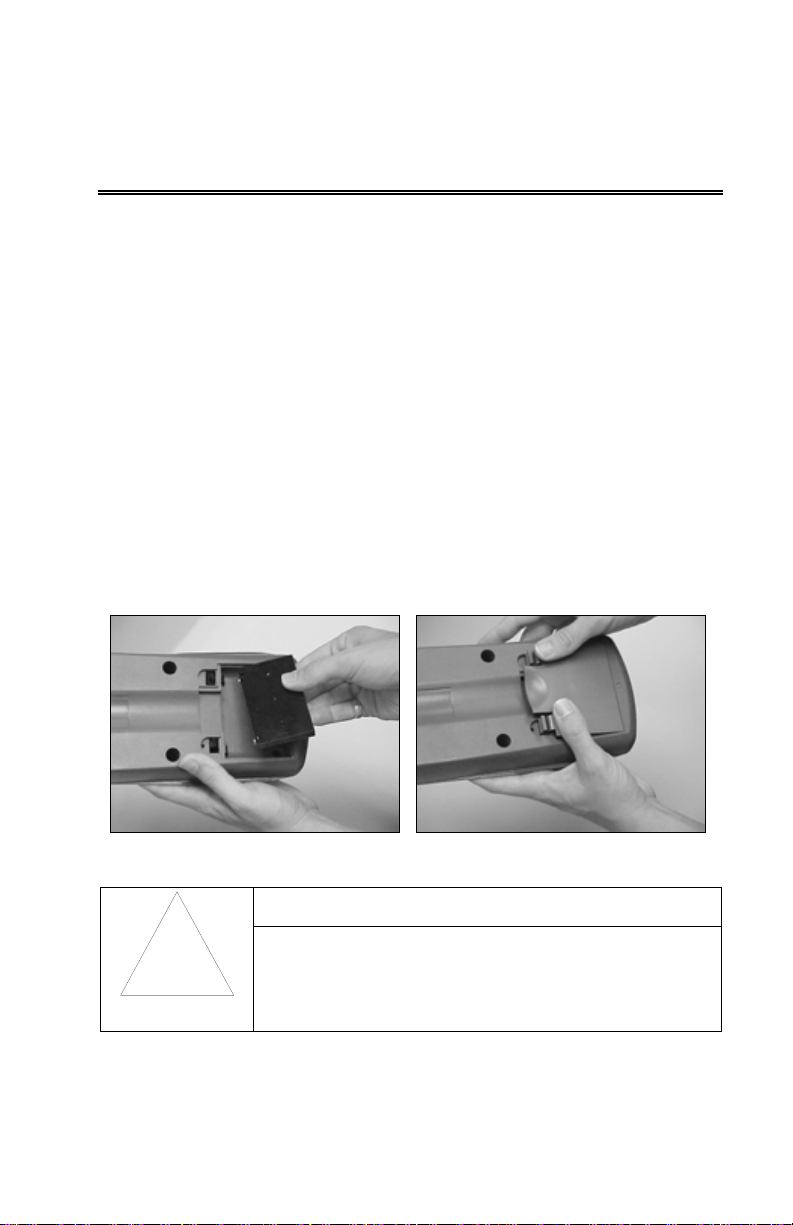
Installing the Batteries
To install the battery holder, first install the 6 individual AA batteries
into the pack, noting the battery polarity as marked on the inside of the
battery holder. Remove the battery compartment door by pressing in and
pulling out on the two locking tabs. Next, install the battery pack
(battery side down) into the battery compartment as shown in
Figure 2-1, putting the top of the pack (the side with the two contacts
extending from the body of the pack) down first and snapping the rest of
the pack in place. Finally, replace the battery compartment door.
RAK
RAK® Particle Counter
®
Ultrafine Particle Counter may be powered in one
Figure 2-1: Install Battery Pack into Battery Compartment
CAUTION
Avoid forcing the battery pack into place. The
!
battery pack fits correctly in only one orientation.
When installed properly, the batteries will face
down into the compartment.
7
1
2
3
45
6
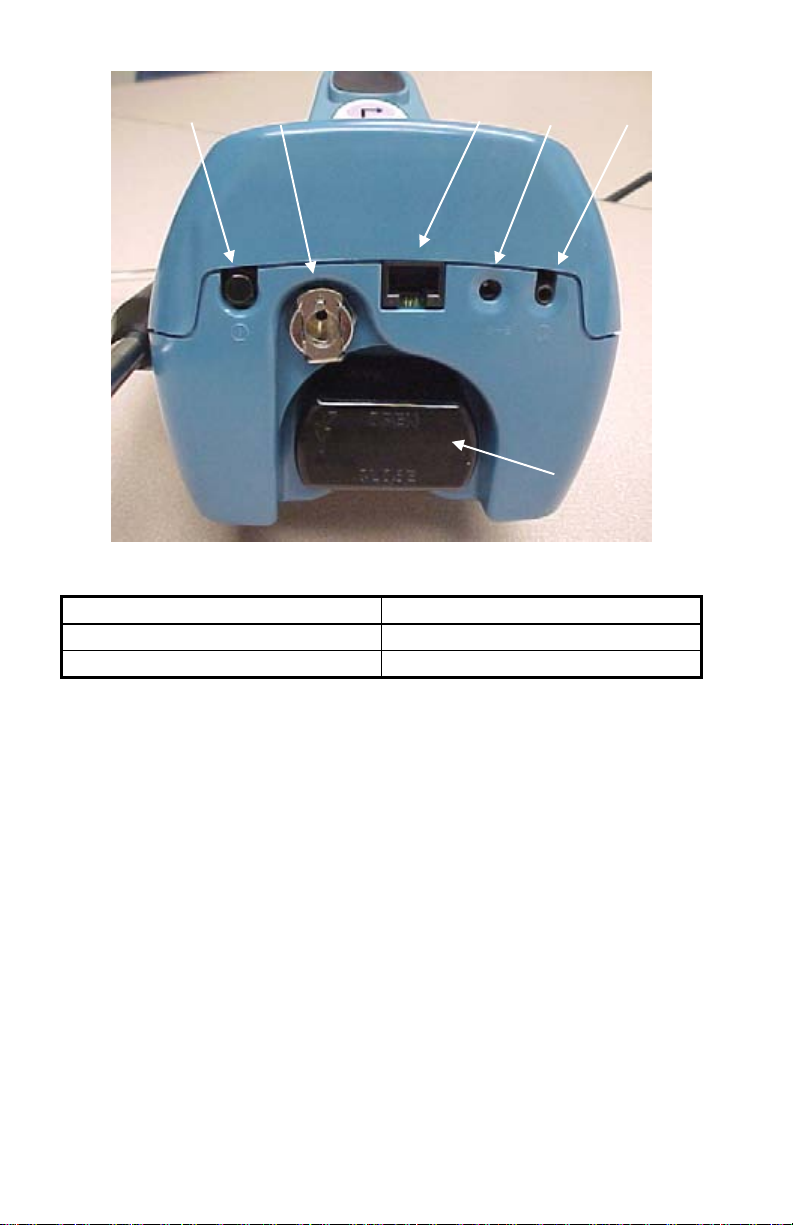
Figure 2-2: The Back of the Instrument
1. On/Off switch 4. AC Adapter socket
2. Inlet quick-connect fitting 5. Headphone jack
3. Communications port 6. Alcohol cartridge
Using the AC Adapter
The AC adapter allows you to power the P-T
from an AC wall outlet. When using the AC adapter, the batteries (if
installed) will be bypassed. The AC adapter will not charge
the batteries.
The P-T
RAK® particle counter has an internal, non-user accessible
battery that is used for battery back-up of logged data when the
instrument is turned off. Removing/changing the alkaline batteries or
disconnecting the AC adapter will not cause data to be lost. This backup
battery will last for years. TSI will install a new battery, if necessary,
when the unit is returned to the factory for service.
RAK® particle counter
8
Chapter 2

Charging and Installing the Alcohol Wick
Cautions Before Proceeding
WARNING
!
Note: Always recap alcohol containers immediately to prevent
Isopropyl Alcohol is hazardous material. Do not ingest
or allow alcohol to contact your eyes or skin. Refer to
the Material Safety Data Sheet (MSDS) located in the
box of alcohol for handling precautions and first aid
procedures.
absorption of moisture and the escape of fumes.
Caution
!
The P-T
a rate of about 1 ml per hour. The alcohol is used to grow microscopic
particles in the air into larger droplets that are easier to detect and count.
Refer to the TSI web site, for details on how the P-T
counter works (
The isopropyl alcohol that is required to properly operate the P-T
particle counter must be very high purity "reagent grade" alcohol.
Isopropyl alcohol that is available from pharmacies, drug stores, or
other consumer outlets is low purity and usually contains significant
percentages of water and other substances that can damage the P-T
particle counter.
Note: It is essential to use isopropyl alcohol that is 99.5% pure
Maintaining an adequate alcohol supply inside the P-
The CO sensor in some models of TSI IAQ monitors may be
adversely affected when exposed to isopropyl alcohol vapors
released from TSI instruments utilizing condensation particle
counting (CPC) technology. For maximum performance, keep
CO sensors away from CPC-based instruments utilizing
isopropyl alcohol.
RAK® particle counter consumes high-purity isopropyl alcohol at
RAK® particle
www.tsi.com).
or better. Do not use isopropyl alcohol from any source
other than TSI or a TSI-approved supplier. Problems
caused by the use of unapproved alcohol are not covered
under warranty.
®
RAK
particle counter is critical to its operation and
T
requires strict adherence to the directions that follow.
RAK®
RAK®
Setting Up
9
Locating and Identifying Components
To add alcohol to the P-TRAK
®
particle counter you must first identify
and locate the alcohol related components and accessories that are
included with the instrument (refer to Figure 1-2, for more information).
You will need the following items:
• Isopropyl Alcohol
• Alcohol Fill Capsule
• Storage Cap
• Alcohol Cartridge
Isopropyl alcohol is supplied by TSI in 30 ml plastic bottles. The
alcohol fill capsule is located in the P-T
cartridge will also be either in the P-T
®
RAK
carrying case. The alcohol
®
RAK
cartridge cavity or in the
alcohol fill capsule, whichever one is not holding the storage cap. The
storage cap should be either sealing the alcohol fill capsule or inserted
into the P-T
®
RAK
cartridge cavity.
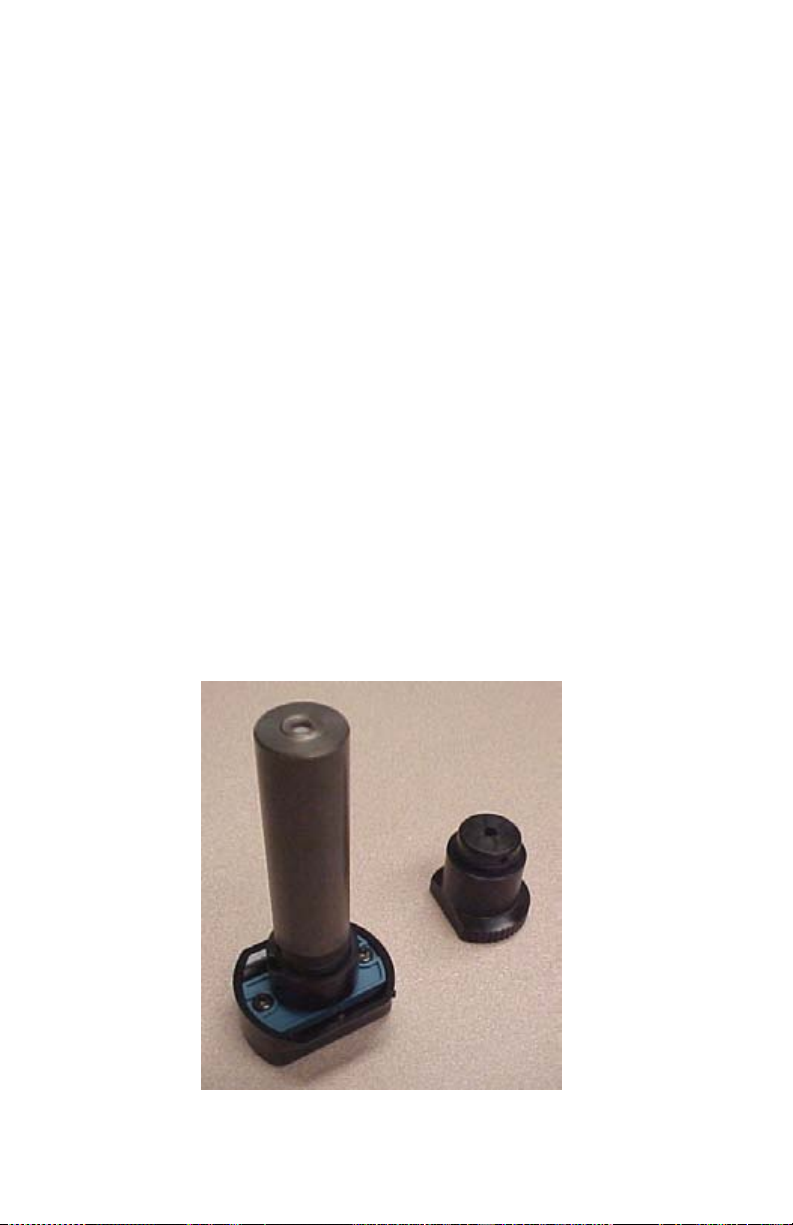
Filling the Alcohol Fill Capsule
1. Turn the P-T
2. Open the alcohol fill capsule by twisting the storage cap (or alcohol
cartridge)
RAK® particle counter off.
1
⁄8 turn counter-clockwise. Set the storage cap (or alcohol
cartridge) down on a clean surface, with the end standing up, as
shown in Figure 2-3.
10
Figure 2-3: Alcohol Cartridge and Storage Cap
Chapter 2
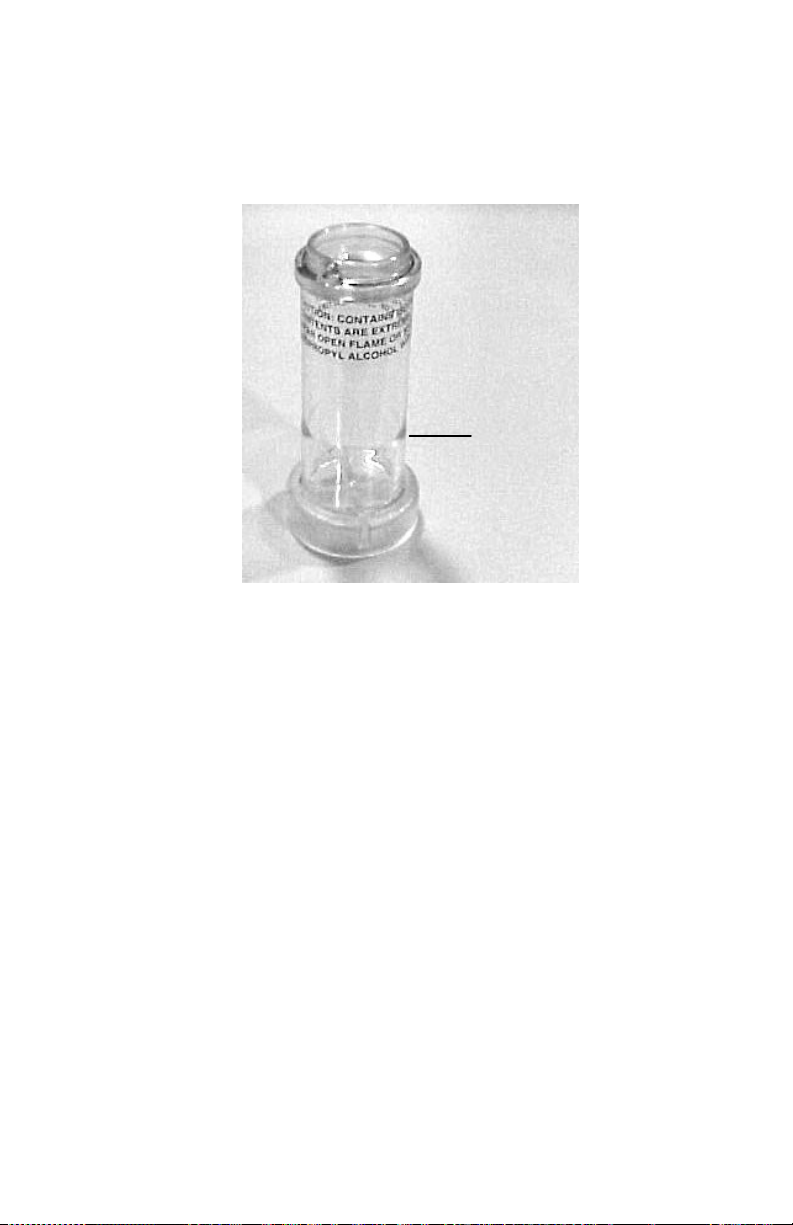
3. Open a bottle of alcohol. Invert the bottle and insert the nozzle end
into the alcohol fill capsule as far as possible to make certain that
you cannot inadvertently spray alcohol anywhere except down into
the capsule.
Fill Line
Figure 2-4: Alcohol Fill Capsule
4. Squeeze alcohol into the alcohol fill capsule until the liquid level is
even with the scribed fill-line near the base (Figure 2-4). Recap the
alcohol bottle.
5. Make certain the alcohol cartridge is clean! Insert the alcohol
cartridge into the alcohol fill capsule by aligning the groove with
the pin and turning
1
⁄8 turn (clockwise) until it locks into place
(Figure 2-5).
Setting Up
11
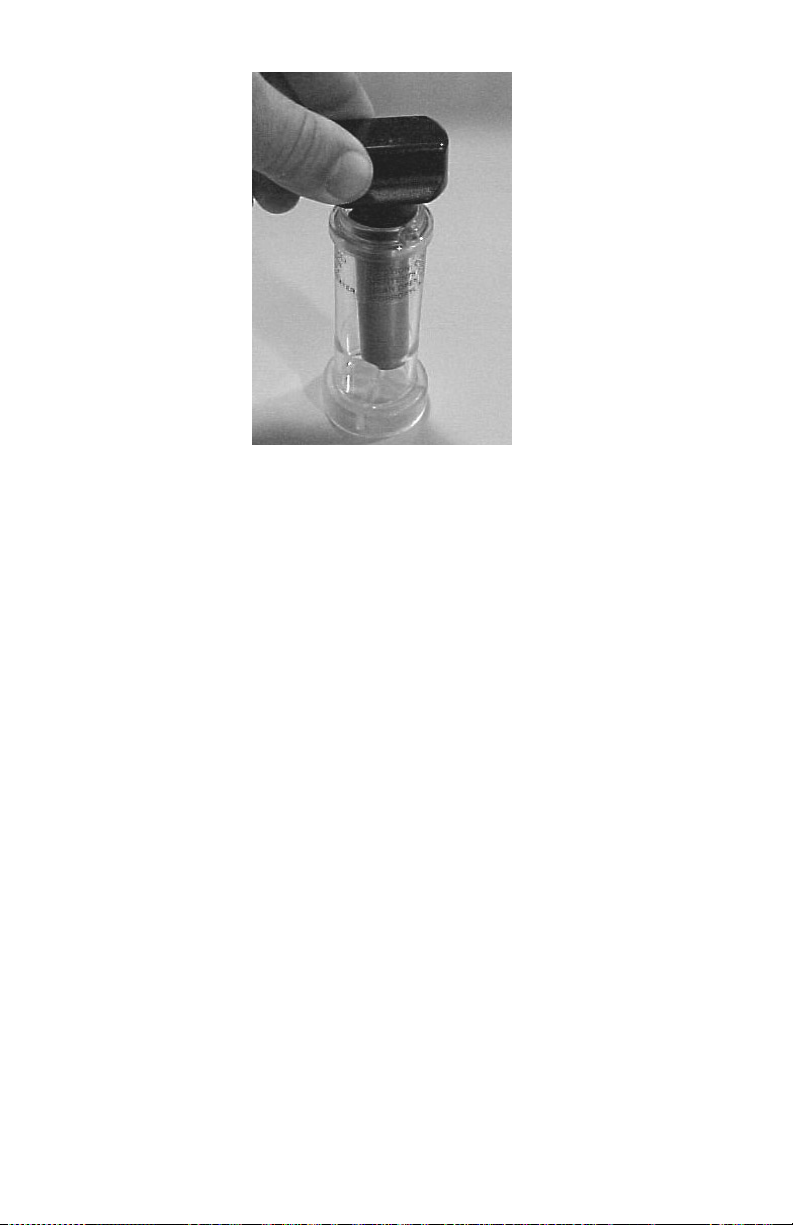
Figure 2-5: Insert Alcohol Cartridge into Fill Capsule
6. Set the alcohol fill capsule down and wait a few minutes while the
wick inside the cartridge soaks up alcohol.
Installing the Cartridge into the P-T
RAK® Particle Counter
1. Remove the alcohol cartridge from the fill capsule and gently shake
it to allow excess alcohol to drain back into the capsule. Stop when
excess alcohol is no longer dripping. It is not necessary to wait until
the outside surface of the alcohol cartridge is dry.
2. Insert the cartridge into the cartridge cavity on the P-T
RAK® particle
counter. It should slide in easily with little effort. Do not force it!
Align the tab on the alcohol cartridge with the corresponding tab on
RAK® particle counter, located just above the cartridge
the P-T
cavity.
3. As you approach full insertion, firmly twist the alcohol cartridge
clockwise about
1
⁄8 turn. It should snap into position.
12
Chapter 2
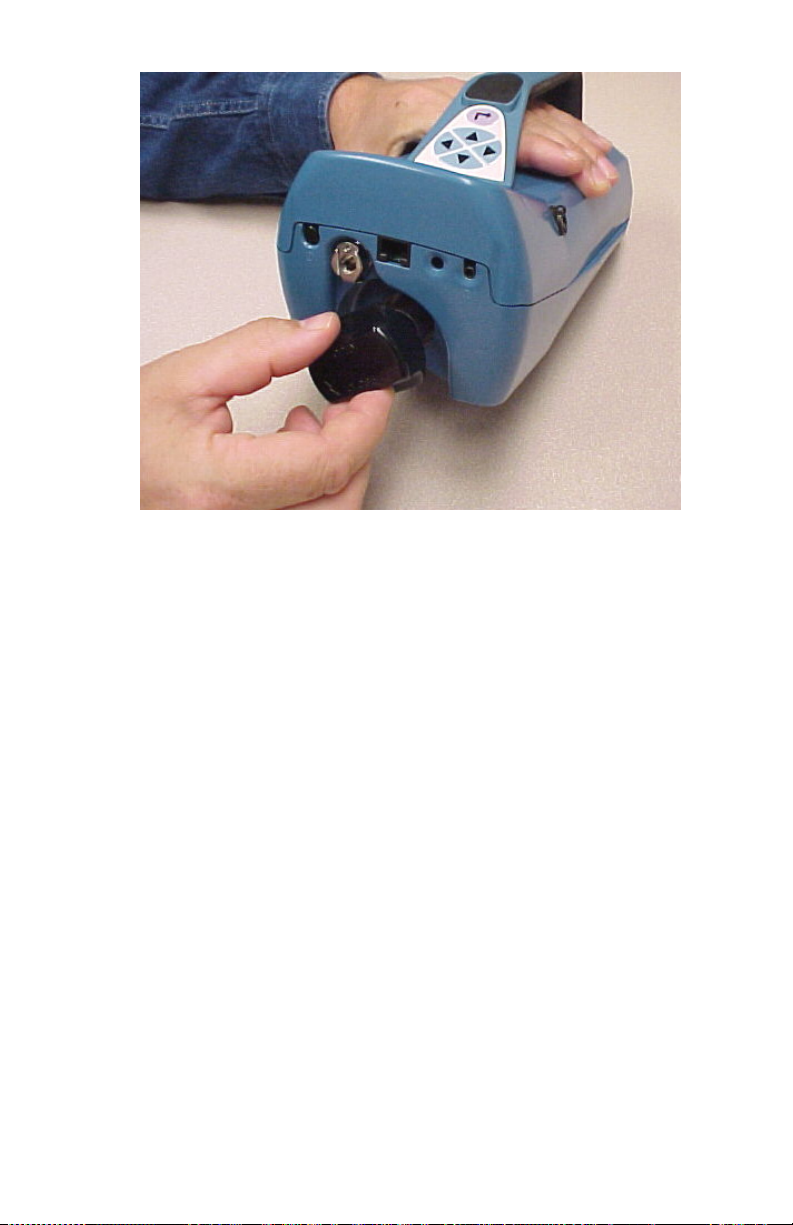
Figure 2-6: Insert Alcohol Cartridge into P-TRAK
®
Particle Counter
Cleaning Up and Final Cautions
1. Recap the alcohol fill capsule using the storage cap.
Note: Always recap the alcohol fill capsule and other containers
immediately to prevent absorption of moisture and the
escape of fumes. Dispose of any alcohol that is visibly
contaminated.
2. When the P-T
RAK® particle counter is stored in the carrying case,
you should store the alcohol cartridge in the alcohol fill capsule.
The alcohol fill capsule is designed to be a safe transportation and
storage container for alcohol. The alcohol cartridge can be left
soaking in alcohol indefinitely. Also, install the storage cap into the
cartridge cavity to prevent dirt or lint from getting inside the
RAK® particle counter.
P-T
3. Never transport or store the P-T
RAK® particle counter with the
alcohol cartridge inside it. Flooding of the optics could occur.
4. Always keep the alcohol cartridge clean.
5. Never leave the cartridge cavity open longer than necessary. Use
the storage cap to cover the cartridge cavity when the P-T
particle counter is transported or stored.
Setting Up
RAK®
13
 Loading...