

Page 1
HM685 QUICK START GUIDE
▲▼
The ▲and ▼keys are used to navigate through menus or to select an item to change.
◄►
The ◄ and ► keys are used to change the selected item.
ESC
The ESC key returns to the previous screen or cancels an operation without saving changes.
Pressing the ENTER key accesses the Main Menu, select a menu item or accept changes.
READ
Pressing the READ key initiates taking a time-averaged reading based on Log Mode and Log
Settings. After taking the reading, the values are stored to memory (current Test ID) and displayed
on screen for a period of four (4) seconds or until the READ key has been pressed again. The
READ key also updates the calculations with current readings in the CALCULATIONS Menu.
Press the BACKLIGHT key to turn the display’s backlighting on or off.
DATA
Press the DATA key from a measurement screen to access the Data Logging Menu.
PRESS
Accesses the Pressure measurement screen from the Flow measurement screen.
Press the key to turn the HM685 Hydronic Manometer on or off.
CALC
Accesses the Calculations menu from the Flow or Pressure measurement screen.
FLOW
Accesses the Flow measurement screen form the Pressure measurement screen.
Key Pad
Each key and its function are described below.
Instrument Power
The HM685 Hydronic Manometer can be powered by four (4) AA-size batteries (alkaline or rechargeable NiMH)
or the AC adapter.
Battery Installation
Locate the battery cover on the back of the unit and loosen the screw to remove. Take out the battery holder and
replace with fresh batteries (alkaline or rechargeable NiMH). Ensure that the batteries are correctly oriented within
the battery holder and Set the battery-type selection switch to indicate the type of batteries to be used (alkaline or
rechargeable NiMH). Reinstall the battery holder and battery cover.
Using the AC Adapter
The AC adapter allows the HM685 Hydronic Manometer to be powered from a standard AC wall outlet. When
using the AC adapter, alkaline batteries (if installed) will be bypassed. The AC adapter also charges the NiMH
type batteries (if installed) in the unit.
Zeroing the Gauge Pressure Sensor
Upon instrument start-up, the user will be prompted to zero the gauge pressure sensor and includes on-screen
instructions. Gauge pressure sensor zeroing can also be initiated by selecting Zero Gauge Pressure when in the
Main Menu by pressing the ENTER ( ) key. The (+) and (-) pressure ports must be open to atmosphere and
the valve handle on the manometer set to the MEASURE position.
Page 2
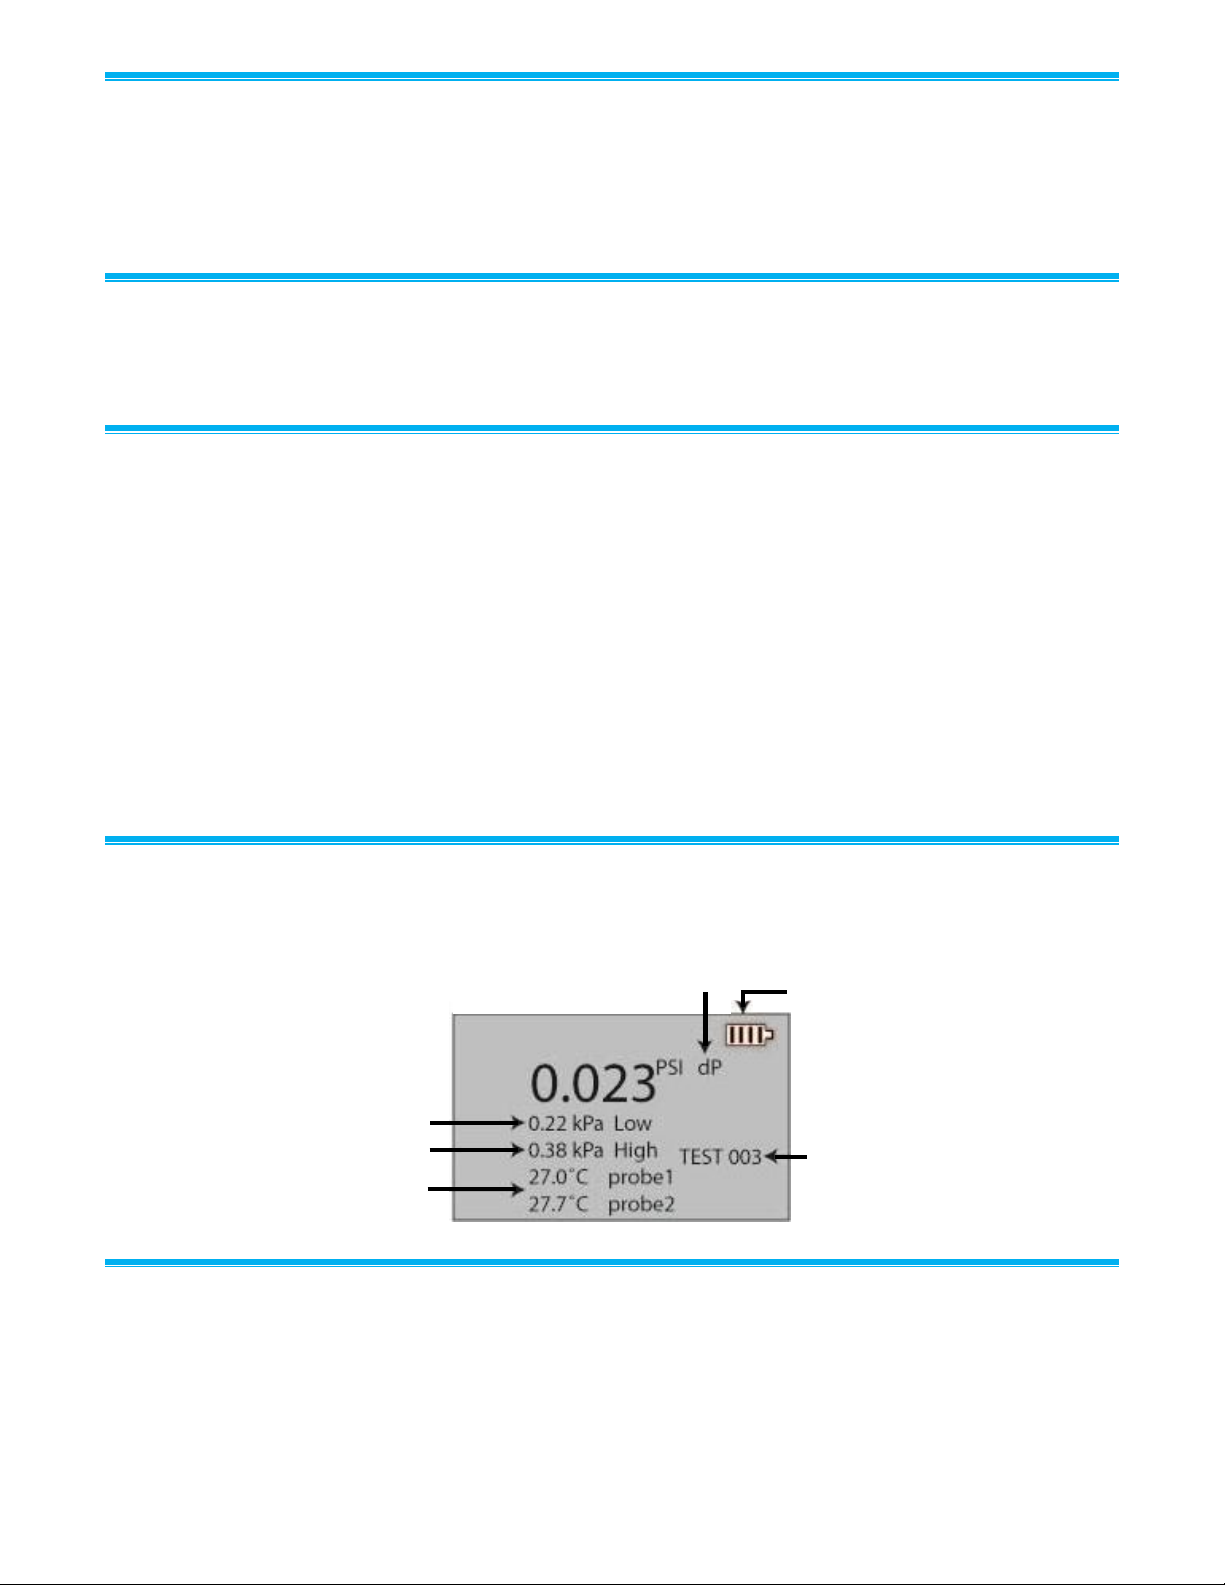
Zeroing the Differential Pressure Sensor
High Side
Pressure
Temperature
Low Side
Pressure
Differential
Pressure
Battery Status
or Power
Input Type
Current
Test ID
Turn the valve handle on the manometer to the BYPASS position while in the main Measurement Screen to
automatically zero the differential pressure sensor. Zeroing of the differential pressure sensor occurs any time the
valve handle is turned to the BYPASS position. Any pressures applied to the hoses will not affect the dP zeroing
function and allows for zeroing of the differential pressure sensor while maintaining connections to the system
under test.
Attaching the Hoses to the Manometer
Connect the straight female flare fitting on the High pressure (red) hose to the male fitting on the top of the
manometer marked with a plus (+) sign. Connect the straight female flare fitting on the Low pressure (blue) hose
to the male fitting on the top of the manometer marked with a minus (-) sign.
Bleeding Entrained Air from the Hoses
1. Turn the shut-off ball valve on both the High and Low pressure hoses to the closed position.
2. Turn the valve handle on the manometer to the MEASURE position.
3. Using an appropriate fitting, connect the open end of the High pressure (red) hose to the test point with the
higher line pressure.
4. Attach the appropriate fitting to the open end of the Low pressure (blue) hose.
5. To ensure all the air is bled from the hoses, hold the open end of the Low pressure (blue) hose in an upright
position over a suitable receptacle or near a drain.
6. Turn the shut-off ball valve on both the High and Low pressure hoses to the open position.
7. Turn the valve handle on the manometer to the BYPASS position to allow the liquid flow to displace the
entrained air.
8. Once the liquid is flowing steadily from the Low pressure (blue) hose, turn the valve handle on the manometer
to the MEASURE position.
Performing Pressure Measurements
The HM685 Hydronic Manometer allows for simultaneous and continuous measurement and display of the Highside gauge and Differential pressure. The calculated Low-side gauge pressure is also displayed.
Discrete Pressure Measurements
Taking a discrete pressure measurement allows for measurement and display of a single time-averaged reading
taken over the sampling period as defined by the Log Mode and Log Settings. Discrete measurement values are
stored to the memory (current Test ID) and displayed on-screen for a period of four (4) seconds and then returns
to continuous measurement mode. Press the READ key to initiate.
-2-
Page 3

Performing Flow Measurements
Flow
A calculated value determined from the differential pressure and user entered values for the
valve flow coefficient (Cv or Kv) and fluid specific gravity.
Cv/Kv
The valve flow coefficient is indicated as Cv (Kv) on the manometer display. The Cv (Kv)
value of the measured valve must be known in order to obtain meaningful flow readings. The
Cv (Kv) value can be temporarily edited within the Flow Measurement screen by pressing the
▲ or ▼ key to enter an edit mode. Use the ▲ or ▼ keys to change the value. Press ESC to
leave the edit mode.
Temperature
Current
Test ID
Current Cv (Kv)
Factor Name
Differential
Pressure
Battery Status or
Power Input Type
Cv/Kv Value
The manometer makes and displays continuous differential pressure measurements, calculates and displays
continuous flow readings, and allows for discrete data storage to the memory when in the Flow measurement
screen.
Discrete Flow Measurements
Taking a discrete flow measurement allows for measurement and display of a single time-averaged reading taken
over the sampling period as defined by the Log Mode and Log Settings. Discrete pressure or flow measurement
values are stored to the memory (current Test ID) and displayed on-screen for a period of 4 seconds and then
returns to continuous measurement mode. Press the READ key to initiate.
Performing Temperature Measurements
The accessory temperature probes are optional for the HM685 Hydronic Manometer and can be connected to the
3-pin mating connector located on the right-hand side of the manometer. The unit of measurement for
temperature (°F or °C) is driven by the differential pressure measurement:
Differential pressure in psi, inH2O, ftH2O, or inHg → temperature in °F
Differential pressure in kPa, mH2O, mmHg, or bar → temperature in °C
Menu Items
Pressing the key from either the Pressure or Flow Measurement screens accesses
the Main Menu, select a menu item or accept changes. Use the arrow ▲▼ ◄► keys
to navigate through menu items and change selected items.
Flow Setup
Use Flow Setup to set values for key factors that impact measured flow values.
-3-
Page 4

USA Tel: +1 800 874 2811
UK Tel: +44 149 4 459200
France Tel: +33 1 41 19 21 99
Germany Tel: +49 241 523030
India Tel: +91 80 67877200
China Tel: +86 10 8219 7688
Singapore Tel: +65 6595 6388
Data Logging
Auto-Save Logging
Samples are automatically logged to memory at the end of the sampling period. To
start logging, press the Read key.
Cont-key Logging
Logging starts by press the Read key. The instrument continues logging until the Esc
key is pressed.
Cont-time Logging
Readings start by pressing the Read key. The instrument continues taking samples
until the time set in “Sample Time” elapses or the Esc key is pressed.
Access the Data Logging Menu by pressing the DATA key from either the Pressure or Flow Measurement
screens or from the Main Menu.
Log Mode: HM685 programmable logging formats:
Log Settings: defines the period the manometer will log sample readings. When the Log Mode is set to Cont-
Time, this setting is also used to define the length of the test in hh:mm:ss.
Choose Test: choose the Test where the samples (readings) will be stored.
Name Test: customize the Test ID name of the selected test using 10 characters maximum.
View Data: choose the data to review.
Delete Data: delete discrete samples, an entire Test ID, or all data stored.
Memory: displays the total memory available
Calculations
The Calculations Menu is accessed by pressing the CALC key from either the
Pressure or Flow Measurement screens.
Brake Power: determines pump brake power using flow, delta P and pump efficiency
Heat Flow: determines heat flow using temperature, flow, specific heat and gravity
Calc Cv/Kv: calculates Cv or Kv based on flow and differential pressure
Pump Law Impeller Diameter: allows for determination of required pump
impeller size
Pump Law Delta P: determines required pump pressure drop using flow and delta P inputs
Pump Law Brake Power: determines pump brake power based upon the following affinity law: Pump brake
power varies as the cube of flow
Settings
The Settings menu allows customization of the
instrument display.
TSI Incorporated – Visit our website www.tsi.com for more information.
P/N 6006776 Rev C ©2015 TSI Incorporated Printed in U.S.A.
 Loading...