

Page 1

ANALOG BALANCING TOOL
MODELS ABT701, ABT703,
ABT711, ABT713
OWNER’S MANUAL
P/N 6002462, REV E
FEBRUARY 2016
Find Quality Products Online at: sales@GlobalTestSupply.com
www.GlobalTestSupply.com
Page 2

Find Quality Products Online at: sales@GlobalTestSupply.com
www.GlobalTestSupply.com
Page 3

LIMITATION OF WARRANTY AND LIABILITY
Copyright©
TSI Incorporated / 2009-2016 / All rights reserved.
LIMITATION OF WARRANTY AND LIABILITY (effective February 2015)
Seller warrants the goods, excluding software, sold hereunder, under normal use and service as described in the
operator's manual, to be free from defects in workmanship and material for 24 months, or if less, the length of time
specified in the operator's manual, from the date of shipment to the customer. This warranty period is inclusive of any
statutory warranty. This limited warranty is subject to the following exclusions and exceptions:
a. Hot-wire or hot-film sensors used with research anemometers, and certain other components when indicated in
specifications, are warranted for 90 days from the date of shipment;
b. Pumps are warranted for hours of operation as set forth in product or operator’s manuals;
c. Parts repaired or replaced as a result of repair services are warranted to be free from defects in workmanship and
material, under normal use, for 90 days from the date of shipment;
d. Seller does not provide any warranty on finished goods manufactured by others or on any fuses, batteries or other
consumable materials. Only the original manufacturer's warranty applies;
e. This warranty does not cover calibration requirements, and seller warrants only that the instrument or product is
properly calibrated at the time of its manufacture. Instruments returned for calibration are not covered by this warranty;
f. This warranty is VOID if the instrument is opened by anyone other than a factory authorized service center with the one
exception where requirements set forth in the manual allow an operator to replace consumables or perform
recommended cleaning;
g. This warranty is VOID if the product has been misused, neglected, subjected to accidental or intentional damage, or
is not properly installed, maintained, or cleaned according to the requirements of the manual. Unless specifically
authorized in a separate writing by Seller, Seller makes no warranty with respect to, and shall have no liability in
connection with, goods which are incorporated into other products or equipment, or which are modified by any
person other than Seller.
The foregoing is IN LIEU OF all other warranties and is subject to the LIMITATIONS stated herein. NO OTHER
EXPRESS OR IMPLIED WARRANTY OF FITNESS FOR PARTICULAR PURPOSE OR MERCHANTABILITY IS
MADE. WITH RESPECT TO SELLER’S BREACH OF THE IMPLIED WARRANTY AGAINST INFRINGEMENT, SAID
WARRANTY IS LIMITED TO CLAIMS OF DIRECT INFRINGEMENT AND EXCLUDES CLAIMS OF CONTRIBUTORY
OR INDUCED INFRINGEMENTS. BUYER’S EXCLUSIVE REMEDY SHALL BE THE RETURN OF THE PURCHASE
PRICE DISCOUNTED FOR REASONABLE WEAR AND TEAR OR AT SELLER’S OPTION REPLACEMENT OF THE
GOODS WITH NON-INFRINGING GOODS.
TO THE EXTENT PERMITTED BY LAW, THE EXCLUSIVE REMEDY OF THE USER OR BUYER, AND THE LIMIT OF
SELLER'S LIABILITY FOR ANY AND ALL LOSSES, INJURIES, OR DAMAGES CONCERNING THE GOODS
(INCLUDING CLAIMS BASED ON CONTRACT, NEGLIGENCE, TORT, STRICT LIABILITY OR OTHERWISE) SHALL
BE THE RETURN OF GOODS TO SELLER AND THE REFUND OF THE PURCHASE PRICE, OR, AT THE OPTION
OF SELLER, THE REPAIR OR REPLACEMENT OF THE GOODS. IN THE CASE OF SOFTWARE, SELLER WILL
REPAIR OR REPLACE DEFECTIVE SOFTWARE OR IF UNABLE TO DO SO, WILL REFUND THE PURCHASE
PRICE OF THE SOFTWARE. IN NO EVENT SHALL SELLER BE LIABLE FOR LOST PROFITS, BUSINESS
INTERRUPTION, OR ANY SPECIAL, INDIRECT, CONSEQUENTIAL OR INCIDENTAL DAMAGES. SELLER SHALL
NOT BE RESPONSIBLE FOR INSTALLATION, DISMANTLING OR REINSTALLATION COSTS OR CHARGES. No
Action, regardless of form, may be brought against Seller more than 12 months after a cause of action has accrued. The
goods returned under warranty to Seller's factory shall be at Buyer's risk of loss, and will be returned, if at all, at Seller's
risk of loss.
Buyer and all users are deemed to have accepted this LIMITATION OF WARRANTY AND LIABILITY, which contains the
complete and exclusive limited warranty of Seller. This LIMITATION OF WARRANTY AND LIABILITY may not be
amended, modified or its terms waived, except by writing signed by an Officer of Seller.
Service Policy
Knowing that inoperative or defective instruments are as detrimental to TSI as they are to our customers, our service
policy is designed to give prompt attention to any problems. If any malfunction is discovered, please contact your
nearest sales office or representative, or call Customer Service department
Trademarks
Alnor, TSI, Balometer, and the TSI logo are registered trademark of TSI Incorporated.
.
iii
Find Quality Products Online at: sales@GlobalTestSupply.com
www.GlobalTestSupply.com
Page 4

CONTENTS
About This Manual ...................................................................................................................................... v
Caution ................................................................................................................................................... v
Technical Assistance—Help! .................................................................................................................. v
Chapter 1. Introduction ............................................................................................................................. 7
Chapter 2. Unpacking and Hood Set Up .................................................................................................. 9
Unpacking ............................................................................................................................................... 9
Hood Setup ........................................................................................................................................... 10
Models ABT701, ABT711—2 ft x 2 ft (610 mm x 610 mm)............................................................ 10
Models ABT703, ABT713—16 in 16 in (406 mm 406 mm) ..................................................... 10
Attaching and Detaching the ABT Meter to the Capture Hood Base ................................................... 11
Power the Meter with Batteries ............................................................................................................ 12
Meter Zero Adjustment ......................................................................................................................... 12
Detachable Handle ............................................................................................................................... 13
Chapter 3. Getting Started ....................................................................................................................... 15
Analog Meter Operation ....................................................................................................................... 15
Hold Switch ........................................................................................................................................... 16
Step-By-Step Example Operation ........................................................................................................ 17
Chapter 4. Changing Flow Hoods ........................................................................................................... 19
Hood Assembly .................................................................................................................................... 19
Alternate Hood Installation ............................................................................................................. 19
Chapter 5. Maintenance and Troubleshooting ...................................................................................... 25
Fabric Hood .......................................................................................................................................... 25
Analog Meter ........................................................................................................................................ 25
Manifold ................................................................................................................................................ 25
Cases .................................................................................................................................................... 25
Calibration ............................................................................................................................................. 25
Appendix A. Actual vs. Standard Air Flow Measurements ................................................................... 27
Specifications* .......................................................................................................................................... 29
iv
Find Quality Products Online at: sales@GlobalTestSupply.com
www.GlobalTestSupply.com
Page 5

About This Manual
C A U T I O N
WHILE USING THE BALOMETER
®
AIR BALANCING INSTRUMENT TO TEST AIR FLOW IN
DUCTS, YOU MAY COME INTO CONTACT WITH OR BE EXPOSED TO DUST, POLLEN, MOLD,
FUNGUS, OR OTHER AIRBORNE CONTAMINANTS. IF YOU ARE OR MAY BE SENSITIVE TO
DUST, POLLEN, MOLD, FUNGUS, OR OTHER AIRBORNE CONTAMINANTS, ALWAYS USE AN
APPROPRIATE MASK OR RESPIRATOR WHILE EMPLOYING THE BALOMETER® AIR
BALANCING INSTRUMENT.
This manual explains how to set up, operate and maintain the Alnor ®ABT Balometer® Capture Hood
Models ABT701, ABT703, ABT711, and ABT713. Be sure to read it thoroughly before using the
instrument.
Caution
Find Quality Products Online at: sales@GlobalTestSupply.com
www.GlobalTestSupply.com
v
Page 6

7
C A U T I O N
The ABT Balometer® capture hood is not designed for gas mixtures other than
air. Any use with corrosive or other dangerous or explosive gas mixtures is not
recommended, and is at the user’s risk.
C A U T I O N
WHILE USING THE BALOMETER
®
AIR BALANCING INSTRUMENT TO TEST AIR FLOW IN
DUCTS, YOU MAY COME INTO CONTACT WITH OR BE EXPOSED TO DUST, POLLEN, MOLD,
FUNGUS, OR OTHER AIRBORNE CONTAMINANTS. IF YOU ARE OR MAY BE SENSITIVE TO
DUST, POLLEN, MOLD, FUNGUS, OR OTHER AIRBORNE CONTAMINANTS, ALWAYS USE AN
APPROPRIATE MASK OR RESPIRATOR WHILE EMPLOYING THE BALOMETER® AIR
BALANCING INSTRUMENT.
Chapter 1. Introduction
The Alnor® Analog Balancing Tool (ABT) Balometer® capture hood Models ABT701, ABT703, ABT711, and
ABT713 are productivity instruments designed to quickly measure the air flow directly from supply diffusers
and return/exhaust grilles mounted in a ceiling, wall or floor with equal accuracy. The ABT consists of:
fabric hood
hood frame
support rods
molded plastic base (which contains the meter and a flow sensing manifold).
Air flowing through the hood is measured by a hot-film sensor located in the central hub of the flow sensing
manifold. The twenty-four pairs of flow sensing ports in the manifold are strategically located so that the ABT
provides a high degree of measurement accuracy, even in non-uniform flow conditions.
The ABT Models are temperature-compensated to display a standard flow rate in CFM (ft3/min.) or
CMH (m3/hr) depending on the model ordered. Standard flow rate is defined as the volumetric flow rate at
standard conditions of 70°F (21.1°C) and 29.92 inHg (760 mm Hg) barometric pressure.
For increased flexibility, additional hood sizes are available to fit interchangeably on the instrument base.
These additional hoods are used with frame pieces which must be assembled by the user. Instructions for
assembly can be found in this manual (see Chapter 2, “Hood Setup” and Chapter 4, “Hood Assembly”) for the
following sizes:
1 ft 4 ft (305 mm 1220 mm)
2 ft 4 ft (610 mm 1220 mm)
3 ft 3 ft (915 mm 915 mm)
1 ft 5 ft (305 mm 1525 mm)
16 in 16 in (406 mm 406 mm).
Find Quality Products Online at: sales@GlobalTestSupply.com
www.GlobalTestSupply.com
Page 7

Chapter 2. Unpacking and Hood Set Up
Item
Part No.
Model ABT701—30 to 1000 CFM with 2 ft 2 ft (610 mm 610 mm) hood
ABT701
Model ABT711—50 to 2000 CMH with 2 ft 2 ft (610 mm 610 mm) hood
ABT711
Model ABT703—30 to 1000 CFM with 16 in 16 in (406 mm 406 mm) hood
ABT703
Model ABT713—50 to 2000 CMH with 16 in 16 in (406 mm 406 mm) hood
ABT713
Wheeled Carrying case
1319379
AA-size alkaline battery, four required
1208013
Operation and Service Manual
6002462
Center handle
534593173
1 ft 4 ft (305 mm 1220 mm) and 2 ft 4 ft (610 mm 1220 mm) fabric hood and
frame kit
801206
1 ft 5 ft (305 mm 1525 mm) and 3 ft 3 ft (915 mm 915 mm) fabric hood and
frame kit
801207
1 ft 4 ft (305 mm 1220 mm) fabric hood and frame kit
801200
2 ft 4 ft (610 mm 1220 mm) fabric hood and frame kit
801201
1 ft 5 ft (305 mm 1525 mm) fabric hood and frame kit
801202
2 ft 2 ft (610 mm 610 mm) fabric hood and frame kit
801097
16 in 16 in (406 mm 406 mm) hood and frame kit
801209
This chapter describes unpacking and setting up (preparing) the ABT Balometer® capture hood for use.
Unpacking
As you unpack the instrument and accessories, check the components against your packing list. If any parts
are missing or damaged, notify us immediately. Table 1 lists available standard and optional components.
The ABT Models ship with the hood and frame attached to the instrument base and must be removed from the
case as a set before the instrument base can be lifted out. Caution must be exercised to assure that the pieces
do not separate, since dropping the instrument may damage the instrument.
Table 1: List of Standard and Optional Components
9
Find Quality Products Online at: sales@GlobalTestSupply.com
www.GlobalTestSupply.com
Page 8

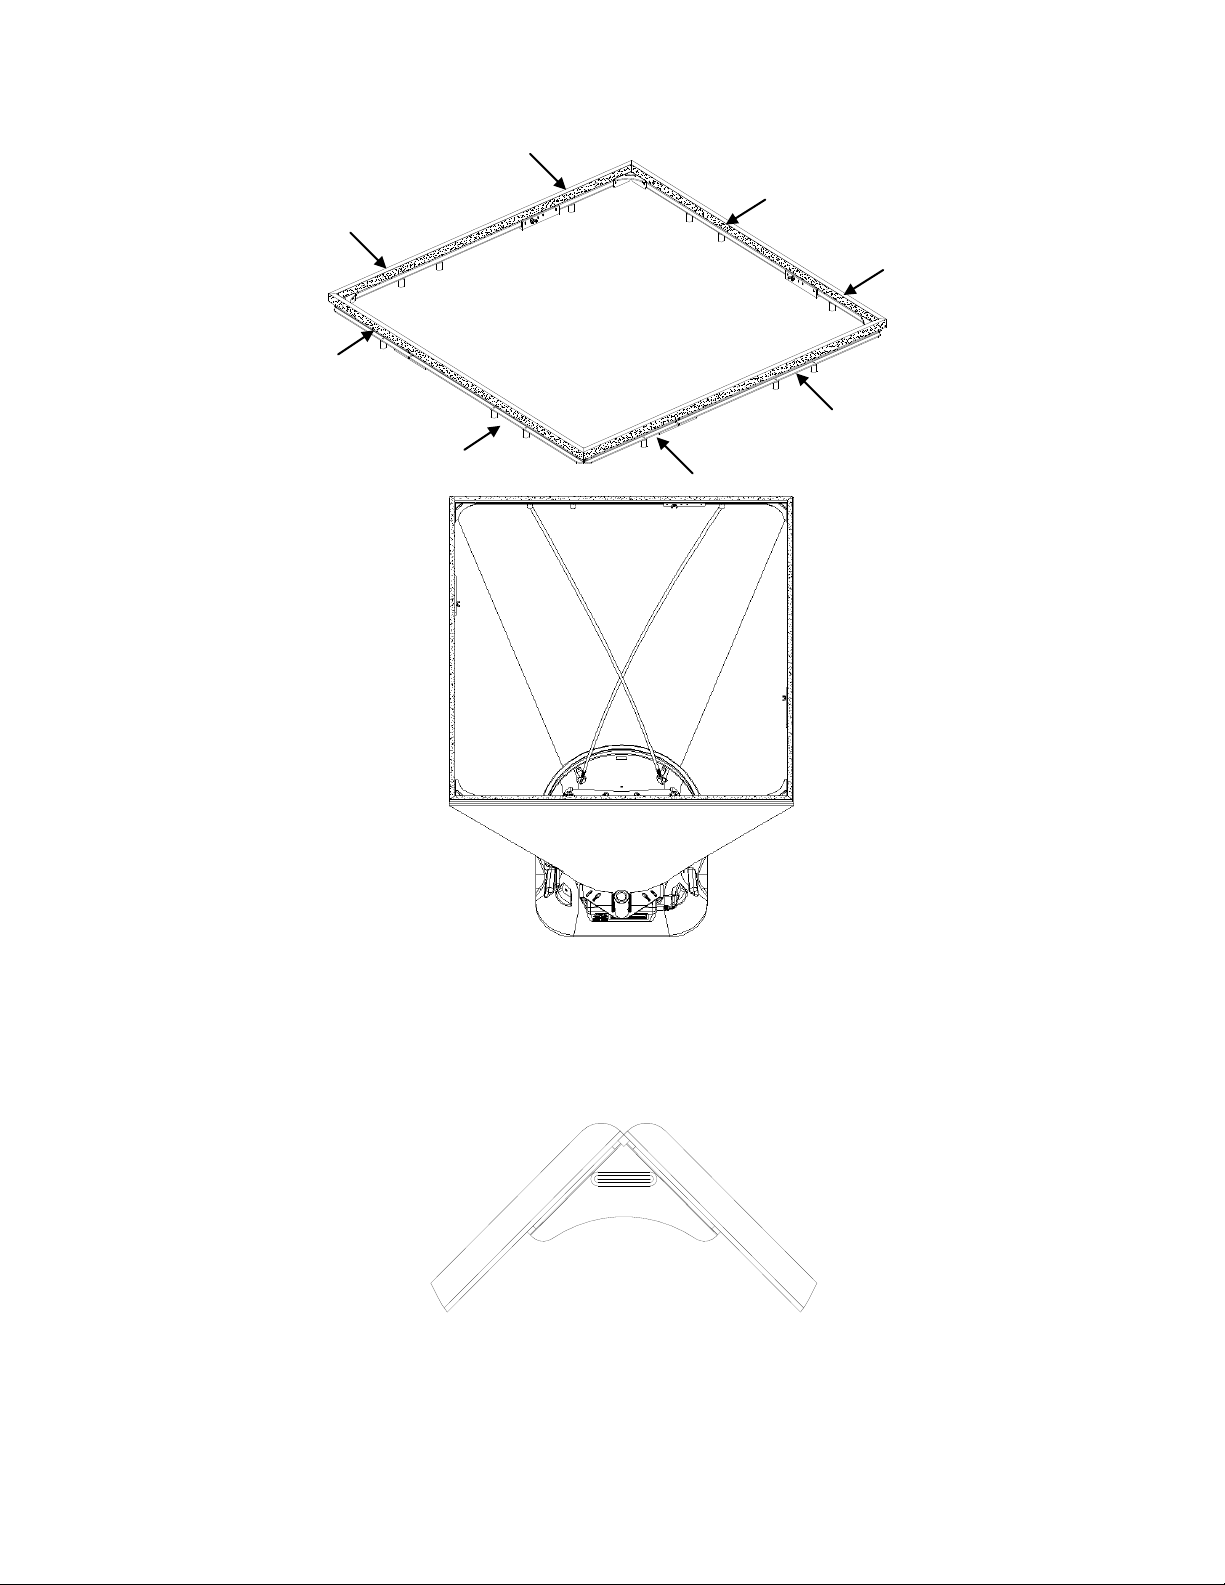
1. Place the base of the capture hood on the floor.
2. Lift the top of the fabric. Insert one end of a support
pole into its pole mount in the base. There is a cup in
each corner of the frame to accept the other end of
each support pole.
3. Grasp the support pole. Bend the pole slightly to insert
the top end of the pole into the support pole cup
located in the opposite corner of the fabric frame. The
poles are connected to the frame corners in a
crisscross fashion as shown in Figure 1.
4. Insert the second support pole into the pole mount on
the opposite side of the base.
5. Repeat step 3 for the second support pole.
6. Repeat steps 4 and 5 for the remaining two support
poles.
Figure 1
Installing a Support Pole on a 2 ft 2 ft
(610 mm 610 mm) Hood
Hood Setup
The ABT Balometer® capture hood is shipped from the factory partially assembled with the 2 ft 2 ft
(610 mm 610 mm) or 16 in 16 in (406 mm 406 mm) nylon hood attached to the base. If you wish to use
another hood size, see Chapter 4. Changing Flow Hoods.
Models ABT701, ABT711—2 ft x 2 ft (610 mm x 610 mm)
To complete the assembly of the 2 ft 2 ft (610 mm 610 mm) hood, follow these steps:
Models ABT703, ABT713—16 in 16 in (406 mm 406 mm)
To complete the assembly of the 16 in 16 in (406 mm 406 mm) hood, follow these steps:
1. Place the base of the capture hood on the floor.
2. For storage purposes, the 16 in 16 in (406 mm 406 mm) frame sits around the top lip of the base. To
assemble, lift one of the front hood corners on an angle to remove the frame from the stowed position.
See Figure 2.
Removing the 16 in x 16 in (406 mm x 406 mm) Hood from Stowed Position
Figure 2
Find Quality Products Online at: sales@GlobalTestSupply.com
10 Alnor® Analog Balancing Tool Models ABT701/ABT703/ABT711/ABT713
www.GlobalTestSupply.com
Page 9

3. Insert one end of a support pole into its pole mount in
the base. There are two cups on the frame to accept
the other end of each support pole.
4. Grasp the support pole. Bend the pole slightly to insert
the top end of the pole into the support pole cup
located on the opposite side of the fabric frame. The
poles are connected to the frame corners in a
crisscross fashion as shown in Figure 3.
5. Insert the second support pole into the pole mount on
the opposite side of the base.
6. Repeat step 4 for the second support pole.
7. Repeat steps 5 and 6 for the remaining two support
poles.
Figure 3
Installing the Support Poles on a 16 in 16 in
(406 mm 406 mm) Hood
1. Tilt the meter forward and align the tabs in the
base of the meter with the two matching slots in
the bottom of the recessed area at the front of
the base (see Figure 4).
2. When the tabs are engaged in the slots, press
firmly on the face of the meter above the display
until the tab in the top center of the meter
“clicks” into the bent metal retaining clip in the
base.
3. Attach the sensor cable and the hold switch
cable to the right side of the meter.
4. To remove the meter from the base, first
disconnect the sensor cable and the hold switch
cable, then press upward on the metal retaining
clip to release the meter from the base.
Figure 4
Attaching the Meter to the Capture Hood Base
Attaching and Detaching the ABT Meter to the Capture Hood Base
Find Quality Products Online at: sales@GlobalTestSupply.com
Chapter 2. Unpacking and Hood Set Up 11
www.GlobalTestSupply.com
Page 10

To install batteries:
1. Turn the unit off and locate the battery cover on
the back of the meter (see Figure 5).
2. Press down on the compartment cover and slide it
down (the cover slides off).
3. Remove the battery holder by pulling up on the
bottom (to loosen it) and then remove the battery
holder.
4. Remove the old batteries and replace with fresh
batteries. Make certain batteries are correctly
oriented.
5. Reinstall the battery holder and replace the
compartment cover.
Figure 5
Battery Cover Removal
N o t e
Make sure the battery holder is oriented so that its terminals make contact with the spring contacts
in the battery compartment.
C A U T I O N
Due to the danger of battery leakage, remove batteries from the battery compartment before
storage. Never mix battery types.
Power the Meter with Batteries
The ABT requires four AA-size alkaline batteries to operate. For your convenience, four alkaline batteries are
included with the ABT.
Meter Zero Adjustment
Check to see that the pointer of the Meter is at zero each time the meter is put into service. The zero adjust
screw enables the user to align the pointer to the zero mark on the scale. With the meter turned off, use a
screwdriver to bring the pointer to zero. It should read zero regardless of how the Balometer® capture hood is
held (see Figure 7).
Find Quality Products Online at: sales@GlobalTestSupply.com
12 Alnor® Analog Balancing Tool Models ABT701/ABT703/ABT711/ABT713
www.GlobalTestSupply.com
Page 11

For maximum flexibility in using or carrying the Balometer® capture
hood, install the detachable handle (see Error! Reference source
not found.). Simply screw it “hand tight” into its mating thread on
the support plate above the meter.
Figure 6
Center Handle
N o t e
Check the tightness of this handle each time before use to ensure
it doesn’t loosen while the instrument is being used to take
readings or being carried from place to place.
Detachable Handle
Find Quality Products Online at: sales@GlobalTestSupply.com
Chapter 2. Unpacking and Hood Set Up 13
www.GlobalTestSupply.com
Page 12

I/O Key
Press and release to turn the ABT meter on. Press and hold for 2 seconds to
turn the ABT meter off.
During the power-up sequence, all the LEDs will be briefly illuminated and the
indicator needle will deflect to full scale and then back to zero. Once the
indicator is back to zero, the instrument is ready to take measurements.
Note: If the indicator needle does not deflect to full-scale position during the
power-up sequence, the meter may be damaged and may not read flow
accurately. See the “Maintenance and Troubleshooting” section of this
manual for further details.
Supply and Return
Flow (▲▼) Keys
Press to switch between supply (▼) flow and return (▲) flow measurement.
Range Selection
Press to switch between the low, medium, and high measurement range.
Note: If unsure of the flow, set the ABT to the highest range first.
Supply Flow
Return Flow
On/Off
Range Selector
Battery Indicator
Sensor Cable
Hold Switch
Zero Adjust
Chapter 3. Getting Started
This section provides information to help you quickly become familiar with the ABT Model functions.
Analog Meter Operation
The analog meter lets you initiate functions and view flow measurements. Prior to operating the instrument,
read this section to more fully understand what each of the keys do (see Figure 7).
Figure 7
Analog Meter Components
Find Quality Products Online at: sales@GlobalTestSupply.com
www.GlobalTestSupply.com
15
Page 13

Battery indicator
The battery indicator remains OFF when battery levels are in the normal
operating range.
When the batteries are becoming depleted, the battery indicator will flash,
indicating that the batteries should be changed soon.
When the batteries are fully depleted, the battery indicator will remain
constant ON, and after a few minutes the ABT meter will automatically poweroff. At this stage, the batteries must be replaced to resume normal operation.
Meter zero adjust
The zero adjust screw aligns the pointer to the zero mark on the scale. With
the meter turned off, use a screwdriver to bring the pointer to zero in the
position it will be used in with no flow.
Sensor Cable
The sensor cable must be plugged into the ABT meter to perform flow
measurement. If the sensor cable is not plugged in or is loose, the Supply and
Return indicator LEDs will flash to indicate this condition.
To “hold” a particular value on the display,
momentarily press and release the red
trigger button located on the left side of the
base (see Figure 8). To restart the
measurements from a “held” value, simply
press and release the red trigger button
again.
Figure 8
Red Hold Switch Location
N o t e
While the reading is being “held”, the LED
corresponding to the currently selected range
on the range selector indicator will be
blinking signifying the hold function is active.
Hold Switch
Find Quality Products Online at: sales@GlobalTestSupply.com
16 Alnor® Analog Balancing Tool Models ABT701/ABT703/ABT711/ABT713
www.GlobalTestSupply.com
Page 14

Step-By-Step Example Operation
If the instrument has been stored at a temperature below 68°F (20°C) or above 86°F (30°C), it should be
allowed to stabilize at room conditions (between 68°F and 86°F) in order to achieve specified accuracy.
1. Assemble the Balometer® capture hood as described in Chapter 2, “Unpacking and Hood Set Up,” of this
manual.
2. With the meter turned off, check the meter for zero adjustment by placing the instrument away from any air
flow and verify that the meter reads zero. If necessary, use a screwdriver to adjust the zero screw so that
the pointer reads zero. Although the meter will typically read zero regardless of how the unit is held, it is
best to zero the meter in the position in which it will be used.
3. Turn the meter on by pressing the I/O key. During the power up sequence, all the LEDs will be illuminated
and the indicator needle will peg to full scale and then return to zero. The instrument is now ready for use.
4. Select supply or return mode and set the range to the highest scale. This technique is to ensure the meter
will not be damaged by an over range condition when flow is unknown.
5. Place the Balometer® capture hood into contact with the perimeter of the diffuser or grill to be measured. To
assure maximum accuracy, the foam gasket along the top of the frame must be firmly in contact with the
surface all around the opening.
6. If the reading is found to be below the full scale of the next lower scale, the range can be switched to the
next lower scale.
Chapter 3. Getting Started 17
Find Quality Products Online at: sales@GlobalTestSupply.com
www.GlobalTestSupply.com
Page 15

Chapter 4. Changing Flow Hoods
This chapter identifies the flow hood parts and gives instructions for assembling the flow hood.
Hood Assembly
Four other hood sizes are available from TSI and can be purchased separately. Available hood sizes are
identified by the dimensions of the frame structure at the top of the hood and include 2 ft 4 ft (610 mm
1220 mm), 1 ft 4 ft (305 mm 1220 mm), 1 ft 5 ft (305 mm 1525 mm) and 3 ft 3 ft (915 mm 915
mm).
To change hood sizes, first remove the hood currently attached to the base. To remove the attached
hood:
1. Unlatch the cinch belt where the fabric is attached to the base.
2. Remove the fabric from its frame structure by pulling the shock cord out of the aluminum frame.
3. Fold up the fabric you just removed so that it can fit into one of the accessory pockets inside the
carrying case. It is a good idea to fold the fabric so that the tag identifying its size remains visible for
future reference.
Alternate Hood Installation
Refer to Figure 9 through Figure 14 to determine the frame channels needed to assemble any of the
standard sized frames. Select the pieces required for the frame size desired and assemble with the aid of
the appropriate figure. Each channel is labeled with its number for easy identification. Several sections
(numbers 1, 3, and 4) consist of a straight channel portion (each a different length) and a corner piece.
This corner piece has an eyelet and slot arrangement which mates with a similar eyelet and slot at the
end of the straight portion of the channel pieces (see Figure 9). These pieces can be slid together and
are self locking by means of a retention spring. The arrangement forms a rugged frame which is
additionally strengthened when the hood is attached.
19
Find Quality Products Online at: sales@GlobalTestSupply.com
www.GlobalTestSupply.com
Page 16

2 1 3 1 2
3
Figure 9
1 ft 4 ft (305 mm 1220 mm) hood and frame. The support poles always cross as pairs at the
front and back of the fabric hood. For the 1 ft 4 ft (305 mm 1220 mm), the support poles are
inserted into the outside ferrule locations.
20 Alnor® Analog Balancing Tool Models ABT701/ABT703/ABT711/ABT713
Find Quality Products Online at: sales@GlobalTestSupply.com
www.GlobalTestSupply.com
Page 17

2 1 4 1 2
4
Figure 10
2 ft 4 ft (610 mm 1220 mm) hood and frame. The support poles always cross as pairs at the
front and back of the fabric hood. For the 2 ft 4 ft (610 mm 1220 mm), the support poles are
inserted into the inside ferrule locations.
The number 1 and 5 channels also have a wing nut at the straight end which will mate with an angle and
studs on the ends of numbers 2, 5 and 6 to form the longer frame sides (see Figure 11).
Chapter 4: Changing Flow Hoods 21
Find Quality Products Online at: sales@GlobalTestSupply.com
www.GlobalTestSupply.com
Page 18

2 1 3 1 2
3
5
5
Figure 11
1 ft 5 ft (305 mm 1525 mm) hood and frame. The support poles always cross as pairs at the
front and back of the fabric hood. For the 1 ft 5 ft (305 mm 1525 mm), the support poles are
inserted into the inside ferrule locations.
22 Alnor® Analog Balancing Tool Models ABT701/ABT703/ABT711/ABT713
Find Quality Products Online at: sales@GlobalTestSupply.com
www.GlobalTestSupply.com
Page 19
1
6
6 1 6 1 6
1
Figure 12
3 ft 3 ft (915 mm 915 mm) hood and frame. The support poles always cross as pairs at the front
and back of the fabric hood. For the 3 ft 3 ft (915 mm 915 mm), the support poles are inserted
into the outside ferrule locations.
Figure 13
Frame Corner Assembly
Chapter 4: Changing Flow Hoods 23
Find Quality Products Online at: sales@GlobalTestSupply.com
www.GlobalTestSupply.com
Page 20

N o t e
The hood corners should always be aligned with the corners of the base, near the hood support
brackets. The base has rivets located in the corners which can be used as a guide for aligning
the hood corners.
Figure 14
Frame Side Coupler Assembly
Each hood is constructed in a trapezoidal shape, sewn together so that one open end forms a round
attachment to the base, and the other forms a square or rectangle large enough to fit its matching frame
assembly. Around the frame end of the hood, an elastic shock cord has been sewn into the hood. This
cord is of a size such that it can be pushed into the open side of the U-shaped channels of the frame.
In general, attach a hood to the frame first, and then to the base unit. By stretching around the frame
corners the cord is slightly reduced in diameter and is easier to press into the frame channel.
24 Alnor® Analog Balancing Tool Models ABT701/ABT703/ABT711/ABT713
Find Quality Products Online at: sales@GlobalTestSupply.com
www.GlobalTestSupply.com
Page 21

Chapter 5. Maintenance and Troubleshooting
The Alnor® Analog Balancing Tool Models ABT701/ABT703/ABT711/ABT713 are designed for long-term field
use. If used with reasonable care, they should be able to make precise measurements over a long time
period. Some of the components can be cleaned periodically. When cleaning the components, please follow
the instructions given below.
Fabric Hood
The hoods can be washed with mild detergent and cold water. When washing the hood, keep the hood away
from objects with sharp corners or sharp edges. Careless cleaning may cause damage.
If the fabric gets ripped it should be replaced or repaired. Duct tape can be placed over the rip on both sides
of the fabric for temporary repair.
To replace a damaged fabric or to order a different fabric size, contact your local TSI®/Alnor® distributor.
Analog Meter
The analog meter case, display screen and keys can be cleaned using a damp cloth with mild detergent
solution. Do not immerse it in water. Wipe the unit dry before use.
Manifold
If you observe the flow sensing taps of the manifold becoming clogged with dust or other material, clean them
with a damp cloth. The manifold should be kept in place during cleaning. Do not apply excessive forces on
the grid of the manifold. If any part of the grid is damaged, please contact Customer Service for repair
information
Cases
If the instrument case or storage case needs cleaning, wipe it off with a soft cloth and isopropyl alcohol or a
mild detergent.
Calibration
TSI recommends an annual calibration for the instrument. For a nominal fee, we will calibrate the unit and
return it to you with a certificate of calibration and NIST traceability. This “annual checkup” assures you of
consistently accurate readings. To calibrate the instrument, please ship the complete package that includes
the meter, the base, the manifold and any fabrics used. The meter and base are calibrated as a set and must
be returned together for calibration. Everything should be packed carefully within the carrying case and then
inside a shipping box. The original shipping box is preferred. Before sending your instrument for calibration or
repair, obtain a Return Material Authorization (RMA) number by visiting our website or contacting customer
service. When obtaining an RMA number, you will also learn the cost of service or calibration and receive
shipping instructions.
Table 2 lists the symptoms, possible causes, and recommended solutions for common problems encountered
with the instrument. If your symptom is not listed, or if none of the solutions solves your problem, please
contact the factory.
25
Find Quality Products Online at: sales@GlobalTestSupply.com
www.GlobalTestSupply.com
Page 22

Symptom
Possible Causes
Corrective Action
No LEDs light up.
Unit not turned on.
Low or dead batteries.
Dirty battery contacts.
Meter may be damaged and need
repair.
Press I/O key.
Replace the batteries.
Clean the battery contacts.
Return to factory for service.
Meter needle does not move
with flow stimulus.
Unit not turned on.
Low or dead batteries.
Dirty battery contacts.
Meter is in flow “Hold” condition (if 1
Range LED is also blinking).
Meter may be damaged and need
repair.
Press I/O key.
Replace the batteries.
Clean the battery contacts.
Press and release the hold button
to resume normal flow reading.
Return to factory for service.
During power-on sequence,
meter needle does not
deflect to full-scale position.
Meter needle zero is out of
adjustment.
Meter may be damaged and need
repair.
Verify correct meter needle zero
adjustment.
Return to factory for service.
1 Range LED is blinking.
Meter is in flow “Hold” condition.
Press and release the hold button
to resume normal flow reading.
Supply and Return LEDs
blink On and Off.
Sensor cable disconnected from
meter.
Flow sensor or cabling may be
damaged and need repair.
Verify sensor cable is connected.
Return to factory for service.
All 3 Range LEDs blink On
and Off.
Meter may be damaged and need
repair.
Return to factory for service.
Battery indicator is blinking.
Batteries are becoming depleted.
Replace the batteries.
Battery indicator is constant
On.
Batteries are fully depleted.
Replace the batteries.
Unit powers On, but
automatically turns itself Off
shortly thereafter.
Batteries are fully depleted.
Replace the batteries.
Table 2: Troubleshooting the Instrument
Find Quality Products Online at: sales@GlobalTestSupply.com
26 Alnor® Analog Balancing Tool Models ABT701/ABT703/ABT711/ABT713
www.GlobalTestSupply.com
Page 23

Appendix A. Actual vs. Standard Air Flow Measurements
Thermo-anemometer sensors measure mass air flow velocity which is a measurement of the air mass moving
past the sensor and is displayed as standard velocity. Air mass is what gives air its heat holding capacity.
Since thermal anemometers measure air mass and display it as standard velocity, many people doing
measurements on indoor air are more concerned with standard air velocity.
Standard readings can be converted to actual air velocity to compensate for temperature and barometric
pressures. Actual or standard measurements will give the same readings at standard conditions (using a
reference of 70°F [21.1°C] and 29.92 in. Hg [101.4 kPa]), but not if pressure or temperature stray from
standard conditions.
To calculate actual air velocity, multiply the standard velocity reading indicated by the thermoanemometer by
the following density correction factor:
Actual Velocity = (Standard Velocity) [(460 + T) / (460 + 70)] * 29.92 / Pm
or
Actual Velocity = (Standard Velocity) [(273 + Tm) / (273 + 21.1)] * 101.4 / P
Where:
T = Ambient temperature in degrees Fahrenheit
Pm = Ambient pressure in inches of Hg.
Tm = Ambient temperature in degrees Centigrade
P = Ambient pressure in kPa
27
Find Quality Products Online at: sales@GlobalTestSupply.com
www.GlobalTestSupply.com
Page 24

Specifications*
Supply and Exhaust Ranges
ABT701/ABT703 30 to 1,000 CFM (ft3/min)
ABT711/ABT713 50 to 2,000 CMH (m3/hr)
Accuracy
ABT701/ABT703 ±3% of full scale selected +5 CFM (ft3/min)
ABT711/ABT713 ±3% of full scale selected +10 CMH (m3/hr)
Units
CFM (ft3/min) Models ABT701 and ABT703
CMH (m3/hr) Models ABT711 and ABT713
Scale Divisions (Supply/Exhaust)
CFM (ft3/min)
5 from 30 to 250
10 from 200 to 500
20 from 400 to 1000
CMH (m3/hr)
10 from 50 to 500
20 from 400 to 1000
40 from 800 to 2000
Power Requirements
Four AA-size cells alkaline
Battery Life (continuous)
200 CFM ( 340 CMH) 29.2 hours
800 CFM (1360 CMH) 21.3 hours
1000 CFM (1700 CMH) 20.4 hours
Weight with Batteries
7.4 lb (3.4 kg)
Operating Temperature Range
32 to 140°F (0 to 60°C)
Storage Temperature Range
-40 to 140°F (-40 to 60°C)
Model Description
ABT701 30 to 1000 CFM (ft3/min) with 2 ft 2 ft (610 mm 610 mm) hood
ABT703 30 to 1000 CFM (ft3/min) with 16 in 16 in (406 mm 406 mm) hood
ABT711 50 to 2000 CMH (m3/hr) with 2 ft 2 ft (610 mm 610 mm) hood
ABT713 50 to 2000 CMH (m3/hr) with 16 in 16 in (406 mm 406 mm) hood
Optional Hood and Frame Kits
801097 2 ft 2 ft (610 mm 610 mm)
801201 2 ft 4 ft (610 mm 1220 mm)
801200 1 ft 4 ft (305 mm 1220 mm)
801202 1 ft 5 ft (305 mm 1525 mm)
801203 3 ft 3 ft (915 mm 915 mm)
801209 16 in 16 in (406 mm 406 mm)
*
Specifications are subject to change without notice.
Find Quality Products Online at: sales@GlobalTestSupply.com
29
www.GlobalTestSupply.com
 Loading...