

Page 1
_____________________
TSI and the TSI logo are registered trademarks of TSI Incorporated in the United States and may
be protected under other country’s trademark registrations. Q-Trak, TrakPro, and BlueSky are
trademarks of TSI Incorporated.
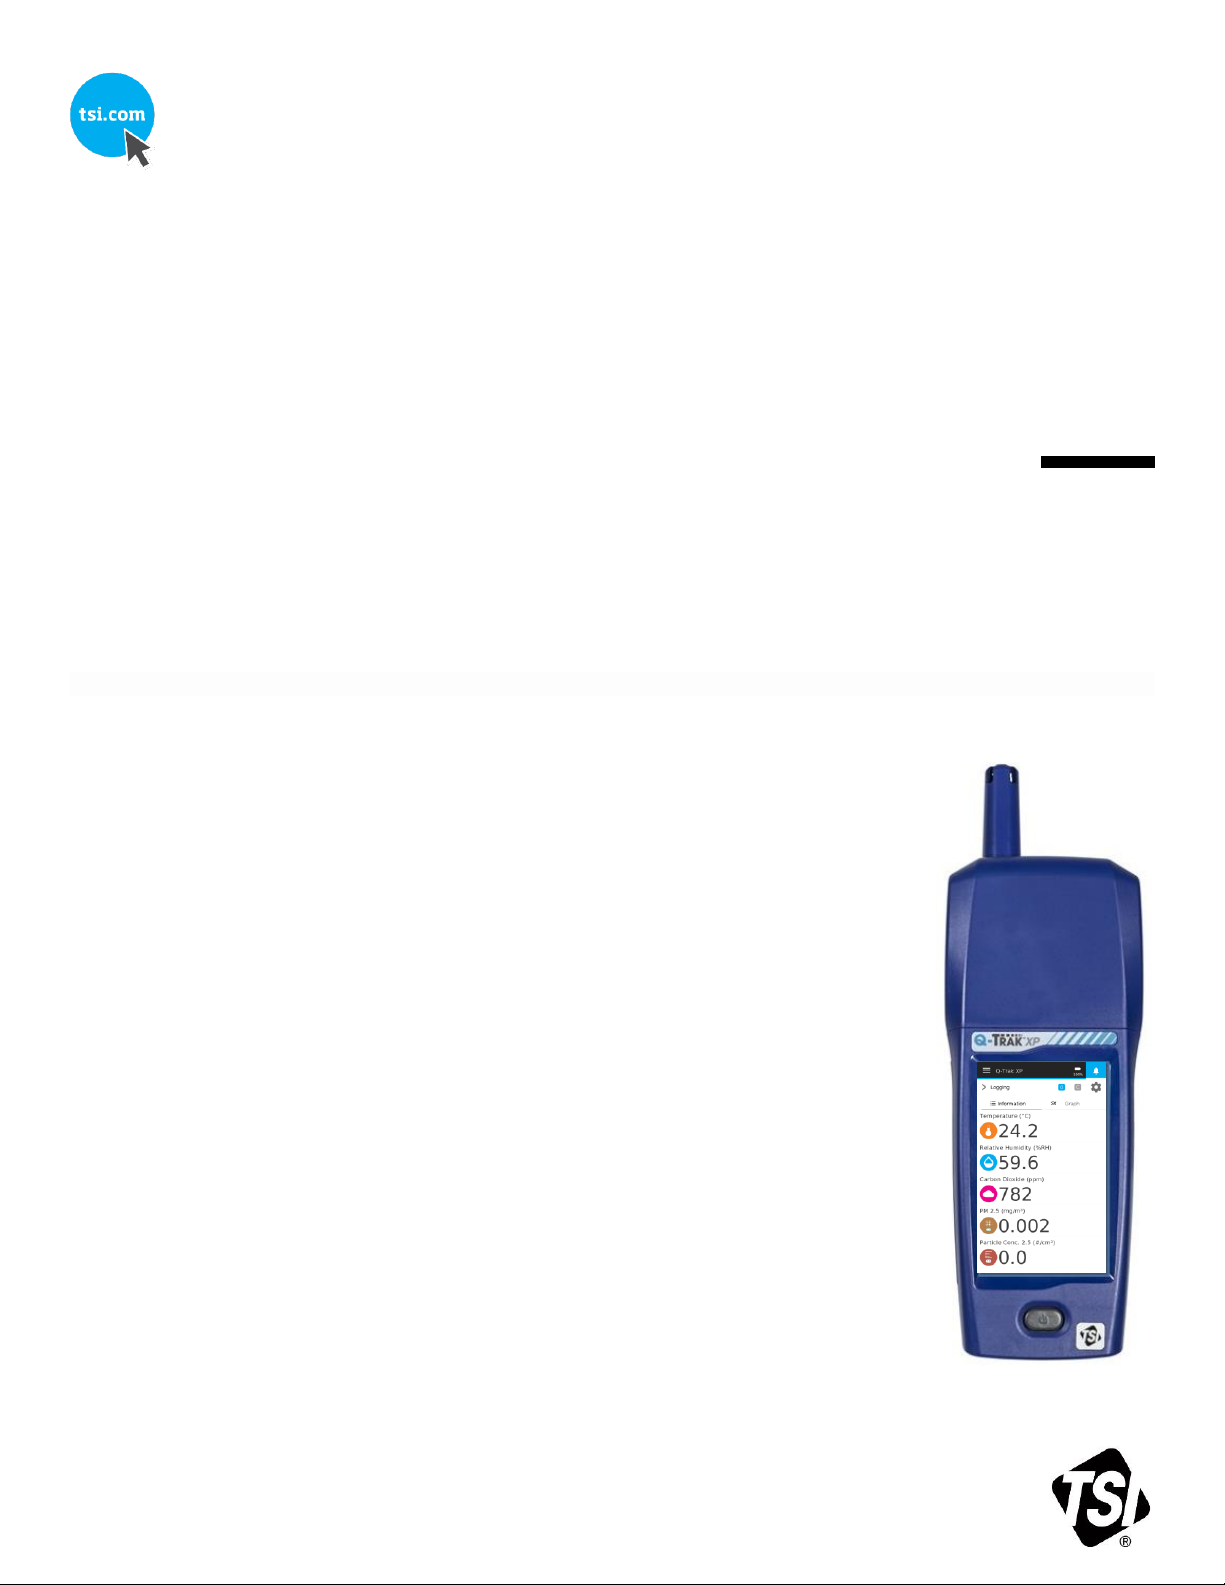
QUICK START GUIDE
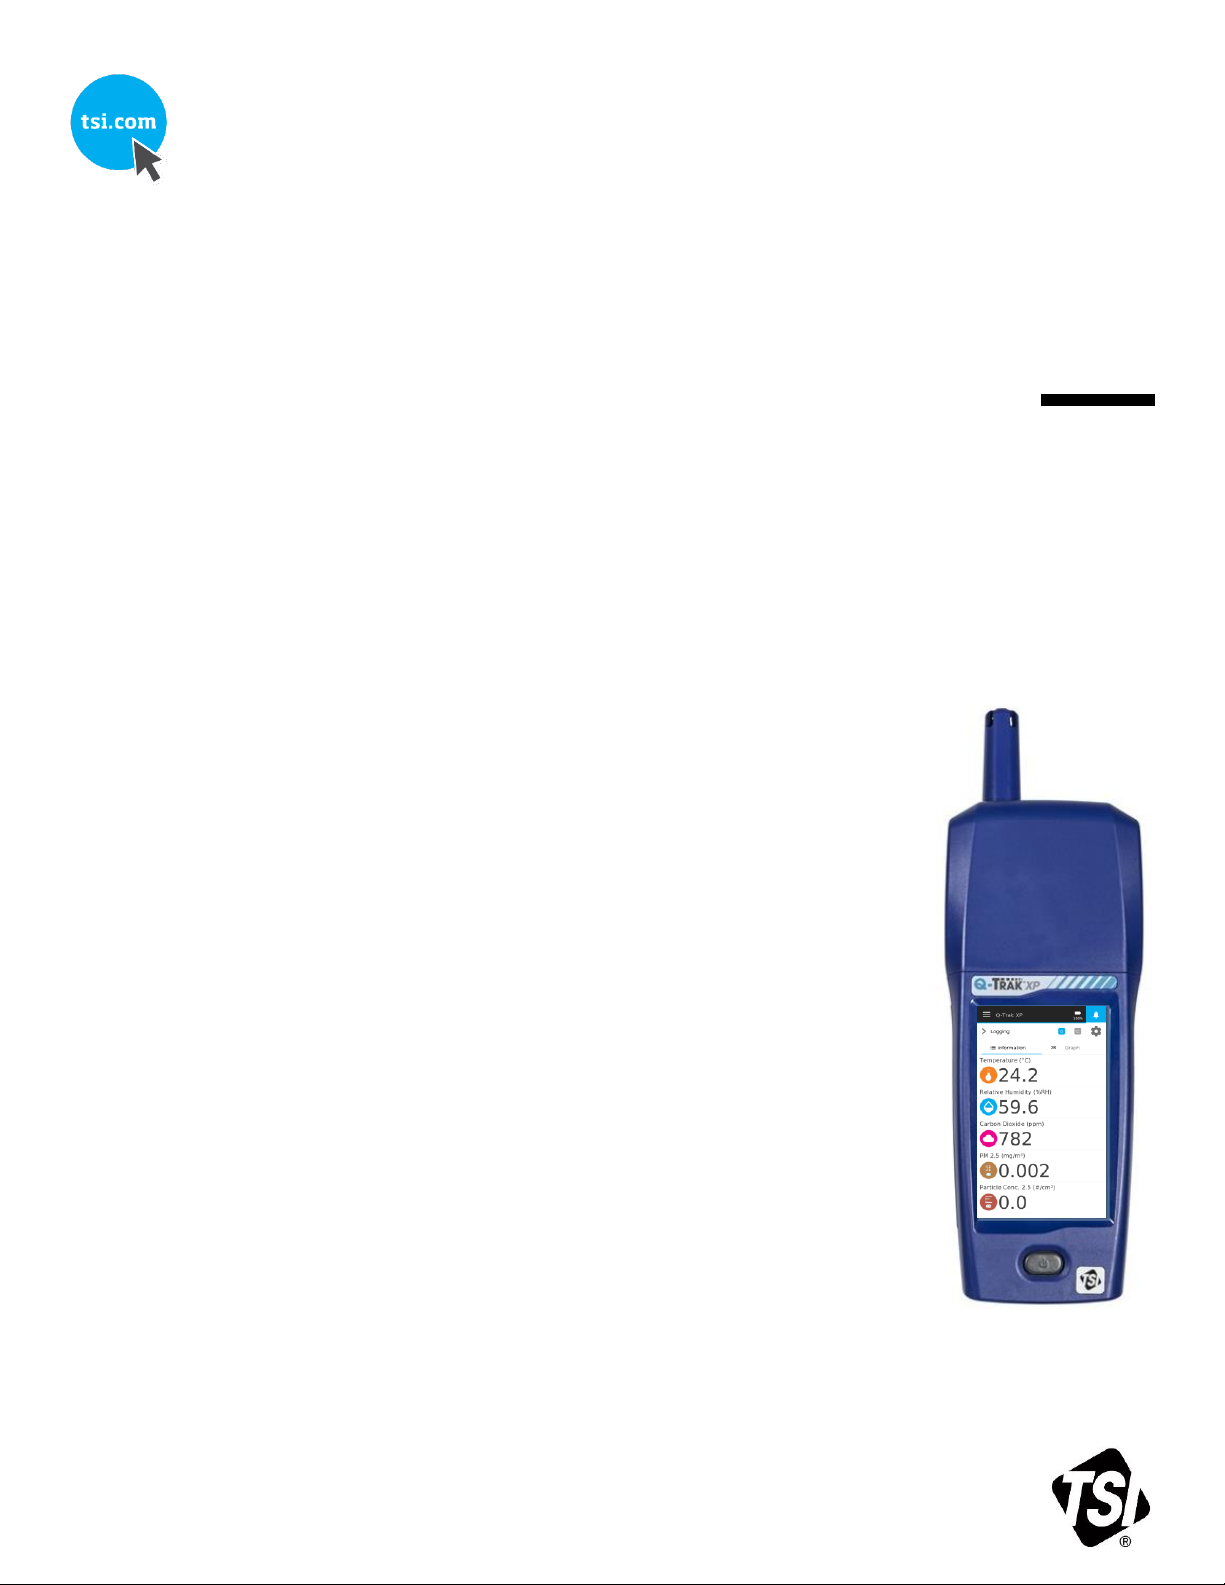
Q-TRAK™ XP
INDOOR AIR QUALITY MONITOR
MODEL 7585
(includes French, German, Simplified Chinese, and Traditional Chinese)
P/N 6013908, REVISION B
JANUARY 2021
Page 2
-2-
Thank you for purchasing a TSI® Incorporated (TSI®)
Q-Trak™ XP Indoor Air Quality Monitor (IAQ). This guide
will help you quickly begin using your monitor.
More detailed information is in the Operation Manual
located on the included Q-Trak™ XP USB Flash Drive.
Please refer to the manual if you have questions on the
operation of your new monitor.
Safety
Refer to the Q-Trak™ XP Indoor Air Quality Monitor
Mode 7585 user manual for safety information.
W A R N I N G
The instrument must be used in the manner
described in the user manual. Failure to
follow all of the procedures described in the
manual can result in serious injury to you or
can cause irrevocable damage to the
instrument.
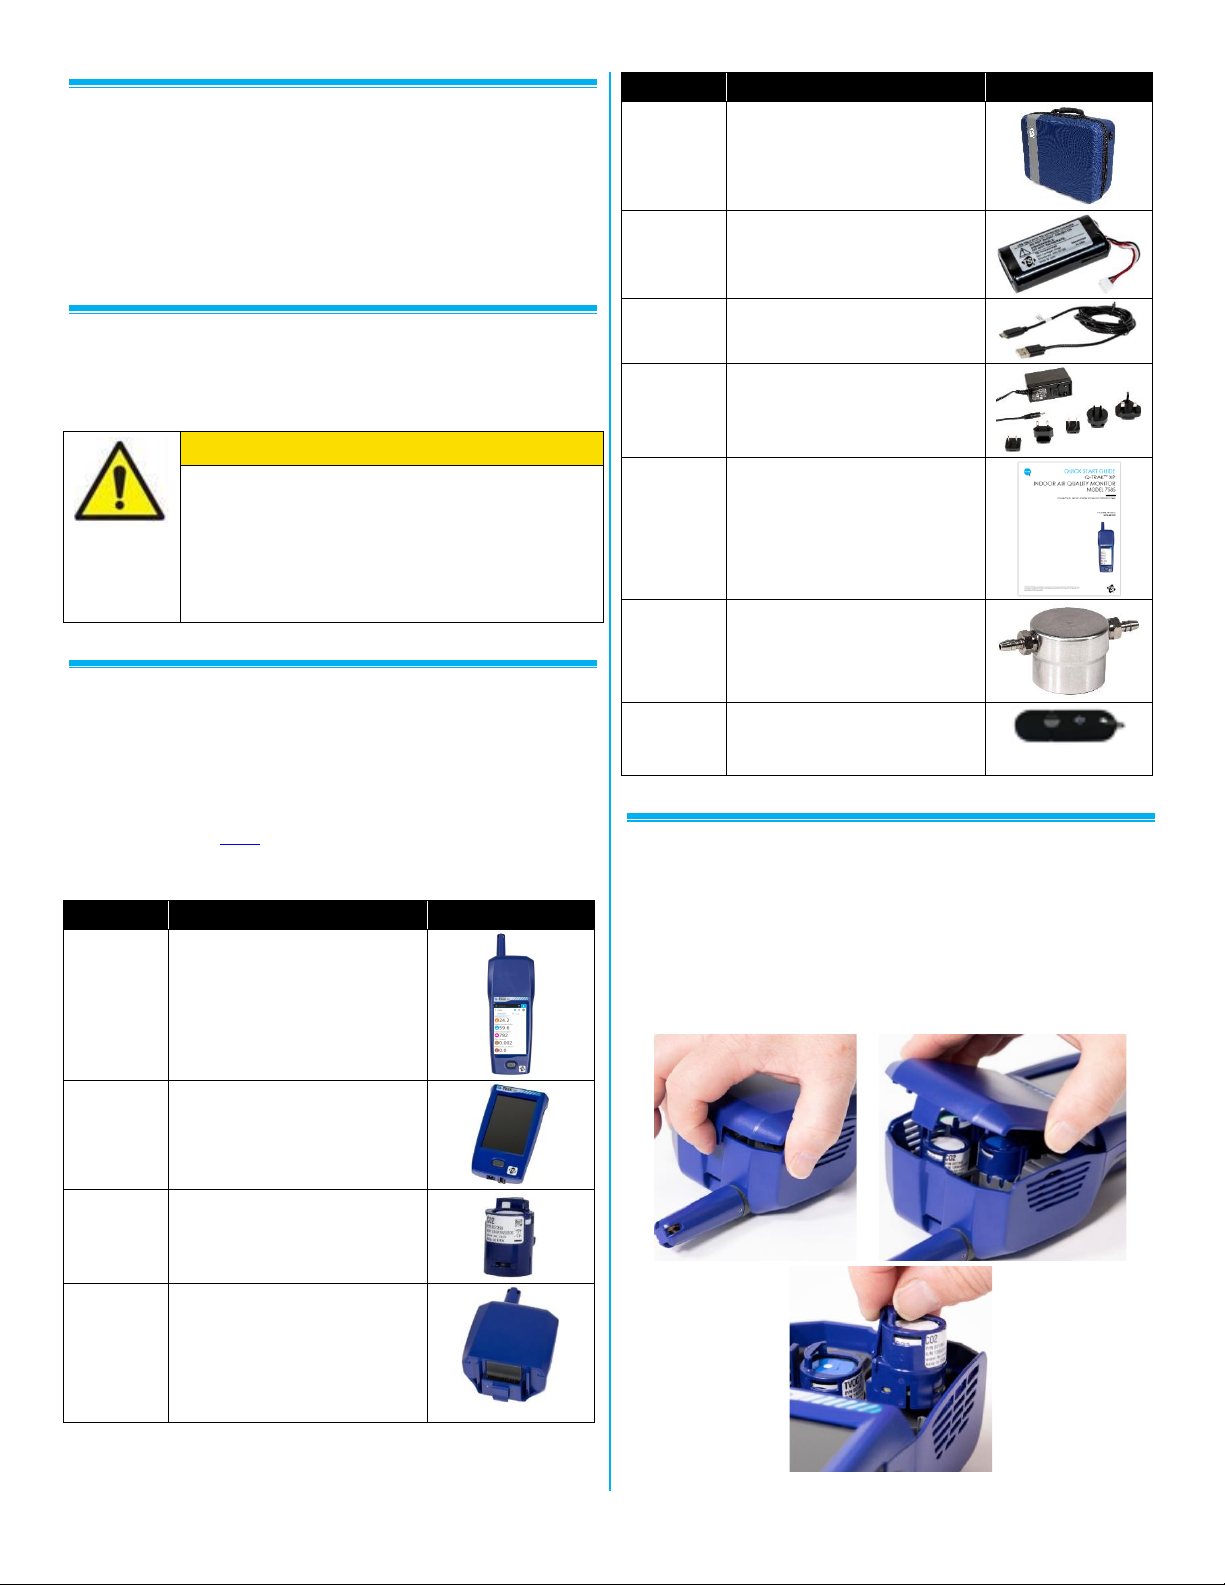
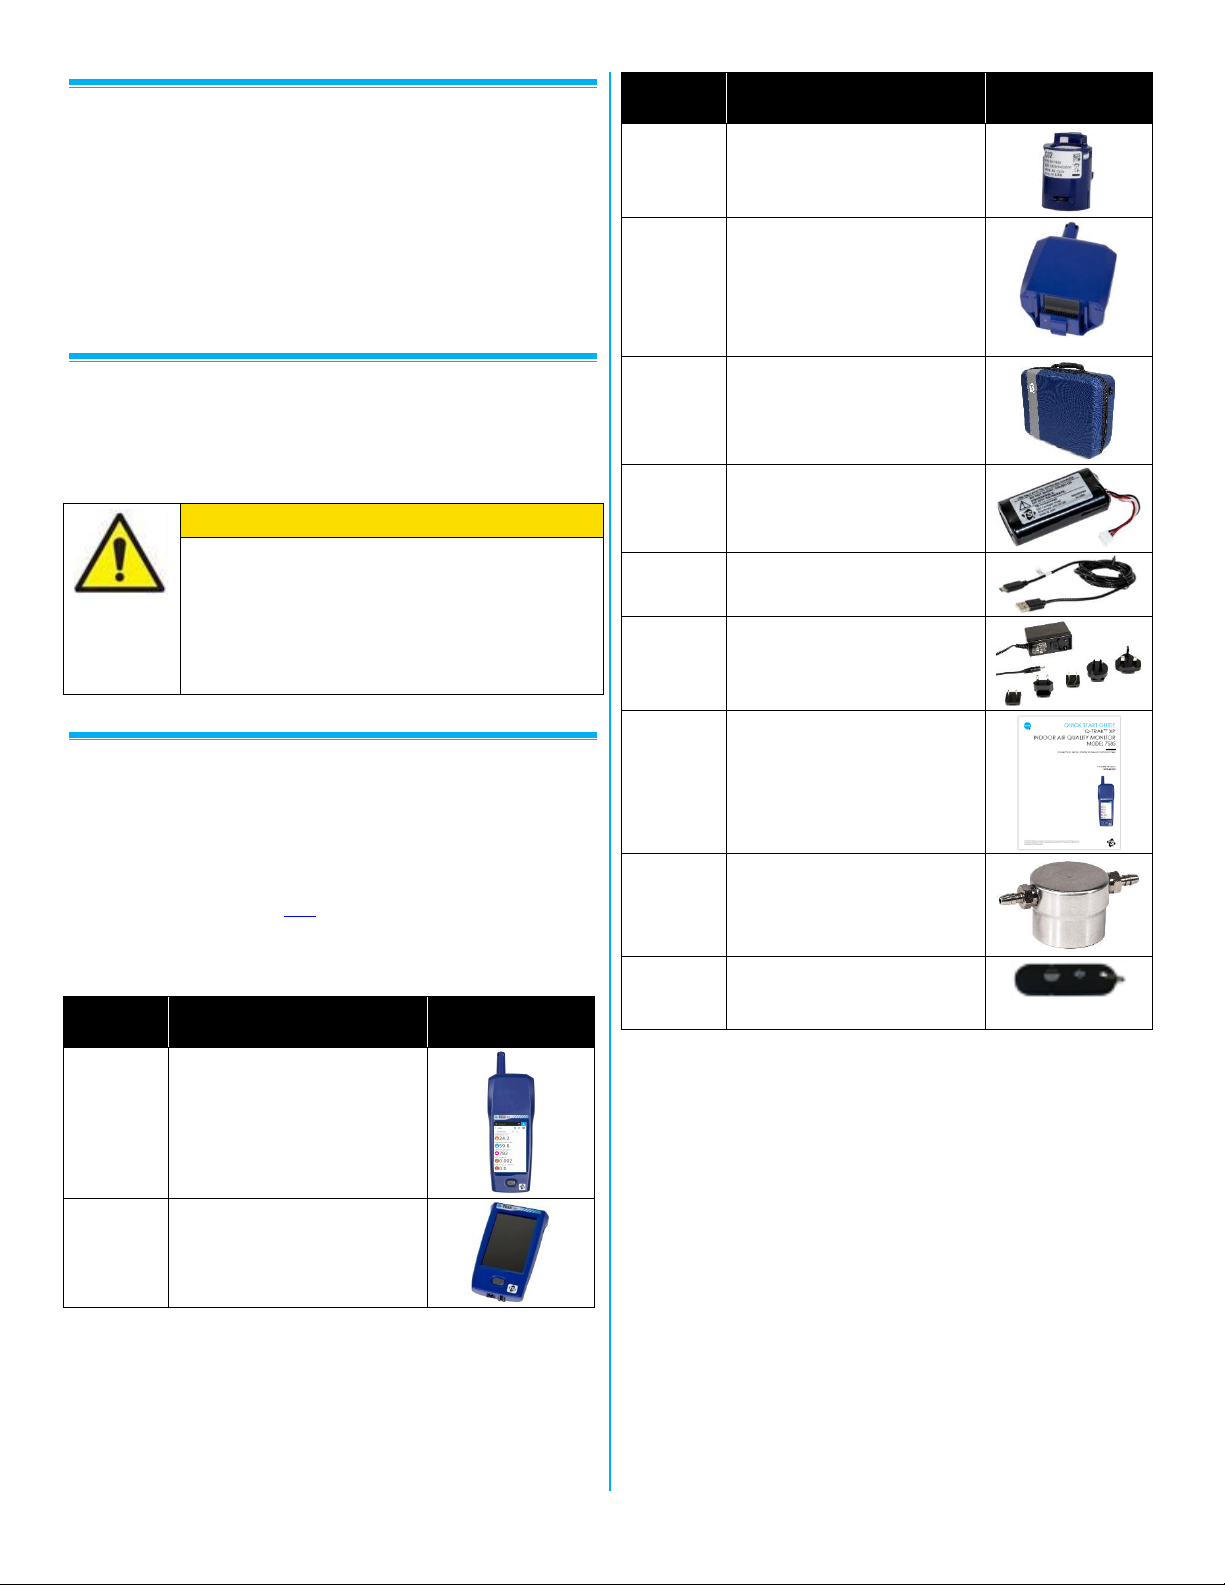
Unpacking and Parts Identification
Carefully unpack the instrument and accessories from the
shipping container. Check the individual parts against the
list of components below. If anything is missing or
damaged, notify TSI® immediately. All standard equipment
can be purchased separately if needed.
Part No.
Description
Picture
7585
Includes Q-Trak™ XP Base
Meter 7580, Multi-Sensor
IAQ Module 801430 and
Carbon Dioxide (CO2) sensor
801399
7580
Base Meter only – Handle
portion
801399
CO2 (Carbon Dioxide), NDIR
(Nondispersive Infrared
sensor)
801430
IAQ Multi-Sensor Gas
Module with Built-in Sensors:
Particulate Matter,
Temperature, Relative
Humidity and Barometric
Pressure
Part No.
Description
Picture
800121
Carrying Case
800123
Lithium Ion Rechargeable
Battery Pack
804001
USB Cable
800122
AC Adapter/Power Supply
6013908
Q-Trak™ XP IAQ Monitor
Quick Start Guide
800120
Gas Sensor Calibration Cap
7004035
USB Flash Drive with
Q-Trak™ XP manuals and
other literature.
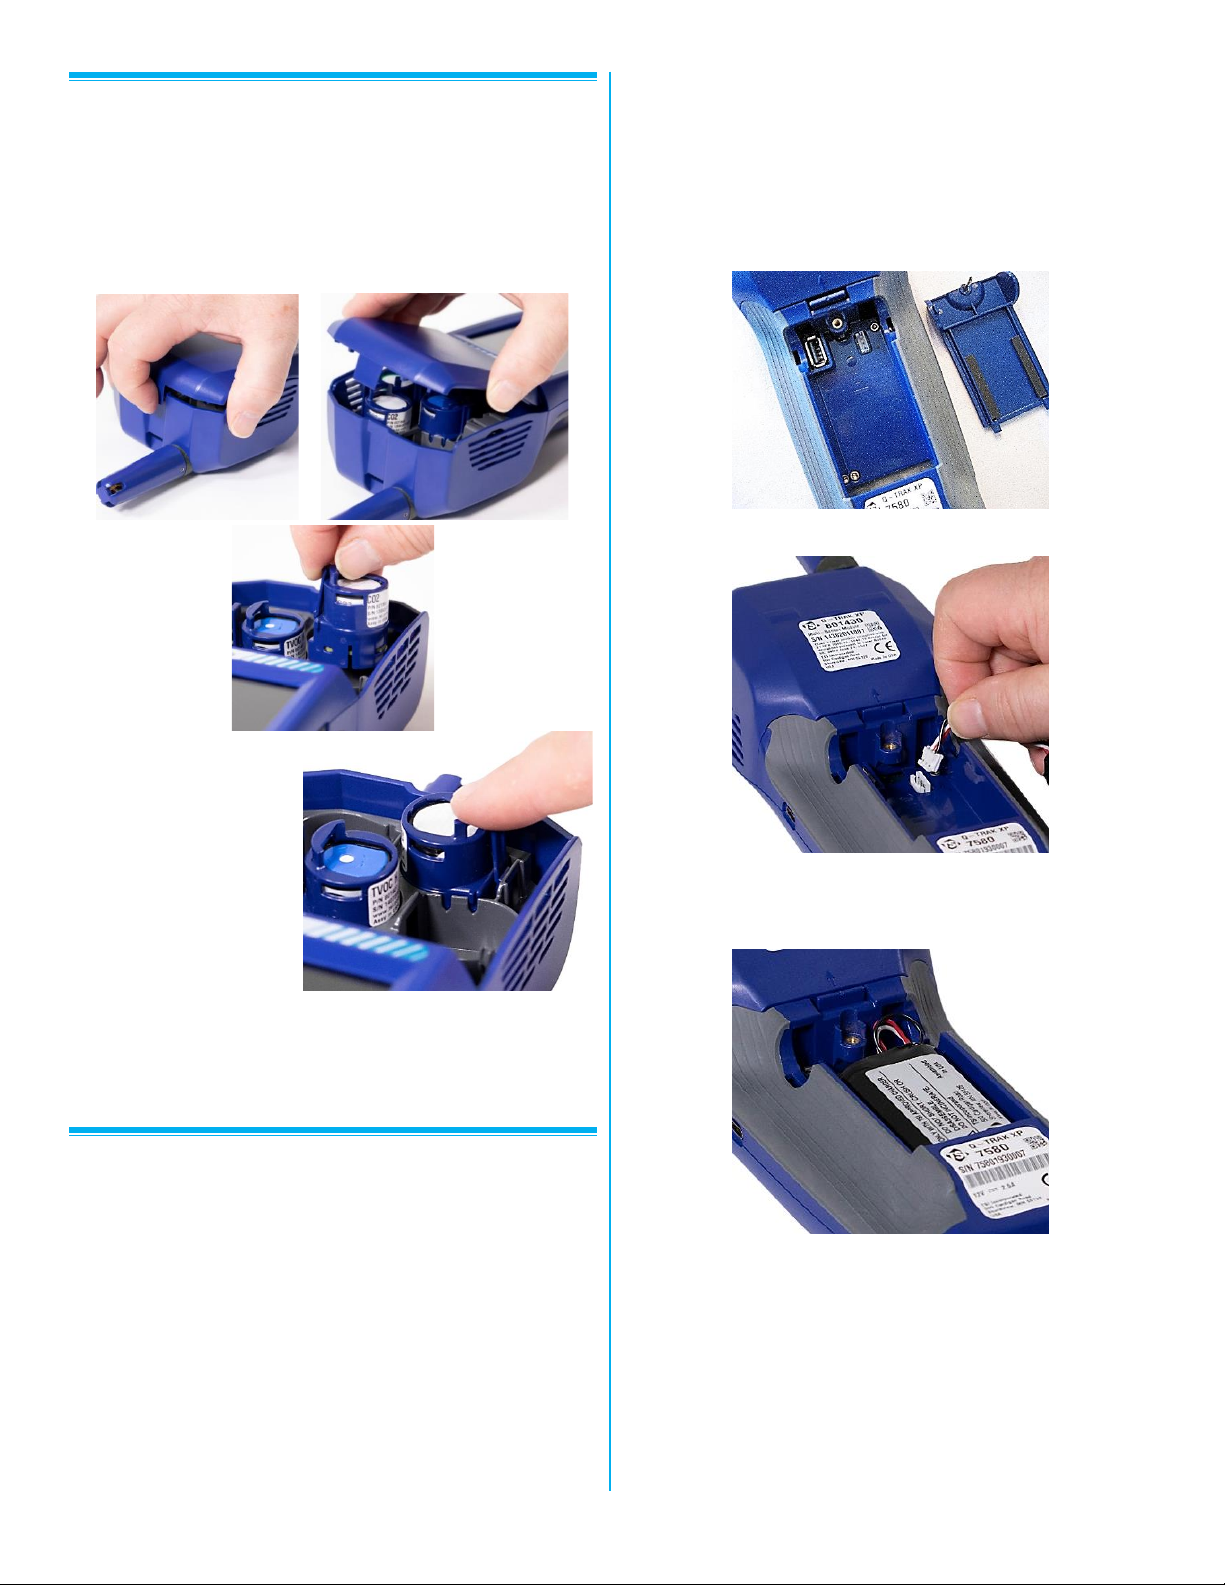
Installation of Gas Sensors
In addition to the standard built-in sensors, the device can
accept up to six gas sensors.
Install the gas sensors as follows:
1. Ensure the instrument is powered OFF.
2. Remove the sensor module cover.
Page 3
-3-
3. Position the sensor
as shown, making
certain the pins
make good contact
with the device.
Gas sensors can
be installed in any
available slot.
Listen for a click to
confirm sensor is
connected properly.
4. Attach cover to the sensor module.
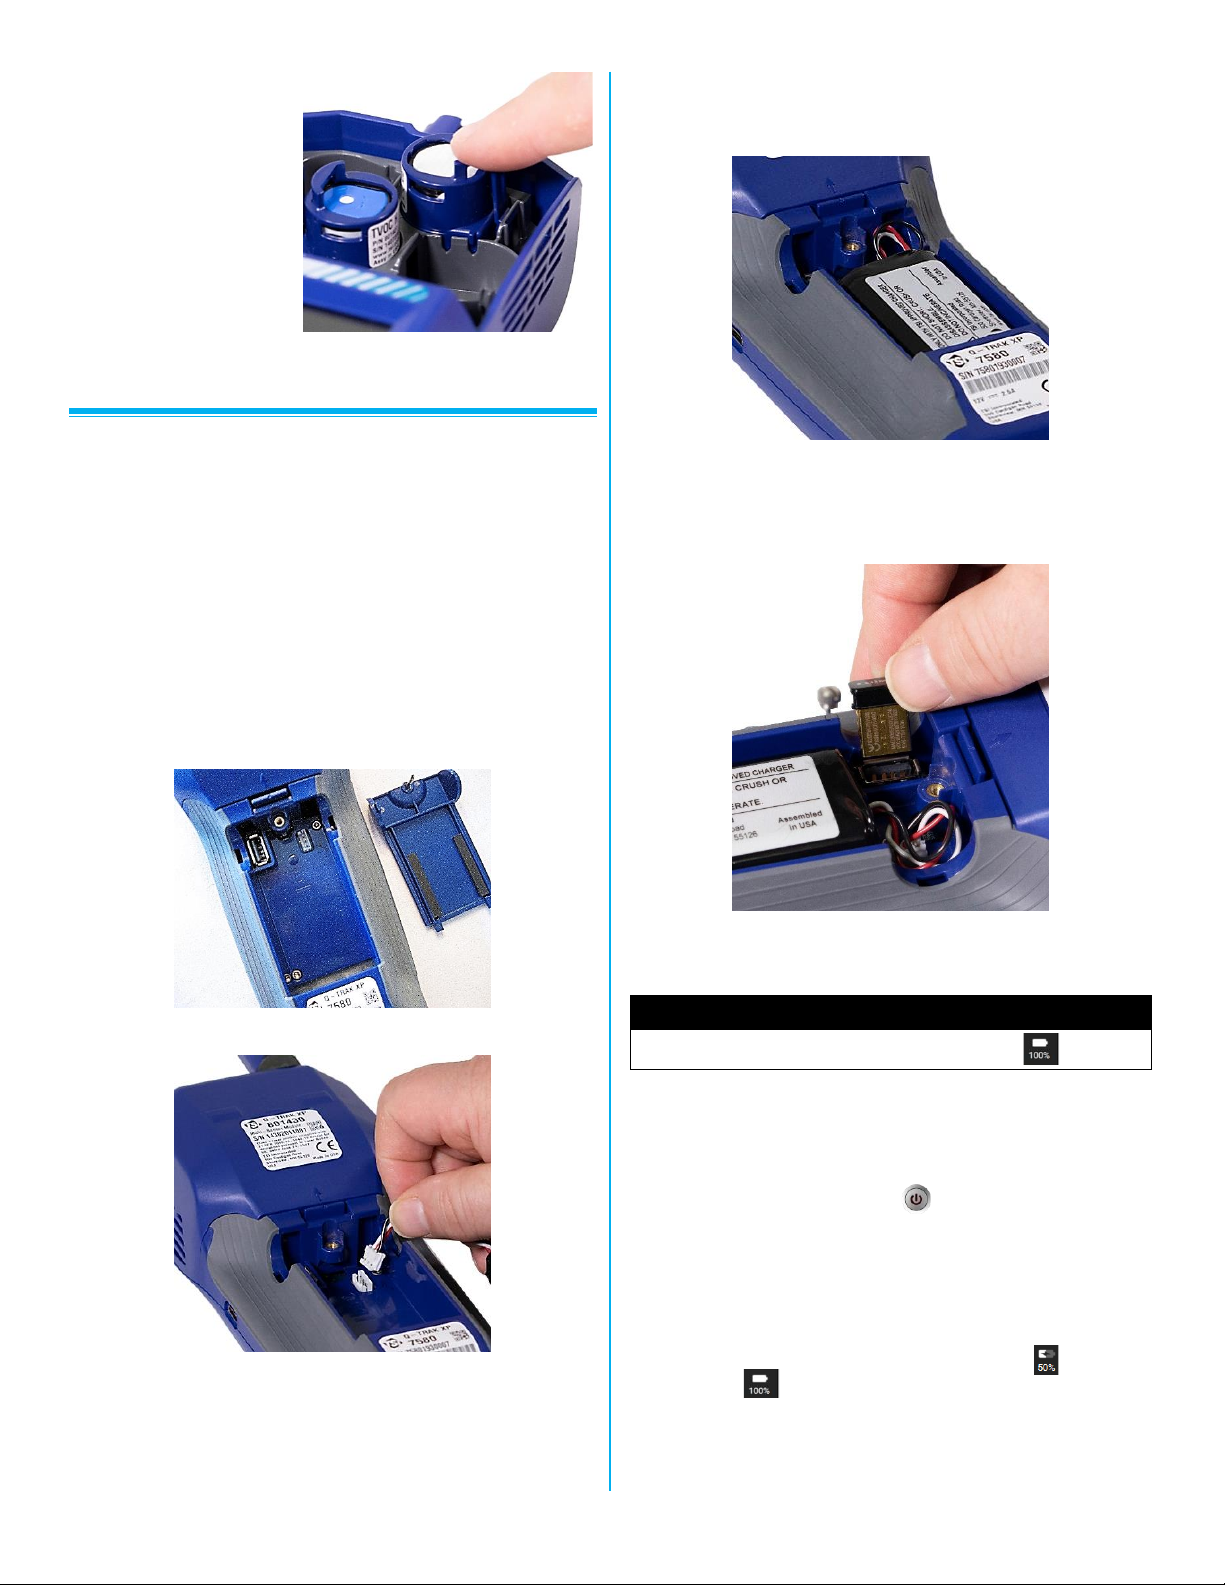
Providing Power to the Q-Trak™ XP Monitor
The Q-Trak™ XP monitor can be powered with the lithiumion battery or with the A/C adapter.
Operating the Instrument with the Lithium-Ion Battery
The lithium-ion battery must be installed by the user and
fully charged before use.
Install the battery:
1. Remove the battery compartment cover.
2. Connect the battery to the handle connector.
3. Insert the battery as shown in the picture below,
keeping the battery wires to the side and clear of the
battery cover screw.
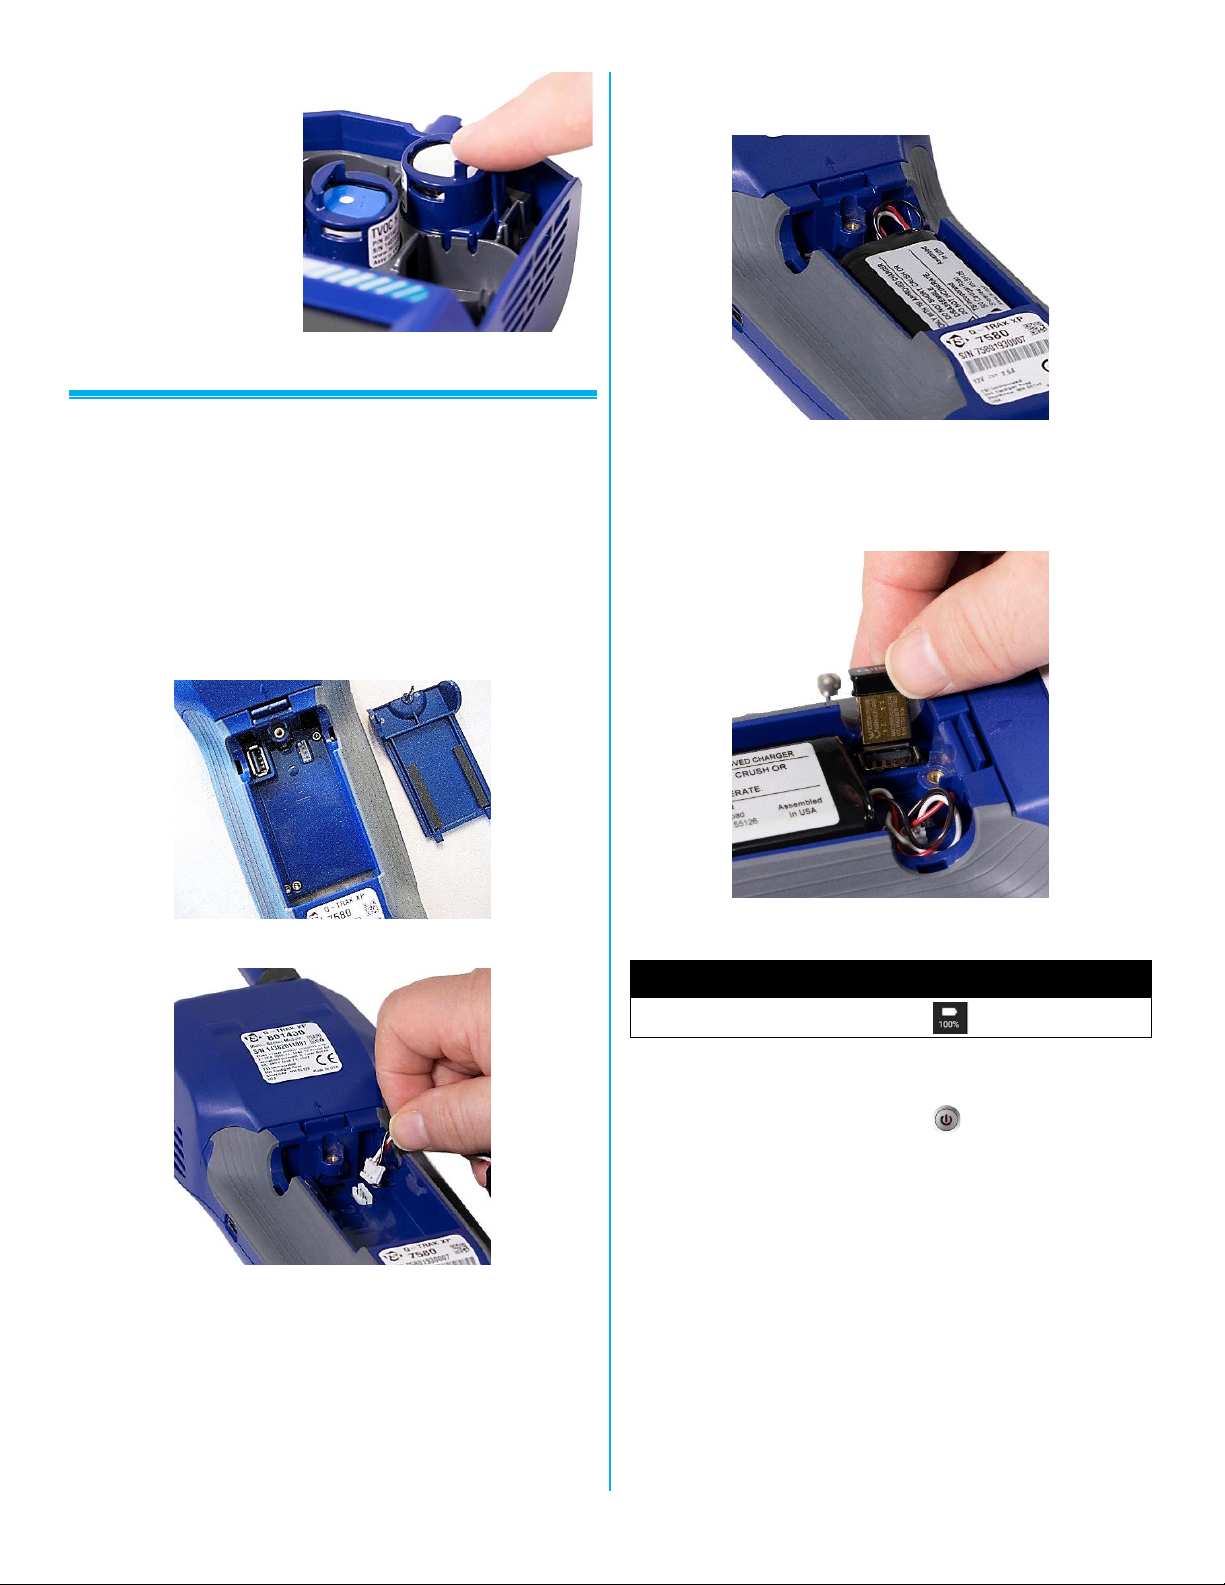
Installing the Wi-Fi® Dongle (optional)
If purchased, install the dongle into the USB port located
inside the battery compartment.
Attach the battery compartment cover, ensuring battery
wires are clear of the screw.
IMPORTANT
Calibrate the battery power gauge .
Charging the Battery and Calibrating the Power Gauge
1. With the battery installed, turn on the instrument by
pressing the power button and run until the
battery is fully discharged. The instrument will
automatically turn off when the battery is fully
discharged.
2. Connect the AC adapter to the instrument and fully
charge the battery. This may take up to 3 hours. Note
the lightning bolt indicator when charging vs fully
charged .
3. The instrument is now ready for use with the battery.
This Power Gauge calibration procedure does not
Page 4
-4-
need to be repeated unless the battery is replaced or
disconnected.
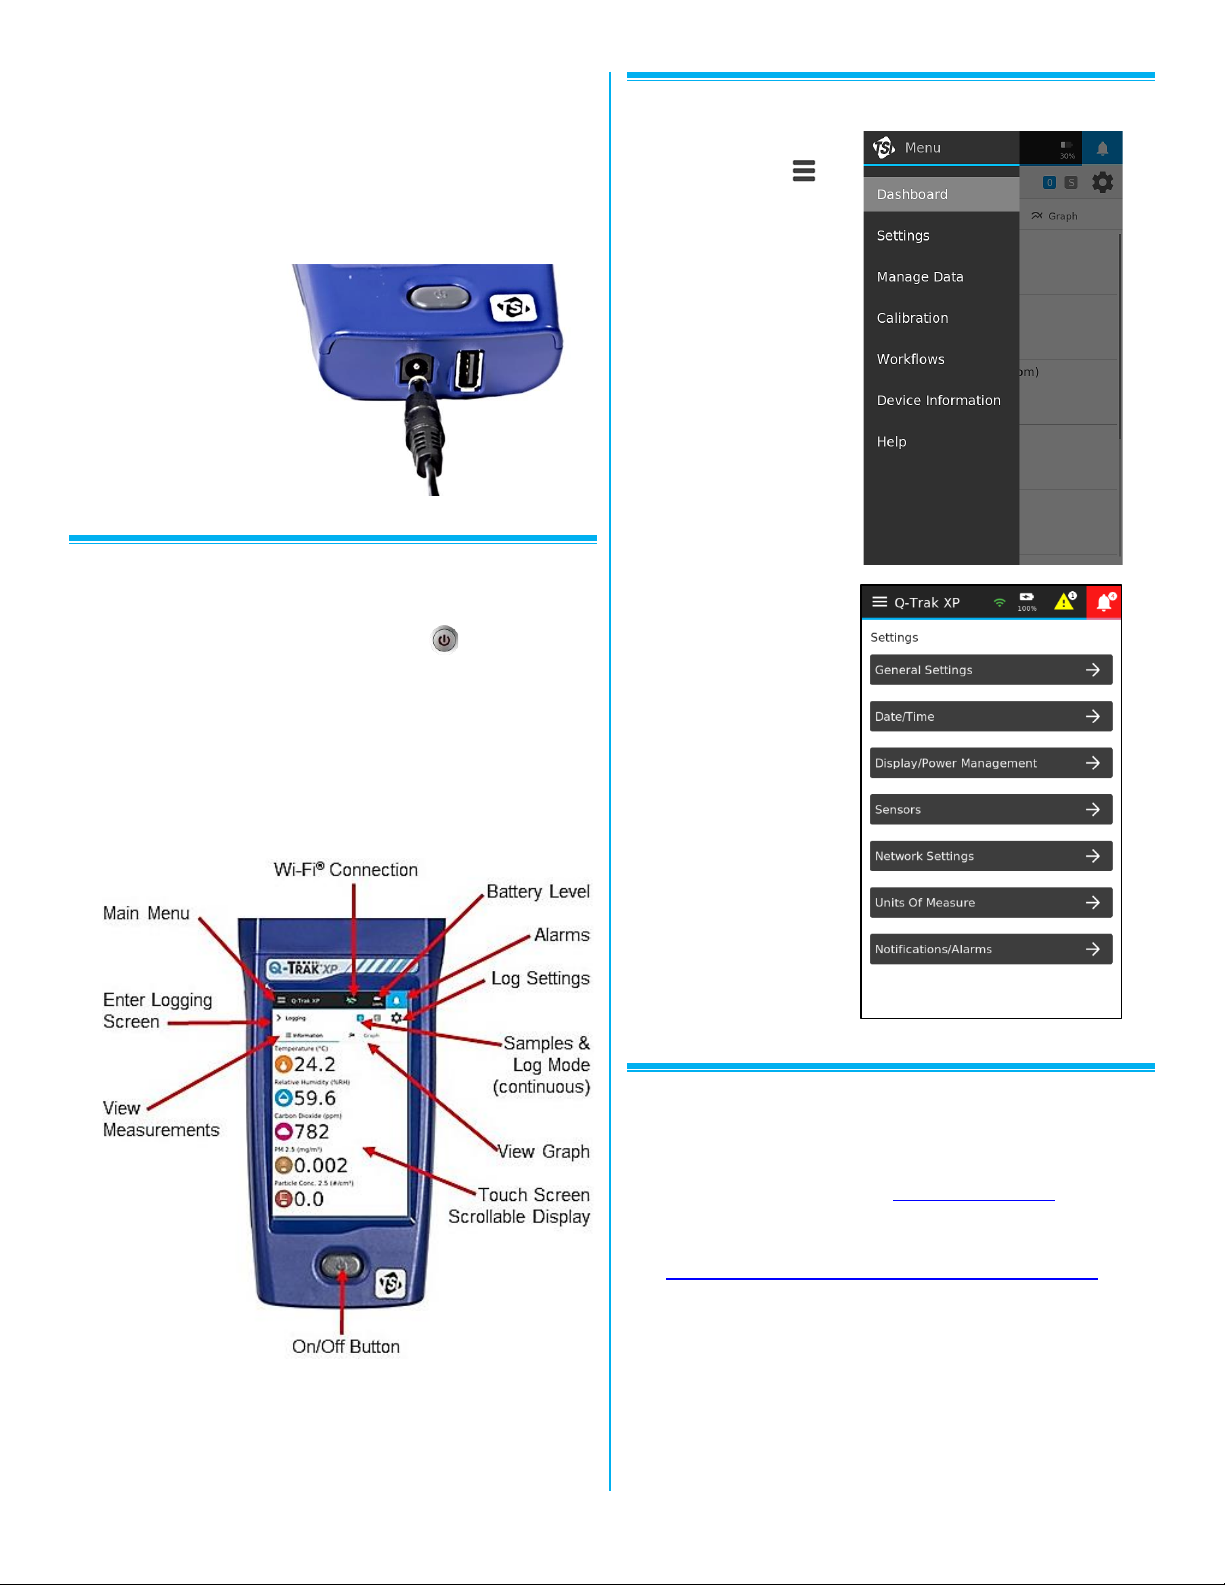
Operating the Instrument with the AC Adapter
The instrument can be operated with or without a battery
using the A/C adapter.
To operate the
instrument with
AC adapter:
1. Plug the AC
adapter into an
electrical outlet.
2. Plug the other
end into the
instrument.
Powering ON the Q-Trak™ XP IAQ Monitor
1. Press and release the power button . In
35 seconds the instrument is ready for use.
2. The first time the Q-Trak™ XP monitor is powered ON
the Welcome to Q-TrakTM XP page is presented.
Select the appropriate Language and Time Zone then
select DONE.
3. After selecting DONE, the Dashboard page is
displayed in Survey mode.
Main Menu
To display the Main
Menu, select the
icon in the upper left
corner of the header
on any page of the
display.
Select Settings to
setup the following:
Manuals, Software, and Other Resources
• User Manuals, App Notes, and other resources are
available for download at www.tsi.com/7585, click on
the “Resources” tab.
• TrakPro™ Ultra Software is available at:
https://tsi.com/support/tsi-software-and-firmware/ and
enter the search term Q-Trak XP.
Page 5
_____________________
TSI et le logo TSI sont des marques déposées de TSI Incorporated aux États-Unis et peuvent être
protégés en vertu des enregistrements de marques déposées d’autres pays. Q-Trak, TRAKPRO et
BlueSky sont des marques déposées de TSI Incorporated.
GUIDE DE DÉMARRAGE RAPIDE
Q-TRAK
™
XP
MONITEUR DE LA QUALITÉ
DE L’AIR INTÉRIEUR
MODEL 7585
(Contient le français, l’allemand, le chinois simplifié et le chinois traditionnel)
P/N 6013908, RÉVISION B
JANVIER 2021
Page 6
-6-
Nous vous remercions d’avoir acheté le moniteur de la
qualité de l’air intérieur (IAQ pour « Indoor Air Quality »)
Q-Trak™ XP de TSI® Incorporated (TSI®). Ce guide vous
aidera à commencer à utiliser rapidement votre moniteur.
Des informations plus détaillées se trouvent dans le
manuel d’utilisation enregistré sur le Flash Drive USB
Q-Trak™ XP inclus. Veuillez vous référer au manuel si
vous avez des questions sur le fonctionnement de votre
nouveau moniteur.
Sécurité
Pour plus d’informations sur la sécurité, se reporter au
manuel d’utilisation du moniteur de qualité de l’air intérieur
Q-Trak™ XP modèle 7585.
AV E RT IS S EM EN T
L’instrument doit être utilisé uniquement
comme décrit dans ce manuel. Le nonrespect de toutes les procédures décrites
dans le manuel peut entraîner des blessures
graves ou des dommages irrévocables à
l’instrument.
Déballage et identification des pièces
Déballez soigneusement l’instrument et les accessoires du
conteneur d’expédition. Vérifiez les pièces contre la liste
des composants ci-dessous. Si un élément est manquant
ou endommagé, avisez TSI® immédiatement. Tous les
équipements standard peuvent être achetés séparément si
nécessaire.
Pièces
No.
Description
Une photo
7585
Comprend l’appareil de
mesure de base Q-Trak™ XP
7580, le module IAQ multicapteurs 801430 et le
capteur de dioxyde de
carbone (CO2) 801399.
7580
Appareil de mesure de base
uniquement – partie poignée
Pièces
No.
Description
Une photo
801399
CO2 (dioxyde de carbone),
NDIR (capteur infrarouge non
dispersif)
801430
Module pour gaz multicapteurs IAQ avec capteurs
intégrés : Particules,
température, humidité
relative et pression
barométrique
800121
Boîtier de transport
800123
Bloc batterie rechargeable
lithium-ion.
804001
Câble USB
800122
Adaptateur
secteur/alimentation
6013908
Guide de démarrage rapide du
moniteur IAQ Q-Trak™ XP
800120
Bouchon d’étalonnage du
capteur de gaz
7004035
Flash drive USB avec
manuels Q-Trak™ XP et
autres documents.
Page 7
-7-
Installation des capteurs de gaz
En plus des capteurs standards intégrés, l’appareil peut
accueillir jusqu’à six capteurs de gaz.
Installez les capteurs de gaz comme suit :
1. Assurez-vous que l’instrument est hors tension.
2. Retirez la vis du couvercle du module capteur.
3. Positionnez le
capteur comme
illustré, en vous
assurant que les
broches soient bien
en contact avec le
dispositif. Les
capteurs de gaz
peuvent être
installés un
quelconque
emplacement disponible. Un clic retentira pour
confirmer que le capteur est correctement connecté.
4. Fixer le couvercle au module capteur.
Alimentation du moniteur Q-Trak™XP
Le moniteur Q-Trak™ XP peut être alimenté par la batterie
au lithium-ion ou par l’adaptateur SECTEUR.
Utilisation de l’instrument avec la batterie
lithium-ion
La batterie au lithium-ion doit être installée par l’utilisateur
et complètement chargée avant utilisation.
Installer la batterie :
1. Retirez le couvercle du compartiment à pile.
2. Branchez la batterie au connecteur de la poignée.
3. Insérez la batterie comme indiqué sur l’illustration cidessous, en maintenant les fils de la batterie sur le
côté et à l’écart de la vis du couvercle de la batterie.
Page 8

-8-
Installation de la clé électronique Wi-Fi®
(en option)
Si vous l’avez acheté, installez la clé électronique dans le
port USB situé dans le compartiment de la batterie.
Fixez le couvercle du compartiment de la batterie en vous
assurant que les fils de la batterie sont bien à l’écart de la
vis.
IM P O R TA NT
Étalonner l’indicateur de charge de la batterie .
Chargement de la batterie et étalonnage de l’indicateur de charge
1. Une fois la batterie installée, mettez l’instrument sous
tension en appuyant sur le bouton d’alimentation
et faites-le fonctionner jusqu’à ce que la batterie
soit complètement déchargée. L’instrument s’éteint
automatiquement lorsque la batterie est complètement
déchargée.
2. Connectez l’adaptateur secteur à l’instrument et
chargez la batterie jusqu’à ce qu’elle soit
complètement chargée. Ce processus peut prendre
jusqu’à 3 heures.
3. L’instrument est maintenant prêt à être utilisé avec la
batterie. Il n’est pas nécessaire de répéter cette
procédure à moins que la batterie ne soit remplacée
ou débranchée.
Utilisation de l’instrument avec l’adaptateur
secteur
L’instrument peut être utilisé avec ou sans batterie à l’aide
de l’adaptateur secteur.
Pour utiliser
l’instrument avec un
adaptateur secteur :
1. Branchez
l’adaptateur
secteur sur une
prise électrique.
2. Branchez l’autre
extrémité sur
l’instrument.
Mise sous tension du moniteur IAQ Q-Trak™ XP
1. Appuyez brièvement sur le bouton d’alimentation .
L’instrument est prêt à l’emploi après 35 secondes.
2. Lors de la première mise sous tension du moniteur
Q-Trak™ XP, la page de Bienvenue dans Q-TrakTM
XP s’affiche. Sélectionnez la langue et le fuseau
horaire appropriés, puis sélectionnez DONE
(TERMINÉ).
3. Après avoir sélectionné DONE, la page Dashboard
(Tableau de bord) s’affiche en mode Survey (Étude).
Connexion Wi-Fi®
Niveau de la
batterie
Alarme
Réglages
Journal
Mode
échantillons et
journal (continu)
Afficher les
graphiques
Écran tactile à
affichage défilant
Afficher les
mesures
Écran
d’enregistrement
d’entrée
Menu
principal
Bouton Marche/Arrêt
Page 9

-9-
Menu principal
Pour afficher le Main
Menu (Menu
Principal),
sélectionnez l’icône
dans le coin
supérieur gauche de
l’en-tête sur n’importe
quelle page de
l’écran.
Sélectionnez Settings
(Paramètres) pour
configurer les
paramètres suivants :
Manuels, logiciels et autres ressources
• Les manuels d’utilisation, les notes d’application et
d’autres ressources sont disponibles au
téléchargement à l’adresse www.tsi.com/7585, cliquez
sur l’onglet « Resources ».
• Le logiciel TrakPro™ Ultra est disponible à l’adresse
suivante : https://tsi.com/support/tsi-software-and-
firmware/ et entrez le terme de recherche Q-Trak XP.
Page 10

_____________________
TSI und das TSI-Logo sind in den Vereinigten Staaten eingetragene Marken von TSI Incorporated
und können unter den Markenregistrierungen anderer Länder geschützt sein. Q-Trak, TrakPro
und BlueSky sind Marken von TSI Incorporated.
KURZANLEITUNG
Q-TRAK
™
XP
RAUM-LUFTQUALITÄTS-MESSGERÄT
MODELL 7585
(enthält Französisch, Deutsch, Chinesisch (vereinfacht) und Chinesisch (traditionell))
VERSIONS-NR.6013908, REVISION B
JANUAR 2021
Page 11

-11-
Vielen Dank für den Kauf eines TSI® Incorporated (TSI®)
Q-Trak™ XP Raumluftqualitäts-Messgerät (IAQ). Diese
Kurzanleitung wird Ihnen helfen, schnell mit der
Inbetriebnahme Ihres Messgeräts zu beginnen.
Ausführlichere Informationen finden Sie im
Bedienerhandbuch, das sich auf dem USB-Stick im
Lieferumfang des Q-Trak™ XP befindet. Bitte lesen Sie
zunächst das Handbuch, wenn Sie Fragen zum Betrieb
Ihres neuen Messgeräts haben.
Sicherheit
Sicherheitshinweise finden Sie im Bedienerhandbuch des
Q-Trak™ XP Rraum-Luftqualitätsmessgeräts Modell 7585.
WA RN U NG
Das Gerät muss in wie im
Bedienerhandbuch beschrieben verwendet
werden. Die Missachtung der in dieser
Kurzanleitung beschriebenen Schritte kann
zu schweren Verletzungen des Anwenders
oder zu dauerhaften Beschädigungen des
Geräts führen.
Auspacken und Identifikation der Teile
Packen Sie das Gerät und das Zubehör vorsichtig aus
dem Verpackung aus. Überprüfen Sie die einzelnen Teile
anhand der untenstehenden Stückliste. Falls
Komponenten fehlen oder beschädigt sein sollten,
benachrichtigen Sie sofort TSI. Die gesamte
Standardlieferumfang kann bei Bedarf separat erworben
werden.
Teilnr.
Beschreibung
Bild
7585
Enthält Q-Trak™ XP BasisMessgerät 7580, IAQ
Multisensor-Modul 801430
und Kohlendioxid- (CO2-)
Sensor 801399
7580
Basis-Messgerät - Bedienteil
Teilnr.
Beschreibung
Bild
801399
CO2 (Kohlendioxid), NDIR
(Nichtdispersiver
Infrarotsensor)
801430
IAQ Multisensor-Gasmodul
mit integrierten Sensoren für:
Feinstaub oder PartikelMassenkonzentration,
Temperatur, relative
Luftfeuchtigkeit und
barometrischen Druck
800121
Gerätekoffer
800123
Wiederaufladbarer
Lithiumionen-Akku
804001
USB-Kabel
800122
Netzteil
6013908
Kurzanleitung Q-Trak™ XP Luftqualitäts-Messgerät
800120
Gassensor-Kalibrierkappe
7004035
USB-Stick mit Q-Trak™ XPHandbüchern und anderen
Dokumenten
Page 12

-12-
Montage von Gassensoren
Zusätzlich zu den standardmäßig eingebauten Sensoren
kann das Gerät mit bis zu sechs Gassensoren bestückt
werden.
Montieren Sie die Gassensoren wie folgt:
1. Stellen Sie sicher, dass das Gerät ausgeschaltet ist
(OFF).
2. Entfernen Sie die Abdeckung des Sensormoduls.
3. Positionieren Sie
den Sensor wie
abgebildet und
stellen Sie sicher,
dass die Stifte
einen guten
Kontakt mit dem
Gerät haben.
Gassensoren
können in jedem
freien Steckplatz
montiert werden. Achten Sie auf das klickende
Geräusch, mit dem der Sensor einrastet.
4. Bringen Sie die Abdeckung des Sensormoduls wieder
an.
Stromversorgung des Q-Trak™ XP- Messgeräts
Das Q-Trak™ XP-Messgerät kann mit dem LithiumionenAkku oder dem Netzteil betrieben werden.
Betrieb des Geräts mit dem LithiumionenAkku
Der Lithiumionen-Akku muss vom Benutzer eingesetzt und
vor Gebrauch vollständig aufgeladen werden.
Einsetzen des Akkus:
1. Entfernen Sie die Akkufachabdeckung.
2. Schließen Sie den Akku an den Steckverbinder im
Griff an.
3. Setzen Sie den Akku wie in der Abbildung unten
dargestellt ein. Das Akkukabel muss seitlich verlegt
werden und darf sich nicht im Bereich der Schraube
für die Akkufachabdeckung befinden.
Page 13

-13-
Einsetzen des Wi-Fi®-Dongles (optional)
Falls erworben, setzen Sie den Dongle in den USB-Port
ein, der sich im Akkufach befindet.
Bringen Sie die Akkufachabdeckung wieder an und achten
Sie darauf, dass sich das Akkukabel nicht im Bereich der
Schraube befindet.
WI CH T I G
Kalibrieren Sie die Anzeige für den Akkustand.
Aufladen des Akkus und Kalibrieren der Akkustand-Anzeige
1. Schalten Sie das Gerät mit eingelegtem Akku ein,
indem Sie die Ein-/Aus-Taste drücken und das
Gerät eingeschaltet lassen, bis der Akku
vollständig entladen ist. Das Gerät schaltet sich
automatisch aus, wenn der Akku vollständig entladen
ist.
2. Schließen Sie das Netzteil an das Gerät an und laden
Sie den Akku vollständig auf. Dies kann bis zu
3 Stunden dauern.
3. Das Gerät ist nun mit dem Akku einsatzbereit. Dieser
Vorgang braucht nur wiederholt werden, falls der Akku
ausgetauscht oder abgeklemmt wird.
Betrieb des Geräts mit dem Netzteil
Das Gerät kann mit oder ohne Akku über den A/C-Adapter
betrieben werden.
Zum Betrieb des
Geräts mit dem
Netzteil:
1. Schließen Sie
das Netzteil an
eine Steckdose
an.
2. Stecken Sie das
andere Ende des
Kabels am Gerät ein.
Einschalten des Q-Trak™ XP Luftqualitäts-Messgeräts
1. Drücken Sie die Ein-/Aus-Taste und lassen Sie
diese wieder los. Das Gerät ist in 35 Sekunden
einsatzbereit.
2. Nach dem ersten Einschalten des Messgeräts
Q-Trak™ XP wird die Begrüßungsseite Willkommen
beiQ-TrakTM XP angezeigt. Wählen Sie die
entsprechende Sprache unter Language (Sprache)
und die Zeitzone unter Time Zone (Zeitzone).
Beenden Sie die Einstellung dann mit DONE
(FERTIG).
3. Nach Auswahl von DONE (FERTIG) wird die Seite
Dashboard im Modus Überwachung angezeigt.
Wi-Fi®-Verbindung
Akkuladestand
Alarme
LoggingEinstellungen
Proben- und
Loggingmodus
(kontinuierlich)
Grafik anzeigen
Scrollbare
Anzeige auf
dem TouchBildschirm
Messungen
anzeigen
Logging-
Bildschirm
aufrufen
Hauptmenü
Ein-/Aus-Taste
Page 14

-14-
Hauptmenü
Um das Hauptmenü
anzuzeigen, wählen
Sie das Symbol
in der oberen linken
Ecke in jeder Anzeige.
Wählen Sie Settings
(Einstellungen), um
Folgendes
einzurichten:
Handbücher, Software und andere Ressourcen
• Bedienerhandbücher, App-Notes und andere
Ressourcen stehen unter www.tsi.com/7585 zum
Herunterladen zur Verfügung. Klicken Sie auf die
Registerkarte „Ressourcen“.
• Die TrakPro™ Ultra-Software ist verfügbar unter:
https://tsi.com/support/tsi-software-and-firmware/.
Geben Sie als Suchbegriff Q-Trak XP ein.
Page 15

_____________________
TSI 和 TSI 徽标是 TSI Incorporated 在美国的注册商标,可能受其他国家/地区商标注册法保护。
Q-Trak、TrakPro 和 BlueSky 是 TSI Incorporated 的商标。
快速入门指南
Q-TRAK
™
XP
室内空气质量监测仪
7585 型
(包含法语、德语、简体中文和繁体中文)
货号:6013908,修订版 B
2021 一月
Page 16

-16-
感谢您购买 TSI® Incorporated (TSI®) Q-Trak™ XP 室内空气
质量监测仪 (IAQ)。本指南将帮助您快速开始使用监测仪。
更多详细信息,请参阅保存于
随附
Q-Trak™ XP USB
闪存盘
上的《操作手册》。如果在操作新监测仪时遇到任何问题,请
查阅手册。
安全性
有关安全信息,请参阅 7585 型 Q-Trak™ XP 室内空气质量
监测仪的使用手册。
警告
本仪器必须按照使用手册规定的方式使用。如
不遵照手册规定的所有程序,可能会对您造成
严重伤害,或者对仪器造成不可逆的损坏。
开箱和部件标识
小心地将仪器和附件从装运箱中取出。请对照下列部件清单
检查各个部件。如有任何缺漏或损坏,请立即通知 TSI
®
。
如有需要,可单独购买所有标配设备。
货号
说明
图片
7585
包含 Q-Trak™ XP 基本检测
仪 7580、多传感器 IAQ 模块
801430 和二氧化碳 (CO2) 传
感器 801399
7580
仅基本检测仪 — 手持部分
801399
CO2(二氧化碳)、
NDIR(不分光红外传感器)
801430
IAQ 多传感器气体模块,内置
以下传感器:颗粒物传感器、
温度传感器、相对湿度传感器
及大气压传感器
800121
手提箱
800123
锂离子可充电电池组
货号
说明
图片
804001
USB 线缆
800122
交流电源适配器/电源
6013908
Q-Trak™ XP IAQ 监测仪快速
入门指南
800120
气体传感器校准帽
7004035
USB 闪存盘,存有 Q-Trak™
XP 手册及其他文献。
气体传感器安装
除标配内置传感器外,本设备还可容纳最多六台气体传感器。
气体传感器安装如下:
1. 确保仪器关机。
2. 取下传感器模块盖子。
Page 17
-17-
3. 如图 所 示放 置 传 感
器, 确 保引 脚 与 设
备充 分 接触 。 气 体
传感 器 可安 装 在 任
何可 用 插槽 内 。 听
到咔 哒 声, 表 明 传
感器正确连接。
4. 将盖 子 盖到 传 感 器
模块上。
Q-Trak™ XP 监测仪供电
Q-Trak™ XP 监测仪可以通过锂离子电池或交流电源适配器
供电。
仪器使用锂离子电池工作
锂离子电池必须由用户安装,且使用前须充满电。
安装电池:
1. 取下电池盒盖。
2. 将电池与手持部分连接器相连。
3. 如下图所示插入电池,保持电池线位于侧面,并与电池
盖螺钉隔开。
安装便携 Wi-Fi 适配器
(可选)
如果购买了便携 Wi -Fi适配器,可将其插入电池盒内部的
USB 端口。
盖上电池盒盖,确保电池线与螺钉隔开。
重要信息
校准电池电量计 。
电池充电和校准电量计
1. 电池装好以后,按下电源按钮 开机,并
运行直至电
池完全放电
。电池完全放电后,仪器将自动关机。
2. 将交流电源适配器连接到仪器为电池充电,直至充满。
电池充满可能需要 3 小时。
3. 电池充满电后,仪器就可以准备使用。除更换或断开电
池外,无需重复该程序。
Page 18

-18-
仪器使用交流电源适配器工作
仪器使用交流电源适配器工作时,配或不配电池皆可。
仪器 使用交 流电 源适
配器时:
1. 将交流电源适配器
插入插座。
2. 将另 一 端 插 入 仪
器。
Q-Trak™ XP IAQ 监测仪开机
1. 按下然后松开电源按钮 。仪器将在 35 秒内准备就绪。
2. Q-Trak™ XP 监测仪首次开机时,会出现 Welcome to
Q-TrakTM XP(欢迎使用 Q-TrakTM XP)页面。选择合
适的 Language(语言)和 Time Zone(时区),然
后选择 DONE(完成)。
3. 选择 DONE(完成)后,Dashboard(仪表板)页面
以 Survey
(测量)
模式显示。
主菜单
要显示 Main Menu
(主菜单),请选择显
示屏任意页面页眉左
上角的 图标。
选择 Settings(设置),
进行如下设置:
手册、软件及其它资源
• 使用手册、应用说明及其它资源可通过
www.tsi.com/7585 网页,单击“Resources(资源)”
选项卡进行下载。
• TrakPro™ Ultra 软件可通过 https://tsi.com/support/tsi-
software-and-firmware/ 网站输入 Q-Trak XP 搜索获得
。
Wi-Fi® 连接
电池电量
报警
记录设置
样本和记录
模式(连续)
查看图表
触摸屏滚动
显示
查看
测量值
进入记录
界面
主菜单
开关按钮
Page 19

_____________________
TSI 和 TSI 標誌為 TSI Incorporated 在美國的註冊商標,並可能受到其他國家的商標註冊保護。
Q-Trak、TrakPro 和 BlueSky 為 TSI Incorporated 的商標。
快速入門指南
Q-TRAK
™
XP
室內空氣檢測儀
型號 7585
(
包含法文、德文、簡體中文和繁體中文
)
出版編號 6013908 ,修訂版 B
2021 一月
Page 20

-20-
感謝您購買 TSI® Incorporated (TSI®) Q-Trak™ XP 室內空
氣檢測儀 (IAQ)。本指南可協助您快速開始使用本檢測儀。
Q-Trak™ XP USB
隨身碟
提供本操作手冊的詳細資訊。如
果您對您的新檢測儀有任何操作上的問題,請參閱本手冊。
安全性
如需安全資訊,請參閱 Q-Trak™ XP 室內空氣檢測儀型號
7585 使用手冊。
警告
請依照使用手冊中的說明使用本儀器。未依照
使用手冊中的所有程序操作,可能會導致嚴重
人身傷害,或是可能對儀器造成無法修復的損
壞。
開箱與零件識別
小心拆開出貨外箱並取出儀器和配件。對照以下零件清單,
檢查個別零件。如有任何零件缺漏或損壞,請立即通知
TSI®。如有需要,所有標準設備都可個別購買。
零件編號
說明
圖片
7585
包含 Q-Trak™ XP 基本檢測
儀 7580、多重感應器 IAQ 模
組 801430 和二氧化碳 (CO2)
感應器 801399
7580
僅基本檢測儀 – 手持部分
801399
CO2 (二氧化碳)、NDIR (非分
散性紅外線感應器)
801430
IAQ 多重感應器氣體模組 (內
建感應器):懸浮微粒、溫度、
相對濕度和大氣壓力
800121
手提箱
800123
充電鋰電池組
零件編號
說明
圖片
804001
USB 線
800122
AC 電源變壓器/電源供應器
6013908
Q-Trak™ XP IAQ 檢測儀快速
入門指南
800120
氣體感應器校正蓋
7004035
內含 Q-Trak™ XP 手冊和其他
文件的 USB 隨身碟。
氣體感應器安裝
除了標準內建感應器之外,本裝置可安裝最多 6 個氣體感
應器。
安裝氣體感應器,如下所述:
1. 確定儀器已關機。
2. 取下感應器模組外蓋。
Page 21

-21-
3. 依圖所示放置感應
器,使特定針腳與
裝置保持良好接
觸。氣體感應器可
安裝在任何可用的
插槽。聽到喀一聲
表示感應器已正確
連接。
4. 將外蓋裝回感應器
模組。
為 Q-Trak™ XP 檢測儀提供電源
Q-Trak™ XP 檢測儀可使用鋰電池或 AC 電源變壓器。
使用鋰電池操作儀器
鋰電池必須由使用者安裝,並已事先充飽電力。
安裝電池:
1. 取下電池槽蓋。
2. 將電池連接至手持裝置接頭。
3. 依下圖所示裝入電池,使電池接線移至一側,以清楚看
到電池蓋螺絲。
安裝 Wi-Fi® Dongle (
選用
)
如果已購買 Wi-Fi® Dongle,將它安裝至電池槽內側的 USB
連接埠。
裝回電池槽蓋,確定電池接線不會擋到螺絲。
重要
校正電池電量計 .
為電池充電並校正電量計
1. 裝上電池,按下電源按鈕 將儀器開機,然後
操作本
儀器直到電池已完全放電
。當電池完全放電時,本儀器
將會自動關機。
2. 將 AC 電源變壓器連接至本儀器並為電池充電,直到它
充飽電力。 充電可能需要最長 3 小時。
3. 本儀器現已可使用電池。除非更換或取下電池,否則無
需重複執行本程序。
Page 22

-22-
使用 AC 電源變壓器操作儀器
本儀器 (裝上或未裝上電池) 可使用 AC 電源變壓器操作。
使用 AC 電源變壓器
操作本儀器:
1. 將 AC 電源變壓器
連接電源插座。
2. 將另一端連接至本
儀器。
將 Q-Trak™ XP IAQ 檢測儀開機
1. 按下再放開電源按鈕 。儀器會在 35 秒內準備就緒。
2. Q-Trak™ XP 檢 測 儀 初 次 開 機 時 , 會 出 現 歡迎使用
Q-TrakTM XP 頁面。選擇適合的語言和時區,然後選擇
完成。
3. 在選擇完成後,儀表板頁面會顯示為
調查
模式。
主選單
如要顯示主選單,選
擇顯示頁面標頭左上
角的 圖示。
選擇設定以進行以下
設定:
手冊、軟體和其他資源
• 如要下載使用手冊、應用程式注意事項和其他資源,請
至 www.tsi.com/7585,按一下「Resources (資源)」標
籤。
• 如要下載 TrakPro™ Ultra 軟體,請至:
https://tsi.com/support/tsi-software-and-firmware/ 並輸
入搜尋字詞 Q-Trak XP。
Wi-Fi® 連線
電池電量
警示
登入設定
採樣和記錄
模式 (續)
檢視圖表
觸控螢幕
可捲動顯示
檢視量測值
進入登入
畫面
主選單
開/關按鈕
Page 23

Page 24

TSI Incorporated – Visit our website www.tsi.com for more information.
USA Tel: +1 800 680 1220
UK Tel: +44 149 4 459200
France Tel: +33 1 41 19 21 99
Germany Tel: +49 241 523030
India Tel: +91 80 67877200
China Tel: +86 10 8219 7688
Singapore Tel: +65 6595 6388
P/N 6013908 Rev. B (US, FR, DE, CN, CN-T) ©2021 TSI Incorporated Printed in U.S.A.
 Loading...