

TSC Auto ID Technology 2008001 User Manual

THERMAL TRANSFER / DIRECT THERMAL
BAR CODE PRINTER
MANUAL
USER’S

Contents
1. Introduction ............................................1
1.1 Product Introduction ...............................................................................1
1.2 Compliances ............................................................................................1
2. Operations Overview .....................................3
2.1 Unpacking and Inspection ......................................................................3
2.2 Printer Overview ......................................................................................4
2.2.1 Front View ......................................................................................4
2.2.2 Interior view....................................................................................5
2.2.3 Rear View........................................................................................6
2.3 Operator Controls....................................................................................7
2.3.1 Front Panel Display .......................................................................7
2.3.2 LED Indicators ...............................................................................7
2.3.3 Front Panel Keys ...........................................................................8
2.4 Setting Up the Printer..............................................................................8
2.5 Installation of Ribbon..............................................................................9
2.5.1 Loading Ribbon .............................................................................9
2.6 Installation of Media ..............................................................................12
2.6.1 Loading Roll Labels.....................................................................12
3. Menu Function .........................................14
3.1 Setup Menu Overview............................................................................15
3.1.1 Printer Setup ................................................................................16
3.1.2 Sensor...........................................................................................23
3.1.3 Serial Comm.................................................................................31
3.1.4 Ethernet........................................................................................34
3.2 File Manager...........................................................................................37
3.2.1 File List.........................................................................................37
3.2.2 Avail. Memory...............................................................................37
3.2.3 Del. All Files..................................................................................38
3.3 Diagnostics ............................................................................................39
3.3.1 Print Config. .................................................................................39
3.3.2 Dump Mode..................................................................................40
3.3.3 Rotate Cutter................................................................................41
3.4 Language................................................................................................41
3.5 Service....................................................................................................42
3.5.1 Initialization..................................................................................42
i

3.5.2 Mileage Info..................................................................................43
4. Diagnostic Tool.........................................44
4.1 Start the Diagnostic Tool.......................................................................44
4.2 Printer Function (Calibrate sensor, Ethernet setup, RTC setup………)
.......................................................................................................................45
5. Troubleshooting ........................................46
5.1 Common Problems................................................................................46
6. Maintenance ...........................................50
Revise History ...........................................52
ii

1. Introduction
1.1 Product Introduction
Thank you very much for purchasing TSC bar code printer.
This printer is designed with die-casting aluminum chassis and print mechanism, metal
cover with large clear media view window, which ensuring to work for the extreme and
heavy duty industrial environment and applications.
With back-lit graphic LCD display, printer status can be managed easier and operated
more user friendly. The moveable sensor design can accept wide range of label media.
All of the most frequently used bar code formats are included. Fonts and bar codes can
be printed in any one of the four directions. This printer is built-in the high quality, high
performance MONOTYPE IMAGING® True Type font engine and one CG Triumvirate
Bold Condensed smooth font. With flexible firmware design, user can also download the
True Type Font from PC into printer memory for printing labels. Besides the scalable
font, it also provides a choice of five different sizes of alphanumeric bitmap font, OCR-A
and OCR-B fonts. By integrating rich features, it is the most cost-effective and high
performance printer in its class!
1.2 Compliances
CE Class A:
EN55022:1998+A1:2000+A2:2003:
EN55024:1998+A1:2001+A2:2003:
EN 61000-4 SERIES REQULATIONS
ETSI EN 301 489-17:V1.2.1(2002-08)
FCC:
CFR 47, Part 15/CISPR 22 3RD EDITION:1997, Class A
UL, CUL
UL 60950 3rd
TÜV-GS:
EN60950: 2000

Federal Communication Commission Interference Statement
This equipment has been tested and found to comply with the limits for a Class B
digital device, pursuant to Part 15 of the FCC Rules. These limits are designed to
provide reasonable protection against harmful interference in a residential installation.
This equipment generates, uses and can radiate radio frequency energy and, if not
installed and used in accordance with the instructions, may cause harmful
interference to radio communications. However, there is no guarantee that
interference will not occur in a particular installation. If this equipment does cause
harmful interference to radio or television reception, which can be determined by
turning the equipment off and on, the user is encouraged to try to correct the
interference by one of the following measures:
- Reorient or relocate the receiving antenna.
- Increase the separation between the equipment and receiver.
- Connect the equipment into an outlet on a circuit different from that to which the
receiver is connected.
- Consult the dealer or an experienced radio/TV technician for help.
This device complies with Part 15 of the FCC Rules. Operation is subject to the
following two conditions:
(1) This device may not cause harmful interference, and
(2) This device must accept any interference received, including interference that
may cause undesired operation.
INFORMATION TO USER
To assure continued compliance, (example - use only shielded interface cables
when connecting to computer or peripheral devices) any changes or
modifications not expressly approved by the party responsible for compliance
could void the user’s authority to operate this equipment.

Wichtige Sicherheits-Hinweise
1.Bitte lesen Sie Diese Hinweis sorgfältig durch
2.Heben Sie diese Anleitung fűr den späteren Gebrauch auf.
3.Vor jedem Reinigen ist das Gerät vom Stromentz zu trennen. Verwenden Sie Keine
Flűssig-oder Aerosolreiniger. Am besten eignet sich ein angefeuchtetes Tuch zur
Reinigung.
4.Die Netzanschlußsteckdose soll nahe dem Gerät angebraucht und leicht zugänglich
sein.
5.Das Gerät ist vor Feuchtigkeit zu schűtzen.
6.Bei der Aufstellung des Gerätes ist auf sicheren Stand zu achten. Ein Kippen oder
Fallen könnte Beschädigungen hervorrufen.
7.Beáchten Sie beim Anschluß an das stromnetz die Anschlußwerte.
8. Dieses das Gerät kann bis zu einer Außentemperatur von maximal 40℃ betieben
werden.
2

2. Operations Overview
2.1 Unpacking and Inspection
This printer has been specially packaged to withstand damage during shipping.
Please carefully inspect the packaging and printer upon receiving the bar code printer.
Please retain the packaging materials in case you need to reship the printer.
Unpacking the printer, the following items are included in the carton.
One printer unit
One Windows labeling software/Windows driver CD disk
One quick installation guide
One power cord
One USB interface cable
If any parts are missing, please contact the Customer Service Department of your
purchased reseller or distributor.
3
2.2 Printer Overview
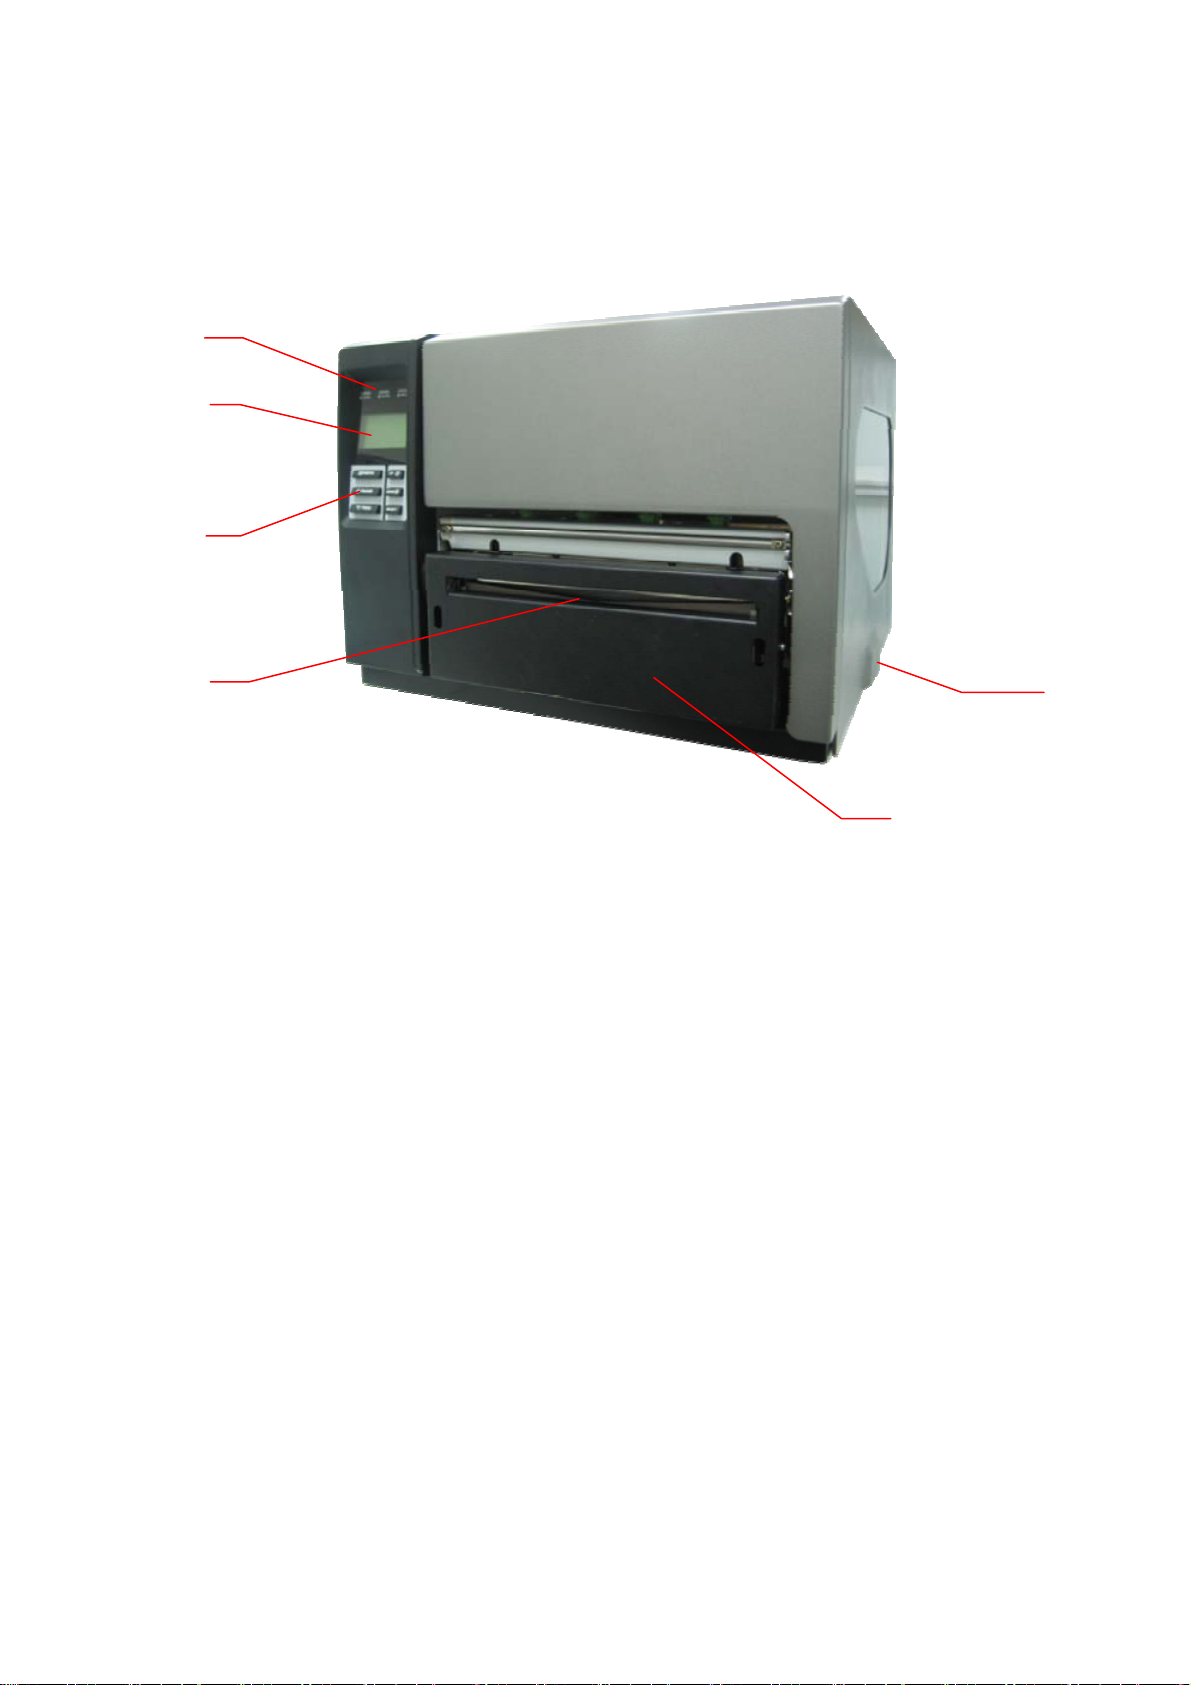
2.2.1 Front View
1
2
3
4
1. LED indicators
2. LCD display
3. Front panel buttons
4. Paper exit chute
5. Printer right side cover
6. Cutter module (Option)
5
6
4

2.2.2 Interior view
1
2
3
4
5
1. Ribbon rewind spindle
6
7
8
9
10
2. Print head
3. Ribbon sensor
4. Media sensor
5. Platen roller
6. Print head release lever
7. Ribbon supply spindle
8. Label supply spindle
9. Media guide bar
10. Label guide
5

2.2.3 Rear View
1
2
3
4
5
6
7
8
9
1. Fan-fold paper entrance chute
2. Centronics interface
3. USB interface
4. RS-232C interface
5. Power jack socket
*6. SD card slot
7. Ethernet interface
8. PS/2 interface
9. Power switch
* Recommended SD card specification.
SD V 1.0, V 1.1 SD V 2.0 (SDHC)
128MB
256MB
512MB
1GB
-Supported DOS FAT file system.
4GB class 6
-Folders stored on the SD card should be in the 8.3 filename format.
-Approved SD card manufacturer: SanDisk, Transcend.
6

2.3 Operator Controls
2.3.1 Front Panel Display
LCD display
Front panel buttons
LED indicators
2.3.2 LED Indicators
LED Status Indication
Off The printer power is turned off
On The printer power is turned on
On Printer is ready
Pause
Blinking
Downloading data into printer.
Off Printer is ready
On "CARRIAGE OPEN" or “CUTTER ERROR”
Blinking "NO PAPER", "PAPER JAM" or "NO RIBBON"
7
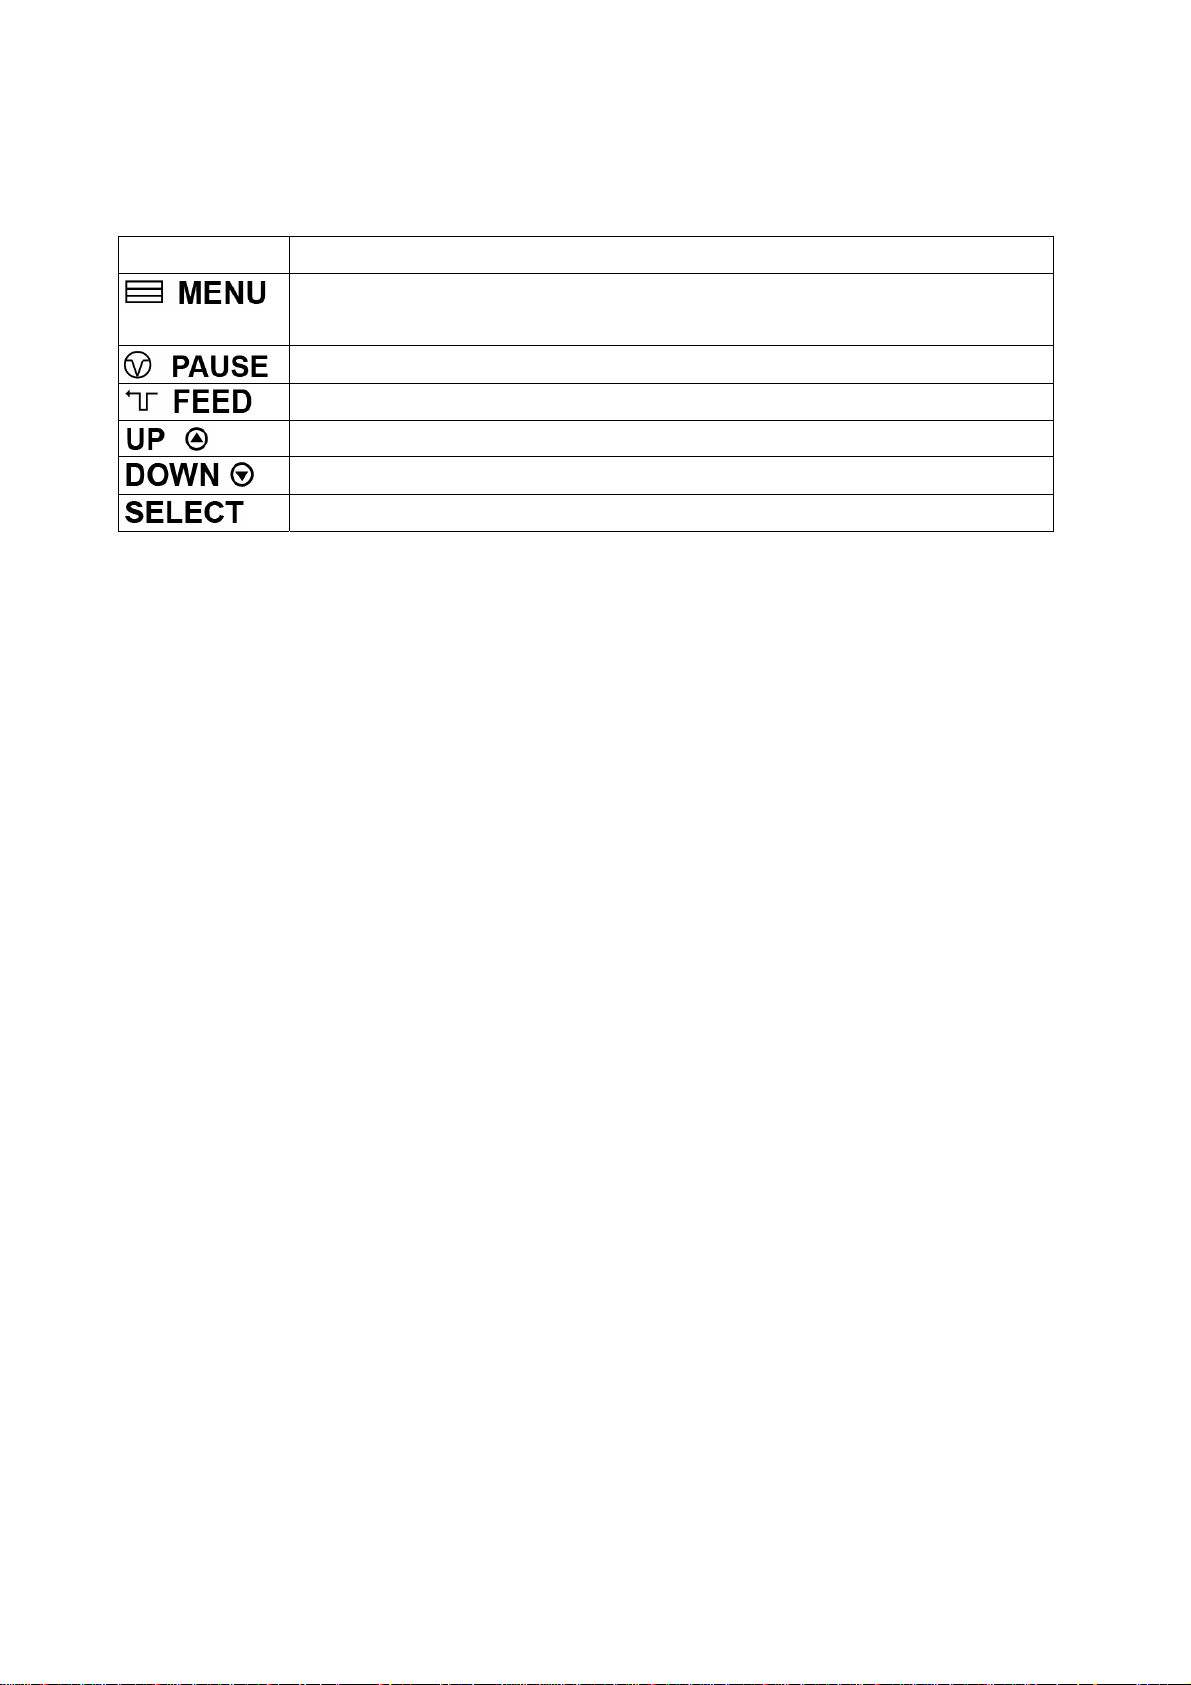
2.3.3 Front Panel Keys
Keys Function
1. Enter the menu
2. Exit from a menu or cancel a setting and return to the previous menu
Pause/Resume the printing process
Advance one label
Scroll up the menu list
Scroll down the menu list
Enter/Select cursor located option
2.4 Setting Up the Printer
1. Place the printer on a flat, secure surface.
2. Make sure the power switch is off.
3. Connect the printer to the computer with the provided USB cable.
4. Plug the power cord into the AC power cord socket at the rear of the printer, and
then plug the power cord into a properly grounded power outlet.
8

2.5 Installation of Ribbon
2.5.1 Loading Ribbon
1. Lift open printer right side cover.
2. Push the print head release lever to open the print head mechanism.
Print head
release lever
3. Install the ribbon onto the ribbon supply spindle.
4. Place a paper core onto the ribbon rewind spindle.
9
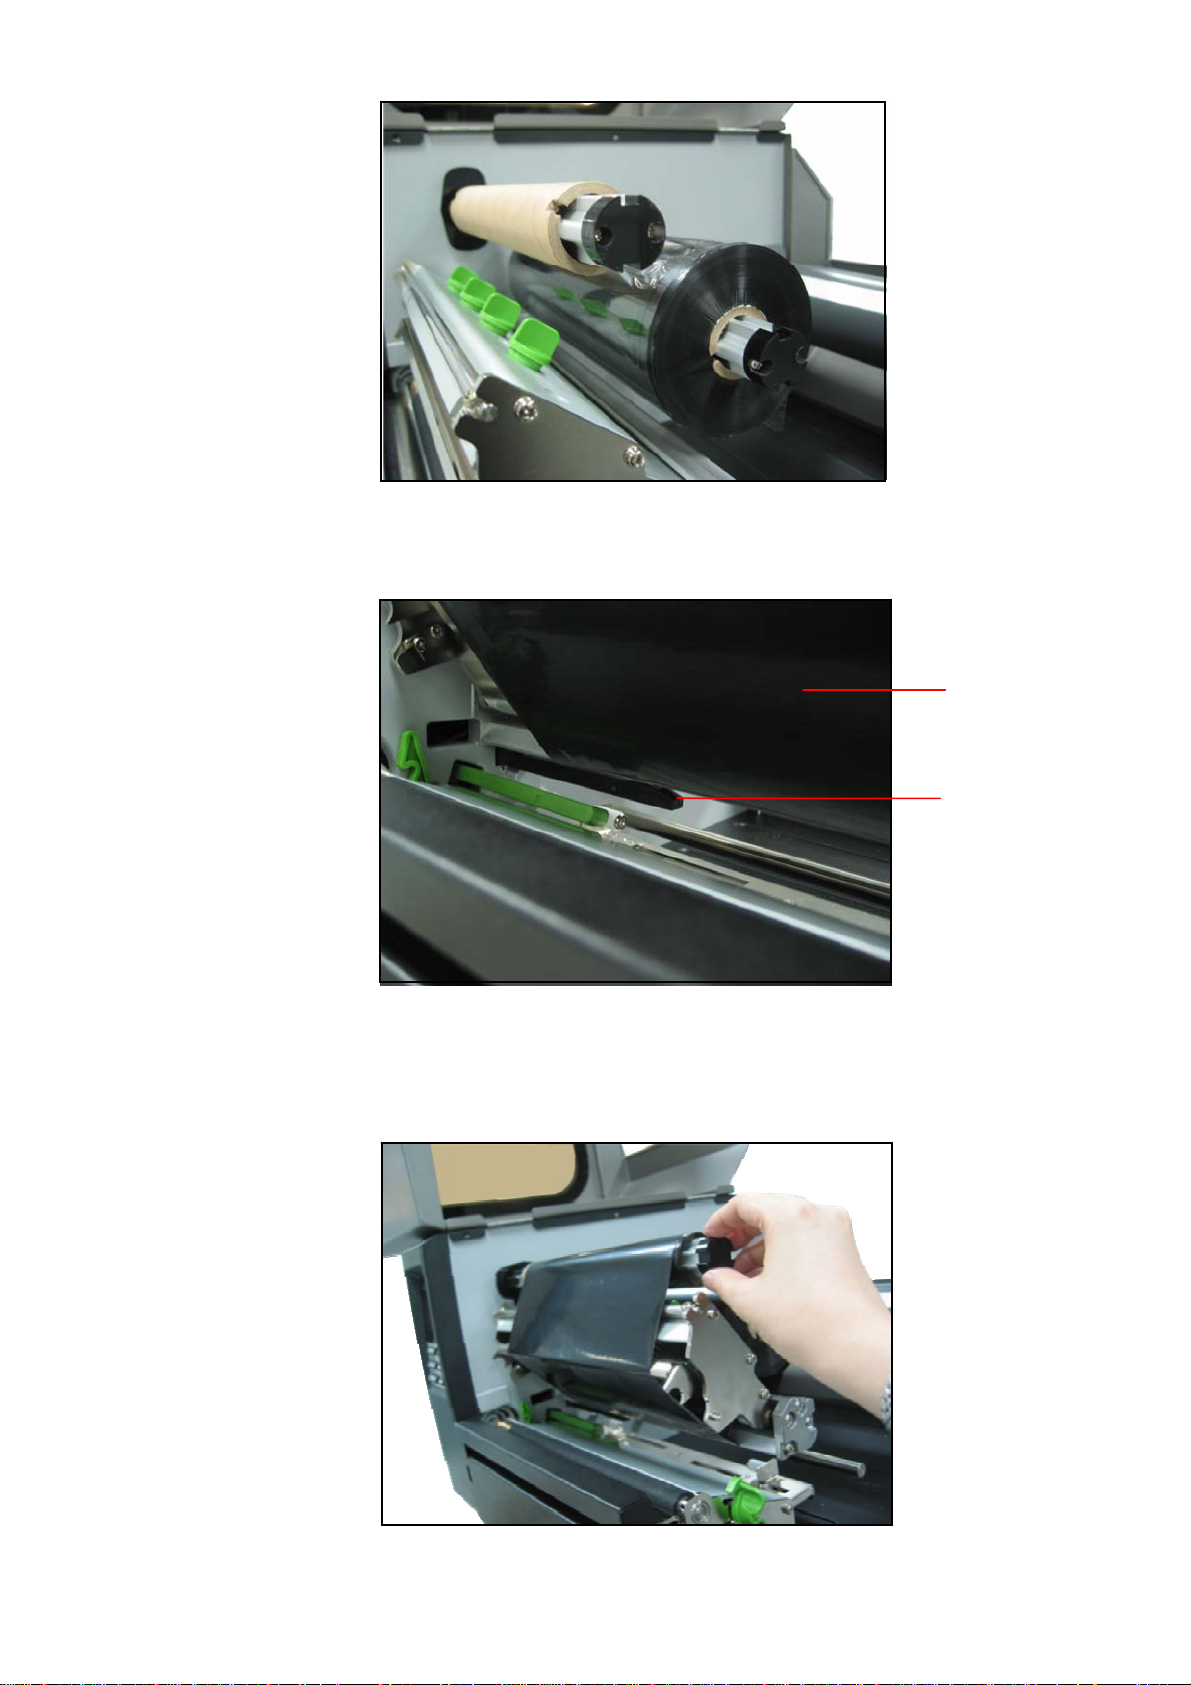
5. Thread the ribbon through the ribbon sensor slot and then through the open space in
between print head and platen.
Ribbon
Ribbon
sensor
5. Stick the ribbon onto the ribbon rewind paper core. Keeping the ribbon flat and
without wrinkles.
6. Wind the ribbon clockwise about 5~10 circles onto the ribbon rewind spindle until it
is smooth and properly stretched.
10

7. Close the print head mechanism making sure the latches are engaged properly.
11
2.6 Installation of Media
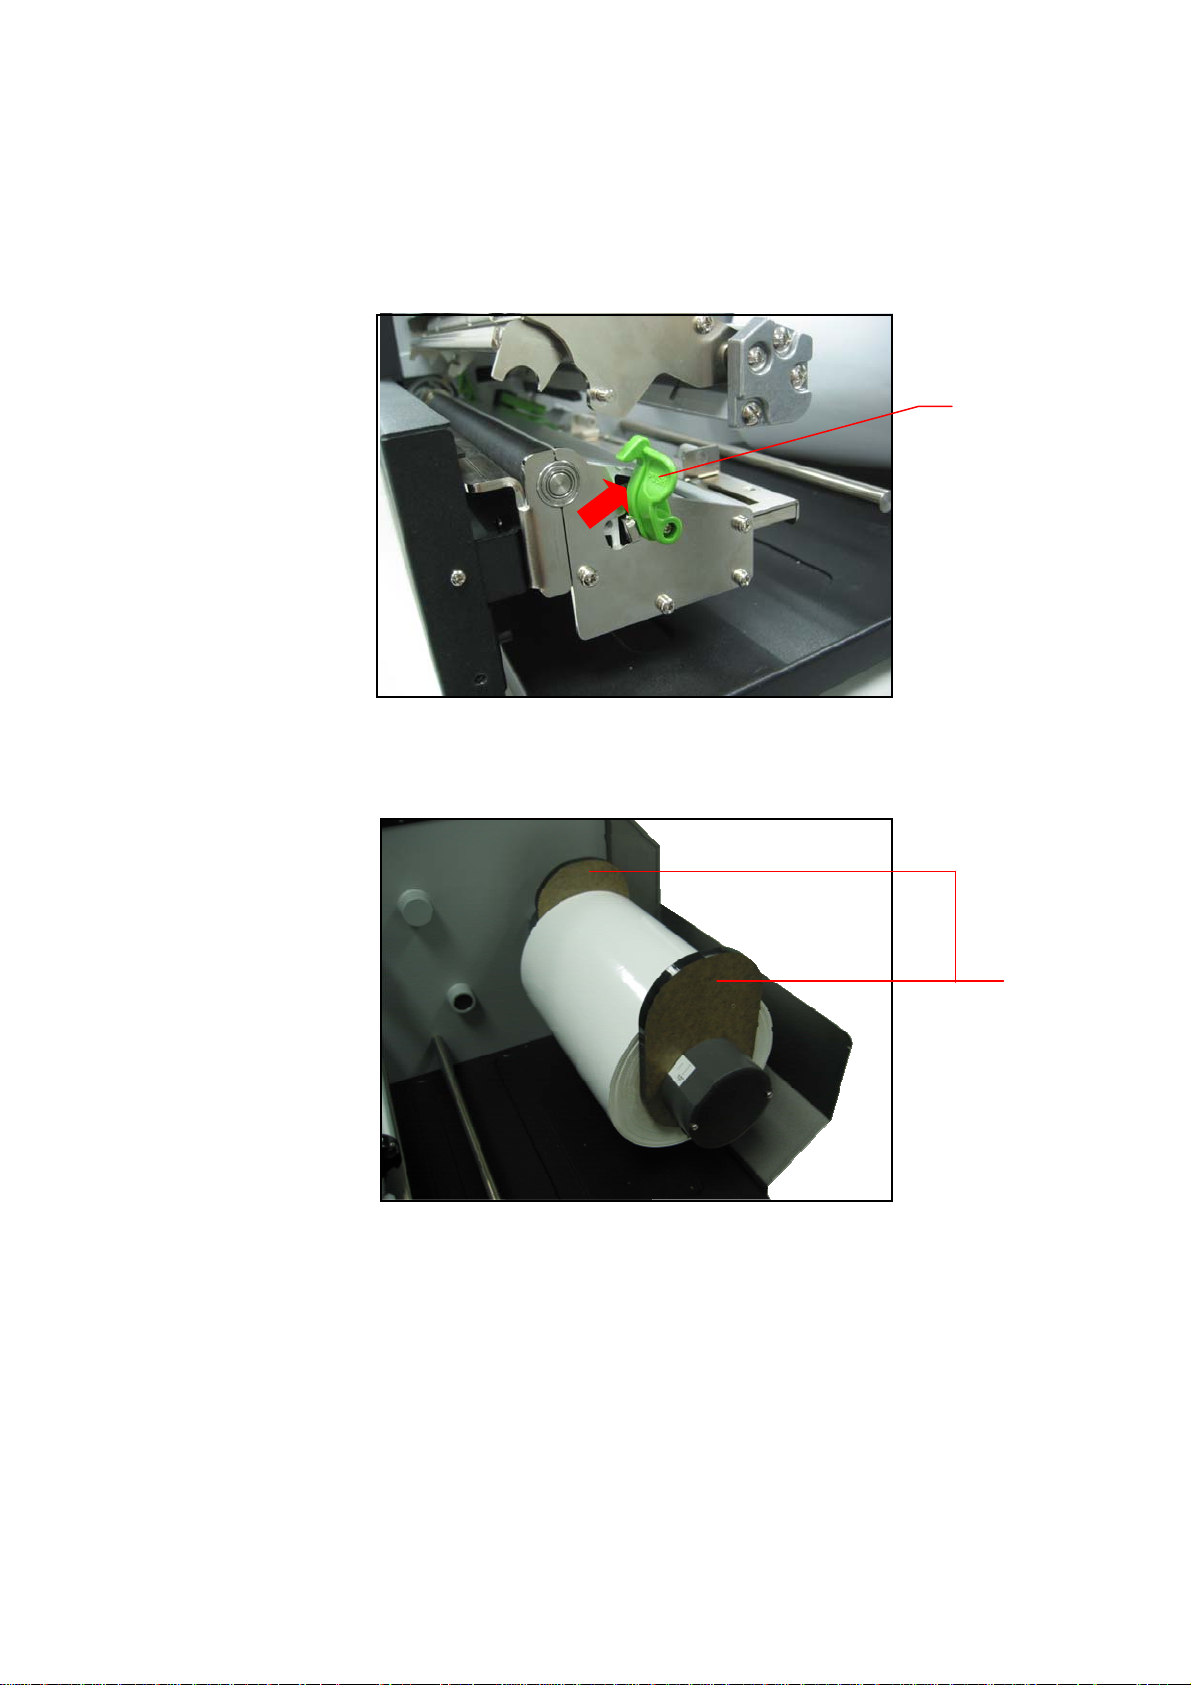
2.6.1 Loading Roll Labels
1. Lift open printer right side cover.
2. Push the print head release lever to open the print head mechanism.
2. Insert a media holder guide and a roll of media into the label supply spindle.
Print head
release lever
3. Place another media holder guide into the label supply spindle and make sure the
media is set on the center of spindle.
Media holder
guide
4. Pull label roll leading edge forward through the media guide bar, label guide, media
sensor and place the label leading edge onto the platen roller.
12
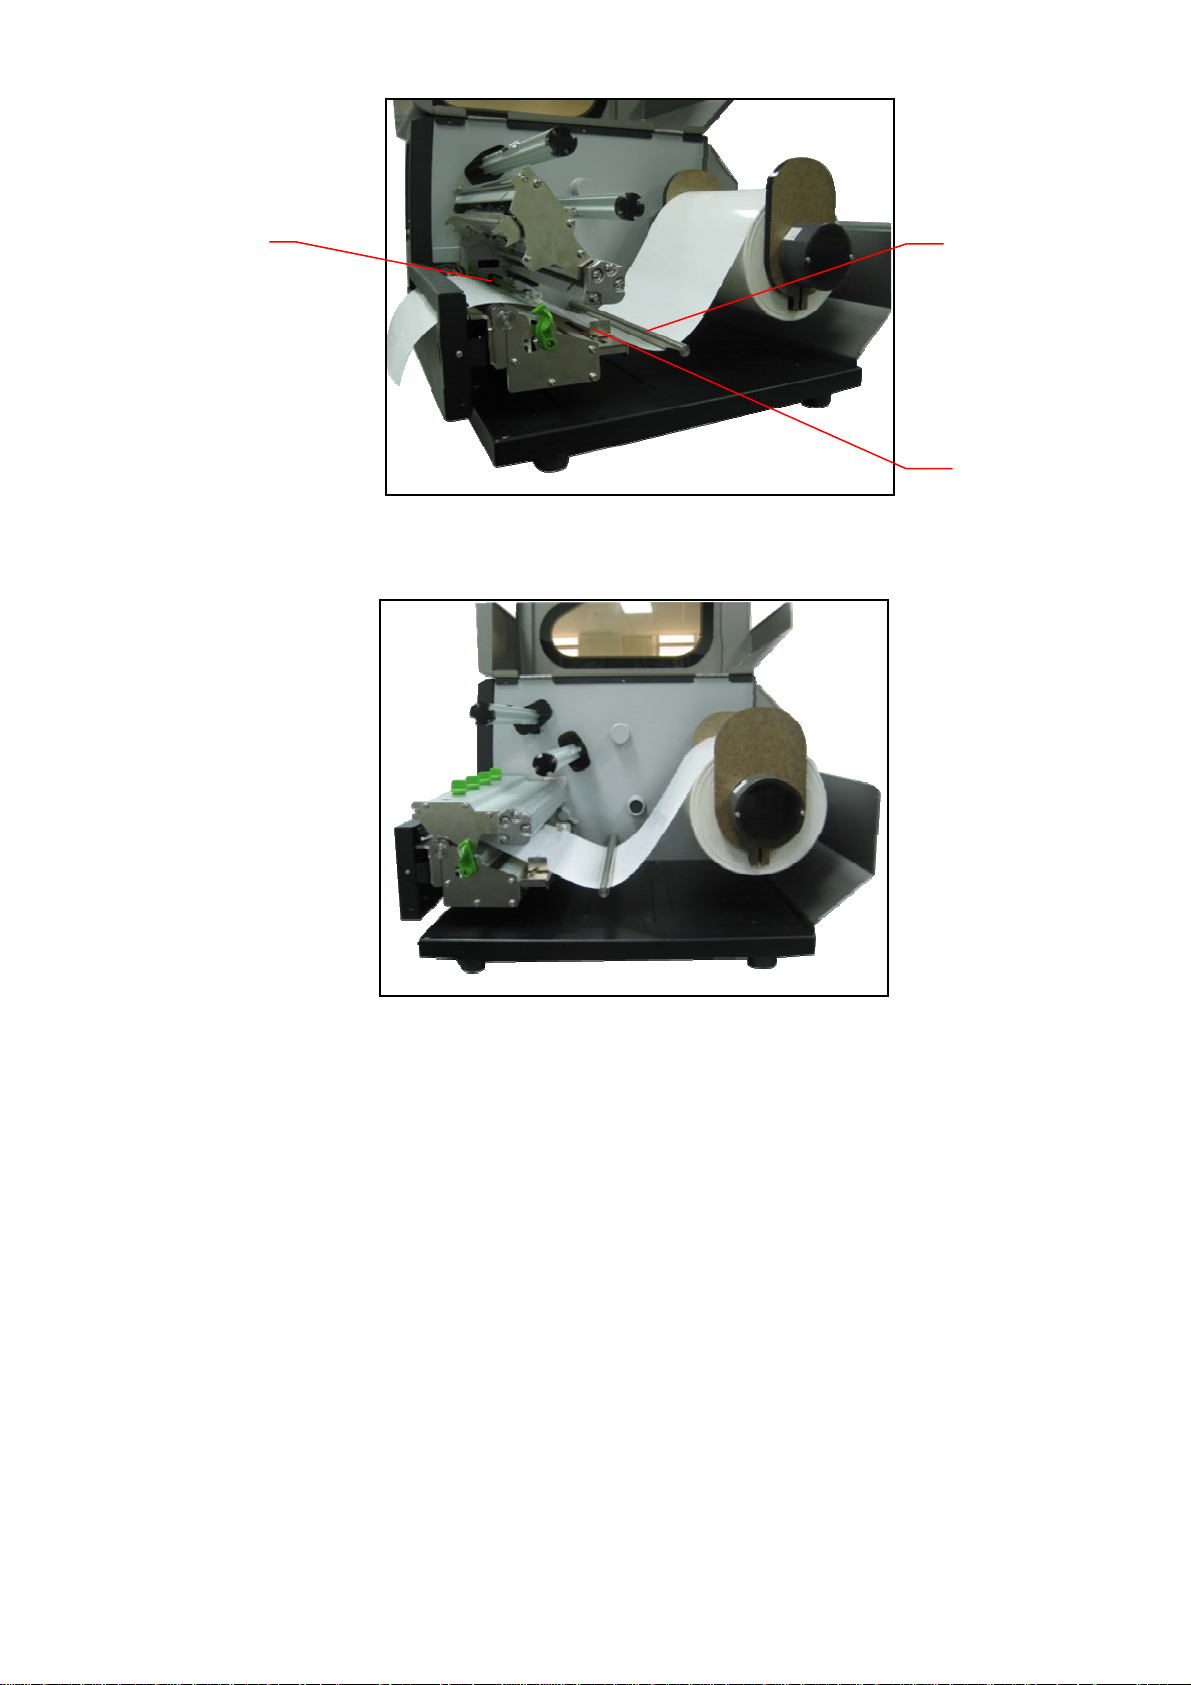
Media sensor
Media guide bar
Label guide
5. Adjust the label guide to fit the width of the label.
6. Close the print head mechanism making sure the latches are engaged properly.
7. Using the front display panel, set the media sensor type and calibrate the selected
sensor.
Note: Please calibrate the gap/black mark sensor when changing media.
13

3. Menu Function
Avail
Main Menu Overview
Main Menu
Setup File Manager Diagnostics Language Serv ice Exit
↓↓↓ ↓↓
Printer Setup File List Print Config. English
↓↓↓ ↓
Sen sor
↓↓↓ ↓
Serial Comm. Del. All Files Ro tate Cutter Chinese(SC) Exit
↓↓↓ ↓
*Ethernet Exit
↓↓
Exit
.
Dump Mode Chinese(TC)
Exit
Japanese
German
↓
Italian
↓
French
↓
Russian
↓
Polish
↓
Spanish
↓
Exit
Initialization
↓
Mileage Info.
↓
Notice:
* The Ethernet function is available for TTP-2410M series only and option for TTP-246M
Plus series.
* Ethernet function is available on the LCD display when Ethernet card is installed.
14
 Loading...