

Page 1

g
Dual counting Scales
JC series
User’s
uide
UGJC-E1.00
Page 2

Page 3

JC series dual counting scale user’s guide
- i-
Page 4

JC series dual counting scale user’s guide
CONTENTS
SECTION 1 INTRODUCTION.............................................……………......................1
SECTION2 TECHNICAL SPECIFICATIONS ...................……...............................2
2.1 SPECIFICATIONS FOR THE LOCAL SCALE................………............................ 2
2.2 SPECIFICATIONS FOR THE REMOTE SCALE ..............……........................... 2
2.3 COMMON SPECIFICATIONS ............................................……......................... 2
SECTION3 INSTALLATION........................................………..................................... 3
3.1 LOCATING THE SCALES .............………............................................................ 3
3.2 SETTING UP THE SCALES...............………........................................................ 3
3.2.1 Setting up the local scale...............………........................................................ 3
3.2.2 Setting up the remote scale...............………....................................................... 4
3.2.3 Remote scale connection...............………........................................................ 4
3.2.4 Remote scale setup.……..............………....................................................…...4
SECTION4 KEY DESCRIPTIONS ..............................……....................................…..6
SECTION5 DISPLAYS...................................................…..................................…....7
5.1 WEIGHT WINDOW ......................................…...............................................…... 7
5.2 UNIT WEIGHT WINDOW...............................…..........................................…......7
5.3 COUNT WINDOW.............................................…..........................................…....7
SECTION6 OPERATION .........................................….......................................……..8
6.1 ZEROING AND TARING THE DISPLAY ...........................……..........................8
6.1.1 Zeroing ........…………………………………………..........……..........................8
6.1.2 Taring ......…………………………………..……………........……..........................9
6.1.3 Taring the remote scale................…………………….........……..........................9
6.2 MEMORY FUNCTIONS...............................................….................................... 10
6.2.1 Manual accumulation .................................................….................................. 10
6.2.2 Automatic accumulated total.....................................……................................. 10
6.3 PARTS COUNTING.........................................................…................................ 10
6.3.1 Weighing a sample to determine the Unit Weight .....……............................... 11
6.3.2 Entering a known Unit Weight ......................................…............................... 11
6.3.3 Automatic update of unit weight....................................….............................. 11
- ii -
Page 5

JC series dual counting scale user’s guide
6.3.4 Count pre-set or check-weighing ......................................…............................ 12
6.4 PLU (Product Look Up)............................................................…...................... 12
6.4.1 Storing PLU’s manually.....………………………………………........................ 13
6.4.2 Entering description manually..........................……………...................... 14
6.4.3 Recalling PLU’s manually..............................………………............................ 14
SECTION7 PARAMETERS................................................................................... 16
7.1 USER PARAMETERS ........................................................….....…....................16
7.2 USER PARAMETERS SETTING TABLE ...........................….....….................... 16
SECTION8 BATTERY OPERATION..........................................…....…................... 18
SECTION9 RS-232 OUTPUT ................................................................................... 19
SECTION10 CALIBRATION ......................................................….......................... 20
SECTION11 ERROR CODES.......................................................…........................ 21
SECTION12 TECHNICAL PARAMETERS..................................…......................... 22
- iii-
Page 6

Page 7

JC series dual counting scale user’s guide
SECTION1 INTRODUCTION
The JC series offers a range of an accurate, fast and versatile counting scales that
can use one additional external platform (Remote scale) for weighing or counting of
heavier items.
These counting scales have the ability to store detailed information on the products
that are used often (PLU).
The scale can be operated using either pounds only, kilograms only or can be
switched between pounds and kilograms.
All have stainless steel weighing pan.
All the keypads are sealed, color coded membrane switches and the displays are
large easy to read liquid crystal type displays (LCD). The LCD’s are supplied with a
backlight.
All units include automatic zero tracking, audible alarm for pre-set weights, pre-set
tare and an accumulation facility that allows the count to be stored and recalled as
accumulated total.
The scales have an expanded bi-directional RS-232 interface for communication with
a PC or printer.
- 1-
Page 8
JC series dual counting scale user’s guide
SECTION2 TECHNICAL SPECIFICATIONS
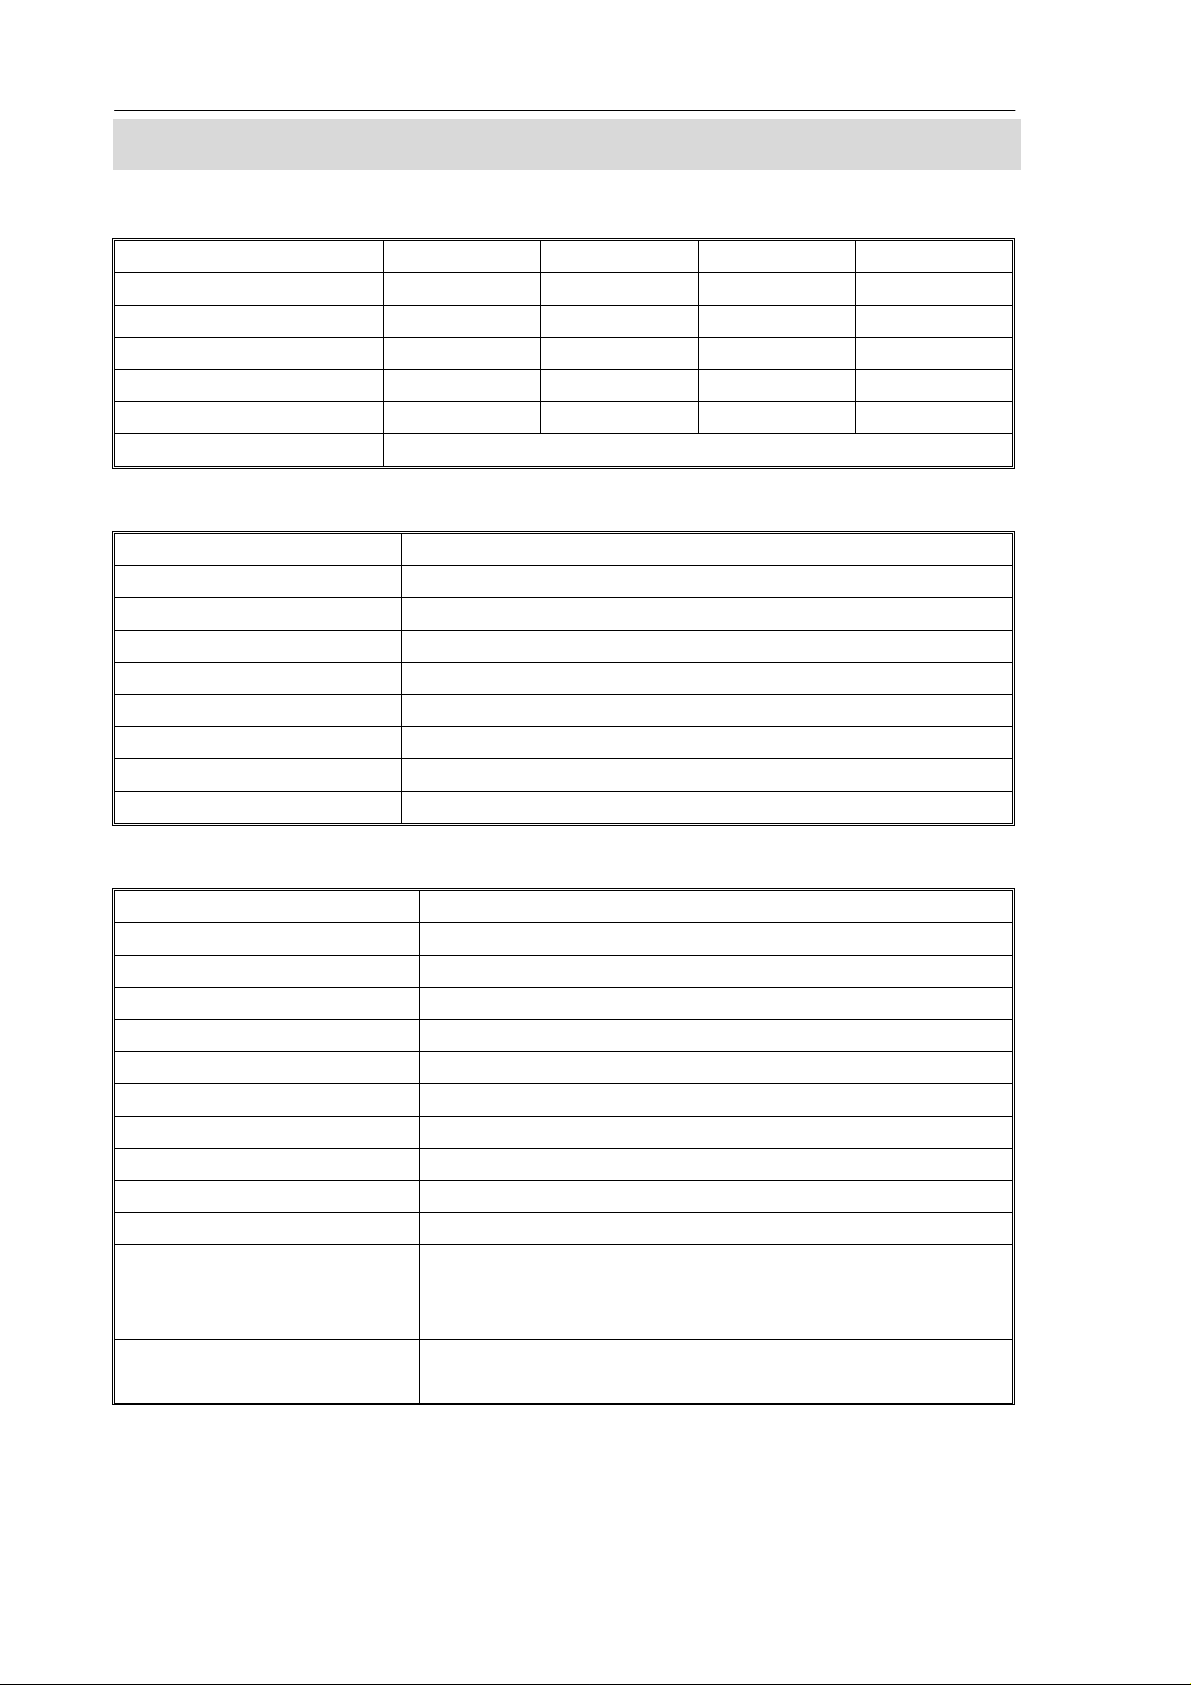
2.1 SPECIFICATIONS FOR THE LOCAL SCALE
Model JC 6 JC 15 JC 30 JC 45
Maximum Capacity 6000 g 15 kg 30 kg 45 kg
Readability 0.2 g 0.5 g 1 g 1 g
Tare Range -6 kg -10 kg -30 kg -45 kg
Repeatability(Std Dev) 0.2 g 0.5 g 1 g 1 g
Linearity ± 0.4 g 1 g 2 g 2 g
Units of Measure lb, kg
2.2 SPECIFICATIONS FOR THE REMOTE SCALE
Excitation voltage 5 VDC
Signal range 0-20 mv(allows 3 mv/v LC with 5mv zero offset)
Zero range 0-5 mv
Sensitivity 0.02 µv/internal ADC count or better
Internal ADC counts 500,000 maximum at 10 mv input
Load 87 ohm minimum, 4 X 350 ohm load cells
Connection 4 wire connection to load cells plus shield
Maximum cable length 6 meters
Termination 9 pin d-subminiature plug on scale
2.3 COMMON SPECIFICATIONS
Interface Bi-directional RS-232 Interface
Stabilisation Time 2 Seconds
Operating Temperature 0°C - 40°C (32°F - 104°F)
Power supply 9 VDC 800 mA from external power supply
Calibration Automatic external
Display 3 x 6 digits LCD digital display
Housing Indicator ABS Plastic, Stainless Steel pan
Pan size 240 x 360mm
Overall dimensions 375 x 360 x 135mm
Net weight 5kg
Applications Counting Scale
Functions Weighing, parts counting, accumulating memory,
preset count with alarm, up to 100 PLUs with
description, unit & tare weight
Other Features and Specs Accuracy enhancement for parts counting,
internal rechargeable battery
- 2 -
Page 9
JC series dual counting scale user’s guide
SECTION3 INSTALLATION
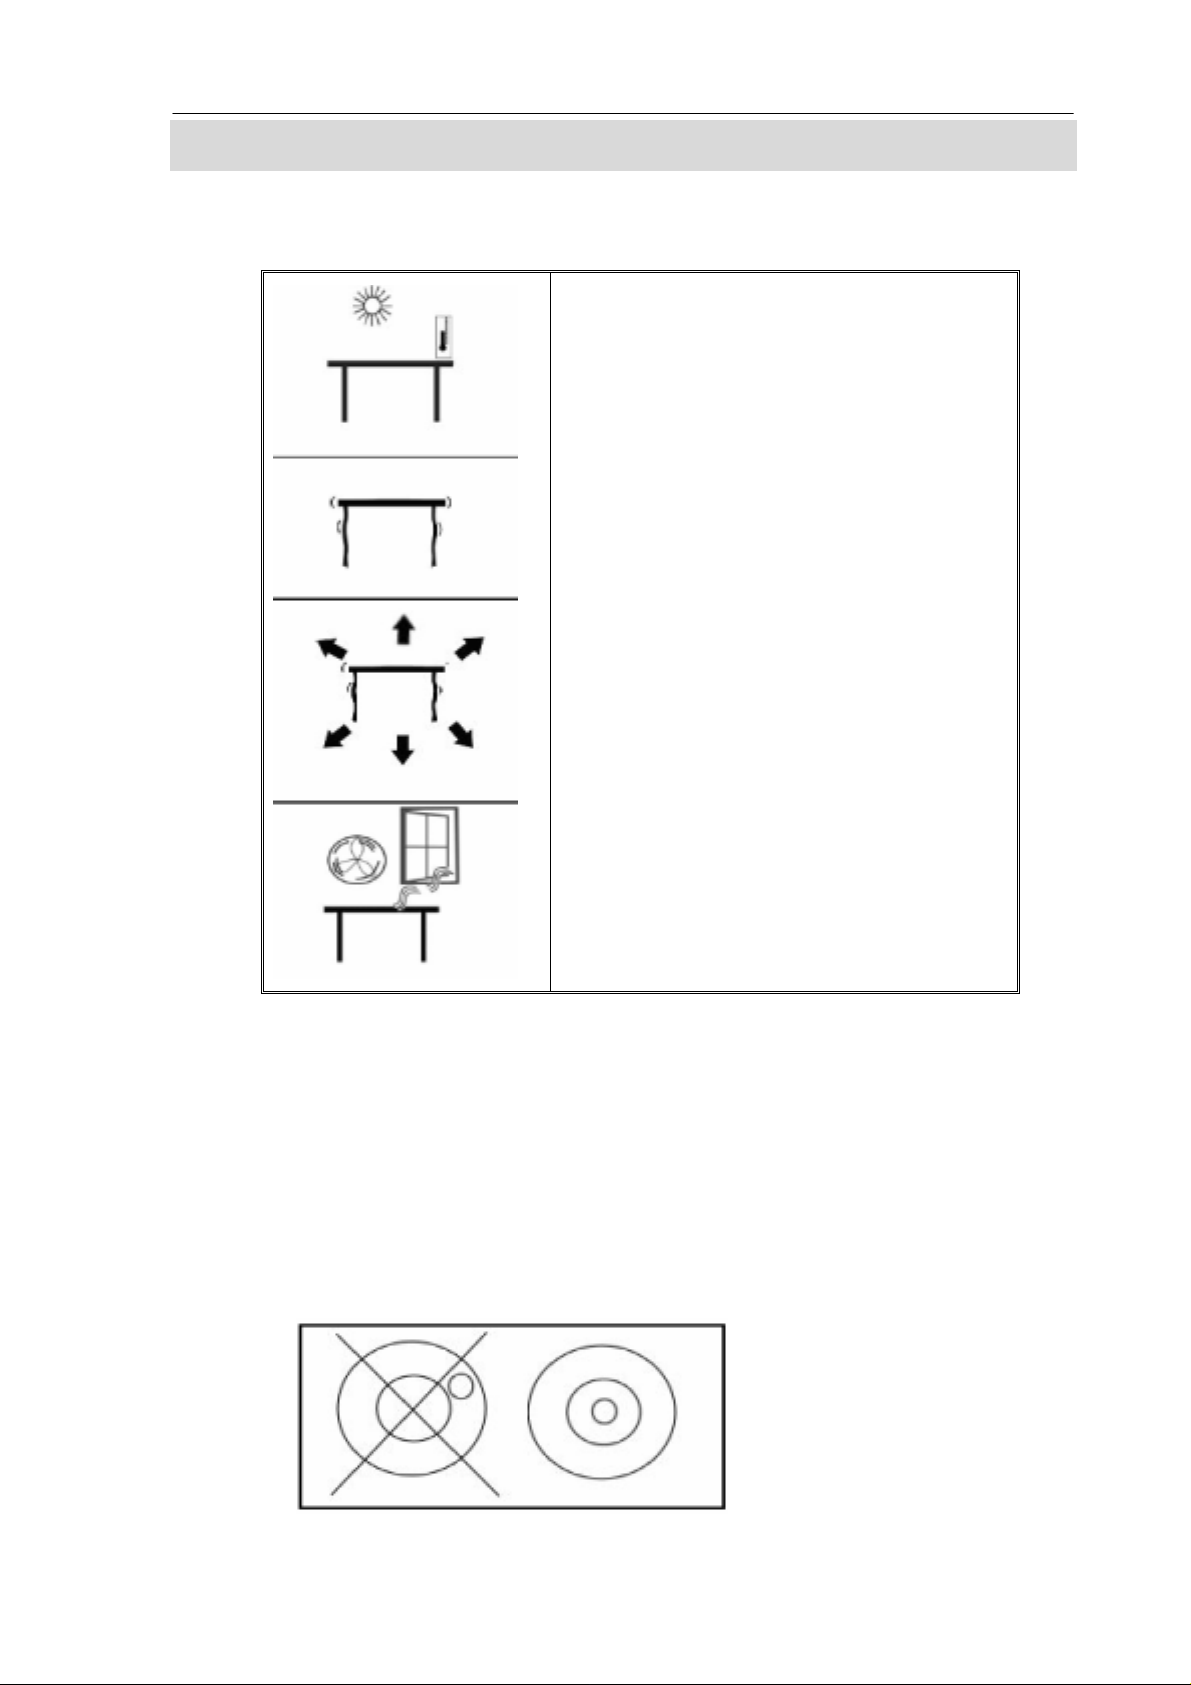
3.1 LOCATING THE SCALES
• The scales should not be placed in a
location that will reduce the accuracy.
• Avoid extremes of temperature. Do not
place in direct sunlight or near air
conditioning vents.
• Avoid unsuitable tables. The table or
floor must be rigid and not vibrate.
• Avoid unstable power sources. Do not
use near large users of electricity such as
welding equipment or large motors.
• Do not place near vibrating machinery.
• Avoid high humidity that might cause
condensation. Avoid direct contact with
water. Do not spray or immerse the
scales in water.
• Avoid air movement such as from fans or
opening doors. Do not place near open
windows or air-conditioning vents.
• Keep the scales clean. Do not stack
material on the scales when they are not
in use.
3.2 SETTING UP THE SCALES
3.2.1 SETTING UP THE LOCAL SCALE
• The JC Series comes with a stainless steel platform packed separately.
• Place the platform in the locating holes on the top cover.
• Do not press with excessive force as this could damage the load cell inside.
• Level the scale by adjusting the four feet. The scale should be adjusted such that the
bubble in the spirit level is in the center of the level and the scale is supported by all
four feet.
- 3-
Page 10
JC series dual counting scale user’s guide
• Attach the power supply cable to the connector on the right side of the scale base.
Plug in the power supply module. The power switch is located at the right side of the
scale base.
• The scale will show the model number in the “Weight” display window (JC 15- where
15 denotes the maximum capacity of the scale in Kg) and the current software
revision numbers in the “Unit Weight” display window .
• Next a self-test is followed. At the end of the self-test, it will display “0” in all three
displays, if the zero condition has been achieved.
3.2.2 SETTING UP THE REMOTE SCALE
• The JC Series can be connected to any size of load cell type weighing base via the
Remote scale port on the left side of the scale case. Ensure you have the correct base
for the scale as each is matched for calibration.
• Place the remote scale platform in the position where it is to be used. Level the scale
by adjusting the four feet. If fitted with a spirit level then it should be adjusted such that
the bubble is in the center.
• Press Local/Rem key and test weighing performance.
3.2.3 REMOTE SCALE CONNECTION
The cable for the load cell goes to a 9 pin d-subminiature plug connector with the
following connections:
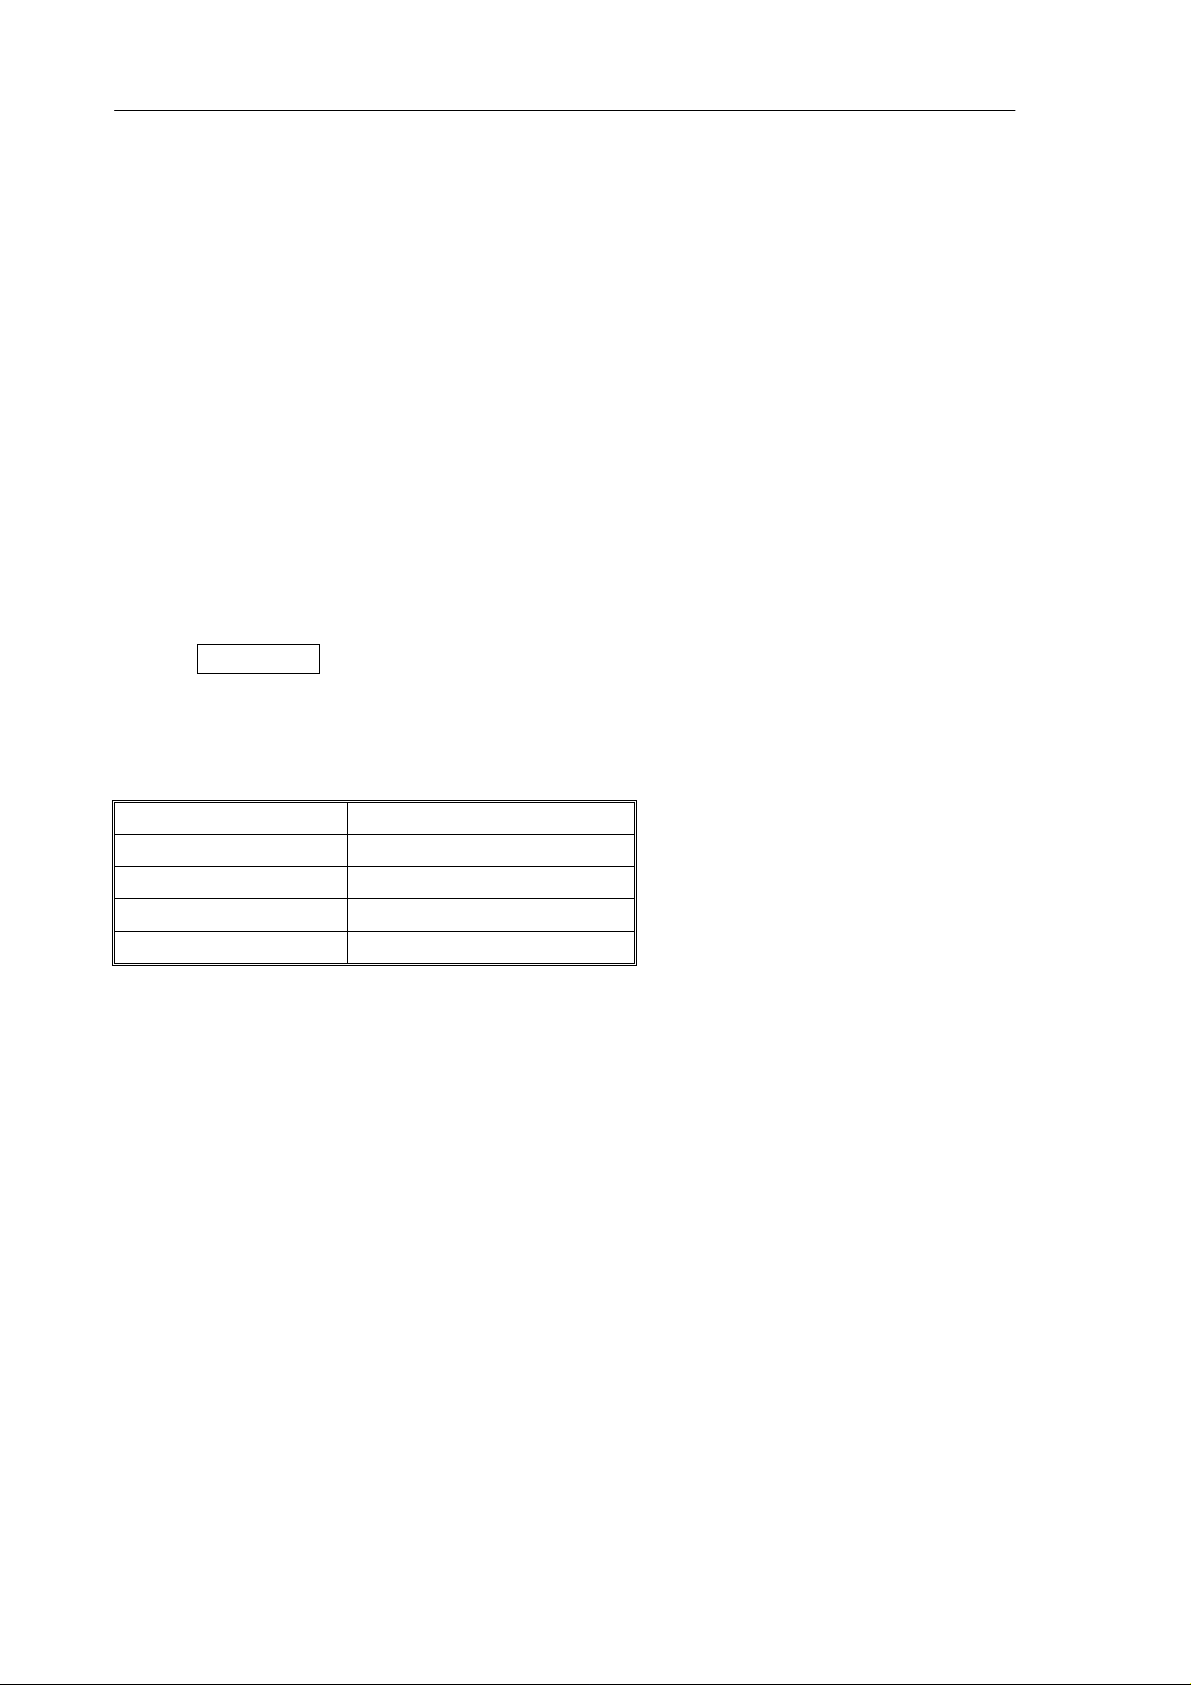
Pin numbers Connection
Pins 1,2 Excitation+(5V)
Pins 4,5 Excitation- (0v)
Pin 7 SignalPin 8 Signal+
(The sense wires connections of a six wire load cell are not used but can be
connected to the respective Excitation pins).
3.2.4 REMOTE SCALE SET UP
The remote scale should set for a realistic resolution with respect to the input provided
by the load cell/s.
If a single 2mV/V load cell is fitted and more than 60% of the load cell is used for full
capacity then the high output of >6mV span makes it possible to set a high resolution.
If this criterion is met then the remote scale can be set to a high resolution with a
maximum of 1/30,000, for example: 300kg x 10g.
It will also be possible to sample on the remote scale with the same accuracy as the
Local.
Where more than one load cell is fitted or the total load cell capacity is not utilised then
a reduced resolution should be selected in the remote scale technical set up. For
example, if a system uses four 2mV/V 1000kg load cells for a scale of 1000kg
- 4 -
Page 11

JC series dual counting scale user’s guide
capacity then the span output at full scale will be only 2.5mV.
In this situation the resolution should be reduced to give a good number of ADC
counts per displayed division, for example, set to 1:5000 or 1000kg x 0.2kg.
Setting a high resolution without providing a good input to the remote scale ADC will
not give better accuracy and may make the scale difficult to meet performance
specification.
For best performance ensure a minimum of 0.1uV/d.
- 5-
Page 12
JC series dual counting scale user’s guide
SECTION4 KEY DESCRIPTIONS
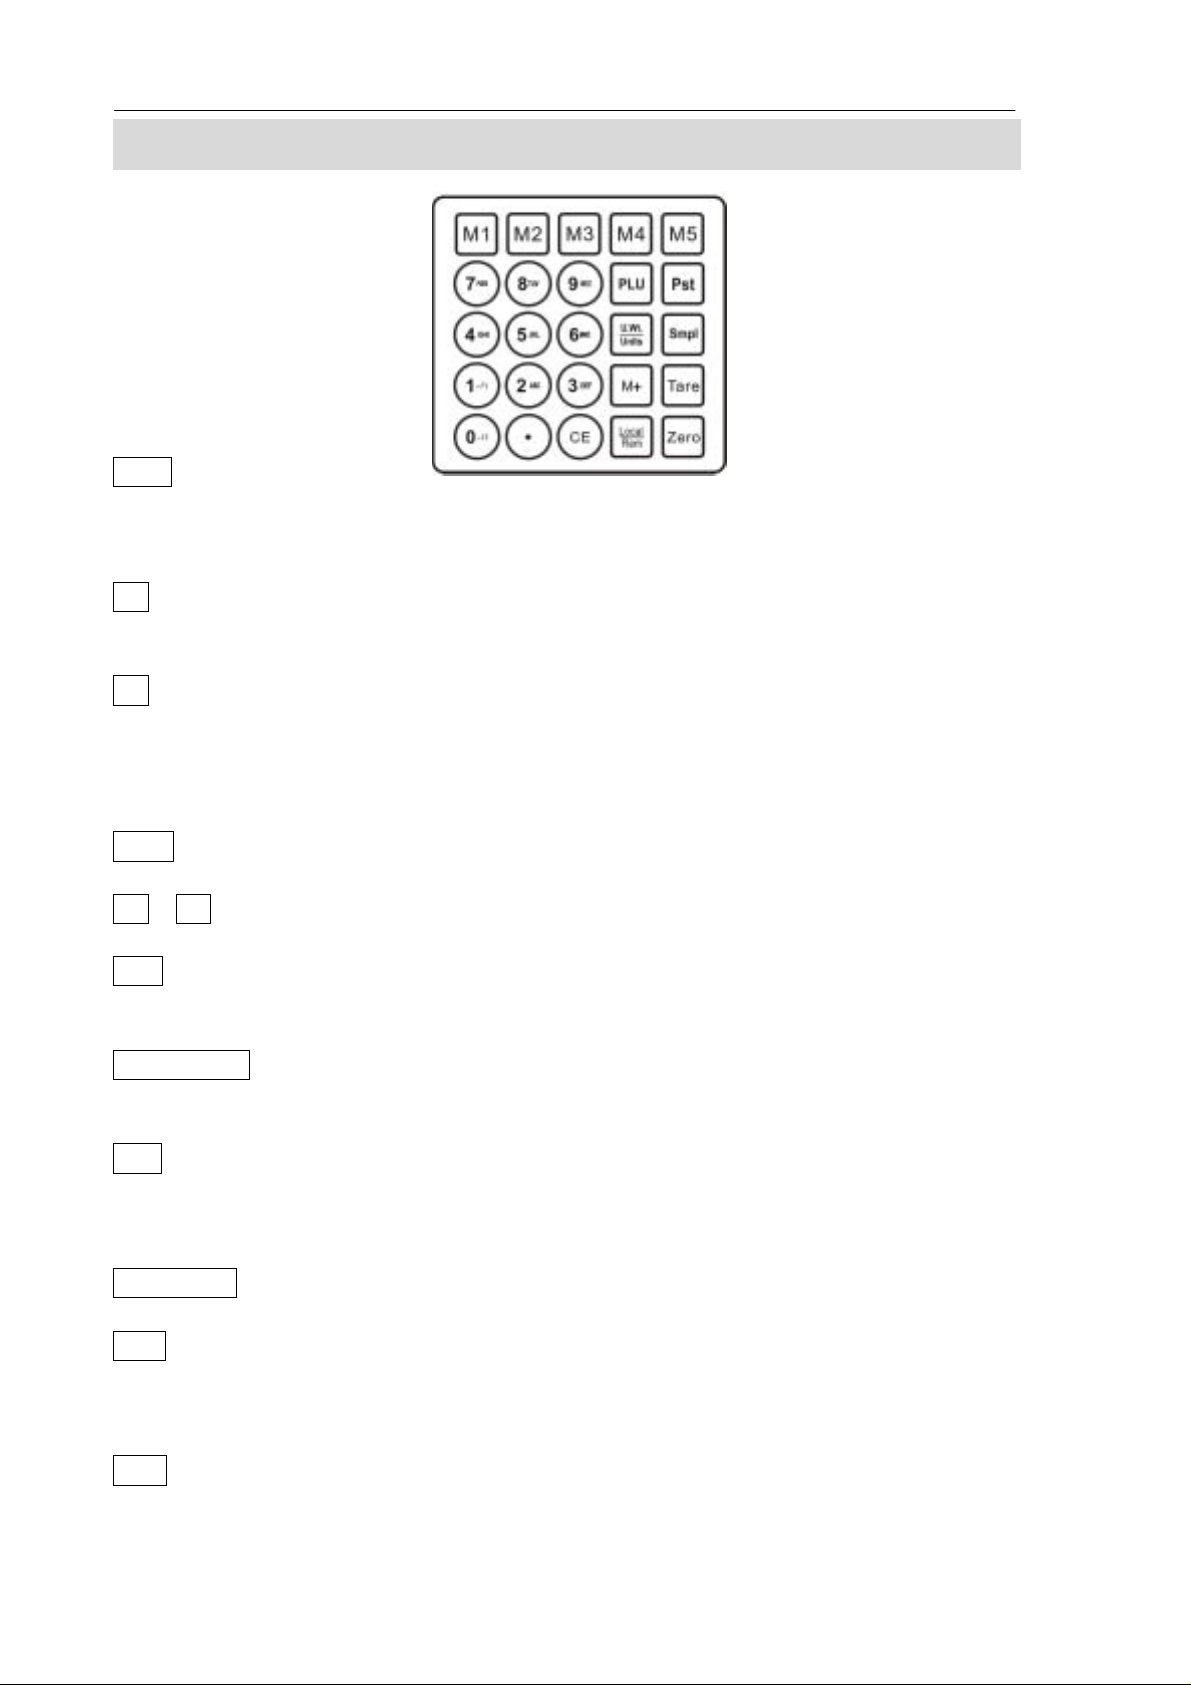
0-9, •
These keys are used to manually enter a value for tare weights, unit weight and
sample size. A secondary function is to enter alpha-numeric characters for PLU
descriptions etc.
CE
Pressing this key clears the unit weight or an erroneous entry. It also clears the
memory accumulation when the total is displayed.
M+
This key is used to add the current count to the accumulator. It also recalls the
memory when pressed with no load on the scale. Up to 99 values or full capacity of
the weight display can be added. Also prints the displayed values when Auto print is
switched off.
Smpl
This is used to enter the number of items of a sample.
M1 ~ M5
Direct PLU key. To store and recall the Piece Look Up sample information quickly.
PLU
To store and recall the Piece Look Up sample information. 100 PLUs with description,
unit & tare weight.
U. Wt./Units
This key is used to enter the weight of a sample manually. It will also change the
weighing units when other units are enabled.
PST
To set the upper limit for the number of items counted. When this upper limit is
exceeded the scale will sound the beeper. A secondary function is to use it for the
backlight control setting.
Local/Rem
This key is used to select the local or remote scale.
Tare
tares the scale by storing the current weight in the memory as a tare value,
subtracting the tare value from the total weight and displaying the results as a net
weight.
Zero
sets the zero point for all subsequent weighing by setting the display to zero.
- 6 -
Page 13
JC series dual counting scale user’s guide
SECTION5 DISPLAYS
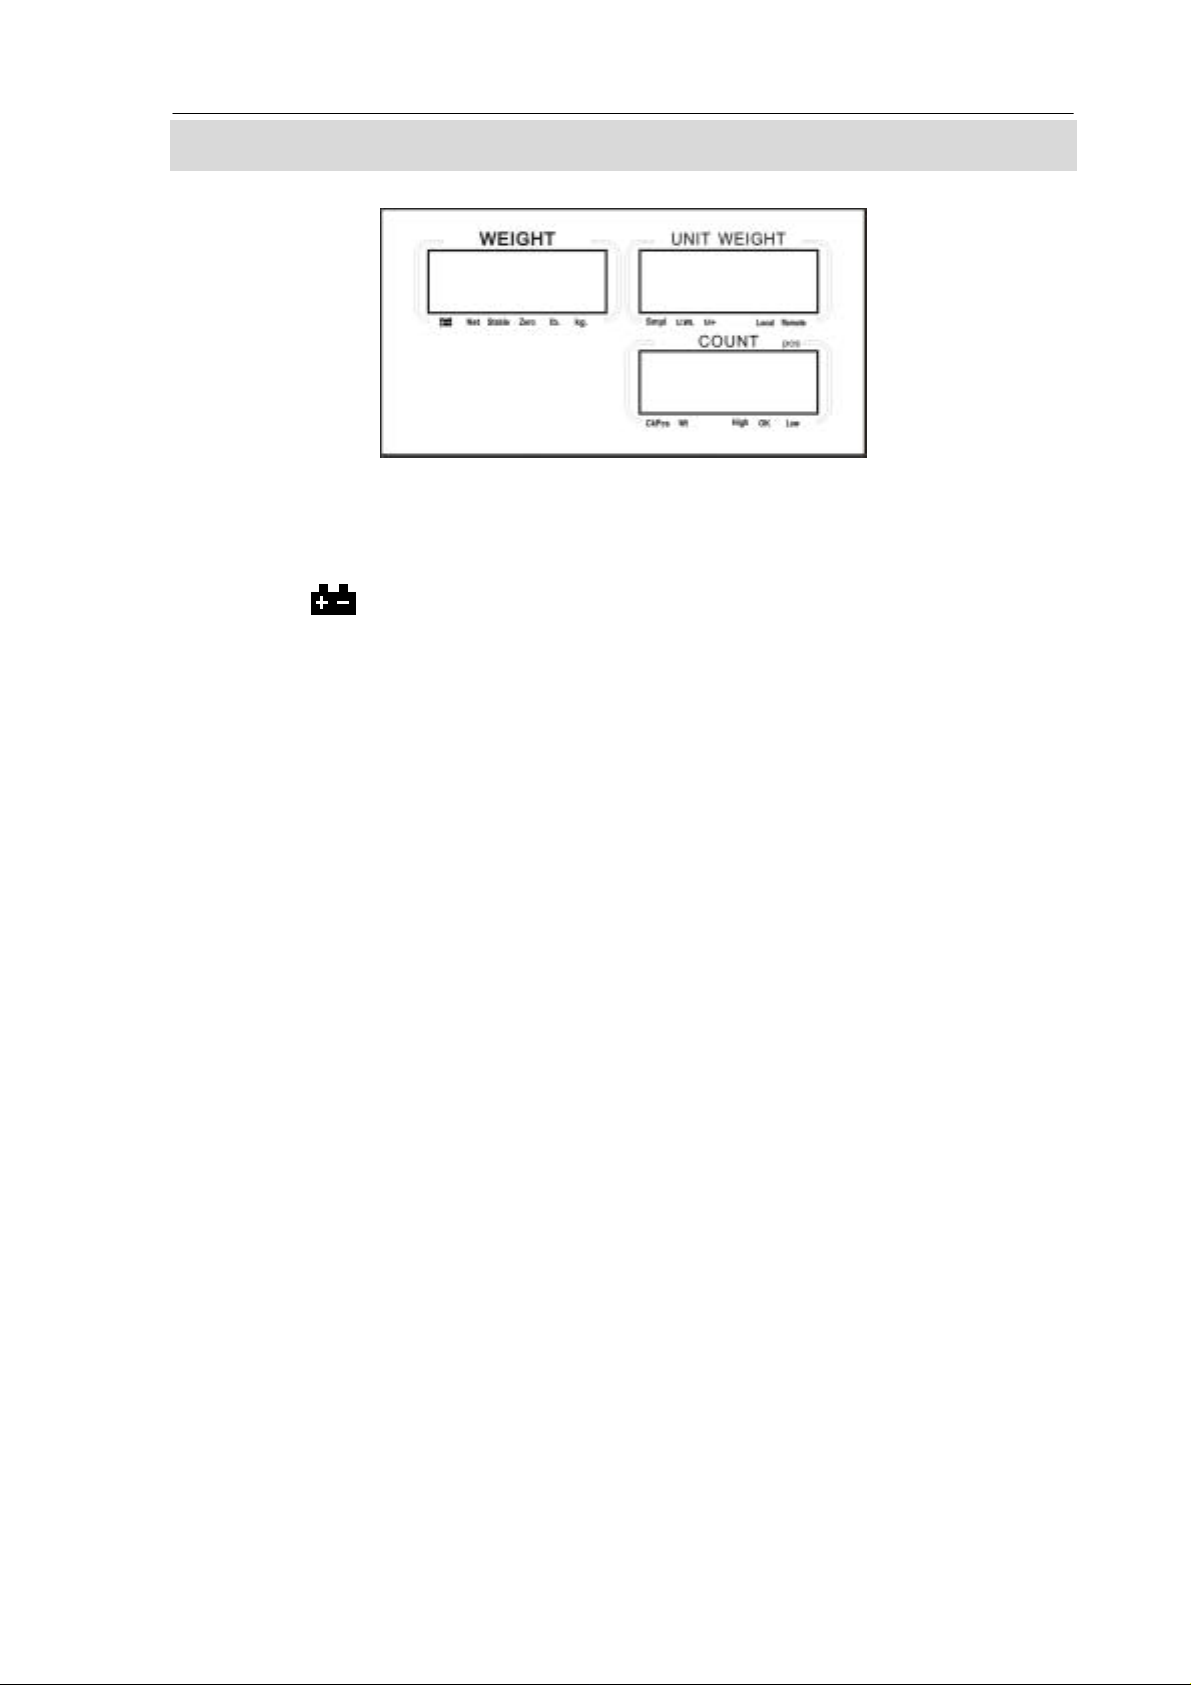
The scales have three display windows- Weight, Unit Weight and Count.
5.1 WEIGHT WINDOW
This consists of a 6 digit display to indicate the weight on the scale.
An arrow above the symbols will indicate the following:
Low battery,
Net Weight Display, "Net"
Stability indicator, “Stable”
Zero indicator, “Zero”
Unit in use indicator, “Lb” or “Kg”
5.2 UNIT WEIGHT WINDOW
• This display will show the unit weight of a sample. This value is either entered by the
user manually or computed by the scale. The unit of measure is either gram on all
scales with kilogram selected as weighing unit or in pounds.
• When the scale has determined that there is insufficient number of samples to
accurately determine the count, an arrow will be shown above "Smpl".
• When the unit weight is not large enough to determine an accurate count, the arrow
will show at "U.Wt".
• When a value has been entered into the memory, the arrow above "M+" will be on.
• In both the cases the scale continues to operate and the indicators are to alert the
user of a potential problem.
5.3 COUNT WINDOW
• This display will show the number of items on the scale or the value of the
accumulated count. See the OPERATION section.
• An arrow above the symbols will indicate the following:
Checkweighing is active during counting, "Ck Pcs"
Checkweighing is active during weighing, “Ck Wt”
Checkweighing is active, result is above the High Limit, “High”
Checkweighing is active, result is between the Low and High Limit, “OK”
Checkweighing is active, result is below the High Limit, “Low”
• Just under the “WEIGHT” display is an LED to indicate the status of the battery
charging. When the scale is plugged into the main power the internal battery will be
charged. If the LED is green, the battery has a full charge. If it is red, the battery
requires further charging and yellow indicates the battery is being charged.
- 7-
Page 14

JC series dual counting scale user’s guide
SECTION6 OPERATION
• The basic weighing functions are same for both the scales- local and remote.
However the number of weighing divisions may be less on the remote scale
dependant on the total capacity of the load cell/s used.
• Each scale (local or remote) has the ability to count parts based on the current unit
weight. This is best obtained by performing a sample on the local scale which may
have the best sensitivity. Then the scale can be switched to the remote where large
quantities can be counted.
• Each scale has a separate tare value that can be entered through the keypad or by
placing a weight on the platform and pressing the Tare key. The tare value for each
scale is retained as the user switches between the remote and local scales.
• Either scale can be used to determine a unit weight.
• When the scale is switched from local to remote, a clear display will be shown to
identify the change and the scales will count based on the tare and unit weight
currently in use for the scale selected. Display for the change is:
“chAngE” ”LocAL“ and “chAngE” ”remotE “, The display will be based on the 7
segment interpretations, some of letters are shown later.
• The switch from local scale to remote scale should be possible at any time by
pressing the Local/Rem key or if the user enables the function it can happen anytime
the weight on the remote scale changes from negative value or zero to a positive
value greater than 50d.
NOTE: For frequently used items, counting is made easier by using PLU numbers
(Product Look Up). Up to 100 PLU’s can be stored and recalled. See section 6.4 on
PLU for details. Place the item on the pan and enter using the keypad “PLUxx” (where
xx is the PLU number associated with that item). The scale will display the Total
Weight, Unit weight and the Count of the item in the respective windows.
6.1 ZEROING AND TARING THE DISPLAY
When the gross weight is within ±2% of the zero, set at power on for either scale
then a new zero is set. If the gross weight is greater than ±2% then the tare
function is performed.
6.1.1 ZEROING
• You can press the Zero key at any time to set the zero point from which all
other weighing and counting is measured. When the zero point is obtained the
Weight display will show the indicator at “Zero”.
• The scale has an automatic re-zeroing function to account for minor drifting or
accumulation of material on the platform. However you may need to press the
Zero to re-zero the scale if small amounts of weight are still shown even when
the platform is empty.
- 8 -
Page 15

JC series dual counting scale user’s guide
6.1.2 TARING
Select the local or remote scale as applicable by pressing the Local/Rem key.
Preset tare values can be used with both the local and remote scale. If a new tare
value is to be used, there are two methods for entering a tare value. The first method
uses the weight on the platform and the second uses a value to be entered by the
user.
First method of entering a tare value:
• Zero the scale by pressing the Zero key, if necessary. The arrow indicator
over “Zero” will be on.
• Place a container on the platform, a value for its weight will be displayed.
• Press the Tare key to tare the scale. The weight that was displayed is stored
as the tare value and that value is subtracted from the display, leaving zero on
the display. The arrow over "Net" will be on. As product is added only the net
weight of the product will be shown. The scale could be tared a second time if
another type of product was to be added to the first one. Again only the weight
that is added after taring will be displayed.
• When the container is removed a negative value will be shown. If the scale
was tared just before removing the container this value is the gross weight of
the container plus all products that were removed. The zero indicator will also
be ON because the platform is back to the same condition as it was when the
Zero key was last pressed.
Second method of entering a tare value:
• This method allows you to enter a value for the tare weight from the keypad.
This is useful if all containers are the same or if the container is already full but
the net weight is required and the weight of the container is known.
• Remove all weights from the platform, press the Zero key to zero the display.
• Enter the value for the Tare weight including decimal point using the keypad,
press Tare to store the tare value. The weight will show a negative value equal
to the tare.
• Place the container on the platform.
• The display will then show the weight of the container minus the tare weight.
When the full container is placed on the platform the tare value will be
subtracted from the gross weight displaying only the net weight of the contents.
• If the value input is not consistent with the increment of the scale, the scale will
round the tare value to the nearest value possible. For example, if a tare value
of 103g is entered into the 60Kg scale with 5g readability, then the display will
show -105g.
• The tare value for each scale is held in memory so that they are not lost when
the active scale changes.
6.1.3 TARING THE REMOTE SCALE
Select the remote scale by pressing the Local/Rem key and then follow the same
procedure for taring as mentioned in the above sections.
- 9-
Page 16

JC series dual counting scale user’s guide
6.2 MEMORY FUNCTIONS
The M+ key will add the results of a weighing into memory, regardless of whether the
local or remote scale is being used for the weighing.
6.2.1 Manual accumulation
• The values (weight and count) shown on the display can be added to the
values in the accumulator by pressing the M+ key. The "Weight" display will
show the total weight, the "Count" display will show the total accumulated count
and the "Unit Weight" display shows the number of times items have been
added to the accumulation memory. The values will be displayed for 2 seconds
before returning to normal.
• The scale must return to zero or a negative number before another sample can
be added to the memory.
• More products can then be added and the M+ key pressed again. This can
continue for up to 99 entries or until the capacity of the “Weight” display is
exceeded.
• To observe the total value stored, press the M+ key when the scale is at zero.
The total will be displayed for 2 seconds.
• To clear the memory, first press M+ to recall the total from the memory and
then press CE to clear all values from the memory.
6.2.2 Automatic accumulated total
• The scale can be set to automatically accumulate total when a weight is placed
on the scale. This eliminates the need to press the M+ key to store values into
the memory. However the M+ key is still active and can be pressed to store the
values immediately. In this case, the values will not be stored when the scale
returns to zero.
• See PARAMETERS Section on enabling Automatic Accumulation.
6.3 PARTS COUNTING
The basic function of parts counting is same for both the scales. In order to do parts
counting it is necessary to know the average weight of the items to be counted. This
can be done either by weighing a known number of the items and letting the scale
determine the average unit weight or by manually inputting a known unit weight using
the keypad.
Either of the scales can be used to determine the sample unit weight or for the manual
entry which can be used to count using either of the scales.
It is possible to increase the accuracy of the unit weight at any time during the
counting process by entering the count displayed and then pressing the Smpl key.
You must ensure that the quantity displayed matches the quantity on the scale before
pressing the key. The unit weight can be adjusted based on a larger sample quantity.
This will give greater accuracy when counting larger sample sizes.
- 10 -
Page 17

JC series dual counting scale user’s guide
6.3.1 Weighing a sample to determine the Unit Weight
To determine the average weight of the items to be counted place a known quantity of
the items on the scale and then enter the quantity being weighed.
The scale will then divide the total weight by the number of samples and display the
average unit weight.
• Zero the scale by pressing the Zero key if necessary. If a container is to be
used, place the container on the scale and tare as discussed earlier.
• Place a known quantity of items on the scale. After the “Weight” display is
stable enter the quantity of items using the numeric keys followed by pressing
the Smpl key. The number of units will be displayed on the "Count" display and
the computed average weight will be shown on the "Unit Weight" display.
• As more items are added to the scale, the weight and the count will increase.
• If the scale is not stable, the calculation will not be completed.
• If the weight is below zero, “Count” display will show negative count.
6.3.2 Entering a known Unit Weight
• If the unit weight is already known then it can be entered using the keypad.
• Enter the value of the unit weight using the numeric keys followed by pressing
the U. Wt. key within few seconds while the display is flashing. If no action is
initiated within a few seconds, the "Unit Weight” display will revert to the
previous value, otherwise it will show the new value that has been entered.
• The sample is then added to the scale and the weight will be displayed as well
as the quantity based upon the unit weight. When weighing in kilograms the unit
weight is shown in grams. When weighing in pounds the unit weight is shown in
pounds.
• After the unit weight has been determined or entered, the scale can be used
for parts counting. The scale may be tared to account for the net weight as
discussed in an earlier section.
• After the scale is tared, the items to be counted are added and the "Count"
display will show the number of items computed using the weight and the unit
weight.
• It is possible to increase the accuracy of the unit weight at any time during the
counting process by manually entering the sample quantity and then pressing
Smpl. Ensure that the quantity displayed matches the quantity on the scale
before pressing the key. The unit weight will be adjusted based upon a larger
sample quantity
providing greater accuracy when counting larger sample sizes.
6.3.3 Automatic update of unit weight
• The scales will automatically update the unit weight when a sample less than
the initial sample count is added. A beep will be heard when the value is
updated. It is wise to check the quantity is correct when the unit weight has been
updated automatically.
• To lock the unit weight and prevent Auto-update, press U.Wt.
• This feature is turned off as soon as the number of items added exceeds the
count used as a sample.
- 11-
Page 18
JC series dual counting scale user’s guide
6.3.4 Count pre-set or check-weighing
Check-weighing (or Count Pre-setting) is a procedure to cause an alarm to sound
when the net weight (or the number of items) on the scale meets or exceeds a number
stored in memory. The value to be stored is entered from the keyboard.
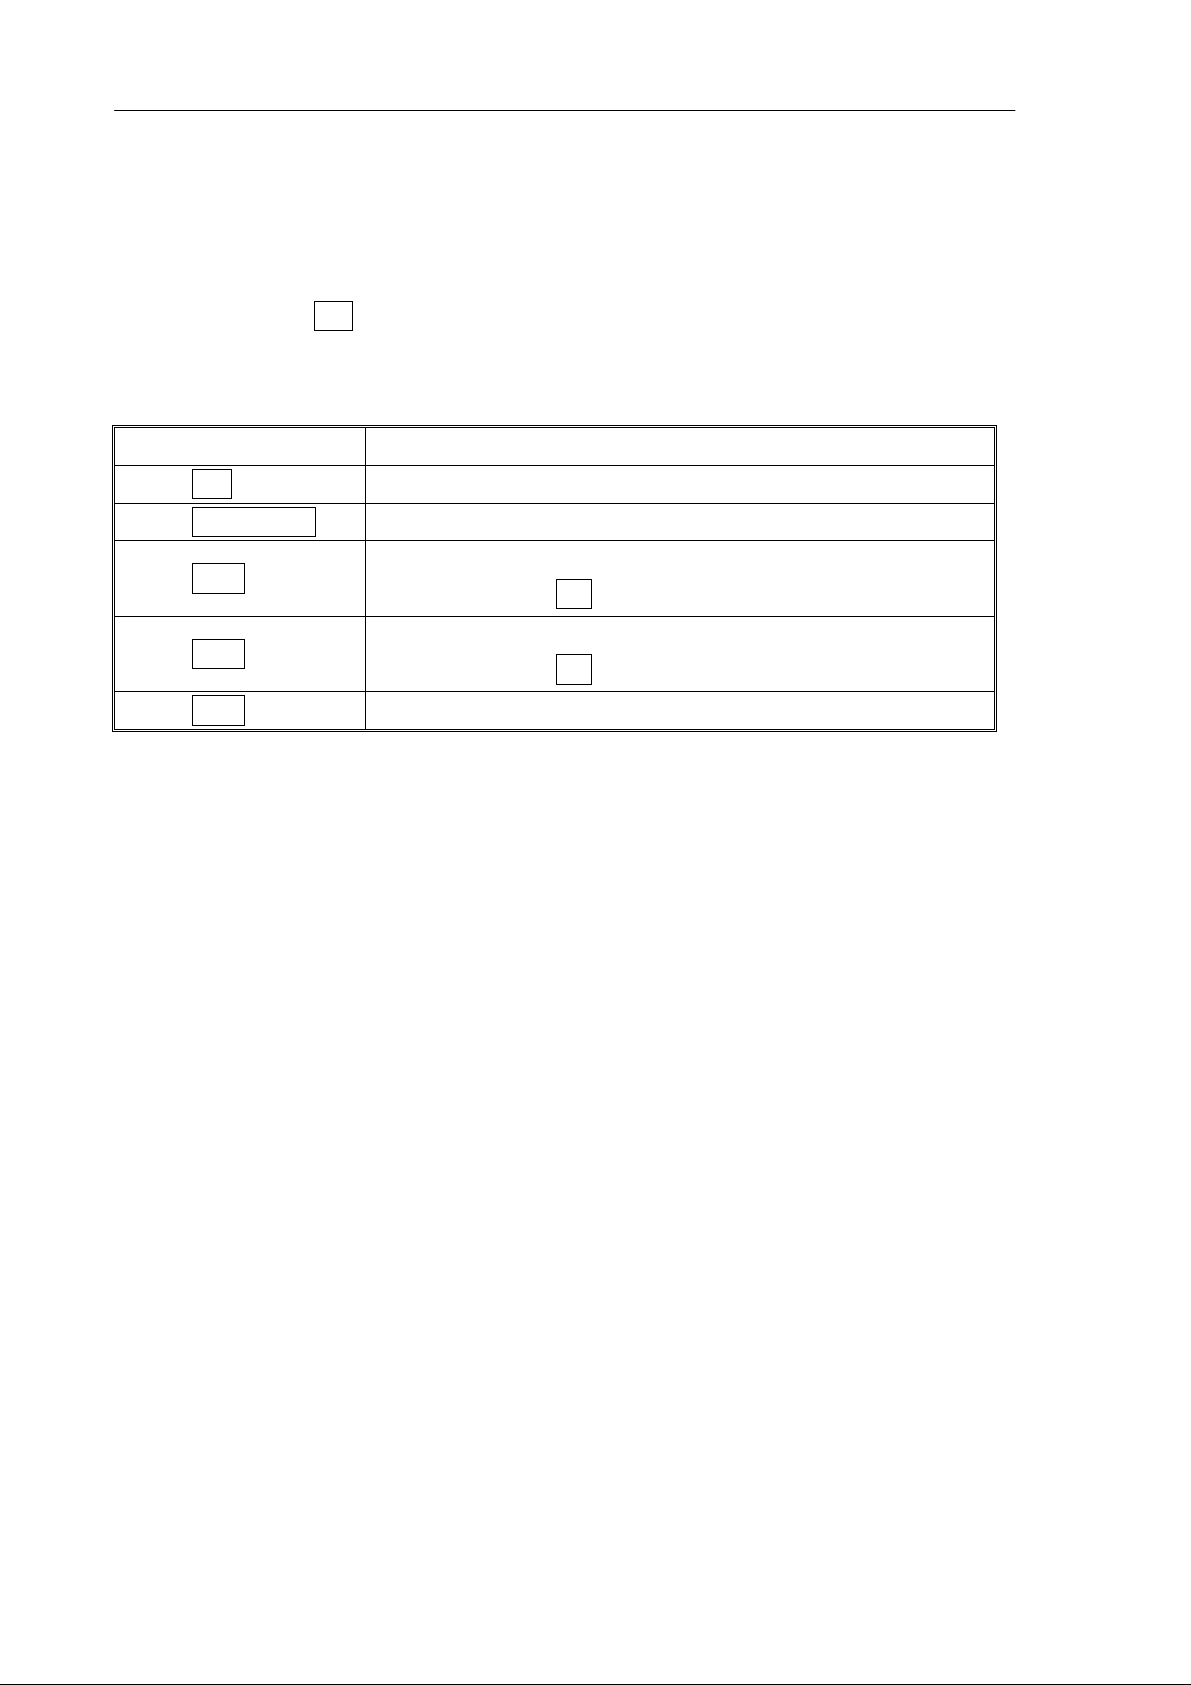
SETTING OF PRESET LIMITS
It is possible to set a high and low limit for either counting or weighing (using net
weight). When the Pst key is pressed the user can select either counting or weighing
and then set the lower and upper limit.
For example:
ACTION DISPLAYS
Press Pst
Press U.Wt/Units
“PST ” “ nEt “ “ “ if currently in the weighing mode
“PST ” “ cnt “ “ “ to toggle from weighing to counting
“Hi cnt” “0.3 234” “ ” The current high count limit is
Press Tare
displayed, press CE to clear and change if needed.
“lo cnt” “0.0234” “ ” The current low count limit is
Press Tare
Press Tare
displayed, press CE to clear and change if needed.
Return to weighing with limits set.
• Clearing of either or both the limits is allowed. Both limits cleared will disable the
Preset altogether.
• If Preset Weight was selected the first display would show “Hi net” and “lo net”.
• The beeper will work as described in the Beeper Parameter.
6.4 PLU (Product Look Up)
Product Look-Up (PLU) numbers are used to store information about the commonly
used items. The Tare Weight, Description of the product and Unit Weights for a
particular item are recalled by entering the PLU number for ease of operation.
The scale is capable of storing values for the Tare weight, Description and Unit
Weight for a maximum of 5 direct PLU and up to 100 indirect PLU numbers.
Tare Weight value is required for calculating the Net Weight where a container is used
during weighing. Descriptions are used for sending data over RS-232 for viewing or
printing and Unit Weight is used for parts counting.
These data should be entered against a particular PLU before the weighing
process starts so that the desired PLU’s can be recalled during the weighing
process. The data can be stored and recalled manually or by sending data over
RS-232 Interface.
- 12 -
Page 19
JC series dual counting scale user’s guide
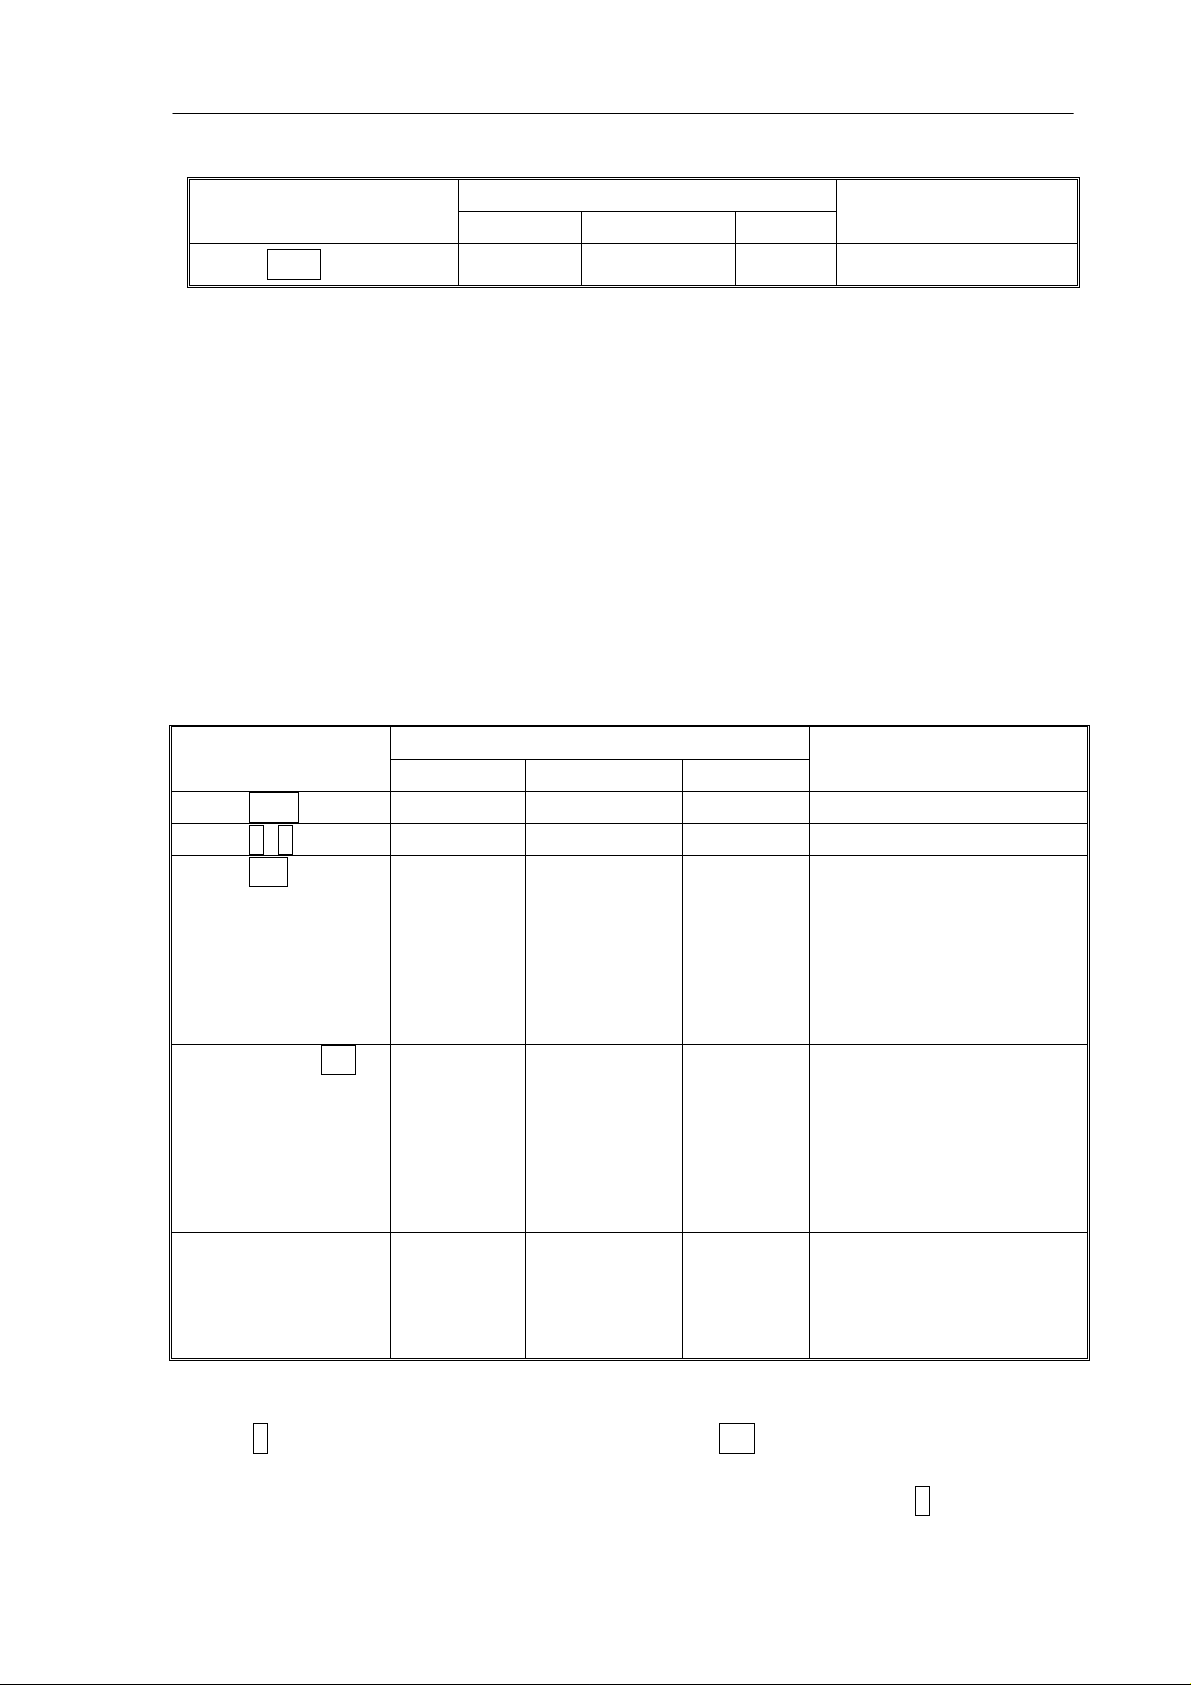
6.4.1 STORING PLU’S MANUALLY
DISPLAYS ACTIONS
REMARKS
Weight Unit weight Count
Press Zero if required.
“00000” “ 0“ “ 0“
The scale is zeroed.
Note:
Enter or determine the Tare Weight when a container is to be used (see section 6.2 of
this User Manual). If a Tare value is used, the scale will be in the NET mode.
Enter or determine the Unit Weight as described in section 6.3.1 and 6.3.2 of this User
Manual.
The Tare and Unit Weight to be stored can be either taken from a weighing in process
or by manual entry of data.
Please find below an example for setting up “PLU 27” with Description as “M4 Nut”
and Unit weight of “0.015”.
DISPLAYS ACTIONS
REMARKS
Weight Unit weight Count
Press PLU
Press 2, 7
Press Pst
“PLU ”
“PLU ” “ 27”
“PLU 27”
“ - -“ “ “ -
“ “ -
“x x x x x x” “x x x ” The current description
will be shown with the
first character flashing.
The flashing digit can
be changed using the
numeric keypad.
Pressing the CE
“PLU 27 ”
“ “ “ “ key when the first
character is
flashing will clear
all the
descriptions.
Continue to enter
characters until
description is
complete.
“PLU 27 ”“M 4 Nut“ “Brass “
12 characters in
total spreading over
both the displays (UNIT
WEIGHT and COUNT).
Note:
Use the . key to go back to the previous digit or the M+ key to advance to the next
character.
A flashing character can be used for entering a space by pressing the 0 key for
slightly longer duration.
- 13-
Page 20
JC series dual counting scale user’s guide
W
Tare value will only be stored with PLU data if the scale is in the NET mode. If the
container is less then the manual zero range which is set in "Technical parameters"
(default is 2% of capacity) then the scale will be Zeroed and no tare value will be
stored. To avoid this, use a larger container, reduce the zero range or use the digital
tare method.
6.4.2 ENTERING DESCRIPTION MANUALLY
The description can be up to 12 characters long and can be a mix of numbers,
symbols or letters.
During the procedure to set the description the numeric keypad will work in a similar
way to a mobile telephone. Pressing a number briefly will show the number and
holding it down will scroll through all the characters.
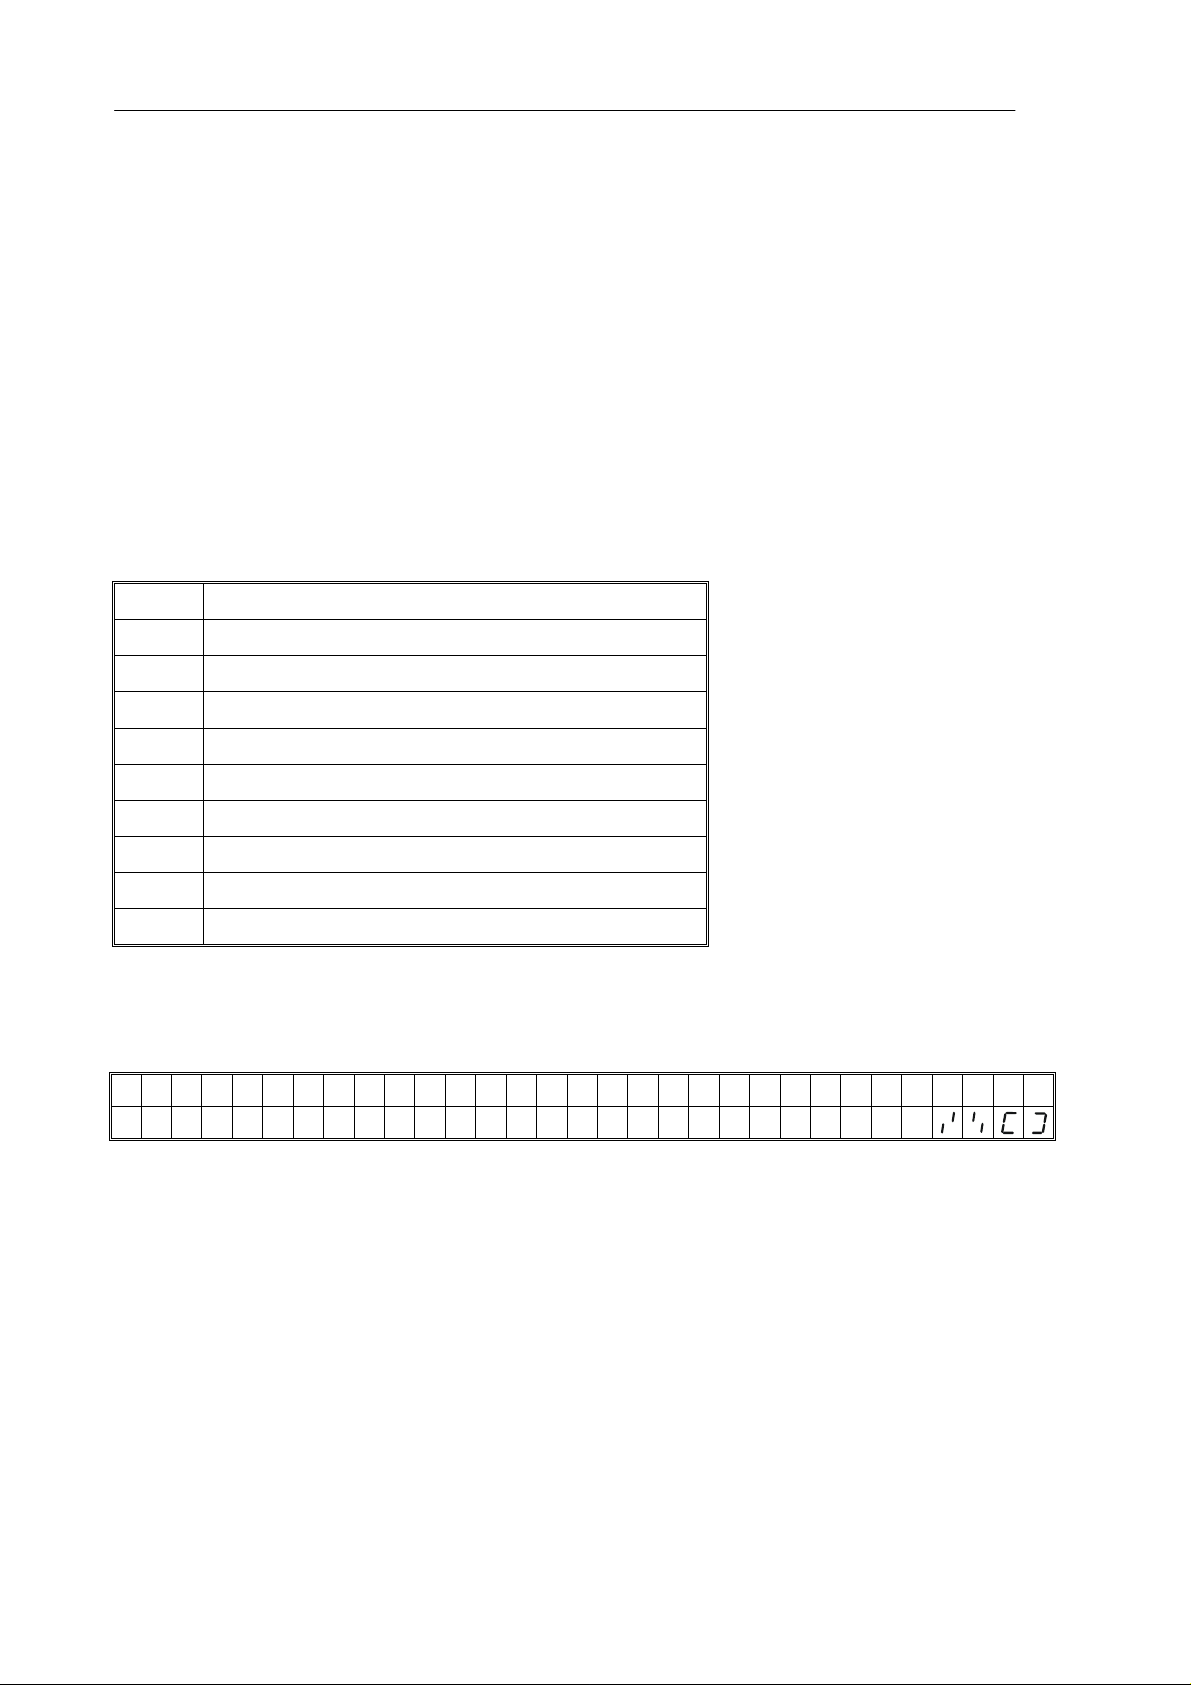
The numbers and characters are:
1 - / \
2 A B C
3 D E F
4 G H I
5 J K L
6 M N O
7 P Q R S
8 T U V
9 W X Y Z
0 _ [ ] Where _ is a Space (Not underscore)
The limitations of the 7 segment display sometimes make it difficult to display some
letters. The characters and the displayed symbols are:
A B C D E F G H I J K L M N O P Q R S T U V
A B C D E F G H I J K L M N O P Q R S T U V W X Y Z
X Y Z - / \ ( )
The characters will be stored as text so the output of the RS-232 interface will be
correct.
The numbers 1 2 3 4 5 6 7 8 9 0 will be 1234567890
Note that this method is only used where alpha-numeric data is permitted. This is
used for the Description field and the User ID number, Scale ID number in the
parameters section.
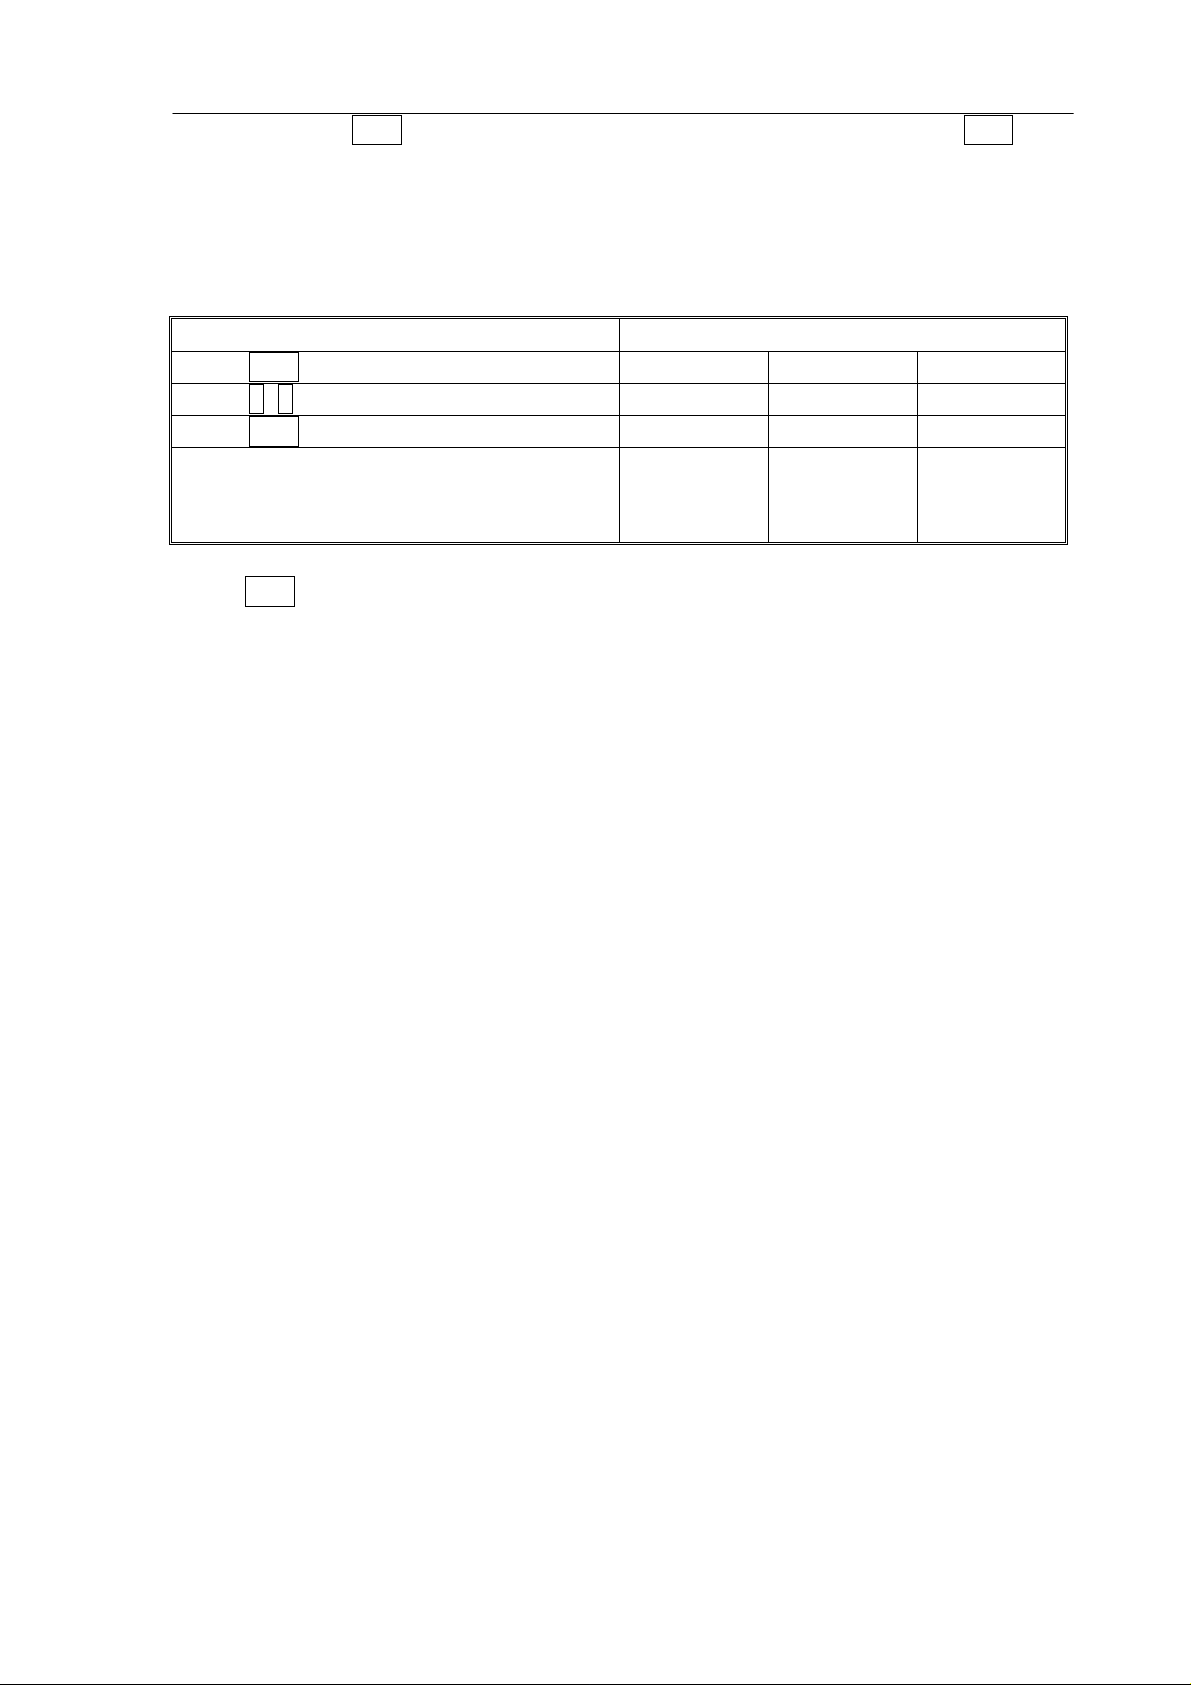
6.4.3 RECALLING PLU’S MANUALLY
• To recall the PLU values the user should first select either local or remote scale as
the tare value stored will be specific to the scale selected.
- 14 -
Page 21
JC series dual counting scale user’s guide
• Then press the PLU key, enter the PLU number (00 – 99) then press the PLU key
again to recall the data.
• The display will show the results of the recall for 1 second then return to weighing
with the data in place.
For example:
ACTIONS DISPLAYS
Press PLU
Press 2, 7
Press PLU
After 1 second, it will return to normal
“PLU ”
“PLU ” “ ”27
“PLU 27 ” “M4 Nut“ “Brass “
“ x x x x“ “ x x x x ” “ x x“
“ - -“ “ “
“ “
weighing with the Tare and Unit Weight
previously entered.
• If the PLU key is held down after the numeric entry, it will show the description as
long as the key is pressed.
• In this example the display “PLU 27 ” “M 4 Nut“ “Brass “ shows the description for
1 second, if no data is stored then it will show “PLU 27” “ “ “ “.
• If the tare value is outside the range permitted for the selected scale (For example, if
the local scale is selected whereas the tare value applies to the remote scale, this
would exceed the capacity of the local scale) the “Weight” display would show zero
tare weight.
• If the tare value stored does not match the increment of the selected scale (For
example, storing -1.446 for a scale with d=0.05) then round the tare weight depending
on the scale resolution (For example, in this case, -1.45 would be used as the tare
value).
• If a PLU number is recalled that does not have any information stored against it, the
scale will continue to work with Tare and Unit weight unchanged.
- 15-
Page 22
JC series dual counting scale user’s guide
SECTION7 PARAMETERS
The parameters are split into 2 sections, one for the managers and the other one for
Technical.
7.1 USER PARAMETERS
Enter the User Parameters section by pressing the Pst key during the self-test when
the power is turned on. This will allow the user to set the way he wants the scale to
work by choosing specific values from some options.
Press the Smpl key to scroll through the other parameters. To enter any parameter,
press the Tare key.
Press Smpl to scroll through the sub-parameters. To see the earlier setting, press the
Tare key. To change and scroll through the other available settings, press Smpl . To
choose the desired setting and thereby go back to the sub-parameter, press the Tare
key.
To return to the parameter, press the Zero key.
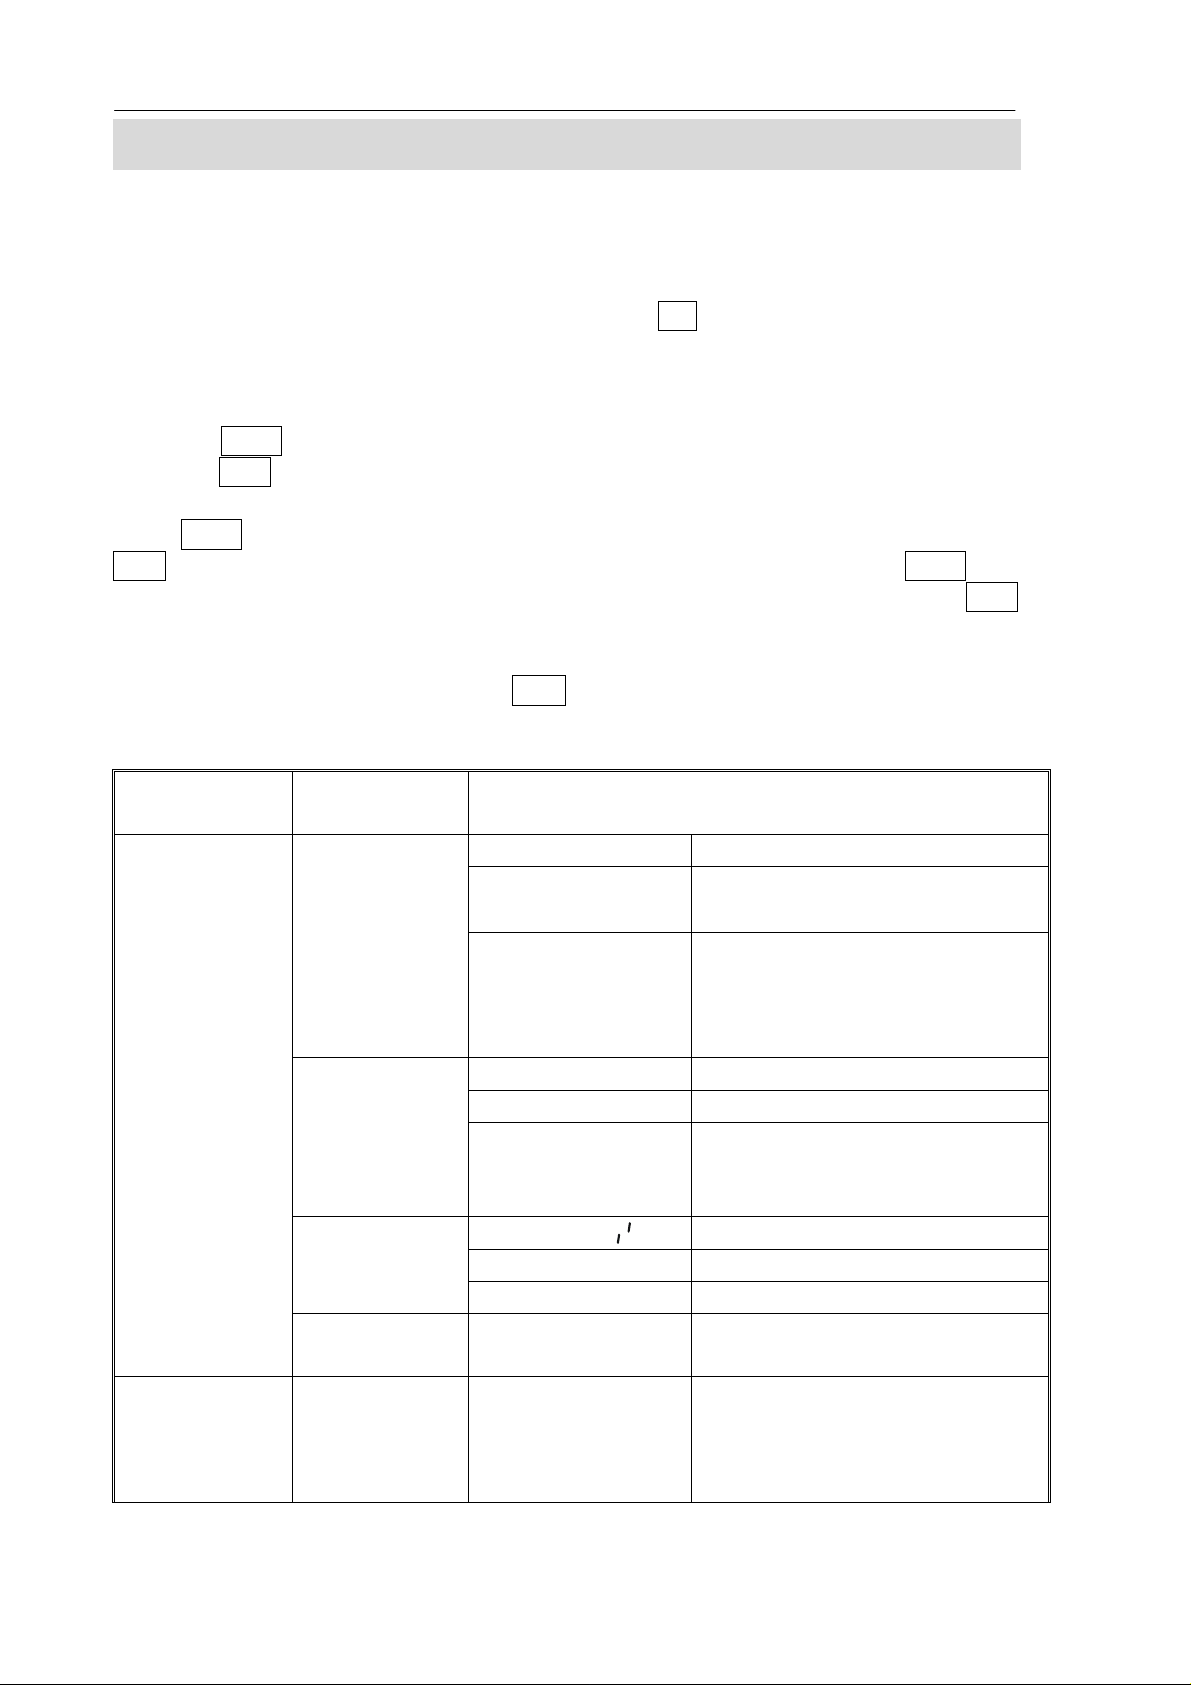
7.2 PARAMETER SETTING TABLE
PARAMETER
F1 oFF
SUB-
PARAMETER
bEEP
EL
Un I t
of
DISPLAYS AND SETTINGS
“bEEP" "oFF"
“bEEP" "on I n "
“bEEP” "on oUt”
“LitE" “"oFF"
“LitE" "on"
“LitE" "AUt"
“UnI t” ” KG Lb”
”UnI t” “KiLo”
”UnI t” “Lb”
0351530 Set auto power off time.
/// /
Beeper is set to off
Beeper is set to on between
limits
Beeper is set to on outside
limits (when weight less than
min capacity, checkweighing
function will not available
Backlight is set to off
Set to on at all times
Set to work automatically when
a weight is placed on the scale
or a key is pressed.
Kg/Lb both are enabled
Kg only is enabled
Lb only is enabled
0/3/5/15/30 minutes
F2 Prt
- 16 -
P Mo dE Print
Au oFF Prints only when the
Auto-Accumulation is set to off.
Au on Prints only when the
Auto-Accumulation is set to on.
Page 23

JC series dual counting scale user’s guide
P bAU d
PAritY 8 n 1
ptype tpup
U id “U id”
“ Abc234”
“ “
SC id “Sc id”
“ Abc234”
“ “
tECH
Allows access to the Technical parameters using a
P Cont
Sets the RS-232 interface to
print continuously and the
accumulation function is
disabled.
SEr r E
Sets the RS-232 to print
continuously the weight
only.(for remote display)
b 600
b 1200
b 2400
b 4800
Sets the required baud rate
(speed for the RS- 232
communications).
Default rate is 4800.
b 9600
8 data bits, no parity
7 E 1
7 o 1
lp50
7 data bits, even parity
7 data bits, odd parity
Tpup TSCALE Tpup printer
Lp50 TSCALE lp-50 printer
:
:
Shows the current user ID (if any).
Enter a new User ID as described in the description
under the PLU section. The ID can be alphanumeric,
but is limited to 6 characters.
Shows the current scale ID (if any).
Enter a new Scale ID as described in the Description
under the PLU section. The ID can be alpha-numeric
but is limited to 6 characters.
password. Not normally accessed by user.
- 17-
Page 24

JC series dual counting scale user’s guide
SECTION8 BATTERY OPERATION
• The scales can be operated from the battery if desired. The battery life is
approximately 70 hours if only the basic unit is used. If a second platform is
used the battery life will be reduced.
• When the battery needs charging the arrow above the low battery symbol
under the “Weight” display will turn on. The battery should be charged as soon
as the arrow above the symbol is on. The scale will still operate for about 10
hours after which it will automatically switch off to protect the battery.
• To charge the battery simply plug into the mains power. The scale need not to
be turned on.
• The battery should be charged for 12 hours for full capacity.
• Just under the “Count” display is an LED to indicate the status of battery
charging. When the scale is plugged into the main power the internal battery will
be charged. If the LED is green the battery has a full charge. If it is red, the
battery is nearly discharged and yellow indicates the battery is nearly charged.
NOTE: It is recommended that the battery be charged before using the scale when the
unit has been unpacked.
- 18 -
Page 25

JC series dual counting scale user’s guide
SECTION9 RS-232 OUTPUT
Specifications:
RS-232 output of weighing, data default settings
ASCII code
4800 Baud (600-9600 selectable)
8 data bits (8 data bits no parity, 7 data bits even and odd parity selectable)
No Parity
Connector style needed:
25 pin d-subminiature socket
Pin 2 Output
Pin 3 Input
Pin 7 Signal Ground
Sample of output:
LOCAL SCALE
ID: 123ABC
NAME:Text
12.456 kg NET
1.1234 g U.W.
11 PCS
TOTAL
- - - - - - - - - - - -
49.824 kg TW
44 TPC
4 No.
- 19-
Page 26
JC series dual counting scale user’s guide
SECTION10 CALIBRATION
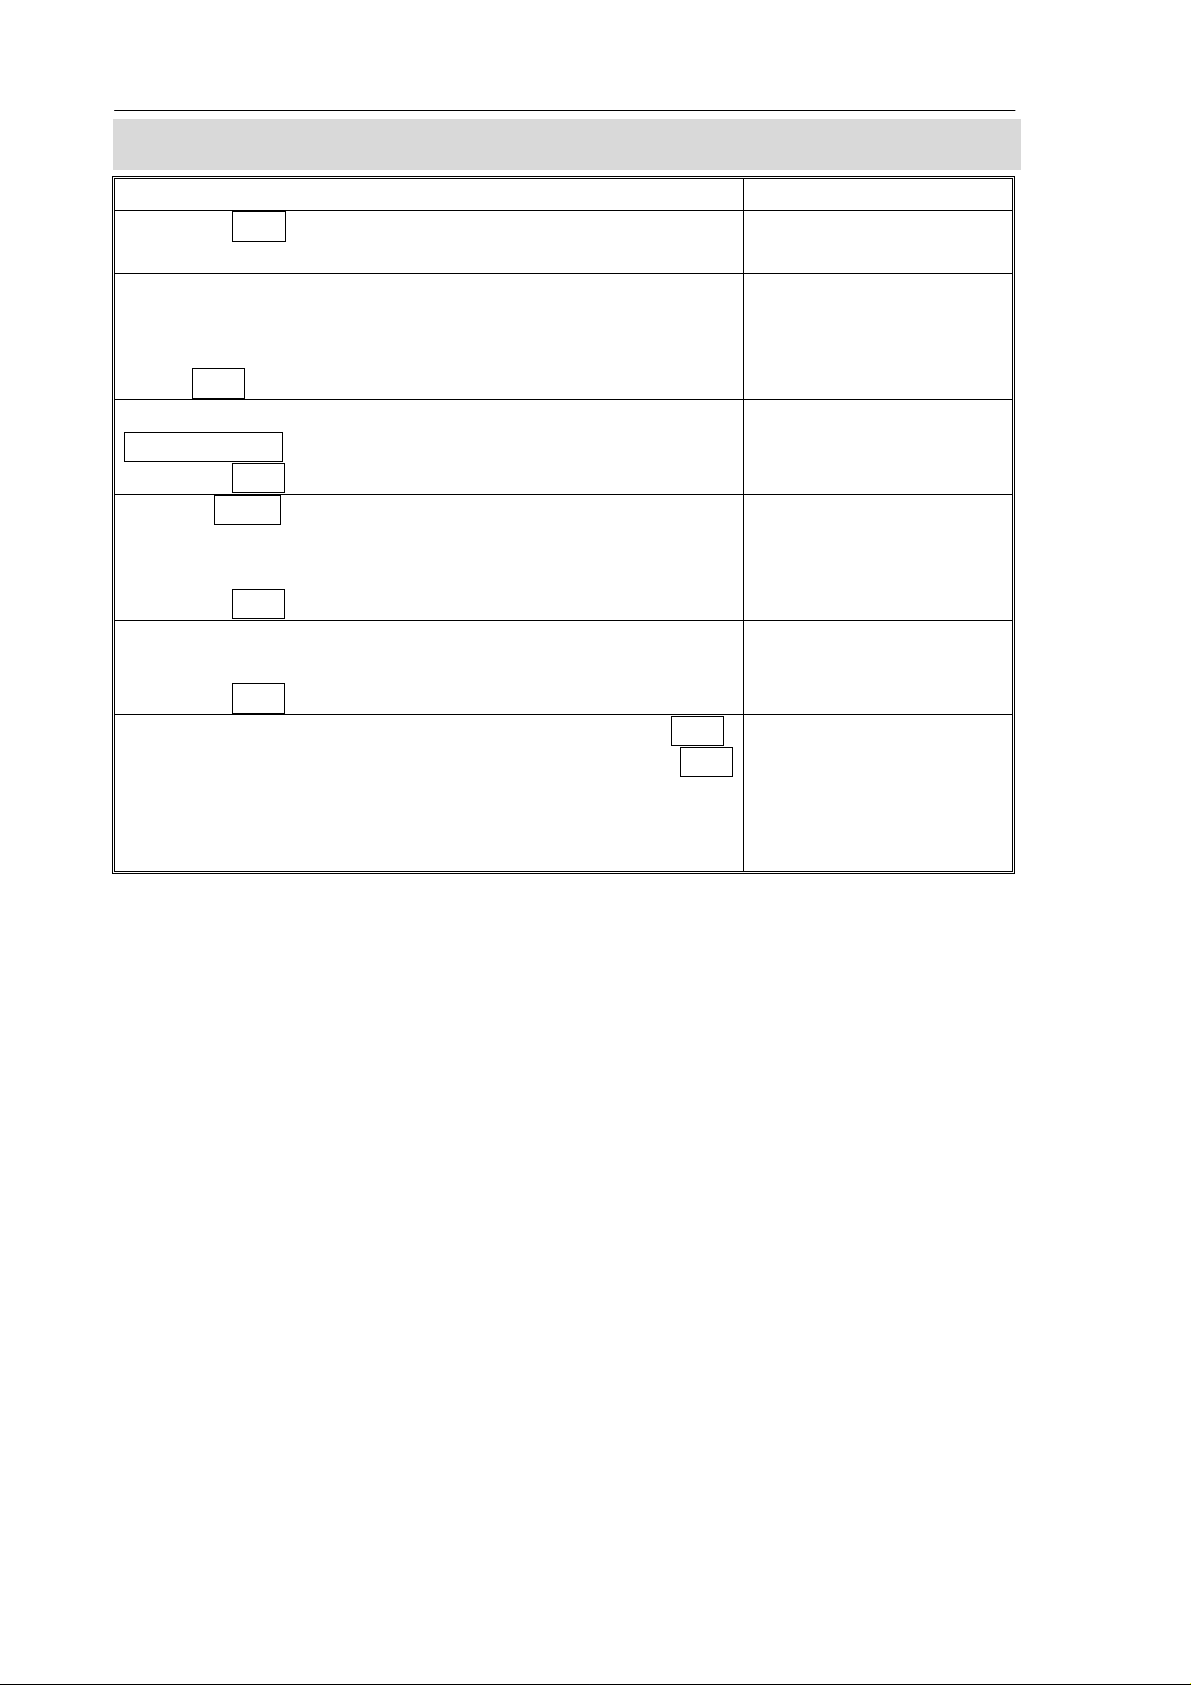
ACTION DISPLAYS
Press the Zero key during the self-test at power on. The
scale will ask to enter the password.
Default Password is 9999.
Enter “9” four times.
Password can be changed in technical parameters.
Press Tare.
Select the scale to be set up by using the
Local/Remote key.
Press the Tare key to enter the technical section.
Use the Smpl. to select the weighing unit to be used for
setting the calibration for the scale. The arrow in the
“Weight” window will indicate the unit selected.
Press the Tare key to continue.
You will enter Calibration. Display will ask to unload any
weight on the platform. After “STABLE” indicator on,
Press the Tare key to continue.
Enter the calibration weight to be loaded and press Tare.
Load the calibration weight onto the scale and press Tare
again.
The Calibration is complete, the scale will run the self-test
during which the weight should be removed.
“ Pi n”
“ Pi n” “ ----”
“tEch” “ LocAL” “ “
“tEch” “rEmo tE” “ “
“tEch” “ Uni t” “ “
“Un L o Ad”
“SEL” “ 0010”
“Lo Ad”
- 20 -
Page 27
JC series dual counting scale user’s guide
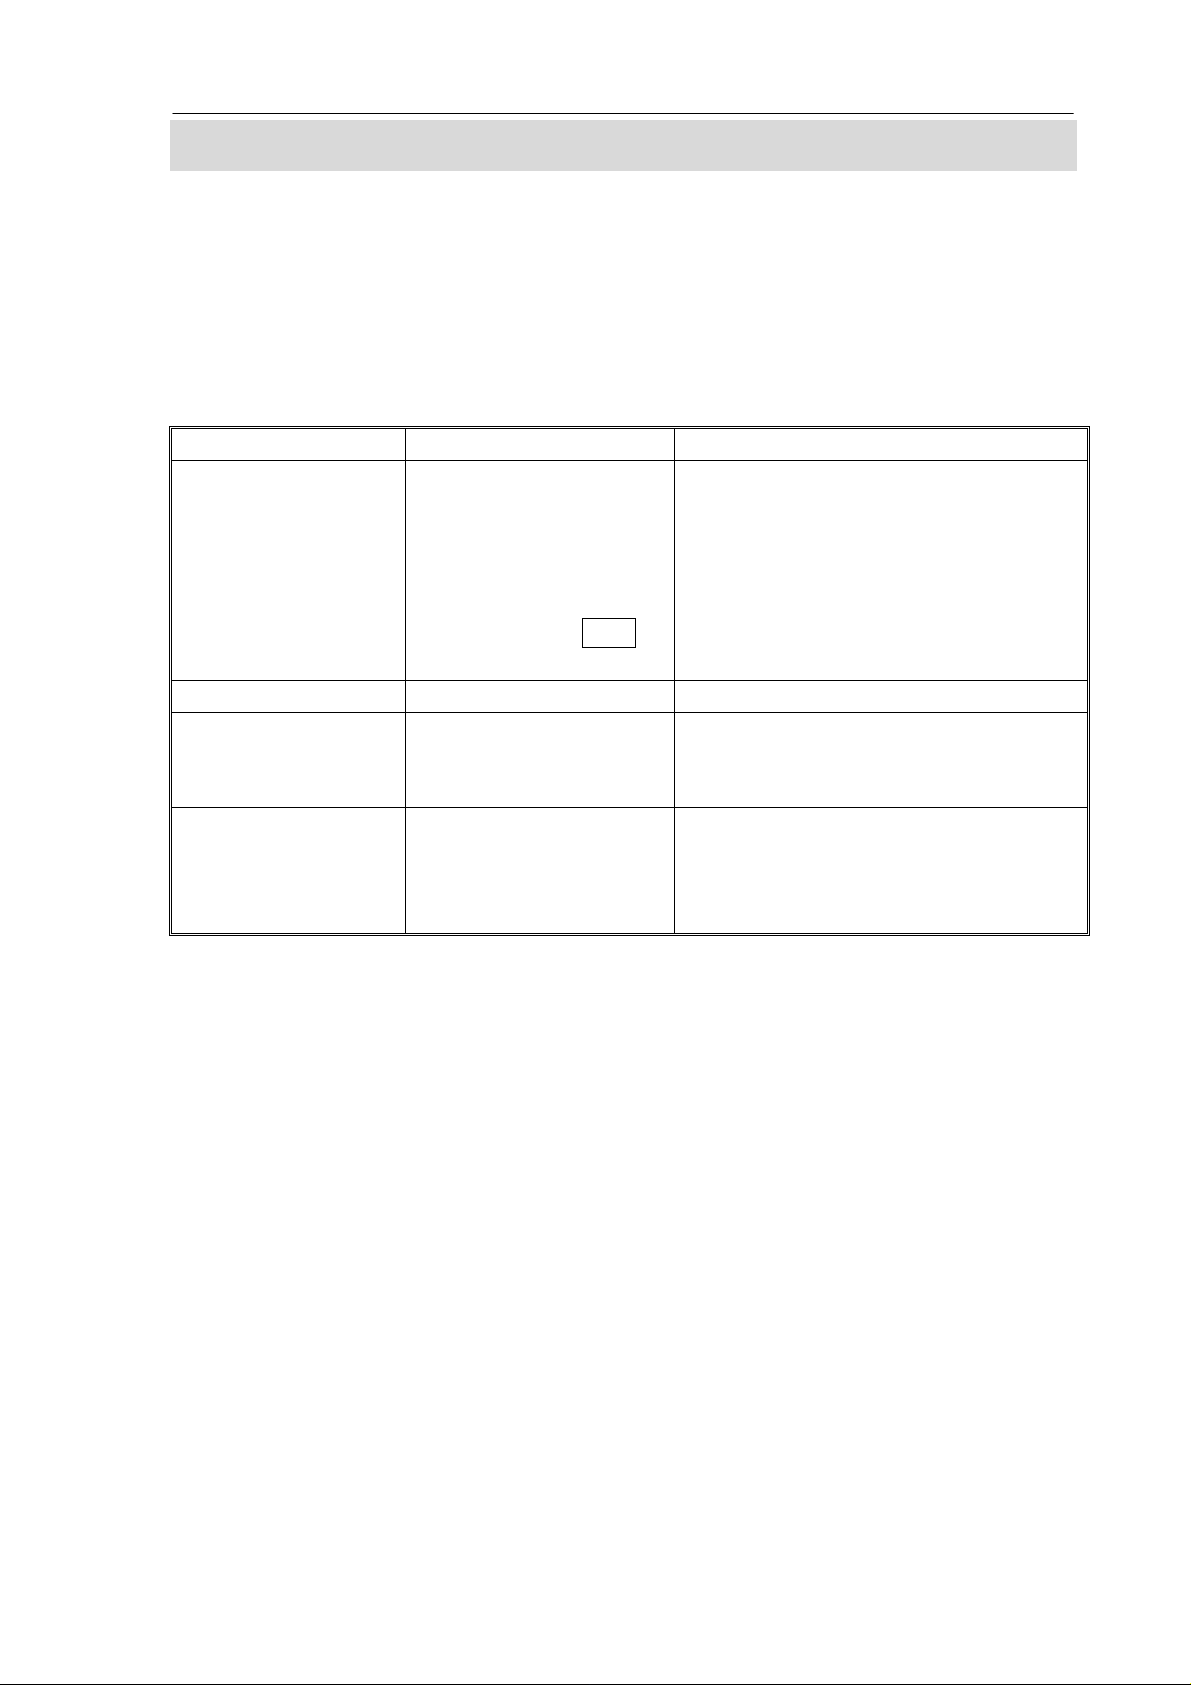
SECTION11 ERROR CODES
During the initial power-on testing or during the operation, the scale may show an
error message. The meaning of the error messages are described below.
If an error message is shown, repeat the procedure that caused the message, such as
turning the balance on, calibration or any other functions. If the error message is still
shown then contact your dealer for further support.
ERROR CODE DESCRIPTION POSSIBLE CAUSES
Err 4
Err 5
Err 6
FAIL H or FAIL L
Initial Zero is greater
than the permissible
value (typically 4% of
maximum capacity)
when power is turned
on or when the Zero
key I s pressed,
Keyboard error Improper operation of the scale.
A/D count is not correct
when turning the scale
on.
Calibration error Improper calibration.
Weight on the pan when turning the
scale on.
Excessive weight on the pan when
zeroing the scale.
Improper calibration of the scale.
Damaged load cell.
Damaged Electronics.
Platform is not installed.
Load cell may be damaged.
Electronics may be damaged.
If the problem persists contact your
dealer or Adam Equipment for
assistance.
.
- 21-
Page 28
JC series dual counting scale user’s guide
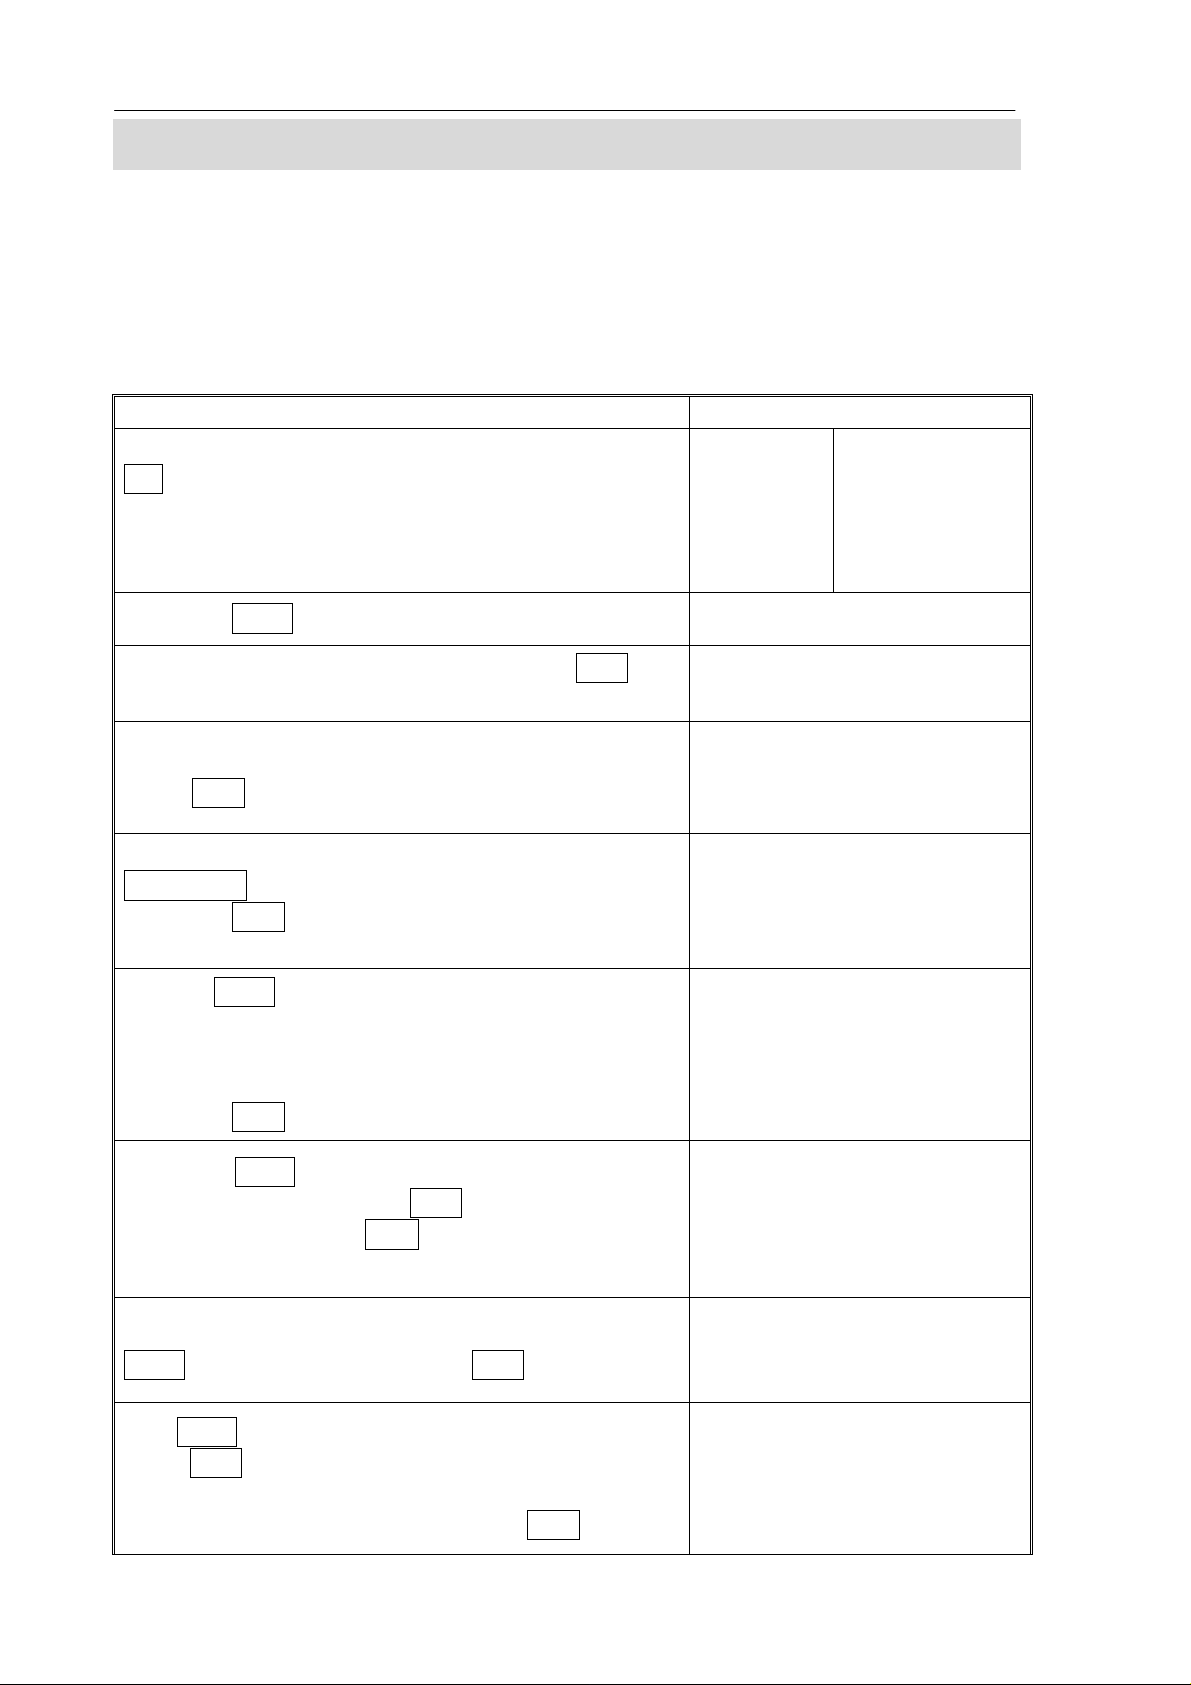
SECTION12 TECHNICAL PARAMETERS
The technical parameters accessed via the “tEch” prompt at the end of user
parameters and are password controlled to prevent unauthorised access.
These parameters set the metrology for the scales. Each scale is set independently.
The parameters will set capacity, division, decimal point position, initial zero range,
auto and manual zero range as well as factory calibration.
ACTION DISPLAYS
Enter the User Parameters section by pressing the
Pst key during the self-test when the power is
turned on. This will allow the user to set the way he
wants the scale to work by choosing specific values
from some options.
Press the Smpl key until display show “tech”
From the “tech” user parameter, Press the Tare key.
The scale will ask you to enter the password.
Default Password is9999. Enter “9” four times.
Press Tare.
Select the scale to be set up by using the
Local/Rem key.
Press the Tare to enter the technical section for that
scale.
Use the Smpl to select the weighing unit to be used
for setting up the parameters for the scale.
The arrow in the “Weight” window will indicate the
unit selected.
Press the Tare key to continue.
Beep
“F1 off”
“tech”
“ Pin”
“ Pin” “ ----”
“tEch” “ LocAL” “ “
“tEch” “rEmotE” “ “
“tEch” “ Unit” “ “
Bk
Unit
off
Press the Smpl key to scroll through the menus for
the chosen scale. User Tare to select and set
parameters and the Zero to escape as without
changing data as with the user parameter section.
The first parameter is show internal counts.ress the
Smpl to go to next menu. Press Tare to enter.
Use Smpl to select the decimal point position and
press Tare
To change the remote scale cap press CE to clear
and then enter new value followed by Tare
- 22 -
“Cnt”
Both scales have the same
menus except that the
capacity of the local scale is
fixed and cannot be entered.
“CAp”. Scale capacity setting.
“dESC” “ 0.00”
“SEL” “0060”
Page 29
JC series dual counting scale user’s guide
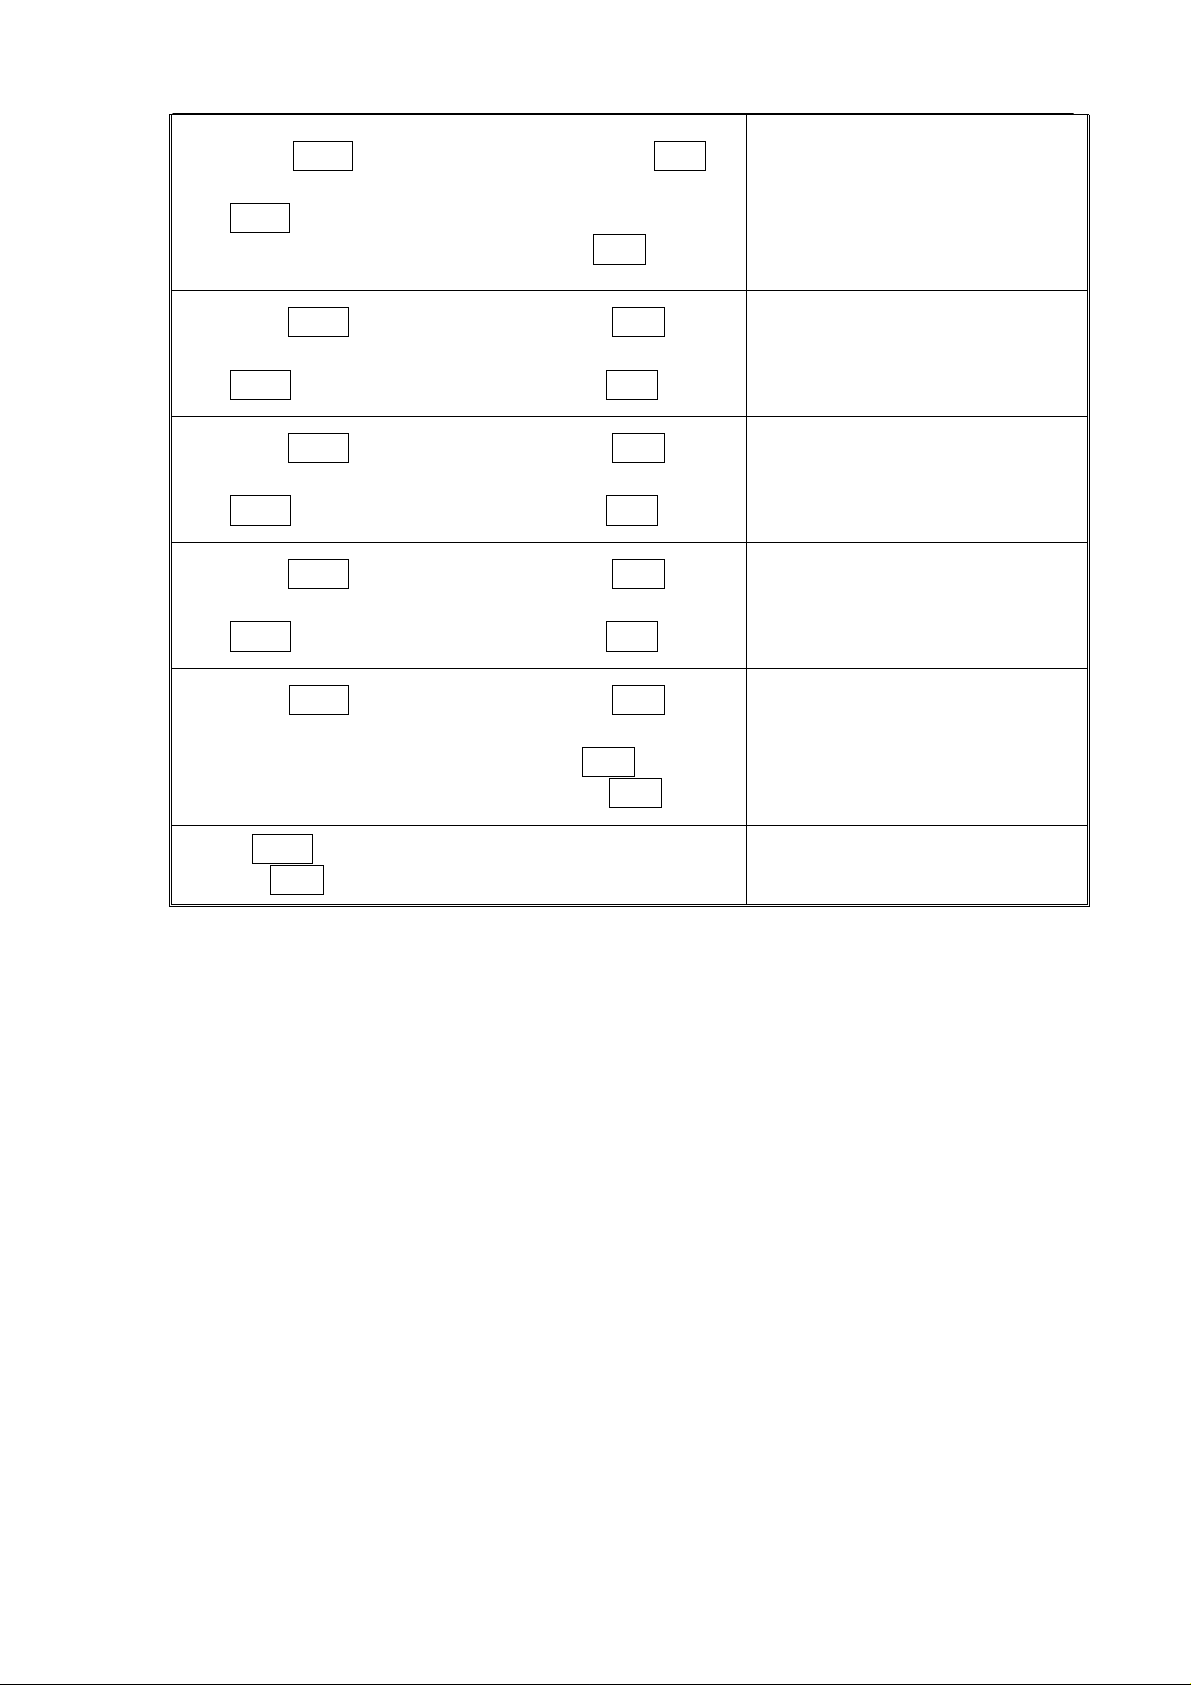
Press the Smpl to go to next menu. Press Tare to
enter
Use Smpl to select the division which you would like
the display to increment in followed by Tare.
Press the Smpl to go to next menu, use Tare key to
enter.
Use Smpl to increment the values then Tare.
Press the Smpl to go to next menu, use Tare key to
enter.
Use Smpl to increment the values then Tare.
Press the Smpl to go to next menu, use Tare key to
enter.
Use Smpl to increment the values then Tare.
Press the Smpl to go to next menu, use Tare key to
enter.
Enter the new PIN number and press Tare
Confirm the new PIN number and press Tare
“div” weighing division.
“inc 5”
“Azt” Autozero tracking
range.
Select from 0.5d 0.5d, 1d, 2,
4,d
“0 Auto” Zero auto range at
power on.
Select form 0%, 2%, 5%, 10%
or 20%
“0 manl” Zero manual
range.
Select form 0%, 2% 2%, 4%,
10%, 50% or 100%
“Pin” Password number for
“tEch”.
“Pin1”
“Pin2”
“donE”
Press Smpl to continue or escape the parameters
with the Zero
- 23-
Page 30

JC series dual counting scale user’s guide
TAIWAN SCALE is a international supplier with more than 30 years experience in the production
and sale of electronic weighing equipment.
Products are supplied and serviced from our company locations in the CHINA, TAIWAN and
distributed through a world wide dealer network, also we make OEM/ODM products for world wide
customer.
TAIWAN SCALE's products are predominantly designed for the laboratory, medical, business and
industrial markets.
The product range can be summarised as follows:
− Counting scales for general industrial and warehouse applications
− Digital weighing/check-weighing scales
− High performance platform scales with extensive software facilities including parts
counting, percent weighing etc.
− Digital electronic scales for medical use
− Retail price computing scales
− Floor scales
− Truck scale
− Crane scales
− Weighing indicator for platform scales, floor scales and truck scales
− Hand push and pull gauge
− Customize auto weighing systems
TAIWAN SCALE and their distributors offer a full range of technical services such as on site and
workshop repair, preventative maintenance and calibration facilities.
TAIWAN SCALE operates an approved quality management system and is certified to
ISO9001:2000.
Visit our Website at:
www.taiwanscale.com
Taiwan Scale Mfg. Co., Ltd.
282, Sec.3, Hoping W. Rd.
Taipei,
Taiwan
TEL:886-2-23068203
FAX:886-2-23044354
e-mail: [email protected]
W & P Scales Mfg. (Kunshan) Co., Ltd.
No. 756 Kuntai Road
Kunshan Hi-tech industry park
Kunshan, Jiangsu
China
TEL:86-512-57669080
F AX:86-512-57669100
e-mail: [email protected]
©Copyright by Taiwan Scale Mfg. Co., Ltd. All rights reserved. No part of this publication may
be reprinted or translated in any form or by any means without the prior permission of Taiwan
scale.
Taiwan Scale reserves the right to make changes to the technology, features, specifications and
design of the equipment without notice.
All information contained within this publication was to the best of our knowledge timely, complete
and accurate when issued. However, we are not responsible for misimpressions which may
result form the reading of this material.
The latest version of this publication can be found on our Website.
- 24 -
 Loading...