

Page 1

i
USER’S
MANUAL
TDM-30 Series
Direct Thermal Portable Printer
Page 2

ii
Copyright Information
© 2019 TSC Auto ID Technology Co., Ltd,
The copyright in this manual, the software and firmware in the printer
described therein are owned by TSC Auto ID Technology Co., Ltd, All
rights reserved.
CG Triumvirate is a trademark of Agfa Corporation. CG Triumvirate Bold
Condensed font is under license from the Monotype Corporation. Windows
is a registered trademark of Microsoft Corporation.
All other trademarks are the property of their respective owners.
Information in this document is subject to change without notice and does
not represent a commitment on the part of TSC Auto ID Technology Co.
No part of this manual may be reproduced or transmitted in any form or by
any means, for any purpose other than the purchaser’s personal use,
without the expressed written permission of TSC Auto ID Technology Co.,
Ltd,
Page 3

iii
Agency Compliance and Approvals
2014/30/EU(EMC), 2014/35/EU(LVD), 2011/65/EU(RoHS 2.0)
EN 55032 Class B
EN 55024
EN61000-3-2:2014
EN61000-3-3:2013
EN 60950-1
FCC part 15B, Class B
This equipment has been tested and found to comply with the limits for a
Class B digital device, pursuant to part 15 of the FCC Rules. These limits are
designed to provide reasonable protection against harmful interference in a
residential installation. This equipment generates, uses and can radiate radio
frequency energy and, if not installed and used in accordance with the
instructions, may cause harmful interference to radio communications.
However, there is no guarantee that interference will not occur in a particular
installation. If this equipment does cause harmful interference to radio or
television reception, which can be determined by turning the equipment off
and on, the user is encouraged to try to correct the interference by one or
more of the following measures:
-Reorient or relocate the receiving antenna.
-Increase the separation between the equipment and receiver.
-Connect the equipment into an outlet on a circuit different from that to which
the receiver is connected.
-Consult the dealer or an experienced radio/ TV technician for help.
This device complies with Part 15 of the FCC Rules. Operation is subject to
the following two conditions: (1) This device may cause harmful interference,
and (2) this device must accept any interference received, including
interference that may cause undesired operation.
This Class B digital apparatus complies with Canadian ICES-003
Cet appareil numérique de la classe B est conforme à la norme
NMB-003 du Canada.
AS/NZS CISPR 22 Class B
AS/NZS CISPR 32 Class B
NOM-019-SCFI-1998
10 C.F.R. Section 430.23(aa) (Appendix Y to Subpart B of part 430)
TP TC 004/2011
TP TC 020/2011
LP0002
Page 4

iv
GB 4943.1
GB/T9254
GB 17625.1
IS 13252(Part 1)/
IEC 60950-1
CNS 13438
CNS 14336-1
CNS 15663
KN 32 / KN 35
Important safety instructions:
1. Read all of these instructions and keep them for later use.
2. Follow all warnings and instructions on the product.
3. Disconnect the power plug from the AC outlet before cleaning or if fault happened.
Do not use liquid or aerosol cleaners. Using a damp cloth is suitable for cleaning.
4. The mains socket shall be installed near the equipment and easily accessible.
5. The unit must be protected against moisture.
6. Ensure the stability when installing the device, Tipping or dropping could cause
damage.
7. Make sure to follow the correct power rating and power type indicated on marking
label provided by manufacture.
8. Please refer to user manual for maximum operation ambient temperature.
重要安全說明:
1. 閱讀所有這些說明,並保留以備未來使用。
2. 按照產品上的所有警告和說明進行操作。
3. 在清潔前或發生故障時,拔除電源插頭與交流電源插座的連接。
不要使用液體或噴霧清潔劑。建議使用濕布清潔。
4. 電源插座應安裝在設備附近及方便使用處。
5. 本機器必須防止潮濕。
6. 確保安裝設備時的穩定性,翻倒或跌落可能會導致設備損壞。
7. 確保按照製造商提供的標籤上標明之正確的額定功率和電源類型進行設定。
8. 請參考使用手冊以確認環境溫度的最大值。
WARNING:
Hazardous moving parts, keep fingers and other body parts away.
Page 5

v
CAUTION:
(For equipment with RTC (CR2032) battery or rechargeable battery pack)
Risk of explosion if battery is replaced by an incorrect type.
Dispose of used batteries according to the Instructions as below.
1. DO NOT throw the battery in fire.
2. DO NOT short circuit the contacts.
3. DO NOT disassemble the battery.
4. DO NOT throw the battery in municipal waste.
5. The symbol of the crossed out wheeled bin indicates that the battery should not be
placed in municipal waste.
警告:
(對於帶有 RTC(CR2032)電池或可充電電池組的設備)
如果更換不正確的電池類型,會有爆炸的危險。
請按照以下說明處理廢電池:
1. 請勿將電池投入火中。
2. 請勿使觸點短路。
3. 請勿拆卸電池。
4. 請勿將電池丟入都市廢棄物。
5. 垃圾桶畫叉圖案表示電池不應放置在都市廢棄物中。
Caution: The printhead may be hot and could cause severe burns. Allow the
printhead to cool.
CAUTION:
Any changes or modifications not expressly approved by the grantee of this device
could void the user's authority to operate the equipment.
CE Statement:
This equipment complies with EU radiation exposure limits set forth for an
uncontrolled environment. This equipment should be installed and operated with
minimum distance 20 cm between the radiator & your body.
RF exposure warning (For Bluetooth)
The equipment complies with FCC RF exposure limits set forth for an uncontrolled
environment.
Page 6

vi
The equipment must not be co-located or operating in conjunction with any other
antenna or transmitter.
Canada, Industry Canada (IC) Notices
This Class B digital apparatus complies with Canadian ICES-003 and RSS-210.
Operation is subject to the following two conditions: (1) this device may not cause
interference, and (2) this device must accept any interference, including interference
that may cause undesired operation of the device.
Radio Frequency (RF) Exposure Information
The radiated output power of the Wireless Device is below the Industry Canada (IC)
radio frequency exposure limits. The Wireless Device should be used in such a
manner such that the potential for human contact during normal operation is
minimized.
This device has also been evaluated and shown compliant with the IC RF Exposure
limits under portable exposure conditions. (Antennas are less than 20 cm of a
person's body). (For Bluetooth)
Canada, avis de l'Industry Canada (IC)
Cet appareil numérique de classe B est conforme aux normes canadiennes ICES-003
et RSS-210.
Son fonctionnement est soumis aux deux conditions suivantes : (1) cet appareil ne
doit pas causer d'interférence et (2) cet appareil doit accepter toute interférence,
notamment les interférences qui peuvent affecter son fonctionnement.
Informations concernant l'exposition aux fréquences radio (RF)
La puissance de sortie émise par l’appareil sans fil est inférieure à la limite
d'exposition aux fréquences radio de l'Industry Canada (IC). Utilisez l’appareil sans fil
de façon à minimiser les contacts humains lors du fonctionnement normal.
Ce périphérique a également été évalué et démontré conforme aux limites
d'exposition radio-fréquence par l'IC pour des utilisations par des opérateurs mobiles
(les antennes sont à moins de 20 cm du corps d'une personne). (Pour le Bluetooth)
Page 7

vii
NCC 警語:
經型式認證合格之低功率射頻電機,非經許可,公司、商號或使用者均不得擅自變更頻
率、加大功率或變更原設計之特性及功能。(即低功率電波輻射性電機管理辦法第十二
條)
低功率射頻電機之使用不得影響飛航安全及干擾合法通信;經發現有干擾現象時,應立
即停用,並改善至無干擾時方得繼續使用。
前項合法通信,指依電信法規定作業之無線電通信。低功率射頻電機須忍受合法通信或
工業、科學及醫療用電波輻射性電機設備之干擾。(即低功率電波輻射性電機管理辦法
第十四條)
警告:
本電池如果更換不正確會有爆炸的危險,請依製造商說明書處理用過之電池。
Page 8

viii
單元Unit
限用物質及其化學符號
Restricted substances and its chemical symbols
鉛Lead
(Pb)
汞Mercury
(Hg)
鎘Cadmium
(Cd)
六價鉻
Hexavalent
chromium
(Cr+6)
多溴聯苯
Polybrominate
d biphenyls
(PBB)
多溴二苯醚
Polybrominate
d diphenyl
ethers (PBDE)
內外塑膠件
○ ○ ○ ○ ○
○
內外鐵件
- ○ ○ ○ ○
○
滾輪
○ ○ ○ ○ ○
○
銘版
○ ○ ○ ○ ○
○
電路板
- ○ ○ ○ ○
○
晶片電阻
- ○ ○ ○ ○
○
積層陶瓷表面
黏著電容
○ ○ ○ ○ ○
○
集成電路-IC
- ○ ○ ○ ○
○
電源供應器
○ ○ ○ ○ ○
○
印字頭
- ○ ○ ○ ○
○
馬達
- ○ ○ ○ ○
○
液晶顯示器
- ○ ○ ○ ○
○
插座
- ○ ○ ○ ○
○
線材
- ○ ○ ○ ○
○
備考 1.〝超出 0.1 wt %〞及〝超出 0.01 wt %〞係指限用物質之百分比含量超出百分比含量基準值。
Note 1:“Exceeding 0.1 wt %” and “exceeding 0.01 wt %” indicate that the percentage content of the restricted substance exceeds the
reference percentage value of presence condition.
備考 2.〝○〞係指該項限用物質之百分比含量未超出百分比含量基準值。
Note 2:“○” indicates that the percentage content of the restricted substance does not exceed the percentage of reference value of presence.
備考 3.〝-〞係指該項限用物質為排除項目。
Note 3:The “−” indicates that the restricted substance corresponds to the exemption.
Page 9

ix
Contents
1. Introduction................................................................................................ ....... 1
1.1 Product Introduction........................................................................................ 1
1.2 Product Features ............................................................................................. 2
1.2.1 Printer Standard Features ................................................................. 2
1.2.2 Printer Optional Features .................................................................. 3
1.3 General Specifications .................................................................................... 4
1.4 Print Specifications ......................................................................................... 5
1.5 Media Specifications ....................................................................................... 5
2. Operations Overview ........................................................................................ 7
2.1 Unpacking and Inspection ............................................................................... 7
2.2 Printer Overview .............................................................................................. 8
2.2.1 Front View .......................................................................................... 8
2.2.2 Interior View ..................................................................................... 10
2.2.3 Rear View ......................................................................................... 11
2.3 Operator control ............................................................................................ 12
2.3.1 LED Indication, LCD screen, and Keys ........................................... 12
3. Setup ............................................................................................................... 15
3.1 Install the Battery ................................ ................................ ........................... 15
3.2 Charge the Battery ......................................................................................... 16
3.2.1 Charge the Battery ................................ ........................................... 16
3.2.2 Charge by Charger Station (Optional) ............................................. 18
3.3 Communicate ................................................................................................. 20
3.3.1 Connecting with the Communication Cable ................................... 20
3.3.2 Connecting with Bluetooth (Optional) .......................................... 20
3.4 Loading the Media ......................................................................................... 21
4. Accessories ..................................................................................................... 22
4.1 Install the Belt Clip......................................................................................... 22
4.2 Install the IP54-rated environmental case with shoulder strap (Optional) ... 23
5. Power-on Utilities................................................................ ............................ 25
5.1 Media Sensor Calibration .............................................................................. 25
5.2 Self-test and Dump Mode .............................................................................. 26
5.3 Printer Initialization ................................................................ ....................... 29
6. Diagnostic Tool ............................................................................................... 30
6.1 Start the Diagnostic Tool .............................................................................. 30
6.2 Printer Function ............................................................................................ 31
Page 10

x
6.3 Calibrating Media Sensor by Diagnostic Tool .............................................. 32
6.3.1 Auto Calibration ............................................................................... 32
6.4 Setting Bluetooth by Diagnostic Tool (Optional) ......................................... 33
7. Troubleshooting ............................................................................................. 34
7.1 Common Problems ........................................................................................ 34
8. Maintenance .................................................................................................... 36
Revise History ..................................................................................................... 37
Page 11

1. Introduction
1.1 Product Introduction
Thank you very much for purchasing TSC bar code printer.
Enjoy TSC’s reputation for cost-efficient, high durability printers with the TDM-30
mobile barcode printer. The TDM-30 is a comfortable, light-weight printer capable of
working with any mobile printing application where you need quick, simple
receipts/labels on demand.
Our TDM-30 is designed for a rough life, inside the IP54-rated environmental case to
resist dust and water and with its durable design prepared to take up to 2.1 meters fall
and keep printing.
These small and light printers can be worn comfortably for a full shift, without interfering
with the user’s tasks. Use USB, optional Bluetooth to connect to a mobile computer or
even a smartphone and produce clear easy-to-read receipts hour after hour.
This document provides an easy reference for operating the TDM-30.
The online version of the Programmer's manual, or more information can be
downloaded from our official website.
To print label formats, please refer to the instructions provided with your labeling
software; if you need to write the custom programs, please refer to the TSPL/TSPL2
programming manual that can be found on the accessories or at TSC official website.
− Applications
Direct store deliveries (DSD)
Proof of Delivery and Pickup
Field Sales/Repairs
Mobile Point-of-Sale
Parking Citations
Mobile Ticketing
Onboard Transportation Ticketing
Utility Billing/Meter Reading
Fleet Management
Page 12

2
1.2 Product Features
1.2.1 Printer Standard Features
The printer offers the following standard features.
Product standard feature
Direct thermal printing
Black mark reflective sensor
Gap reflective sensor
Head open sensor
3 operation buttons (On/off, feed/pause, and cover-open buttons)
LED version:
5 LEDs: 1 for printer states; 3 for Battery capacity; 1 for RF status
LCD version:
LCD color display: showing battery status, media type, firmware version,
and error messages
1 LED for Printer Status
1 LED for RF connection (3 colors)
Audible alert Programmable buzzer
Rechargeable Li-ion battery
Micro USB 2.0 (High speed mode) interface
32 MB DRAM
16 MB NOR Flash memory
32-bit RISC high performance processor
Eltron® EPL, Epson® ESC-POS, and Zebra® ZPL emulation languages
support
Fonts and bar codes can be printed in any one of the four directions (0,
90,180, 270 degree)
8 alpha-numeric bitmap fonts
One Monotype Imaging® CG Triumvirate Bold Condensed scalable font
Built-in Monotype True Type Font engine
Downloadable fonts from PC to printer memory
Downloadable firmware upgrades
Support TPH Care function
Page 13

3
Text, bar code, graphics/image printing (Please refer to the TSPL/TSPL2
programming manual for supporting code page)
Supported bar code
Supported image
1D bar code
2D bar code
BITMAP,
BMP,
PCX
(Max. 256 colors
graphics)
Code128 subsets
A.B.C,Code128UCC,
EAN128, Interleave 2 of
5,Code 39,Code 93,
EAN-13, EAN-8,
Codabar, POSTNET,
UPC-A, UPC-E, EAN
and UPC 2(5) digits
add-on, MSI, PLESSEY,
China Post, ITF14,
EAN14, Code 11,
TELPEN, PLANET,
Code 49, Deutsche Post
Identcode, Deutsche
Post Leitcode,
LOGMARS
CODABLOCK F
mode, DataMatrix,
Maxicode, PDF-417,
Aztec,
MicroPDF417, QR
code, RSS Barcode
(GS1 Databar)
1.2.2 Printer Optional Features
The printer offers the following optional features.
Product option feature
User
options
Factory
options
Micro USB 2.0 (high-speed mode) + MFi
Bluetooth V4.2
○
NFC tag
○
TSPL-EZD and TSPL-EZ with CPCL or ESC-POS
emulation
○
1-bay printer wireless charging station
○
4-bay printer wireless charging station
○
1-bay printer charger station
○
4-bay printer charger station
○
1-bay battery charger station
○
4-bay battery charger station
○
12-60V DC automobile cigarette lighter plug
○
Vehicle Charger
○
Vehicle Charger Converter
Page 14

4
IP54-rated protective case with shoulder strap
○
Micro USB 2.0 cable (1.5M)
○
10.8-60 VDC power source with dummy battery
○
Rechargeable Li-ion battery
○
Smart battery pack
○
External charging pin (for wireless charging cover
and cradle only)
○
3” paper core adapter
○
Linerless mode
○
CD
○
1.3 General Specifications
General Specifications
Physical dimensions
105 mm (W) x 49.5 mm (H) x 116 mm (D)
Enclosure
Plastic
Weight (w/ battery)
385g
Electrical
Internal charging capability (battery-in)
Input: AC 100-240V, 2.5A, 50-60Hz
Output: DC 12V/ 1A
12-24V DC automobile cigarette lighter plug
Auto-switching AC adapter
External charging capability (battery-out)
Single printer charger station
Input: 12V/ 2A
Output: 12V/ 2A
4-bay printers charger station
Input: 12V/ 5A
Output:12V/ 5A
1 bay battery charger station
- Input: 12V/ 2A
- Output: 8.4V/ 1.5A
4 bay batteries charger station
- Input: 24V/ 2.5A DC
- Output: 8.4V/ 1.5A*4 DC
Note: The printer will automatically turn off when stopping
Page 15

5
operation after 30 minutes.
Environmental
condition
Operation Temperature: -15 ~ 50˚C (5 ~ 122˚F)
Charging Temperature: 0 ~ 40˚C (32 ~ 104˚F)
Storage Temperature: -30 ~ 70 ˚C (-22 ~ 158˚F)
Relative Humidity:
- Operation: 10% to 90% non-condensing
- Storage: 10% to 90% non-condensing
IP54 w/ protective case
Drop 1.8m (5.9ft) w/o IP54-rated environmental case
Drop 2.1m (6.9ft) w/ IP54-rated environmental case
1.4 Print Specifications
Print Specifications
TDM-30
Print head resolution
203 dots/inch (8 dots/mm)
Printing method
Direct thermal
Dot size
(width x length)
0.125 x 0.125 mm(1 mm = 8 dots)
Print speed
(inches per second)
Max. 4 ips (102 mm/sec)
Max. print width
72 mm (2.83")
Max. print length
Continuous receipt paper: 2,794 mm (110”)
(associate with DRAM)
Printout bias
Vertical: 1 mm max.
Horizontal: 1 mm max.
1.5 Media Specifications
Media Specifications
TDM-30
Media roll capacity
Max. O.D.: 40 mm
Media type
Continuous, die-cut, receipt, liner free label, and black
mark
Media wound type
Outside wound
Media length
10 mm (0.39”) ~ 2,794 mm (110”)
Tear mode: 50 mm (1.97”) ~ max. print length
Media width
Max. 80 mm (includes liner)
Page 16

6
Black mark label: min.8 mm (w) x 2 mm (h)
Gap label: min.8 mm (w) x 2 mm (h)
Media thickness
0.06mm ~ 0.16 mm
In lowest print speed: 0.06mm ~0.18 mm
Note: Please locate the black mark on the printing side when using black mark continuous label.
Page 17
7
2. Operations Overview
2.1 Unpacking and Inspection
This printer has been specially packaged to withstand damage during shipping. Please
carefully inspect the packaging and printer upon receiving the bar code printer. Please
retain the packaging materials in case you need to reship the printer.
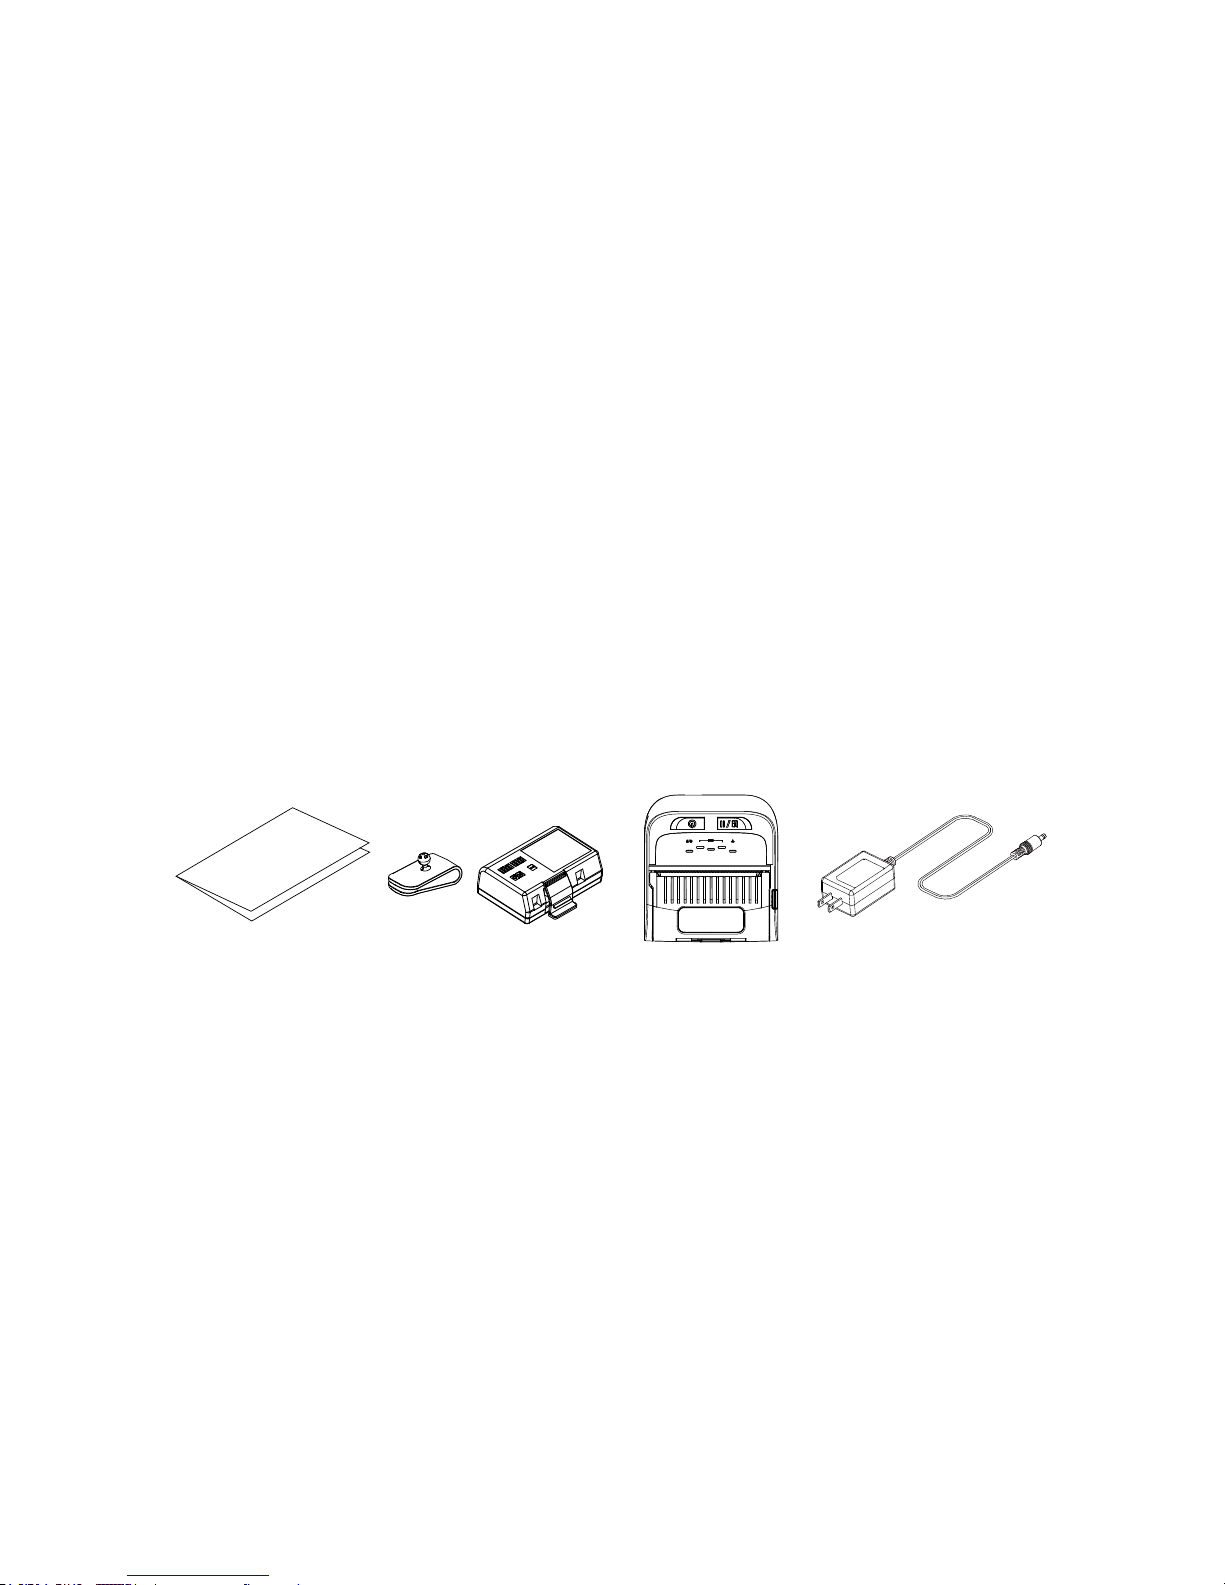
Unpacking the printer, the following items are included in the carton.
One printer unit
One Li-ion battery
One quick installation guide
One Auto-switching AC adapter
One belt clip
If any parts are missing, please contact the Customer Service Department of your
purchased reseller or distributor.
Page 18
8
2.2 Printer Overview
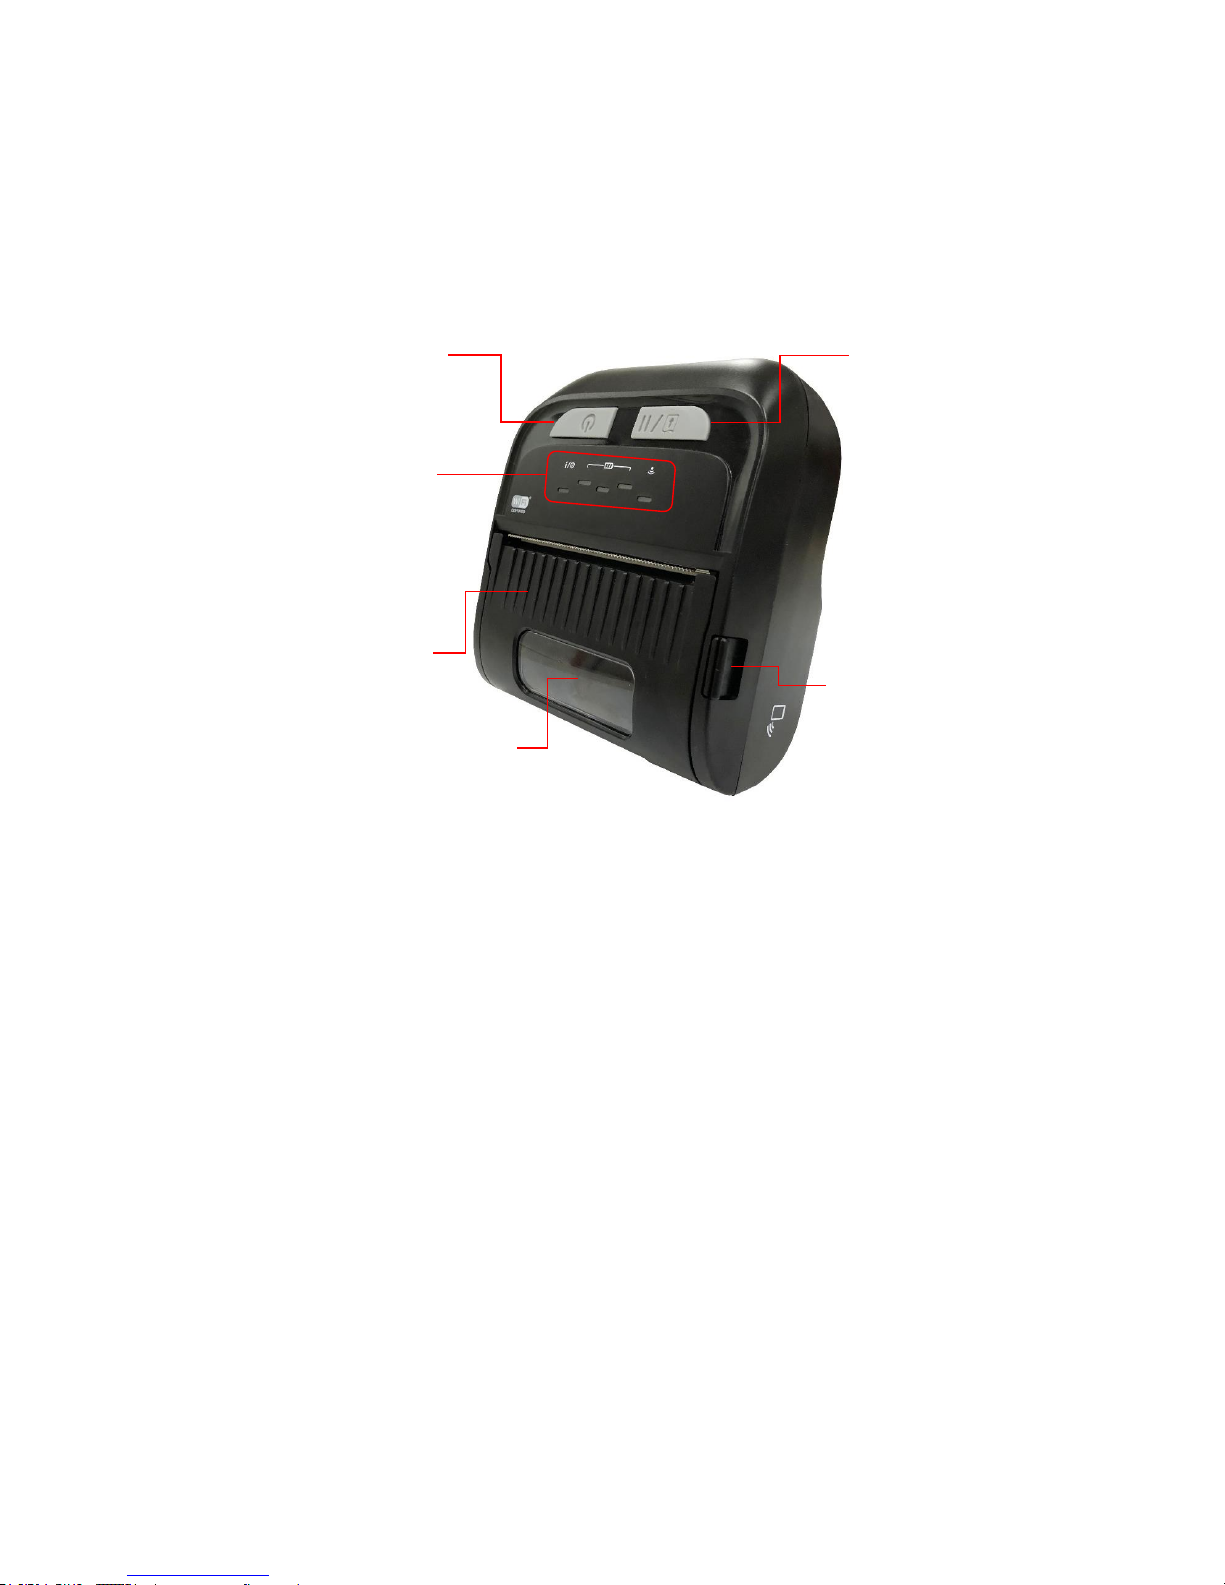
2.2.1 Front View
For LED version
1. Power on/off button
2. Feed/stop button
3. LED indicators
4. Media cover
5. Media cover window
6. Media cover release button
1
5
6
2
3
4
Page 19
9
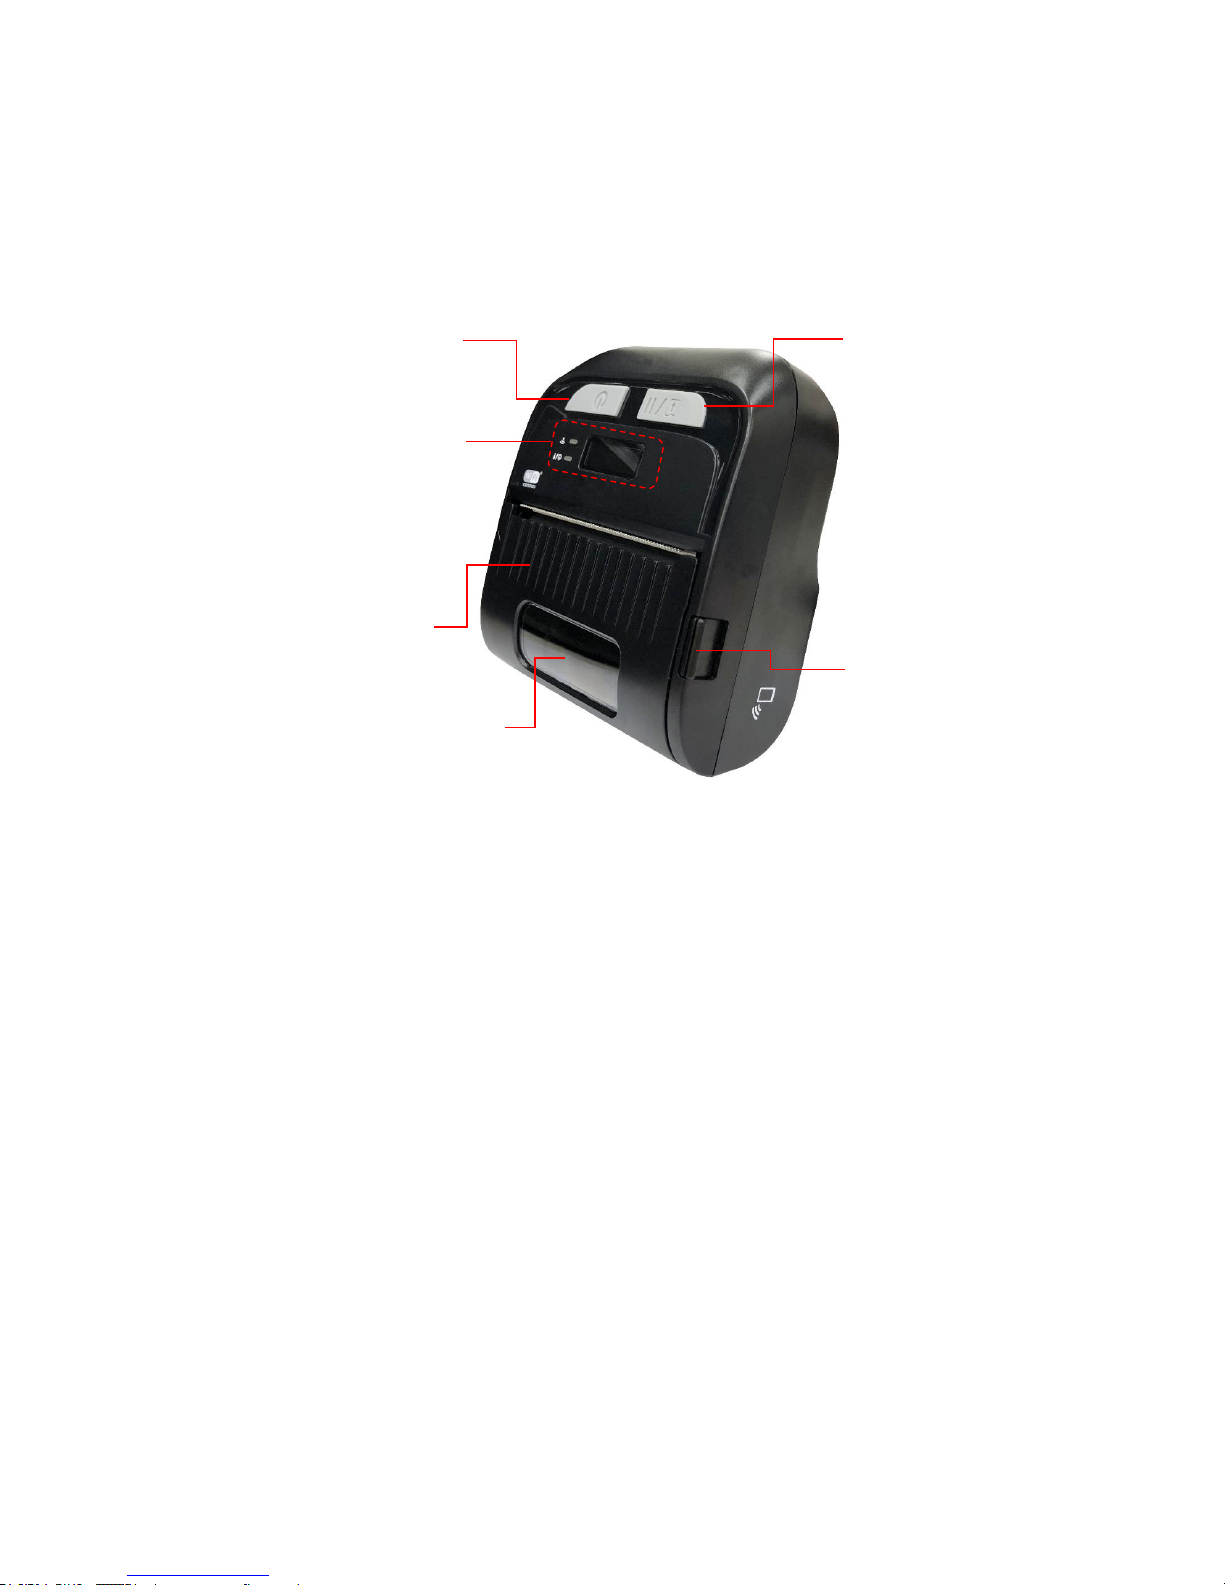
For LCD version
1. Power on/off button
2. Feed/stop button
3. LED indicators & LCD screen
4. Media cover
5. Media cover window
6. Media cover release button
6
3
5
4
1
2
Page 20
10
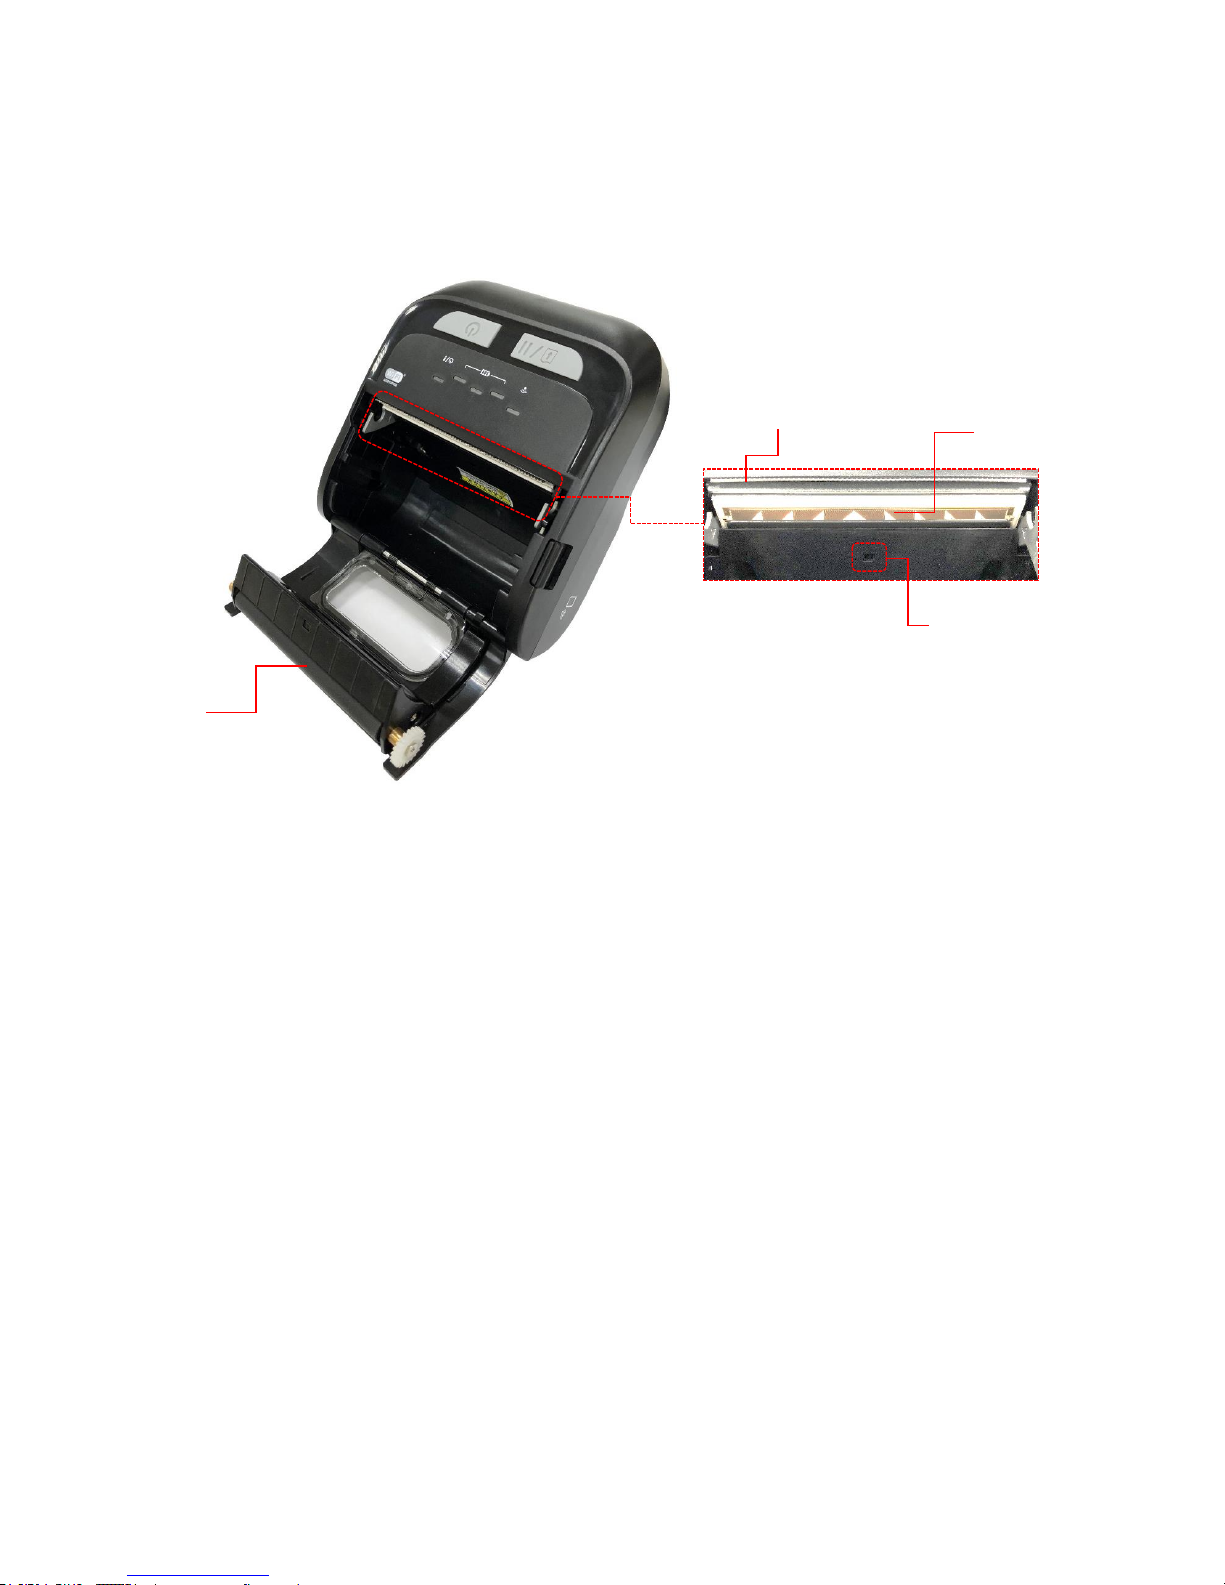
2.2.2 Interior View
1. Tear edge
2. Print head
3. Platen roller
4. Black mark sensor
3
2
4
1
Page 21
11
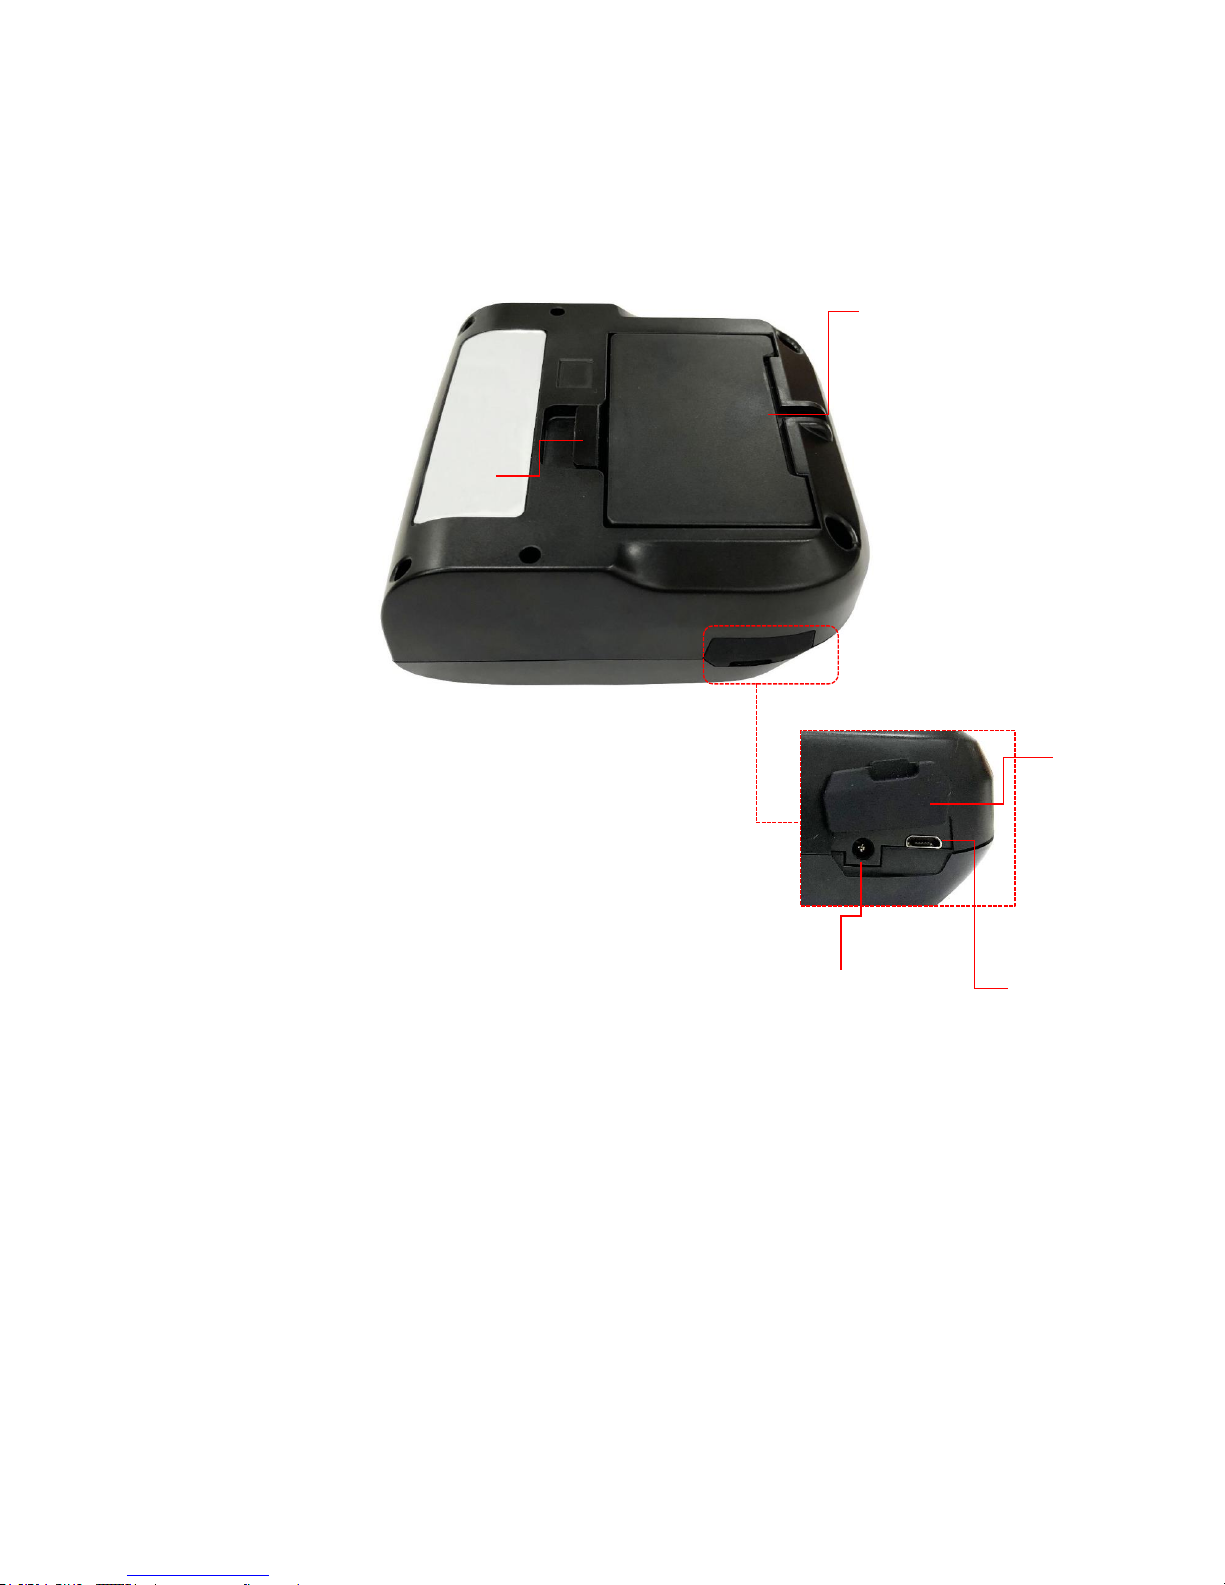
2.2.3 Rear View
1. Li-ion Battery
2. Battery open clasp
3. Interface cover
4. Power jack
5. USB interface
1
3
2
4
5
Page 22
12
2.3 Operator control
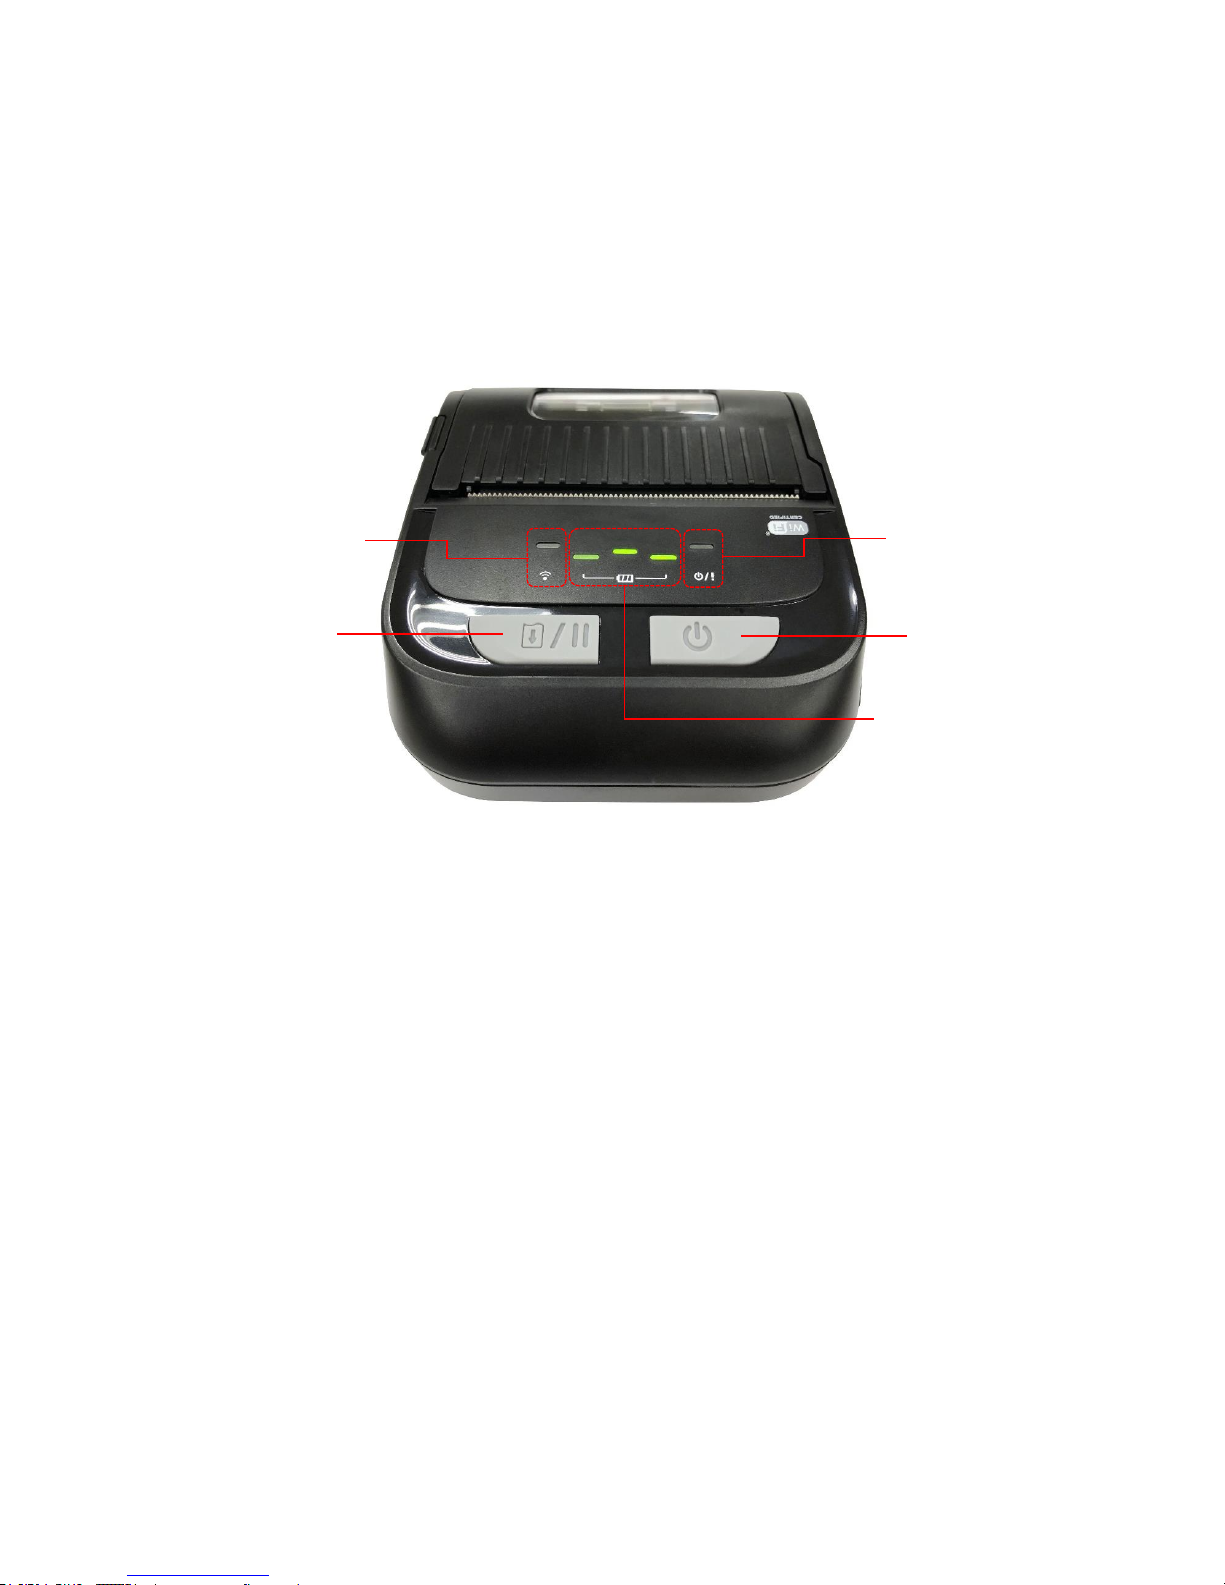
2.3.1 LED Indication, LCD screen, and Keys
For LED version
1. Power on/off button
2. Feed/Pause button
3. Printer status LED indicator
4. Battery charge level LED indicators
5. Wireless status LED indicator
1
2
5
4
3
Page 23
13
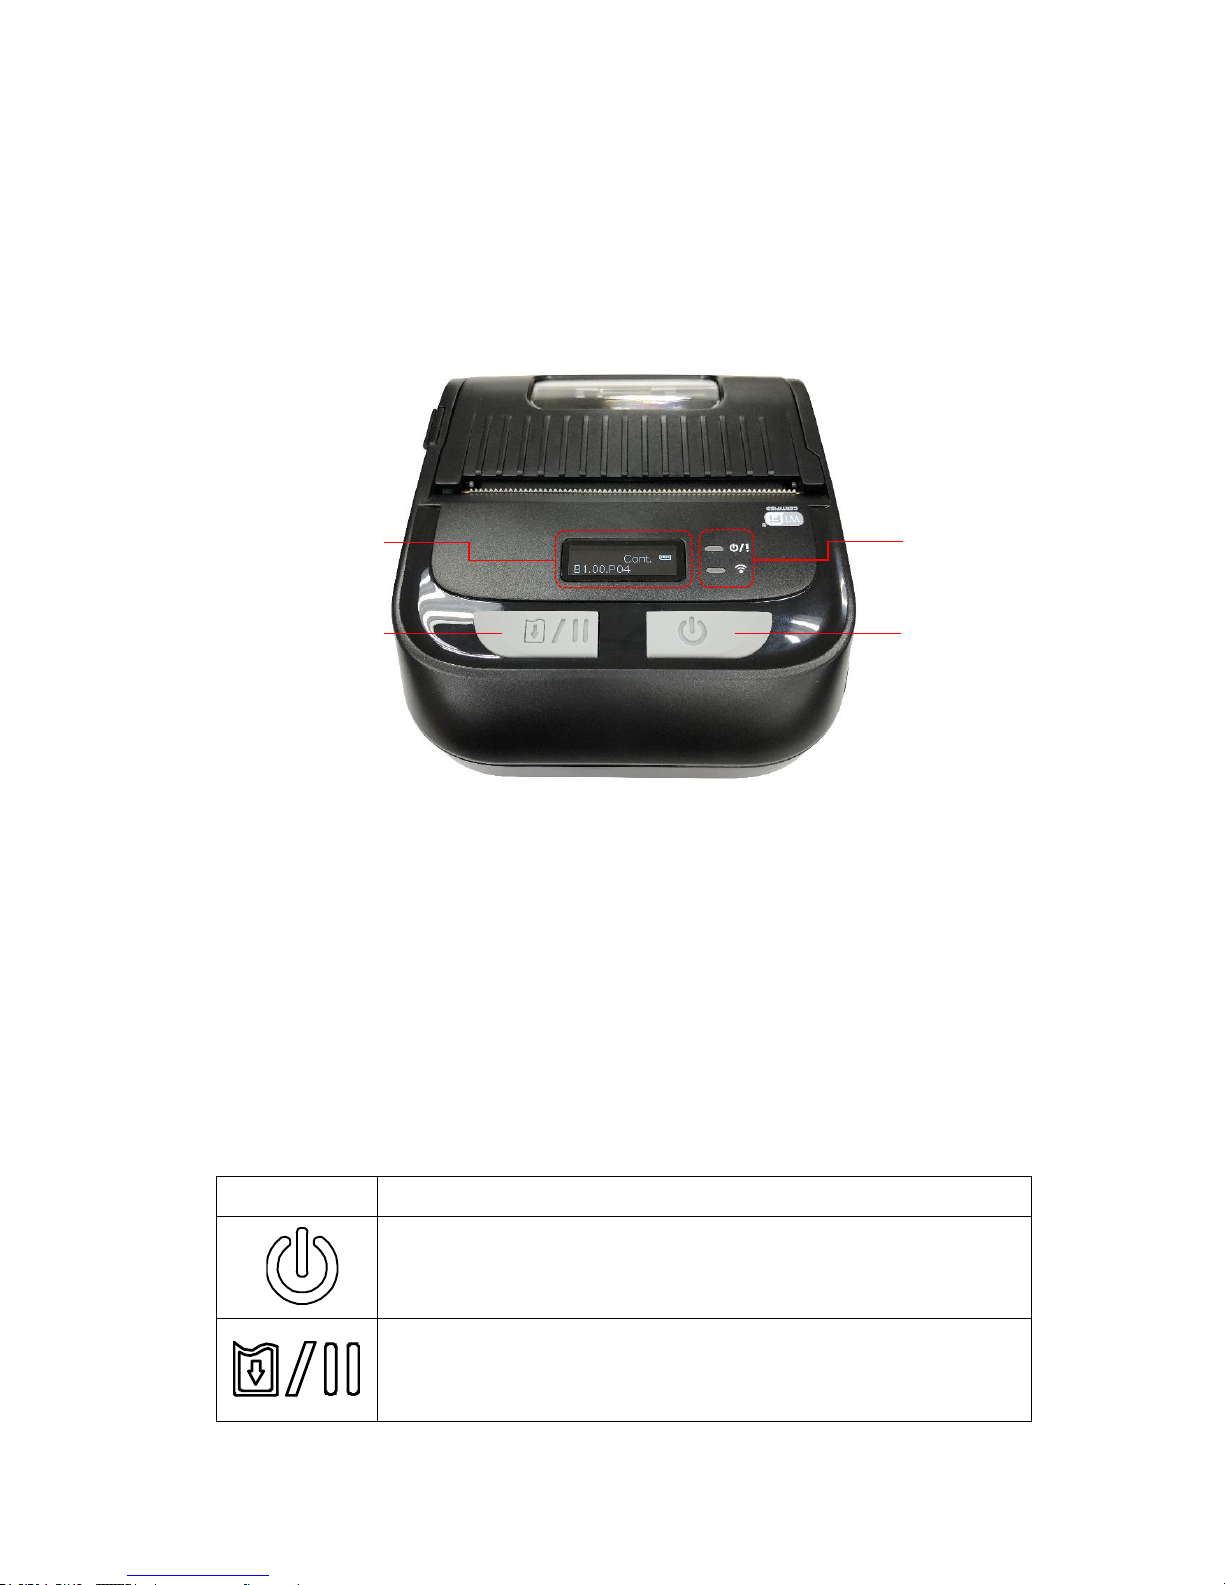
For LCD version
1. Power on/off button
2. Feed/Pause button
3. Printer status/Wireless status LED indicator
4. LCD screen (indicates battery status/media type/firmware version/error
messages)
Keys
Function
1. Press and hold for 2-3 seconds to turn on the printer.
2. Press and hold for 2-3 seconds to turn off the printer.
1. Ready status: Feed one label
2. Printing status: Pause the print job
4
3
2
1
Page 24
14
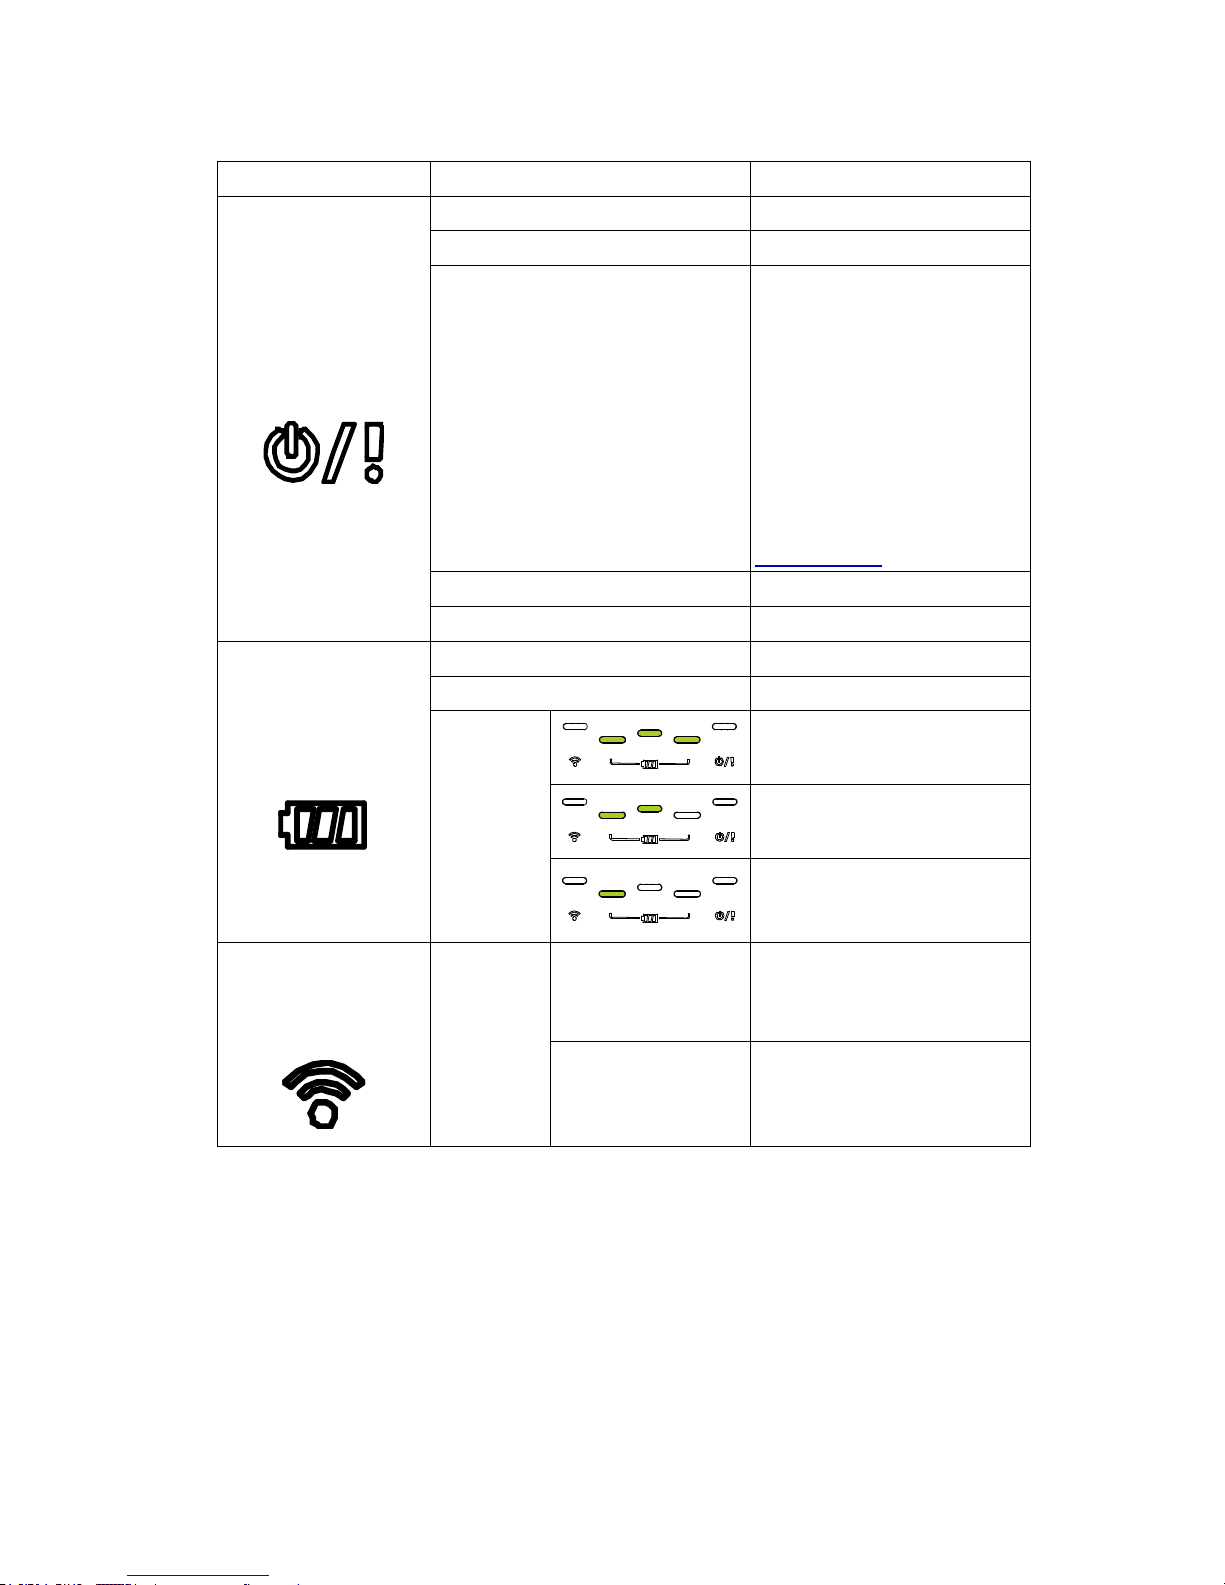
LED
Status
Indication
Printer status LED
indicator
Off
Printer is ready
Green (blinking)
Printer is paused
Green (blinking every two
seconds)
Sleep mode/ entered the
sleep mode after stop
working over 2 minutes
(The interval can be
changed by revising the
command, refer to
TSPL/TSPL2
programming manual on
TSC website).
Red (solid)
Media cover is open
Red (blinking)
Printer error
Battery status LED
indicator
Green (blinking)
Recharge the battery
Amber (solid)
Battery is charging
Green
(solid)
Fully charged
2/3 charged level
1/3 charged level
Wireless/Bluetooth
status LED
indicator
Bluetooth
Blue (solid)
Bluetooth device is ready
Blue (blinking)
Bluetooth device is
communicating
Page 25
15
3. Setup
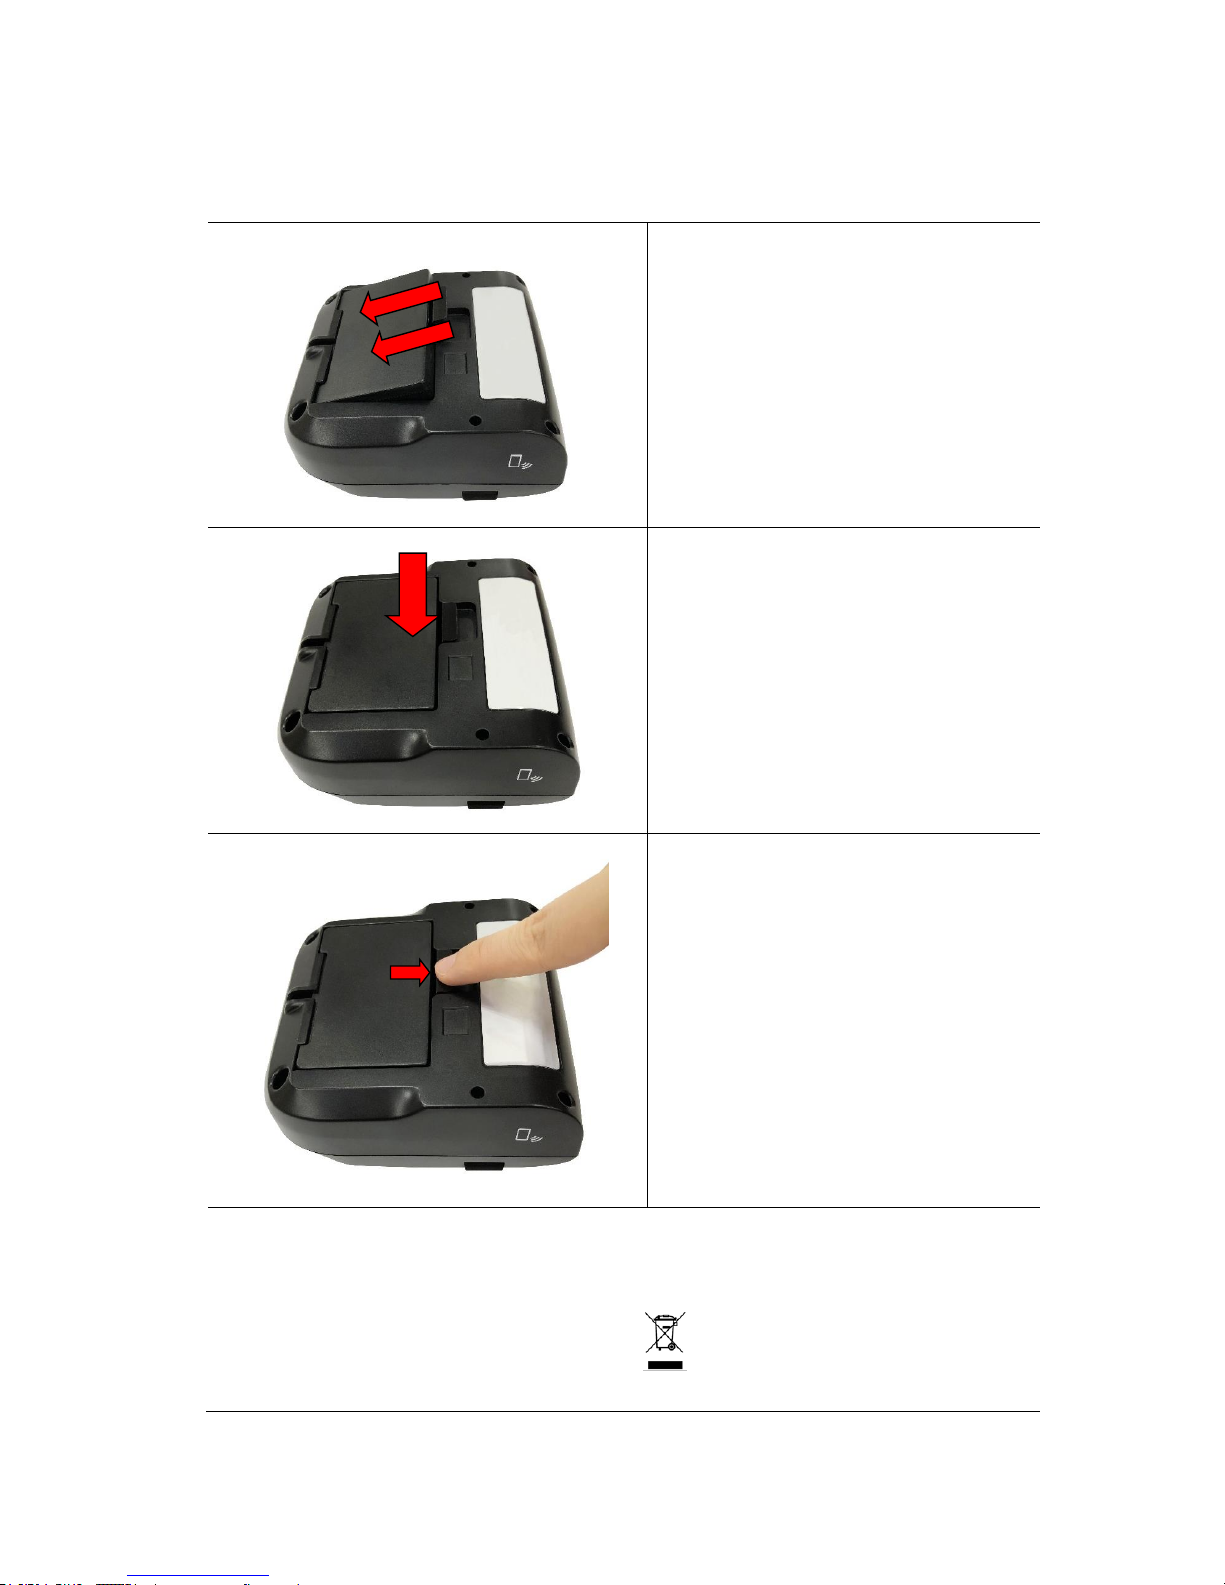
3.1 Install the Battery
1. Insert battery to the left side of
battery slot on the rear of the
printer.
2. Push the right side of the battery
down.
3. Pull the battery clasp to lock the
battery.
Battery safety warning:
DO NOT throw the battery in fire. DO NOT short circuit the contacts.
DO NOT disassemble the battery. DO NOT throw the battery in municipal waste.
The symbol of the crossed out wheeled bin ( ) indicates that the battery should not
be placed in municipal waste.
PUSH
Page 26
16
3.2 Charge the Battery
It takes 1.5 to 2 hours to fully charge the battery before the first time usage. The
lifetime of the battery is 300 times for charge/discharge cycles.
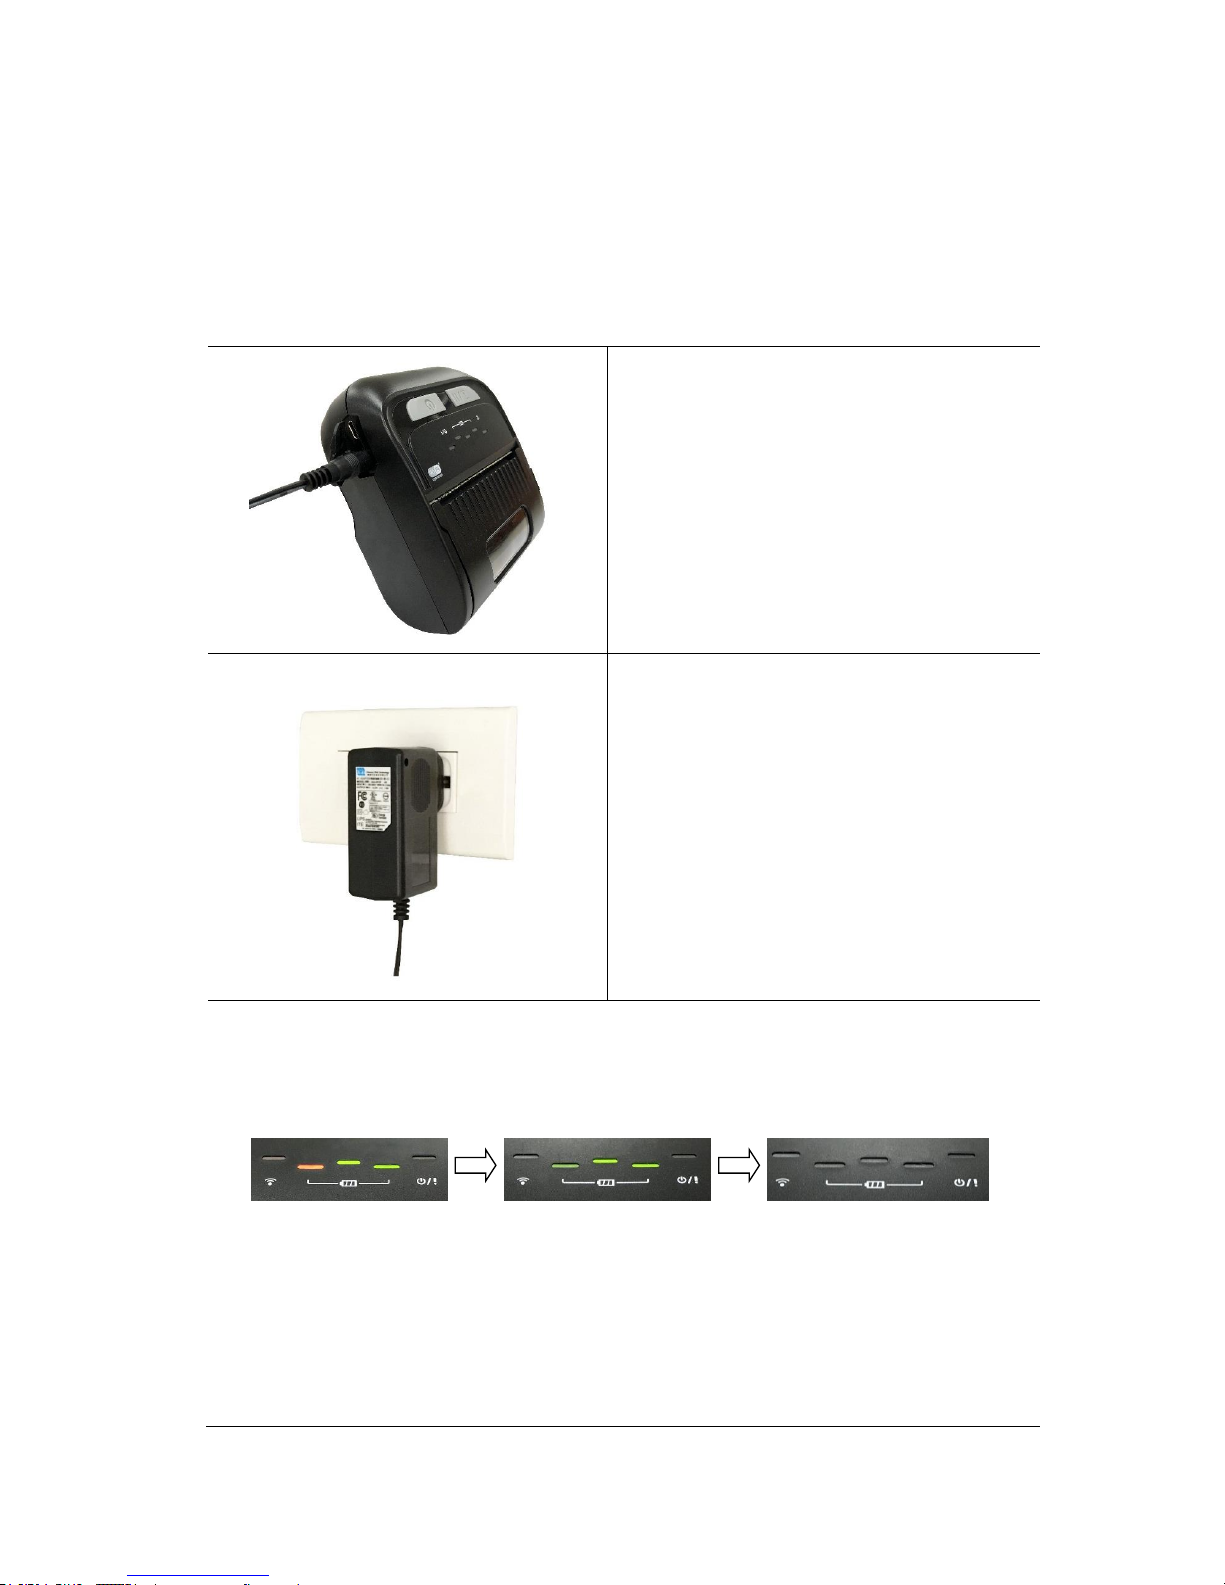
3.2.1 Charge the Battery
1. Open the interface cover and plug the
power cord in to the power jack.
Note:
Please switch OFF printer power prior to plug
in the power cord to printer power jack.
When the battery is charging, please do not
remove the battery from the printer,
otherwise, please re-plug the power cord into
a power outlet.
2. Plug the power cord into a properly
power outlet.
3. When the battery installed on printer and start charging, the printer will
automatically open and color of battery status LED indicator is solid amber.
The amber LED indicator will turned off after the battery is fully charged.
Battery charging Battery fully charged Auto power off
Note:
1. When printer start charging, the printer will automatically open and could not turn-off
the power.
2. When checking the battery status, please connect the adapter to printer, the LED
indicator will turn to green then extinguished when the battery is fully charged.
Page 27

17
Charging Temperature
The battery normal working condition is from 0°C to 40°C (32 °F to 104 °F). The device or
battery charger always perform battery charging in a safe and optimum manner. At higher
temperatures (e.g. approximately +40 °C (+104 °F) or charging when turning on the
printers), the printer or battery charger may stop charging for a period of time to keep the
battery at acceptable temperatures.
Page 28
18
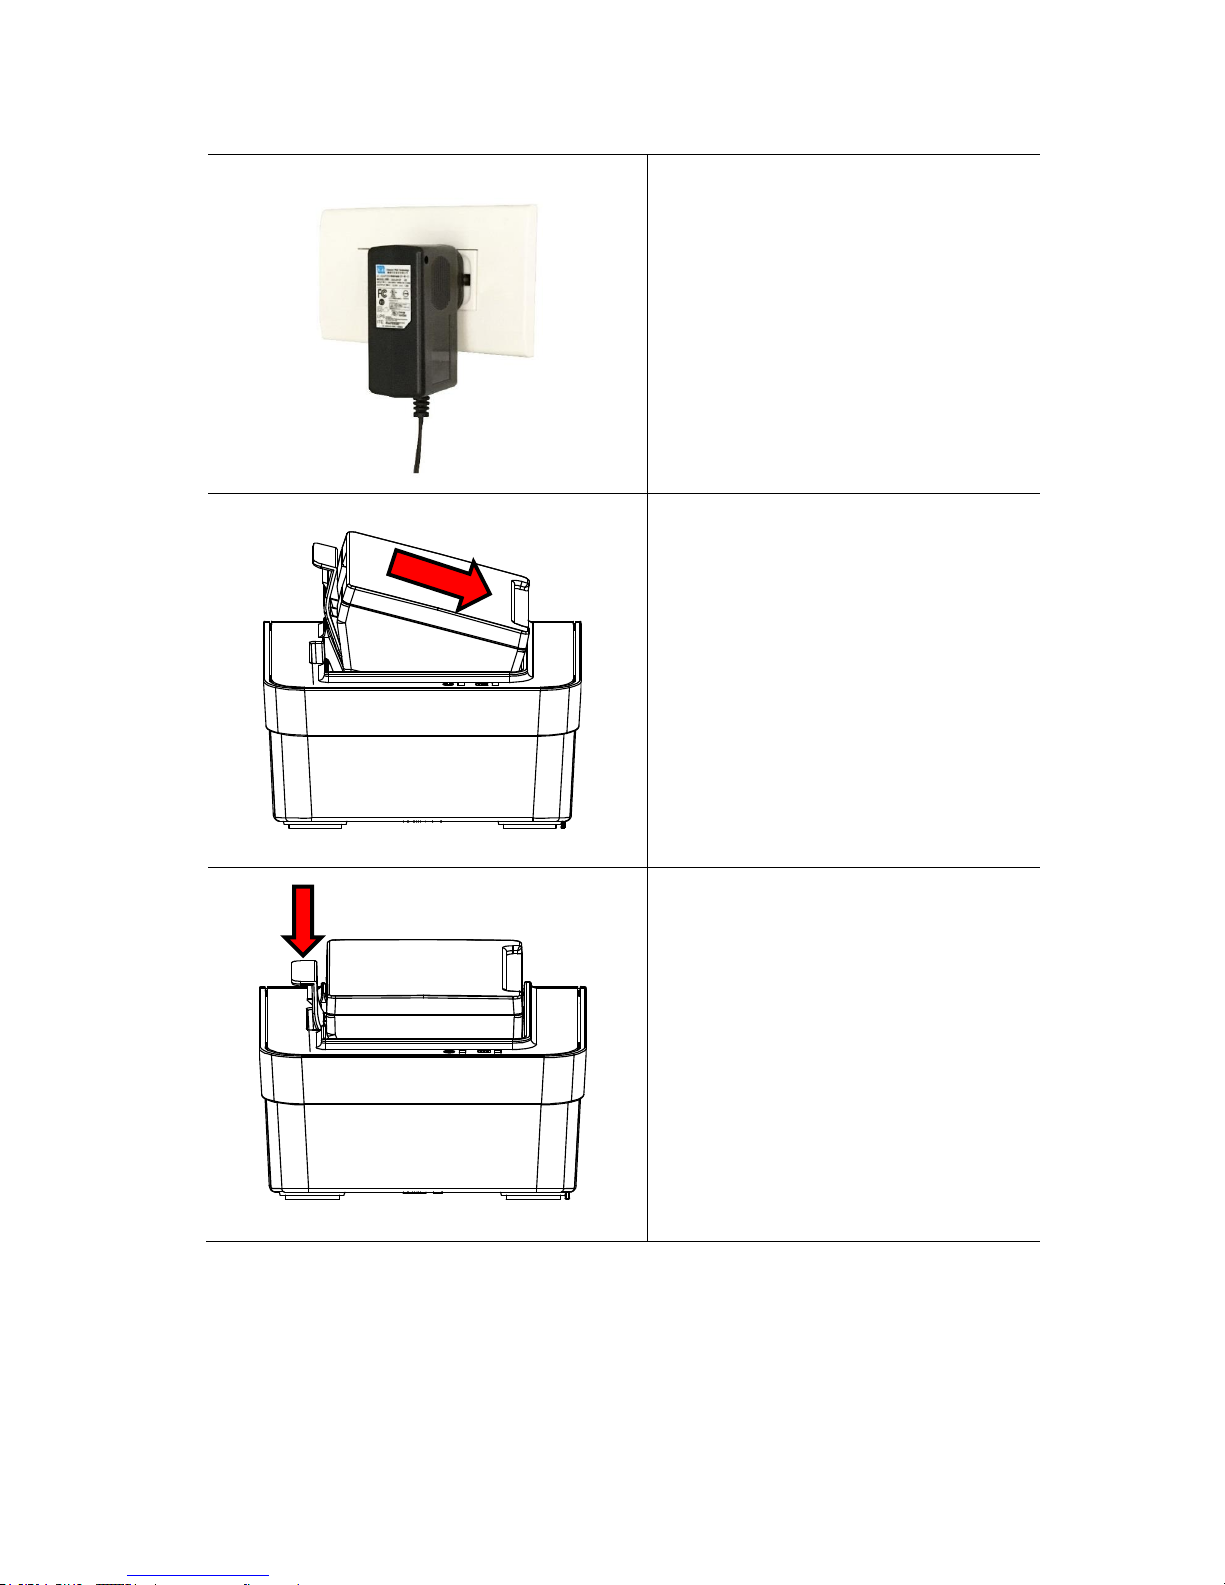
3.2.2 Charge by Charger Station (Optional)
1. Plug the power cord to the power
jack on the charger station.
2. Insert the battery along the slot to
the right side of charger station as
pictured. (Refer to section 3.1 for
battery installation procedure.)
3. Push the battery clasp and
properly install the battery, it will
start charging.
Note:
The battery is completely charged
and the amber of LED indicator will
be off and turns to green.
Page 29
19
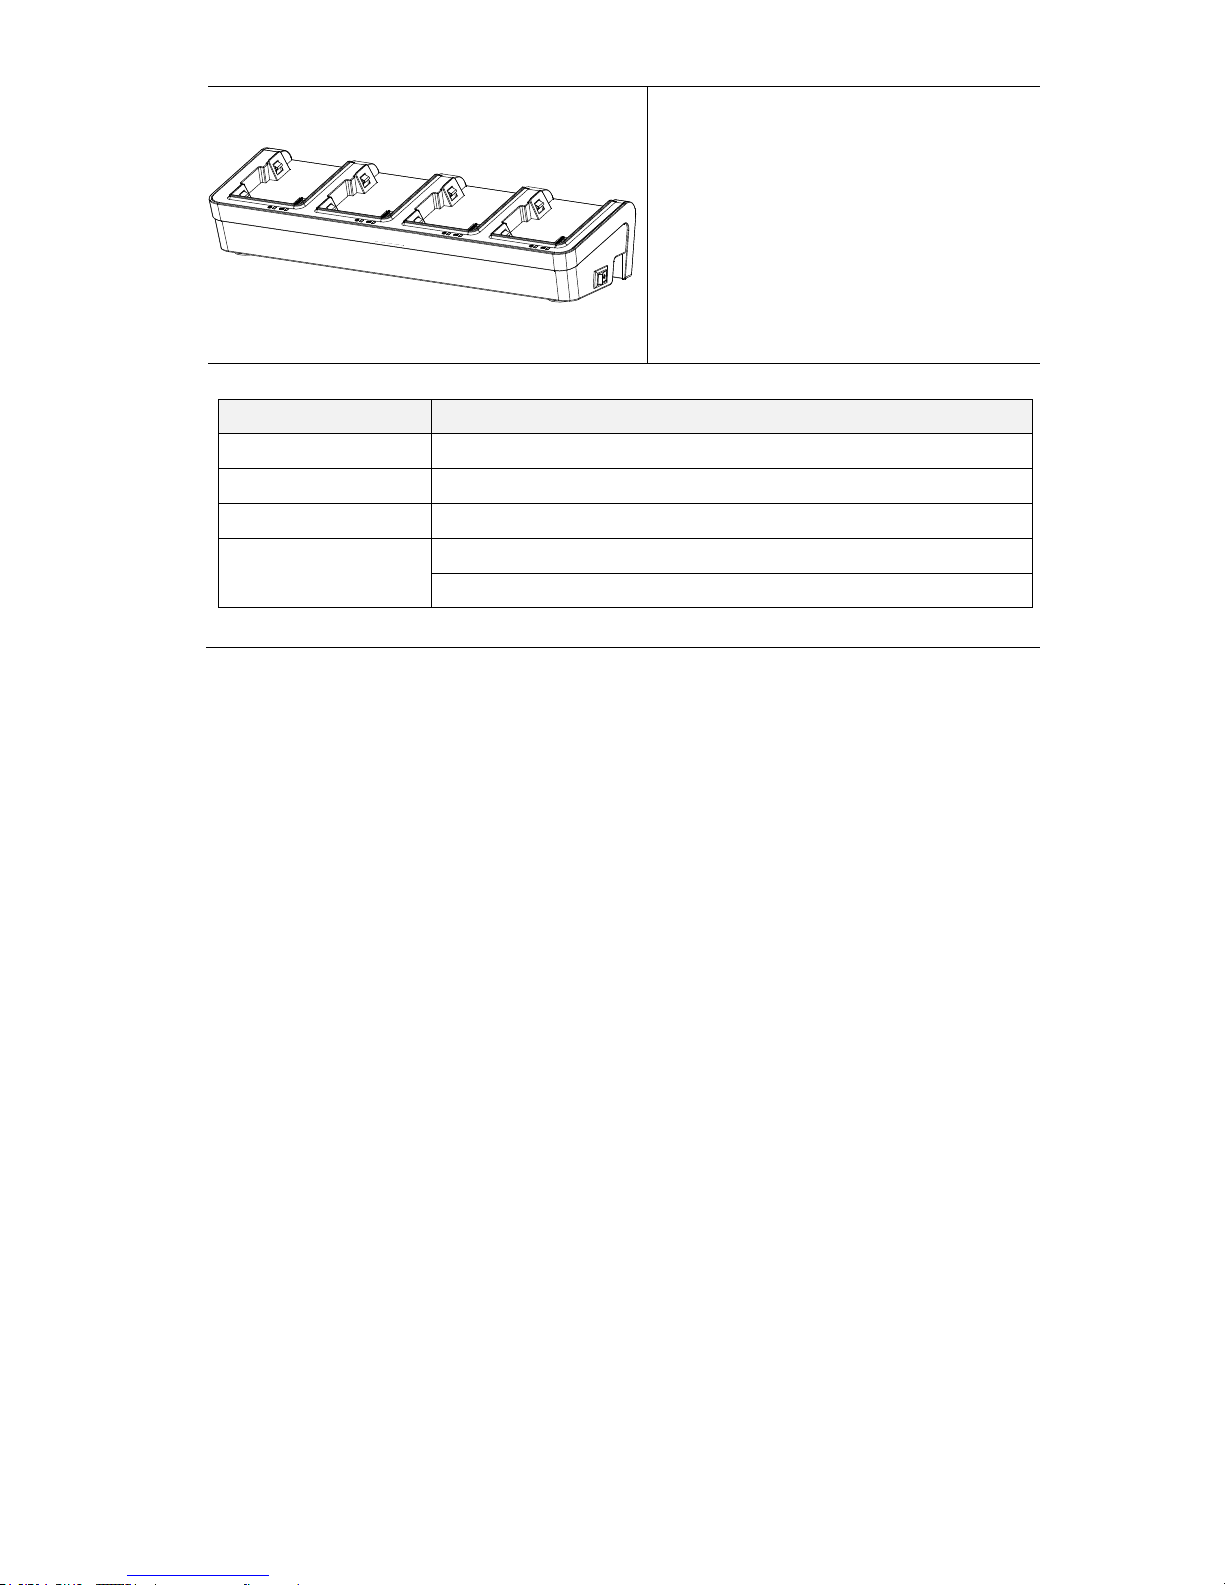
Note:
The four bay batteries charger
station is also available for your
reference.
LED Color
Description
Green / Solid
Battery is completely charged
Green / Blinking
Battery is charging
Red / Blinking
Battery charging error
Off
No battery
Battery is completely charged over 1.5 ~ 2 hrs.
Page 30
20
3.3 Communicate
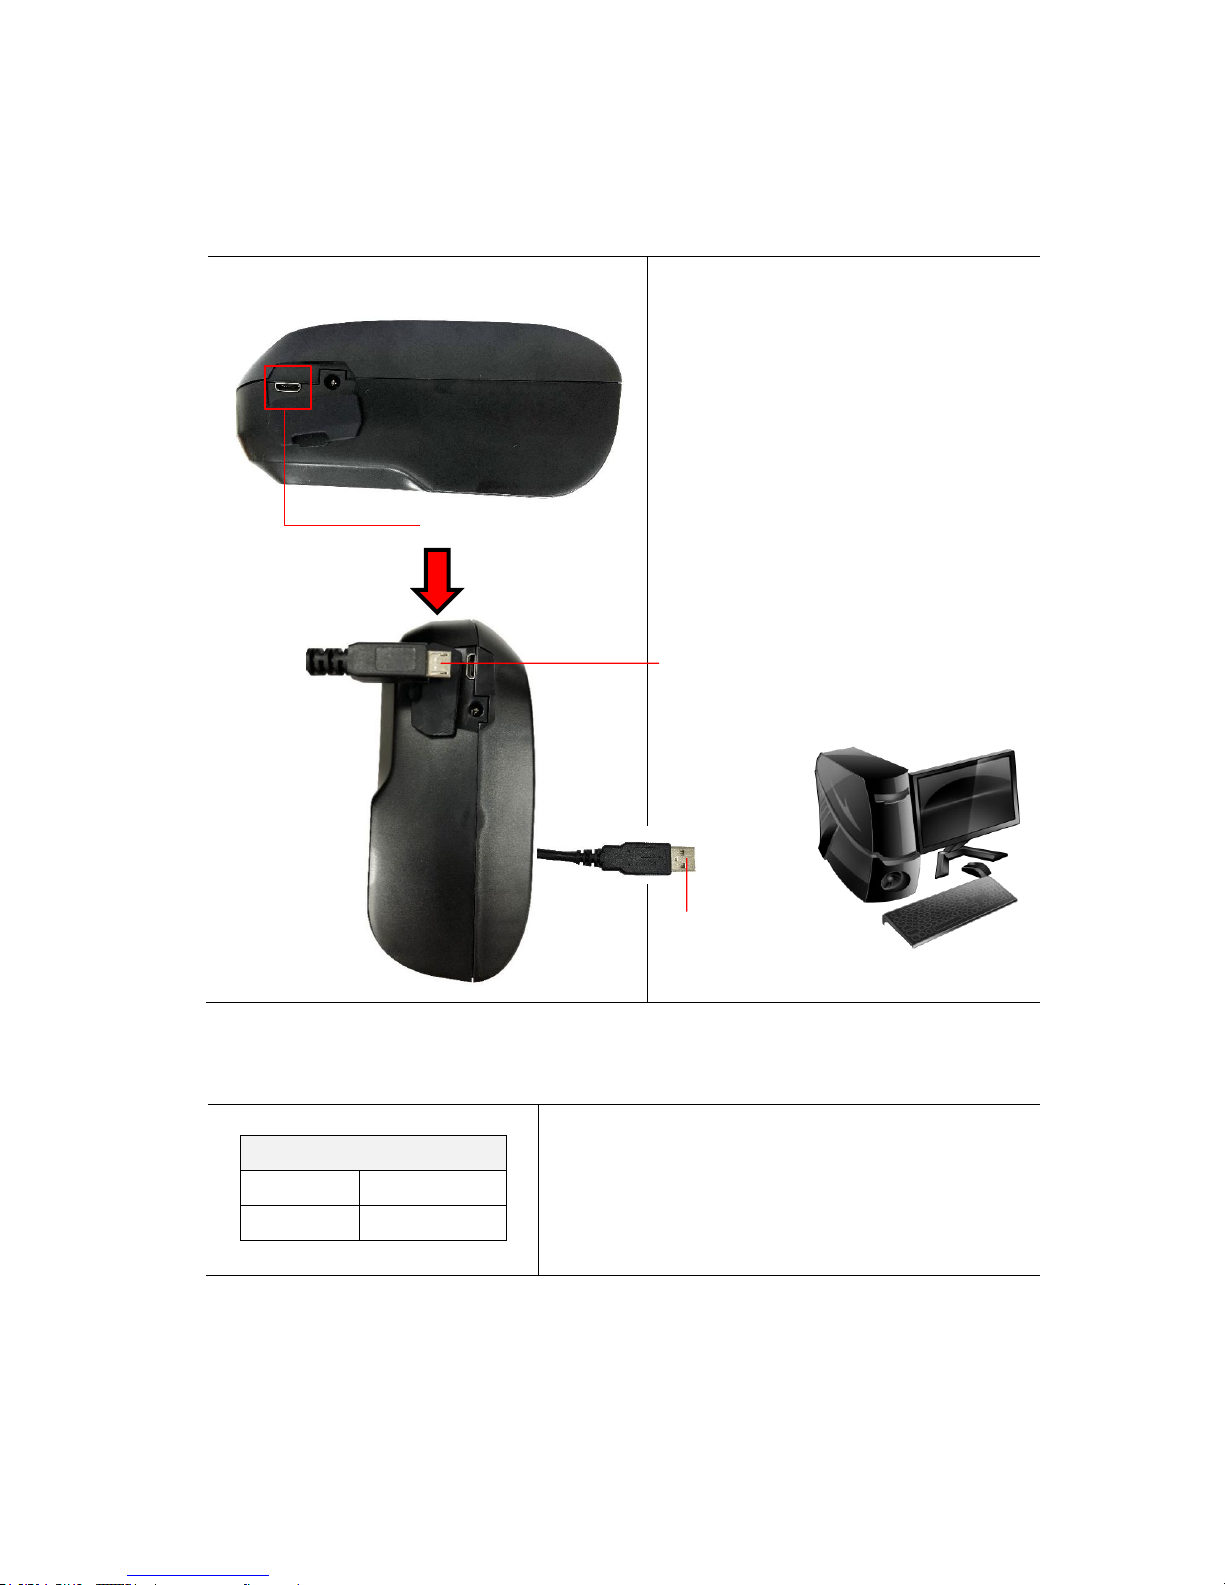
3.3.1 Connecting with the Communication Cable
USB to USB Cable (Optional)
1. Open the interface cover and
connect the printer to the computer
with USB cable.
3.3.2 Connecting with Bluetooth (Optional)
Default
Name
RF-BHS
PIN
0000
Turn on the printer and make sure the Bluetooth
of device is opened.
Note:
Please refer to section 6.5 to change the name of
default and PIN.
USB interface
USB connector
(PC)
USB connector
(Printer)
Page 31
21
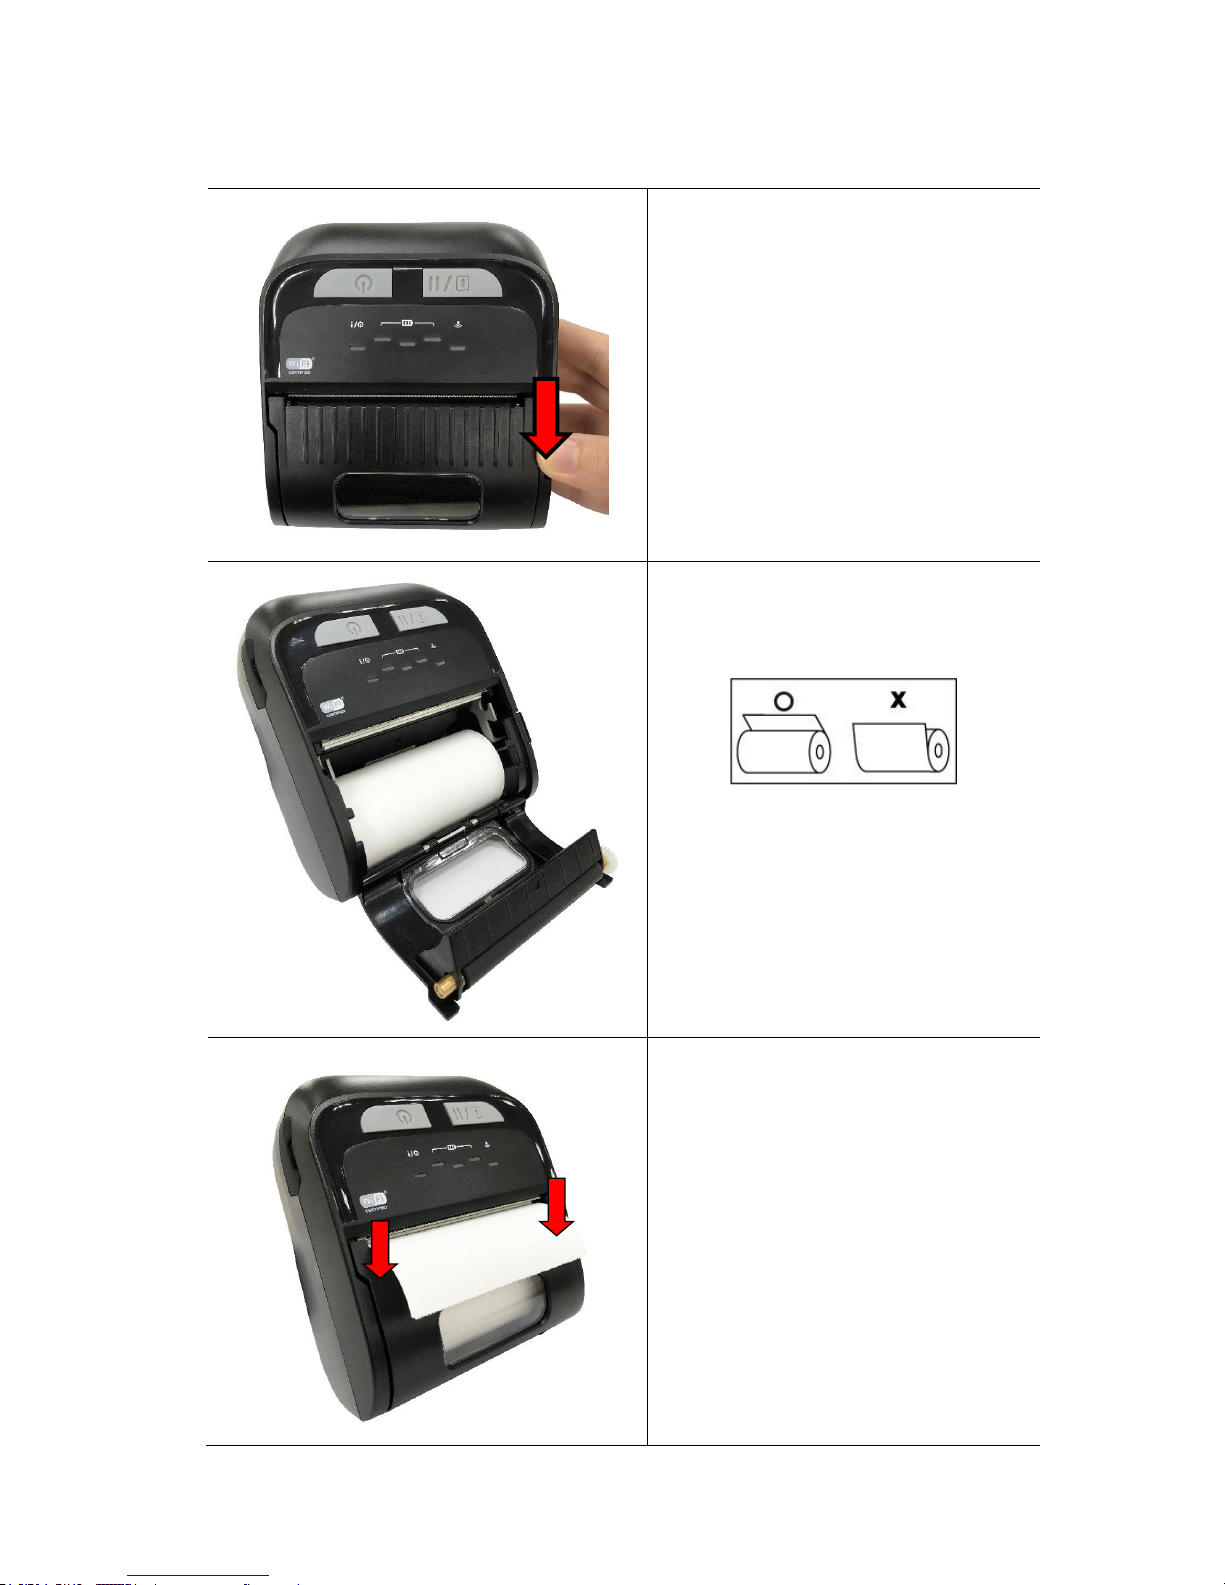
3.4 Loading the Media
1. Open the printer media cover by
pressing the media cover release
button.
2. Place the media roll at the correct
side, and pull out enough paper
over the tear edge.
3. Press the media cover on both
sides to close it and make sure the
media cover have closed correctly.
Page 32
22
4. Accessories
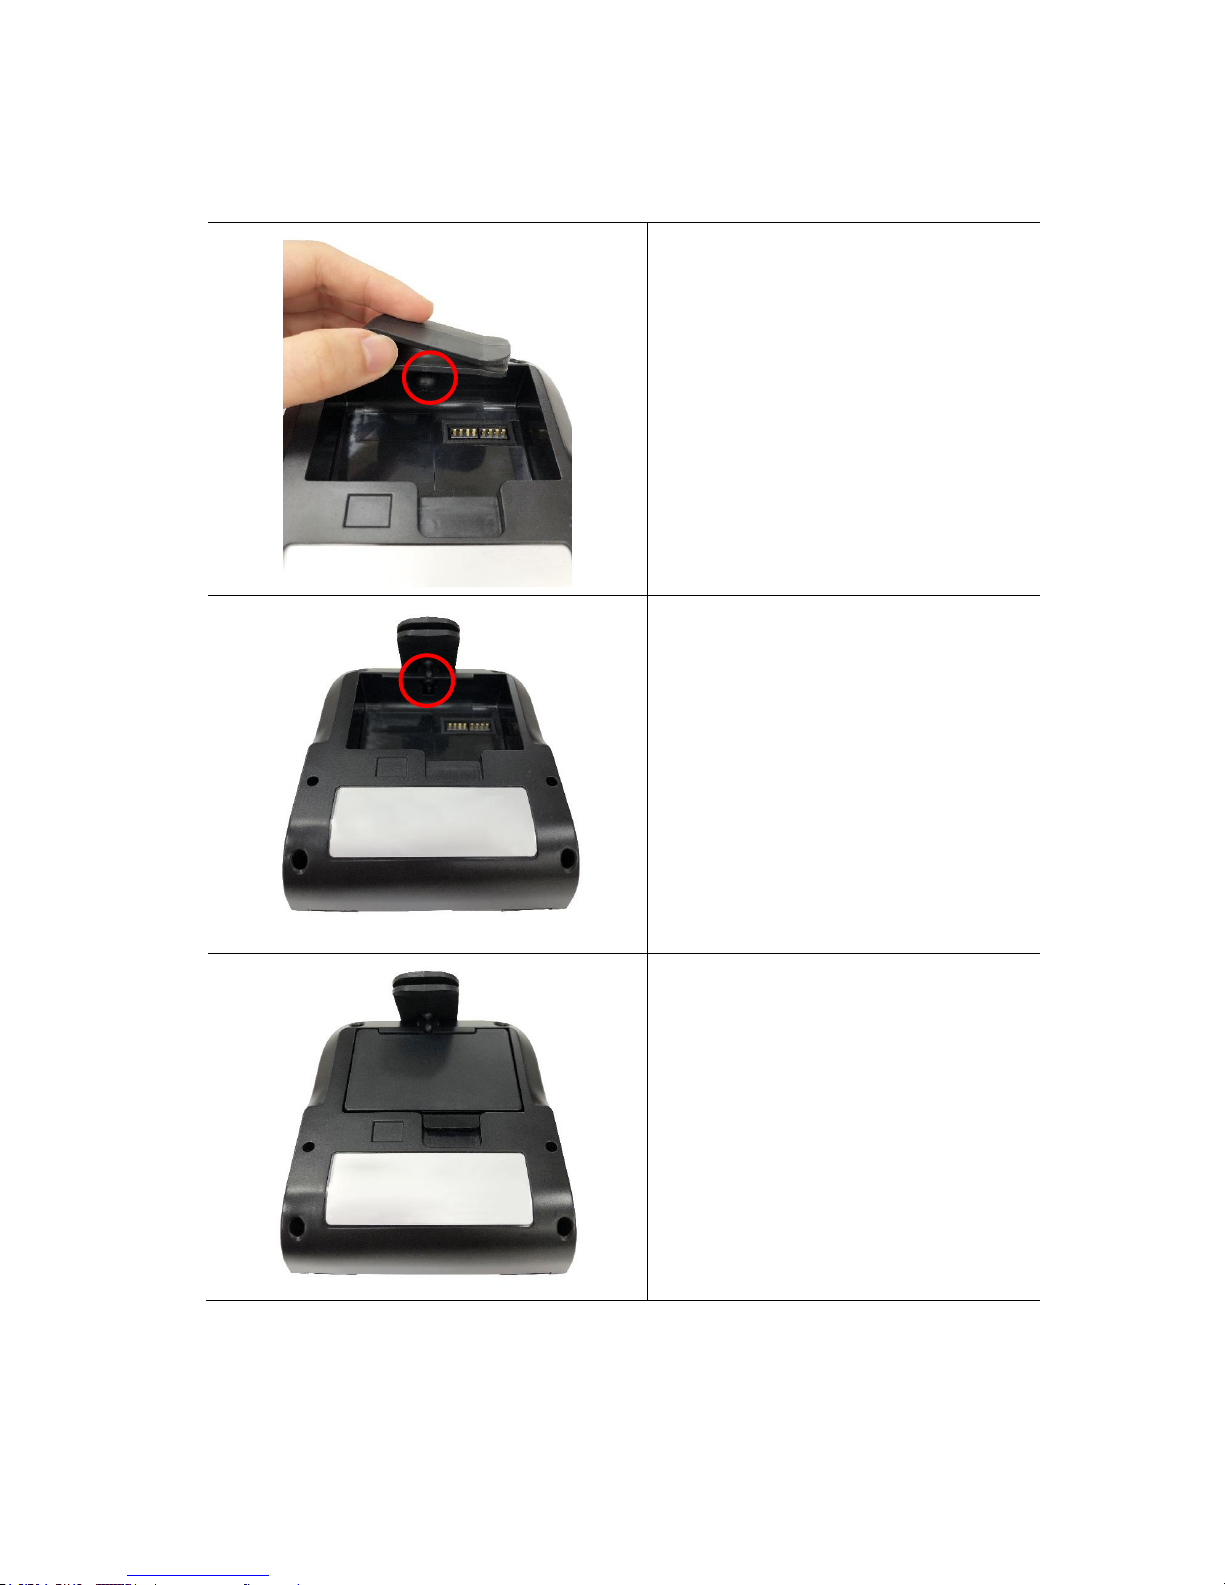
4.1 Install the Belt Clip
1. Turn the battery to rear side,
remove the battery on the rear of
the printer and lock the belt clip
on the hole above the battery.
2. Press the ball on the belt clip to
the hole as pictured.
3. After reinstalled the battery, the
printer can be hung on the belt.
Page 33
23
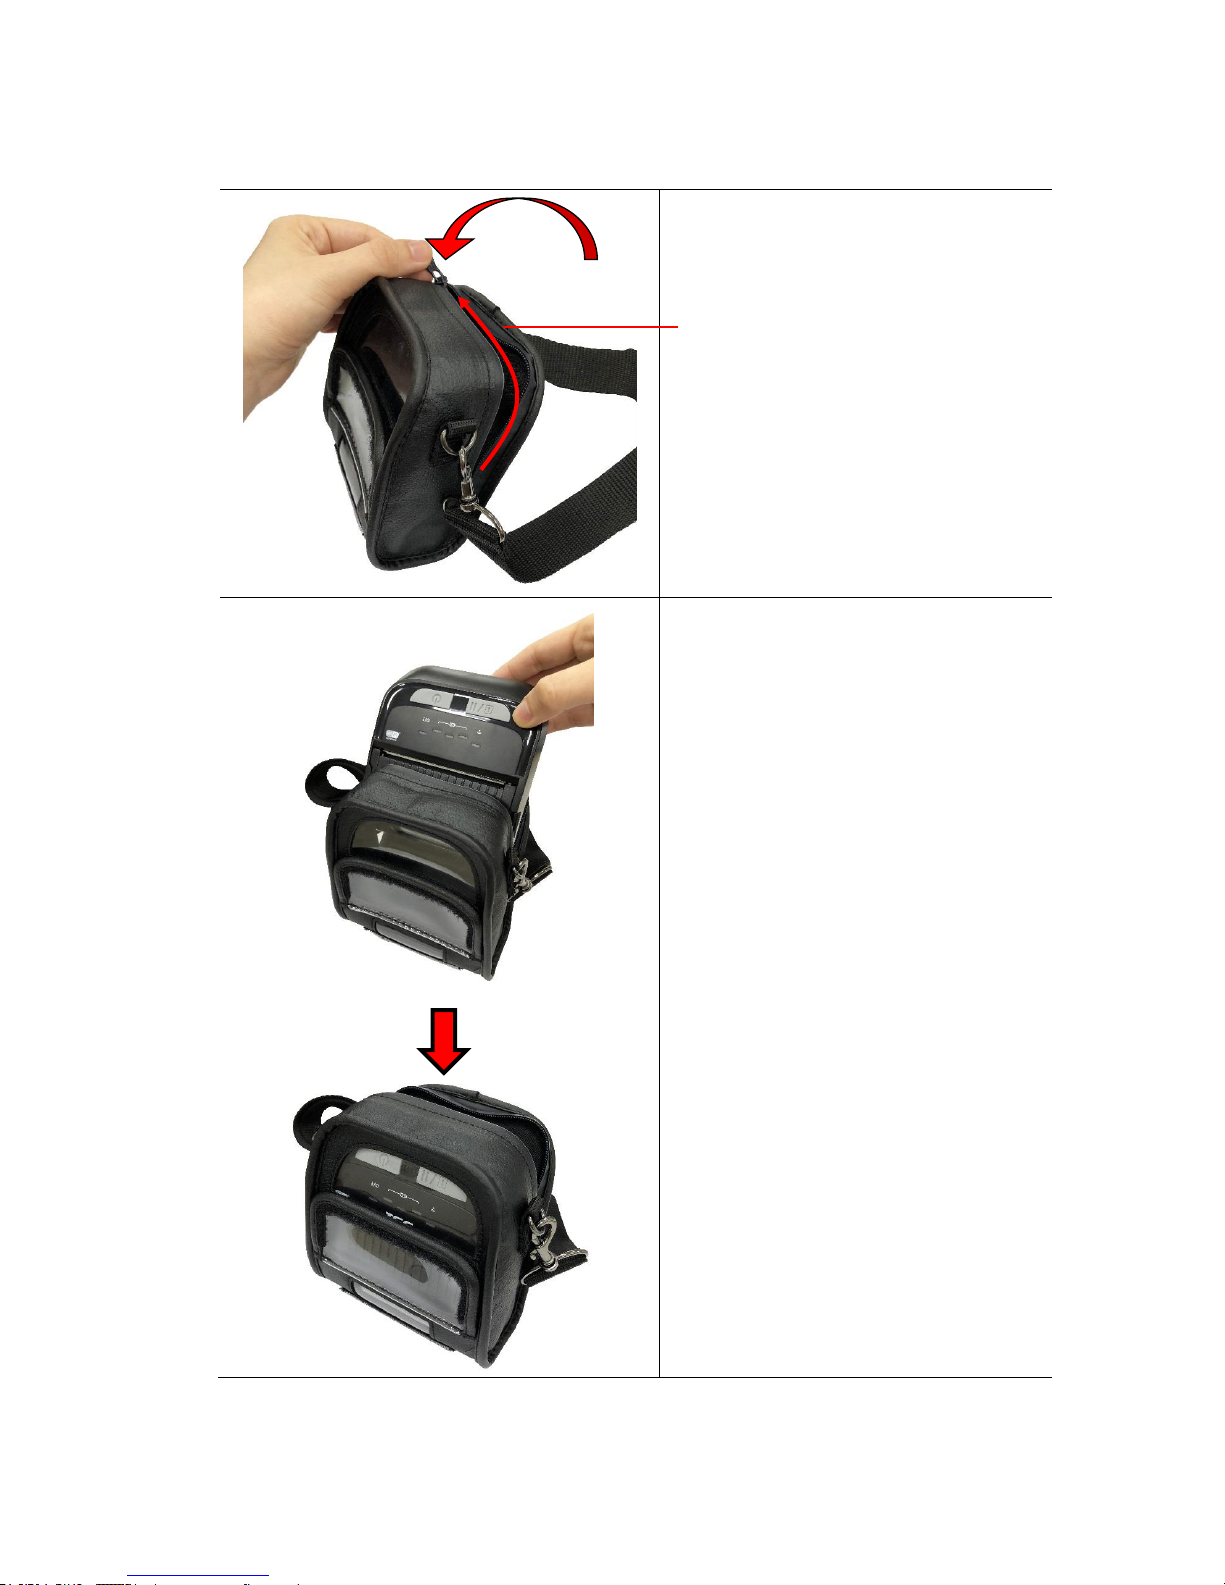
4.2 Install the IP54-rated environmental case with shoulder strap
(Optional)
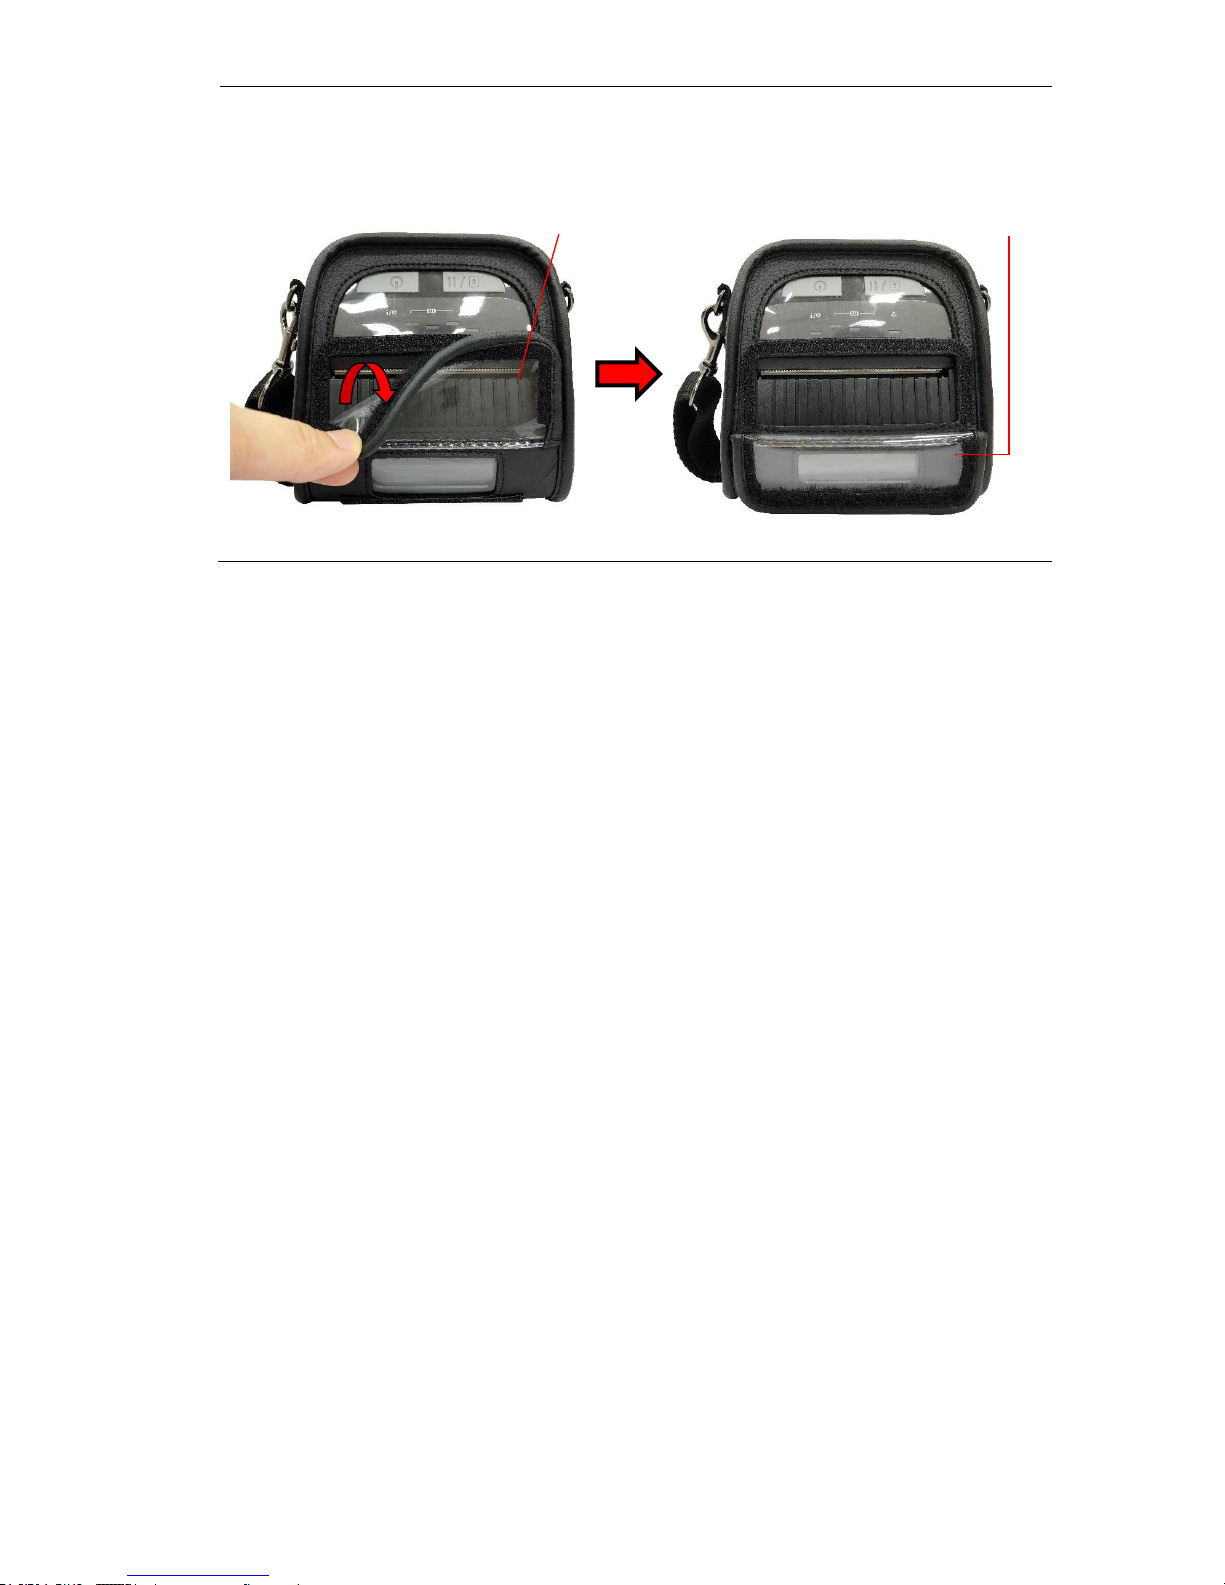
1. Open the zip along the arrow
direction indicated on case
cover.
2. Place the printer in the case.
Note: The printing side must face the
outside cover as indicated.
Zip of case cover
Page 34
24
3. Zip up the case cover. The outside cover should be opened and fixed while
printing.
Outside cover
Outside cover fixed
Page 35
25
5. Power-on Utilities
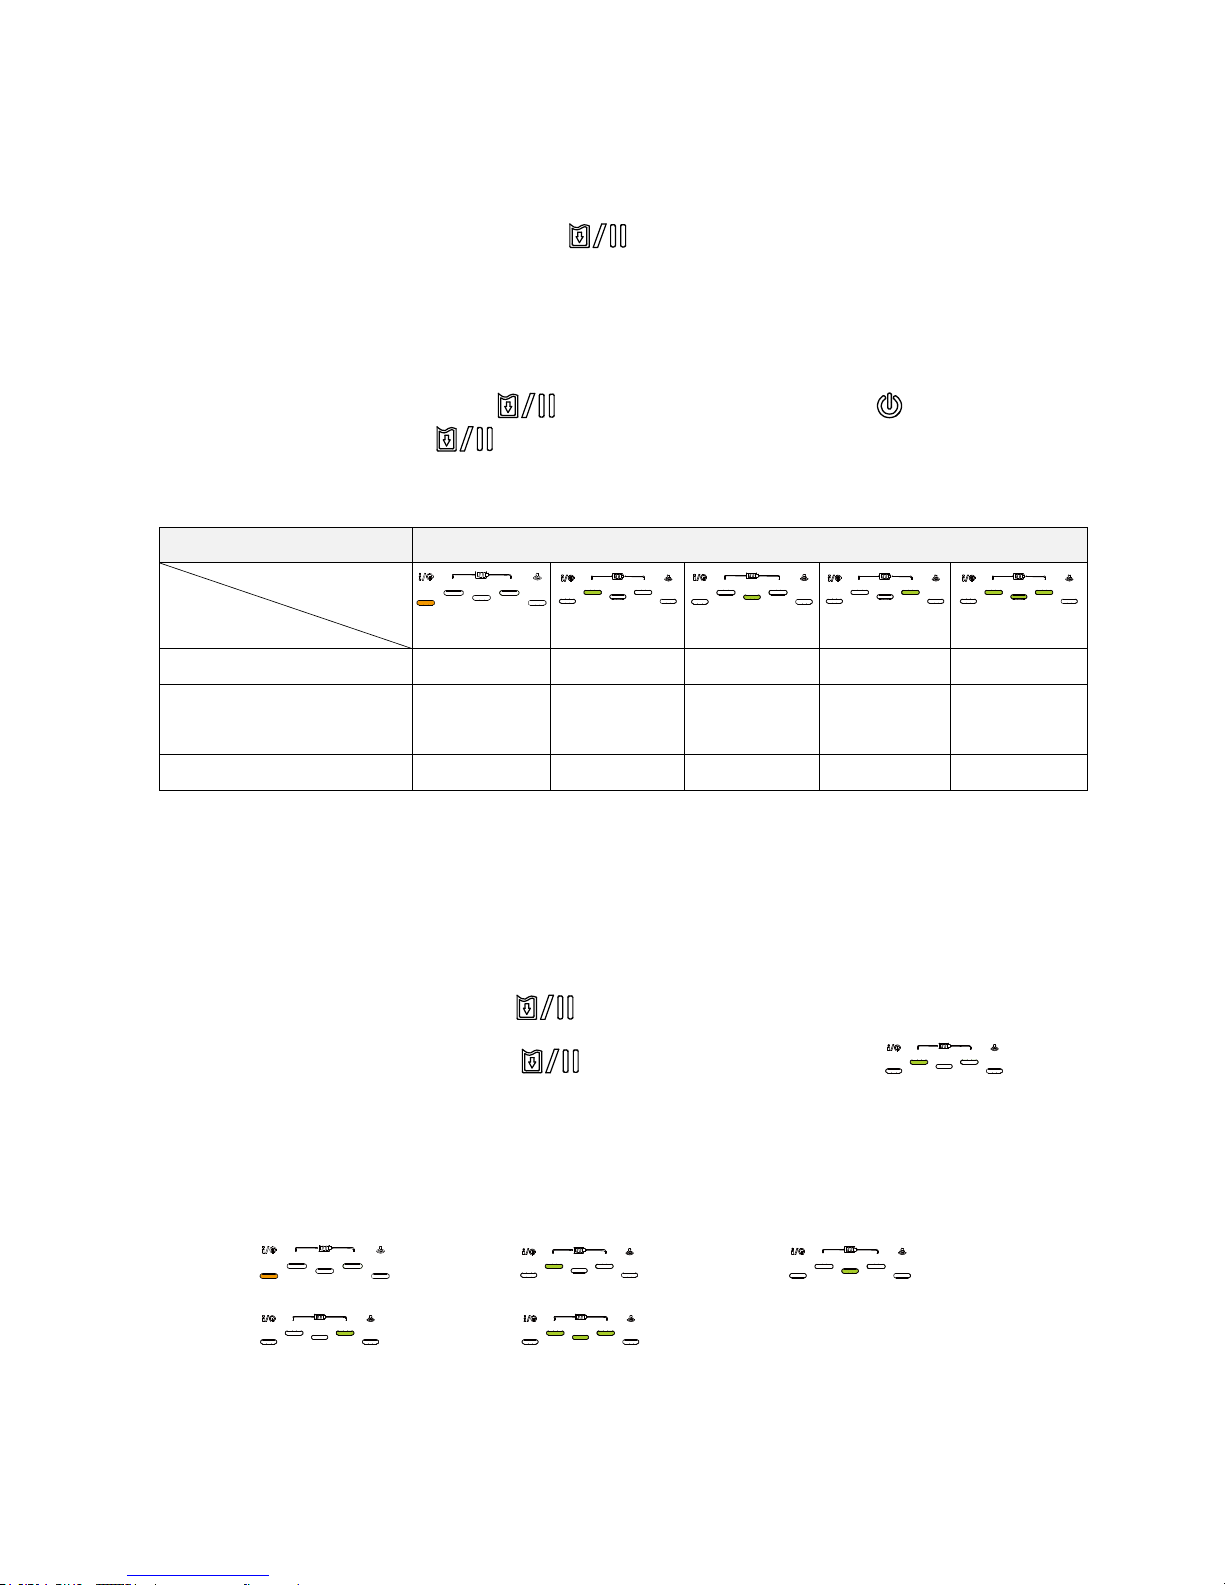
There are three power-on utilities to set up and test printer hardware. These utilities are
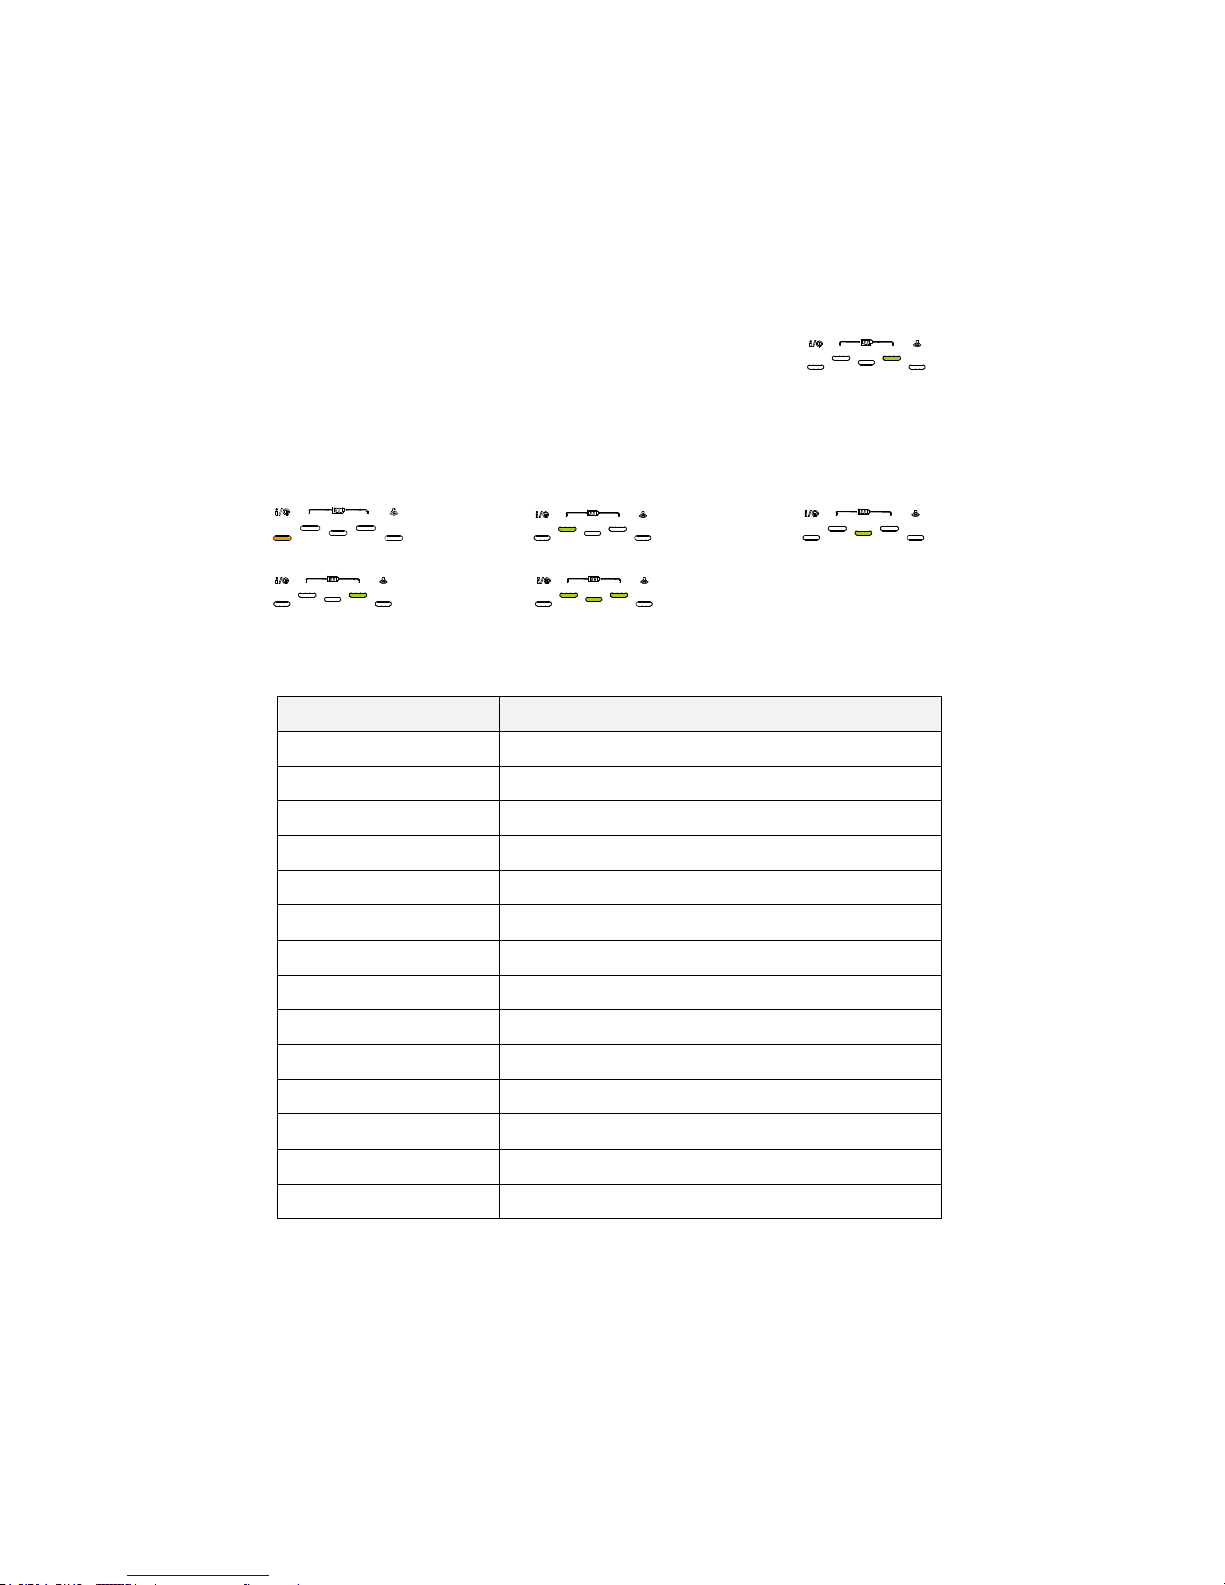
activated by pressing FEED button ( ) then turning on the printer power
simultaneously and release the button at different positions of LED indicator.
Please follow the steps below for different power-on utilities.
1. Turn off the printer power switch.
2. Hold on the FEED button ( ) then turn on the power switch ( ).
3. Release the button ( ) when LED indicates with different positions for different
functions.
Power on utilities
The positions of LED light will be changed as following pattern:
LED
Functions
(solid)
(5 blinks)
(5 blinks)
(5 blinks)
(Solid green)
1. Media sensor calibration
Release
2. Self-test and enter dump
mode
Release
3. Printer initialization
Release
5.1 Media Sensor Calibration
Please follow the steps below to calibrate the media sensor.
1. Turn off the power switch.
2. Hold on the FEED button ( ) then turn on the power switch.
3. Release the FEED button ( ) when the indicator becomes and
blinking. (Any green will do during the 5 blinks)
It will calibrate the black mark sensor sensitivity.
The LEDs will be changed as following order:
(amber) (5 blinks) (5 blinks)
(5 blinks) (solid green)
Page 36

26
5.2 Self-test and Dump Mode
Please follow the steps below.
1. Turn off the power switch.
2. Hold on the FEED button ( ) then turn on the power switch.
3. Release the FEED button ( ) when the indicator becomes and
blinking. (Any green will do during the 5 blinks)
The LEDs will be changed as following order:
(amber) (5 blinks) (5 blinks)
(5 blinks) (solid green)
4. It calibrates the sensor and measures the media length and prints internal settings
then enter the dump mode.
5. Turn off / on the power to resume printer for normal printing.
Page 37
27
Self-test
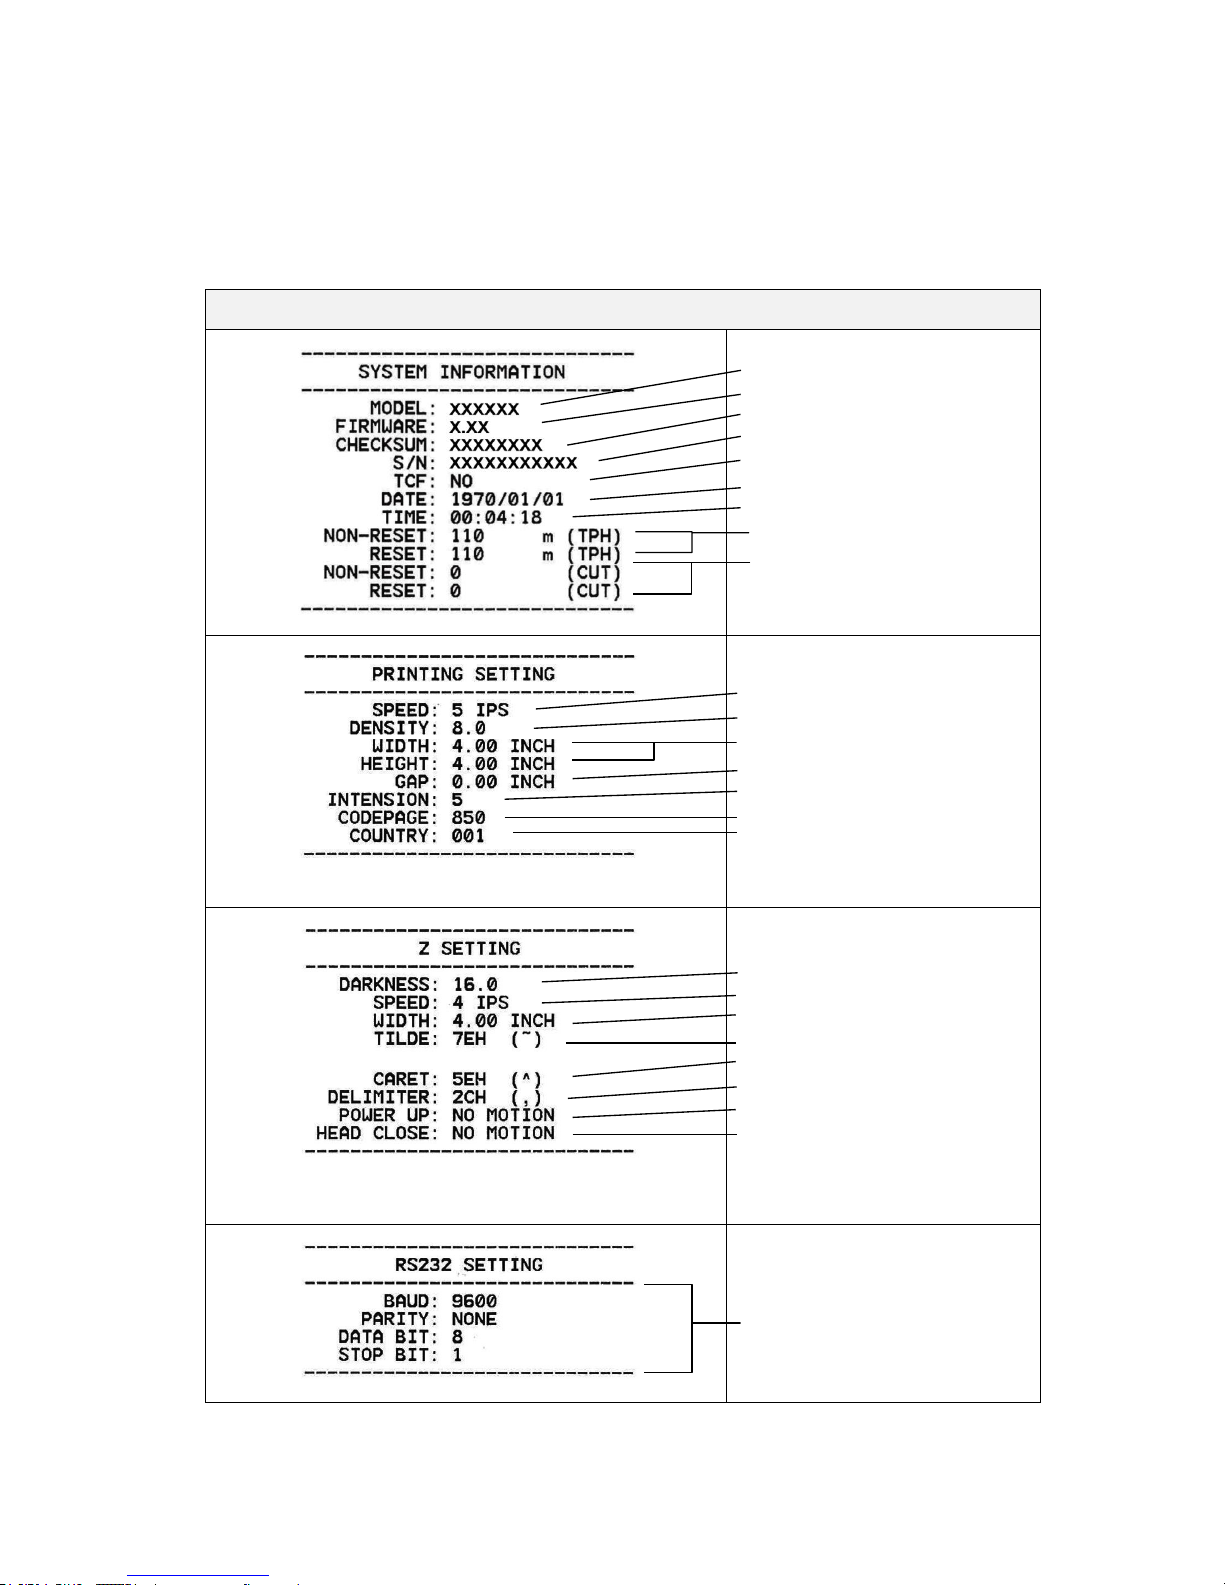
Printer will print the printer configuration after media sensor calibration. Self-test
printout can be used to check if there is any dot damage on the heater element,
printer configurations and available memory space.
Self-test printout
Model name
F/W version
Firmware checksum
Printer S/N
TSC configuration file
System date
System time
Printed mileage (meter)
Cutting counter
Print speed (inch/sec)
Print darkness
Label size (inch)
Gap distance (inch)
Gap/black mark sensor intension
Code page
Country code
ZPL setting information
Print darkness
Print speed (inch/sec)
Label size
Control prefix
Format prefix
Delimiter prefix
Printer power up motion
Printer head close motion
Note:
ZPL is emulating for Zebra®
language.
RS232 serial port
configuration
Page 38
28
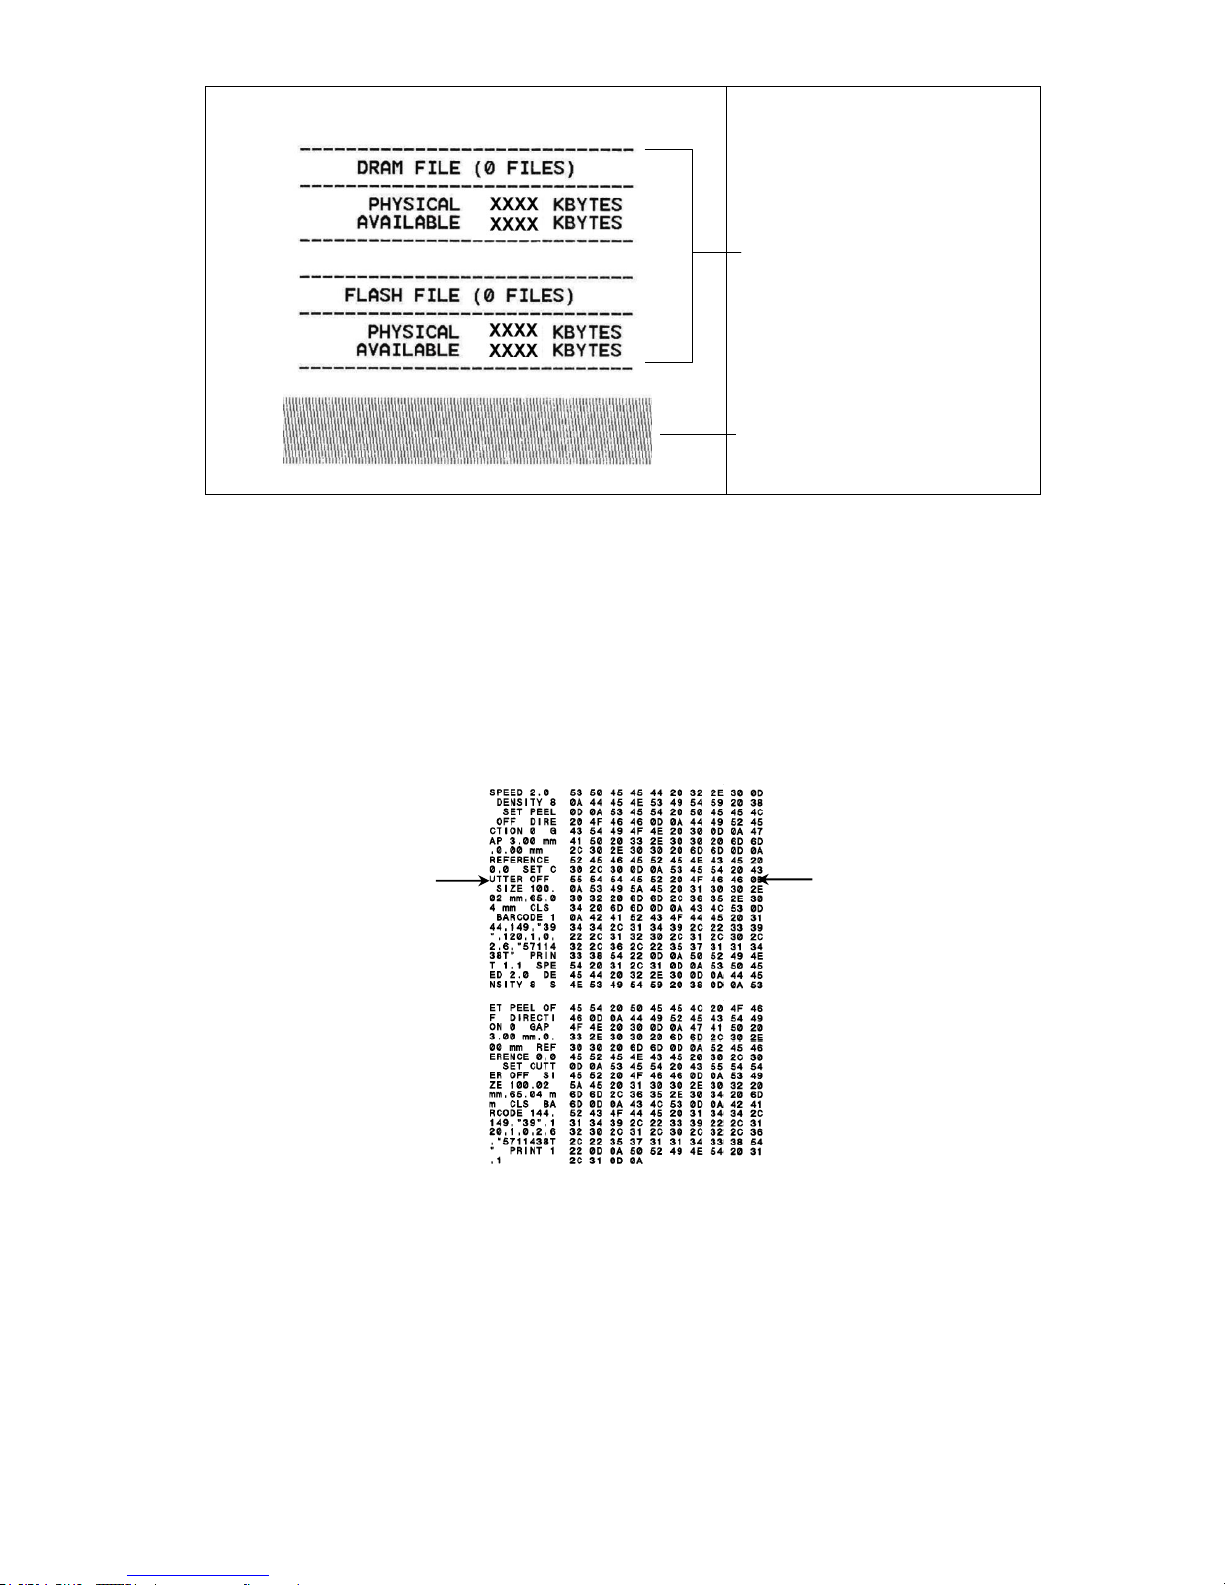
Numbers of download files
Total & available memory
space
Print head check pattern
Dump mode
Printer will enter dump mode after printing printer configuration. In the dump mode,
all characters will be printed in 2 columns as following. The left side characters are
received from your system and right side data are the corresponding hexadecimal
value of the characters. It allows users or engineers to verify and debug the
program.
Note:
1. Dump mode requires 2” wide paper width.
2. Turn off / on the power to resume printer for normal printing.
ASCII Data
Hex decimal data related to left
column of ASCII data
Page 39
29
5.3 Printer Initialization
Printer initialization is used to clear DRAM and restore printer settings to defaults.
Printer initialization is activated by the following procedures.
1. Turn off the power switch.
2. Hold on the FEED button then turn on the power switch.
3. Release the FEED button when the indicator becomes and blinking.
(Any green will do during the 5 blinks).
The LEDs will be changed as following order:
(amber) (5 blinks) (5 blinks)
(5 blinks) (solid green)
Printer configuration will be restored to defaults as below after initialization.
Parameter
Default setting
Speed
50.8 mm/sec (2 ips)
Density
8
Media Width
2.83” (72 mm)
Media Height
4” (101.5 mm)
Sensor Type
Black mark sensor (As paper end sensor)
Black Mark Setting
As paper end sensor
Print Direction
0
Reference Point
0,0 (upper left corner)
Offset
0
Serial Port Settings
9600 bps, none parity, 8 data bits, 1 stop bit
Code Page
850
Country Code
001
Clear Flash Memory
No
IP Address
DHCP
Page 40
30
6. Diagnostic Tool
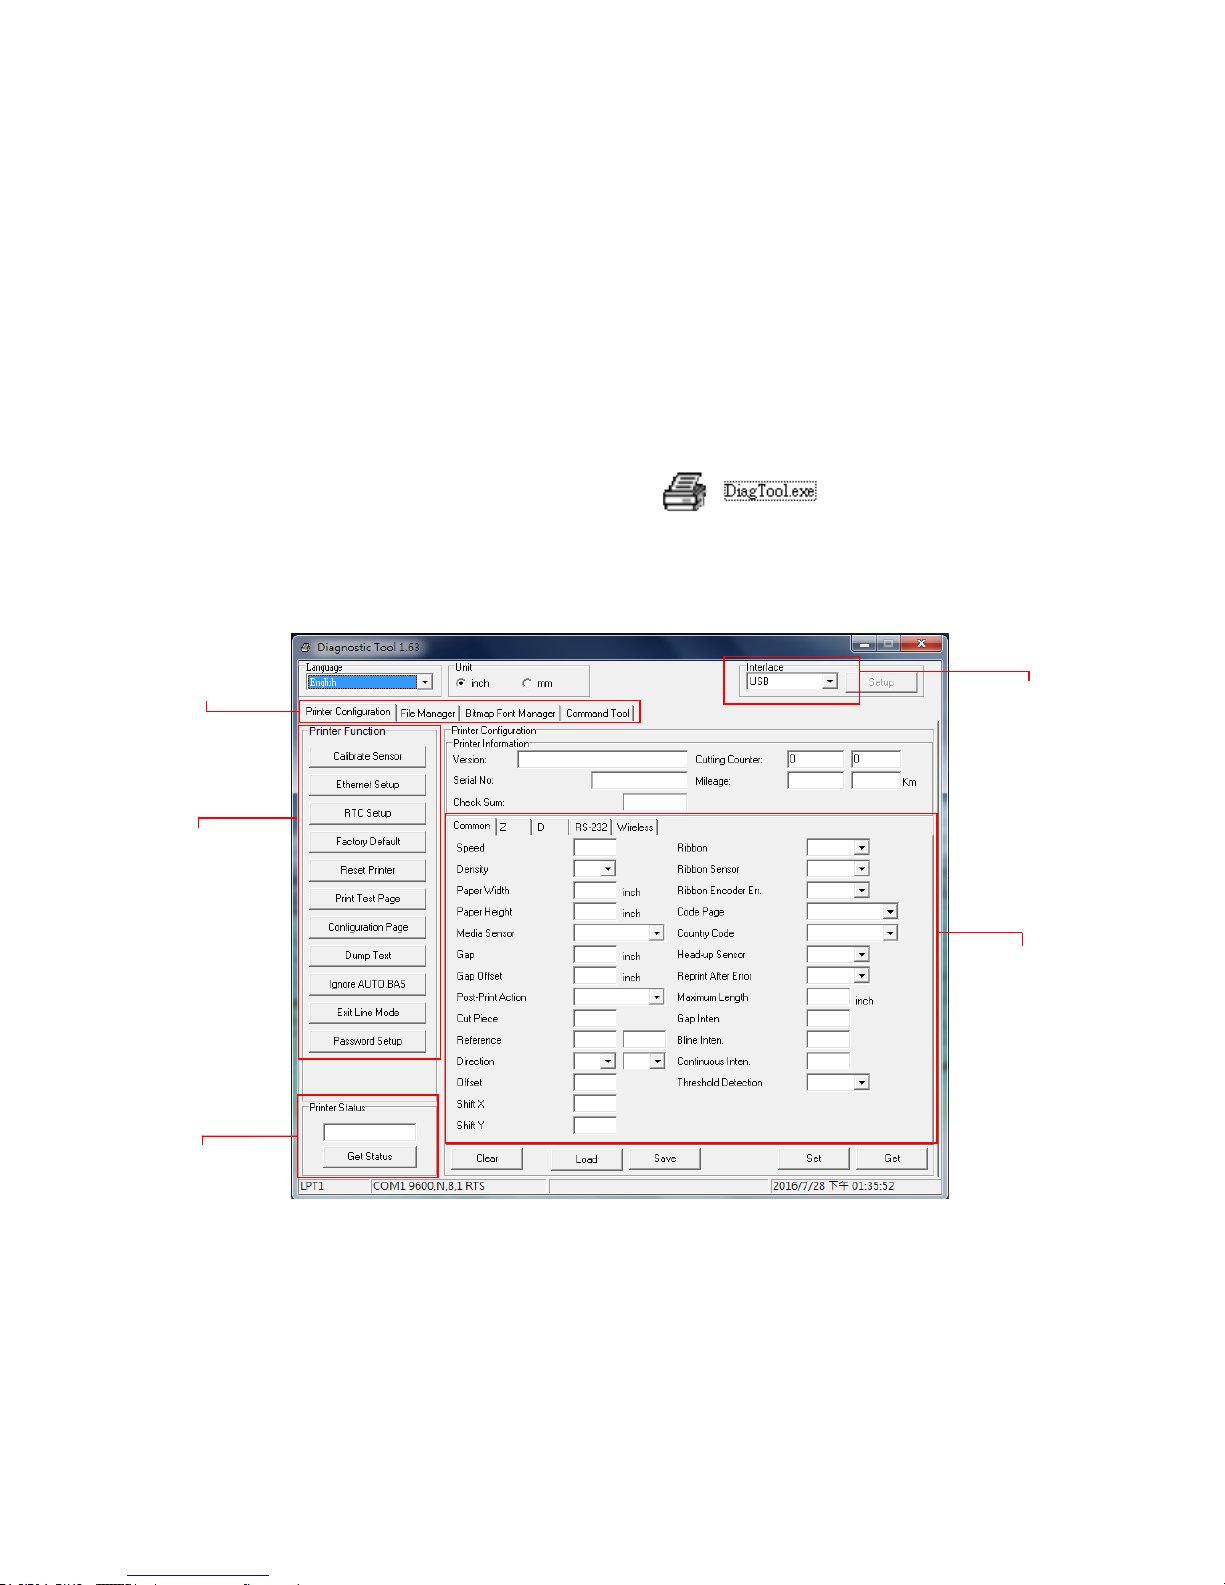
TSC’s Diagnostic Utility is an integrated tool incorporating features that enable you to
explore a printer’s settings/status; change a printer’s settings; download graphics,
fonts and firmware; create a printer bitmap font; and send additional commands to a
printer. With the aid of this powerful tool, you can review printer status and settings in
an instant, which makes it much easier to troubleshoot problems and other issues.
6.1 Start the Diagnostic Tool
1. Double click on the Diagnostic tool icon to start the software.
2. There are four features (Printer Configuration, File Manager, Bitmap Font Manager,
Command Tool) included in the Diagnostic utility.
Features tab
Printer functions
Interface
Printer Status
Printer setup
Page 41
31
6.2 Printer Function
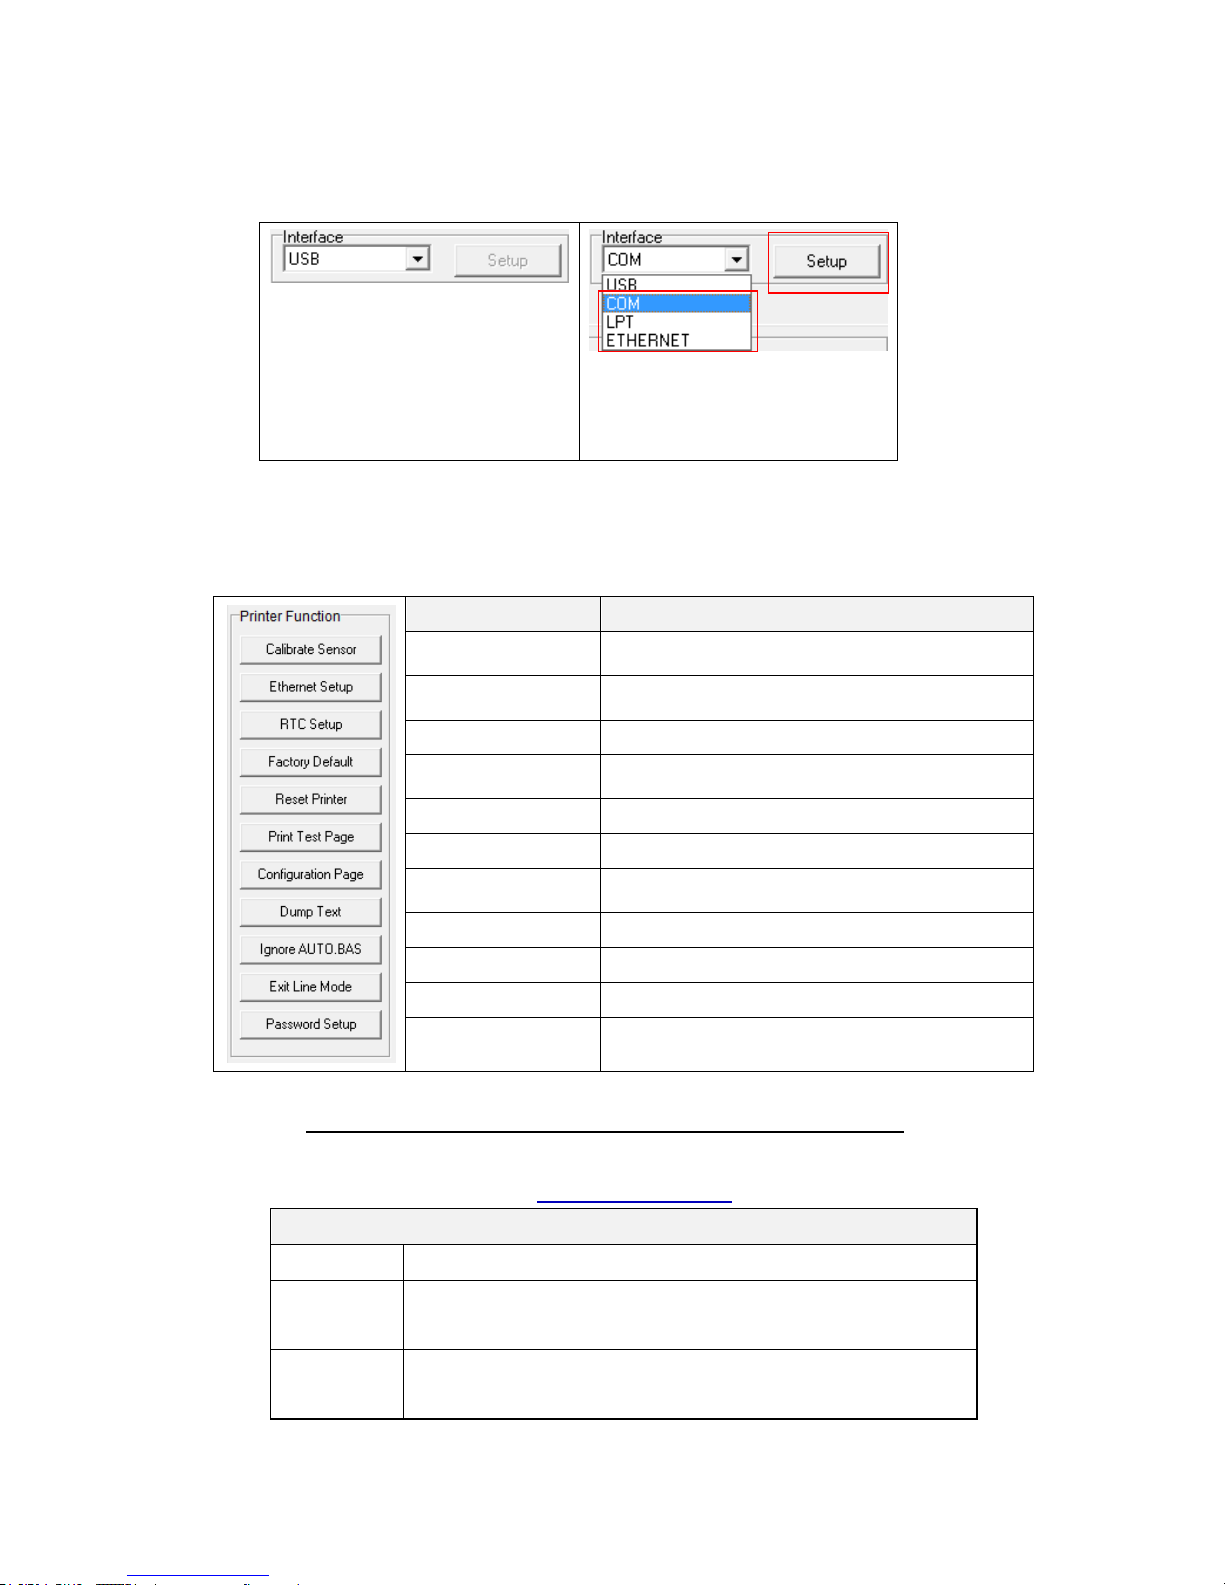
1. Select the PC interface connected with bar code printer.
The default interface setting is
USB interface. If USB interface
is connected with printer, no
other settings need to be
changed in the interface field.
2. Click the “Printer Function” button to setup.
3. The detail functions in the Printer Function Group are listed as below.
Function
Description
Calibrate Sensor
Calibrate the sensor specified in the Printer Setup
group media sensor field
Ethernet Setup
Setup the IP address, subnet mask, gateway for
the on board Ethernet
RTC Setup
Synchronize printer Real Time Clock with PC
Factory Default
Initialize the printer and restore the settings to
factory default. (Please refer section 5.3)
Reset Printer
Reboot printer
Print Test Page
Print a test page
Configuration Page
Print printer configuration (Please refer section
5.2)
Dump Text
To activate the printer dump mode.
Ignore AUTO.BAS
Ignore the downloaded AUTO.BAS program
Exit Line Mode
Exit line mode.
Password Setup
Set the password to protect the settings
For more information about Diagnostic Tool, please refer to the diagnostic utility quick start guide on
TSC website at Downloads \ Manuals \ Utilities \ Diagnostic utility quick start guide.
Note: The three different print modes below are available, you can download the command on
TSPL/TSPL2 programming manual at TSC official website:
Print modes
DRAFT
High print speed with lower density.
OPTIMUM
According to the label content such as barcode, text, and
graphic to lower the print speed for getting higher print quality.
STANDARD
(default)
Standard print speed and quality.
1
2
Page 42
32
6.3 Calibrating Media Sensor by Diagnostic Tool
6.3.1 Auto Calibration
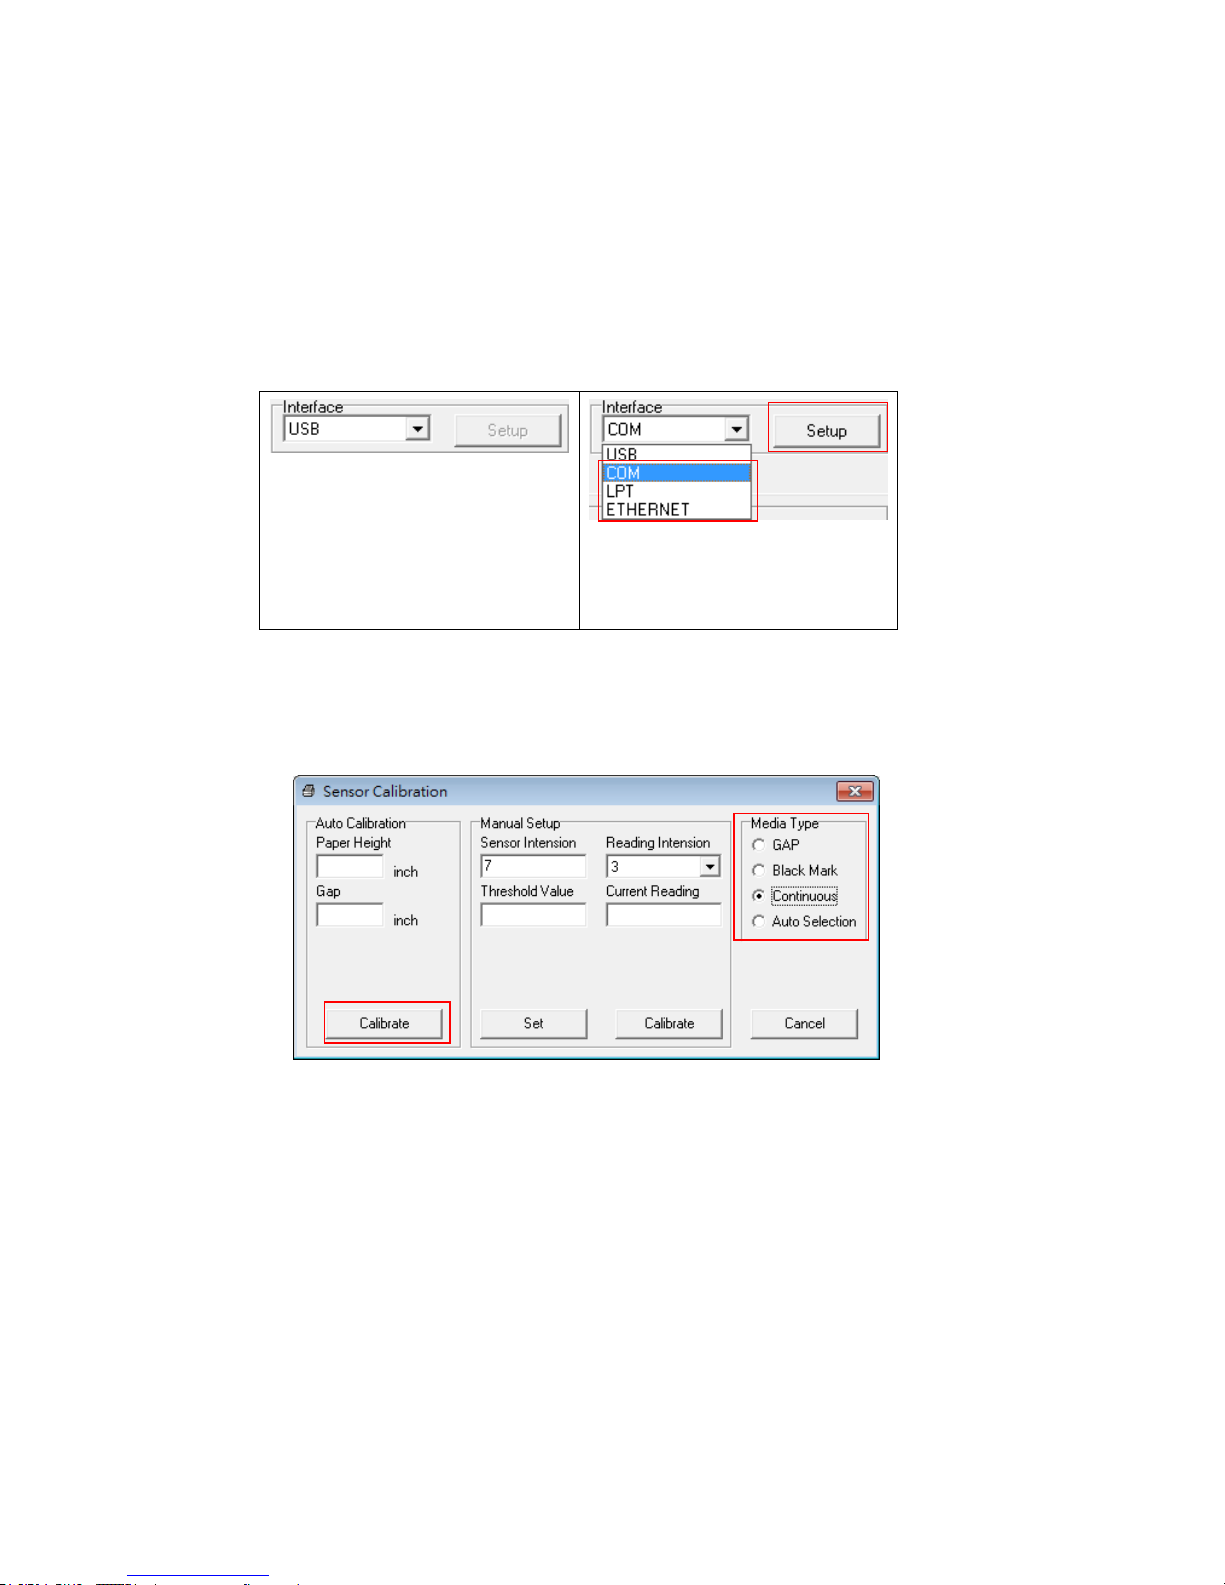
1. Make sure the media is already installed and media cover is closed. (Please refer to
section 3.4)
2. Turn on the printer power switch.
3. Open Diagnostic tool and set interface. (The default setting is USB)
The default interface setting is
USB interface. If USB interface
is connected with printer, no
other settings need to be
changed in the interface field.
4. Click the “Calibrate Sensor” button.
5. Select the media type and click the “Calibrate” button.
Note: The TDM-30 can only support continuous, die-cut, receipt, and black mark media type.
1
2
1
2
Page 43
33
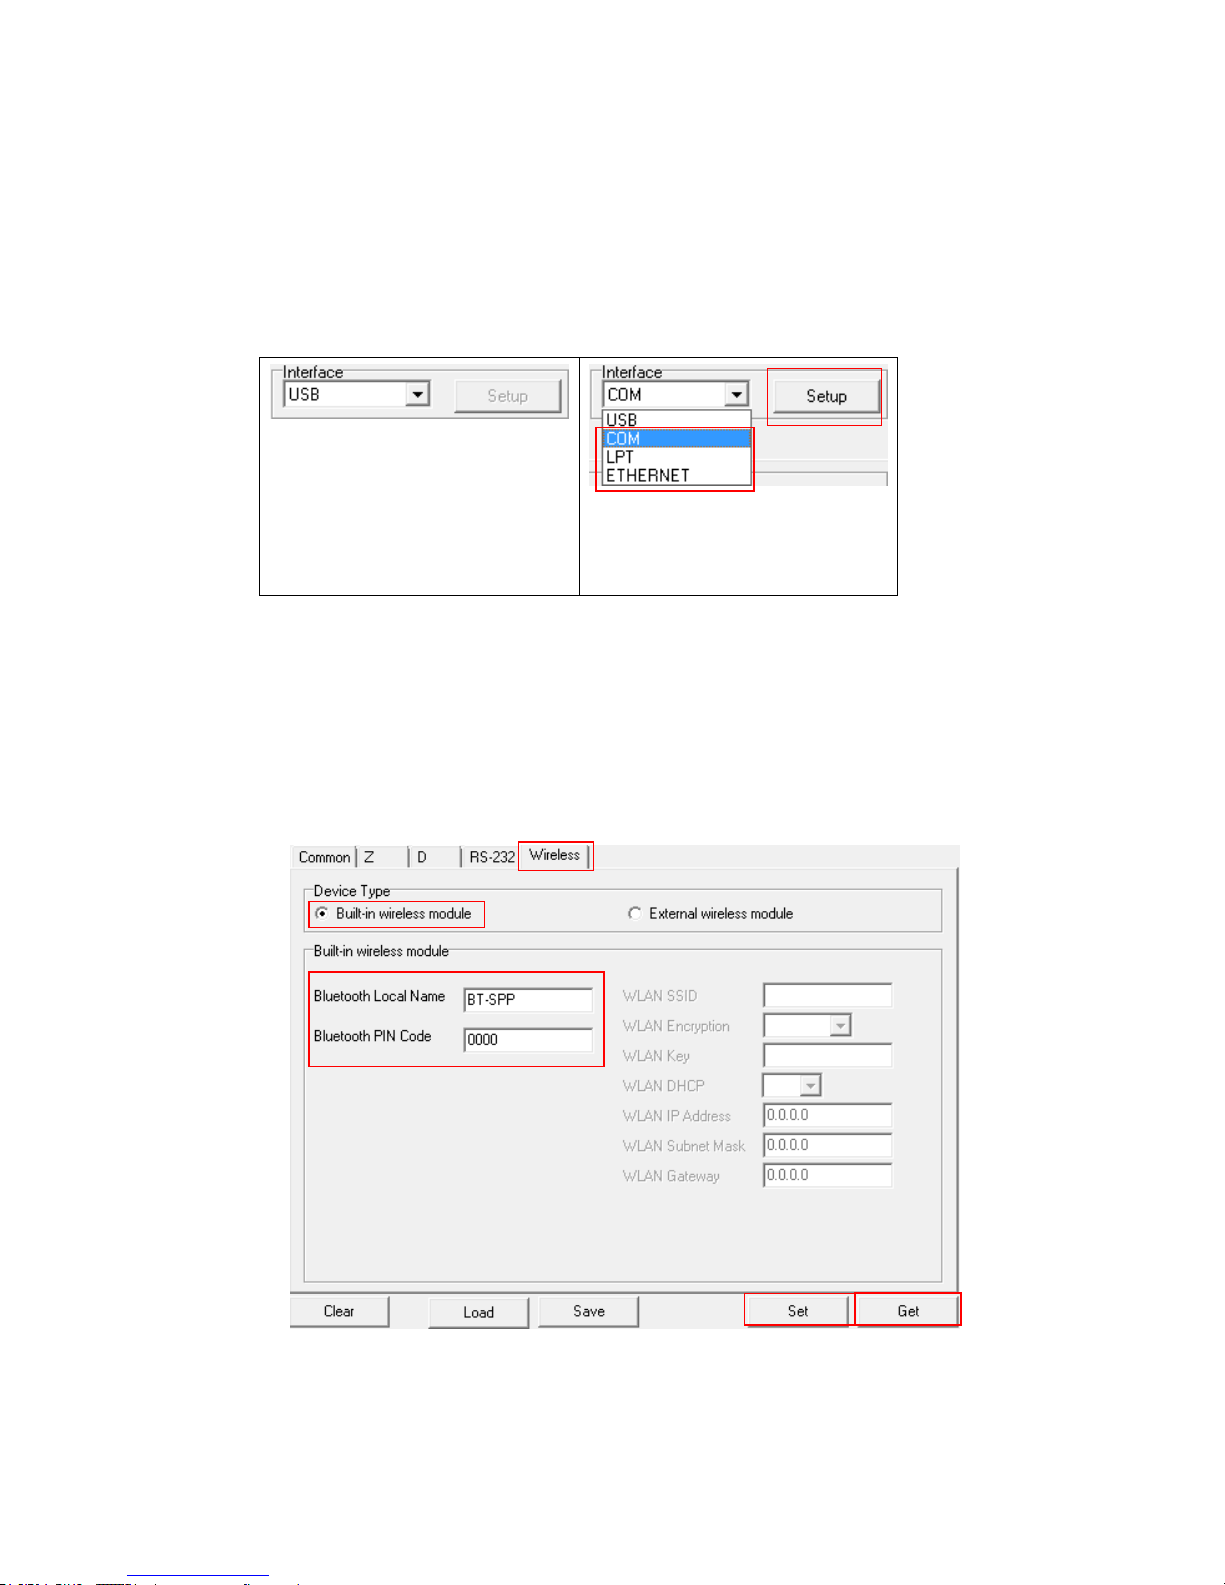
6.4 Setting Bluetooth by Diagnostic Tool (Optional)
1. Make sure the media is already installed and media cover is closed. (Please refer
to section 3.4)
2. Turn on the printer power switch.
3. Open Diagnostic tool and set interface. (The default setting is USB)
The default interface setting is
USB interface. If USB interface
is connected with printer, no
other settings need to be
changed in the interface field.
4. Select “Wireless” tab and “Built-in wireless module” item.
5. Enter the new BT Local Name or BT PIN Code in the editor.
6. Press “Set” button to set the new BT name or BT PIN code of the printer.
7. Press “Get” button to get back the settings. Make sure the Bluetooth module
settings are set properly.
Note:
* The printer connects with the computer via USB cable, which is option.
1
2
3
4 1 2
5
Page 44

34
7. Troubleshooting
7.1 Common Problems
The following guide lists the most common problems that may be encountered when operating
this bar code printer. If the printer still does not function after all suggested solutions have been
invoked, please contact the Customer Service Department of your purchased reseller or
distributor for assistance.
Problem
Possible Cause
Recovery Procedure
Power indicator does not
illuminate
* The battery is not properly
installed.
* The battery is dead.
* Reinstall the battery.
* Switch the printer on.
* Charge the battery.
- The printer status from
DiagTool shows “Head Open”.
* The printer carriage is open.
* Please close the print carriage.
- The printer status from
DiagTool shows “Out of
Paper”.
* Running out of media roll.
* The media is installed
incorrectly.
* Black mark sensor is not
calibrated.
* Supply a new media roll.
* Please refer to the steps on section 3.4 to
reinstall the media roll.
* Calibrate the black mark sensor.
- The printer status from
DiagTool shows “Paper Jam”.
* Black mark sensor is not set
properly.
* Make sure media size is set
properly.
* Media may be stuck inside
the printer mechanism.
* Calibrate the black mark sensor.
* Set media size correctly.
* Clean the printer mechanism.
Memory full
( FLASH / DRAM )
* The space of FLASH/DRAM
is full.
* Delete unused files in the FLASH/DRAM.
* Run printer self-test and check the
available memory space for DRAM or
FLASH.
* Check the available memory space
for DRAM or FLASH via DiagTool.
Poor Print Quality
* Media is loaded incorrectly
* Dust or adhesive
accumulation on the print
head.
* Print density is not set
properly.
* Print head element is
damaged.
* Reload the supply.
* Clean the print head.
* Clean the platen roller.
* Adjust the print density and print speed.
* Run printer self-test and check the print
head test pattern if there is dot missing in
the pattern.
* Change proper media roll.
Page 45

35
Missing printing on the left or
right side of label
* Wrong label size setup.
* Set the correct label size.
Gray line on the blank label
* The print head is dirty.
* The platen roller is dirty.
* Clean the print head.
* Clean the platen roller.
Irregular printing
* The printer is in Hex Dump
mode.
* Turn off and on the printer to skip the
dump mode.
Page 46
36
8. Maintenance
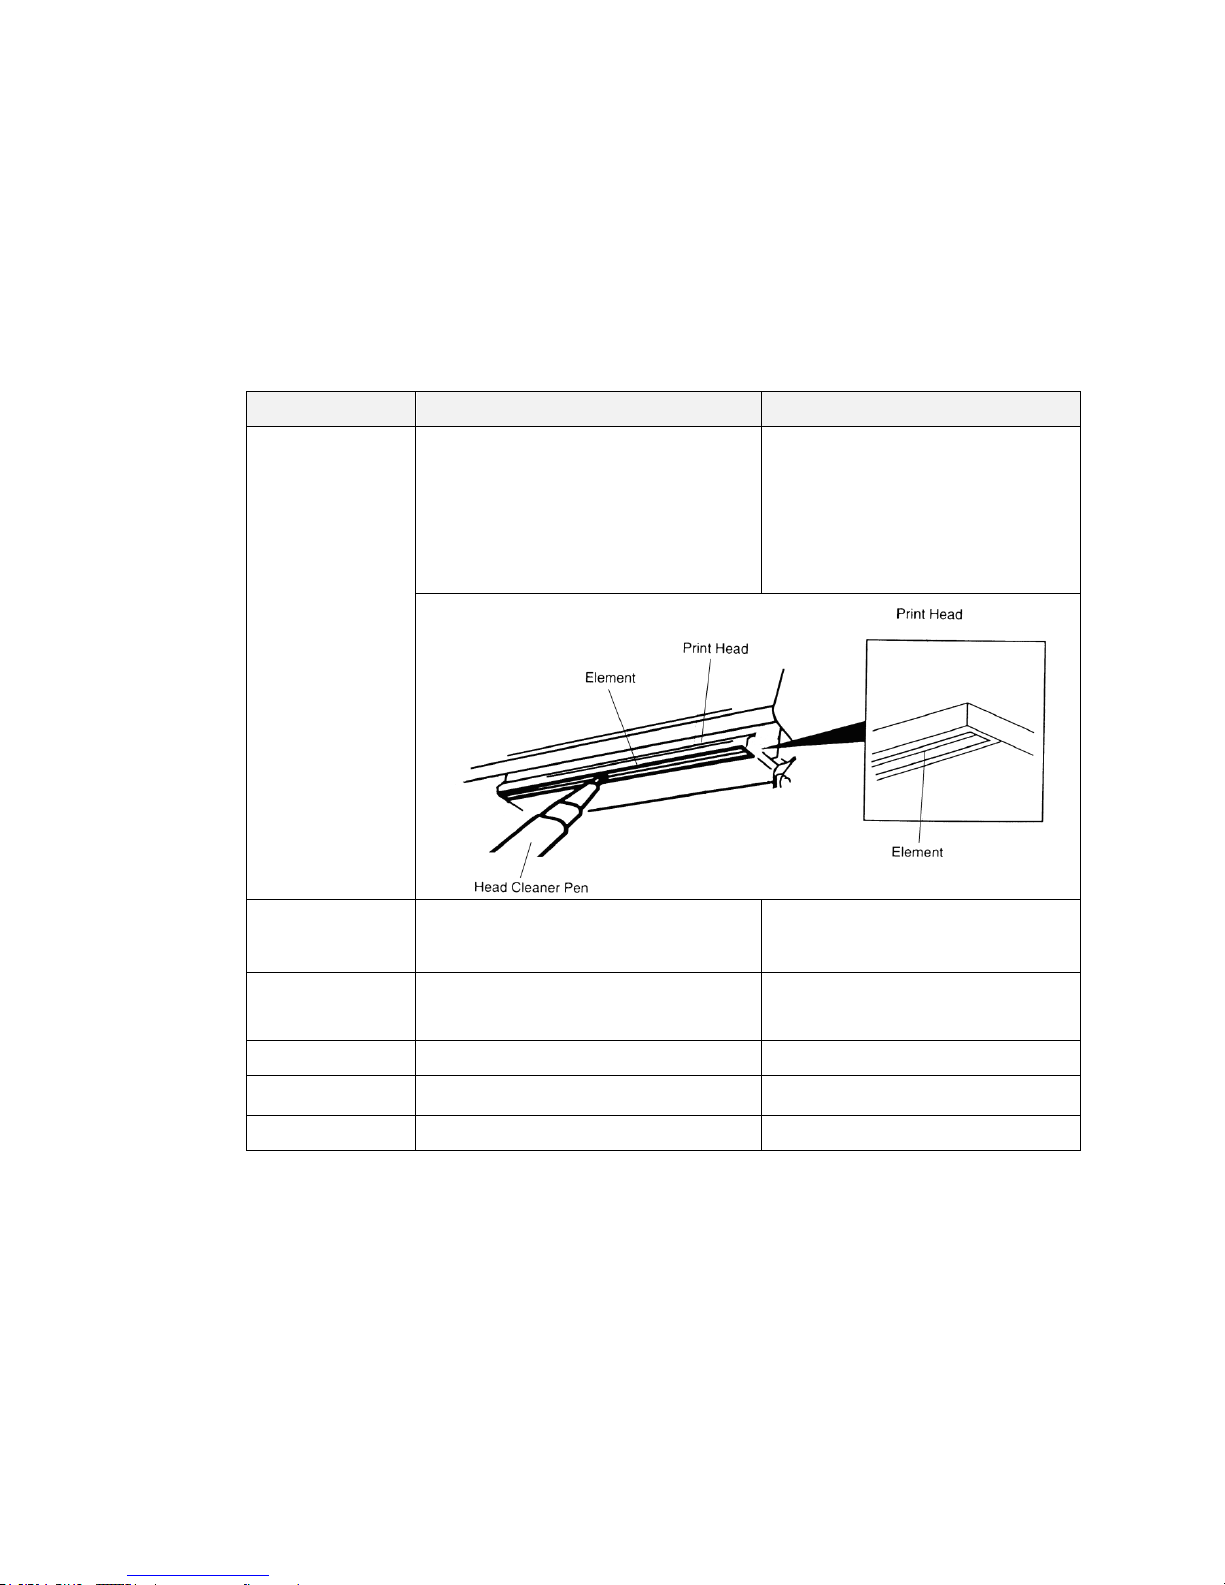
This session presents the clean tools and methods to maintain your printer.
1. Please use one of following material to clean the printer.
Cotton swab
Lint-free cloth
Vacuum / Blower brush
100% Ethanol or Isopropyl Alcohol
2. The cleaning process is described as following,
Printer Part
Method
Interval
Print Head
1. Always turn off the printer before
cleaning the print head.
2. Allow the print head to cool for a
minimum of one minute.
3. Use a cotton swab and 100%
Ethanol or Isopropyl Alcohol to
clean the print head surface.
Clean the print head when
changing a new label roll
Platen Roller
1. Turn the power off.
2. Rotate the platen roller and wipe it
thoroughly with water.
Clean the platen roller when
changing a new label roll
Tear Bar/Peel
Bar
Use the lint-free cloth with 100%
ethanol to wipe it.
As needed
Sensor
Compressed air or vacuum
Monthly
Exterior
Wipe it with water-dampened cloth
As needed
Interior
Brush or vacuum
As needed
Note:
Do not touch printer head by hand. If you touch it careless, please use ethanol to clean
it.
Please use 100% Ethanol or Isopropyl Alcohol. DO NOT use medical alcohol, which
may damage the printer head.
Regularly clean the print head and supply sensors once change a new ribbon to keep
printer performance and extend printer life.
Page 47

37
Revise History
Date
Content
Editor
Page 48

Corporate Headquarters Li Ze Plant
9F., No.95, Minquan Rd., Xindian Dist., No.35, Sec. 2, Ligong 1st Rd., Wujie Township,
New Taipei City 23141, Taiwan (R.O.C.) Yilan County 26841, Taiwan (R.O.C.)
TEL: +886-2-2218-6789 TEL: +886-3-990-6677
FAX: +886-2-2218-5678 FAX: +886-3-990-5577
Web site: www.tscprinters.com
E-mail: [email protected]
TSC Auto ID Technology Co., Ltd.
 Loading...