

Page 1
Installation and
Maintenance
Instructions
PRE-RINSE UNIT
B-0123 Series
(B-0123-B, Pre-Rinse
Unit w/ Wall Bracket)
Limited Three Year Warranty
T&S warrants to the original purchaser (other than for purposes of resale) that such product is free
from defects in material and workmanship for a period of three (3) years from the date of purchase.
During this three-year warranty period, if the product is found to be defective, T&S shall, at its option,
repair and/or replace it. To obtain warranty service, products must be returned to.....
T&S Brass and Bronze Works, Inc.
Attn: Warranty Repair Department
2 Saddleback Cove
Travelers Rest, SC 29690
Shipping, freight, insurance, and other transportation charges of the product to T&S and the return
of repaired or replaced product to the purchaser are the responsibility of the purchaser. Repair and/
or replacement shall be made within a reasonable time after receipt by T&S of the returned product.
This warranty does not cover items which have received secondary fi nishing or have been altered
or modifi ed after purchase, or for defects caused by physical abuse to or misuse of the product, or
shipment of the products.
Any express warranty not provided herein, and any remedy for Breach of Contract which might
arise, is hereby excluded and disclaimed. Any implied warranties of merchantability or fi tness for a
particular purpose are limited to three years in duration. Under no circumstance shall T&S be liable
for loss of use or any special consequential cost, expenses or damages.
Some states do not allow limitations on how long an implied warranty lasts or the exclusion or
limitation of incidental or consequential damages, so the above limitations or exclusions may not
apply to you. Specifi c rights under this warranty and other rights vary from state to state.
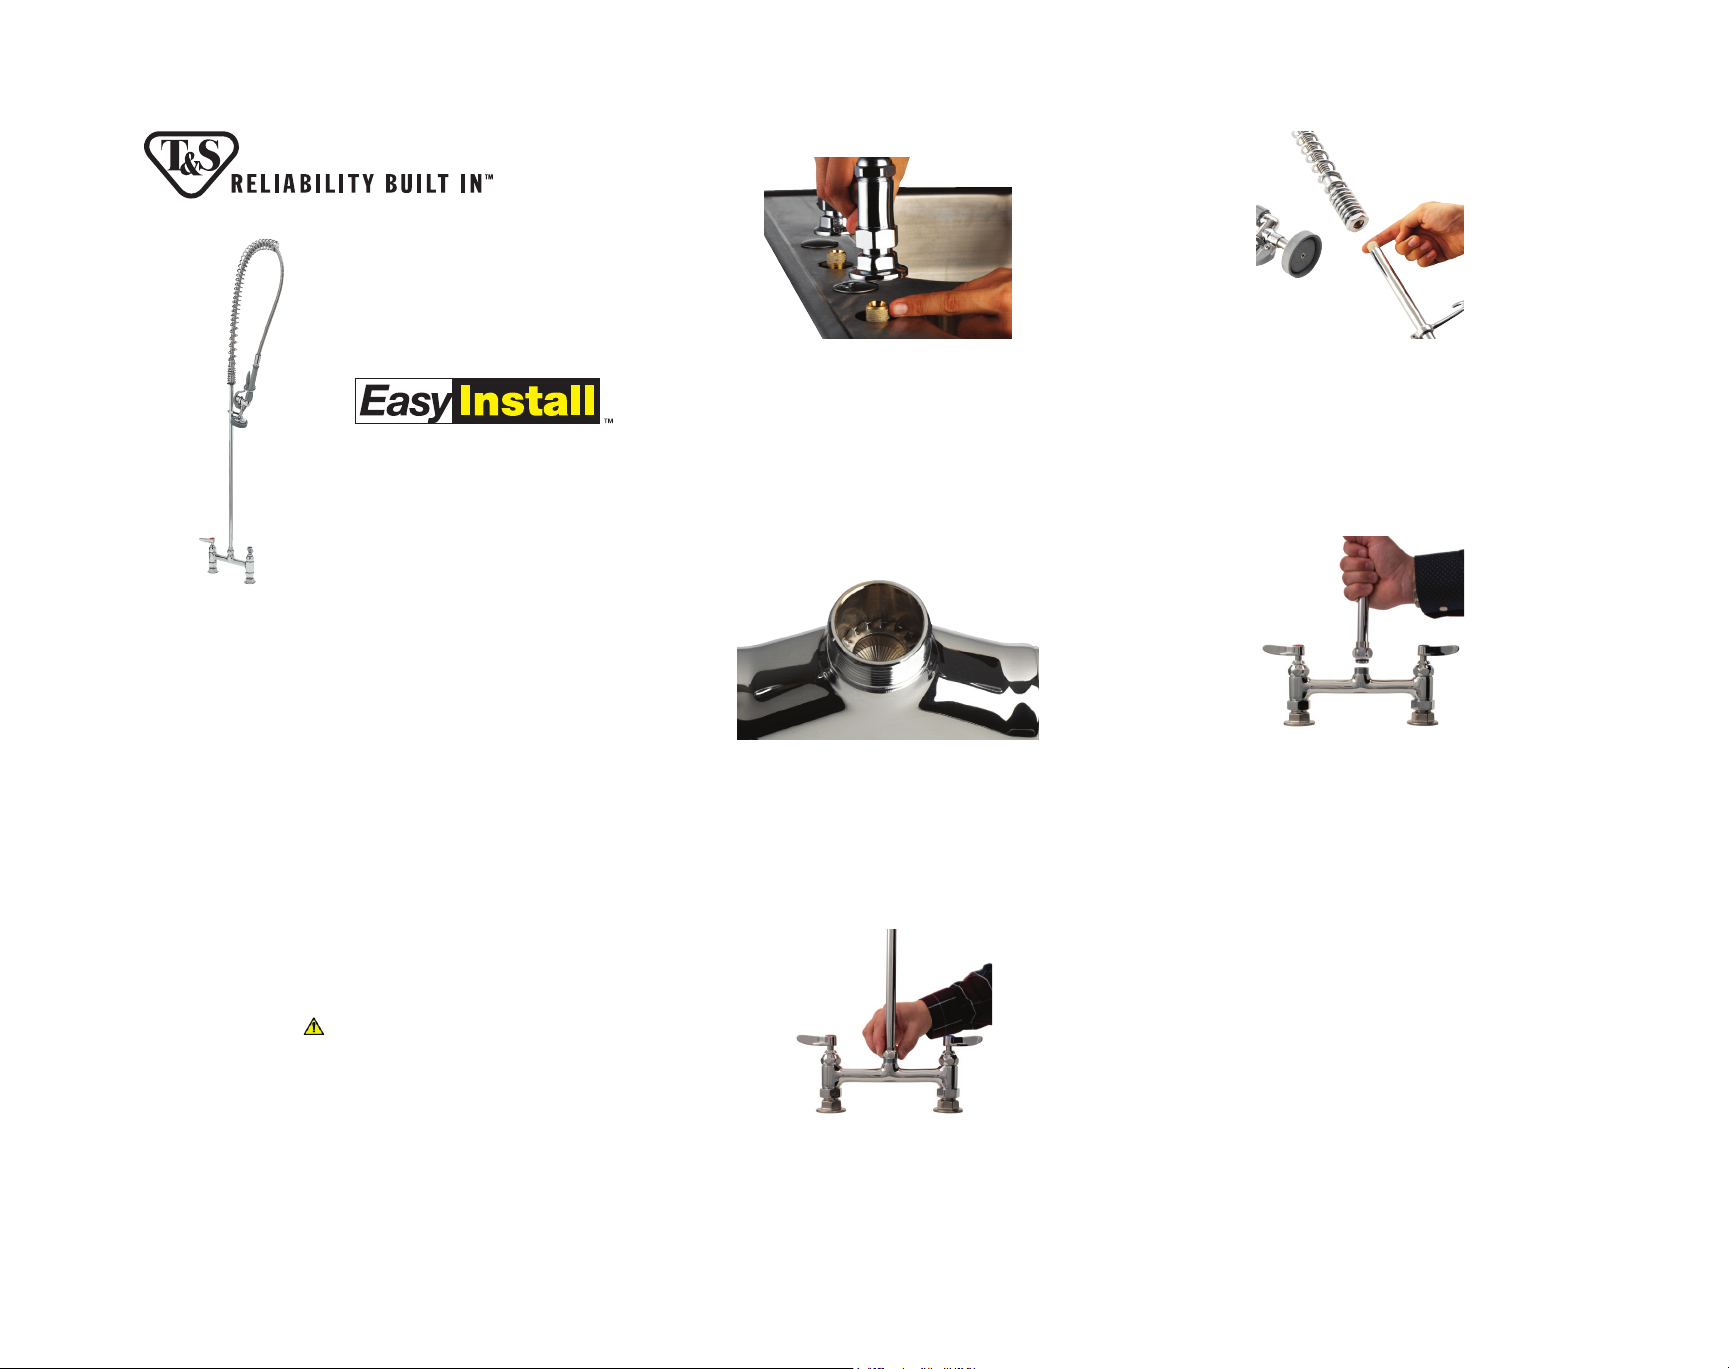
(Commercial Applications)
Step 1:
Apply plumber’s putty to underside of inlets and
plumber’s tape to inlet threads. Line up water supply
lines and couplings, attach and tighten with wrench.
Step 3:
Make sure that the EasyInstall® locking washer is
seated properly inside the faucet body.
Step 2:
Apply plumber’s tape to top of riser threads and
attach to spring assembly. Tighten with wrench.
Step 4:
Grab riser assembly and lower the EasyInstall® endfitting into faucet body. Press down until the endfitting “pops” in.
WARNING This product can expose you to chemicals including Lead, Chromium
(hexavalent compounds) and Phthalates (DEHP) which are known to the State of California
to cause cancer and birth defects or other reproductive harm.
Attention California Residents:
For more information go to
www.P65Warnings.ca.gov.
P/N:
DATE:
DRAWN:
CHECKED:
APPROVED:
098-014496-45 Rev.7
06-05-19
TED
JRM 06-28-19
JHB 07-19-19
Step 5:
Lock the EasyInstall® locking nut in place and tighten
with wrench.
Page 2
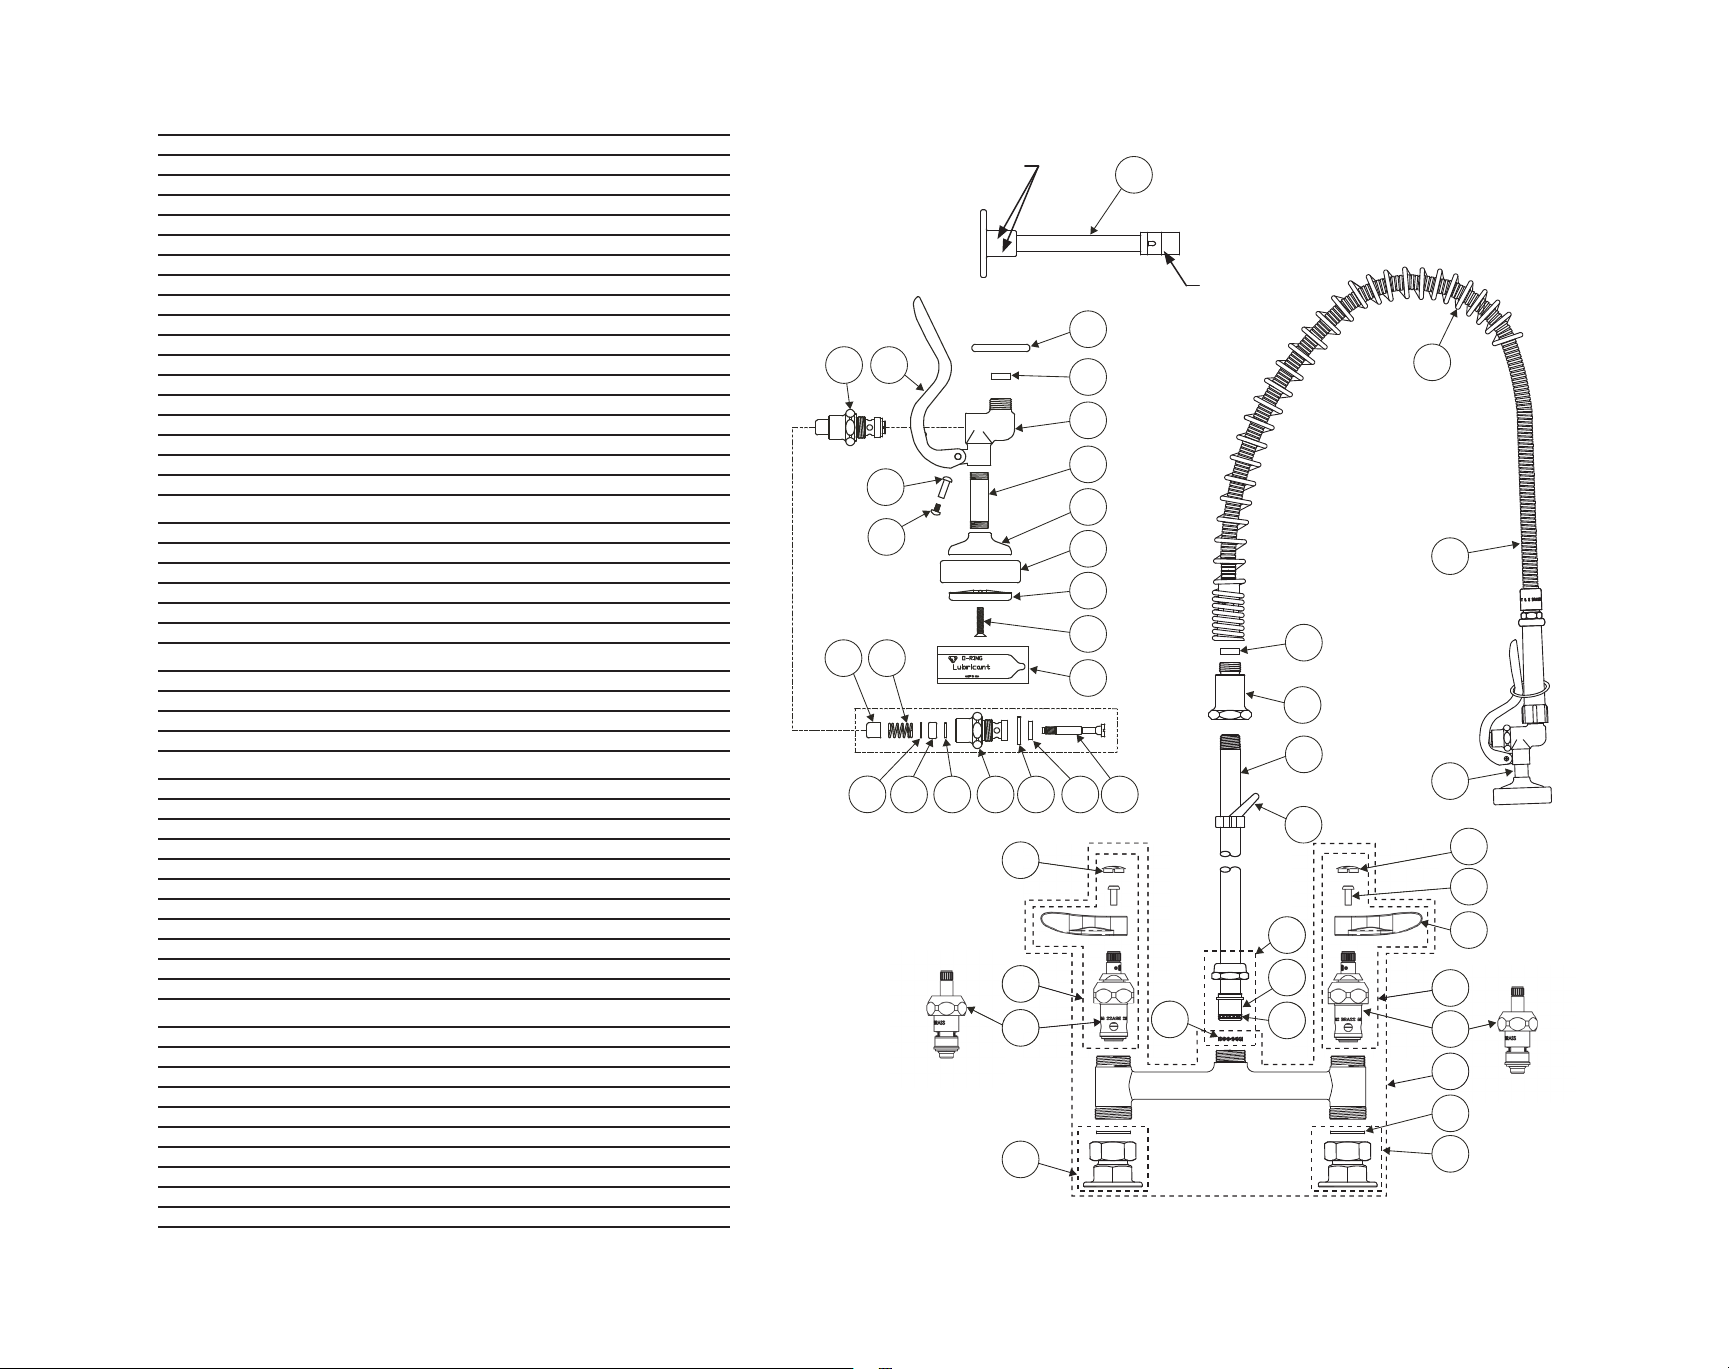
Base Faucet Assemblies
1 Faucet Body Assembly w/ Eterna Cartridges B-0220-LN
2 Faucet Body Assembly w/ Cerama Cartridges B-0220-CR-LN
2 Asm, Quarter-Turn Eterna Cartridge, RTC (new style) 002712-40NS
3 Asm, Quarter-Turn Cerama Cartridge, RTC (new style) 012446-25NS
3 Cartridge Only, Eterna w/ Spring Checks, RTC 012443-40NS
3 Cartridge Only, Cerama w/ Check Valves, RTC 012394-25NS
4 Asm, Quarter-Turn Eterna Cartridge, LTC (new style) 002711-40NS
2 Asm, Quarter-Turn Cerama Cartridge, LTC (new style) 012447-25NS
5 Cartridge Only, Eterna w/ Spring Checks, LTC 012442-40NS
5 Cartridge Only, Cerama w/ Check Valves, LTC 012395-25NS
6 Handle, Lever 001638-45NS
4 Handle, Wrist Action B-WH4-NS
7 S
crew, Handle 000925-45
8 Index, Button - Hot (Red) 001193-19NS
9 Index, Button - Cold (Blue) 018506-19NS
10 Asm, Coupling Flange 00AA
11 Washer, Coupling Nut 001019-45
12 Lock Washer, EasyInstall 014200-45
Riser Assembly
13 Nipple, 3/8” x 24” 000372-40
14 Swivel Assembly, EasyInstall EZ-K
15 Swivel Piece N/A
16 O-Ring, Swivel Piece 001065-45
17 Asm, Finger Hook & Screw 004R
18 Wall Bracket, 6” (add -B to model # for wall bracket) B-0109-01
Pre-Rinse Unit Assembly
19 Spring Body 000821-40
20 Spring, Overhead 000888-45
21 Asm, Flexible Stainless Steel Hoses B-0044-H
22 Asm, Spray Valve B-0107
Spray Valve Assembly
23 Washer, Hold Down Assembly 010476-45
24 Ring, Hold Down Assembly 000907-45
25 Body, Spray Valve (no handle) 000065-40
26 Handle 001120-45
27 Nut, Handle 003198-45
28 Screw, Handle 003199-45
29 Nipple 000694-40
30 Cup, Spray 000019-40
31 Ring, Sprayhead 007861-45
*
32 Sprayface 001121-45
*
33 Screw, Sprayface 000913-45
*
Bonnet Assembly
34 Asm, Bonnet 002856-40
35 Stem 001097-45
*
36 Washer, Seat 012915-45
*
37 Washer, Bonnet Binding 001040-45
*
38 Bonnet 000608-25
39 Washer, Bonnet Brass 000974-45
*
40 Stem, Packing 001100-45
*
41 Spring, Bonnet 000895-45
*
42 Push Button 000753-25
43 Grease Pack (o-ring lubricant) 012665-45
*
* Parts included in B-10K parts kit
34
39
26
27
28
4142
Set Screws (2)
10
OPTIONAL (-B Models)
Wall Bracket Installation:
1. Fasten wall fl ange to wall using wall mount screws
18
2. Place 2-piece clamp assembly around riser and tighten
clamp screws securely.
3. Tighten set screws securely.
Clamp
Screws (2)
24
23
20
25
29
30
31
21
32
33
23
43
19
13
353637383940
22
17
8
9
7
14
2
12
3
1
15
16
6
4
5
1
11
10
 Loading...