

Page 1
HAVE FUN WITH THE TRYBIKE!
578 246 13
D
B
E
C
578 246 13
E
WARNING!
• Adult assembly only!
• Read all assembly instrucons, warnings and maintenance instrucons before
you start.
• If you do not read/follow these instrucons carefully, the Trybike might be assembled
incorrectly and/or it may get damaged, which could lead to serious injury during use.
• Remove all bags, packaging materials and protecve materials before allowing a child to
use the bike.
• The Trybike is not suitable for children weighing more than 25kg/55lbs.
• Make sure your child wears proper protecve gear when riding the Trybike. Use an
approved safety helmet and closed-toe shoes. It is also a good idea to wear gloves as
well as elbow and kneepads, long trousers and outer garments with long sleeves.
• A child should always be under adult supervision when riding the Trybike.
• Always let your child ride in front of you, not behind you.
• Regularly check that all parts are secure and undamaged, paying parcular aenon to
the handlebars, wheels and seat. Make sure you perform a thorough check-up 14 days
aer assembly.
• If the Trybike is in some way damaged, do not use it again unl it has been repaired by
an authorised Trybike dealer.
• No more than ONE child on the Trybike at a me!
• Before your child gets on the bike, explain how the Trybike should be stopped by using
your feet.
• Never allow children to use the Trybike on public roads, in areas where there are cars,
on slopes, on stairs, on or near bridges or near water (e.g. swimming pools, rivers,
ponds, ditches, canals) or in other places that could be dangerous.
• Do not use Trybike in the dark or at dusk.
• Keep these instrucons and safety precauons in a safe place for future reference
• Co&Co cannot be held liable for any injuries or accidents caused by the use of a Trybike.
The buyer accepts the risks involved in the use of the Trybike.
578 246 13
D
E
C
578 246 13
D
B
E
C
UNLESS OTHERWISE SPECIFIED:
DIMENSIONS ARE IN MILLIMETERS
SURFACE FINISH:
FINISH:
DEBURR AND
BREAK SHARP
EDGES
DO NOT SCALE DRAWING
REVISION
L
DETAIL
L
SCALE
1 : 3
1
2
3
578 246 13
D
B
A
E
C
DRAWN
CHK'D
APPV'D
MFG
Q.A
UNLESS OTHERWISE SPECIFIED:
DIMENSIONS ARE IN MILLIMETERS
SURFACE FINISH:
TOLERANCES:
LINEAR:
ANGULAR:
FINISH:
DEBURR AND
BREAK SHARP
EDGES
NAME
SIGNATURE
DATE
MATERIAL:
DO NOT SCALE DRAWING
REVISION
TITLE:
DWG NO.
SCALE:1:4
SHEET 6 OF 12
A3
WEIGHT:
fig5a
ASSEMBLING THE TRYBIKE
We have already parally assembled the
Trybike. We would love to put the enre
bike together for you beforehand, but then
we would have to ship it in a large box. This
would make transportaon very expensive,
it would be bad for the environment and
no fun for the poor postman.
A
DETAIL
A
SCALE
1 : 3
1
2
3
578 246 13
D
B
E
C
DRAWN
UNLESS OTHERWISE SPECIFIED:
DIMENSIONS ARE IN MILLIMETERS
SURFACE FINISH:
TOLERANCES:
LINEAR:
ANGULAR:
FINISH:
DEBURR AND
BREAK SHARP
EDGES
NAME
SIGNATURE
DATE
DO NOT SCALE DRAWING
REVISION
TITLE:
A
1
2
3
578 246 13
D
E
C
578 246 13
D
E
C
578 246 13
D
E
D
E
C
578 246 13
D
B
E
C
DRAWN
CHK'D
APPV'D
UNLESS OTHERWISE SPECIFIED:
DIMENSIONS ARE IN MILLIMETERS
SURFACE FINISH:
TOLERANCES:
LINEAR:
ANGULAR:
FINISH:
DEBURR AND
BREAK SHARP
EDGES
NAME
SIGNATURE
DATE
DO NOT SCALE DRAWING
REVISION
TITLE:
578 246 13
E
D
C
F F
Thank you for buying an original Trybike!
Or maybe you got it as a present, which is
even nicer!
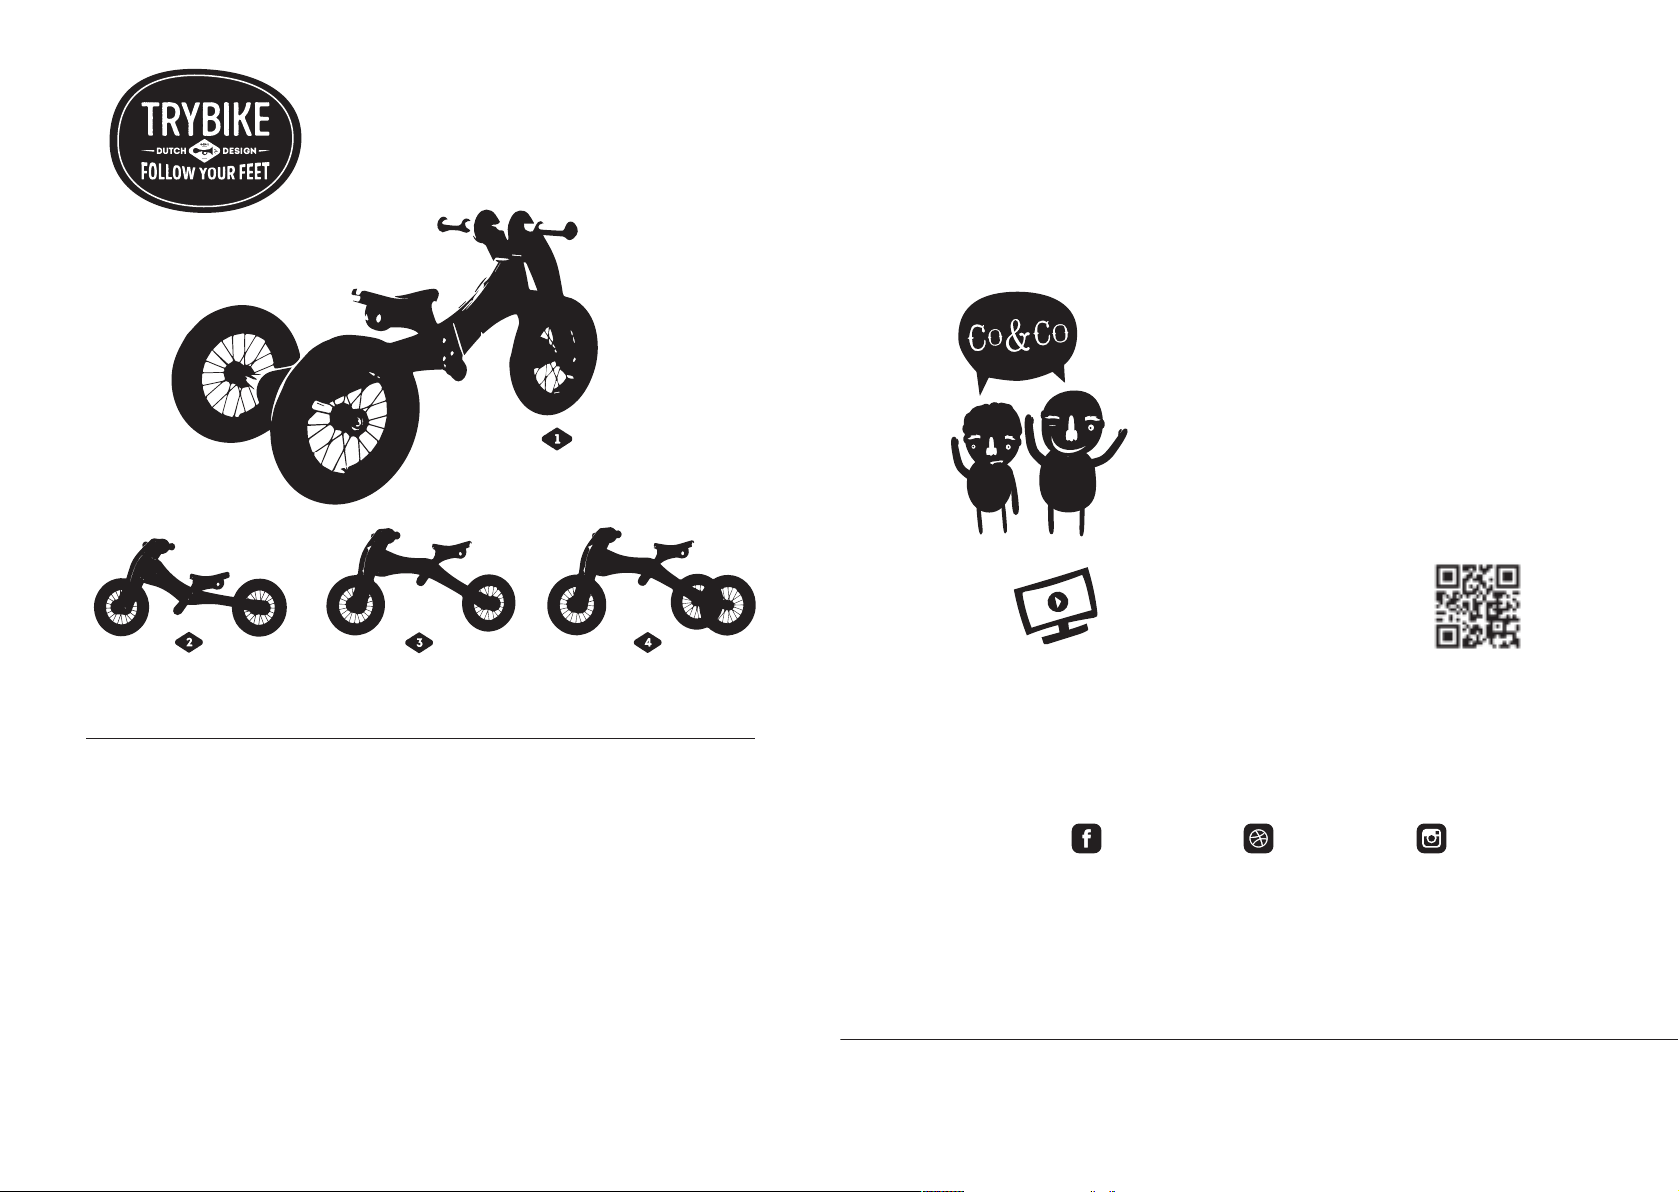
The Trybike can be used by children from
one year old upwards. Uniquely, it can
grow with your child, because you can turn
it from a tricycle into a bicycle with only
some minor adjustments.
LOW BICYCLE
LEA RN TO BAL ANC E
HIGH BICYCLE
THE LO CAL SU PERHE RO!
USER INSTRUCTIONS
LOW TRICYCLE
LEA RN TO WALK A ND RID E FROM 12 MON THS
HIGH TRICYCLE
JUST F OR FUN OR FO R
ADDI TION AL SUPP ORT
You can also ip the frame of the bicycle
into a high posion so children can use it
even longer, or you can have it at that same
height as the tricycle for loads of fun!
We have discovered that children with a
disability and children who nd it dicult
to keep their balance can really benet
from the Trybike as a tricycle, both in the
lower and in the higher posion.
TBW-EN-05
WE ARE
PIM AND ALEX
OF CO&CO
Two brothers who are crazy about cycling.
We come from the Netherlands, where
almost everyone has one or two bikes.
We are enthusiasc cyclists, and we have
been imporng loads of fun toys, especially
ones with wheels – including balance bikes
– for more than 10 years by now. In 2014,
we started developing our own balance
bike, applying all of our knowledge as toy
sellers and enthusiasc cyclists during the
process. We had great fun designing the
perfect balance bike: durable, strong, and,
to top it all, darned good-looking to boot!
The result: the Trybike, which is exactly the
kind of bike we would have loved to have
had as kids!
WATCH THE ASSEMBLY
INSTRUCTIONS BY SCANNING
THE QR-CODE
ENJOY YOUR TRYBIKE AND LET US KNOW
WHAT YOU THINK
TRYBIKE TRYBIKE
TRYBIKE.NL
CO&CO BV, KONING L ODEWIJKL AAN 40C , 7314 GG APEL DOORN, THE NETHERL ANDS
+31 55 522 28 63, W WW.COAN DCO.NL, I NFO@COA NDCO.N L
Co&Co BV is the exclusive trademark holder of the gurave trademark TRYBIKE. The TRYBIKE
is protected by intellectual property rights. Co&Co BV reserves all rights.
Page 2

578 246 13
D
B
E
C
578 246 13
E
WARNING!
578 246 13
D
E
C
578 246 13
D
B
E
C
UNLESS OTHERWISE SPECIFIED:
DIMENSIONS ARE IN MILLIMETERS
SURFACE FINISH:
FINISH:
DEBURR AND
BREAK SHARP
EDGES
DO NOT SCALE DRAWING
REVISION
L
DETAIL
L
SCALE
1 : 3
1
2
3
578 246 13
D
B
A
E
C
DRAWN
CHK'D
APPV'D
MFG
Q.A
UNLESS OTHERWISE SPECIFIED:
DIMENSIONS ARE IN MILLIMETERS
SURFACE FINISH:
TOLERANCES:
LINEAR:
ANGULAR:
FINISH:
DEBURR AND
BREAK SHARP
EDGES
NAME
SIGNATURE
DATE
MATERIAL:
DO NOT SCALE DRAWING
REVISION
TITLE:
DWG NO.
SCALE:1:4
SHEET 6 OF 12
A3
WEIGHT:
fig5a
A
DETAIL
A
SCALE
1 : 3
1
2
3
578 246 13
D
B
E
C
DRAWN
UNLESS OTHERWISE SPECIFIED:
DIMENSIONS ARE IN MILLIMETERS
SURFACE FINISH:
TOLERANCES:
LINEAR:
ANGULAR:
FINISH:
DEBURR AND
BREAK SHARP
EDGES
NAME
SIGNATURE
DATE
DO NOT SCALE DRAWING
REVISION
TITLE:
A
1
2
3
578 246 13
D
E
C
578 246 13
D
E
C
578 246 13
D
E
D
E
C
578 246 13
D
B
E
C
DRAWN
CHK'D
APPV'D
UNLESS OTHERWISE SPECIFIED:
DIMENSIONS ARE IN MILLIMETERS
SURFACE FINISH:
TOLERANCES:
LINEAR:
ANGULAR:
FINISH:
DEBURR AND
BREAK SHARP
EDGES
NAME
SIGNATURE
DATE
DO NOT SCALE DRAWING
REVISION
TITLE:
578 246 13
E
D
C
F F
• Adult assembly only!
• Read all assembly instrucons, warnings and maintenance instrucons before
• If you do not read/follow these instrucons carefully, the Trybike might be assembled
• Remove all bags, packaging materials and protecve materials before allowing a child to
• The Trybike is not suitable for children weighing more than 25kg/55lbs.
• Make sure your child wears proper protecve gear when riding the Trybike. Use an
• A child should always be under adult supervision when riding the Trybike.
• Always let your child ride in front of you, not behind you.
• Regularly check that all parts are secure and undamaged, paying parcular aenon to
• If the Trybike is in some way damaged, do not use it again unl it has been repaired by
• No more than ONE child on the Trybike at a me!
• Before your child gets on the bike, explain how the Trybike should be stopped by using
• Never allow children to use the Trybike on public roads, in areas where there are cars,
• Do not use Trybike in the dark or at dusk.
• Keep these instrucons and safety precauons in a safe place for future reference
• Co&Co cannot be held liable for any injuries or accidents caused by the use of a Trybike.
ASSEMBLING THE TRYBIKE
We have already parally assembled the
Trybike. We would love to put the enre
bike together for you beforehand, but then
we would have to ship it in a large box. This
would make transportaon very expensive,
it would be bad for the environment and
no fun for the poor postman.
you start.
incorrectly and/or it may get damaged, which could lead to serious injury during use.
use the bike.
approved safety helmet and closed-toe shoes. It is also a good idea to wear gloves as
well as elbow and kneepads, long trousers and outer garments with long sleeves.
the handlebars, wheels and seat. Make sure you perform a thorough check-up 14 days
aer assembly.
an authorised Trybike dealer.
your feet.
on slopes, on stairs, on or near bridges or near water (e.g. swimming pools, rivers,
ponds, ditches, canals) or in other places that could be dangerous.
The buyer accepts the risks involved in the use of the Trybike.
TRYBIKE TRYBIKE
FOLL OW YOUR FE ET DISCO VER THE W ORLD
WHAT IS IN THE BOX?
• Frame with front forks and seat
aached to it.
• 3 wheels (due to safety regulaons
without caps)
• Bag with long rear axle with three
aluminium pipes, four short black nylon
bushings and two long nuts
• 2 short wheel axles with each 2 long
black nylon bushings and 2 long nuts
• Seat cover
• Handlebar
• Safety pad for handlebar
• 2 handlebar grips
• 2 Allen keys
• Trybike user instrucons
FITTING THE FRONT WHEEL INTO THE FRAME
Insert the black long nylon bushings into the wheel, with
the narrow part of the bushing ng into the bearing of
the wheel. Posion the wheel with the black nylon bushings
between the front forks so that the holes of the front forks
are exactly aligned with the holes of the bushings. Insert
the axle through the front forks, the bushings and therefore
also through the wheel. Before you push the axle all the
way through, put the nut on one side of the axle, giving it
a few turns. Push the axle enrely through the hole and t
FITTING THE HANDLEBAR INTO THE FRONT FORKS
Place the safety pad between the holes at the top of the
front forks and push the wooden handlebar through
the front forks and the safety pad. You will noce two
grooves on the handlebar. Insert the handlebar so the
grooves end up outside the front forks. Fasten the two
screws at the boom of the top “ball” of the front forks
in the handlebar to secure it, see arrow in picture. Now t
the grips to the handlebar. If this is dicult then dampen
the grips with a lile water on the inside and try again.
a nut on the other side, again giving it a few turns. Once
ed, ghten the nuts on both sides simultaneously, and
check whether the wheel rotates smoothly.
Page 3
D
B
E
C
E
ADJUSTING THE SEAT
L
DETAIL
L
SCALE
1 : 3
1
2
3
578 246 13
D
B
A
E
C
DRAWN
CHK'D
APPV'D
MFG
Q.A
UNLESS OTHERWISE SPECIFIED:
DIMENSIONS ARE IN MILLIMETERS
SURFACE FINISH:
TOLERANCES:
LINEAR:
ANGULAR:
FINISH:
DEBURR AND
BREAK SHARP
EDGES
NAME
SIGNATURE
DATE
MATERIAL:
DO NOT SCALE DRAWING
REVISION
TITLE:
DWG NO.
SCALE:1:4
SHEET 6 OF 12
A3
WEIGHT:
fig5a
A
DETAIL
A
SCALE
1 : 3
1
2
3
578 246 13
D
B
E
C
DRAWN
UNLESS OTHERWISE SPECIFIED:
DIMENSIONS ARE IN MILLIMETERS
SURFACE FINISH:
TOLERANCES:
LINEAR:
ANGULAR:
FINISH:
DEBURR AND
BREAK SHARP
EDGES
NAME
SIGNATURE
DATE
DO NOT SCALE DRAWING
REVISION
TITLE:
A
1
2
3
578 246 13
D
E
C
D
E
C
D
B
E
C
DRAWN
CHK'D
APPV'D
UNLESS OTHERWISE SPECIFIED:
DIMENSIONS ARE IN MILLIMETERS
SURFACE FINISH:
TOLERANCES:
LINEAR:
ANGULAR:
FINISH:
DEBURR AND
BREAK SHARP
EDGES
NAME
SIGNATURE
DATE
DO NOT SCALE DRAWING
REVISION
TITLE:
578 246 13
E
D
C
F F
CONVERTING THE TRYBIKE FROM A
LOW BICYCLE INTO A HIGH BICYCLE
First, dismantle the handlebar and the front wheel, then
loosen the axle that ts through the frame and the front
forks. One nut is located on top of the front forks, under
the handlebar, this nut is sealed to the axle. The other nut
is located at the boom, above the front wheel. Loosen the
boom nut. Now pull the axle from the top out o the front
forks.
Once the axle has been separated from the front forks, carefully slide the frame out of the
front forks. Cauon! Make sure the frame is in the middle of the front forks so the second
axle can be pushed out through the slot. Do not force it, because it could damage the
wood. Keep a hold of the protecve caps so they do not fall.
The second axle is a safety axle; it makes
sure that the forks do not spread too far and
prevents ngers from being pinched between
the frame and the front forks. So it is very
important to posion this axle correctly.
Flip the frame around so the seat is upside
down and slide the frame carefully into the
front forks. Make sure the frame is in the
middle of the front forks so the second axle
can be pushed in through the slot. Check
that the protecve caps are back in posion
between the frame and the front forks.
Make sure the holes of the front forks are aligned with the holes of the frame. Slide the
axle with the sealed nut at the top from the top downwards into the front forks and
through the frame. Tighten the nut at the boom and check that the front forks rotate
smoothly in the frame. Also check that the space between the frame and the front forks is
at least 12 mm (roughly the thickness of your lile nger) when you move the forks all the
way to the le or right. Now reassemble the handlebar and the front wheel.
Detach the seat from the frame and t it on the other side of the frame. Now use holes 1
and 3 to fasten the seat. See the secon on adjusng the seat.
A
DRAWN
578 246 13
D
E
C
578 246 13
D
B
E
C
TRYBIKE
THE GROWBIKE
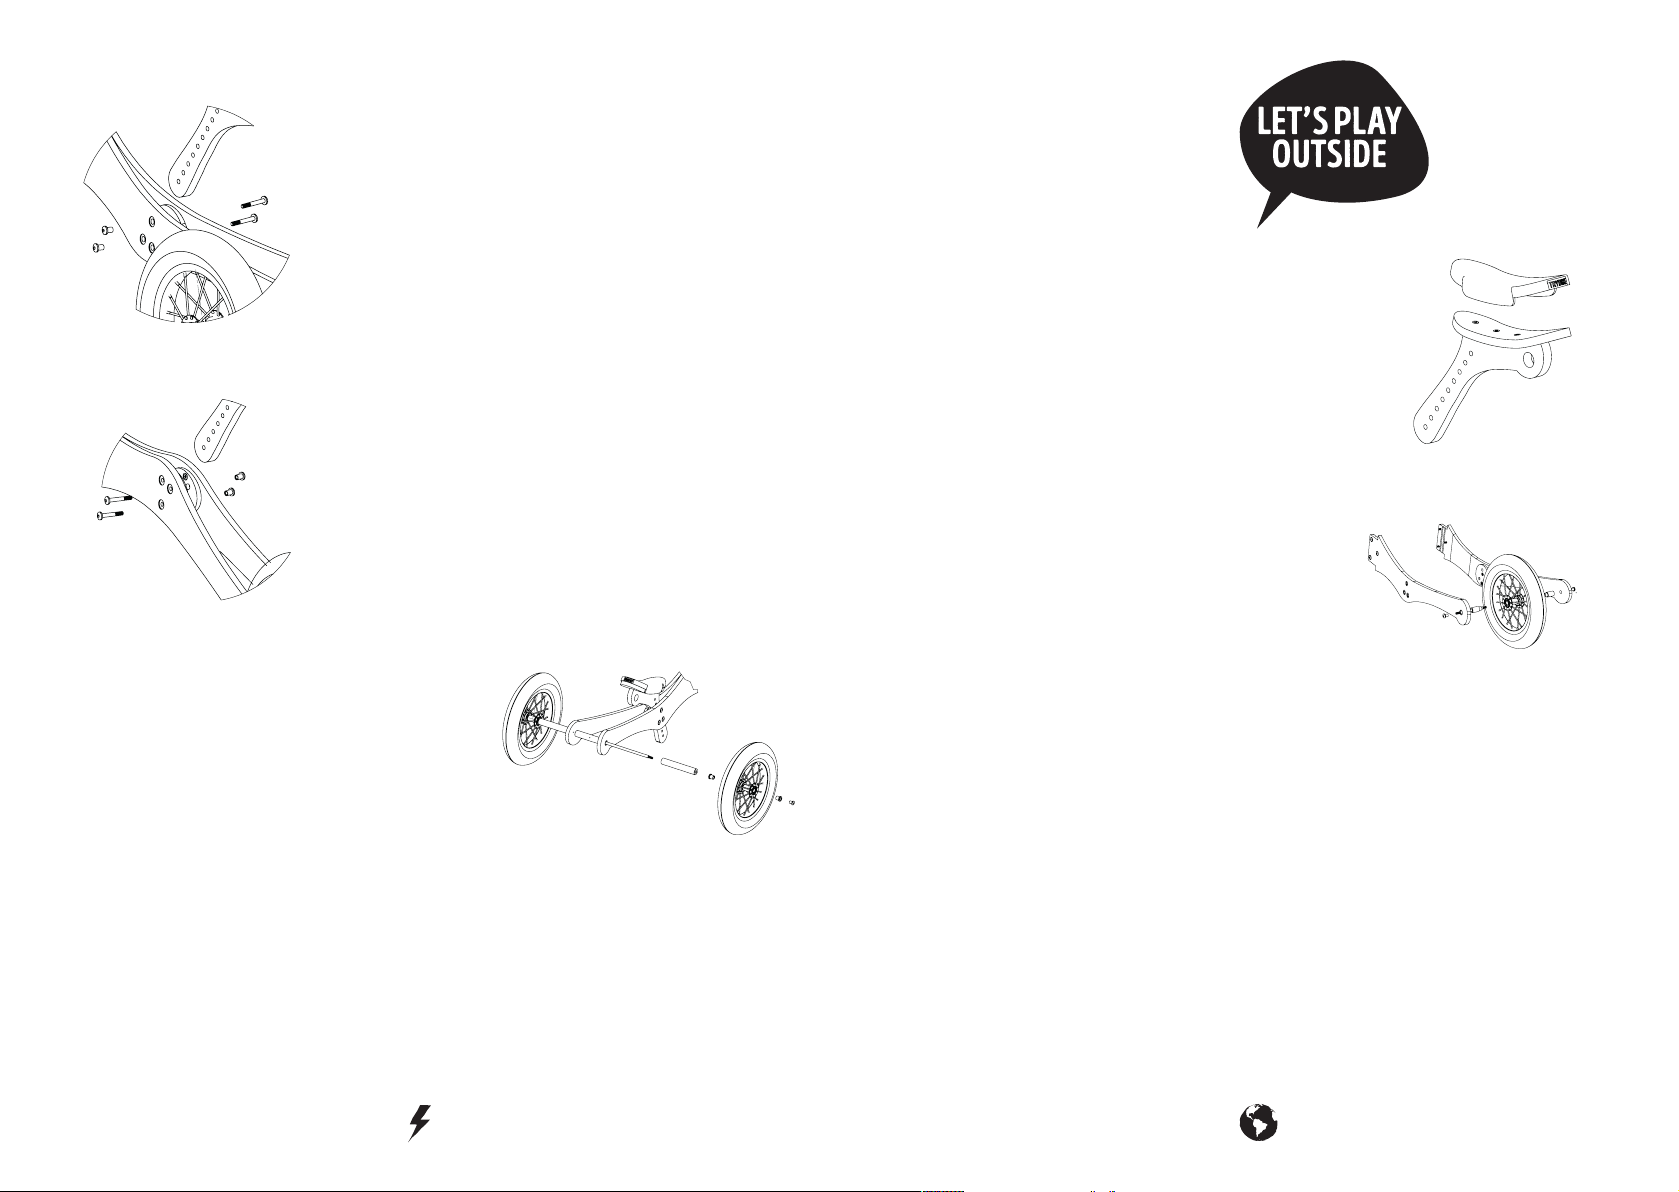
The seat and seat post have already been ed. Before
use, secure the seat post with two bolts through hole
1 and hole 2, see picture. The third hole is used for
posioning the seat in the high Trybike mode.
The seat post is wedged prey ghtly into the frame, so
you may have to pull the frame apart a lile to t the seat
post when you want to lower or raise the seat.
The Trybike grows with your child by ipping the frame to
the high mode. Use holes 1 and 3 for the high mode, as
shown in the picture.
FITTING THE SEAT COVER
The boom of the seat cover has a Velcro fastening. Place
the cover on the seat, with the Trybike logo facing to the back
and make sure that the Velcro fastenings are properly stuck
together. Pull the sides of the seat cover over the seat and
fasten the underside of the seat.
CORRECT SEAT HEIGHT
The seat will be at the correct height when your child can
just reach the oor with his or her heels. If the seat is too
low in tricycle mode, the heels tend to touch the back axle,
and in bicycle mode, the child’s feet will end up dragging
slightly. So, ensure the seat is not too low.
A
SSEMBLY
OF THE LONG REAR AXLE AND THE TWO REAR WHEELS
Remove the parts of the long axle, please note: one nut
is sealed and only one nut can be unscrewed. Insert the
short aluminium pipe in between the rear forks. Insert
the short black bushings into the wheels, with the
narrow part of the bushings into the wheel bearings.
Then slide one wheel with the bushings over the rear
axle to the xed nut at the end of the axle. Push the
long aluminium pipe over the axle up to the wheel and
slide the axle, from the le side of the rider, into the
holes of the rear forks and through the aluminium pipe. Important, keep the sealed nut
on the le side of the rider. This way the nut on the other side won’t turn loose when
the Trybike is ridden. Slide the remaining long aluminium pipe and the wheel with the
bushings onto the right side of the rear axle and fasten the wheel with the nut. Finally,
ghten the nut properly (not too ght but also not too loose) and check that the wheels
rotate smoothly and the nuts don’t turn. Put the short axle in the supplied bag and store
it, so you can convert the tricycle to a bicycle in the future.
TRYBIKE
LIGH TNIN G FAST
CONVERTING THE TRYBIKE FROM A TRICYCLE INTO A BICYCLE
Detach the long axle with the two wheels, pipes and
bushings from the rear forks. Put the long axle in the
supplied bag and store it together with one wheel so you
can convert the tricycle to a bicycle for another child in
the future. The rear wheel is basically mounted the same
way as the front wheel, but the rear wheel is a bit more
dicult to do because it is subject to some tension. So
you may have to pull the prongs of the rear forks apart.
Insert the black long nylon bushings into the wheel, with the narrow part of the bushing
into the wheel bearing. Place the wheel with the black nylon bushings between the rear
forks so the holes of the rear forks are exactly aligned with the holes of the bushings.
Insert the axle through the rear forks, the bushings and therefore also through the wheel.
Before you push the axle all the way through, put the nut on one side of the axle, giving it
a few turns. Push the axle completely through the hole and put the nut on the other side,
again giving it a few turns. Once ed, ghten the nuts simultaneously on both sides and
check that the wheel rotates smoothly.
Put the long axle in the supplied bag and store it together with the wheel so you can
convert the tricycle to a bicycle for another child in the future.
TRYBIKE
WALK ING THE W ORLD
Page 4
CONVERTING THE TRYBIKE FROM A
A
DRAWN
D
E
C
D
B
E
C
LOW BICYCLE INTO A HIGH BICYCLE
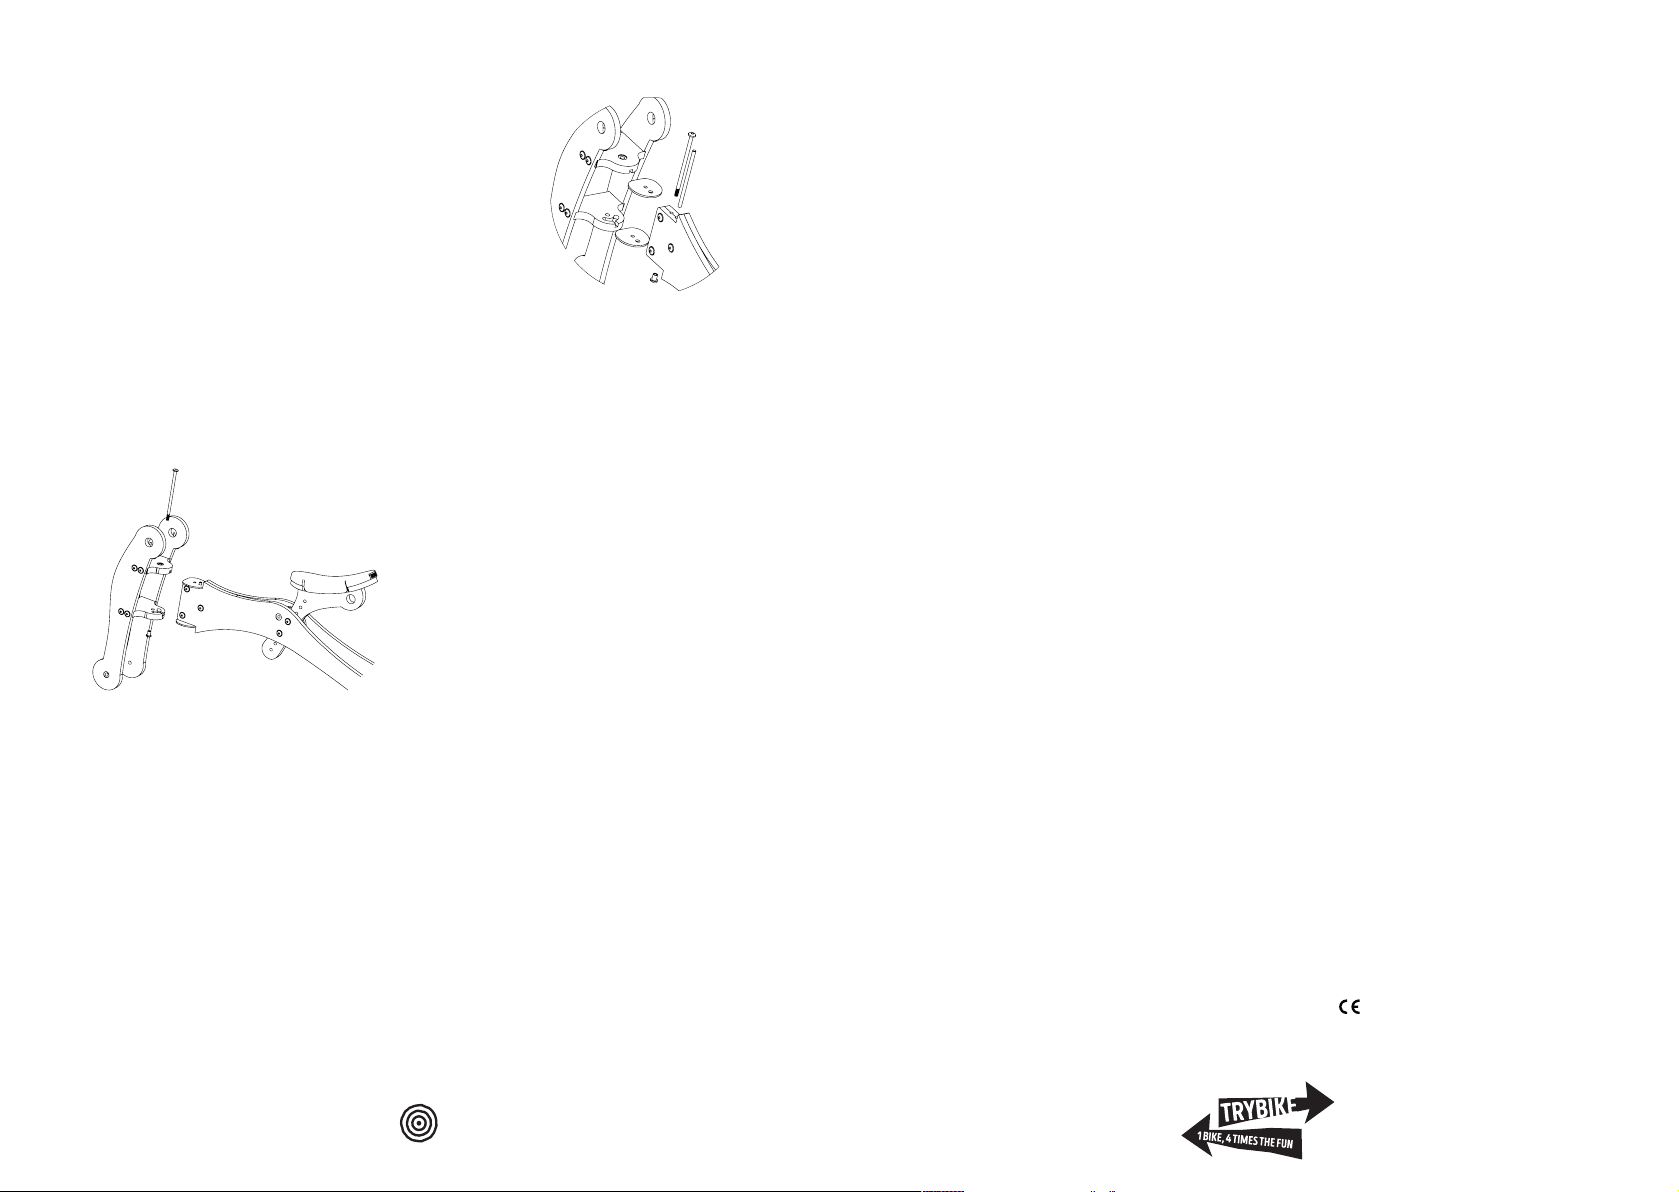
First, dismantle the handlebar and the front wheel, then
loosen the axle that ts through the frame and the front
forks. One nut is located on top of the front forks, under
the handlebar, this nut is sealed to the axle. The other nut
is located at the boom, above the front wheel. Loosen the
boom nut. Now pull the axle from the top out o the front
forks.
Once the axle has been separated from the front forks, carefully slide the frame out of the
front forks. Cauon! Make sure the frame is in the middle of the front forks so the second
axle can be pushed out through the slot. Do not force it, because it could damage the
wood. Keep a hold of the protecve caps so they do not fall.
MAINTENANCE
Regularly check that all parts are secure
and undamaged, paying parcular
aenon to the handlebars, wheels and
seat. Make sure you perform a thorough
check-up 14 days aer assembly.
TYRES
We recommend that you inate all the
tyres to approximately 30 PSI to 35 PSI (2.0
to 2.4 bar). You should sll be able to push
in the tyre a lile with your thumb. Do not
overinate the tyres. Do not exceed 35 PSI,
because the tyre may burst!
WARRANTY
Designing our bikes took a lot of me, and
each Trybike has been manufactured with
great care and aenon. Every Trybike is
checked separately, but producon errors
may sll slip through. That’s why the Trybike
comes with a 2-year warranty period from
date of purchase against any manufacturing
defects. We will repair or replace the Trybike
free of charge during this period if you should
encounter any manufacturing defects. If
you have any problems with your Trybike,
please contact the (online) store where you
purchased your Trybike.
Regularly check the tyres and wheels for
The second axle is a safety axle; it makes
sure that the forks do not spread too far and
prevents ngers from being pinched between
the frame and the front forks. So it is very
important to posion this axle correctly.
Flip the frame around so the seat is upside
down and slide the frame carefully into the
front forks. Make sure the frame is in the
middle of the front forks so the second axle
can be pushed in through the slot. Check
that the protecve caps are back in posion
between the frame and the front forks.
Make sure the holes of the front forks are aligned with the holes of the frame. Slide the
axle with the sealed nut at the top from the top downwards into the front forks and
through the frame. Tighten the nut at the boom and check that the front forks rotate
smoothly in the frame. Also check that the space between the frame and the front forks is
at least 12 mm (roughly the thickness of your lile nger) when you move the forks all the
way to the le or right. Now reassemble the handlebar and the front wheel.
Detach the seat from the frame and t it on the other side of the frame. Now use holes 1
and 3 to fasten the seat. See the secon on adjusng the seat.
damage and correct tyre pressure.
PROTECTION
Treat the wooden parts of the Trybike with
beeswax to keep the wood looking nice for
longer.
CLEANING
To clean the Trybike, use car wash
detergents, lukewarm water and a so
cloth. Apply beeswax aerwards to protect
the paint.
LUBRICATION
Lubricate the axles and the bearings of the
wheels lightly with standard bicycle oil.
STORAGE
Store the Trybike in a warm, dry and
well-venlated area at room temperature.
Do not keep it outside or in a cold damp
storage area and keep out of extreme
temperatures. Use the supplied bag
for storing the long axle or short axle
if not used.
This warranty is valid only for the original
purchaser who bought the product new from
an authorised dealer, so make sure you keep
a copy of your receipt.
Your warranty will be likely to become void if
you have modied the Trybike in any way, if
the problem is due to normal wear and tear,
if you bought the Trybike in a used condion
or if the Trybike has not been correctly
assembled, used and/or maintained.
Please contact us if you have any problem
with your Trybike, because we can always
help you, even if your warranty is no longer
valid. We designed the Trybike so that it can
always be xed. All components are available
and can be ordered separately. We will do
everything we can to ensure that children
may enjoy the Trybike for as long as possible.
Rights may vary by country.
This product complies with the following
toy safety requirements: AS/NZS ISO 8124,
EN 71 and
TRYBIKE
THE GROWBIKE
 Loading...