

Page 1
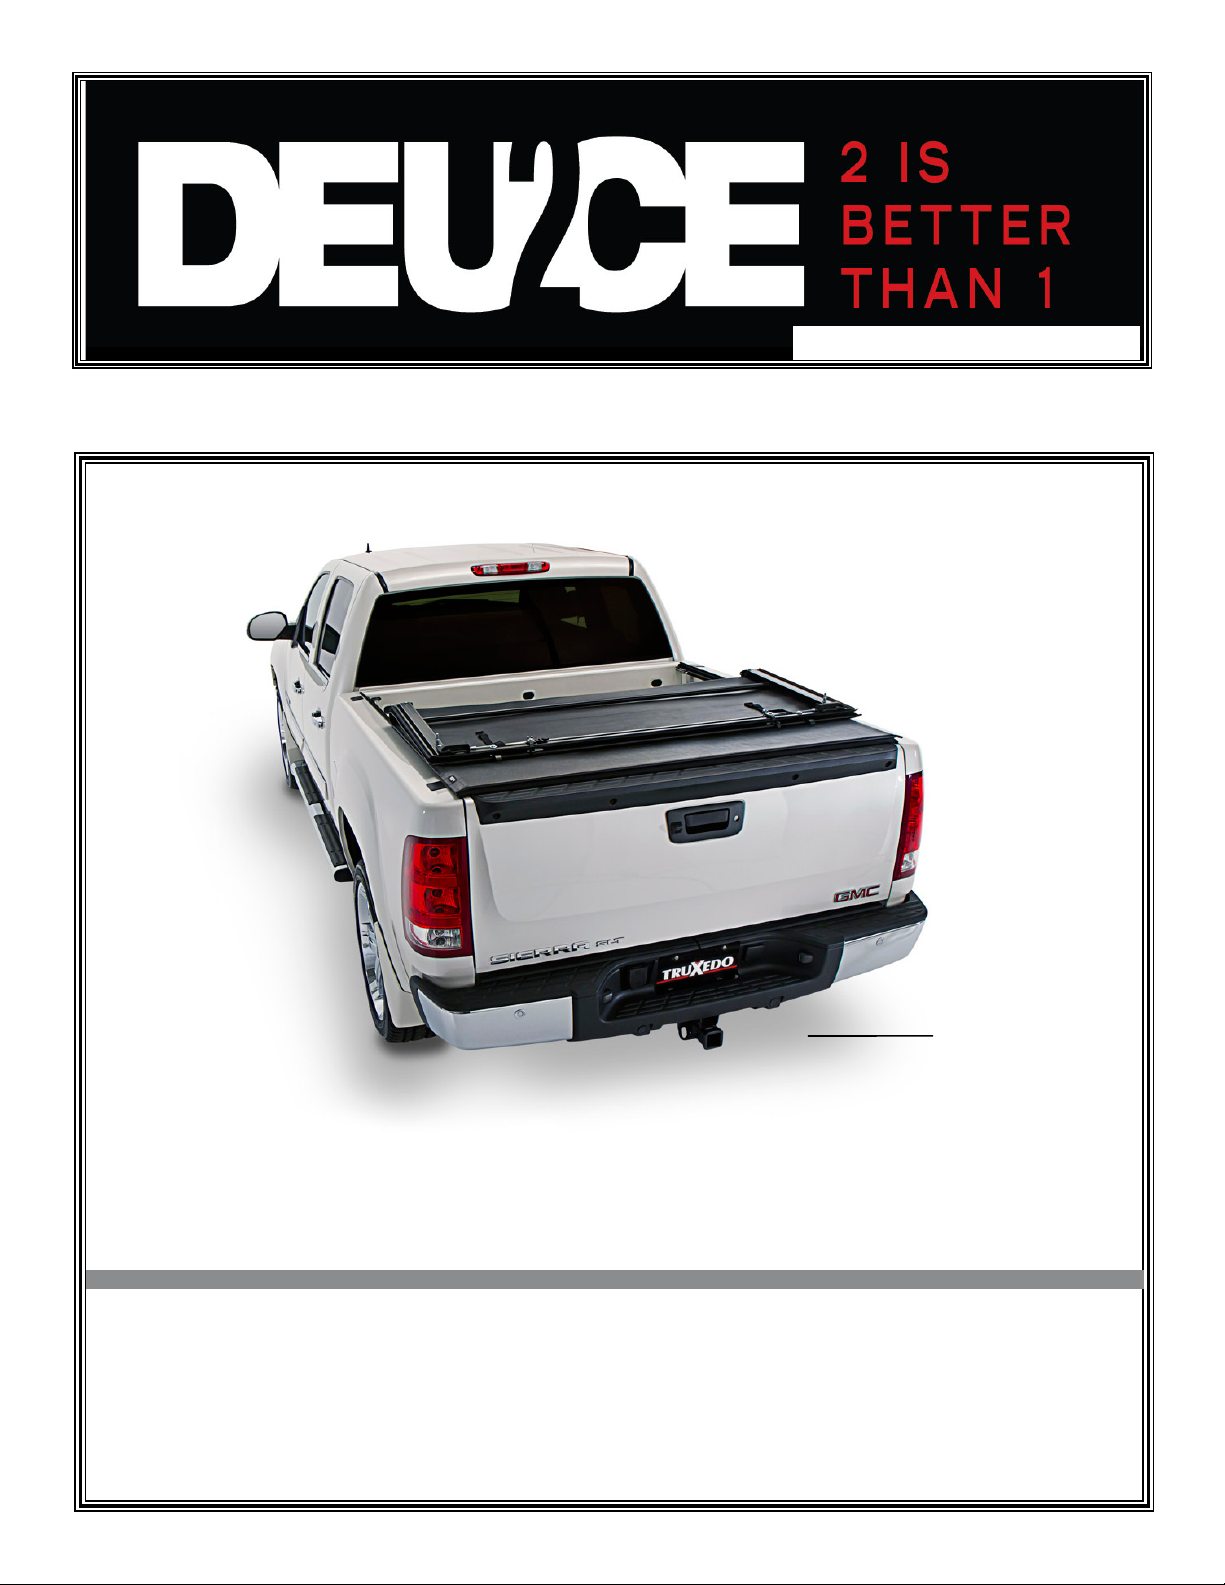
Owner’s & Installation Manual
READ INSTRUCTIONS - Failure to assemble cover properly will void warranty.
OWNER’S MANUAL
Damaged or missing parts?
1-877-878-9336
Call
Mon - Fri 8 am - 5 pm CT
Parts will be shipped to you factory direct.
Do not return kit to place of purchase.
PICKUP BED COVER
2209 Kellen Gross Dr., Yankton SD 57078
Phone: 1-877-TRUXEDO (1-877-878-9336) Fax: (605) 664-9304
Web Site: http://www.truxedo.com
TruXedo® Deuce is a registered United States trademark of TruXedo. Patents pending.
___ 1 ___
Tools Required:
-3/8” Rachet
-1/2”, 9/16” Socket
-Tape Measure
- Pencil (For marking Locations)
- Small Spring Clamps (Optional,
used to hold rails in place while
clamping)
P/N 1117648 Rev D
Page 2
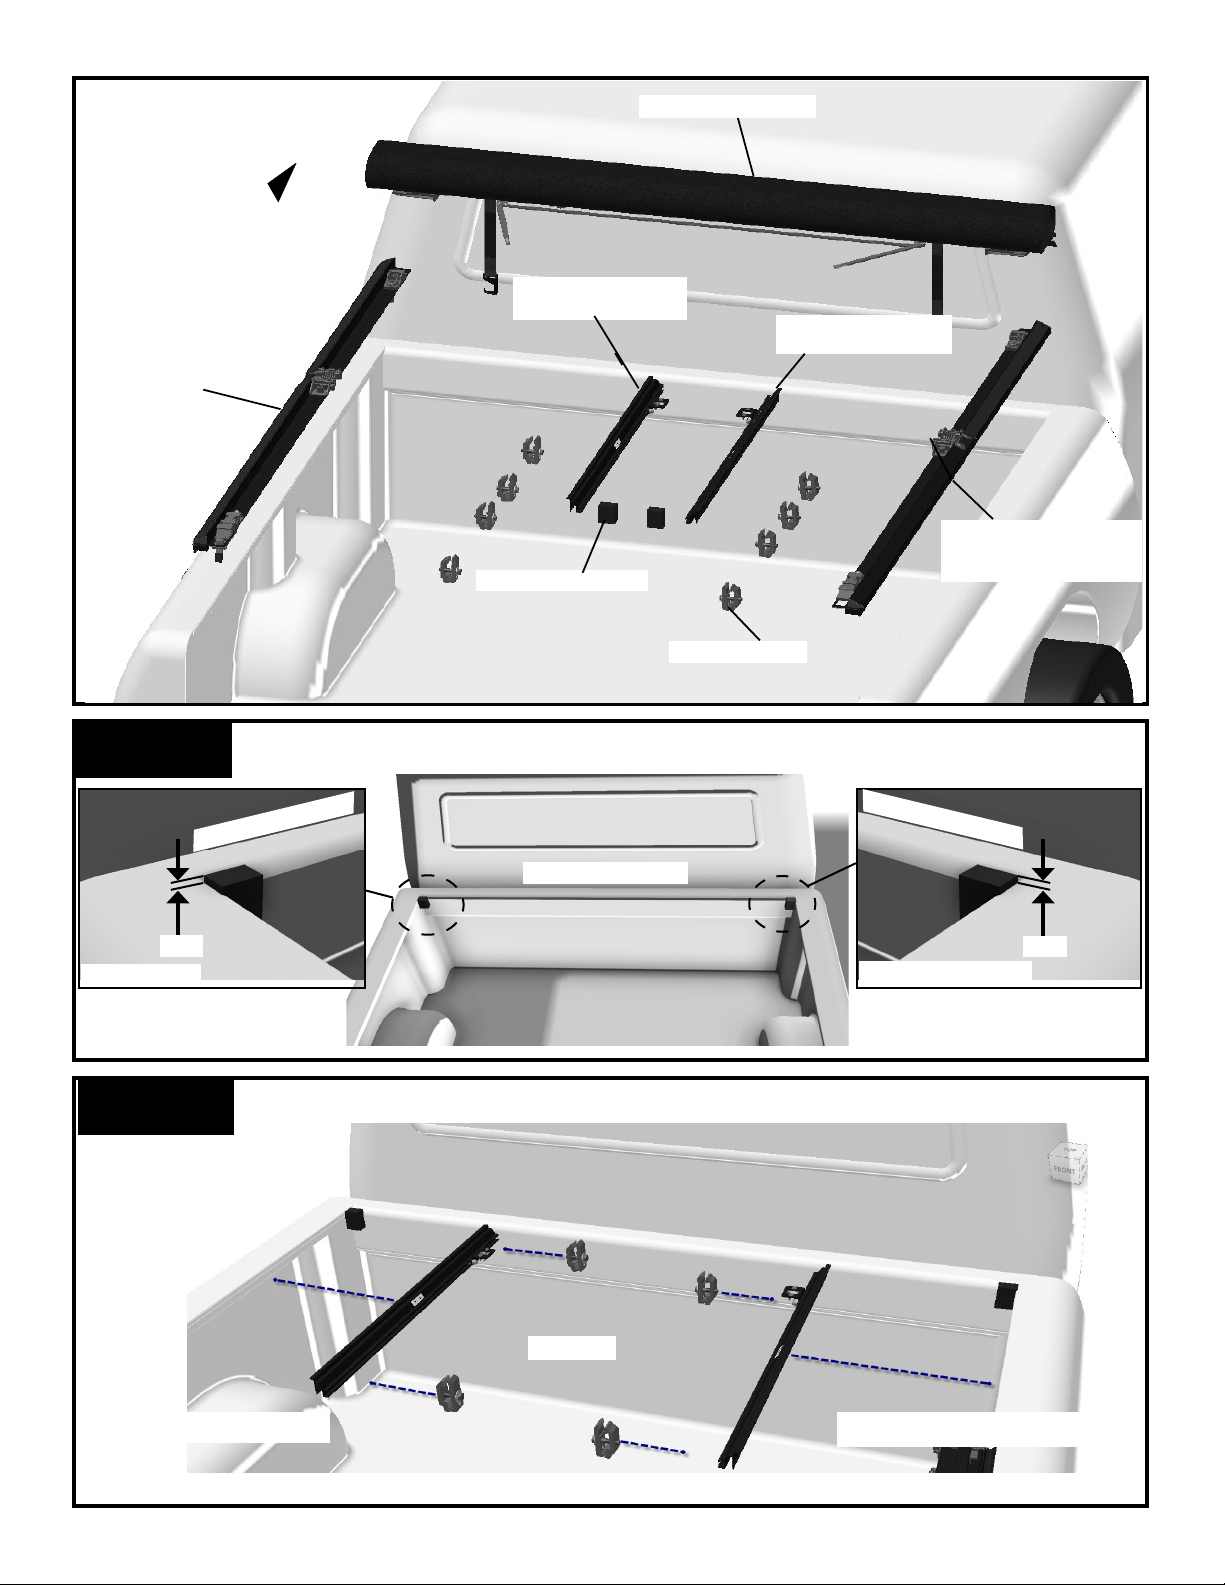
Cover Assembly
FRONT OF
TRUCK BOX
Driver’s Side Rail
Assembly
STEP 1
Attach Foam Block Seals. Peel white paper backing off and attach foam corner
block seals.
Front Bulkhead
Driver’s Side
Underbody Rail
Passenger’s
Side Underbody
Passenger’s Side
Rail Assembly
Block Seal (x2)
Clamps (x8)
Front Bulkhead
Front Bulkhead
1/4”
Driver Side
Passenger Side
Attach Underbody Rail and Clamp Components.
1/4”
STEP 2
Clamps
Driver Underbody Rail Passenger Underbody Rail
___ 2 ___
Page 3
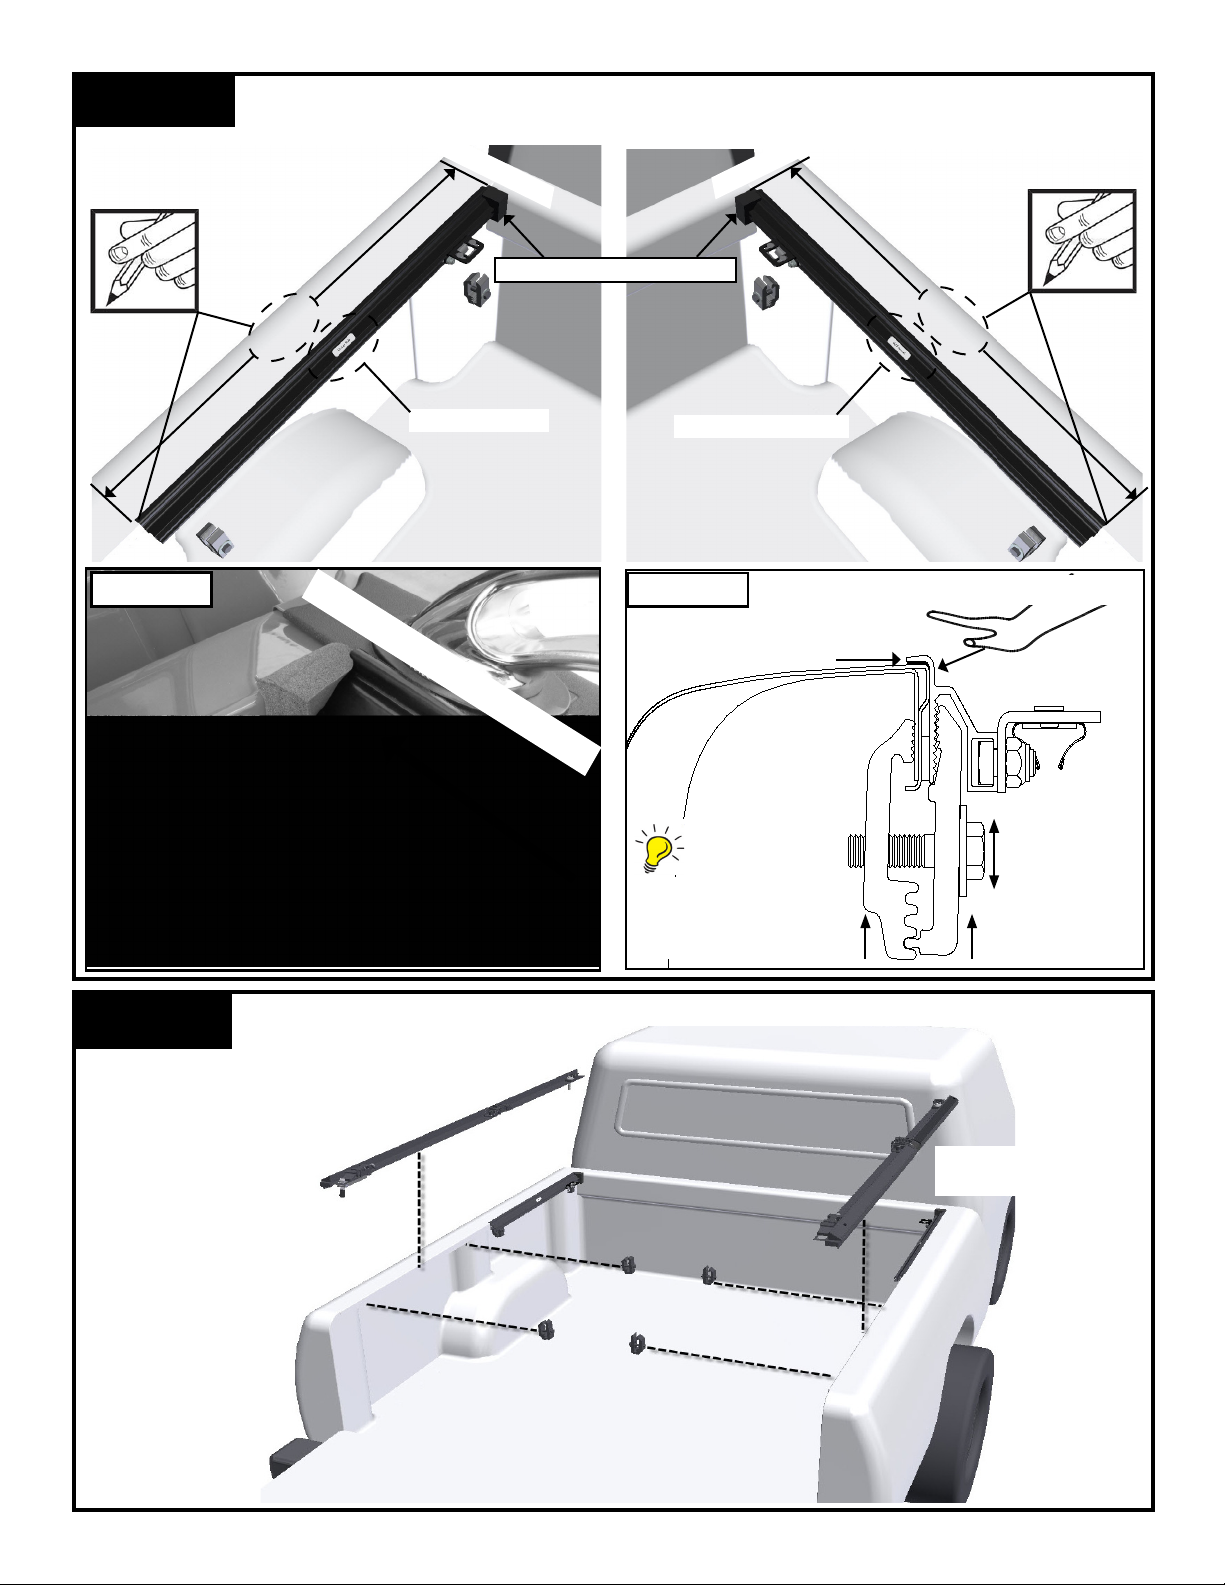
STEP 2-A
Attach driver and passenger side underbody rails, see note 1 & 2 for installation hints.
Front Bulkhead
Front Bulkhead
Compress Block Seal
30 1/4”
30 1/4”
Note 1
Driver’s Side
Compress Block Seal
Passenger Side
Note 2
FOR BEST CLAMPING
MOUNT CLAMP HIGH
AS POSSIBLE
WHILE CLAMPING PRESS DOWN
COMPRESS SEAL
Level
ADJUSTABLE
CLAMP
STEP 3
Driver’s Side Rail
Assembly
Position driver and passenger rails.
Passenger’s Side
Rail Assembly
Clamps
___ 3 ___
Page 4
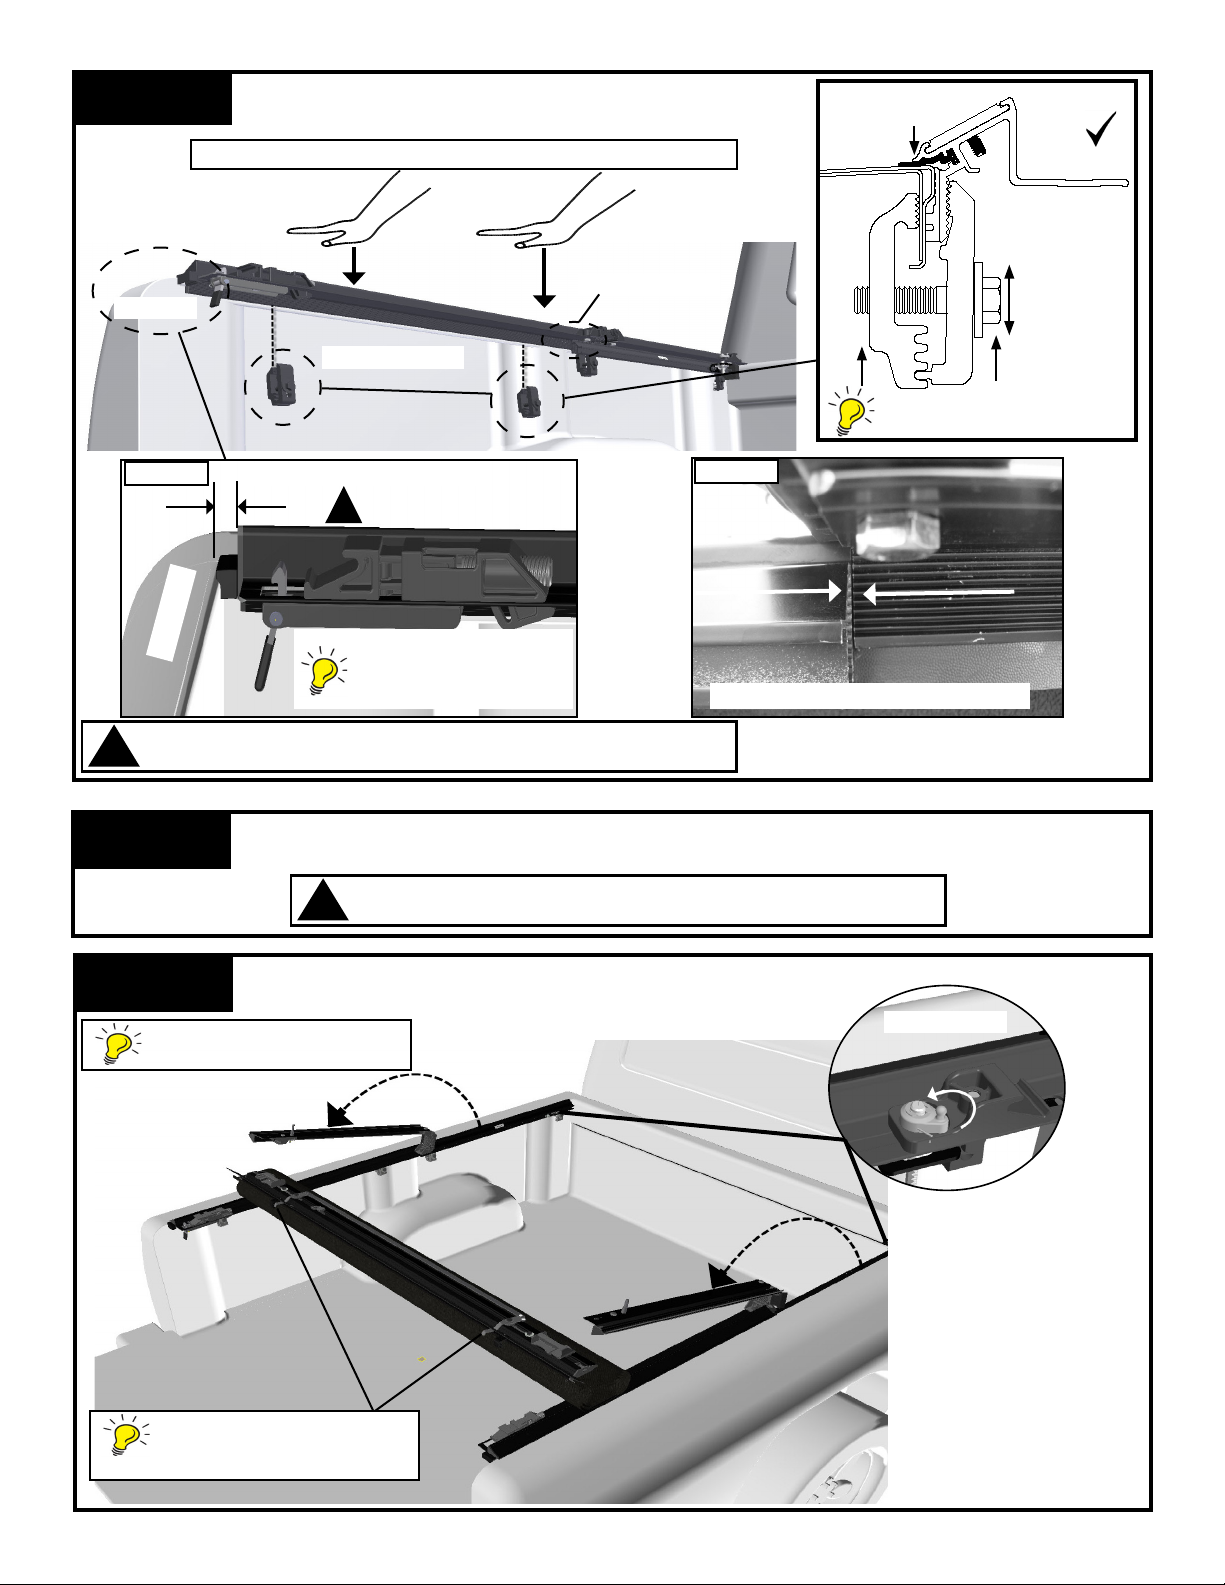
STEP 3-A
Position and install driver side rail assembly with
clamps, see note 1 and 2 for installation hints.
SEAL
COMPRESSED
Note 1
Note 1
While clamping press down to compress side seal
Note 2
Tailgate
Driver’s Side
Driver’s Side Shown
!
3/8”
If rear seal is not slightly
compressed then
reposition assemblies
rearward slightly.
LEVEL
FOR BEST CLAMPING MOUNT
CLAMP HIGH AS POSSIBLE
Note 2
End To End, Must Be Flush
ADJUSTABLE
CLAMP
!
WARNING
STEP 3-B
STEP 4
Works best with tailgate
down as shown.
Tighten clamps securely on side rails before driving vehicle.
Repeat step 3-A to position and install passenger side rail assembly with
clamps, see notes 1 and 2 in step 3-A for installation hints.
!
WARNING
Attach cover assembly to the driver and passenger side rails as shown.
Tighten clamps securely on side rails before driving vehicle.
To Release
Correct if levers point to
the rear or toward the
tailgate.
___ 4 ___
Page 5
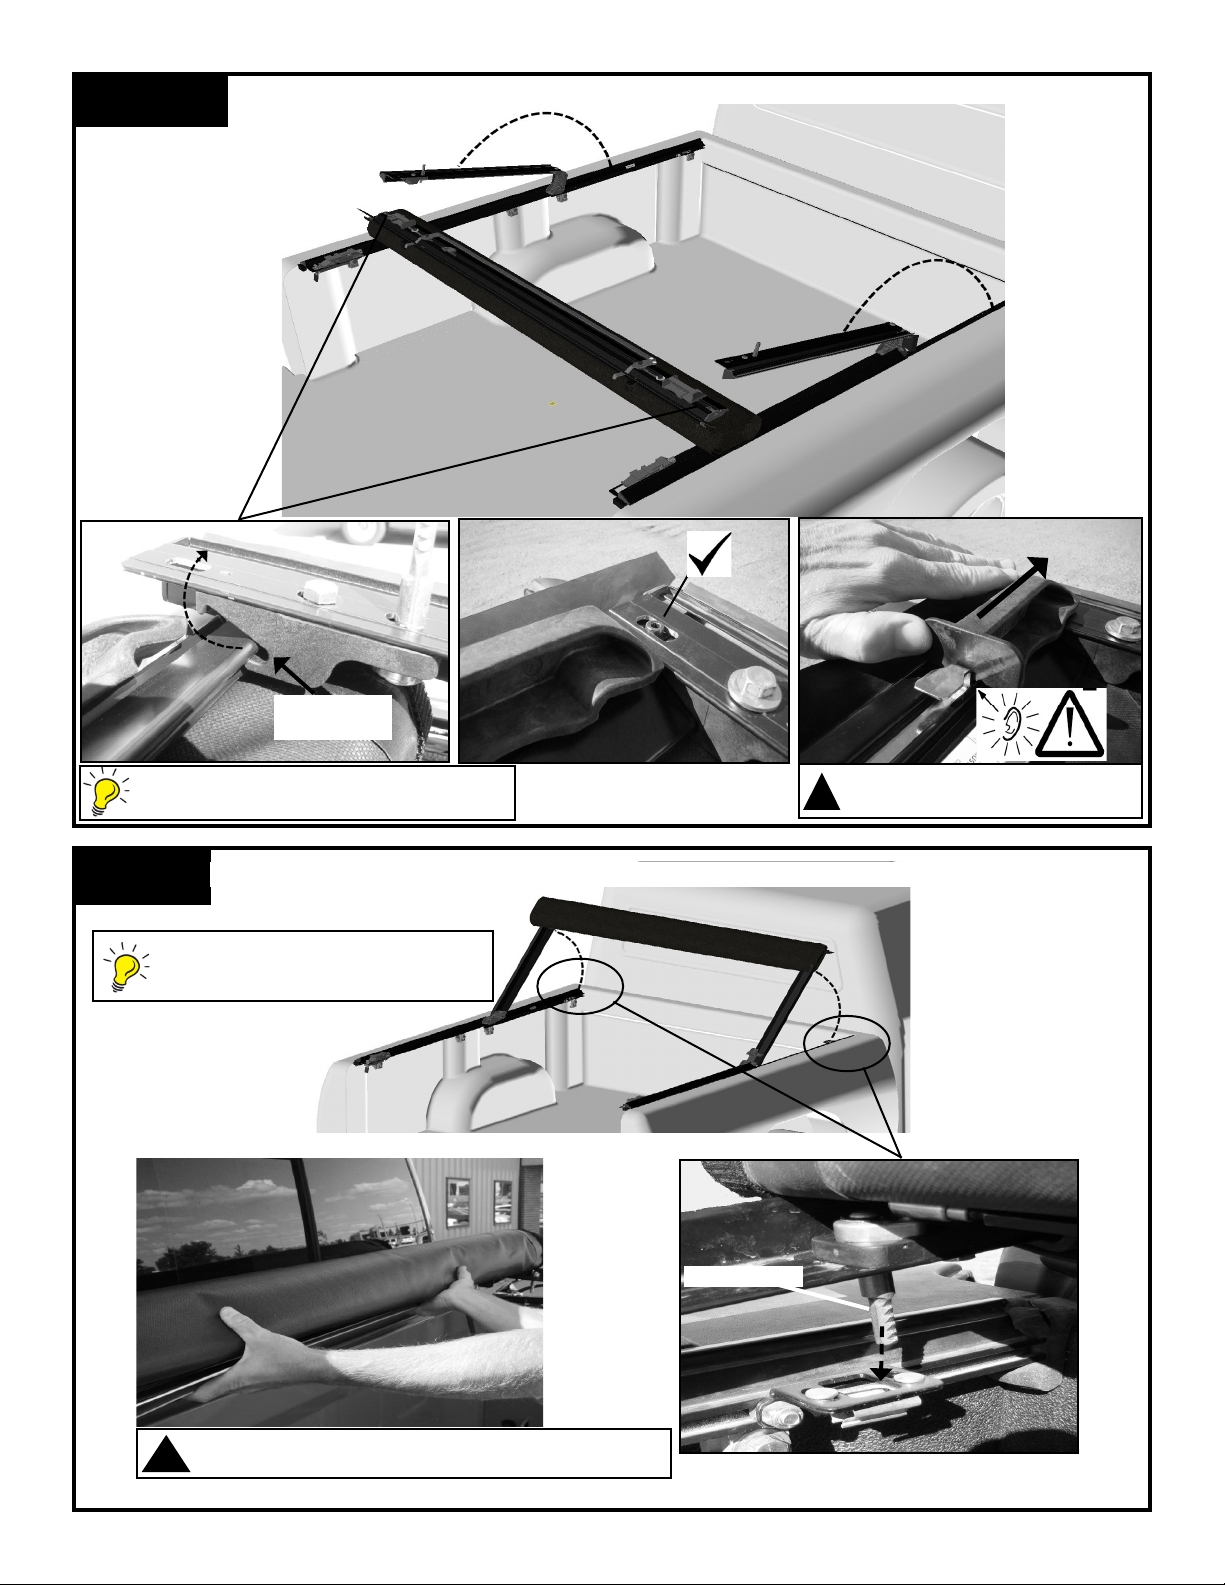
STEP 4-A
Attach cover assembly to the driver and passenger side rails as shown.
Insert and
Rotate up.
Simultaneously insert front header in both
driver and passenger side header stops.
STEP 5
Rotate attached cover assembly over to the cab and engage strikers into latch brackets.
Installer should be inside the truck
box when rotating assembly over to
the front.
Striker Pin
Lock both driver and passenger
!
side.
Use CAUTION, cover assembly is heavy. Use
!
both hands to guide striker pins into position.
___ 5 ___
Page 6
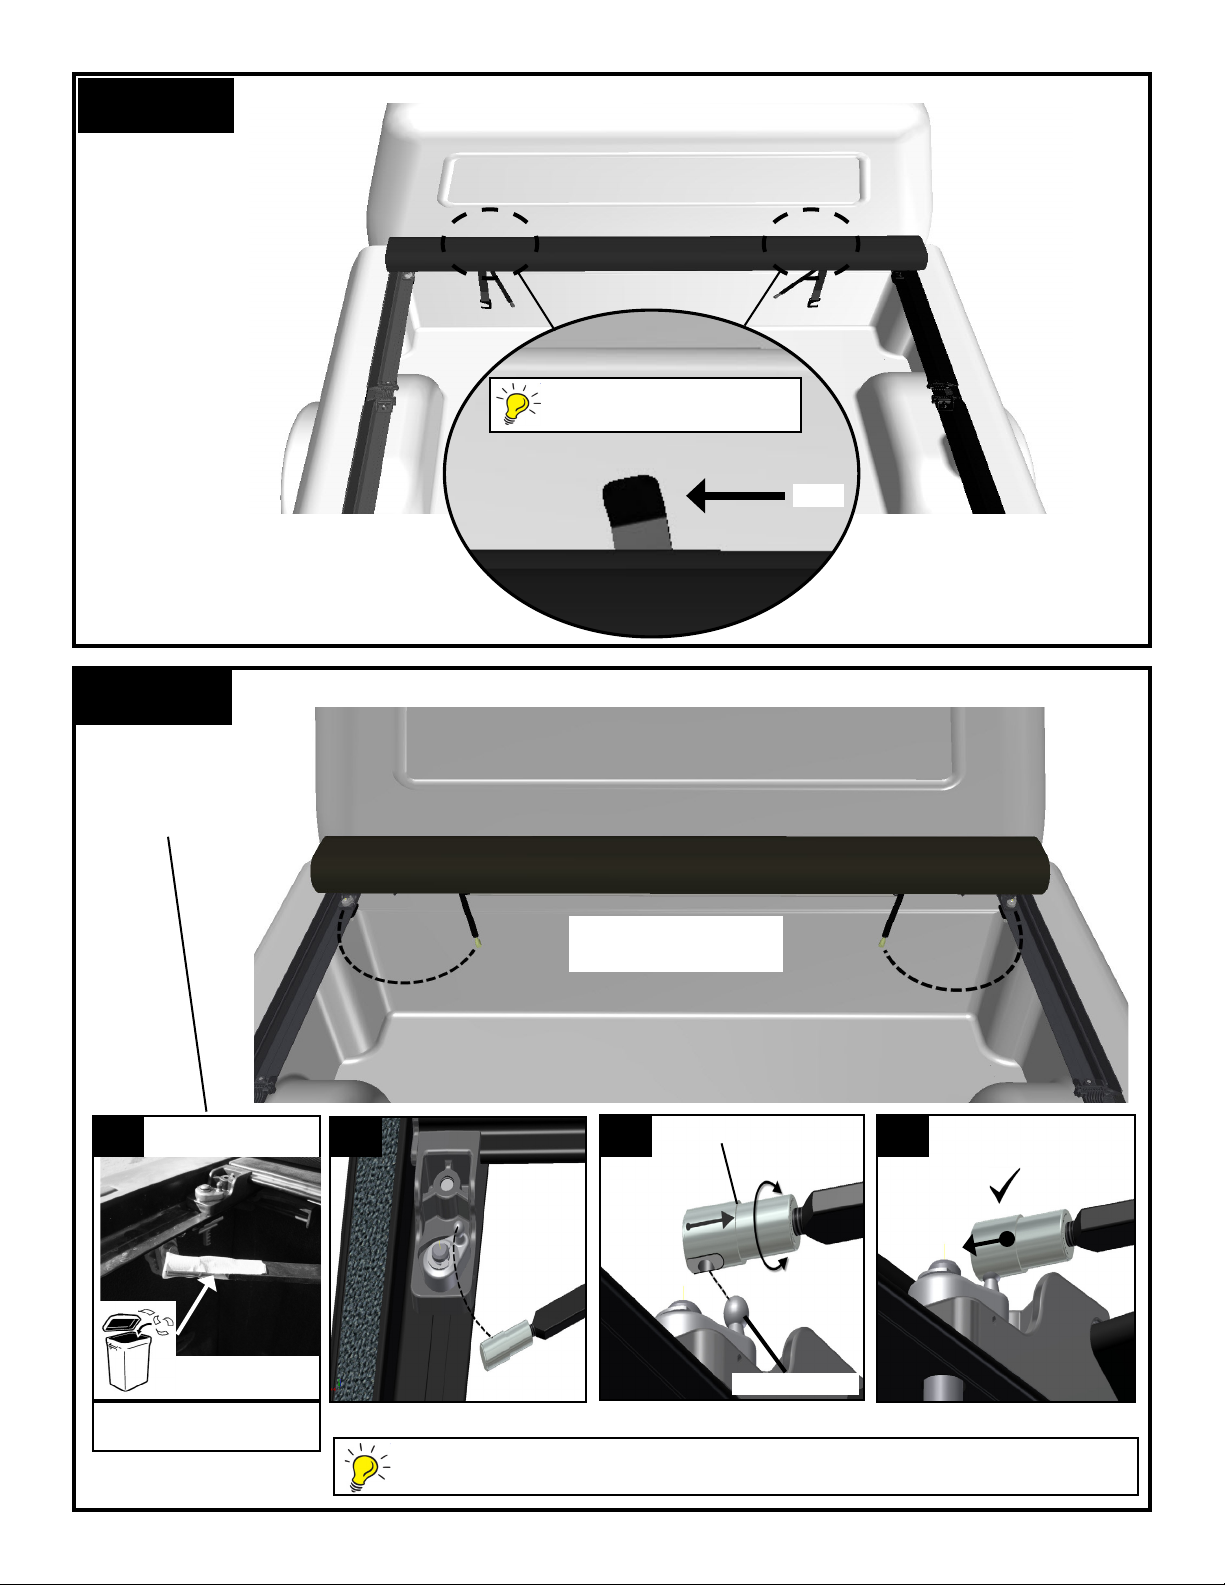
STEP 6
Rotate release levers to the left before connecting outside tie-bars.
Rotate both levers to
the position as shown.
Left
STEP 7
Connect driver and passenger short tie-bars as shown below.
Driver side shown,
repeat procedure for
passenger side
7A
Rotate Tie-bars into
position as shown
7B 7C
Connector End
7D
Remove anti-spin
tape
Ball Socket
Position both release levers to the left before attaching outer tie-bars, see step 6.
___ 6 ___
Page 7
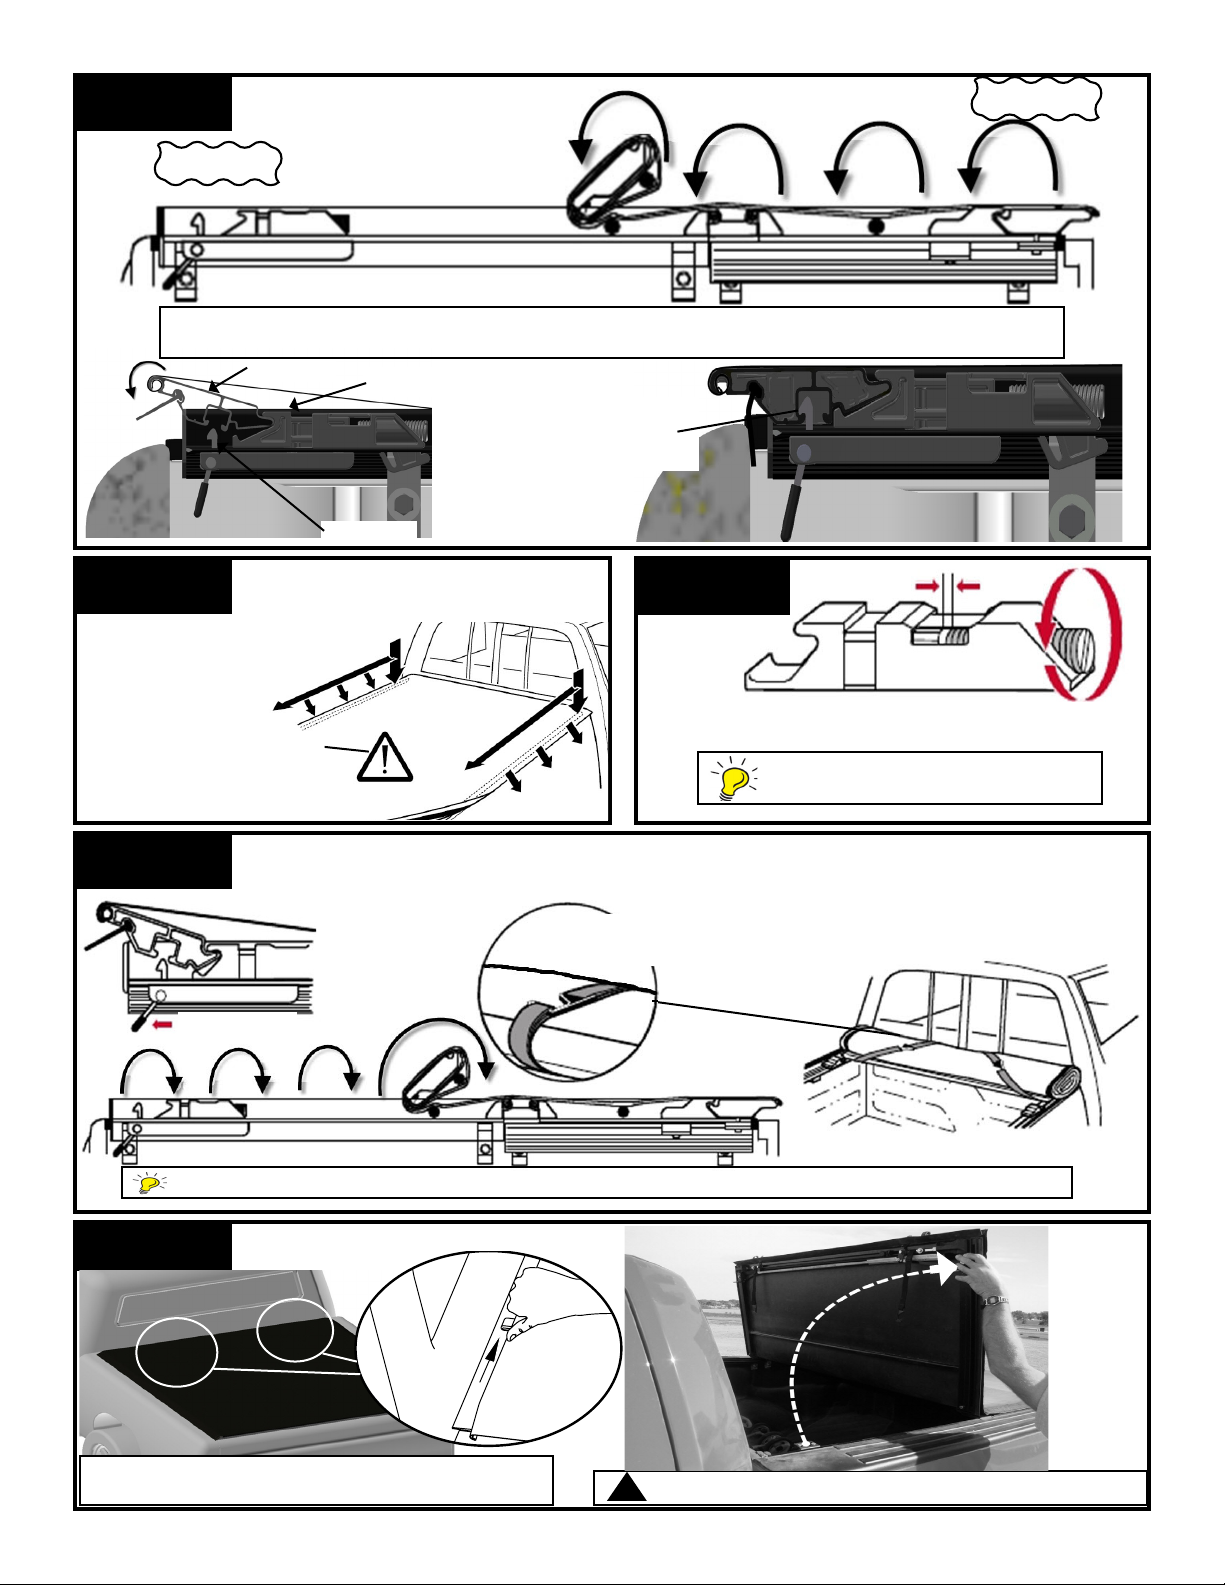
STEP 8
How to close the cover.
Tailgate
Unroll cover toward the tailgate. Rotate rear header into the header stops and press
down to lock toggle into header.
Header
Header Stop
Cover closed and
toggle locked in
header.
Toggle
Cab End
After cover is closed secure the hook
STEP 9
Before driving truck be
sure that the hook and loop
fasteners are secured along
the entire length of both side
rails.
STEP 11
and loop fastener strips on both sides
of truck.
To stow cover, open tailgate, pull rear release toggle and roll cover toward
cab making sure both sides roll evenly.
To Release
STEP 10
Secure cover with
safety straps
1/16”
Set cover tension during the
warmest part of the day.
Slight adjustments, in small
increments, will gain signicant results
1/8”
For best results leave unrolled portion attached to the hook and loop fasteners while rolling
How to open the cover front.
STEP 12
Front of cover can be opened from either the
driver or passenger side of truck
!
___ 7 ___
.
Caution, in windy conditions operate cover with care.
Page 8
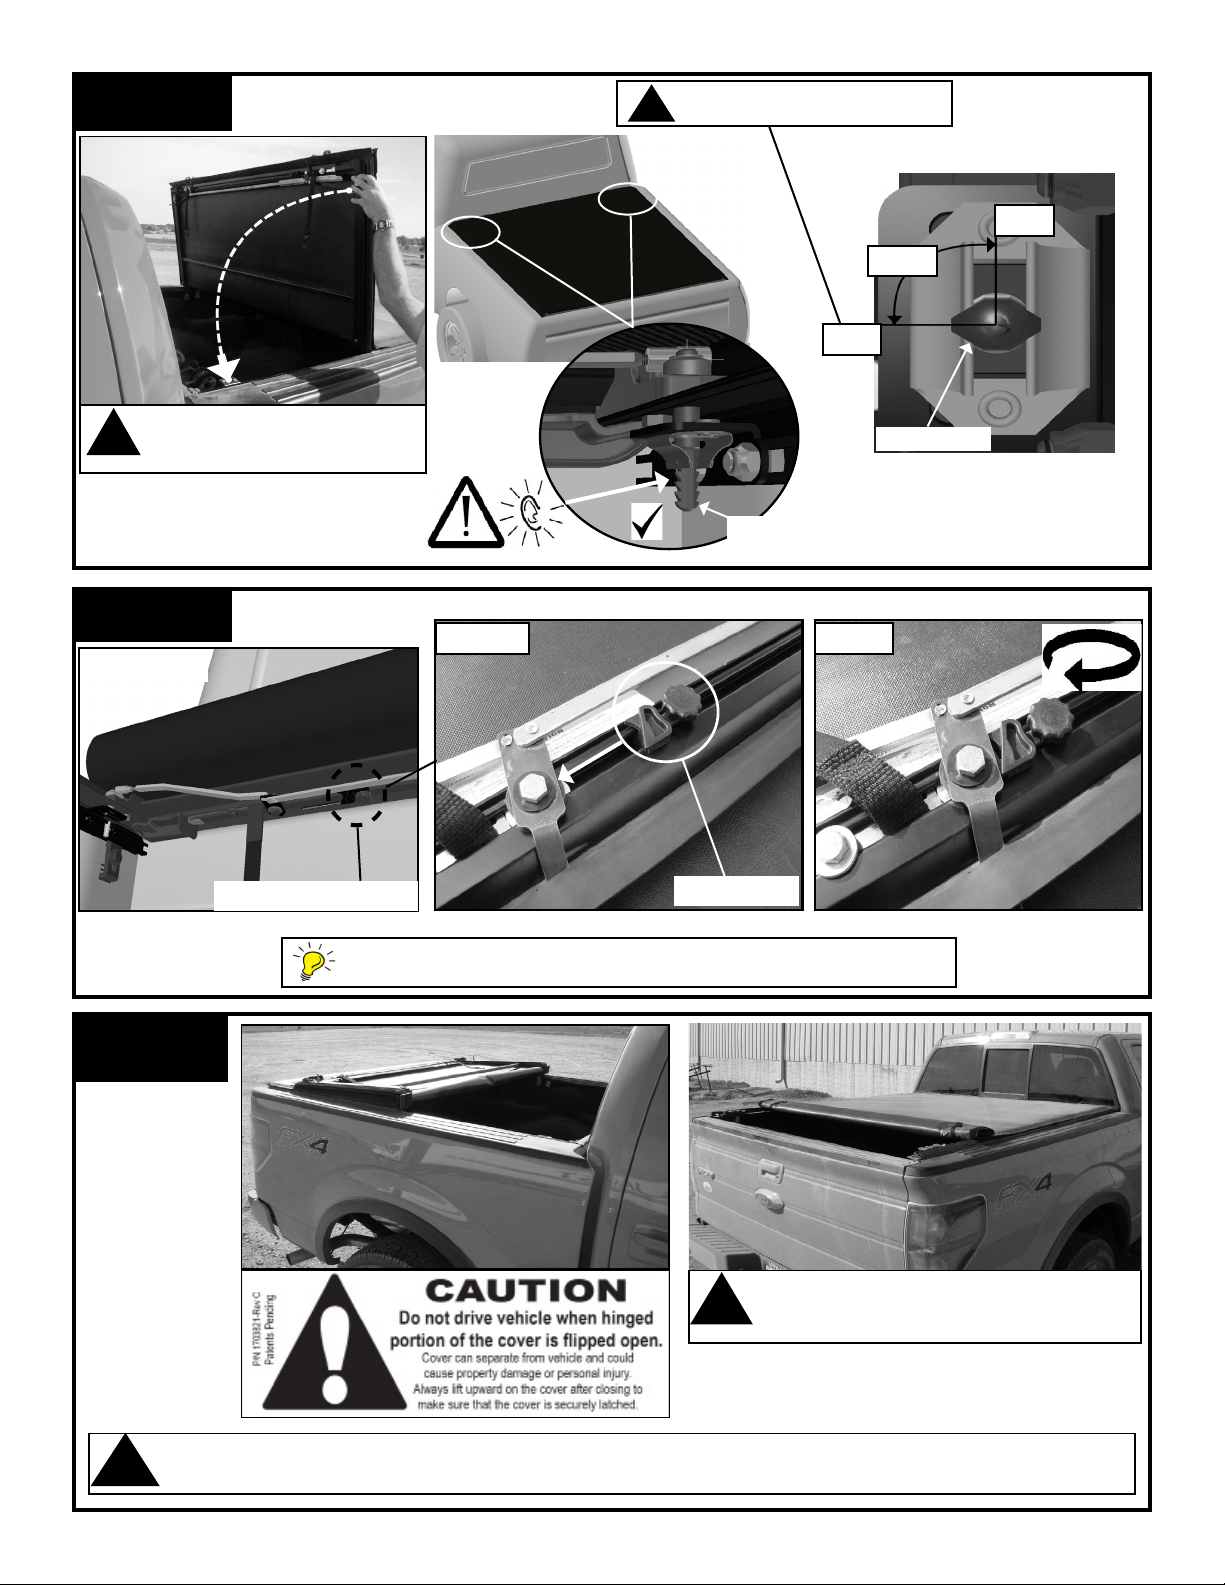
STEP 13
Always lift upward on cover front
after closing to make sure cover
!
is securely latched.
Closing Cover
Latches are secure when striker
!
pins return back to 90 deg.
Close
Striker Pin
Open
90 Deg
Striker Pin
STEP 14
Driver Side
STEP 15
How to lock cover closed for security.
Unlocked
Security Lock Location
The Deuce cover can be locked while the cover is rolled up or in the
open position as shown above.
locked
Security Lock
Caution, never drive vehicle with cover
!
unlatched at the rear or partially rolled to the
front.
• To prevent accidental release of tailgate header, ensure rear header is securely latched to the side rails before driving vehicle.
!
• To prevent wind lift, secure VELCRO
®
brand fasteners along entire length of both side rails before driving vehicle.
___ 8 ___
Page 9
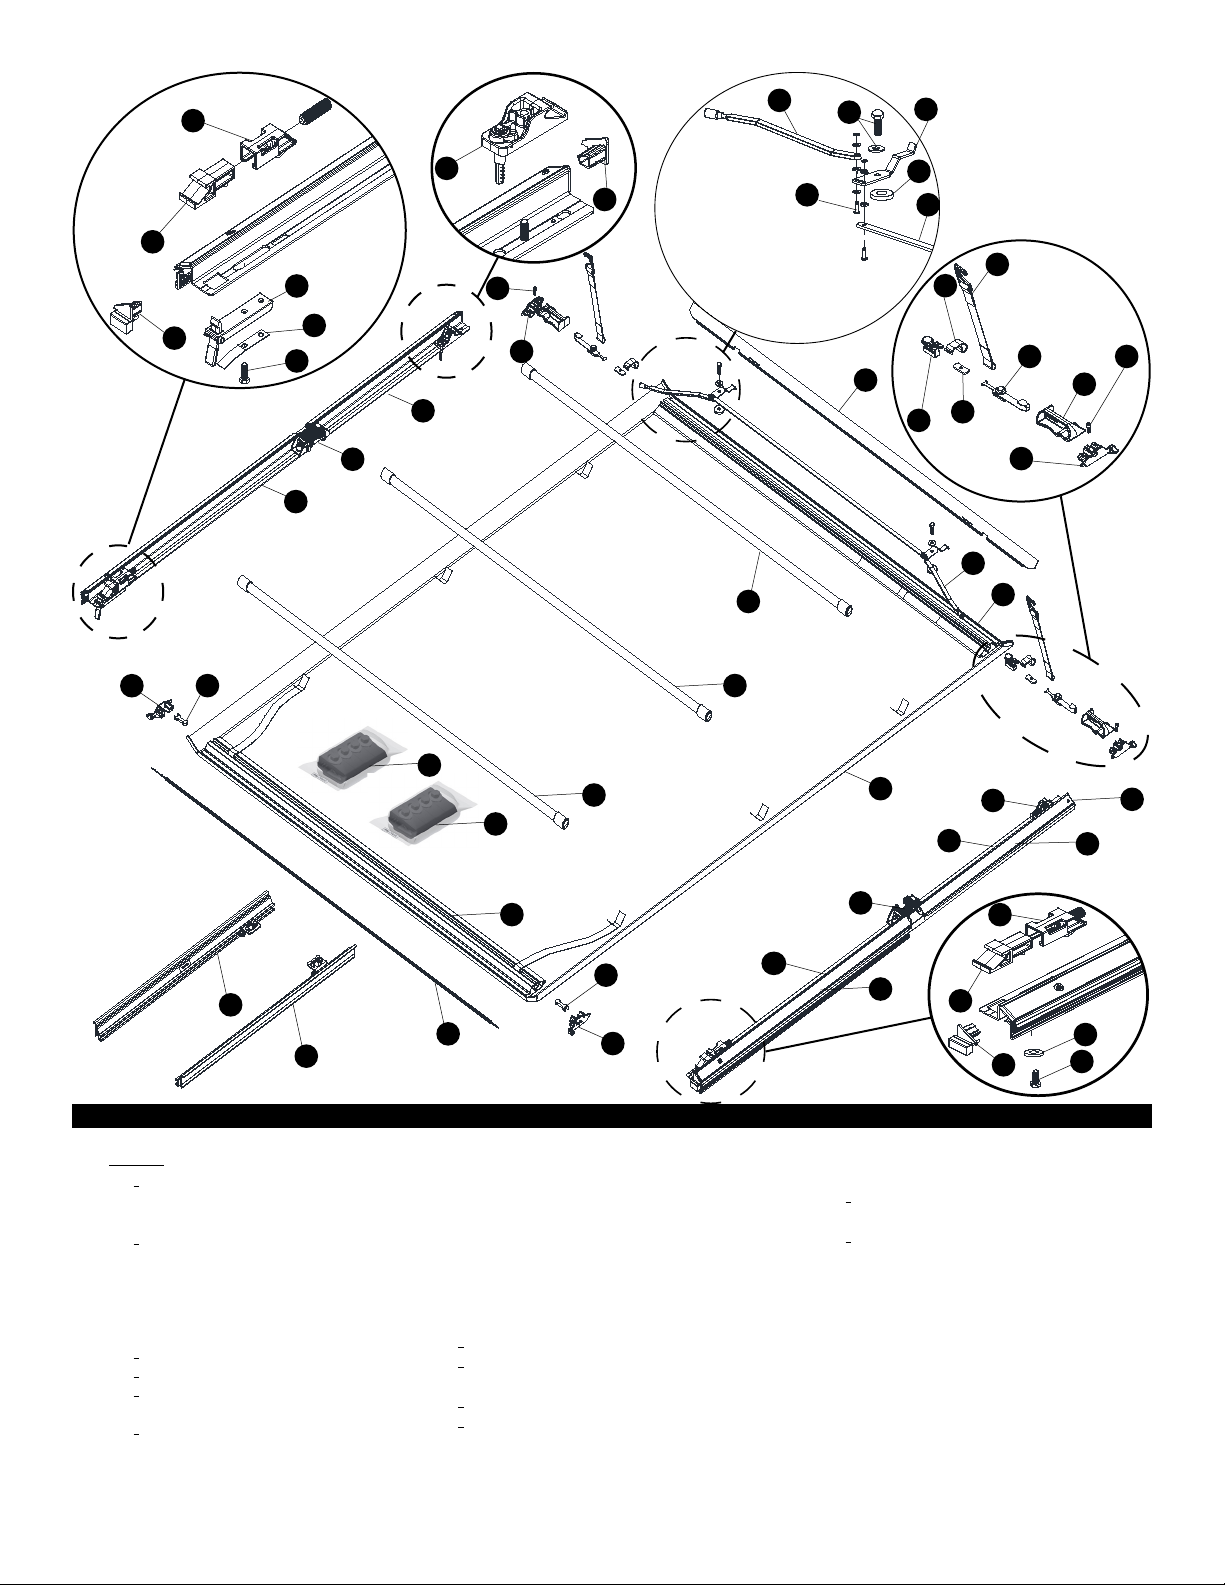
14
21
16
17
18
33
22
23
33
19
20
24
25
28
31
27
10
10
2
16
2
16
15
3
4
6
13
9
8
10
14
5
10
7
29
30
___*___
1
Deuce® Replacement Cover
2 ___*___ Cross Bow Tubes Assembled
___*___
3
Safety Strap
4 1704715 Extruded Reatainer Loop
5 ___*___ Black Front Header
6 1117594 Header Guide Retainer Assy
7 1704707 Header Guide_2011
8 1704879 Lever Lock Assy.
9 1704194 Weld Nut, Tab, 5/16”
10 1117781 Header End Plug_Front_LH & RH
11 ___*___ Side Rail, Passenger Side
12 ___*___ Header Seal_Tailgate
13 ___*___ Header Seal, Cab
14 1705034 Outside Linkage Tie-Bar
15 ___*___ Tie-Bar Center Linakge
16 1117766 Linkage Pins_Includes Washers
26
2
26
36
20
12
TRUXEDO
®
DEUCE REPLACEMENT PARTS
19
17 1704860 Release Levers
18 1704864 Header Stop & Striker Pin Assy
19 1117467 Rear Header 08 End Plugs (Set of 2)
20 1115354 Header Insert Safety Clip
21 1704658 Tension Control Housing & Spring Tension
22 1704660 Header Stop_Deuce
23 1704213 Latch Assembled
24 1114773 Flat Spring, 5/8” x 3 7/8”
25 1702926 Screw Hex HD 5/16”x 7/8”
26 ___*___ Aluminum Clamp Assy
27 ___*___ Side Rail, Driver’s Side
28 1704614 Side Rail Front, Driver’s Side
29 ___*___ Rail Underbody Assembly, Driver’s Side
30 ___*___ Rail Underbody Assembly, Pass Side
31 1704654 Hinge Assembly
1
31
11
34
18
35
21
22
33
32 1704709 Washer Plastic 5/16 dia x 1.25 RD
33 1117767 Side Rail End Plugs_Front & Back
34 ___*___ Hook and Loop Fasteners
35 1704615 Side Rail Front, Pass. Side
36 ___*___ Black Rear Header
33
34
32
25
___ 9 ___
* Please specify length or make and model of vehicle.
Page 10
TROUBLE SHOOTING
front latch won’t release either side:
-Adjust tie-bar connector ends outward to eliminate slack in entire linkage mechansim.
See Step 7.
front release levers, linkage and striker pins seem to bind:
-Lubricate all linkage pivot points with mineral oil. Lubricate striker pins and pivot base
with a graphite dry liquid lubricant.
front of cover will not stay latched down:
-Make sure striker pins are returning to closed 90 degree position. See Step 13.
Lubricate striker pins and pivot base with a graphite dry lubricant.
tailgate header will not latch:
-Check side rails to make sure they are level, see Step 3 and 3-A. Position clamps higher
or lower to achieve level side rails
fabric cover is too tight or too loose:
Adjust rear tension controls, See step 10.
!
WARNING
Tighten clamps securely on side rails before driving
vehicle, to prevent cover from blowing off.
LIFETIME WARRANTY
TruXedo. warrants that all new, unused products are free from
defects in material and workmanship. This Warranty is effective
if the product is properly installed and used for the purpose
intended for the life of the product. It applies to the original
buyer only. TruXedo.’s obligation under this Warranty is limited
to repairing, or at its option, replacing any part that is returned,
transportation prepaid, to TruXedo., Yankton, South Dakota, if
the product is, in our judgment, defective. All materials must
be accompanied by an RMA (Returned Material Authorization)
number requested and authorized in advance of returning the
materials. TruXedo. shall not be liable or responsible to supply
or pay labor to replace any part found defective, nor shall it be
liable for any damages of any kind or nature to person, product,
or property.
There are no Warranties for used products or products that
have been repaired, altered, modied, subjected to misuse,
negligence, accident or ordinary wear and tear.
mustbeonleand/orproofoforiginalpurchase(detailedanddated)required
for warranty to be valid. For warranty registration, see form below.
Call 1-877-878-9336 for complete details.
TruXedo. products are sold without any express warranty except as
set forth above. TruXedo. is not obligated to honor warranty claims if
Genuine TruXedo. parts are not utilized.
DIRECT ALL WARRANTY CLAIMS TO TRUXEDO. AT 1-877-878-9336
SAFETY INSTRUCTIONS
1. Do not place objects on or against cover or framework.
®
2. Do not tie cargo to TruXedo
3. Never allow children or pets to occupy pickup box while cover
is closed.
4. Cover is not airtight. Special care is required to keep cargo
clean and dry.
5. Fabric cover won’t prevent theft of contents inside truck box.
6. Cover must be rolled fully open and secured with safety straps
when towing vehicle backwards.
7. Never drive vehicle while hinged front of cover is open.
Deuce framework.
Warranty registration
OWNER/USER RESPONSIBILITIES
It is the responsibility of the owner/user to read this manual and
comply with the operating procedures. The owner/user is also
responsible for inspecting their TruXedo
®
Deuce cover, and for
having parts repaired or replaced when worn or damaged.
Failure to follow safety instructions and warning labels could result
in failure of your cover system and/or personal injury.
MESSAGES TO INSTALLER
• Always wear safety glasses and/or other necessary protective
equipment when installing your TruXedo
• These instructions are complete for most pickup models. Additional instructions are included, if required for your pickup. Please
read entire manual before installing your Truxedo
COVER MAINTENANCE
Vinyl cover can be hand washed with mild soap and water or
cleaned in a car wash. Thoroughly rinse cover to remove any soap
residue. Cover can be treated with any vinyl protectant made for
tonneau covers.
Never use silicon, petroleum, or citrus based products on
your tonneau cover.
Call our friendly customer service staff
Questions?
at Truxedo Toll Free:
1-877-878-9336
Register online at www.truxedo.com or mail this form to: TruXedo, P.O.
Box 1078, Yankton, SD 57078-0713
Name: _______________________________________________________
Address: ______________________________ ______________________
City: ______________________________ State:_______ Zip:___________
Phone Number: _______________________________________________
Email Address: ________________________________________________
Date Purchased: ___________________Price Paid: __________________
Dealer Name: _________________________________________________
Pickup Make: _________________________________________________
Model: ________________________Year: _________________________
Product Purchased:
□OriginalTruXedo □TruXedoLoProQT □TruXedoPlus
□TruXport □TruXedoDeuce □
TonneauTraX
®
Deuce.
®
Deuce.
___
10
___
 Loading...