

Page 1
User instructions
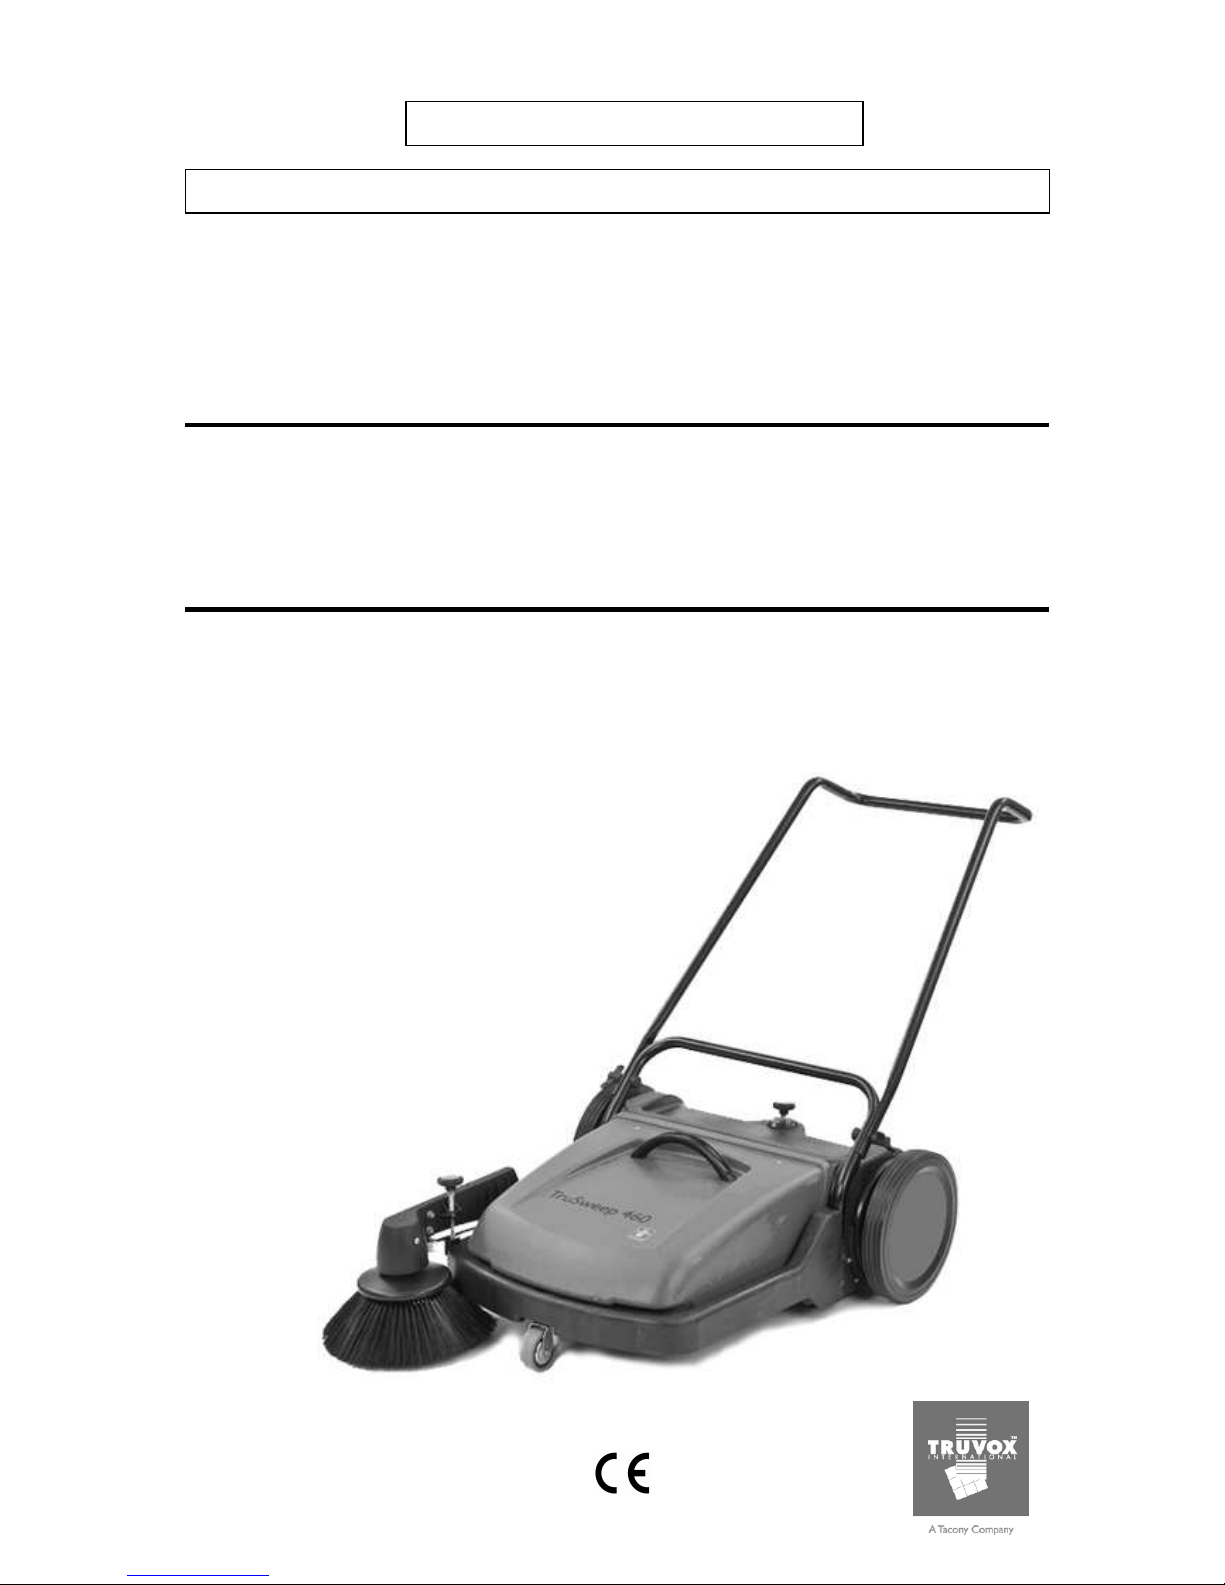
TruSweep 460 – TRUS460
Commercial Sweeper
03-8236-000 Iss.1 06/11
CA
UTION
–
READ THESE INSTRUCTIONS BEFORE USING THE MACHINE
ORIGINAL INSTRUCTIONS
1
Page 2

Contents
1. Product information .............................................................................................................................3
1.1 Important safety advice.............................................................................................................3
1.2 Guidelines for the operator .......................................................................................................3
1.3 Transporting the machine......................................................................................................... 4
1.4 Symbols & markings................................................................................................................. 4
2. Preparing for use.................................................................................................................................4
2.1 Attaching the side brush assembly...........................................................................................4
3. Controls ............................................................................................................................................... 5
3.1 Pressure adjustment knob for side brush.................................................................................5
3.2 Pressure adjustment knob for main brush................................................................................5
3.3 Handle thumbscrews ................................................................................................................5
3.4 Main brush pressure reading scale ..........................................................................................6
4. Operation............................................................................................................................................. 6
4.1 Using the sweeper.................................................................................................................... 6
4.2.Overcoming obstacles ..............................................................................................................6
4.3 When cleaning is finished......................................................................................................... 6
5. Storage................................................................................................................................................6
6. Maintenance........................................................................................................................................6
6.1 Replacement of the main brush................................................................................................6
6.2 Rubber seals.............................................................................................................................7
6.3 Greasing of the main wheels ....................................................................................................7
6.4 Replacement of the V-belt ........................................................................................................7
6.5 Replacement of the side brush................................................................................................. 7
6.6 Re-aligning of the bristles ........................................................................................................7
7. After sales service ...............................................................................................................................8
8. Guarantee............................................................................................................................................8
9. Technical specification ........................................................................................................................9
10. Accessories ...................................................................................................................................... 9
11. Individual spare parts ........................................................................................................................9
12. Fault diagnosis ................................................................................................................................10
13. Spare parts manual .........................................................................................................................11
14. EC Declaration of conformity...........................................................................................................15
2
Page 3

IMPORTANT
BEFORE USE READ THESE INSTRUCTIONS AND RETAIN FOR FUTURE REFERENCE
1. Product information
The TruSweep 460 is designed exclusively for
operation on solid, level and dry surfaces. It
has been designed for the professional user to
ensure long service life and safe operation.
These instructions only cover the operation of
the machine and do not include information on
the basics of sweeping. Any user not familiar
with basic sweeping methods should contact
their supervisor, supplier or Truvox
International before proceeding.
This machine must only be used for the
manufacturer’s approved application. This
sweeper is intended exclusively for operation
on solid, level and dry surfaces.
Do not use on a surface with a slope
exceeding 2%. Do not use the
machine where it is suspected that the surface
contains health endangering dust or debris
such as asbestos or chemical waste. If this is
suspected do not proceed, contact your
supervisor or Truvox International for advice.
The following instructions contain important
information about the machine and safety
advice for the operator.
Equipment must be operated, serviced and
maintained in accordance with the
manufacturer’s instructions. If in doubt
contact the supplier of your machine.
These instructions are valid for the following
model: TruSweep 460 – TRUS460
1.1 Important safety advice
When using the TruSweep 460 basic safety
precautions should be followed including the
following:
• Read all instructions carefully before use.
• Please note that the safety information
described in the manual supplements and
does not replace standards in force in the
country in which the machine is used.
• This appliance is suitable for commercial
use, for example in warehouses, hotels,
schools, hospitals, factories, shops, rental
businesses and other than normal
housekeeping purposes.
• Do not operate machine:
-
Unless trained and authorized by a person
responsible for their safety.
- Unless operator manual is read and
understood.
-
Unless with mentally, physically and the
sensory capability of following machine
instructions.
• Keep children and unauthorised persons
away from the machine when in use.
• All parts are to be positioned as indicated in
the instructions before using the machine.
• Do not operate the machine if it malfunctions
or is damaged in any way. Contact an
authorised service agent for repair or
adjustment.
• Keep hair, loose clothing, fingers and all
parts of body away from openings and
moving parts.
• Do not use where hazardous dust is
present.
• Do not use in an explosive
atmosphere.
• Do not pick up oil or other flammable
material.
• Take care when using a machine near the
top of stairs to avoid overbalancing.
1.2 Guidelines for the operator
WARNING - Operators must be fully
trained in the use of the machine in
accordance with these instructions,
able to perform user maintenance and the
correct selection of accessories.
• Operators should be physically capable to
manoeuvre, transport and operate the
machine.
• Operators should be able to recognise
unusual operation of the machine and report
any problems.
• Only use the machine on firm level surfaces
• Wear suitable footwear to avoid slipping.
• Wear suitable clothing to keep dry and
warm.
• Where possible implement job rotation and
adequate rest periods to avoid continuous
use of the same muscles.
• Do not smoke when using the machine.
• Do not put any objects into openings. Do not
use with any opening blocked: keep free of
dust, debris, hair, or anything that may
reduce air flow.
• Do not sweep over wet surfaces.
CAUTION - This machine is for use in
dry areas and should not be stored
outdoors or in wet conditions.
CAUTION - If it is suspected that there
is hazardous dust or flammable
materials stop cleaning the area
immediately and consult your superior.
3
Page 4
WARNING - Only use accessories and
spare parts provided with the machine or those
approved by the manufacturer. The use of
other accessories may impair the safety of the
machine.
1.3 Transporting the machine
CAUTION - Incorrect lifting techniques
may result in personal injury, where
applicable do not lift large and heavy machines
without assistance. We advise that the manual
handling regulations are followed. Please refer
to the technical table for details on weight of
machine.
When transporting the machine ensure that all
components and removable parts are securely
fastened.
Do not lift or transport the machine whilst
containing dirt as this will add considerably to
the weight.
Take extreme care when moving the machine
up or down steps or stairs.
CAUTION - Bumping over thresholds,
kerbs and similar obstacles can damage the
machine. Small obstacles can be overcome by
pulling the machine backwards.
1.4 Symbols & markings
In order to highlight information and
procedures regarding safety, maintenance etc,
the following symbols have been adopted in
the manual:
WARNING
2. Preparing for use
• Please remove the TruSweep 460 from its
packaging. Do not attempt to lift it out of the
box.
• For ease of packing, the handle and side
brush assembly are packed separately. The
side arm brush is located within the dirt
collector. These parts must be installed
before the machine is put into operation.
• You will require the following tools to
assemble the TruSweep 460:
- 2x 10mm spanners
- Phillips screwdriver
• For ease of assembly we advise to assemble
the sweeper with two people.
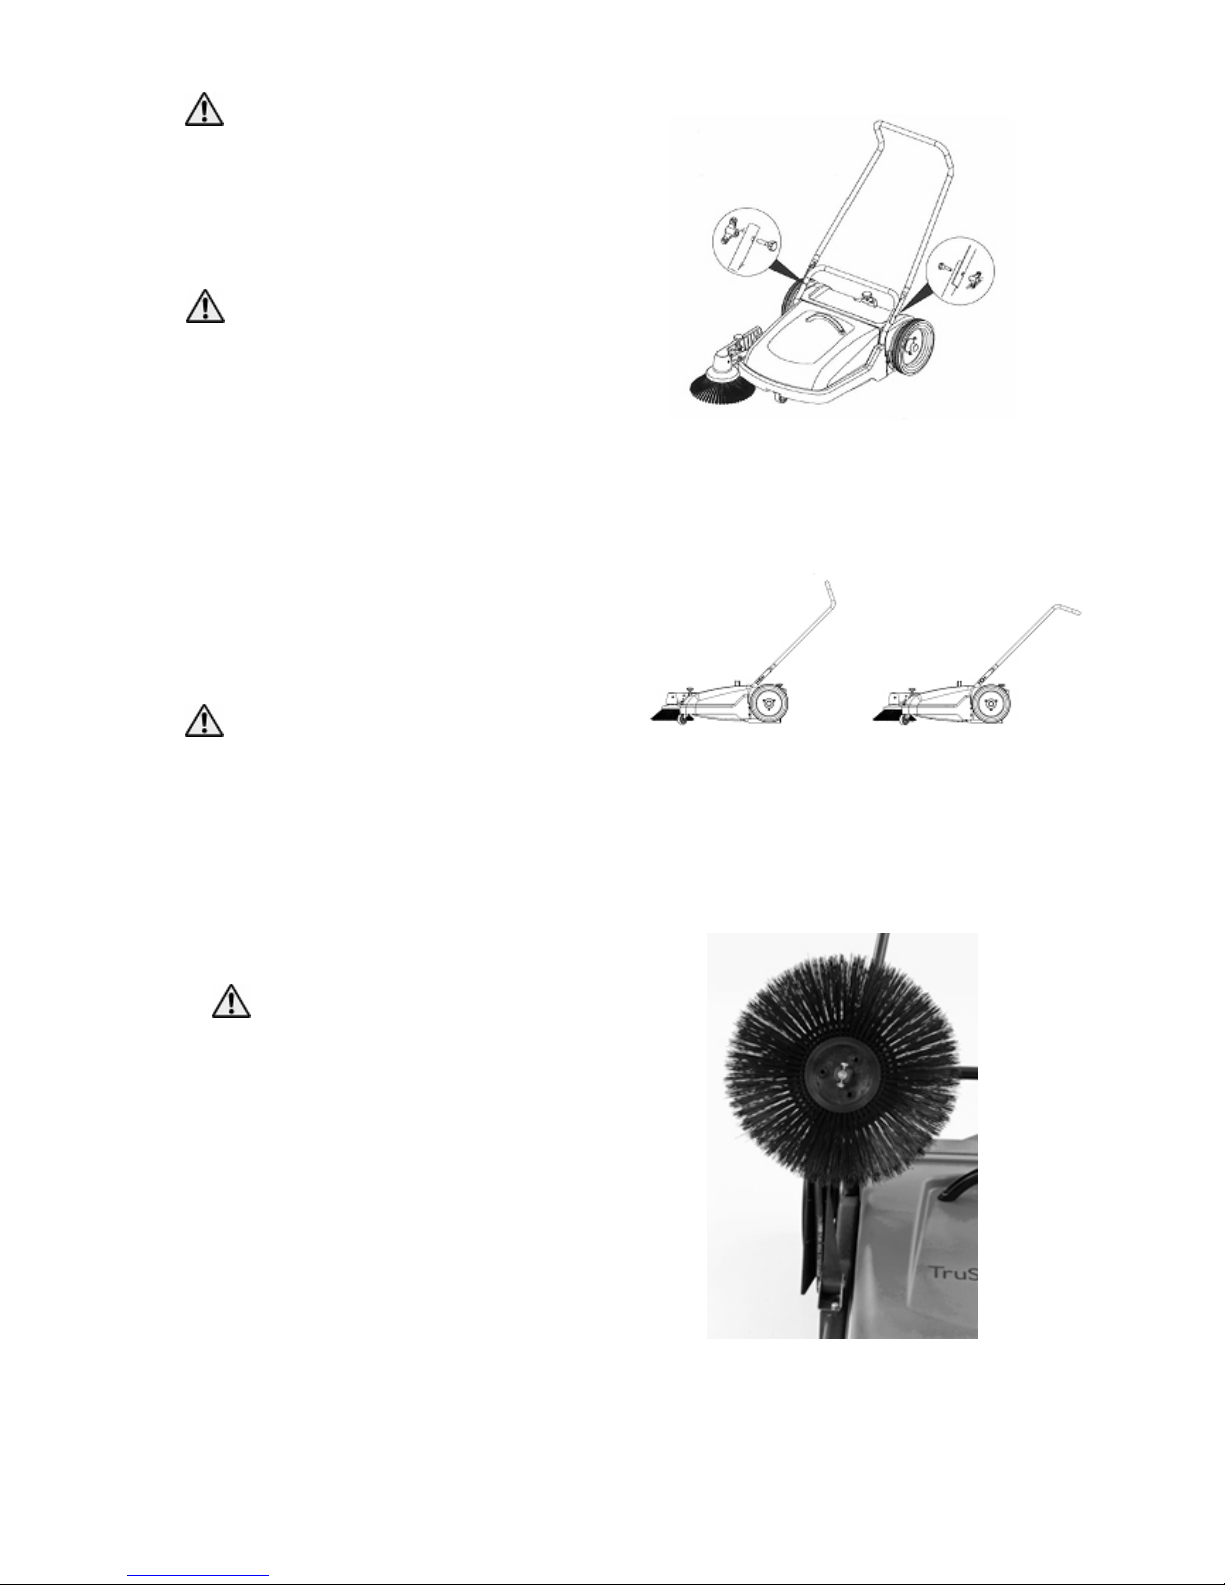
• Assemble the handle in the upright position
by attaching it to the brackets above the rear
wheels. Tighten with the two thumbscrews
(Fig. 1).
Fig.1
• The handle can be fixed in two different
positions as shown below. We recommend
handle position 1 for ease of use and
improved pick-up (Fig. 2).
Handle position 1 Handle position 2
Fig. 2
2.1 Attaching the side brush assembly
• Attach the side brush to the brush plate on
the side arm assembly using the hex head
bolt and the nylock nut (Fig. 3).
Fig. 3
• Position the V-belt from the side arm
assembly around the pulley attached to the
back of the rear right wheel. In order to
attach the V-belt it will be necessary to twist
4
Page 5
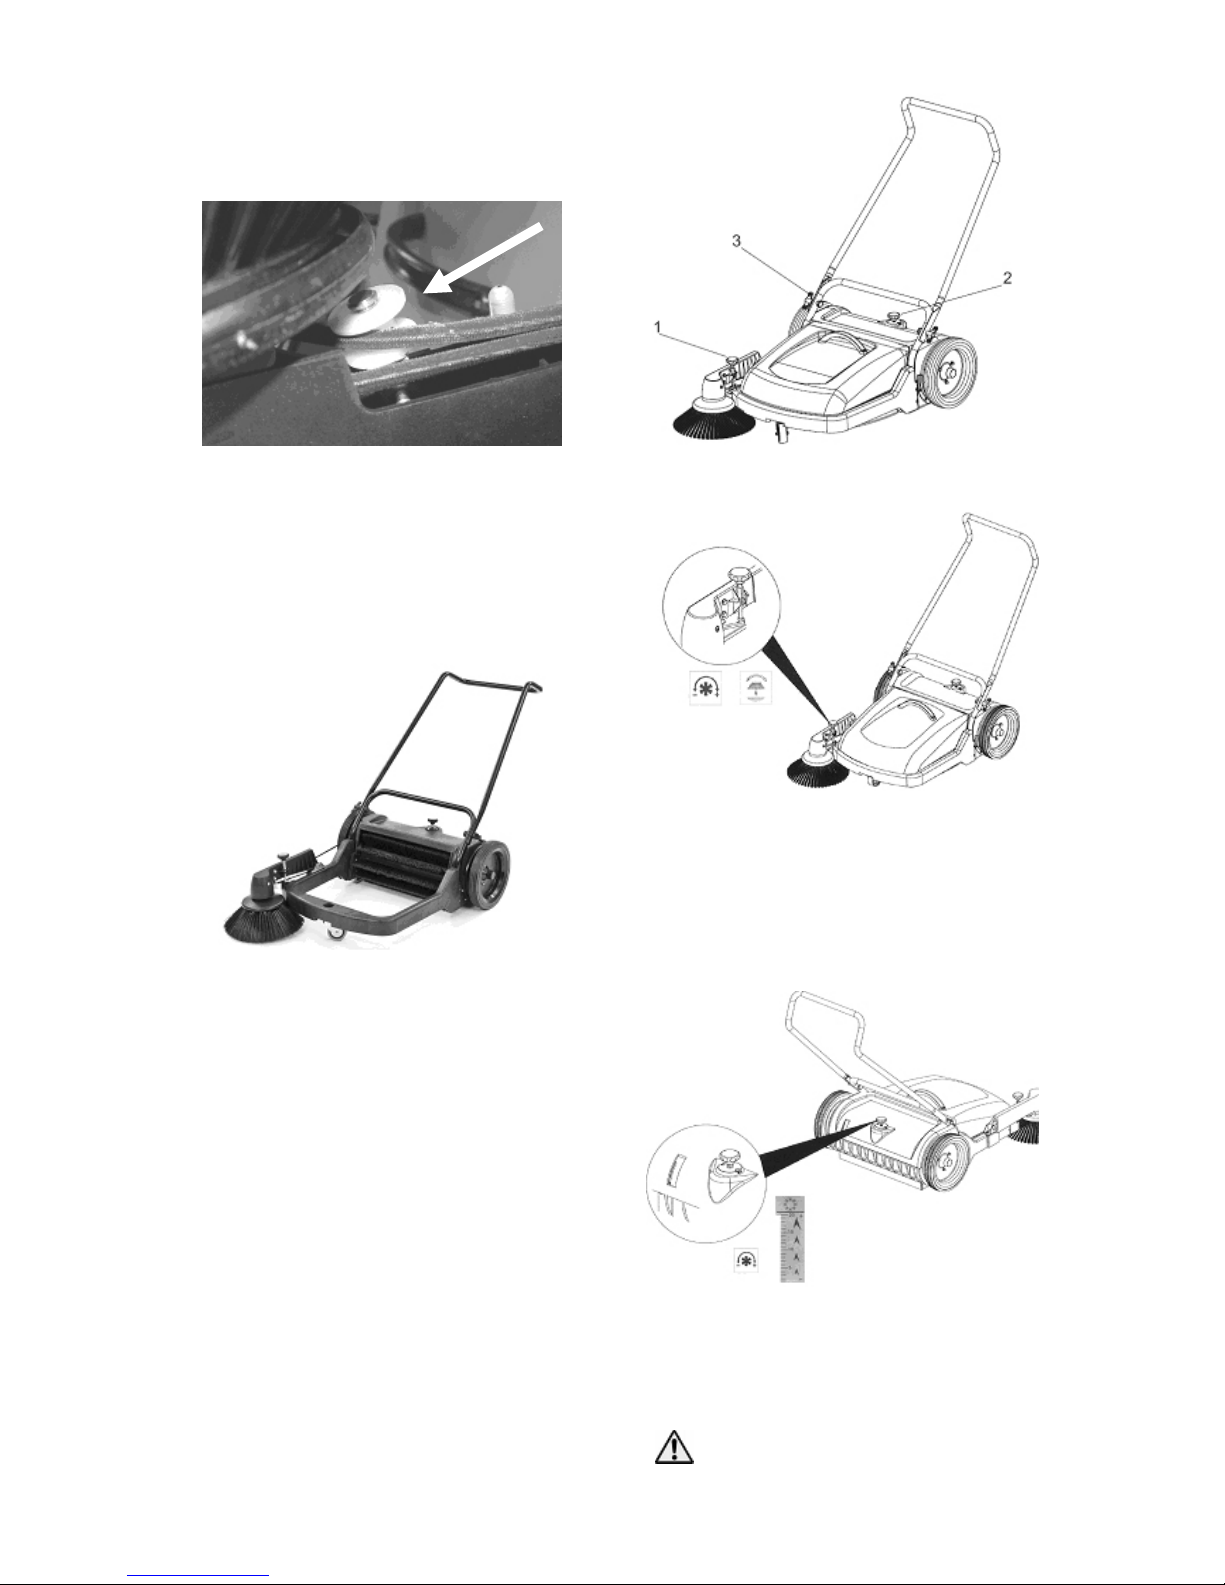
it. Both sides of the V-belt should be
positioned on the same side of the belt guide
(indicated by arrow in Fig.4), not the brush
pulley.
Fig. 4
• To attach the side arm assembly to the main
frame remove the two screws that have
already been inserted into the right side of
the main frame. Align the bracket on the side
arm assembly to the main frame and screw
tightly into position (Fig. 5).
Fig. 5
• Check the rotation and operation of the side
brush. The brush should rotate counterclockwise when the TruSweep 460 is pushed
forward. If this is not the case, the V-belt was
installed incorrectly.
• If the V-belt is loose the tension can be
adjusted by loosening the two screws that
attach the support side arm to the main
frame. Move the bracket forward then
retighten screws.
3. Controls
3.1 Pressure adjustment knob for side
brush (1 in Fig. 6 and Fig. 7)
Used for setting the height of the side brush.
The side brush may touch the floor only by one
third, so as to throw the swept debris into the
machine.
Fig. 6
Fig. 7
3.2 Pressure adjustment knob for main
brush (2 in Fig. 6 and Fig. 8)
Used for setting the pressure of the main
brush. It must be set to assure an efficient
cleaning operation (Fig. 8).
Fig. 8
3.3 Handle thumbscrews (3 in Fig. 6)
Used to secure the handle to the machine or to
reposition it.
Excess pressure will cause
u
nnecessary wear of the brush and
increased load for the operator.
5
Page 6
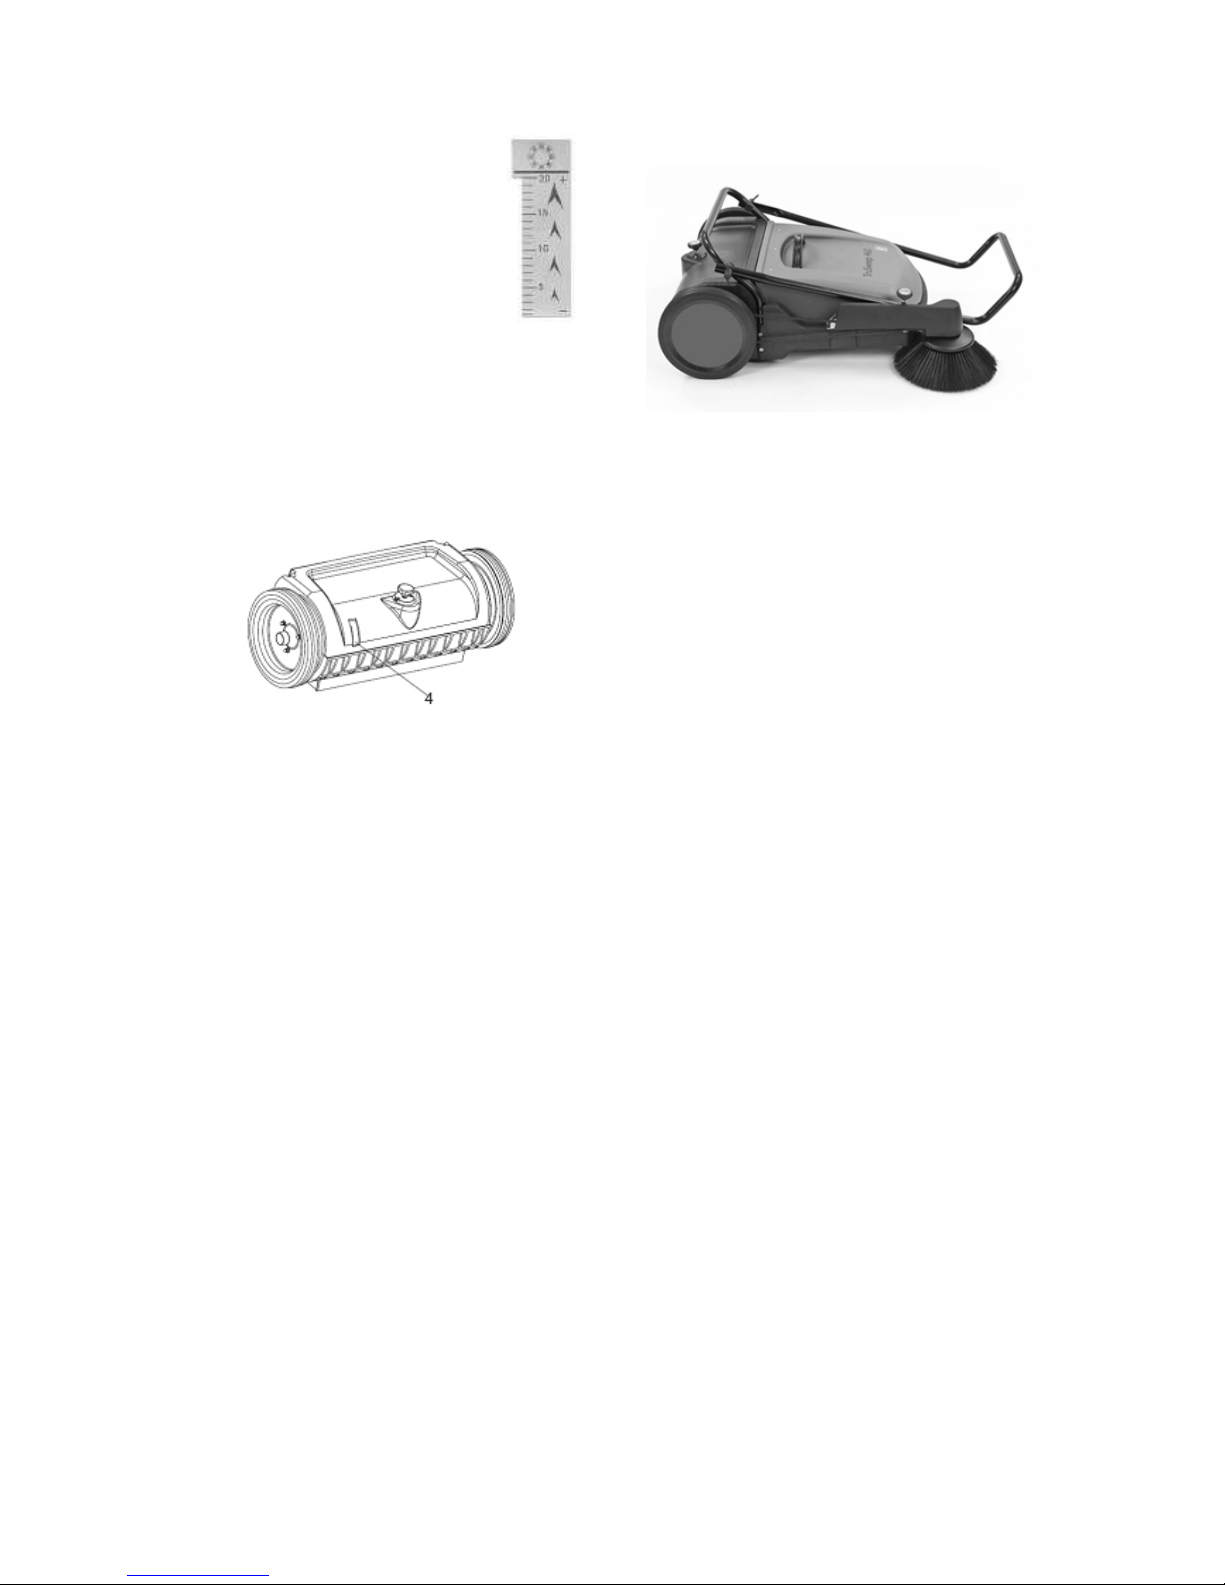
3.4 Main brush pressure reading scale (4 in
Fig. 9)
Indicates the pressure at which the
m
ain brush has been set. Settings
must be performed as described
below:
• Set the main brush by turning the
knob clockwise to increase the
pressure.
Note: We recommend to set the
pressure at ‘5’.
• Starting with this setting, the main brush
pressure can be increased to meet the
requirement for example as the main brush
wears out. Lower pressure enables pick-up
of smaller debris.
• If required, turn the knob in a counter-
clockwise direction to reduce the main brush
pressure.
Fig. 9
4. Operation
4.1 Using the sweeper
•
The sweeper operates with two brushes –
The side brush takes dirt from the side into
the reach of the main brush. The main brush
maintains its direction of rotation to throw the
dirt into the dirt collector when the TruSweep
460 is moved forward.
• To use the TruSweep 460, simply push it at
a normal walking speed.
4.2 Overcoming obstacles
• To overcome small obstacles the TruSweep
460 should be pressed down at the handle.
This will cause the two brushes to lift off from
the floor and the machine can easily
overcome these obstacles.
4.3 When cleaning is finished
The dirt collector can be easily lifted by using
the handle. It is secured to the machine on the
main frame and it must be in direct contact
with the main brush compartment, in order to
prevent dirt from falling out. To empty the dirt
collector, simply lift it out and empty it into a
suitable waste disposal bin.
5. Storage
• Lower and fold the handle down by
loosening the thumbscrews slightly (Fig. 10).
Fig. 10
• Do not store outdoors. Store in a clean and
dry location.
6. Maintenance
The machine requires minimum maintenance
apart from the following checks by the operator
- Dirt collector
- Brushes
- V-belt
Maintenance Intervals
Daily
- empty dirt collector
- clean the unit
- check brushes and seals
Weekly
- remove any debris entangled in
the main brush shaft
Monthly
- grease the track wheels
- check V-belt tension, if
necessary, retighten
• To clean the machine wipe off with a dry or
damp cloth.
• Do not wash the machine with direct or
pressurised jets of water.
• Only replace damaged or worn parts with
genuine original equipment parts in order to
maintain safety and to protect your warranty.
• Contact an authorised service agent for
repairs and request ORIGINAL spare parts
only.
6.1 Replacement of the main brush
The main brush consists of a brush shaft with
two brush core assemblies fastened with six
self tapping screws.
The brush cores can be replaced as per below:
•
Unscrew the self tapping screws
• Pull the brush core assembly to the front to
remove it from the brush shaft (Fig. 11).
6
Page 7
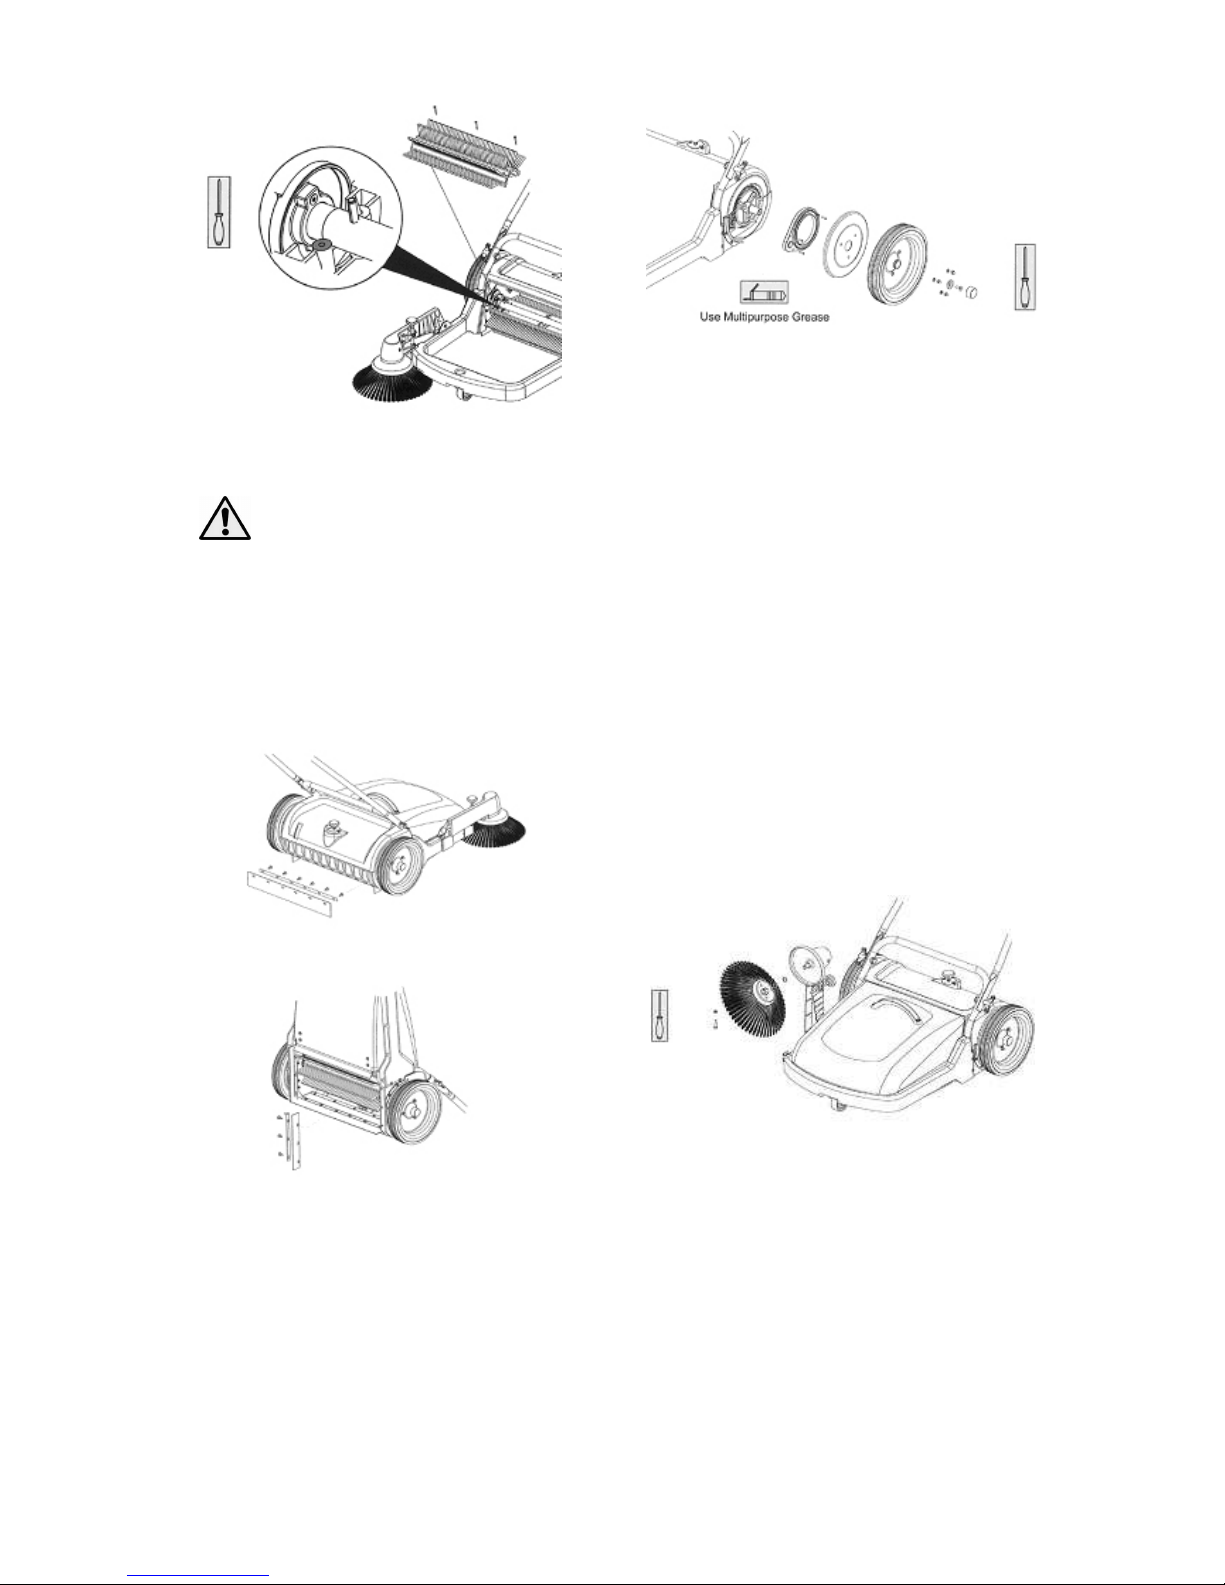
Fig. 11
When re-assembling the brush
core assemblies ensure the split
pins are fixed in the holes to guide
the brush.
6.2 Rubber seals
The rubber seals situated on the rear of the
main frame as well as on the dirt collector
ensure that the dirt is kept within the sweeper.
Damaged or worn seals that cannot fulfil this
task any longer must be replaced (Fig. 12).
Fig. 12
6.3 Greasing of the main wheels
For cleaning and greasing of the wheel axle
and the gear ring, the main wheels must be
removed as per below (Fig. 13).
• Remove hub cap, remove the bolt and three
domed cap nut from the wheel and remove
the main wheel.
• Unscrew the gear cover and apply grease in
the gear area.
• Reposition the main wheel.
Fig. 13
6.4 Replacement of the V-belt
•
Raise the side arm brush
• Loosen the hex head bolt and the nylock nut
and remove the side brush from the brush
arm.
• Place the V-belt through the brush arm and
put it on the V-belt pulley on the brush shaft
• Push the side brush back into the brush arm
and re-tighten the clamp screw.
• Place V-belt into the groove of the right-hand
main wheel.
• When the brush arm is put down and if the
V-belt is loose it must be tensioned to allow
a perfect drive transmission. If necessary
loosen the two screws that attach the
support side arm to the main frame. Move
the bracket forward then retighten screws.
6.5 Replacement of the side brush
The side brush can be replaced after removing
the hex head bolts and the nylock nut from the
side brush (Fig. 14).
Fig. 14
6.6 Re-aligning of the bristles
• If the bristles have been bent inwards the
side brush must be placed on a flat base, the
bristles pointing outward and a weight must
be placed on the plate. The bristles will realign gradually. Once the bristles have been
re-aligned, take the weight off and re-attach
the brush.
• If the bristles have been bent outwards, bring
them together by applying a rubber band
around the bristles for some time. The
b
ristles will re-align gradually. Once the
7
Page 8

bristles have been re-aligned, take the
rubber band off and re-attach the brush.
7. After sales service
Truvox machines are high quality machines
that have been tested for safety by authorised
technicians. It is always apparent that after
longer working periods, mechanical
components will show signs of wear and tear
or ageing.
Under extreme or specialised conditions
and/or insufficient maintenance, shorter
maintenance intervals are necessary. Use only
original Truvox spare parts. Use of other
spare parts will invalidate all warranty and
l
iability claims.
Should you require after sales service please
contact the supplier from whom you purchased
the machine, who will arrange service. Repairs
and servicing of Truvox products should only
be performed by trained staff. Improper repairs
can cause considerable dangers to the user.
8. Guarantee
Your product is guaranteed for one year from
the date of original purchase, or hire purchase,
against defects in materials or workmanship
during manufacture. Within the guarantee
period we undertake at our discretion, to repair
or replace free of charge to the purchaser, any
part found to be defective, subject to the
following conditions.
CONDITIONS
1
. Claims made under the terms of the
guarantee must be supported by the
original invoice/bill of sale issued at the time
of sale, or the machine Serial Number.
2. For claims under this guarantee contact the
supplier from whom you purchased the
product who will arrange the appropriate
action. Do not initially return the product as
this could result in transit damage.
3. Neither Truvox nor its distributors shall be
liable for any incidental or consequential
loss.
4. This guarantee is governed by the laws of
England.
5. This guarantee does not cover any of the
following:
• Periodic maintenance, and repair or
replacement of parts due to normal wear
and tear.
• Damage caused by accident, misuse or
neglect, or the fitting of other than
genuine Truvox parts.
• Defects in other than genuine Truvox
parts, or repairs, modifications or
adjustments performed by other than a
Truvox service engineer or authorised
service agent.
• Costs and risks of transport relating
directly or indirectly to the guarantee of
this product.
• Consumable items and wear parts such
as drive belts.
This guarantee does not affect your statutory
rights, nor your rights against the supplier
arising from their sales or purchase contract.
8
Page 9

9. Technical specification
Model
Product Code
TruSweep 460
TRUS460
Width cm 72.5
Width with side brush cm 78.5
Height with handle cm 102
Height without handle cm 40
Length with side brush cm 100
Length without side brush cm 80
Weight with side brush group kg 26
Diameter of drive wheel cm 28
Sweeping width without side brush cm 46
Sweeping width with side brush cm 65
Diameter of main brush cm 23
Main brush bristle diameter mm 0.18
Brush speed (theoretical) rpm 273 at 4 km/h
Side brush bristle diameter mm 0.4
V-belt (side brush) (W x L) cm 0.8 x 168
Dirt collector capacity l 40
Direction of rotating for sweeping Forward
Area coverage Up to 2600 m²/hr at 4 km/h
Truvox International is a BSI Registered Company and our policy is one of continuous
development. We reserve the right to change specifications without prior notification.
10. Accessories
Item Part No.
Main brush 552180067
Side brush 923783
11. Individual spare parts
Item Part No.
Main brush pressure knob assembly 921776
Hub cap 55321022000
IMPORTANT: Genuine accessories are only available from authorised Service Agents or
Truvox Customer Services Department
9
Page 10

12. Fault diagnosis
The following simple checks may be performed by the operator.
TROUBLE
REMEDIAL ACTION
1. Machine hard to push/pull
Decrease main brush pressure setting
Grease main wheels
2. Sweeping unsatisfactory
Increase main/side brush pressure
Clean main/side brush
Check main brush for loose bristles
3. Traces of dirt left behind the machine
Check side/rear rubber sealings
4. Side brush not rotating
Check V-belt for transmission
10
Page 11

MACHINE:
REF. DWG. #:
SERIES:
REVISION ECN# DESCRIPTION OF CHANGE MOD. BY DATE
1 N/A ORIGINAL ISSUE 04/07/2011
Drawing Ref. No. Kit No. Part Description Qty
1 552180053 1
2 552180055 1
3 552180056 1
4 552180057 1
5 552180058 1
6 552180059 1
7 552180054 1
8 552180041 1
9 552180074 1
10 552180070 1
11 552180071 1
12 921103 1
13 921821 1
14 923783 1
15 552180067 1
16 552180063 1
17 552180061 1
18 552180062 1
19 552180066 1
20 552180065 1
REF 09-1129-0000 SHEET 1 FRAME AND HOPPER KIT LIST
Tacony CFC
TruSweep Commercial Sweeper
Part Reference: MACHINE ASSEMBLY
HANDLE KIT
BOTTOM COVER - THREAD ROD KIT
SPLASH SHIELD KIT
SIDE PLATE RH KIT
SIDE PLATE LH KIT
HOLDER SIDE BRUSH KIT
CASTOR WHEEL KIT
RUBBER STRIP KIT
HOPPER FLAP KIT
HOPPER GROUP
REF 09-1129-0000 SHEET 2 MAIN AND SIDE BRUSH KIT LIST
MAIN BRUSH KIT
BOOT KIT
SUPPORT ARM ASSEMBLY
V-BELT
SIDE BRUSH DRIVE ASSEMBLY
SIDE BRUSH
THREAD ROD KIT
INDICATOR KIT
GEAR 54 KIT
HANDLE KNOB KIT
REF 09-1129-0000 SHEET 3 BRUSH SHAFT, HANDLE AND GEAR KIT LIST
TRUS460
09-1129-0000 SHEETS 1,2 & 3
A
11
Page 12
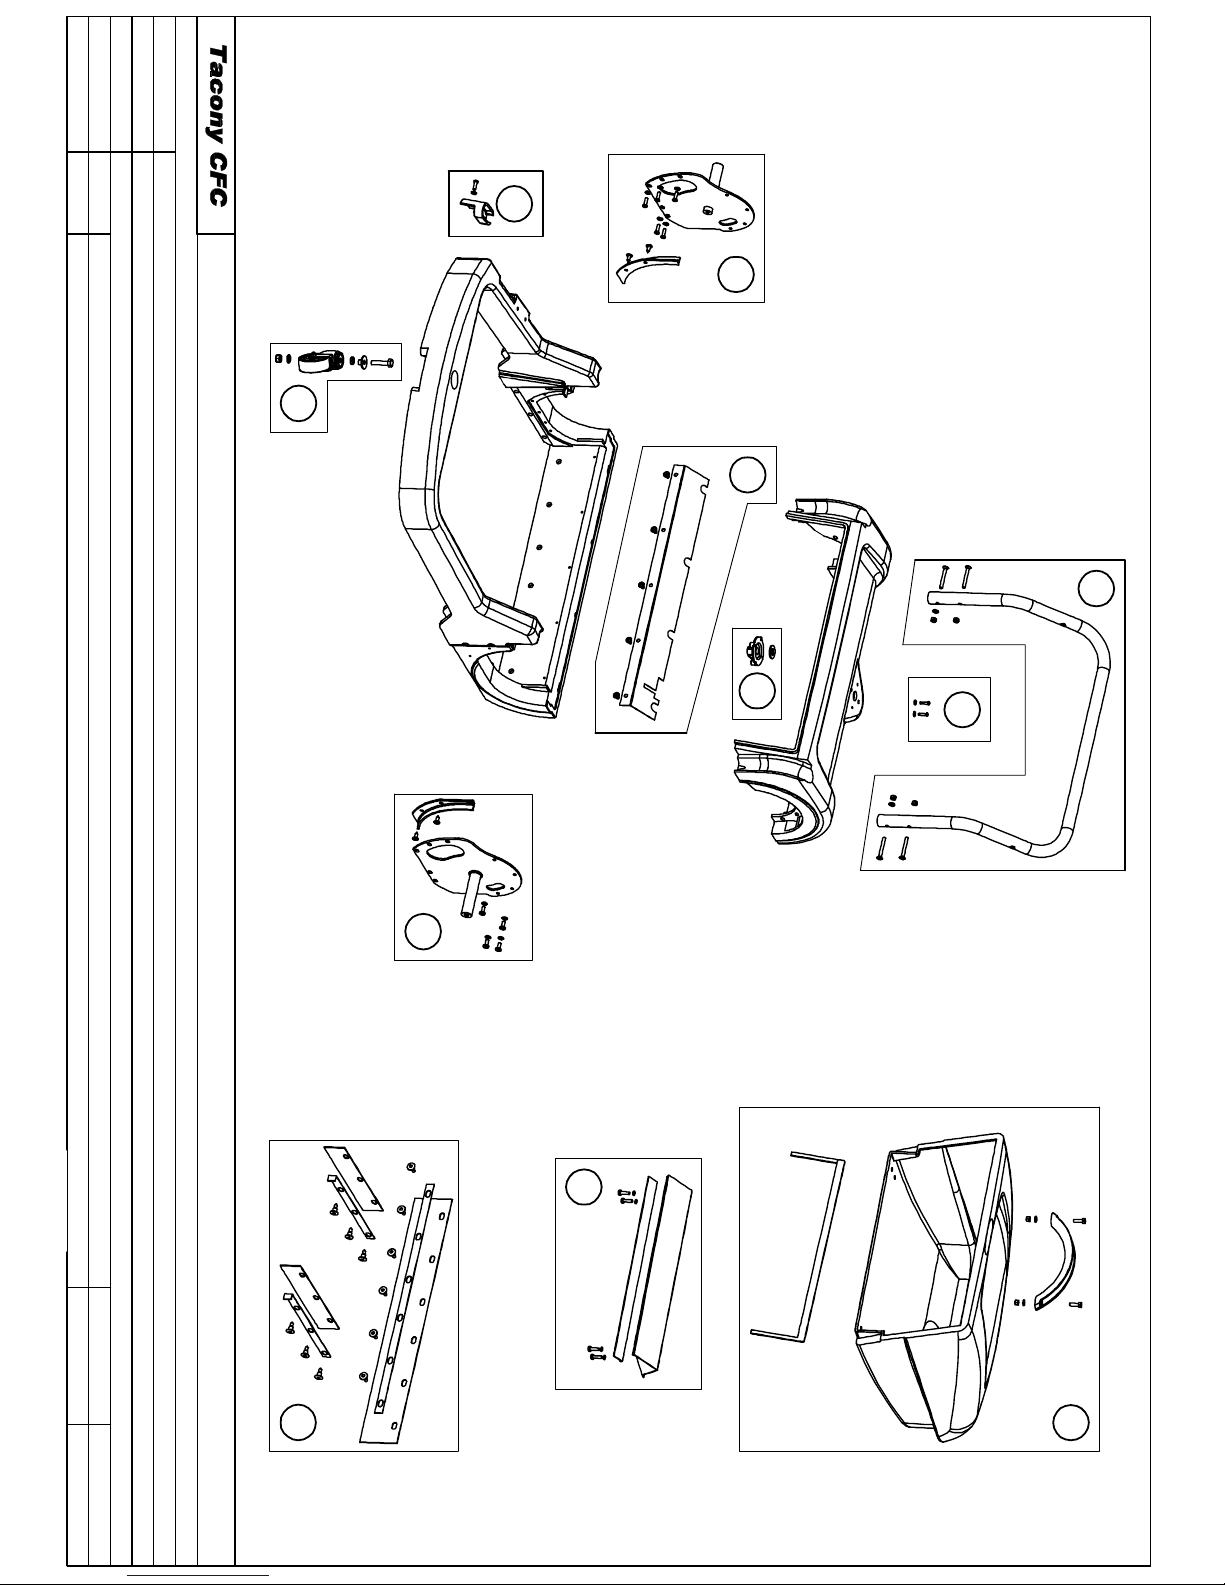
1
2
2
3
4
5
6
7
8
9
10
-
-
DRAWING NO: 09-1129-0000 SHEET 1 - FRAME AND HOPPER KIT LIST
MACHINE: TRUS460
REF. PARTS LIST: TRUS460 ISSUE 1
SERIES: A
REVISION
A
ECN # DESCRIPTION OF CHANGE
ORIGINAL ISSUE
MOD. BY DATE
04 JULY 2011
TRUSWEEP COMMERCIALSWEEPER
12
Page 13
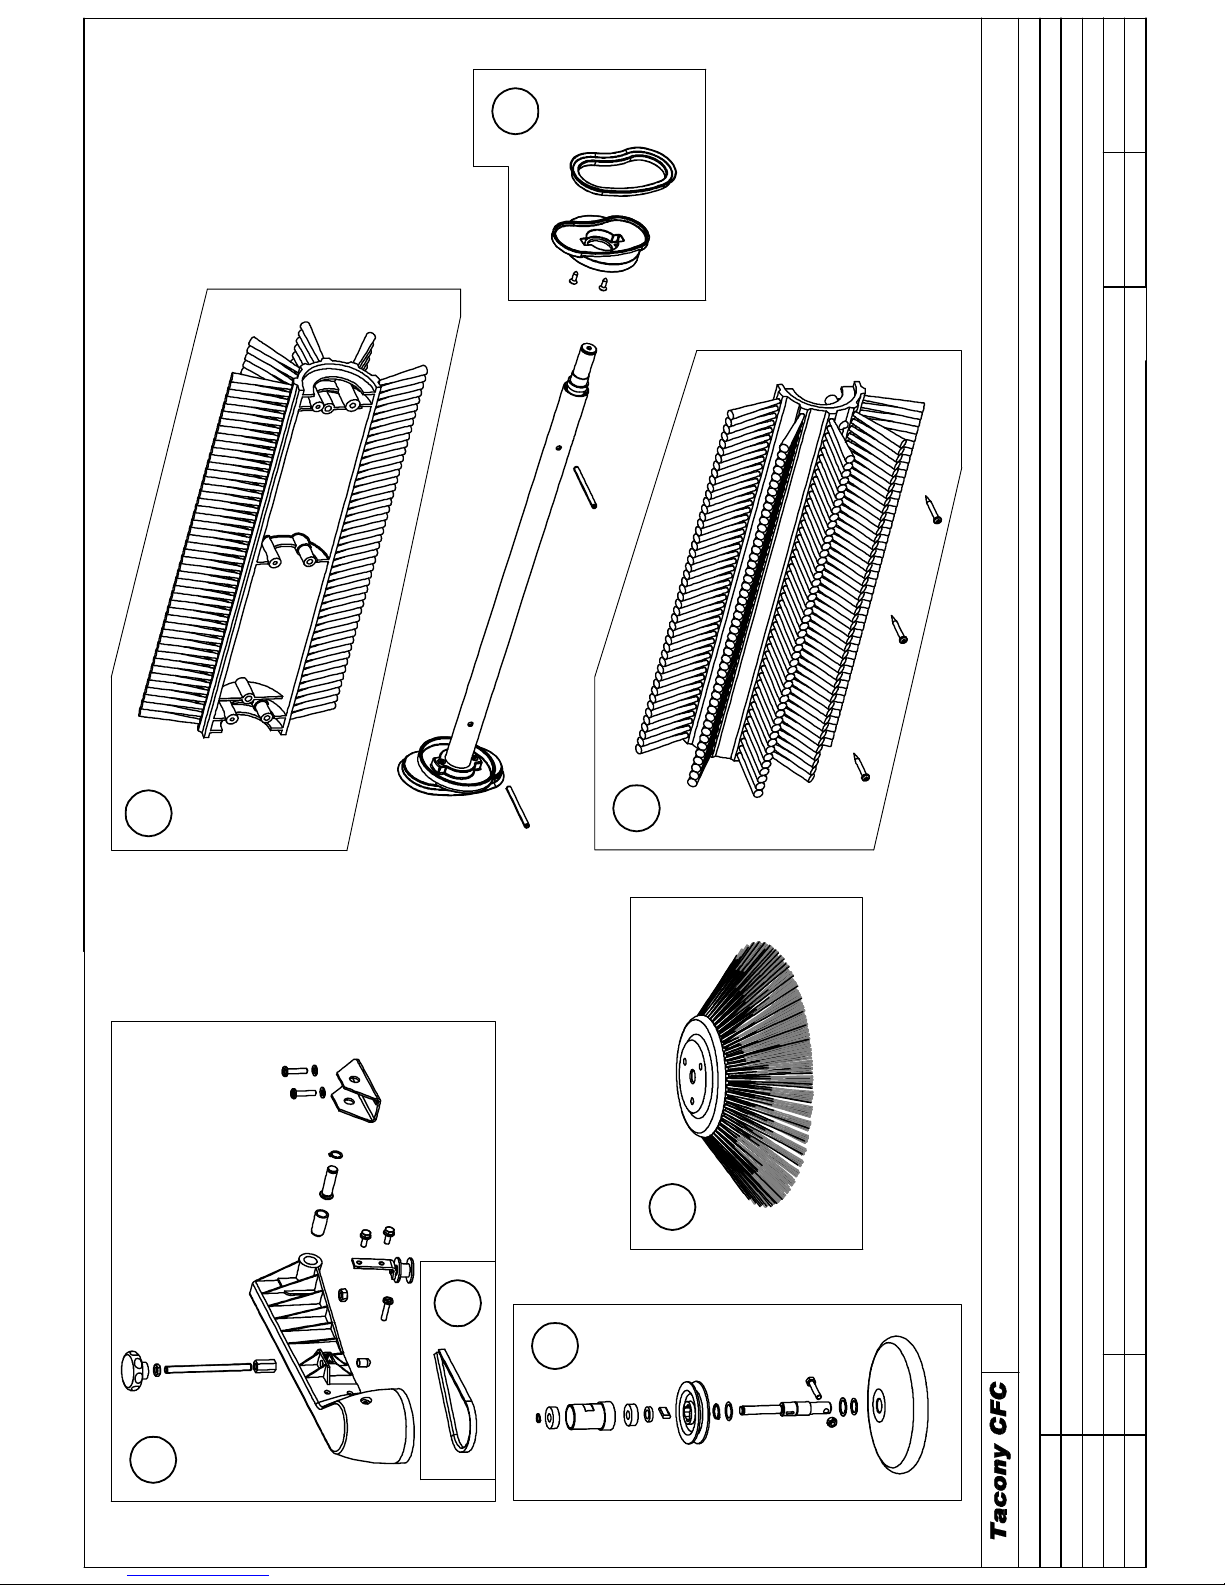
11
13
12
14
15
16
15
--
DRAWING NO: 09-1129-0000 SHEET 2 - MAINANDSIDEBRUSHKIT LIST
MACHINE: TRUS460
REF. PARTS LIST: TRUS460ISSUE1
SERIES: A
REVISION
A
ECN # DESCRIPTION OF CHANGE
ORIGINALISSUE
MOD. BY DATE
04 JULY 2011
TRUSWEEP COMMERCIAL SWEEPER
13
Page 14
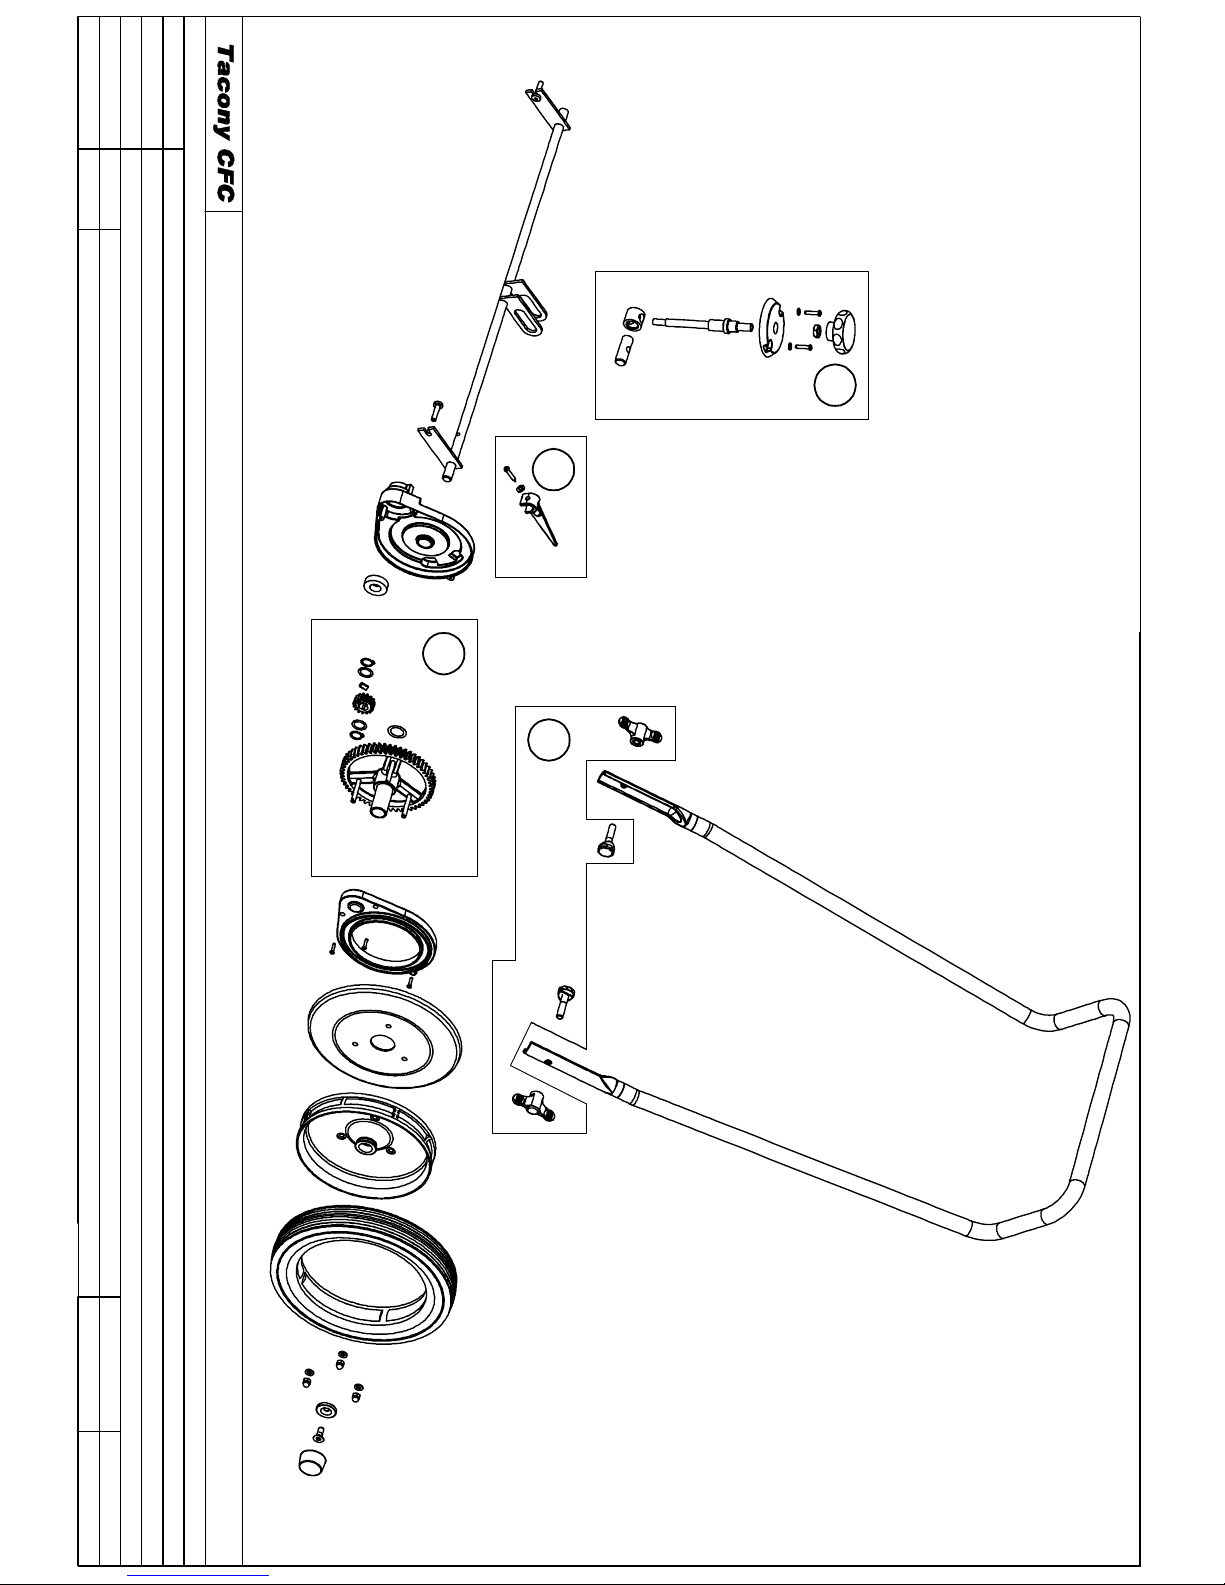
17
18
19
20
--
DRAWING NO: 09-1129-0000 SHEET 3 - BRUSHSHAFT, HANDLEAND GEARKIT LIST
MACHINE: TRUS460
REF. PARTS LIST: TRUS460ISSUE1
SERIES: A
REVISION
A
ECN # DESCRIPTION OF CHANGE
ORIGINALISSUE
MOD. BY DATE
04 JULY 2011
TRUSWEEP COMMERCIAL SWEEPER
14
Page 15
14. EC Declaration of conformity
EC Declaration of Conformity
We, Truvox International Ltd.
of Third Avenue, Millbrook,
Southampton, Hampshire
England
SO15 0LE
declare that the machinery
Make : Sweepers
Type : TruSweep 460
Model : TRUS460
Serial Number : from 000001
Year of Construction : 2011
has been manufactured using the following transposed harmonised European Standards and
technical specifications.
Ref No Title
EN ISO 12100:2010 Safety of machinery – General principles for design – Risk
assessment and risk reduction
Signed in : SOUTHAMPTON, England
on the 1st June 2011
Signature :
Name : David Overell Technical file: TruSweep 460 Iss. 1
Position : Managing Director Mark Campbell
Product Support Manager
15
Page 16

Truvox International Limited
Third Avenue, Millbrook, Southampton, Hampshire SO15 0LE, England
Tel: +44 (0) 23 8070 2200 Fax: +44 (0) 23 8070 5001
e-mail: [email protected] Web: www.truvox.com
Authorised dealer:
16
 Loading...