


An FKI Industries Company
700 West Bridge Street
Owatonna, MN 55060
1-800-324-4487
www.truth.com
Form 90059 R1
Danger: To help prevent severe personal injury or death:
LANGUAGES
ENGLISH PAGE 1
ESPAÑOL PAGINA 10
FRANÇAIS PAGE 20
o Read and understand instructions completely before beginning
o When connecting the Sentry 2 system to accessories, read the
o Save ALL instructions.
o Installer – please be sure to give ALL instructions to the
o
o
o
o
o
o
o
o Do not allow children to operate the wall push buttons or remote
Sentry II®
Hand Held Remote
Operating Instructions
installation.
installation instructions supplied with each accessory before
beginning installation.
homeowner once installation is complete.
Wiring must be installed by a qualified electrician according to local
and National Electrical Codes (N.E.C.)
Disconnect main power before beginning installation! Verify that
power is OFF at the main breaker or fuse panel by testing with a
voltage meter that you know is working correctly.
Connect power only after motor connections and settings are
verified.
This equipment does not provide a method to shut off power, and
should be connected to a dedicated breaker or fused power circuit.
The Sentry 2 system should not be used on windows that are
intended to meet egress codes.
The Sentry 2 system is intended for indoor use only, with screens in
place.
The screen interlock MUST be correctly mounted and is a required
part of the installation. It is intended to help prevent injury that could
result from reaching into the window or skylight area during
operation. The correct installation of the screen interlock is the
responsibility of the installer.
control transmitte r(s).
Made in USA
Important Information
o This remote control is an RF (radio frequency) device and therefore
does not need to be pointed in any manner toward the intended
window/skylight to be operated. The effective range for this remote
is approximately 100ft, but this varies with application conditions
such as: wall materials, mounting height of receiver and
interference from other devices radiating on RF frequencies.
o Devices which could be affected or cause interference can include
the following: radio baby monitors, garage door openers and
automotive keyless entry / security systems.
o
o Batteries: This remote control uses 3 size “AAA” batteries (not
included), Inserted with the proper polarities (+ and -) aligned
correctly. The use of alkaline batteries is recommended for best
service life. Do not mix alkaline and manganese battery types, nor
use old and new batteries together.
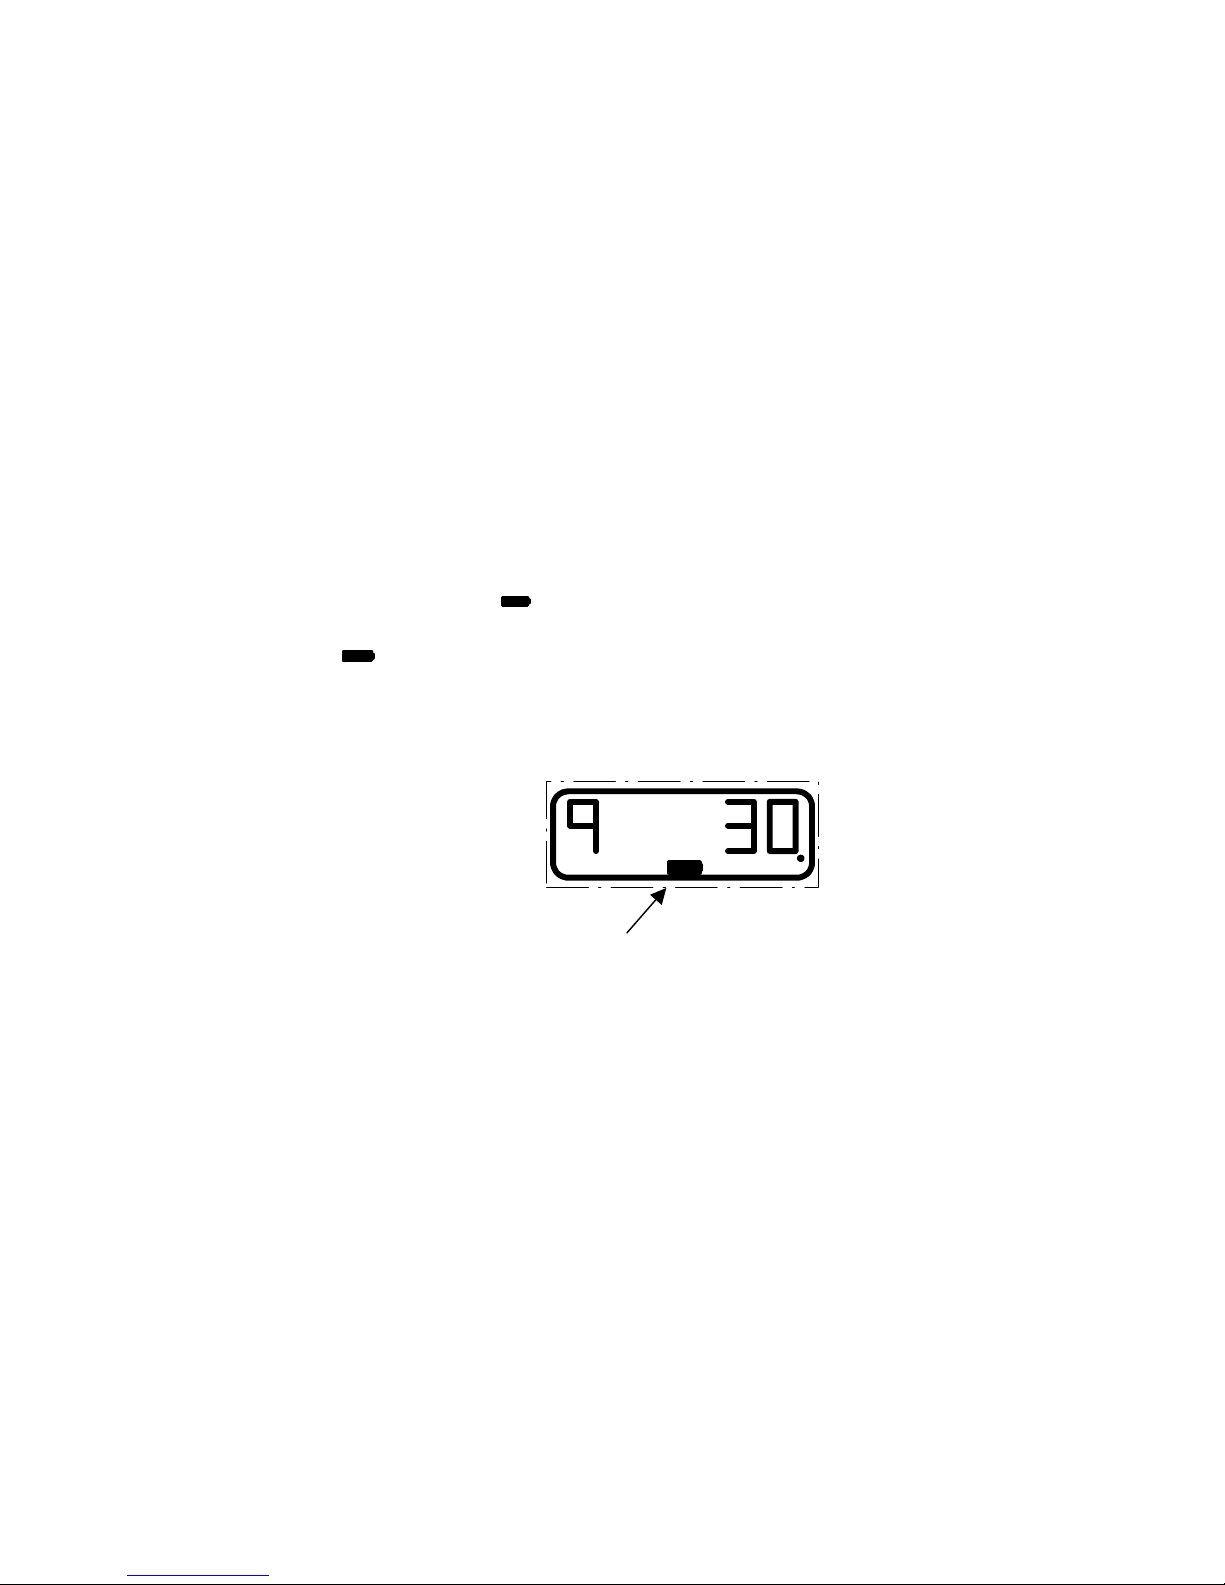
o A battery icon “ “ will become visible on the LCD when the
batteries are down to 20% of usable life. When the battery icon
“ “ begins to flash the batteries no longer provide enough power
to operate the remote consistently, and therefore should be
replaced.
Motor
Unit
Battery Icon
C

Regulatory Compliance
United States of America
Federal Communications Commission (FCC)
Unintentional emitter per FCC Part 15
Note: This equipment has been tested and found to comply with the limits for a Class B digital device,
pursuant to part 15 of the FCC Rules. These limits are designed to provide reasonable protection against
harmful interference in a residential installation. This equipment generates, uses, and can radiate radio
frequency energy and, if not installed and used in accordance with the instructions may cause harmful
interference to radio communications. However, there is no guarantee that interference will not occur in a
particular installation. If this equipment does cause harmful interference to radio or television reception,
which can be determined by turning the equipment off and on, the user is encouraged to try to correct the
interference by one or more of the following measures:
o Reorient or relocate the receiving antenna.
o Increase the separation between the equipment and receiver.
o Connect the equipment into an outlet on a circuit different from that to
which the receiver is connected.
o Consult the dealer or an experienced radio/TV technician for help.
Warning: Changes or modifications not expressly approved by Truth Hardware could void the FCC
compliance and negate your authority to operate the product.
FCC Declaration of Conformity
According to 47 CFR, Parts 15.107 and 15.109 Class B
Responsible party: Truth Hardware, 700 West Bridge St., Owatonna, MN 55060
www.truth.com
Product: Sentry 2 Hand Held Remote (43.53)
This device complies with part 15 of the FCC Rules. Operation is subject to the following two conditions: (1)
This device may not cause harmful interference, and (2) this device must accept any interference received
including interferences that may cause undesired operation.
or 1-800-324-4487
Canada
Industry Canada (IC)
Unintentional emitter per ICES-003
This class B digital apparatus complies with Canadian ICES-003.
Cet appareil numérique de la classe B est conforme á la norme NMB-003 du Canada.
Operation is subject to the following two conditions: (1) this device may not cause interference, and (2) this
device must accept any interference, including interference that may cause undesired operation of the
device.
Europe
European Community EMC Directive (CE)
Compliance with these directives implies conformity to the following
European Norms or Regulations:
Emissions Immunity
ETSI EN 300-220-3 v1.1.1 (2000-09) ETSI EN 301 489-3 v1.4.1 (2000-04)
ETSI EN 301 489-3 v1.4.1 (2000-04)

Programming the Remote Control
If optional Hand Held Remote was purchased, it can now be
programmed using the “Learn” button (see S1 on wire diagram)
Program the remote using the following steps:
Place three “AAA” batteries into the Remote.
The display on the Remote will be bla nk except for the word “SET”
“Set” icon
is displayed after
batteries are installed
Unit
Set
Open
Mode
Close
Press the “Learn” button (S1) on the control board once
“Learn”
button
4444
Blue
Y e llow
Green
Grey
5555
Grey
Green
Y e llow
Blue
Grey
Green
Yel low
Blue
Grey
Grey
Red
Black
Grey
Green
7777
10
10
1010
12
12
1212
Red
LED
J2
J2
J2J2
S1
S1
S1S1
S2
S2
S2S2
3456
off
on
S tatus
LED
12
A red LED will flash… and the status LED (on control board or wall
plate) will begin to flash green.

Press the “Open” button on the remote once.
Press
Unit
Set
Open
Mode
Close
“Open”
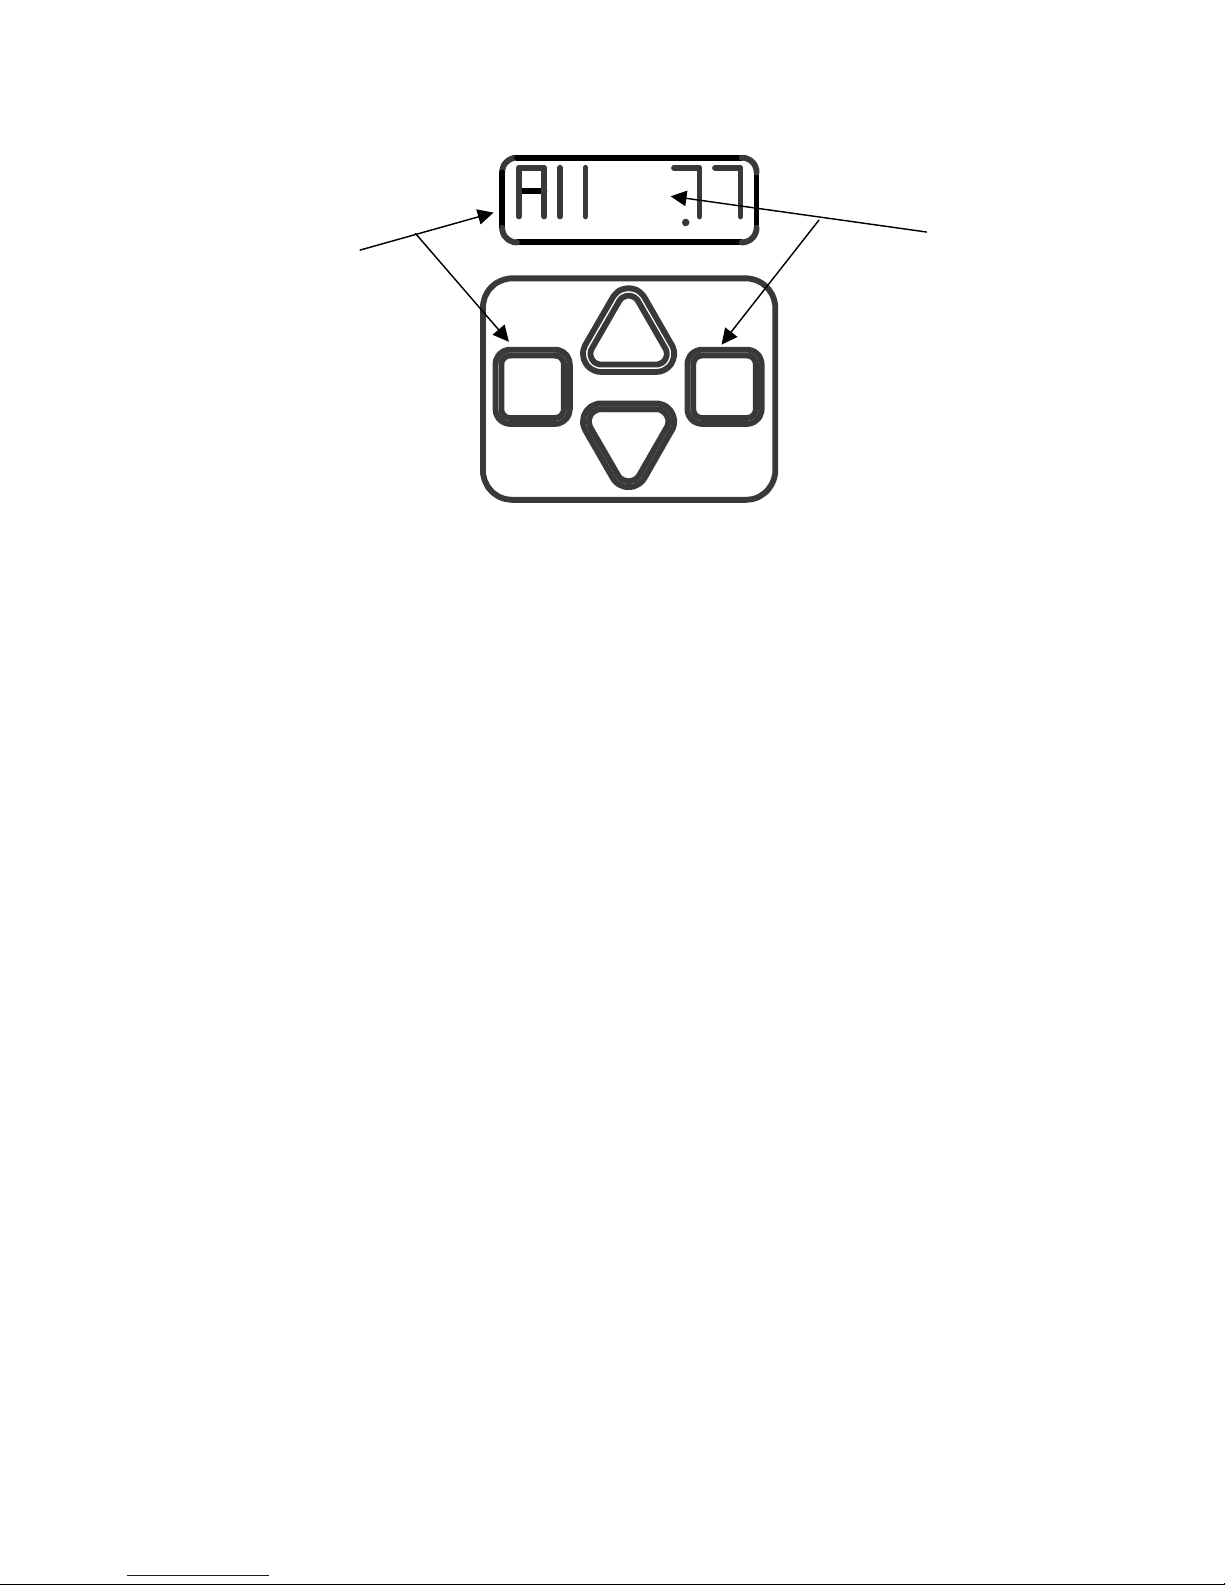
The display on the remote should change to show both the unit as “All”
and the ambient temperature.
Motor
Unit
F
By pressing the “Unit” button on the remote, select the desired Unit
Code which will represent this window/skylight. Choose from 1 thru 9.
(Note: Any number of motors can be programmed onto a single Unit
Code.)
Motor
F
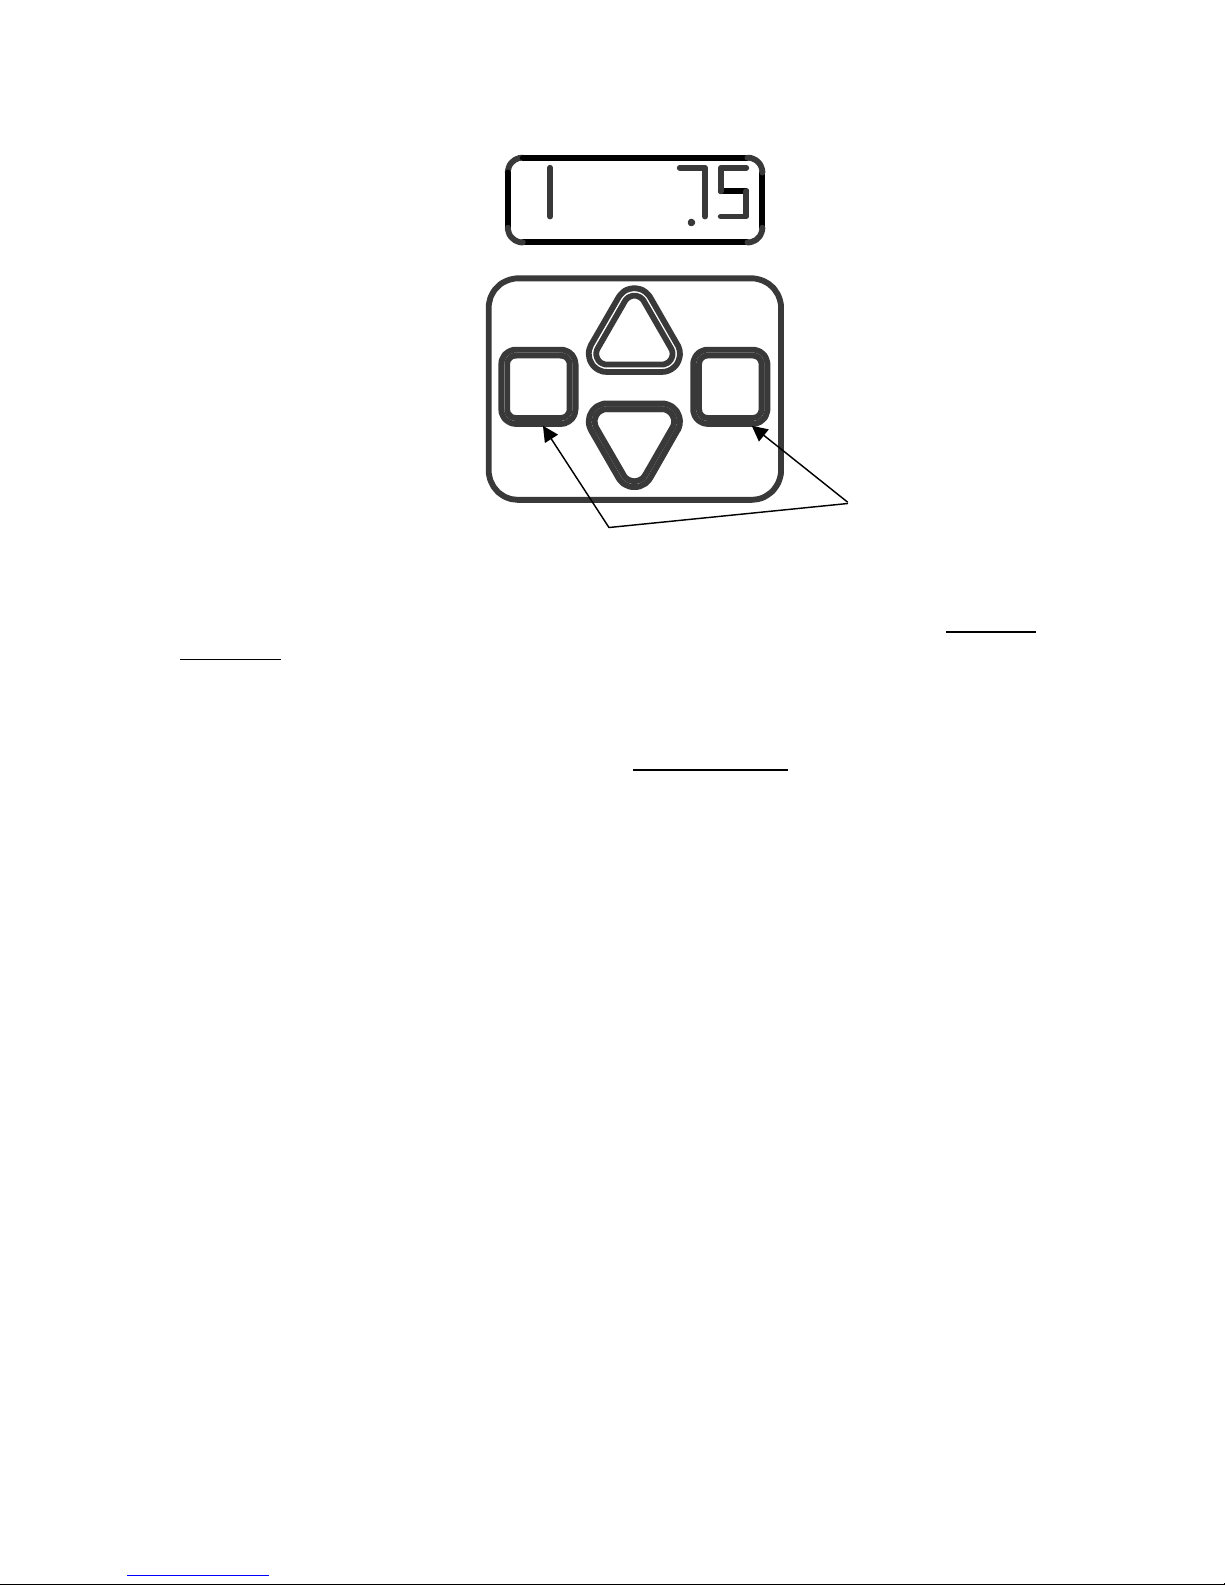
Once unit code number is
selected,
Press “Open” once again.
Press “Unit” button
to choose unit code
(1 – 9)
Unit
Open
Press the “Open” button on the remote once again.
The Red Led flashes once and the green flashing Status LED will go
out. Programming is now complete.
Unit
Mode
Close

Options for programming multiple units:
There are a number of different programming possibilities provided
by the “Unit” code function of the Sentry 2 remote. Here are a few:
1. Grouped Units on Single Unit Code: By pressing the “Learn”
button on a number of selected control panels you can
simultaneously program more than one window or skylight to a
single unit code. This can provide control of a group of windows
and/or skylights of any number as long as they are within range
of the remote control (approx. 100ft)
2. Banked Units on single Unit Code: By using the method above
you can also group windows on the same side of the room or
“bank” allowing you to take advantage of prevailing wind
conditions to make your home more comfortable. To further
improve cross ventilation in a room grouping windows on
opposing walls.
3. Chimney Ventilation: By combining a skylight unit and a window
unit (preferably on the shady or cooler side of the house) a
natural convection draft known as “chimney effect”. This helps
to cool the room by allowing the hot air to escape out through
the skylight and be replaced by the cooler air coming in through
the window.
4. The “All” setting for the Unit Code can also be used to provide
the above conditions.

Normal Operation:
Unit or Group the
remote is set to
control.
Unit
Motor
Room
F
Temp.
Mode selects the function
Open
to be controlled.
ie: Motor, Blind etc...
Unit
Close
To “Open” a selected window/skylight.
1) Using the “Unit” key select the number which you programmed into the control unit for the
selected window or skylight. Or select “All” which will then control all units programmed
regardless of unit number.
2) Using the “Mode” key select the “Motor” function.
3) Press the “Open” key to open the window/skylight unit
Note: Skylight motors will open to 90% of full range with one key press. Window motors
will open to 75% of full range on the first key press, and then open a few more degrees
with each key press until full open position is reached.
4) Pressing the “Close” key while the selected unit is opening will cause the unit to STOP.
To “Close” a selected window/skylight.
1) Using the “Unit” key select the number which you programmed into the control unit for
the selected window or skylight. Or select “All” which will then control all units
programmed regardless of unit number.
2) Using the “Mode” key select the “Motor” function.
3) Press the “Close” key to close the window/skylight unit.
4) Pressing the “Open” key while the selected unit is closing will cause the unit to STOP.
To “Open” a selected window/skylight blind:
1) Using the “Unit” key select the number which you programmed into the control unit for the
selected window or skylight. Or select “All” which will then control all units programmed
regardless of unit number.
2) Using the “Mode” key select the “Blind” function.
3) Press the “Open” key to open the blinds.
4) Pressing the “Close” key while the selected unit is opening will cause the unit to STOP.
To “Close” a selected window/skylight blind:
1) Using the “Unit” key select the number which you programmed into the control unit for the
selected window or skylight. Or select “All” which will then control all units programmed
regardless of unit number.
2) Using the “Mode” key select the “Blind” function.
3) Press the “Close” key to close the blinds.
4) Pressing the “Open” key while the selected unit is closing will cause the unit to STOP.
Mode
Thermostat Operation:
Therm
Use Unit button to
select the units to be
controlled by the
thermostat.
Unit
Open
F
Use Mode button
to select “therm”
Unit
Close
Mode
To control a selected window/skylight via the internal thermostat in the hand held
remote.
1) Using the “Unit” key select the number which you programmed into the
control unit for the selected window or skylight. Or select “All” which will
then control all units programmed regardless of unit number.
2) Using the “Mode” key select the “Therm” or thermostat function.
3) Using the “Open” and “Close” keys adjust the Set Point of the thermostat.
When “Set” icon is visible the display shows th e current set point. When
the “Set” icon disappears the ambient room temperature is again
displayed.
4) By leaving the remote in the “Therm” Mode the motors sharing the
displayed Unit Code will react to changes in room tempera ture. When the
room temperature is above the Set Point the units will automatically open,
and when the temperature drops below the Set Point by 5° F (2°C) the
units will automatically close. Note: The remote must be located within
range of the intended motor control units for reliable operation.
5) When thermostat control is no longer desired, changing the “Mode” to
either the “Motor” or “Blind” settings will deactivate the automatic
thermostat operation. The Set Point will be retained for future use.

Note:The temperature display can provide either Fahrenheit (F) or Celsius
(C) by changing the position of switch 2 found behind the battery door.
Remove the batteries before changing position of switch 2.
This Switch changes Temp. display
from F to C.
Forced Re-initialization:
Motor
Unit
Open
Unit
Close
F
Mode
Press Unit & Mode
buttons together and
hold for “Reset”
When an error is noted in the operation of the motor unit (indicated by a Flashing
RED light on the wall plate or status indicator), the unit can be “Reset” by forcing
a re-initialization via the remote control.
1) Shut off the power* to the unit for 20 seconds. Upon reapplication of
power the unit should automatically close and stop.
2) Verify motor operation at this point, since cycling the power may correct
some problems.
3) Using the “Unit” key select the number which you programmed into the
control unit for the selected window or skylight. Note: A Reset cannot be
activated in the “All” Unit setting.
4) Using the “Mode” key select the “Motor” function.
5) Press both the “Unit” and “Mode” keys down simultaneously and hold
them until the “Motor” icon on the display blinks twice. Watch to be sure
the Unit Code does not change during the button press. If it does you will
have to return to step 3.
6) The selected unit should begin to run through a full open and closed cycle
during which a Red light should be seen at the wall switch plate or status
indicator. Watch the unit for obstructions or other problems during this
procedure. Take action to correct hardware or window/skylight related
problems as necessary.
6) Repeat this procedure from step 3) until the problem is resolved.
*Power interruption is most easily accomplished by shutting off the specific
breaker at the homes fuse or power distributi on panel .
 Loading...