

Page 1
This quickstart guide provides basic instructions for setting up and using your XRS Stick Reader. For more detailed instructions, see the comprehensive
Manual
available on the USB flash drive/CD supplied, or at www.tru-test.com.
Note:
In this document, EID = Electronic Identification and VID = Visual Identification.
XRS Stick Reader User
Before you start
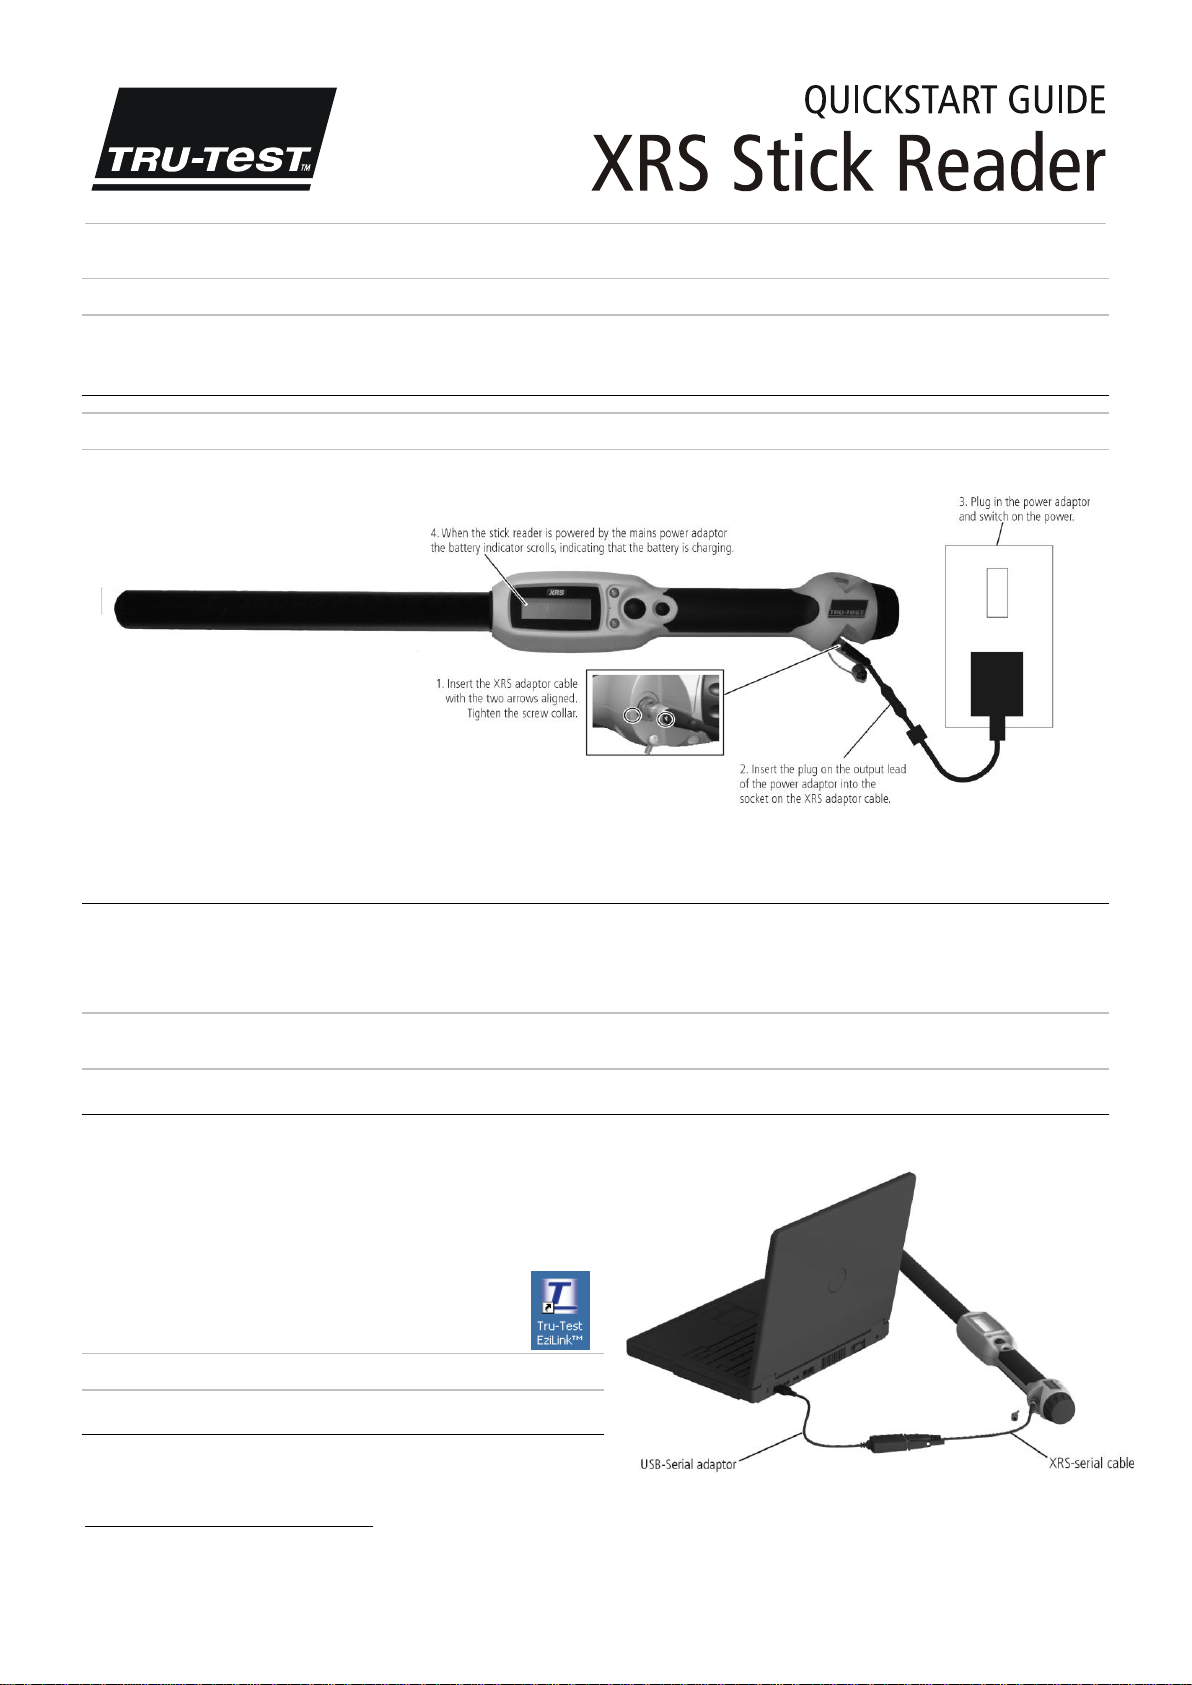
Charging the internal battery
Note:
Before using the stick reader, ensure that the internal battery is fully charged.
The ambient temperature should be between +5 and +40 °C (+41 and +104 °F) when charging the battery. The battery will be fully charged in approximately 3 hours. When
fully charged, the internal battery will allow the stick reader to be used for up to 19 hours1.
The stick reader may be used while it is on charge.
To charge the internal battery using a 12 V vehicle battery , see the
XRS Stick Reader User Manual
.
Using the stick reader
The stick reader can be used in two ways:
1 Standalone - the stick reader saves each scanned tag in its internal memory. These records can be transferred to a PC afterwards.
2 Connected – the stick reader is connected to another device, such as a weigh scale indicator or a PC running a third party application, via cable or
connection. When connected, the stick reader transmits every scanned tag immediately to the connected device.
Note:
When using a stick reader connected to another device, it still saves all the scanned tags to its own internal memory. Therefore, when you connect to a PC and run
EziLink™, a session with a large number of unwanted scanned records may be displayed. If you don’t need this session, it may be deleted.
Bluetooth
® wireless
Using EziLinkTM
EziLink software can be installed from the USB flash drive/CD provided with the XRS Stick Reader. EziLink allows information to be transferred to and from the stick reader and
a PC. A number of stick reader settings can be adjusted on the stick reader itself, but there are some that must be configured using EziLink.
To use EziLink:
1 Install the EziLink software on a PC. To do this, insert the USB flash drive into a
USB port or insert the CD into the CD drive on your PC and follow the instructions.
2 Connect the stick reader to the PC’s USB port using the XRS-Serial cable and the
USB-Serial adaptor (see opposite).
3 Turn on the stick reader.
4 Launch EziLink by double-clicking on the EziLink icon on the
desktop.
Note:
For troubleshooting information, see the EziLink help system.
Using Data Link
You can transfer sessions to and from the stick reader using an Android* smartphone
with the Tru-Test Data Link app installed. This free app can be downloaded from the
Google Play* Store. Instructions for using the Tru-Test Data Link app are available on the Tru-Test website www.tru-test.com.
1
When default settings are used. 813557 issue 4 01/2015
© Tru-Test Limited 2011-2015. All rights reserved.
The
Bluetooth
® word mark and logos are registered trademarks owned by Bluetooth SIG, Inc. Any use by Tru-Test Limited is under licence.
All trademarks with an * are not owned by Tru-Test Limited and belong to their respective owners.
Page 2
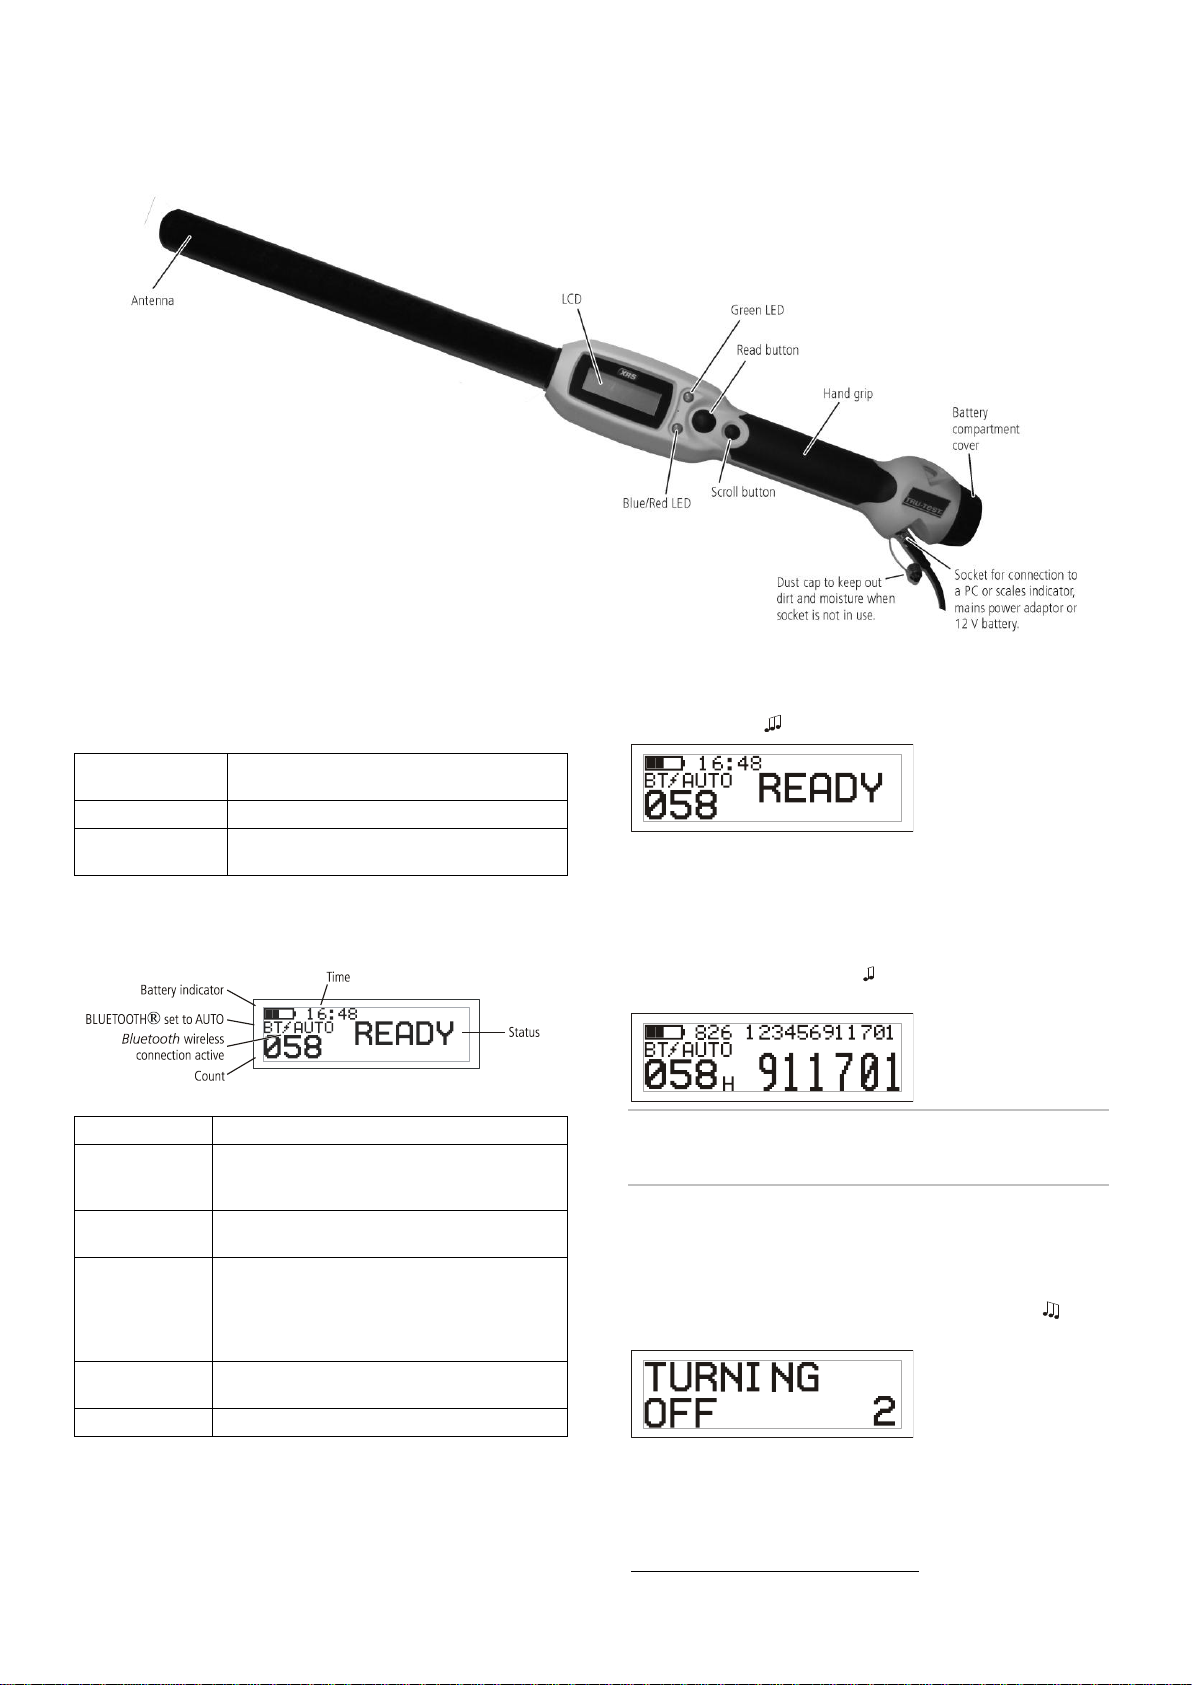
Parts of the stick reader
Blue/Red LED
flashing.
The stick reader is in the process of scanning for or
reading an EID tag.
Green LED flashes.
The EID tag has been read successfully.
Blue/Red LED is blue
when not flashing red.
The stick reader is connected to a
Bluetooth
enabled
device.
Battery indicator
Shows the battery charge level.
BLUETOOTH® set
to AUTO
Indicates that the
Bluetooth
setting is set to
automatically connect to a
Bluetooth
enabled device. To
change this, see
Modifying the stick reader settings
.
Bluetooth
wireless
connection active
The stick reader is connected to another
Bluetooth
enabled device.
Time
The current time is displayed. The time and date are
recorded against the animal ID during the scanning
session. The stick reader’s date and time can be set in
EziLink. See the
XRS Stick ReaderUser Manual
for
information.
Count
The number of animals scanned during the current
scanning session.
Status
Message display area.
LEDs
The stick reader has two LEDs. One is green and the other is blue or red,
depending on the current function of the stick reader. Here are the most common
LED display sequences:
Parts of the stick reader LCD
Turn on the stick reader
Press the Read button.
The stick reader beeps and the message ‚READY‛ appears on the LCD:
Scanning an EID tag
Press and release the Read button while passing the antenna near a tag.
The ID tag number appears on the LCD, the green LED flashes once, the hand
grip vibrates and the stick reader beeps to indicate that the tag has been read
successfully.
Tip:
If animals are moving quickly through a race or into a pen, you can hold
down the Read button continuously. Scanning will stop when the Read button is
released2.
Turning off the stick reader
Press and hold the Scroll button.
A countdown appears on the LCD (3, 2, 1) then the stick reader beeps and
turns off.
2
When Read Mode is set to ‚Standard‛ (default).
Page 3
Using a cross reference file
Size
651 x 65 x 51 mm (25½ x 2½ x 2‛) (L x H x W)
Weight
706 g, including battery
Communications
Bluetooth
® Class 1 wireless connection, up to 100 m (330’) range.
RS232 9600-115200 bps, Xon/Xoff
Operating temperature
-10 to +50 °C (+14 to +122 °F).
Storage temperature
-20 to +35 °C (-4 to +95 °F).
Battery charging temperature
+5 to +40 °C (+41 to +104 °F).
Read distance
HDX up to 330 mm (13‚), FDX up to 350 mm (14‚).
Read rate
Up to 1000 reads per minute.
Memory capacity
Up to 20,000 scanned records
Up to 10,000 alerts
Up to 20,000 EID-VID pairs
Tag compatibility
Reads ISO HDX and ISO FDX-B
Ingress protection
IP67 (immersion in 1 m (3’) of water for 30 minutes).
Battery life
19 hours – Read Mode = Standard or Single
9.5 hours – Read Mode = Continuous
Battery
7.4 V, 1500 mAh Lithium Ion
Charging time
3 hours
Software
Tru-Test EziLink™
Tru-Test Limited hereby declares that this EID Reader is in compliance with the essential
requirements and other relevant provisions of Directive 1999/5/EC. The declaration of
conformity may be consulted at http://livestock.tru-test.com/compliance
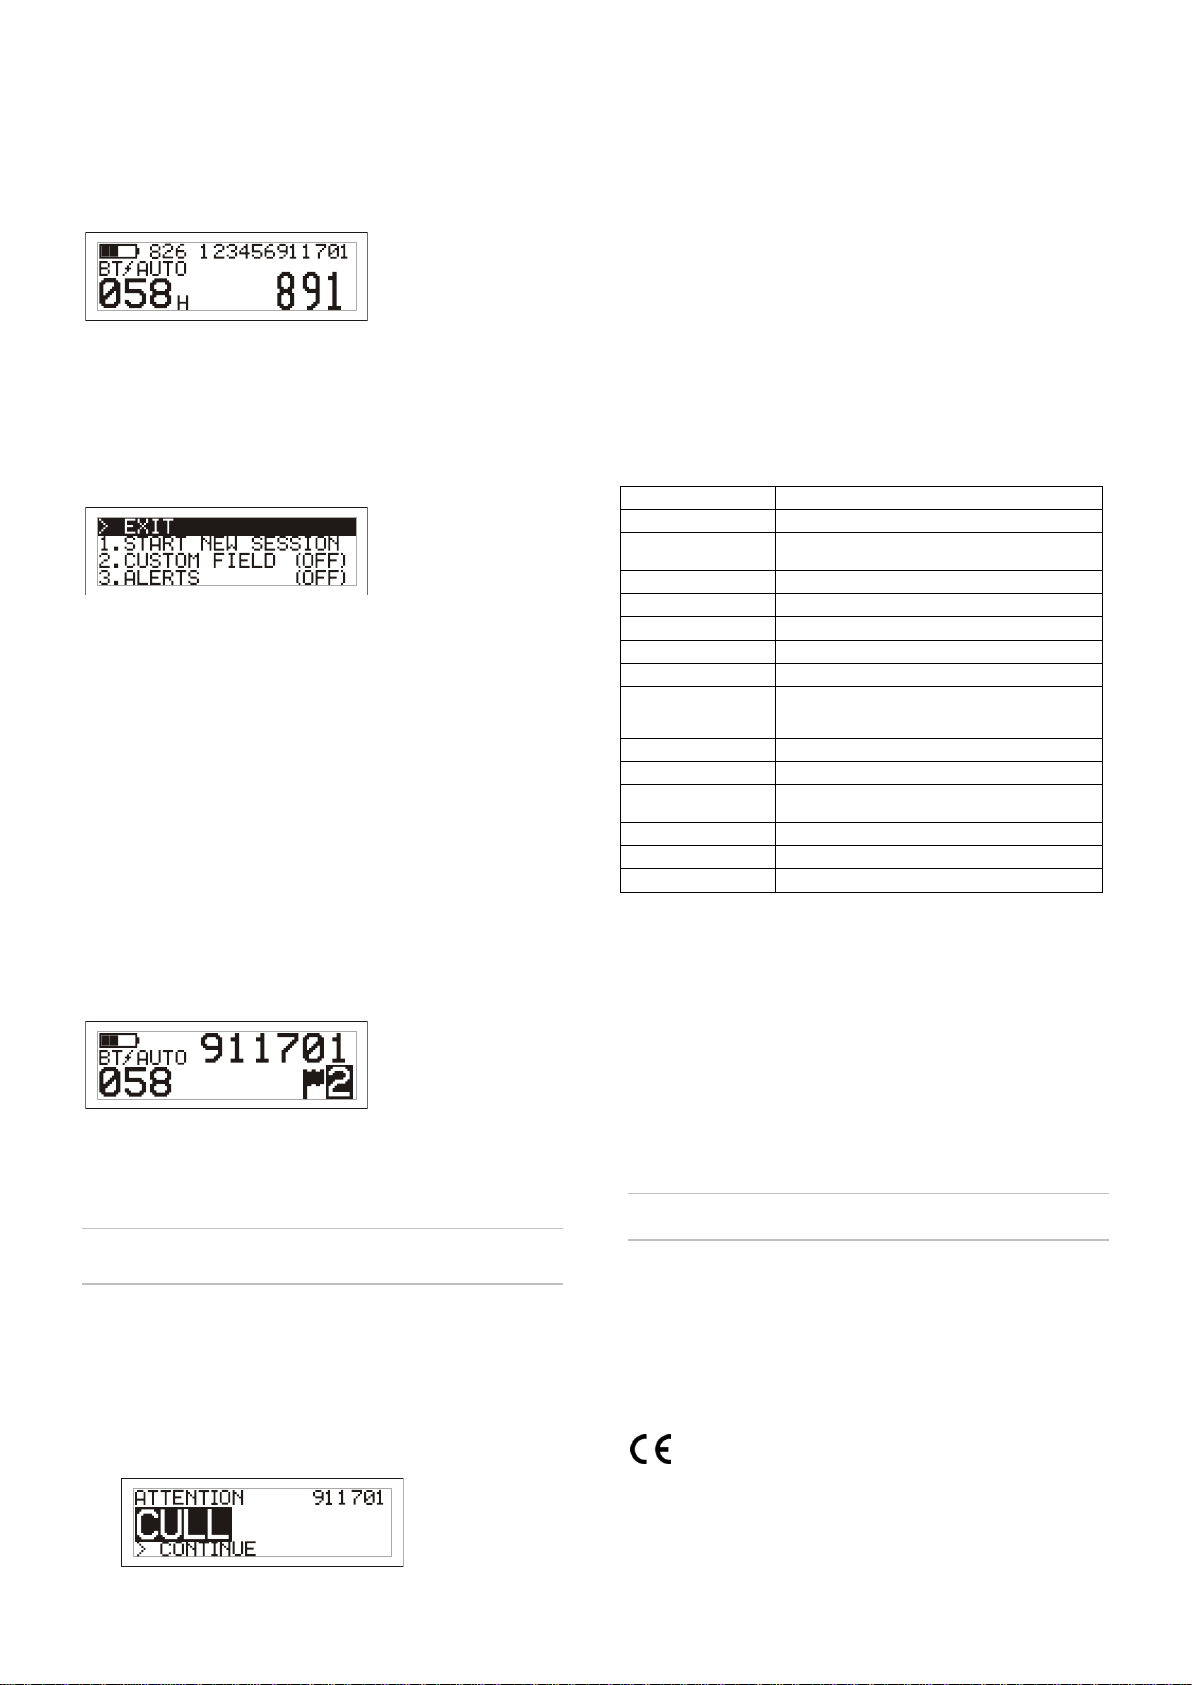
A file containing EIDs and corresponding VIDs (visible tag numbers) can be
transferred to the stick reader prior to the scanning session, using EziLink. If a
cross reference file has been pre-loaded, the animal’s VID will appear in large
numerals on the LCD when a tag is scanned. The EID is displayed in small
numerals directly above.
For information about transferring a cross reference file, see the
User Manual
.
XRS Stick Reader
Modifying the stick reader settings
To access stick reader settings:
Press and hold both the Read button and the Scroll button.
The first three items appear on the LCD with the EXIT option available at the top.
To scroll through the menu options, press the Scroll button repeatedly.
To select an option, highlight the option and press the Read button.
To exit out of the stick reader menu settings, press the Scroll button until EXIT is
highlighted, then press the Read button.
For an explanation of the stick reader menu settings, see the following page.
2 Press the Scroll button to select Continue and then press the Read button.
This acknowledges the alert and allows you to continue scanning.
For information about transferring an alerts file, see the
Manual
.
XRS Stick Reader User
Caring for the stick reader
Wipe the stick reader clean using a damp cloth, warm water and soap. Other
cleaners may damage the case. Do not immerse the stick reader in water.
Store the stick reader in a cool, dry place.
Fit the dust cap when there are no cables connected to the stick reader. This will
prevent moisture and dirt from entering the socket.
Service and warranty information
For service and warranty information, see www.tru-test.com.
Specifications
Other stick reader settings
Other stick reader settings can be configured using the EziLink software. Settings
include Automatic Power Down, Beeper and Vibration On/Off, Date/Time settings
etc. See the
XRS Stick Reader User Manual
for information.
Adding custom field information during
scanning
If you have enabled the Custom Field setting, you can add information about
each animal during scanning. The stick reader has one preset custom field – Flag
(options are blank, 1, 2, 3, 4 or 5). The custom field may also be customised in
EziLink (see the
XRS Stick Reader User Manual
for information).
1 Scan the EID tag as described above.
2 Press the Scroll button to view the available options.
3 When the appropriate option is displayed, scan the next EID tag.
The custom field information for the previously scanned EID tag will then
be stored against it.
Note:
The custom field information will also be stored if the display times out and
returns to the READY screen or the stick reader is turned off.
Receiving alerts during scanning
If you have enabled the Alerts setting, you can receive alerts about a particular
animal as its tag is read. A file containing EIDs and alert messages can be
transferred to the stick reader prior to the scanning session, using EziLink.
1 Scan the EID tag as described above.
If an alert is stored against the EID, the stick reader will beep, the handle
will vibrate and a message appears on the LCD:
FCC notice
This device complies with part 15 of the FCC Rules. Operation is subject to the following two conditions: (1)
This device may not cause harmful interference, and (2) this device must accept any interference received,
including interference that may cause undesired operation.
This equipment has been tested and found to comply with the limits for a Class B digital device, pursuant to
part 15 of the FCC Rules. These limits are designed to provide reasonable protection against harmful
interference in a residential installation.
This equipment generates, uses and can radiate radio frequency energy and, if not installed and used in
accordance with the instructions, may cause harmful interference to radio communications. However, there
is no guarantee that interference will not occur in a particular installation. If this equipment does cause
harmful interference to radio or television reception, which can be determined by turning the equipment off
and on, the user is encouraged to try to correct the interference by one or more of the following measures:
- Reorient or relocate the receiving antenna.
- Increase the separation between the equipment and receiver.
- Connect the equipment into an outlet on a circuit different from that to which the receiver is connected.
- Consult the dealer or an experienced radio/ TV technician for help.
FCC warning
Note:
Users are cautioned that changes or modifications not expressly approved by the party responsible for
compliance could void the user's authority to operate the equipment.
Industry Canada notice
This radio transmitter, model XRS-2, has been approved by Industry Canada to operate only with its integral
antenna.
This device complies with Industry Canada licence-exempt RSS standard(s). Operation is subject to the
following two conditions:
(1) this device may not cause interference, and
(2) this device must accept any interference, including interference that may cause undesired operation of
the device.
EC declaration of conformity
Page 4

Stick reader menu settings
Menu name
Options1
Description
START NEW
SESSION
All tags recorded are stored in sessions (files). Up to 50 sessions can be created. A session can be transferred using EziLink or
the Tru-Test Data Link App for Android* smartphones.
Press the Read button to start a new scanning session.
CUSTOM FIELD
OFF*
ON
Enable Custom Field if you want to enter data about an animal during a session, such as a condition score. The custom field
label and options can be customised in EziLink then transferred to the stick reader (see the
XRS Stick Reader User Manual
for
information).
ALERTS
OFF*
ON
Enable Alerts if you want to be warned when a particular animal’s tag has been scanned. For example, you may want to set
an alert in order to remind you than an animal is in a withholding period. Alert information can be configured in EziLink then
transferred to the stick reader (see the
XRS Stick Reader User Manual
for information).
BLUETOOTH®
AUTO*
OFF
MANUAL
Bluetooth
® wireless connectivity enables the transfer of information from the stick reader to another device such as a weigh
scale indicator or a computer with
Bluetooth
wireless connectivity.
Auto – When BLUETOOTH® is set to Auto, the stick reader will automatically connect to the
Bluetooth
enabled device most
recently used. If it can’t find this device, it will attempt to connect to another
Bluetooth
enabled device from its list of
previously paired devices. If a previously paired device can’t be found, the stick reader will search for a weigh scale indicator,
then connect with it and add it to its list of paired devices. If this is not successful, the stick reader will then allow an
incoming connection from any other
Bluetooth
enabled device. At any time, you may override the Auto settings and manually
search for a device (see FIND BT DEVICES below) or select a device from the list of previously paired devices (see PAIRED
DEVICES below). The Auto setting is ideal if you typically use the same
Bluetooth
enabled device with the stick reader.
Off – You may want to disable
Bluetooth
wireless connectivity if you don’t want the stick reader to automatically connect to
or search for another
Bluetooth
enabled device. Disabling
Bluetooth
wireless connectivity conserves the stick reader’s battery.
Manual – When BLUETOOTH® is set to Manual, the stick reader will allow an incoming connection from another
Bluetooth
enabled device. Also, you can manually search for another
Bluetooth
enabled device (see FIND BT DEVICES below) or select a
device from the list of previously paired devices (see PAIRED DEVICES below).
FIND BT DEVICES
When BLUETOOTH® is in set to Auto or Manual, you can manually search for and connect to a particular device or break an
existing connection and force it to a different device.
Press the Read button to search for
Bluetooth
enabled devices within range.
After a few moments, the stick reader populates the screen with devices that are within range.
To connect to a device:
Select the required device from the list and press the Read button.
The device is added to the list of paired devices (see PAIRED DEVICES below).
PAIRED DEVICES
When BLUETOOTH® is set to Auto or Manual, you can manually connect to a previously paired device or break an existing
connection and force it to a different device.
Connecting to a previously paired device is faster than using the ‘FIND BT DEVICES’ option.
Press the Read button to display previously connected (paired) devices. Select a device and press the Read button.
The stick reader attempts to connect to the previously paired device.
DUPLICATES
ON*
OFF
When Duplicates is enabled, the stick reader will not record the same EID twice in the same session. The stick reader
remembers the previous 500 tags.
FLIP SCREEN
OFF*
ON
Enable Flip Screen to rotate the LCD for a left-handed user. The LCD screen will then be displayed upside-down for a righthanded user.
CONTRAST
Adjust the contrast to suit the light conditions.
Press the Read button repeatedly to adjust the contrast on the LCD.
READ MODE
STANDARD*
CONTINUOUS
SINGLE
When set to Standard, the stick reader begins scanning when the Read button is pressed. Scanning continues for 3 seconds
(default) or until a tag is read if this is sooner. If the Read button is held down continuously, the stick reader will continue to
scan and therefore read multiple tags. ‘Standard’ is the recommended setting for general use. The read time can be set in
EziLink (see the
XRS Stick Reader User Manual
for information).
When set to Continuous, the stick reader begins scanning when the Read button is pressed and it only stops when the Read
button is pressed again. This setting is useful if you want to scan every animal in a pen or race.
When set to Single, the stick reader behaves as it would in Standard mode, except that even if the Read button is held down,
the stick reader won’t continue scanning after it reads the first tag. To scan for another tag, the Read button must be
released and pressed again.
PRINT SESSION
This will print all sessions (files) stored on the stick reader to a connected
Bluetooth
enabled printer.
BACKLIGHT
OFF
LOW*
HIGH
Adjust the backlight to suit the lighting conditions.
Press the Read button to adjust the backlight on the LCD.
SOFTWARE
VERSION
The stick reader software version is displayed.
ENGLISH*
ESPAÑOL (Spanish)
PORTUGUÊS (Portuguese)
FRANÇAIS (French)
DEUTSCH (German)
ITALIANO (Italian)
DANSK (Danish)
SVENSKA (Swedish)
[other languages…]
The language displayed on the stick reader LCD can be modified.
Press the Read button repeatedly.
When the stick reader is connected to a weigh scale indicator via a
Bluetooth
wireless connection, it will automatically
display the same language as the indicator.
1
Default settings marked *
Page 5
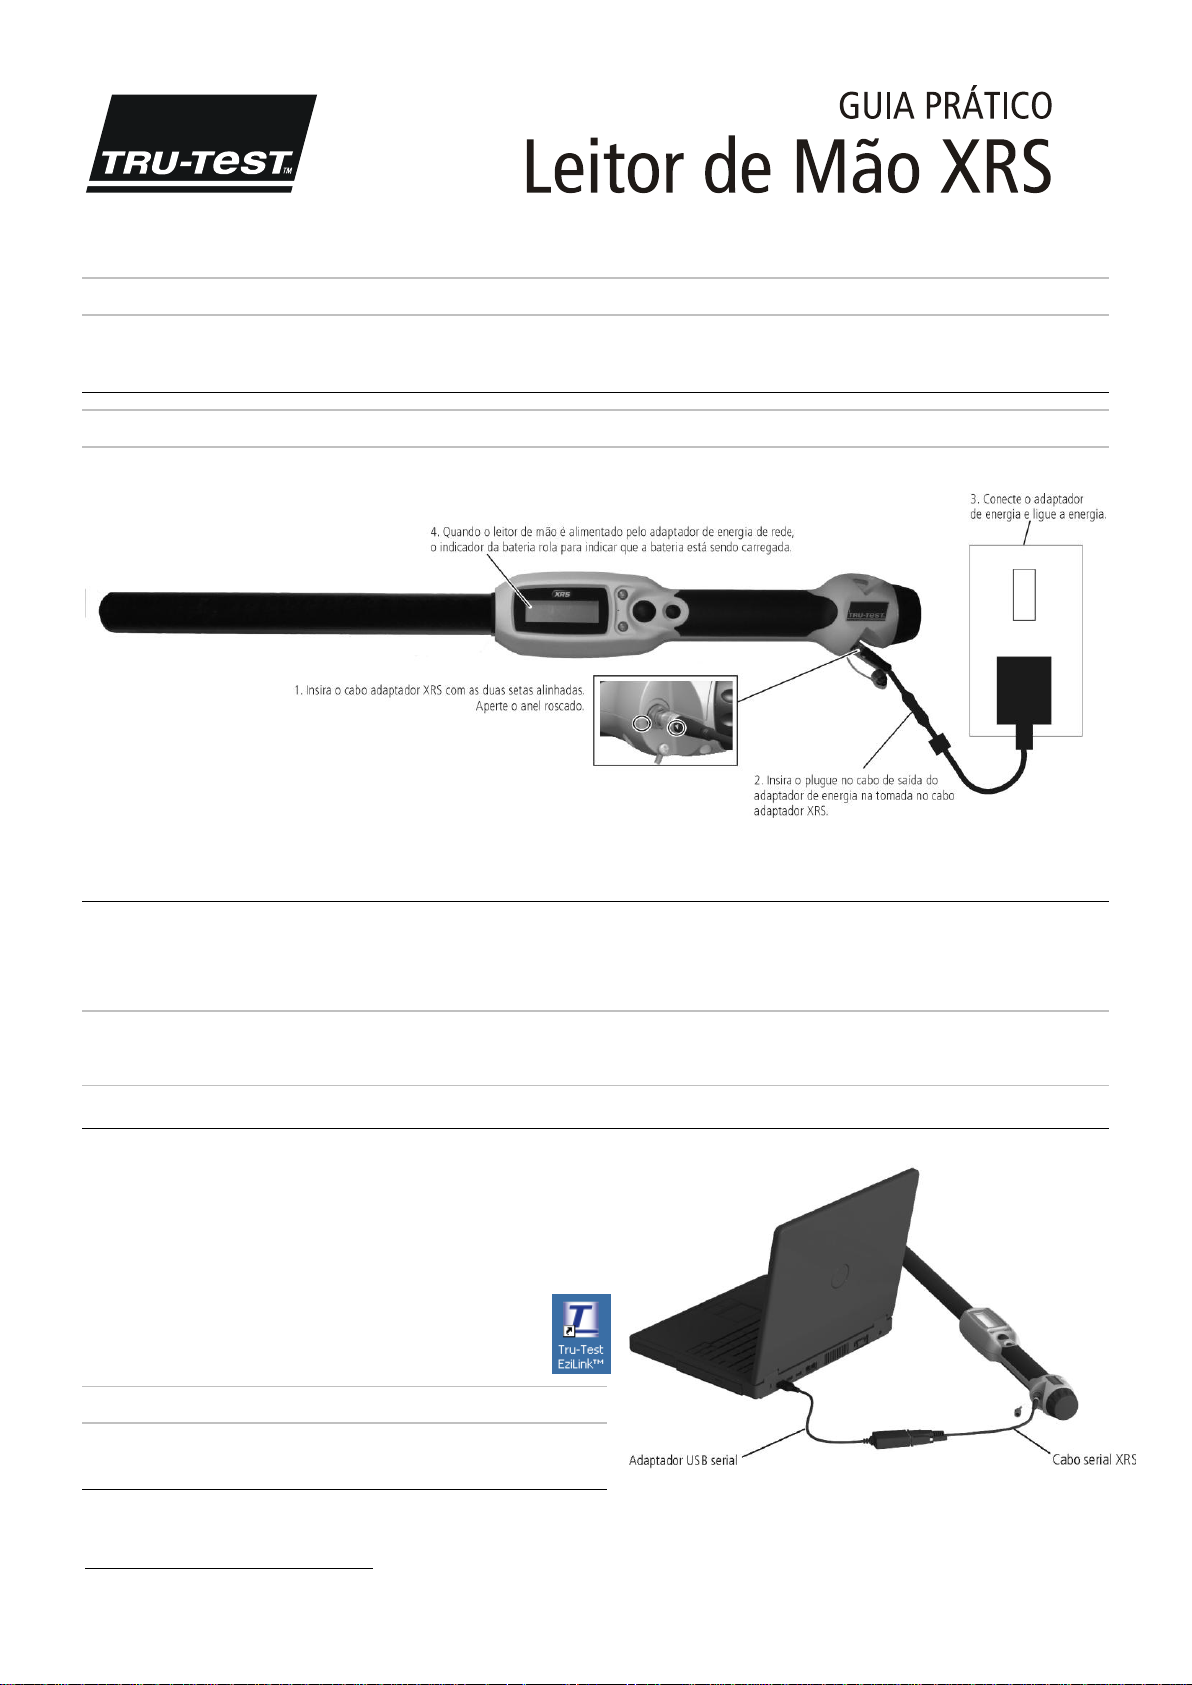
Este guia prático tem como objetivo fornecer as instruções básicas para a instalação e o uso do seu bastão de leitura XRS. Para instruções mais detalhadas, veja o
Usuário do bastão de leitura XRS
Nota:
No presente documento, IDE = Identificação eletrônica e IDV = Identificação visual.
disponível na unidade pendrive USB/no CD fornecido ou em www.tru-test.com.
Manual do
Antes de começar
Carregando a bateria interna
Nota:
Antes de usar o bastão de leitura, certifique-se de que a bateria interna esteja completamente carregada.
A temperatura ambiente deve ser entre +5 e +40°C quando a bateria for carregada. A bateria é carregada completamente em cerca de 3 horas. Completamente carregada, a
bateria interna permite usar o bastão de leitura por 19 horas, no máximo1.
O bastão de leitura pode ser usado durante o carregamento.
Para carregar a bateria interna com uma bateria de automóvel 12 V, veja o
Manual do Usuário do bastão de leitura XRS
.
Usar o bastão de leitura
O bastão de leitura pode ser usado de duas maneiras:
1 Independente - o bastão de leitura salva todos os brincos (tags) lidos na sua memória interna. A seguir, estes registros podem ser transferidos a um PC.
2 Conectado – o bastão de leitura está conectado a um outro aparelho, com um indicador de pesagem ou um PC com um aplicativo terceiro, através do cabo ou de uma
conexão sem fio
Nota:
Quando o bastão de leitura for usado conectado a um outro aparelho, ele também salvará todos os tags lidos na sua memória interna. Por isso, quando você conectá-lo
a um PC e executar EziLink™, é possível que uma sessão com uma grande quantidade de registros lidos não desejados seja mostrada. Se você não precisar deles, eles
poderão ser apagados.
Bluetooth
®. Quando conectado, o bastão de leitura transmite cada brinco lido imediatamente ao aparelho conectado.
Usar o EziLinkTM
O software EziLink pode ser instalado da unidade pendrive USB/do CD fornecido junto com o bastão de leitura. O EziLink permite transmitir informações do bastão de leitura a
um PC e vice-versa. Alguns ajustes do bastão de leitura podem ser feitos no bastão de
leitura, mas alguns têm de ser configurados, usando EziLink.
Para usar o EziLink:
1 Instale o software EziLink em um PC. Para tal, insira a unidade pendrive USB em
uma porta USB ou coloque o CD na unidade de CD no seu PC e siga as instruções.
2 Conecte o bastão de leitura à porta USB do PC, usando o cabo serial-
XRS e o adaptador serial-USB (veja a página seguinte).
3 Ligue o bastão de leitura.
4 Inicialize o programa EziLink com um clique duplo no ícone EziLink na
área de trabalho:
Nota:
Para informações sobre a solução de falhas, veja o sistema de ajuda do EziLink.
Usar Data Link
Você pode transferir sessões ao e do bastão de leitura, usando um smartphone Android* com o aplicativo Tru-Test Data Link instalado. Este aplicativo gratuito pode ser
baixado da loja Google Play*. Instruções relativas ao uso do aplicativo Tru-Test Data Link constam no website www.tru-test.com.
1
Quando os ajustes padrão forem usados.
Page 6
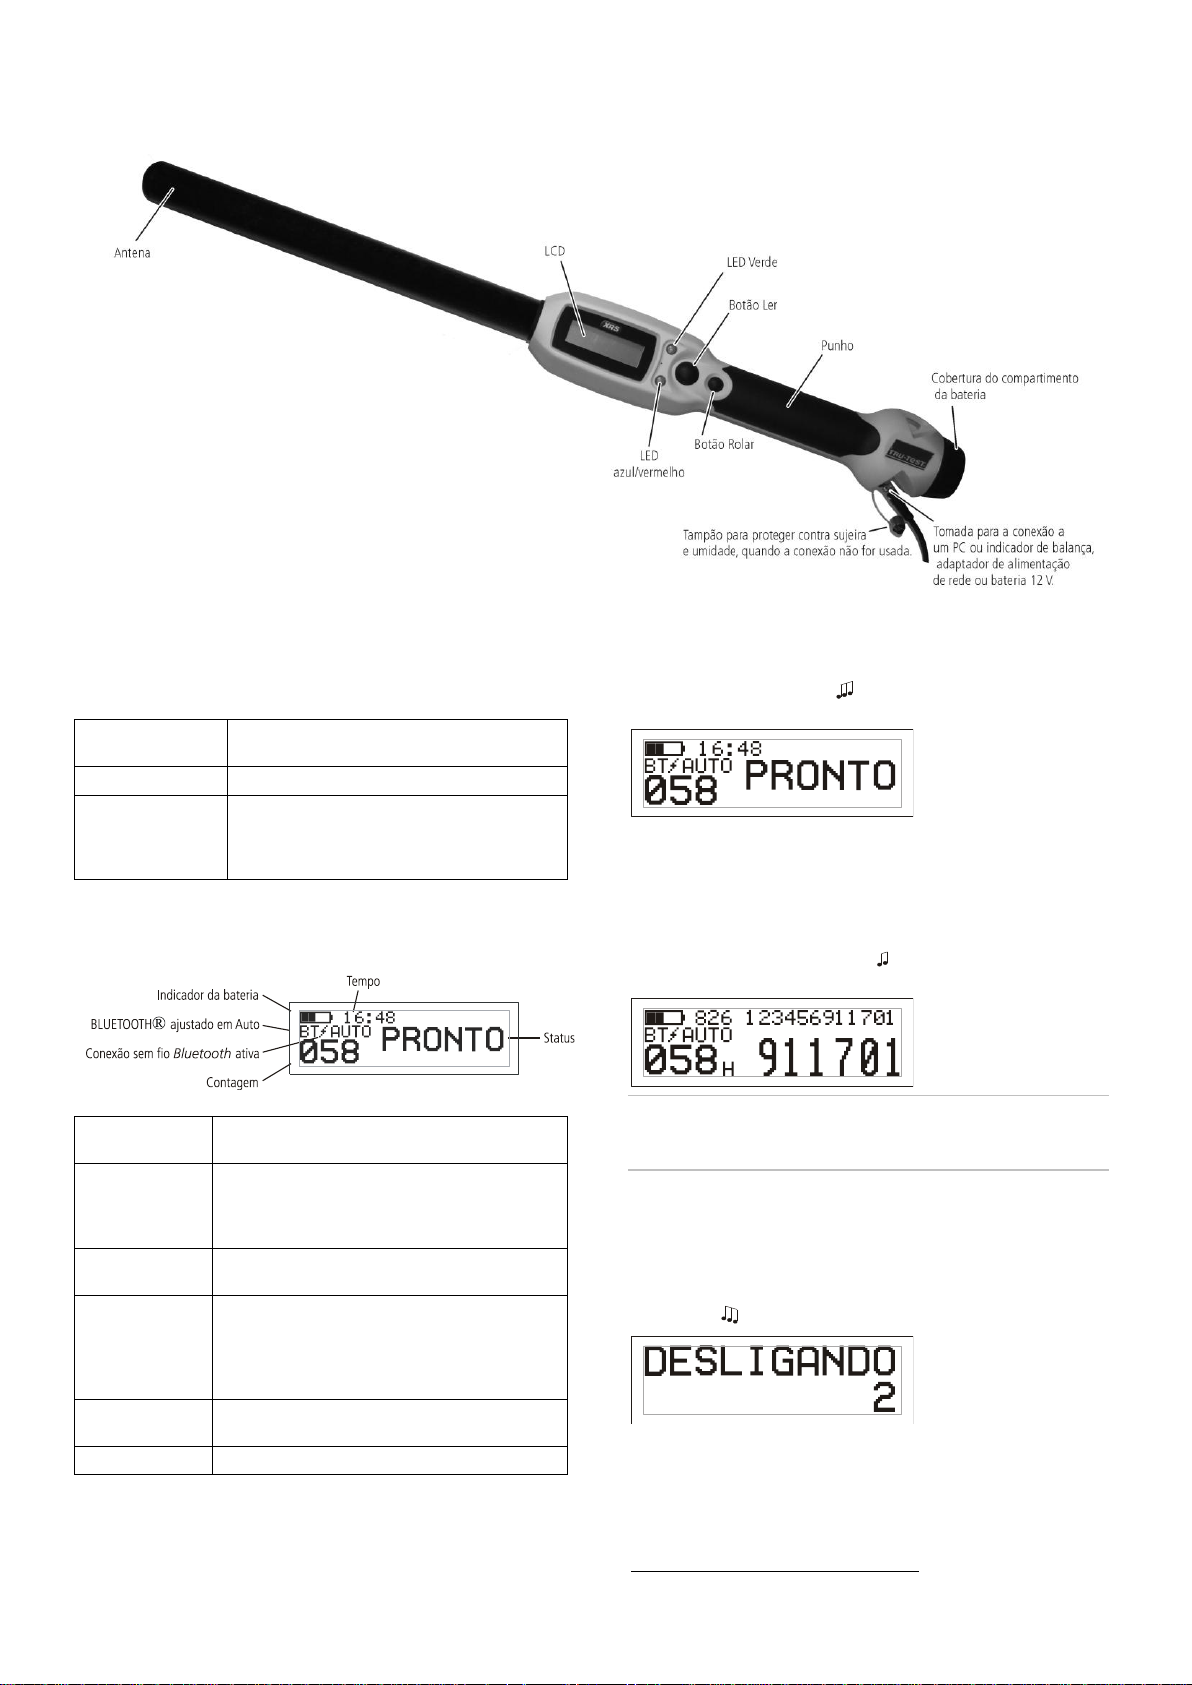
Partes do bastão de leitura
O LED azul/vermelho
pisca.
O bastão de leitura está escaneando ou lendo um
brinco IDE.
O LED verde pisca.
A leitura do brinco IDE foi efetuada com sucesso.
O LED azul/vermelho
está azul, se não tiver
piscando em
vermelho.
O bastão de leitura está conectado a um aparelho
com função
Bluetooth
.
Indicador da
bateria
Mostra a carga da bateria.
BLUETOOTH®
ajustado em AUTO
Indica que
Bluetooth
está ajustado para estabelecer uma
conexão automática com um aparelho com função
Bluetooth
. Para mudar isto, veja
Modificar os ajustes do
bastão
de leitura.
Conexão sem fio
Bluetooth
ativa
O bastão de leitura está conectado a um outro aparelho
com função
Bluetooth
.
Hora
A hora atual é mostrada. Durante a sessão de
escaneamento, a hora e a data da identificação de um
animal são registradas. A data e a hora do bastão de
leitura podem ser ajustadas no programa EziLink. Veja o
Manual usuário do Leitor de Mão XRS
para informações.
Contagem
A quantidade de animais escaneados durante a sessão
de escaneamento atual.
Status
Área de exposição de mensagens.
LEDs
O bastão de leitura tem dois LEDs. Um é verde e ou outro é azul ou vermelho,
dependendo da função atual do bastão de leitura. As sequências de indicação de
LED mais comuns são:
Partes do bastão de leitura LCD
Ligar o bastão de leitura
Pressione o botão Ler.
O bastão de leitura emite um beep e a mensagem ‚PRONTO‛ aparece no
LCD:
Escaneando um brinco IDE
Pressione e solte o botão Ler, passando a antena perto de um brinco.
O número do brinco ID aparece no LCD, o LED verde pisca uma vez, o manípulo
vibra e o bastão de leitura emite um beep para indicar que o brinco foi lido
com sucesso.
Dica:
Se os animais estiverem passando rapidamente por um corredor ou
entrando em um brete, você pode manter o botão Ler pressionado
continuamente. Quando você soltar o botão Ler, o escaneamento parará2.
Desligar o bastão de leitura
Pressione e mantenha pressionado o botão Rolar.
Uma contagem regressiva aparece no LCD (3, 2, 1). A seguir, o bastão de leitura
emite um beep e se desliga.
2
Quando o modo de Ler estiver ajustado em "Padrão" (por omissão).
Page 7
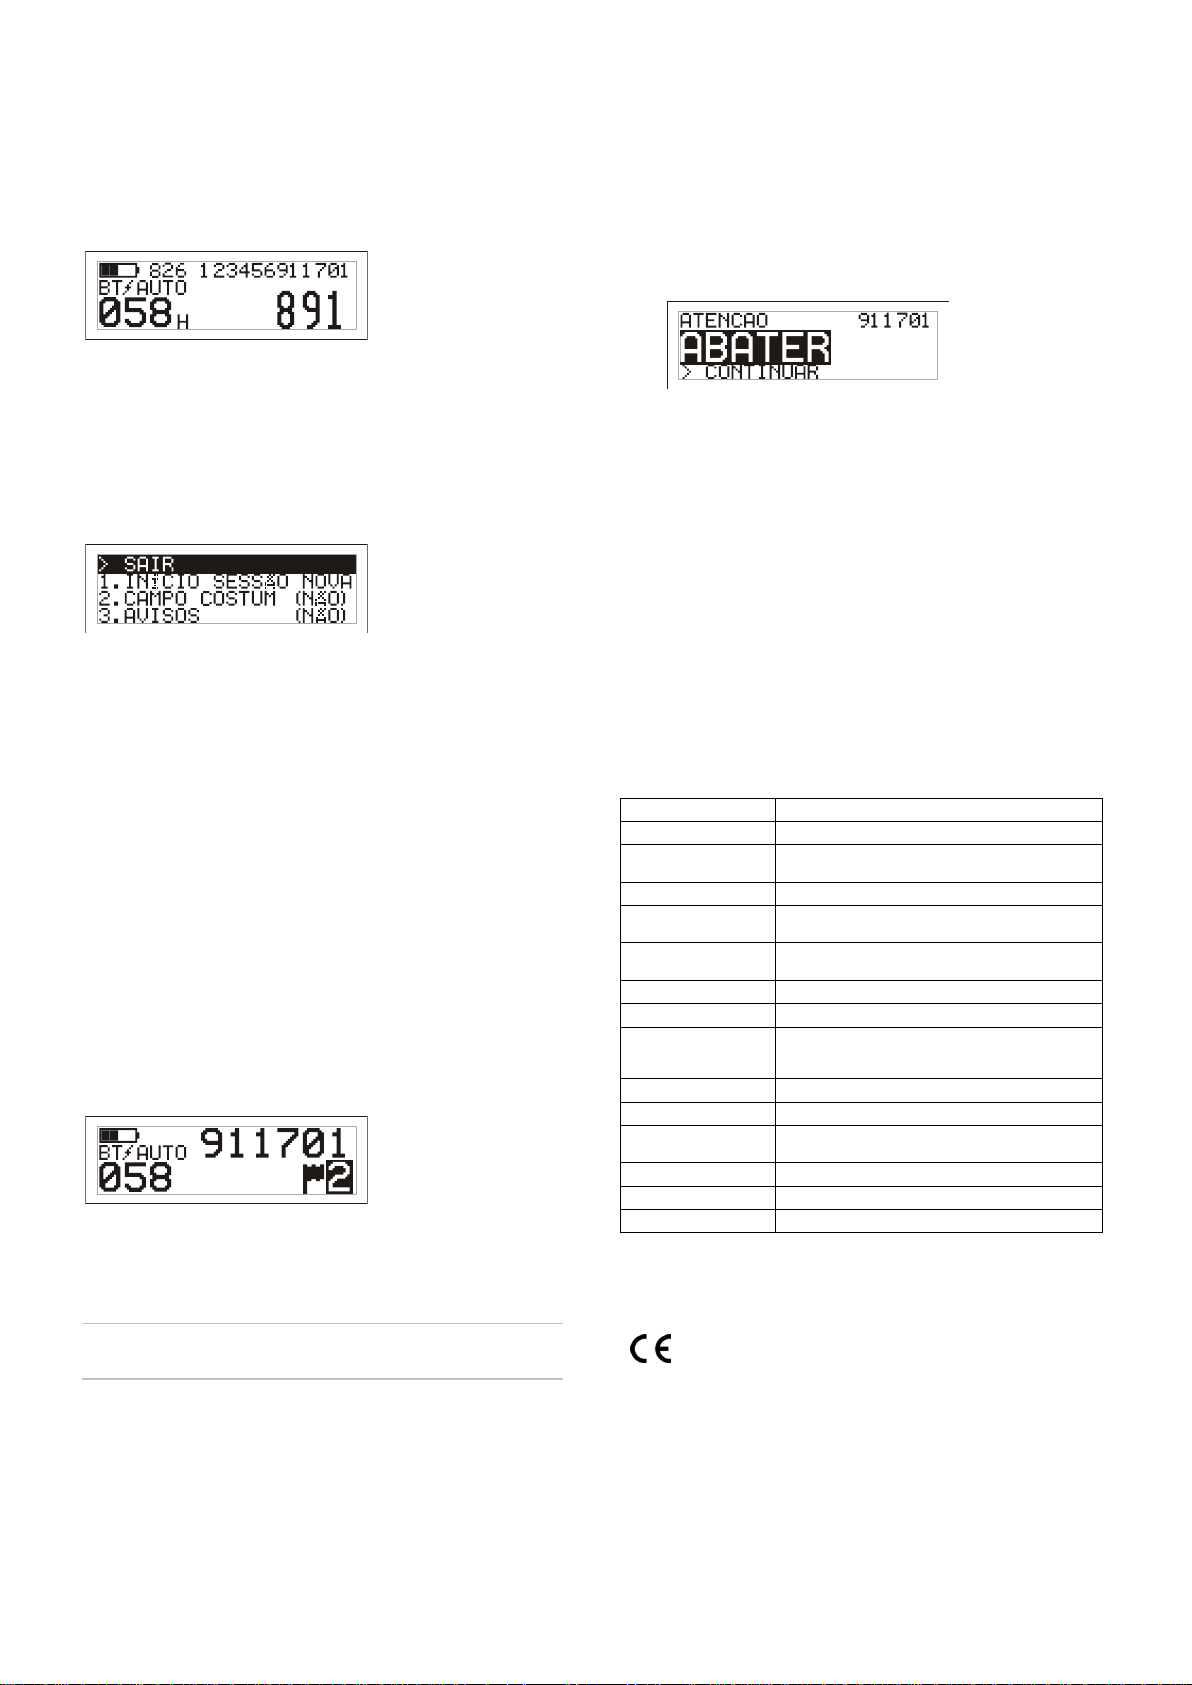
Usar um arquivo de referência cruzada
Tamanho
651 x 65 x 51 mm (C x A x L)
Peso
706 g, inclusive a bateria
Comunicação
Conexão Bluetooth
® sem fio classe 1 até 100 m de alcance..
RS232 9600-115200 bps, Xon/Xoff
Temperatura de serviço
-10 a +50 °C.
Temperatura de
armazenamento
-20 a +35 °C.
Temperatura de carregamento
da bateria:
+50 a +40 °C.
Distância de leitura
HDX até 330 mm, FDX até 350 mm.
Taxa de leitura
Até 1000 leituras por minuto.
Capacidade da memória
Até 20,000 registros escaneados
Até 10,000 alertas
Até 20,000 pares de IDE-IDV
Compatibilidade de brincos
Lê ISO HDX e ISO FDX-B
Proteção do ingresso
IP67 (imersão em 1 m de água por 30 minutos).
Vida útil da bateria
19 horas – Modo de leitura = padrão ou individual
9.5 horas – Modo de leitura = Contínuo
Bateria
7.4 V, 1500 mA/h íon-lítio
Tempo de carregamento
3 horas
Software
Tru-Test EziLink™
Pelo presente, a Tru-Test Limited declara que este leitor de IDE está conforme os
requerimentos essenciais e outras disposições relevantes da diretiva 1995/5/CE. O certificado
de conformidade consta em http://livestock.tru-test.com/compliance.
Receber alertas durante a leitura
Com o programa EziLink, um arquivo que contém IDEs e as IDV correspondentes
(números de brincos visíveis) pode ser transferido ao bastão de leitura antes da
sessão de escaneamento. Se o arquivo de referência cruzada tiver sido carregado
previamente, a IDV do animal aparecerá em números grandes no LCD quando o
brinco for escaneado. A IDE é mostrada em números pequenos, diretamente em
cima.
Para informações sobre o carregamento de um arquivo de referência cruzada,
veja o
Manual do Usuário do Leitor de Mão XRS
.
Modificar os ajustes do bastão de leitura
Para acessar os ajustes do bastão de leitura:
Pressione e mantenha pressionado o botão Ler e o botão Rolar.
Os primeiros três itens aparecerão no LCD, quando a opção SAIR estiver
disponível no topo.
Para rolar nas opções do menu, pressione o botão Rolar repetidamente.
Para selecionar uma opção, marque a opção e pressione o botão Ler.
Para sair do menu de ajustes do bastão de leitura, pressione o botão Rolar até
SAIR for marcado e, a seguir, pressione o botão Ler.
Para uma explicação dos ajustes do menu do bastão de leitura, veja a página
seguinte.
Se você tiver ativado o ajuste de Alertas, você poderá receber alertas relativos a
um animal particular, quando o seu brinco for lido. Com o programa EziLink, um
arquivo que contém IDEs e mensagens de alerta pode ser transferido ao bastão
de leitura antes da sessão de escaneamento.
1 Faça um scan do brinco IDE como descrito acima.
Se um alerta estiver memorizado junto com uma IDE, o bastão de leitura
vai emitir um beep, o manípulo vai vibrar e uma mensagem vai ser
mostrada no LCD:
2 Pressione o botão Rolar para selecionar Continuar e, a seguir, pressione o
botão Ler. Isto confirma o alerta e permite continuar a escanear.
Para informações sobre a importação de um arquivo de alarme, veja o
Usuário do Leitor de Mão XRS
.
Manual do
Cuidados com o bastão de leitura
Limpe o bastão de leitura com um pano umedecido, água morna e sabão. Outros
detergentes podem danificar a caixa. Não imerja o bastão de leitura em água.
Guarde o bastão de leitura em um lugar fresco e seco.
Fixe a tampa protetora de pó, se os cabos não estiverem conectados no bastão
de leitura. Isso evitará que umidade e sujeira entre na conexão.
Informações de assistência e garantia
Para informações de assistência e garantia, veja a www.tru-test.com.
Especificações
Outros ajustes do bastão de leitura
Outros ajustes do bastão de leitura podem ser configurados, usando o software
EziLink. Os ajustes incluem o Desligamento automático, Ligar/Desligar o beep e a
vibração, ajustes de Data/Hora, etc. Veja o
XRS
para informações.
Manual do Usuário do Leitor de Mão
Juntar informações de campo
costumizado durante o escaneamento
Se você tiver ativado o ajuste do Campo Costumizado, você poderá juntar
informações sobre cada animal durante o escaneamento. O bastão de leitura tem
um campo costumizado pré-ajustado – Sinalizador (as opções são 1, 2, 3, 4 ou
5). O campo costumizado também pode ser configurado no programa EziLink
(veja o
Manual do Usuário do Leitor de Mão XRS
1 Faça um scan do brinco IDE como descrito acima.
2 Pressione o botão Rolar para ver as opções disponíveis.
3 Quando a opção apropriada for mostrada, leia o próximo brinco IDE.
A informação do campo costumizado para o brinco IDE escaneado
previamente será memorizada com a IDE.
Nota:
A informação do campo costumizado também será memorizada, se o visor
se desligar e voltar à tela PRONTO ou se o bastão de leitura for desligado.
para informações).
Certificado de conformidade CE
Page 8

Ajustes do menu do bastão de leitura
Nome do menu
Opções1
Descrição
INICIAR UMA SESSÃO
NOVA
Todos os brincos registrados são memorizados em sessões (arquivos). Até 50 sessões podem ser criadas. Uma sessão pode ser transferida,
usando o EziLink ou o aplicativo Tru-Test Data Link para smartphones Android*.
Pressione o botão Ler para iniciar uma sessão de escaneamento nova.
CAMPO
COSTUMIZADO
NÃO*
SIM
Ative o campo costumizado, se você quiser introduzir dados de um animal durante uma sessão, como um escore de condição. A designação e as
opções do campo costumizado podem ser configuradas no programa EziLink e, a seguir, exportados ao leitor de mão (veja o
Manual do Usuário
do Leitor de mão XRS
para informações).
ALERTAS
NÃO*
SIM
Ative os Alertas, se você quiser ser avisado quando o brinco de um animal particular for escaneado. Por exemplo, é possível que você queira
ajustar um aviso para lembrar-se de que um animal está em um período de retenção As informações de alertas podem ser configuradas no
programa EziLink e, a seguir, exportadas ao leitor de mão (veja o
Manual do Usuário do Leitor de mão XRS
para informações).
BLUETOOTH®
AUTO*
DESLIGADO
MANUAL
A conetividade sem fio
Bluetooth
Auto – Quando a função BLUETOOTH® estiver em Auto, o bastão de leitura vai estabelecer automaticamente uma ligação ao último aparelho
com função
Bluetooth
usado. Se ele não encontrar este aparelho, ele vai tentar estabelecer uma ligação a um outro aparelho com função
Bluetooth
da sua lista de dispositivos pareados previamente. Se um aparelho pareado previamente não for encontrado, o bastão de leitura vai
buscar um indicador de pesagem, vai estabelecer uma ligação com ele e juntá-lo à sua lista de aparelhos pareados. Se isto falhar, o bastão de
leitura vai permitir uma conexão vinda de qualquer outro aparelho com função
Bluetooth
. Você pode substituir os ajustes Auto a qualquer tempo
e buscar um aparelho manualmente (veja BUSCAR APARELHOS BT a seguir) ou selecionar um aparelho da lista dos aparelhos pareados
previamente (veja APARELHOS PAREADOS a seguir). O ajuste Auto é ideal, se normalmente você usar o mesmo aparelho com função
Bluetooth
com o bastão de leitura.
Desligado – É possível que você queira desativar a conetividade sem fio
Bluetooth
, se você não quiser que o bastão de leitura estabeleça uma
ligação automática ou busque por um outro aparelho com função
Bluetooth
. A desativação da conetividade sem fio
Bluetooth
poupa a bateria do
bastão de leitura.
Manual – Quando BLUETOOTH® estiver ajustado em Manual, o bastão de leitura vai permitir uma conexão vinda de outro aparelho com função
Bluetooth
. Você também pode buscar um outro aparelho com função
Bluetooth
(veja BUSCAR APARELHOS BT a seguir) ou selecionar um
aparelho da lista dos aparelhos pareados previamente (veja APARELHOS PAREADOS a seguir).
BUSCAR APAR. BT
Quando a função BLUETOOTH® estiver no modo Auto ou Manual, você poderá buscar manualmente e estabelecer uma ligação com um aparelho
particular ou interromper uma ligação existente e estabelecê-la com um outro aparelho.
Pressione o botão Ler vermelho para buscar aparelhos com função
Bluetooth
dentro do alcance.
Após alguns momentos, o bastão de leitura indicará na tela os aparelhos com função
Bluetooth
dentro do alcance.
Para estabelecer a ligação com um aparelho:
Selecione o aparelho desejado da lista e pressione o botão Ler.
O aparelho é juntado à lista de aparelhos pareados (veja APARELHOS PAREADOS a seguir).
APAR. PAREADOS
Quando BLUETOOTH® estiver no modo Auto ou Manual, você poderá estabelecer manualmente uma ligação com um aparelho pareado
previamente ou interromper uma ligação existente e estabelecê-la com um outro aparelho.
O estabelecimento da ligação com um aparelho pareado previamente é mais rápido do que utilizando a opção "BUSCAR APARELHOS BT".
Pressione o botão Ler para mostrar os aparelhos
Bluetooth
(pareados) conectados previamente. Selecione um aparelho e pressione o botão Ler.
O bastão de leitura tenta estabelecer a ligação com o aparelho pareado previamente.
DUPLICADOS
SIM*
NÃO
Quando Duplicados estiver ativado, o bastão de leitura não vai registrar a mesma IDE duas vezes na mesma sessão. O bastão de leitura memoriza
os 500 brincos precedentes.
INVERTER TELA
NÃO*
SIM
Ative a inversão da tela para girar o LCD para um utilizador canhoto.
A tela LCD será mostrada aos avessos para um utilizador destro.
CONTRASTE
Ajuste o contraste conforme as condições de luz.
Pressione o botão Ler repetidamente para ajustar o contraste no LCD.
MODO DE LEITURA
PADRÃO*
CONTIÍNUO
INDIVIDUAL
Quando ajustado em Padrão, o bastão de leitura começará a escanear quando o botão Ler for pressionado:
O escaneamento continuará por 3 segundos (ajuste padrão) ou até um brinco IDE for lido, dependendo do que acontecer antes.
Se o botão Ler for pressionado continuamente, o bastão de leitura continuará a escanear e lerá brincos múltiplos.
‘Padrão’ é o ajuste recomendado para o uso geral.
O tempo de leitura também pode ser configurado no programa EziLink (veja o Manual do Usuário do Leitor de Mão XRS para informações).
Quando ajustado em Contínuo, o bastão de leitura começará a escanear, quando o botão Ler for pressionado e somente parará, quando o botão
Ler for pressionado novamente.
Este ajuste é conveniente, se você quiser escanear todos os animais no brete ou em um corredor.
Quando ajustado em Individual, o bastão de leitura funciona como no modo Padrão, só que mesmo quando o botão Ler for mantido pressionado,
o bastão de leitura não vai continuar a escanear depois de ler o primeiro brinco IDE.
Para escanear um outro brinco, o botão Ler deve ser solto e pressionado novamente.
IMPRIMIR A SESSÃO
Isto permite imprimir todas as sessões (arquivos) memorizadas no bastão de leitura em uma impressora com função
Bluetooth
conectada.
LUZ DE FUNDO
DESLIGADA
BAIXA*
ALTA
Ajuste a luz de fundo conforme as condições de luz.
Pressione o botão Lera repetidamente para ajustar a luz de fundo no LCD.
VERSÃO DO
SOFTWARE
A versão do software do bastão de leitura é mostrada.
ENGLISH*
ESPAÑOL (espanhol)
PORTUGUÊS (português)
FRANÇAIS (francês)
DEUTSCH (alemão)
ITALIANO (italiano)
DANSK (dinamarquês)
SVENSKA (sueco)
[outros idiomas…]
O idioma mostrado no LCD do bastão de leitura pode ser mudado.
Pressione o botão Ler repetidamente.
Quando o bastão de leitura estiver conectado a um indicador de pesagem, por meio de uma conexão sem fio
Bluetooth
, ele mostrará
automaticamente o mesmo idioma como o indicador.
1
Ajustes padrão marcados *
Page 9
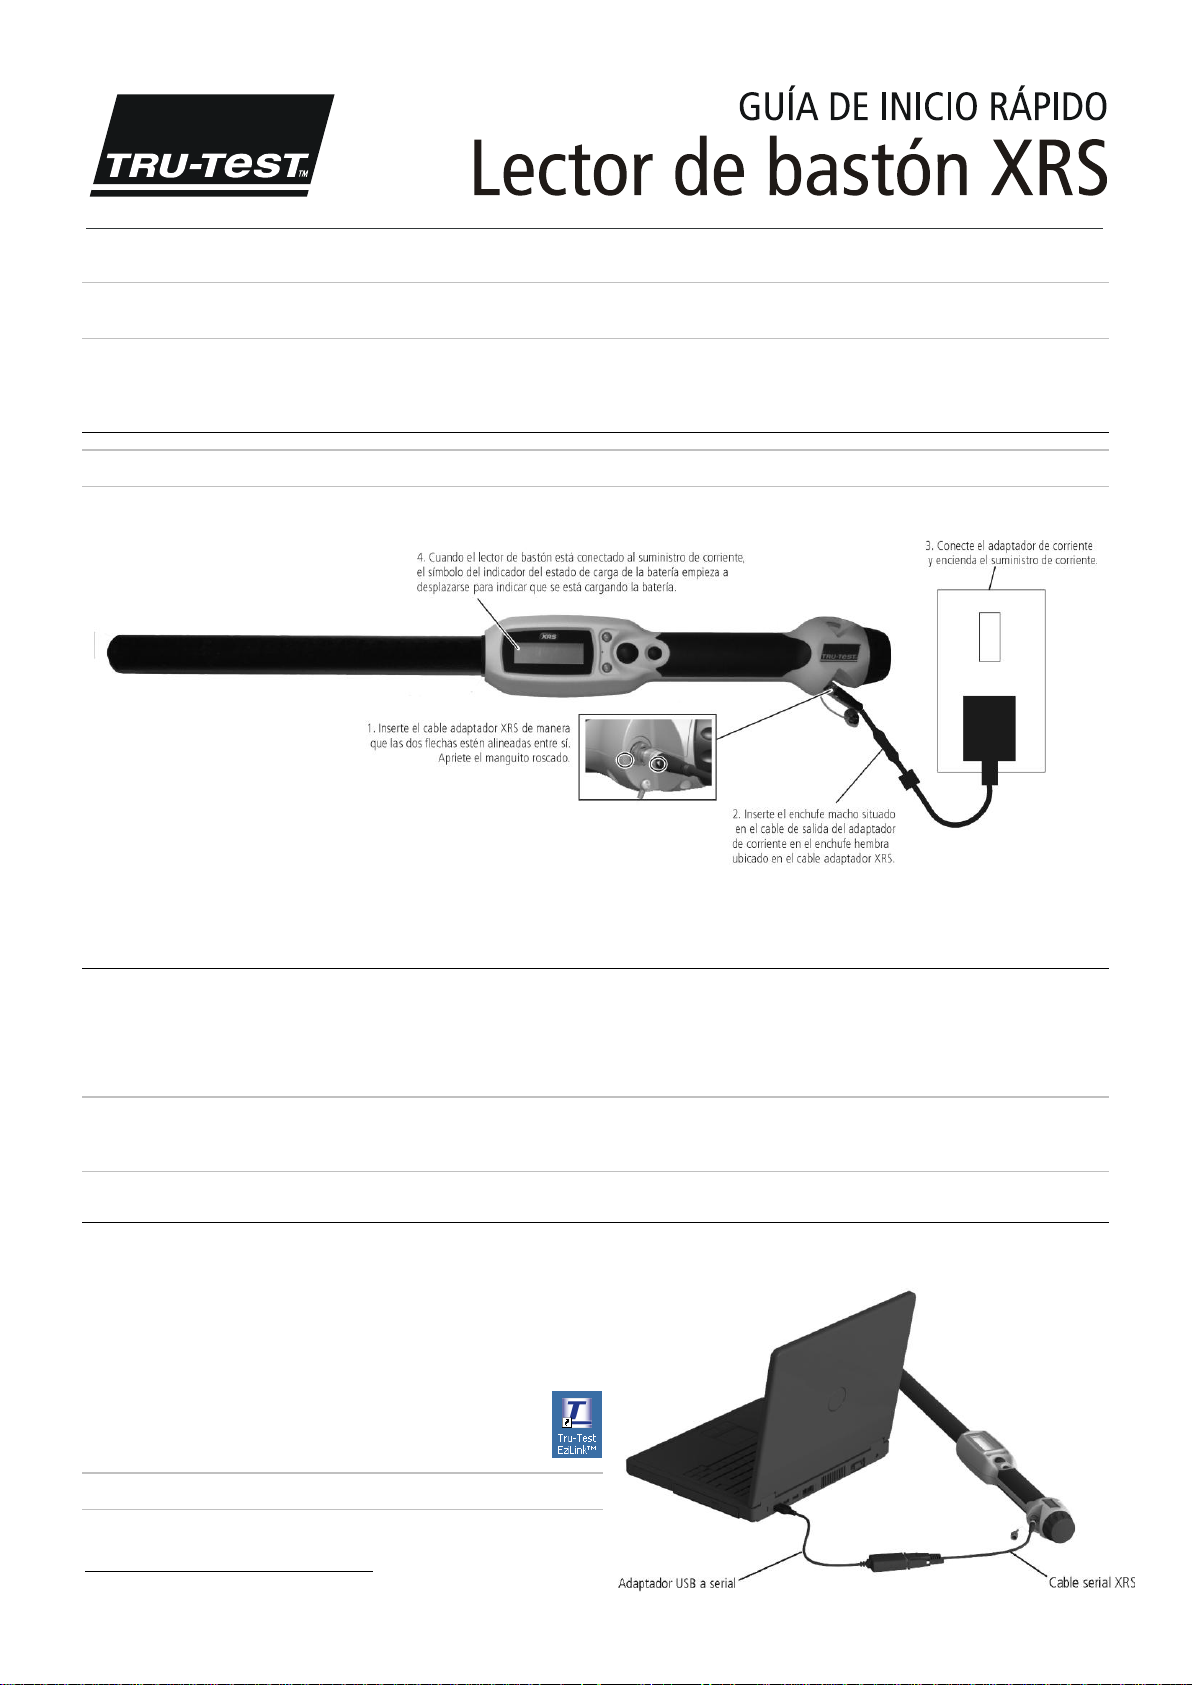
Esta guía de inicio rápido contiene las instrucciones básicas para la configuración y el uso de su lector de bastón XRS. Para instrucciones más detalladas, véase el
usuario del lector de bastón XRS
Nota:
En este manual la abreviatura ‘IDE’ significa ‘identificación electrónica’ (en inglés: EID = Electronic Identification) y la abreviatura ‘IDV’ significa ‘identificación visual’ (en
inglés: VID = Visual Identification).
disponible en la unidad flash USB (llave USB)/el CD suministrado junto con el lector o en www.trutest.com.
Manual del
Antes de empezar
Cargar la batería interna
Nota:
Antes de utilizar el lector de bastón, asegúrese de que la batería interna esté completamente cargada.
Durante la carga de la batería la temperatura ambiente debería situarse entre +5 y +40 °C. La batería tardará aproximadamente 3 horas en cargarse totalmente. Si la batería
interna está completamente cargada, el lector de bastón se puede usar hasta 19 horas1.
El lector de bastón puede ser usado mientras que se está cargando la batería.
Para cargar la batería interna con una batería de vehículo, véase el
Manual del usuario del lector de bastón XRS
.
Maneras de usar el lector de bastón
El lector de bastón puede usarse de dos maneras:
1 Modo independiente: el lector de bastón guarda cada etiqueta escaneada en su memoria interna. Estos registros pueden transferirse posteriormente.
2 Modo conectado: el lector de bastón está conectado a otro dispositivo p.ej. un indicador de pesaje o una computadora ejecutando una aplicación de terceros, mediante
cable o conexión inalámbrica
Cuándo está conectado, el lector de bastón transmite inmediatamente cada etiqueta escaneada al dispositivo conectado.
Nota:
Cuando el lector de bastón está conectado a otro dispositivo, sigue guardando todas las etiquetas escaneadas en su propia memoria interna. Si utiliza el lector de bastón
con una computadora y ejecuta EziLink™, puede ser que se visualice una sesión con un gran número de registros escaneados no deseados. Si no necesita esta sesión, puede
borrarla.
Bluetooth
®.
Usar EziLinkTM
El software EziLink se puede instalar de la unidad flash USB (llave USB)/del CD suministrado junto con el lector de bastón XRS. EziLink permite transferir datos entre el lector de
bastón y una computadora. Algunos ajustes pueden ser modificados directamente en el lector de bastón, otros han de ser configurados usando EziLink.
Para usar EziLink:
1 Instale el software EziLink en una computadora. Para hacerlo, inserte la unidad
flash USB (llave USB) en el puerto USB o inserte el CD en la unidad de CD y siga
las instrucciones.
2 Conecte el lector de bastón al puerto USB de la computadora usando el cable
serial XRS y el adaptador USB a serial (véase la foto).
3 Encienda el lector de bastón.
4 En el escritorio (‘desktop’) de la computadora, haga doble clic en el
icono EziLink para lanzar EziLink.
Nota:
En caso de problemas, véase el sistema de ayuda EziLink.
1
Con los ajustes predeterminados.
Page 10
Usar Data Link
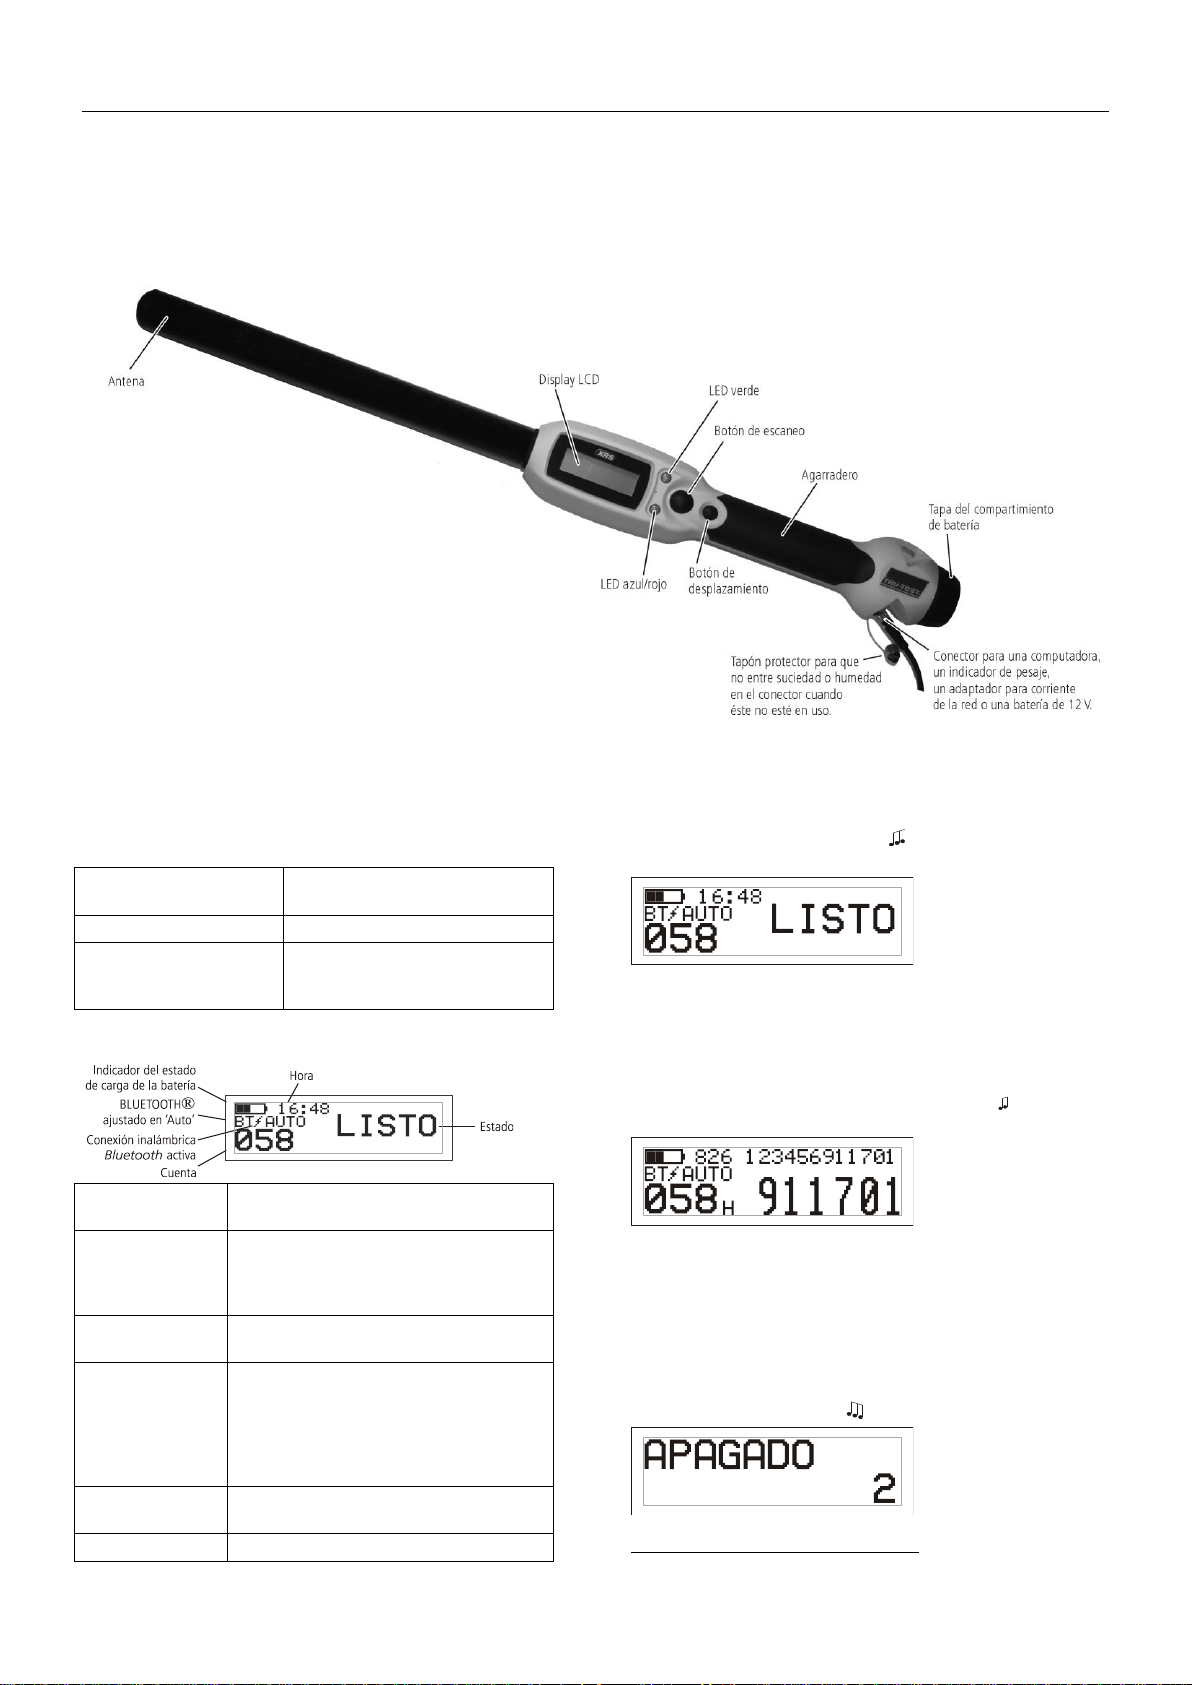
El LED azul/rojo parpadea en
rojo.
El lector de bastón está buscando o
leyendo un IDE (ID electrónico).
El LED verde parpadea.
El IDE ha sido leído correctamente.
El LED azul/rojo se ilumina de
color azul cuando no está
parpadeando en rojo.
El lector de bastón está conectado a un
dispositivo habilitado para
Bluetooth
®.
Indicador del estado
de carga de la batería
Indica el nivel de carga de la batería.
BLUETOOTH®
ajustado en ‘AUTO’
Indica que la opción ‘Conexión automática a un
dispositivo habilitado para
Bluetooth
’ está activada.
Para modificar este ajuste, véase más adelante
Modificar los ajustes del lector de bastón.
Conexión inalámbrica
Bluetooth
activa
El lector de bastón está conectado a otro dispositivo
Bluetooth
habilitado.
Hora
Se visualiza la hora actual. La hora y la fecha son
registradas junto con el número ID del animal
durante la sesión de escaneo. La fecha y la hora del
lector de bastón se pueden ajustar con el software
EziLink. Para más informaciones, véase el
Manual
del usuario del lector de bastón XRS.
Cuenta
Indica el número de animales escaneados durante
la sesión de escaneo actual.
Estado
Área para mensajes.
Gracias a la app Data Link de Tru-Test instalada en su smartphone, puede transferir sesiones desde y a un lector de bastón. Esta app gratuita puede descargarse desde la
tienda Google Play* Store.
La conectividad inalámbrica Bluetooth® del lector de bastón debe ajustarse en ‚Manual‛ para poder conectarlo a un smartphone. Véase
bastón
.
Las instrucciones sobre cómo usar la app DataLink de Tru-Test están disponibles en la página web de Tru-Test: www.tru-test.com
Modificar los ajustes del lector de
Partes del lector de bastón
LEDs
El lector de bastón tiene dos LEDs. Uno es verde y otro azul o rojo dependiendo
de la función actual del lector de bastón. A continuación encuentra las
secuencias más frecuentes de los LEDs:
Display LCD del lector de bastón
Encender el lector de bastón
Pulse el botón de escaneo.
El lector de bastón emite una señal acústica y el mensaje ‘LISTO’ aparece en
el display LCD:
Escanear un IDE
Pulse el botón de escaneo y vuelva a soltarlo mientras que pasa la antena del
lector de bastón cerca de una caravana.
El número ID aparece en el display LCD, el LED verde parpadea una vez, el
agarradero vibra y el lector de bastón emite una señal acústica para indicar que
el número ha sido leído con éxito.
Consejo:
Si los animales se mueven rápidamente por un pasillo (corredor) o
hacia un corral, puede mantener pulsado continuamente el botón de escaneo. El
proceso de escaneo será parado en cuanto suelte el botón de escaneo2.
Apagar el lector de bastón
Mantenga pulsado el botón de desplazamiento.
En el display LCD aparecerá primero una cuenta atrás (3, 2, 1) y luego el lector
de bastón emitirá una señal acústica y se apagará.
2
Cuando el modo de escaneo está ajustado en ‘Estándar’ (ajuste
predeterminado).
Page 11
Usar un archivo de referencia
Dimensiones
651 x 65 x 51 mm (A x A x P)
Peso
706 g (batería incluida)
Comunicaciones
Conexión inalámbrica Bluetooth® clase 1, con alcance de hasta
100 m.
RS232 9600-115200 bps, Xon/Xoff
Temperatura de operación
Desde -10 hasta +50 °C.
Temperatura de almacenamiento
Desde -20 hasta +35 °C
Temperatura para cargar batería
Desde +5 hasta +40 °C
Distancia de lectura
HDX hasta 330 mm, FDX hasta 350 mm
Velocidad de lectura
Hasta 1.000 lecturas por minuto
Capacidad de memoria
Hasta 20.000 registros escaneados
Hasta 10.000 advertencias
Hasta 20.000 parejas IDE-IDV
Compatibilidad ID
Lee tanto ISO HDX como ISO FDX-B
Sellado
IP67 (inmersión en 1 m de agua durante 30 minutos).
Tiempo de funcionamiento de la
batería interna
19 horas – ‘Modo de escaneo’ = ‘Estándar’ o ‘1 IDE’
9,5 horas – ‘Modo de escaneo’ = ‘Continuo’
Batería
7,4 V; 1.500 mAh, batería de iones de litio
Tiempo de carga
3 horas
Software
Tru-Test EziLinkTM
Tru-Test Limited declara por la presente que este lector IDE (‘EID Reader’) cumple con los requisitos
fundamentales además de otras disposiciones relevantes de la directiva 1999/5/EC. Puede consultar la
declaración de conformidad en http://livestock.tru-test.com/compliance.
Recibir advertencias durante el escaneo
Antes de la sesión de escaneo, se puede transferir un archivo con los ID
electrónicos (IDE) y los ID visuales (IDV) al lector de bastón usando el software
EziLink. Si se ha precargado un archivo de referencia, el número IDV del animal
aparecerá en grandes números en el display LCD al escanear una caravana. El
número IDE se visualiza en pequeños números directamente encima.
Para informaciones sobre cómo transferir un archivo de referencia, véase el
Manual del usuario del lector de bastón XRS
.
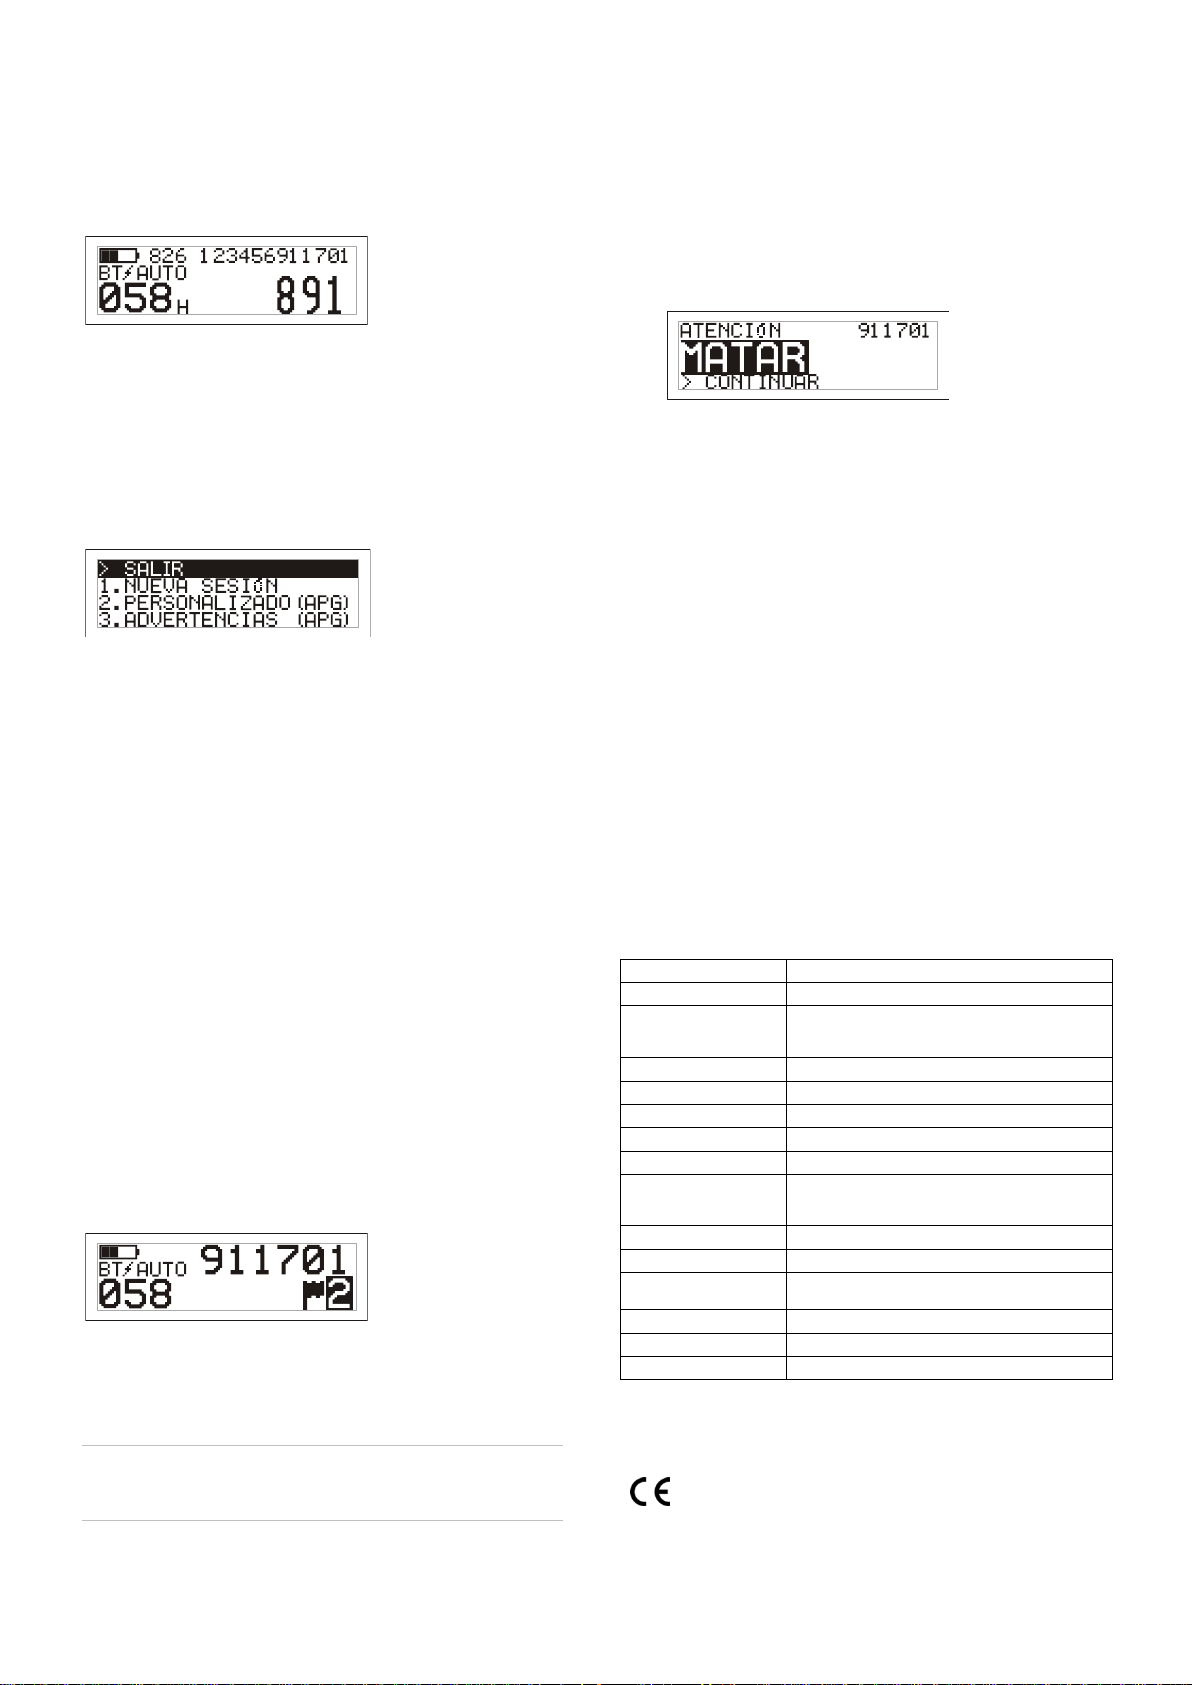
Modificar los ajustes del lector de bastón
Para acceder a los ajustes del lector de bastón:
Mantenga pulsados simultáneamente el botón de escaneo y el botón de
desplazamiento.
Los primeros tres ítems aparecerán en el display LCD con la opción ‘SALIR’
situada arriba.
Para desplazarse entre las opciones del menú, pulse repetidamente el botón de
desplazamiento.
Para seleccionar una opción, marque la opción y pulse el botón de escaneo.
Para salir de los ajustes de los menús del lector de bastón, pulse el botón de
desplazamiento hasta que ‘SALIR’ esté marcado y pulse luego el botón de
escaneo.
Para explicaciones acerca de los ajustes de los menús del lector de bastón, véase
la página siguiente.
Si ha activado la función ‘Advertencias’, puede recibir advertencias acerca de un
animal determinado cuando su número ID sea leído. Antes de la sesión de
escaneo, se puede transferir al lector de bastón un archivo con los números IDE y
los mensajes de advertencia usando EziLink.
1 Escanee el número IDE como descrito arriba.
Si existe una advertencia para un número IDE, el lector de bastón emitirá
una señal acústica, el agarradero vibrará y el mensaje será visualizado en el
display LCD:
2 Pulse el botón de desplazamiento para seleccionar Continuar y pulse
luego el botón de escaneo. Esto confirma la advertencia y le permite
continuar escaneando.
Para más informaciones sobre cómo transferir un archivo de advertencias, véase
el
Manual del usuario del lector de bastón XRS
.
Cuidado del lector de bastón
Limpie el lector de bastón con un paño húmedo, agua templada y jabón. Otros
detergentes pueden dañar la caja del lector. No deje el lector de bastón inmerso
en agua.
Guarde el lector en un lugar fresco y seco.
Coloque el tapón protector cuando no haya cables conectados al lector de
bastón. Esto impedirá que entre suciedad y humedad en el manguito.
Informaciones de servicio técnico y
garantía
Otros ajustes del lector de bastón
Otros ajustes del lector de bastón pueden ser configurados usando el software
EziLink. Están disponibles las opciones ‘Apagado automático’, ‘Señal acústica y
vibración enc/apag’, ‘Ajustes de fecha/hora’ etc. Para más informaciones, véase
el
Manual del usuario del lector de bastón XRS
.
Añadir informaciones en un campo
personalizado durante el escaneo
Si ha activado la función ‘Personalizado’ (campo personalizado), puede añadir
informaciones sobre cada animal durante la sesión de escaneo. El lector de
bastón dispone de un campo personalizado predeterminado – la bandera (las
opciones son 1, 2, 3, 4 ó 5). El campo personalizado puede igualmente ser
configurado mediante el software EziLink (Para más informaciones, véase el
Manual del usuario del lector de bastón XRS
1 Escanee el número IDE como descrito arriba.
2 Pulse el botón de desplazamiento para ver todas las opciones disponibles.
3 Cuando se visualiza la opción deseada, escanee el próximo IDE.
La información del campo personalizado para el número IDE previamente
escaneado será guardada junto con el número anterior.
Nota:
La información del campo personalizado será igualmente guardada si el
display vuelve a indicar ‘LISTO’ después de cierto tiempo o si el lector de bastón
es apagado.
).
Para informaciones de servicio técnico y garantía, véase www.tru-test.com.
Datos técnicos
Declaración de conformidad CE
Page 12

Ajustes de los menús del lector de bastón
Puntos de menú
Opciones1
Descripción
NUEVA SESIÓN
Todos los números ID registrados son guardados en sesiones (archivos). Se pueden crear hasta 50 sesiones. Se puede transferir una
sesión usando EziLink o la app Data Link de Tru.Test para los smartphones Android*.
Pulse el botón de escaneo para iniciar una nueva sesión de escaneo.
PERSONALIZADO
APG (Apagado)*
ENC (Encendido)
Active la función ‘Personalizado’ (campo personalizado) si desea entrar datos acerca de un animal durante una sesión, p.ej. un código
de condición. El nombre del campo personalizado y sus opciones pueden ser configurados con EziLink y luego ser transferidos al lector
de bastón. Para más informaciones, véase el
Manual del usuario del lector de bastón XRS
.
ADVERTENCIAS
APG (Apagado)*
ENC (Encendido)
Active la función ‘Advertencias’ si desea recibir advertencias al escanear los ID de determinados animales. Puede p.ej. ajustar un
recordatorio que le advertirá que un animal se encuentra en periodo de retención. Puede configurar los mensajes de advertencia en
EziLink y luego transferirlos al lector de bastón. Para más informaciones, véase el
Manual del usuario del lector de bastón XRS
.
BLUETOOTH®
AUTO*
APG (Apagado)
MANUAL
La conectividad inalámbrica
Bluetooth
® permite la transferencia de datos desde un lector de bastón hacia otro dispositivo como p.ej.
un indicador de pesaje o una computadora con conectividad inalámbrica
Bluetooth
.
Auto: Cuando BLUETOOTH® está ajustado en ‘Auto’, el lector de bastón se conecta automáticamente al último dispositivo
Bluetooth
utilizado. Si no encuentra este dispositivo, intentará establecer conexión a otro dispositivo
Bluetooth
de la lista de los dispositivos
previamente sincronizados. Si tampoco puede encontrar un dispositivo previamente sincronizado, el lector de bastón buscará un
indicador de pesaje , se conectará luego a éste y lo añadirá a su lista de dispositivos sincronizados. Si no consigue llevarlo a cabo con
éxito, el lector de bastón aceptará entonces una conexión entrante de cualquier dispositivo
Bluetooth
. En todo momento puede pasar
por alto los ajustes ‘Auto’ y buscar manualmente un dispositivo (véase BUSCAR DISPOS BT a continuación) o seleccionar un dispositivo
de la lista de los dispositivos previamente sincronizados (véase DISPOS SINCRONIZ a continuación). El ajuste ‘Auto’ es ideal si
normalmente usa siempre el mismo dispositivo
Bluetooth
junto con el lector de bastón.
Apagado: Si no desea que el lector de bastón se conecte a o busque automáticamente un dispositivo
Bluetooth
, debería desactivar la
conectividad inalámbrica
Bluetooth
. La desactivación de la conectividad inalámbrica
Bluetooth
permite ahorrar la batería del lector de
bastón.
Manual: Cuando BLUETOOTH® está ajustado en ‘Manual’, el lector de bastón aceptará una conexión entrante de un dispositivo
Bluetooth
. Puede también buscar manualmente un dispositivo
Bluetooth
(véase BUSCAR DISPOS BT a continuación) o seleccionar un
dispositivo de la lista de los dispositivos previamente sincronizados (véase DISPOS SINCRONIZ a continuación).
BUSCAR DISPOS BT
(BUSCAR
DISPOSITIVOS BT)
Cuando BLUETOOTH® está ajustado en ‘Auto’ o en ‘Manual’, puede buscar manualmente un dispositivo y establecer conexión a un
dispositivo determinado o interrumpir una conexión existente y forzar una nueva conexión a un dispositivo diferente.
Pulse el botón de escaneo para buscar dispositivos
Bluetooth
dentro de su alcance.
Después de pocos minutos, el lector de bastón visualizará en el display todos los dispositivos
Bluetooth
dentro de su alcance.
Para establecer una conexión con un dispositivo:
Seleccione el dispositivo deseado de la lista y pulse el botón de escaneo.
El dispositivo será añadido a la lista de los dispositivos sincronizados (véase DISPOS SINCRONIZ a continuación).
DISPOS SINCRONIZ
(DISPOSITIVOS
SINCRONIZADOS)
Cuando BLUETOOTH® está ajustado en ‘Auto’ o en ‘Manual’, puede establecer manualmente una conexión a un dispositivo
previamente sincronizado o interrumpir una conexión existente y forzar una nueva conexión a un dispositivo diferente.
La conexión a un dispositivo previamente sincronizado es más rápida que la opción ‘BUSCAR DISPOS BT’.
Pulse el botón de escaneo para visualizar los dispositivos previamente conectados (sincronizados). Seleccione un dispositivo y pulse el
botón de escaneo.
El lector de bastón intentará establecer conexión al dispositivo previamente sincronizado.
DUPLICADOS
ENC (Encendido)*
APG (Apagado)
Cuando está activada la función ‘Duplicados’, el lector de bastón no registrará dos veces el mismo IDE durante una sola sesión. El
lector de bastón recuerda los últimos 500 números.
GIRAR PANTALLA
APG (Apagado)*
ENC (Encendido)
Active la función ‘Girar pantalla’ para girar el display LCD para usuarios zurdos. Para usuarios diestros, el display LCD será visualizado
al revés.
CONTRASTE
Ajuste el contraste para que corresponda a las condiciones lumínicas.
Pulse repetidamente el botón de escaneo para ajustar el contraste en el display LCD.
LECTURA
ESTÁND (Estándar)*
CONTIN (Continuo)
1 IDE
Cuando está ajustado en ‘Estándar’, el lector de bastón empezará a escanear en cuanto se pulse el botón de escaneo. El escaneo
continúa por 3 segundos (ajuste predeterminado) o hasta que un IDE sea leído, si esto ocurriera antes. Si se mantiene pulsado
continuamente el botón de escaneo, el lector de bastón seguirá escaneando y leerá sucesivamente varios ID. Se recomienda el ajuste
‘Estándar’ para el uso general. Se puede ajustar el tiempo de escaneo mediante EziLink. Para más informaciones, véase el
Manual del
usuario del lector de bastón XRS
.
Cuando está ajustado en ‘Continuo’, el lector de bastón empezará a escanear en cuanto se pulse el botón de escaneo y parará sólo si
se vuelve a pulsar el botón de escaneo. Este ajuste es útil si desea escanear todos los animales en un corral o pasillo (corredor).
Cuando está ajustado en ‘1 IDE’, el lector de bastón se comportará como si estuviera en el modo ‘estándar’, salvo que el lector de
bastón no continuará escaneando después de haber leído el primer IDE incluso si se mantiene pulsado el botón de escaneo. Para
escanear otro IDE, se debe soltar y volver a pulsar el botón de escaneo.
IMPRIMIR SESIÓN
Puede imprimir todos los archivos de sesión guardados en el lector de bastón con una impresora habilitada para
Bluetooth
.
LUZ DE PANTALLA
APG (Apagado)
BAJA*
ALTA
Adapte la luz de pantalla a las condiciones lumínicas circundantes.
Para adaptar la luz de pantalla, pulse el botón de escaneo.
VER SW (VERSIÓN
DE SOFTWARE)
Indica la versión de software del lector de bastón.
ENGLISH (inglés)*
ESPAÑOL
PORTUGUÊS
FRANÇAIS
DEUTSCH
ITALIANO
DANSK
SVENSKA
[otros idomas…]
Se puede modificar el idioma visualizado en el display LCD del lector de bastón.
Pulse repetidamente el botón de escaneo.
Cuando el lector de bastón está conectado a un indicador de pesaje mediante una conexión inalámbrica
Bluetooth,
visualizará
automáticamente el mismo idioma que el indicador.
1
Los ajustes predeterminados están marcados con *
Page 13
Le présent guide de démarrage rapide fournit des instructions de base pour la configuration et l’utilisation de votre Bâton de lecture XRS. Pour obtenir des informations plus
détaillées, référez-vous à la
Note :
Dans le présent document, l’abréviation EID désigne l’identification électronique et VID l’identification visuelle.
Notice d’utilisation du Bâton de lecture XRS,
disponible sur la clé USB/CD fournis avec votre lecteur ou en ligne sur www.tru-test.com.
Avant de démarrer
Charger la batterie interne
Note :
Avant d’utiliser le bâton de lecture, assurez-vous que la batterie interne est pleinement chargée.
Lorsque vous chargez la batterie, la température ambiante devrait se situer entre +5 et +40 °C. Il faudra environ 3 heures pour charger la batterie complètement. Une batterie
interne complètement chargée permet d’utiliser le bâton de lecture jusqu’à 19 heures1.
Vous pouvez utiliser le bâton de lecture pendant la charge.
Pour charger la batterie interne à l’aide d’une batterie 12 V de voiture, voir la
Notice d’utilisation du Bâton de lecture XRS
.
Utiliser le bâton de lecture
Le bâton de lecture peut être utilisé de deux manières :
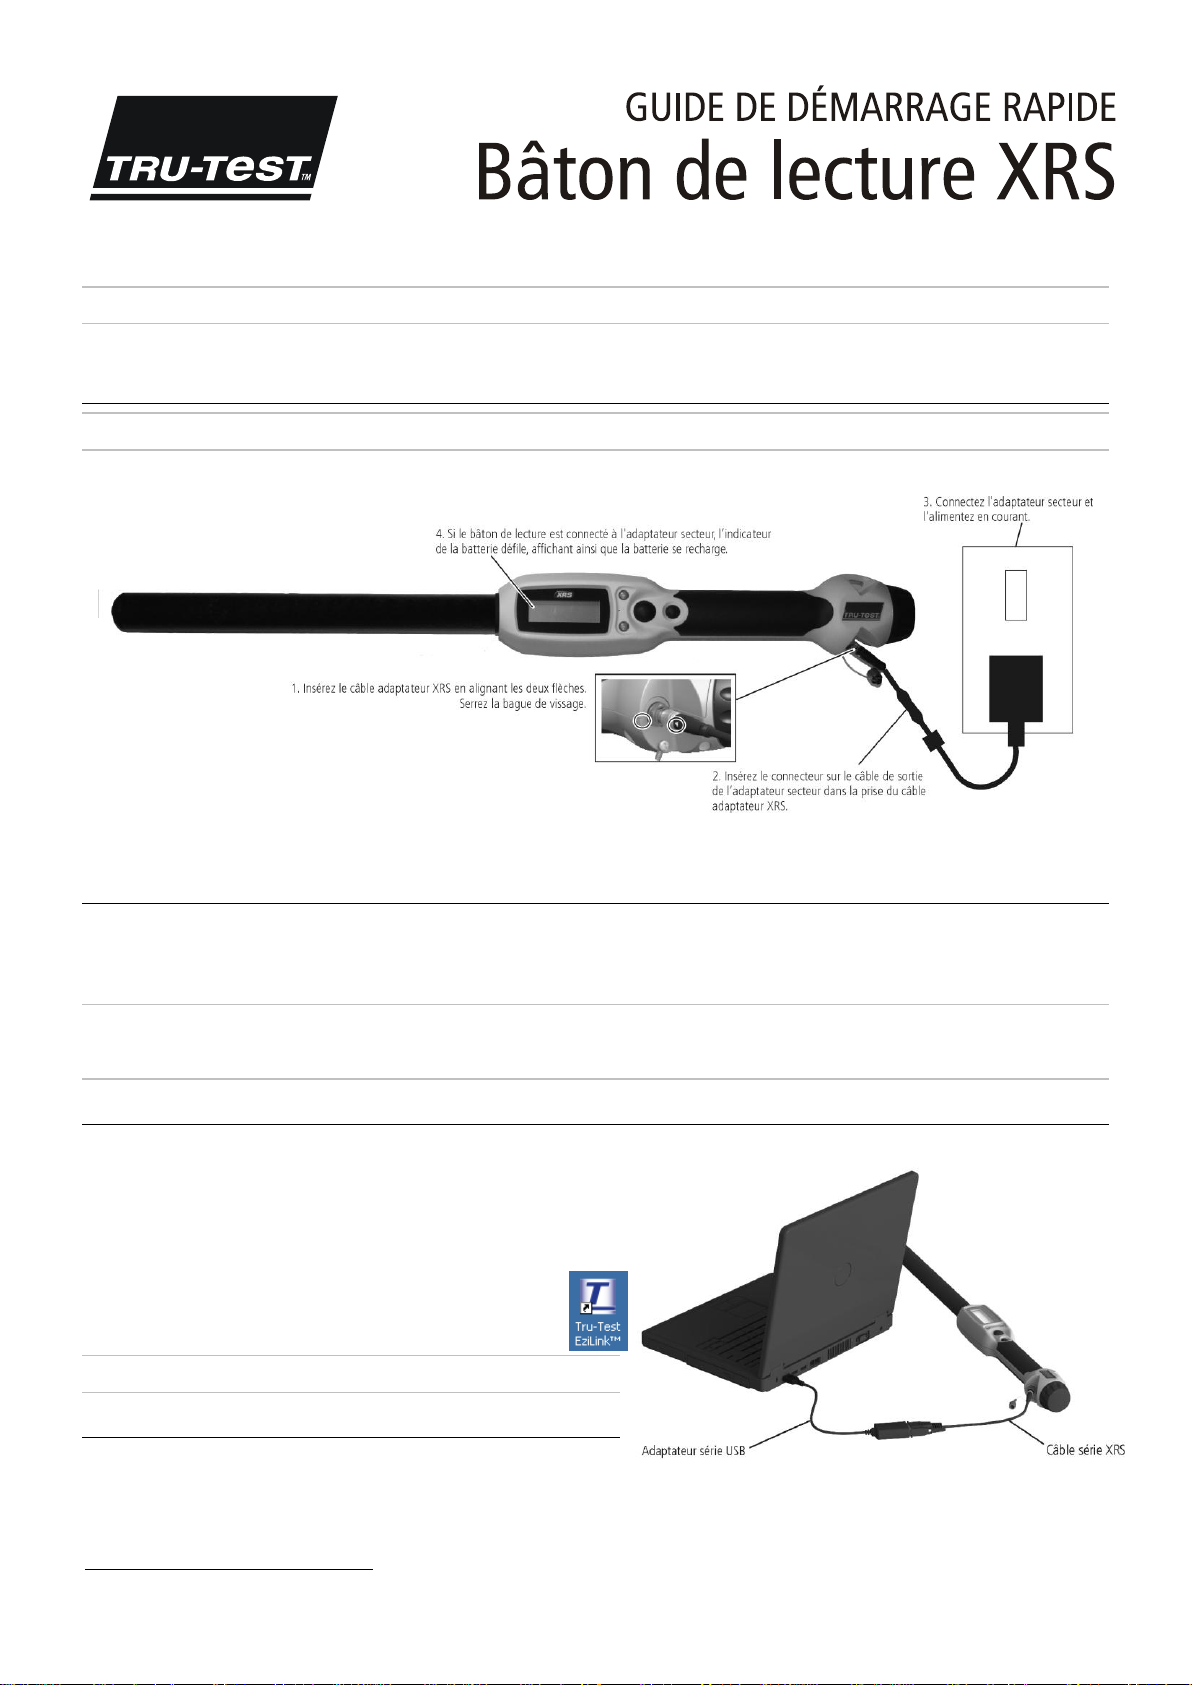
1 Mode autonome - le bâton de lecture enregistre chaque boucle lue dans sa mémoire interne. Ces enregistrements peuvent ensuite être transférés vers un PC.
2 Mode connecté – le bâton de lecture est relié via câble ou une connexion sans fil
doté d’une application tierce. Lorsque le bâton de lecture est connecté, il transmet immédiatement chaque boucle lue à l’appareil connecté.
Note :
Si vous utilisez le bâton de lecture et qu’il est connecté à un autre appareil, toutes les boucles lues seront toujours sauvegardées dans la mémoire interne du bâton. Pour
cette raison, il est possible qu’une séance contenant un grand nombre d’enregistrements non désirés s’affiche, quand vous connectez le bâton de lecture à un PC et exécutez
EziLink™. Si vous n’avez pas besoin de cette séance, vous pouvez la supprimer.
Bluetooth
® à un autre appareil comme par exemple un indicateur de pesée ou un PC
Utiliser EziLinkTM
Vous pouvez installer le logiciel EziLink à partir de la clé USB/du CD fournis avec votre Bâton de lecture XRS. EziLink vous permet de transférer les données du bâton de lecture
vers votre PC et vice versa. Quelques-unes des configurations peuvent se faire directement
sur le bâton de lecture, mais d’autres doivent se faire à l’aide du logiciel EziLink.
Pour utiliser EziLink :
1 Installez le logiciel EziLink sur votre PC. Pour le faire, insérez la clé USB dans un port
USB ou le CD dans le lecteur de CD de votre PC et suivez les instructions.
2 Connectez le bâton de lecture au port USB du PC à l’aide du câble série
XRS et de l’adaptateur série USB (voir figure ci-contre).
3 Allumez le bâton de lecture.
4 Double-cliquez sur l’icône EziLink sur votre bureau pour démarrer EziLink.
Note :
Pour diagnostiquer des problèmes, voir le système d’aide du logiciel EziLink.
Utiliser Data Link
Une fois l’application Data Link de Tru-Test installée, vous pouvez transférer des séances
du bâton de lecture vers votre smartphone Android* et vice versa. Cette application gratuite peut être téléchargée du Google Play* Store. Les instructions pour l’utilisation de
l’application Tru-Test Data Link sont disponibles sur le site web www.tru-test.com.
1
En utilisant les configurations usine.
Page 14
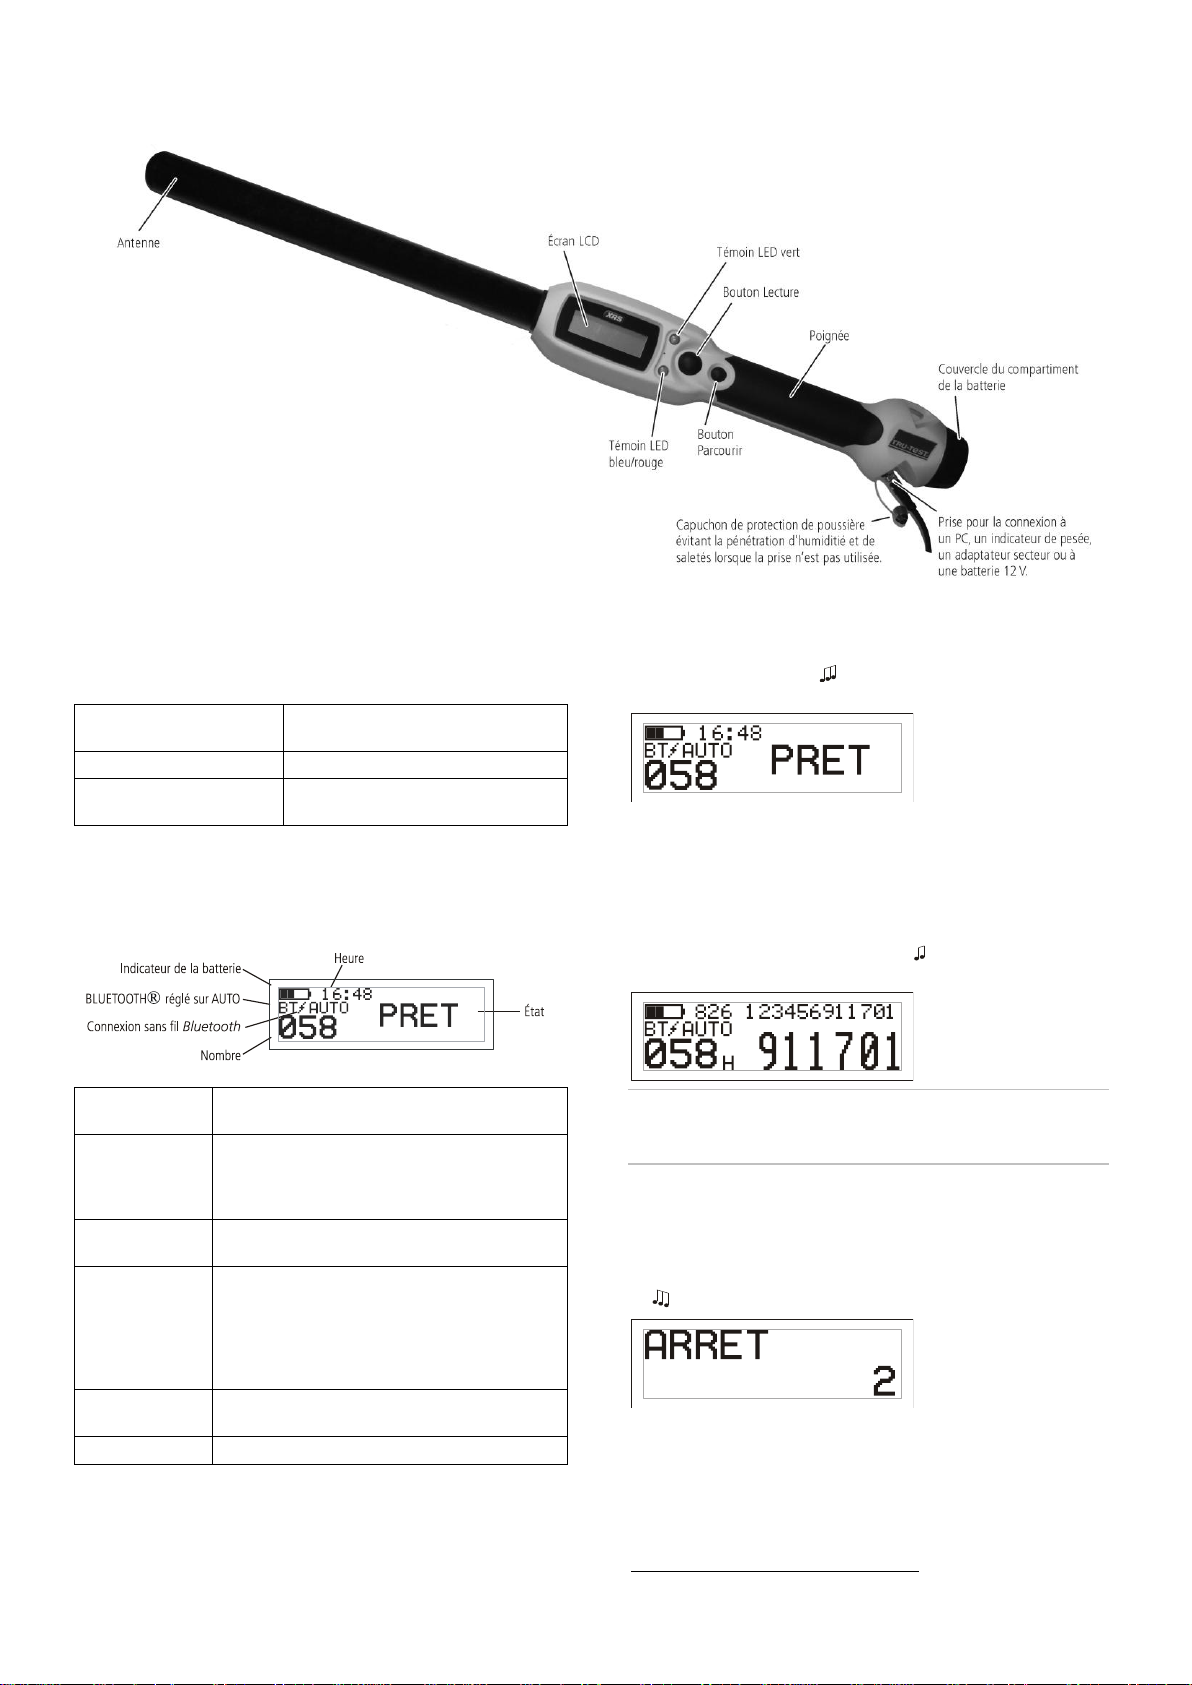
Éléments du bâton de lecture
LED bleu/rouge clignote.
Le bâton de lecture est en train de chercher
ou de lire une boucle EID.
LED vert clignote.
La boucle EID a été lue avec succès.
Le LED bleu/rouge est bleu
lorsqu’il ne clignote pas rouge.
Le bâton de lecture est connecté à un
appareil compatible
Bluetooth
.
Indicateur de la
batterie
Indique le niveau de charge de la batterie.
BLUETOOTH®
réglé sur AUTO
Indique que
Bluetooth
est réglé à ce qu’il se connecte
automatiquement à un appareil compatible
Bluetooth
.
Pour modifier ce réglage, voir
Modifier les réglages du
bâton de lecture
.
Connexion sans fil
Bluetooth
activée
Le bâton de lecture est connecté à un autre appareil
compatible
Bluetooth
.
Heure
L’heure actuelle est affichée. Pendant la séance de
scannage, l’heure et la date sont enregistrées en même
temps que le numéro d’identification de l’animal. Vous
pouvez régler l’heure et la date du bâton de lecture à
l’aide du logiciel EziLink. Voir la
Notice d’utilisation du
Bâton de lecture XRS
pour plus d’informations.
Nombre
Indique le nombre des animaux scannés pendant la
séance de scannage actuelle.
État
Zone sur l’écran réservée à l’affichage de messages.
Témoins LED
Sur le bâton de lecture se trouvent deux témoins LED : un témoin vert et un
témoin bleu ou rouge selon la fonction activée du bâton de lecture. Les
séquences des témoins LED les plus fréquentes sont :
Éléments de l’écran LCD du bâton de
lecture
Allumer le bâton de lecture
Appuyez sur le bouton Lecture.
Le bâton de lecture émet un bip et le message « PRÊT» s’affiche sur l’écran
LCD :
Scanner une boucle EID
Pressez puis relâchez le bouton Lecture tout en passant l’antenne à proximité de
la boucle.
Le numéro de boucle apparaît sur l’écran, le témoin LED vert clignote une fois, la
poignée vibre et le bâton de lecture émet un bip pour indiquer que la boucle a
été lue avec succès.
Conseil :
Si les animaux passent rapidement à travers un couloir ou dans un
enclos, vous pouvez tenir enfoncé le bouton Lecture en continu. Le scannage
s’arrête lorsque vous relâchez le bouton Lecture2.
Éteindre le bâton de lecture
Pressez et tenez enfoncé le bouton Parcourir.
Un décompte (3, 2, 1) s’affiche sur l’écran LCD, puis le bâton de lecture émet un
bip et s’éteint.
2
Si le mode Lecture est mis sur « standard » (configuration usine).
Page 15
Utiliser un fichier de référence
Dimensions
651 x 65 x 51 mm (25½ x 2½ x 2‛) (L x H x L)
Poids
706 g, y compris la batterie
Communications
Connexion sans fil
Bluetooth
® classe 1, portée jusqu’à 100 m (330’) range.
RS232 9600-115200 bps, Xon/Xoff
Température de
fonctionnement
-10 à +50 °C.
Température de stockage
-20 à +35 °C.
Température de
chargement de la batterie
+5 à +40 °C.
Distance de lecture
HDX jusqu’à 330 mm (13‚), FDX jusqu’à 350 mm (14‚).
Taux de lecture
Jusqu’à 1000 lectures par minute.
Capacité de mémoire
Jusqu’à 20 000 enregistrements
Jusqu’à 10 000 alertes
Jusqu’à 20 000 paires EID-VID
Compatibilité de la boucle
Peut lire ISO HDX et ISO FDX-B
Indice de protection
IP67 (immersion dans l’eau jusqu’à une profondeur de 1 m (3’) pendant
30 minutes).
Autonomie de la batterie
19 heures pour le mode Lecture = Standard ou 1 EID
9,5 heures pour le mode Lecture = En continu
Batterie
Lithium-ion 7,4 V/1500 mAh
Durée de charge
3 heures
Logiciel
Tru-Test EziLink™
Par la présente, Tru-Test Limited déclare que ce Lecteur EID est conforme aux exigences
essentielles et aux autres dispositions pertinentes de la directive 1999/5/CE. La déclaration de
conformité peut être consultée à l’adresse suivante : http://livestock.tru-test.com/compliance.
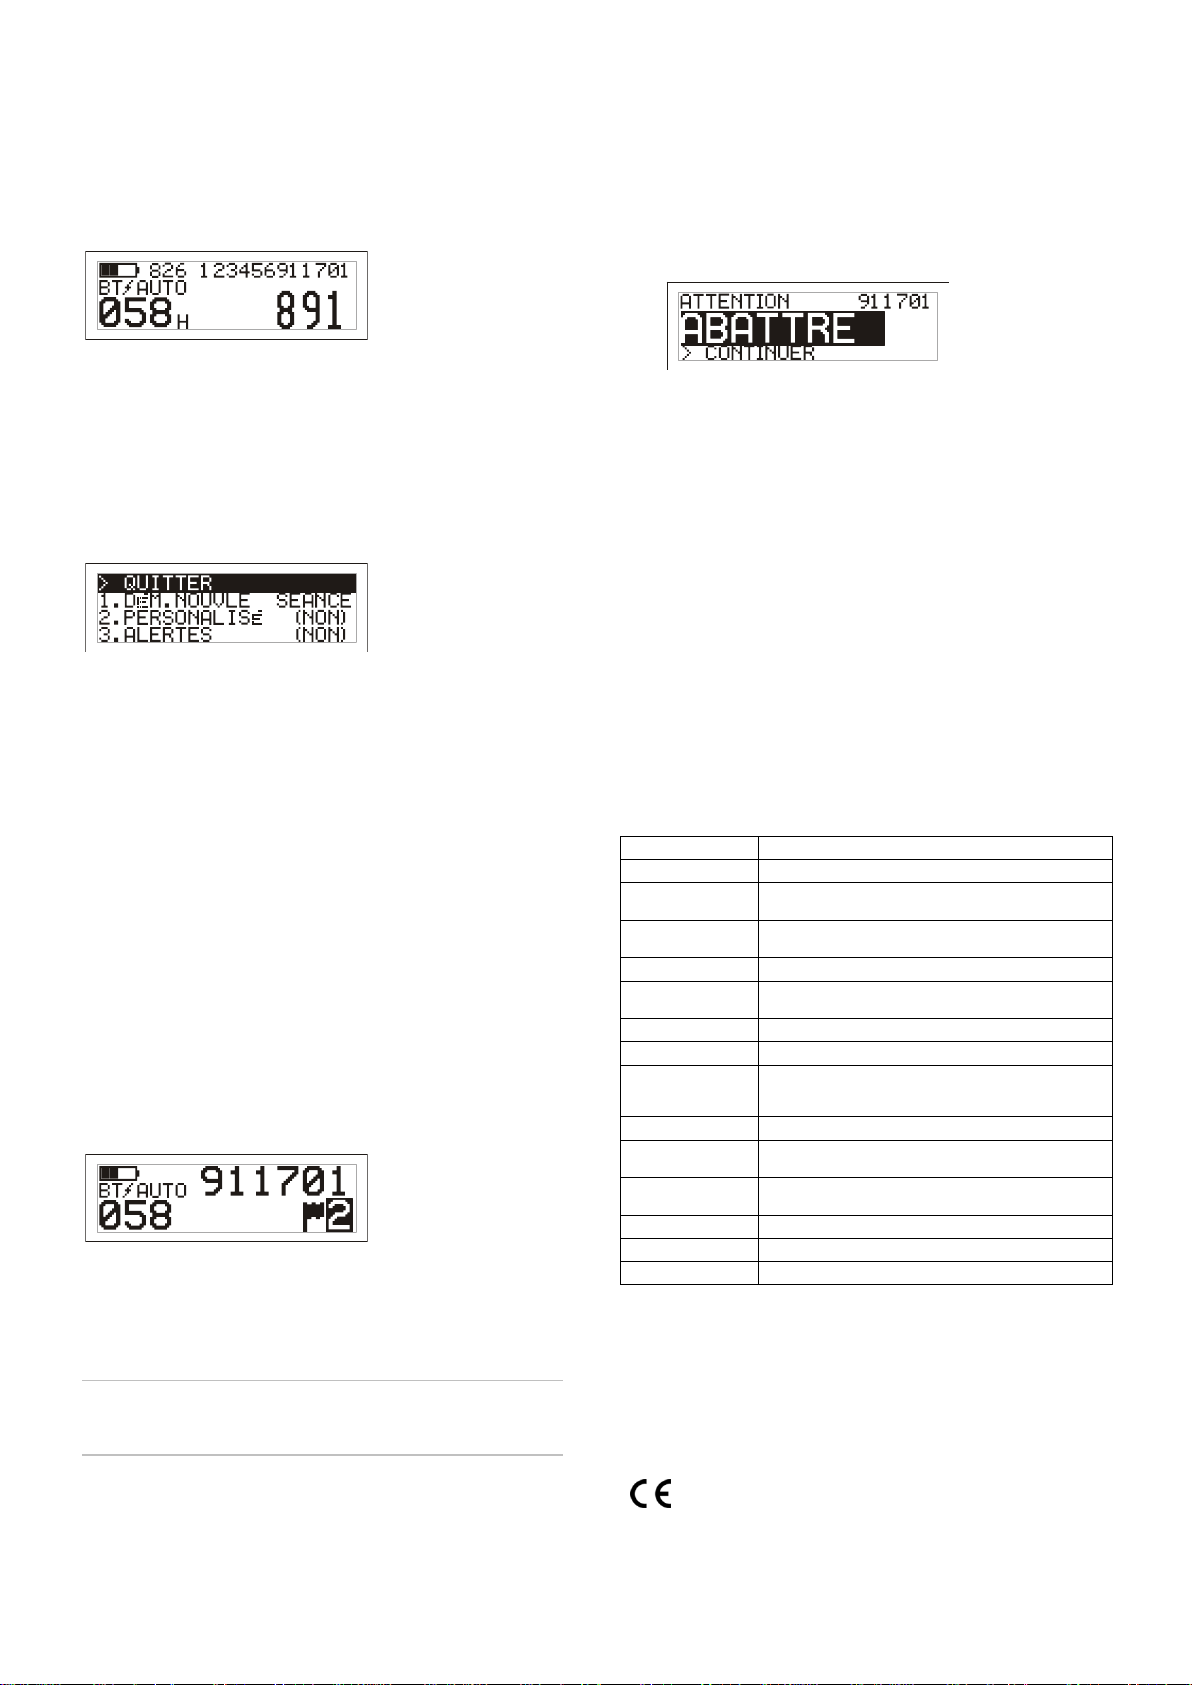
Recevoir des alertes pendant le scannage
Avant de commencer votre séance de scannage, vous pouvez transférer sur votre
bâton de lecture un fichier contenant les EID et les VID correspondants (numéros
des boucles visuelles) en utilisant EziLink. Si vous avez transféré un fichier de
référence au préalable, le VID de l’animal apparaîtra en larges chiffres sur l’écran
LCD lorsque la boucle est lue. L’EID est affiché en petits chiffres directement audessus du VID.
Pour savoir comment transférer un fichier de référence, voir la
du Bâton de lecture XRS
.
Notice d’utilisation
Modifier les réglages du bâton de lecture
Pour accéder aux réglages du bâton de lecture :
Pressez et tenez enfoncé le bouton Lecture et le bouton Parcourir en même
temps.
Les trois premiers points du menu apparaissent sur l’écran avec l’option QUITTER
se trouvant en haut.
Pour parcourir les options du menu, pressez le bouton Parcourir de façon répétée.
Pour sélectionner une option, marquez l’option et appuyez sur le bouton Lecture.
Pour quitter le menu des réglages du bâton de lecture, appuyez sur le bouton
Parcourir jusqu’à ce que QUITTER soit marqué, puis pressez le bouton Lecture.
Vous trouverez une description des réglages du bâton de lecture sur la page
suivante.
Autres réglages du bâton de lecture
Si vous avez activé la fonction Alertes, vous recevrez des alertes sur un animal
particulier dès que sa boucle est lue. Utilisez pour ceci EziLink et transférez sur le
bâton de lecture un fichier contenant les EID et les messages d’alertes avant de
commencer la séance de scannage.
1 Scannez la boucle EID comme décrit ci-dessus.
S’il existe une alerte pour un EID, le bâton de lecture émettra un bip, la
poignée se mettra à vibrer et un message s’affichera sur l’écran :
2 Appuyez sur le bouton Parcourir pour sélectionner Continuer, puis
appuyez sur le bouton Lecture. Ainsi, vous confirmez l’alerte et pouvez
continuer le scannage.
Pour savoir comment transférer un fichier d’alertes, voir la
Bâton de lecture XRS
.
Notice d’utilisation du
Entretien du bâton de lecture
Nettoyez le bâton de lecture à l’eau tiède et au savon à l’aide d’un chiffon
humide. D’autres nettoyants peuvent endommager le boîtier. Ne jamais immerger
le bâton de lecture dans l’eau.
Gardez le bâton de lecture dans un endroit frais et sec.
Remettez le capuchon de protection contre la poussière lorsque les câbles ne sont
pas connectés au bâton de lecture. Ainsi, vous éviterez la pénétration d’humidité
et de saletés dans la prise.
Informations de service et de garantie
Pour toutes les informations de service et de garantie, voir www.tru-test.com.
Caractéristiques techniques
D’autres réglages du bâton de lecture se configurent à l’aide du logiciel EziLink.
Ces réglages sont : l’arrêt automatique, marche/arrêt du signal sonore et de la
vibration, les réglages de la date et de l’heure, etc. Pour les informations
détaillées, voir la
Notice d’utilisation du Bâton de lecture XRS
.
Ajouter des informations personnalisées
pendant le scannage
Si vous avez activé la fonction Champ personnalisé, vous avez la possibilité
d’ajouter des informations supplémentaires pour chaque animal pendant le
scannage. Le bâton de lecture dispose d’un champ personnalisé préréglé : le
drapeau (avec les options blanc, 1, 2, 3, 4 ou 5). Vous pouvez adapter le champ
personnalisé également à l’aide du logiciel EziLink (voir la
Bâton de lecture XRS
).
1 Scannez la boucle EID comme décrit ci-dessus.
2 Appuyez sur le bouton Parcourir pour visualiser les différentes options
disponibles.
3 Lorsque l’option appropriée est affichée, scannez la boucle EID suivante.
L’information personnalisée introduite pour la boucle EID scannée
auparavant sera enregistrée simultanément avec le numéro.
Note :
L’information personnalisée est toujours enregistrée, même si l’écran
passe après un certain temps vers l’écran PRÊT ou que le bâton de lecture
s’éteint.
Notice d’utilisation du
Avis d’Industrie Canada
Le présent émetteur radio, modèle XRS-2, a été approuvé par Industrie Canada pour fonctionner
uniquement avec son antenne intégrée.
Le présent appareil est conforme aux CNR d’Industrie Canada applicables aux appareils radio exempts de
licence. L’exploitation est autorisée aux deux conditions suivantes :
(1) l’appareil ne doit pas produire de brouillage, et
(2) l’utilisateur de l’appareil doit accepter tout brouillage radioélectrique subi, même si le brouillage est
susceptible d’en compromettre le fonctionnement.
Déclaration CE de conformité
Page 16

Réglages du menu du bâton de lecture
Fonctions du
menu
Options1
Description
DÉM. NOUVLE
SÉANCE
Toutes les boucles lues sont enregistrées dans des séances (fichiers). Il est possible de créer plus de 50 séances. Par la suite, vous pouvez
transférer la séance à l’aide du logiciel EziLink ou de l’application Data Link de Tru-Test pour smartphones Android*.
Appuyez sur le bouton Lecture pour démarrer une nouvelle séance de scannage.
PERSONNALISÉ
NON*
OUI
Activez le champ personnalisé si vous souhaitez entrer des données au cours de la séance comme par ex. un indice d’état des animaux.
Vous pouvez adapter la légende et les options du champ personnalisé à l’aide du logiciel EziLink et le transférer ensuite sur le bâton de
lecture (voir la
Notice d’utilisation du Bâton de lecture XRS
).
ALERTES
NON*
OUI
Activez les alertes si vous souhaitez recevoir des messages d’alerte lors de la lecture de la boucle de certains animaux. Par exemple, vous
pouvez vous faire rappeler par une alerte qu’un animal est en délai d’attente. Vous pouvez configurer les messages d’alertes à l’aide du
logiciel EziLink et les transférer ensuite sur le bâton de lecture (voir la
Notice d’utilisation du Bâton de lecture XRS
).
BLUETOOTH®
AUTO*
NON
MANUEL
La technologie
Bluetooth
® pour la connectivité sans fil vous permet de transférer des données du bâton de lecture à un autre appareil tel
qu’un indicateur de pesée ou un ordinateur avec connectivité sans fil
Bluetooth
.
AUTO : si BLUETOOTH® est mis sur Auto, le bâton de lecture se connectera automatiquement à l’appareil compatible
Bluetooth
utilisé le
plus récemment. S’il ne peut pas trouver cet appareil, le lecteur essaie de se connecter à un autre appareil compatible
Bluetooth
à partir de
sa liste des appareils jumelés auparavant. Si le bâton de lecture ne peut trouver aucun appareil jumelé, il cherche un indicateur de pesée,
puis établit une connexion avec celui-ci et l’ajoute à sa liste des appareils jumelés. Si cela n’est pas possible, le bâton de lecture autorisera
alors une connexion entrante à partir d’un appareil compatible
Bluetooth
quelconque. Vous pouvez à tout moment éviter les réglages Auto
et rechercher manuellement un appareil (voir RECH. APPAREILS BT ci-après) ou sélectionner un appareil à partir de la liste des appareils
jumelés auparavant (voir APPAREILS JUMELÉS ci-après). Le réglage Auto est idéal si vous utilisez, en général, toujours le même appareil
compatible
Bluetooth
avec votre bâton de lecture.
NON : désactivez la connectivité sans fil
Bluetooth
si vous ne souhaitez pas que le bâton de lecture se connecte ou recherche un autre
appareil compatible
Bluetooth
automatiquement. En désactivant la connectivité sans fil
Bluetooth
vous économiserez la batterie du bâton
de lecture.
MANUEL : si BLUETOOTH® est mis sur Manuel, le bâton de lecture autorisera une connexion entrante à partir d’un autre appareil
compatible
Bluetooth
. En plus, vous pouvez rechercher manuellement un autre appareil compatible
Bluetooth
(voir RECH. APPAREILS BT
ci-après) ou sélectionner un appareil à partir de la liste des appareils jumelés auparavant (voir APPAREILS JUMELÉS ci-après).
RECH. APPAREILS
BT
Lorsque BLUETOOTH® est mis sur Auto ou Manuel, vous pouvez rechercher manuellement un appareil particulier, établir une connexion,
couper une connexion existante et commander une nouvelle connexion avec un appareil différent.
Appuyez sur le bouton Lecture pour rechercher un appareil compatible
Bluetooth
se trouvant dans les limites de la portée.
Quelque temps après, tous les appareils dans les limites de la portée apparaissent sur l’écran du bâton de lecture.
Pour établir la connexion à un appareil :
Sélectionnez l’appareil souhaité à partir de la liste et appuyez sur le bouton Lecture.
L’appareil est ajouté à la liste des appareils jumelés (voir APPAREILS JUMELÉS ci-après).
APPAREILS
JUMELÉS
Lorsque BLUETOOTH® est mis sur Auto ou Manuel, vous pouvez établir manuellement une connexion à un appareil jumelé auparavant ou
couper une connexion existante et commander une nouvelle connexion avec un appareil différent.
L’établissement d’une connexion à un appareil jumelé auparavant est plus rapide que l’utilisation de la fonction ‘RECH. APPAREILS BT’.
Appuyez sur le bouton Lecture pour afficher les appareils connectés (jumelés) auparavant. Sélectionnez un appareil et appuyez sur le
bouton Lecture.
Le bâton de lecture essaie de se connecter à l’appareil jumelé auparavant.
DOUBLONS
OUI*
NON
En activant la fonction Doublon, l’enregistrement en double d’un seul EID pendant une séance n’aura pas lieu. Le bâton de lecture
mémorise les 500 dernières boucles.
TOURNER ÉCRAN
(TOURNER
L’ÉCRAN)
NON*
OUI
Activez cette fonction pour tourner l’écran LCD convenant ainsi aux utilisateurs gauchers. Pour les utilisateurs droitiers, l’affichage se
présentera alors à l’envers.
CONTRASTE
Ajustez le contraste en fonction des conditions de lumière.
Appuyez sur le bouton Lecture de façon répétée pour ajuster le contraste de l’écran LCD.
LECTURE
STDARD* (Standard)
CONTIN (En continu)
1 EID
Si le mode est mis sur Standard, le bâton de lecture commence à scanner lorsque vous appuyez sur le bouton Lecture. Le scannage
continue pendant 3 secondes (configuration usine) ou jusqu’à la lecture d’une boucle, si celle-ci survient avant. Si le bouton Lecture reste
enfoncé, le bâton de lecture continuera à scanner et lira ainsi plusieurs boucles. « Standard » est la configuration recommandée pour un
usage général. Vous pouvez régler la durée de lecture à l’aide du logiciel EziLink (voir la
Notice d’utilisation du Bâton de lecture XRS
).
Si le mode est mis sur En continu, le bâton de lecture commence à scanner lorsque vous appuyez sur le bouton Lecture, et s’arrête
uniquement lorsque vous appuyez à nouveau sur le bouton Lecture. Cette configuration est utile si vous souhaitez scanner tous les
animaux dans un enclos ou un couloir.
Si le mode est mis sur 1 EID, le bâton de lecture se comporte comme en mode Standard, hormis le fait que le bâton de lecture ne
continuera pas à scanner après lecture de la première boucle, même si le bouton Lecture reste enfoncé. Pour lire une autre boucle, relâchez
le bouton Lecture puis l’actionnez encore une fois.
IMPRIMER
SÉANCE
Cette option permettra d’imprimer toutes les séances (fichiers) sauvegardées sur le bâton de lecture à l’aide d’une imprimante compatible
Bluetooth
connectée.
ÉCLAIRAGE PAR
L’ARRIÈRE
NON
BAS*
HAUT
Ajustez l’éclairage par l’arrière en fonction des conditions de lumière.
Appuyez sur le bouton Lecture pour ajuster l’éclairage par l’arrière de l’écran LCD.
VERS. La version du logiciel du bâton de lecture est affichée.
ENGLISH*
ESPAÑOL (Espagnol)
PORTUGUÊS (Portugais)
FRANÇAIS (Français)
DEUTSCH (Allemand)
ITALIANO (Italien)
DANSK (Danois)
SVENSKA (Suédois)
[autres langues…]
Vous pouvez modifier la langue utilisée par le bâton de lecture.
Appuyez sur le bouton Lecture de façon répétée.
Si le bâton de lecture est connecté à un indicateur de pesée via une connexion sans fil
Bluetooth
, il utilisera automatiquement la même
langue que l’indicateur.
1
L’astérisque * indique les configurations usine
Page 17
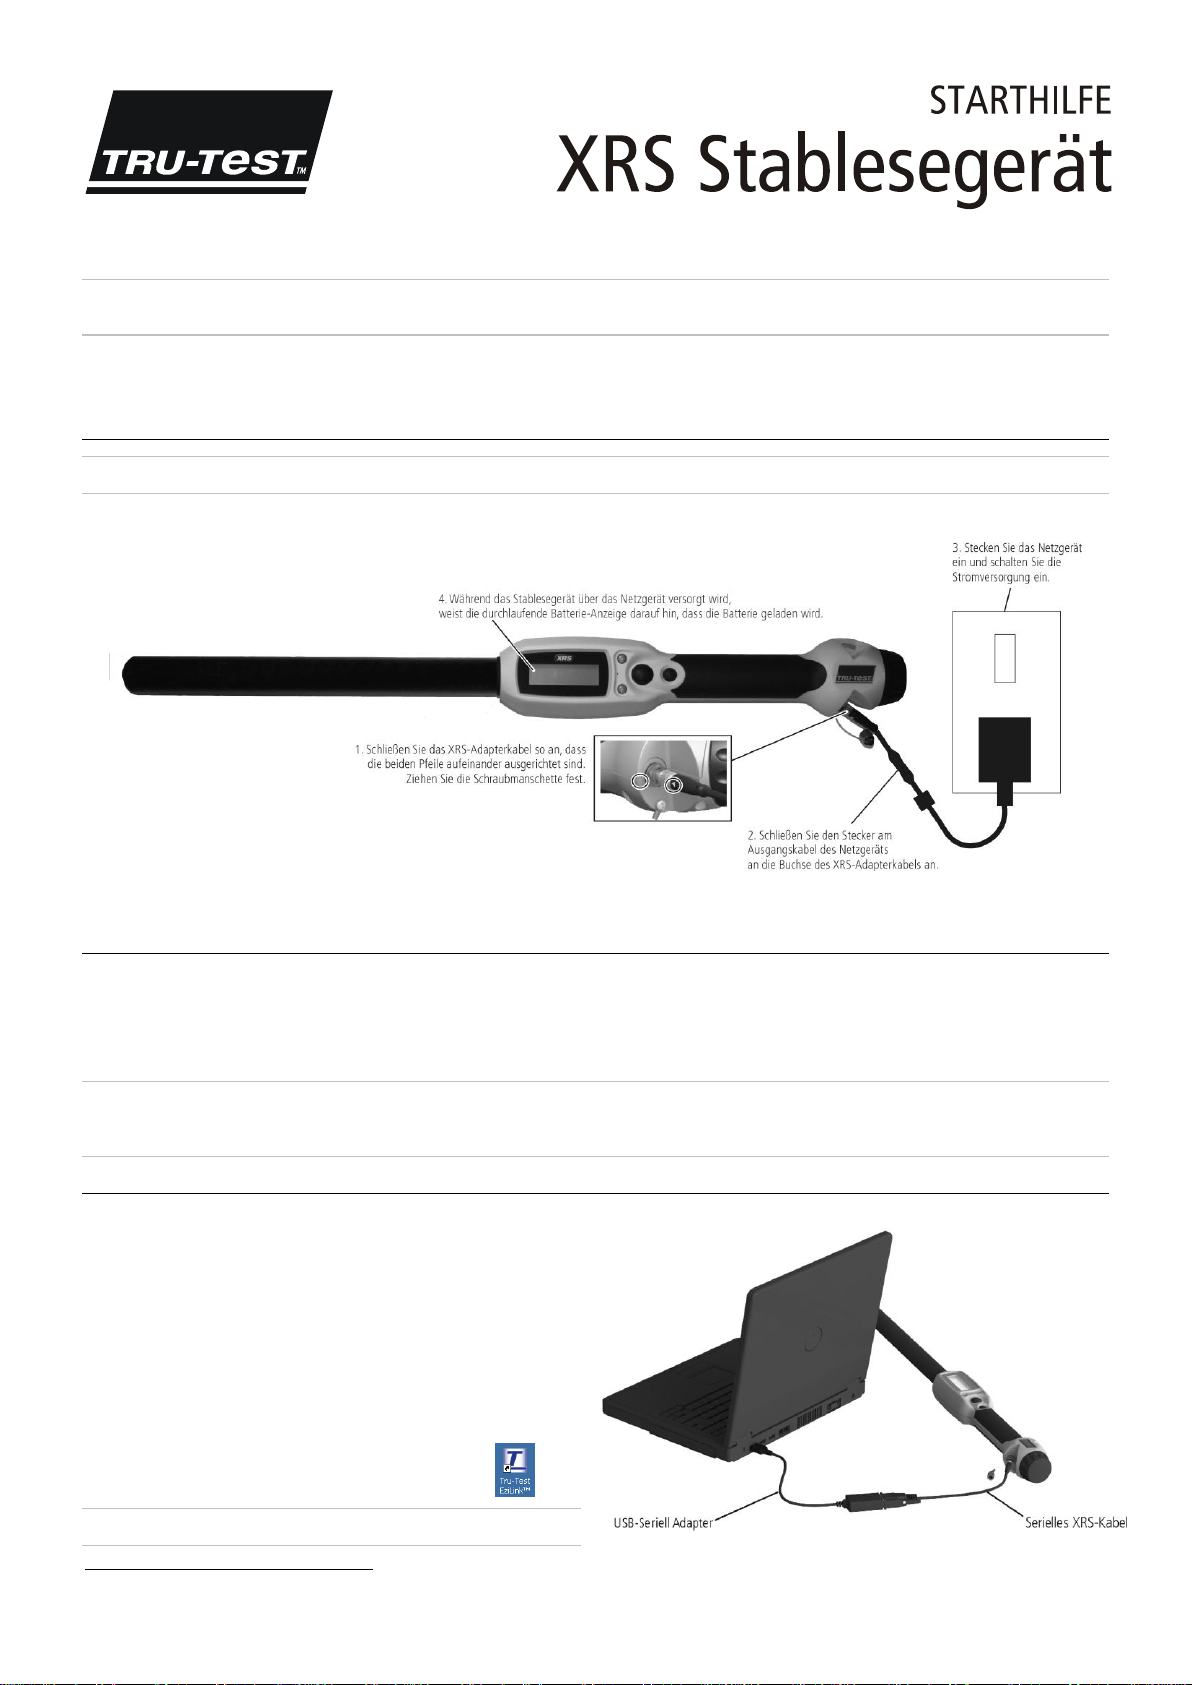
Diese Starthilfe enthält die wichtigsten Hinweise zur Konfigurierung und Verwendung Ihres XRS Stablesegeräts. Ausführlichere Informationen finden Sie im
Benutzerhandbuch
Hinweis:
Im vorliegenden Text bezeichnet „EID‛ die elektronische Kennzeichnung mit elektronischen Tiernummern und „VID‛ die visuelle Kennzeichnung mit visuellen
Tiernummern.
auf dem mitgelieferten USB-Stick/der CD bzw. unter www.tru-test.com.
XRS Stablesegerät
Vor der Benutzung
Laden der internen Batterie
Hinweis:
Stellen Sie vor der Verwendung des Stablesegeräts sicher, dass die interne Batterie voll geladen ist.
Die Umgebungstemperatur sollte beim Laden der Batterie zwischen +5 und +40 °C liegen. Das vollständigen Aufladen der Batterie dauert etwa 3 Stunden. Eine voll
aufgeladene Batterie ermöglicht eine Einsatzdauer des Stablesegeräts von bis zu 19 Stunden1.
Das Stablesegerät kann während des Ladevorgangs verwendet werden.
Eine Anleitung zum Laden der internen Batterie mithilfe einer 12 V Fahrzeugbatterie finden Sie im
XRS Stablesegerät Benutzerhandbuch
.
Verwendung des Stablesegeräts
Das Lesegerät kann auf zwei Arten verwendet werden:
1 Alleine – das Lesegerät speichert jede eingescannte Ohrmarke in seinem internen Speicher. Diese Daten können später übertragen werden.
2 In Verbindung mit einem anderen Gerät – das Lesegerät wird über ein Kabel oder eine drahtlose
Wiegeterminal oder einem PC mit einer Anwendung eines Drittanbieters verbunden. Das Lesegerät überträgt sofort jede eingescannte Ohrmarke an ein verbundenes
Gerät.
Hinweis:
Wenn Sie das Lesegerät in Verbindung mit einem anderen Gerät verwenden, speichert es trotzdem alle gescannten Ohrmarken in seinen internen Speicher. Wenn Sie
das Stablesegerät also mit einem PC und dem Programm EziLink™ verwenden, wird ggf. eine Wägung mit einer großen Anzahl an unerwünschten gescannten Datensätzen
angezeigt. Diese Wägung kann gelöscht werden, wenn sie nicht gebraucht wird.
Bluetooth
®-Verbindung mit einem anderen Gerät, wie etwa mit einem
Verwendung von EziLinkTM
Die EziLink-Software kann von der mit dem Stablesegerät mitgelieferten CD/dem
USB-Stick installiert werden. EziLink ermöglicht den Datentransfer zwischen dem
Stablesegerät und einem PC. Einige der Einstellungen können direkt auf dem
Stablesegerät selbst vorgenommen werden, aber manche Parameter lassen sich nur
über EziLink konfigurieren.
So verwenden Sie EziLink:
1 Installieren Sie die EziLink-Software auf einem PC. Zur Installation stecken Sie
den USB-Stick in eine USB-Schnittstelle Ihres PCs oder legen Sie die CD in das
CD-Laufwerk ein und folgen Sie den Anweisungen.
2 Schließen Sie das Stablesegerät mithilfe des seriellen XRS-Kabels und des
seriellen USB Adapters an den USB-Port des PCs an (siehe Abbildung).
3 Schalten Sie das Stablesegerät ein.
4 Doppelklicken Sie auf das EziLink-Symbol auf Ihrem Desktop,
um EziLink zu starten:
Hinweis:
Informationen zur Fehlerbehebung finden Sie im EziLink Hilfesystem.
1
Bei Verwendung von Standardeinstellungen.
Page 18
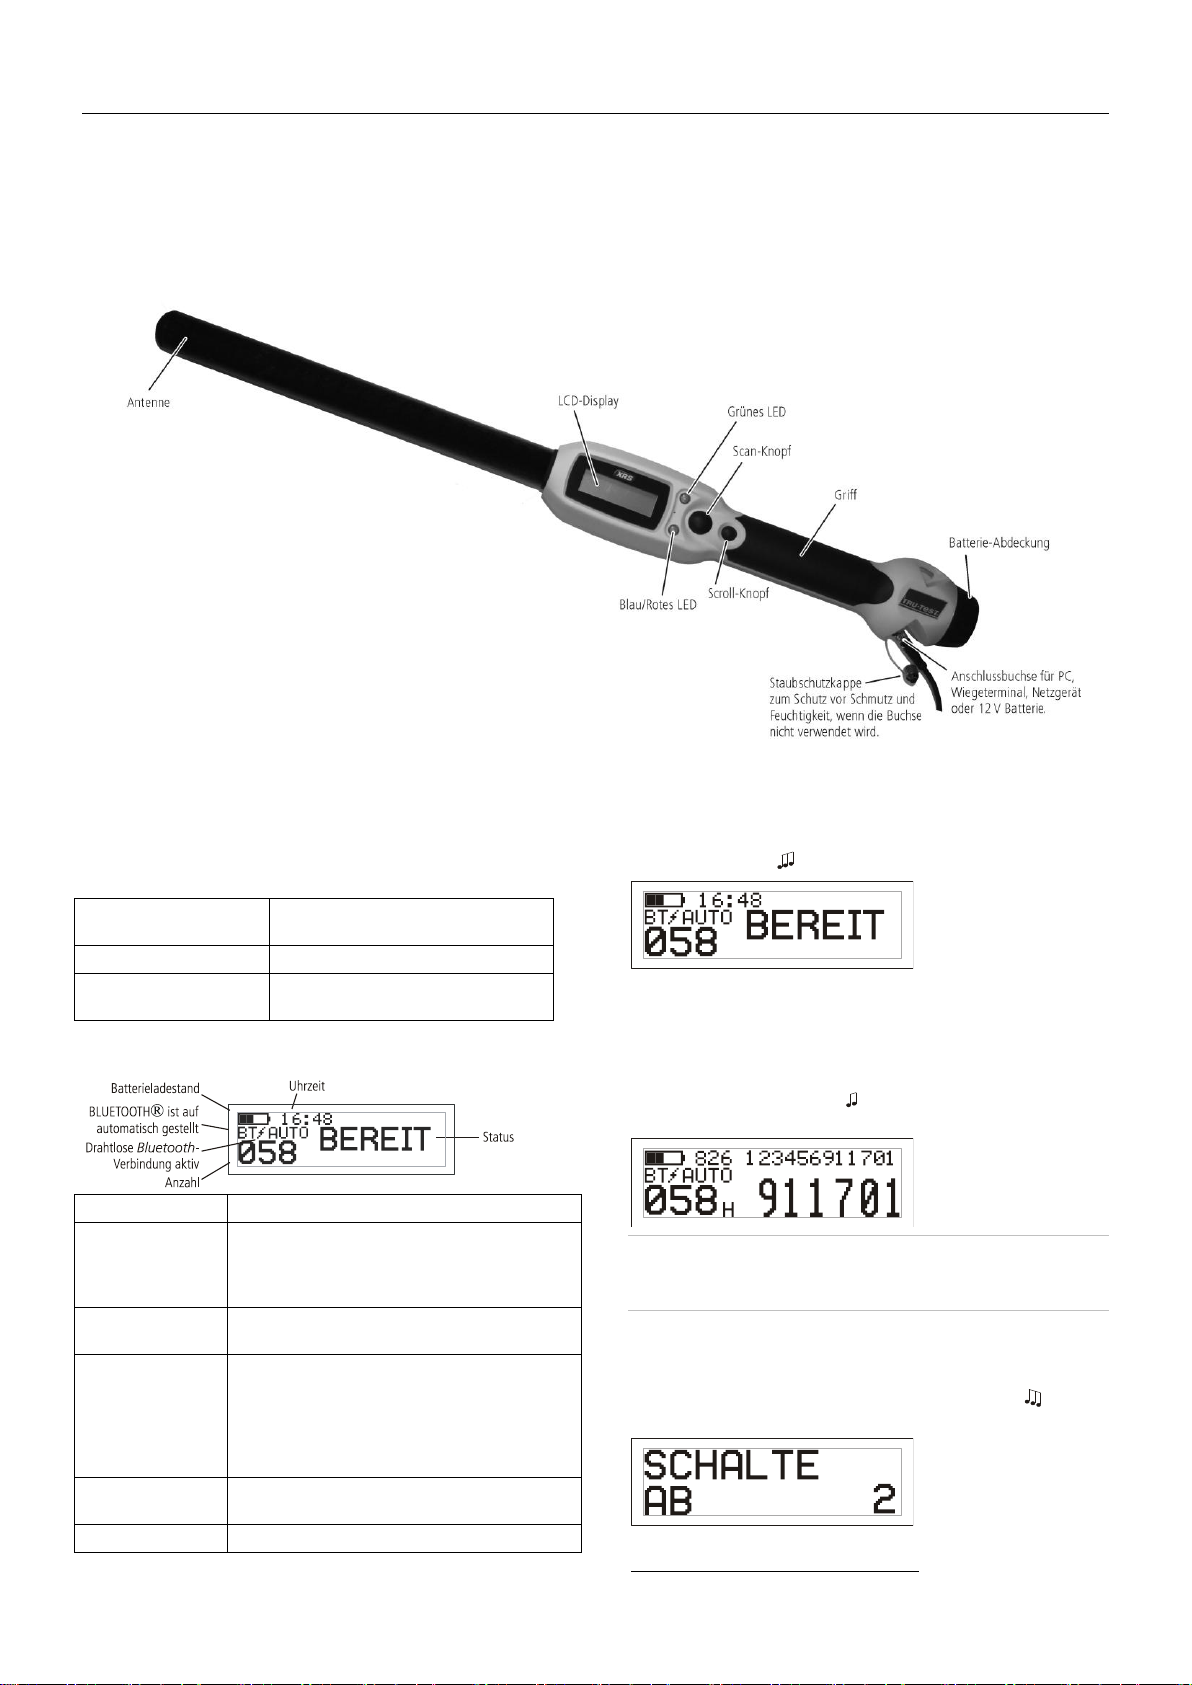
Verwendung von Data Link
Das blaue/rote LED blinkt.
Das Stablesegerät sucht oder liest gerade
eine EID-Nummer.
Das grüne LED blinkt.
Die EID wurde erfolgreich gelesen.
Das blau/rote LED ist blau,
wenn es nicht rot blinkt.
Das Stablesegerät ist an ein
Bluetooth
-
fähiges Gerät angeschlossen.
Batterieladestand
Zeigt den Ladestand der Batterie.
BLUETOOTH® ist auf
automatisch gestellt
Zeigt, dass die Option ‚automatisches Verbinden mit
einem
Bluetooth
-fähigen Gerät‛ eingestellt ist. Zur
Änderung dieser Einstellung, siehe ‚Ändern der
Stablesegeräteinstellungen‛ unten.
Drahtlose
Bluetooth
-
Verbindung aktiv
Das Stablesegerät ist mit einem anderen
Bluetooth
-
fähigen Gerät verbunden.
Uhrzeit
Zeigt die aktuelle Uhrzeit. Datum und Uhrzeit werden
jeweils zusammen mit der eingescannten Tiernummer
abgespeichert. Datum und Uhrzeit des Stablesegeräts
können mit der EziLink-Software eingestellt werden.
Informationen hierzu finden Sie im
XRS Stablesegerät
Handbuch
.
Anzahl
Zeigt die Anzahl der bei dieser Wägung eingescannten
Tiere.
Status
Displaybereich für Statushinweise.
Sie können mithilfe der auf einem Android*-Smartphone installierten Tru-Test Data Link-App Wägungen auf und von einem Stablesegerät übertragen. Diese App ist als
kostenfreier Download im Google Play* Store erhältlich.
In den Einstellungen für die drahtlose
Ändern der Stablesegeräteinstellungen
Eine Anleitung zur Verwendung der Tru-Test Data Link App finden Sie auf der Website von Tru-Test: www.tru-test.com.
Bluetooth
®-Verbindung muss „manuell‚ ausgewählt werden, damit Sie das Lesegerät mit einem Smartphone verbinden können. Siehe
auf Seite 3.
Bestandteile des Stablesegeräts
LEDs
Das Stablesegerät verfügt über zwei LEDs. Eines davon ist grün, das andere
blau/rot, je nach aktueller Funktion des Stablesegeräts. Die nachfolgende Tabelle
fasst die häufigsten LED-Signalabfolgen zusammen:
Display-Anzeige des Stablesegeräts
Einschalten des Stablesegeräts
Drücken Sie auf den Scan-Knopf.
Das Stablesegerät piepst und im Display erscheint der Hinweis ‚BEREIT‛.
EID-Nummer einscannen
Drücken Sie den Scan-Knopf und lassen Sie ihn wieder los, während Sie die
Antenne des Stablesegeräts in die Nähe einer EID halten.
Die Tiernummer erscheint auf dem Display, das grüne LED blinkt einmal, der Griff
vibriert und das Stablesegerät piepst , um anzuzeigen, dass die Nummer
erfolgreich gelesen wurde.
Tipp:
Wenn die Tiere schnell durch einen Treibgang oder in einen Pferch laufen,
können Sie den Scan-Knopf durchgehend gedrückt halten. Der Scan-Vorgang
wird beendet, wenn Sie den Scan-Knopf loslassen2.
Ausschalten des Stablesegeräts
Halten Sie den Scroll-Knopf gedrückt.
Im Display erscheint zunächst ein Countdown (3, 2, 1), dann piepst das
Stablesegerät und schaltet sich aus.
2
Wenn der Lesemodus auf „Standard‛ gestellt ist (Werkseinstellung).
Page 19
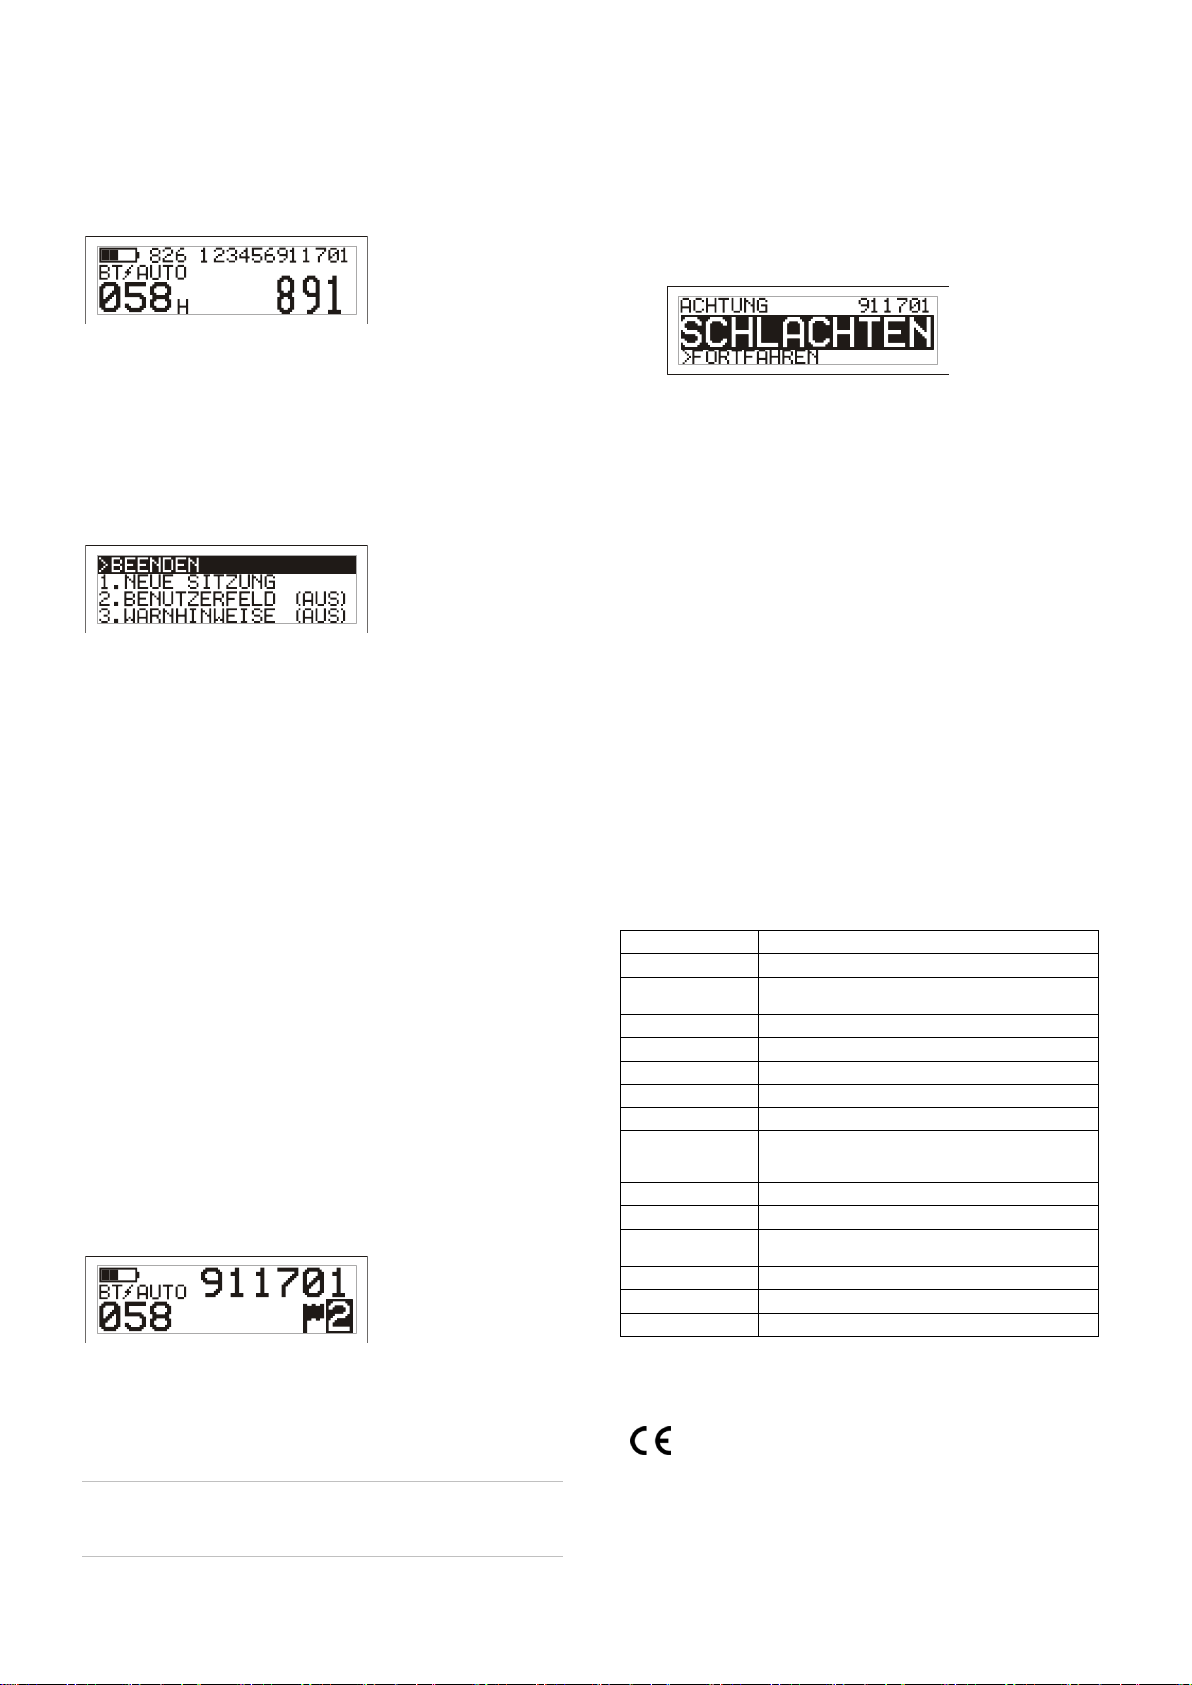
Verwenden einer Referenzdatei
Größe
651 x 65 x 51 mm (L x H x B)
Gewicht
706 g, einschließlich Batterie
Kommunikation
Drahtlose
Bluetooth
®-Verbindung, Klasse 1, bis zu 100 m Reichweite.
RS232 9600-115200 bps, Xon/Xoff
Betriebstemperatur
-10 bis +50 °C.
Lagertemperatur
-20 bis +35 °C.
Batterieladetemperaturen
+5 bis +40 °C.
Lesedistanz
HDX bis zu 330 mm, FDX bis zu 350 mm.
Lesegeschwindigkeit
Bis zu 1000 Lesevorgänge pro Minute.
Speicherkapazität
Bis zu 20.000 eingescannte Datensätze
Bis zu 10.000 Warnhinweise
Bis zu 20.000 EID-VID-Paare
Unterstützte Transponder
Liest ISO HDX und ISO FDX-B
Schutzart
IP67 (Eintauchen in Wasser bis zu 1 m Tiefe während 30 Minuten).
Batteriebetriebsdauer
19 Stunden – Lesemodus = Standard oder 1 EID
9,5 Stunden – Lesemodus = Permanent
Batterie
7,4 V, 1500 mAh Lithium-Ionen
Ladedauer
3 Stunden
Software
Tru-Test EziLink™
Tru-Test Limited erklärt hiermit, dass dieses EID-Lesegerät die wesentlichen Anforderungen und sonstigen
anwendbaren Bestimmungen der Richtlinie 1999/5/EC erfüllt. Die Konformitätserklärung kann unter
http://livestock.tru-test.com/compliance eingesehen werden.
Warnhinweise während des Scannens
Vor einer Wägung kann mit EziLink eine Datei mit den EID-Nummern und den
zugehörigen VID-Nummern auf das Stablesegerät geladen werden. Wenn eine
solche Referenzdatei im Vorfeld hochgeladen wurde, erscheint beim Einscannen
der EID eines Tieres in großen Ziffern seine VID im Display. Die EID wird direkt
darüber in kleinen Ziffern angezeigt.
Ausführliche Informationen zum Hochladen einer Referenzdatei finden Sie im
Stablesegerät Benutzerhandbuch
.
XRS
Ändern der Stablesegeräteinstellungen
Aufrufen der Einstellungen des Stablesegeräts:
Halten Sie den Scan- und den Scroll-Knopf gleichzeitig gedrückt.
Auf dem Display erscheinen die ersten drei Menüpunkte und darüber die Option
BEENDEN.
Um durch die einzelnen Menüpunkte zu scrollen, drücken Sie wiederholt auf den
Scroll-Knopf.
Um eine Option auszuwählen, markieren Sie die Option und drücken Sie den
Scan-Knopf.
Um die Einstellungen des Stablesegeräts zu verlassen, drücken Sie den ScrollKnopf, bis BEENDEN markiert ist, und betätigen Sie anschließend den ScanKnopf.
Auf der folgenden Seite finden Sie ein Beispiel für Menüeinstellungen des
Stablesegeräts.
Wenn Sie die Warnhinweise aktiviert haben, können während des Scannens einer
Tiernummer zugehörige Warnhinweise angezeigt werden. Mit EziLink kann vor
der Wägung eine Datei mit EID-Nummern und zugehörigen Warnhinweisen auf
das Stablesegerät geladen werden.
1 Scannen Sie die EID-Nummer wie oben beschrieben.
Wenn zu einer EID ein Warnhinweis vorliegt, piepst das Stablesegerät, der
Griff vibriert und der Hinweis erscheint am Display:
2 Drücken Sie den Scroll-Knopf, um Fortfahren auszuwählen, und drücken
Sie anschließend den Scan-Knopf. Auf diese Weise wird der Warnhinweis
bestätigt und Sie können mit dem Scannen fortfahren.
Ausführlichere Informationen zum Laden einer Datei mit Warnhinweisen, siehe
XRS Stablesegerät Benutzerhandbuch
.
Pflege des Stablesegeräts
Reinigen Sie das Stablesegerät mit einem feuchten Tuch, warmem Wasser und
Seife. Andere Reinigungsmittel könnten das Gehäuse beschädigen. Tauchen Sie
das Stablesegerät nicht in Wasser.
Bewahren Sie das Stablesegerät an einem kühlen, trockenen Ort auf.
Schrauben Sie die Staubschutzkappe an, wenn kein Kabel an das Stablesegerät
angeschlossen ist. So verhindern Sie das Eindringen von Feuchtigkeit und
Schmutz in den Anschluss.
Wartungs- und
Gewährleistungsinformationen
Wartungs- und Gewährleistungsinformationen finden Sie unter
www.tru-test.com.
Weitere Einstellungen für das
Stablesegerät
Weitere Einstellungen für das Stablesegerät können mit der EziLink-Software
vorgenommen werden. Verfügbare Optionen sind Automatisches Abschalten,
Akustisches Signal und Vibration Ein/Aus, Datums- und Uhrzeiteinstellungen etc.
Siehe
XRS Stablesegerät Benutzerhandbuch
.
Benutzerdefinierte Information beim
Scannen hinzufügen
Wenn Sie die Option Benutzerdefiniertes Feld aktiviert haben, können Sie
während des Scannens zu jedem Tier zusätzliche Informationen erfassen. Das
Stablesegerät bietet ein voreingestelltes Benutzerdefiniertes Feld – die Flagge
(die Optionen sind leer, 1, 2, 3, 4 oder 5). Das Benutzerdefinierte Feld kann auch
mit EziLink individuell angepasst werden (siehe
Benutzerhandbuch
1 Scannen Sie die EID-Nummer wie oben beschrieben.
2 Drücken Sie den Scroll-Knopf, um die verfügbaren Optionen einzusehen.
3 Wenn die gewünschte Option angezeigt wird, scannen Sie die nächste EID-
Nummer.
Die Benutzerdefinierte Information zu der zuvor eingescannten EID-
Nummer wird dann gemeinsam mit der vorherigen Nummer abgespeichert.
Hinweis:
Die Information im Benutzerdefinierten Feld wird auch dann
abgespeichert, wenn das Display nach einer bestimmten Zeit wieder BEREIT
anzeigt oder das Stablesegerät ausgeschaltet wird.
).
XRS Stablesegerät
Technische Daten
EG-Konformitätserklärung
Page 20

Menüeinstellungen für das Stablesegerät
Menü
Optionen1
Beschreibung
NEUE WÄGUNG
Alle gescannten Nummern werden in Wägungen (Dateien) abgespeichert. Bis zu 50 Wägungen können angelegt werden. Eine Wägung kann
später mit EziLink oder der App für Android*-Smartphones heruntergeladen werden.
Um eine neue Wägung zu starten, drücken Sie den Scan-Knopf.
BENUTZERFELD
(BENUTZERDEFINIERTES
FELD)
AUS*
EIN
Aktivieren Sie Benutzerdefiniertes Feld, wenn Sie während einer Wägung zusätzliche Informationen wie etwa eine Zustandsbewertung für die
einzelnen Tiere eingeben möchten. Die Bezeichnung für das benutzerdefinierte Feld und die Optionen können mit EziLink individuell angepasst
und dann auf das Stablesegerät geladen werden (siehe
XRS Stablesegerät Benutzerhandbuch
).
WARNHINWEISE
AUS*
EIN
Aktivieren Sie die Warnhinweise, wenn Sie beim Scannen Hinweise zu den einzelnen Tieren erhalten möchten. Beispielsweise können Sie sich
von einer Warnung daran erinnern lassen, dass sich ein Tier in einer Sperrfrist befindet. Die Warnhinweise können in EziLink konfiguriert und
dann auf das Stablesegerät geladen werden (siehe
XRS Stablesegerät Benutzerhandbuch
)
BLUETOOTH®
AUTO*
AUS
MANU
Eine drahtlose BLUETOOTH®-Verbindung erlaubt die Übertragung von Daten vom Stablesegerät auf ein anderes Gerät wie etwa auf ein
Wägeterminal oder einen
Bluetooth
-fähigen Computer.
Auto – Wenn BLUETOOTH® auf Auto gestellt ist, baut das Stablesegerät automatisch eine Verbindung mit dem zuletzt benutzten
Bluetooth
-
fähigen Gerät auf. Wenn eine Verbindung zu diesem Gerät nicht möglich ist, versucht es eine Verbindung zu einem anderen
Bluetooth
-fähigen
Gerät aus einer Liste der bereits früher gekoppelten Geräte herzustellen. Wenn kein bereits früher verbundenes Gerät gefunden werden kann,
sucht das Stablesegerät nach einem Wägeterminal, stellt eine Verbindung her und fügt das Terminal zur Liste der bereits früher gekoppelten
Geräte hinzu. Wenn dieser Versuch scheitert, lässt das Stablesegerät eine eingehende Verbindung von jedem anderen
Bluetooth
-fähigen Gerät
zu. Sie können zu jeder Zeit die Automatik-Einstellung umgehen und manuell nach einem Gerät suchen (siehe BT GER. SUCHEN unten) oder ein
Gerät aus der Liste der bereits früher gekoppelten Geräte auswählen (siehe GEKOPPELTE GERAETE unten). Die Automatik-Einstellung ist ideal,
wenn Sie im Normalfall immer dasselbe
Bluetooth
-fähige Gerät mit dem Stablesegerät verwenden.
Aus – Wenn Sie nicht möchten, dass das Stablesegerät automatisch eine Verbindung aufbaut oder nach einem
Bluetooth
-fähigen Gerät sucht,
sollten Sie die drahtlose
Bluetooth
-Konnektivität deaktivieren. Die Deaktivierung der drahtlosen
Bluetooth
-Konnektivität spart Batteriestrom.
Manu (manuell) – Wenn BLUETOOTH® auf Manuell gestellt ist, lässt das Gerät eine eingehende Verbindung von einem anderen
Bluetooth
-
fähigen Gerät zu. Außerdem können Sie manuell nach einem anderen
Bluetooth
-fähigen Gerät suchen (siehe BT GERÄT SUCHEN unten) oder
aus der Liste der bereits früher gekoppelten Geräte ein Gerät auswählen (siehe GEKOPPELTE GERAETE unten).
BT GER. SUCHEN
(BT GERÄT SUCHEN)
Wenn der automatische oder manuelle BLUETOOTH®-Modus aktiviert ist, können Sie manuell nach einem bestimmten Gerät suchen, eine
Verbindung herstellen bzw. eine bestehende Verbindung abbrechen und die Verbindung mit einem anderen Gerät erzwingen.
Drücken Sie den Scan-Knopf , um nach
Bluetooth
-fähigen Geräten innerhalb der Reichweite zu suchen.
Nach kurzer Zeit werden auf dem Bildschirm sämtliche
Bluetooth
-Geräte innerhalb der Reichweite angezeigt.
Um die Verbindung zu einem Gerät herzustellen:
Wählen Sie das gewünschte Gerät aus der Liste aus und drücken Sie den Scan-Knopf .
Das Gerät wird zur Liste der bereits gekoppelten Geräte hinzugefügt (siehe GEKOPPELTE GERAETE unten).
GEKOPPELTE GERAETE
Wenn der automatische oder manuelle BLUETOOTH®-Modus aktiviert ist, können Sie manuell eine Verbindung zu einem bereits früher
gekoppelten Gerät herstellen bzw. eine bestehende Verbindung abbrechen und die Verbindung mit einem anderen Gerät erzwingen.
Die Herstellung einer Verbindung zu einem bereits früher gekoppelten Gerät ist schneller als die Verwendung der Option ‘BT GERÄT SUCHEN’.
Drücken Sie den Scan-Knopf, um die bereits früher gekoppelten Geräte anzuzeigen. Wählen Sie ein Gerät aus und drücken Sie den Scan-Knopf.
Das Stablesegerät versucht, eine Verbindung mit dem bereits früher gekoppelten Gerät herzustellen.
DUPLIKATE
EIN*
AUS
Wenn die Funktion DUPLIKATE aktiviert ist, wird ein und dieselbe EID-Nummer während einer Wägung nicht zweimal gespeichert. Das
Stablesegerät merkt sich die letzten 500 Nummern.
UMDREHEN
AUS*
EIN
Aktivieren Sie die Funktion UMDREHEN, um die Display-Anzeige für Linkshänder umzudrehen. Für Rechtshänder erscheint die Anzeige dann auf
den Kopf gestellt.
KONTRAST
Passen Sie den Kontrast an die Lichtverhältnisse an.
Drücken Sie wiederholt auf den Scan-Knopf, um den Displaykontrast einzustellen.
LESEMODUS
STNDRD*
PERMNT
1 EID
Wenn STNDRD (Standard) als Einstellung gewählt wurde, beginnt das Stablesegerät zu scannen, sobald der Scan-Knopf gedrückt wird. Der
Scan-Vorgang dauert 3 Sekunden (Werkseinstellung) oder bis eine Nummer gelesen wurde, sofern dies schneller erfolgt. Wird der Scan-Knopf
durchgehend gedrückt gehalten, scannt das Stablesegerät weiter und liest mehrere Nummern hintereinander ein. STNDRD ist die empfohlene
Einstellung für eine allgemeine Verwendung. Die Lesedauer kann mit EziLink eingestellt werden (siehe
XRS Stablesegerät Benutzerhandbuch
).
Bei der Einstellung Permanent beginnt das Stablesegerät zu scannen, sobald der Scan-Knopf betätigt wird, und hört erst wieder auf, wenn der
Scan-Knopf erneut gedrückt wird. Diese Einstellung ist hilfreich, wenn sämtliche Tiere in einem Pferch oder einem Treibgang gescannt werden
sollen.
Wenn das Stablesegerät auf 1 EID gestellt ist, verhält es sich so wie im Standard-Modus, außer dass es selbst dann nach dem Lesen der ersten
Nummer nicht weiter scannt, wenn der Scan-Knopf durchgehend gedrückt wird. Um eine weitere Nummer scannen zu können, muss der ScanKnopf losgelassen und dann erneut gedrückt werden.
WÄGUNG DRUCKEN
Sie können alle auf dem Stablesegerät gespeicherten Wägungsdateien mit einem
Bluetooth
-fähigen Drucker ausdrucken.
DISPLAYBELEUCHTUNG
AUS
SCHWACH*
STARK
Passen Sie die Displaybeleuchtung auf die jeweiligen Lichtverhältnisse an.
Drücken Sie zum Anpassen der Displaybeleuchtung den Scan-Knopf.
SW VER
Die Software-Version des Stablesegeräts wird angezeigt.
ENGLISH* (Englisch)
ESPAÑOL
PORTUGUÊS
FRANÇAIS
DEUTSCH
ITALIANO
DANSK
SVENSKA
[andere
Sprachen…]
Die verwendete Sprache kann geändert werden.
Drücken Sie wiederholt auf den Scan-Knopf.
Wenn das Stablesegerät über eine drahtlose
Bluetooth
-Verbindung mit einem Wägeterminal verbunden ist, wird automatisch die Sprache des
Terminals übernommen.
1
Standardeinstellungen sind mit * gekennzeichnet
Page 21
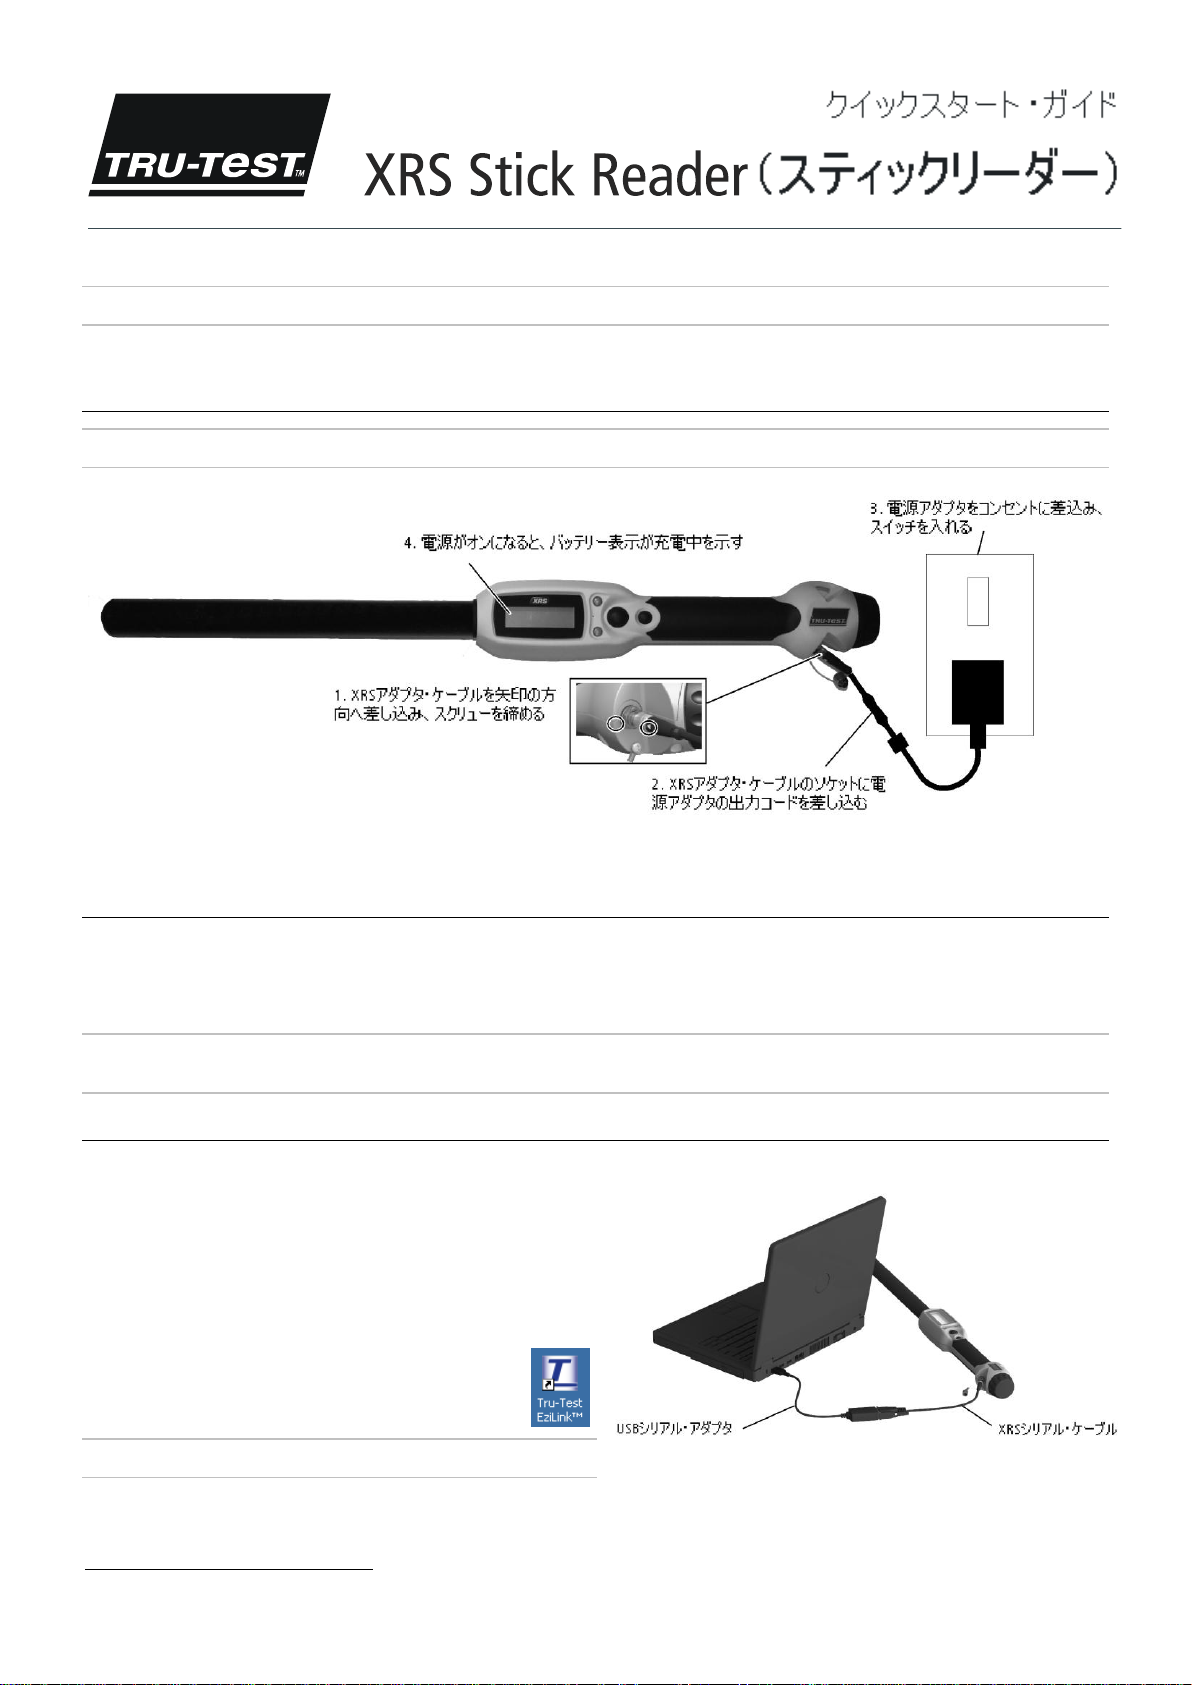
このクィックスタート・ガイドは XRS Stick Reader の設定と使用方法を案内する簡単な説明書です。詳しい情報は付属の USB メモリ/CD にある
取扱説明書をご覧いただくか、ウェブサイト www.tru-test.comをご覧ください。
注記:
本書では次の略号を使用してます。EID = 電子タグ VID =視覚識別番号
ご利用前に
内蔵バッテリーの充電
注記:
本器使用前に内蔵バッテリーを必ず満充電にしてください。
バッテリーの充電は気温 5 度以上 40 度以下で行ってください。満充電にはおよそ 3 時間かかります。満充電で約 19 時間使用できます1。
XRS Stick Reader
本器は充電しながらでも使用できます。
12 V 自動車バッテリーを使用して内部バッテリーを充電する方法は、
XRS Stick Reader 取扱説明書
をご覧ください。
スティックリーダーの使用方法
スティック リーダーは以下の 2 つの方法で使用できます:
1 本体だけで使用 - スティックリーダーはスキャンした電子タグを内部のメモリに保存します。保存した記録は後で PC に転送できます。
2 接続して使用 - 重量測定器や PC などその他の機器に接続して使用できます。ケーブルもしくは
と、スティックリーダーはスキャンしたタグのデータをすぐに接続した機器に送信します。
注記:
スティックリーダーをその他の機器に接続したまま使用していても、スキャンしたすべてのタグは内部メモリにも保存されています。したがって、PC に
接続し、EziLink™を起動すると、不要な大量のスキャンした記録を含むセッションが表示されることがあります。このような不要なセッションは削除できます。
TM
EziLink
EziLink ソフトウェアは本器に付属の USB メモリ/CD からインストールできます。EziLink を使ってスティックリーダーから PC へ情報を転送できます。スティックリ
ーダーの設定は機器内でもできますが、一部の設定は EziLink を使わなけれ
ばなりません。
EziLink の使用方法:
1 PC に EziLink ソフトウェアをインストール。インストールするには、USB ポ
2 USB ポートに XRS シリアルケーブルと USB シリアルアダプター を使って
3 スイッチをオンにする。
4 立ち上げにはデスクトップにある EziLink のアイコンをダブ
の使用
ートに USB メモリを挿入、もしくは PC の CD ドライブに CD を挿入し、指
示に従う。
スティックリーダーを接続(写真参照)。
ルクリック。
Bluetooth
®のワイヤレスで接続できます。接続する
注記:
問題が起こった場合は EziLink のヘルプを参照してください。
1
初期設定のままで使用された場合
Page 22
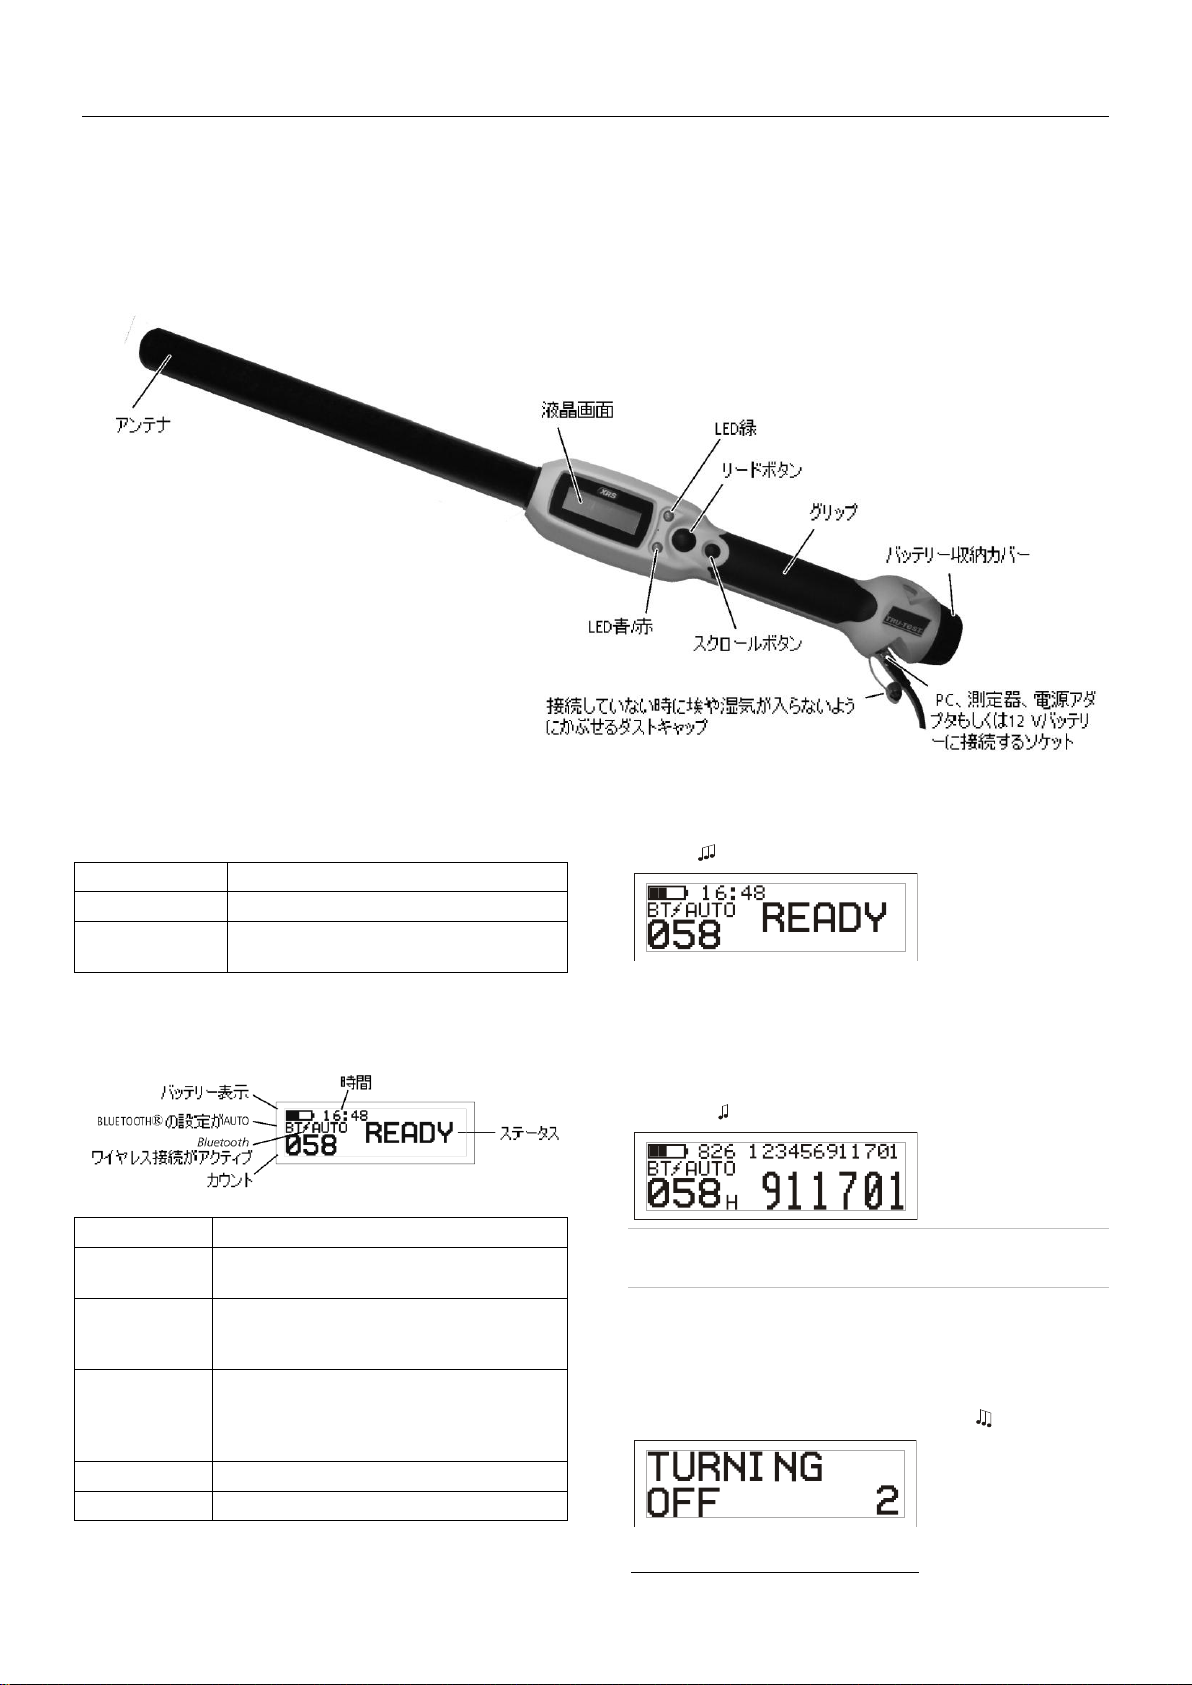
Data Link を使用
青/赤が点滅
EID の読み込み中
緑が点灯
EID の読み込み完了
青/赤の LED で赤が
点滅せず青が点灯
Bluetooth が相手先を探して接続
バッテリー表示
充電量を表示
BLUETOOTH® の
設定が AUTO
Bluetooth の設定が自動的に相手先を探す。スティ
ックリーダーの設定を変更
Bluetooth
ワイヤ
レス接続がアク
ティブ
Bluetooth が機器に接続
時間
現在の時刻を表示。タグをスキャンする際にこの
日時が記録される。EziLink を使って日時を変更可
。詳細は
XRS Stick Reader 取扱説明書
を参照してく
ださい。
カウント
現行セッションでスキャンしている家畜の数
ステータス
メッセージを表示
Tru-Test Data Link のアプリをインストールし、 Android* スマートフォンを使ってスティックリーダーからのセッションを転送することができます。この無料アプリ
は、Google Play*からダウンロードできます。Tru-Test Data Link アプリの使用方法はウェブサイト www.tru-test.com で見ることができます。
各部名称
LED
本器には緑と、状態により青か赤になる 2つの LED があります。以下
のとおりに点灯します:赤が点滅
液晶画面の表示
スイッチをオンにする
リードボタンを押す。
音が鳴り 、「READY」が表示される:
EID をスキャン
アンテナをタグの近くに持っていき、リードボタンを押してから放す。
画面にタグの番号が表示され、緑の LED が一度点滅。グリップが振動
し、音が鳴る と読み込み完了。
ヒント:
家畜が移動中の場合はリードボタンを押し続けておくことができ
ます。リードボタンを放すとスキャンが停止します
2
。
スイッチをオフにする
スクロールボタンを押し続ける。
LCD に 3, 2, 1とカウントダウンが表示され、音が鳴り オフになる。
2
読み込み時に初期設定が「スタンダード」に設定されている場合。
Page 23
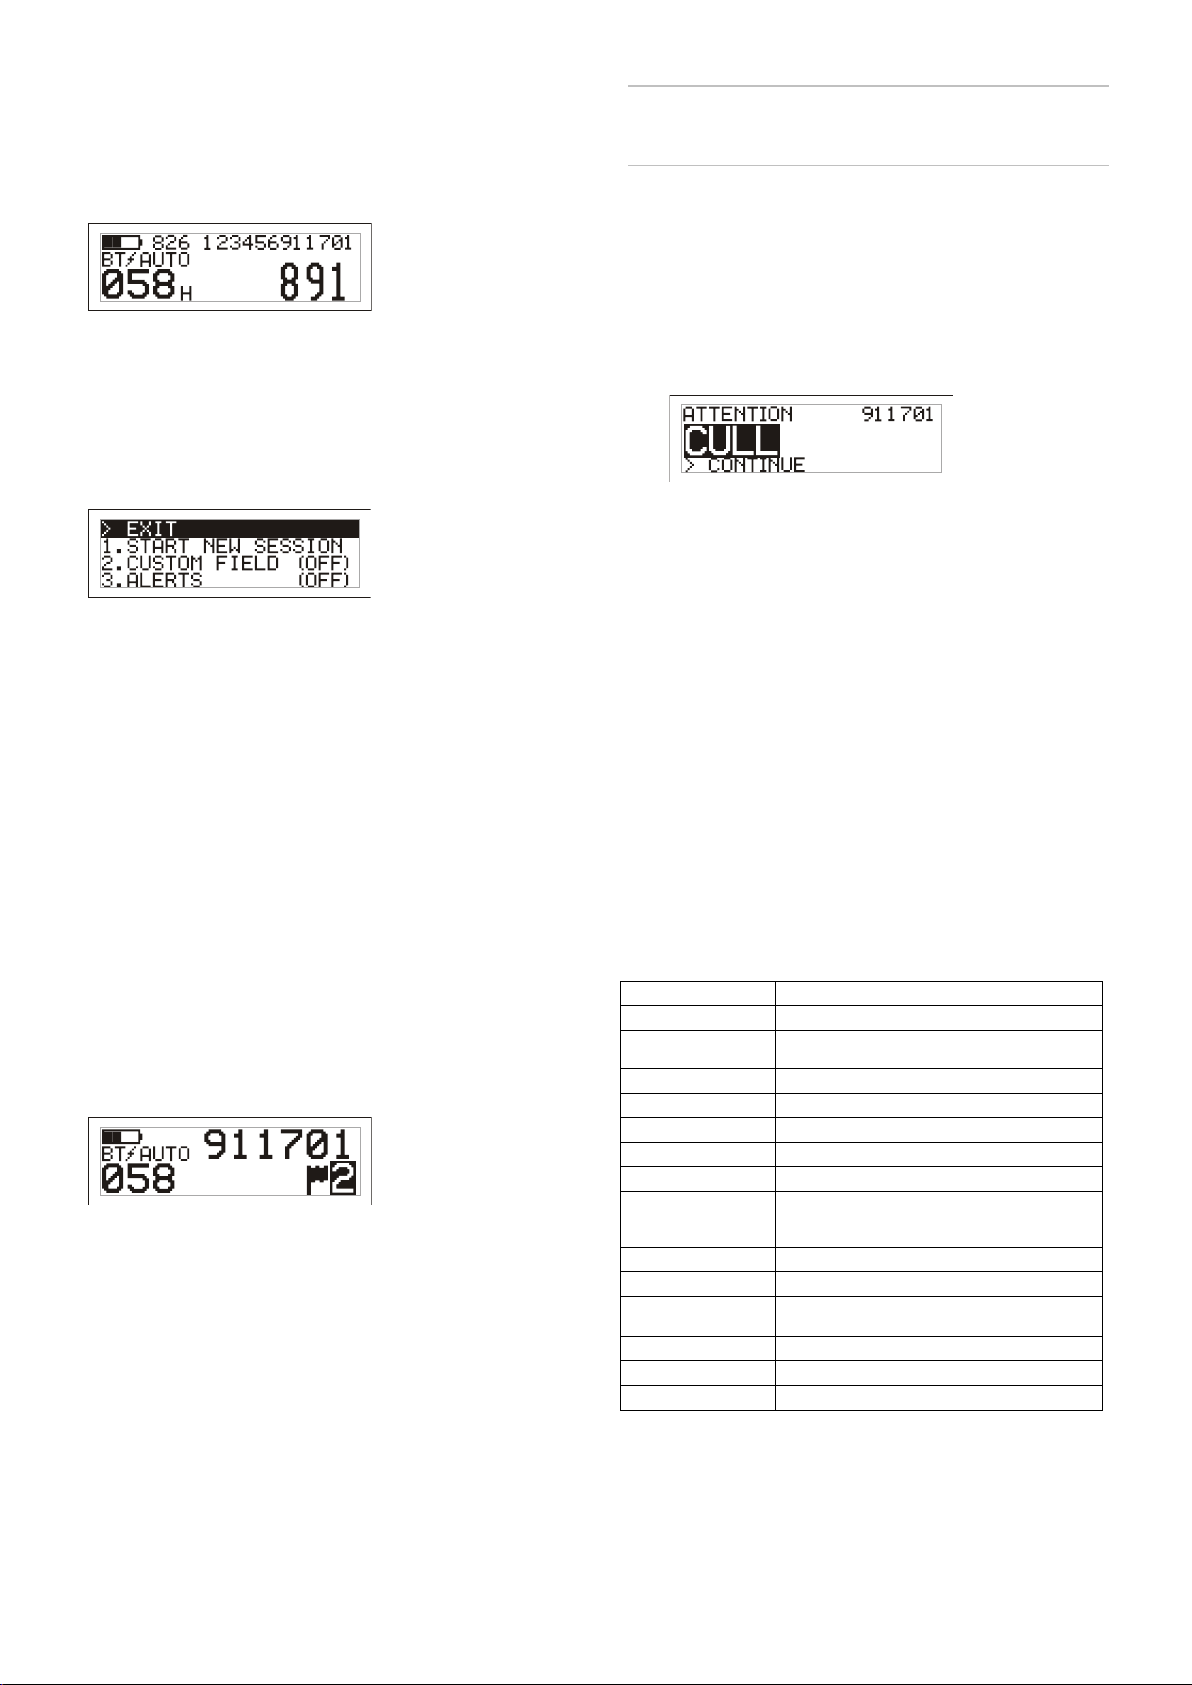
相互対応ファイルを使用する
サイズ
651 x 65 x 51 mm (L x H x W)
重量
バッテリーを含み 706 g
通信環境
Bluetooth® クラス 1, 100 m (330’) まで
RS232 9600-115200 bps, Xon/Xoff
動作中の気温環境
-10 から +50 °C
保管中の気温環境
-20 から+35 °C
バッテリー充電温度
-5 から +40 °C
読み取り可能範囲
HDX 330 mmまで、FDX 350 mm まで
読み取り速度
1 分につき 1000まで
データ保存容量
スキャンのデータは 20000まで
アラートは 10,000 まで
EID-VID の組み合わせは 20000 組まで
タグの互換性
ISO HDX と ISO FDX-Bを読み取り
保護特性(防浸)
IP67(1mで 30 分の浸水に耐える)
バッテリー動作可能時間
19 時間、リードボタンモードがスタンダードの場合
9.5 時間、リードボタンモードがコンティニアス(連続)の場合
バッテリー
7.4 V, 1500 mAh リチウムイオン
充電所要時間
3 時間
ソフトウェア
Tru-Test EziLinkTM
EID とそれに対応する VID のデータを含むファイルは、EziLink を使ってス
キャン開始前にスティックリーダーにデータ転送できます。相互対応ファ
イルを事前に転送しておけば、スキャン時に VID は大きな字で画面に表
示されます。EID はそのすぐ上に小さい字で表示されます。
相互対応ファイルの転送に関する情報は
XRS Stick Reader 取扱説明書
を参照してください。
スティックリーダーの設定を変更
設定メニューへ移動:
設定画面にするには、リードボタンとスクロールボタンを同時に押す。
EXIT の下に 3 つの設定メニューが表示される。
メニューを選ぶには、スクロールボタンを繰り返し押す。
選ぶメニューがハイライトされたら、リードボタンを押す。
設定メニューの画面から出るには、EXITがハイライトされるまでスクロー
ルボタンを押し、リードボタンを押す。
メニュー設定の説明は次のページを参照してください。
その他の設定メニュー
スティックリーダーの画面上でできるもの以外は EziLinkソフトウェアを使
って設定変更ができます。Automatic Power Down(自動電源オフ)、音や
振動のオン/オフ、日時の設定などがあります。詳細は
取扱説明書
を参照してください。
XRS Stick Reader
スキャン時にカスタムフィールドの情
報を追加
注記:
カスタムフィールドの情報は、次の動作に移らなくても、ディスプレ
イの時間が切れたり、READY の表示画面に戻ったり、 電源が切れた場
合でも、自動的に保存されます。
スキャン時にアラートを受ける
アラートの設定をオンにしておくと、家畜を特定したい場合、該当のタグ
が読み込まれたときにアラートを受けられます。EID とアラートのメッセー
ジを含むファイルをスキャン前に EziLink を使ってスティックリーダーに転
送できます。
1 前述のように EID をスキャン。
該当の EID にアラートの指示がなされていると、音が鳴り、グリップ
が振動し、画面にメッセージが表示される。
2 スクロールボタンを押し「Continue」を選び、リードボタンを押す。そ
れにより、アラートが認識されたとみなされ、スキャンが続行でき
るようになる。
アラートのファイル転送についての情報は
XRS Stick Reader 取扱説明書
を参照してください。
本器の取扱いについて
ぬるま湯と石鹸で湿めらせた布で拭いてください。洗剤等はケースを損
傷することがあるので使用しないでください。本器を水の中に置いたま
まにしないでください。
涼しく乾いた場所に保管してください。
スティックリーダーにケーブルを接続していない時は、ダストキャップを
かぶせ、埃や湿気が入らないようにしてください。
サービスと保証内容
サービスと保証内容についてはウェブサイト www.tru-test.com を参照し
てください。
仕様
カスタムフィールドの設定をオンにしておけば、スキャン時に各家畜の
情報を追加することができます。スティックリーダーにはカスタムフィー
ルドをフラッグ(オプションはブランクか、数字の 1から 5)で示すようあ
らかじめ設定されています。カスタムフィールドは EziLink を使って希望
のとおりに変更ができます。(詳細は
XRS Stick Reader 取扱説明書
を参
照してください)。
1 前述のように EID をスキャン。
2 スクロールボタンを押し、オプションを見る。
3 希望するオプションが表示されたら、そのまま次のスキャンに移る。
次の動作に移ることで、表示されていたオプションの情報が自動
的に上書きして保存される。
Page 24

メニュー設定
メニュー
オプション
1
説明
START NEW
SESSION
(新しいセンショ
ンを開始)
記録されたすべてのタグはセッションのファイルに保存されています。セッションのファイルは 50 まで作成できます。EziLink もし
くは Android*スマートフォン用の Tru-Test Data Link アプリを使用して、セッションを転送できます。
リードボタンを押すと新しいセッションのスキャンを開始します。
CUSTOM FIELD
(カスタムフィー
ルド)
OFF オフ*
ON オン
セッションの間に家畜のコンディションなどのデータを入力したい場合、カスタムフィールドの設定をオンにします。タイトルとオ
プションは EziLink で設定し、スティックリーダーへ転送します。(詳しくは
XRS スティックリーダー取扱説明書を参照)
ALERTS
(アラート)
OFF オフ*
ON オン
家畜を特定したい場合、該当のタグが読み込まれたときにアラートが受けられるよう設定をオンにします。例えば、保留期間
中の家畜を知らせるようアラートをセットしたい場合などです。アラートは EziLink で設定し、スティックリーダーへ転送します。
(詳しくは XRS
スティックリーダー取扱説明書を参照)。
BLUETOOTH®
AUTO 自動*
OFF オフ
MANUAL 手動
Bluetooth
® ワイヤレス接続によって、スティックリーダーから重量測定器やコンピューターなど別の機器へ情報を転送できま
す。
Auto(自動) - Bluetooth が Auto にセットされている場合、スティックリーダーは自動的に直近で使用された Bluetooth 搭載機器に
接続します。該当の機器がみつからない場合は、以前使用された機器の中から接続するものを選ぼうとします。その中からも
みつからない場合は、測定器を探して接続し、接続したことのある機器として記憶します。それでもうまくいかない場合は、ステ
ィックリーダーは Bluetooth 搭載機器から入ってくる接続を許可します。いつでも Auto を無効にして、手動で機器を探すか( 下
記 FIND BT DEVICES を参照)、もしくは以前接続した機器のリストから選ぶことができます(下記 PAIRED DEVICES を参照)。スティ
ックリーダーにいつも同じ Bluetooth 搭載機器を使用する場合は Auto の設定が理想的です。
Off (オフ)- スティックリーダーが自動的に Bluetooth 搭載機器に接続したり、探したりするのを避けたい場合は、機能をオフに
することができます。この機能をオフにするとバッテリーの節約になります。
Manual (マニュアル)- Manual にセットすると、スティックリーダーは Bluetooth 搭載機器から入ってくる接続を許可します。また
は手動で機器を探すか(下記 FIND BT DEVICES を参照)、もしくは以前接続した機器のリストから選ぶことができます(下記
PAIRED DEVICES を参照)。
FIND BT DEVICES
(Bluetooth 搭載機
器を探す)
Auto もしくは Manual にセットされている場合、手動で Bluetooth 搭載機器を探し、、特定の機器に接続するか、もしくは既存の
接続を断ち、別の機器に接続させることができます。
範囲内にある機器を探すには、まずリードボタンを押してください。
数分後、スティックリーダーは範囲内にある Bluetooth 搭載機器のリストを画面に表示します。
接続の方法:
接続するには、リストから該当する機器を選び、リードボタンを押します。
該当の機器は接続したことのある機器のリストに追加されます(下記 PAIRED DEVICES を参照)。
PAIRED DEVICES
(接続したことの
ある機器)
Auto もしくは Manual にセットされている場合、手動で以前接続していた機器に接続させるか、もしくは既存の接続を断ち、別の
機器に接続させることができます。
接続したことのある機器の中から選んで接続するほうが 「FIND BT DEVICES」のオプションを使うよりも素早く接続できます。
リードボタンを押し、接続したことのある機器を表示します。機器を選択し、リードボタンを押します。
該当の機器を選び、リードボタンを押すと、スティックリーダーは接続したことのある機器へ接続しようとします。
DUPLICATES
(重複)
ON オン*
OFF オフ
Duplicates がオンになっていると、スティックリーダーは同じセッションの中で同じ EID を二度記録しません。スティックリーダーは
過去 500 のタグを記憶します。
FLIP SCREEN
(スクリーンを回
転)
OFF オフ*
ON オン
液晶画面を左利き用に回転させることができます。オンにすると画面は右利き用には逆さまになります。
CONTRAST
(照度)
画面照度の明暗を調整できます。
リードボタンを繰り返し押すと調整できます。
READ MODE
(リードモード)
STANDARD*
(スタンダード)
CONTINUOUS(コンティニュア
ス=継続)
SINGLE(シングル)
STANDARD にセットすると、スティックリーダーはリードボタンが押されるとスキャンを開始します。タグが読み込まれれば瞬時で
すが、初期設定では 3 秒間スキャンをします。リードボタンを押し続けるとスキャンは継続し、複数のタグをスキャンします。
STANDARD は一般の使用に適しています。リードタイム(読み込みの所要時間)は EziLink を使って変更できます。詳細は
XRS
Stick Reader 取扱説明書
を参照してください。
CONTINUOUS(継続)にセットすると、リードボタンが押されるとスキャンを開始し、再びリードボタンが押されるまでストップしませ
ん。この設定は囲いにいる家畜や移動させている家畜をスキャンするのに適しています。
シングルにセットすると、スタンダードと同じように機能しますが、リードボタンを押し続けても、 1 つのタグを読み込んだ後はス
キャンを継続しません。次のタグをスキャンするには、リードボタンを一度放し、再度押さなければなりません。
PRINT SESSION
セッションを
プリント
スティックリーダーに保存されているすべてのセッション(ファイル)を Bluetooth で接続されているプリンターでプリントします。
BACKLIGHT
画面の明るさ
OFF オフ
LOW 低*
HIGH 高
明るさに合わせてバックライトを調整します。
リードボタンを押し、液晶画面の明るさを調整してください。
SOFTWARE
VERSION
(ソフトウェア)
スティックリーダーのソフトウェアのバージョンを表示します。
ENGLISH*(英語)
ESPAÑOL
PORTUGUÊS
FRANÇAIS
DEUTSCH
ITALIANO
DANSK
SVENSKA
[その他の言語...]
画面の言語を変更できます。
リードボタンを繰り返し押してください。
Bluetooth でスティックリーダーが重量測定器に接続される場合は、自動的に測定器の言語になります。
1
初期設定には *マーク
Page 25
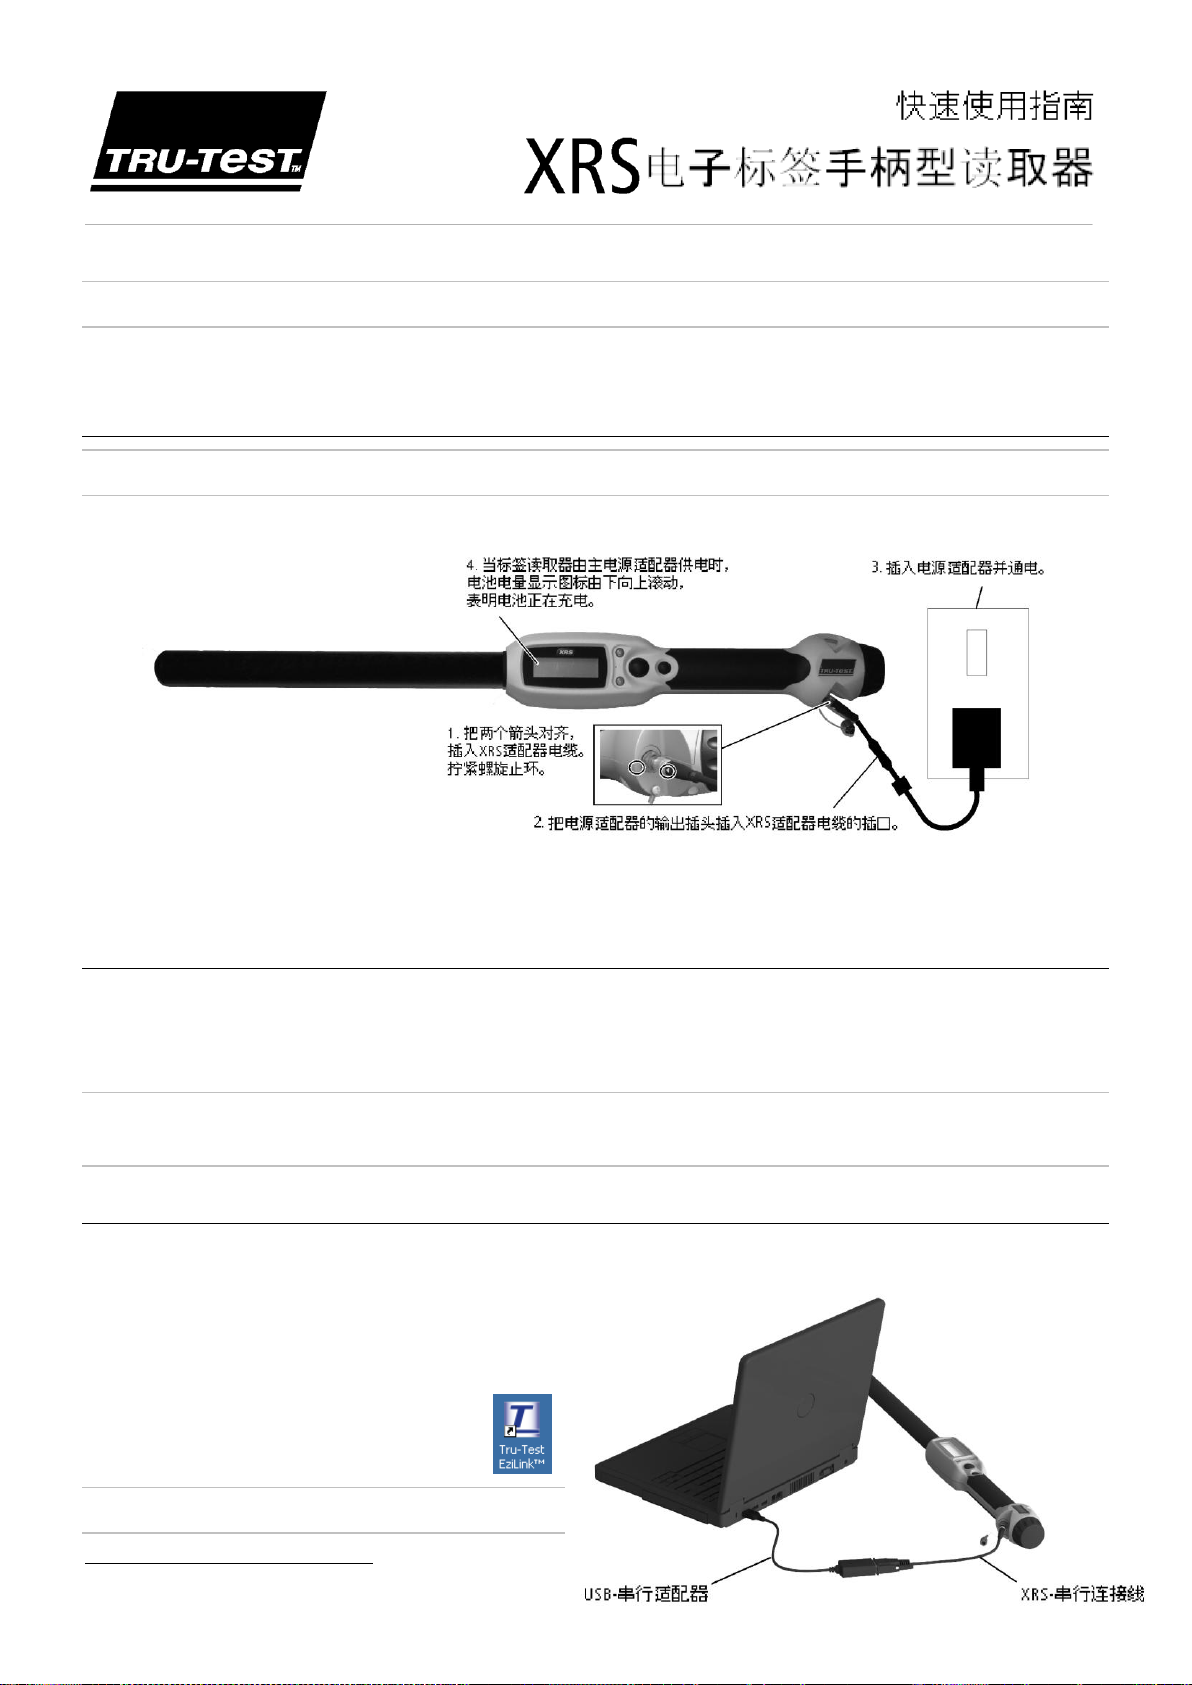
该快速使用指南为您提供设置和使用 XRS 手柄型读取器的基本说明。欲了解更多详细信息,请在随机器提供的 USB 盘或 CD 中查阅 XRS 手柄型读取
器的使用说明书,也可访问网站 www.tru-test.com。
注意:
本指南中,EID = Electronic Identification(电子标识), VID = Visual Identification(视觉标识)。
使用之前
给内置电池充电
注意:
使用手柄型读取器前,请确认内置电池已充满电。
当给电池充电时,周围温度应该在+5°C和+40°C 之间(即 41°F 和 104°F 之间)。电池可在约 3 小时内充满电。内置电池充满电后,手柄型读取器
可连续使用达 19 个小时。1
充电过程中也可使用手柄型读取器。
有关使用 12V 车辆用蓄电池给内置电池充电的信息,请查阅 XRS 手柄型读取器使用说明书。
使用手柄型读取器
手柄型读取器有两种使用方法:
1 独立使用:使用手柄型读取器扫描的所有标签都会保存在读取器的内存储器。之后,可以将这些数据传输至电脑。
2 连接到其他设备:可以将手柄型读取器通过连接线或
用程序的电脑。建立连接后,手柄型读取器可以将扫描的每一个标签信息立即传输到连接的设备中。
注意:
即使将手柄型读取器与另一个设备进行连接,所有扫描的标签信息仍然会保存在手柄型读取器的内存储器中。因此,当手柄型读取器与运
行有 EziLink™软件的电脑进行连接时,电脑可能会显示出一个含有大量不需要的扫描记录的场次。如果您不需要这个场次的信息,可以将其删除。
Bluetooth
®蓝牙无线连接与另一个设备进行连接,例如:重量显示器或运行有第三方应
使用 EziLink™软件
您可以使用手柄型读取器附带的 USB 盘或 CD 安装 EziLink 软件。使用 EziLink 软件可以在手柄型读取器和电脑之间传输信息。手柄型读取器的多数功
能设置都可以在机身上完成,但是部分设置需要通过 EziLink 软件才能进行。
使用 EziLink:
1 在电脑上安装 EziLink 软件。将附带的 USB 盘插入电脑的 USB 端
口(或将附带的 CD 插入光驱),并跟随提示,完成安装。
2 使用 XRS-串行连接线和 USB-串行适配器将手柄型
读取器连接到电脑的 USB 端口(如右图)。
3 打开手柄型读取器。
4 双击在桌面上的 EziLink 图标,启动 EziLink 程序。
注意:
如出现任何问题,请参考 EziLink 软件上的 Help (帮助)。
1
在使用默认设置的情况下。
Page 26
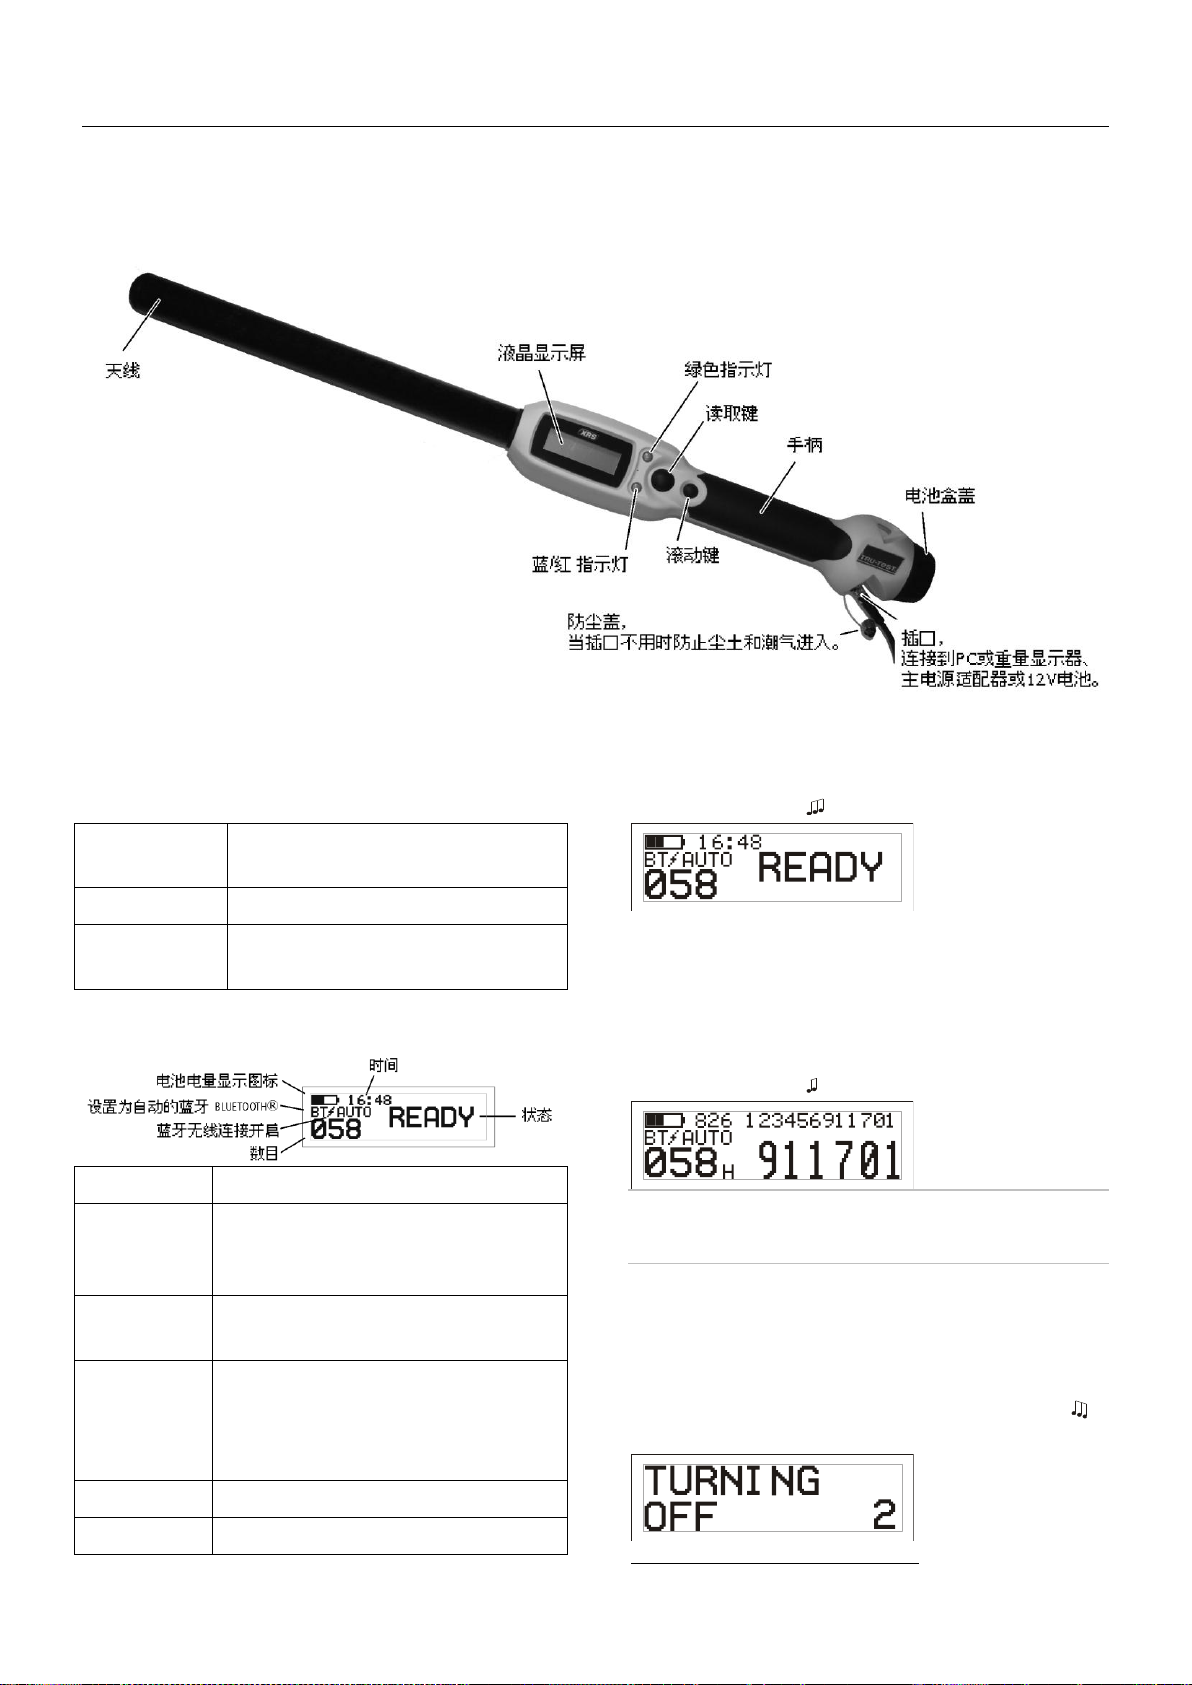
使用 Data Link 手机应用程序
蓝色或红色指示灯
闪烁
手柄型读取器正在扫描或读取 EID 标签。
绿色指示灯闪烁
EID 标签已成功读取。
蓝/红指示灯呈蓝
色,不闪烁红灯
手柄型读取器已连接到启用蓝牙的设备。
电池电量图标
显示电池的充电量。
BLUETOOTH®设
置为自动
表明当前的蓝牙设置为“自动连接到启用蓝牙的
设备”。若要改变设置,请参见
更改手柄型读取
器的设置
。
蓝牙无线连接
已激活
标签读取器连接到另一个启用蓝牙的的设备。
时间
显示当前时间。扫描家畜的电子标签时,当前
的日期和时间将同时被记录。通过 EziLink 软件
可以设置手柄型读取器的时间和日期。请参考
XRS 手柄型读取器使用说明书。
数目
当前扫描过程中所扫描的动物数目。
状态
信息显示区。
在安卓*智能手机上安装 Tru-Test Data Link 手机应用程序,可以将场次信息传输至手柄型读取器,或从手柄型读取器传出。该应用程序可以从 Google
Play*商店免费下载。欲了解 Tru-Test Data Link 应用程序的使用信息,可浏览 Tru-Test 网站 www.tru-test.com。
手柄型读取器的部件
LED 指示灯
该手柄型读取器有两个 LED 指示灯。一个是绿色,另一个根据情况
呈蓝色或红色。常见的指示灯显示情况:
液晶屏
打开手柄型读取器
按下读取键。
手柄型读取器发出蜂鸣声 ,液晶屏显示“READY”字条:
扫描 EID 标签
当天线接近某个标签时,按下并释放读取键。
当 ID 标签号码显示在液晶屏上,绿色指示灯闪烁一次,手柄振动,
手柄型读取器发出蜂鸣声 ,这表明手柄型读取器已成功读取标签。
提示:
如果需要扫描正在快速移动中的家畜的标签,可以持续按住
读取键。一旦放开读取键,扫描即停止2。
关闭手柄型读取器
持续按住滚动键。
倒计时 (3, 2, 1) 显示在液晶屏上,然后手柄型读取器发出蜂鸣声 并
关闭。
2
当读取模式被设置为 Standard(默认设置) 时。
Page 27
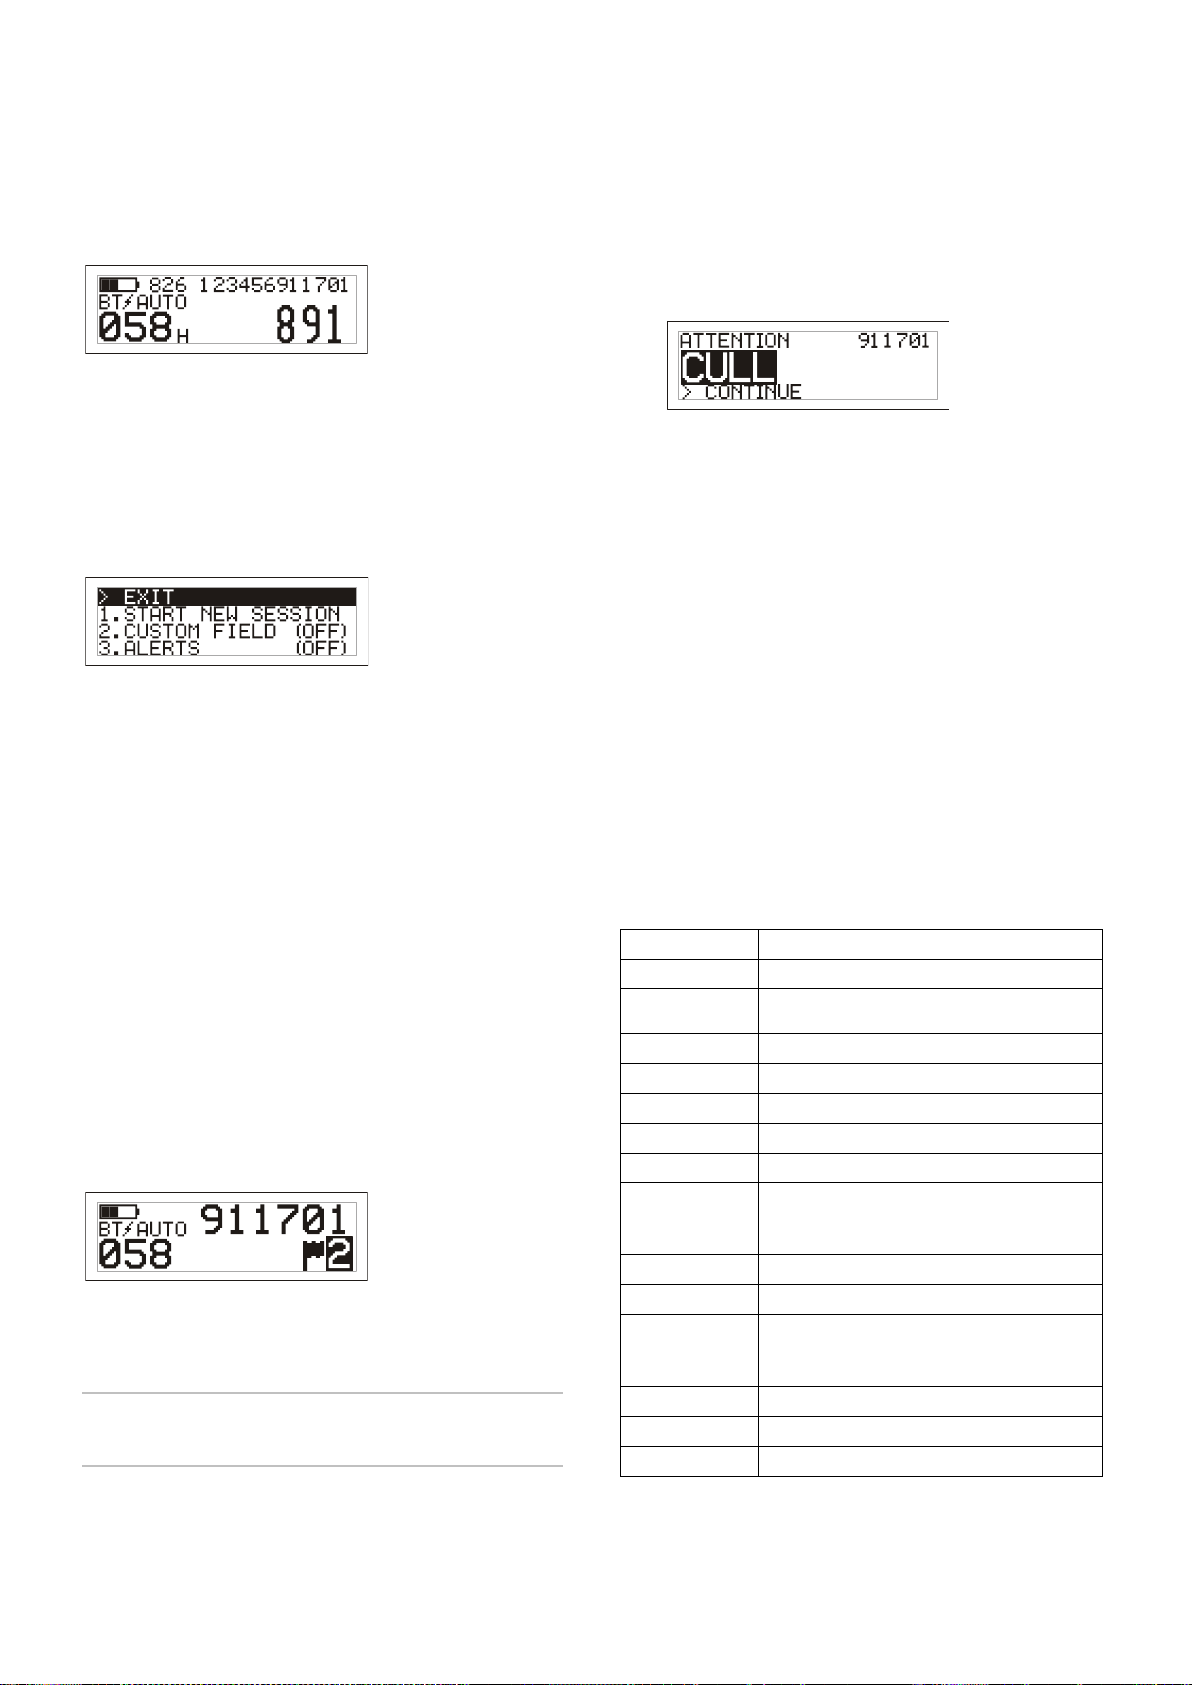
使用交叉引用文件
尺寸
651 x 65 x 51 mm(长×高 × 宽)
重量
706 克,包括电池
通信
Bluetooth
® 1 类无线连接,最大传输距离 100 米。
RS232 9600-115200 bps, Xon/Xoff
工作温度
-10 到 +50°C
贮藏温度
-20 到 +35 °C (-4 到 +95 °F).
电池充电温度
+5 到 +40 °C (+41 到 +104 °F).
读取距离
HDX 最多 330 mm, FDX 最多 350 mm
读取速率
每分钟最多读取 1000 次
内存容量
最多 20,000 个扫描记录
最多 10,000 个警报
最多 20,000 对 EID-VID 成对标签
标签兼容性
读 ISO HDX 和 ISO FDX-B
防护等级
IP67 (在 1 米深的水中浸没 30 分钟)
电池工作时间
19 小时:Read Mode(读取模式)= Standard(标准)或者
Single(单个)
9.5 小时:Read Mode(读取模式)= Continuous(连续)
电池规格
7.4V,1500mAh,锂离子电池
充电时间
3 小时
软件
Tru-Test EziLink™
扫描期间接收警报
在扫描之前,可通过 EziLink 将包含 EID 和相应 VID 的交叉引用文件导
入手柄型读取器。如果交叉引用文件已导入手柄型读取器,那么当
扫描电子标签时,VID 会以大号数字的形式显示在液晶屏上。EID 会
以小号数字的形式显示在其上方。
关于传输交叉引用文件的的信息,请参阅 XRS 手柄型读取器使用说
明书。
更改手柄型读取器的设置
进入手柄型读取器设置:
同时按下读取键和滚动键。
EXIT(退出)选项的下方出现三个选项。
若要查看所有选项,请重复按下滚动键。
若要进入某个选项,选中该选项并按下读取键。
若要退出菜单设置,请按滚动键直至 EXIT(退出)选项被选中,
然后按下读取键。
有关手柄型读取器菜单设置的的解释,请参见下一页。
启用警报设置后,当手柄型读取器扫描到某个特殊家畜的标签时就
发出警报。扫描前,使用 EziLink软件可以将包含 EID 标签和警报信
息的文件传输至标签读取器。
1 按照上一页描述步骤扫描 EID 标签。
如果有针对某个 EID 标签的警报存储,手柄型读取器就会发出
蜂鸣声,手柄振动,液晶屏上显示警报信息:
2 按下滚动键选择 Continue 然后按读取键。这表明您已接到警
报,可继续扫描。
关于传输警报文件的更多信息,请参阅 XRS 手柄型读取器使用说明
书。
手柄型读取器的保养和维护
用湿布、温水和肥皂把手柄型读取器擦净。其他清洁用品可能会损
坏手柄型读取器。禁止把手柄型读取器浸在水里。
把手柄型读取器放在干燥阴冷的地方。
当没有线缆与手柄型读取器相连时,请将防尘盖盖上,以防止湿气
或尘土进入插槽。
服务与保修信息
手柄型读取器的其他设置
使用 EziLink 软件可以更改手柄型读取器的其他设置。包括自动断电
(Automatic Power Down)、蜂鸣器/振动开/关(Beeper and Vibration
On/Off)、日期/时间设置(Date/Time settings)等。
详情请参阅 XRS 手柄型读取器使用说明书。
扫描期间加自定义字段信息
启用自定义字段设置后,可以在扫描过程中给每只家畜添加备注信
息。手柄型读取器将旗帜图标预设为表示自定义字段的标识(其他
选项包括:空白或 1, 2, 3, 4, 5)。这个自定义字段可在 EziLink 软件中
更改,参阅 XRS 电子标签手柄型读取器使用说明书。
1 按照上一页描述步骤扫描 EID 标签。
2 按下滚动键浏览可选项。
3 当希望选择的选项显示时,直接扫描下一个 EID 标签。
上一个被扫描的 EID 标签的自定义字段信息会被自动保存。
服务与保修信息请参阅 www.tru-test.com。
规格
注意:
即使发生显示时间超时,返回到 READY 屏幕,或者手柄型读
取器被关闭的情况,自定义字段信息仍会被保存。
Page 28

手柄型读取器的菜单设置
菜单名称
选项 1
描述
START NEW SESSION
(开始新的一场)
已读取的所有标签都存储在场(文件)里。最多可建 50 个场。使用 EziLink 软件或 Tru-Test Data Link 安卓*智能手机应用程
序可以传输场次信息。
按下读取键开始一个新的扫描场次。
CUSTOM FIELD
(自定义字段)
OFF*
ON
启用 Custom Field(自定义字段)功能可以为某个家畜输入备注信息,例如状态评分。使用 EziLink 软件可以设置自定义
字段的标记(label)和选项(label),然后将其传输至手柄型读取器(参阅 XRS 手柄型读取器使用说明书)。
ALERTS
(警报)
OFF*
ON
启用 Alerts(警报)设置后,当手柄型读取器扫描到某个特殊家畜的标签时就会发出警报。例如,给某个正在停药期的
家畜设置警报,以便提醒农场工作人员。使用 EziLink 可以设置警报信息,然后将其传输至手柄型读取器(参阅 XRS 电子
标签手柄型读取器使用说明书)。
BLUETOOTH®
(蓝牙)
AUTO*
OFF
MANUAL
通过 BLUETOOTH®无线连接可以将信息从手柄型读取器传输至重量显示器或电脑等其他具备蓝牙的设备。
AUTO(自动):当 BLUETOOTH®设置为自动时,手柄型读取器将自动连接到最近使用过的蓝牙设备。如果没有搜索到该
设备,手柄型读取器会选择之前建立过连接的其他设备,并与之建立连接。如果没有搜索到之前建立过连接的设备,手
柄型读取器将搜索重量显示器,与之建立连接并将其加入至连接设备列表。如果仍不成功,手柄型读取器将允许任何其
他蓝牙设备发出的连接请求。用户随时都可以撤销 Auto 设置,手动搜索设备(见下面的 FIND BT DEVICES)或者从设备列
表中选择一个之前连接过的设备 (见下面的 PAIRED DEVICES)。如果每次都使用同一个蓝牙设备与手柄型读取器进行连
接,Auto 设置则是最理想的。
OFF(关):如果不想让手柄型读取器自动连接或搜索蓝牙设备,可以关闭蓝牙功能。关闭蓝牙功能可以为手柄型读取
器节省电池电量。
MANUAL(手动):当 BLUETOOTH®被设置为手动时,手柄型读取器将允许从其他蓝牙设备发出的连接请求。您也可以手
动搜索一个蓝牙设备(请参阅下面的 FIND BT DEVICES)或者从以前建立过连接的设备列表中选择一个设备(请参阅下面
的 PAIRED DEVICES)。
FIND BT DEVICES
(查找蓝牙设备)
当 BLUETOOTH®被设置为 Auto(自动)或 Manual(手动)时,可手动搜索蓝牙设备并与之建立连接,或者中断现有的连
接并强制连接到另一设备。
按下读取键,搜索有效范围内启用蓝牙的设备。
稍等片刻后,手柄型读取器的屏幕上会显示出有效范围内正在启用蓝牙的设备。
连接到一个设备:
从列表中选择需要连接的设备,然后按下读取键。
该设备会被添加至之前建立过连接的设备列表(见下面的 PAIRED DEVICES)。
PAIRED DEVICES
(之前建立过连接的
设备)
当 BLUETOOTH®被设置为 Auto(自动)或 Manual(手动)时,可以手动将其连接至之前建立过连接的设备,或者中断当
前的连接,并强制将其连接到另外一个设备。
使用 PAIRED DEVICES 会比 FIND BT DEVICES 更加快速地建立连接。
按下读取键显示之前建立过连接的设备。选择一个设备并按下读取键后,
手柄型读取器会尝试与之前建立过连接的设备进行连接。
DUPLICATES
(重复)
ON*
OFF
当 Duplicates(重复)启用时,手柄型读取器不会在同一场中重复记录同一个 EID。手柄型读取器可以对之前的 500 个标
签进行记忆。
FLIP SCREEN
(翻转屏幕)
OFF*
ON
启用 FLIP SCREEN(翻转屏幕)可以调转液晶屏的显示内容,方便习惯用左手的用户。此时,惯用右手的用户在屏幕上看
到的是上下颠倒显示的内容。
CONTRAST
(对比度)
根据光线来调整对比度。
重复按下读取键来调整液晶屏的对比度。
READ MODE
(读取模式)
STANDARD*
CONTINUOUS
SINGLE
当设置为 Standard(标准)时,一旦按下读取键,手柄型读取器就开始扫描。扫描并读取标签的时间会在瞬间完成,出
厂设置的默认值为 3 秒钟。如果持续按下读取键,手柄型读取器将持续扫描并读取多个标签。Standard 是常规使用的推
荐设置。读取时间可在 EziLink 软件中进行设置,参阅 XRS 电子标签手柄型读取器使用说明书。
当设置为 Continuous(持续)时,一旦按下读取键,手柄型读取器就开始扫描;只有再次按下读取键时手柄型读取器才
停止扫描。此设置适用于扫描圈中或跑动中的家畜。
当设置为 Single(单个)时,手柄型读取器的操作与 Standard 模式基本相同,但是手柄型读取器在读取完一个标签之后
不会继续进行扫描。需要扫描下一个标签时必须先放开读取键,然后再次按下。
PRINT SESSION
(打印场次信息)
使用该功能可以将存储在手柄型读取器上的所有场次信息通过连接的蓝牙打印机打印出来。
BACKLIGHT
(背光)
OFF
LOW*
HIGH
根据光照条件调整背光。
按读取键调整液晶屏的背光。
SOFTWARE VERSION
(软件版本)
显示手柄型读取器的软件版本信息。
ENGLISH*
(英文)
ESPAÑOL
PORTUGUÊS
FRANÇAIS
DEUTSCH
ITALIANO
DANSK
SVENSKA
[other languages…]
显示在手柄型读取器液晶屏上的语言可被更改。
重复按下读取键。
当手柄型读取器通过蓝牙无线连接与重量显示器相连时,手柄型读取器会自动显示重量显示器上所使用的语言。
默认设置被标记为
*
 Loading...