

Page 1
Page 2

Tru-Test Limited
25 Carbine Road
Mt Wellington
Auckland 1060
New Zealand
Postal address:
P O Box 51078
Pakuranga
Manukau 2140
New Zealand
Tru-Test recommends the use of Jenquip Pasture Management Software. This software
is required in order to download data from the plate meter. It takes the information
from your farm walk and produces ready-to-use reports. Jenquip Pasture Management
Software is supplied with your plate meter on a USB stick. For all support, phone
0800 AGDATA (0800 243282).
Computer requirements: Windows XP or later.
© 2018 Tru-Test Limited.
All product names and brand names in this document are trademarks or registered trademarks of their
respective holders.
No part of this publication may be photocopied, reproduced, stored in a retrieval system, or transmitted in
any form or by any means, electronic, mechanical, photocopying, recording or otherwise without the prior
written permission of Tru-Test Limited. Product specifications may change without prior notice.
For more information on other quality Tru-Test Group brands and products, visit
www.tru-testgroup.com
Tru-Test Limited, 2018. All rights reserved.
832992 Issue 1 01/2018
Page 3

Introduction ................................................................................................. 1
Assembly instructions................................................................................... 2
Operating the plate meter ............................................................................ 4
Zero calibration ........................................................................................... 6
Start up/self test .......................................................................................... 8
Entering the factory default formula ............................................................. 9
Other formulas: ........................................................................................... 9
Entering your own formula ......................................................................... 10
Using your plate meter ............................................................................... 11
Taking paddock readings (the pasture walk) ............................................... 12
Software .................................................................................................... 14
Maintenance ............................................................................................. 14
Fault finding .............................................................................................. 16
Warranty and servicing .............................................................................. 20
Page 4

Page 5
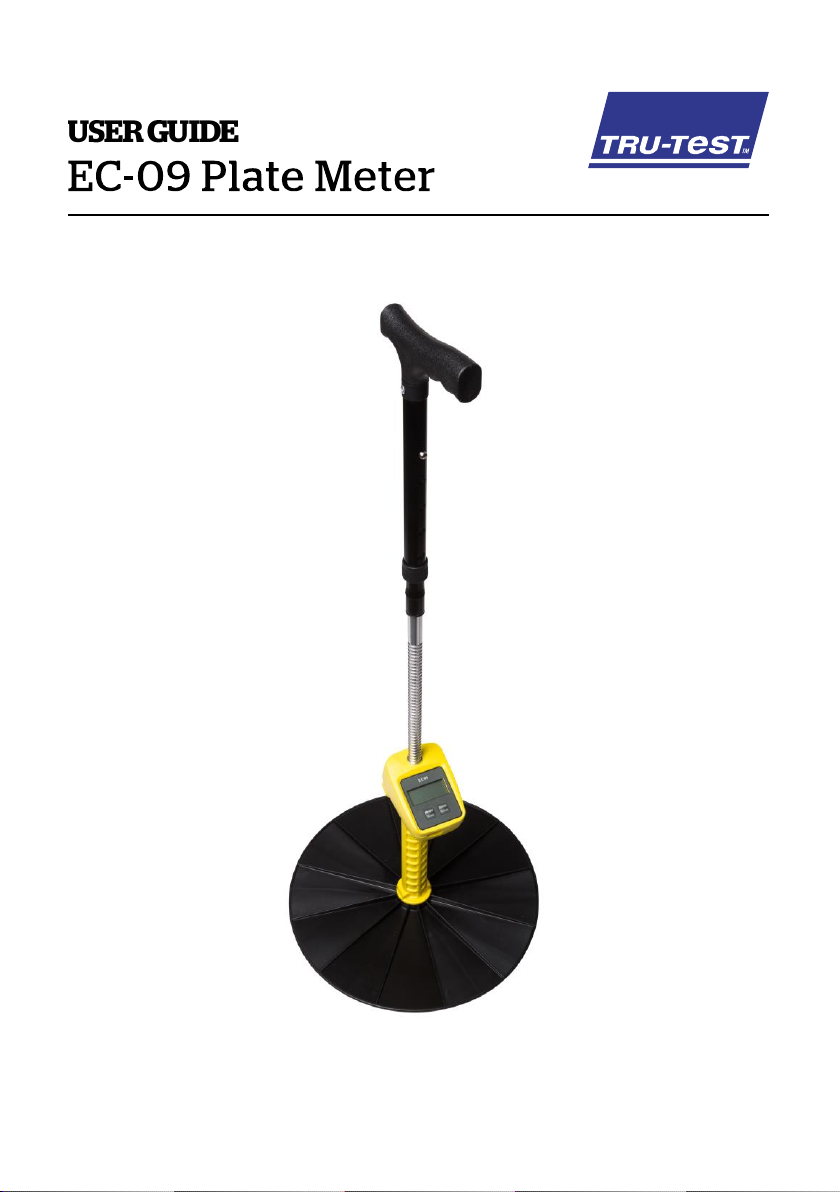
Congratulations on the purchase of your Tru-Test EC-09 Plate Meter (plate meter).
Be careful around electric fences. Parts of the plate meter will
conduct electricity!
Water blasting or submerging the unit will void the warranty.
This plate meter is a high precision engineered device for measuring the average
height of pasture relative to density of the pasture.
This is directly relative to the quantity of dry matter present (kilograms of dry
matter – kg DM/ha)
Your plate meter will become an invaluable tool in your farming operation for
day-to-day feeding decisions and long term feed budgeting.
Read and understand all the instructions before using the plate meter. A copy of
this user guide can be downloaded from www.livestock.tru-test.com
Your plate meter is designed only for measuring pastures. Use it for no other
purpose (e.g. it is not a walking stick). We have manufactured the plate meter
using quality materials and manufacturing techniques, however, if faults do occur,
have them corrected before you use the plate meter.
Store the plate correctly. Be careful that the wind does not blow the plate away - it
could be dangerous. It is not to be thrown.
1
Page 6
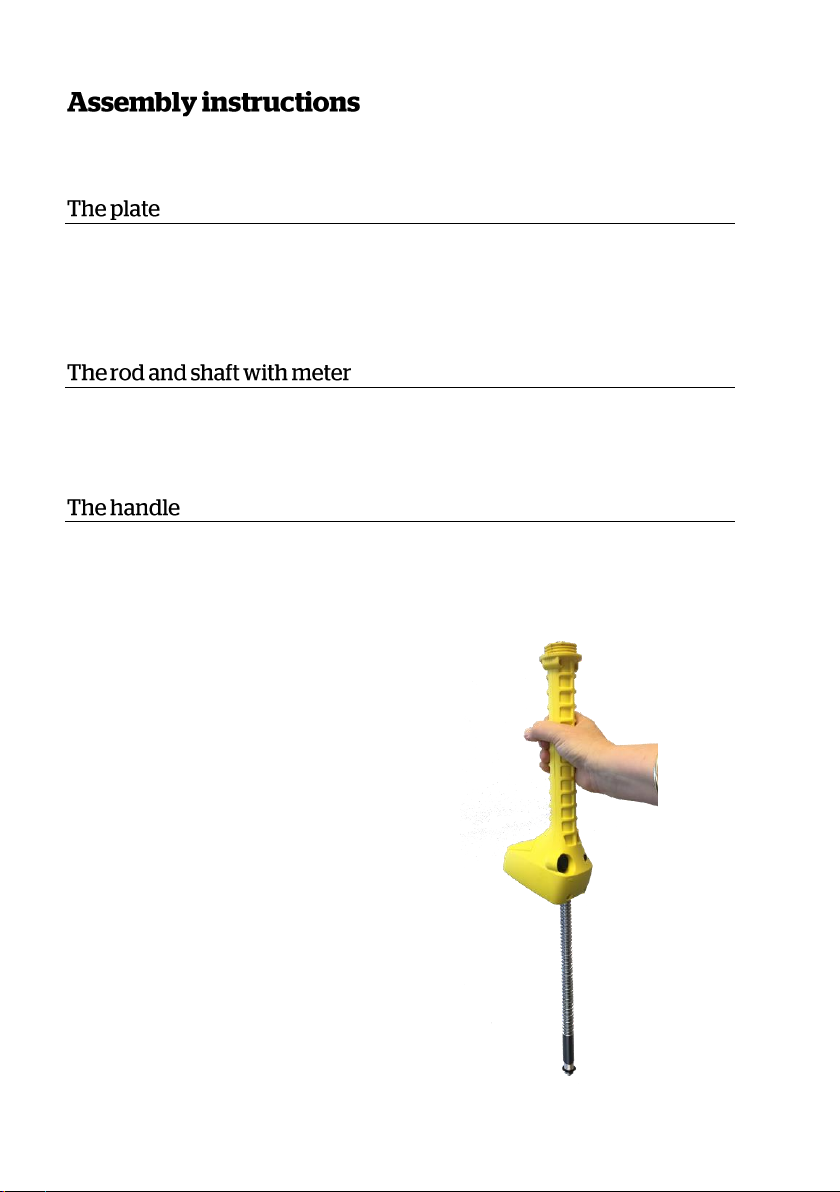
The plate meter is supplied in three parts:
1 With one hand, hold the yellow shaft
vertically with the counter towards the
ground. The grooved rod will slide
down through the shaft.
The heavy duty plastic plate sits on top of the pasture to establish average height
and density. The area of the circle and weight of the plate have been carefully
calibrated.
The grooved rod allows pasture to be measured in 0.5 cm intervals (clicks). The
yellow shaft includes the electronic meter.
The black handle can be adjusted to suit the height of the user.
To assemble the plate meter:
2
Page 7
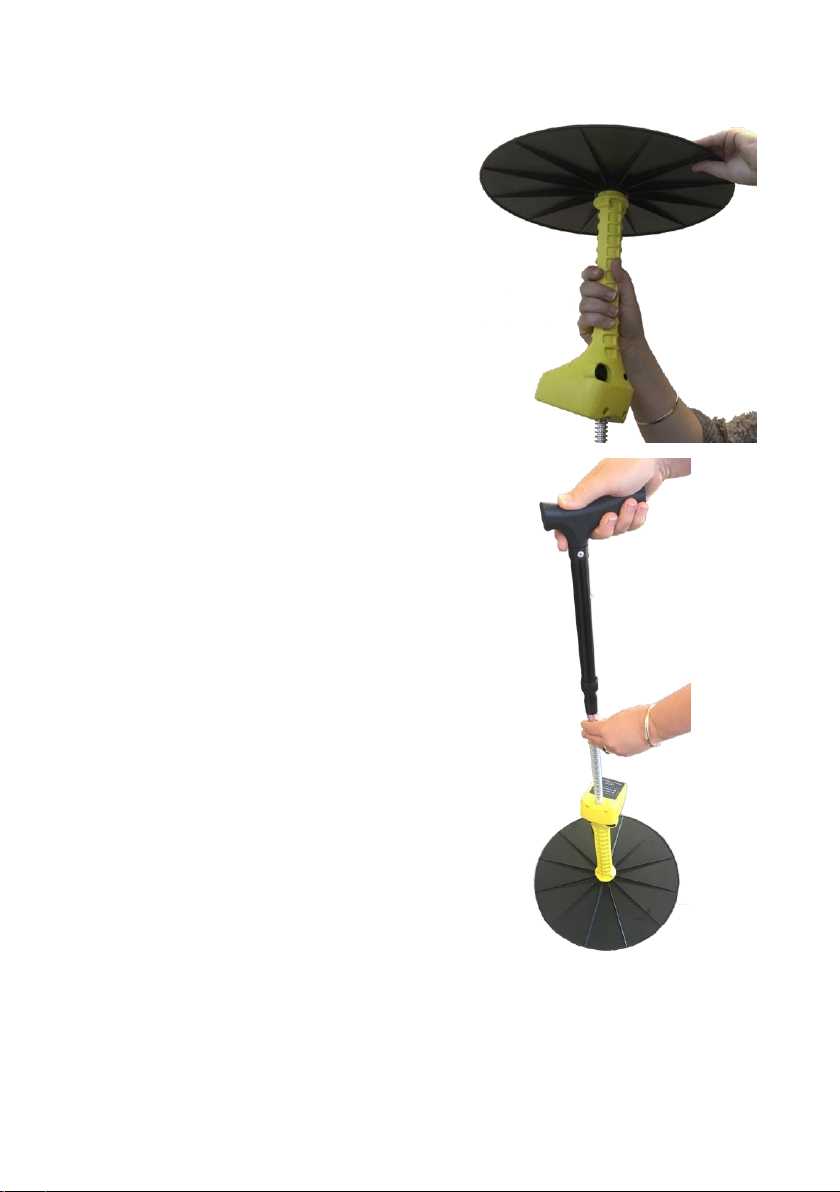
2 With your other hand, screw on the
plate, making sure that the smooth
side of the plate is uppermost (ribbed
side closest to the meter).
3 Turn the plate meter the correct way
up (plate down) and place it on the
ground, The grooved rod will protrude
out of the shaft. With one hand hold
the grooved rod and with the other
hand, screw on the black plastic
handle. Be careful not to displace the
small rubber O-ring on the top of the
rod.
4 Use the buttons on the handle to adjust the handle so that it is a
comfortable height.
3
Page 8
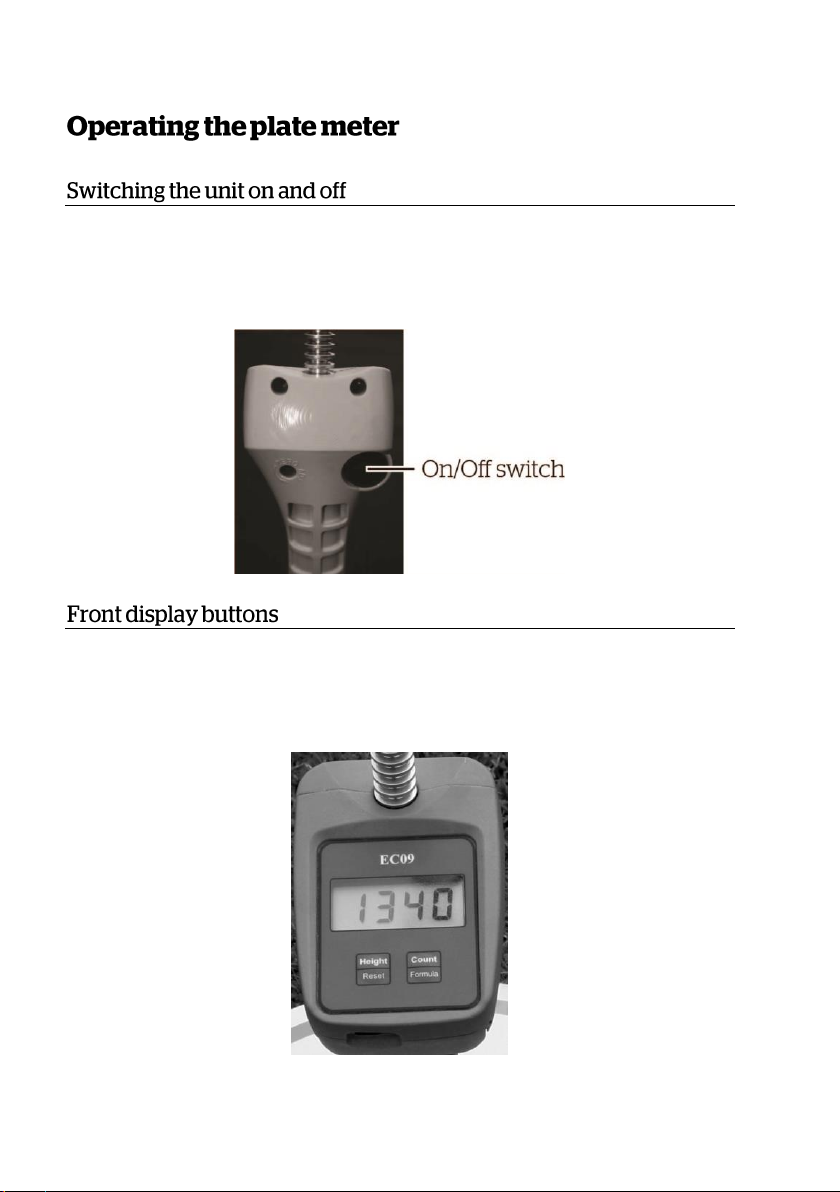
The plate meter is switched on and off using the black switch at the back of the
unit. Off is in the ‘down’ position. When the unit is off, there are no numbers
displayed on the LCD screen.
The various functions of the plate meter are accessed by the two buttons on the
front of the unit, labelled ‘Height/Reset’ and ‘Count/Formula’. The words in bold
type are the primary functions.
4
Page 9

These are activated by a short press of the button. The secondary functions ‘Reset’
1 click = 0.5 cm.
and ‘Formula’ are activated by holding the button down until the function
operates. When the unit is first switched on, the display will show the current
formula in use and the calculated kg DM/ha based on that formula, and any
readings in memory. Pressing the “Height” button will briefly display the average
pasture height. This is often referred to as “clicks” (measured in 0.5 cm) and will
be displayed to one decimal place (i.e. 0.0 or 12.4).
The number of readings is displayed when the ‘Count’ button is pressed. The
display will show a ‘c’ on the left side and the count on the right. The display will
return to normal after two seconds.
All readings can be cleared (reset) by holding down the “Reset” button for
approximately two seconds, then the display will change to “0”.
5
Page 10
To ensure that the plate meter accurately measures the compressed height of
1 Hold the plate meter at the bottom of travel and ensure that the plate meter is
switched off.
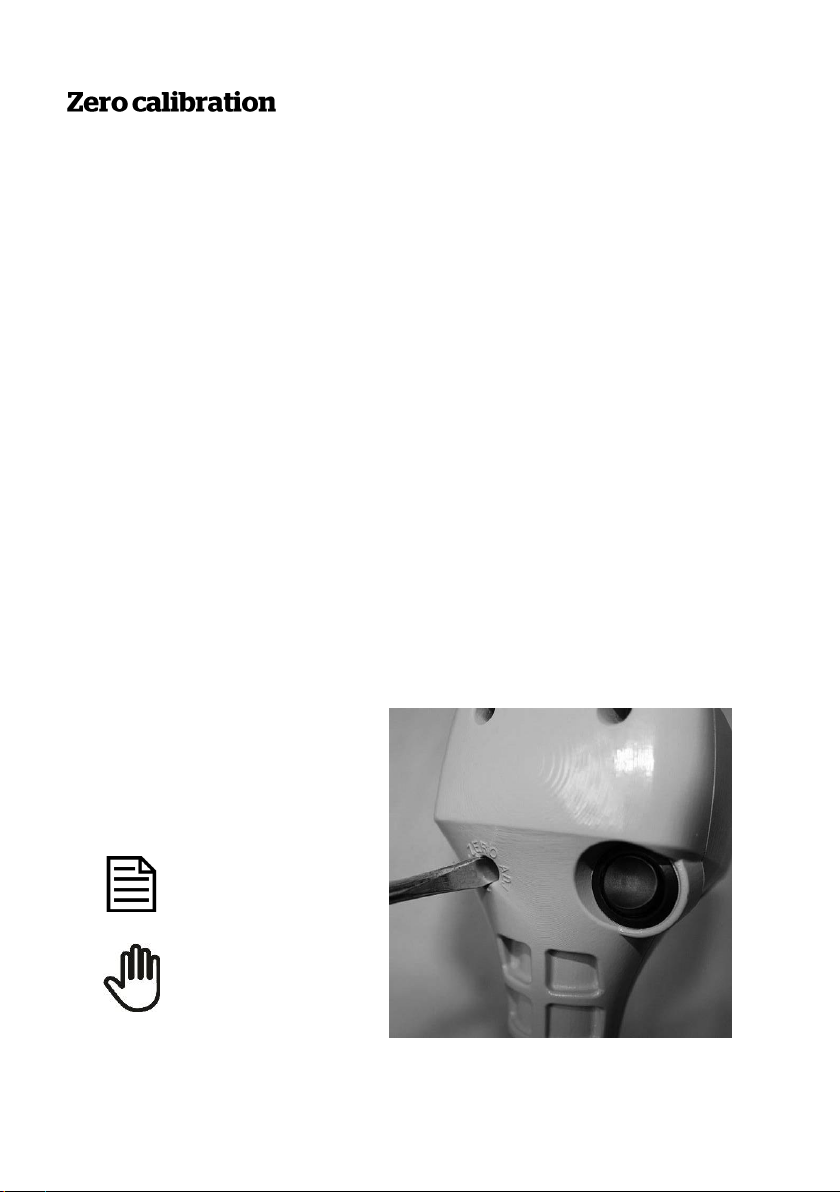
2 Locate the zero adjustment screw (beside the On/Off switch).
3 Remove the protective rubber bung by levering it out gently using a flat-
bladed screwdriver.
4 Hold down the “Count” button while switching the unit on. The display will
change to “CAL” briefly and display a colon (:) followed by a number. The
colon (:) signifies that it is in fine calibration mode.
As an example, you might see “:5” when you switch on.
5 Using the flat bladed screw
driver, turn the yellow plastic or
steel shaft within the cog,
anticlockwise, until the display
reads “0”.
The cog and steel
shaft must remain
stationary.
Do not turn the shaft
beyond this point or
you may damage the
plate meter and void
the warranty.
pasture, the plate meter must be calibrated. This requires setting a base level of
zero so measurements can be benchmarked against this. If the plate meter does
not return to zero after each reading, it will not record the measurement - hence
the plate meter will not beep.
If, for any reason, the plate meter is out of calibration, it will need to be
recalibrated.
To calibrate the plate meter:
6
Page 11

6 Once the counter reads zero, move the plate meter up the full length of the
shaft. The colon will disappear once it passes 9 and enters “clicks” mode. At
the full height the display should read approximately “50” which is 50 half
centimetres. The plate meter has now been calibrated.
7 Switch off when you have finished, and then back on again without pressing
any buttons.
8 Test the zero calibration by raising and lowering the plate all the way to the
bottom several times. A beep should sound and the kg DM/ha displayed as
the plate falls. If it does not, repeat the steps above and retest.
9 When you have finished calibrating the plate meter, replace the rubber bung
over the zero adjustment screw.
If the calibration fails to hold, then the potentiometer, which the cog drives, is
probably faulty and will need replacing. This can occur with excessive wear often
compounded by dust and dirt entering the dry bearing of the potentiometer.
7
Page 12

1 Switch on.
The plate meter will beep and display the current formula setting. The formula
will be displayed next with the ‘+’ part of the equation first (default 500) and
then the ‘x’ part second (default 140).
2 The display will then show the kg DM/ha calculation based on that formula
and any readings stored in memory.
3 To clear the readings, press and hold the ‘Reset’ button until the display
shows ‘0.0’ There is one default plate equation, and one custom (user
editable) equation. The former is built into the chip and cannot be replaced or
modified. This equation is typically used between April and September in New
Zealand.
During start up, if the battery charge is low it will display “Lo” and give two
beeps. It will still work OK for some time. However, it would be a good idea to
take a spare battery with you on the farm walk.
The original formulas developed for use with the plate meter were:
Dairy Pasture (Reasonably consistent rainfall areas height reading x 158 +
1000 = Cover (kg DM/ha).
Dairy Pasture (moderate rainfall periods height reading x 158 + 200 = Cover
(kg DM/ha).
Sheep pastures: height reading x 158 = Cover (kg DM/ha).
The plate meter also provides an option for selecting your own equation or those
recommended by consultants, such as Dairy NZ or Beef + Lamb New Zealand.
Your plate meter will be set up for the Dairy NZ recommended equation for the
autumn/winter months.
8
Page 13
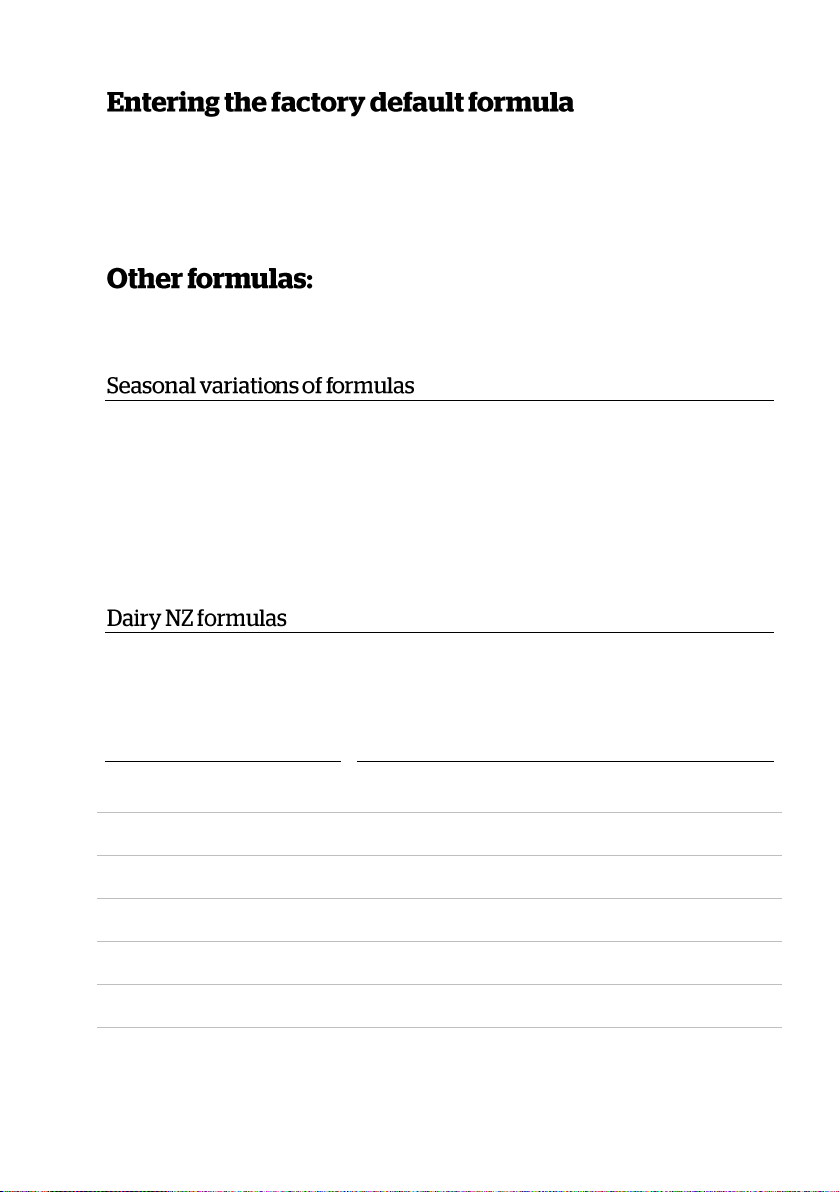
While the plate meter is switched on, hold down the ‘Formula’ button. The display
Months
(Southern hemisphere)
Plate meter equations
(Dairy pastures)
Winter (April/September)
Plate meter reading x 140 + 500 (factory default)
October
Plate meter reading x 115 + 850
November
Plate meter reading x 120 + 1000
December
Plate meter reading x 140 + 1200
January
Plate meter reading x 140 + 1200
February
Plate meter reading x 185 + 1200
March
Plate meter reading x 170 + 1100
shows ‘F_ _ d’ Press the ‘Reset’ button briefly. The display will then show (500)
and then (140). The default formula has now been loaded and saved to memory.
To better reflect the growth stages of pastures, these formulas were derived:
1 Winter & early spring - before stem growth x125 + 640
2 Late spring & early summer - during stem growth x130 + 990
3 Mid summer x165 + 1480
4 Early autumn - before autumn rain x159 + 1180
5 Late autumn - after rain x 157 + 970
Dairy NZ also developed these month based formulas:
9
Page 14
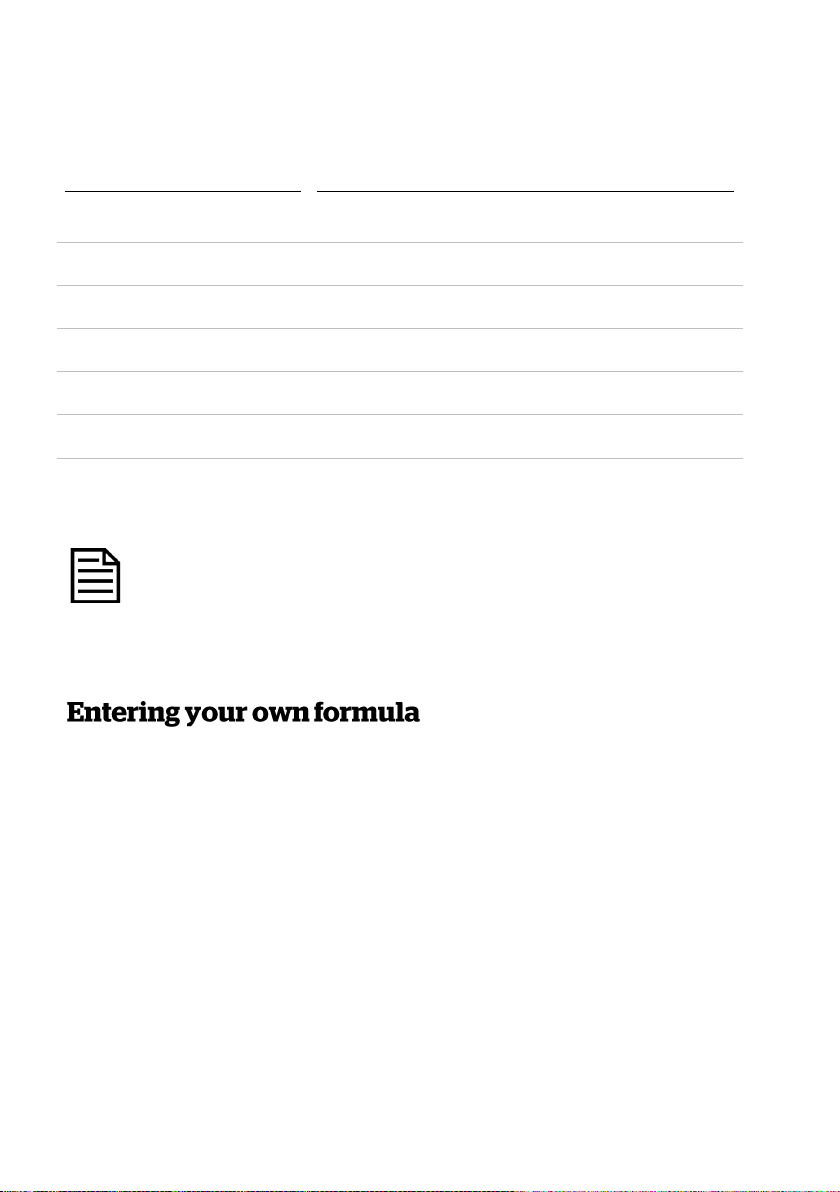
Months
(Northern hemisphere)
Plate meter equations
(Dairy pastures)
Winter (October/March)
Plate meter reading x 140 + 500 (factory default)
April
Plate meter reading x 115 + 850
May
Plate meter reading x 120 + 1000
June
Plate meter reading x 140 + 1200
July
Plate meter reading x 140 + 1200
August
Plate meter reading x 185 + 1200
September
Plate meter reading x 170 + 1100
Some equations may change without notice and are influenced by
seasonal differences. If you are unsure of the current equation contact
Dairy NZ or your local consultant.
To enter your own cover equation or one that may have been recommended by a
third party, such as your consultant, Dairy NZ or Beef + Lamb New Zealand, please
do the following:
1 While the plate meter is switched on, hold down the “Formula” button. The
display looks like this: “F--d”. Press the formula button again briefly - then
change the “d” (default) to “c” (custom). Now press “Reset” briefly and the
display will look like this: “0---” This is the first of two numbers you will enter.
The first number is the equation “add” number and the second the “multiply
number. For example, in equation 2 above, the first number (115) is the
“multiply” number and the second (850) is the “add” number.
10
Page 15
2 The “add” number is 4 digits long and can range from 0 to 9999. Starting
Lowering the plate meter consistently rather than rolling it, will provide
a more accurate reading.
with the first digit, press the “Formula” button to change this digit to a value
from 0 to 9. Press the “reset” button when it is correct. NB, 850 for example
would be entered as (0850). Enter the next digit. Repeat this process until all
4 digits have been entered. The display then changes to the “multiply”
number.
3 The “multiply” number has 3 digits and can range from 0 to 255. The first
digit will appear. Press the “Formula” button to change this digit to a value of
0, 1, or 2. Press the “Reset” button when it is correct and the next digit will
appear. Repeat this process until all digits are entered and the display returns
to its normal state.
As manufacturers we can only give broad guidelines with regard to the formula to
use. For advice on creating custom formulas optimised for your particular farm,
and circumstances contact 0800 AGDATA (0800 243282).
Place the plate meter squarely on the ground. The plate will “rise” as it rests on
the grass, giving a reading of grass height (½ cm increments) on the bottom
counter. At each measurement, click the top (sample) counter to record the total
number of samples taken.
Practice the technique of an uninterrupted slow walking pace, taking care not to
“roll” the plate meter. This is where the plate is not square to the ground and it
will provide a false HIGH reading.
11
Page 16
The more regularly you take readings the better. Astute farmers will take readings
Be consistent. Plan the same walk every time although it can be done
in reverse. This allows each walk to be compared with another.
weekly, sometimes more often during critical times of the year and less frequently
during times of static conditions.
The more samples taken per paddock the less margin of error. We recommend 20
to 40 samples per paddock but if you have bad conditions ie. pugged paddocks,
then more samples should be taken.
Most paddocks will have areas of good growth and areas of poor growth. If
recently grazed, the pasture may be clumpy. Ensure that your walk includes
representative samples of both areas. Avoid tracks, stock camp sites and other
uncharacteristic areas.
Take samples every 3 paces or so, rather than choosing by eye the spot to sample.
This removes operator preference for long or short patches.
The plate meter can save recorded average height readings to a specific paddock
number which can be selected on the plate meter. These readings can then be
downloaded from the plate meter via the mini USB cable and aligned with your
paddocks in “walk order”. The walk order will need to be defined in the Jenquip
Pasture Management Software.
1 Switch the unit on using the toggle switch at the back.
2 Reset by holding the ‘Reset’ button until the display changes to ‘0’. This
should be accompanied by 2 short beeps.
3 Walk across the paddock taking readings every few paces. You will hear a
beep every time a reading is stored. The average kg DM/ha is immediately
12
Page 17

recalculated and displayed. The number of samples (readings) to be taken
Undo Feature: You can “undo” the last reading by holding down the
“Height” button as you switch on the plate meter. The count will now
be one less than what it was and the dry matter reading will also
change to the previous reading. You can continue taking more readings
if you wish.
should range between 20 and 40 per paddock however this will be
determined by the variance existing in the cover. You will hear 3 short beeps
when you have completed 29 readings and one long beep when you reach
30. This is the recommended number of readings. Readings need to be taken
on a regular basis e.g. every three paces to even out any variations, however
avoid stock camp areas, tracks or uncharacteristic areas. The greater the
variability, the greater the number of readings you should take.
4 If you need to negotiate an obstacle (e.g. fence or creek) switch the unit off so
that no readings are taken if the plate moves. On the other side of the
obstacle, switch the unit back on and continue taking readings.
5 When you have completed the paddock, read off the average pasture cover.
6 Write down the average height and/or the average cover.
7 Repeat instructions 4 to 8 until you have completed every paddock.
8 Switch the unit off using the toggle switch at the back.
Results from feed budgeting will assist in making important management decisions
such as:
Stocking rates
Quantity of feed supplements to feed
When to apply nitrogen fertiliser
Predicting future shortages or surpluses of pasture
Planning silage and hay making
Drying off times
Stock sale decisions
Highlighting poor performing pastures or paddocks
13
Page 18
Tru-Test recommends the use of Jenquip Pasture Management Software. This
software is required in order to download data from the plate meter. It takes the
information from your farm walk and produces ready-to-use reports. Jenquip
Pasture Management Software is supplied with your plate meter on a USB stick.
Use the Jenquip Pasture Management software to further process the plate meter
readings and do your feed wedge:
Total Dry Matter = Kg Dry Matter per Hectare x Paddock Area
Growth Rate of Pasture
= Final kg DM/ha - Initial kg DM/ha (kg DM/ha/day )
Number of days between samples
Your plate meter has been developed over a number of years to be simple,
effective yet reliable. However, a little maintenance will ensure many years of
trouble free use from this plate meter.
After assembling the plate onto the meter, move the plate up and down a few
times to ensure no binding occurs. If its movement is restricted, the reason must
be identified and resolved before the plate meter is used.
Remove the plate and wash it clean.
14
Page 19

Wash/wipe and dry the area around the bottom of the plate meter. Move the plate
This is a precision instrument - look after it.
Water blasting or submerging the unit will void the warranty.
meter up or down the shaft so that all dirt and accumulated grass can be washed
away.
Apply some dry lubricant or light oil to the hinge assembly and to the inside of the
hinge lock tube.
On start up if you get a “Lo” battery warning then the battery will need replacing
over the next farm walk or two. A triangle icon in the top left hand corner also
indicates a low battery. The plate meter is powered by a single 9 V battery. The
use of an alkaline battery is recommended though a standard heavy duty battery
will still work well. An alkaline battery should give 40-50 hours continuous use. A
NiCad rechargeable battery may also be used.
Before you replace the battery, ensure that the plate meter is switched off. Remove
the screw on the front of the plate meter. The battery retainer will slide out
towards you.
Remove the battery and gently remove the battery snap connections (lever off with
a screwdriver). Fitting the new battery is the reverse of the removal procedure.
If your battery is near the end of its life, it is a good idea to carry a spare with you.
15
Page 20
Check
Resolution
The plate meter is not turned on
Turn on
The battery is flat
Replace the battery
If you have just changed a battery you
may have damaged the battery snap
clip to top of the battery.
Service: Send the plate meter to your
service agent
Check
Resolution
This is normally due to a low battery.
The plate meter requires a given level of
power to operate correctly. If the
battery doesn’t have sufficient power it
may continuously beep to warn you.
Remember if you turn the plate meter
off for a few minutes it may recover
slightly but the problem will not go
away.
Change the battery
Battery may be due for replacement.
Requires electronic service.
Most problems are due to the plate meter being out of calibration (see
following points as to why. If in doubt it is worth Zero Calibrating just to
make sure it is correct (see page 6).
16
Page 21

Check
Resolution
The cog has wound off.
Replace - Request a spare cog from
your service agent.
Potentiometer damaged. The
Potentiometer is the shaft part that
drives the cog.
Note:
Under no
circumstances should you apply CRC or
a light oil to the potentiometer. It is a
dry bearing and any lubricant will
render the potentiometer useless).
Send the plate meter to your service
agent for repair.
Check the metal shaft is coming right
back into the base of the tube. Ensure
there is no grass or soil build-up
preventing it from doing so. Also check
the washer at the bottom of the shaft is
not catching on the bottom of the
plate.
Clean the plate meter.
This means that the plate meter does not know where the bottom is - therefore
does not record the reading.
17
Page 22

Check
Resolution
The counter is like a calculator - it does
not give false readings under normal
circumstances.
Check the equation being used is
correct and the calibration has been
correctly set. (Zeroed).
Cover Equations
In New Zealand there are a number of
standard equations published by
various organisations. These reflect
regional pasture types. If you wish to
change an equation or select alternative
species you will need to contact your
consultant. Traditionally the equation of
height X 158 plus 200 was used
however there has been a series of
equations produced to reflect changes
in pasture types and physiological state
(vegetative, flowering, seed head)
which can alter DM levels in the
paddock.
A more accurate calibration can be
achieved by taking cuttings or your
consultant may be able to advise you
on the most appropriate equation for
your situation. This particularly applies
to pastures under irrigation.
Check which equation you are using.
18
Page 23
Check
Resolution
Metal shaft is bent.
Straighten or request a replacement
part from your service agent.
Grass or soil build-up inside case.
Clean the plate meter.
Flutes on steel shaft have become filled
with grass or soil.
Clean the plate meter.
Check
Resolution
Buttons not clicking or activating.
Service - membrane needs replacing.
Send the plate meter to your service
agent.
Check
Resolution
The plate meter is switched on.
If you wish to select the inbuilt default
formula.
Hold down the ‘Formula’ button until
the display changes to ‘F_ _d’. While
the ‘d’ is displayed, press the ‘Reset’
button. The following equation is used:
Cover (kg DM/ha) = 140 x height +500
19
Page 24

For warranty and servicing information, see
www.livestock.tru-test.com/product-warranty
20
For all support, phone
0800 AGDATA (0800 243282)
 Loading...