

TruTalk TK14 Owner's Manual
TK14
(Family Radio Service)
UHF FM TRANSCEIVER
(Servicio de radio familiar)
UHF FM TRANSMISOR-RECEPTOR

1
CONTENTS
Important Information........................................ 1
FCC Information................................................ 3
FCC Warning………………………………..….. 3
Introduction……...………………………………… 4
Maintenance...........................…..……………… 5
Getting to Know Your Radio………………...…… 6
Removing / Attaching the Belt Clip.…..……… 8
LCD Display Panel....…....……………………. 8
Battery Installation............………………….…… 9
Using Your Radio…………………………………. 10
Specifications……………………………………… 16
FRS Channel Table…………………………..… 16
Troubleshooting………………………………..…. 17
Warranty Service Instructions………………..…. 19
Accessories...........................………………..…. 20
Warranty Statement……..……………………….. 20
IMPORTANT INFORMATION
To get the most out of your TK14 two-way radio, please
READ THESE INSTRUCTIONS before attempting to
use your new radio.
SAVE THESE INSTRUCTIONS - they contain important
operation and safety information.

2
CONTENIDO
Información Importante.....……………............… 2
Información de la FCC .…………………....….... 22
FCC Warning………………………………….... 22
Intróduccion……………………………………..... 23
Mantenimiento…………………………………..... 25
Familiarizándose con la Radio.....……………… 26
Quitar/ Asurar el Clip de Cinturon.................. 28
Pantella de Cristal Liquido (LCD)…….………. 28
Instalación de las Pilas....……………………….. 29
Utilización de la Radio…………………………… 30
Especificaciones………………………………..… 37
Tabla de Canales FRS……………………….… 37
Reparacion de Averias…………………………… 38
Instrucciones Servicio de Garantía…………….. 40
Accesorios.........................................…………. 41
Aclaración de la Garantía Limitada.....…………. 41
INFORMACIÓN IMPORTANTE
Para sacarle el mayor provecho posible a su radio
bi-direccional TK14, LEA ESTAS INSTRUCCIONES
antes de intentar utilizar su nueva radio.
GUARDE ESTAS INSTRUCCIONES - contienen
información importante sobre el modo de uso y
seguridad.

3
FCC INFORMATION
The FCC requires that you be advised of certain requirements involving the use of this radio. This equipment
has been tested and found to comply with the limits for
a Class B Digital Device, pursuant to Part 15 of the FCC
Rules and Regulations. These rules are designed to
provide reasonable protection against harmful interference with other electronic devices in a residential
environment. This equipment uses and can generate
radio frequency energy. If not used in accordance with
the instructions, it may cause interference to other radio
communications. However, there is no guarantee that the
interference will not occur in another device's reception
(which can be determined by turning the equipment off
and on). The user is encouraged to correct the interference by one or more of the following measures:
• Reorient or relocate the receiving antenna
• Increase the separation between the radio and
other devices
• Consult the manufacturer for technical assistance
FCC WARNING: This equipment generates or uses
radio frequency energy. Changes or modifications not
expressly approved in writing may cause harmful
interference and void the user's authority to operate
this equipment.

4
INTRODUCTION
Family Radio Service (FRS) is the newest generation
in personal two-way communications. No license is
required for FRS radio operation - the radios provide
communication on any of the 14 license-free UHF
channels dedicated to such use.
The TK14 is a lightweight, compact two-way radio that
can be used for communicating with family or friends
at parks, shopping malls, sporting events, concerts any indoor or outdoor activity.
Providing up to two mile range, the TK14 is compatible
with other two-way radios using the FRS frequency
band (462.5625 MHz to 467.7125 MHz). Additional
features include:
• Simple push-to-talk operation on 14 UHF Channels.
• 38 PrivateTalk Codes - receive only messages
meant for you. The radio's CTCSS (Continuous
Tone Coded Squelch System) filters out other
messages on the channel.
• Channel scan monitors radio activity on all
channels.
• A multi-functional backlit display indicates the
current channel, and displays icons for volume
settings, battery power level, transmit and receive
modes, call function and mode lock. INTRO

5
INTRODUCTION, Continued
• Battery save circuitry allows radio to communicate
up to 30 hours from 4 "AAA" alkaline, rechargeable
Ni-Cad batteries or TruTalk rechargeable NiMH
battery packs.
Note: The maximum transmission range will vary
depending on terrain and environment of use. Range
will be greater in open fields, while the range is shorter
within and around buildings or large structures.
MAINTENANCE
Your TK14 radio is designed to be maintenance free.
To keep your radio in good working condition:
• Clean external surfaces with a clean cloth dampened
in a solution of dishwasher detergent diluted in
water. Apply the solution sparingly to avoid any
moisture leaking into cracks and crevices. Do not
submerge the radio. Use a non-metallic brush to
dislodge stubborn particles, if necessary. Dry the
surface thoroughly with a soft, lint free cloth
• DO NOT use solvents or spirits for cleaning - they
may permanently damage the housing
• Clean the radio battery contacts with a lint free cloth
to remove dirt, grease, or other foreign material that
may impede good electrical contact.
6
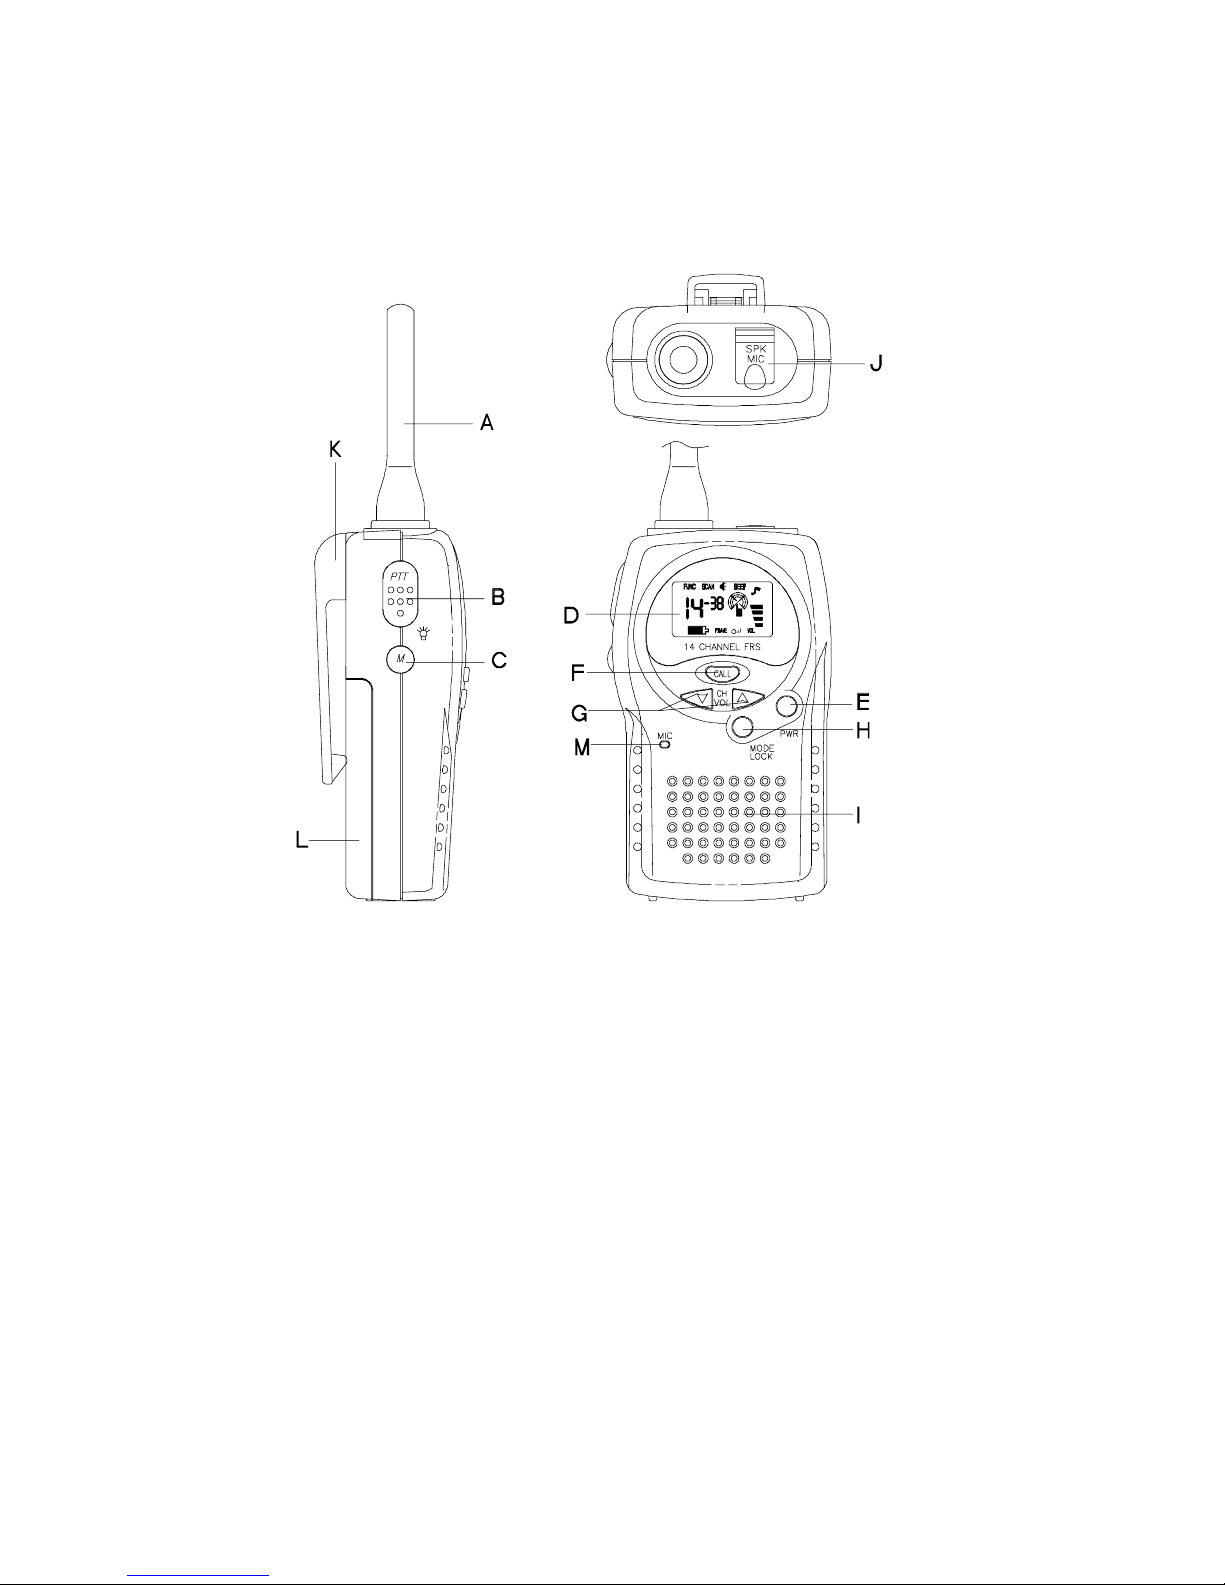
GETTING TO KNOW YOUR RADIO
A. Flexible Antenna (fixed)
B. P-T-T (Push-To-Talk) Button - Transmits your voice
messages.
C. Monitor / Backlight Button - Checks activity on
your channel before transmitting and backlights the
LCD panel.
D. LCD Panel - Provides current channel selection
information and radio status icons.

7
GETTING TO KNOW YOUR RADIO
E. Power Button - Used to turn the radio on and off.
F. Call Button - Announces your call to other radio
users on the same channel.
G. Up / Down Buttons - Selects radio channel and
adjusts volume level.
H. MODE / LOCK Button - Allows radio status changes
and locks keypad from accidental keypress.
I. Speaker - Allows received voice messages to be
heard.
J. Accessory Jack - Used for optional radio
accessories: lapel speaker / microphone with ear
jack, ear bud speaker with in-line P-T-T and
microphone. (Accessories sold separately).
K. Belt Clip - Secures radio to your belt, purse, back-
pack or other convenient location.
L. Battery Compartment - Houses 4 "AAA" sized
alkaline, rechargeable Ni-Cad batteries, or TruTalk
rechargeable NiMH battery pack.
M. Microphone - Allows transmitted voice messages
to be heard.
8
GETTING TO KNOW YOUR RADIO
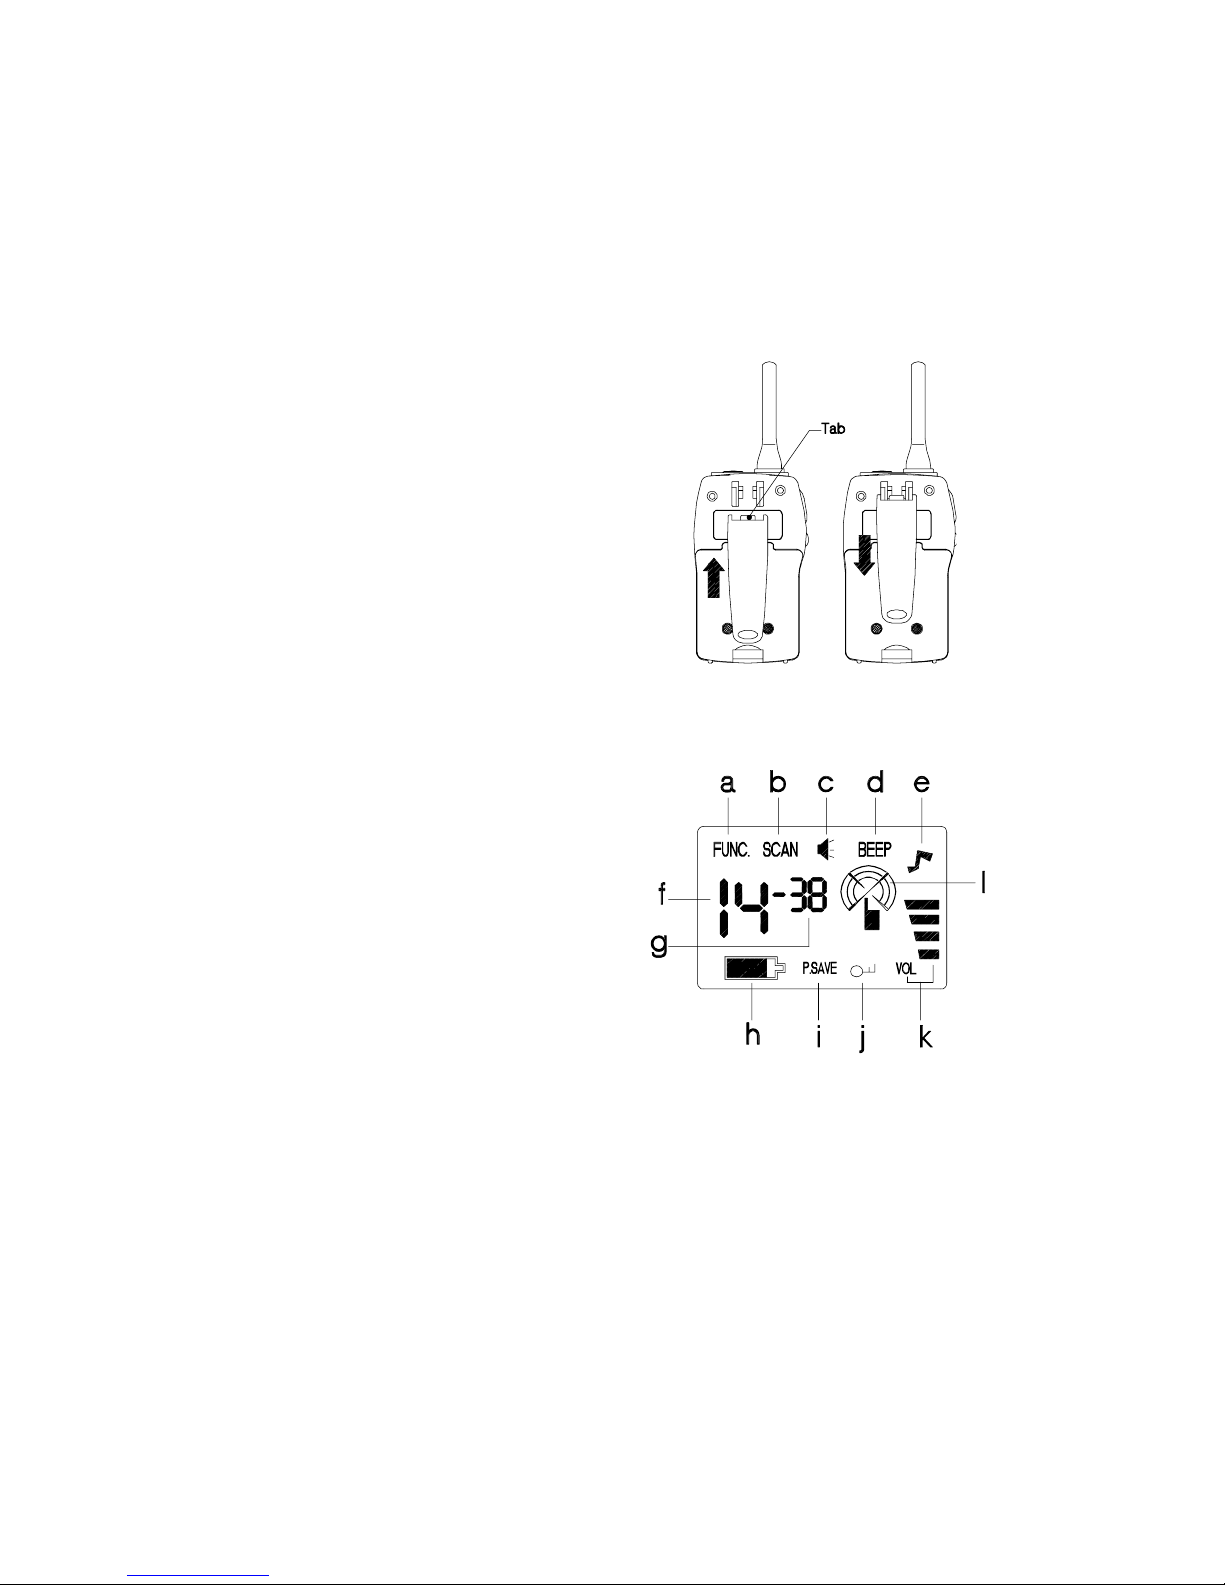
Removing / Attaching the Belt Clip
To remove the belt clip, pull and hold the tab located
at the top of the clip. Slide the belt clip down, and off
the radio.
To re-attach the belt clip,
align clip sides with rails
on radio back and slide
the clip upward until it
locks into place.
LCD Display Panel
a. Function mode indicator
b. Scan mode is activated
c. Speaker is active
d. Beep tone is active
e. Talk confirmation tone is active
f. Current Channel selection
g. Current PrivateTalk
sub-channel selection
h. Battery power level
i. Power Save mode is activated
j. Lock feature is activated
k. Volume level indicator
l. RX / TX (Receive / Transmit) indicator
9
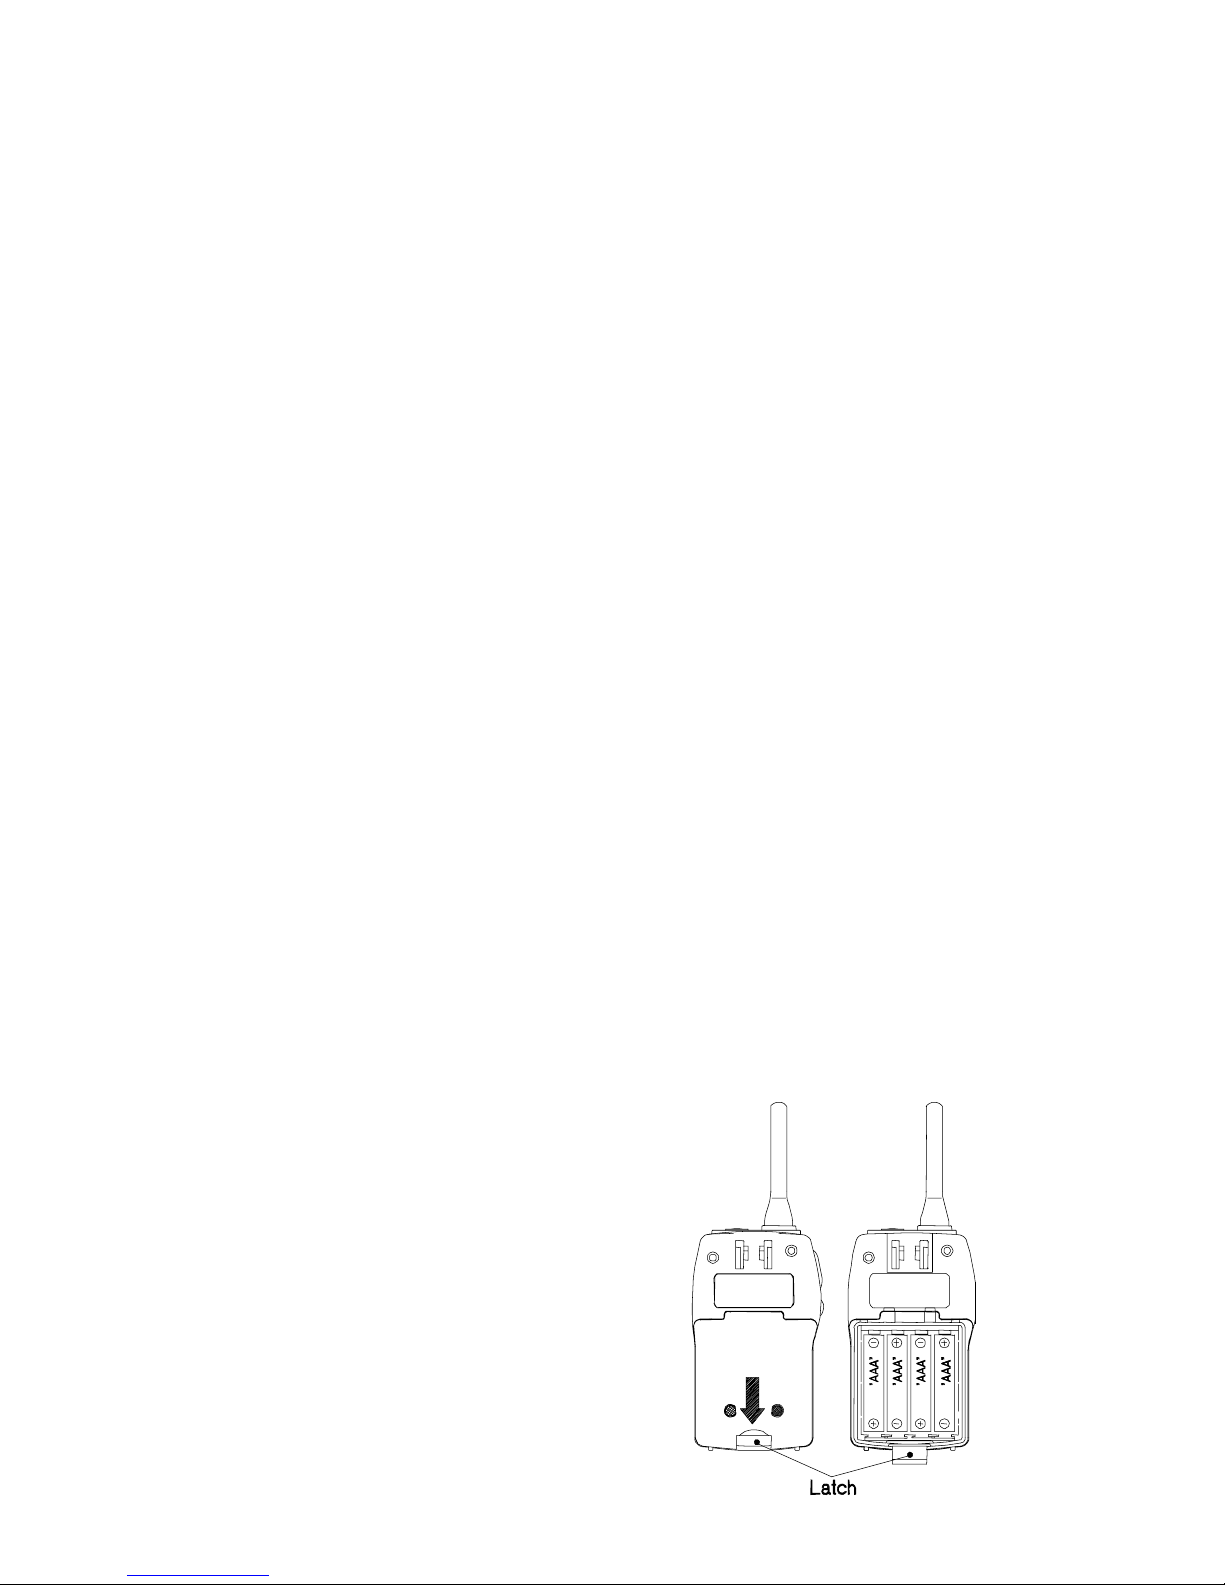
BATTERY INSTALLATION
Remove the radio's belt clip for access to the battery
compartment.
Note: Use only "AAA" alkaline, rechargeable Ni-Cad or
TruTalk model ACC-214 Rechargeable NiMH Battery
Pack in the TK14. Other types of batteries may burst,
causing injury to persons and/ or damage to the radio
unit. Always remove the batteries or battery pack from
the radio if it will not be used for long periods of time.
1. Locate the battery cover latch (near the base of the
radio on back side). Move the latch downward to
unlock.
2. Gently lift the battery cover away from the battery
compartment.
3. Install four (4) fresh "AAA" alkaline, rechargeable
Ni-Cad batteries, or TruTalk ACC-214 rechargeable
NiMH battery pack into the compartment, following
the polarity diagram embossed in the compartment
base (or label on battery pack).
4. Reinstall the battery cover
and move the battery cover
latch upward to lock.
Re-attach the belt clip
to the radio.
10
USING YOUR RADIO
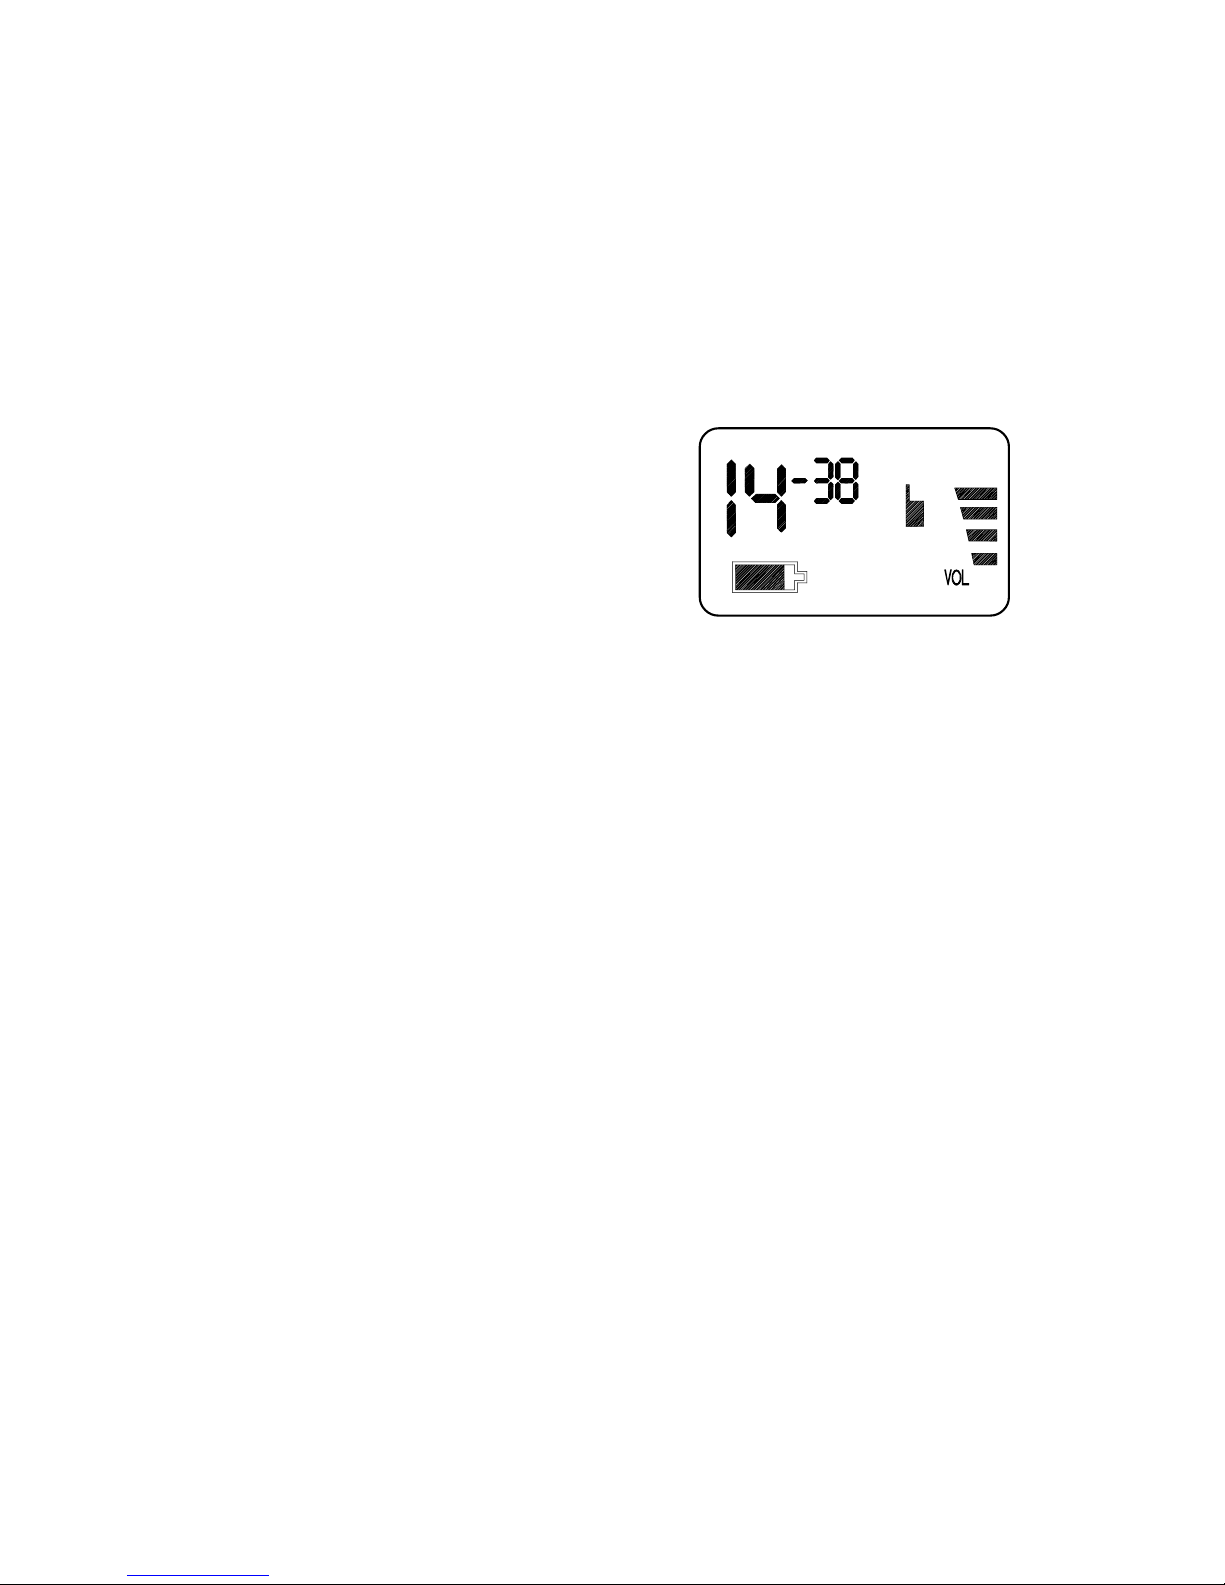
Turning the Radio ON - Press and hold the PWR
(power) button on the front of the TK14 for approximately
2 seconds. A tone series will indicate the unit is receiving
power. The radio's LCD panel will make a 2-second selftest and then go into operational mode. The operational
mode LCD appears like this:
Turning the Radio OFF -
Press and hold the power
button again for approximately
2 seconds. The LCD panel will
go dim to confirm the radio is off.
Adjusting the Speaker Volume - With the radio on,
press the UP (!) button to increase volume; the DOWN
(") button to decrease volume. The volume indicator
icon (lower right position on the LCD panel) will change
according to your setting. Special Note - When using
the ACC-705 ear bud speaker / microphone accessory,
ensure the volume level is at the lowest setting, then
increase gradually until a comfortable level is achieved.
Selecting a Channel - Press and release the MODE
button until the main channel number flashes on the
LCD panel. Select the desired channel by pressing
the UP (!) or DOWN (") buttons. When the desired
channel is displayed, press and release the P-T-T
button to select it. If no selection has been made after
.

11
USING YOUR RADIO, Continued
Selecting a Channel, Continued
5 seconds, the unit will return to the last channel used
and return to operational mode
Selecting a PrivateTalk CTCSS Channel - Press
and release the MODE button until the small numbers
beside the main channel numbers begin to flash.
Select the desired sub-channel by using the UP (!)
or DOWN (") buttons. When the desired PrivateTalk
code is displayed, press and release the P-T-T to select
it. If no selection is made after 5 seconds, the radio will
save the last change and return to operational mode.
To exit without saving your last setting, press and
release the Call button.
Receiving a Call - The radio is continuously in
receiving (RX) mode when powered on. When you
receive a call on the current channel, the RX / TX
indicator icon (located on right side of LCD panel)
will flash.
Transmitting a Call - To reply to a received message,
or initiate a new message, press and hold the P-T-T
button on the side of the TK14. For the best results,
speak at a normal rate, in a normal tone - placing the
radio microphone approximately 2 inches from your
mouth. When you have finished your message, release
the P-T-T button. The radio's RX / TX indicator icon will

12
USING YOUR RADIO, Continued
Transmitting a Call, Continued
appear while you are speaking to confirm that you are
transmitting.
Sending a Call Tone - You can send an audible tone
to alert another radio user that you are getting ready to
transmit, or to help you identify yourself. You can also
use the call tone to signal the beginning and the end
of a transmission. Simply press and hold the Call
button (located at center of radio face) for approximately 1 second, then release. The call tone will be
transmitted to others on your current channel.
Power Save Mode - To conserve battery life, the TK14
will go into a power save mode after 6 seconds without
a received RX message signal. The Power Save icon
will flash on the LCD panel to confirm the mode. If a
button press is made, or an incoming message
received, the radio will automatically return to
operational mode.
Main Channel Scanning - To provide a quick search
for all-channel activity, activate the radio's scan
function by pressing and releasing the MODE button
until the icon word "scan" and the main channel
number flash together. Press and release the UP (!)
button to initiate scan of all the main channels. The
radio will stop scanning if an incoming message is

13
USING YOUR RADIO, Continued
Main Channel Scanning, Continued
detected. To reply to the incoming message, press
the P-T-T button once, then hold down the P-T-T
button while speaking into the microphone. To remain
on the active channel, and stop scanning, press the
P-T-T again or the Call button. The radio scan
sequence will stop on the current channel. (If you
wish to return to another channel, follow instructions
for Selecting a Channel). If you wish to re-activate
scan, repeat the steps above.
PrivateTalk CTCSS Sub-Channel Scanning - To
provide a quick search for sub-channel activity (from
a single main channel), press the MODE button until
the small sub-channel numbers along with the icon
word "SCAN" flashes. Press and release the UP (!)
button. The radio will begin to scan the sub-channels.
The radio will continue to scan until it detects an
incoming transmission. Press the P-T-T once, then
hold down the P-T-T and speak into the radio microphone. Press the P-T-T or Call button to stop the
scan sequence.
Beep Tone (ON / OFF) - You may set an audible tone
to occur when any button (except Call and the P-T-T)
is pushed. To activate, press the MODE button until
the icon word "BEEP" flashes in upper right corner of
 Loading...