


M86 Web Filtering and Reporting Suite
USER GUIDE
Software Version: 3.0.00
Document Version: 02.28.11

M86 SECURITY WEB FILTERING AND
R
EPORTING SUITE USER GUIDE
© 2011 M86 Security
All rights reserved.
828 W. Taft Ave., Orange, CA 92865, USA
Version 1.01, published February 2011 for software release
3.0.00
Printed in the United States of America
This document may not, in whole or in part, be copied, photocopied, reproduced, translated, or reduced to any electronic
medium or machine readable form without prior written consent from M86 Security.
Every effort has been made to ensure the accuracy of this
document. However, M86 Security makes no warranties with
respect to this documentation and disclaims any implied warranties of merchantability and fitness for a particular purpose.
M86 Security shall not be liable for any error or for incidental
or consequential damages in connection with the furnishing,
performance, or use of this manual or the examples herein.
Due to future enhancements and modifications of this product,
the information described in this documentation is subject to
change without notice.
The latest version of this document can be obtained from
http://www.m86security.com/support/wfr/documentation.asp
Trademarks
Other product names mentioned in this manual may be trademarks or registered trademarks of their respective companies
and are the sole property of their respective manufacturers.
Part# WFR-UG_v1.01-1102
II M86 SECURITY USER GUIDE

CONTENTS
WFR S
UITE OVERVIEW
..................................................... 1
How to Use this User Guide .......................................................2
Organization ...................................................................................... 2
Conventions ...................................................................................... 3
Components and Environment ..................................................4
Components ...................................................................................... 4
Hardware .................................................................................... 4
Software ..................................................................................... 4
Environment ...................................................................................... 5
Network Requirements ............................................................... 5
Administrator Workstation Requirements ...................................5
End User Workstation Requirements ......................................... 6
How to Use the WFR on the Web ...............................................7
Initial Setup ....................................................................................... 7
Access the WFR Welcome Window .................................................. 7
Single Sign-On Access .....................................................................9
Access all applications from the SR UI ....................................... 9
Default Usernames and Passwords . ........................................ 10
Technical Support / Product Warranties ......................................... 10
WEB F
ILTER INTRODUCTORY SECTION
............................. 11
Web Filter ...................................................................................11
About this Portion of the User Guide ...................................... 11
Terminology .................................................................................... 13
Overview ....................................................................................18
Chapter 1: Filtering Operations ............................................... 19
Operational Modes ..........................................................................19
Invisible Mode ........................................................................... 20
Router Mode .............................................................................22
Firewall Mode ...........................................................................23
Group Types ...................................................................................25
M86 SECURITY USER GUIDE iii

CONTENTS
Global Group ............................................................................ 25
IP Groups . ................................................................................ 26
Filtering Profile Types .....................................................................27
Static Filtering Profiles . .............................................................29
Master IP Group Filtering Profile......................................... 29
IP Sub-Group Filtering Profile ............................................. 29
Individual IP Member Filtering Profile ................................. 29
Active Filtering Profiles . ............................................................ 30
Global Filtering Profile......................................................... 30
Override Account Profile ..................................................... 30
Time Profile ......................................................................... 30
Lock Profile ......................................................................... 30
Filtering Profile Components ........................................................... 31
Library Categories . ...................................................................32
M86 Supplied Categories.................................................... 32
Custom Categories .............................................................32
Service Ports . ...........................................................................33
Rules ........................................................................................ 33
Minimum Filtering Level ............................................................ 33
Filter Settings ............................................................................ 34
Filtering Rules ................................................................................. 35
Filtering Levels Applied ............................................................35
Chapter 2: Logging and Blocking ............................................38
Web Access Logging ......................................................................38
Instant Messaging, Peer-to-Peer Blocking ...................................... 38
How IM and P2P Blocking Works ............................................. 38
IM Blocking.......................................................................... 38
P2P Blocking.......................................................................39
Setting up IM and P2P .............................................................. 40
Using IM and P2P ..................................................................... 40
Block IM, P2P for All Users ................................................41
Block IM for All Users ................................................... 41
Block P2P for All Users.................................................41
Block Specified Entities from Using IM, P2P ......................42
Block IM for a Specific Entity ........................................ 42
Block P2P for a Specific Entity ..................................... 42
Chapter 3: Synchronizing Multiple Units ................................43
Web Filter Synchronization ............................................................. 43
Synchronization Setup ....................................................................45
iv M86 SECURITY USER GUIDE

Setting up a Source Server ......................................................45
Setting up a Target Server .......................................................45
Types of Synchronization Processes ..............................................46
Filtering Profile Synchronization Process .................................46
Library Synchronization Process .............................................. 47
Delays in Synchronization ...............................................................48
Synchronized, Non-Synchronized Items .........................................49
Synchronize All Items . .............................................................. 50
Synchronized Items (All) ..................................................... 50
Functionally Synchronized Items ........................................ 50
Non-synchronized Items .....................................................51
Synchronize Only Library Items ................................................ 52
Synchronized Items (Library Only)...................................... 52
Functionally Synchronized Items ........................................ 52
Non-synchronized Items .....................................................52
Server Maintenance Procedures ..................................................... 54
Source Server Failure Scenarios .............................................. 54
Establish Backup Procedures ................................................... 54
Use a Backup File to Set up a Source Server ..........................55
Set up a Target Server as a Source Server ........................55
Set up a Replacement Target Server .................................56
Set up a New Source Server from Scratch ............................... 56
Set up a Target Server as a Source Server ........................56
CONTENTS
Chapter 4: Getting Started ....................................................... 57
Using the Administrator Console ..................................................... 57
Access the Web Filter Login window ........................................ 57
Access the Web Filter from the WFR Portal ....................... 57
Enter Web Filter’s URL in the Address field ....................... 58
Log In ........................................................................................59
Last Library Update message ............................................. 60
Navigation Tips .........................................................................62
Access Main Sections ......................................................... 62
Help Features ..................................................................... 64
Access Help Topics ...................................................... 64
Tooltips ......................................................................... 65
Screen and Window Navigation .........................................67
Topic Links.................................................................... 67
Select Sub-topics.......................................................... 68
Navigate a Tree List......................................................69
Tree List Topics and Sub-topics ...................................70
M86 SECURITY USER GUIDE v

CONTENTS
Navigate a Window with Tabs ...................................... 71
Console Tips and Shortcuts ...............................................72
Navigation Path ............................................................ 72
Refresh the Console .....................................................72
Select Multiple Items..................................................... 73
Copy and Paste Text .................................................... 73
Calculate IP Ranges without Overlaps .........................74
Re-size the User Interface ............................................75
Log Out ..................................................................................... 76
WF G
LOBAL ADMINISTRATOR SECTION
........................... 77
Introduction ...............................................................................77
Chapter 1: System screen ........................................................78
Control ............................................................................................. 80
Filter window .............................................................................80
Local Filtering......................................................................81
Disable Local Filtering Options ..................................... 81
Enable Local Filtering Options...................................... 82
HTTP Filtering ..................................................................... 82
Enable HTTP Packet Splitting Detection ......................82
Disable HTTP Packet Splitting Detection ..................... 82
HTTPS Filtering .................................................................. 83
Service Control.................................................................... 84
Enable Pattern Blocking ............................................... 84
Disable Pattern Blocking...............................................85
Target(s) Filtering................................................................ 85
Disable Filtering on Target Servers ..............................85
Enable Filtering on Target Servers ............................... 85
Block Page Authentication window ........................................... 86
Enter, Edit Block Page Options .......................................... 87
Block page ..........................................................................88
Options page.......................................................................90
Option 2 ........................................................................ 91
Option 3 ........................................................................ 92
ShutDown window . ................................................................... 93
Shut Down the Server ......................................................... 93
Reboot window . ........................................................................ 94
Reboot the Server ............................................................... 94
Network ........................................................................................... 96
vi M86 SECURITY USER GUIDE

LAN Settings window ................................................................ 96
Specify LAN Settings .........................................................97
NTP Servers window . ............................................................... 98
Specify Network Time Protocol Servers ............................. 99
Add an NTP Server.......................................................99
Remove an NTP Server................................................99
Regional Setting window . .......................................................100
Specify the Time Zone, Language Set.............................. 100
Block Page Route Table window ............................................101
Add a Router .................................................................... 102
Remove a Router ..............................................................102
Administrator ................................................................................. 103
Administrator window ............................................................. 103
View Administrator Accounts ............................................104
Add an Administrator Account...........................................104
Edit an Administrator Account .......................................... 105
Delete an Administrator Account.......................................105
Secure Logon ................................................................................106
Logon Settings window ........................................................... 106
Enable, Disable Password Expiration ............................... 107
Enable, Disable Account Lockout ....................................108
Logon Management ................................................................ 110
View User Account Status, Unlock Username .................111
View Account Status................................................... 111
Unlock a Username .................................................... 112
View Locked IP Address, Unlock IP Address....................112
View Locked IPs ......................................................... 112
Unlock an IP Address ................................................. 112
View Admin, Sub Admin User Interface Access .............. 113
Diagnostics .................................................................................... 114
System Command window .....................................................114
Perform a Diagnostic Test, View Data ............................. 115
Command Selections ........................................................116
Ping............................................................................. 116
Trace Route ................................................................116
Process list .................................................................116
TOP CPU processes .................................................. 117
NIC configuration ........................................................117
Active connections...................................................... 117
Routing table...............................................................117
Current memory usage............................................... 118
CONTENTS
M86 SECURITY USER GUIDE vii

CONTENTS
CPU usage .................................................................118
System performance...................................................118
Recent logins ..............................................................118
System uptime ............................................................119
df(disk usage) ............................................................. 119
dmesg(print kernel ring buffer)....................................119
View Log File window . ............................................................ 120
View Log Results ..............................................................120
Troubleshooting Mode window ............................................... 122
Use the Troubleshooting Mode ........................................123
Active Profile Lookup window .................................................124
Verify Whether a Profile is Active .....................................125
Admin Audit Trail window ....................................................... 128
Admin Audit Trail............................................................... 128
Specify FTP Criteria.................................................... 129
FTP the Log on Demand ............................................ 129
View ................................................................................. 130
View the Log of Administrator Changes ..................... 130
Alert ............................................................................................... 131
Alert Settings window ............................................................. 131
Enable the Alert Feature ..................................................133
Modify Alert Settings .........................................................133
Disable the Alert Feature ..................................................133
SMTP Server Settings window . .............................................. 134
Enter, Edit SMTP Server Settings..................................... 134
Verify SMTP Settings ........................................................135
Software Update ...........................................................................136
Local Software Update window .............................................. 136
Read Information about a Software Update...................... 137
Select and Apply a Software Update ................................ 137
Undo an Applied Software Update ...................................140
Software Update Log window ................................................. 140
View Log Contents ............................................................141
Download Log, View, Print Contents.................................141
Download the Log....................................................... 141
View the Contents of the Log......................................142
Save, Print the Log File Contents ...............................144
Synchronization ............................................................................. 145
Setup window . ........................................................................146
Using Only One Web Filter on the Network .....................147
Using More than One Web Filter on the Network ............. 147
viii M86 SECURITY USER GUIDE

Set up a Web Filter to be a Source Server................. 147
Sync All Target Servers with the Same Settings ........ 150
Set up a Web Filter to be a Target Server.................. 151
Status window . ....................................................................... 153
View the Sync Status of Targets from the Source ...........154
View Items in the Queue.............................................154
View Items Previously Synced to the Server .............. 155
Place Items in Queue for Syncing ..................................... 156
View the Sync Status of the Target Server .......................156
Mode ............................................................................................. 158
Operation Mode window .........................................................158
Set the Operation Mode ...................................................159
Specify the Listening Device .............................................159
Specify the Block Page Device ......................................... 159
Invisible Option: Specify the Block Page Delivery.............160
ICAP Option: Specify ICAP Server Settings ..................... 161
Mobile Option: Specify the Mobile Client Control ............. 163
Apply Operation Mode Settings ........................................ 163
Proxy Environment Settings window . ..................................... 164
Use a Local Proxy Server .................................................164
Use Proxy Port 80 .............................................................165
Enable HTTPS Filtering .................................................... 165
Authentication ............................................................................... 165
Backup/Restore ............................................................................. 166
Backup/Restore window ......................................................... 166
Backup Procedures........................................................... 167
Perform a Backup on Demand ......................................... 168
Schedule a Backup .......................................................... 169
Configure FTP Server Settings................................... 169
Create a Backup Schedule......................................... 170
Remove a Backup Schedule ...................................... 173
Download a File ...............................................................174
Perform a Restoration ......................................................175
Upload a File to the Server......................................... 175
Restore Configurations to the Server ......................... 176
Remove a Backup File ......................................................176
View Backup and Restoration Details ..............................177
Reset ............................................................................................. 178
Reset window .........................................................................178
Radius Authentication Settings .....................................................179
Radius Authentication Settings window ..................................179
CONTENTS
M86 SECURITY USER GUIDE ix

CONTENTS
Enable Radius...................................................................180
Specify Radius Authentication Settings ...................... 180
Apply Settings............................................................. 181
Disable Radius .................................................................. 181
SNMP ............................................................................................ 182
SNMP window ........................................................................182
Enable SNMP.................................................................... 182
Specify Monitoring Settings .............................................. 183
Set up Community Token for Public Access...............183
Create, Build the Access Control List .........................183
Maintain the Access Control List ................................ 183
Hardware Failure Detection ..........................................................184
Hardware Failure Detection window .......................................184
View the Status of the Hard Drives ................................... 185
X Strikes Blocking ......................................................................... 186
X Strikes Blocking window ...................................................... 186
Configuration.....................................................................187
Set up Blocking Criteria .............................................. 187
Reset All Workstations................................................188
Lock Page ...............................................................................188
Overblocking or Underblocking...................................189
Email Alert ........................................................................191
Set up Email Alert Criteria .......................................... 191
Set up Email Alert Recipients .....................................192
Remove Email Alert Recipients .................................. 192
Logon Accounts ...............................................................193
Set up Users Authorized to Unlock Workstations ....... 193
Deactivate an Authorized Logon Account................... 194
Delete a Logon Account ............................................. 194
Categories.........................................................................195
Set up Categories to Receive Strikes or No Strikes ... 195
Go to X Strikes Unlock Workstation GUI ..........................196
Re-login window .........................................................196
X Strikes Unlock Workstation ........................................... 197
Unlock a Workstation.................................................. 197
Set up an Email Address to Receive Alerts ................ 199
Remove an Email Address from the Alert List ............ 199
Close the Pop-up Window ..........................................199
Warn Option Setting ......................................................................200
Warn Option Setting window .................................................. 200
Specify Interval for Re-displaying the Warn page ............. 201
x M86 SECURITY USER GUIDE

Customization ............................................................................... 202
Common Customization window . ........................................... 203
Enable, Disable Features ................................................. 204
Lock Page Customization window . .........................................206
Edit Entries, Setting .......................................................... 207
Preview Sample Lock Page ............................................. 208
Block Page Customization window ......................................... 209
Add, Edit Entries ...............................................................210
Preview Sample Block Page ............................................211
Warn Page Customization window . ........................................213
Add, Edit Entries ..............................................................214
Preview Sample Warning Page ....................................... 215
Profile Control window ............................................................217
Edit Entries........................................................................218
Quota Block Page Customization window . ............................. 219
Add, Edit Entries ...............................................................219
Preview Sample Quota Block Page .................................. 220
Quota Notice Page Customization window .............................222
Add, Edit Entries ...............................................................222
Preview Sample Quota Notice Page................................. 223
CMC Management ........................................................................ 225
Software Update Management window .................................. 225
View Software Update Information ...................................226
Apply or Undo a Software Update ....................................227
Status window . ....................................................................... 228
View Filtering Status Information ...................................... 228
Quota Setting ................................................................................ 230
Quota Setting window ............................................................. 230
Configure Quota Hit Settings ...........................................231
Reset Quotas ...................................................................232
Reset Quotas Now......................................................232
Set up a Schedule to Automatically Reset Quotas.....232
Delete a Quota Reset Time from the Schedule .......... 233
Quota Notice page ............................................................ 233
Quota Block page ............................................................. 235
SSL Certificate .............................................................................. 236
SSL Certificate window ........................................................... 236
CONTENTS
Chapter 2: Policy screen ........................................................ 237
Global Group .................................................................................239
Range to Detect window ......................................................... 239
M86 SECURITY USER GUIDE xi

CONTENTS
Add a Segment to the Network .........................................240
Range to Detect Setup Wizard ................................... 242
Range to Detect Advanced Settings...........................247
Modify a Segment of the Network ....................................248
Remove a Segment from the Network ..............................248
Rules window . ........................................................................ 249
View Criteria for a Rule .....................................................249
Add a Rule ........................................................................250
Modify a Rule .................................................................... 252
Copy a Rule ......................................................................252
Remove a Rule .................................................................253
Global Group Profile window .................................................. 253
Category Profile ...............................................................254
Create, Edit a List of Selected Categories.................. 254
Port.................................................................................... 256
Create, Edit a List of Service Ports............................. 257
Default Redirect URL ........................................................ 257
Create, Edit the Redirect URL ....................................258
Filter Options.....................................................................258
Create, Edit the Filter Options .................................... 258
Override Account window . ......................................................262
Add an Override Account .................................................263
Category Profile ..........................................................264
Redirect URL .............................................................. 267
Filter Options ..............................................................268
Edit an Override Account .................................................. 270
Change the Password ................................................ 270
Modify an Override Account ....................................... 271
Delete an Override Account ..............................................271
Approved Content Settings window ........................................ 272
Approved Content feature and VuSafe ............................. 272
Approved Content setup and configuration....................... 273
Approved Content portal setup ...................................273
Approved Content Settings entries ............................. 274
Minimum Filtering Level window ............................................. 275
Minimum Filtering Categories .......................................... 276
Create, Edit Minimum Filtering Categories ................. 277
Port ................................................................................... 278
Create, Edit a List of Service Ports............................. 278
Minimum Filtering Bypass Options....................................279
Specify Minimum Filtering Bypass Options ................ 280
xii M86 SECURITY USER GUIDE

Refresh All .............................................................................. 280
Refresh All Main Branches................................................ 280
IP ................................................................................................... 281
Add Group ..............................................................................281
Add a Master IP Group .....................................................281
Refresh ................................................................................... 282
Refresh IP Groups ............................................................282
Chapter 3: Library screen .......................................................283
Updates ......................................................................................... 285
Configuration window ............................................................. 285
Set a Time for Updates to be Retrieved............................ 285
Optional: Specify a Proxy Server .....................................286
Select the Log Level.......................................................... 286
Manual Update window . ......................................................... 287
Specify the Type of On Demand Update .......................... 287
Additional Language Support window . ................................... 289
Select Additional Languages.............................................289
Library Update Log window .................................................... 290
View the Library Update Process...................................... 290
Download Log, View, Print Contents ................................291
Download the Log....................................................... 291
View the Contents of the Log......................................291
Save, Print the Log File Contents ...............................294
Emergency Update Log window ............................................. 295
View the Emergency Software Update Process ............... 295
Download the Software Update Log File ..........................296
Library Lookup ..............................................................................297
Library Lookup window ...........................................................297
URL Lookup, Removal ......................................................297
Perform a URL Check.................................................297
Remove a URL ........................................................... 298
Submit an Email to the Administrator ......................... 299
Search Engine Keyword Lookup, Removal.......................299
Perform a Search Engine Keyword Check .................299
Remove a Search Engine Keyword............................ 299
Reload the Library ............................................................ 300
Customer Feedback Module .........................................................301
Customer Feedback Module window ......................................301
Disable Customer Feedback Module ................................ 302
Enable Customer Feedback Module................................. 302
CONTENTS
M86 SECURITY USER GUIDE xiii

CONTENTS
Category Weight System .............................................................. 305
Category Weight System window ...........................................305
View the Current Selections ............................................. 306
Method for Weighting Library Categories..........................306
Weighting Library Categories ........................................... 307
NNTP Newsgroup ......................................................................... 308
NNTP Newsgroup window ...................................................... 308
Add a Newsgroup to the Library........................................308
Remove a Newsgroup from the Library ........................... 309
Pattern Detection Whitelist ............................................................ 310
Pattern Detection Whitelist window ........................................ 310
Create, Maintain a Whitelist of IP Addresses ................... 311
Category Groups ...........................................................................312
Library Details window ............................................................ 313
View Library Details ..........................................................313
URLs window .......................................................................... 314
View a List of URLs in the Library Category .................... 315
Add or Remove URLs, Reload the Library ....................... 316
Add a URL to the Library Category.............................316
Add a Wildcard URL to the Library Category..............317
Remove a URL from the Library Category ................. 318
Reload the Library ...................................................... 318
URL Keywords window ........................................................... 319
View a List of URL Keywords ........................................... 320
Add or Remove URL Keywords ........................................ 320
Add a URL Keyword to the Library Category.............. 320
Remove a URL Keyword from the Library .................. 320
Upload a List of URL Keywords to the Library .................321
Upload a List of URL Keyword Additions....................321
Upload a List of URL Keyword Deletions.................... 322
Reload the Library............................................................. 322
Search Engine Keywords window . ......................................... 323
View a List of Search Engine Keywords ........................... 324
Add or Remove Search Engine Keywords ........................ 324
Add a Search Engine Keyword to the Library............. 324
Remove a Search Engine Keyword from the Library..325
Upload a List of Search Engine Keywords........................ 325
Upload a List of Search Engine Keyword Additions ... 325
Upload a List of Search Engine Keyword Deletions ... 326
Reload the Library............................................................. 326
xiv M86 SECURITY USER GUIDE

Chapter 4: Reporting screen .................................................. 327
Report Configuration .....................................................................328
Report Configuration window .................................................328
Execute Log Transfer Now................................................328
Real Time Probe ........................................................................... 329
Real Time Probe window ........................................................ 329
Configuration.....................................................................329
Enable Real Time Probes........................................... 329
Set up Real Time Probes............................................330
Exclude an IP Address from Real Time Probing ........ 330
Remove IPs from the White List ................................. 330
Report Recipients ............................................................. 331
Specify Email File Criteria...........................................331
Set up Email Addresses to Receive Reports..............332
Remove Email Addresses .......................................... 332
Logon Accounts ...............................................................333
Set up Users Authorized to Create Probes.................333
Deactivate an Authorized Logon Account................... 334
Delete a Logon Account ............................................. 334
Go to Real Time Probe Reports GUI ...............................335
Re-login window .........................................................335
Real Time Probe Reports ................................................. 336
Create a Real Time Probe..........................................337
View Real Time Probe Details .................................... 340
Usage Graphs ............................................................................... 344
Usage Graphs window ...........................................................344
Select a Graph to View ....................................................345
Recent Trend ..............................................................345
Daily Peaks................................................................. 346
Shadow Log Format ......................................................................347
Shadow Log Format window .................................................. 347
Specify the Shadow Log Format .......................................347
Auto-detect option....................................................... 348
Post 2.0.10 log format option...................................... 348
Apply Setting ..................................................................... 348
CONTENTS
WF G
ROUP ADMINISTRATOR SECTION
........................... 349
Introduction .............................................................................349
Chapter 1: Policy screen ........................................................ 350
M86 SECURITY USER GUIDE xv

CONTENTS
IP ................................................................................................... 351
Refresh ................................................................................... 351
Refresh the Master IP Group, Member .............................351
Master IP Group ............................................................................352
Group Details window ............................................................. 352
Change the Group Administrator Password...................... 352
Members window .................................................................... 353
Add the IP Address of the Member ..................................354
Remove a Member from the Group .................................. 354
Override Account window . ......................................................355
Add an Override Account ..................................................356
Category Profile ..........................................................357
Redirect URL .............................................................. 360
Filter Options ..............................................................361
Edit an Override Account .................................................. 363
Change the Password ................................................ 363
Modify an Override Account ....................................... 363
Delete an Override Account .............................................364
Group Profile window .............................................................364
Category Profile ................................................................364
Create, Edit a List of Selected Categories.................. 365
Redirect URL .................................................................... 368
Create, Edit the Redirect URL ....................................368
Filter Options ....................................................................369
Create, Edit the Filter Options .................................... 369
Exception URL window ........................................................... 372
Valid URL entries ............................................................. 373
Add URLs to Block URL or ByPass URL frame ............... 374
Remove URLs from Block URL or ByPass URL frame ....376
Apply Settings ................................................................... 377
Time Profile window ...............................................................377
Add a Time Profile ............................................................ 378
Category Profile ..........................................................383
Redirect URL .............................................................. 384
Filter Options ..............................................................385
Exception URL............................................................ 386
Approved Content....................................................... 387
Modify a Time Profile ....................................................... 388
Delete a Time Profile......................................................... 388
Approved Content Settings window ........................................ 389
Approved Content setup and configuration....................... 389
xvi M86 SECURITY USER GUIDE

Approved Content portal setup ...................................390
Approved Content Settings entries ............................. 390
Upload/Download IP Profile window ....................................... 392
Upload IP Profiles .............................................................392
Download Profile ..............................................................394
Add Sub Group .......................................................................395
Add an IP Sub Group ........................................................395
Add Individual IP ..................................................................... 396
Add an Individual IP Member ............................................396
Delete Group .......................................................................... 397
Delete a Master IP Group Profile ...................................... 397
Paste Sub Group .................................................................... 397
Paste a Copied IP Sub Group........................................... 397
Sub Group .....................................................................................398
Sub Group (IP Group) window ...............................................398
View IP Sub-Group Details ...............................................398
Add IP Sub-Group Details................................................. 399
Members window .................................................................... 400
Modify Sub-Group Members ............................................401
Sub Group Profile window ......................................................401
Exception URL window ........................................................... 401
Time Profile window ...............................................................402
Approved Content Settings window ........................................402
Delete Sub Group . ..................................................................403
Delete an IP Sub-Group....................................................403
Copy Sub Group .....................................................................403
Copy an IP Sub-Group......................................................403
Individual IP ................................................................................... 404
Member window ..................................................................... 404
Enter the IP Address of the Member ................................ 405
Individual IP Profile window .................................................... 405
Exception URL window ........................................................... 405
Time Profile window ...............................................................405
Approved Content Settings window ........................................406
Delete Individual IP ................................................................. 406
Delete an Individual IP Member ........................................406
CONTENTS
Chapter 2: Library screen .......................................................407
Library Lookup ..............................................................................408
Library Lookup window ...........................................................408
Look up a URL .................................................................409
M86 SECURITY USER GUIDE xvii

CONTENTS
Look up a Search Engine Keyword .................................. 410
Custom Categories .......................................................................410
Add Category .......................................................................... 411
Add a Custom Library Category........................................ 411
Refresh ................................................................................... 412
Refresh the Library............................................................ 412
Custom library category ................................................................ 413
Library Details window ............................................................ 413
View, Edit Library Details .................................................. 414
URLs window .......................................................................... 415
View a List of URLs in the Library Category .................... 416
Add or Remove URLs or Wildcard URLs .........................417
Add a URL to the Library Category.............................417
Add a Wildcard URL to the Library Category..............418
Remove a URL from the Library Category ................. 419
Upload a Master List to the Library ................................... 419
Upload a Master List of URLs..................................... 419
Upload a Master List of Wildcard URLs...................... 421
Reload the Library............................................................. 423
URL Keywords window ........................................................... 423
View a List of URL Keywords............................................ 424
Add or Remove URL Keywords ........................................ 424
Add a URL Keyword to the Library Category.............. 424
Remove a URL Keyword from the Library .................. 424
Upload a List of URL Keywords to the Library .................425
Reload the Library............................................................. 425
Search Engine Keywords window . ......................................... 426
View a List of Search Engine Keywords ........................... 427
Add or Remove Search Engine Keywords ........................ 427
Add a Search Engine Keyword to the Library............. 427
Remove a Search Engine Keyword............................ 427
Upload a Master List of Search Engine Keywords ...........428
Reload the Library............................................................. 428
Delete Category ...................................................................... 428
Delete a Custom Category................................................ 428
WEB F
ILTER APPENDICES SECTION
............................... 429
Appendix A .............................................................................. 429
Filtering Profile Format and Rules .................................................429
Rule Criteria ............................................................................ 430
xviii M86 SECURITY USER GUIDE

Appendix B .............................................................................. 433
Create a Custom Block Page ........................................................433
Part I: Modify the Web Filter ................................................... 433
1. Enable block page redirection....................................... 433
Set up for each sub-group ..........................................433
2. Exclude filtering <server for block page> IP..................434
Part II: Customize the Block Page .......................................... 434
1. Set up a Web server .....................................................434
2. Create a customized block page................................... 434
Show M86’s information in the block page (optional) . 435
Implement the “further option” (optional) ....................435
Customized block page examples.............................. 436
Part III: Restart the Web Filter ................................................ 436
Reference . .............................................................................. 437
HTML ................................................................................437
CGI written in Perl ............................................................ 439
Embed data in query string......................................... 439
Use Java Script to post form data...............................440
CGI written in C.................................................................441
Appendix C .............................................................................. 447
Override Pop-up Blockers .............................................................447
Yahoo! Toolbar Pop-up Blocker ....................................................448
If Pop-up Blocking is Enabled ................................................. 448
Add Override Account to the White List .................................. 448
Google Toolbar Pop-up Blocker .................................................... 450
If Pop-up Blocking is Enabled ................................................. 450
Add Override Account to the White List .................................. 450
AdwareSafe Pop-up Blocker .........................................................451
If Pop-up Blocking is Enabled ................................................. 451
Temporarily Disable Pop-up Blocking .....................................451
Mozilla Firefox Pop-up Blocker .....................................................452
Add Override Account to the White List .................................. 452
Windows XP SP2 Pop-up Blocker ................................................454
Set up Pop-up Blocking .......................................................... 454
Use the Internet Options dialog box.................................. 454
Use the IE Toolbar ...........................................................455
Temporarily Disable Pop-up Blocking .....................................455
Add Override Account to the White List .................................. 456
Use the IE Toolbar ............................................................456
Use the Information Bar ................................................... 457
CONTENTS
M86 SECURITY USER GUIDE xix

CONTENTS
Set up the Information Bar.......................................... 457
Access your Override Account ................................... 457
Appendix D .............................................................................. 459
Mobile Client .................................................................................459
Environment Requirements . ...................................................460
Workstation Requirements................................................ 460
Network Requirement ......................................................461
Remote Filtering Components .......................................... 461
Work Flow Overview ............................................................... 461
Mobile Client Installed on a Mobile PC ............................. 461
Network Operations Overview . ...............................................462
Mobile Client on the Network ............................................ 462
Mobile Server Section ............................................................462
Initial Setup .......................................................................462
Configure the Web Filter to use the Mobile Mode ............ 463
Add MAC Addresses to the Master IP Group ................... 464
Select MAC Addresses for a Sub Group...........................465
View Sub Group MAC Addresses .....................................466
Add a MAC Address to an Individual Member ..................467
Upload MAC Address File for IP Group ...........................468
Troubleshoot MAC Addresses ......................................... 469
Mobile Client Section ..............................................................470
Download and Install the Deployment Kit ........................ 471
Access the Mobile Client Deployment Tool window ......... 474
Configure a New Package Set .........................................475
Specify Package criteria .............................................476
Configure Network Settings ........................................477
Optional: Specify URL for Mobile Client Updates ....... 480
Optional: Set up Application Options .......................... 481
Save configuration settings, download files................485
Edit a Package Configuration ...........................................489
Edit default configuration settings...............................490
View Package Configuration contents .............................. 491
MCU file preparations ......................................................492
Step 1: Install MCU on end user workstations............492
Step 2: Choose a deployment host for updates.......... 493
Step 3: Post the latest files for MCU........................... 495
MC Deployment to Windows Computers ......................... 497
Deployment to a group ............................................... 497
Installation on a single computer ................................500
xx M86 SECURITY USER GUIDE

MC Deployment to Macintosh OS X Computers............... 500
Mobile Client Removal from Computers .......................... 501
Uninstallation from a Windows group .........................501
Uninstallation from an individual computer ................. 501
Appendix E ..............................................................................504
Glossary ........................................................................................ 504
SR I
NTRODUCTORY SECTION
........................................ 511
Security Reporter Overview ...................................................511
About this Portion of the User Guide .................................... 512
Terminology .................................................................................. 513
Getting Started ........................................................................ 518
Procedures for Logging In, Out .....................................................518
Access the Security Reporter Login window .......................... 518
Access SR Report Manager from the WFR Portal............ 518
Enter Report Manager’s URL in the Address field ............519
Log In ......................................................................................520
Re-login ............................................................................ 522
Expired Passwords ...........................................................522
User Interface Navigation . ...................................................... 524
Links in the Report Manager Navigation Toolbar .............. 524
Navigation Tips and Conventions ............................... 525
Wildcard Searches......................................................526
Links in the System Configuration Navigation Toolbar ....527
Log Out ................................................................................... 528
CONTENTS
SR S
YSTEM CONFIGURATION SECTION
.......................... 529
Introduction .............................................................................529
Chapter 1: Access System Configuration ............................ 530
Chapter 2: Configuring the Server ........................................ 531
Network Menu ............................................................................... 531
Box Mode screen .................................................................... 532
Live Mode.......................................................................... 532
Archive Mode ...................................................................533
M86 SECURITY USER GUIDE xxi

CONTENTS
Change the Box Mode ...................................................... 533
Locked-out Accounts and IPs screen .....................................534
View Locked Accounts, IP addresses ...............................535
Unlock Accounts, IP addresses ........................................535
Server Menu .................................................................................. 536
Backup screen ........................................................................536
Backup and Recovery Procedures....................................537
Set up/Edit External Backup FTP Password..................... 538
Execute a Manual Backup ................................................538
Perform a Remote Backup................................................ 539
Perform a Restoration to the SR .......................................540
Self Monitoring screen . ...........................................................541
View a List of Contact E-Mail Addresses ......................... 542
Set up and Activate Self-Monitoring.................................. 542
Remove Recipient from E-mail Notification List ................542
Deactivate Self-Monitoring ................................................542
Server Status screen .............................................................. 543
View the Status of the Server ...........................................544
Secure Access screen . ...........................................................545
Activate a Port to Access the SR ......................................545
Terminate a Port Connection ............................................546
Terminate All Port Connections ........................................ 546
Shut Down screen . ................................................................. 547
SR Action Selections......................................................... 547
Perform a Server Action.................................................... 548
Report Manager screen ..........................................................549
Restart the Report Manager..............................................549
Enable/Disable the Report Manager Scheduler ............... 550
Database Menu .............................................................................551
User Name Identification screen .......................................551
View the User Name Identification screen .......................554
Configure the Server to Log User Activity .........................554
Page View Elapsed Time screen ............................................ 555
Establish the Unit of Elapsed Time for Page Views .......... 555
Elapsed Time Rules .........................................................556
Page Definition screen . ..........................................................557
View the Current Page Types ........................................... 557
Remove a Page Type ......................................................558
Add a Page Type ..............................................................558
Tools screen . .......................................................................... 559
View Diagnostic Reports ..................................................560
xxii M86 SECURITY USER GUIDE

View Database Status Logs ..............................................560
Generate Technical Support Report Package .................. 562
Expiration screen ....................................................................563
Expiration Rules ................................................................ 564
View Data Storage Statistics ............................................ 565
Optional Features screen ....................................................... 566
Enable Search String Reporting .......................................568
Enable Block Request Count ............................................ 568
Enable Blocked Searched Keywords ................................ 568
Enable Time Usage reports ..............................................569
Enable Page and/or Object Count .................................... 569
Enable, Configure Password Security Option ...................570
User Group Import screen . ..................................................... 573
Import User Groups .......................................................... 574
CONTENTS
SR R
EPORT MANAGER ADMINISTRATION SECTION
........ 575
Introduction .............................................................................575
Chapter 1: Group, Profile Management ................................ 577
User Groups panel ........................................................................577
View User Group Information . ................................................ 579
User group status key ....................................................... 579
View a list of members in a user group .............................579
Add a User Group ................................................................... 581
Patterns frame................................................................... 582
Add a new pattern.......................................................582
View users resolved by the pattern.............................583
Remove a pattern ....................................................... 583
IP Ranges frame ............................................................... 584
Specify an IP range .................................................... 585
Remove an IP address range .....................................586
Single Users/Exclude frame ............................................. 587
Add one or more individual users ...............................588
Remove users from the Add tab ................................. 589
Edit a User Group . ..................................................................590
Rebuild the User Group ..........................................................591
Delete a User Group ............................................................... 591
Admin Groups panel .....................................................................592
Add a Group ...........................................................................593
View, Edit an Admin Group’s Permissions . ............................ 595
M86 SECURITY USER GUIDE xxiii

CONTENTS
View Admin Group settings............................................... 595
Edit Admin Group settings ............................................... 596
Delete an Administrator Group ...............................................596
Admin Profiles panel .....................................................................597
Add an Administrator Profile ...................................................598
View, Edit Admin Detail . ......................................................... 602
View Admin Details ........................................................... 602
Edit Account Info ............................................................... 603
Delete Admin . ......................................................................... 604
Chapter 2: Database Management ........................................ 605
HTTPS Configuration panel .......................................................... 605
Generate a Self-Signed Certificate for the SR ........................606
Create, Upload a Third Party Certificate ................................. 607
Step A: Create a CSR .......................................................607
Step B: Download the CSR, Submit to Agency.................608
Step C: Upload the Signed SSL Certificate to SR ............ 609
Download, Delete a Third Party Certificate ............................. 610
Download the SSL Certificate ...........................................610
Delete the SSL Certificate................................................. 610
User Profiles panel ........................................................................ 611
Search the User Database .....................................................612
View End User Activity ......................................................612
Activity View panel ........................................................................ 613
Perform a Search on a Specified Activity ............................... 613
Search results ................................................................... 615
Device Registry panel ................................................................... 616
Removing/adding Web Filter, SWG devices ........................... 618
Web Filter Device Maintenance .............................................. 619
View, edit Web Filter device criteria ..................................619
Add a Web Filter to the device registry ............................620
Delete a Web Filter from the device registry .....................620
Security Reporter Maintenance .............................................. 621
View SR device criteria ..................................................... 621
Add, remove a bandwidth range ...................................... 622
View Other Device Criteria ..................................................... 622
View SMTP device criteria ................................................622
View Patch Server device criteria ..................................... 623
View Proxy Server device criteria .....................................623
View NTP Server device criteria ....................................... 624
Sync All Devices .....................................................................624
xxiv M86 SECURITY USER GUIDE

New Policy Server Device Maintenance .................................625
View, edit Policy Server device criteria ............................. 625
Add a Policy Server to the device registry ........................ 626
Delete a Policy Server from the device registry ................627
LDAP Server Device Management ......................................... 627
Add an LDAP Server to the device registry.......................627
Import LDAP Group profiles ..............................................629
View, edit LDAP Server device criteria ............................. 629
Delete an LDAP Server from the device registry .............. 630
Database Processes List panel ..................................................... 631
View Details on a Process . .....................................................632
Terminate a Process ..............................................................632
Server Information panel ............................................................... 633
Mode .......................................................................................634
Date Scopes . .......................................................................... 635
Report Manager Startup Time ................................................ 635
Server Info .............................................................................. 635
Server Activity ......................................................................... 636
Expiration Info ......................................................................... 639
Reset to Factory Defaults panel .................................................... 640
Reset to Factory Default Settings frame ................................. 641
Wizard panel ........................................................................... 642
CONTENTS
Chapter 3: Report Configuration ........................................... 644
Default Report Settings panel ....................................................... 644
Set New Defaults ....................................................................645
Custom Category Groups panel .................................................... 646
Add a Custom Category Group . ............................................. 647
Modify a Custom Category Group . .........................................648
Delete a Category Group ........................................................ 648
SR P
RODUCTIVITY REPORTS SECTION
........................... 649
Introduction .............................................................................649
Chapter 1: A High Level Overview .........................................650
Dashboard ..................................................................................... 650
Summary Reports ......................................................................... 652
Summary Report types ...........................................................653
Modify the Summary Report view ...........................................655
Download, Export a Summary Report . ................................... 656
M86 SECURITY USER GUIDE xxv

CONTENTS
PDF format........................................................................656
Download the report in the PDF format ......................656
Export the PDF format report......................................657
CSV format ....................................................................... 658
Download the report in the CSV format...................... 658
Export the CSV format report ..................................... 658
PNG format .......................................................................659
Download the report in the PNG format...................... 659
Export the PNG format report..................................... 660
Sample Reports ............................................................................660
Sample Report types . ............................................................. 661
View, Export a Sample Report . ..............................................662
View Sample Report contents........................................... 662
Export the Sample Report................................................. 663
Chapter 2: Drill Down Reports ...............................................664
Generate a Drill Down Report .......................................................665
Summary Drill Down Report View ................................................. 666
Detail Drill Down Report View .......................................................668
Report View Tools and Usage Tips ...............................................669
Navigation Tips .......................................................................669
Report view breadcrumb trail links ....................................669
Page navigation ................................................................669
Summary Report View Tools and Tips . .................................. 670
Count columns and links ...................................................670
Bandwidth and Time columns ..........................................672
Column sorting tips ...........................................................672
Record exportation ........................................................... 673
Detail Report View Tools and Tips .........................................673
Page/Object Detail columns.............................................. 673
Column sorting tips ...........................................................675
Page/Object viewing tip..................................................... 675
Truncated data viewing tip ................................................ 675
Customization Buttons ............................................................ 676
Modify button..................................................................... 676
Limit Detail Result button ..................................................677
Export button .................................................................... 678
Save button ...................................................................... 680
Report View Components .............................................................683
Report Fields and Usage ........................................................683
Type field........................................................................... 683
xxvi M86 SECURITY USER GUIDE

Date Scope and date fields ..............................................684
# Records fields ...............................................................686
Filter and Filter String fields ..............................................686
Sort By and Limit summary result to fields .......................687
Order field .........................................................................687
Limit Detail Results fields .................................................688
Break Type field ............................................................... 689
Format field ....................................................................... 689
Data to Export field............................................................ 689
For additional-break reports only ..................................... 690
# Records field............................................................ 690
Sort By field ................................................................690
For pie and bar charts only ............................................... 690
Generate Using field...................................................690
Output type field ................................................................ 691
Hide un-Identified IPs checkbox........................................691
E-Mail / For e-mail output only fields ................................ 692
Detailed Info fields............................................................. 692
Exporting a Report ........................................................................ 694
View and Print Options .................................................................. 695
View and Print Tools ............................................................... 695
Sample Report File Formats ................................................... 696
MS-DOS Text ...................................................................697
PDF ................................................................................... 697
Rich Text Format .............................................................. 698
HTML ............................................................................... 699
Comma-Delimited Text .....................................................699
Excel (English) .................................................................700
CONTENTS
Chapter 3: Customize, Maintain Reports ..............................701
Report Wizard ............................................................................... 701
Step A: Select the Report Option . .......................................... 702
Step B: Specify the Report Type . ........................................... 703
Summary report ................................................................703
Detail report....................................................................... 703
Step C: Specify Filters ............................................................ 703
Step D: Specify Other Report Components ............................705
Step E: Specify when to Generate the Report ........................706
Step F: Save Report panel ..................................................... 707
Saved Reports ..............................................................................712
Edit a Report ........................................................................... 713
M86 SECURITY USER GUIDE xxvii

CONTENTS
Edit a Summary or Detail Report ...................................... 713
Edit a Security Report ......................................................714
Copy a Saved Report . ............................................................ 715
Run a Saved Report . .............................................................. 717
Delete a Report ......................................................................717
Report Schedule ...........................................................................718
View Details for a Scheduled Report Run Event ....................719
Edit a Scheduled Report Run Event .......................................720
Add a Report Run Event to the Schedule ............................... 721
Delete a Scheduled Report Run Event ...................................722
Chapter 4: Specialized Reports ............................................. 723
Executive Internet Usage Summary ..............................................723
View, Edit Report Settings . .....................................................724
Add a New Report . .................................................................725
Sample Executive Internet Usage report ................................ 727
Blocked Request Reports .............................................................732
Generate a Blocked Request Report ...................................... 733
View the Blocked Request Report .......................................... 735
Time Usage Reports .....................................................................736
Generate a Time Usage Report . ............................................737
View the Time Usage Report .................................................. 739
Time Usage algorithm . ...........................................................740
SR R
EAL TIME REPORTS SECTION
................................ 741
Introduction .............................................................................741
Chapter 1: Gauge Components ............................................. 742
Types of Gauges ...........................................................................742
URL gauges ............................................................................ 742
Bandwidth gauges . ................................................................. 743
Anatomy of a Gauge ..................................................................... 744
How to Read a Gauge ................................................................... 745
Bandwidth Gauge Components ....................................................746
Gauge Usage Shortcuts ................................................................ 748
Chapter 2: Custom Gauge Setup, Usage ..............................750
Add a Gauge ................................................................................. 752
Specify Gauge Information . .................................................... 753
Define Gauge Components ....................................................754
xxviii M86 SECURITY USER GUIDE

Assign user groups .................................................................755
Save gauge settings ............................................................... 756
Modify a Gauge .............................................................................757
Edit gauge settings ................................................................. 757
Hide, Disable, Delete, Rearrange Gauges .................................... 759
Hide a gauge . ......................................................................... 761
Disable a gauge ...................................................................... 761
Show a gauge ......................................................................... 761
Rearrange the gauge display in the dashboard ......................761
Delete a gauge ....................................................................... 762
View End User Gauge Activity ...................................................... 763
View Overall Ranking ............................................................. 763
View a Gauge Ranking table .................................................. 764
Monitor, Restrict End User Activity ................................................ 766
View User Summary data .......................................................766
Access the Category View User panel ................................... 767
URL Gauges tab selection ................................................ 767
Bandwidth Gauges tab selection ......................................769
Manually lock out an end user ................................................ 770
Low severity lockout.......................................................... 771
Medium and High severity lockout ...................................772
End user workstation lockout ............................................772
Low severity URL, medium URL/bandwidth lockout... 772
High severity URL, low/high bandwidth lockout..........773
CONTENTS
Chapter 3: Alerts, Lockout Management .............................. 774
Add an Alert ..................................................................................776
Email alert function ................................................................. 777
Configure email alerts ....................................................... 777
Receive email alerts.......................................................... 778
System Tray alert function ......................................................778
Lockout function . ....................................................................779
View, Modify, Delete an Alert ........................................................780
View alert settings . ................................................................. 781
Modify an alert . ....................................................................... 782
Delete an alert ........................................................................ 783
View the Alert Log ......................................................................... 784
Manage the Lockout List ...............................................................786
View a specified time period of lockouts .................................787
Unlock workstations ................................................................ 788
Access User Summary details ................................................ 788
M86 SECURITY USER GUIDE xxix

CONTENTS
Chapter 4: Analyze Usage Trends .........................................789
View Trend Charts ........................................................................790
View activity for an individual gauge ....................................... 790
View overall URL or bandwidth gauge activity ........................792
Navigate a trend chart ............................................................ 793
View gauge activity for a different time period .................. 793
Analyze gauge activity in a pie chart................................. 794
Analyze gauge activity in a line chart ................................794
View In/Outbound bandwidth gauge activity ..................... 796
Print a trend chart from an IE browser window .................796
Chapter 5: Identify Users, Categories ...................................797
Perform a Custom Search ............................................................. 797
Specify Search Criteria . ..........................................................798
View URLs within the accessed category ........................800
SR S
ECURITY REPORTS SECTION
................................. 801
Introduction .............................................................................801
Chapter 1: Security Reports ...................................................802
Security Report types ....................................................................802
Blocked Viruses report view . ..................................................803
Security Policy Violations report view . ....................................804
Traffic Analysis report view ..................................................... 805
Rule Transactions report view . ............................................... 806
Security Report Tools .................................................................... 807
Report View Options ............................................................... 808
Report View Graph Only ................................................... 808
Report View Graph and Records ...................................... 808
Report View Records Only................................................ 809
Report Settings Options ................................................................ 810
Run a Security Report ............................................................ 810
Save a Security Report ........................................................... 813
Schedule a Security Report to Run . .......................................816
Export a Security Report ............................................................... 818
Security Report Format ................................................................. 820
Chapter 2: Security Report Wizard ........................................ 822
Create a Custom Security Report ................................................. 822
Specify Report Details ............................................................ 822
xxx M86 SECURITY USER GUIDE

Select Users ...........................................................................823
Specify Email Settings ............................................................825
Schedule, Run a Report using the Wizard ....................................826
CONTENTS
SR A
PPENDICES SECTION
............................................. 827
Appendix A .............................................................................. 827
Evaluation Mode ...........................................................................827
System Configuration Console . ..............................................828
Use the Server in the Evaluation Mode ............................829
Expiration screen ........................................................829
Change the Evaluation Mode ........................................... 830
Activation Page........................................................... 830
Appendix B .............................................................................. 832
System Tray Alerts: Setup, Usage ................................................832
LDAP server configuration ...................................................... 832
Create the System Tray logon script................................. 832
Assign System Tray logon script to administrators ...........836
Administrator usage of System Tray .......................................838
Use the System Tray Alert icon’s menu ............................ 838
Status of the System Tray Alert icon................................. 839
View System Tray alert messages.................................... 840
Appendix C .............................................................................. 841
Glossary ........................................................................................ 841
WFR A
PPENDICES SECTION
......................................... 845
Appendix I ................................................................................845
Disable Pop-up Blocking Software ................................................ 845
Yahoo! Toolbar Pop-up Blocker ....................................................845
Add the Client to the White List .............................................. 845
Google Toolbar Pop-up Blocker .................................................... 847
Add the Client to the White List .............................................. 847
AdwareSafe Pop-up Blocker .........................................................848
Disable Pop-up Blocking ........................................................848
Mozilla Firefox Pop-up Blocker .....................................................849
Add the Client to the White List .............................................. 849
Windows XP SP2 Pop-up Blocker ................................................851
Set up Pop-up Blocking .......................................................... 851
M86 SECURITY USER GUIDE xxxi

CONTENTS
Use the Internet Options dialog box.................................. 851
Use the IE Toolbar ............................................................852
Add the Client to the White List . ............................................. 853
Use the IE Toolbar ............................................................853
Use the Information Bar .................................................... 853
Set up the Information Bar.......................................... 854
Access the Client ........................................................854
Appendix II ...............................................................................855
RAID and Hardware Maintenance ................................................855
Part 1: Hardware Components ............................................... 855
Part 2: Server Interface . .........................................................856
Front Control Panel on a 300 Series Unit ......................... 856
Front control panel on the 500 series model.....................856
Part 3: Troubleshooting .......................................................... 858
Hard drive failure...............................................................858
Step 1: Review the notification email..........................858
Step 2: Verify the failed drive in the Admin console ... 858
Step 3: Replace the failed hard drive..........................860
Step 4: Rebuild the hard drive ....................................861
Step 5: Contact Technical Support ............................. 861
Power supply failure..........................................................861
Step 1: Verify the power supply has failed.................. 861
Step 2: Contact Technical Support ............................. 861
Fan failure ........................................................................862
Identify a fan failure .................................................... 862
I
NDEX
........................................................................... 863
xxxii M86 SECURITY USER GUIDE

WFR SUITE OVERVIEW
The M86 Security Web Filtering and Reporting Suite (WFR)
consists of the M86 Web Filter and M86 Security Reporter,
consolidated into one unit.
M86 Web Filter offers an enhanced solution for Internet
filtering on a network. The Web Filter tracks each user’s
online activity, and can be configured to block specific Web
sites or service ports, thereby protecting your organization
against lost productivity, network bandwidth issues, and
possible legal problems that can result from the misuse of
Internet resources.
Data from the Web Filter is fed into the Security Reporter
(SR), giving you the ability to interrogate massive datasets
through flexible drill-down technology, until the desired view
is obtained. This “view” can then be memorized and saved
to a user-defined report menu for repetitive, scheduled
execution and distribution. The SR also provides real time
graphical snapshots of network Internet traffic, supported by
remediation tools to manage and control user-generated
Web threats. Simply by drilling down into the easy-to-read
dashboard of gauges, you can target and halt the source of
the threat.
WFR SUITE OVERVIEW
Using the WFR Suite, threats to your network are quickly
identified, thus arming you with the capability to take immediate action to secure your network.
NOTE: The SR application can be configured to accept logs from
a M86 Secure Web Gateway (SWG) and generate security
reports. See the M86 Secure Web Gateway User Guide at http://
www.m86security.com/support/Secure-Web-Gateway/Documentation.asp for information on the SWG.
M86 SECURITY USER GUIDE 1

WFR SUITE OVERVIEW HOW TO USE THIS USER GUIDE
How to Use this User Guide
Organization
This User Guide is organized into the following portions:
• WFR Suite Overview - This portion introduces the WFR
product and explains how to use the WFR console and
this user guide, and provides information on how to
contact M86 Security technical support.
• Web Filter (WF) - Refer to this portion for information on
configuring and maintaining the Web Filter application.
• Security Reporter (SR) - Refer to this portion for infor-
mation on configuring and using the SR application to
generate reports.
• WFR Appendices - Appendix I explains how to disable
pop-up blocking software. Appendix II provides information on how to perform hardware maintenance and troubleshoot RAID on the 300 series and 500 series WFR
chassis.
• Index - The index lists subjects and the first page
numbers where they appear in this user guide.
2 M86 SECURITY USER GUIDE
Conventions
The following icons are used throughout this user guide:
NOTE: The “note” icon is followed by italicized text providing
additional information about the current topic.
TIP: The “tip” icon is followed by italicized text giving you hints on
how to execute a task more efficiently.
WARNING: The “warning” icon is followed by italicized text
cautioning you about making entries in the application, executing
certain processes or procedures, or the outcome of specified
actions.
IMPORTANT: The "important" icon is followed by italicized text
informing you about important information or procedures to follow
to ensure maximum uptime on the WFR Server.
WFR SUITE OVERVIEW HOW TO USE THIS USER GUIDE
M86 SECURITY USER GUIDE 3

WFR SUITE OVERVIEW COMPONENTS AND ENVIRONMENT
Components and Environment
Components
Hardware
• High performance server equipped with RAID
• Two or four high-capacity hard drives
• Optional: One or more attached “NAS” storage devices
(e.g. Ethernet connected, SCSI/Fibre Channel
connected “SAN”)
Software
• Linux OS
• Administrator User Interface (UI) console utilized by an
authorized administrator to configure and maintain the
WFR server
• MySQL database
4 M86 SECURITY USER GUIDE

Environment
Network Requirements
• Power connection protected by an Uninterruptible Power
Supply (UPS)
• HTTPS connection to M86 Security’s software update
server
• SR must be be fully configured, and the Structured Query
Language (SQL) server must be installed on the network
and connected to the Web access logging device(s) (e.g.
Web Filter(s) and Secure Web Gateway—the latter
device, if an SWG will be used with the SR)
• High speed access to the WFR server by authorized
client workstations
• Internet connectivity for downloading Java virtual
machine, if not already installed
WFR SUITE OVERVIEW COMPONENTS AND ENVIRONMENT
• Port 1443 must be available for the Web Filter user inter-
face to use, and ports 8443 and 8843 must be available
for the SR user interface to use
NOTE: Administrators must be set up with software installation
privileges in order to install Java used for accessing the Web
Filter user interface.
Administrator Workstation Requirements
System requirements for the administrator include the
following:
• Windows XP, Vista, or 7 operating system running:
• Internet Explorer (IE) 7.0 or 8.0
• Firefox 3.6
• Macintosh OS X Version 10.5 or 10.6 running:
M86 SECURITY USER GUIDE 5

WFR SUITE OVERVIEW COMPONENTS AND ENVIRONMENT
• Safari 4.0
• Firefox 3.6
• JavaScript enabled
• Java Virtual Machine
• Java Plug-in (minimum version 1.6.0_17, maximum
version 1.6.0_21)
NOTE: Java 1.6.0_22 and later are incompatible with this software release.
TIP: See http://www.m86security.com/software/8e6/hlp/ifr/
files/5help_java.html for information about identifying the
version of Java on your machine and downloading the latest
version.
• Pop-up blocking software, if installed, must be disabled
• Session cookies from the WFR server must be allowed in
order for the Administrator consoles to function properly
NOTES: Information about disabling pop-up blocking software
can be found in WFR Appendix I: Disable Pop-up Blocking Software.
End User Workstation Requirements
System requirements for the end user include the following:
• Windows XP, Vista, or 7 operating system running:
• Internet Explorer (IE) 7.0 or 8.0
• Firefox 3.6
• Macintosh OS X Version 10.5 or 10.6 running:
• Safari 4.0
• Firefox 3.6
• JavaScript enabled
• Pop-up blocking software, if installed, must be disabled
6 M86 SECURITY USER GUIDE
WFR SUITE OVERVIEW HOW TO USE THE WFR ON THE WEB
How to Use the WFR on the Web
Initial Setup
To initially set up your M86 Web Filter and Reporter (WFR)
server, the administrator installing the unit should follow the
instructions in the M86 WFR Installation Guide, the booklet
packaged with your WFR unit. This guide explains how to
perform the initial configuration of the server so that it can
be accessed via an IP address or host name on your
network.
NOTE: If you do not have the M86 WFR Installation Guide,
contact M86 Security immediately to have a copy sent to you.
WARNING: In order to prevent data from being lost or corrupted
while the WFR server is running, the server should be connected
to a UPS or other battery backup system. Once you turn on the
WFR server, DO NOT interrupt the initial boot-up process. This
process may take from five to 10 minutes per drive. If the process
is interrupted, damage to key files may occur.
Access the WFR Welcome Window
After the WFR unit is set up on the network, the designated
global administrator of the server should be able to access
the unit via its URL on the Internet, using the user name and
password registered during the Wizard hardware installation procedures.
1. Launch an Internet browser window supported by the
WFR.
2. In the address line of the browser window, type in
“https://” and the WFR server’s IP address or host name,
and use port number “:1443” for a secure network
connection.
For example, if your IP address is 210.10.131.34, type in
https://210.10.131.34:1443. Using a host name
M86 SECURITY USER GUIDE 7

WFR SUITE OVERVIEW HOW TO USE THE WFR ON THE WEB
example, if the host name is logo.com, type in https://
logo.com:1443.
With a secure connection, the first time you attempt to
access the WFR’s user interface in your browser you will
be prompted to accept the security certificate. In order to
accept the security certificate for your browser, follow the
instructions at: http://www.m86security.com/software/
8e6/docs/ig/misc/sec-cert-wfr3.0.pdf
3. Click Go to open the Welcome window of the WFR user
interface:
Fig. 1:1-1 WFR Welcome window
Using this portal you can click the icon corresponding to
Web Filter or Security Reporter to access the user interface of that application, as described in the following
sections of this user guide.
However, by logging into the SR Report Manager as the
global administrator—as described on the next page—
you will have access to the Web Filter, SR Report
Manager and SR System Configuration administrator
console on the WFR server, without needing to use this
WFR Welcome portal to individually log into the two main
applications.
8 M86 SECURITY USER GUIDE

WFR SUITE OVERVIEW HOW TO USE THE WFR ON THE WEB
Single Sign-On Access
Access all applications from the SR UI
Single Sign-On (SSO) access eliminates the process of
choosing either the Web Filter or SR application from the
WFR Welcome window, and then logging in to each application separately.
To enable SSO, be sure the same username and password
combination set up in the wizard hardware installation
process is saved in the Web Filter (System > Administrator—‘Admin’ account type profile). Also be sure the host
name for the WFR is entered in the hosts file.
To use the single sign-on option:
1. Log in to SR using the Wizard username and password.
2. Go to the navigation links at the top of the Report
Manager panel and select:
• Administration > System Configuration to access
the SR administrator console
• Administration > Web Filter > (IP address) to
access the Web Filter user interface
M86 SECURITY USER GUIDE 9

WFR SUITE OVERVIEW HOW TO USE THE WFR ON THE WEB
Default Usernames and Passwords
Without setting up single sign-on access for the global
administrator account, default usernames and passwords
for WFR applications are as follows:
Application Username Password
Web Filter admin user3
Security Reporter admin testpass
Note that since the default username for both the Web Filter
and Security Reporter are identical (admin), but the passwords are dissimilar, the SSO feature will not function.
Thus, in order to use SSO, M86 recommends setting up an
administrator account in the Web Filter that matches the
global administrator account set up in the SR (Administration > Admin Profiles).
Technical Support / Product Warranties
For technical assistance or warranty repair, please visit
http://www.m86security.com/support/ .
10 M86 SECURITY USER GUIDE

WEB FILTER INTRODUCTORY SECTION WEB FILTER
W
EB
F
ILTER INTRODUCTORY
S
ECTION
Web Filter
M86 Security’s Web Filter tracks each user’s online activity,
and can be configured to block specific Web sites, service
ports, and pattern and file types, and lock out an end user
from Internet access, thereby protecting your organization
against lost productivity, network bandwidth issues, and
possible legal problems that can result from the misuse of
Internet resources.
The Web Filter provides an extensive library filtering category database, user authentication, implementation of time
and quota filtering profiles, and tools for tailoring a user’s
filtering profile to comply with your organization’s Internet
usage policy, based on the end user’s Internet usage habits.
About this Portion of the User Guide
The Web Filter portion of the user guide primarily addresses
the network administrator designated to configure and
manage the server on the network. This administrator is
referred to as the “global administrator” throughout this
portion of the user guide. In part, this portion of the user
guide also addresses administrators who manage user
groups on the network. These administrators are referred to
as “group administrators” throughout this portion of the user
guide.
See the M86 Web Filter Authentication User Guide at
http://www.m86security.com/support/wf/documentation.asp for information on authentication.
This portion of the user guide is organized into the following
sections:
M86 SECURITY USER GUIDE 11

WEB FILTER INTRODUCTORY SECTION ABOUT THIS PORTION OF THE USER GUIDE
• Web Filter Introductory Section - This section is
comprised of an overview on filtering, Web access
logging, instant messaging and peer-to-peer blocking,
and synchronizing multiple Web Filter units. This section
also provides information on how to use this portion of
the user guide to help you configure the Web Filter.
• WF Global Administrator Section - This section
includes information for the global administrator—who
has all rights and permissions on the Web Filter—to
create group administrator accounts, and to configure
the Web Filter for filtering the entire network.
• WF Group Administrator Section - This section
includes information for administrators authorized by the
global administrator to manage profiles of designated
groups and their associated users on the Web Filter.
Group administrators also have rights to access certain
library category functions.
• Web Filter Appendices Section - Appendix A includes
formats and rules used in the filtering profile file.
Appendix B includes information on creating a customized block page. Appendix C provides tips on how to
override pop-up windows with pop-up blocker software
installed. Appendix D explains how to install, configure,
and use the Mobile Client. Appendix E features a glossary of technical terminology used in this portion of the
user guide.
12 M86 SECURITY USER GUIDE

WEB FILTER INTRODUCTORY SECTION ABOUT THIS PORTION OF THE USER GUIDE
Terminology
The following terms are used throughout this user guide.
Sample images (not to scale) are included for each item.
• alert box - a message box
that opens in response to
an entry you made in a
dialog box, window, or
screen. This box often
contains a button (usually labeled “OK”) for you to click in
order to confirm or execute a command.
• button - an object in a dialog box,
window, or screen that can be clicked
with your mouse to execute a command.
• checkbox - a small square in a dialog
box, window, or screen used for indicating whether or not you wish to select an option. This
object allows you to toggle between two choices. By
clicking in this box, a check mark or an “X” is placed, indicating that you selected the option. When this box is not
checked, the option is not selected.
• dialog box - a box that
opens in response to a
command made in a
window or screen, and
requires your input. You
must choose an option by clicking a button (such as
“Yes” or “No”, or “Next” or “Cancel”) to execute your
command. As dictated by this box, you also might need
to make one or more entries or selections prior to clicking
a button.
• field - an area in a dialog box,
window, or screen that either
accommodates your data entry, or displays pertinent
information. A text box is a type of field.
M86 SECURITY USER GUIDE 13

WEB FILTER INTRODUCTORY SECTION ABOUT THIS PORTION OF THE USER GUIDE
• frame - a boxed-in area in a dialog
box, window, or screen that
includes a group of objects such as
fields, text boxes, list boxes,
buttons, radio buttons, checkboxes, and/or tables. Objects within a frame belong to a
specific function or group. A frame often is labeled to indicate its function or purpose.
• grid - an area in
a frame that
displays rows
and columns of
data, as a result of various processes. This data can be
reorganized in the Administrator console, by changing
the order of the columns.
• list box - an area in a dialog box,
window, or screen that accommodates and/or displays entries of
items that can be added or removed.
• navigation panel - the panel that
displays at the left of a screen. This
panel can contain links that can be
clicked to open windows or dialog boxes
at the right of the screen. One or more
tree lists also can display in this panel.
When an item in the tree list is clicked,
the tree list opens to reveal items that
can be selected.
14 M86 SECURITY USER GUIDE

WEB FILTER INTRODUCTORY SECTION ABOUT THIS PORTION OF THE USER GUIDE
• pop-up box or pop-up
window - a box or window
that opens after you click a
button in a dialog box,
window, or screen. This box
or window may display information, or may require you
to make one or more entries.
Unlike a dialog box, you do not need to choose between
options.
• pull-down menu - a field in a
dialog box, window, or screen
that contains a down-arrow to the right. When you click
the arrow, a menu of items displays from which you make
a selection.
• radio button - a small, circular object in
a dialog box, window, or screen used
for selecting an option. This object allows you to toggle
between two choices. By clicking a radio button, a dot is
placed in the circle, indicating that you selected the
option. When the circle is empty, the option is not
selected.
• screen - a main
object of an application that
displays across
your monitor. A
screen can
contain panels,
windows, frames,
fields, tables, text
boxes, list boxes, icons, buttons, and radio buttons.
M86 SECURITY USER GUIDE 15
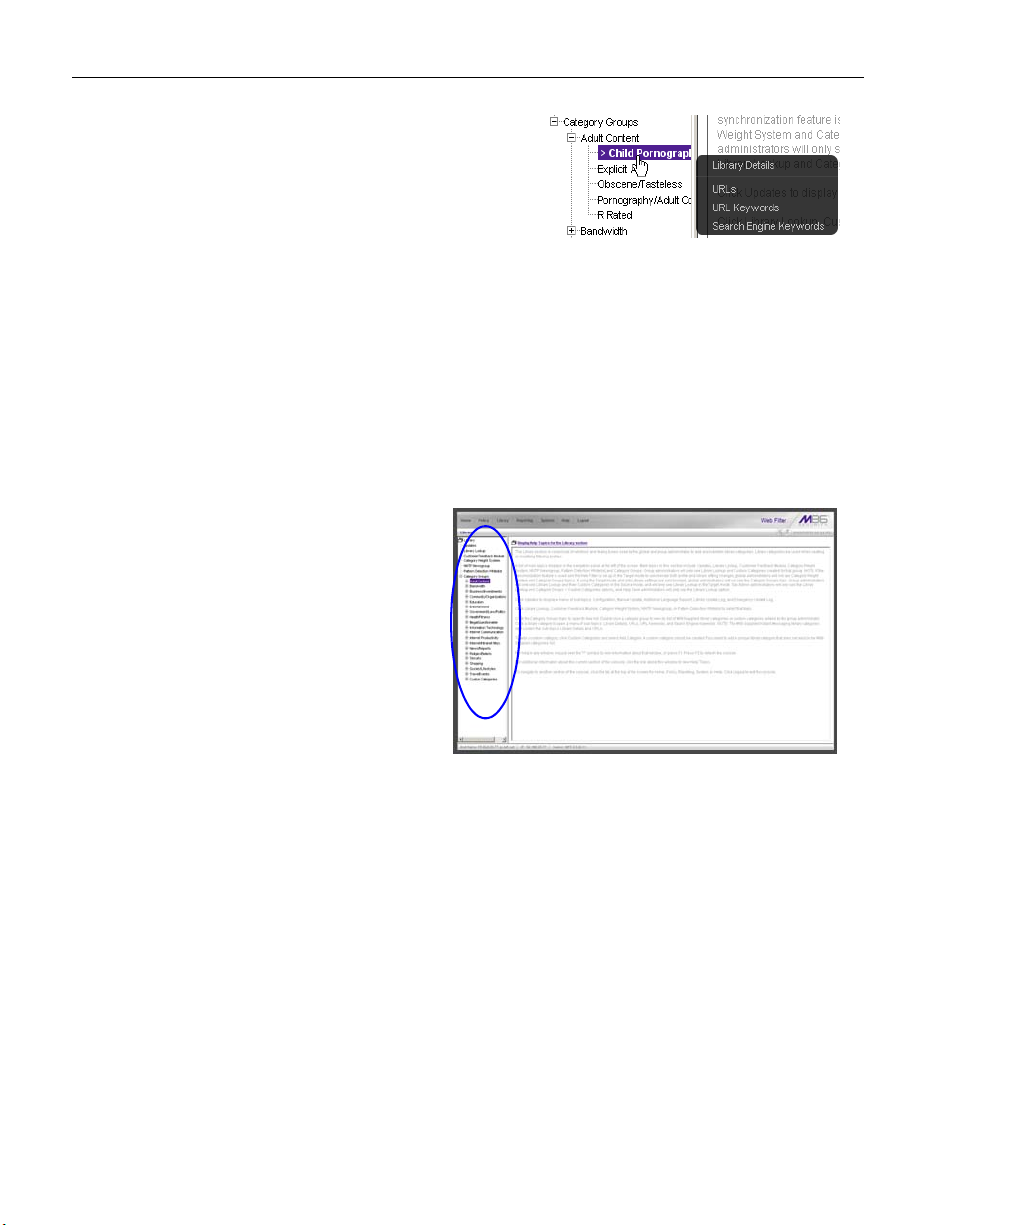
WEB FILTER INTRODUCTORY SECTION ABOUT THIS PORTION OF THE USER GUIDE
• sub-topic - a subset
of a main topic that
displays as a menu
item for the topic. The
menu of sub-topics
opens when a pertinent topic link in the left panel—the navigation panel—of
a screen is clicked. If a sub-topic is selected, the window
for that sub-topic displays in the right panel of the screen,
or a pop-up window or an alert box opens, as appropriate.
• text box - an area in a dialog box, window, or screen that
accommodates your data entry. A text box is a type of
field. (See “field”.)
• topic - a
topic
displays as
a link in the
left panel—
the navigation panel—
of a screen.
By clicking
the link for a
topic, the
window for that topic displays in the right panel of the
screen, or a menu of sub-topics opens.
16 M86 SECURITY USER GUIDE

WEB FILTER INTRODUCTORY SECTION ABOUT THIS PORTION OF THE USER GUIDE
• tree - a tree displays in the navigation panel of a screen, and is
comprised of a hierarchical list of
items. An entity associated with a
branch of the tree is preceded by a
plus (+) sign when the branch is
collapsed. By double-clicking the
item, a minus (-) sign replaces the
plus sign, and any entity within that
branch of the tree displays. An item
in the tree is selected by clicking it.
• window - a window displays on
a screen, and can contain
frames, fields, text boxes, list
boxes, buttons, checkboxes,
and radio buttons. A window for
a topic or sub-topic displays in
the right panel of the screen.
Other types of windows include
pop-up windows, login
windows, or ones from the
system such as the Save As or
Choose file windows.
M86 SECURITY USER GUIDE 17

WEB FILTER INTRODUCTORY SECTION OVERVIEW
Overview
The Web Filter’s Administrator console is used by the global
administrator—and group administrator, as required—to
configure the Web Filter to perform the following basic functions:
• filter URLs (Web addresses) on the Internet
• log traffic on the Internet
and, if applicable for your organization:
• block instant messaging and peer-to-peer services
• authenticate users via the existing authentication system
on the network
NOTE: See the M86 Web Filter Authentication User Guide at
http://www.m86security.com/support/wf/documentation.asp
for information on setting up and using authentication.
• synchronize multiple Web Filter units so that all servers
will be updated with the same user profile and library
configurations
To help you become familiar with the Web Filter and how it
functions on the network, Chapter 1 of this section of the
User Guide provides an overview on filtering. Chapter 2
gives insight into Web site access logging, and instant
messaging and peer-to-peer setup procedures. Chapter 3
features information on synchronizing multiple Web Filter
units. Chapter 4 includes details on getting started, with log
in and log out procedures, and tips on navigating the Administrator console.
18 M86 SECURITY USER GUIDE

WEB FILTER INTRODUCTORY SECTION CHAPTER 1: FILTERING OPERATIONS
Chapter 1: Filtering Operations
Operational Modes
Based on the setup of your network, the Web Filter can be
configured to use one of these operational modes for
filtering the network:
• invisible mode
• router mode
• firewall mode
M86 SECURITY USER GUIDE 19
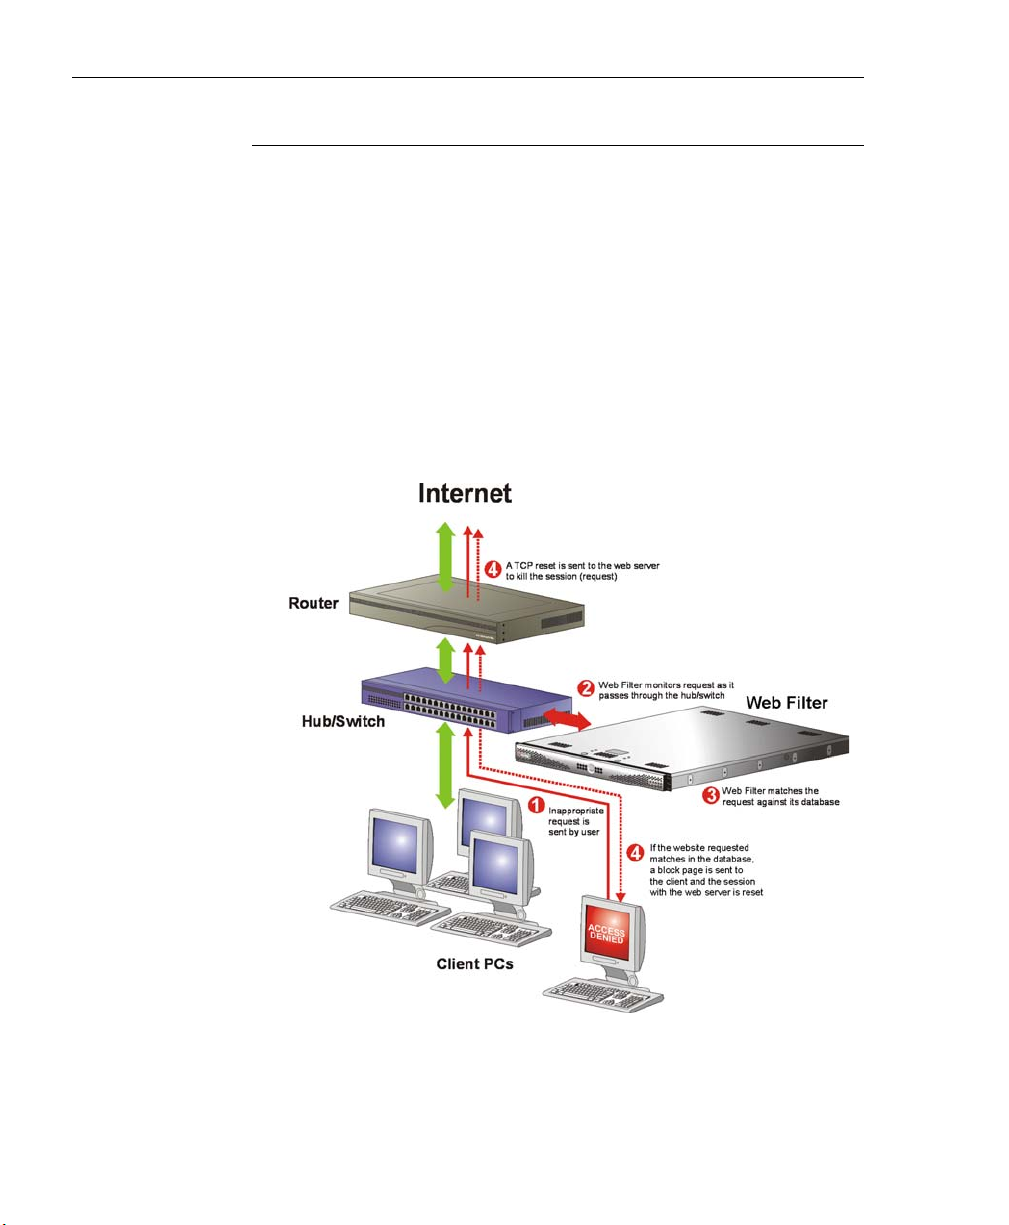
WEB FILTER INTRODUCTORY SECTION CHAPTER 1: FILTERING OPERATIONS
Invisible Mode
If the Web Filter is set up in the invisible mode, the unit will
filter all connections on the Ethernet between client PCs and
the Internet, without stopping each IP packet on the same
Ethernet segment. The unit will only intercept a session if an
inappropriate request was submitted by a client. In this
scenario, the Web Filter returns a message to the client and
server to deny the request, and a block page displays to
deny the client access to the site or service.
Figure 1:1-1 depicts the invisible mode that removes the
Web Filter from any inclusion in the network connection
path.
Fig. 1:1-1 Pass-by filtering diagram
20 M86 SECURITY USER GUIDE

WEB FILTER INTRODUCTORY SECTION CHAPTER 1: FILTERING OPERATIONS
When users (Client PCs) make Internet requests, the traffic
flows (1) through the network path without interruption. The
Web Filter captures the request as the user’s request (2)
leaves the network. The Web Filter then determines the
action (3) to either block or pass the request. If the Web
Filter determines to block the user’s request, a block
message (4) is sent to the user plus a terminate message
(4) is sent to the Internet server.
A Web Filter set up in the invisible mode can also work in the
router mode. Figure 1:1-2 illustrates an example of a
monitor mode setup, with the Web Filter connected to the
managed switching hub. In this setup, the Web Filter port is
configured with the port monitoring function enabled, so that
the Web Filter’s port mirrors the port connected to the
router.
Fig. 1:1-2 Invisible mode diagram, with port monitoring
In the invisible mode, the Web Filter performs as a standalone server that can be connected to any network environment.
M86 SECURITY USER GUIDE 21

WEB FILTER INTRODUCTORY SECTION CHAPTER 1: FILTERING OPERATIONS
Router Mode
If the Web Filter is set up in the router mode, the unit will act
as an Ethernet router, filtering IP packets as they pass from
one card to another. While all original packets from client
PCs are allowed to pass, if the Web Filter determines that a
request is inappropriate, a block page is returned to the
client to replace the actual requested Web page or service.
Since only outgoing packets need to be routed—and not
return packets—the Web Filter only appears in the outgoing
path of the network.
Figure 1:1-3 illustrates an example of the router mode
setup, in which the Web Filter is set up to act as the Internet
router.
Fig. 1:1-3 Router mode diagram
As previously mentioned, a Web Filter set up in the router
mode can also work in the invisible mode. The router mode
setup also will work in the firewall mode.
22 M86 SECURITY USER GUIDE
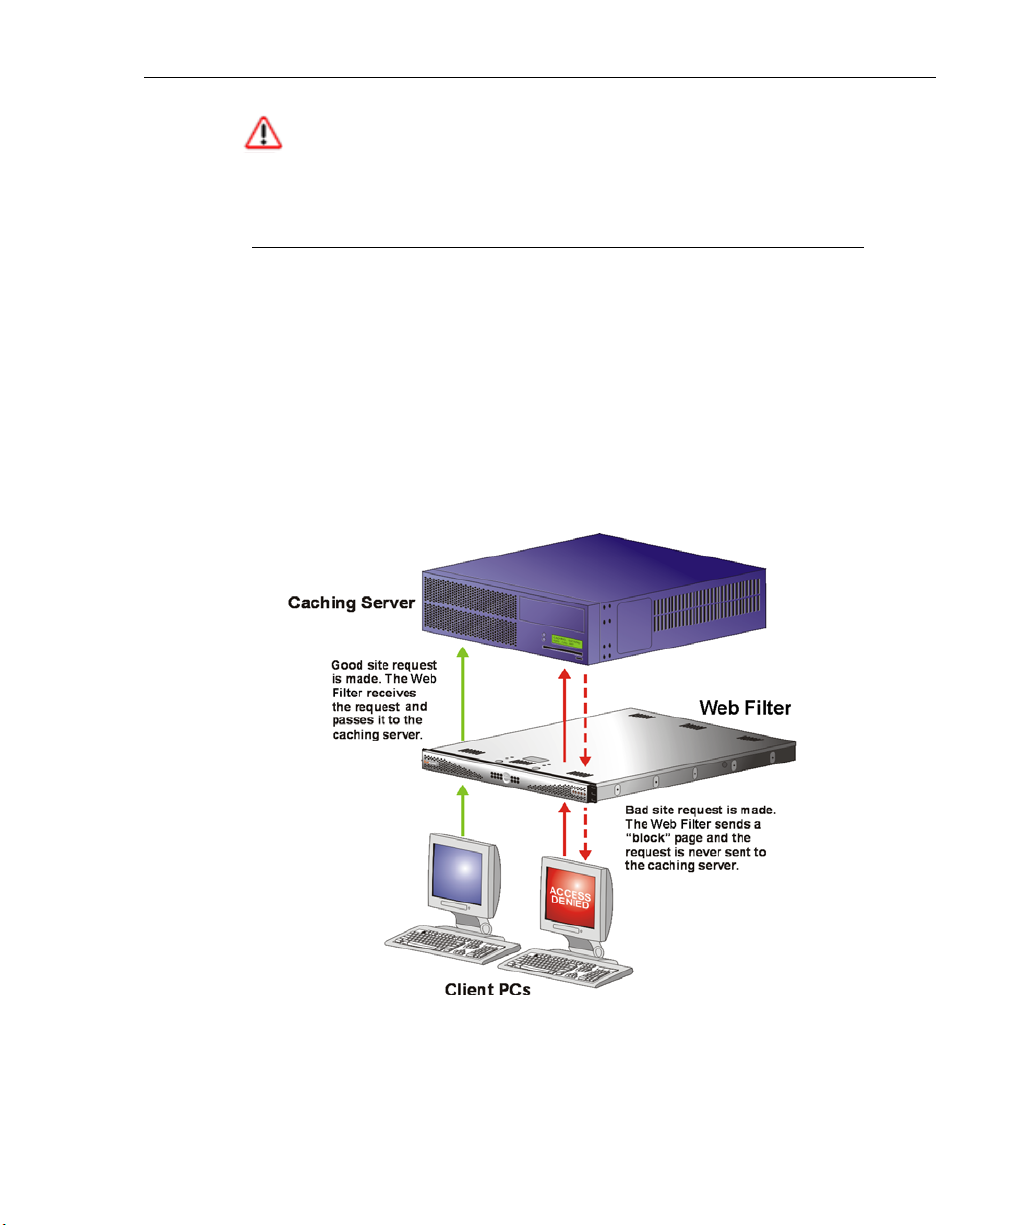
WEB FILTER INTRODUCTORY SECTION CHAPTER 1: FILTERING OPERATIONS
WARNING: M86 recommends contacting one of our solutions
engineers if you need assistance with router mode setup procedures.
Firewall Mode
The firewall mode is a modification of the router mode. With
the Web Filter set up in this mode, the unit will filter all
requests. If the request is appropriate, the original packet
will pass unchanged. If the request is inappropriate, the
original packet will be blocked from being routed through.
Using the firewall mode, while the outgoing request is
delayed slightly—to allow filtering to take place before the
packet leaves the gateway router of the network—return
traffic remains unaffected.
Fig. 1:1-4 Firewall mode diagram, with firewall and cache setup
M86 SECURITY USER GUIDE 23

WEB FILTER INTRODUCTORY SECTION CHAPTER 1: FILTERING OPERATIONS
The firewall mode cannot be used with any other mode
(invisible or router).
Figure 1:1-4 illustrates an example of a firewall mode setup
in which requests are never sent to the caching server. In
this scenario the local caching proxy will not affect the Web
Filter—even if the server contains unfiltered, “bad” cached
pages—since no request can pass until it is filtered.
Figure 1:1-5 illustrates an example of a firewall mode setup
in which requests are always sent to the caching server. In
this scenario the Web Filter will be affected if the caching
proxy server contains unfiltered, “bad” cached pages. M86
recommends that cached content is cleared or expired after
installing the Web Filter.
WARNING: Contact a solutions engineer at M86 Security for
setup procedures if you wish to use the firewall mode.
Fig. 1:1-5 Firewall mode diagram, with filtering and cache setup
24 M86 SECURITY USER GUIDE

WEB FILTER INTRODUCTORY SECTION CHAPTER 1: FILTERING OPERATIONS
Group Types
After the operational filtering mode is configured on the Web
Filter, the group type(s) that will be used on the Web Filter
must be set up so that filtering can take place.
In the Policy section of the Administrator console, group
types are structured in a tree format in the navigation panel.
The global administrator can access the Global Group and
IP groups in the tree. The group administrator can only
access the designated IP group to be maintained.
NOTES: If authentication is enabled, the global administrator can
also access the LDAP branch of the tree.
If multiple Web Filter units are set up on the network and the
synchronization feature is used, a Web Filter that is set up to
receive profile changes will only display the Global Group type in
the tree list. (See Chapter 3: Synchronizing Multiple Units for
more information on synchronization.)
Global Group
The first group that must be set up is the global group,
represented in the tree structure by the global icon .
The filtering profile created for the global group represents
the default profile to be used by all groups that do not have
a filtering profile, and all users who do not belong to a group.
M86 SECURITY USER GUIDE 25
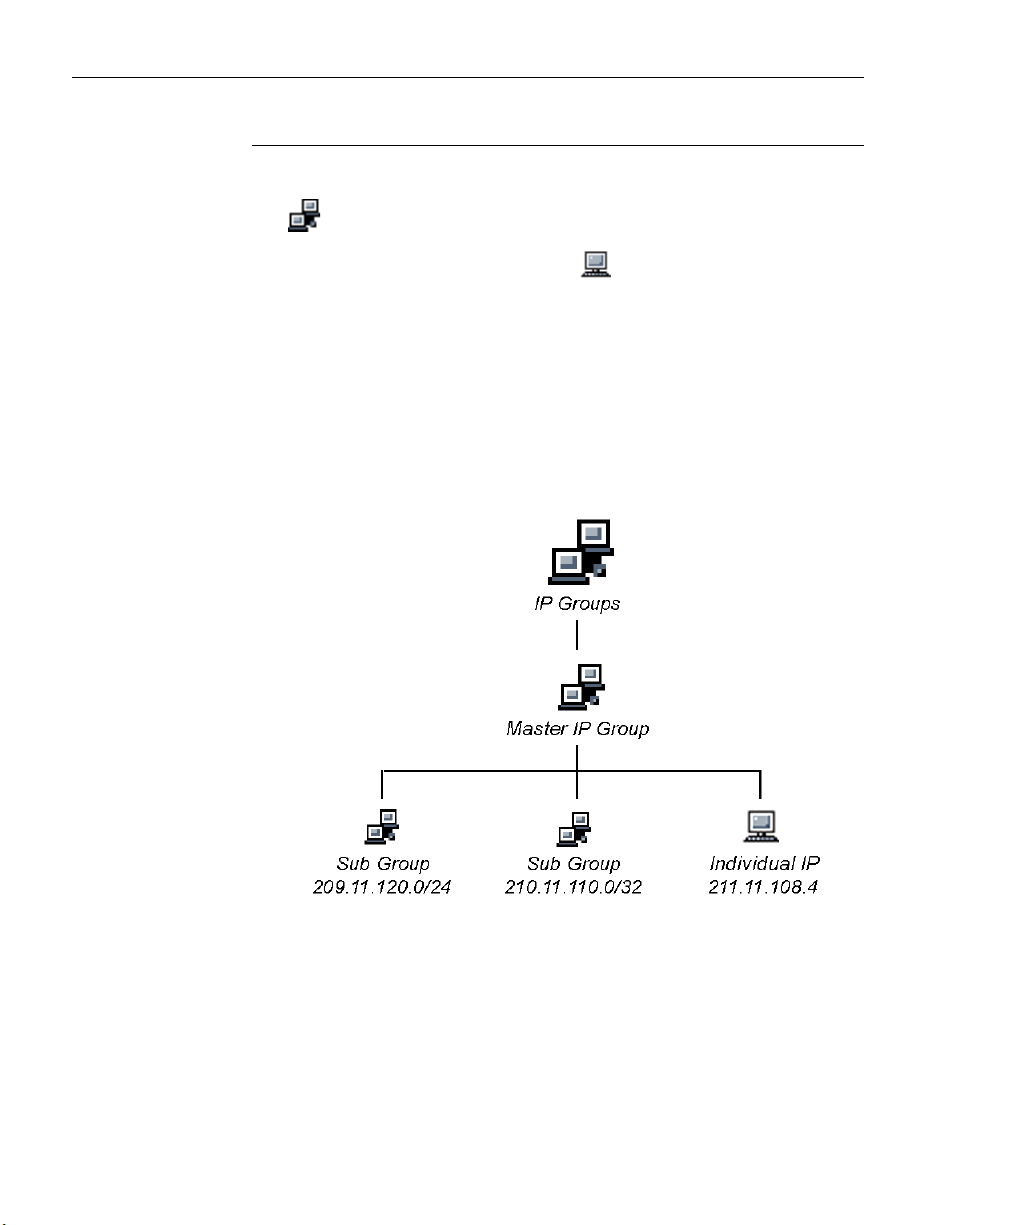
WEB FILTER INTRODUCTORY SECTION CHAPTER 1: FILTERING OPERATIONS
IP Groups
The IP group type is represented in the tree by the IP icon
. A master IP group is comprised of sub-group members
and/or individual IP members .
The global administrator adds master IP groups, adds and
maintains override accounts at the global level, and establishes and maintains the minimum filtering level.
The group administrator of a master IP group adds subgroup and individual IP members, override account, time
profiles and exception URLs, and maintains filtering profiles
of all members in the master IP group.
Fig. 1:1-6 IP diagram with a sample master IP group and its members
26 M86 SECURITY USER GUIDE

WEB FILTER INTRODUCTORY SECTION CHAPTER 1: FILTERING OPERATIONS
Filtering Profile Types
A filtering profile is used by all users who are set up to be
filtered on the network. This profile consists of rules that
dictate whether a user has access to a specified Web site or
service on the Internet.
The following types of filtering profiles can be created,
based on the setup in the tree menu of the Policy section of
the console:
Global Group
• global filtering profile - the default filtering profile positioned at the base of the hierarchical tree structure, used
by end users who do not belong to a group.
IP group (master group)
• master group filtering profile - used by end users who
belong to the master group.
• master time profile - used by master group users at a
specified time.
IP group member
• sub-group filtering profile - used by a sub-group
member.
• individual filtering profile - used by an individual IP
group member.
• time profile - used by a sub-group/individual IP group
member at a specified time.
Other filtering profiles
• authentication profile - used by LDAP group members.
This type of profile includes the workstation profile.
NOTE: For information about authentication filtering profiles, see
the M86 Web Filter Authentication User Guide.
M86 SECURITY USER GUIDE 27

WEB FILTER INTRODUCTORY SECTION CHAPTER 1: FILTERING OPERATIONS
• override account profile - set up in either the Global
Group section or the master IP group section of the
console.
• lock profile - set up under X Strikes Blocking in the Filter
Options section of the profile.
• Radius profile - used by end users on a Radius
accounting server if the Radius server is connected to
the Web Filter and the Radius authentication feature
enabled.
• TAR profile - used by the Threat Analysis Reporter
(TAR) module if an end user is locked out by TAR when
attempting to access blocked content in a library category.
28 M86 SECURITY USER GUIDE

WEB FILTER INTRODUCTORY SECTION CHAPTER 1: FILTERING OPERATIONS
Static Filtering Profiles
Static filtering profiles are based on fixed IP addresses and
include profiles for master IP groups and their members.
Master IP Group Filtering Profile
The master IP group filtering profile is created by the global
administrator and is maintained by the group administrator.
This filtering profile is used by members of the group—
including sub-group and individual IP group members—and
is customized to allow/deny users access to URLs, or warn
users about accessing specified URLs, to redirect users to
another URL instead of having a block page display, and to
specify usage of appropriate filter options.
IP Sub-Group Filtering Profile
An IP sub-group filtering profile is created by the group
administrator. This filtering profile applies to end users in an
IP sub-group and is customized for sub-group members.
Individual IP Member Filtering Profile
An individual IP member filtering profile is created by the
group administrator.This filtering profile applies to a specified end user in a master IP group.
M86 SECURITY USER GUIDE 29

WEB FILTER INTRODUCTORY SECTION CHAPTER 1: FILTERING OPERATIONS
Active Filtering Profiles
Active filtering profiles include the Global Group Profile,
Override Account profile, Time Profile, and Lock profile.
NOTE: For information about authentication filtering profiles, see
the M86 Web Filter Authentication User Guide.
Global Filtering Profile
The global filtering profile is created by the global administrator. This profile is used as the default filtering profile. The
global filtering profile consists of a customized profile that
contains a list of library categories to block, open, add to a
white list, or assign a warn setting, and service ports that are
configured to be blocked. A URL can be specified for use
instead of the standard block page when users attempt to
access material set up to be blocked. Various filter options
can be enabled.
Override Account Profile
If any user needs access to a specified URL that is set up to
be blocked, the global administrator or group administrator
can create an override account for that user. This account
grants the user access to areas set up to be blocked on the
Internet.
Time Profile
A time profile is a customized filtering profile set up to be
effective at a specified time period for designated users.
Lock Profile
This filtering profile blocks the end user from Internet access
for a set period of time, if the end user’s profile has the X
Strikes Blocking filter option enabled and he/she has
received the maximum number of strikes for inappropriate
Internet usage.
30 M86 SECURITY USER GUIDE

WEB FILTER INTRODUCTORY SECTION CHAPTER 1: FILTERING OPERATIONS
Filtering Profile Components
Filtering profiles are comprised of the following components:
• library categories - used when creating a rule, minimum
filtering level, or filtering profile for the global group or any
entity
• service ports - used when setting up filter segments on
the network, creating the global group (default) filtering
profile, or establishing the minimum filtering level
• rules - specify which library categories should be
blocked, left open (a set number of minutes in which that
category remains open can be defined), assigned a warn
setting, or white listed
• filter options - specify which features will be enabled: X
Strikes Blocking, Google/Bing/Yahoo!/Ask/AOL Safe
Search Enforcement, Search Engine Keyword Filter
Control, URL Keyword Filter Control
• minimum filtering level - takes precedence over
filtering profiles of entities who are using a filtering profile
other than the global (default) filtering profile
• filter settings - used by service ports, filtering profiles,
rules, and the minimum filtering level to indicate whether
users should be granted or denied access to specified
Internet content
M86 SECURITY USER GUIDE 31

WEB FILTER INTRODUCTORY SECTION CHAPTER 1: FILTERING OPERATIONS
Library Categories
A library category contains a list of Web site addresses and
keywords for search engines and URLs that have been set
up to be blocked or white listed. Library categories are used
when creating a rule, the minimum filtering level, or a
filtering profile.
M86 Supplied Categories
M86 furnishes a collection of library categories, grouped
under the heading “Category Groups” (excluding the
“Custom Categories” group). Updates to these categories
are provided by M86 on an ongoing basis, and administrators also can add or delete individual URLs within a specified library category.
Custom Categories
Custom library categories can be added by either global or
group administrators. As with M86 supplied categories,
additions and deletions can be made within a custom category. However, unlike M86 supplied categories, a custom
category can be deleted.
NOTE: M86 cannot provide updates to custom categories. Maintaining the list of URLs and keywords is the responsibility of the
global or group administrator.
32 M86 SECURITY USER GUIDE

WEB FILTER INTRODUCTORY SECTION CHAPTER 1: FILTERING OPERATIONS
Service Ports
Service ports are used when setting up filter segments on
the network (the range of IP addresses/netmasks to be
detected by the Web Filter), the global (default) filtering
profile, and the minimum filtering level.
When setting up the range of IP addresses/netmasks to be
detected, service ports can be set up to be open (ignored).
When creating the global filtering profile and the minimum
filtering level, service ports can be set up to be blocked or
filtered.
Examples of service ports that can be set up include File
Transfer Protocol (FTP), Hyper Text Transfer Protocol
(HTTP), Network News Transfer Protocol (NNTP), Secured
HTTP Transmission (HTTPS), and Secure Shell (SSH).
Rules
A rule is comprised of library categories to block, leave
open, assign a warn setting, or include in a white list.
Access to an open library category can be restricted to a set
number of minutes. Each rule that is created by the global
administrator is assigned a number. A rule is selected when
creating a filtering profile for an entity.
Minimum Filtering Level
The minimum filtering level consists of library categories set
up at the global level to be blocked or opened, and service
ports set up to be blocked or filtered. If the minimum filtering
level is created, it applies to all users in IP groups, and takes
precedence over filtering settings made for group and user
filtering profiles.
The minimum filtering level does not apply to any user who
does not belong to a group, and to groups that do not have
a filtering profile established.
M86 SECURITY USER GUIDE 33
WEB FILTER INTRODUCTORY SECTION CHAPTER 1: FILTERING OPERATIONS
NOTE: If the minimum filtering level is not set up, global (default)
filtering settings will apply instead.
If an override account is established at the IP group level for
a member of a master IP group, filtering settings made for
that end user will override the minimum filtering level if the
global administrator sets the option to allow the minimum
filtering level to be bypassed. An override account established at the global group level will automatically bypass the
minimum filtering level.
Filter Settings
Categories and service ports use the following settings to
specify how filtering will be executed:
• block - if a category or a service port is given a block
setting, users will be denied access to the URL set up as
“blocked”
• open - if a category or the filter segment detected on the
network is given an open (pass) setting, users will be
allowed access to the URL set up as “opened”
NOTE: Using the quota feature, access to an open category can
be restricted to a defined number of minutes.
• always allowed - if a category is given an always
allowed setting, the category is included in the user’s
white list and takes precedence over blocked categories
NOTE: A category that is allowed will override any blocked
settings except if the minimum filtering level is set to block that
category.
• warn - If a category is given a warn setting, a warning
page displays for the end user to warn him/her that
accessing the intended URL may be against established
policies and to proceed at his/her own risk
34 M86 SECURITY USER GUIDE

WEB FILTER INTRODUCTORY SECTION CHAPTER 1: FILTERING OPERATIONS
• filter - if a service port is given a filter setting, that port will
use filter settings created for library categories (block or
open settings) to determine whether users should be
denied or allowed access to that port
• ignore - if the filter segment detected on the network has
a service port set up to be ignored, that service port will
be bypassed
Filtering Rules
Filtering Levels Applied
1. The global (default) filtering profile applies to any user
who does not belong to a master IP group.
2. If the minimum filtering level is defined, it applies to all
master IP groups and members assigned filtering
profiles. The minimum filtering level combines with the
user’s profile to guarantee that categories blocked in the
minimum filtering level are blocked in the user’s profile.
3. For master IP group members:
a. A master IP group filtering profile takes precedence
over the global profile.
b. A master IP group time profile takes precedence over
the master IP group profile.
4. For IP sub-group members:
a. An IP sub-group filtering profile takes precedence over
the master IP group’s time profile.
b. An IP sub-group time profile takes precedence over
the IP sub-group profile.
5. For individual IP members:
a. An individual IP member filtering profile takes prece-
dence over the IP sub-group’s time profile.
M86 SECURITY USER GUIDE 35

WEB FILTER INTRODUCTORY SECTION CHAPTER 1: FILTERING OPERATIONS
b. An individual IP member time profile takes precedence
over the individual IP member profile.
6. An authentication (LDAP) profile—this includes a workstation profile—takes precedence over an individual IP
member’s time profile.
NOTE: A Radius profile is another type of authentication profile
and is weighted the same as LDAP authentication profiles in the
precedence hierarchy.
7. A Threat Analysis Reporter (TAR) profile is a type of
lockout profile used by the TAR module in the SR application. The TAR low level lockout profile takes precedence over an authentication profile or a time profile
profile, locking out the end user from library categories
specified in the lockout profile in the TAR module.
8. An override account profile takes precedence over a TAR
lockout profile. This account may override the minimum
filtering level—if the override account was set up in the
master IP group tree, and the global administrator allows
override accounts to bypass the minimum filtering level,
or if the override account was set up in the Global Group
tree.
NOTE: An override account set up in the master group section of
the console takes precedence over an override account set up in
the Global Group section of the console.
9. An X Strikes lockout profile takes precedence over all
filtering profiles. This profile is set up under Filter
Options, by enabling the X Strikes Blocking feature.
36 M86 SECURITY USER GUIDE

WEB FILTER INTRODUCTORY SECTION CHAPTER 1: FILTERING OPERATIONS
Fig. 1:1-7 Sample filtering hierarchy diagram
M86 SECURITY USER GUIDE 37

WEB FILTER INTRODUCTORY SECTION CHAPTER 2: LOGGING AND BLOCKING
Chapter 2: Logging and Blocking
Web Access Logging
One of the primary functions of the Web Filter is to log the
activity of users on the Internet. Information captured in the
log can be transferred to a reporting appliance, to be viewed
on a PC monitor or output to a printer.
Log files from the Web Filter are transferred to the SR where
they are “normalized” and then inserted into a MySQL database. The SR Report Manager accesses that database to
generate queries and reports.
Instant Messaging, Peer-to-Peer Blocking
The Web Filter has options for blocking and/or logging the
use of Instant Messaging and Peer-to-Peer services, and
makes use of Intelligent Footprint Technology (IFT) for
greatly increasing management and control of these
popular—yet potentially harmful—applications. This section
explains how to set up and use IM and P2P.
How IM and P2P Blocking Works
IM Blocking
Instant Messaging (IM) involves direct connections between
workstations either locally or across the Internet. Using this
feature of the Web Filter, groups and/or individual client
machines can be set up to block the use of IM services
specified in the library category.
When the IM module is loaded on the server, the Web Filter
compares packets on the network with IM libraries stored on
the Web Filter. If a match is found, the Web Filter checks the
user’s profile to see whether the user’s connection to the IM
38 M86 SECURITY USER GUIDE

WEB FILTER INTRODUCTORY SECTION CHAPTER 2: LOGGING AND BLOCKING
service should be blocked, and then performs the appropriate action.
WARNING: The following items are known issues pertaining to
the IM module:
• IM can only block by destination IP address if network traffic is
being tunneled, sent through a Virtual Private Network (VPN),
or encrypted.
• IM will not be blocked if a client-side VPN is set up to proxy
traffic through a remote IP address outside the connection
protected by the Web Filter.
• Some versions of the AOL client create a network interface that
send a network connection through a UDP proxy server, which
prevents blocking IM.
P2P Blocking
Peer-to-Peer (P2P) involves communication between
computing devices—desktops, servers, and other smart
devices—that are linked directly to each other. Using this
feature of the Web Filter, groups and/or individual client
machines can be set up to block the use of P2P services
specified in the library category.
When the P2P module is loaded on the server, the Web
Filter compares packets on the network with the P2P library
stored on the Web Filter. If a match is found, the Web Filter
checks the user’s profile to see whether the user’s connection to the P2P service should be blocked, and then
performs the appropriate action.
M86 SECURITY USER GUIDE 39

WEB FILTER INTRODUCTORY SECTION CHAPTER 2: LOGGING AND BLOCKING
Setting up IM and P2P
IM and P2P are set up in the System and Library sections of
the Administrator console.
1. In the System section, activate Pattern Blocking in the
Filter window.
2. In the Library section, note the services set up to be
blocked, as defined at: http://www.m86security.com/
software/8e6/hlp/ifr/files/1system_im_block.html.
NOTE: Please contact an M86 technical support representative
or a solutions engineer if access is needed to one or more P2P
services blocked by M86's supplied library category for P2P.
3. In the Manual Update to M86 Supplied Categories
window (accessible via Library > Updates > Manual
Update), IM pattern files can be updated on demand.
Using IM and P2P
To solely log IM and/or P2P user activity, the Pattern
Blocking setting needs to be enabled in the Filter window.
To additionally block specified groups and/or users from
using components and features of IM and/or P2P, settings
need to be made in the Policy section of the Administrator
console.
If applying M86’s supplied IM and/or P2P library category to
an entity’s profile, all IM and/or P2P services included in that
category will be blocked.
NOTE: If IM and/or P2P was set up to be blocked while a user’s
IM and/or P2P session was in progress, the user will not be
blocked from using that service until he/she logs off the server
and back on again.
40 M86 SECURITY USER GUIDE

WEB FILTER INTRODUCTORY SECTION CHAPTER 2: LOGGING AND BLOCKING
Block IM, P2P for All Users
Block IM for All Users
To block IM for all users on the network:
• the Pattern Blocking option in the Filter window must be
activated
• the global filtering profile must have both CHAT and
specified individual Instant Messaging library categories
(such as IMGEN, IMGCHAT, IMGTALK, ICQAIM,
IMMSN, IMMYSP, and/or IMYAHOO) set up to be
blocked
• the minimum filtering level profile must have both CHAT
and specified individual Instant Messaging library categories set up to be blocked.
Block P2P for All Users
To block P2P for all users on the network:
• the Pattern Blocking option in the Filter window must be
activated
• the global filtering profile must have the PR2PR library
category set up to be blocked
• the minimum filtering level profile must have the PR2PR
library category set up to be blocked.
M86 SECURITY USER GUIDE 41

WEB FILTER INTRODUCTORY SECTION CHAPTER 2: LOGGING AND BLOCKING
Block Specified Entities from Using IM, P2P
Block IM for a Specific Entity
To block IM for a specified group or user:
• the Pattern Blocking option in the Filter window must be
activated
• the CHAT and specified individual Instant Messaging
library categories must both be set up to be blocked for
that entity
• the global filtering profile should not have IM blocked,
unless blocking all IM traffic with the Range to Detect
feature is desired
• the minimum filtering level profile should not have IM
blocked, unless blocking all IM traffic with the Range to
Detect feature is desired.
Block P2P for a Specific Entity
To block P2P for a specified group or user:
• the Pattern Blocking option in the Filter window must be
activated
• the PR2PR library category must be set up to be blocked
for that entity
• the global filtering profile should not have P2P blocked,
unless blocking all P2P traffic with the Range to Detect
feature is desired
• the minimum filtering level profile should not have P2P
blocked, unless blocking all P2P traffic with the Range to
Detect feature is desired.
42 M86 SECURITY USER GUIDE

WEB FILTER INTRODUCTORY SECTION CHAPTER 3: SYNCHRONIZING MULTIPLE UNITS
Chapter 3: Synchronizing Multiple Units
Web Filter Synchronization
The Web Filter can function in one of three modes—“Stand
Alone” mode, “Source” mode, or “Target” mode—based on
the setup within your organization. In a multi-Web Filter
environment, all Web Filters should be set up with the same
user profile data, so that no matter which Web Filter a user’s
PC accesses on the network, that user’s Internet usage is
appropriately filtered and blocked. The act of configuring
multiple Web Filters to share the same user profile information is known as synchronization.
The synchronization feature allows an administrator to
control multiple Web Filters without the need to configure
each one independently. Web Filter synchronization uses a
source/target configuration, in which one Web Filter is
designated as the source server on which all configuration
entries are made. All other Web Filters on the network are
configured as target servers to the source Web Filter unit,
receiving updates from the source server.
M86 SECURITY USER GUIDE 43

WEB FILTER INTRODUCTORY SECTION CHAPTER 3: SYNCHRONIZING MULTIPLE UNITS
FUNCTIONAL MODES
Stand Alone Mode
In the Stand Alone mode, the Web Filter functions as the
only Internet filter on the network. This mode is used if there
is only one Web Filter on the network. Synchronization does
not occur in this mode.
Source Mode
The Source mode is used in synchronization. In this mode
the Web Filter is configured to not only function as a content
filter, but also to act as a Centralized Management Console
for all other Web Filters on the network. Whenever a filtering
configuration change is made on the source Web Filter, that
change is sent to all target Web Filters that have been identified by the source unit via the Synchronization Setup
window of the Web Filter console. This means that all
filtering configuration should be made on the source Web
Filter. This also means that any user-level filter authentication should be performed on the source Web Filter so that
these filtering changes can be disseminated to all Web Filter
target units.
NOTE: If the failover detection synchronization feature is
enabled, if a target server fails, the source server can be set up to
detect the failed server and perform filtering for that server.
Target Mode
As in the Source mode, the Target mode is used in synchronization. In this mode, filtering information from the source
server will be uploaded to the target server. The only
synchronization setup that needs to be made on the target
server is to ensure that network interfaces are configured for
network communication.
44 M86 SECURITY USER GUIDE
WEB FILTER INTRODUCTORY SECTION CHAPTER 3: SYNCHRONIZING MULTIPLE UNITS
Synchronization Setup
To set up synchronization on a Web Filter, a selection must
be made in Setup window from the System section of the
Web Filter console to specify whether the Web Filter will
function as a source server or as a target server. This selection affects the contents that display in the Setup window.
NOTE: This version of synchronization only supports the use of
unique IP addresses throughout a network.
Setting up a Source Server
When setting up an Web Filter to function as a source
server, an IP address must be entered for each target Web
Filter unit. This entry identifies the location of each target
unit on the network.
NOTE: If synchronizing from a WFR to a standalone Web Filter
server, please consult the chart at http://
www.m86security.com/software/8e6/hlp/ifr/files/
1system_sync_versions.html for software version compatibility
between the two products.
WARNING: If an Web Filter is set up in the Source mode with a
Network Address Translation (NAT) device between the source
and target server(s), be sure that ports 26262, 26268, and 88 are
open on the source server. This setup is required so that the
source server can communicate with the target server(s).
Setting up a Target Server
When setting up a Web Filter to function as a target server,
the IP address of the source server must be entered to identify the source server on the network. This IP address is
used for security purposes, as the target server will only
acknowledge and apply changes it receives from the designated source server. Additionally, this IP address is used by
the target server to identify the source server from which it
M86 SECURITY USER GUIDE 45

WEB FILTER INTRODUCTORY SECTION CHAPTER 3: SYNCHRONIZING MULTIPLE UNITS
should receive its running filter configuration in the event of
a reboot.
WARNING: If a Web Filter server is set up in the Target mode
with a NAT device between the target and source server, be sure
that ports 26262 and 26268 are open on the target server. This
setup is required so that the target server can communicate with
the source server.
Types of Synchronization Processes
Synchronization involves two types of processes: filtering
profile synchronization, and library synchronization.
Filtering Profile Synchronization Process
In the filtering profile synchronization process, if a filtering
change is made on the source server—whether the update
is a global, IP, LDAP, minimum filtering bypass activation, or
user profile update—the change is applied locally. Once
locally applied on the source server, this update is sent to all
target Web Filters. Each target server will then immediately
apply this filtering change. The result is that profile updates
occur on all Web Filter units in near real time.
In the event that a target server is unable to communicate
with the source server, the target server will continue to run
the last known configuration it received from the source
server. The only exception to this scenario is that active
profiles—such as LDAP or override accounts—will not run
on the target server, since active profiles are timed out after
a specified period of time. However, all IP based filters—
such as the minimum filtering level, and the global rule that
was last received from the source server—will be applied.
When the target server resumes communication with the
source server, it will actively download and apply the latest
running configuration from the source server.
46 M86 SECURITY USER GUIDE

WEB FILTER INTRODUCTORY SECTION CHAPTER 3: SYNCHRONIZING MULTIPLE UNITS
If the target server is rebooted for any reason (loss of power
etc.) upon bootup, the target server will actively download
and apply the current running configuration from the source
server. It will then also receive future changes made on the
source server.
Library Synchronization Process
In the library synchronization process, if a library change is
made on the source server, the change is applied locally.
Once locally applied on the source server, this update will
be placed in a queue for submission to target Web Filters.
The source server will then send the information in the
queue to all target servers. Each target server will receive
this information and apply the update.
On the source server, a separate queue exists for each
identified target server. A queue is used as a repository in
the event of a communication failure between the source
server and target server. Information remains in this queue
and is submitted to the target server once communications
are re-established. The use of queues ensures that if a
target server is taken offline for a period of time, when it is
brought back online, it will be updated with the latest
changes from the source server.
M86 SECURITY USER GUIDE 47

WEB FILTER INTRODUCTORY SECTION CHAPTER 3: SYNCHRONIZING MULTIPLE UNITS
Delays in Synchronization
When a filtering profile is applied to the source server, there
is a slight delay in the time it takes to apply the profile to the
target server. This delay is caused by the amount of time it
takes the source server to process the change, prepare the
update for submission, send the update, and finally to activate the update on the target server. In practice, this should
only be matter of seconds. In essence, filtering profiles are
shared in near real time with this factor being the only delay.
The delay in activating a library change can take a little
longer than in activating a filtering profile change. This is
due to the fact that the library on the Web Filter is loaded
into the physical memory. When a change is made to the
library, a new library must be loaded into memory with the
changes. So the delay between the library change taking
place is the net of the amount of time it takes the source
server to prepare the update for submission, and then the
amount of time it takes for the update to be sent, received,
and processed by the target server. Once processed, the
new library is loaded into memory and activated, while the
old version of the library is removed from memory. The total
time of this process will vary depending upon custom library
entries, but the entire procedure should take approximately
one minute.
48 M86 SECURITY USER GUIDE

WEB FILTER INTRODUCTORY SECTION CHAPTER 3: SYNCHRONIZING MULTIPLE UNITS
Synchronized, Non-Synchronized Items
It is important to note that while some items are synchronized to the target Web Filters, they do not become permanent configurations on the target Web Filter. These items
are in essence functionally synchronized, since they are
configurations that the target Web Filters will read from the
source Web Filter upon load. These items will then be
updated on an as needed basis from the source Web Filter.
For purpose of differentiation, these items will be referred to
as functionally synchronized for purposes of this user guide.
These functionally synchronized items will be available for
use on the target Web Filter.
The following options are available for synchronization:
Synchronize all items (both profile and library changes), and
synchronize only library items.
As you will see by the lists on the following pages, static
configuration options—such as library changes—will be
synchronized. All active options—such as profile changes—
will be functionally synchronized. One time configuration
options on the Web Filter—such as reporting configurations,
or IP addresses—will not be synchronized.
M86 SECURITY USER GUIDE 49

WEB FILTER INTRODUCTORY SECTION CHAPTER 3: SYNCHRONIZING MULTIPLE UNITS
Synchronize All Items
The following lists show which items will be synchronized
when the option to synchronize all items is selected.
Synchronized Items (All)
• M86 Library additions/deletions
• Custom library creations
• Custom library additions/deletions
• Search Engine keyword additions/deletions
• Keywords in URL additions/deletions
• Approved Content settings in the Global Group profile
Functionally Synchronized Items
• Common Customization, Block Page Authentication
settings, Authentication Form Customization, Lock Page
Customization, Warn Page Customization, Profile
Control settings, Quota Block Page Customization,
Quota Notice Page Customization
• Minimum Filtering Level
• Rules
• Global Group Profile
• Override Account: addition/deletion, activation/deactivation
• Lock Profiles
• IP User/Group and sub-group: additions/deletions,
changes, filter changes
• LDAP User/Group: additions/deletions, changes, filter
changes, profile activation/deactivation
• Category Weight System additions/deletions
50 M86 SECURITY USER GUIDE

WEB FILTER INTRODUCTORY SECTION CHAPTER 3: SYNCHRONIZING MULTIPLE UNITS
• Quota Setting
Non-synchronized Items
• Filter control settings
• Virtual IP and Authentication IP addresses
• IP addresses
• Default routes
• Software Update application
• Synchronization settings
• Filter Mode
• Backup/Restore
• SNMP configuration
• Warn Option Setting
• Reporter configuration
• CMC Management
M86 SECURITY USER GUIDE 51

WEB FILTER INTRODUCTORY SECTION CHAPTER 3: SYNCHRONIZING MULTIPLE UNITS
Synchronize Only Library Items
The following lists show which items will be synchronized
when the option to synchronize only library items is
selected.
Synchronized Items (Library Only)
• M86 Library additions/deletions
• Custom library creations
• Custom library additions/deletions
• Search Engine keyword additions/deletions
• Keywords in URL additions/deletions
Functionally Synchronized Items
• Category Weight System additions/deletions
Non-synchronized Items
• Common Customization, Block Page Authentication
settings, Authentication Form Customization, Lock Page
Customization, Warn Page Customization, Profile
Control settings, Quota Block Page Customization,
Quota Notice Page Customization
• Minimum Filtering Level
• Rules
• Global Group Profile
• Override Account: addition/deletion, activation/deactivation
• Lock Profiles
• IP User/Group and sub-group: additions/deletions,
changes, filter changes
52 M86 SECURITY USER GUIDE

WEB FILTER INTRODUCTORY SECTION CHAPTER 3: SYNCHRONIZING MULTIPLE UNITS
• LDAP User/Group: additions/deletions, changes, filter
changes, profile activation/deactivation
• Filter control settings
• Virtual IP and Authentication IP addresses
• IP addresses
• Default routes
• Software Update application
• Synchronization settings
• Filter Mode
• Backup/Restore
• Radius Authentication Settings
• SNMP configuration
• X Strikes Blocking settings
• Warn Option Setting
• Reporter configuration
• CMC Management
M86 SECURITY USER GUIDE 53

WEB FILTER INTRODUCTORY SECTION CHAPTER 3: SYNCHRONIZING MULTIPLE UNITS
Server Maintenance Procedures
Source Server Failure Scenarios
In the event that the source Web Filter unit should fail, the
target servers will continue to run using the last known
configuration loaded from the source server. However, all
dynamic authentication-based profiles will eventually timeout, since the source Web Filter server can no longer verify
user credentials. When this occurs, the information on the
server can no longer be trusted. In most cases, the failure of
the source server can be quickly repaired, though it is
possible the source server will be down for an extended
period of time due to detailed troubleshooting that needs to
be performed, or that the source server will need to be
replaced due to hardware failure.
In cases in which the source Web Filter server is out of
commission for an extended period of time, this server
should be replaced as soon as possible so that individual
user authentication can be executed, and the ability to
control the filtering cluster is continually enabled. In cases in
which the Web Filter will not be immediately replaced, one
of the target Web Filter servers should be designated as the
new source server.
Establish Backup Procedures
To prevent down time during a source server failure, M86
recommends establishing backup and restore procedures.
It is important that regular backups of the source Web Filter
server are saved using the Backup/Restore window in the
System section of the Web Filter console. Once a backup is
created, it can be downloaded to another machine for safekeeping. A backup should be created and downloaded
whenever a change is made to filtering settings on the
source Web Filter.
54 M86 SECURITY USER GUIDE

WEB FILTER INTRODUCTORY SECTION CHAPTER 3: SYNCHRONIZING MULTIPLE UNITS
Use a Backup File to Set up a Source Server
In the event of a source server failure, the global administrator should designate a target server as the new source
server.
Set up a Target Server as a Source Server
1. Log in to the console of the target server designated as
the new source server.
2. In the System section of the console, go to the Backup/
Restore window and create a backup of the current
running configuration on that server.
3. Download the server’s configuration to a safe storage
place until it is needed.
4. In the LAN Settings window (accessible via System >
Network), set up IP addresses to be the same as on the
source server that is being replaced.
5. Go to the Reboot window (accessible via System >
Control) and reboot the server.
6. Once the Web Filter is rebooted, reconnect to the
console and access the Backup/Restore window.
7. Upload the last good configuration from the failed source
server to the new source server. When the configuration
file is uploaded and available in the Web Filter console,
that file should be used for restoring configuration
settings.
8. After the restoration of configuration settings is applied
and a quick reload takes place, this Web Filter will now
function as the source server in the Web Filter cluster.
M86 SECURITY USER GUIDE 55

WEB FILTER INTRODUCTORY SECTION CHAPTER 3: SYNCHRONIZING MULTIPLE UNITS
Set up a Replacement Target Server
Once the original source server is replaced or repaired, it
can then be configured to replace the empty spot created by
the movement of the target server to the position of source
server. Configure this Web Filter so that the IP addresses
are that of the target server which became the source
server. Upload the running target configuration, which was
downloaded prior to converting the target server to a source
server. Use this configuration to create a duplicate of the
target server that was moved. Once this step is complete,
the cluster is whole again and should operate normally.
Set up a New Source Server from Scratch
In the event that you do not have a reliable backup file that
can be used for establishing a new source server, you must
recreate the settings on the new source server.
Set up a Target Server as a Source Server
1. Log in to the console of the target server designated as
the new source server.
2. In the System section of the console, access the Reset
window and click Reset to remove all settings on the
server.
3. Enter all settings from the failed source server on this
“new” server. In the Setup window (accessible via
System > Synchronization), specify that this is a source
server.
4. Apply all software updates that were applied on the failed
source server.
5. In the Policy section of the console, enter all groups and
filtering profiles.
6. Make all necessary settings in all sections and windows
of the console.
56 M86 SECURITY USER GUIDE
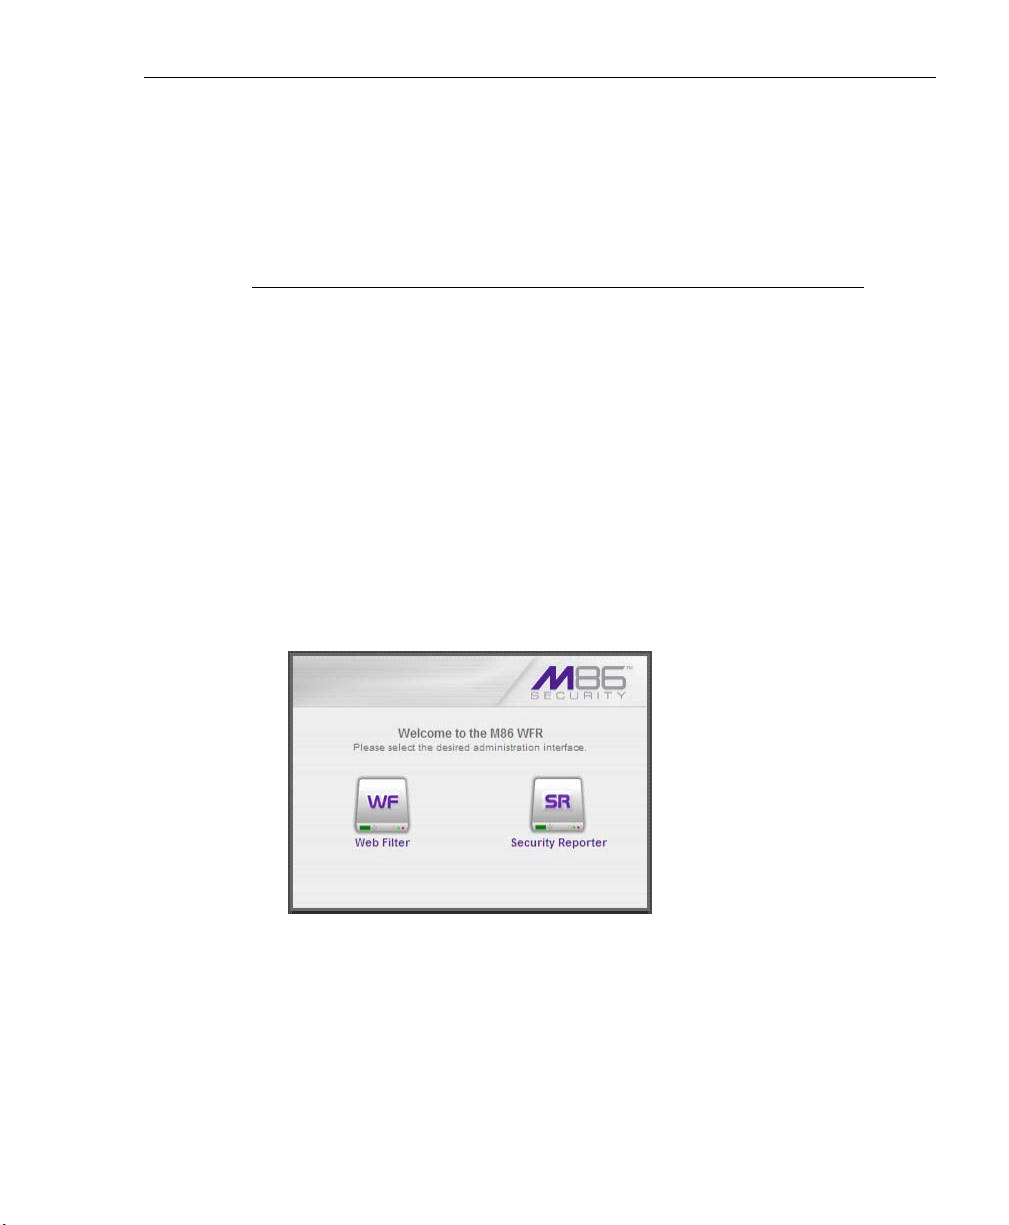
WEB FILTER INTRODUCTORY SECTION CHAPTER 4: GETTING STARTED
Chapter 4: Getting Started
Using the Administrator Console
Access the Web Filter Login window
The Web Filter user interface is accessible in one of two
ways:
• by clicking the WF icon in the WFR Welcome window
(see Access the Web Filter from the WFR Portal)
• by launching an Internet browser window supported by
the Web Filter and then entering the Web Filter’s URL in
the Address field (see Enter Web Filter’s URL in the
Address field)
Access the Web Filter from the WFR Portal
Click the WF icon in the WFR Welcome window:
Fig. 1:4-1 Web Filter icon in WFR Welcome window
Clicking the WF icon opens a separate browser window/tab
containing the Web Filter Login window (see Fig. 1:4-2).
M86 SECURITY USER GUIDE 57

WEB FILTER INTRODUCTORY SECTION CHAPTER 4: GETTING STARTED
Enter Web Filter’s URL in the Address field
1. Launch an Internet browser window supported by the
Web Filter.
2. In the address line of the browser window, type in
“https://” and the Web Filter server’s IP address or host
name, and use port number “:1443” for a secure network
connection, plus “/login.jsp”.
For example, if your IP address is 210.10.131.34, type in
https://210.10.131.34:1443/login.jsp. Using a host
name example, if the host name is logo.com, type in
https://logo.com:1443/login.jsp.
With a secure connection, the first time you attempt to
access the Web Filter’s user interface in your browser
you will be prompted to accept the security certificate. In
order to accept the security certificate, follow the instructions at: http://www.m86security.com/software/8e6/
docs/ig/misc/sec-cert-wf4.1.pdf
3. After accepting the security certificate, click Go to open
the Web Filter login window (see Fig. 1:4-2).
58 M86 SECURITY USER GUIDE
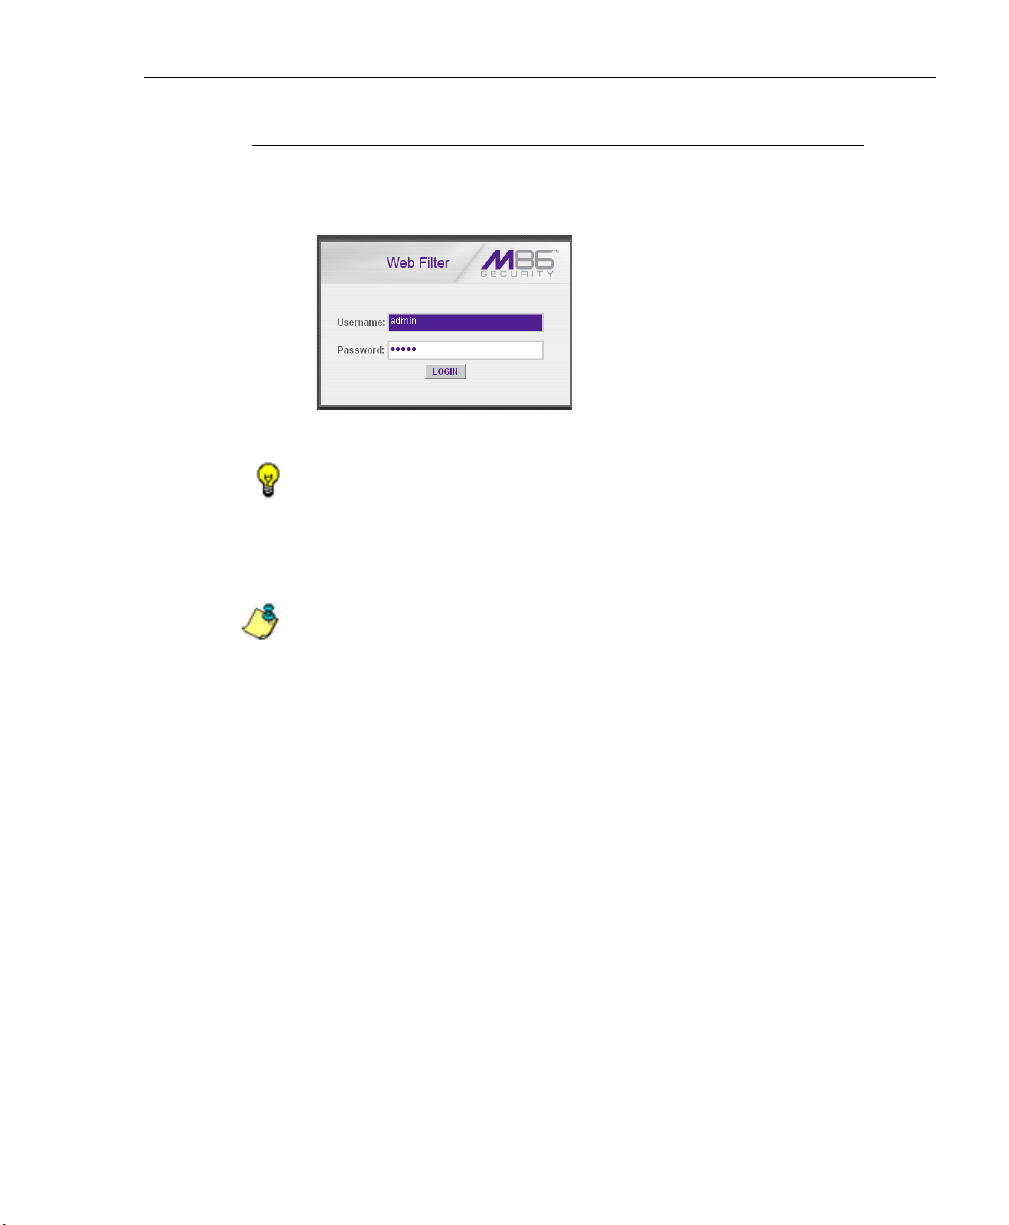
WEB FILTER INTRODUCTORY SECTION CHAPTER 4: GETTING STARTED
Log In
1. In the Login window, enter your Username and Pass-
word:
Fig. 1:4-2 Web Filter Login window
TIP: The default Username is admin and the Password is user3.
To change this username and password, go to the Administrator
window (see the Administrator window of the System screen in
the WF Global Administrator Section) and create a global administrator account.
NOTE: See Chapter 1: System screen in the WF Global Administrator Section for information on logging into the Web Filter user
interface if your password has expired.
2. Click LOGIN to access the Welcome screen of the Web
Filter Administrator console:
M86 SECURITY USER GUIDE 59

WEB FILTER INTRODUCTORY SECTION CHAPTER 4: GETTING STARTED
Fig. 1:4-3 Welcome screen
On this screen, the Web Filter Version Number displays
in the Product frame, and dates for the Last Software
Update and Last Library Update display in the Web Filter
Status frame.
The following information displays at the bottom of the
Administrator console: Host Name, LAN IP address used
for sending block pages, and software Version number.
Last Library Update message
If it has been more than seven days since the Web Filter last
received updates to library categories, upon logging into the
Administrator console a pop-up dialog box opens and
displays the following message: ”Libraries were last
updated more than 7 days ago. Do you want to update your
libraries now?” Click either Yes or No to perform the
following actions:
• Yes - clicking this button closes the dialog box and opens
an alert box indicating that it will take a few minutes to
perform the library update. Click OK to close the alert box
and to execute the command to update the libraries.
60 M86 SECURITY USER GUIDE
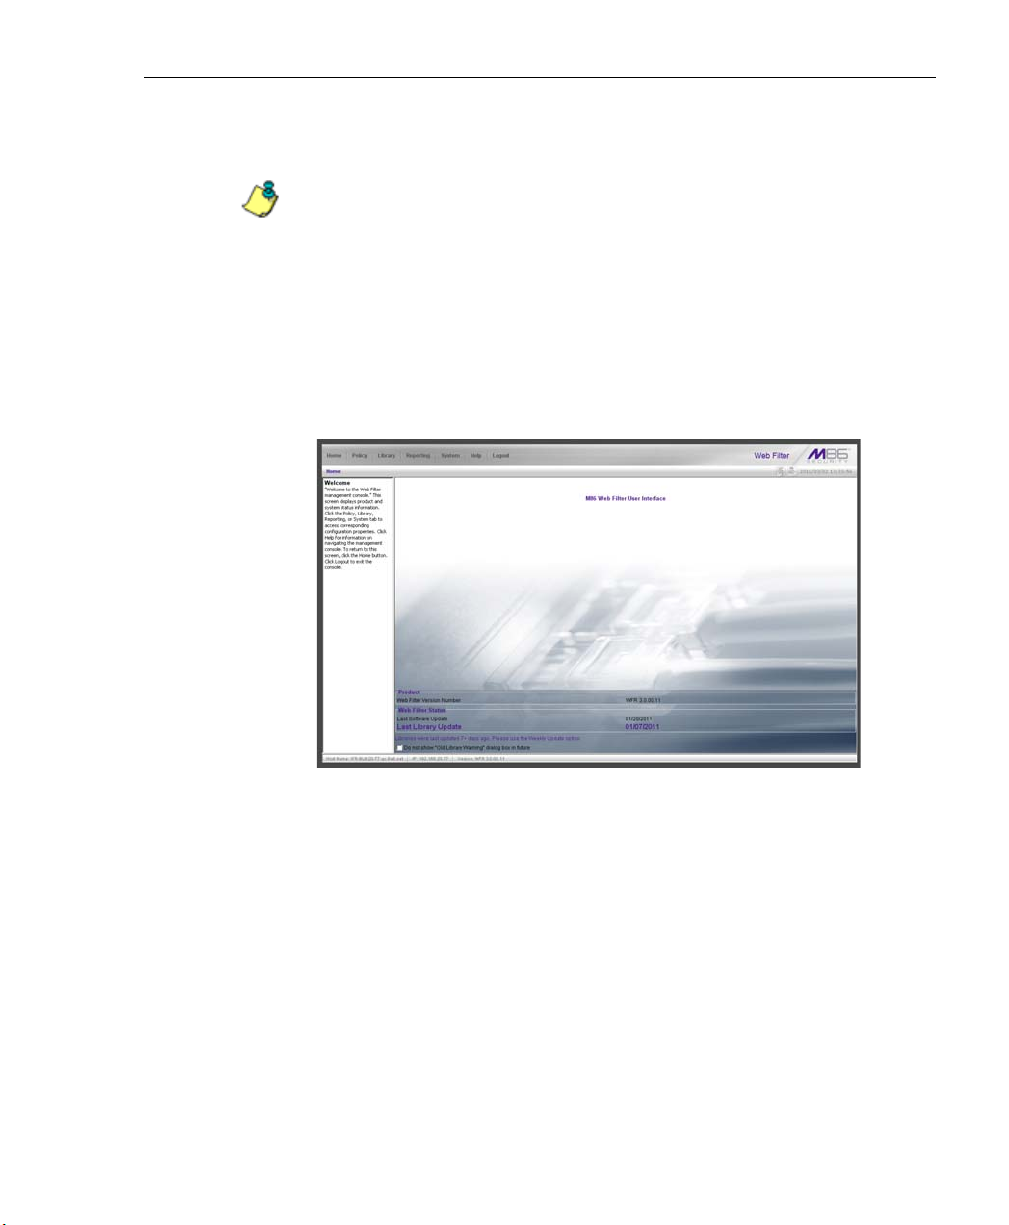
WEB FILTER INTRODUCTORY SECTION CHAPTER 4: GETTING STARTED
After the libraries are updated, today’s date will appear
as the Last Library Update on the welcome screen.
NOTE: Refer to the Library screen’s Manual Update to M86
Supplied Categories window—in the Web Filter Global Group
Section—for information about updating library categories on
demand.
• No - clicking this button closes the dialog box and
displays the welcome screen with the Last Library
Update and the following message below in purple
colored text: “Libraries were last updated 7 days ago.
Please use the Weekly Update option”:
Fig. 1:4-4 Welcome screen, Last Library Update text
Click the checkbox “Do not show “Old Library Warning”
dialog box in future” to disable the Last Library Update
message pop-up box. After the libraries are updated, the
welcome screen will appear as in Fig. 1:4:3 with today’s
date as the Last Library Update in black text.
M86 SECURITY USER GUIDE 61

WEB FILTER INTRODUCTORY SECTION CHAPTER 4: GETTING STARTED
Navigation Tips
Access Main Sections
The Administrator console is organized into six sections,
each accessible by clicking the corresponding link in the
navigation toolbar at the top of the screen:
• Home - clicking this link displays the Welcome screen of
the Administrator console.
• Policy - clicking this link displays the main screen for the
Policy section. Windows in the Policy section are used
for creating and managing master IP groups, subgroups, and individual IP filtering profiles, or for setting
up LDAP domains, groups, and individual users, and
their filtering profiles.
• Library - clicking this link displays the main screen for
the Library section. Library section windows are used for
adding and maintaining library categories. Library categories are used when creating or modifying a filtering
profile.
• Reporting - clicking this link displays the main screen for
the Reporting section. The Reporting section contains
windows used for configuring reports on users’ Internet
activities.
• System - clicking this link displays the main screen for
the System section. This section is comprised of
windows used by the global administrator for configuring
and maintaining the server to authenticate users, and to
filter or block specified Internet content for each user
based on the applied filtering profile.
62 M86 SECURITY USER GUIDE
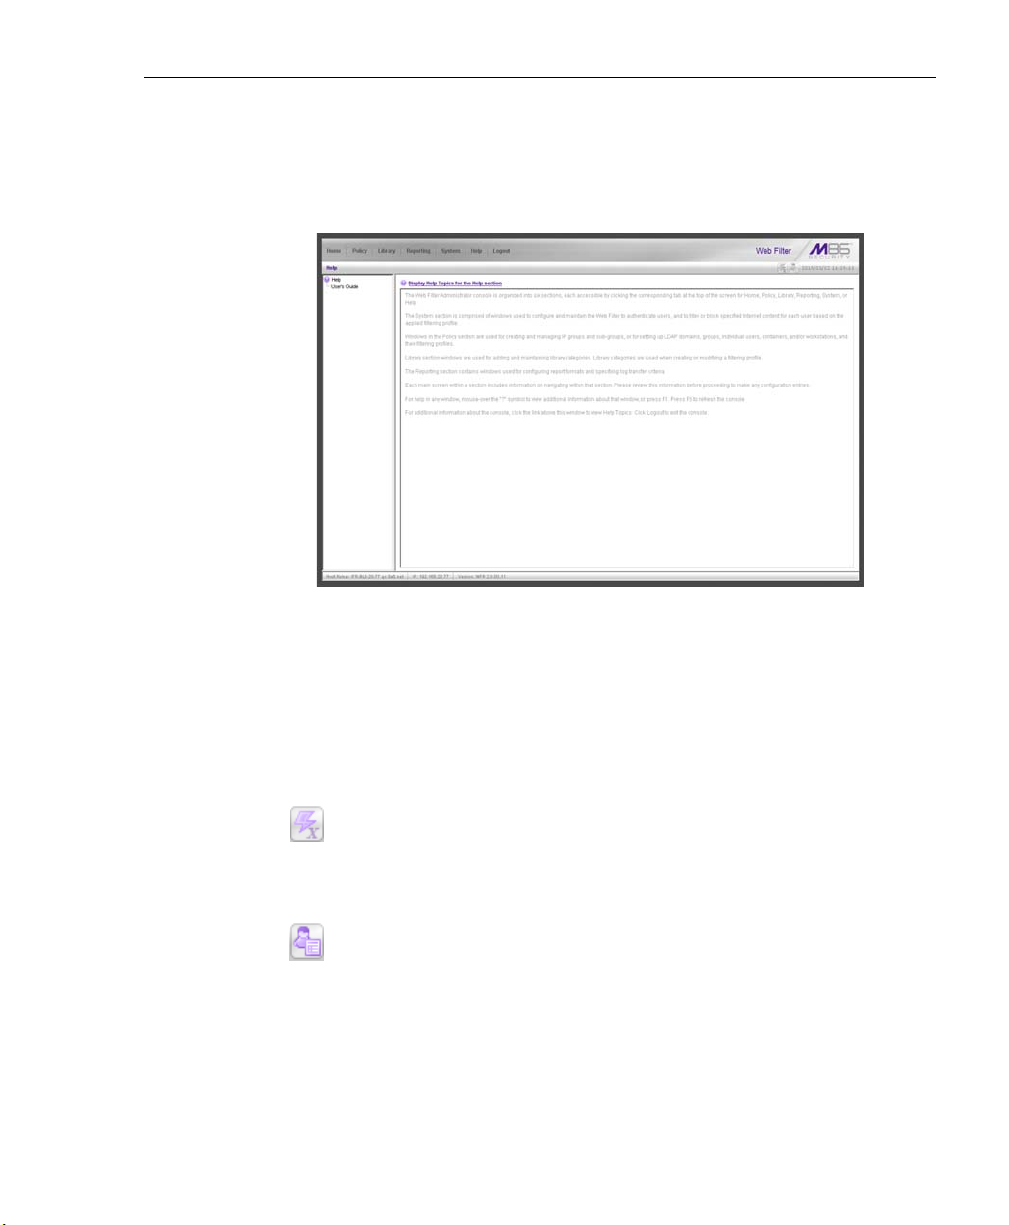
WEB FILTER INTRODUCTORY SECTION CHAPTER 4: GETTING STARTED
• Help - clicking this link displays the Help screen. This
screen includes navigation tips and a link to a page
where you can access the latest user guides (in the .pdf
format) for this application:
Fig. 1:4-5 Help screen
• Logout - click this link to log out of this application. When
your session has been terminated, the login window redisplays.
Note that on each screen, in the right side of the navigation
path bar beneath the banner, the following displays:
X Strikes Blocking icon - If the X Strikes Blocking
feature is enabled, this icon can be clicked by authorized users to access the X Strikes Unlock Workstation
window where workstations are unlocked.
Real Time Probe icon - If the Real Time Probe feature
is enabled, this icon can be clicked by authorized
users to access the Real Time Probe reporting tool.
• system time - The system time displays using the
YYYY/MM/DD HH:MM:SS date and time format
M86 SECURITY USER GUIDE 63

WEB FILTER INTRODUCTORY SECTION CHAPTER 4: GETTING STARTED
Help Features
Help features provide information about how to use
windows in the Administrator console. Such features
include help topics and tooltips.
Access Help Topics
Each of the main section screens contains a link beneath
the banner. When that link is clicked, a separate browser
window opens with Help Topics for that section:
Fig. 1:4-6 Help Topics window
1. Click a link to go to a specified topic.
2. To view Help Topics for another section, click the tab for
that section: Policy, Library, Reporting, System, or Help.
3. Click Close Window to close the Help Topics window.
64 M86 SECURITY USER GUIDE

WEB FILTER INTRODUCTORY SECTION CHAPTER 4: GETTING STARTED
Tooltips
In any window that features the icon in the navigation
path bar beneath the banner, additional information about
that window can be obtained by hovering over that icon with
your mouse, or by pressing the F1 key on your keyboard.
• Hover Display
The yellow tooltip box displays when you hover over the
icon with your mouse:
Fig. 1:4-7 Tooltip mouseover effect
To close the tooltip box, move the mouse away from the
icon.
M86 SECURITY USER GUIDE 65

WEB FILTER INTRODUCTORY SECTION CHAPTER 4: GETTING STARTED
• Help pop-up box
The Help pop-up box opens when you press the F1 key
on your keyboard:
Fig. 1:4-8 Help pop-up box
Click OK to close the pop-up box.
66 M86 SECURITY USER GUIDE

WEB FILTER INTRODUCTORY SECTION CHAPTER 4: GETTING STARTED
Screen and Window Navigation
All screens are divided into two panels: a navigation panel
to the left, and a window in the panel to the right. Windows
display in response to a selection made in the navigation
panel.
In the Administrator console, screens and windows use
different navigation formats, based on the contents of a
given screen or window. Screens can contain topic links and
sub-topic menus, and/or tree lists with topics and sub-topic
menus. Windows can contain tabs that function as subwindows.
Topic Links
In Library, Reporting, and System screens, the navigation
panel contains topic links. By clicking a topic link, the
window for that topic displays in the right panel:
Fig. 1:4-9 Selected topic and its corresponding window
M86 SECURITY USER GUIDE 67
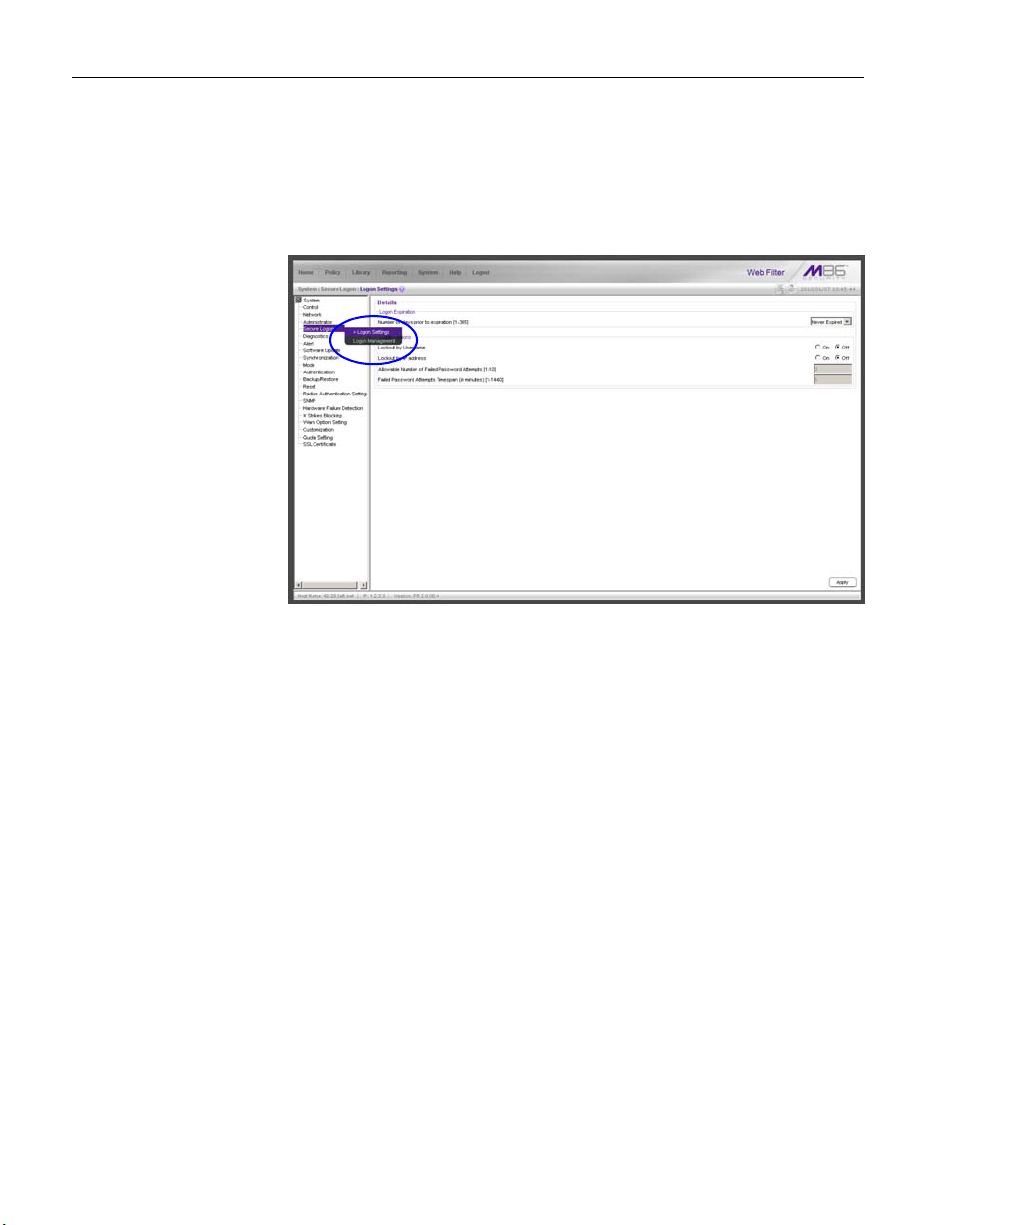
WEB FILTER INTRODUCTORY SECTION CHAPTER 4: GETTING STARTED
Select Sub-topics
Some topics in Library and System screens consist of more
than one window. For these topics, clicking a topic link
opens a menu of sub-topics:
Fig. 1:4-10 Sub-topics menu
When a sub-topic from this menu is selected, the window for
that sub-topic displays in the right panel of the screen.
68 M86 SECURITY USER GUIDE
 Loading...