

Page 1

140BM LCD WIRELESS OBSERVATION
SYSTEM
UK
User’s manual
V1.0
L I F E I S M O R E ! T R U S T U S T R U S T . C O M
Page 2

140BM LCD WIRELESS OBSERVATION
SYSTEM
Thank you for your purchase. Register your product via our Inter net site at
www.trust.com/register, so that you will be eligible for optimal guarantee and service support.
You will also be automatically informed of the development of your and other Trust products.
UK
L I F E I S M O R E ! T R U S T U S T R U S T . C O M
Page 3
140BM LCD WIRELESS OBSERVATION
SYSTEM
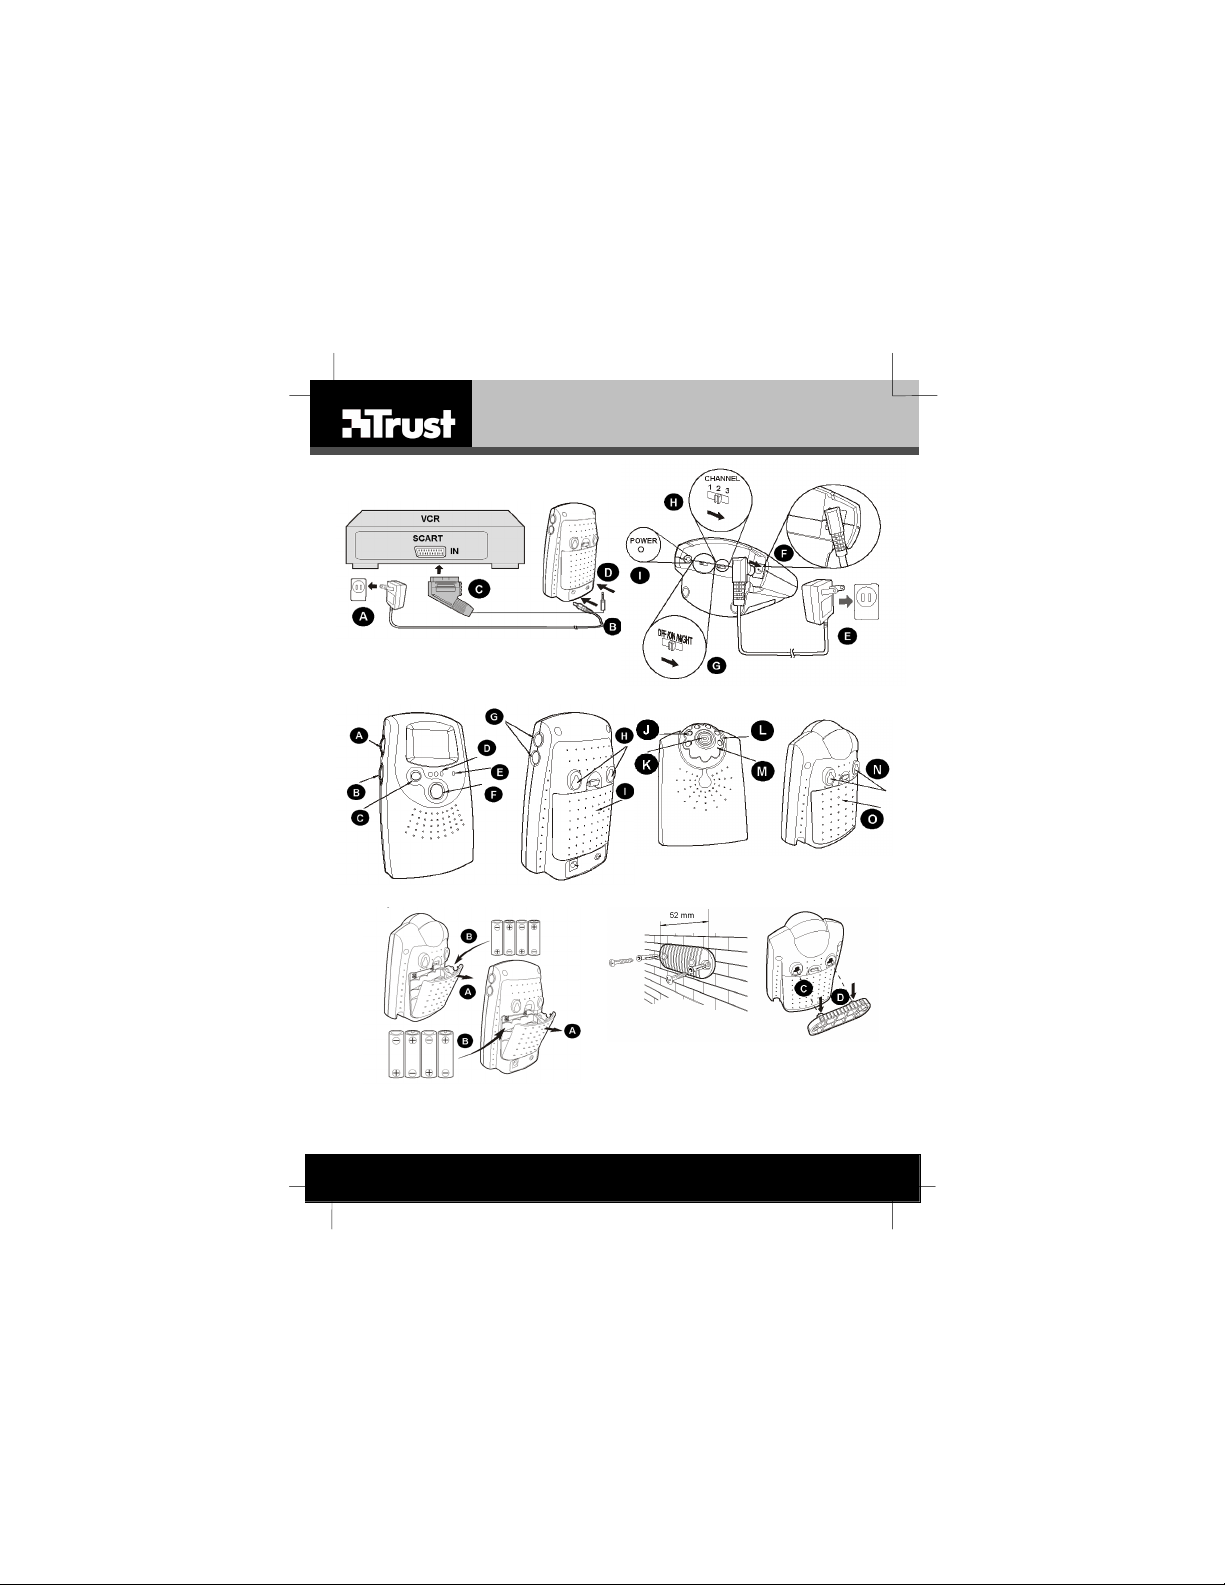
Fig. 1 Fig. 2
Fig. 3 Fig. 4
F
ig. 5 Fig. 6
L I F E I S M O R E ! T R U S T U S T R U S T . C O M
Page 4

TRUST 140BM LCD WIRELESS OBSERVATION SYSTEM
Instructions when usin g for the first time Chapt er
1. Installing the camera and the monitor (4.3)
2. Rece ption quality (4.6)
1 Introduction
This instruction manual is for users of the TRUST 140BM LCD WIRELESS
OBSERVATION SYSTEM. This device can be used as an observation system, for
example, for your baby. This device works using radio frequencies and, therefore,
does not require any cables.
Advantages:
Transmits wireless audio and video signals from the camera.
•
The 2.4 GHz FM signal passes through walls, floors and ceilings.
•
Can be expanded using other Trust Convenience products (see
•
www.trust. com
).
2 Safety
Carefully read the following instructions before use:
1. Do not use this device in a damp environment such as a bathroom, damp
basement, swimming pool, etc.
2. Never insert objects into the holes on the outside of this device, because you
may touch live components. This may cause a fire or give you an electric
shock.
3. Do not try to repair this device yourself. If you open or remove the casing,
you may accidentally touch live components. There are also other risks if
you open or remove the casing.
4. Position the device so that the cables cannot be damaged.
5. The camera’s IR LED’s and the wireless transmitter are not harm ful to
humans.
6. Keep all components out of the reach of children.
7. Fingerprints or dirt on the lens may affect the performance of the camera.
Avoid touching the lens with your fingers.
8. Do not use the device in a dirty or dusty environment.
9. Only use this device with the power adapter provided or with the type of
batteries indicated.
10. The frequencies used are for general use. It is possible for the video and
audio signals to be detected by others. In order to protect your privacy, it is
recommended to turn the camera off when it is not being used.
11. Do not use old batteries and new batteries together. This may damage the
device.
UK
1
Page 5

TRUST 140BM LCD WIRELESS OBSERVATION SYSTEM
3 Approval
0678
- This device meets the essential requirements and other relevant conditions of the
applicable European directives. The Declaration of Conformity (DoC) is available
at www.trust .com/13816/ce.
- The device has been approved in accordance with RF CE0678
- This wireless device works at a frequency of 2.434 ~ 2.473 GHz. It meets the
essential requirements and other relevant conditions of R&TTE Directive
1999/5/EC and can be used in the following countries.
AT/BE/DK/FI/FR/DE/G R/IE/IT/LU/NO/P T/ES/SE/CH/NL/UK/HU/CZ/S K/PL.
- The following limitations are applicable for certain countries.
France -> only channel 2 may be used if the device is used outdoors.
(All three channels may be used if the device is used indoors.)
- There may be restrictions for the use of this device outside of the EU. If this device
is used outside of the EU, check whether this device meets local regulat ions.
Frequencies: 2.434 ~ 2.473 GHz. Bandwidth: 20 MHz. Transmitting power: 10
mW.
.
4 Installation
4.1 Preparing for installation
The connections on the monitor are given in table 1 and figure 1.
Item Description Comments
6 Volt power adapter for the
A
monitor.
Monitor’s power adapter
B
connection.
Extra:
C
Scart connection
Monitor’s audio/video
D
connection
Table 1: Monitor connections
The connections and switches of the camera are given in table 2 and figure 2.
Item Description Comments
9 Volt power adapter for the
E
camera.
Camera’s power adapter
F
connection.
On/Off/Night mode switch
G
Channel selection switch
H
Power indicator Is lit when the camera is turned on.
I
Table 2: Camera connections
The monitor settings and options are given in table 3 and figure 3.
2
The voltage is shown on the label on
the adapter.
For viewing the camera image on a TV
or to record the camera image on a
VCR.
The voltage is shown on the label on
the adapter.
Page 6

TRUST 140BM LCD WIRELESS OBSERVATION SYSTEM
Item Description Comments
Level button Sets the sound level for the Auto mode. When
A
Power/volume button Turns the sound on and off and adjusts t he
B
Auto switch Turns the Auto mode on and off.
C
Channel indicator Lights up for the chosen channel.
D
Power indicator Is lit when the monitor has been turned on.
E
Channel selection
F
switch
Brightness buttons Adjusts t he brightness.
G
Attachment points Use these to attach the monitor to an
H
Battery cover If necessary, insert four AA batteries here.
I
Table 3: Monitor components
The camera settings and options are given in table 4 and figure 4.
Item Description Comments
Infrared LED’s Makes it possible to receive clear
J
Lens Records the image.
K
Lens ball Used to alter the vertical viewing
L
Microphone Records the sound.
M
Attachment points Use these to attach the camera to an
N
Battery cover If necessary, insert four AA batteries
O
Table 4: Camera components
using the Auto mode, the monitor turns on
automatically when the set sound level is
exceeded.
sound level.
attachment plate or wall.
images in dark conditions when in the
Night mode.
angle.
attachment plate or wall.
here.
4.2 Inserting the batteries (optional)
You can use batteries (not included) if you do not wish or are not able to use the
power adapter for the camera or the monitor. Use AA batteries.
1. Remove the battery cover (A) on the rear of the monitor or the rear of the
camera (see figure 5).
2. Insert the batteries as indicated inside the battery compartm ent (B).
3. Close the battery flap.
Note: Inserting the batteries incorrectly may cause damage.
Only use alkaline or rechargeable NiMH batteries (type AA). The
If you use batteries, it is recommended to change these or charge
image quality and the transmission range are reduced when the
battery power is reduced. It is, therefore, recommended t o use the
power adapter whenever possible.
them regularly.
UK
3
Page 7

TRUST 140BM LCD WIRELESS OBSERVATION SYSTEM
4.3 Connecting
1. Connect the 6 Volt power adapter to the monitor (A and B, figure 1) and the 9
Volt power adapter to the camera (E and F, figure 2).
2. Switch the camera to channel 1 using switch H (see figure 2).
3. Turn the camera on (On or Night) using the switch (G, figure 2). The voltage
indicator (I, figure 2) will be lit.
Note: If you turn the camera on in the Night mode, the image displayed on
4. Turn the monitor on by rotating the PWR/VOL button (B, figure 3). Adjust the
5. Set the monitor to channel 1 by pressing the switch (F, figure 3) a number of
6. Adjust the brightness of the image as required using the brightness buttons
7. Optional: connect the Scart cable to the monitor and the VCR (C and D, figure
8. The security system is now operational.
the monitor (or a possible TV or video) will be black-and-white.
volume as required. A click will be heard and felt and the voltage indicator (E,
figure 3) will be lit.
times until the channel indicator (D, figure 3) is lit. You will now see the image
detected by the camera.
on the monitor (G, figure 3).
1). The image detected by the camera can now be recorded.
4.4 Extra functionality
To save energy, this system has an Auto mode (C, figure 3). The monitor will be
turned on if noise is detected by the microphone on the camera.
1. Adjust the noise sensitivity level as required using the level button (A, figure
3).
Note: The noise sensitivity level can be adjusted from level 1 to level 9. Level 1 is
the least sensitive and level 9 is the most sensitive.
2. Press the Auto button on the monitor (C, figure 3). The monitor will be turned
off.
3. When the noise detected by the microphone on the camera reaches the set
sensitivity level, the monitor will turn on automatically.
4. The monitor will turn off automatically as soon as the noise level drops below
the set noise sensitivity level for an uninterrupted period of 1 minute.
Note: The Auto m ode has no effect on the choice of channel.
If you use the Auto mode, the image will st ill be transmitted via the
monitor’s AV-out connection to a VCR or TV which may be connected
to the scart connection.
4.5 Positioning and use
1. Use the attachment aids to attach the camera and/or the monitor to a wall,
etc. (see figure 6).
2. When positioning the camera, keep the wiring and the camera out of the
reach of children and babies.
4.6 Reception quality
1. The reception from the camera depends on the number of walls, doors, floors,
ceilings, etc. between the monitor and the camera. Metal and constructions
containing metal can also considerably reduce the range and quality of the
4
Page 8

TRUST 140BM LCD WIRELESS OBSERVATION SYSTEM
signal. Therefore, in order to have the best possible reception, try to avoid
these obstacles as much as possible.
2. People walking near the transmitter or receiver (particularly between the two)
may also reduce the quality of the reception.
3. Try to achieve the best possible reception by positioning the camera and the
monitor correctly in relation to each other. Both devices have built-in aerials.
The aerials can be directed by moving the devices.
4. The device may be affected by external sources of interference, such as
microwave ovens, the weather and other devices which use the same
frequency as this device. If possible, turn these devices off when using the
TRUST 140BM LCD WIRELESS OBSERVATION SYSTEM.
4.7 Expanding the wireless security system
If you have several black-and-white or colour cameras and/or receivers, you can use
these to expand your wireless system. For these additional cameras and/or receivers
to function correctly, they must to be connected to the system and operate on the
same frequency (signal). A maximum of 3 wireless cameras can be connected to the
monitor. There is no theoretical limit to the number of receivers which can be added
to the system.
This monitor is ideal for use with other TRUST CONVENIENCE products. See the
Trust webs ite (www.t rust.co m) for mo re infor mation. When a number of cameras are
connected to this monitoring system, you must manually switch between the
channels.
5 Troubleshooting
Problem Cause Possible solution
No image on the
monitor.
The power supply has not been
connected.
The batteries have been
inserted incorrectly.
The batteries in the camera
and/or the monitor are empty.
Another RF device is operating
on the same channel as the
TRUST 140BM LCD
WIRELESS OBSERVATI ON
SYSTEM.
The camera is set up in a dark
room and the Night mode has
not been selected.
The monitor has been set to
the Auto mode.
Check whether the power
supply has been connected
to the monitor and the
camera correctly.
Reinsert the batteries
Replace the batteries.
Change the channel of both
the camera and the receiver.
Change the physical location
of the camera (transmitter)
and/or the receiver by
altering the direction or the
distance.
Select the Night mode on
the camera.
Turn off the Auto mode or
adjust the noise sensitivity
level.
5
UK
Page 9

TRUST 140BM LCD WIRELESS OBSERVATION SYSTEM
Problem Cause Possible solution
There is noise on
the image and/or
the sound.
The camera
suddenly stops
working.
The problem is
not listed here.
Register your product via www.trus t.com so that you are able to rec eive optim al
guarantee and service support, such as up-to-date FAQ’s. You will be automatically
informed of developments to your product and other Trust produc ts. You will also
have the chance of winning some spectacular prizes.
If you still have problems after trying these solutions, please contact one of the Trust
Customer Care Centers. You can find more information at the back of this instruction
manual. Please have the following information available:
The item number. This is 13816 (European model) or 13817 (UK model).
•
A good description of what does not work.
•
A good description of when the problem occurs.
•
The batteries in the camera
and/or monitor are empty.
The monitor and the camera
are in different rooms and one
of these rooms (or both) is
surrounded by a metal
construction.
The built-in aerials are not
directed at each other correctly.
The transmission range is
restricted by objects, e.g.
people, walls, etc.
The camera and the monitor
are too far apart.
The wrong channel has been
selected.
The channel is being used by
another device.
The signal is affected by an
external source of interference.
The power adapter plug has not
been plugged in correctly.
The latest FAQs are available
on the Internet.
Replace the batteries in the
camera and/or monitor.
Position the monitor and/or
the camera in a different
room which is not
surrounded by the metal
construction.
Change the physical location
of the camera or monitor.
Turn the camera and/or the
monitor until the image
becomes sharp.
Change the physical location
of the camera or monitor.
Place the camera and the
monitor closer together.
Set the camera and the
receiver to the same
channel.
Select a different
transmitting and receiving
channel.
Select a different
transmitting and receiving
channel.
Turn off or remove the
source of interference.
Insert the plug correctly into
the camera and/or the
monitor.
Go to www.tru st.com /13816
for FAQ’s and other product
information.
6
Page 10

TRUST 140BM LCD WIRELESS OBSERVATION SYSTEM
6 Specifications
6.1 Wireless range
The system has been tested in the open field using both power adapters (not with the
batteries). The maximum distance at which the image and sound signals are still
acceptable is 100 m.
The system has been tested indoors using both power adapters (not with t he
batteries). The signals can be transmitted a distance of 20 metres with only one
concrete floor (no walls, etc.) between the camera and the monitor.
In the Night mode, the camera can record clear imag es in an unlit area up to a
distance of 2.5 metres.
The system has been tested with rechargeable 1800 mAh NiMH batteries. The
monitor will work for approximately 4 hours in the Normal mode with maximum
brightness. The camera will work for 8 hours in the Night mode. The distance
between the camera and the monitor was 10 metres.
Note: Depending on the circumstances in which the camera and monitor are
used, the measured distances and times are no guarantee for this
device.
6.2 Technical information
The table below gives the technical specifications for the monit or and the camera.
Description Response
Wireless technology [RF, IR, … +
frequency]
Frequency per channel [GHz] [1 / 2 / 3]
Optical module [CCD / CMO S / ...]
A/V modulation/demodulation method
Lens viewing angle
Lens focal distance
Monitor screen size
Number of pixels for the monitor
Monitor screen type
Maximum wireless distance between the
camera and the monitor (metres)
RF approval no. (CE xxxx !)
Other outputs
Camera resolution ... x ...
Power supply
RF / 2.434 ~ 2.473 GHz
2.434 / 2.453 / 2.473
CMOS 1/3”
FM
45°
f 6.0 mm, F1.8
1.5 inch
117,600 pixels
Colour
100 m in free space using the
power adapter provided.
20 m in a closed space with a
maximum of 1 obstacle using the
power adapter provided.
CE0678
A/V out on monitor
PAL: 628 (H) x 582(V)
Monitor: JAD0600600E Input
230VAC 50 Hz / Output 6VDC
600mAh
UK
7
Page 11

TRUST 140BM LCD WIRELESS OBSERVATION SYSTEM
Video output signa l
Product size [HxWxD] (mm)
Weight (kg)
Camera: JAD0900300E Input 230
VAC 50 Hz / Output 9 VDC 300
mAh
PAL
Camera 123 x 92 x 59
Monitor 140 x 85 x 53
Camera 175 g (excluding batteries)
Monitor 240 g (excluding batteries)
7 Warranty conditions
- Our products have a two-year manufacturer's warranty which is effective from the
date of purchase.
- If there is a fault, return the product to your dealer and include a description of the
fault, the proof of purchase and all the access ories.
- During the warranty period, you will receive a similar product, if one is available. If
no similar product is available, your product will be repaired.
- Please contact our help desk for missing components, such as the instruction
manual, software or other components.
- The warranty becomes invalid if the product has been opened, if there is
mechanical damage, if the product has been misused, if alterations have been
made to the product, if the product has been repaired by a third party, in the case
of negligence or if the product has been used f or a purpose other than that
originally intended.
- Excluded from the warranty:
Damage caused by accidents or disasters, such as fire, flood, earthquakes,
•
war, vandalism or theft;
Incompatibility with other hardware/software which is not stated in the
•
minimum system requirements;
Accessories such as batteries and fuses (where applicable).
•
- Under no circumstances will the manufacturer be held responsible for any
incidental or consequential damage, including the loss of income or other
commercial losses resulting from the use of this product.
8
Page 12

CUSTOMER CARE CENTERS
24 HOURS free service: www.trust.com
Residents in the UK and Ireland should contact:
Mon - Fri
From 8:00 - 16:00
I residenti in Italia possono contattare:
lun - ven
9:00 - 13:00 /
14:00 -18:00
Les habitants de la France et de l’Afrique du Nord peuvent contacter :
Lundi-vendredi
De 9:00 à 17:00
Kontaktadresse für Einwohner Deutschlands:
Mo – Fr
9:00 - 17:00
Los habitantes de Espa ña pueden ponerse en con tacto con:
lun – viernes
De las 9:00 a las
17:00 horas
Osoby mieszkające na terytorium Polski powinny skontaktować si ę:
Od pon. do pt.
w godz 09:00-17:00
Inwoners van Nederland kunnen contact opnemen met:
ma – vr
9:00 - 17:00 uur
All other countries / Alle anderen Länder / Tous les autre s pays
Tutti gli altri paesi / Todos lo s demás países / Alle andere l anden
Mon - Fri
From 9:00 - 17:00
UK Office
Phone +44-(0)845-6090036
Fax +31-(0)78-6543299
Ufficio italiano
Telefono +39-051-6635947
Fax +39-051-6635843
Bureau français
Téléphone +33-(0)825-083080
Fax +31-(0)78-6543299
Deutsche Geschäftsstelle
Telefon 0800-00TRUST (0800-0087878)
Fax +31-(0)78-6543299
Oficina española
Teléfono +34-(0)902-160937
Fax +31-(0)78-6543299
Biuro w Polska
Tel +48-(0)22-8739812
Fax +31-(0)78-6543299
Kantoor Nederland
Telefoon 0800-BELTRUST (0800-23587878)
Fax +31-(0)78-6543299
European Head Office
Phone +31-(0)78-6549999
Fax +31-(0)78-6543299
L I F E I S M O R E ! T R U S T U S T R U S T . C O M
 Loading...