

Page 1
1290Z POWERC@M OPTICAL ZOOM
User’s manual
Version 1.0
UK
IT
L I F E I S M O R E ! T R U S T U S T R U S T . C O M
Page 2

1290Z POWERC@M OPTICAL ZOOM
Thank you for your purchase. Register your product via our Inter net site at
www.trust.com/register, so that you will be eligible for optimal guarantee and service support.
You will also be automatically informed of the development of your and other Trust products.
UK
L I F E I S M O R E ! T R U S T U S T R U S T . C O M
Page 3
1290Z POWERC@M OPTICAL ZOOM
Fig. 1a Fig. 1b
Fig. 1c Fig.1d
Fig. 2
Fig. 3 Fig.4
L I F E I S M O R E ! T R U S T U S T R U S T . C O M
Page 4
1290Z POWERC@M OPTICAL ZOOM
UK
DE
Fig. 5 Fig. 6
FR
IT
ES
Fig.7 Fig. 8a
PL
NL
PT
Fig.8b Fig. 8c
L I F E I S M O R E ! T R U S T U S T R U S T
. C O M
Page 5

TRUST 1290Z POWERC@M OPTICAL ZOOM
Read the ‘Quick Installation Guide’ before using the camera for the first time.
The basic functions of the camera are described here.
!
CONTENTS
1 Int duction 2ro
1.1 Some general comments about photography 2
2 Safety 2
2.1 Batteries 3
3 Approval 3
4 Explanation of the camera functions 3
5 Inserting and removing the batteries 5
6 Ins rting the memory 5
e
6.1 Formatting the memory 6
7 Us settings 6
er
7.1 Setting the language of the OSD menu 6
7.2 Setting the da te 6
8 Ta ng photographs ( ) 7
ki
8.1 Zooming in and out 7
8.2 Selecting the mode 7
8.3 Self timer ( ) 8
8.4 Focusing 8
8.5 Flash 8
9 Recording video clips ( ) 9
10 View videos 9
ing pictures /
10.1 Display on the camera ( ) 9
10.2 Connecting the camera to a computer 10
10.3 Playback on television 11
11 Add onal settings 12iti
11.1 Capture mode 12
11.2 Settings in the Playback mode 13
11.3 Settings in th e SETUP mode 14
11.4 Fitting the wrist strap 14
12 Soft are 14
w
12.1 Trust Photo Site 14
12.2 MGI PhotoSuite SE version 4.0 15
12.3 MGI Photovista 15
12.4 Deleting software and drivers 15
13 Verification after installation (Windows) 16
14 Troubleshooting 16
15 Technical specifications 19
16 Warranty conditions 19
1
UK
Page 6

TRUST 1290Z POWERC@M OPTICAL ZOOM
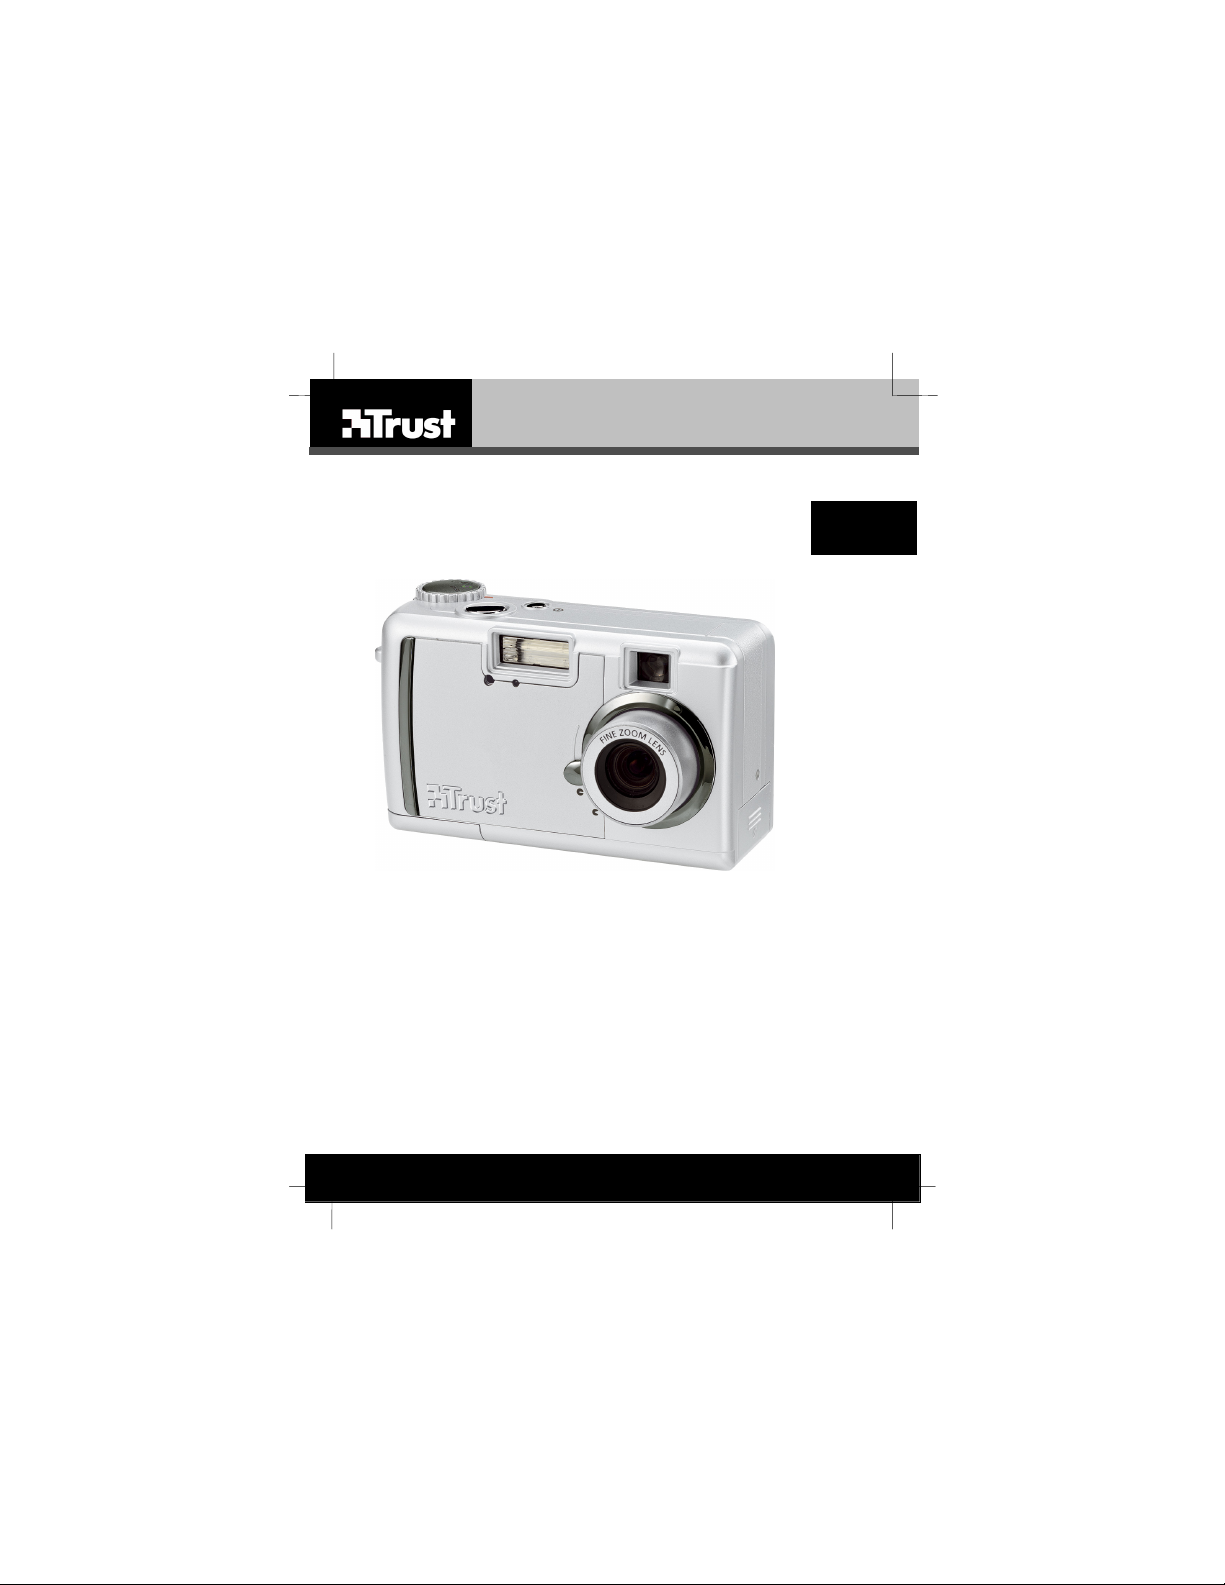
1 Introduction
This instruction manual is for users of the TRUST 1290Z POWERC@M OPTICAL
ZOOM. The camera is equipped with a 4 megapixel sensor and an optical zoom lens.
The photos are saved on the memory card supplied with the camera.
1.1 Some general comments about photography
Taking test pictures
Before taking pictures of a unique event it is s ensible to take some test pictures first.
This is to make sure that the camera is working properly.
No damages can be claimed for a picture which is not satisfactory.
No damages can be claimed for unsatisfactory pictures caused by faulty working of
your camera or software etc.
Exchanging picture data
No guarantees are given that pictures made with this camera can be reproduced on
other apparatus, or that pictures made with other apparatus can be reproduced on
this camera.
Sunlight
Do not point the camera at the sun for long periods as this can damage the sensor.
Knocking / shaking
Do not shake the camera or knock it against something. This may cause a fault,
unsuccessful photographs, memory incompatibility or the loss of photog raphs from
the memory.
LCD display
Small black or bright spots can sometimes be seen on a LCD display. This is a
normal occurrence and has no influence on the quality of the image recorded by the
camera. When there are no more than 10 of these spots it is not necessary to
exchange the camera.
Exposing the LCD display to sunlight for a long time can cause defects.
Lens
Keep the glass of the lens clean. Use a cotton wool stick to clean the lens. If
necessary, use special cleaning fluid for camera lenses. Do not use any other
cleaning materials.
2 Safety
Read the following instructions carefully before using:
- The Trust 1290Z0 PowerC@m Optical Zoom does not require any special
maintenance. Use a slightly moist soft cloth to clean t he camera.
- Do not use any aggressive materials such as petroleum spirit or t urpentine.
These can affect the materials used.
- Never immerse the camera in a fluid. This can be dangerous and damage the
product. Do not use the camera in the vicinity of water.
- Do not try to repair the camera yourself.
2
Page 7
TRUST 1290Z POWERC@M OPTICAL ZOOM
2.1 Batteries
- The Duracell Ultra batteries supplied with the device are not rechargeable. Do
not try to recharge these batteries. This can give rise to danger of an
explosion.
- Do not throw the batteries into a fire. The batteries could explode.
- Do not drill through the batteries.
- Keep the batteries out of reach of small children.
- Use solely NiMH AA batteries with this camera (at least 1800mAh).
-
When the alkaline batteries (including Duracell Ultra batteries) are empty, ask
your local authority where you can dispose of them.
N.B.: standard NiCd AA batteries are unsuitable for use with this camera.
N.B.: do not use old and new batteries together, since the old batteries may
N.B.: remove the batteries if the camera is not to be used for a longer period
drain the new batteries.
of time. This will prolong the life of the batteries.
3 Approval
This product conforms with the essential requirement s and other relevant provisions
stipulated by the applicable European directives. The Declaration of Conformity
(DoC) is avai lable at www.t rust.co m/13984/ce.
4 Explanation of the camera functions
Please refer to Figures 1a to 1d inclusive.
Item Explanation
1 Shutter release
2 Selector dial
3 Power Button Press the button to switch on the camera.
4 Flash Use the built-in flash to highlight the subject.
5 Automatic exposure
6 Lens cover Protects the lens when the camera is not in
7 Lens The lens focuses the image on the digital
button
indicator
Description
Press this button to take a photograph.
Dial for the selection of the mode.
SETUP Setup mode: For the adjustment
of the settings.
Capture mode: Taking
photographs. (Section 8)
Playback mode: Display
photograph(s). (Section 10)
Video mode: Recording a video
clip (Section 9)
Press the button again to switch off the
camera.
Illuminated/flashes when the automatic
exposure function is used. (Section 8.3)
use.
Slide the button downwards to open the
cover.
UK
3
Page 8

TRUST 1290Z POWERC@M OPTICAL ZOOM
Item Explanation Description
8 +
Viewfinder The viewfinder is used to determine the
10
image capturing circuitry. Make sure that the
lens remains free of dust and fingerprints;
take care not to scratch the lens.
format of the photograph and its composit ion.
The actual photograph is taken through the
lens, not the viewfinder. The image may differ
when the digital zoom is used.
9 Indicator Indicates the current camera mode.
11 Control buttons Button to scroll through the menu, or
12 "W" button (zoom
out)
13 "T" button (zoom in) Use the Zoom-in button to zoom in on the
“Å” button: macro function (Section 8.4)
“Æ” button: automatic exposure (Section 8.3)
“Ç” button: mode (Section 8.2)
“È” button: flash settings (Section 8.5)
Use the Zoom-out button to zoom out on the
subject while in Capture mode.
subject while in Capture mode.
14 Indicator Indicates the status of the memory.
15 LCD display Use the LCD display to preview photos.
In the Setup menu the LCD display can be
used to view the configuration.
16 “MENU” Button: Press the “MENU” button to enter the menu.
17 “ENTER” button Use the “ENTER” button to confirm or perform
18 “DISPLAY” button Used to determine the presentation on the
19 Hook for the
carrying strap
a function.
LCD display. Turning the LCD display off will
save batteries.
For your convenience, attach the carrying
strap to the hook on the camera.
20 Battery cover Protects the batteries.
21 Memory card cover Protects the memory card.
22 USB connection The USB (Universal Serial Bus) port is used
23 Tripod socket Use the tripod socket to fit a tripod to the
24 Video-out
connection / adapter
connection
to connect the camera to a PC for the transf er
of photos.
camera. This optional accessory is used to
stabilize the camera. This is ideal for
photography when little light is available, e.g.
at night.
Connect your video-out cable to your TV and
this socket to use the television to preview
your images.
You can also connect an adapter (not
supplied with the camera) to this socket.
Table 1: camera functions
4
Page 9

TRUST 1290Z POWERC@M OPTICAL ZOOM
Preparing the camera for use
5 Inserting and removing the batteries
Follow the instructions given below to insert or remove the batteries
N.B.:
Open the battery cover and insert the batteries into the battery compartm ent as
indicated on the inside of the battery cover. Close the battery cover.
When the battery voltage begins to fall the battery indicator (
LCD display. Replace the batteries in time.
N.B.: the camera case will become warm during use. This is normal.
N.B.: after inserting or replacing the batteries you will need to reset the date
N.B.: turn off the LCD display to prolong the life of the batteries.
Battery life: It is preferable to use Ni-MH batteries rather than Alkaline batteries in
digital cameras. Trust’s product range includes a variety of Ni-MH battery chargers.
(please refer to www.trust.com/battery-chargers)
make sure the camera is turned off.
) will be shown in the
and the time (see Section 7.2)
6 Inserting the memory
A memory card is supplied with this camera. You can save a number of photos on
this card. We recommend the purchase of a memory card with a larger capacity. This
will enable you to save more photographs (Table 2).
Memory cards can be purchased from, for example, a photography store.
Image quality 8MB 16MB 32M B 64MB 128MB
Standard
Economy
(ECO)
Table 2: list of storage capacities
N.B.: t o avoid damage to the memory card or the camera, turn the
N.B.: do not remov e the memory card when the indicator is flashing.
Follow the instructions given below to insert the memory card.
Open the memory-card cover (21, Figure 1d) and insert the memory card as
indicated in the holder. Press the memory card into the slot until it clicks in place.
Remove the memory card by pushing it to release the lock. Remove the memory
card.
N.B.:
The external memory card needs to be formatted for optimum use. See Section 6.1.
N.B.: never remove the memory card while the camera is processing dat a.
3 11 23 48 97
Fine:
7 22 47 96 195
(STD)
11 34 72 149 301
Basic
44 129 270 553 1118
camera off before inserting or removing the memory card.
the memory card fits only in one way in the camera. Do not force the
card into the slot. This can damage both the memory card and the
camera.
(the green indicator is flashing (14, Figure 1c). This can result in the
loss of data, or defects.
UK
5
Page 10

TRUST 1290Z POWERC@M OPTICAL ZOOM
Symbol Mode Description
Photo, Playback, Video No memory card in the camera.
Photo, Playback, Video The camera is unable to recognize
Playback No images stored on the memory
Photo, Video Memory card is full. No more
Playback Playback not possible, for example
Table 3: memory symbols shown on the LCD display
the card. Check that the card has
been inserted correctly. Format the
card using the external card reader.
card.
images can be stored on the card.
because the recording is damaged.
6.1 Formatting the memory
For the optimum use of the internal memory or a memory card f ormat the memory
before use.
N.B.: formatting the memory card will delete all data stored on the
the card cannot be formatted in the write-protect ed mode (Lock).
N.B.:
1. Switch on the camera, and turn the selector dial to “SETUP”
2. Press the “MENU” button. See Figure 3.
3. Select [CARD FORMATTING] using the “Ç” button or the “È“ button
4. Press the “ENTER” button.
5. Select [YES] using the “Ç” button or the “È“ button
6. Press the “ENTER” button. The memory card will now be formatted.
card, inclusive of the images which have been write-protected.
7 User settings
7.1 Setting the language of the OSD menu
1. Switch on the camera, and turn the selector dial to “SETUP”
2. Press the “MENU” button.
3. Select [LANGUAGE] using the “Ç” button or the “È“ button (options: English,
German, French, Italian, and Spanish)
4. Select the language using the “Å” button or the “Æ” button
5. Your choice will be saved if you
a. Press the “ENTER’, “Ç” or “È” buttons
b. Change to another mode
c. Switch off the camera
7.2 Setting the date
1. Switch on the camera, and turn the selector dial to “SETUP”
2. Press the “MENU” button. See Figure 3.
6
Page 11

TRUST 1290Z POWERC@M OPTICAL ZOOM
3. Select [DATE SETTING] using the “Ç” button or the “È“ button
4. Press the “ENTER” button. See Figure 4.
5. Use the “Ç” or “È” button to select [YEAR/MONTH/DAY/ HOUR/MINUTE/
OPTION]
Use the “Å” or “Æ” button to adjust the setting
6. Press the “MENU” button to save the settings
Basic use of the camera
8 Taking photographs (
Please consult the Quick Installation Guide.
Make sure that the batteries and the memory card have been fitted to the camera.
1. Open the lens cover
2. Switch on the camera, and turn the selector dial to Capture mode (
3. Use the viewfinder or the LCD display to position the camera on the subject
4. Press the shutter release button half-way in; the camera will adjust the
exposure settings and the focus. Press the shutter release button fully in.
5. The photo will now be saved on the memory card.
N.B.:
N.B.: hold the camera st eady to avoid taking blurred photos.
8.1 Zooming in and out
This camera has an optical zoom (3x) and a digital zoom (2x).
You can use the Zoom-in (T) or Zoom-out (W) buttons to reduce or increase the
camera's field of view. Use the LCD display or the viewfinder (solely optical display)
to preview the effect of the zoom function.
Digital zoom
The digital zoom enables you to magnify the image by a factor of 2.
Zoom in completely on the subject (keep the “T” button pressed in).
Briefly release the “T” button, and then press it in again. This will activate the digital
zoom. The
N.B.: t he digital zoom can decrease the image quality.
8.2 Selecting the mode
Use the “Ç” button ( ) to switch between the camera’s various programmed
settings.
Symbol Mode
none Normal Normal m ode. You can adjust the settings in
it may take a little while to save the photograph. You will need to
wait about 10 seconds before you can take the next photo.
symbol will be shown on the LCD display.
Portrait Used to photograph people. The camera
Landscape Used to photograph landscapes such as
)
)
Description
the menu.
focuses on the person, and the background
is less sharp.
mountains.
UK
7
Page 12

TRUST 1290Z POWERC@M OPTICAL ZOOM
Symbol Mode Description
Night view Used to take photographs when little light is
Table 4: mode settings
available. The camera uses a longer
exposure time. The flash will be used.
N.B.: the use of a tripod is recommended
when the camera is set to this
mode.
Note: the macro function cannot be
activated.
8.3 Self timer ( )
This function enables you to take a delayed photograph. The function can be used to
take a self-portrait, a photograph of a gr oup, or a macro photo (a close-up).
Use the “Æ” button (
Press the shutter release button fully in to take a photo with t he self-timer.
The self-timer indicator (5, Figure 1b) will light for 7 seconds, and then begin to flash.
The photo has been taken once the indicator is no longer illuminated/flashing.
The self-timer is switched off again after the photo has been taken.
Note: you can interrupt the self-timer function by pressing the shutter
) to set the self-timer.
release button again.
8.4 Focusing
Use the “È” button ( ) to adjust the camera’s focus.
Symbol Distance Description
70 cm – infinite (~) Auto focus: this setting is optimized for portrait
10 - 70 cm (Wide)
25 – 70 cm (Tele)
Infinite (~) The focus is optimized for landscape photos; the
Table 5: focus settings
Note: when the camera is used in the “Auto focus” mode you will need
to press the shutter release button half-way in to focus the
camera. The camera will now focus on the subject. Press the
shutter release button fully in. (Do not release the shutter release
button once the camera has focused on the subject)
photos of other people.
Macro mode (for close-up photos).
lens is focused such that all objects in the field of
view are equally sharp.
8.5 Flash
You can use the flash when there is insufficient ambient light, and to fill-in the subject
when photographing against the light.
It will take about 10 seconds to charge the flash when the batt eries are new. The
LCD display is extinguished whilst the flash is charging. The status indicator flashes.
8
Page 13

TRUST 1290Z POWERC@M OPTICAL ZOOM
Symbol Status Function
Automatic The camera automatically uses the flash when so
On The f lash will be used for all photographs. This is
Off T he flash is not used.
Red-eye
reduction
Table 6: summary of flash settings
required.
ideal when fill-in flash is needed (against the light).
N.B.: the flash is turned off in burst mode.
The flash will be automatically used when there is
insufficient light; an advance flash will be used to
reduce the red-eye effect.
9 Recording video clips ( )
You can use this function to record video clips of a maximum duration of 30 seconds.
1. Turn the selector dial to video mode (
2. Press the shutter release button to begin recording. The camera will then
make a recording until 30 seconds have passed or the shutter release button
is pressed again.
N.B.: t he digital zoom cannot be used.
N.B.: y ou cannot zoom in or out during the recording.
)
10 Viewing pictures / videos
10.1 Display on the camera ( )
To view photos turn the selector dial to Playback mode and switch on the camera.
The last photo you took will be displayed.
The default Playback method is to display individual photos on the full screen. Press
the “Å” button or “Æ” button to browse through the photos stored in the mem ory.
N.B.: you will need to wait about 5 seconds before the photo is shown
on the LCD display, allowing you to browse to the next photo
UK
9
Page 14

TRUST 1290Z POWERC@M OPTICAL ZOOM
Enlarging photos
You can use the Zoom buttons (T)/(W) to display a photograph in more detail. The
default zoom setting is 1.0x
Press the zoom-in button (T) to increase the zoom factor from 1.0x to 4.0x in 1.0x
increments. Press the zoom-out button (W) to reduce the zoom factor/
You can use the “Ç“, “Æ”, “È” and “Å” buttons to browse through the photos.
Thumbnails
Press the “DISPLAY” button until the thumbnails are shown on the LCD display.
In Thumbnail Review mode up to nine photographs are displayed simultaneously on
the LCD display. You can use the “Ç“, “Æ”, “È” and “Å” buttons to browse through
the thumbnails.
To return to Full-Screen view select the required photo and press the “ENTER”
button. The selected picture will then expand to fill the entire LCD display.
Video recordings
Press the “ENTER” button to start the playback of the video. Press the “ENTER”
button to interrupt the playback of the video. Press the “ENT ER” button again to
continue the playback.
Whilst the playback is interrupted you can use the “Å” and “Æ” buttons to browse to
the previous/next shot.
Erasing an image
1. Select the image you wish to erase
2. Press the “MENU” button.
3. Select [ERASE SINGLE IMAGE]
4. Press the “ENTER” button.
5. Select [YES] and press “ENTER” to erase the image.
6. Press the “MENU” button to return to the normal playback mode.
N.B.: you cannot erase images which are protected or set ready for
printing.
10.2 Connecting the camera to a computer
This Section explains how the camera can be connected to a computer for the
transfer of images.
Before you connect the camera to the computer you must complete the following
steps:
1. Install the driver (only for Windows 98) Section 10. 2.1
2. Connecting the camera to a computer Section 10.2.2
3. Copying photos/video-clips to the computer Section 10.2.3
10.2.1 Installing the driver (only for Windows 98)
N.B.: do not connect the camera to your computer before you install
1. Insert the CD-ROM in your computer’s CD-ROM drive. The installation
the driver.
program will start automatically. If it does not start autom atically, carry out the
following:
a. Select 'Run' from the Windows Start menu.
b. Key in [D:\setup.exe] and click ‘OK’
10
Page 15

TRUST 1290Z POWERC@M OPTICAL ZOOM
2. The Trust Software Installer window will be displayed (Figure 5). Select the
language (in the top right-hand corner) you wish to use during the installation.
3. Select ‘Install driver’
4. Follow the directions displayed on the monitor, and restart the computer if so
advised.
10.2.2 Connecting the camera to the computer (Windows and
1. Connect the small connector of the USB cable to the camera. (22, Figure 1d)
2. Connect the large end of the USB cable to an empty USB port on your
10.2.3 Copying photos/video-clips to the computer
When the camera is connected to your computer the digital camera will behave like
any other exchangeable disk drive connected to your computer. Copying images from
your camera to the hard drive is then as easy as copying files from a floppy disk, ZIP
drive, or CD-ROM.
N.B.: s ome time may be required to copy the photos from the camera
10.2.3.1 PC
Make sure than the camera is connected to the computer, and that the camera is
switched on.
1. Windows XP:
2. Open Windows Explorer. The contents of your computer will be displayed,
3. Select the digital camera’s ‘Removable Disk’ station.
4. Open the DCIM -> 100PRDSC folder
5. Select the photos and drag them to a directory, for example “My Pictures”, on
10.2.3.2 Macintosh
Make sure than the camera is connected to the Mackintosh, and that t he camera is
switched on.
Open de UNLABELED folder on the desktop, and then open the “DCIM” ->
100PRDSC folder
You can view the images using a suitable program.
Macintosh)
computer (Figure 7). The Windows “New Hardware” Wizard will automatically
detect the camera and guide you through the installation procedure.
The desktop of a Macintosh will be supplemented by an “UNLABELED” icon
to the computer (8MB/80sec) (www.trust.com/cardreaders)
displayed on the monitor. (Figure 8). Select the option “Open folder to view
files using Windows Explorer”. Skip Step 2.
inclusive of all your disk drives; provided your camera is connected properly
the content of the camera's memory will be shown in an extra “Removable
Disk” disk drive.
your computer’s hard drive.
on connecting the camera a “Removable disk” window will be
10.3 Playback on television
The camera can be connected to a TV or video to playback your photos and / or
video-clips. A standard RCA video cable is supplied with the camera.
Setting video-out
The camera’s TV-OUT should be set to PAL. This standard is the most usual
standard used in Europe. See Table 9.
Connecting the camera to a TV:
UK
11
Page 16

TRUST 1290Z POWERC@M OPTICAL ZOOM
1. Connect one end of the video cable to the camera’s video-out connection.
(24, Figure 1d)
2. Connect the other end of the video cable to your TV. Your TV needs an input
for video signals (yellow RCA plug). The yellow plug is used for the image
signal.
You will need an adapter if your TV has only a SCART plug. This can be
purchased from most TV and radio stores.
3. Adjust the TV to video-input display.
4. Switch on your camera. The camera’s image will now be displayed on your
TV. To display all images set the camera to slide show (Table 8). Each image
is displayed for 2 seconds.
N.B.: when you use the camera in slide show mode the image will be
make sure you use the PAL setting in Europe. The use of the
Note:
Note: the camera’s video-out output is not suitable for use with your
Note: if you do not see an image and you hear a loud humming sound
displayed on the TV for 2 seconds; about 5 seconds will elapse
before the next image is displayed.
incorrect standard will result in a fuzzy black-and-white image.
TV’s aerial connection. Your TV needs a Video-in connection.
through the speakers you may have connected the image plug to
the incorrect socket. Check the connections.
Other settings
11 Additional settings
11.1 Capture mode
Press the “MENU” button to adjust the additional settings.
Use the “Ç” and “È” buttons to select the function
Use the “Å” and “Æ” buttons to adjust the setting
Option Possible
Mode
[Quality]
settings
[Single]
[Burst]
[Fine]
[Eco]
[Basic]
[STD]
Icon Explanation
Takes one photograph when the
shutter release button is pressed
Takes three successive
photographs when the shutter
release button is pressed
Set the camera’s resolution
(Table 2).
12
Page 17

TRUST 1290Z POWERC@M OPTICAL ZOOM
[ISO
Sensitivity]
[Exposure]
(also for the
Video mode)
[White
Balance]
(also for the
Video mode)
[Photometry]
[AE mode]
[100]
[200]
[400]
[0.00] Set the exposure time.
[AWB]
[Daylight]
[Fluorescent]
[Tungsten]
[Spot]
[Center
weighted]
[Normal]
[Creative]
[Action]
Table 7: summary of the menu settings in the Capture mode
11.2 Settings in the Playback mode
Switch on the camera, and turn the selector dial to “Playback”
Press the “MENU” button to adjust the additional settings.
Use the “Ç” and “È” buttons to select the function
Press the “ENTER” button to adjust an option
Use the “Å” and “Æ” buttons to adjust the setting
Setting Options Explanation
Images]
image]
[Protect] [Lock/Unlock] Adjust the protection setting of the image.
Setting]
[Yes] [Erase All
[No]
[Yes] [Erase single
[No]
[Select] <> [Print
[Date Print]
Delete all images. Images marked as “Lock” will
not be erased.
The selected image will be erased. Images
marked as “Lock” will not be erased.
Set the image for printing directly to a printer
using the card reader (DPOF).
Set the ISO sensitivity. The
amount of light required to take a
good photo decreases with
increase in ISO setting.
Adjustable from –1.50 -> 0 ->
1.50 in 0.25 increments
Use the AWB setting for the
optimum brightness (lighting) of
the photo.
Use when taking photos outdoors
or in brightly-lit conditions.
Use when taking photos with
fluorescent lighting.
Use when taking photographs
with tungsten lighting.
The exposure settings are
determined by the light falling on
the subject in the middle of the
field
The exposure settings are
determined by the lighting falling
on all subjects in the field
Normal exposure time
A longer exposure time. Ideal for
a still life.
A short exposure time, ideal for a
motion shot.
UK
13
Page 18

TRUST 1290Z POWERC@M OPTICAL ZOOM
Setting Options Explanation
[Slide Show] Start slide show. Press the “ENTER” button to
[Quantity] Date Print, prints the date on the print. The
Table 8: settings in the Playback mode
number can be set between 0 and 99
start/stop the slide show.
11.3 Settings in the SETUP mode
Switch on the camera, and turn the selector dial to “Setup” (Figure 3)
Use the “Ç” and “È” buttons to select the function
Use the “Å” and “Æ” buttons to adjust the setting
Option
[Date Setting] Set the date (Figure 4)
[Card Formatting] Format the memory card
[Language] Set the language
[LCD Brightness] Adjust the luminance of the LCD display. Ideal in sunlight,
[Beep] Set the aural signal
[Auto Shut off] Adjust the energy-saving setting (1, 3, or 5 minutes)
[Video out] Set Video-out to PAL or NT SC. On the adjustment of the
Table 9: settings in the setup mode
Function, and possible settings
or in darker surroundings.
setting the LCD display will be extinguished for a maximum
of 5 seconds.
11.4 Fitting the wrist strap
Fit the wrist strap to the camera for optimum convenience, and for the safety of your
camera. Attach the strap to the attachment point (19, Figure 1d)
12 Software
12.1 Trust Photo Site
Trust offers you an opportunity to publish your photographs on the Internet. To do so,
surf to ou r website ( www.trust photosite.com). A number of conditions are attached to
the use of this site. The conditions are stated on our website,
www.trustphot osite.com.
Installation (Windows)
Install the Trust Photo Upload from CD-ROM. (Tr ust Installer Æ Install software
Trust Photo Upload)
Æ
Use (Windows)
An instruction manual for the Trust PhotoSite is included on the CD-ROM. This
explains how to install and use the software. (Trust Installer Æ Read instructions Æ
Trust PhotoSite)
14
Page 19

TRUST 1290Z POWERC@M OPTICAL ZOOM
12.2 MGI PhotoSuite SE version 4.0
Installation
1. Insert the CD-ROM in your CD-ROM drive. Trust Installer Æ “Install software”
“MGI PhotoSuite 4 SE”.
Æ
2. Select the required language for the program. Click ‘OK’.
3. Follow the on-screen instructions to complete the installation.
- Check “Install Jerry Downs collection photo album”
- Under “File association” check at least “JPEG image” for PhotoSuite 4
4. You can use “register online” to register the program with MGI. Click “Finish”
to close the Wizard. Restart the computer when requested to do so.
Use
1. Connect the camera to the computer, and switch on the camera.
2. Start MGI Photosuite 4 (Start – programs – MGI Photosuite – MGI PhotoSuite
4)
3. Click the “GET” button (Figure 8a)
4. Select “Computer” (Figure 8b)
5. Under “Look in” select the camera’s “removable disk”
6. Open the DCIM -> 100PRDSC folder
7. Select the image and click “open”.
N.B.: a litt le time may be required to open the image. (a maximum of
8. You will then be able to edit the image (Figure 8c).
9. You can save the image on your computer. Click File and select “Save as..”
The Help function contains more information about the use of the software.
30 seconds)
The use of a new filename is recommended.
12.3 MGI Photovista
1. Insert the CD-ROM in your CD-ROM drive. Trust Installer Æ “Install software”
“MGI PhotoVista”.
Æ
2. Select the required language for the program. Click ‘OK’.
3. Follow the on-screen instructions to complete the installation.
4. You can use “register online” to register the program with MGI. Click “Finish”
to close the Wizard. Restart the computer when requested to do so.
Use
You can use this program to paste a number of photos to create a panorama photo.
You can, for example, create a 360° photo.
Information about the initial use of the program is g iven in the “Quick Start Tutorial”
(Help – Quick Start Tutorial”)
12.4 Deleting software and drivers
Follow the steps given below if you wish to delete the camera’s driver, the MGI
PhotoSuite/Photovista software or the Trust Photo Upload program from your
computer
1. In the Control Panel, go to Software (Start Æ Settings Æ Control Panel Æ
software)
UK
15
Page 20

TRUST 1290Z POWERC@M OPTICAL ZOOM
2. Click the program you wish to delete, and then click the “delete” button
3. Follow the instructions displayed on the monitor. Restart your computer if
requested to do so.
13 Verification after installation (Windows)
Subsequent to the complete installation of the product and the programs the following
programs will be installed on your computer; you can check for their presence:
Start – Settings – Control Panel – System – Device Manager
- Disk Drives – Digital Camera 4MP859 USB Device (Windows XP, 2000)
- Storage volumes – Generic Volume (Windows XP, 2000)
-
Universal Serial Bus Controllers – USB Mass Storage Device (Win. XP, 2000)
- Disk drives – Digital Camera 4MP859 (Windows ME)
- Storage Device – USB Disk (Windows ME)
- Universal Serial Bus Controllers – USB Mass Storage Device (Windows ME)
- Disk drives – Digital Camera 4MP859 (Windows 98)
- Hard disk controllers – Digital Camera DISK device (Windows 98)
- Universal Serial Bus controllers – Digital Camera (Windows 98)
‘Start – Settings – Control Panel’ – Software
- Digital Camera Drivers
- MGI PhotoSuite 4.0 (remove only)
- MGI Photovista 2.02 (remove only)
- Trust Photo Upload
Start - Programs –… - …
-
Trust - Trust Photo Upload - Trust Photo Upload
- MGI PhotoSuite 4 – MGI PhotoSuite 4
- MGI PhotoSuite 4 – Photo Viewer
- MGI PhotoSuite 4 – Read Me
- MGI Photovista – MGI Photovista
- MGI Photovista – Photovista Readme
N.B.: the inform ation given above will vary when the installation has
N.B.:
N.B.: the location or name may vary in the Control Panel of different
been altered by the user (for example, not everything has been
installed or locations other than the default locations have been
selected).
differences may also result from the use of new drivers available
on the Internet.
operating systems.
14 Troubleshooting
Procedure
1.
2.
Read the solutions listed below
Check the latest FAQs, drivers and manuals on
the Internet (www.trust.com/13948)
!
16
Page 21

TRUST 1290Z POWERC@M OPTICAL ZOOM
Messages shown on the LCD display, and solutions
Message Solution
[Card Protected] Memory card is write-protected, remove the card’s write
[Open the Lens
Cover]
[No Image] No images on the memory card.
[Rec Error] Problems have arisen with saving the image. Switch on
[Card Error] The camera cannot format the memory card. Use a
Table 10: messages shown on the LCD display
Problem
The camera has
no power.
The camera won’t
take a picture.
The flash doesn’t
work.
The images are
blurry.
protection.
The lens cover is still closed. Open the lens cover.
the camera again.
card reader, or try another memory card.
Cause
The camera is switched off.
Memory card full? Backup your images and
Is the camera connected to
a computer?
Is the flash switched on? Check whether the flash is
The batteries may be weak. The flash cannot be charged
The camera or subject was
moving when the shot was
taken.
Adjustment of the lens focus Check that the lens is
Possible solution
Press the power button to
switch on the camera.
The batteries are
discharged. Replace the
batteries with new ones.
Refer to the section on
batteries.
The batteries are inserted
incorrectly. Check the
battery orientation. Refer to
the section on batteries.
delete unwanted images, or
format the memory card.
The camera’s buttons are
not operational whilst
connected to a computer.
Disconnect the camera to
take photos.
set to automatic, or to
always on. Refer to the
section on the flash.
if the batteries are almost
empty. Switch off the
camera, and wait a few
seconds before switching it
on again. If this doesn’t
solve the problem then
replace the batteries.
Hold the camera still;
if so required, use a tripod.
Use the self-timer.
focused correctly.
UK
17
Page 22

TRUST 1290Z POWERC@M OPTICAL ZOOM
Problem Cause Possible solution
Windows ME and
Windows 2000: An
"Unsafe Removal
Device Detected"
error message
appears when the
USB cable is
unplugged from
the computer.
If you still have problems after trying these solutions, please contact one of the Trust
Customer Care Centers. You can find more information on t he back of this instruction
manual. Please have the following information available.
The item number, in this instance: 13948;
•
An accurate description of the precise nature of the problem;
•
An accurate description of precisely when the problem occurs
•
Use if the "Safe Removal of
USB Device" procedure is
recommended when
removing USB devices.
Procedure:
a. Right-click the
Unplug or Eject hardware
icon displayed at the bottomright of your computer’s
monitor.
b. Left-click the Unplug
or Eject hardware text box to
open the 'Unplug or Eject
Hardware' screen.
c. Select the device to
be disconnected from the
'Unplug or Eject Hardware'
screen, and then click the
Stop button to call the 'Stop
a Hardware device'
confirmation screen.
d. Select the device to
be stopped from the 'Stop a
Hardware device'
confirmation screen, and
click OK to call the 'Safe To
Remove Hardware'
confirmation.
e. Disconnect the cable
to the digital camera.
18
Page 23

TRUST 1290Z POWERC@M OPTICAL ZOOM
15 Technical specifications
Image Sensor Type: CCD
Digital zoom 2x for taking photos
Still image capture 2272 x 1704 (photo)
Colour TFT LCD Size: 1.6” Resolution: 280 x 220
Self-timer Automatic, with menu compensation +/-1.50
Preset mode Auto White Balance
Flash mode Auto
File format JPEG compression
Computer Interface USB 1.1
Video-output NTSC & PAL
Power source 2 x AA (Alkaline, NiMH, Lithium)
Storage interface SD card socket support
Dimensions Body: 106 x 63 x 40mm
Regulation and
Certification
Resolution: 4M pixels
4x for playback, in 1.0 increments
1600 x 1200 (Standard)
1280 x 960 (Basic)
640 x 480 (Economy)
0.25 increments
Daylight
Fluorescent
Incandescent lamp
On
Off
Red-eye reduction
EXIF 2.2 file format
CE
UK
19
Page 24

TRUST 1290Z POWERC@M OPTICAL ZOOM
16 Warranty conditions
- Our products have a two-year manufacturer's warranty which is effective from
the date of purchase.
- If there is a fault, return the product to your dealer. Include an explanation of
the fault, the proof of purchase and all the accessories.
- During the warranty period, you will receive a similar model, if one is available.
If no similar product is available, your product will be repaired.
- Please contact our help desk for missing components, such as t he instruction
manual, software or other components.
- The warranty becomes invalid if the device has been opened, if there is
mechanical damage, if the device has been misused, if alterations have been
made to the device, if the device has been repaired by a third party, in the
case of negligence or if the device has been used for a purpose other than
that originally intended.
- Excluded from the warranty:
Damage caused by accidents or disasters, such as fire, flood,
•
earthquakes, war, vandalism or theft.
Incompatibility with other hardware/software which is not stated in the
•
minimum system requirements.
Accessories, such as batteries, fuses (if applicable).
•
- Under no circumstances will the manufacturer be held responsible for any
incidental or consequential damage, including the loss of incom e or other
commercial losses resulting from the use of this product.
20
Page 25

CUSTOMER CARE CENTERS
24 HOURS free service: www.trust.com
Residents in the UK and Ireland should contact:
Mon - Fri
From 8:00 - 16:00
I residenti in Italia possono contattare:
lun - ven
9:00 - 13:00 /
14:00 -18:00
Les habitants de la France et de l’Afrique du Nord peuvent contacter :
Lundi-vendredi
De 9:00 à 17:00
Kontaktadresse für Einwohner Deutschlands:
Mo – Fr
9:00 - 17:00
Los habitantes de Espa ña pueden ponerse en con tacto con:
lun – viernes
De las 9:00 a las
17:00 horas
Osoby mieszkające na terytorium Polski powinny skontaktować si ę:
Od pon. do pt.
w godz 09:00-17:00
Inwoners van Nederland kunnen contact opnemen met:
ma – vr
9:00 - 17:00 uur
All other countries / Alle anderen Länder / Tous les autr es pays
Tutti gli altri paesi / Todos lo s demás países / Alle andere l anden
Mon - Fri
From 9:00 - 17:00
UK Office
Phone +44-(0)845-6090036
Fax +31-(0)78-6543299
Ufficio italiano
Telefono +39-051-6635947
Fax +39-051-6635843
Bureau français
Téléphone +33-(0)825-083080
Fax +31-(0)78-6543299
Deutsche Geschäftsstelle
Telefon 0800-00TRUST (0800-0087878)
Fax +31-(0)78-6543299
Oficina española
Teléfono +34-(0)902-160937
Fax +31-(0)78-6543299
Biuro w Polska
Tel +48-(0)22-8739812
Fax +31-(0)78-6543299
Kantoor Nederland
Telefoon 0800-BELTRUST (0800-23587878)
Fax +31-(0)78-6543299
European Head Office
Phone +31-(0)78-6549999
Fax +31-(0)78-6543299
L I F E I S M O R E ! T R U S T U S T R U S T . C O M
 Loading...