

Page 1
Benchtop AC Ionizer
Installation, Operation, and Maintenance
Ionizers are useful in preventing electrostatic charge
generation, electrostatic discharge, electrostatic
attraction, as well as preventing equipment latch-up.
Per ANSI/ESD S20.20 section 6.2.3.1. Protected
Areas Requirement states: “Ionization or other charge
mitigating techniques shall be used at the workstation
to neutralize electrostatic fields on all process essential
insulators if the electrostatic field is considered
a threat.” “Air ionization can neutralize the static
charge on insulated and isolated objects by producing
separate charges in the molecules of the gases of
the surrounding air. When an electrostatic charge is
present on objects in the work environment, it will be
neutralized by attracting opposite polarity charges from
the ionized air. Note that ionization systems should
not be used as a primary means of charge control on
conductors or people.” (Reference: EN 61340-5-2:1
clause 5.2.9)
User Guide
TB-8003
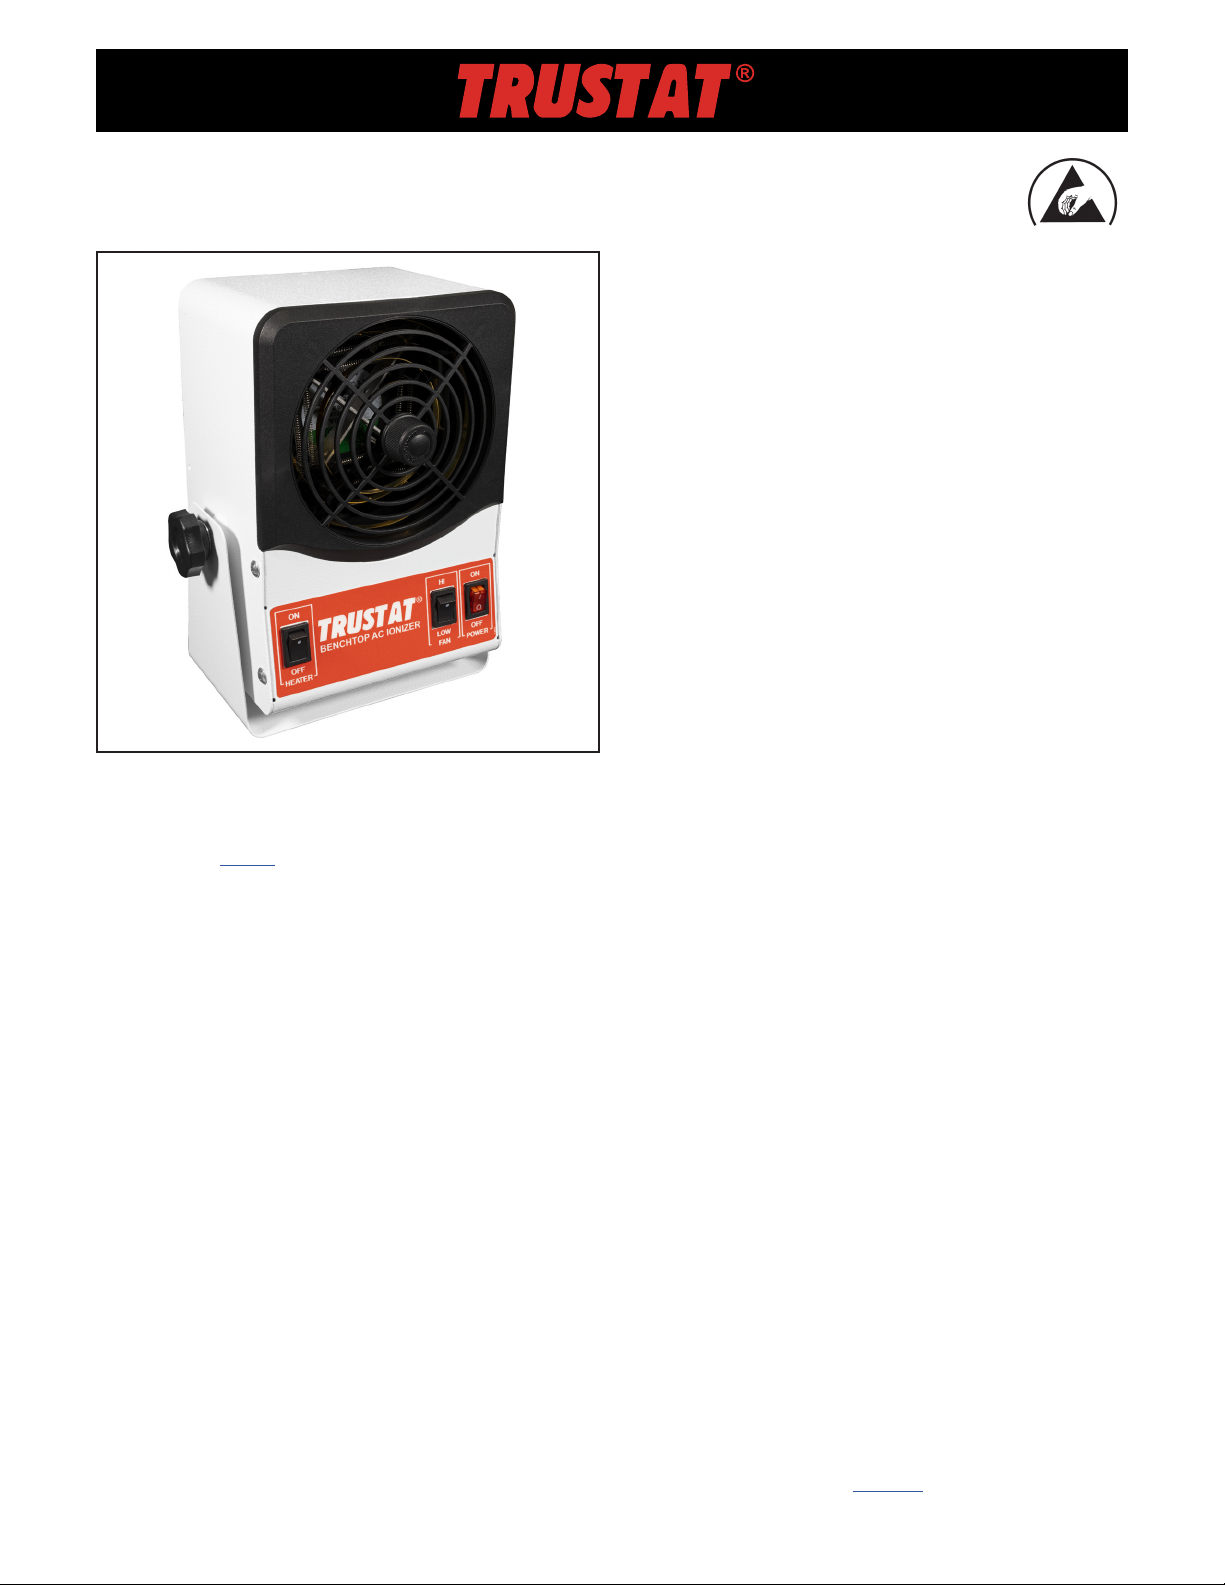
Figure 1. Trustat® 19550 Benchtop AC Ionizer
Description
The Trustat® 19550 Benchtop AC Ionizer is used for
neutralizing electrostatic charges on insulators and
ungrounded conductors. Its discharge times
(< 1 second at 12") and ±10 Volt offset voltage meet
the required limits of ANSI/ESD S20.20 and ESD
TR53. The Trustat® Benchtop AC Ionizer generates
AC high voltage to produce an airflow rich in positive
and negative ions. The fan speed is controlled by a
two-state rocker switch for low (52 CFM) and high (76
CFM) airflow. The low wattage heating element can be
enabled to improve operator comfort. The emitters can
be quickly and regularly cleaned by fully rotating and
releasing the knob located over the center of the fan.
The Trustat® Benchtop AC Ionizer features a powder
coated steel enclosure and stand.
“The primary method of static charge control is direct
connection to ground for conductors, static dissipative
materials, and personnel. A complete static control
program must also deal with isolated conductors
that cannot be grounded, insulating materials (e.g.,
most common plastics), and moving personnel who
cannot use wrist or heel straps or ESD control flooring
and footwear. Air ionization is not a replacement for
grounding methods. It is one component of a complete
static control program. Ionizers are used when it is not
possible to properly ground everything and as backup
to other static control methods. In clean rooms, air
ionization may be one of the few methods of static
control available.” (ESD Handbook ESD TR20.20
Ionization, section 5.3.6.1 Introduction and Purpose /
General Information)
Packaging
1 Trustat® Benchtop AC Ionizer
1 Snap-on Filter Retainer
1 Air Filter
1 Power Cord with North America Plug, 6 ft.
1 Certificate of Calibration
TB-8003 Page 1 of 5
DESCO EAST - One Colgate Way, Canton, MA 02021-1407 • (781) 821-8370 • Website: Desco.com
November 2021
DESCO WEST - 3651 Walnut Avenue, Chino, CA 91710 • (909) 627-8178
© 2021 DESCO INDUSTRIES INC
Employee Owned
Page 2
Features and Components
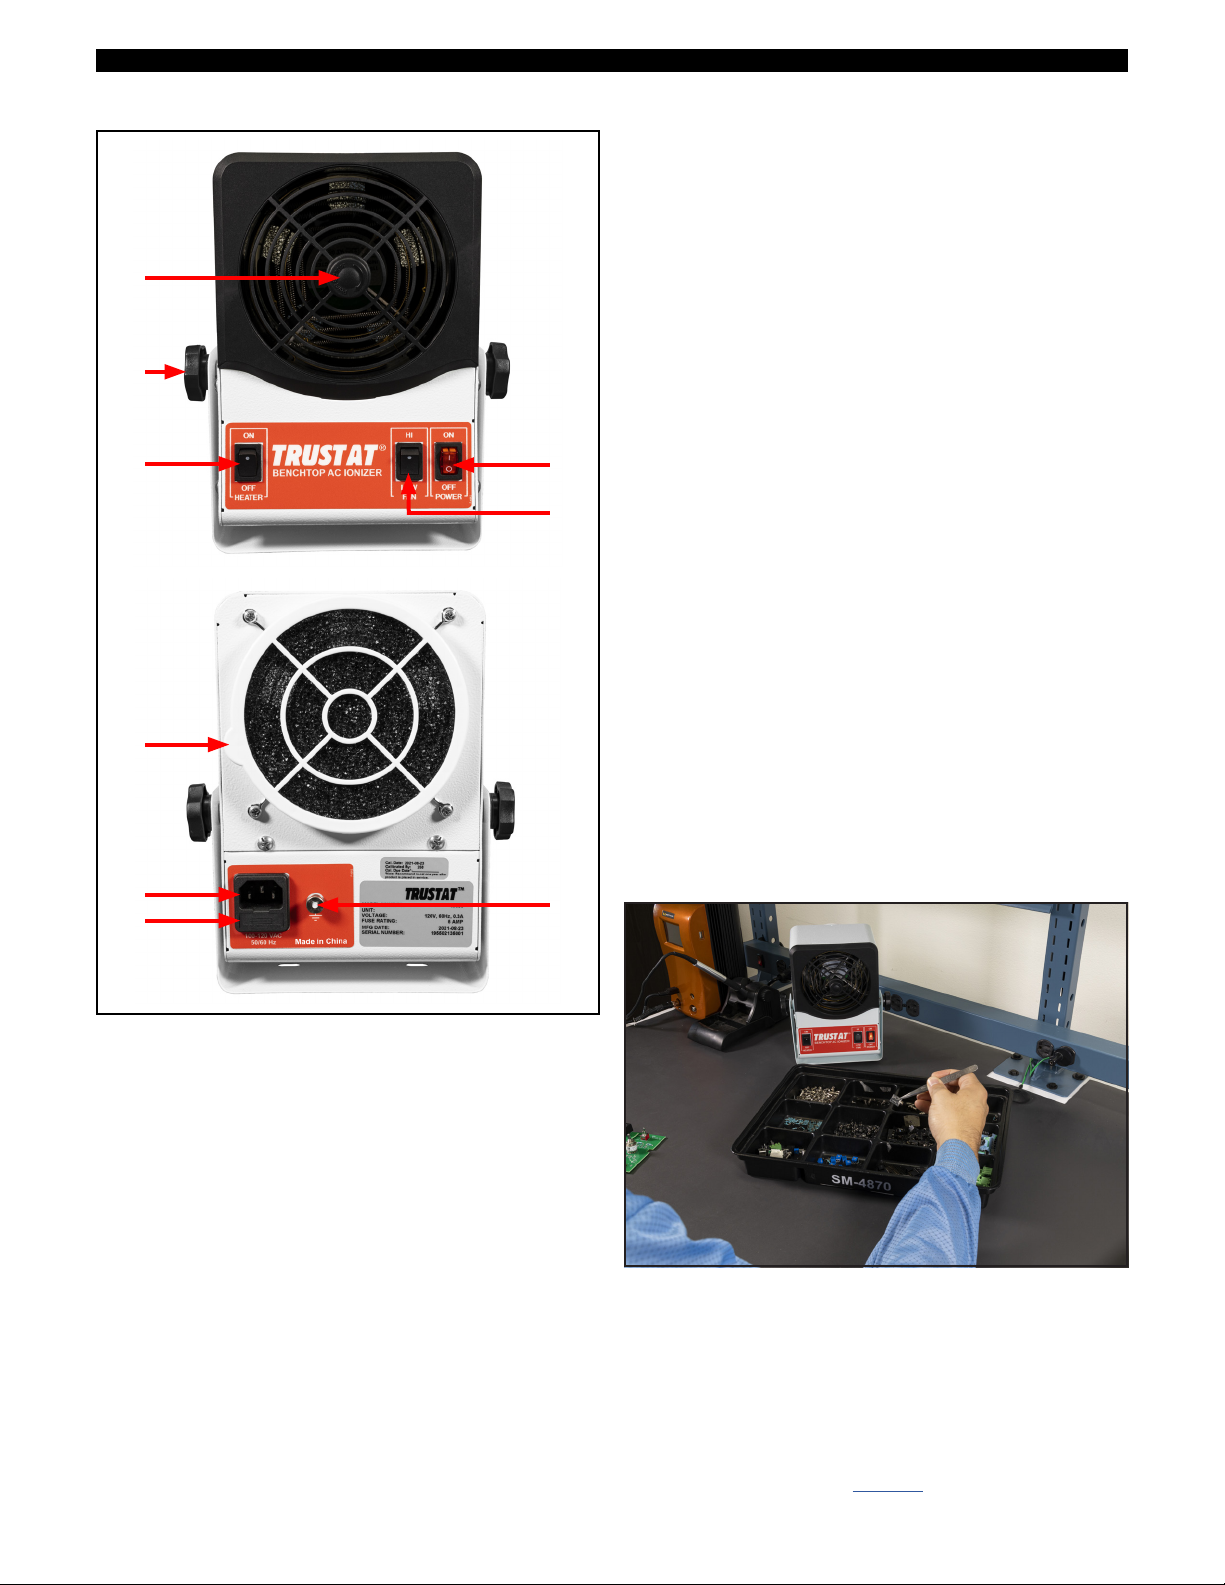
E. Fan Speed Switch: Toggle the switch up to set the
fan speed to HIGH. Toggle the switch down to set the
fan speed to LOW.
F. Snap-on Filter Retainer: Use the snap-on retainer
to install the filter onto the air-intake grill at the back of
the ionizer.
A
B
C D
F
G. Power Inlet: Connect the power cord here.
H. Fuseholder: Stores the 5 A slow-blow fuse for
powering the ionizer.
I. Ground Terminal: For best performance, the
blower chassis-ground terminal and all worksurfaces in
proximity to the target (i.e. wokbench, ESD mat) should
always be wired to a reliably earthed electrical point.
Installation
E
Place the unit at a desired location where the airflow
will not be restricted. Use the tilt lock knobs to aim the
ionizer at the area to be neutralized. Ensure that the
power switch is set to OFF. Connect the ionizer’s power
cord into an appropriate AC power source.
Operation
1. Position the ionizer so that maximum airflow is
directed towards the items or area to be neutralized.
2. Turn the unit ON. The power LED will illuminate and
remain solid.
3. Set the fan speed switch to the desired setting.
Higher airflow will result in faster discharge times.
G
H
I
Figure 2. Trustat® Benchtop Ionizer features and
components
A. Emitter Point Cleaner Knob: Remove the cap
to expose the balance offset voltage adjustment
potentiometer. Turn the potentiometer clockwise
for positive adjustment. Turn the potentiometer
counter-clockwise for negative adjustment.
B. Tilt Lock Knob: Loosen and tighten the two knobs to
tilt the ionizer and alter its direction of airflow.
C. Heater Switch: Toggle the switch up to turn the
heater ON. Toggle the switch down to turn the heater
OFF.
D. Power Switch: Toggle the switch up to turn the
ionizer ON. Toggle the switch down to turn the ionizer
OFF.
4. Use the heater switch as desired to enable the
heater for operator comfort.
Figure 3. Using the Trustat® Benchtop Ionizer at a
workstation
TB-8003 Page 2 of 5
DESCO EAST - One Colgate Way, Canton, MA 02021-1407 • (781) 821-8370 • Website: Desco.com
DESCO WEST - 3651 Walnut Avenue, Chino, CA 91710 • (909) 627-8178
© 2021 DESCO INDUSTRIES INC
Employee Owned
Page 3

Figure 4. Using the Trustat® Benchtop Ionizer at a
machine station
Maintenance
Under normal conditions the ionizer will attract dirt and
dust, especially on the ionizing electrodes. To maintain
optimum neutralization efficiency and operation,
cleaning should be performed on a regular basis.
Maintenance at least once a month is recommended
to preserve optimum neutralizing performance. The
ionizing electrodes can be quickly and regularly cleaned
by fully rotating and releasing the Emitter Point Cleaner
Knob located over the center of the grill on the front
panel of the blower.
If necessary, the unit may be disassembled for more
extensive maintenance and cleaning beyond that
described above.
NOTE: The AC power cord MUST be disconnected
before the unit can be disassembled for
maintenance.
First, turn the unit OFF and unplug the power cord.
Unthread and remove 3 Phillips head screws on each
side and 2 in rear (8 total). The bottom/base chassis
plate and ionization-circuit subassembly can next be
separated from the top/cover chassis plate and fan.
If necessary, the heater-element subassembly and the
ionizer subassembly may be separated from the air-exit
grill subassembly after first unthreading 4 Phillips-head
screws, and then removing the 4 black ionizer retaining
clips freed by the screw removal.
Similarly, the fan may be separated from the chassis
top by unthreading the 4 corner retaining nuts inside the
chassis. Wires may be disconnected at fast-on terminals
(i.e. fan, ionizer subassembly) for further disengagement
if necessary. Take careful note of all wire and terminal
positions before disconnection to correctly reassemble
the unit after cleaning.
The emitter pin electrodes may be cleaned using a
Q-Tip type cotton swab or a soft nylon toothbrush
dampened with IPA (Isopropyl alcohol). Clean the
blades of the fan and other accessible internal surfaces
using a soft-bristle brush or cloth agitator and/or
compressed air.
Use caution when cleaning inside the blower. The
ionizing electrodes are sharp.
After cleaning, reassemble all internal components and
subassemblies and reconnect all wiring as required.
Reengage the bottom and top blower sections and
fasten by fully threading the 8 external chassis screws.
Plug in the power cord and turn the unit back ON.
An air-intake filter and retainer have been provided for
some applications and/or environments outside of the
Cleanroom and Medical Industries. Users in more dirty
manufacturing environments should install the filter
onto the air-intake grill (on rear panel of unit) using the
snap-on retainer to keep the inside of the blower clean.
This filter should be changed every 2 to 4 weeks or as
needed per a visual inspection.
The balance of the unit is intrinsic due to its floating
ionization circuit. Hence, balance and long-term drift are
nominally zero for a normally functioning unit. Periodic
cleaning is beneficial for maintaining minimum discharge
times. Both the discharge time and balance may be
tested using a charged plate analyzer.
DESCO WEST - 3651 Walnut Avenue, Chino, CA 91710 • (909) 627-8178
DESCO EAST - One Colgate Way, Canton, MA 02021-1407 • (781) 821-8370 • Website: Desco.com
TB-8003 Page 3 of 5
© 2021 DESCO INDUSTRIES INC
Employee Owned
Page 4
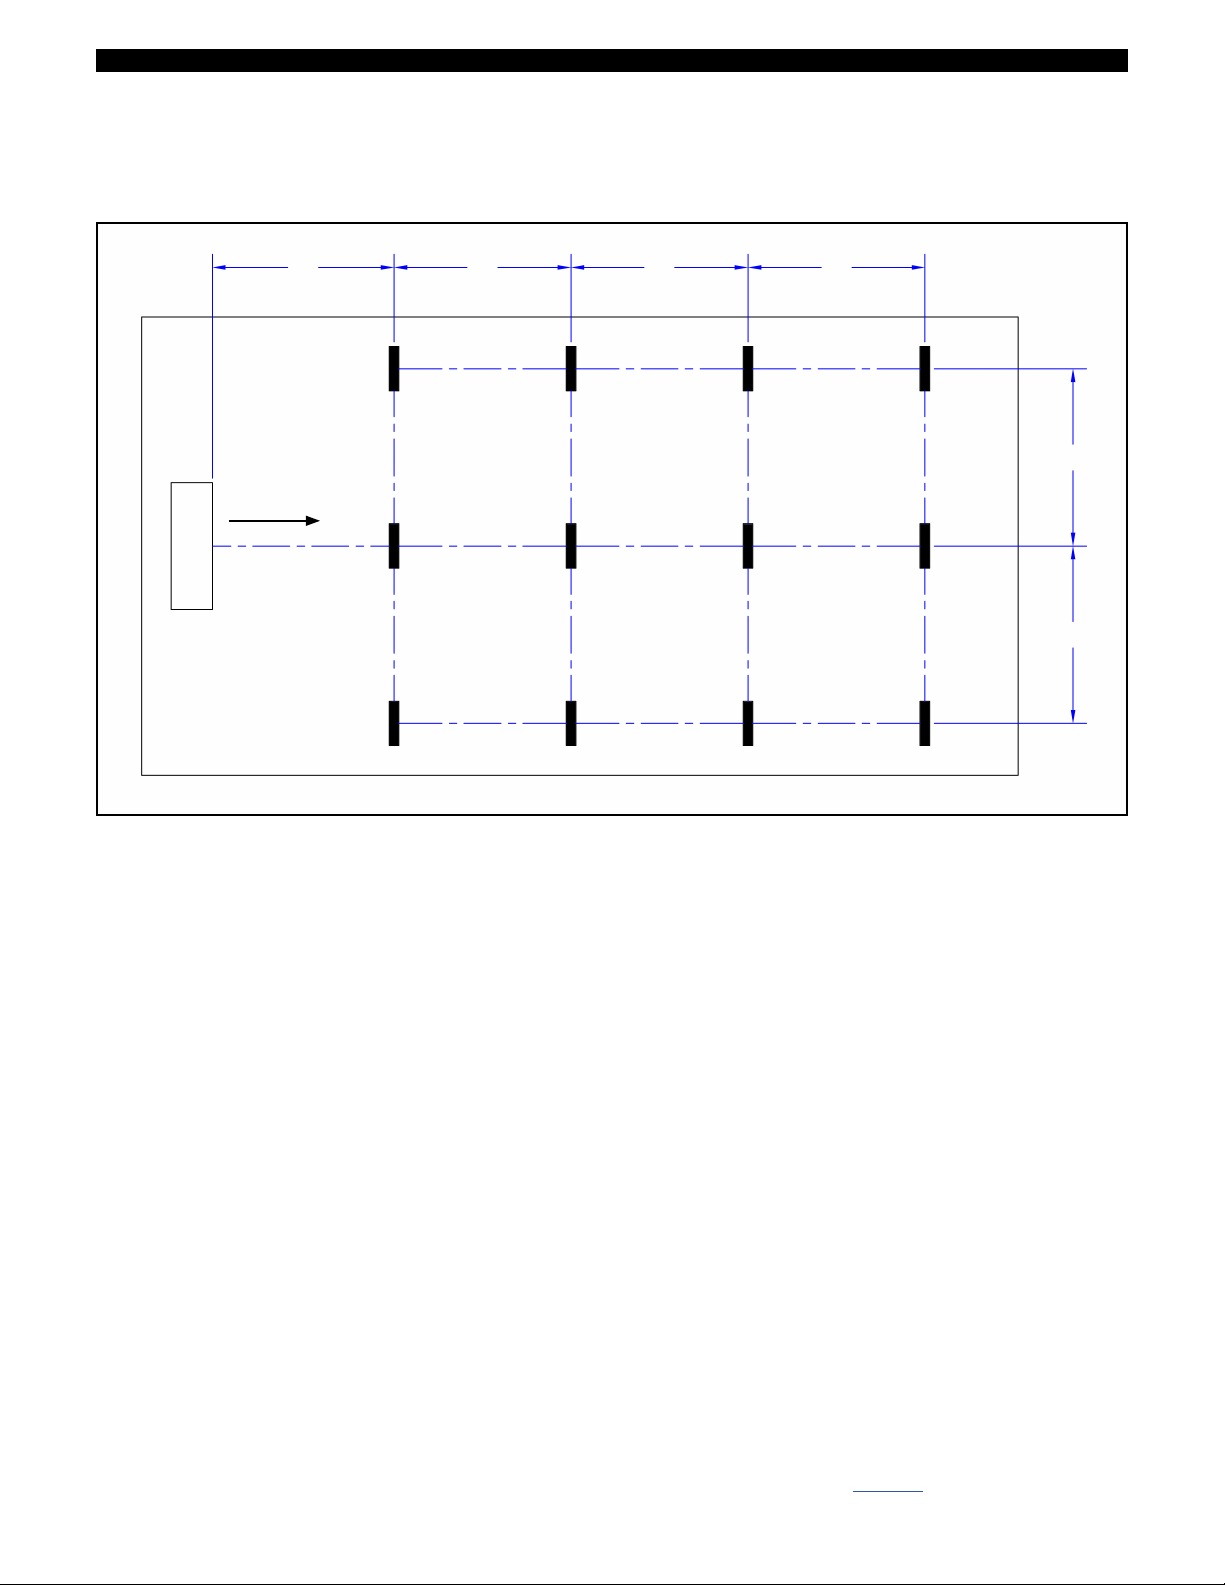
Neutralization (Discharge) Times
All data was taken without an air filter installed and the fan speed set to high. All measurements are in seconds.
NOTE: Discharge times in seconds are representative only and are not a guarantee. Discharge times are actual
measurements recorded in a factory ambient environment.
12"
TP1 >60
Charged Plate
>60
12" 12" 12"
TP4 >60
>60
Air Flow
TP2 +1.4
-1.9
TP5 +2.6
-3.1
Trustat® AC
Benchtop Ionizer
TP3 >60
>60
TP6 >60
>60
Figure 5. Neutralization (discharge) times at 120 VAC, 60 Hz input
TP7 +17.9
-23.7
TP8 +3.8
-4.7
TP9 >60
>60
TP10 +15.5
-16.5
12"
TP11 +5.5
-6.8
12"
TP12 >60
>60
TB-8003 Page 4 of 5
DESCO EAST - One Colgate Way, Canton, MA 02021-1407 • (781) 821-8370 • Website: Desco.com
DESCO WEST - 3651 Walnut Avenue, Chino, CA 91710 • (909) 627-8178
© 2021 DESCO INDUSTRIES INC
Employee Owned
Page 5
12"
12" 12" 12"
Charged Plate
Air Flow
Trustat® AC
Benchtop Ionizer
TP1 >60
>60
TP2 +2.3
-2.9
TP3 >60
>60
TP4 >60
>60
TP5 +3.9
-4.4
TP6 >60
>60
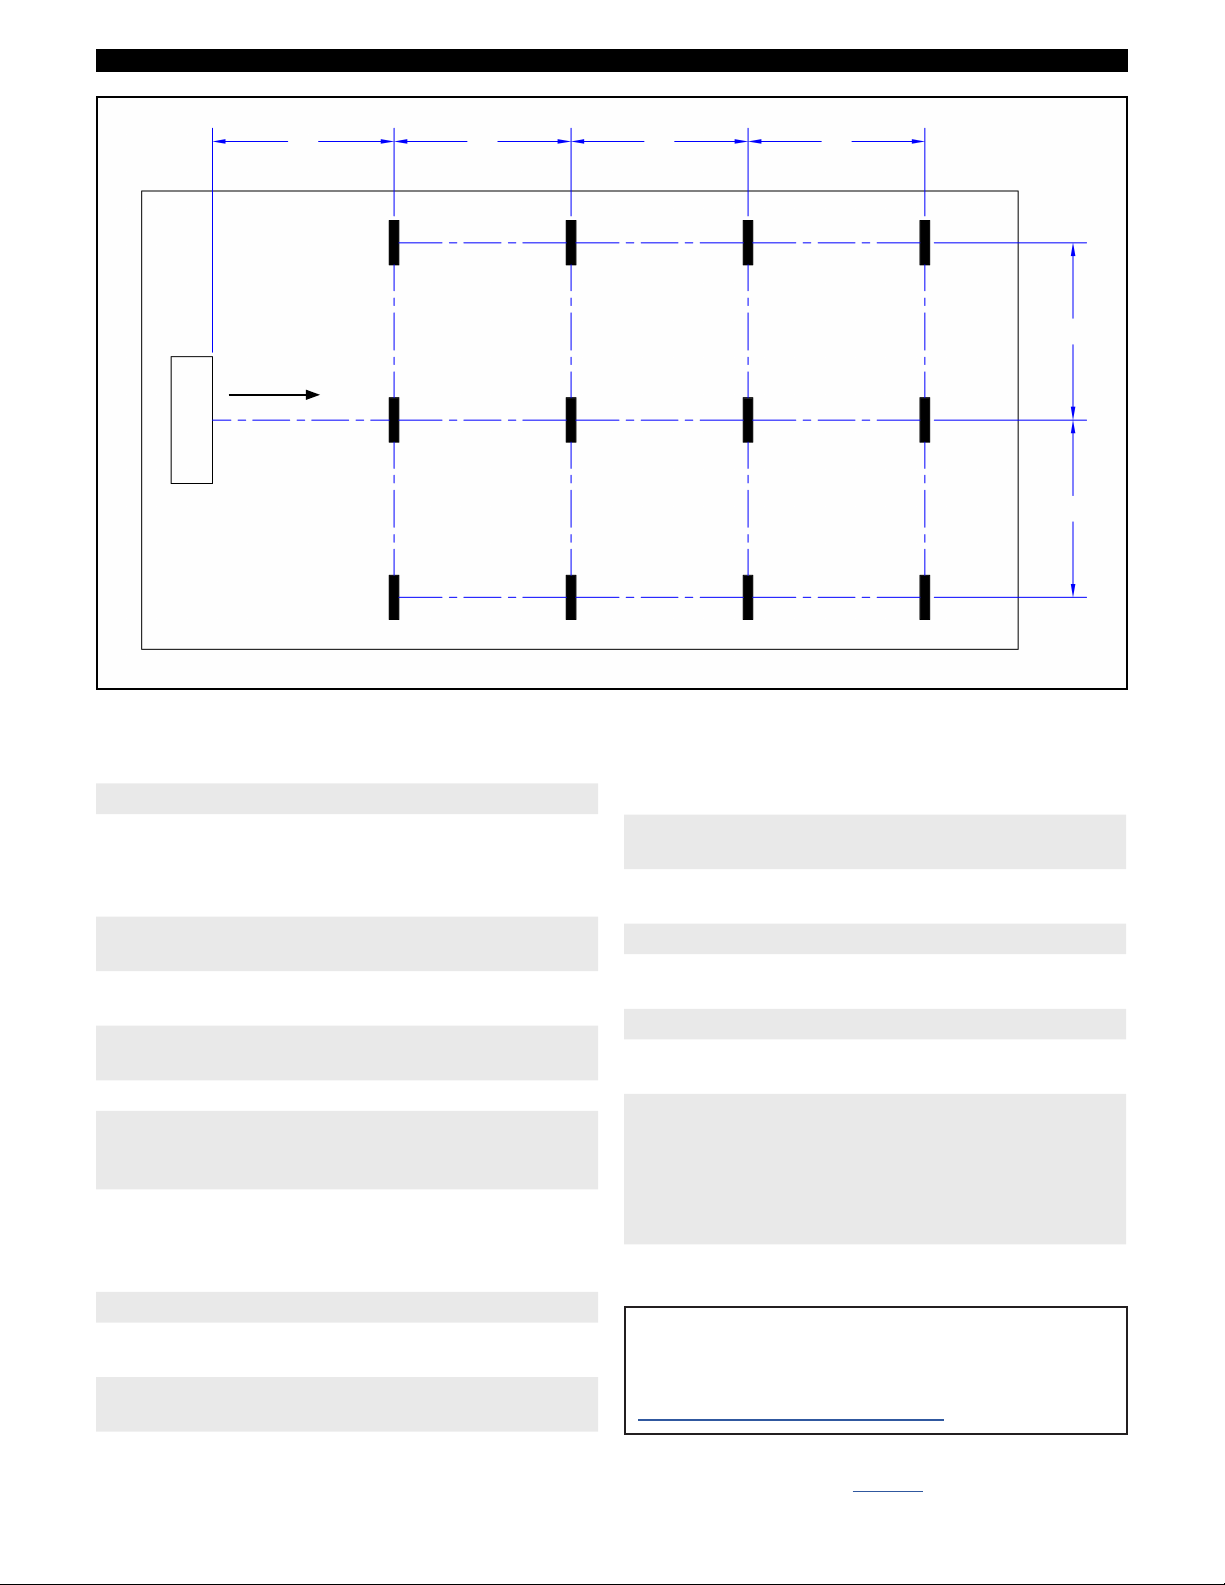
Figure 6. Neutralization (discharge) times at 100 VAC, 50 Hz input
Specifications
Input Voltage 100-120 VAC, 50/60 Hz
Input Current 1.9 A (heater ON, fan HIGH)
1.8 A (heater ON, fan LOW)
0.3 A (heater OFF, fan HIGH)
0.2 A (heater OFF, fan LOW)
Air Velocity
(on fan center axis)
600 FPM (fan HIGH @ 1 ft.)
420 FPM (fan LOW @ 1 ft.)
Air Delivery Rate 76 CFM (fan HIGH)
52 CFM (fan LOW)
Ionization Balance ±10 V typical
(65° to 80° F, 15% to 65% RH)
Ionization Voltage 60 Hz AC, AC coupled
Ionization Emitter Radial configuration, 10
stainless steel electrodes with
fine ground terminal radius
Heated Air 15° F rise above ambient
(fan LOW, 6 in.)
8° F rise above ambient
(fan HIGH, 12 in.)
HV Generator Isolation transformer
Input Wiring IEC-320 C14 AC inlet with
fuseholder
Input Cord NEMA 5-15P to IEC-320 C13,
6 ft.
Input Fuse 5A slow-blow
Chassis Steel enclosure, powder-coated
Air Filter (Optional) Open cell polyurethan foam
Ozone 0.01 ppm (fan LOW, 6 in.)
Audible Noise 54 dBA SPL (fan LOW, 1 ft.)
Weight 7.1 lbs. (3.2 kg)
Dimensions
(with stand & knobs)
Mounting Benchtop tilt-adjusted stand
Country of Origin China
Limited Warranty, Warranty Exclusions, Limit
of Liability and RMA Request Instructions
See the Desco Warranty -
Desco.com/Limited-Warranty.aspx
TP7 >60
>60
TP8 +5.7
-6.8
TP9 >60
>60
TP10 +49.8
>60
12"
TP11 +8.5
-11.4
12"
TP12 +55.5
-50.2
epoxy/polyester paint finish
(30 pores per in.)
61 dBA SPL (fan HIGH, 1 ft.)
9" x 7.5" x 5.25"
(229 mm x 191 mm x 133 mm)
with locking knobs, black
polymer feet; can also be wall
mounted or shelf mounted
using slots in stand and 2
screw (1/4" thread)
TB-8003 Page 5 of 5
DESCO EAST - One Colgate Way, Canton, MA 02021-1407 • (781) 821-8370 • Website: Desco.com
DESCO WEST - 3651 Walnut Avenue, Chino, CA 91710 • (909) 627-8178
© 2021 DESCO INDUSTRIES INC
Employee Owned
 Loading...