

Page 1
UK
WB-5600R MEGAPIXEL USB2 WEBCAM LIVE
DE
FR
IT
ES
PL
NL
PT
GR
DK
SE
HU
CZ
FI
NO
TR
RU
User’s manual
Version 1.0
SK
RO
BU
ZH
Page 2

USER’S MANUAL
1
2
E
F
D
B
A
C
G
Page 3

USER’S MANUAL
3
4
5
Page 4
USER’S MANUAL
6A
6B
2x
1
32
4
Page 5

USER’S MANUAL
1
Product information
A: Adjustable lens ring
B: Light
C: Status LED
D: Multi purpose clamp
E: Microphone
F: Light button
G: USB cable
UK
Installation
1 Place webcam.
2
PC on. Connect USB.
Wait until Windows completes installation automatically.
Use webcam
3
Sign in Windows Live Messenger and use webcam for video calls.
Adjust lens ring untill image is focused. Press backside button to turn ON/OFF light.
4 Close all Live Messenger video options.
5
Place CD in CD-ROM. Install extra software. Follow on-screen instructions.
Windows Vista: Allow and execute all necessary actions.
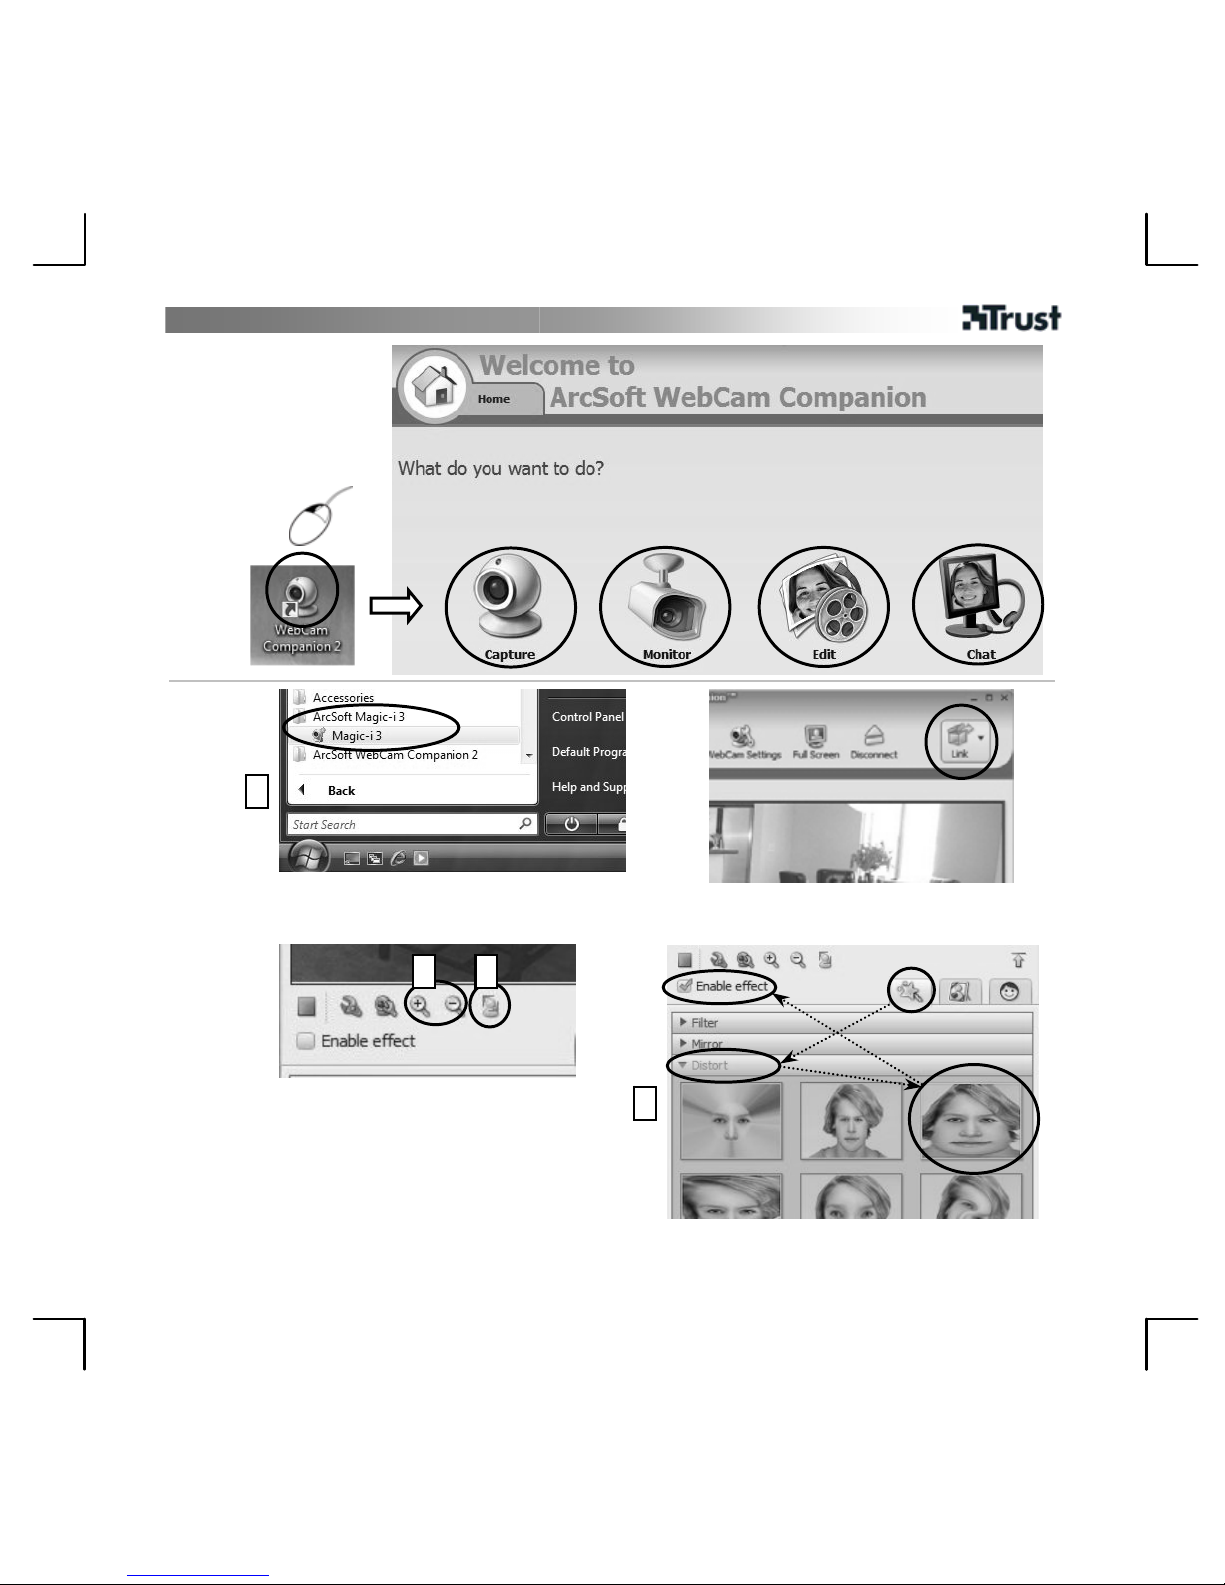
6A Arcsoft Webcam Companion: For capturing video and snapshots, monitoring, editing and chatting.
6B
Arcsoft Magic-I: For special effects and digital zoom.
1. Run: <Start - All Programs - Arcsoft Magic-I>, or <Webcam Companion - Capture - Link>
2. Zoom in / out
3. Face tracking enable / disable
4. Special effect s: <select - enable>
Note
Software
• Use messenger service, like Live Messenger, for video calls. For help and information about Live Messenger
check www.msn.com.
• The extra software is for optional use and may only be available in English.
• To use Magic-I image effects within Live Messenger, Arcsoft Webcam Companion or other video applications:
Run Messenger’s audio and video setup wizard or open capture settings of your other video application and
set “Magic-I Virtual Capture” as video device, instead of regular webcam.
• Use the “Help” option of the softwa re, or read manual on CD if assistance is needed ( only available in
English). See www.arcsoft.com for more info.
General usage
• Make sure there is sufficient light when use the webcam!
• Use soft brush to clean the lens when it’s dusty!
• The webcam cannot be used in more than one application at the time!
• If re-connect the webcam to other USB port, Windows may need to automatically install the webcam again!
Page 6
USER’S MANUAL
2
See www.trust.com/15309 for up-to-date FAQs and instruction manuals. For extensive service, register at
www.trust.com/register.
Safety
• Keep this device away from liquids, such as water.
• Do not open or repair this device.
• This device meets the essential requirements and othe r relevant conditions of the applicable European
directives. The Declaration of Conformity (DoC) is available at www.trust.com/15309/ce.
• If possible, dispose of the device at a recycling centre. Do not dispose of the device with the household
waste.
Warranty & copyright
• This product has a two-year manufac turer's warranty which is effective from the date of purchase. For more
information see www.trust.com/warranty
• Reproduction of this manual or any part of it is prohibited without permission from Trust International B.V.
Page 7

BENUTZERHANDBUCH
1
Produktinformation
A: Verstellbarer Linsenring
B: Licht
C: Status LED
D: Mehrzweckhalterung
E: Mikrofon
F: Lichtknopf
G: USB-Kabel
DE
Installation
1 Webcam aufstellen.
2
PC starten. USB anschließen.
Warten, bis Windows die Installation automatisch durchgeführt hat.
Webcam verwenden
3
Melden Sie sich an bei Windows Live Messenger und nutzen Sie die Webcam für Videoa nrufe.
Linsenring anpassen, bis Bild korrekten Fokus aufweist. Knopf auf der Rückseite drücken, um das Licht
EIN/AUS zu schalten.
4 Alle Live Messenger Video-Optionen schließen.
5
CD in CR-ROM einlegen. Zusatzsoftware installieren. Folgen Sie den Bildschirmanweisungen.
Windows Vista: Alle notwendigen Aktionen zulassen bzw. durchführen.
6A
Arcsoft Webcam Companion: Für Videoaufnahmen und Schnappschüsse, Überwachung, Bearbeitung und
Chats.
6B
Arcsoft Magic-I: Für Spezialeffekte und Digitalzoom.
1. Ausführen: <Start - Programme - Arcsoft Magic-I>, oder <Webcam Companion - Capture - Link>
2. Herein- / Herauszoomen
3. Gesichtstracking ein / aus
4. Spezialeffekte: <Auswahl - Aktivieren>
Hinweise
Software
• Messenger-Dienst, zum Beispiel Live Messenger, für Videoanrufe verwenden. Für Hilfe und Informatio nen
über Live Messenger siehe www.msn.com.
• Die Verwendung der zusätzlichen Software ist optio nal und evt. nur in englischer Sprache verfügbar.
• Zur Verwendung der Magic-I Bildeffekte unter Live Messenger, Arcsoft Webcam Companion oder anderen
Video-Anwendungen:
Führen Sie den Audio- und Video-Installa tionsassistenten des Messenger aus, oder öffnen Sie di e
Einstellungen Ihrer Video-Anwendung und legen Sie “Magic-I Virtual Cap ture” anstelle der normalen
Webcam als Videogerät fest.
• Verwenden Sie die "Hilfe"-Option der Software oder lesen Sie für w eitere Unterstützung das auf CD
mitgelieferte Handbuch (nur in englischer Sprache verfügbar). Siehe www.arcsoft.com für weitere
Informationen.
Allgemeine Verwendung
• Sorgen Sie während der Verwendung der Webcam für ausreichend es Licht!
• Eine verstaubte Linse ist mit einem weichen Pinsel zu reinigen!
Page 8

BENUTZERHANDBUCH
2
• Die Webcam kann gleichzeitig nur unter einer Anwendung verwendet werden!
• Beim Anschluss der Webcam an einen anderen USB-Port wird Windows die Web c am eventuell erneut
automatisch installieren!
Siehe www.trust.com/15309 für aktuelle FAQ und Bedienungsanleitungen. Für erweiterte Serviceleistungen
registrieren Sie sich unter www.trust.com/register.
Sicherheit
• Halten Sie das Gerät von Flüssigkeiten, wie z. B. Wasser, fern.
• Öffnen Sie das Gerät nicht und führen Sie keine Reparaturen an d iesem Gerät aus.
• Dieses Gerät entspricht den grundlegenden Anforderungen und anderen relevanten Bedingungen der
einschlägigen europäischen Richtlinien. Die Konformitätserklärung (DoC) können Sie unter
www.trust.com/15309/ce nachlesen.
• Geben Sie das Gerät wenn möglich bei einem Recyclingcenter ab. Das Gerät darf nicht zusammen mit dem
normalen Haushaltsabfall entsorgt werden.
Garantie und Urheberrecht
• Für dieses Produkt gilt eine Herstellergarantie von 2 Jahren, die Garantiefrist geht am Ankaufsdat um ein.
Weitere Informationen finden Sie unter www.trust.com/warranty.
• Diese Anleitung darf ohne Genehmigung von Trust International B.V. weder ganz noch auszugsweise
vervielfältigt werden.
Page 9
MANUEL D’UTILISATION
1
Informations sur les produits
A : Bague d’objectif réglable
B : Lumière
C : Témoin d’état
D : Fixation polyvalente
E : Microphone
F : Bouton lumière
G : Câble USB
Installation
1 Positionnez la Webcam.
2
Ordinateur allumé. Connectez le câble USB.
Attendez que Windows achève automatiquement l’installation.
FR
Utilisation de la Webcam
3
Ouvrez une session dans Windows Live Messenger et utilisez la Webcam pour des appels vidéo.
Réglez la bague d’objectif jusqu’à la mise au point de l'image. Appuyez sur le bouton à l’arrière pour
ALLUMER/ETEINDRE la lumière.
4 Fermez toutes les options vidéo de Live Messenger.
5
Insérez le CD dans le lecteur de CD-ROM. Installez le logiciel additionnel. Suivez les instructions à l'écran.
Windows Vista : acceptez et exécutez toutes les actions nécessaires.
6A Arcsoft Webcam Companion : pour la capture de vidéo et d’instantanés, l’édition et le chat.
6B
Arcsoft Magic-I : pour des effets spéciaux et des zooms numériques.
1. Exécuter : <Démarrer (Start) – Tous les programmes (All Programs) - Arcsoft Magic-I>, ou <Webcam
Companion - Capturer (Capture) – Lien (Link)>
2. Zoom avant/arrière
3. Activer/désact iver suivi du visage
4. Effets spéciaux : <sélectionner (select) – activer (enable)>
Note
Logiciel
• Utilisez un service de messagerie tel que Live Messenger pour les appels vidéo. Pour de l’aide et des
informations sur Live Messenger, rendez-vous sur www.msn.com.
• Le logiciel additionnel est facultatif ; il se peut qu’il soit disponible uniquement en anglais.
• Pour utiliser des effets d’image Magic-I dans Live Messenger, Arcsoft Webcam Companion ou d’autres
applications vidéo :
Exécutez l’assistant d’installation audio et vidéo de Messenger ou ouvrez les paramètres de capture de
votre autre application vidéo, puis définissez “Magic-I Virtual Capture” en tant qu’appareil vidéo, au lieu de
la Webcam habituelle.
• Utilisez l’option “Aide” (Help) du logiciel ou lisez le manuel sur le CD si vous avez besoin d’assistance
(disponible uniquement en anglais). Voir www.arcsoft.com pour plus d’informations.
Utilisation générale
• Veillez à ce que l’éclairage soit suffisant en utilisant la Webcam !
• Utilisez une brosse souple pour nettoyer l’objectif lorsque celui-ci est poussiéreux !
• La Webcam ne peut pas être utilisée dans plus d’une application à la fois !
Page 10

MANUEL D’UTILISATION
2
• Si vous reconnectez la Webcam à un autre port USB, il se peut que Windows doive installer à nouveau la
Webcam automatiquement !
Pour les mises à jour de la FAQ et des manuels d’instructions, rendez-vous sur www.trust.com/15309. Pour un
service étendu, enregistrez-vous à l’adresse suivante : www.trust.com/register.
Sécurité
• Tenez cet appareil à l’écart de tout liquide, tel que l’eau.
• N’ouvrez pas et ne réparez pas cet appareil vous-même.
• Ce produit répond aux principales exigences et autres dispositions pert inentes des directives européennes en
vigueur. La Déclaration de Conformité (DoC) est disponible à l’adresse suivante : www.trust.com/15309/ce.
• Si possible, mettez l’appareil au rebut dans un centre de recyclage. N’éliminez pas l’appareil avec les déchets
ménagers.
Garantie et copyright
• Ce produit bénéficie d’une garantie d’usine valable deux ans à compter de la date d’achat. Pour plus
d’informations, voir www.trust.com/warranty.
• Toute reproduction de ce manuel, en totalité ou en partie, est interdite sans l’autorisation de Trust
International B.V.
Page 11

MANUALE DELL'UTENTE
1
Informazioni sul prodotto
A: messa a fuoco regolabile
B: luce
C: LED di stato
D: morsetto polifunzionale
E: microfono
F: pulsante per la luce
G: cavo USB
Installazione
1 Posizionare la webcam.
2
Accendere il PC. Collegare la presa USB.
Attendere che Windows completi automaticamente l'installazione.
IT
Utilizzo della webcam
3
Effettuare l’accesso a Windows Live Messeng er e utilizzare la webcam per le video chiamate.
Regolare la ghiera dell’obiettivo fino a ottenere un’immagine nitida. Premere il pulsante sul retro per
attivare o disattivare la luce.
4 Chiudere tutte le opzioni video di Live Messenger.
5
Inserire il CD nell'apposito lettore. Installare il software aggiuntivo. Seguire le istruzioni che appariranno
sullo schermo.
Windows Vista: lasciare che il sistema operativo esegua le azioni pr eviste.
6A
Arcsoft Webcam Companion: da usare per creare video e fotografie, per il fotoritocco, ma anche per
chattare e come sistema di monitoraggio.
6B
Arcsoft Magic-I: per gli effetti speciali e lo zoom digitale.
1. Eseguire: <Start - Tutti i programmi - Arcsoft Magic-I> (Start - All Programs - Arcsoft Magic-I) oppure
<Webcam Companion - Cattura - Link> (Webca m Co mpanion - Capture - Link).
2. Zoom avanti e indietro.
3. Attiva/disattiva sistema di rilevamento automatico del volto.
4. Effetti speciali: <seleziona - a b ilita> (select - enable).
N.B.:
Software
• Utilizzare un servizio di messaggistica istantanea come Live Messenger per effettuare video chiamate. Per
maggiori informazioni su Live Messenger, consultare il sito Web www.msn.com.
• L’installazione del software aggiuntivo non è obbligatoria (è possibile che il soft ware sia disponibile solo in
inglese).
• Per utilizzare gli effetti di Magic-I con Live Messenger, Arcsoft Webcam Companion o altre applicazioni video:
avviare il programma di configurazione guidata delle opzioni audio e video di Messenger oppure aprire le
impostazioni di cattura dell’applicazione video in uso e impostare “Magic-I Virtual Capture” come dispositivo
video al posto della webcam.
• Se necessario, consultare la guida del software per l’assist enza oppure il manuale presente su CD (disponibile
solo in inglese). Per maggiori informazioni, consultare il sito Web www.arcsoft.com.
Utilizzo
• Assicurarsi che durante l'uso della webcam vi sia luce a sufficienza.
Page 12

MANUALE DELL'UTENTE
2
• Utilizzare una spazzola morbida per pulire il sensore ottico se impolverato.
• La webcam non può essere utilizzata in più d i un'applicazione alla volta.
• Se la webcam viene ricollegata a un'altra porta USB, è probabile che Windows debba reinstallarla
automaticamente.
Controllare le FAQ e i manuali aggiornati presenti all'indirizzo www.t rust.com/15309. Per un'assistenza
completa, registrarsi all'indirizzo www.trust.com/register.
Sicurezza
• Tenere il dispositivo lontano dai liquidi, come ad esempio l’acqua.
• Non aprire o riparare da soli il prodotto.
• Il presente dispositivo è conforme agli standard essenziali e alle altre normative pertinenti dei regolamenti
europei applicabili. La Dichiarazione di Conformità (DoC) è consultabile al seguente indirizzo Internet:
www.trust.com/15309/ce.
• Se possibile, smaltire il dispositivo in un centro di riciclaggio. Non gettare il dispositivo tra i rifiuti domestici.
Garanzia e copyright
• Il prodotto dispone di una garanzia di fabbrica di due anni a partire dalla data di acquisto. Per ulteriori
informazioni visitare il sito www.trust.com/warranty.
• È proibito riprodurre il presente manuale, in toto o in parte, senza l'esplicito consenso di Trust Intern ational
B.V.
Page 13
MANUAL DEL USUARIO
1
Información del producto
A: Anillo de objetivo ajustable
B: Iluminación
C: LED de estado
D: Abrazadera multipropósitos
E: Micrófono
F: Botón de iluminación
G: Cable USB
Instalación
1 Coloque la webcam.
2
Encienda el PC. Conecte el cable USB.
Espere a que Windows haya completado la instalación automática.
Uso de la webcam
3
Regístrese en Windows Live Messenger y utilice la webcam para videollamadas.
Ajuste el anillo del objetivo hasta que la imagen esté enfocada. Pulse el botón en la part e trasera para
ENCENDER/APAGAR la luz.
4 Cierre todas las opciones de video de Live Messenger.
5
Inserte un CD en la unidad de CD-ROM. Instale un software ad icional. Siga las instrucciones en la pantalla.
Windows Vista: Permita y ejecute todas las acciones necesarias.
6A Arcsoft Webcam Companion: Para capturar video e instantáneas, monitorizar, editar y chatear.
6B
Arcsoft Magic-I: Para efectos especiales y zoom digital.
1. Ejecutar: <Inicio – Todos los Programas - Arcsoft Magic-I>, o <Webcam Companion - Captura -
Enlace>
2. Ampliar / reducir
3. Activar/ desact ivar seguimiento de caras
4. Efectos especiales: <seleccionar - activar>
ES
Nota
Software
• Utilice un servicio Messenger, como Live Messenger, para las videollamadas. Para ayuda e información acerca
de Live Messenger visite www.msn.com.
• El software adicional es para uso opcional y es posible que esté sólo disponible en inglés.
• Para usar los efectos de imagen Magic-I con Live Messenger, Arcsoft Webcam Companion u otra aplicación
de video:
Ejecute el asistente de Messenger para configuración de audio y video o abra las configuraciones de
captura de su otra aplicación de video defina “Magic-I Virtual Capture” como dispositivo de video, en lugar
de la webcam regular.
• Utilice la opción “Ayuda” del software, o lea el manual del CD si necesita asistencia (sólo disponible en
inglés). Visite www.arcsoft.com para más información.
Uso general
• ¡Asegúrese de que haya suficiente iluminación cuando utilice la webcam!
• ¡Utilice un cepillo suave para quitar el polvo del objetivo!
• ¡No es posible utilizar la webcam para más de una aplicación a la vez !
Page 14
MANUAL DEL USUARIO
2
• ¡Si vuelve a conectar la webcam a otro puerto USB, es posible que Windows tenga que volver a realizar la
instalación automática de la webcam!
En www.trust.com/15309 encontrará la versión más actualizada de los manuales de instrucciones y de las
preguntas frecuentes. Para un extenso servicio, regístrese en www.trust.com/register.
Seguridad
• Mantenga este dispositivo alejado de líquidos, como el agua.
• No intente abrir ni reparar usted mismo el producto.
• Este producto cumple los requisitos y condiciones esenciales de la normativa europea vigente. La Declaración
de Conformidad (DoC) está disponible en www.trust.com/15309/ce.
• Si es posible, lleve el dispositivo a un centro de reciclaje. No tire el dispositivo a la basura.
Garantía y copyright
• Este producto tiene una garantía de fabricación de 2 años a partir de la fecha de compra. Para obtener más
información al respecto, consulte www.trust.com/warranty.
• Se prohíbe la reproducción total o parcial de este manual sin la autorización de Trust International B.V.
Page 15
INSTRUKCJA OBSŁUGI
1
PL
Informacje na temat produktu
A: Regulowany pierścień obiektywu
B: Lampa błyskowa
C: Kontrolka stanu
D: Zaczep wielofunkcyjny
E: Mikrofon
F: Przycisk lampy błyskowej
G: Kabel USB
Instalacja
1 Umieść kamerę.
2
Włącz komputer. Podłącz kabel USB.
Poczekaj, aż Windows automatycznie zakończy instalację.
Korzystanie z kamery
3
Zapisz się w Windows Live Messenger i korzystaj z kamery do wykonywania rozmów wideo.
Ustaw pierścieniem obiektywu wymaganą ostrość. Naciśnij przycisk z tyłu, aby włączyć lub wyłączyć lampę
błyskową.
4 Zamknij wszystkie opcje wideo Live Messenger.
5
Umieść płytę w napędzie CD-ROM. Zainstaluj dodatkowe oprogramowanie. Wykonuj polecenia pojawiające
się na ekranie.
Windows Vista: Wykonaj wszystkie wymagane działania.
6A UArcsoft Webcam CompanionU: Zapisywanie wideo i zdjęć, monitorowanie, edycja i chat.
6B
UArcsoft Magic-IU: Efekty specjalne i zoom cyfrowy.
1. Wykonaj: <Start - Wszystkie programy - Arcsoft Magic-I>, lub <Webcam Companion - Capture - Link>
2. Zoom - przybliżenie i oddalenie (in/out)
3. Śledzenie twarzy włączenie/ wyłączenie (enable/disable)
4. Efekty specjalne: <select - enable> (wybierz - włącz)
UUwaga
Oprogramowanie
• Do rozmów wideo korzystaj z usługi np. Live Messenger. Pomoc i informacje na temat Live Messenger
znajdziesz na stronie www.msn.com.
• Dodatkowe oprogramowanie jest opcjonalne i może być dostępne tylko w j. angielskim.
• Aby korzystać z efektów Magic-I w Live Messenger, Arcsoft Webcam Companion lub innym programie wideo:
Uruchom kreatora ustawień audio i wideo w Messenger lub otwórz ustawienia zdjęć innego programu
wideo i ustaw „Magic-I Virtual Capture” jako urządzenie wideo zamiast kamery internetowej.
• W razie potrzeby skorzystaj z opcji pomocy (Help) programu lub przeczytaj instrukcję obsługi na dysku CD
(tylko w j. angielskim). Więcej informacji znajduje się na stronie www.arcsoft.com.
Zasady eksploatacji
• Upewnij się, że oświetlenie podczas używania kamery jest wystarczające!
• Do czyszczenia obiektywu z kurzu używaj miękkiej szczoteczki!
• Z kamery nie można korzystać w kilku aplikacjach jednocześnie!
• Jeśli kamera zostanie podłączona do innego portu USB, Windows może automatycznie zainstalować kamerę
ponownie!
Page 16

INSTRUKCJA OBSŁUGI
2
Na stronie www.trust.com/15309 znajdziesz najnowsze odpowiedzi na pytania i instrukcje obsługi. Aby uzyskać
większy zakres usług zarejestruj się na stronie www.trust.com/register.
Środki bezpieczeństwa
• Chroń urządzenie przed kontaktem z wodą lub innymi cieczami.
• Urządzenia nie wolno ani otwierać ani naprawiać.
• Niniejszy produkt spełnia wszystkie najważniejsze wymogi i przepisy obowiązujących dyrektyw Unii
Europejskiej. Deklaracja zgodności (DoC) znajduje się na stronie www.trust.com/15309/ce.
• W miarę możliwości prosimy o utylizację produktu w zakładzie odzysku odpadów. Urządzenia nie należy
wyrzucać razem z odpadkami domowymi.
Gwarancja i prawa autorskie
• Ten produkt posiada 2 lata gwarancji fabrycznej, licząc od dnia zakupu. Więcej informacji znajdziesz na
stronie www.trust.com/warranty
• Niniejsza instrukcja nie może być kopiowana w całości lub w części bez zezwolenia firmy Trust International
B.V.
Page 17

GEBRUIKERSHANDLEIDING
1
Productinformatie
A: Instelbare lensring
B: Licht
C: Status-LED
D: Multifunctionele klem
E: Microfoon
F: Licht-knop
G: USB-kabel
Installatie
1 Plaats de webcam.
2
Schakel de pc in. Sluit de USB-kabel aan.
Wacht tot Windows de installatie automatisch heeft voltooid.
Webcam gebruiken
3
Start Windows Live Messenger en gebruik de webcam voor videogesprekken.
Stel de lensring in tot het beeld scherp is. Druk op de knop aan de achterzijd e om het licht in- of uit te
schakelen.
4 Sluit alle video-opties van Live Messenger.
5
Plaats de cd-rom in het cd-r om-station. Installeer de extr a software. Voer de instructies op het scherm uit.
Windows Vista: voer alle noodzakelijke activiteiten uit.
6A Arcsoft Webcam Companion: voor het vastleggen van video en foto’s, waarnemen, bewerken en chatten.
6B
Arcsoft Magic-I: voor speciale effecten en digitaal in- en uitzoomen.
1. Uitvoeren: <Start - Alle programma’s - Arcsoft Magic-I> of <Webcam Companion - Vastleggen
(Capture) - Koppeling (Link)>
2. In-/uitzoomen
3. Face tracking in-/uitschakelen
4. Speciale effecten: <select eren ( select) - inschakelen (enable)>
NL
Opmerking
Software
• Gebruik een berichtdienst, zoals Live Messenger, voor videogesprekken. Raadpleeg www.msn.com voor de
Help en informatie over Live Messenger.
• De extra software is voor optioneel gebruik en is wellicht alleen in het Engels beschikbaar.
• Om beeldeffecten van Magic-I te gebruiken binnen Live Messenger, Arcsoft Webcam Companion of andere
videotoepassingen: start de installatiewizard voor audio en video van Messenger of de instellingen voor
vastleggen van uw videotoepassing en stel ‘Magic- I Virtual Capture’ in als videoapparaat in plaats van als
gewone webcam.
• Gebruik de Help van de software of lees de handleiding op de cd-rom als u hulp nodig hebt (alleen in het
Engels beschikbaar). Ga naar www.arcsoft.com voor meer informatie.
Algemeen gebruik
• Zorg dat er voldoende licht is bij het gebruik van de webcam.
• Reinig de lens als die vuil is met een zachte borstel.
• Bij de webcam kunnen niet meerdere toepassingen tegelijk worden gebruikt .
Page 18

GEBRUIKERSHANDLEIDING
2
• Als de webcam op een andere USB-poort wordt aangesloten, moet de webcam wellicht opnieuw worden
geïnstalleerd.
Zie www.trust.com/15309 voor bijgewerkte veelgestelde vragen en instructiehandleidingen. Registreer u voor
uitgebreide service op www.trust.com/register.
Veiligheid
• Houd het apparaat uit de buurt va n vloeistoffen, zoals water.
• Probeer dit apparaat niet t e openen of te repareren.
• Dit product voldoet aan de essentiële eisen en aan de overige relevante bepalingen van de geldende
Europese richtlijnen. De Verklaring van Conformiteit (DoC) is beschikbaar op www.trust.com/15309/ce.
• Lever het apparaat indien mogelijk na gebruik in bij een inzamelplaats voor hergebruik. Gooi het apparaat
niet weg bij het huishoudafval.
Garantie en copyright
• Dit product heeft twee jaar garantie, ingaande op de aankoopdatum. Ga voor meer informatie naar
www.trust.com/warranty
• Het is verboden om zonder toestemming van Trust International B.V. deze handleiding of d elen d aarvan te
reproduceren.
Page 19

MANUAL DO UTILIZADOR
1
Informações sobre o produto
A: Anel ajustável da objectiva
B: Luz
C: LED de estado
D: Clipe multi-funções
E: Microfone
F: Botão de luz
G: Cabo USB
Instalação
1 Coloque a webcam.
2
Ligue o PC. Ligue o USB
Aguarde até o Windows terminar a instalação automaticamente.
Utilizar a webcam
3
Inicie a sessão no Windows Live Messenger e use a webcam para chamadas de vídeo.
Ajuste o anel da lente até a imagem estar focada. Prima o botão posterior para ligar (ON) /desligar (OFF) a
luz.
4 Feche todas as opções de vídeo do Live Messenger.
5
Coloque o CD no CD-ROM Instale o software extra. Siga as instruções apresentadas no ecrã.
Windows Vista: Permita e execute todas as acções necessárias.
6A Arcsoft Webcam Companion: Para capturar video e fotografias, monitorizar, editar e conversa r.
6B
Arcsoft Magic-I: Para efeitos especiais e zoom digital.
1. Executar: <Iniciar (Start) – Todos os programas (All Programs) - Arcsoft Magic-I>, ou <Webcam
Companion - Capture - Link>
2. Aproximar a imagem/Afastar a imagem.
3. Activar / desactivar acompanhamento de faces
4. Efeitos especiais: <seleccionar (select) – activar (enable)>
PT
Nota
Software
• Utilize um serviço de mensagens, tal como o Live Messenger, para videoconferência. Para ajuda e informação
acerca do Live Messenger consulte www.msn.com.
• O software extra destina-se a utilização opcional e pode estar disponível apenas em inglês.
• Para utilizar os efeitos de imagem do Magic-I dentro do Live Messenger, Arcsoft Webcam Companion ou
outras aplicações de vídeo:
Execute o assistente de configuração de vídeo e áudio ou abra as definições de captura da aplicação de
vídeo e defina “Magic-I Virtual Capture” como dispositivo de vídeo, em lugar da webcam regular.
• Use a opção de “Ajuda” (Help) do software, ou leia o manual no CD se precisar de assistência (apenas
disponível em inglês). Consulte www.arcsoft.com para obter mais informações.
Utilização geral
• Quando utiliza a webcam, certifique-se de que há luz suficiente!
• Utilize uma escova suave para limpar a objectiva quando estiver com poeira!
• A Webcam não pode ser usada em mais de uma aplicação ao mesmo tempo!
Page 20

MANUAL DO UTILIZADOR
2
• Se voltar a ligar a câmara a outra porta USB, o Windows pode necessitar de instalar automaticamente a
câmara de novo!
Visite www.trust.com/15309 para perguntas mais frequentes (FAQ) actualizadas e manua is de instruções. Para
um serviço extensivo registe-se em www.trust.com/register.
Segurança
• Mantenha este dispositivo longe de líquidos como a água.
• Não abra nem repare este dispositivo
• Este dispositivo cumpre os requisitos essenciais e outras condições relevantes das directivas europeias
aplicáveis. A Declaração de Conformidade (DoC) encontra-se disponível no site www.trust.com/15309/ce.
• Se possível, elimine o dispositivo num centro de reciclagem. Não elimine o dispositivo com o lixo doméstico.
Garantia e direitos de autor
• Este produto tem uma garantia de fábrica de 2 anos a contar da data de aquisição. Para mais informações,
consulte www.trust.com/warranty.
• A reprodução deste manual ou qualquer parte do mesmo está proibida sem a autorização da Trust
International B.V.
Page 21

ΕΓΧΕΙΡΙ∆ΙΟ ΧΡΗΣΗΣ
1
Πληροφορίες προϊόντος
A: Ρυθμιζόμενος δακτύλιος φακού
B: Φωτεινή ένδειξη
C: LED κατάστασης
D: Πολυλειτουργικός σφιγκτήρας
E: Μικρόφωνο
F: Κουμπί φωτός
G: Καλώδιο USB
Εγκατάσταση
1 Τοποθετήστε τη webcam.
2
Ανοίξτε τον υπολογιστή. Συνδέστε το USB.
Περιμένετε έως ότου τα Windows ολοκληρώσουν αυτόματα την εγκατάσταση.
Χρήση webcam
3
Συνδεθείτε στο Windows Live Messenger και χρησιμοποιήστε τη webcam για κλήσεις μέσω βίντεο.
Ρυθμίστε το δακτύλιο του φακού έως ότου εστιάσετε στην εικόνα. Πατήστε το κουμπί backside για να
ανάψετε (ON)/σβήσετε (OFF) το φως.
4 Κλείστε όλες τις επιλογές βίντεο του Live Messenger.
5
Βάλτε το CD στη μονάδα CD-ROM. Εγκαταστήστε το πρόσθετο λογισμικό. Ακολουθήστε τις οδηγίες στην
οθόνη.
Windows Vista: Επιτρέψτε και εκτελέστε όλες τις απαραίτητες ενέργειες.
6A Arcsoft Webcam Companion: Για βίντεο και στιγμιότυπα, παρακολούθηση, επεξεργασία και chat.
6B
Arcsoft Magic-I: Για ειδικά εφέ και ψηφιακή μεγέθυνση.
1. Εκτελέστε: <Start/Έναρξη - All Programs/Όλα τα προγράμματα - Arcsoft Magic-I>, ή <Webcam
Companion - Capture - Link>
2. Μεγέθυνση / σμίκρυνση
3. Ενεργοποίηση/απενεργοποίηση παρακολούθηση όψης
4. Ειδικά εφέ: <select - enable> (επιλέξτε – ενεργοποίηση)
GR
Σημείωση
Λογισμικό
• Χρησιμοποιήστε μια υπηρεσία messenger, όπως το Live Messenger, για κλήσεις μέσω βίντεο. Για βοήθεια και
πληροφορίες σχετικά με το Live Messenger, δείτε τη διεύθυνση www.msn.com.
• Το πρόσθετο λογισμικό είναι για προαιρετική χρήση και διατίθεται μόνο στα Αγγλικά.
• Για να χρησιμοποιήσετε τα εφέ του Magic-I στο Live Messenger, Arcsoft Webcam Companion ή άλλες
εφαρμογές βίντεο:
Εκτελέστε τον οδηγό εγκατάστασης ήχου και βίντεο του Messenger ή ανοίξτε τις ρυθμίσεις της άλλης
εφαρμογής βίντεο και ρυθμίστε το “Magic-I Virtual Capture” ως συσκευή βίντεο, αντί για την κανονική σας
webcam.
• Χρησιμοποιήστε την επιλογή «Βοήθεια» του λογισμικού ή διαβάστε το εγχειρίδιο στο CD αν χρειάζεστε
βοήθεια (διατίθεται μόνο στα Αγγλικά). Για περισσότερες πληροφορίες, δείτε www.arcsoft.com.
Γενική χρήση
• Βεβαιωθείτε ότι υπάρχει αρκετό φως όταν χρησιμοποιείτε τη webcam!
• Χρησιμοποιήστε μια μαλακιά βούρτσα για να καθαρίσετε το φακό, αν είναι σκονισμένος!
Page 22

ΕΓΧΕΙΡΙ∆ΙΟ ΧΡΗΣΗΣ
2
• Η webcam δεν μπορεί να χρησιμοποιηθεί σε περισσότερες από μία εφαρμογές ταυτόχρονα!
• Αν συνδέσετε τη webcam σε κάποια άλλη θύρα USB, τα Windows ίσως εγκαταστήσουν αυτόματα τη webcam
ξανά!
∆είτε την ιστοσελίδα www.trust.com/15309 για ενημερωμένες Συνήθεις Ερωτήσεις και εγχειρίδια οδηγιών. Για
εκτενή εξυπηρέτηση εγγραφείτε στη διεύθυνση www.trust.com/register.
Ασφάλεια
• ∆ιατηρήστε αυτή τη συσκευή μακριά από υγρά, π.χ. νερό.
• Μην ανοίγετε ή επισκευάζετε τη συσκευή αυτή μόνοι σας.
• Αυτή η συσκευή πληροί τις ουσιώδεις απαιτήσεις και τους λοιπούς σχετικούς όρους των ισχυουσών
ευρωπαϊκών οδηγιών. Η ∆ήλωση Συμμόρφωσης (DoC) διατίθεται στη διεύθυνση: www.trust.com/15309/ce.
• Αν είναι δυνατόν, απορρίψτε τη συσκευή σε κάποιο κέντρο ανακύκλωσης. Μην απορρίψετε τη συσκευή στα
οικιακά απόβλητα.
Εγγύηση και πνευματικά δικαιώματα
• Αυτό το προϊόν παρέχεται με εργοστασιακή εγγύηση δύο ετών, η οποία τίθεται σε ισχύ από την ημέρα
αγοράς. Για περισσότερες πληροφορίες, δείτε www.trust.com/warranty.
• Απαγορεύεται η αναπαραγωγή αυτού του εγχειριδίου ή οποιουδήποτε μέρους του χωρίς την άδεια της Trust
International B.V.
Page 23

BRUGERMANUAL
1
DK
Produktoplysninger
A: Justerbar linsering
B: Lys
C: Statusindikator
D: Flerfunktionsklemme
E: Mikrofon
F: Lysknap
G: USB-kabel
Installation
1 Placer webcam.
2
Tænd pc'en. Tilslut USB.
Vent, til installationen gennemføres automatisk af Windows.
Anvendelse af webcam
3
Log på Windows Live Messenger, og brug webcam'et til videoopkald.
Justér på linseringen, til motivet er i fokus. Tænd/sluk for lyset vha. knappen bagpå.
4 Luk alle indstillinger for Live Messenger-video.
5
Placer cd'en i cd-drevet. Installer ekstra software. Følg vejledningen på skærmen.
Windows Vista: Tillad, og udfør alle nødvendige handlinger.
6A UArcsoft Webcam CompanionU: Til optagelse af video og shapshots, overvågning, redigering og chat.
6B
UArcsoft Magic-IU: Til specialeffekter og digital zoom.
1. Kør: <Start - Alle programmer - Arcsoft Magic-I> (<Start - All Programs - Arcsoft Magic-I>) eller
<Webcam Companion - Capture - Link>
2. Zoom ind og ud
3. Aktiver/deaktiver ansigtssporing
4. Specialeffekter: <vælg - akt iver> (<select - ena ble>)
UBemærk!
Software
• Brug Messenger-tjenesten som Live Messenger til videoopkald. Besøg www.msn.com for at få flere
oplysninger om Live Messenger.
• Den ekstra software er frivillig at bruge og findes muligvis kun på engelsk.
• Sådan bruges Magic-I-billedeffekter i Live Messenger, Arcsoft Webcam Companion eller i andre
videoprogrammer:
Kør guiden til opsætning af lyd og video i Messenger, eller åbn optagelsesindstillinger for dit andet
videoprogram, og indstil "Magic-I Virtual Capture" som videoenhed i stedet for almindelig webcam.
• Brug indstillingen Hjælp (Help) i softwaren, eller læs vejledningen på cd'en, hvis du har brug for hjælp
(findes kun på engelsk). Gå til www.arcsoft.com for at få flere oplysninger.
Generel anvendelse
• Sørg for, at der er nok lys, når du anvender webcammet.
• Anvend en blød børste for at rengøre linsen, hvis den er blevet b eskid t.
• Webcammet kan kun bruges i ét program ad gangen.
• Hvis webcam'et sluttes til en anden USB-port, kan der kræves fornyet automatisk installation i Windows.
Page 24

BRUGERMANUAL
2
Gå til www.trust.com/15309 for at finde opdaterede ofte stillede spørgsmål (FAQ) og brugervejledninger. Du
opnår omfattende service ved at lade dig registrere på www.trust.com/register.
Sikkerhed
• Hold enheden væk fra vand og andre væsker.
• Åbn eller reparer ikke selv enheden.
• Enheden opfylder de vigtigste krav og andre relevante betingelser i de anvendte europæiske direktiver.
Overensstemmelseserklæringen (DoC) findes på www.trust.com/15309/ce.
• Bortskaf om muligt enheden på et genbrugsanlæg. Enheden må ikke bortskaffes sammen med
husholdningsaffald.
Garanti og copyright
• Dette produkt har 2 års garanti fra producenten, som gælder fra købsdatoen. Se yderligere oplysninger på
www.trust.com/warranty.
• Reproduktion af denne brugervejledning eller dele af den er ikke tilladt uden tilladelse fra Trust International
B.V.
Page 25

BRUKSANVISNING
1
Produktinformation
A: Justerbar linsring
B: Lampa
C: Statuslampa
D: Flerfunktionsklämma
E: Mikrofon
F: Ljusknapp
G: USB-kabel
Installation
1 Placera webbkameran.
2
Starta datorn. Anslut USB-kabeln.
Vänta tills Windows slutför installationen automa tiskt.
Använda webbkameran
3
Logga in på Windows Live Messenger och använd webbkameran för videosamtal.
Justera linsringen tills bilden är fokuserad. Tryck på knappen på baksidan för att slå på/st änga av lampan.
4 Stäng alla videoalternativ i Live Messenger.
5
Sätt in CD-skivan i CD-ROM-enheten. Installera ytterligare programvara. Följ instruktionerna på skärmen.
Windows Vista: Tillåt och kör alla nödvändiga åtgärder.
6A Arcsoft Webcam Companion: För insamling av video och fotografier, övervakning, redigering och chatt.
6B
Arcsoft Magic-I: För effekter och digital zoom.
1. Kör: <Start - Alla program - Arcsoft Mag ic-I>, eller <Webcam Companion - Capture - Link>
2. Zooma in/ut
3. Aktiver/avaktivera ansiktsspårning
4. Effekter: <välj - aktivera>
SE
Obs!
Programvara
• Använd en meddelandetjänst, t.ex. Live Messenger, för videosamtal. Hjälp och information o m Live
Messenger finns på www.msn.com.
• Användning av extraprogramvara är valfritt. Programvaran kanske endast finns på engelska.
• Använd Magic-I-bildeffekter i Live Messenger, Arcsoft Webcam Companion eller andra videoprogram:
Kör Messengers ljud- och videoinstallationsg uide eller öppna insamlingsinställningar för ditt andra
videoprogram och ställ in “Magic-I Virtual Capture” som videoenhet istället för den vanliga webbkameran.
• Använd alternativet “Help” (hjälp) i programmet eller läs handboken på CD-skivan om du behöver hjälp
(endast tillgänglig på engelska). Mer information finns på www.arcsoft.com.
Allmän användning
• Se till att det finns tillräckligt med ljus när du använder webbkameran!
• Rengör linsen med en mjuk pensel när den blir dammig
• Det går inte att använda webbkameran i mer än ett program åt gången!
• Om webbkameran ansluts till en annan USB-port kanske Windows måste installera webbkameran automatiskt
igen!
Page 26

BRUKSANVISNING
2
Uppdaterade frågor och svar och bruksanvisningar på www.trust.com/15309. För att få tillgå ng t ill omfattande
service registrerar du dig på www.trust.com/register.
Säkerhet
• Håll enheten borta från vätskor, t.ex. vatten.
• Enheten får inte öppnas eller repareras.
• Den här enheten uppfyller kraven och relevanta villkor i gällande europeiska direktiv.
Överensstämmelsedeklarationen (Declaration of Conformity) finns på www.trust.com/15309/ce.
• Avfallshantering: Returnera enheten till en återvinningsstation, om så är möjligt. Släng inte enheten i
hushållssoporna.
Garanti och upphovsrätt
• Den här produkten har två års garanti som gäller från inköpsdatum. För mer information, se
www.trust.com/warranty.
• Reproduktion av den här bruksanvisningen, eller någon del av den, utan tillstånd från Trust International B.V.
är förbjuden.
Page 27

KEZELŐI ÚTMUTATÓ
1
Termékismertető
A: Állítható fókuszáló gyűrű
B: Fény
C: Állapotjelző LED
D: Univerzális bilincs
E: Mikrofon
F: Fényerő gomb
G: USB-kábel
Telepítés
1 Helyezze el a webkamerát.
2
Kapcsolja be a számítógépet. Csatlakoztassa a készüléket az USB csatlakozóhoz
Várjon, amíg a Windows elvégzi az automatikus telepítést.
A webkamera használata
3
Jelentkezzen be a in Windows Live Messenger programba, és használja videohívásokhoz a webkamerát.
A fókuszáló gyűrűt addig mozgassa, míg éles képet nem kap. A fényerő be-/kikapcsolásához nyomja meg
a hátoldalon található gombot.
4 Zárja be a Live Messenger minden videóval kapcsolatos lehetőségét.
5
Helyezze be a CD-lemezt a CD-ROM meghajtóba. Telepítse a kiegészítő szoftvert. Kövesse a képernyőn
megjelenő utasításokat.
Windows Vista rendszer esetén: Engedélyezzen és hajtson végre minden szükséges műveletet.
6A
Arcsoft Webcam Companion: Videofelvételek és pillanatképek rögzítéséhez, nyomon követéshez,
szerkesztéshez és chat beszélgetéshez.
6B
Arcsoft Magic-I: Különleges hatások és digitális zoom használatához.
1. Futtatás: <Start - Programok - Arcsoft Magic-I>, vagy <Webcam Companion - Capture - Link>
2. Nagyítás és kicsinyítés
3. Arckövetés engedélyezés / letiltás
4. Különleges effektusok: <kiválasztás - engedélyezés>
HU
Megjegyzés
A szoftver
• Videokonferenciához használjon azonnali üzenetkezelő alkalmazást, mint például a Live Messenger. A Live
Messenger programmal kapcsolatos további tudnivalókat lásd: www.msn.com.
• A kiegészítő szoftvert igény szerint használatba veheti, azonban csak angol nyelven áll rendelkezésre.
• A Magic-I képeffektusok használata Live Messenger, Arcsoft Webcam Companion vagy egyéb
videoalkalmazási programban:
Futtassa a Messenger audio- és videotelepítési varázslóját, vagy nyissa meg egyéb videoalkalmazás
képrögzítési beállításait, és adja meg a „Magic-I Virtual Capture”-t az alapértelmezett webkameraként.
• Szükség esetén használja a szoftver Súgóját, vagy olvassa el a CD-lemezen található felhasználói kézikönyvet
(csak angol nyelven áll rendelkezésre). A további tudnivalókat ld.: www.arcsoft.com.
Általános használat
• Ügyeljen arra, hogy a webkamera használatához elegendő fény álljon rendelkezésre.
• Ha az objektív poros, puha ecsettel tisztítsa!
• A webkamerát egyszerre csak egy alkalmazás használhatja.
Page 28

KEZELŐI ÚTMUTATÓ
2
• Ha a kamerát később másik USB-porthoz csatlakoztatja, a Windows ismét elindíthatja a kamera automatikus
telepítését.
A www.trust.com/15309 weboldalon megtalálhatja a legfrissebb GYFK-t és a felhasználói kézikönyveket.
További szolgáltatásokért regisztráljon a www.trust.com/register weboldalon.
Biztonság
• Ügyeljen arra, hogy az eszköz ne érintkezzen folyadékkal, például vízzel.
• Az eszközt tilos felnyitni vagy saját kezűleg javítani!
• A készülék megfelel a vonatkozó európai irányelvek alapvető követelményeinek és azok egyéb vonatkozó
kikötéseinek. A Megfelelőségi nyilatkozat (DoC) a www.trust.com/15309/ce weboldalon érhető el.
• Az elhasználódott eszközt lehetőség szerint szállítsa újrahasznosító központba. Ne kezelje az eszközt
háztartási hulladékként.
Szavatosság és szerzői jog
• Ez a termék kétéves gyártói garanciával rendelkezik, amely a vásárlás időpontjában lép érvénybe. További
információt a www.trust.com/warranty weboldalon talál
• A Trust International B.V. engedélye nélkül tilos a jelen kézikönyvet vagy annak bármely részét másolni.
Page 29

NÁVOD K OBSLUZE
1
Informace o výrobku
C: Indikátor stavu
A: Nastavitelný prstenec objektivu
B: Světlo
D: Víceúčelová svorka
E: Mikrofon
F: Tlačítko pro světlo
G: Kabel USB
Instalace
1 Umístěte webovou kameru.
2
Zapněte počítač. Připojte k portu USB.
Vyčkejte na dokončení automatické instalace v systému Windows.
Použití webové kamery
3
Přihlaste se ke službě Windows Live Messenger a používejte webovou kameru k video hovorům.
Nastavujte zaostřovací kroužek, dokud nebude obraz zaostřen. Stisknutím tlačítka na zadní straně můžete
zapnout anebo vypnout světlo.
4 Zavřete všechny možnosti videa v programu Live Messenger.
5
Vložte CD do jednotky CD-ROM. Instalujte dodatečný software. Postupujte podle pokynů na obrazovce.
Windows Vista: Povolte a vykonejte všechny potřebné funkce.
6A Arcsoft Webcam Companion: Pro snímání videa a momentek, monitorování, úpravy a konverzaci.
6B
Arcsoft Magic-I: Pro speciální efekty a digitální přiblížení.
1. Spusťte. Start – Všechny programy - Arcsoft Magic-I<Start - All Programs - Arcsoft Magic-I> nebo
Webcam Companion – Snímat - Propojení<Webcam Companion - Capture - Link>
2. Přiblížení / oddálení
3. Zapnutí / vypnutí sledování tváře
4. Speciální efekty: vybrat – zapnout <select - enable>
Poznámka
Software
CZ
• Pro video hovory použijte službu zasílání zpráv, např. Live Messenger. Nápovědu a informace o službě Live
Messenger najdete na adrese www.msn.com.
• Dodatečný software je určen k libovolnému použití a může být dostupný pouze v angličtině.
• Chcete-li používat obrazové efekty programu Magic-I v programu Live Messenger, Arcsoft Webcam
Companion nebo v jiné aplikaci zpracování videa: Spusťte průvodce nastavením zvuku a videa programu
Messenger nebo otevřete nastavení snímání jiné aplikace zpracování videa a nastavte video zařízení „Magic-I
Virtual Capture“ namísto normální webové kamery
• Potřebujete-li nápovědu, použijte možnost Nápověda (Help) software nebo si přečtěte příručku na CD (pouze
v angličtině). Více informací naleznete na adrese www.arcsoft.com.
Obecné použití
• Během provozu webové kamery zajistěte dostatečné osvětlení okolí!
• Když bude čočka zaprášená, očistěte ji štětečkem!
• Webovou kameru nelze používat ve více aplikacích současně!
Page 30

NÁVOD K OBSLUZE
2
• Pokud webovou kameru připojíte k jinému portu USB, systém Windows může chtít automaticky nainstalovat
webovou kameru znovu!
Aktuální časté otázky a návody k použití naleznete na adrese www.trust.com/15309. Rozsáhlý servis si
registrujte na adrese www.trust.com/register.
Bezpečnostní opatření
• Toto zařízení nepoužívejte v blízkosti kapalin, např. vody.
• Neopravujte zařízení a ani je neotevírejte.
• Toto zařízení splňuje základní požadavky a ostatní podmínky příslušných směrnic Evropské unie. Prohlášení o
shodě (DoC) je k dispozici na adrese www.trust.com/15309/ce.
• Je-li to možné, odevzdejte likvidovaný přístroj do recyklačního střediska. Nevyhazujte přístroj do domovního
odpadu.
Záruka a copyright
• Na tento výrobek se vztahuje dvouletá záruční doba výrobce, která začíná dnem prodeje. Další informace
naleznete na adrese www.trust.com/warranty.
• Kopírování tohoto návodu k použití nebo jakékoli jeho části bez svolení společnosti Trust International B.V. je
zakázáno.
Page 31

PRÍRUČKA POUŽÍVATEĽA
1
Informácie o produkte
A: Nastaviteľný zaostrovací krúžok
B: Svetlo
C: Stavová dióda LED
D: Viacúčelová príchytka
E: Mikrofón
F: Tlačidlo svetla
G: Kábel USB
Inštalácia
1 Umiestnite webovú kameru.
2
Zapnite počítač. Pripojte webovú kameru k portu USB.
Počkajte, kým systém Windows automaticky nedokončí inštaláciu.
Používanie webovej kamery
3
Prihláste sa k službe Live Messenger a používajte webovú kameru na videohovory.
Nastavujte zaostrovací krúžok, až kým nebude obraz zaostrený. Stlačením tlačidla na zadnej strane môžete
zapnúť/vypnúť svetlo.
4 Zatvorte všetky možnosti videa v programe Live Messenger.
5
Vložte disk CD do mechaniky CD-ROM. Nainštalujte dodatočný softvér. Postupujte podľa pokynov na
obrazovke.
Operačný systém Windows Vista: Povoľte a vykonajte všetky potrebné akcie.
6A Arcsoft Webcam Companion: Na snímanie videa a momentiek, monitorovanie, úpravy a konverzáciu.
6B
Arcsoft Magic-I: Na špeciálne efekty a digitálne priblíženie.
1. Spustite: <Štart – Všetky programy – Arcsoft Magic-I> (Start – All Programs – Arcsoft Magic-I) alebo
<Webcam Companion – Snímať – Prepojenie> (Webcam Companion – Capture – Link).
2. Priblíženie/oddialenie.
3. Zapnutie/vypnutie sledovania tváre.
4. Špeciálne efekty: <vybrať – zapnúť> (select – enable).
Poznámky
Softvér
• Na videohovory použite službu zasielania správ, akou je Live Messenger. Pomoc a informácie o službe Live
Messenger nájdete na adrese www.msn.com.
SK
• Dodatočný softvér je určený na voliteľné používanie a môže byť dostupný len v angličtine.
• Ak chcete používať obrazové efekty programu Magic-I v programe Live Messenger, Arcsoft Webcam
Companion alebo v inej aplikácii na spracovanie videa:
Spustite sprievodcu nastavením zvuku a videa programu Messenger alebo otvorte nastavenia snímania inej
aplikácie na spracovanie videa a nastavte videozariadenie „Magic-I Virtual Capture“ namiesto normálnej
webovej kamery.
• Ak potrebujete pomoc, použite možnosť softvéru „Pomocník“ (Help) alebo si prečítajte príručku na disku CD
(dostupná je len v angličtine). Ďalšie informácie nájdete na adrese www.arcsoft.com.
Všeobecné používanie
• Pri používaní webovej kamery skontrolujte, či je dostatočné osvetlenie!
• Keď je objektív zaprášený, na jeho očistenie použite jemný štetec!
Page 32

PRÍRUČKA POUŽÍVATEĽA
2
• Webová kamera sa nemôže súčasne používať vo viac ako jednej aplikácii!
• Ak webovú kameru pripojíte k inému portu USB, systém Windows môže potrebovať znova automaticky
nainštalovať webovú kameru!
Na adrese www.trust.com/15309 nájdete aktuálne často kladené otázky (FAQ) a príručky. Prístup k rozšíreným
službám získate po zaregistrovaní na adrese www.trust.com/register.
Bezpečnosť
• Zariadenie umiestnite tak, aby sa nedostalo do styku s kvapalinami, napríklad s vodou.
• Zariadenie neotvárajte ani neopravujte.
• Zariadenie spĺňa základné požiadavky a ostatné príslušné podmienky platných európskych smerníc.
Vyhlásenie o zhode (Declaration of Conformity) sa nachádza na adrese www.trust.com/15309/ce.
• Ak je to možné, nepotrebné zariadenie odovzdajte do recyklačného strediska. Zariadenie neodhadzujte do
domového odpadu.
Záruka a autorské práva
• Na tento výrobok poskytuje výrobca dvojročnú záruku, ktorá začína plynúť dátumom zakúpenia. Ďalšie
informácie nájdete na adrese www.trust.com/warranty.
• Reprodukovanie tejto príručky alebo akejkoľvek jej časti je bez povolenia spoločnosti Trust International B.V.
zakázané.
Page 33

KÄYTTÖOPAS
1
Tuotetiedot
C: Tila-merkkivalo
A: Säädettävä objektiivirengas
B: Valo
D: Monitoimipuristin
E: Mikrofoni
F: Valopainike
G: USB-kaapeli
Asennus
1 Aseta verkkokamera.
2
Kytke tietokone päälle. Kytke USB-liitin.
Odota, kunnes Windows päätt ää asennuksen automaattisesti.
Verkkokameran käyttö
3
Kirjaudu Windows Live Messengeriin ja käytä verkkokameraa videopuheluihin.
Säädä objektiivirengasta kunnes kuva on tarkennettu. Paina takaosan p ainiketta valon kytkemiseksi
PÄÄLLE/POIS.
4 Sulje kaikki Live Messengerin videoasetukset.
5
Aseta CD-levy CD-ROM-asemaan. Asenna lisäohjelmisto. Noudata näyttöön tulevia ohjeita.
Windows Vista: Salli ja suorita kaikki tarvittava t toiminnot.
6A
Arcsoft Webcam Companion: videokuvien ja tilannekuvien kaappaamiseen, seurantaan, muokkaamiseen ja
chattailuun.
6B
Arcsoft Magic-I: Erikoistehosteisiin ja digitaaliseen zoomiin.
1. Käynnistys: <Käynnistä (Start) - Kaikki ohjelmat (All Programs) - Arcsoft Magic-I>, tai <Webcam
Companion - Kaappaa (Capture) - Linkki (Link)>
2. Zoom +/-.
3. Kasvojen tunnistuksen käyttöönotto / käytöstä poisto.
4. Erikoisteho steet: <valitse (select) - ota kä yttöön (enable)>
Huomautus
Ohjelmisto
• Käytä videopuheluihin messenger-palvelua, esimerkiksi Live Messenger. Ohjeet ja lisä tietoja Live Messenger -
palvelusta on sivustossa www.msn.com.
FI
• Lisäohjelmistot ovat valinnaisia ja saattavat olla saatavilla vain englanniksi.
• Magic-I image -tehosteiden käyttö Live Messeng erin, Arcsoft Webcam Companionin tai muun
videosovelluksen kanssa:
Käynnistä Messengerin ääni- ja videoasetusten asennusohjelma tai avaa muun videosovelluksen
kaappausasetukset ja aseta videolaitteeksi tavallisen verkkokameran asemesta Magic-I Virtual Capture.
• Käytä ohjelman Ohje (Help) -toimintoa ja lue CD-levyllä oleva ohjekirjasta lisäohjeet (saa tavilla vain
englanniksi). Katso lisätietoja sivustosta www.arcsoft.com.
Yleistä käytöstä
• Varmista, että valoa on riittävästi verkkokameraa käyttäessäsi.
• Käytä pehmeää harjaa objektiivin puhdistamiseen pölystä!
• Verkkokameraa ei voi käyttää kuin yhdessä sovelluksessa kerrallaan.
Page 34

KÄYTTÖOPAS
2
• Jos kytket verkkokameran uudelleen toiseen USB-porttiin, Windowsin pitää ehkä asentaa kamera
automaattisesti uudelleen.
Ajan tasalla olevat usein kysytyt kysymykset (FAQ) ja ohjekirjat saat sivustosta www.trust.com/15309. Kattavan
huollon saat rekisteröitymällä osoitteessa www.trust.com/register.
Turvallisuus
• Pidä laite kaukana nesteistä, kuten vedestä.
• Älä avaa tai yritä korjata tuotetta.
• Tämä laite on asianmukaisten EY-direktiivien vaatimusten ja muiden ehtojen mukainen.
Vaatimustenmukaisuusvakuutus (DoC) on saatavana osoitt eesta www.trust.com/15309/ce.
• Mikäli mahdollista, toimita laite hävitettäväksi kierrätyskeskukseen. Älä hävitä laitett a kotitalousjätteen
mukana.
Takuu ja tekijänoikeudet
• Tuotteella on kahden vuoden tehdastakuu, joka on voimassa ostopäivästä alkaen. Lisätietoja saat sivustosta
www.trust.com/warranty.
• Tämän ohjekirjan tai sen osan toisintaminen ilman Trust International B.V:n lupaa on kielletty.
Page 35

BRUKERHÅNDBOK
1
Produktinformasjon
A: Justerbar linsering
B: Lys
C: Statuslampe
D: Flerfunksjonsklemme
E: Mikrofon
F: Lysknapp
G: USB-kabel
Installering
1 Plasser webkameraet.
2
Slå på PCen. Koble til USB.
Vent til Windows fullfører installasjonen automatisk.
Bruke webkameraet
3
Logg inn på Windows Live Messenger, og bruk webkameraet til videosamtaler.
Juster med linseringen til bildet blir fokusert. Trykk på knappen på baksiden for å slå PÅ/AV lyset.
4 Lukk alle Live Messenger videoalternativer.
5
Sett CD-platen i CD-stasjonen. Installere tilleggsprogramvaren. Følg instruksjonene på skjermen.
Windows Vista: Tillat og utfør alle nødvendige handlinger.
6A Arcsoft Webcam Companion: Til opptak av video og stillbilder, overvåkning, redigering og chatting.
6B
Arcsoft Magic-I: Til spesialeffekter og digital zoom.
1. Kjør programmet: <Start – Alle programmer (All Programs) - Arcsoft Magic-I> eller <Webcam
Companion – Spill inn (Capture) – Kobling (Link)>
2. Zoom inn/ut.
3. Aktiver/deaktiver a nsikt ssporing.
4. Spesialeffekter: <velg - aktiver>.
Merk
Programvare
• Bruk en meldingstjeneste, som Live Messenger, til videosamta ler. Hvis du vil ha mer informasjon om Live
Messenger, se www.msn.com.
• Tilleggsprogramvaren er for valgfri installering og kan finnes bare på engelsk.
• Hvis du vil bruke Magic-I bildeeffekter i Live Messenger, Arcsoft Webcam Companion eller andre
videoprogrammer:
Kjør Messengers veiviser for konfigurasjon av lyd og video, eller åpne innstillingene for innspilling for et
eventuelt annet videoprogram og angi Magic-I Virtual Capture som videoenhet i stedet for va nlig
webkamera.
NO
• Bruk hjelpesystemet i programvaren, eller les håndboken på CD-platen hvis du trenger hjelp (finnes bare på
engelsk) Se www.arcsoft.com for mer informasjon.
Generell bruk
• Pass på at det er tilstrekkelig lys når du bruker webkameraet!
• Bruk en myk børste til å rengjøre linsen hvis den er støvete.
• Webkameraet kan ikke brukes i mer enn ett program om gangen!
Page 36

BRUKERHÅNDBOK
2
• Hvis du kobler til webkameraet på nytt til en annen USB-port, kan det hende Windows må insta llere
kameraet automatisk en gang til!
Se www.trust.com/15309 for å finne oppdaterte svar på spørsmål og instruksjonshåndbøker. For mer
omfattende service, registrer deg på www.trust.com/register.
Sikkerhet
• Hold enheten unna væsker som for eksempel vann.
• Ikke åpne eller reparer enheten.
• Denne enheten tilfredsstiller nødvendige krav og andre relevante vilkår i gjeldende europeiske direktiver.
Samsvarserklæringen (DoC) er tilgjengelig på www.trust.com/15309/ce.
• Hvis mulig må enheten avhendes til et resirkuleringssenter. Ikke kast enheten sammen med
husholdningsavfall.
Garanti og opphavsrett
• Dette produktet har en to års prod usentgaranti som er effektiv fra kjøpsdato en. Du finner flere opplysninger
på www.trust.com/warranty.
• Gjengivelse av denne håndboken, helt eller delvis, er ikke tillatt uten tillatelse fra Trust International B.V.
Page 37

KULLANICI KILAVUZU
1
Ürün bilgileri
A: Ayarlanabilir mercek bileziği
B: Işık
C: Durum LED göstergesi
D: Çok amaçlı kelepçe
E: Mikrofon
F: Işık düğmesi
G: USB kablosu
Kurulum
1 Web kamerasını yerleştirin.
2
Bilgisayar açık. USB’yi bağlayın.
Windows kurulumu otomatik olarak tamamlayıncaya dek bekleyin.
Web kamerasının kullanımı
3
Windows Canlı Messenger’a giriş yapın ve görüntülü aramalar için web kamerasını kullanın.
Görüntü odaklanıncaya kadar mercek yüzüğünü ayarlayın. Işığı AÇIP/KAPATMAK için, arka taraftaki
düğmeye basın.
4 Tüm Canlı Messenger görüntü seçeneklerini kapatın.
5
CD’yi CD-ROM sürücüsüne yerleştirin. Ekstra yazılımı yükleyin. Ekrandaki tâlimatları izleyin.
Windows Vista: Tüm gerekli işlemlere izin verin ve uygulayın.
6A
Arcsoft Web Kamerası Yardımcısı: Görüntü ve enstantanelerin yakalanması; izleme, düzenleme ve sohbet
etme işlemleri için.
6B
Arcsoft Magic-I: Özel efektler ve dijital yakınlaştırma/uzaklaştırma işlemleri için.
1. Çalıştır (Run): <Başlat (Start) – Tüm Programlar (All Programs) - Arcsoft Magic-I> ya da <Web
Kamerası Yardımcısı (Webcam Companion) – Yakala (Capture) – Bağlantı (Link)>
2. Yakınlaştır/uzaklaştır (Zoom in / out)
3. Yüz izleme işlevini etkinleştir / devre dışı bırak (Face tracking enable / disable)
4. Özel efektler: <seç (select) – etkinleştir (enable)>
Not
Yazılım
• Görüntülü aramalar için, Canlı Messenger gibi bir ileti sistemi servisi kullanın. Canlı Messenger hakkında
yardım ve bilgi almak için, bkz: www.msn.com.
• Ekstra yazılım isteğe bağlı kullanım içindir ve sadece İngilizce dilinde mevcut olabilir.
• Canlı Messenger, Arcsoft Web Kamerası Yardımcısı ve diğer görüntü uygulamalarında Magic-I görüntü
efektlerini kullanmak için:
Messenger’ın ses ve görüntü kurulum sihirbazını çalıştırın ya da diğer görüntü uygulamanızın yakalama
ayarlarını açın ve “Magic-I Sanal Yakalama” (Magic-I Virtual Capture) işlevini normal web kamerası yerine
görüntü aygıtı olarak ayarlayın.
TR
• Yazılımın “Yardım” (Help) seçeneğini kullanın ya da yardım gerekirse CD’deki kılavuzu okuyun (sadece
İngilizce dilinde mevcuttur). Daha fazla bilgi için, bkz: www.arcsoft.com
Genel kullanım
• Web kamerasını kullanırken yeterli ışık olduğundan emin olun!
• Tozlandığı zaman mercekleri temizlemek için, yumuşak bir fırça kullanın!
Page 38

KULLANICI KILAVUZU
2
• Web kamerası aynı anda birden çok uygulamada kullanılamaz!
• Web kamerası diğer USB bağlantı noktasına yeniden bağlanırsa, Windows’un kamerayı tekrar otomatik olarak
kurması gerekebilir!
Güncellenmiş Sıkça Sorulan Sorular (FAQs) bölümü ve talimat kılavuzları için, bkz: www.trust.com/15309.
Yaygın servis için, www.trust.com/register web sitesine kayıt yaptırın.
Güvenlik
• Bu aygıtı su gibi sıvılardan uzakta tutun.
• Aygıtı açmayın ya da kendiniz onarmaya kalkmayın.
• Bu aygıt, temel gereksinimlere ve uygulanabilir Avrupa yönetmeliklerinin ilgili diğer şartlarına uygundur.
Uygunluk Bildirimi (DoC) belgesini www.trust.com/15309/ce Internet adresinde bulabilirsiniz.
• Olanaklıysa, aygıtı elden çıkarırken yeniden dönüşüm merkezine teslim edin. Aygıtı elden çıkarırken her
zamanki çöp kutularına atmayın.
Garanti ve telif hakkı
• Bu ürün, satın alındığı tarihten îtibâren iki yıl süreyle imalatçı garantisi kapsamındadır. Daha fazla bilgi için
www.trust.com/warranty Internet adresini ziyâret edin.
• Bu kullanım kılavuzu, Trust International B.V. kuruluşunun izni olmadan kısmen veya tamâmen çoğaltılamaz.
Page 39

РУКОВОДСТВО ПОЛЬЗОВАТЕЛЯ
1
Информация об изделии
C: Индикатор состояния
A: Кольцо регулировки объектива
B: Подсветка
D: Многоцелевой зажим
E: Микрофон
F: Кнопка включения подсветки
G: Шнур USB
Установка
1 Установите веб-камеру в удобном месте.
2
Включите компьютер. Подключите устройство к USB-порту.
Дождитесь завершения автоматической установки под Windows.
Работа с веб-камерой
3
Запустите программу Windows Live Messenger для проведения видеоконференций в помощью вебкамеры.
Сфокусируйте изображение кольцом регулировки объектива. Пользуйтесь кнопкой сзади для
включения/отключения подсветки.
4 Отключите все видеоэффекты программы Live Messenger.
5
Вставьте компакт-диск в дисковод CD-ROM. Установите дополнительное программное обеспечение.
Выполните указания на экране.
Windows Vista: Разрешив выполнение всех необходимых операций, выполните их.
6A
Программа Arcsoft Webcam Companion: предназначена для видеосъемки и мгновенной съемки,
балансировки, обработки видеоматериалов и проведения видеоконференций.
6B
Программа Arcsoft Magic-I: предназначена для спецэффектов и цифрового приближения/удаления.
1. Порядок запуска: <Пуск (Start) – Все программы (All Programs) - Arcsoft Magic-I> или <Webcam
Companion – Capture (Съемка) – Link (Соединение)>
2. Включение / отключение функции приближения или удаления
3. Включение / отключение функции балансировки
4. Спецэффекты: <select - enable> (<выбрать – включить>)
Внимание!
Программное обеспечение
• Для проведения видеоконференций пользуйтесь программным обеспечением доставки сообщений,
например, Live Messenger. Справки и сведения о программе Live Messenger см. по адресу
www.msn.com.
• Дополнительное программное обеспечение является факультативным и может иметься только на
английском языке.
• Применение спецэффектов Magic-I с программами Live Messenger, Arcsoft Webcam Companion или
другими видеоприложениями:
RU
Запустив мастер настройки видеопараметров программы Messenger или открыв окно настройки
параметров съемки другого видеоприложения, назначьте “Magic-I Virtual Capture” устройством
проведения видеосъемки вместо обычной веб-камеры.
Page 40

РУКОВОДСТВО ПОЛЬЗОВАТЕЛЯ
2
• Если потребуется помощь, ознакомьтесь с содержанием «Справки» ( “Help”) или руководства по
программному обеспечению на компакт-диске (только на английском языке). Подробнее см.
www.arcsoft.com.
Общие указания по эксплуатации
• При работе с веб-камерой обеспечьте достаточное освещение!
• При попадании пыли на объектив протрите его мягкой кисточкой!
• Веб-камера не работает одновременно с несколькими приложениями!
• При переподключении веб-камеры к другому порту USB может возникнуть необходимость повторной
автоматической установки ее драйвера под Windows!
Ознакомиться с самыми свежими ответами на типичные вопросы (FAQ) и указаниями по эксплуатации
можно по адресу: www.trust.com/15309. Расширенное обслуживание предоставляется после регистрации
по адресу: www.trust.com/register.
Меры предосторожности
• Храните и устанавливайте устройство вдали от воды и прочих жидкостей.
• Не вскрывайте и не пытайтесь ремонтировать устройство.
• Данное устройство соответствует важнейшим требованиям и условиям, изложенным в директивах
Европейского Союза. С Декларацией о соответствии (DoC) можно ознакомиться по адресу:
www.trust.com/15309/ce.
• Утилизация отработанного устройства производится по возможности в центре вторичной переработки
материалов. Не выбрасывайте устройство вместе с бытовыми отходами.
Гарантийные обязательства и авторские права
• На изделие распространяется двухлетняя гарантия изготовителя, которая действует со дня
приобретения. Дополнительные сведения см. по адресу: www.trust.com/warranty
• Запрещается как полное, так и частичное воспроизведение данного руководства без разрешения
компании Trust International B.V.
Page 41

MANUAL DE UTILIZARE
1
Informaţii privind produsul
A: Inel obiectiv reglabil
B: Lumină
C: LED stare
D: Clemă de fixare polivalentă
E: Microfon
F: Buton lumină
G: Cablu USB
Instalarea
1 Poziţionaţi camera Web.
2
Calculator pornit. Conectaţi cablul USB.
Aşteptaţi până când Windows finalizează automat instalarea.
Utilizare cameră Web
3
Autentificaţi-vă în Windows Live Messenger şi folosiţi camera Web pentru apeluri video.
Ajustaţi inelul obiectivului până când imaginea este focalizată. Apăsaţi pe butonul din spate pentru a
aprinde/stinge lumina.
4 Închideţi toate opţiunile video din Live Messenger.
5
Introduceţi CD-ul în unitatea CD-ROM. Instalaţi software-ul suplimentar. Urmaţi instrucţiunile de pe ecran.
Windows Vista: Acceptaţi şi executaţi toate acţiunile necesare.
6A Arcsoft Webcam Companion: Pentru captură video şi de instantanee, monitorizare, editare şi chat.
6B
Arcsoft Magic-I: Pentru efecte speciale şi zoom digital.
1. Executare: <Start – Toate programele (All Programs) - Arcsoft Magic-I>, sau <Webcam Companion –
Captură (Capture) – Legătură (Link)>
2. Mărire/Micşorare
3. Activare/dezactivare urmărire figură
4. Efecte speciale: <selectare (select) – activare (enable)>
Notă
Software
• Folosiţi un serviciu de mesagerie, precum Live Messenger, pentru apeluri video. Pentru ajutor şi informaţii
despre Live Messenger, vizitaţi www.msn.com.
• Software-ul suplimentar este pentru uz opţional şi este posibil să fie disponibil doar în engleză.
• Pentru a folosi efecte de imagine Magic-I în Live Messenger, Arcsoft Webcam Companion sau alte aplicaţii
video:
Executaţi expertul de instalare audio şi video al Messenger sau deschideţi setările de captură ale aplicaţiei
dumneavoastră video şi setaţi “Magic-I Virtual Capture” ca dispozitiv video, în locul camerei Web obişnuite.
• Folosiţi opţiunea „Ajutor” (Help) a software-ului sau citiţi manualul de pe CD dacă aveţi nevoie de asistenţă
(disponibil doar în engleză). Vizitaţi www.arcsoft.com pentru mai multe informaţii.
Utilizare generală
RO
• Asiguraţi-vă că există suficientă lumină atunci când folosiţi camera Web!
• Utilizaţi o perie moale pentru a curăţa obiectivul atunci când este prăfuit!
• Camera Web nu poate fi utilizată în mai multe aplicaţii simultan!
Page 42

MANUAL DE UTILIZARE
2
• Dacă reconectaţi camera Web la un alt port USB, este posibil ca Windows să trebuiască să o instaleze din nou
automat!
Vizitaţi www.trust.com/15309 pentru ÎF (FAQ) şi manuale de utilizare actualizate. Pentru un serviciu cuprinzător,
înregistraţi-vă la www.trust.com/register.
Siguranţă
• Păstraţi acest dispozitiv departe de lichide, cum ar fi apa.
• Nu deschideţi sau reparaţi acest dispozitiv.
• Acest dispozitiv îndeplineşte cerinţele de bază şi toate condiţiile aferente ale directivelor europene aplicabile.
Declaraţia de conformitate (DoC) este disponibilă la www.trust.com/15309/ce.
• Dacă este posibil, casaţi dispozitivul la un centru de reciclare. Nu casaţi dispozitivul împreună cu gunoiul
menajer.
Garanţie şi drepturi de autor
• Acest produs beneficiază de o garanţie de doi ani din partea producătorului, garanţie valabilă de la data
cumpărării produsului. Pentru mai multe informaţii, vizitaţi www.trust.com/warranty.
• Reproducerea acestui manual sau a oricărei părţi ale sale este interzisă în lipsa permisiunii din partea Trust
International B.V.
Page 43

USER’S MANUAL
1
Информация за продукта
A: Вариообектив
B: Светкавица
C: Светодиод за статуса
D: Универсална щипка
E: Микрофон
F: Бутон за светкавицата
G: USB кабел
Инсталиране
1 Поставете уеб камерата.
2
Включете компютъра. Свържете я към USB порта.
Изчакайте, докато Windows завърши автоматичната инсталация.
Използване на уеб камерата
3
Регистрирайте се в “Windows Live Messenger” и използвайте камерата за провеждане на видео
разговори. Настройте вариообектива, докато образите застанат на фокус. Натиснете бутона от
задната страна за включване / изключване на светкавицата.
4 Затворете всички видео опции на “Live Messenger”.
5
Поставете диска в CD-ROM устройството. Инсталирайте допълнителния софтуер. Следвайте
инструкциите на съответните екрани.
Windows Vista: Потвърдете и извършете всички необходими действия.
6A
“Arcsoft Webcam Companion”: За снимане на клипове и моментални снимки, наблюдение, редакция и
чат.
6B
“Arcsoft Magic-I”: За специални ефекти и дигитално увеличение на образите.
1. Стартирайте: <Start - All Programs - Arcsoft Magic-I> или <Webcam Companion - Capture - Link>
2. Увеличете или намалете образа
3. Лицево проследяване: активиране/ деактивиране
4. Специални ефекти: <избор - активиране>
Забележка
Софтуер
• Използвайте програми за моментни съобщения като Live Messenger за провеждането на видео
разговори. За помощ и повече информация относно Live Messenger, посетете: www.msn.com.
• Не е задължително да се използва допълнителния софтуер, който може да бъде достъпен единствено
на английски език.
• За използване на ефектите на програмата “Magic-I” в рамките на “Live Messenger”, “Arcsoft Webcam
Companion” или други видео приложения:
Стартирайте програмата за аудио- и видеонастройка на “Live Messenger” или влезте в настройките на
другото видео приложение и задайте “Magic-I Virtual Capture” като видео устройство вместо
обикновена уеб камера.
• При нужда от помощ, използвайте функцията “Помощ” на софтуера или прочете ръководството върху
диска (достъпни само на английски език). За повече информация, посетете: www.arcsoft.com.
BU
Общи положения
• При използване на уеб камерата, следете светлината да е достатъчна!
Page 44

USER’S MANUAL
2
• Използвайте мека четка за почистването на обектива при напрашване!
• Уеб камерата не може да бъде използвана едновременно с повече от едно приложение!
• Ако свържете повторно уеб камерата, към друг USB порт, може да се наложи Windows автоматично да
я инсталира отново!
Посетете: www.trust.com/15309 за актуална информация в рубриката “Въпроси и отговори” и ръководство
за употреба. За повече услуги, регистрирайте се на адрес: www.trust.com/register.
Мерки за безопасност
• Пазете устройството от съприкосновение с течности, например, вода.
• Не отваряйте и не ремонтирайте това устройство.
• Това устройство отговаря на основните изисквания и другите съответни условия на приложимите
европейски директиви. Можете да получите достъп до декларацията за съответствие (DoC) на
www.trust.com/15309/ce.
• Ако е възможно, предайте устройството за унищожаване в център за рециклиране. Не изхвърляйте
устройството заедно с домакинските отпадъци.
Гаранция и авторско право
• Това устройство има двугодишна гаранция от производителя, която влиза в сила от датата на
закупуване. За повече информация посетете www.trust.com/warranty
• Възпроизвеждането на това ръководство или част от него без разрешение от Trust International B.V. е
забранено.
Page 45

用户手册
1
产品信息
A: 可调镜圈
B: 灯光
C: 显示灯
D: 多用夹
E: 扩音器
F: 光键
G: USB 线
安装
1
装上网络摄影机.
2
运行电脑. 连接 USB。
等待系统自动安装完毕。
使用网络摄影机
3
签名进入 Windows Live Messenger,使用网络摄影机进行网络电话。调试镜圈以便聚焦图像。按后键开/关
灯光。
4
关掉所有的 Live Messenger视频选项。
把光盘放入光盘驱动器中。安装更多的软件程序。按照荧屏上的指南进行操作。
Windows Vista: 接收并执行所有需要的程序。
5
6A
Arcsoft Webcam Companion: 用于捕获视频和快照, 追踪, 编辑和在线聊天。
Arcsoft Magic-I: 用于特技效果和图像数位缩放。
1. 运行: <Start - All Programs - Arcsoft Magic-I>, 或<Webcam Companion - Capture - Link>
2. 放大/ 缩小
3. 打开/关掉面部追踪
4. 特技: <select - enable>
6B
注意
软件
• 使用短信服务, 如 Live Messenger的网络视频电话。有关 Live Messenger 的信息及帮助服务请在
www.msn.com 网站上查看。
• 额外的软件是选项,可能只有英文版本。
• 在 Live Messenger中使用 Magic-I 镜像效应, Arcsoft Webcam Companion或其它视频应用程序:
运行 Messenger的音频和视频设置向导或打开其它视频应用程序中的捕获图象的设置,把 “Magic-I Virtual
Capture” 设为视频设备, 而不是常规的网络摄影机。
• 使用该软件上的 “Help” 选项, 如果需要请阅读光盘上的使用手册 (只有英文版本)。更多信息请参考
www.arcsoft.com 网页。
常用方法
• 使用网络摄影机时要有充足的光源!
• 镜头上的灰尘用软毛刷擦拭!
• 网络摄影机不能同时用于多个不同的应用程序!
• 当网络摄影机重新插入其它的 USB 端口时, 系统可能需要自动重新安装网络摄影机!
Page 46

USER’S MANUAL
2
请在 www.trust.com/15309网站上查看最新的常见问题、驱动程序和安装指南。您可以在
www.trust.com/register 网站上登记以获得更广泛的服务。
安全
• 该设备应远离液体,如水。
• 不要打开或修理该设备。
• 该设备符合欧盟指令中规定的必要条件和相关规定。在www.trust.com/15309/ce 网站上可查看厂商合格证书
(DoC)。
• 如果可能,该设备弃置不用时请交给废物回收中心处理。请不要把该设备扔到生活垃圾中。
保修&版权
• 该设备从购买之日有两年的保修期。详细信息请在 www.trust.com/warranty 网站上查看。
• 未经 Trust 国际公司的允许不得复制安装手册的任何部分。
Page 47

NAVODILA ZA UPORABO
1
Informacije o izdelku
A: Nastavljivi obroč leče
B: Lučka
C: LED stanje
D: Večnamenska objemka
E: Mikrofon
F: Gumb za lučko
G: USB kabel
SI
Namestitev
1 Namestite web kamero.
2
Vključite PC. Povežite USB.
Počakajte, da Okna samodejno opravijo namestitev.
Uporaba web kamere
3
Vpišite se v Windows Live Messenger in uporabite web kamero za video klice.
Nastavite obroč leče, da se slika izostri. Pritisnite gumb na zadnji strani web kamere, da jo vklopite (ON) ali
izklopite (OFF).
4 Zaprite vse video opcije Live Messenger-ja.
5
Vstavite CD v CD-ROM. Namestite dodatno programsko opremo. Sledite navodilom na zaslonu.
Windows Vista: Dovoli in izvrši vsa potrebna opravila.
6A Arcsoft Webcam Companion: Za snemanje posnetkov, slikanje, nadzorovanje, urejanje in klepetanje.
6B
Arcsoft Magic-I: Za posebne efekte in digitalni zum.
1. Zaženite: <Start - All Programs - Arcsoft Magic-I> ali <Webcam Companion - Capture - Link>
2. Povečava / pomanjšanje
3. Omogoči (enable) / onemogoči (disable) sledenje obraza
4. Posebni efekti: <select - enable>
Pomni
Programska oprema
• Za video klice uporabljajte sporočilno storitev, kot je Live Messenger. Za pomoč in informacije o Live
Messenger si oglejte www.msn.com.
• Dodatna programska oprema ni obvezna in je morda na voljo samo v angleščini.
• Za uporabo efektov Magic-I image v Live Messenger, Arcsoft Webcam Companion ali drugih video aplikacijah:
Zaženite čarovnika za avdio in video nasmestitev v Messenger-ju ali odprite »Capture settings« vaše druge
video aplikacije in nastavite »Magic-I Virtual Capture« kot video napravo namesto običajne web kamere.
• Uporabite opcijo »Help« programske opreme ali preberite priročnik za uporabo na CD-ju, če potrebujete
pomoč (na voljo samo v angleščini). Za več informacij obiščite www.arcsoft.com.
Splošna uporaba
• Prepričajte se, da je na voljo dovolj svetlobe, kadar uporabljate web kamero!
• Uporabite mehko ščetko za čiščenje leče, kadar postane prašna!
• Web kamere ne morete naenkrat uporabljati v več kot eni aplikaciji!
• Če web kamero ponovno povežete prek drugih USB vrat, bodo Okna morda morala ponovno samodejno
namestiti tabelo!
Page 48

NAVODILA ZA UPORABO
2
Za aktualna pogosto zastavljena vprašanja in navodila za uporabo glejte www.trust.com/15309. Za dodatne
storitve se prijavite na www.trust.com/register.
Varnost
• Napravo ne uporabljajte v bližini tekočin, npr. vode.
• Naprave nikoli ne poskušajte odpreti ali popraviti.
Page 49

UPUTE ZA KORISNIKA
1
HR
Informacije o proizvodu
A: podsivi prsten za objektiv
B: svjetlo
C: statusni LED indikator
D: višenamjenska spojnica
E: mikrofon
F: tipka za svjetlo
G: USB kabel
Instalacija
1 Postavite web kameru.
2
PC je uključen. spojite USB.
Pričekajte dok Windows automatski završi instalaciju.
Upotreba web kamere
3
Uključite Windows Live Messenger i koristite web kameru za video pozive.
Podešavajte prsten objektiva dok slika ne postane jasna. Pritisnite stražnju tipku kako biste
uključili/isključili svjetlo.
4 Zatvorite sve video mogućnosti Live Messenger-a.
5
Stavite CD u CD-ROM. Instalirajte dodatni softver. Slijedite upute na zaslonu.
Windows Vista: dopustite i izvršite sve potrebne aktivnosti.
6A Arcsoft Webcam Companion: Za snimanje video zapisa i fotografija, praćenje, ureñivanje i chatanje.
6B
Arcsoft Magic-I: Za specijalne efekte i digitalno zoomiranje.
1. Postupak: <Start - All Programs - Arcsoft Magic-I>, ili <Webcam Companion - Capture - Link>
2. Zoomiranje / udaljavanje
3. Prepoznavanje lica omogućeno / onemogućeno
4. Specijalni efekti: <select - enable>
Napomena
Softver
• Koristite servis messenger, kao što je Live Messenger, za video pozive. Za pomoć i informacije o Live
Messenger-u posjetite www.msn.com.
• Dodatni softver je za upotrebu po izboru i može biti da je dostupan samo na engleskom.
• Za upotrebu Magic-I efekata za slike s Live Messenger-om, Arcsoft Webcam Companion ili druge video
aplikacije:
Pokrenite audio i video setup wizard Messenger-a ili otvorite postavke za snimanje vaše druge video
aplikacije i postavite “Magic-I Virtual Capture” kao video ureñaj umjesto regularne web kamere.
• Koristite “Help” mogućnost softvera ili pročitajte upute na CD-u ako vam je potrebna pomoć (dostupno samo
na engleskom). Za više informacija posjetite www.arcsoft.com.
Opća upotreba
• Pobrinite se da je svjetlo zadovoljavajuće kad koristite web kameru!
• Koristite meku četku za čišćenje objektiva kad je prašnjav!
• Web kamera se ne može koristiti za više od jedne aplikacije u isto vrijeme!
• Ako ponovno povezujete web kameru na drugi USB port, može biti potrebno da Windows automatski
ponovno instalira web kameru!
Page 50

UPUTE ZA KORISNIKA
2
Posjetite www.trust.com/15309 kako biste pogledali ažurirana često postavljana pitanja, upravljačke programe i
upute za upotrebu. Za proširenu uslugu registrirajte se na adresi www.trust.com/register.
Sigurnost
• Držite ovaj ureñaj daleko od tekućina kao što je voda.
• Nemojte otvarati ili popravljati ovaj ureñaj.
• Ovaj ureñaj ispunjava temeljne zahtjeve i ostale relevantne uvjete navedene u odgovarajućim europskim
smjernicama.Izjava o sukladnosti (DoC) je dostupna na adresi www.trust.com/15309/ce.
• Ako je moguće, zbrinite ureñaj u centar za recikliranje. Nemojte bacati ureñaj u kućni otpad.
Jamstvo & autorsko pravo
• Ovaj proizvod ima 2-godišnje jamstvo proizvoñača koje vrijedi od dana kupnje. Za više informacija posjetite
www.trust.com/warranty.
• Zabranjeno je reproducirati dijelove ovih uputa za upotrebu bez dopuštenja tvrtke Trust International B.V.
 Loading...