

Page 1

Trust SpaceC@m 300
NL
TRUST SPACEC@M 300
Instruction Manual
Version 3.0
Page 2

Trust SpaceC@m 300
01 UK 11995 SPACE300V3.DOC
Thank you
Thank you very much for purchasing this product from the Trust range. We wish you hours of fun
with it. Please read this manual carefully before using the product.
Registration
Register your purchase now at the Trust Internet site, www.trust.com, so that you are able to
receive optimal guarantee and service support. You will be automatically informed of
developments to your product and of other Trust products. You will also have the chance to win
some spectacular prizes.
Copyright statement
No part of this instruction manual may be reproduced or transmitted, in any form or by any means,
electronic or mechanical, including photocopying, recording, or information storage and retrieval
systems, for any purpose other than the purchaser's own personal use, without prior written
permission from the manufacturer.
Disclaimer statement
The manufacturer specifically disclaims all warranties, either express or implied, including, but not
limited to, implied warranties for the marketability and suitability for a particular purpose, with
respect to the software, the accompanying product manual(s) and written material, and all other
accompanying hardware. The manufacturer reserves the right to revise or make improvements to
its product at any time and without obligation to notify any person of such revisions or
improvements.
In no event shall the manufacturer be liable for any consequential or incidental damages, including
any loss of business profits or any other commercial damages, arising out of the use of its
products.
All company or product names are trademarks or registered trademarks of their respective
owners.
Page 3

Trust SpaceC@m 300
1
NL
Contents
1. Introduction ..................................................................................................................................... 2
1.1 Conventions used in this manual .......................................................................................... 2
1.2 Contents of the package ......................................................................................................... 2
1.3 Minimum system requirements .............................................................................................. 2
2. Safety ............................................................................................................................................... 3
2.1 General...................................................................................................................................... 3
3. Functions of the ‘Trust SpaceC@m 300’...................................................................................... 3
4. Installation ....................................................................................................................................... 4
4.1 Installing the ‘Trust SpaceC@m 300’ driver.......................................................................... 4
4.2 Installing Ulead Photo Express 3.0 SE .................................................................................. 5
4.3 Installing Acer EasyXpress VideoMail 2.2 ............................................................................. 9
4.4 Installation Microsoft ® NetMeeting (Windows 98 / Me / 2000) ......................................... 12
5. Using the camera and the applications ...................................................................................... 16
5.1 Trust SpaceC@m 300 Software ............................................................................................ 16
5.1.1 Description of the functions .......................................................................................... 16
5.1.2 Advanced image settings............................................................................................... 17
5.1.3 Taking a snapshot........................................................................................................... 18
5.1.4 Zoom in & zoom out ....................................................................................................... 19
5.2 Using Ulead PhotoExpress 3.0 SE ....................................................................................... 19
5.3 Using Acer EasyXpress VideoMail 2.2................................................................................. 21
5.4 Using Microsoft ® NetMeeting.............................................................................................. 24
6. Troubleshooting ........................................................................................................................... 28
7. Specifications................................................................................................................................ 29
8. Trust Customer Care Centres...................................................................................................... 30
Page 4

Trust SpaceC@m 300
2
1. Introduction
This instruction manual is intended for users of the Trust SpaceC@m 300. Prior knowledge of computers is
not necessary to install and use this product. If you have any questions, please consult one of the Trust
Customer Care Centres. You can find more information about these Customer Care Centres on the last page
of this electronic manual, as well as at the back of the quick installation manual.
1.1 Conventions used in this manual
The following conventions have been used in this manual to indicate instructions:
<
key
> Here you should press a key. The name of the key is given between brackets.
‘
System
’ This is a specific term used in a program. These are the terms used by, for example,
Microsoft Windows 98.
[
DIR
] Key in the text shown in square brackets [….].
{Term}
The text between the accolades {….} is the term in English, e.g. {File} which occurs in the
associated figure.
Additional information will be shown as follows:
Note: If you connect the Trust Spacec@m 300 to a USB HUB, then the USB HUB should have its own
power supply.
The examples assume that the letter “D” has been assigned to your CD-ROM drive. If your system uses a
different drive letter for your CD-ROM drive, for example “E”, you should replace “D” by “E”.
1.2 Contents of the package
Please check the contents of the package before reading the instruction manual. It should contain the
following:
• Trust SpaceC@m 300
• Headphones with microphone
• CD-ROM containing the drivers, software and instruction manuals
• Quick installation manual
If anything is missing or damaged, please contact one of the Trust Care Centres. You can find more
information at the back of this instruction manual.
1.3 Minimum system requirements
• Intel Pentium 166 MMX CPU
• USB port
• Windows 98
• 32 MB RAM
• 60 MB hard disk space available
• 4X CD-ROM drive
Recommended system configuration for full operation of the programs:
• ISDN adapter or modem
• Sound card with speakers and microphone
• Internet account
Page 5
Trust SpaceC@m 300
3
NL
2. Safety
2.1 General
1. Do not use the device in a damp environment.
2. Do not try to repair the device yourself.
3. Under the following circumstances have the device repaired by qualified personnel:
a) The cable or plug is damaged or worn.
b) Liquid has entered the device.
c) The device has fallen and/or the casing has been damaged.
4. Position the device so that the cables cannot be damaged.
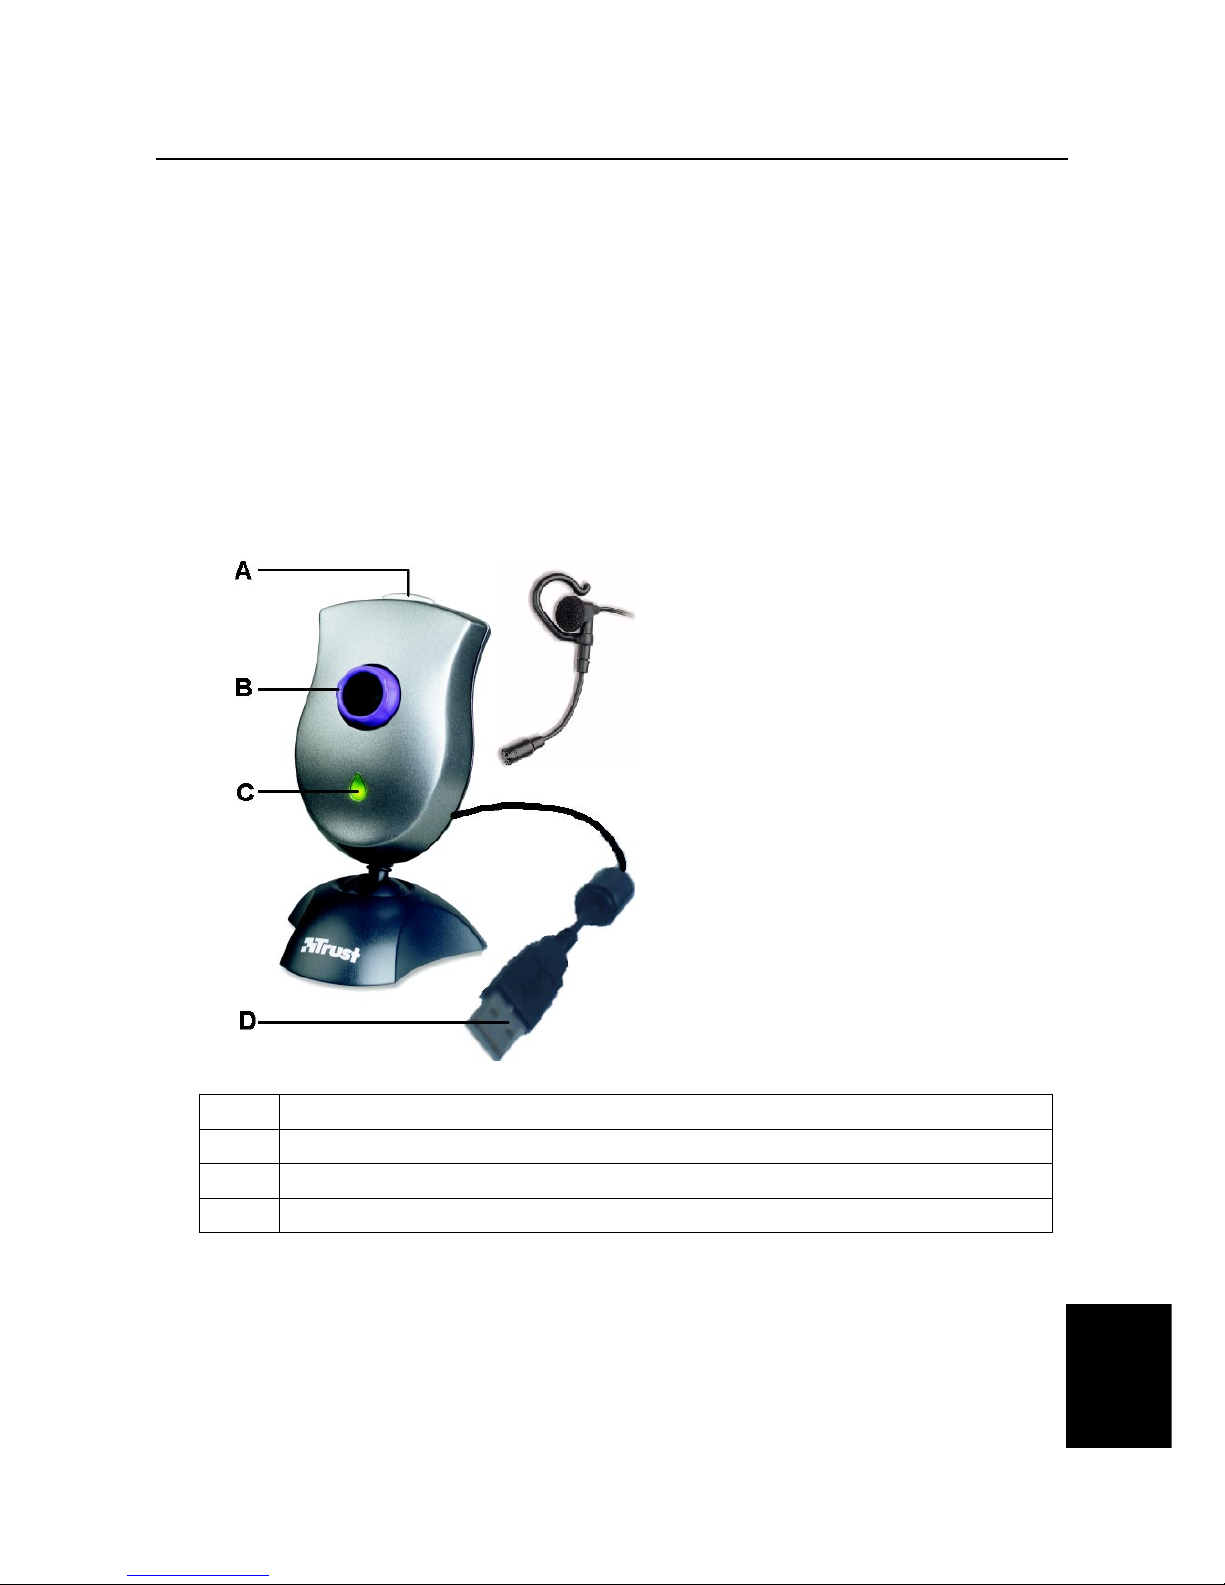
3. Functions of the ‘Trust SpaceC@m 300’
Figure 1: Functions of the ‘Trust SpaceC@m 300’
A
Snapshot button; Takes a picture when this button is pressed.
B
Lens; turn the lens to make the image sharp.
C
LED; goes on when the camera is in use.
D
USB connection
Table 1: Functions of the SpaceC@m 300
Page 6
Trust SpaceC@m 300
4
4. Installation
4.1 Installing the ‘Trust SpaceC@m 300’ driver
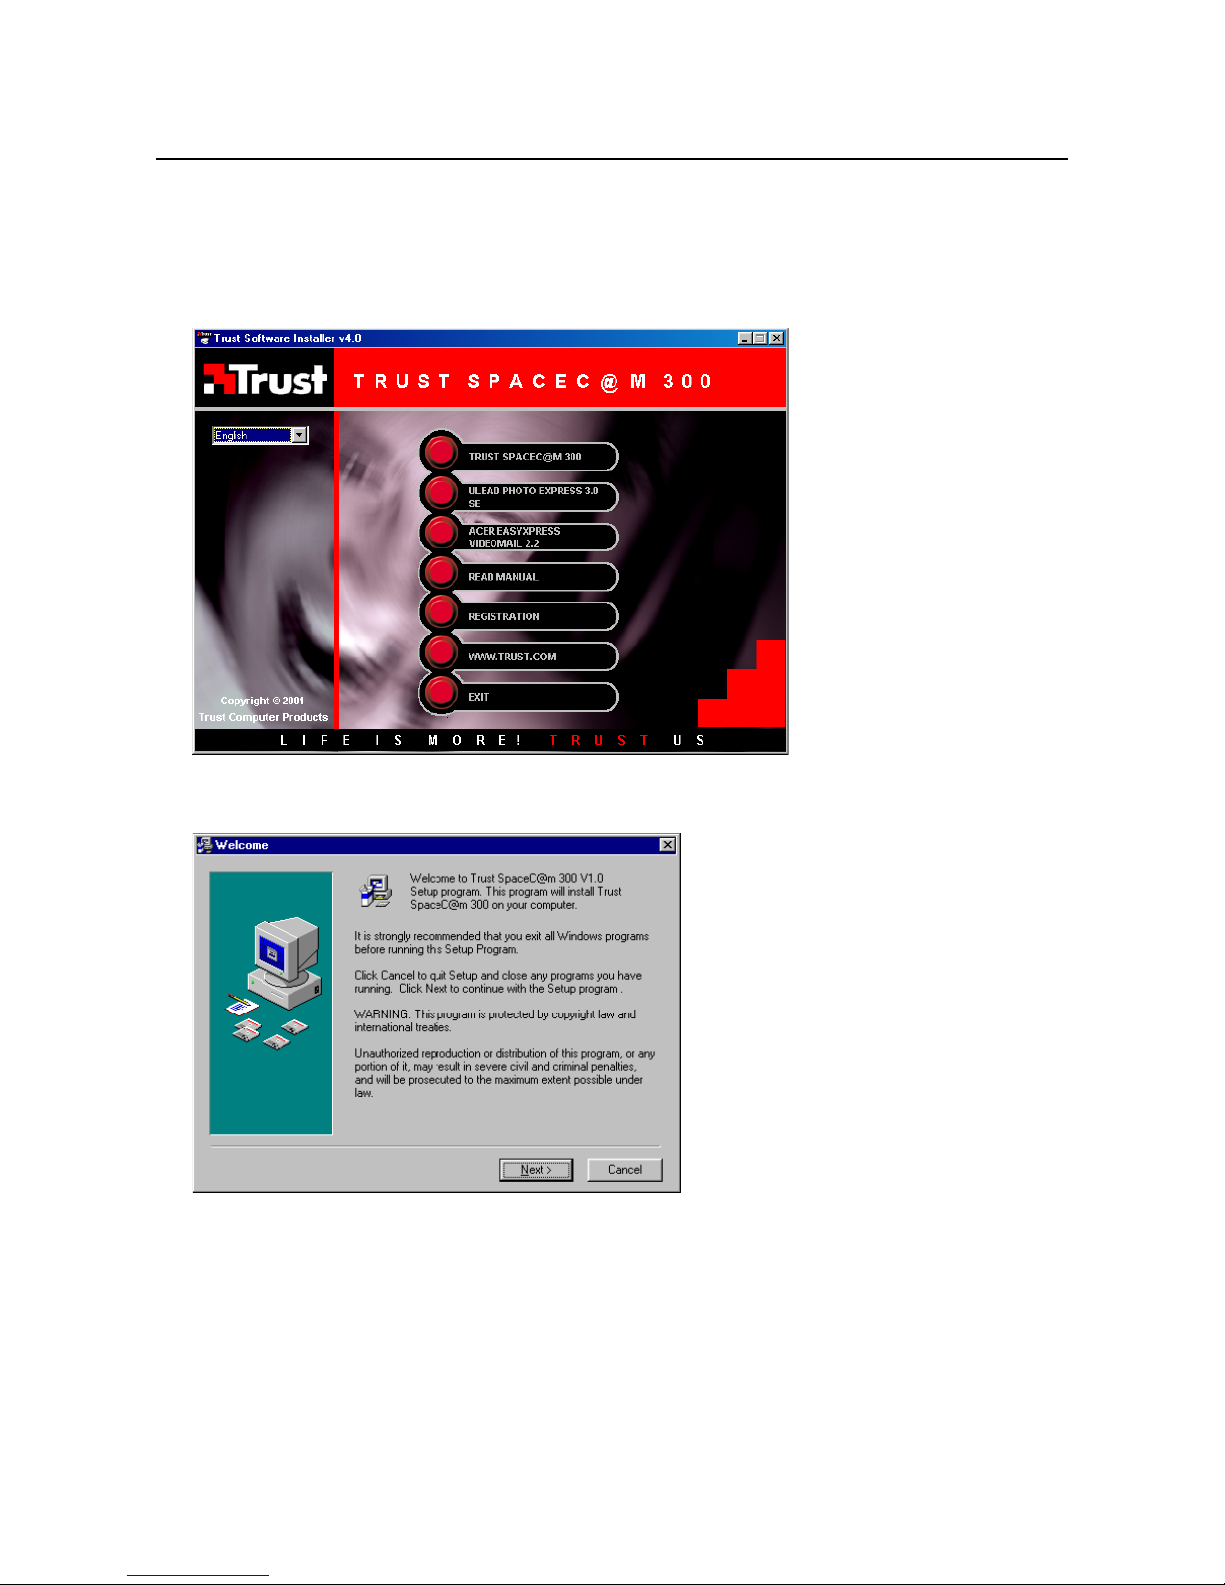
1. Insert the CD-ROM into your CD-ROM drive and the program will start automatically. Should this not
happen, start up ‘Setup.exe’ in the CD. Figure 2 will appear.
Figure 2: Installating the driver
2. Click on ‘TRUST SPACEC@M 300’ to install the driver. Figure 3 will appear.
Figure 3: Installation of driver
3. Click on ‘Next’ to start the installation. Figure 4 will appear.
Page 7
Trust SpaceC@m 300
5
NL
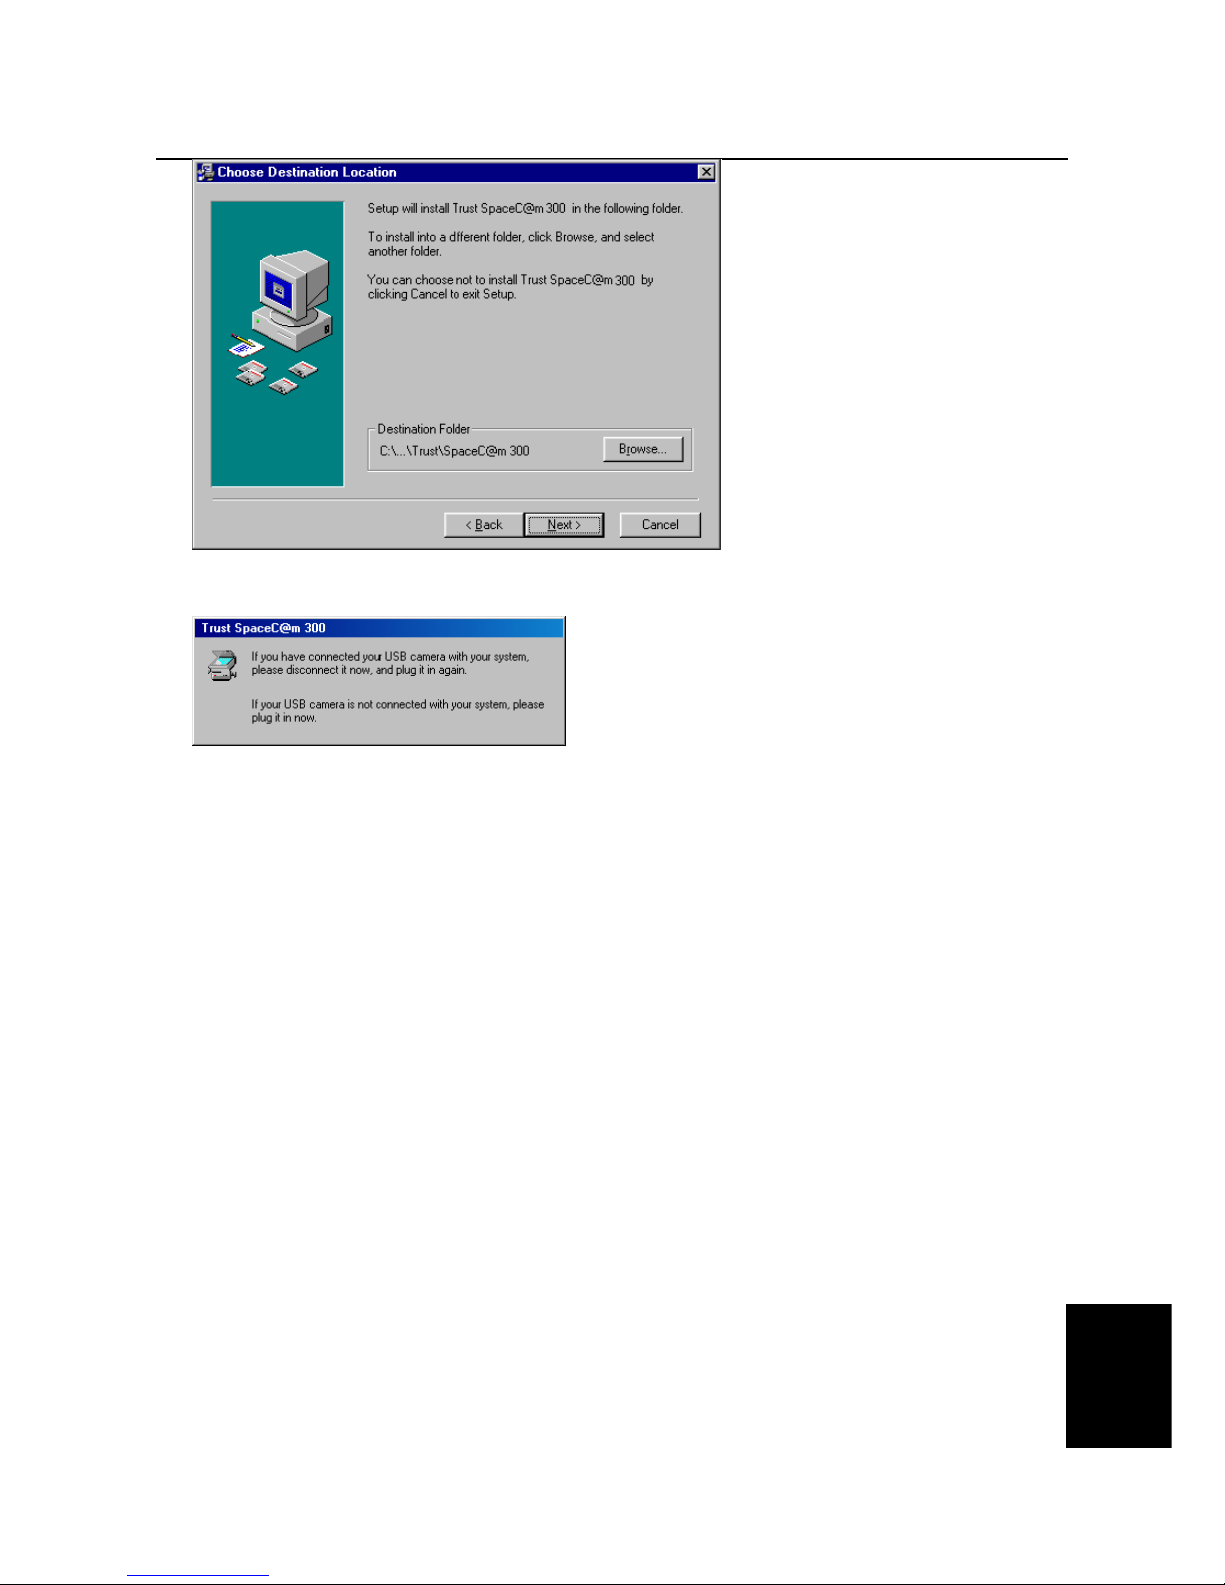
Figure 4: Installation of driver
4. Click on ‘Next’ to start the installation. After the driver has been installed, figure 5 will appear.
Figure 5: Installing the driver
5. Connect the camera’s USB connection D (see Figure 1) to a free USB port of your computer. Windows
98 will detect the new hardware and automatically install the Trust SpaceC@m 300 driver program.
6. Now connect the headphones with the microphone to the sound card. For this see the symbol on both
plugs.
You have now completed the installation of the driver program. Continue to chapter 4.2 for the installation of
Ulead Photo Express 3.0 SE.
4.2 Installing Ulead Photo Express 3.0 SE
Ulead Photo Express 3.0 SE is an image editor which you can use to load and edit the images on your
computer that you have taken using the SpaceC@m 300. Follow the instructions below to install Ulead Photo
Express 3.0 SE.
1. In the installation screen, click on 'Install Ulead Photo Express 3.0 SE'. See figure 2. Figure 6 will
appear.
Page 8

Trust SpaceC@m 300
6
Figure 6: Installing Ulead Photo Express 3.0 SE
2. Click on 'Install'. Figure 7 will appear.
Figure 7: Installing Ulead Photo Express 3.0 SE
3. Click on 'Next'. Figure 8 will appear.
Figure 8: Installing Ulead Photo Express 3.0 SE
4. Click on 'Yes' to accept the license agreement and continue with the installation. Figure 9 will appear.
Page 9
Trust SpaceC@m 300
7
NL
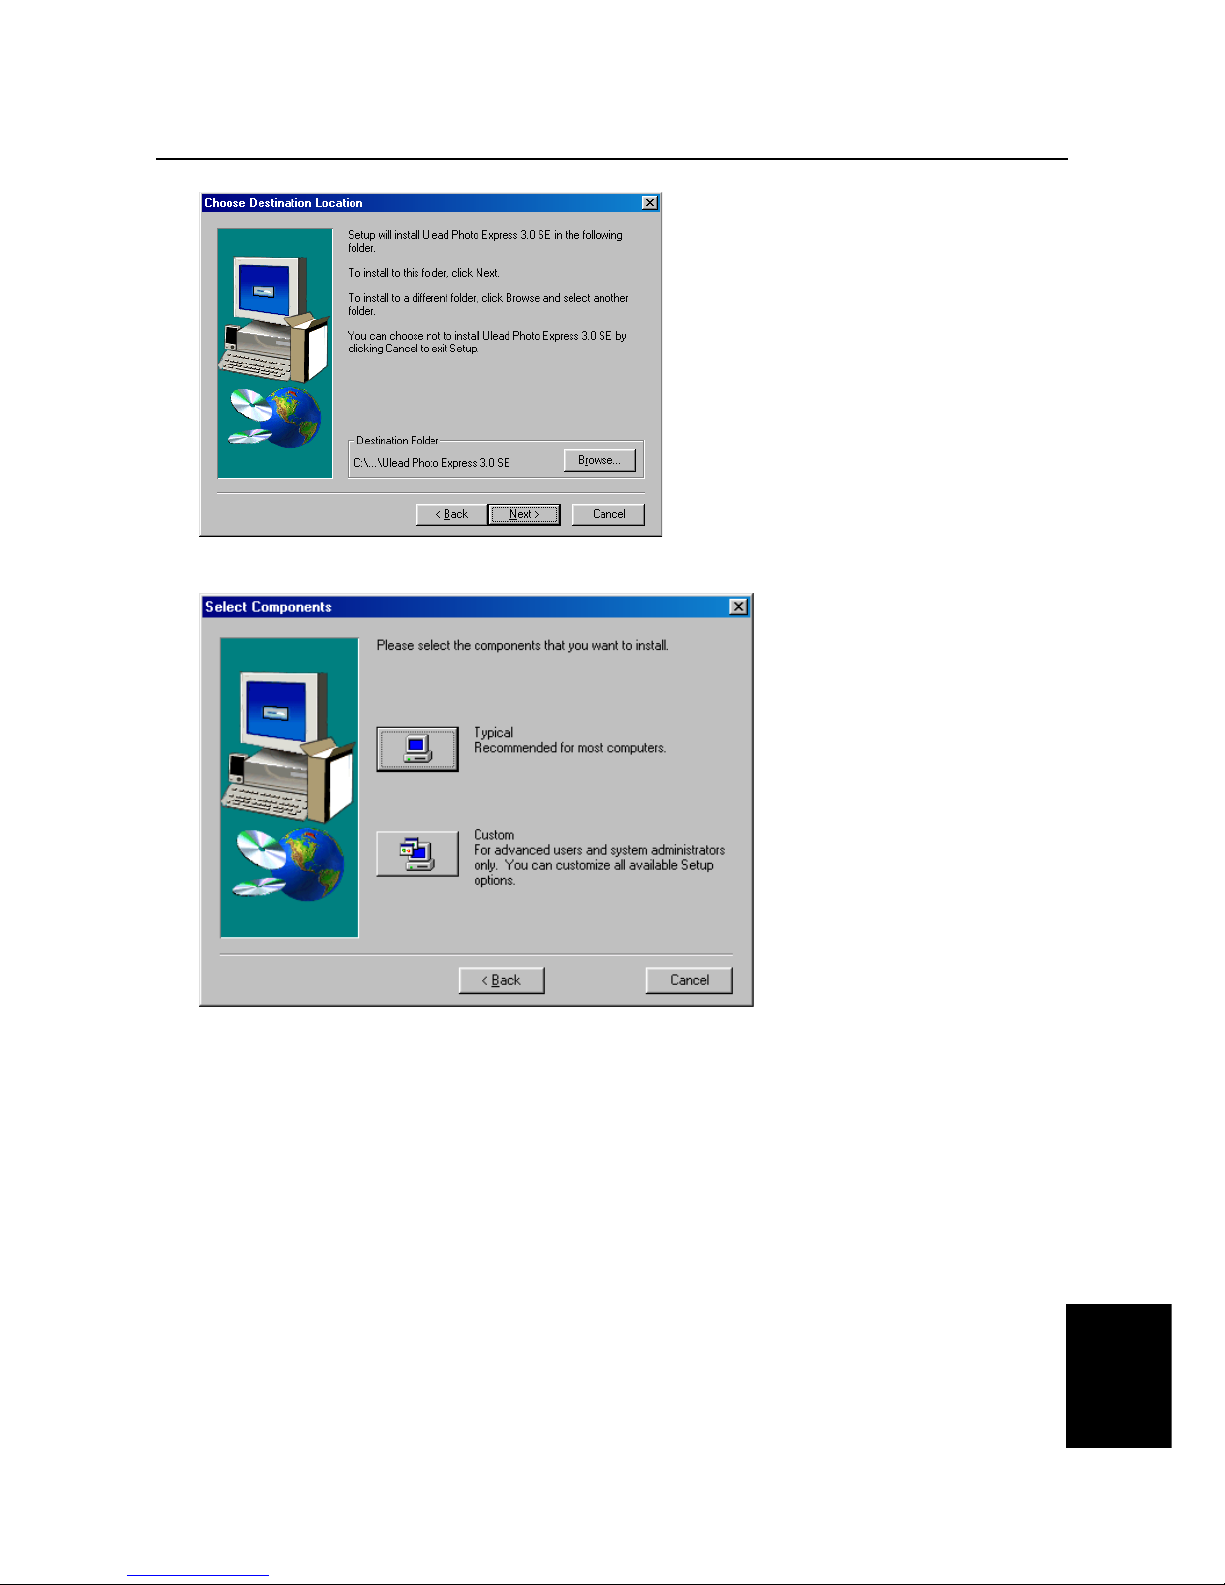
Figure 9: Installing Ulead Photo Express 3.0 SE
5. Click on 'Next'. A screen similar to figure 10 will appear.
Figure 10: Installing Ulead Photo Express 3.0 SE
Page 10
Trust SpaceC@m 300
8
6. Click on ‘Typical’. Figure 11 will appear.
Figure 11: Installing Ulead Photo Express 3.0 SE
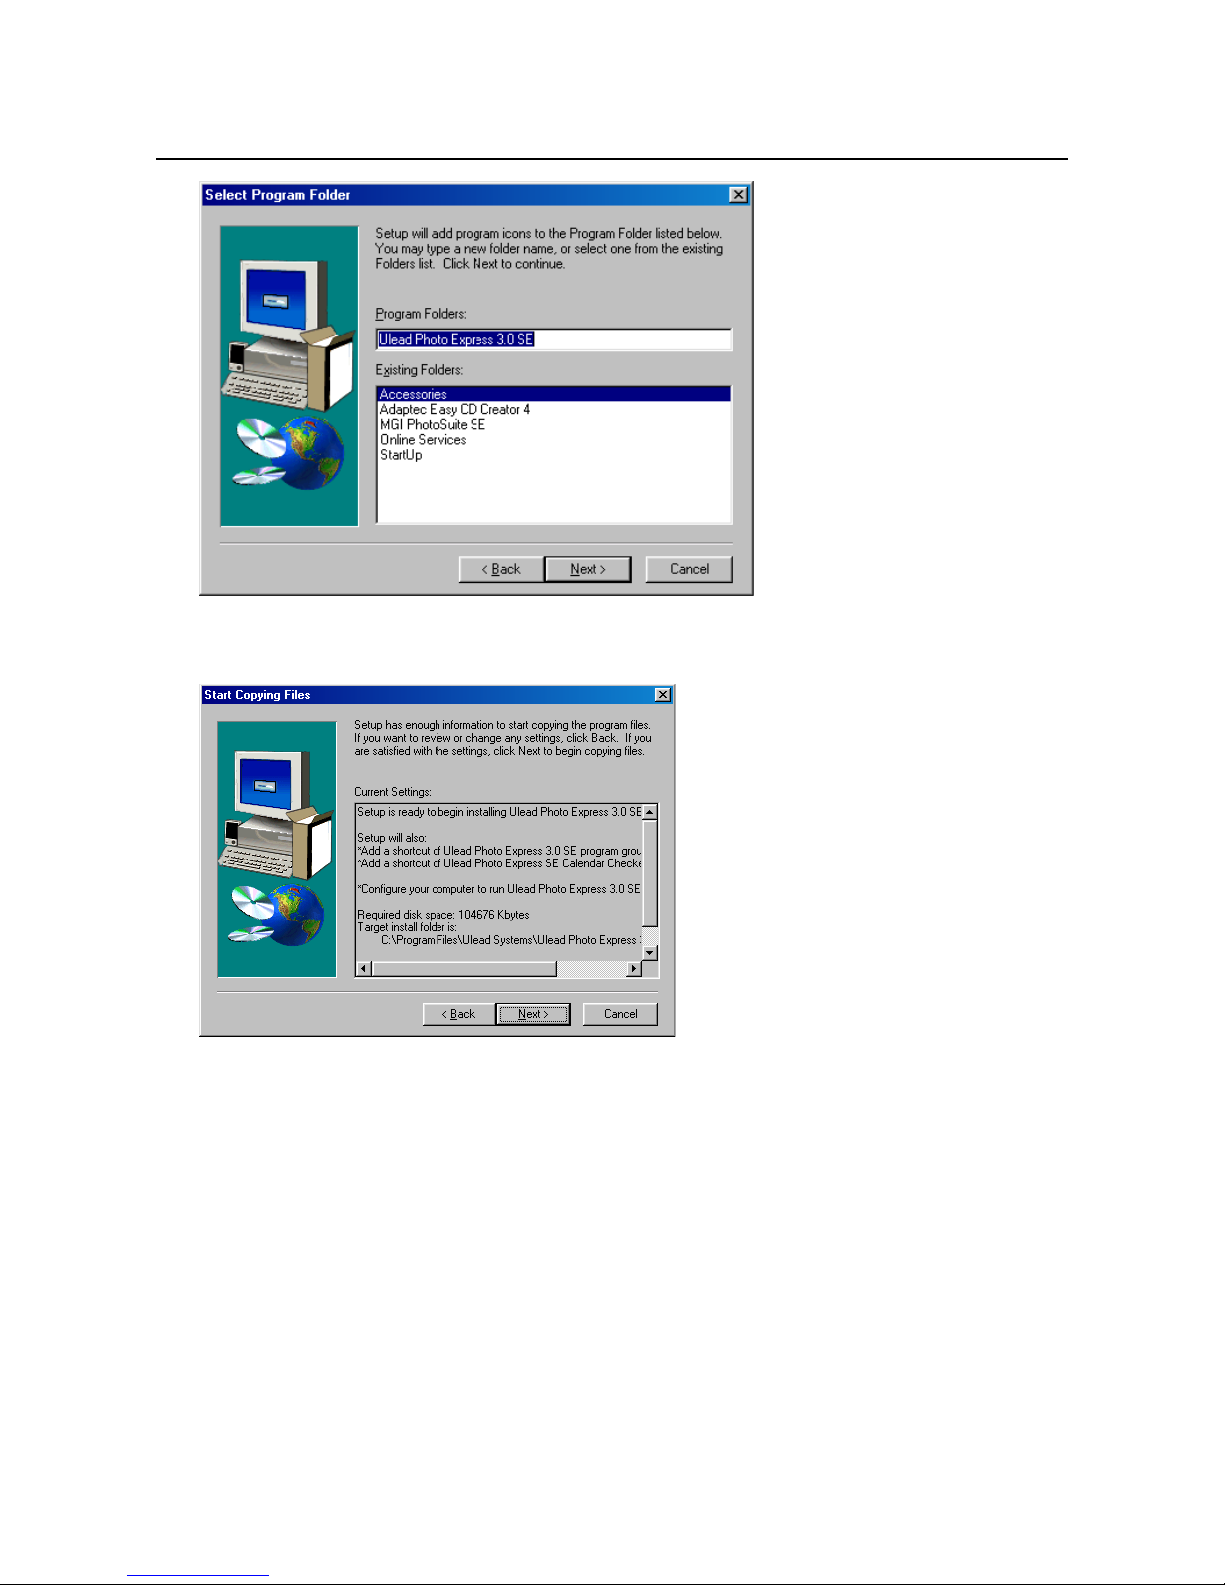
7. Click on 'Next'. Figure 12 will appear.
Figure 12: Installing Ulead Photo Express 3.0 SE
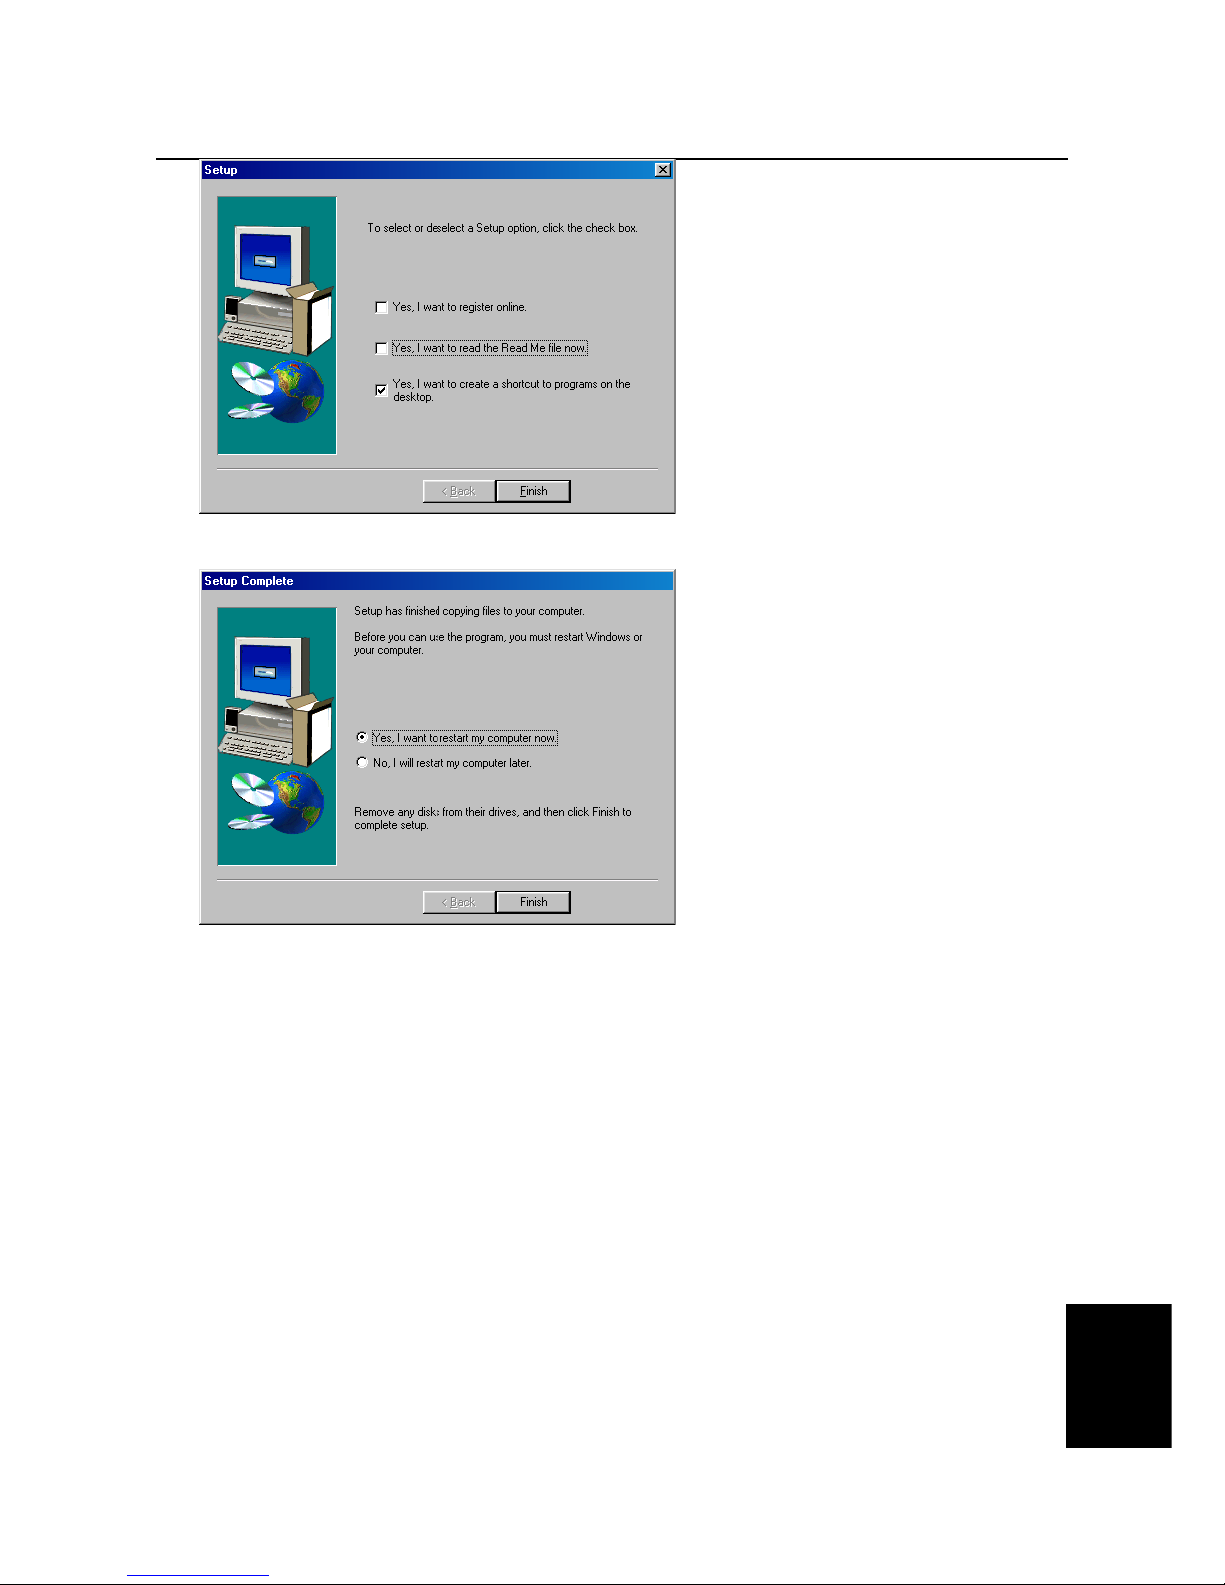
8. Click on 'Next'. Ulead Photo Express 3.0 SE will now be installed. Figure 13 will appear after the
installation.
Page 11
Trust SpaceC@m 300
9
NL
Figure 13: Installing Ulead Photo Express 3.0 SE
9. Disable the option for 'online' registration and click on 'Finish'. Figure 14 will appear.
Figure 14: Installing Ulead Photo Express 3.0 SE
10. Click on 'Finish' to restart your computer.
You have now completed the installation of Ulead Photo Express 3.0 SE. See chapter 4.3 for the installation
of Acer EasyXpress VideoMail 2.2.
4.3 Installing Acer EasyXpress VideoMail 2.2
You can use Acer EasyXpress VideoMail 2.2 to send video and audio multimedia e-mails. To use this
program, you need to have a modem or ISDN connection, a sound card with speakers and a microphone,
and an Internet account.
Follow the instructions below to install EasyXpress VideoMail 2.2.
1. In the installation screen, click on 'Install Acer EasyXpress VideoMail 2.2'. See figure 2. Figure 15 will
appear.
Page 12
Trust SpaceC@m 300
10
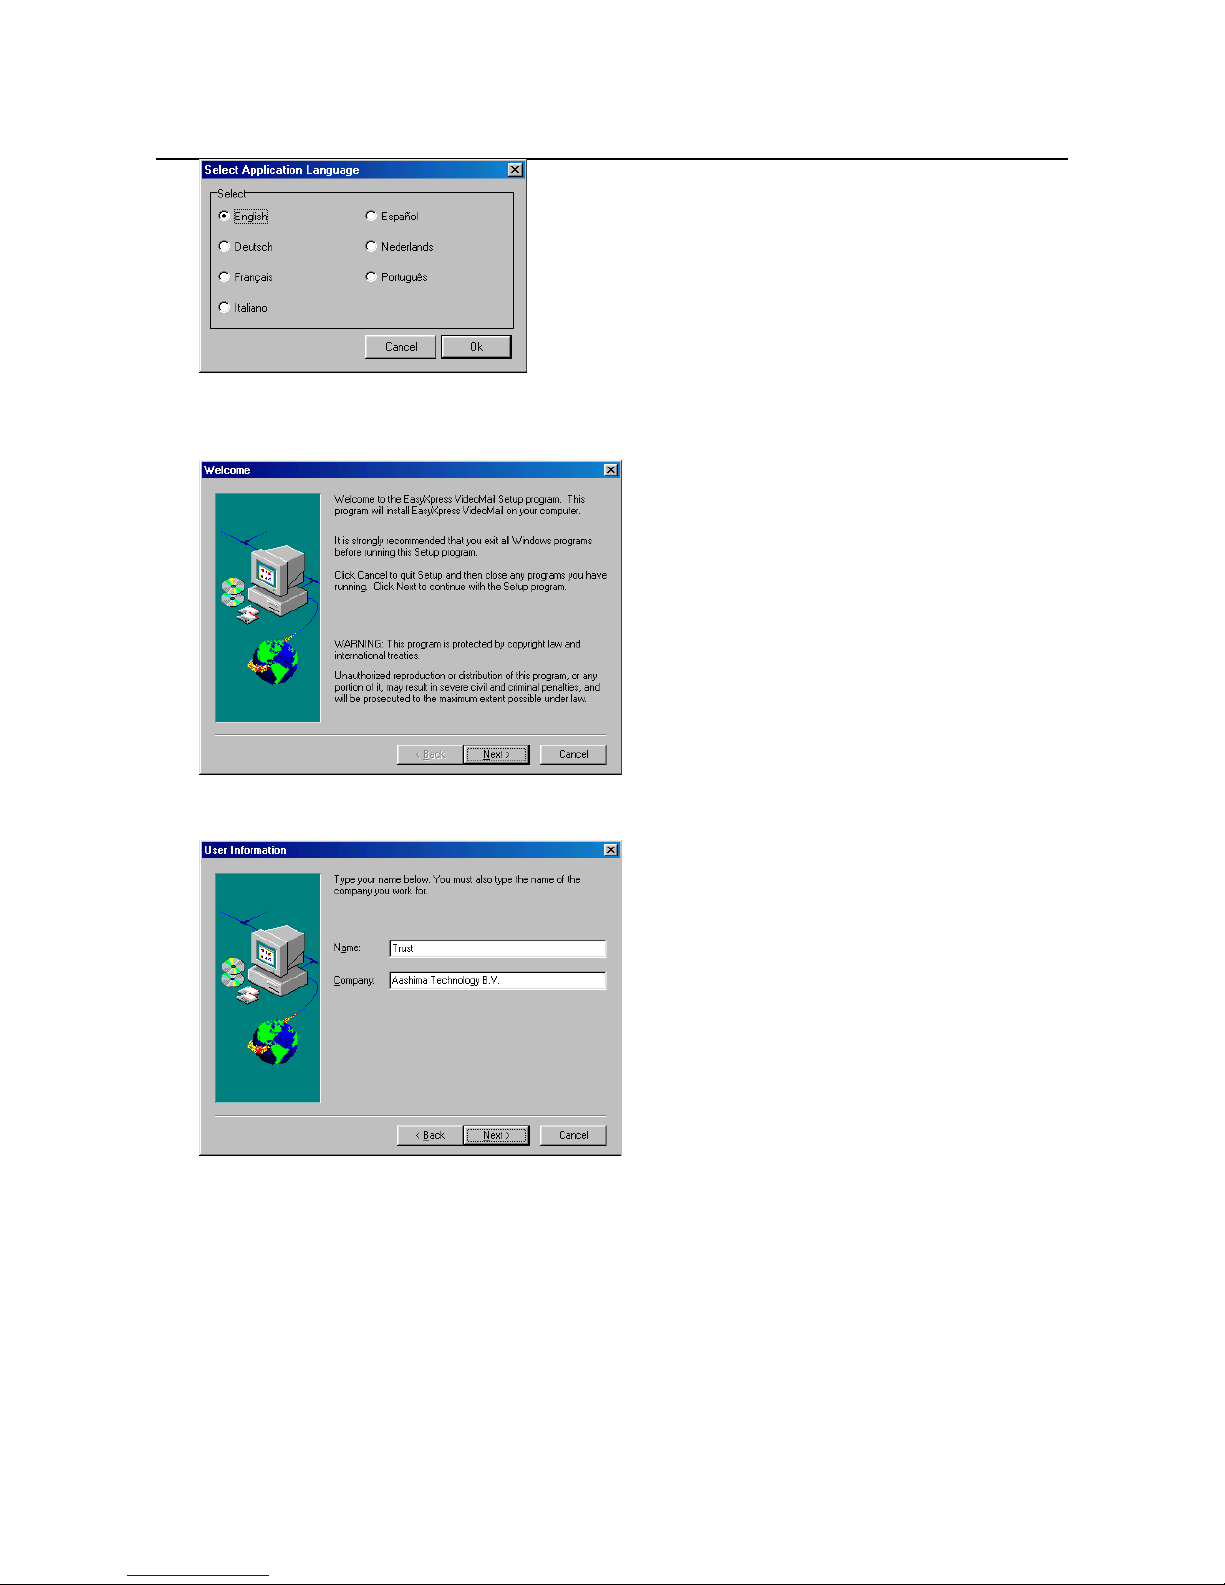
Figure 15: Selecting the language
2. Select the language you wish to use for the installation of Acer EasyXpress VideoMail 2.2 and click on
'OK'. Figure 16 will appear.
Figure 16: Installing Acer EasyXpress VideoMail 2.2
3. Click on 'Next'. Figure 17 will appear.
Figure 17: Installing Acer EasyXpress VideoMail 2.2
4. Fill in your details and click on 'Next'. Figure 18 will appear.
Page 13
Trust SpaceC@m 300
11
NL
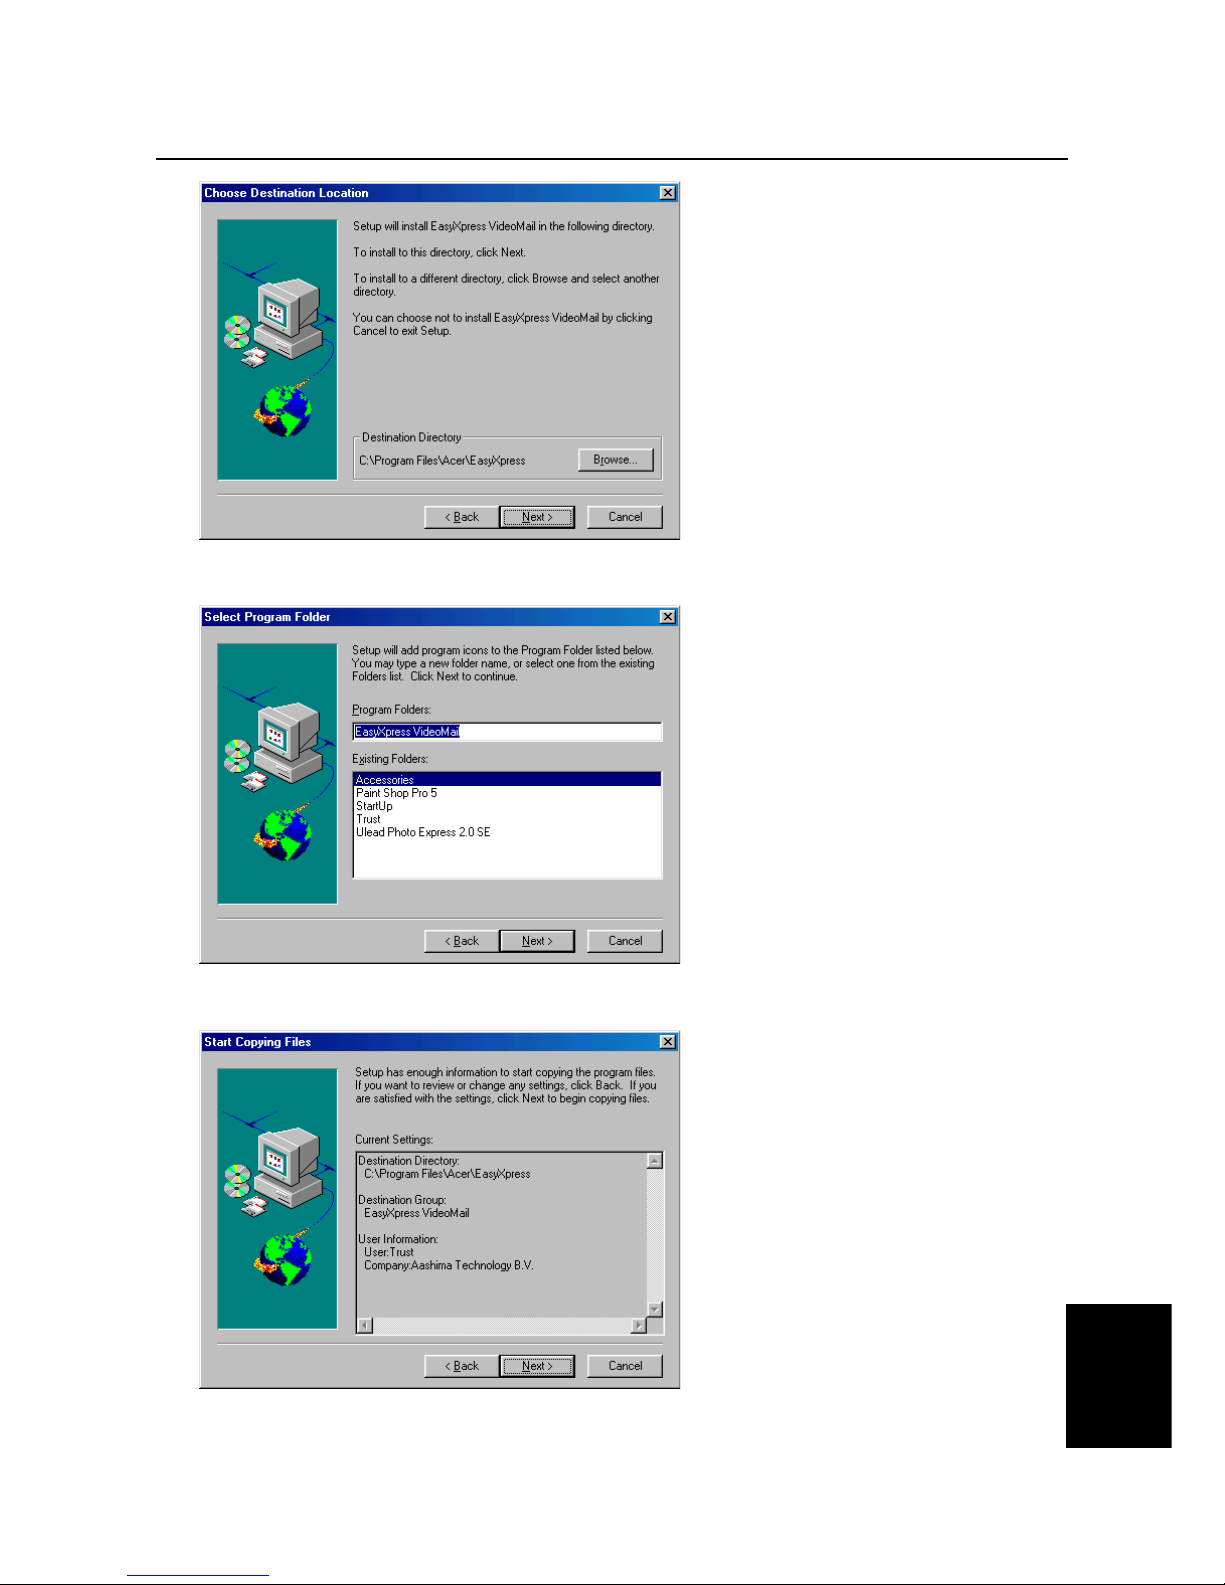
Figure 18: Installing Acer EasyXpress VideoMail 2.2
5. Click on 'Next'. Figure 19 will appear.
Figure 19: Installing Acer EasyXpress VideoMail 2.2
6. Click on 'Next'. Figure 20 will appear.
Figure 20: Installing Acer EasyXpress VideoMail 2.2
7. Click on 'Next'. EasyXpress VideoMail will now be installed.
Page 14
Trust SpaceC@m 300
12
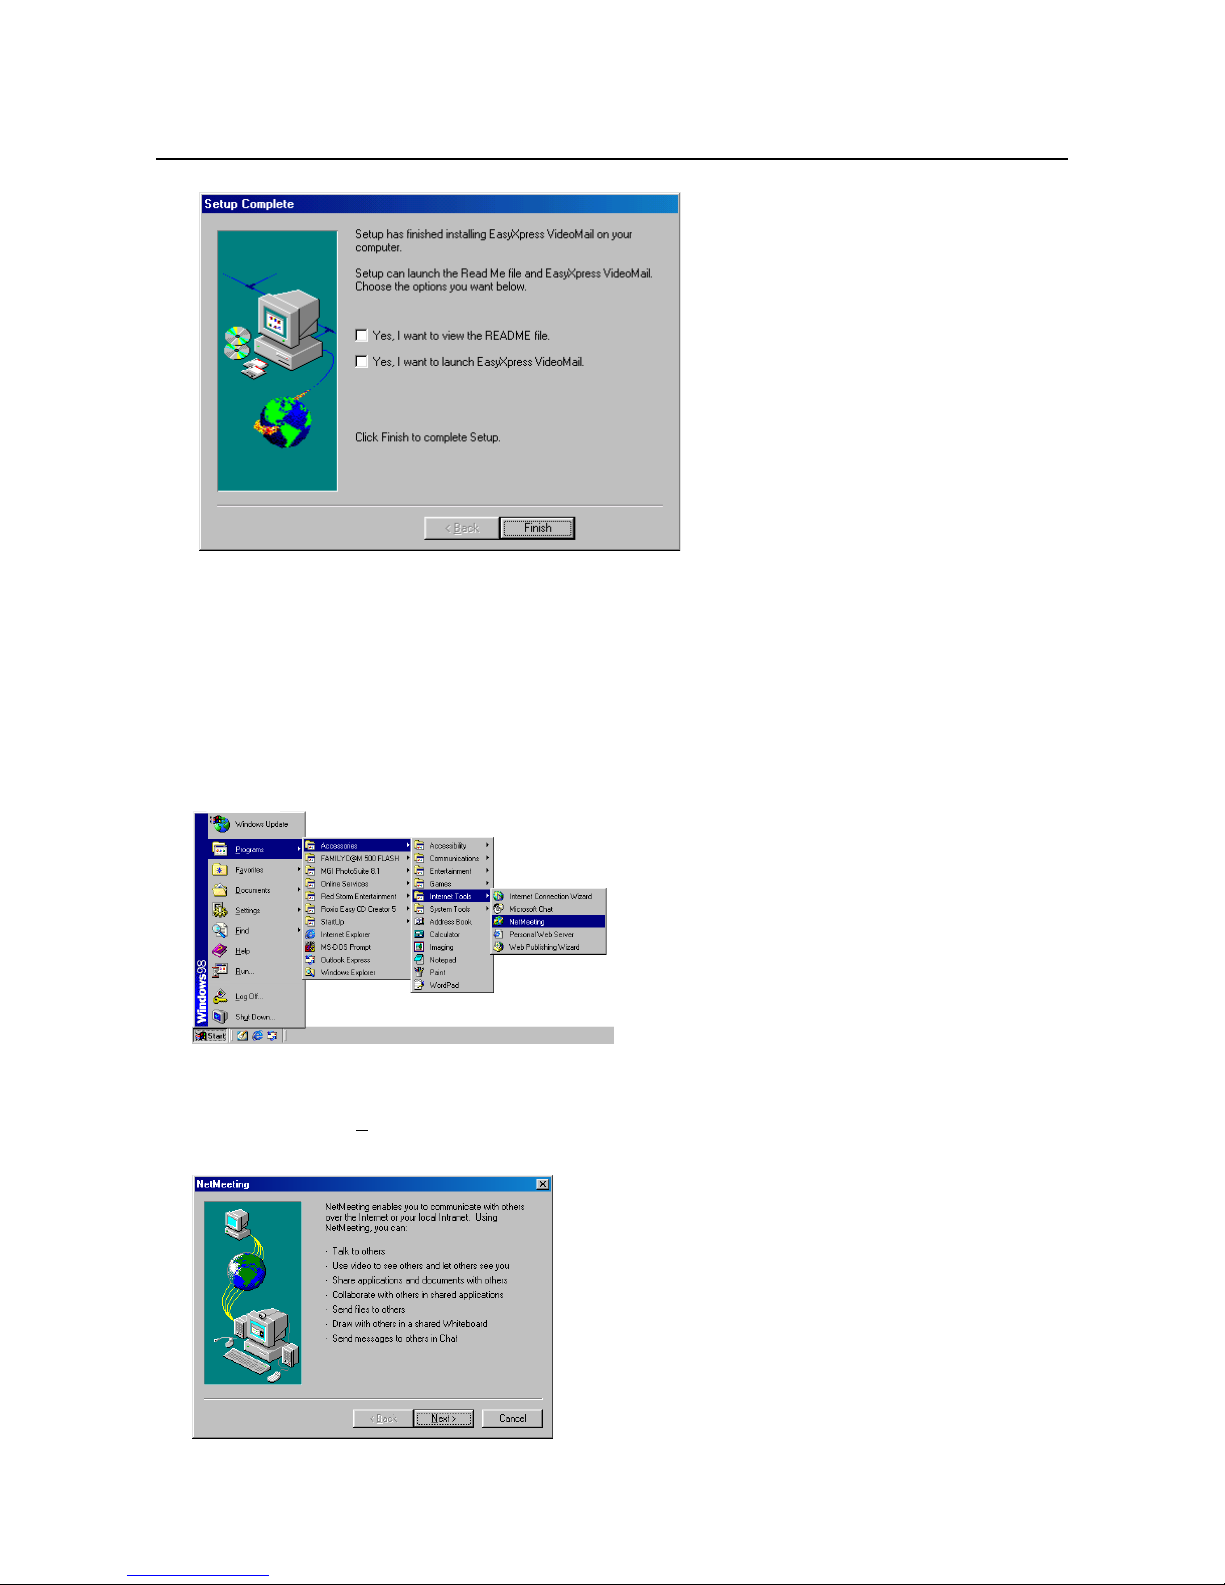
8. After the installation, figure 21 will appear. Click on 'Finish' to complete the installation.
Figure 21: Installing Acer EasyXpress VideoMail 2.2
9. Click on 'Finish' to complete the installation.
You have now completed the installation of Acer EasyXpress VideoMail 2.2.
4.4 Installation Microsoft ® NetMeeting (Windows 98 / Me / 2000)
NetMeeting is a program which is included in Windows 98 / Me / 2000. The program makes it possible to use
your Trust SpaceC@M as webcam.
To install NetMeeting you have to follow the next steps:
Figure A: Installation Microsoft ® NetMeeting
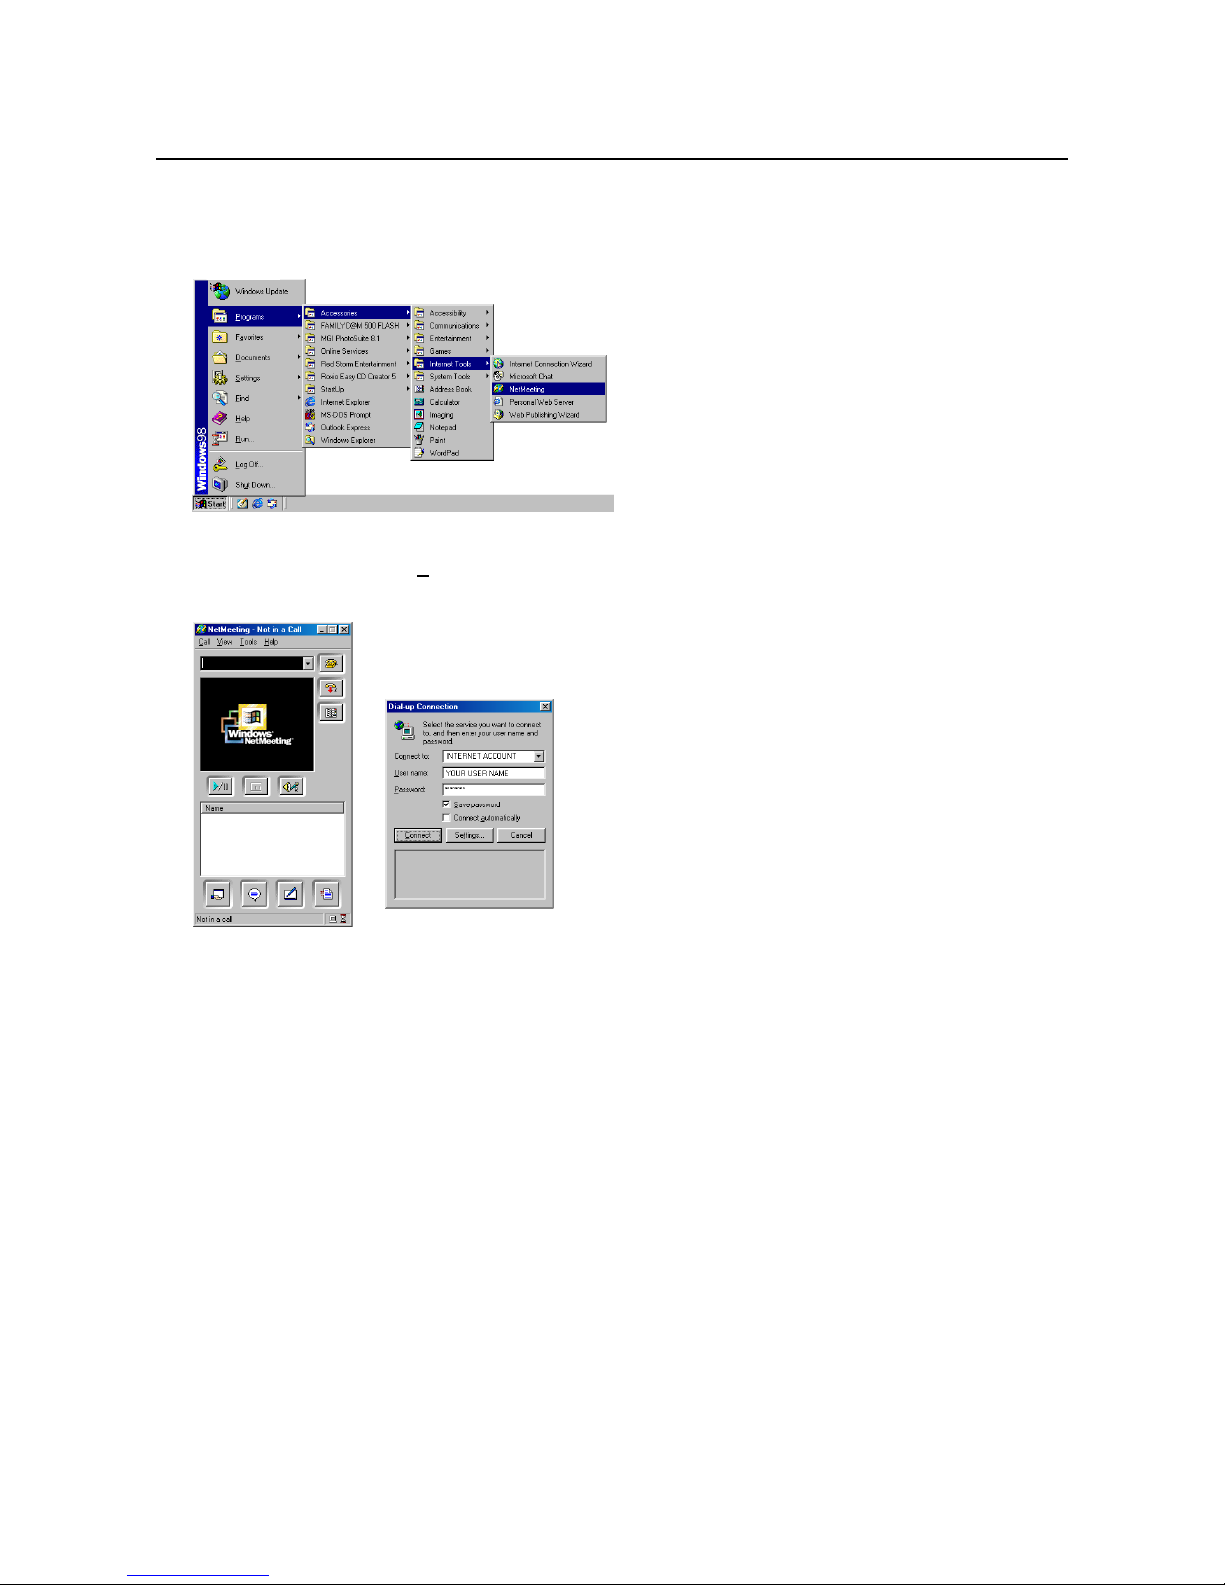
1. Click the ‘Start’ button left below of your desktop.
Go to NetMeeting (Programs -> Accessories -> Internet Tools -> NetMeeting) (See Figure A)
2. Click your left mouse button to start the installation. Figure B appears.
Figure B: Installation Microsoft ® NetMeeting
Page 15
Trust SpaceC@m 300
13
NL
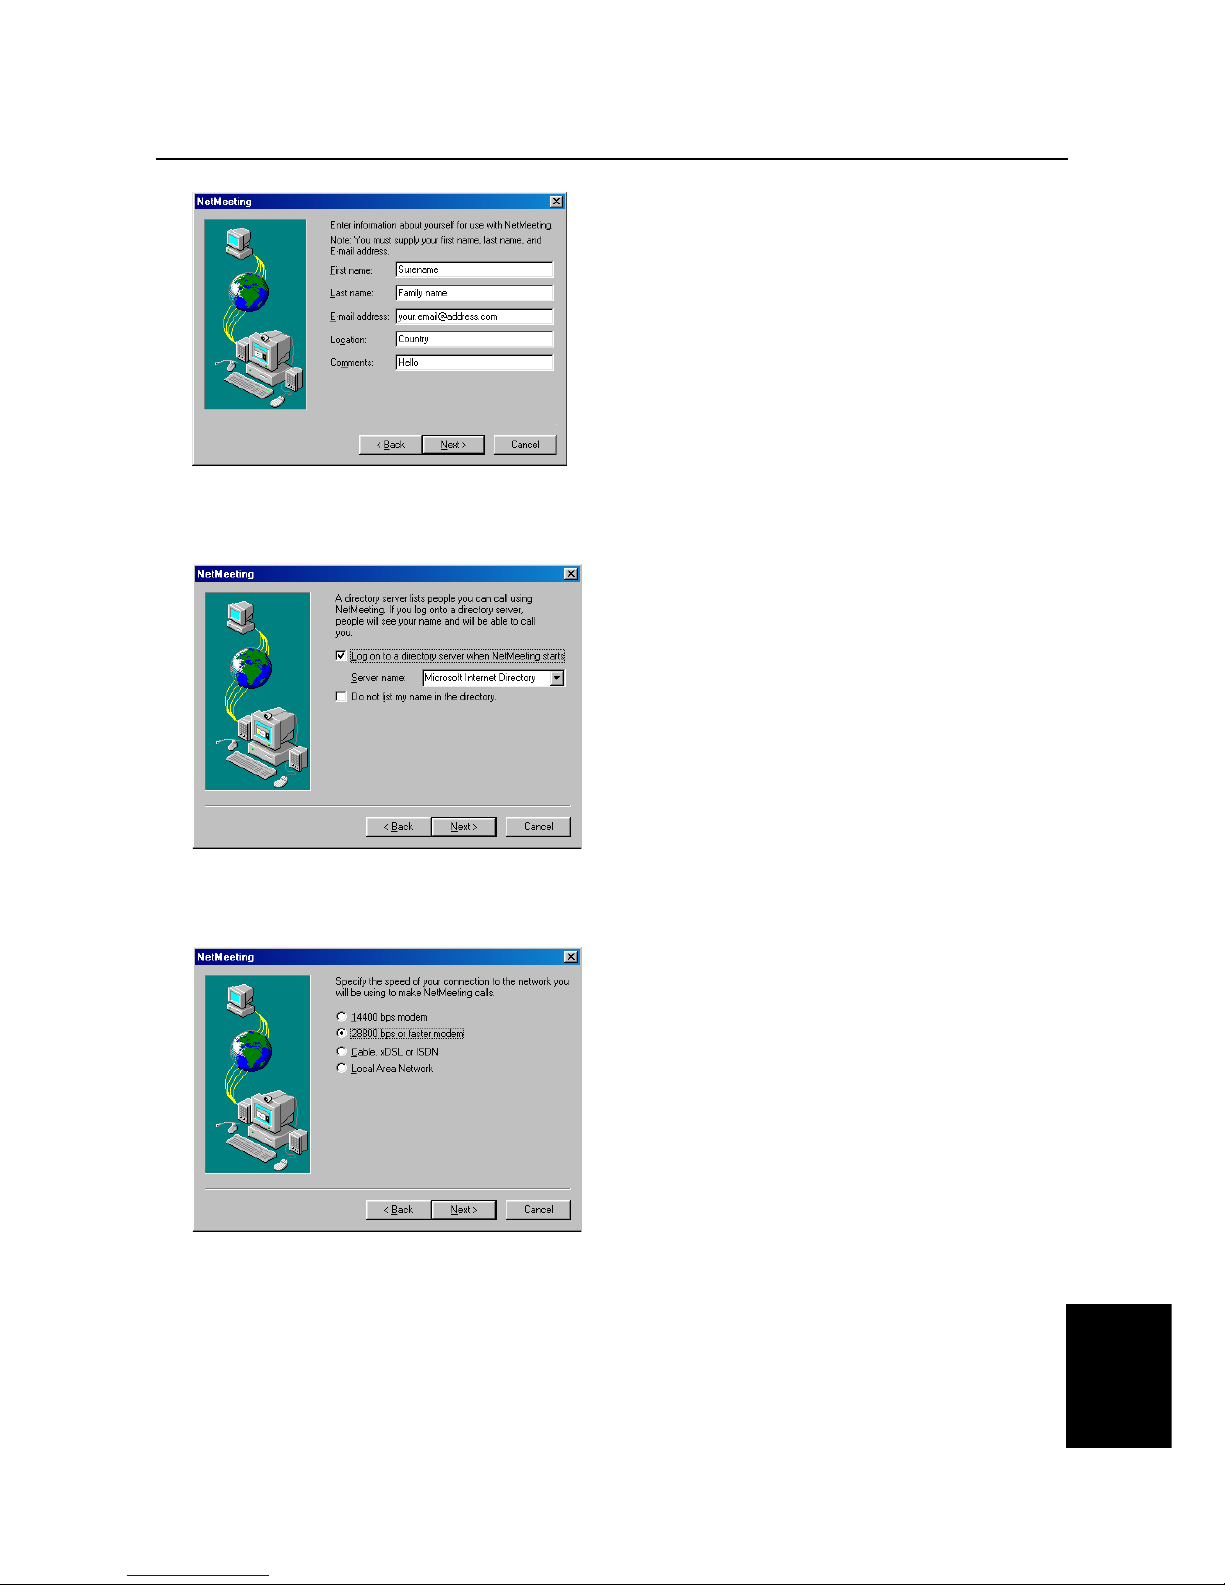
3. Click “Next” to continue. Figure C appears.
Figuur C: Installation Microsoft ® NetMeeting
4. Enter the information about yourself like Fill in your surname, family name, e-mail address place or
country and a greeting text. Then click op “Next”. Figure D appears.
Figure D: Installation Microsoft ® NetMeeting
5. If you do not want to list your name in the directory list, select ‘Do not list my name in the directory’. Click
“Next” to continue. Figure E appears.
Figure E: Installation Microsoft ® NetMeeting
6. Select the connection you use and click “Next” to continue. Figure F appears.
Page 16
Trust SpaceC@m 300
14
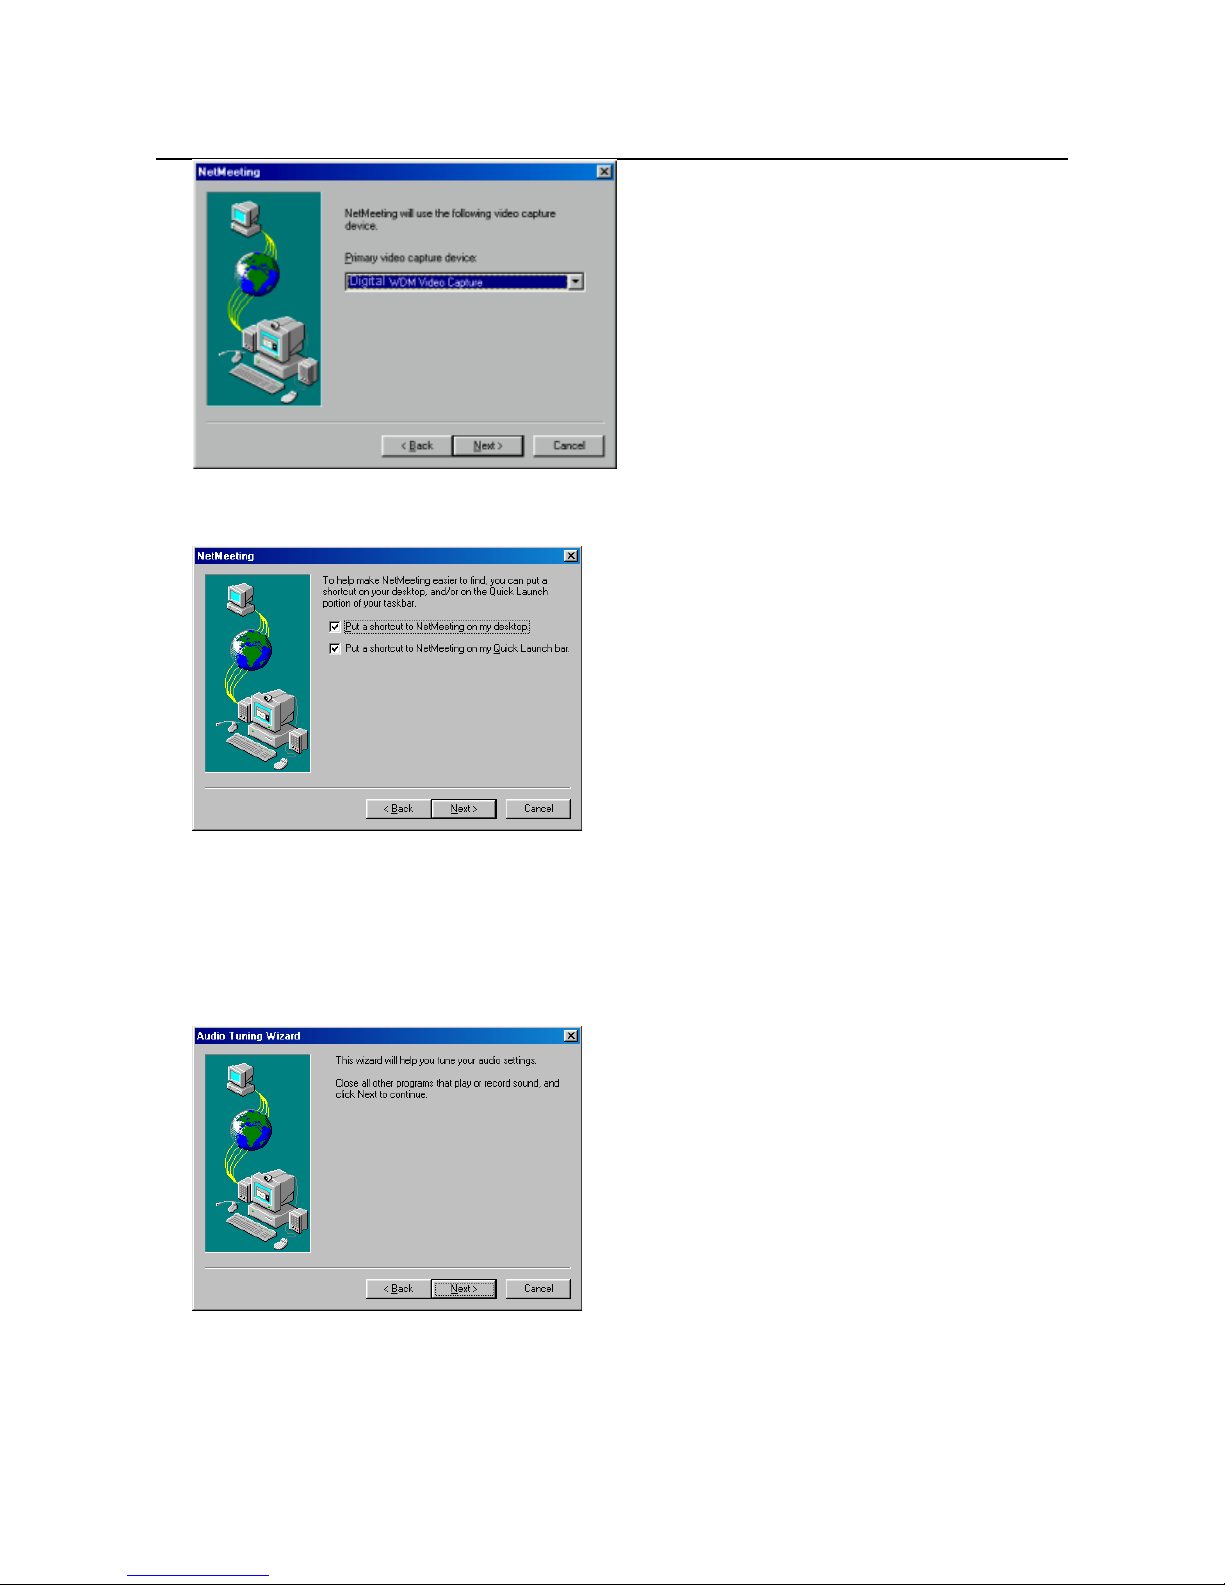
Figure F: Installation Microsoft ® NetMeeting
7. Select the camera you want to use for NetMeeting and click “Next” to continue. Figure G appears.
Figure G: Installation Microsoft ® NetMeeting
8. Select “Put a shortcut to NetMeeting on my desktop” if you like to have a shortcut of NetMeeting on your
desktop of Windows.
Select “Put a shortcut to NetMeeting on My Quick Launch bar” if you like to have a shortcut of
NetMeeting in your Windows taskbar.
9. Click ‘Next’ to continue. Figure H appears.
Figure H: Installation Microsoft ® NetMeeting
10. Click “Next” to configure and test the audio settings of NetMeeting. Figure I appears.
Page 17
Trust SpaceC@m 300
15
NL
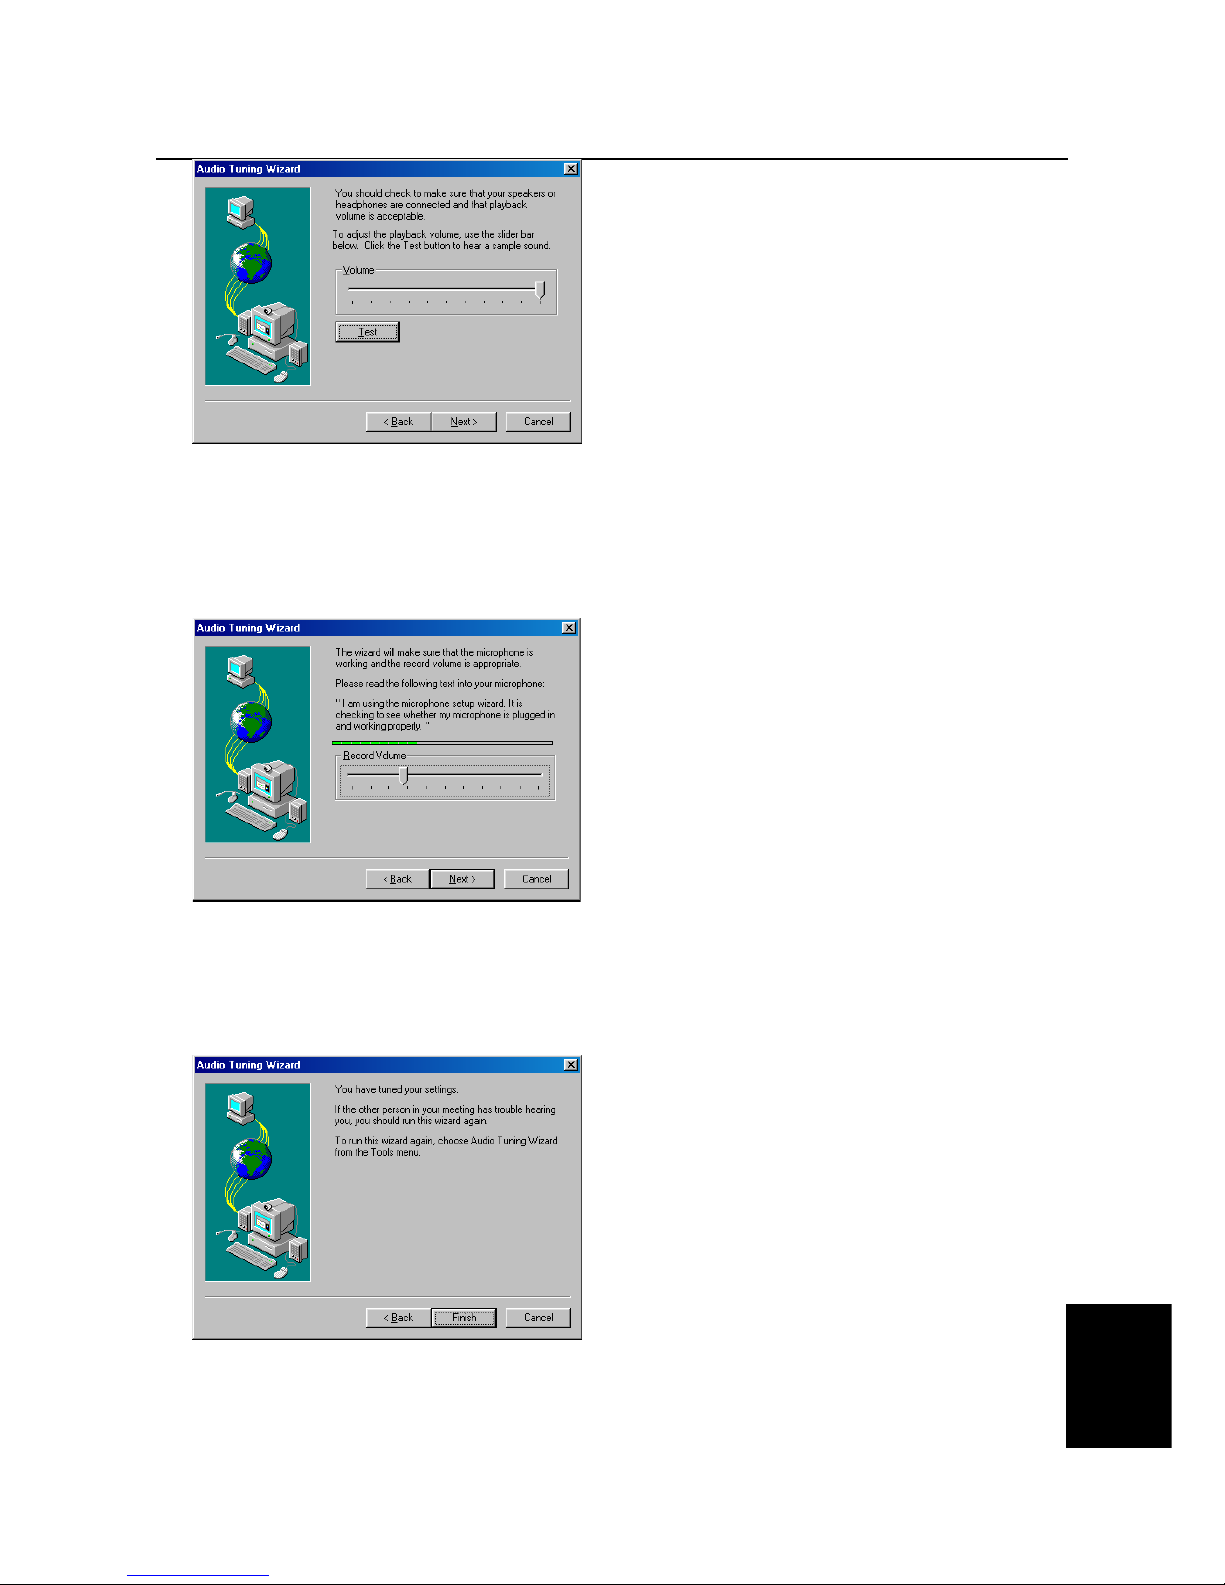
Figure I: Installation Microsoft ® NetMeeting
11. Click the “Test” button to test your connected speakers. The“Test” button will change into a “Stop”
button”. You will hear sound of your speakers now.
12. You can set the volume by using the slide button. If there is no sound, your soundcard probably is not
installed correctly. Refer to the manual of your soundcard manufacturer to install your soundcard. If you
can hear sound, click the “Stop” button followed by ‘Next’. Figure J appears.
Figure J: Installation Microsoft ® NetMeeting
Note: Be sure your microphone is connected to your soundcard.
13. Speak through the microphone to test. The indicator will beat out. Use the ‘Record Volume’ slide switch
to set the sensitivity of the volume in the green zone, If the volume is in the red or yellow zone the volume
is too high. Click “Next” to continue. Figure K appears.
Figure K: Installation Microsoft ® NetMeeting
14. Click ‘Finish’ to finish the installation of NetMeeting. NetMeeting will start automatically. Read chapter
“Using Microsoft® NetMeeting” for using the program.
Page 18
Trust SpaceC@m 300
16
5. Using the camera and the applications
5.1 Trust SpaceC@m 300 Software
The 'Trust SpaceC@m 300' program is installed during the installation of the camera. Follow the instructions
below for the use of this program.
5.1.1 Description of the functions
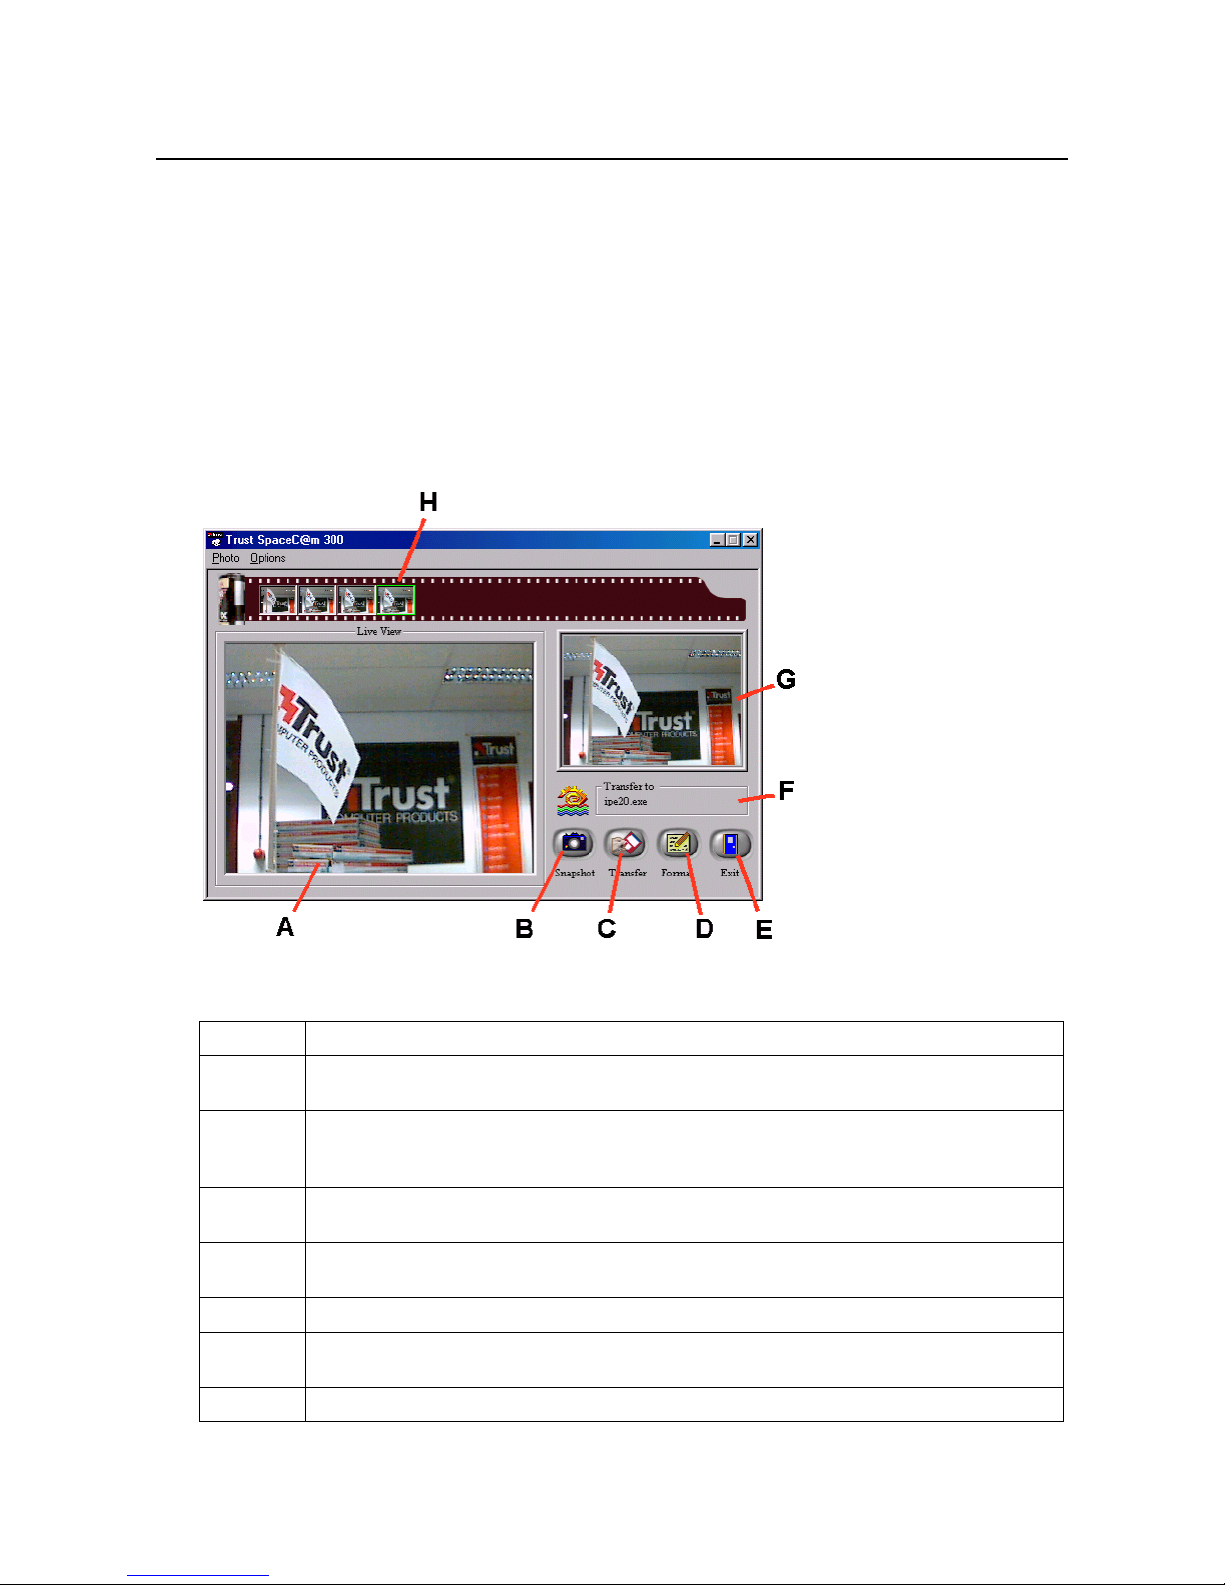
1. Go to ‘Start - Programs - Trust - SpaceC@m 300' and click on ‘Trust SpaceC@m 300’.
2. Figure 22 will appear. See the table below for the description of the program's functions.
Figure 22: SpaceC@m 300 Software
Function Description
A
The present camera image is shown in this screen. See chapter 4.1.2 to adjust the
image.
B
‘Snapshot’ button: Takes a snapshot of the image (A). The snapshot taken is shown in
screen (G) and added to the 'Thumbnails' (H). You can also take a snapshot using the
button on the camera.
C
‘Transfer’ button: Opens the snapshot that is shown in the screen (G) in the image editing
program that you have selected (F). See chapter 4.2. for the use of this program.
D
‘Format’ button: Selects the file format used to save the snapshot. You can choose
between BMP and JPEG. You can also adjust the image compression for a JPEG image.
E
‘Exit’ button: Closes the program
F
Shows the program selected in which the snapshot (G) is opened if you click on the
'Transfer' button (C).
G
The snapshot is shown in this screen.
Page 19
Trust SpaceC@m 300
17
NL
Function Description
H
Thumbnails' (small example of the image) of the snapshots are placed here. Click on the
'Thumbnails' to view the snapshot in the screen (G). See chapter 4.2. for the use of this
program.
Table 2: Functions of the driver program
5.1.2 Advanced image settings
Follow the instructions below to adjust the camera image.
Note: Only change the settings if it is necessary. Incorrect settings can cause problems for other
programs (e.g. NetMeeting).
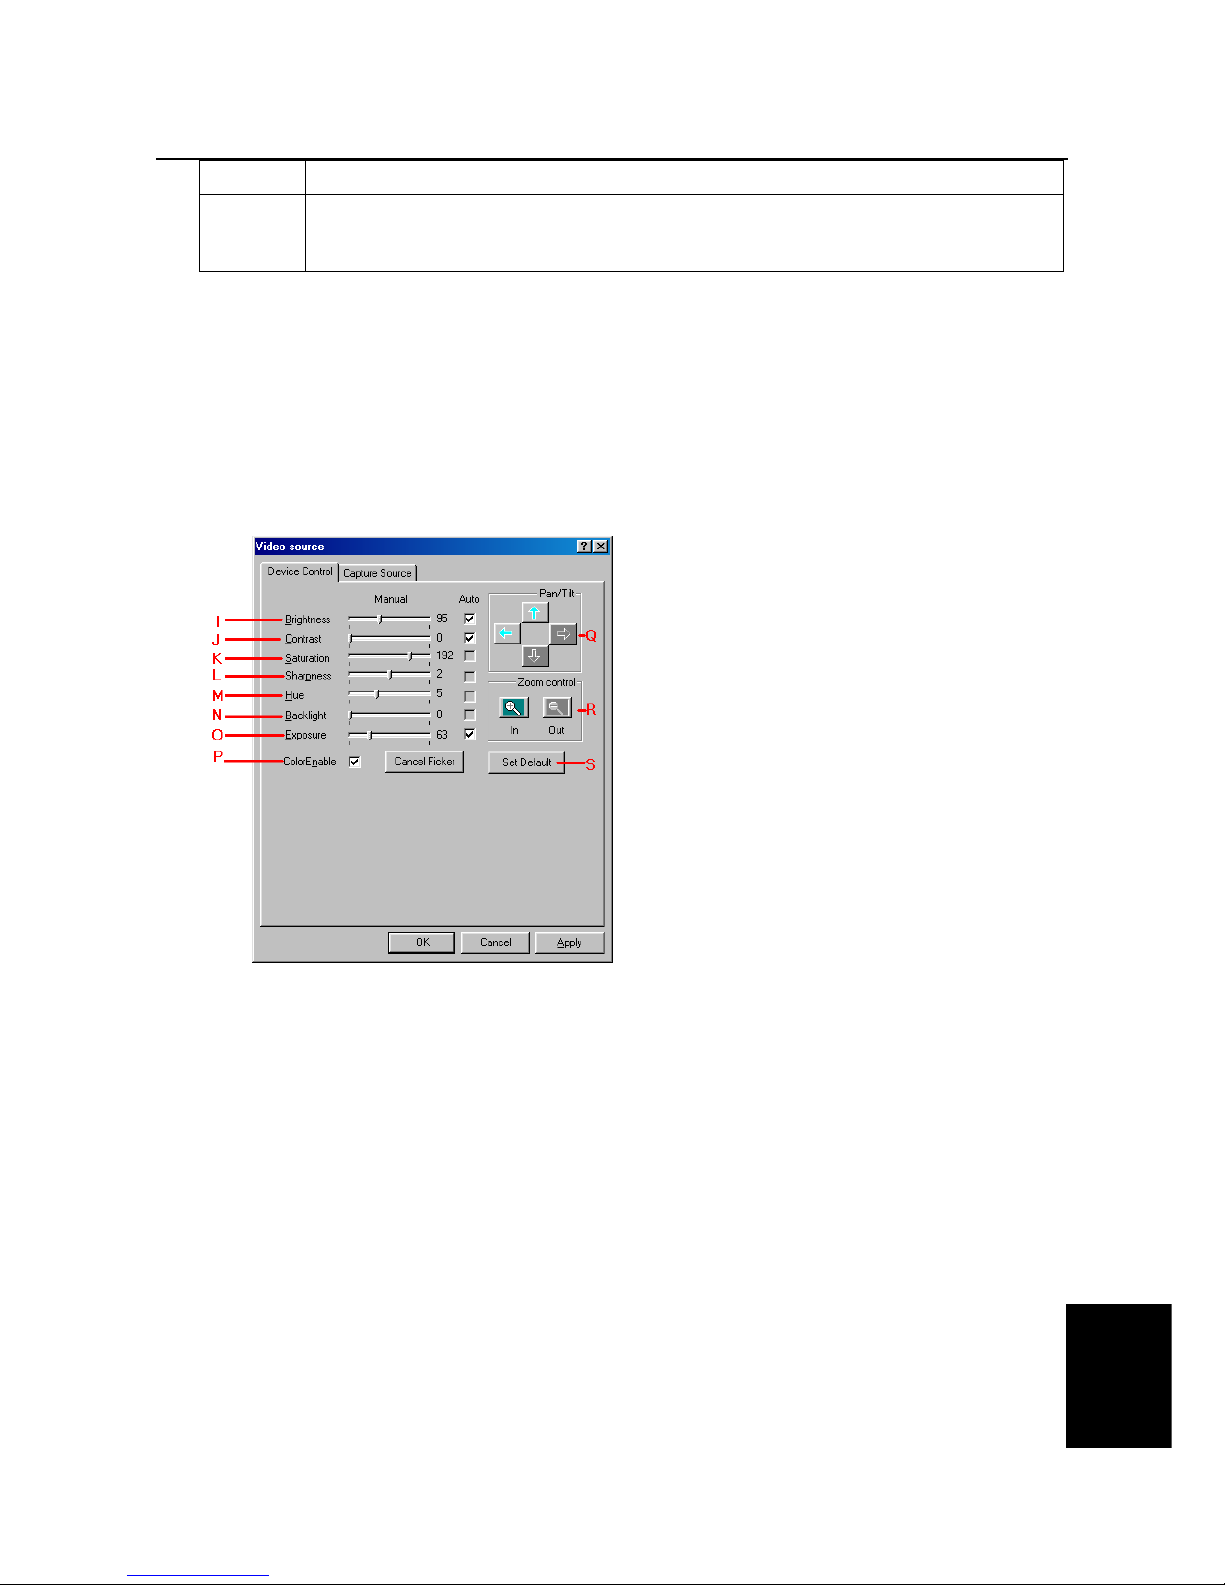
1. Go to the Menubar and click on 'Options'.
2. Select ‘Capture Filter’. Figure 23 will appear. See the table below for the description of the program's
diverse functions.
Figure 23: Changing the camera settings
Page 20
Trust SpaceC@m 300
18
Function Description
I
Adjusts the image brightness
J
Adjusts the image contrast
K
Adjust the image colour depth
L
Adjusts the sharpness of the image
M
Adjusts the hue
N
Adjusts the background
O
Adjusts the exposure
P
Colour or Black / White
Q
Screen position
R
Zoom In / Zoom Out
S
Factory settings
Table 3: Settings
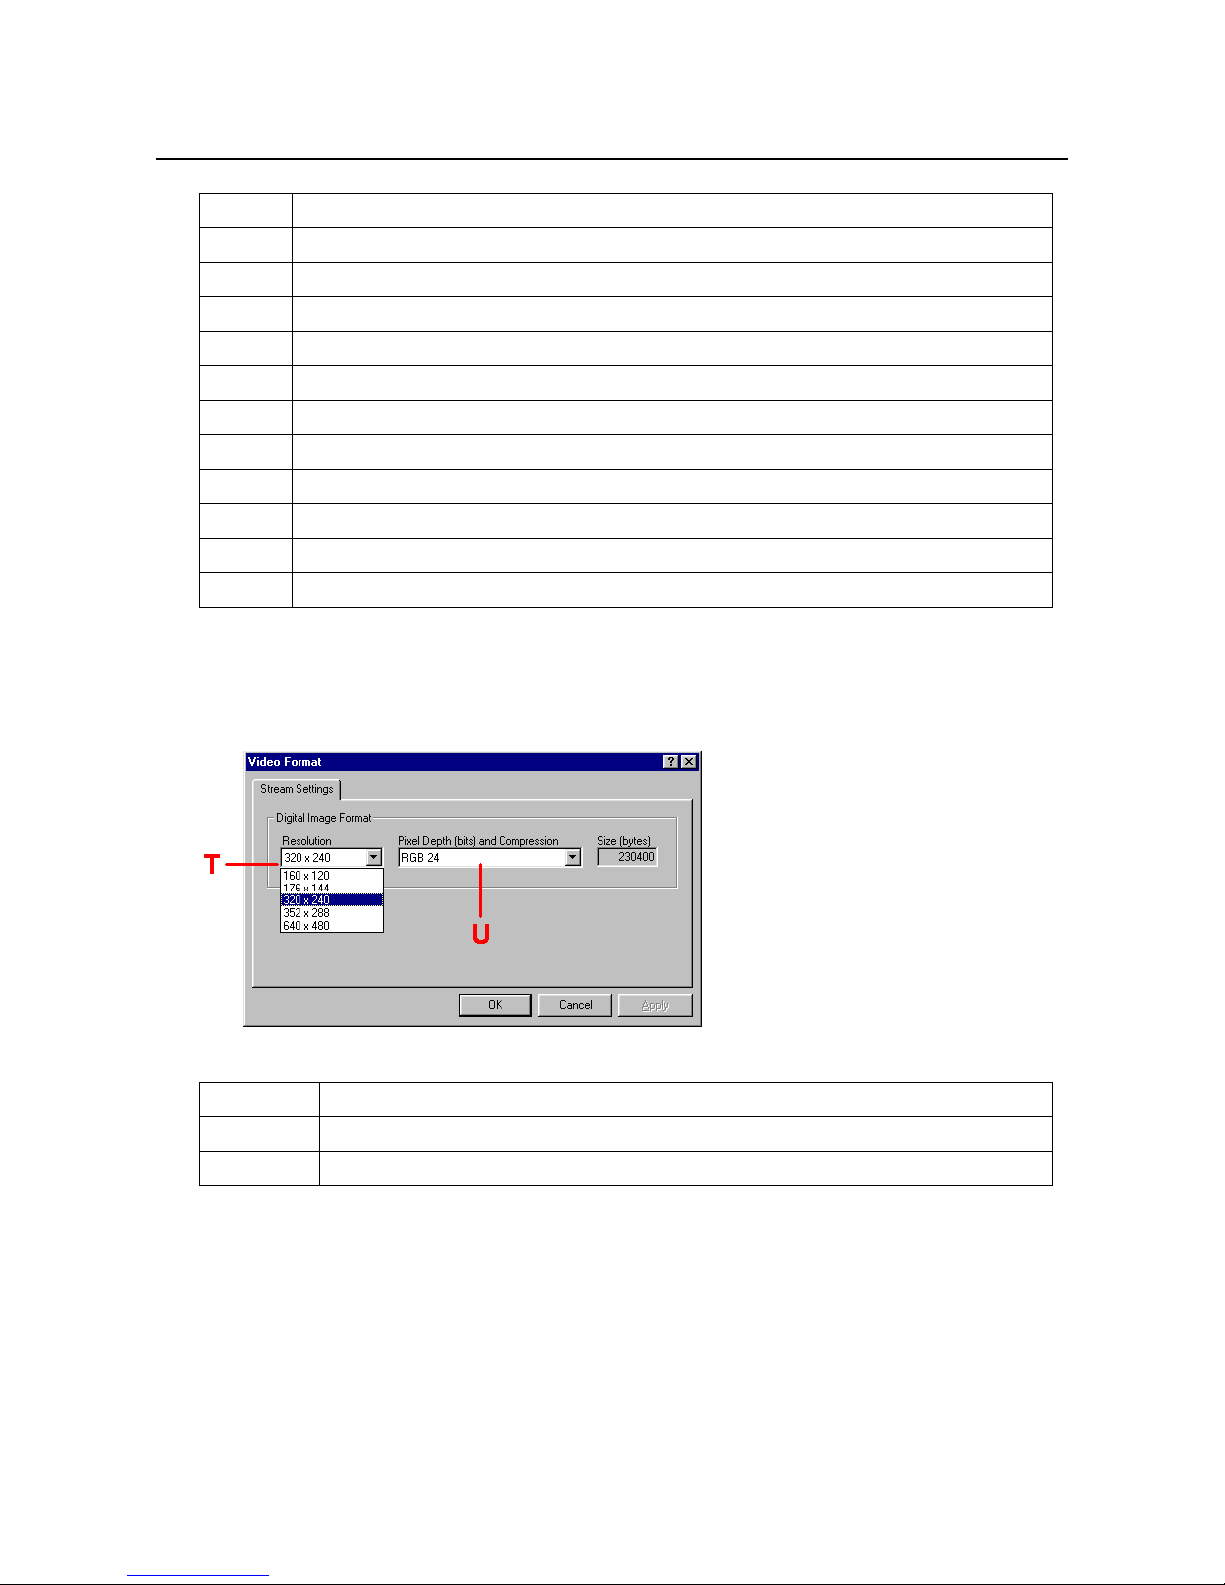
3. Go to the Menubar and click on 'Options'.
4. Select ‘Video Format’. Figure 24 will appear. See the table below for the description of the diverse
functions.
Figure 24: Adjusting the image size and colour depth
Function Description
T
Selects the desired image size.
U
Selects the desired colour depth. You can choose between 24 bit RGB and I420.
Table 4: Settings
5.1.3 Taking a snapshot
Follow the directions below to take and edit a snapshot.
1. Click on the 'Snapshot' button (B) (Figure 22) or on the camera button to capture an image. The image
is shown in the screen (G) and also as a small image with the 'Thumbnails' (H). See figure 22.
2. No more than 10 'Thumbnails' can be placed there. If you take more snapshots, you will receive a
message telling you to save or delete images. Go to the Menubar and click on 'Photo'. See figure 22.
3. Click on 'Save As' if you want to save the selected image. Click on 'Delete' if you want to delete the
selected image.
Page 21
Trust SpaceC@m 300
19
NL
4. You can also open the image in an image editing program. Click on the 'Thumbnail' (H) of the image that
you wish to edit. The selected image will be visible in the screen (G). See figure 22.
5. Go to the Menubar and click on 'Options'.
6. Select 'Transfer to' and then click on the image editing program that you wish to use (e.g. Ulead Photo
Express). The selected program will be given in window (F). See figure 22.
7. Click on the 'Transfer' button (C). The image will be opened in the program that you have selected. You
can now edit and save the image. If necessary, read the image editing program's help function.
5.1.4 Zoom in & zoom out
The SpaceC@m 300 provides the possibility to zoom in or zoom out.
Use function (R) in Figure 23 to zoom in and zoom out.
5.2 Using Ulead PhotoExpress 3.0 SE
A short description for the use of the camera in Ulead Photo Express 3.0 SE is given below. For more
information about Photo Express 3.0 SE, please read this program's manual on the CD-ROM.
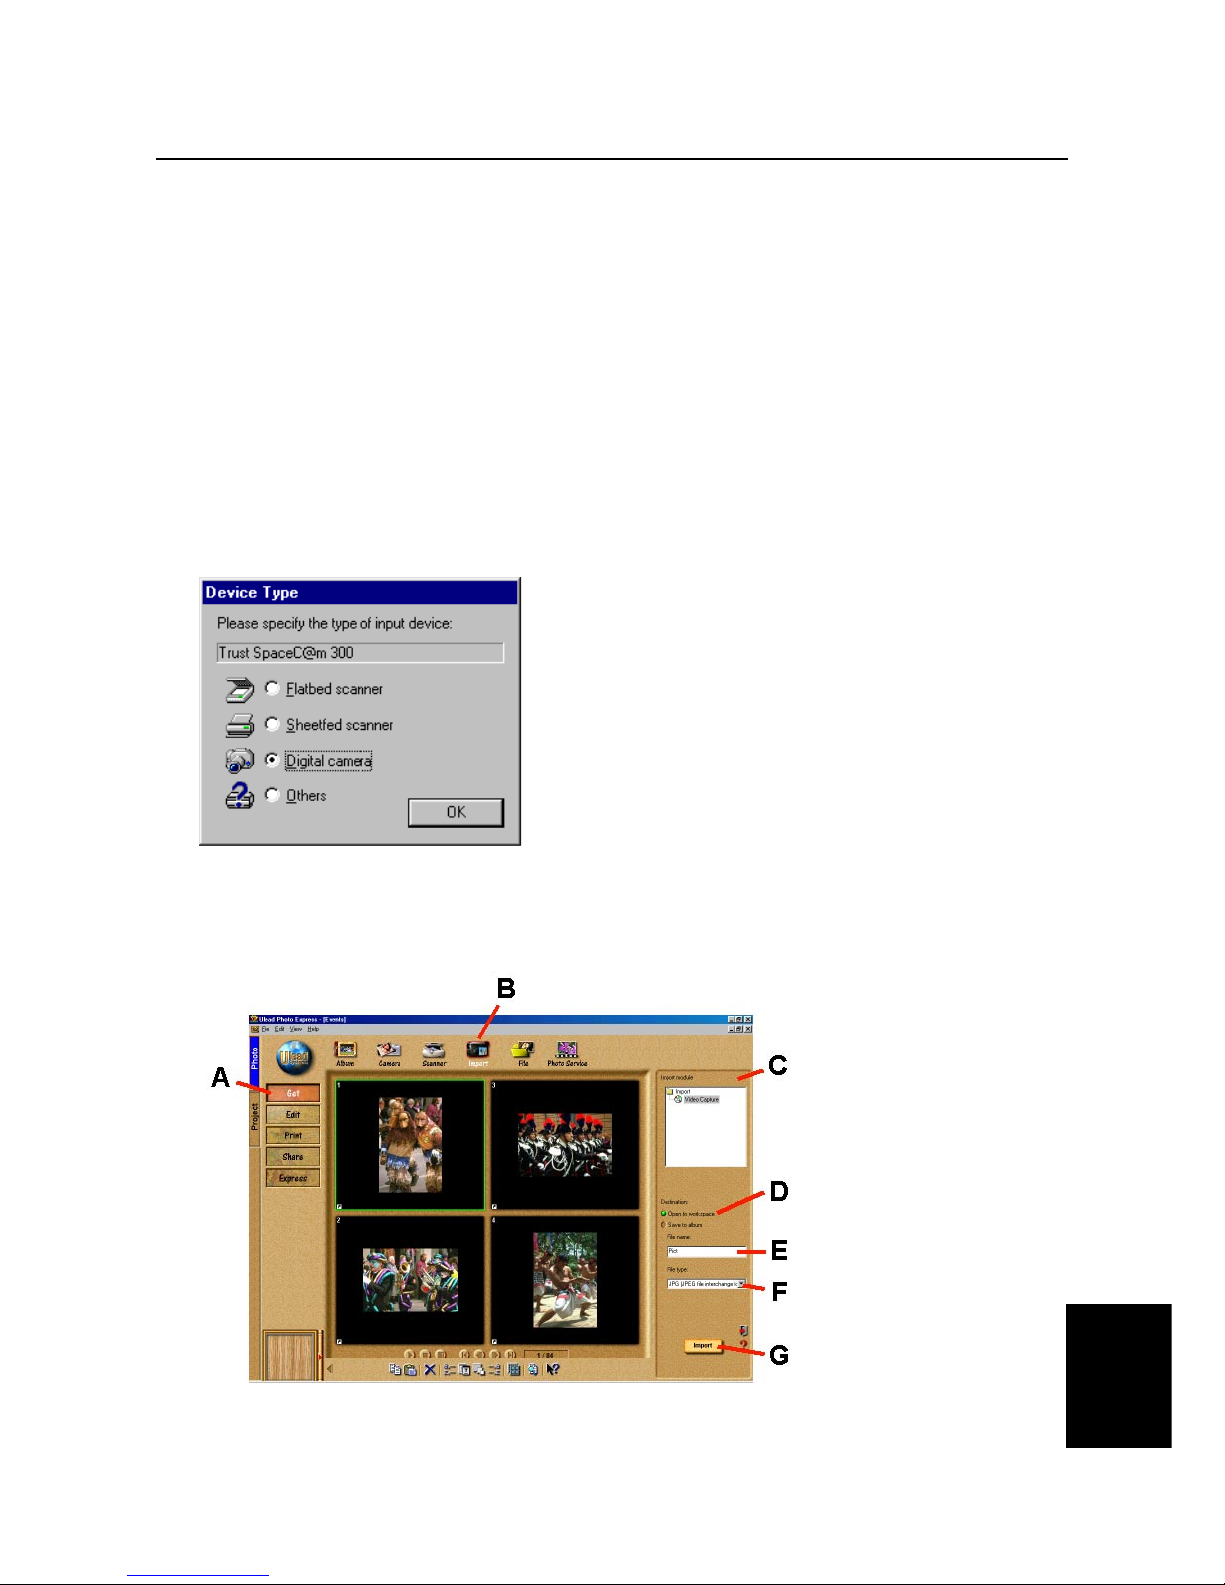
1. Start Photo Express 3.0 SE. Figure 25 will appear.
Figure 25: Selecting the camera
2. Select ‘Digital camera’. 'Trust SpaceC@m 300' is shown in the window. Click on 'OK'.
3. In the main menu for Photo Express, select 'Get' (A) and then 'Import' (B). The 'Import Module' screen
(C) will appear next to the photo album window. See figure 26.
Figure 26: Main screen for Photo Express
4. Select 'Open to workspace' (D) to send the image to the program.
5. Give the name of the file in field (E).
Page 22
Trust SpaceC@m 300
20
6. Give the type of file (e.g. JPEG) in field (F).
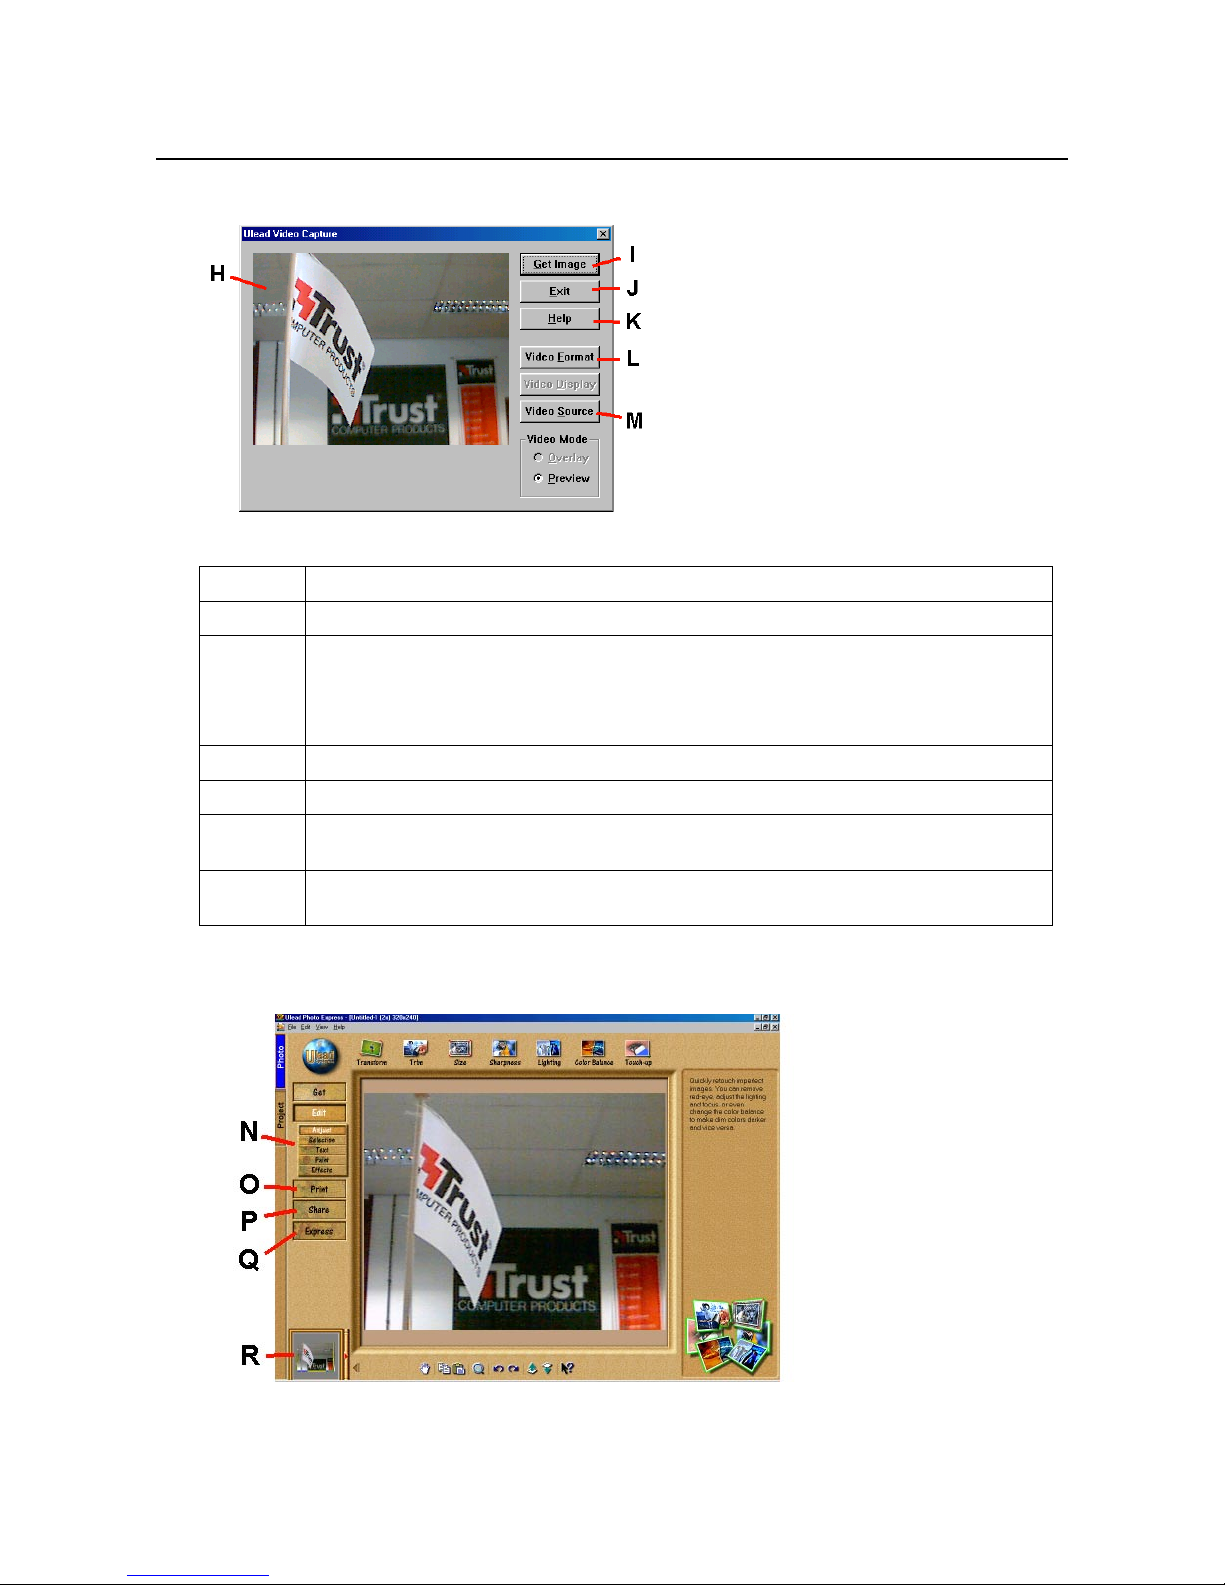
7. Click on 'Import' (G). Figure 27 will appear. See the table below for this screen's diverse functions.
Figure 27: Editing the camera image in Photo Express
Function Description
H
The present camera image is shown in this screen.
I
‘Get Image’ button: Takes a 'snapshot' of the present camera image (H). The 'snapshot'
is opened in the 'Edit' screen in Photo Express. You can edit and save the snapshot in
this screen. See figure 28.
Note: The snapshot button on the camera does not work with this program.
J
‘Exit’ button: Closes the 'Video Capture' screen (figure 27).
K
‘Help’ button: Calls up the help function for this screen.
L
‘Video Format’ button: Adjusts the image size of the screen (H). A screen similar to
figure 24 will appear.
M
‘Video Source’ button: Changes the camera settings. A screen similar to figure 23 will
appear.
Table 5: Processing an image
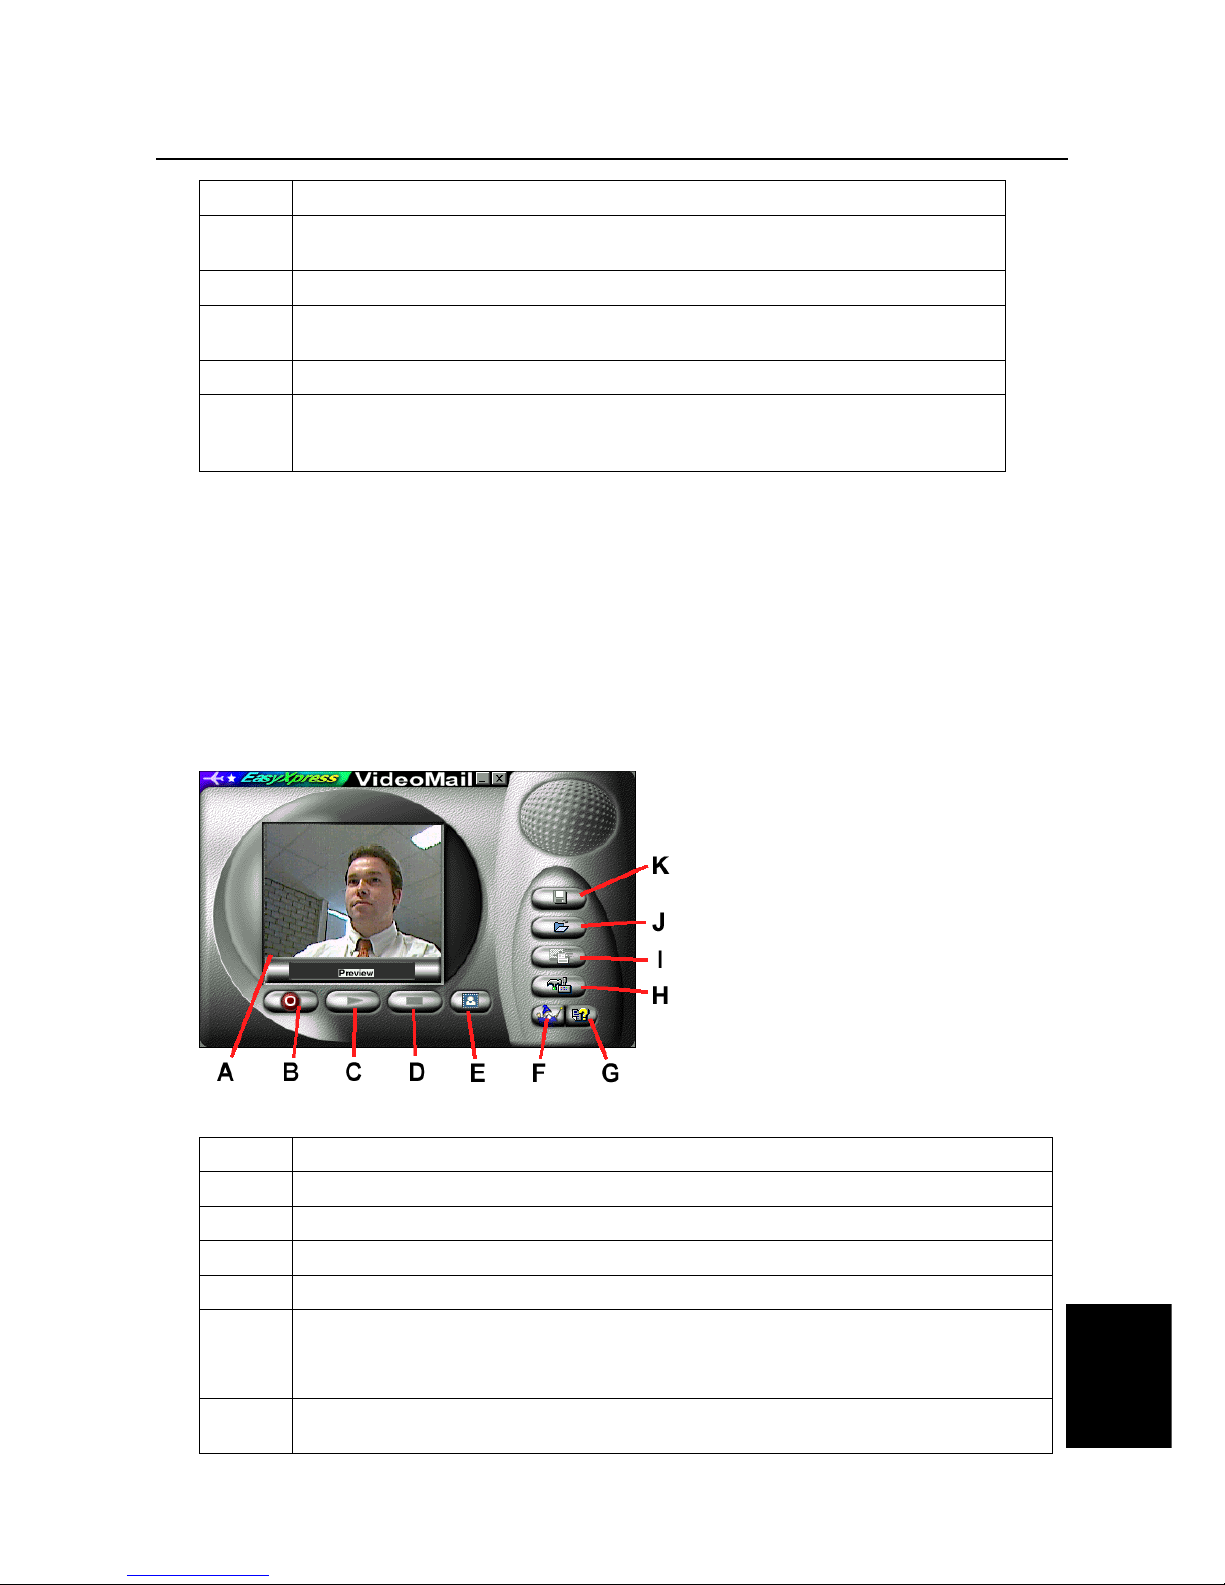
Figure 28: Editing a snapshot in Photo Express
Page 23
Trust SpaceC@m 300
21
NL
Function Description
N
There are various functions in this submenu of the 'Edit' screen that you can use to
edit the image.
O
‘Print’ button: Prints the edited image on your printer.
P
‘Share’ button: Saves the edited image to your hard disk, sends the edited image
by e-mail or fax, or saves it as a HTML document (Internet).
Q
‘Express’ button: Gives more functions that you can use to edit the image.
R
A 'Thumbnail' (small image) of the image is shown here. Click on the red arrow
next to the thumbnail to see all your images. Click on the thumbnail of the image
that you want to edit.
Table 6: Processing a snapshot
5.3 Using Acer EasyXpress VideoMail 2.2
Follow the instructions below for the use of Acer EasyXpress VideoMail. For more information you can also
consult the help function of this program.
Note: You must have a working e-mail account installed on your system before you start EasyXpress
VideoMail. Ask your Internet Service Provider if you have any questions about your e-mail
account.
1. Start EasyXpress VideoMail 2.2.
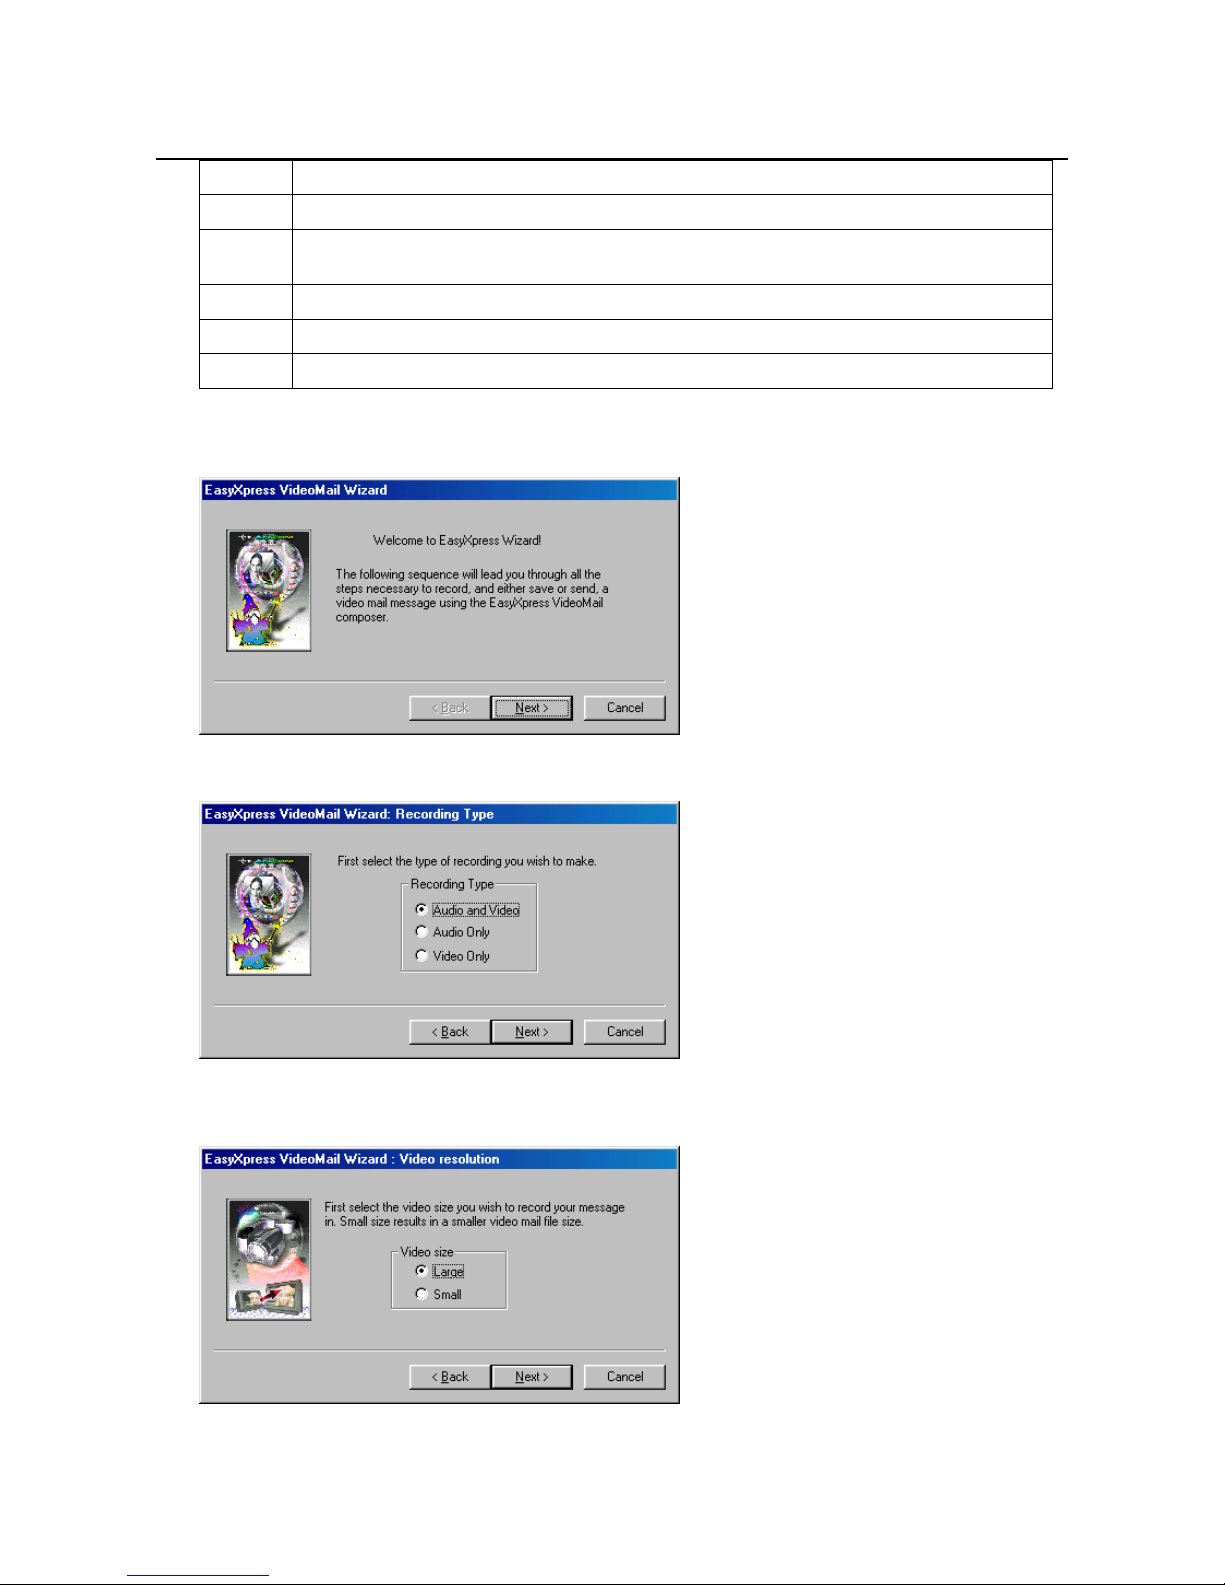
2. A screen similar to figure 29 will appear. See the table below for this screen's diverse functions.
Figure 29: Using Acer EasyXpress
Function Description
A
The camera image is shown in this screen.
B
‘Record’ button: Starts the video/sound recording.
C
‘Play’ button: Plays the recorded video mail message.
D
‘Stop’ button: Stops recording or playback of the video mail message.
E
‘Snapshot’ button: Takes a 'snapshot' of the present video image. The snapshot is opened
in the EasyPaint program where the image can be edited and saved.
Note: The Snapshot button on the camera does not work with this program.
F
‘‘Wizard’ button: Starts the VideoMail W izard. You can create and send a video mail
message using this wizard. Follow the instructions below for the use of this wizard.
Page 24
Trust SpaceC@m 300
22
Function Description
G
‘Help’ button: Calls up the help function for this program.
H
‘Properties’ button: Changes the video mail message settings. You can change the image
size, image quality and camera settings here.
I
‘Mail’ button: Sends the video mail message.
J
‘Open’ button: Opens a saved video mail message.
K
‘Save’ button: Saves the video mail message.
Table 7: acer EasyXpress functions
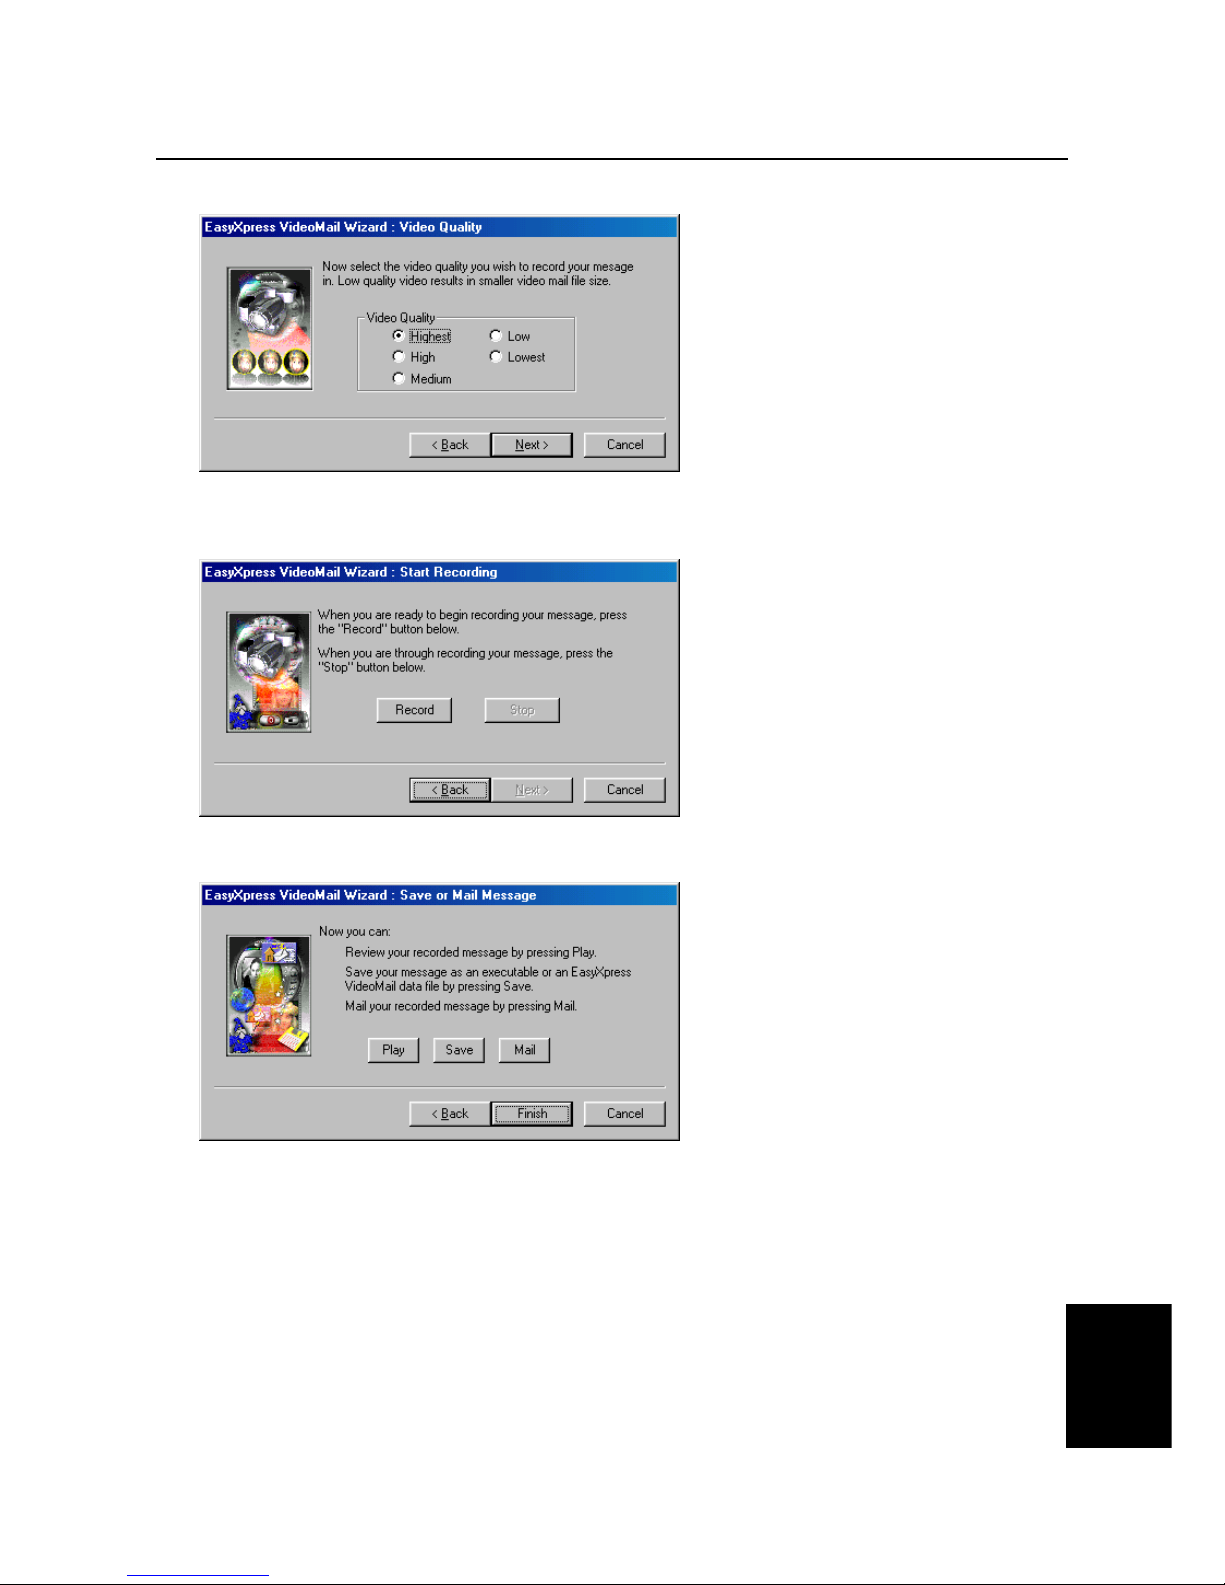
3. Click on ‘VideoMail Wizard’ (F). Figure 30 will appear. Click on 'Next'.
Figure 30: Making a video mail message
4. Click on 'Next'. Figure 31 will appear.
Figure 31: Making a video mail message
5. Select whether you wish to record both images and sound, only images or only sound. Click on 'Next'.
Figure 32 will appear.
Figure 32: Making a video mail message
Page 25
Trust SpaceC@m 300
23
NL
6. Select the image size you wish to use and click on 'Next'. Figure 33 will appear. Select the image quality,
better quality gives a large file size. Click on 'Next'.
Figure 33: making a video mail message
7. Select the image quality (better quality gives a large file size). Click on 'Next'. Figure 34 will appear. Click
on 'Record' to start recording. Click on 'Stop' when recording has finished.
Figure 34: Making a video mail message
8. Click on 'Record' to start recording. Click on 'Stop' when recording has finished. Figure 35 will appear.
Figure 40: Making a video mail message
9. Choose the following in this screen:
‘
Play
’ to play the recording.
‘
Save
’ to save the recording.
‘
Mail
’ to send the recording by e-mail as an .exe file.
11. Click on 'Finish' to close the Wizard.
Page 26
Trust SpaceC@m 300
24
5.4 Using Microsoft ® NetMeeting
1. Before you start NetMeeting, an internet account need to be installed.
Figure 41: Start NetMeeting
2. Start NetMeeting (Start -> Programs -> Accessories -> Internet Tools -> NetMeeting). See Figure 41.
3. Two windows will be opened now, NetMeeting and your Dial up Connection. See Figure 42.
Figure 42: Using Microsoft ® NetMeeting
4. Fill out your username and password and click “Connect” to make an internet connection.
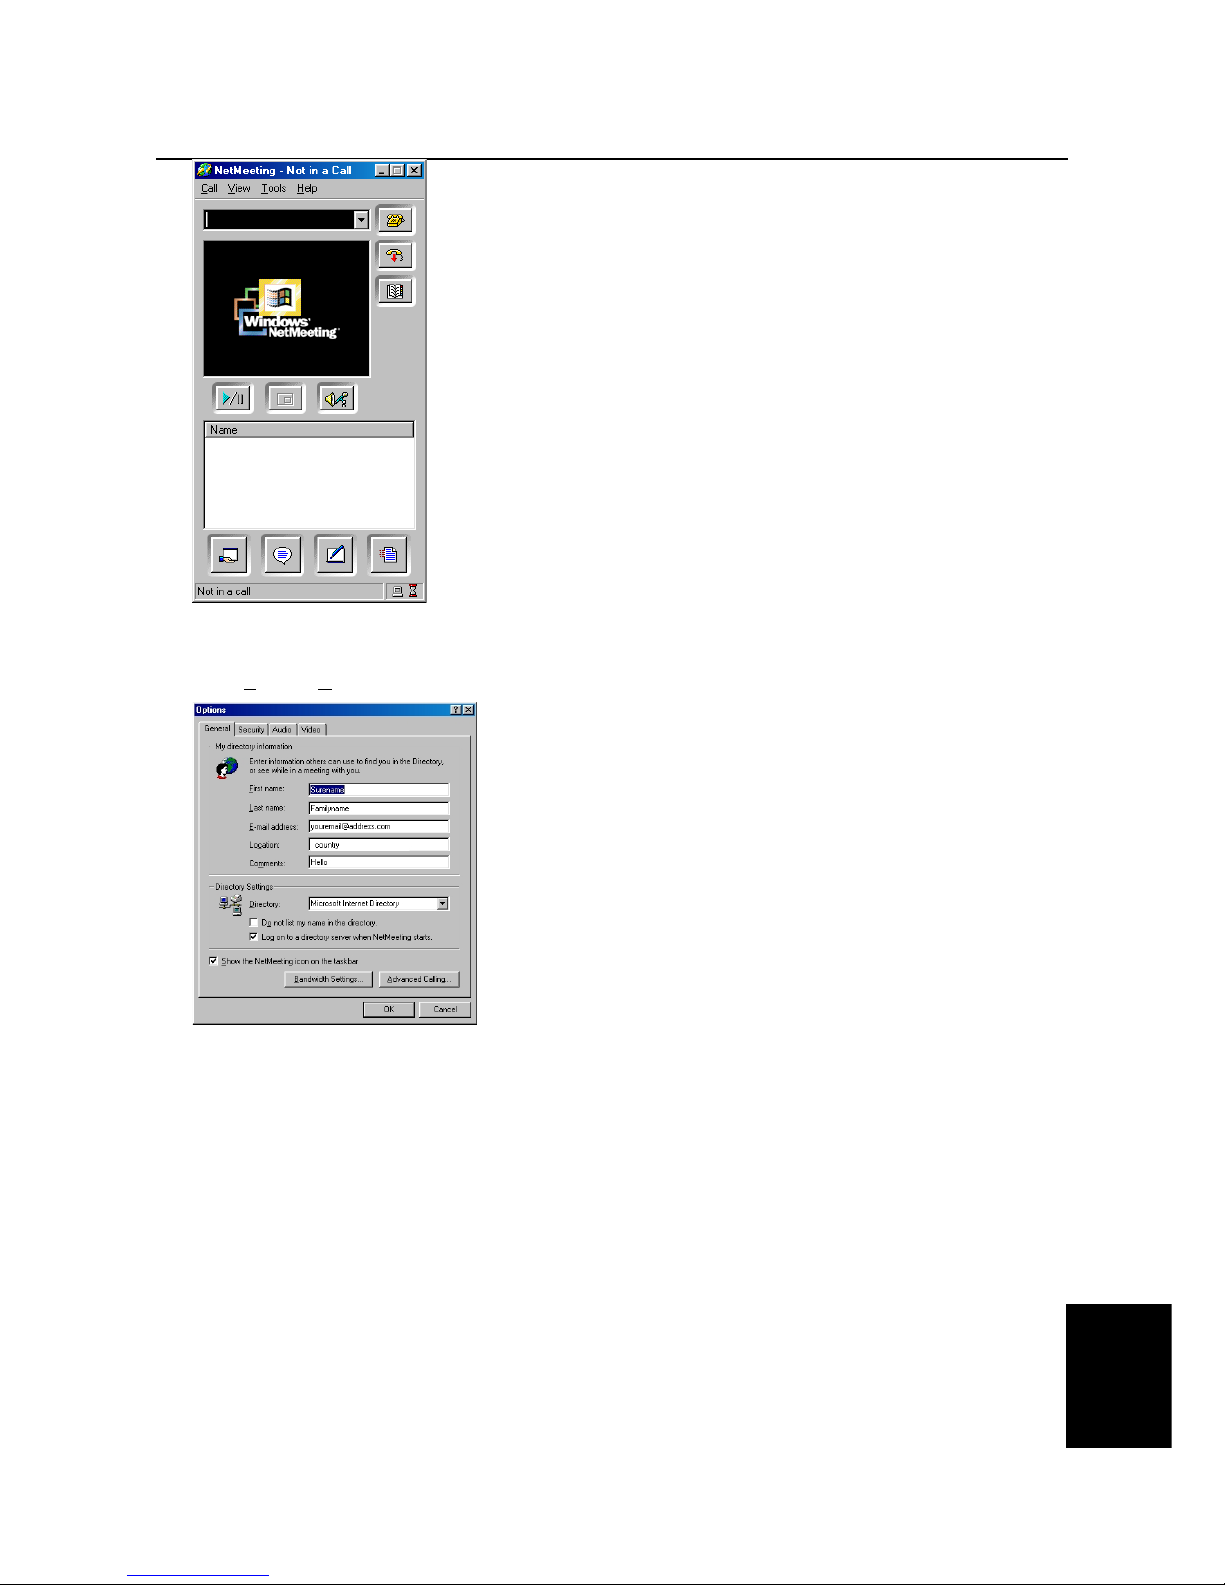
5. When the connection with internet is correct, only the NetMeeting window will be shown on your screen.
See Figure 43.
Page 27
Trust SpaceC@m 300
25
NL
Figure 43: Using Microsoft ® NetMeeting
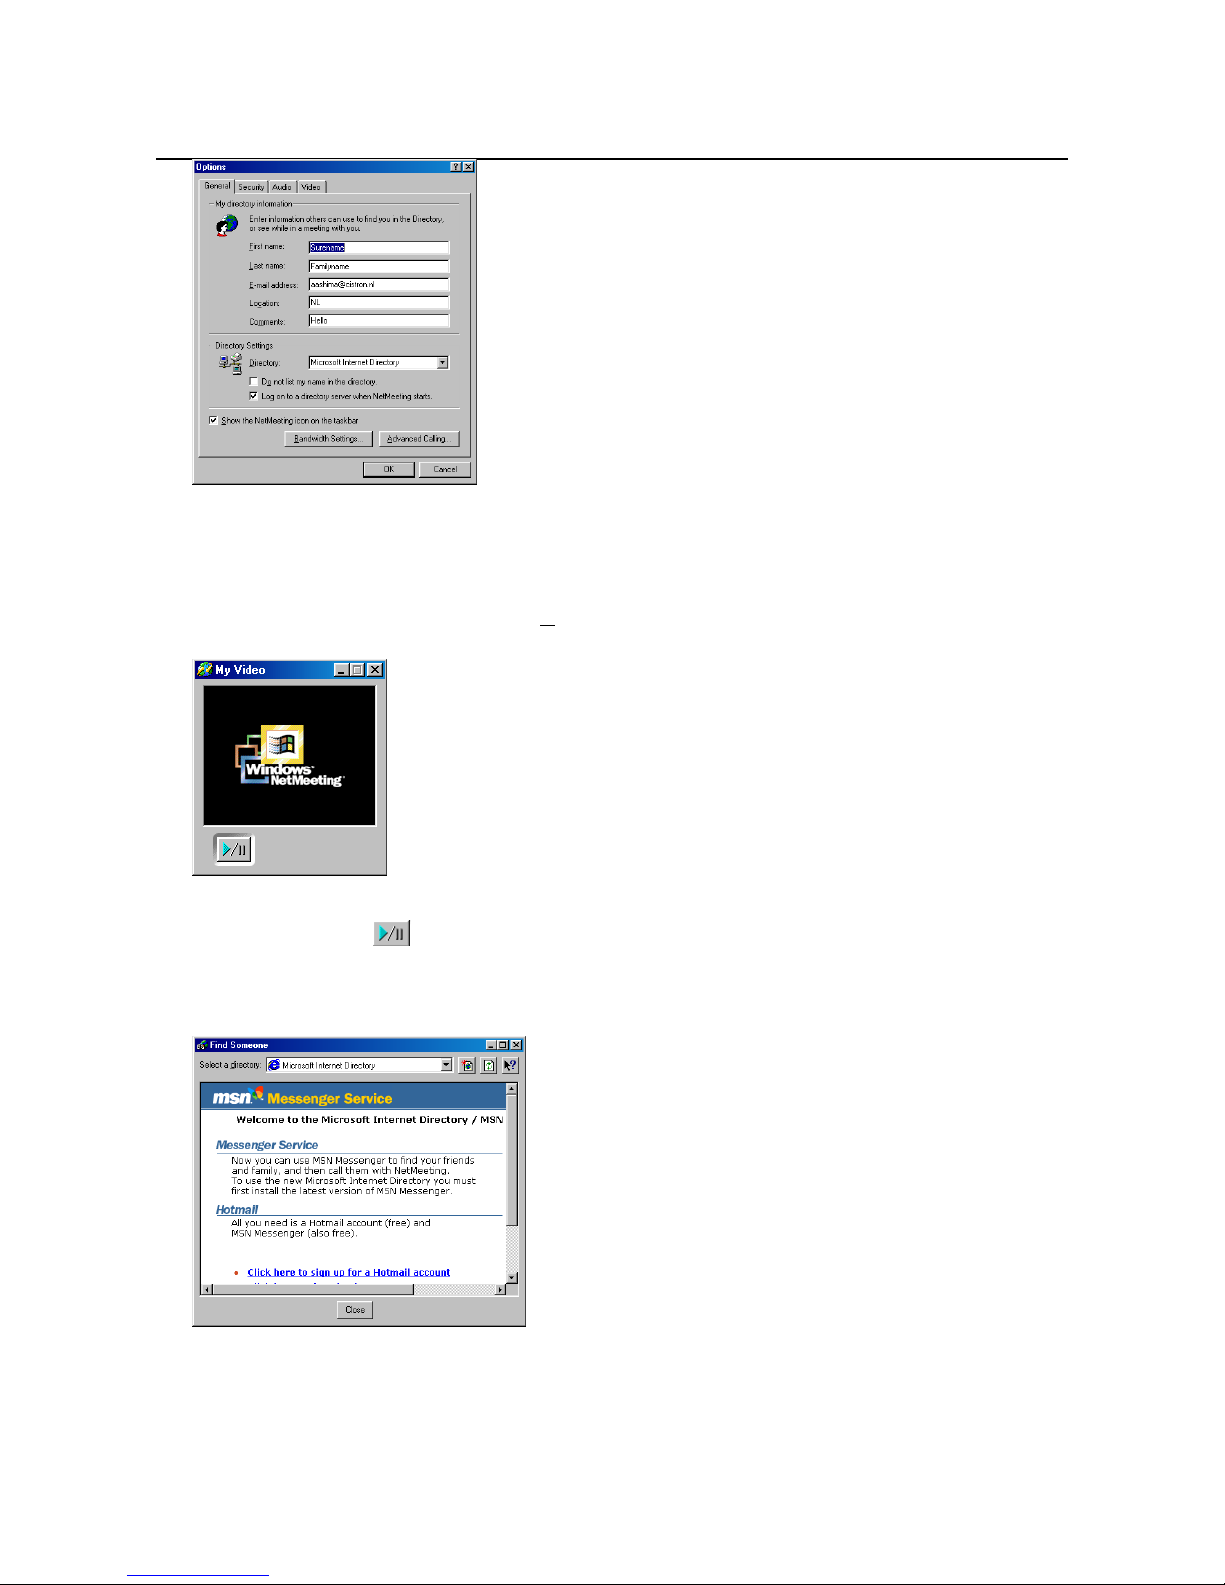
6. Now you have to make the unique settings for NetMeeting.
Go to Tools -> O
ptions…. Figuur 44 verschijnt.
Figure 44: Unique settings Microsoft ® NetMeeting
7. Click ‘Video’. Figure 45 appears
Page 28
Trust SpaceC@m 300
26
Figure 45: Unique settings Microsoft ® NetMeeting
8. To prevent your image is mirrored you have to switch the option ‘Show mirror image in preview video
window’ off. You also can change the settings of your camera, for example screen size and quality.
Click ‘OK’ to save your new settings and to return to the NetMeeting main screen.
9. Click ‘View’ (Figure 43) and select option ‘My Video (New Window)’. An extra window ‘My Video’ will be
opened now. See Figure 46.
Figure 46: Using Microsoft ® NetMeeting
10. Click the play button (
) to see the image of your own camera. This image alse will be seen by the
other party with you will have a connection later.
11. Now you are ready to make a NetMeeting connection. Click the phonebook icon in figure 43. Figure 47
appears.
Figure 47: Using Microsoft ® NetMeeting
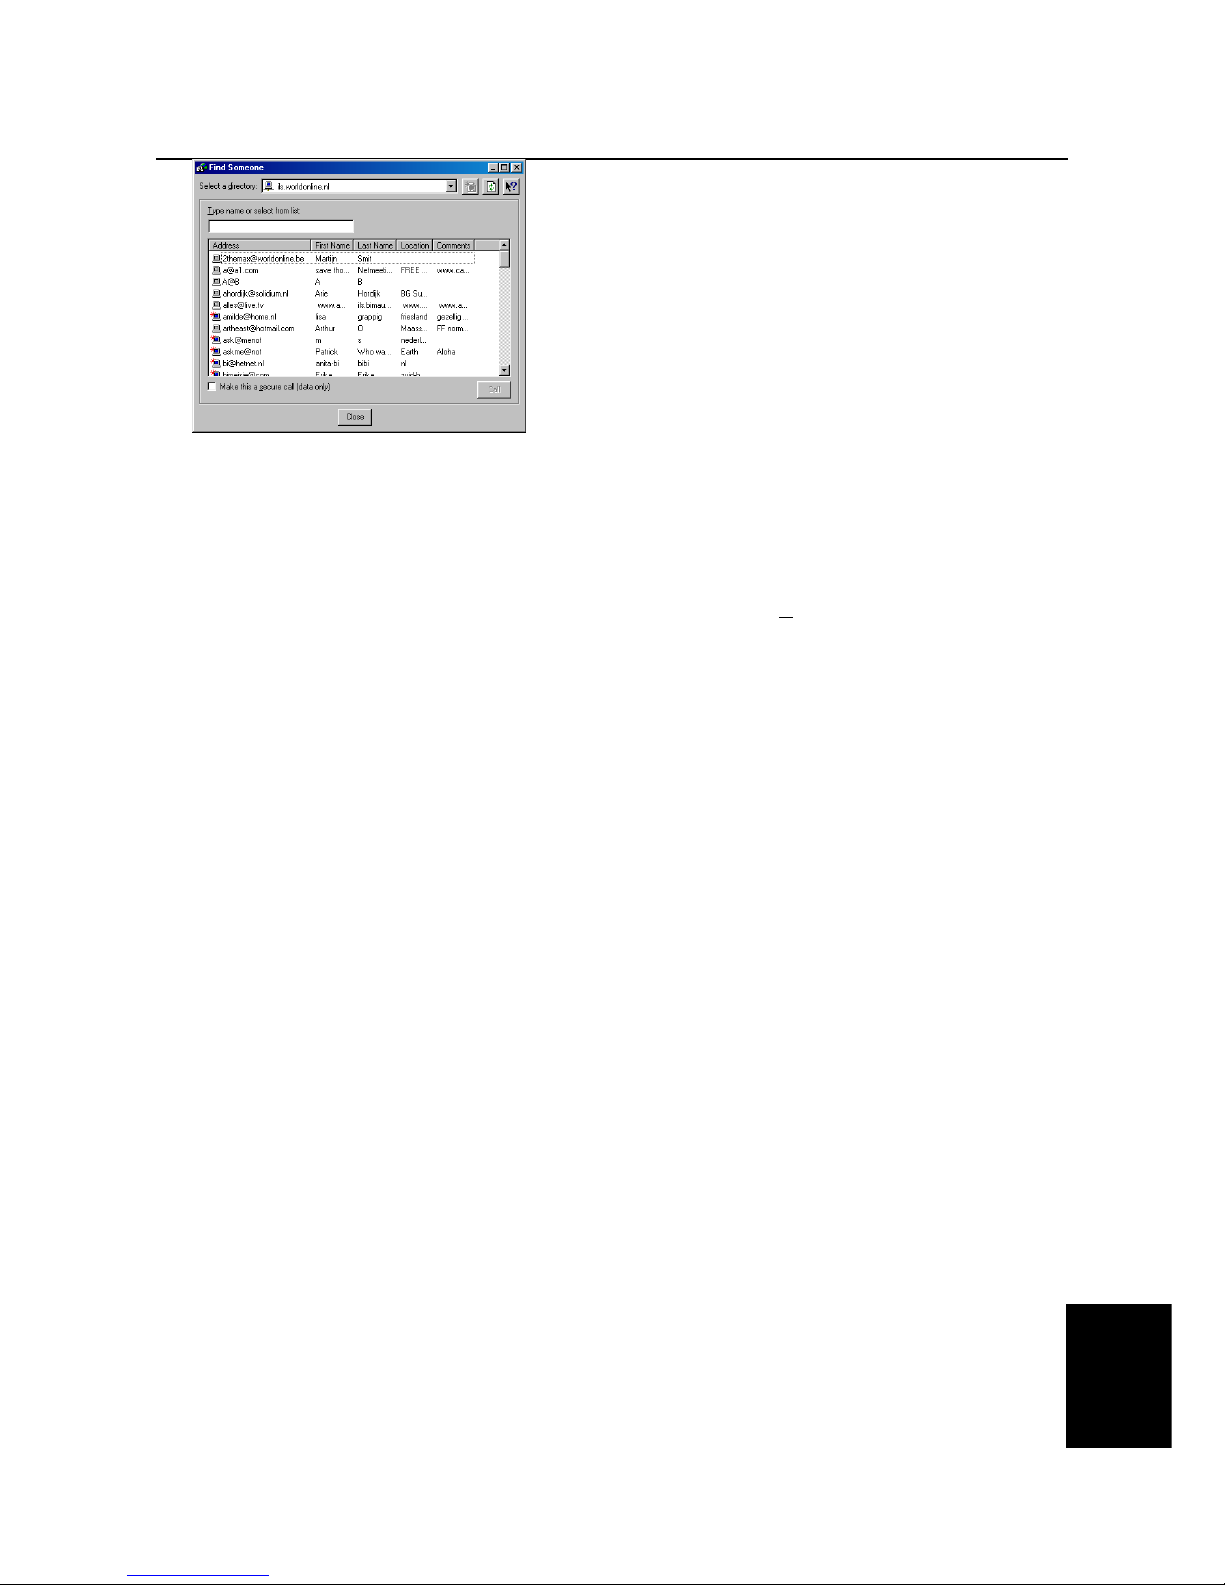
12. In the address bar you have to type a “ils servername” in. (For example: ils.worldonline.nl) and click the
Enter button. Figure 48 appears.
Page 29
Trust SpaceC@m 300
27
NL
Figure 48: Using Microsoft ® NetMeeting
13. Double click on a person in the list. A NetMeeting connection will be made now.
Sometimes it can happen the selected person refuse the connection because he or she already has a
connection with somebody else. Then select another person in the list.
Other ils server addresses can be found on internet.
In case of trouble or if you want to have more information, please click the ‘Help’ function in Figure 43.
Page 30

Trust SpaceC@m 300
28
6. Troubleshooting
Problem Cause Possible solution
Windows does not find any
new hardware after
connecting the camera.
The computer's USB port does
not work.
Remove the USB port from the
Device Manager and reinstall it.
The computer becomes
jammed when using a USB
device.
The USB port has shared an IRQ
with another device.
Remove cards from the computer
or divide the IRQ's differently.
Read more about this in the
Windows manual or the manual of
your motherboard.
The camera is not correctly
connected to the USB port.
Connect the camera to a USB portThe error message ‘Capture
device was not detected’ is
displayed.
The camera is connected to a
USB HUB that does not have a
power supply.
Connect the camera to a USB
HUB that has a power supply or to
a USB port on your computer.
The Trust SpaceC@m 300
is marked with an
exclamation mark '!' in the
'Device Manager'.
The camera is connected to a
USB HUB that does not have a
power supply.
Connect the camera to a USB
HUB that has a power supply or to
a USB port on your computer.
You are not able to take
photographs using the
snapshot button.
The 'Trust SpaceC@m 300'
program has not been started.
Start the 'Trust SpaceC@m 300'
program.
There is another program open
that is using the camera image.
Close the other program before
you start the test program.
A black image and a red
indicator are shown in the
SpaceC@m 300 test
program.
The snapshot button on the
camera does not work.
The camera is not correctly
connected to the USB port.
Connect the camera correctly to
the USB port.
SpaceC@m 300 does not
operate in combination with
TV / capture card.
Conflict between the camera and
TV card
Proceed as follows:
1) Remove the TV Capture card
2) Install SpaceC@m 200
3) Reinstall the TV Capture card
Problem is not listed here. The latest FAQ update is
available on the Internet.
Visit www.trust.com/11995 for FAQ
and other product information.
Table 8: Troubleshooting
Check the FAQ's on the Internet (www.trust.com). You can also register your product via www.trust.com
so
that you are able to receive optimal guarantee and service support. You will be automatically informed of
developments to your product and of other Trust products. You will also have the chance to win some
spectacular prizes.
If you still have any problems after trying these solutions, please contact one of the Trust Customer Care
Centres. You can find more information on the last page of this electronic manual, as well as at the back of
the quick installation manual. Please have the following information available:
• The article number. This is: 11995.
• Your hardware information.
• A good description of what precisely does not work.
• A good description of when the problem precisely takes place.
Page 31

Trust SpaceC@m 300
29
NL
7. Specifications
Sensor type: CMOS
Recording element (CCD): 1/3”
Focus: Manual focus
Pixel resolution: 300K (640x480)
Colour depth: 24 bits
Distance: 5 cm to endless
Exposure: 1/60 – 1/25,000 sec
Minimum lighting: 50 Lux
30 fps for an image size of 160 x
120
20 fps for an image size of 320 x
240
Image speed:
15 fps for an image size of 640 x
480
TWAIN interface: Yes
Connection: USB 1.0
Power: Via USB port
Dimensions (HxBxD): 105 x 58 x 45 mm
Camera weight: 100 gram
Table 9: Specifications
Page 32

Trust SpaceC@m 300
30
8. Trust Customer Care Centres
www.trust.com
Residents in the UK and Ireland should contact:
From
8:00 - 16:00
UK Office
Phone +44-(0)0845-6090036
Fax +44-(0)1376-514633
I residenti in Italia possono contattare:
Orario:
9:00 - 13:00 /
14:00 -18:00
Ufficio italiano
Telefono +39-051-6635947
Fax +39-051-6635843
Les habitants de la France et de l’Afrique du Nord peuvent contacter :
De
9:00 à 17:00
Bureau français
Téléphone +33-(0)825-083080
Fax +33-(0)1-48630261
Kontaktadresse für Einwohner Deutschlands:
Erreichbar:
9:00 - 17:00
Deutsche Geschäftsstelle
Telefon 0800-00TRUST (0800-0087878)
Fax +44-(0)2821-58873
Los habitantes de España pueden ponerse en contacto con:
De las
9:00 a las 17:00 horas
Oficina española
Teléfono +34-(0)902-160937
Fax +31-(0)78-6543299
Inwoners van Nederland kunnen contact opnemen met:
Van
9:00 - 17:00 uur
Kantoor Nederland
Telefoon 0800-BELTRUST (0800-23587878)
Fax +31-(0)78-6543299
All other countries / Alle anderen Länder / Tous les autres pays
Tutti gli altri paesi / Todos los demás países / Alle andere landen
From:
9:00 - 17:00
European Head Office
Phone +31-(0)78-6549999
Fax +31-(0)78-6543299
 Loading...