

Trust Sound Expert 128 User Manual

Sound Expert 128 PCI
Sound Expert 128 PCI
User’s Manual
Version 1.0

Sound Expert 128 PCI
Copyright Statement
No part of this manual may be reproduced or transmitted, in any form
or by any means, electronic or mechanical, incl uding photocopying,
recording, or in formation storage and retrieval systems, for any
purpose other than th e purchaser's personal use, without the prior
written permission of the manufacturer.
Disclaimer S tatement
The manufacturer specifically discl aims all warranties, either express
or implied, including but not limited to implied warranties of
merchantability and fitness for a particular purpose, with respect to the
software, the product manual(s) and written materials, an d any other
accompanying h ardware. The manufacturer reserves the right to
revise or make improvements to its product at any time and without
obligation to notify any person of such revisions or improvements.
In n o event shall th e manufacturer be liable for any consequential or
inciden tal damages, including any loss of business profits or any other
commercial damages, arising out of the use of its product.
* All company or product names are trademarks or registered
trademarks or service marks of their respective owners.
SOUND EXPERT PCI

Sound Expert 128 PCI
1
Table of contents
1. Introduction....................................................................................2
2. Installing the card..........................................................................3
3. Connecting.....................................................................................4
4. Installation of the software...........................................................5
4.1 Windows 95...............................................................................5
4.2 Windows 98...............................................................................7
4.3 Windows NT 4.0........................................................................8
4.4 DOS...........................................................................................9
4.5 Willow Pond...............................................................................9
5. Modifying settings.......................................................................11
5.1 Modifying MIDI settings............................................................12
5.2 Modifying 3D se ttings...............................................................13
6. Troublesh ooting ..........................................................................15
7. Specifications..............................................................................17

Sound Expert 128 PCI
2
1. Introduction
You have acquired an advanced product wi th the Sound Expert 128
PCI. This s ound card has a better sound quality and improves your
system performance in comparison to an ISA sound card.
The Sound Expert 128 PCI supports Positional 3D. This means that
with games you will hear sound from all sides with just two speakers.
Minimum system requirements:
• Pentium 100 system
• Windows 95
• 8 MB memory
• An available PCI slot
• 12 MB of hard-disk space
• 4X CD-ROM player
The illustrations in this manual may differ from what appears on your
screen. In the event of any confusion, consult your Windows manual.
Conventions in this manual:
<Key> Here you press a key. The name of the key will
appear between brackets.
‘System’ This is a specific term used in a program; e.g., a term
used in Windows.
[DIR] You must type in text with this font.
Additional information will be shown as follows:
Note: Turn off the computer before opening it.

Sound Expert 128 PCI
3
2. Installing the card
You should have the following items after unpacking the Sound
Expert:
• This manual
• The Sound Expert 128 PCI
• A CD-ROM with drivers and programs
Contact your dealer if any of the items are missing.
Note: Make sure that the plug has been removed from the
outlet before you open the casing. You risk injuring
yourself and damaging your system if you work on the
PC’s internal components when the PC is still connected
to the electrical mains. ATX systems can activate
themselves when a card is added or removed.
1. Turn off your PC.
2. Remove the plug from the outlet.
3. Remove the casing from the computer. If necessary, consult your
computer’s User’s Manual.
4. Remove the metal cover-plate from an available PCI slot.
5. Insert the sound card into the PCI sl ot and screw down the card.
6. Close the PC and insert the plug back into the outlet.
Sound Expert 128 PCI
4
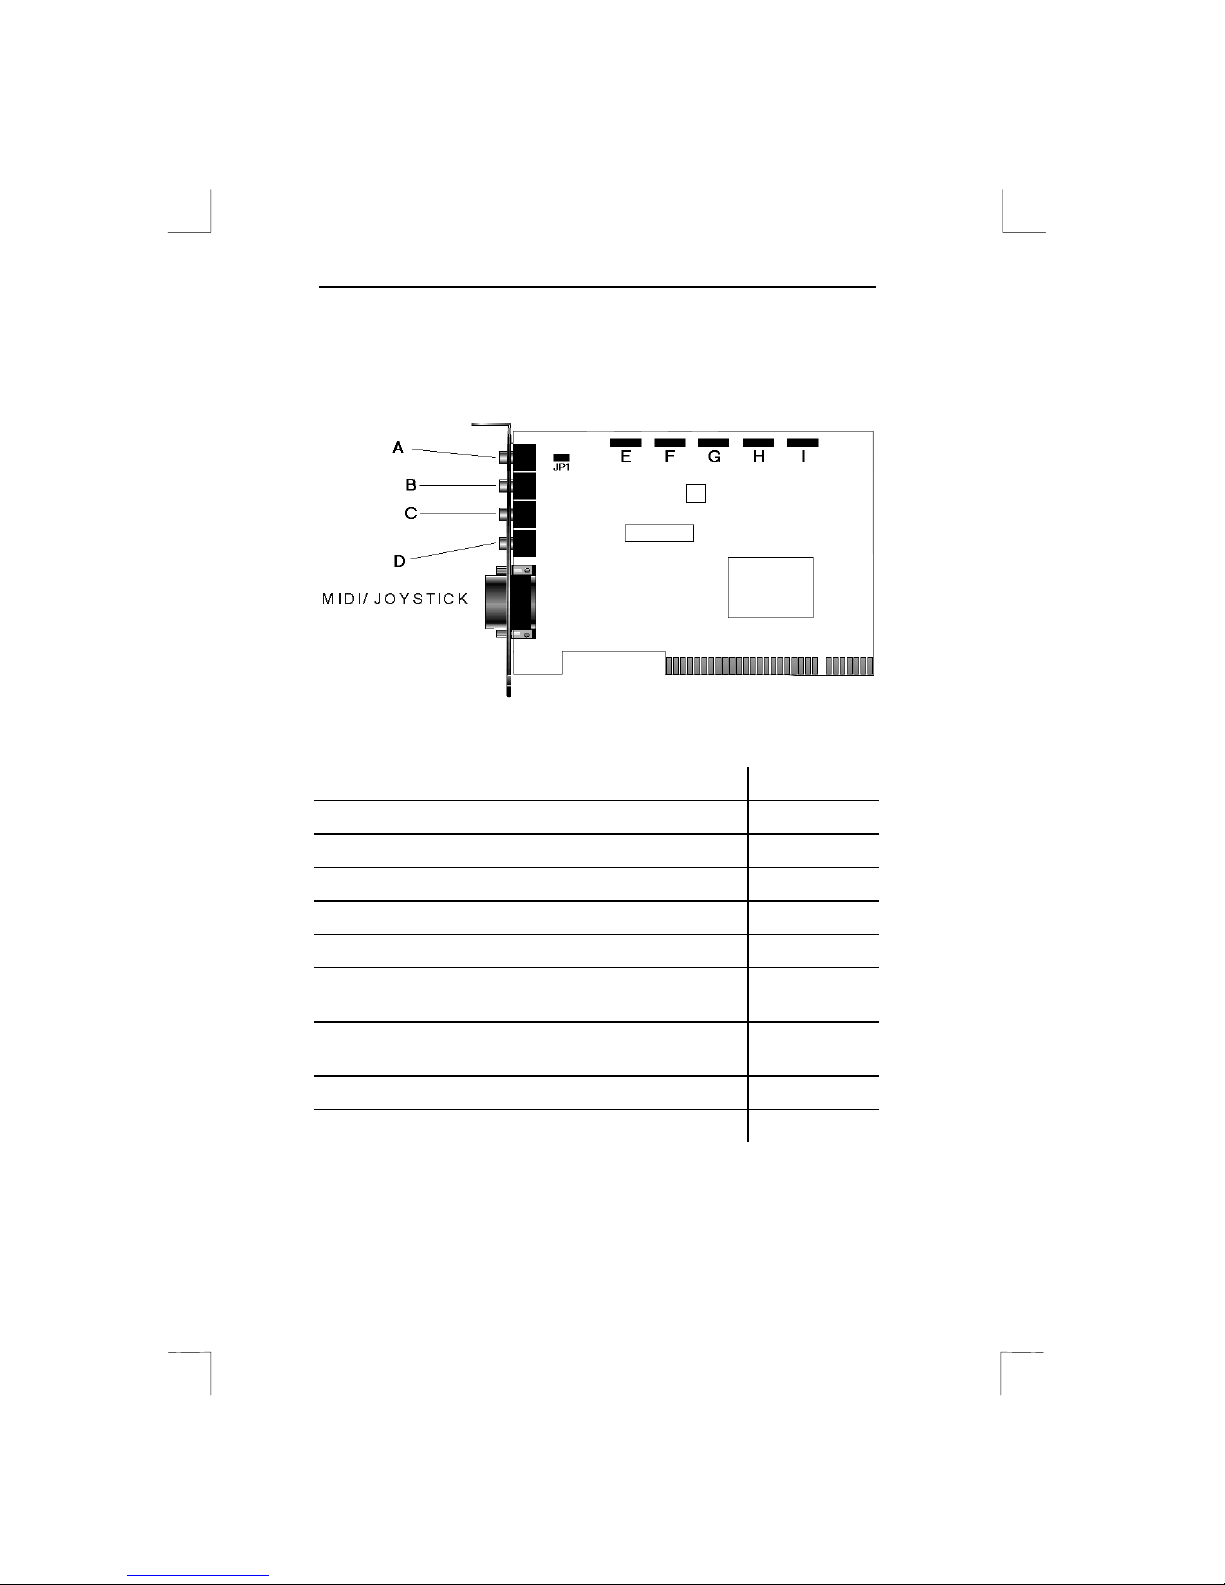
3. Connecting
Figure 1: Connectin g
Device Connect to
Microphone A
External source: e.g., a CD player B
Recording source: e.g., a tape recorder C
Speakers D
Voice modem with internal audio connection E
The audio cable supplied with your CD-ROM
(dependent on the CD-ROM type)
F
The audio cabl e supplied with you r CD-ROM
(dependent on the CD-ROM type)
G
Audio signal of a video signal: e.g., video editing card. H
AUX sig nal I

Sound Expert 128 PCI
5
4. Installation of the software
This chapter describes the software installation of the Sound Expert
128 PCI.
Note: The examples assume that the letter ‘D:’ has been assigned
to your CD-ROM drive on your computer. If your computer
uses a different letter, such as ‘E:’ for example, then
substitute ‘D’ with ‘E’.
4.1 Windows 95
The Sound Expert 128 PCI complies with Plug & Play standards. Your
system will recognise the card automatically.
Follow the instructions below to install the software:
1. Start Windows 95.
2. The Sound Expert will be found automatically and will request a
driver. Insert the CD containin g the drivers into your CD-ROM
player.
3. Click ‘Next’.
4. The driver will be found.
5. Click ‘Finish’ to start the installation.
6. The driver will be installed.
7. If DirectX 5 has not yet been installed, its installation procedure wil l
be started automatically. A screen as illustrated in Figure 2 will
appear; otherwise, go to s tep 12.
 Loading...