

Page 1

Prec ision View er 17” -Excel lence Series-
PRECISION VIEWER 17”
– EXCELLENCE SERIES –
User’s manual
Version 1.0
Page 2

Prec ision View er 17” -Excel lence Series-
Thank you
Thank you very much for purchasi ng t hi s pr oduct f r om the Trust range. We wish you
hours of fun with i t . Pl ease read this manual carefully before using the product.
Registration
Register your purchase now at the Trust Internet site (www.trust.com) and you could
win one of the fabulous prizes. The web site is also the place to look for dealer
addresses, comprehensive product information, drivers, and FAQ (Frequently Asked
Questions) sheets.
Copyright Sta t e m e nt
No part of this manual may be reproduced or transmitted, in any form or by any
means, electronic or m echanical , i ncluding photocopying, recording, or information
storage and retrieval systems, for any pur pose other than the purchaser's personal
use, without the prior writ ten permissi on of t he m anuf acturer.
Disclaimer Statement
The manufacturer specifically disclaims al l warranties, either express or impl ied,
including but not l imited to im plied warranties of merchantability and fitness for a
particular pur pose, wit h r espect to the software, the product manual(s) and writt en
materials, and any ot her accompanying hardware. The manufacturer reserves the
right to revise or m ake improvements to its product at any t i me and without obligation
to notify any person of such revisions or improvements.
In no event shall the manufacturer be liabl e for any consequential or i ncidental
damages, including any loss of business profits or any other commercial damages,
arising out of t he use of its product .
* All company or pr oduct names are trademarks or registered trademarks or service
marks of their r espective owners.
01 UK 11426 PV17ES.doc
Page 3

Prec ision View er 17” -Excel lence Series-
1
Contents
1. Introduction...................................................................................................2
2. Safety.............................................................................................................2
3. Installing the monitor ...................................................................................3
3.1 Unpacking ...............................................................................................3
3.2 Fastening the swivel-and-ti lt base ............................................................3
3.3 Positioning the monitor............................................................................4
3.4 Connecting the moni t or............................................................................4
4. Installing the driver.......................................................................................5
4.1 Windows 95 / 98......................................................................................5
4.2 Other operating syst em s.......................................................................... 6
4.3 Setting the refresh rate.............................................................................6
5. Operation.......................................................................................................7
5.1 Control buttons on the monitor.................................................................7
5.2 OSD menu...............................................................................................7
5.3 Power saving...........................................................................................9
6. Troubleshooting..........................................................................................11
7. Specifications .............................................................................................14
8. Warranty...................................................................................................... 15
8.1 Service.................................................................................................. 15
8.2 Conditions.............................................................................................15
8.3 Service Centres .....................................................................................16
Page 4

Prec ision View er 17” -Excel lence Series-
2
1. Introduction
This manual cont ains instructions for i nst al ling and operating the Precision Viewer
17” -Excellence Series. No prior knowledge is required for the installation and
operation.
This monitor is suitable for professional use in an off ice environment. The Precision
Viewer 17” -Excellence Series- is versatile, ergonomic and easy to use.
Conventions
The following layout conventions are used in this manual:
‘System’ Program term , whi ch i s vi sible on the screen.
[data] Text is entered between the brackets.
Import ant i nformation is shown as f ol lows:
Note:
Do not leave the equipment out in the rain.
Minimum system requir ements
- A computer with a st andar d VGA si gnal.
2. Safety
Read the following carefully before use:
1. Do not use this equipment in humid environments like bathrooms, damp cellars,
swimm i ng pools, etc.
2. Never insert objects into the openings on the outside of the device as you can
come into contact with live electrical components. This can cause fir e or give
strong electrical shocks.
3. Do not try to repair the equipment yourself.
4. You should disconnect the power supply and have the equipment repaired by
qualified personnel if:
a) the cable or the plug is damaged or worn;
b) the equipment has come into contact wi t h f l uids;
c) the equipment is not functioning properly;
d) the equipment has been dropped and/or the casing has been damaged.
Page 5
Prec ision View er 17” -Excel lence Series-
3
3. Installing the monitor
3.1 Unpacking
The following items should be found in the packaging:
•
Monitor
•
Swivel-and-tilt base
•
Mains cord
•
This manual
Please contact your dealer if anything is missing or damaged.
Tip:
Save the box for future transportation.
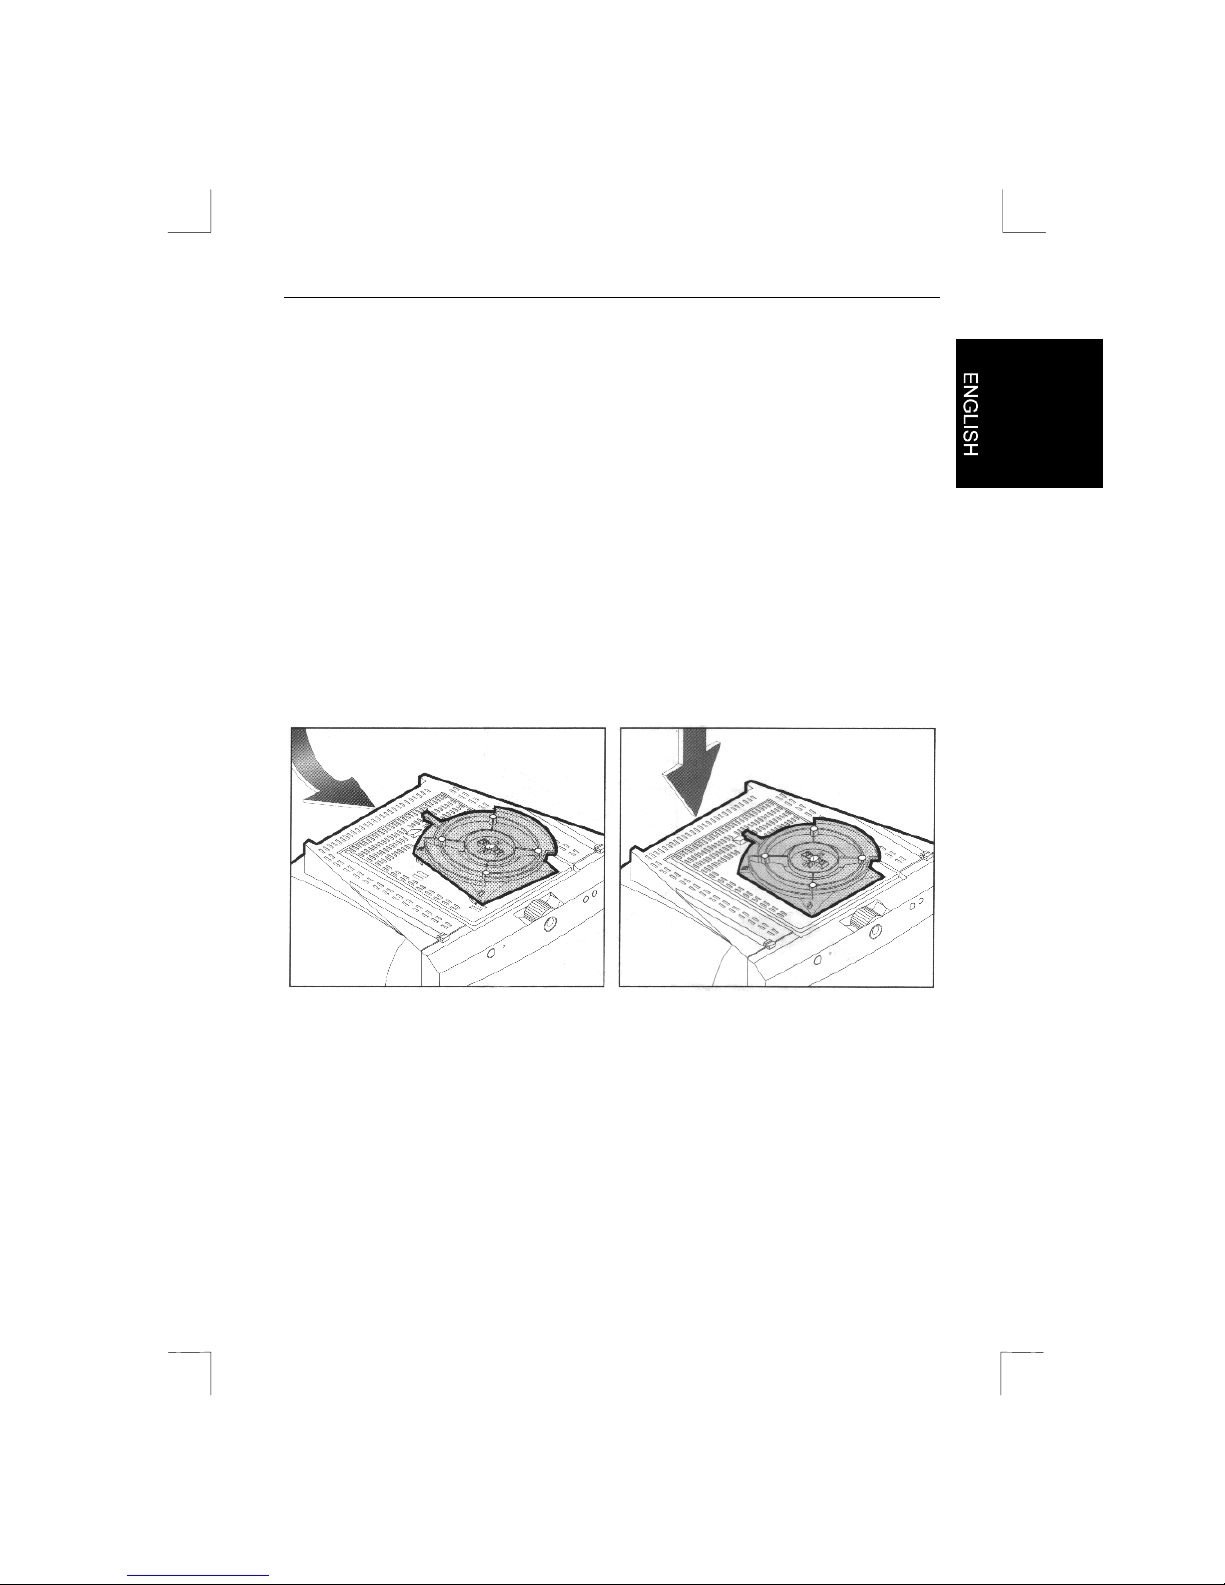
3.2 Fastening the swivel-and-tilt base
Figure 1: Fastening t he base
Follow the instructions below to fasten the base:
1. Place the base against the bottom of the monitor so that the base fasteners are
aligned with the appropriate slot s. See Figure 1.
2. Push the base towards the front of the m oni t or unt il the latch locks into posit ion.
See Fi gure 1.
The base is now bolted in place. See section 3.3 for posit ioning the monitor.
Page 6
Prec ision View er 17” -Excel lence Series-
4
3.3 Positioning the monitor
1. Place the monitor in a convenient location near your computer.
2. Position the monitor so t hat t he top of the screen is no higher than eye level.
3. Position the monitor di r ectl y in front of you at a comfortable reading distance
(around 45 to 60 cm) .
4. Position the monitor so that you will not experience any problems with
reflecting, etc.
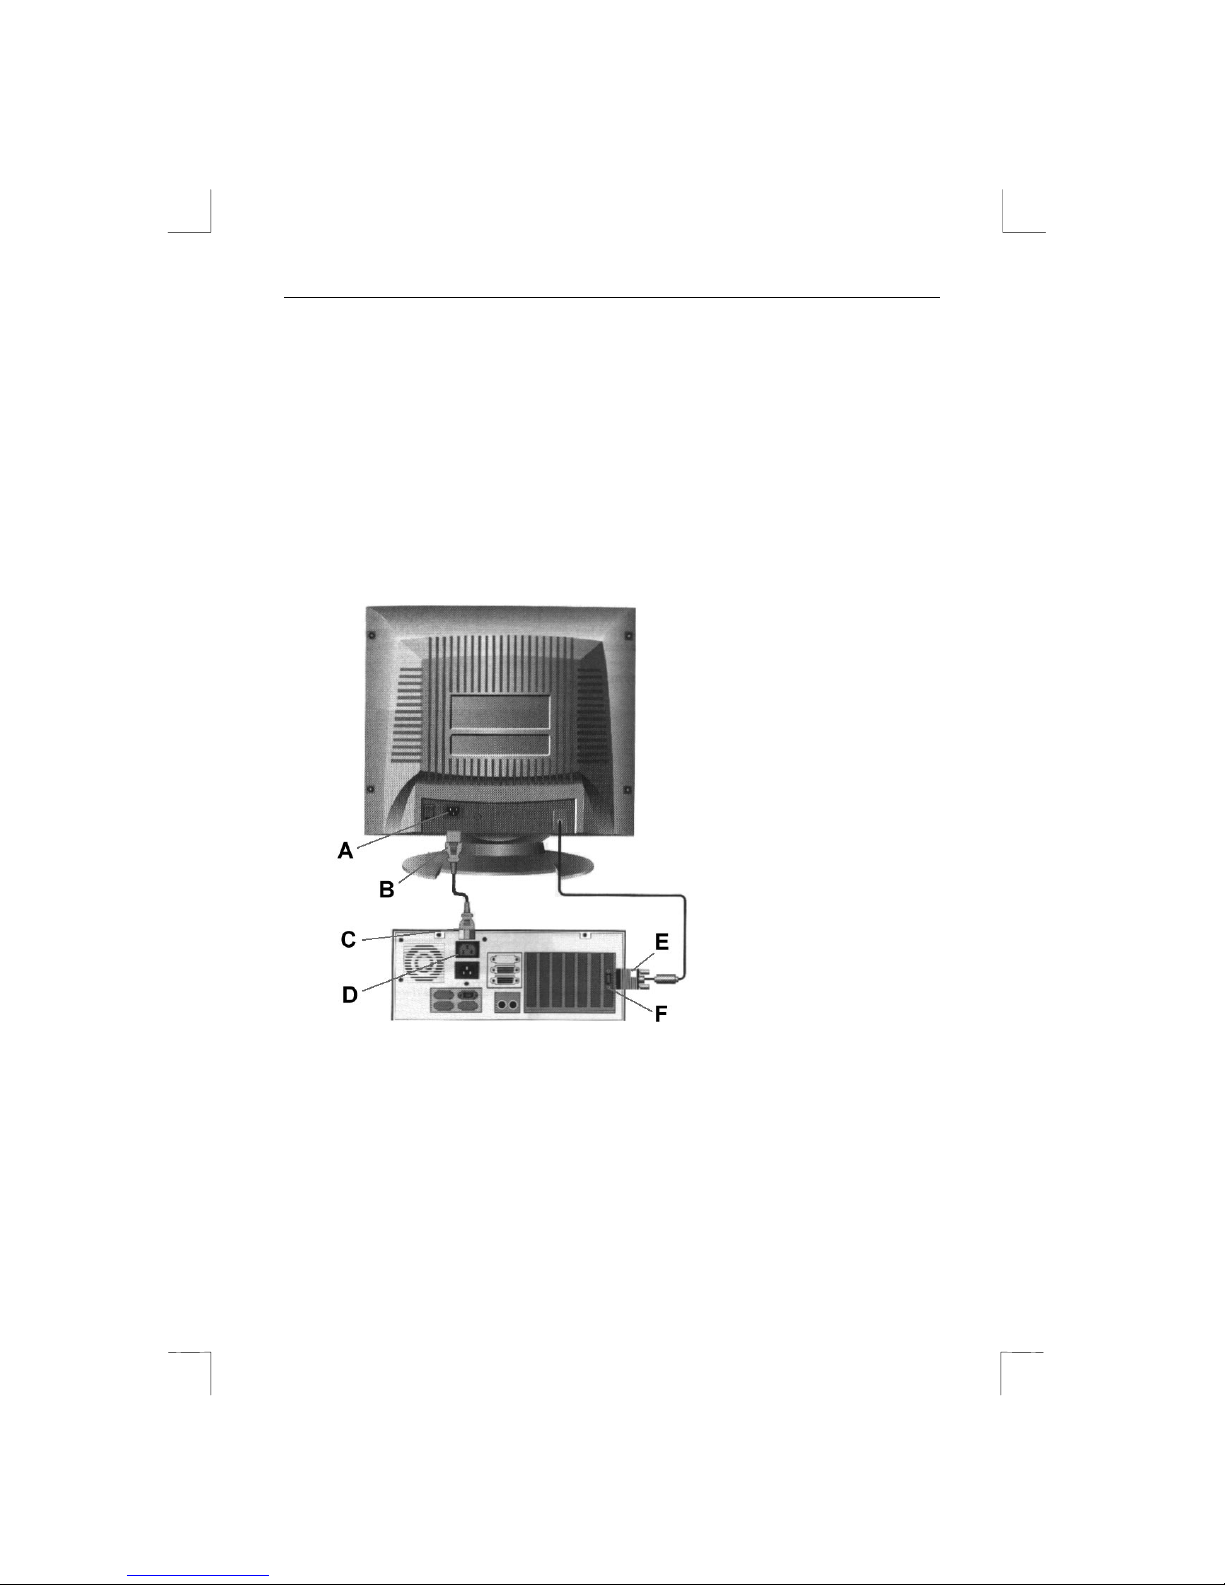
3.4 Connecting the monitor
Figure 2: Connecting t he monitor
Note:
This monitor can also be connected to an Apple Macintosh computer.
Ask your dealer for a conversion cable.
Follow the instructi ons below for connecti ng t he m oni t or to your computer. See
Figure 2.
1. Switch off the computer.
2. Insert the 15-pin signal cable connector (E) to the VGA connection (F) on your
computer and screw it down.
Page 7

Prec ision View er 17” -Excel lence Series-
5
3. Plug the mains cord connection (B) to connection ( A) on the monitor.
4. Plug the other end of the mains cord (C) to your com put er's mains supply
connection (D).
5. Switch on the computer.
Note:
If your computer does not have a mains connection for a monitor, plug
the monitor directly into the wall socket. Ask your dealer for a mains cord.
4. Installing the driver
4.1 Windows 95 / 98
This monitor complies with Microsof t Window's Plug and Play standard. The m oni t or
will be detected automatically when starting Windows 95 or 98.
1. Switch on the monitor .
2. Start Windows. New hardware will be found (Plug and Play monitor) and t he
‘Add New Hardware Wizard’ will start up.
3. Click on 'Next' to continue. See Figure 3.
Figure 3: Instal l ing the driver
4. Follow the on-screen instructions for i nstalling the proper driver. Windows will
locate the driver for the Plug and Play m onitor.
The computer does not need to be restarted following i nst allation.
Page 8

Prec ision View er 17” -Excel lence Series-
6
4.2 Other operating systems
No drivers are required for other operating systems, such as DOS, Windows 3.1x or
Windows NT.
The recommended setting is a resolution of 1024x768 and a refresh rate of 85Hz.
4.3 Setting the refresh rate
Follow the instructi ons below to set your refresh rate in Windows 98:
1. Go to the configuration window ( Star t - Settings - Configurati on wi ndow).
2. Double-click on the 'Display' icon.
3. Click on the 'Settings' tab.
4. Click on the 'Advanced' button.
5. Click on 'Adapter' and select 85Hz from the list.
6. Click on 'Apply' to accept the selected value.
The installation i s now complete. See chapter 5 for instructions on how to operate the
monitor .
Page 9

Prec ision View er 17” -Excel lence Series-
7
5. Operation
5.1 Control buttons on the monitor
Figure 4: Frontal vi ew of the monitor
A
‘ZOOM’ button. Press this butt on and r ot at e the button (D) t o enlarge or
reduce the image.
B
‘RECALL’ button. This button has 2 functions, namely:
1. Switching off t he OSD m enu.
2. Retrieving the default settings.
C
‘ONE TOUCH OSD’ b u t ton. Press this button t o ob tain the OSD main menu
and to select a function.
D
‘ADJUST’ button. Rotate this button to scr oll through the OSD menu and to
change the selected function.
E
‘Power LED’. Displays the status of the monitor when lit.
F
‘Soft Power’ button. Push-button for switching the monitor on and off .
5.2 OSD menu
This monitor is equipped with an On Screen Display (OSD) for changing your monitor
settings via the display screen.
Page 10

Prec ision View er 17” -Excel lence Series-
8
Press the ‘ONE TO UCH OSD’ button (C) to obtain t h e OSD main m enu. A menu like
the one shown in Figure 5 will pop up.
Figure 5: OSD m ain menu
The OSD main menu is divided into 2 windows. The upper window displays the
current resolution and refresh rate.
The second window displays all functions that can be changed. Use the turn knob (D)
to scroll through the OSD menu and press the ‘ONE TOUCH OSD’ button (C) to
select a function.
A new OSD window will appear for every function selected. Press the 'ONE TOUCH
OSD' button in this wi ndow to select the functi on you wish to change. Use the turn
knob (D) to adjust the value of the selected function.
See the table below for descriptions of the various f unct ions.
Icon Function Description
Contrast /
Brightness
For adjusting the contrast and br ightness.
H-position /
V-position
For adjusting the hori zontal and vertical position of the
display im age.
H-size /
V-size
For adjusting the hori zontal and vertical size of the display
image.
Pincushion /
Trapezoid
For correcting pincushion and trapezoid distortion.
Parallel /
Pin Balance
For correcting parall el and pi n balance distortion.
Page 11

Prec ision View er 17” -Excel lence Series-
9
Icon Function Description
Corner Pin /
Rotation
For correcting angle deflection and a rotat ed displ ay i mage.
H-moire /
V-moire
For readjusting the horizontal and vertical moire.
Degauss For demagnetising the display i mage.
Color Control For adjusting the RGB value (m anually) or colour
temperature (6550K, 9300K).
Mode
Information
For requesting the default settings and user settings.
Language For selecting a language (English, German, Italian,
Spanish or French).
OSD Display
Time
For setting the amount of time that the OSD menu should
be displayed (5, 8, 12, 20 or 30 seconds).
OSD Adjust For setting the horizontal posit i on, vertical position and size
of the OSD display.
DPMS Select For selecting t h e power-s av ing mode (VESA or NUTEK) .
See section 5.3.
5.3 Power saving
This moni tor complies wit h EPA ( Environmental Protection Agency) and NUTEK
standards. The power-saving feature is only effective if the monitor is connected to a
computer that supports the VESA DPMS (Display Power Management Signalling).
See the table below for the status of the monitor:
Signal
Status
H-Sync. V-Sync. Video
Power
Consumption
Refresh
time
LED colour
On Pulse Pulse Active 90 W att - Green
60 Watt <1 sec.Stand-by No pulse Pulse Bl ack
screen
15 Watt <3 sec.
Flashing
green/yellow
(OSD select)
Suspend Pulses No pulse Black
screen
<15 Watt <3 sec. Flashing
green/yellow
Page 12

Prec ision View er 17” -Excel lence Series-
10
SignalStatus
H-Sync. V- Sync. Video
Power
Consumption
Refresh
time
LED colour
Off No pulse No pulse Black
screen
<5 Watt <15 sec. Yellow
Page 13

Prec ision View er 17” -Excel lence Series-
11
6. Troubleshooting
If your m oni t or is not functioning properly, you may be able to solve the problem by
locating the problem and possible solution in the following table.
Problem Cause Possible solution
Monitor is not swit ched on. Switch on the monitor. See section
5.1.
No display image,
LED is not lit.
Mains cord is not
connected.
Connect the mains cord. See
section 3.4.
No display image,
but LED is lit.
Computer is switched off
or 'hanging'.
Switch on the computer or reset it
by switching it of f and then on
again.
Computer is in t he ‘powersaving’ mode.
Move the mouse or press a key.
A so-called 'screensaver'
has been activated.
Move the mouse or press a key.
The signal cable is not
connected.
Connect the signal cable. See
section 3.4.
Contrast and/or bri ght ness
is set improperly
Adjust the contrast and/or
brightness. See section 5.2.
Announcement
on screen: ‘out of
range’.
The computer is sending a
signal that t he monitor
does not support.
Lower the resolution or refresh rate.
See section 4.3.
Ther e is a
coloured spot in
the display image
or the colours are
faded.
There is a loudspeaker or
magnet next to the
monitor .
Remove the loudspeaker or
magnet. Try the m oni tor at a
different workplace. Select the
'Degauss' function from t he OSD
menu. See section 5.2.
The monitor has been
rotated or moved after
being switched on.
Select the 'Degauss' function from
the OSD menu. See section 5.2.
Page 14

Prec ision View er 17” -Excel lence Series-
12
Problem Cause Possible solution
The picture is
bouncing or a
wave pattern is
present in the
display.
There is a device with a
transformer or adapter
nearby (such as a TV,
radio or loudspeaker).
Remove or move the source of
disturbance. Try the moni t or at a
different workplace if necessary.
The colours are
faded or lacking.
The signal plug is not
properly secured in the
computer.
Secure the plug. See section 3.4.
Defective VGA card. If possible, try the monitor with a
different computer in or der to check
whether it wo rks.
Pin 1, 2 or 3 on the signal
plug is bent or broken.
Straighten the pin. Note: the pins
break off very easily (and do not fall
under the guarantee)
Display image is
not centred.
Position settings set
improperly.
Adjust the horizontal position
(H.Position) and verti cal position
(V.Position). See section 5.2.
Display image is
too small or too
large
Size settings set
improperly.
Adjust the horizontal size (H.size)
and vertical size (V.Size). See
section 5.2.
Display image is
too dark or too
light
Contrast and brightness
settings set improperly.
Adjust the contrast and bright ness
(section 5.2).
Display image is
in the form of a
trapezoid.
Example: / \ or
\ /.
Trapezoid setting set
improperly.
Adjust the trapezoid setting. See
section 5.2.
Display image is
convex or
concave.
Pincushion setting set
improperly.
Adjust the pincushion setting. See
section 5.2.
Display image is
tilted.
Rotation setting set
improperly.
Adjust the rotation setting. See
section 5.2.
Page 15

Prec ision View er 17” -Excel lence Series-
13
Problem Cause Possible solution
Windows Pl ug
and Play does not
recognise the
monitor .
Pins in the signal plug ar e
bent.
Straighten the bent pins. Note: the
pins break off very easily (and do
not fall under the guarantee)
Defective VGA card. Try the monitor with a different
computer.
Ther e is a moiré
pattern on the
image (blurred
strips or cir cul ar
lines that do not
belong in the
image).
The OSD menu's moiré
pattern setting has been
changed too quickly.
For some models, the moiré pattern
can be adjusted using the OSD
menu. W hen using t he OSD m enu,
do not change the value too quickly.
Slowly change the value because
every val ue can reduce o r remove
the effect.
Monitor self-test:
This monitor is capable of checking the input signal. Whenever the signal cable is
disconnected or if no signal is detected, the monit or will switch to the ‘AUTO POWER
OFF MODE’. An OSD announcement will appear and the monitor will switch off.
If the ‘O NE TOUCH OSD’ button (C) is now press ed, an RGB test pattern will appear
on the screen. There is nothing defective about the monit or i f this screen appears.
Check the signal cable and your computer.
If the signal fal ls outside the range of the monitor, the announcement 'OUT OF
RANGE' will appear on the screen. The horizontal and vertical frequency of this
signal will also be displayed. The wrong frequency will flash. Check your system or
switch to a different resolution.
If these suggestions are not of any help, consult the Trust Int ernet site at
www.trust.com
. Please contact your dealer if you still have problems after you have
tried these solutions. You should keep the following infor mation availabl e:
•
Brand nam e and type of monitor;
•
Brand nam e and type of computer;
•
Operating syst em language and version;
•
Resolution being used;
•
Refresh rate being used;
•
Exact description of t he problem .
Page 16

Prec ision View er 17” -Excel lence Series-
14
7. Specifications
Screen size 17 inch
Viewable size 16 inch (40.5 cm )
Dot pitch 0.27 mm
Display area 330 x 245 mm
Number of colours Infinit e
Maximum resolution 1280x1024 non interl aced
Horizontal synchronisation 30 to 70 KHz
Vertical synchronisation 50 to 150 Hz
Bandwidth 108 MHz
Video mode recognition Automati c
Plug and Play DDC 1 / 2B (Display Data Channel)
Voltage 100-240 V AC, 50/60 Hz
Power consumption 90 Watt
Dimensions (HxW xD) 416 x 416 x 447 mm
Weight 16 Kg
Operating temperature 0º C - 40º C
Compl iance UL, CSA, DHHS, N, D, FI, S, CE, FCC- B, VESA
DPMS, NUTEK A, EPA, TÜV-GS, ISO-9241-3,
TCO99.
Page 17

Prec ision View er 17” -Excel lence Series-
15
8. Warranty
8.1 Service
•
On-site service for the first year in t he following countries: Belgium, Denmark,
France, Germany, It al y , Luxembourg, t he Netherlands, Norway, Spain, Sweden
and the United Kingdom. This means that you contact your national servi ce
centre (mentioned elsewhere in this m anual) whereupon the faulty product will be
exchanged at your own door.
•
The second and third year of the warranty involves a 'carry-in service'. You send
the faulty product to your nat ional service centre. If there is no service centre in
your country, then you can send the product to the nearest service centre in a
neighbouring country. The only cost you are required to pay is t he postal cost to
send the product to the service centre. The product will be delivered to your door
free of charge after repair.
•
For all European countries not mentioned above, the warranty condition for the
first year is t he 'carry-in' service instead of on-site and is therefore the same as
the second and third years.
•
If your monitor may be faulty, al ways check the following before contacting our
service centre:
- Read and check the 'Troubleshooting' chapter
- If possible, check the FAQs on our website:
www.trust.com
- Read the warranty conditions
•
Make sure you have the following infor mation available when you contact our
service centre:
-
Proof of purchase
which includes the date of purchase (
this is also a proof of
warranty, so keep it in a safe pl ace
)
- The product's article num ber (1xxxx), th e product name and type
- The serial number
(Please be aware that you may be required to wait f or a l onger period of t i me if
you phone between 12:00 AM and 2:00 PM.)
•
Make sure that you do not send accessories with your m oni t or , such as cables or
the manual. The moni tor support can remain attached to your monitor.
8.2 Conditions
•
The on-site service consists of the following: I f you cal l our service centre before
13:00 on a working day, the product will be exchanged no later than the following
working day in 90% of cases (24 hour service). The reaction ti me may be longer
due to local accessibility, journey distance, transport over water and holidays.
•
Trust® Computer Products warr ant s t o the original purchaser of this product ,
purchased from the authorised resellers or distributors, that it will be free from
defects in material and workmanship for a period of 36 m onths from the date of
purchase (excluding consumable and accessory items such as power cords and
Page 18

Prec ision View er 17” -Excel lence Series-
16
cables, manual and cosmetic items which do not aff ect the normal operation of
the product).
•
Warr ant y servic e is available to the original purchaser by delivering the product
during the warranty period to the available service centres.
•
Proof of purchase must be provided showing the purchase date, product serial
number and the seller’s and buyer’s names.
•
The purchaser shall bear all shipping, packi ng, insurance costs and all other
costs, excluding labour and parts which ar e necessary to repair, replace or return
under this warranty.
•
The service centre will invoice the purchaser all labour, parts and transportation
costs in case of no fault found, mechanical damage (lik e damaged housing, PCB,
CRT, cables, connectors or controls), mistreatment of the product and/ or
opened/repaired by an unauthorised service person.
•
You can also read the general conditions of the warranty on our website:
www.trust.com
. Contact your nearest service centre for the service conditions
that apply for you.
8.3 Service Centres
Country: Contact:
UK
Eurographic Industries Ltd
E-mail mark@eurographics.co.uk
Mail Unit 6 Premier Way
Abbey Park
Indus trial Estate
Romsey
Hampshir e SO51 9AQ
United Kingdom
Fax +44-1794-830044
Phone +44-1794-830775
Italy
Sirpel
E-mail r.ballada@sirpel.it
Mail 10090 S. Bernardo d'ivrea
Via Cun eo - Zona
Indus triale PiP
Italy
Fax +39-125-632085
Phone +39-125-239954
France
Serrib
E-mail p.guyot@serrib.com
Mail 25 Rue Albert Camus
BP 355
F-90006 Belfort Cedex
France
Fax +33-84-545554
Phone +33-3-84545519
Page 19

Prec ision View er 17” -Excel lence Series-
17
Country: Contact:
Benelux
NGP
E-mail paul@ngp.nl
Mail Dwarsdijk 4
5705 DM H ELM O N D
The Netherlands
Fax +31-4925-23781
Phone +31-4925-22466
Germany
M+S
Internet www.repair-center.de
E-mail fleckenb@mus.de
Mail Nordring 55-57
63843 NIEDERNBER G
Germany
Fax +49-60-28944211
Phone +49-60-28944212
Spain
Seltron S.L
E-mail jose_luis@jet.es
Mail C/Industria,44-46
08830 Sant Boi De Llobregat
Barcelona
Spain
Fax +34-936-308104
Phone +34-936-529772
Sweden
Ibas Laboratories
Internet www.ibas.se
E-mail ibas@ibas.s e
Mail Bergkaellavaegen 32
191 30 Sollentuna/Stockholm
Sweden
Fax +46-8-6267608
Phone +46-8-6267600
Norway
Ibas Laboratories A/S
Internet www.ibas.no
E-mail leif.arne.melgaard@ibas.no
Mail Industriveien 65
2200 Kongsvinger
Norway
Fax +47-628-10150
Phone +47-628-10100
Denmark
Ibas Laboratories A/S
Internet www.ibas.dk
E-mail ibas@ibas.dk
Mail Ved Klaedebo 12
2970 Hoersholm
Denmark
Fax +45-45-760121
Phone +45-45-760110
 Loading...