

Page 1

ICS-2000
OCTOPUS CONTROL STATION
ONLINE MANUAL
www.trust.com
Item 71110 Version 1.0
Visit www.trust.com
for the latest instructions
Page 2

3 4
ICS-2000 OCTOPUS CONTROL STATIONICS-2000 OCTOPUS CONTROL STATION
Index
1.1 Add a room 5
1.2 Edit/Delete room 6
2.1 Connec t a new device 7
2.2 Connect a ZigBee bulb 10
2.3 Connect a ZigBee remote 14
2.4 Edit/delete device 16
3.1 Add scenes 17
3.2 Add/delete actions 18
3.3 Add/delete delays 19
4.1 Configure timers 20
4.2 Edit/delete timer 23
5.1 Configure rules 24
5.2 Edit/delete rule 27
6.0 Connect manually 28
7.0 Connect an existing device (Clone) 29
Page 3
5 6
ICS-2000 OCTOPUS CONTROL STATIONICS-2000 OCTOPUS CONTROL STATION
1.1
1.2
1.2 Edit/Delete room1.1 Add a room
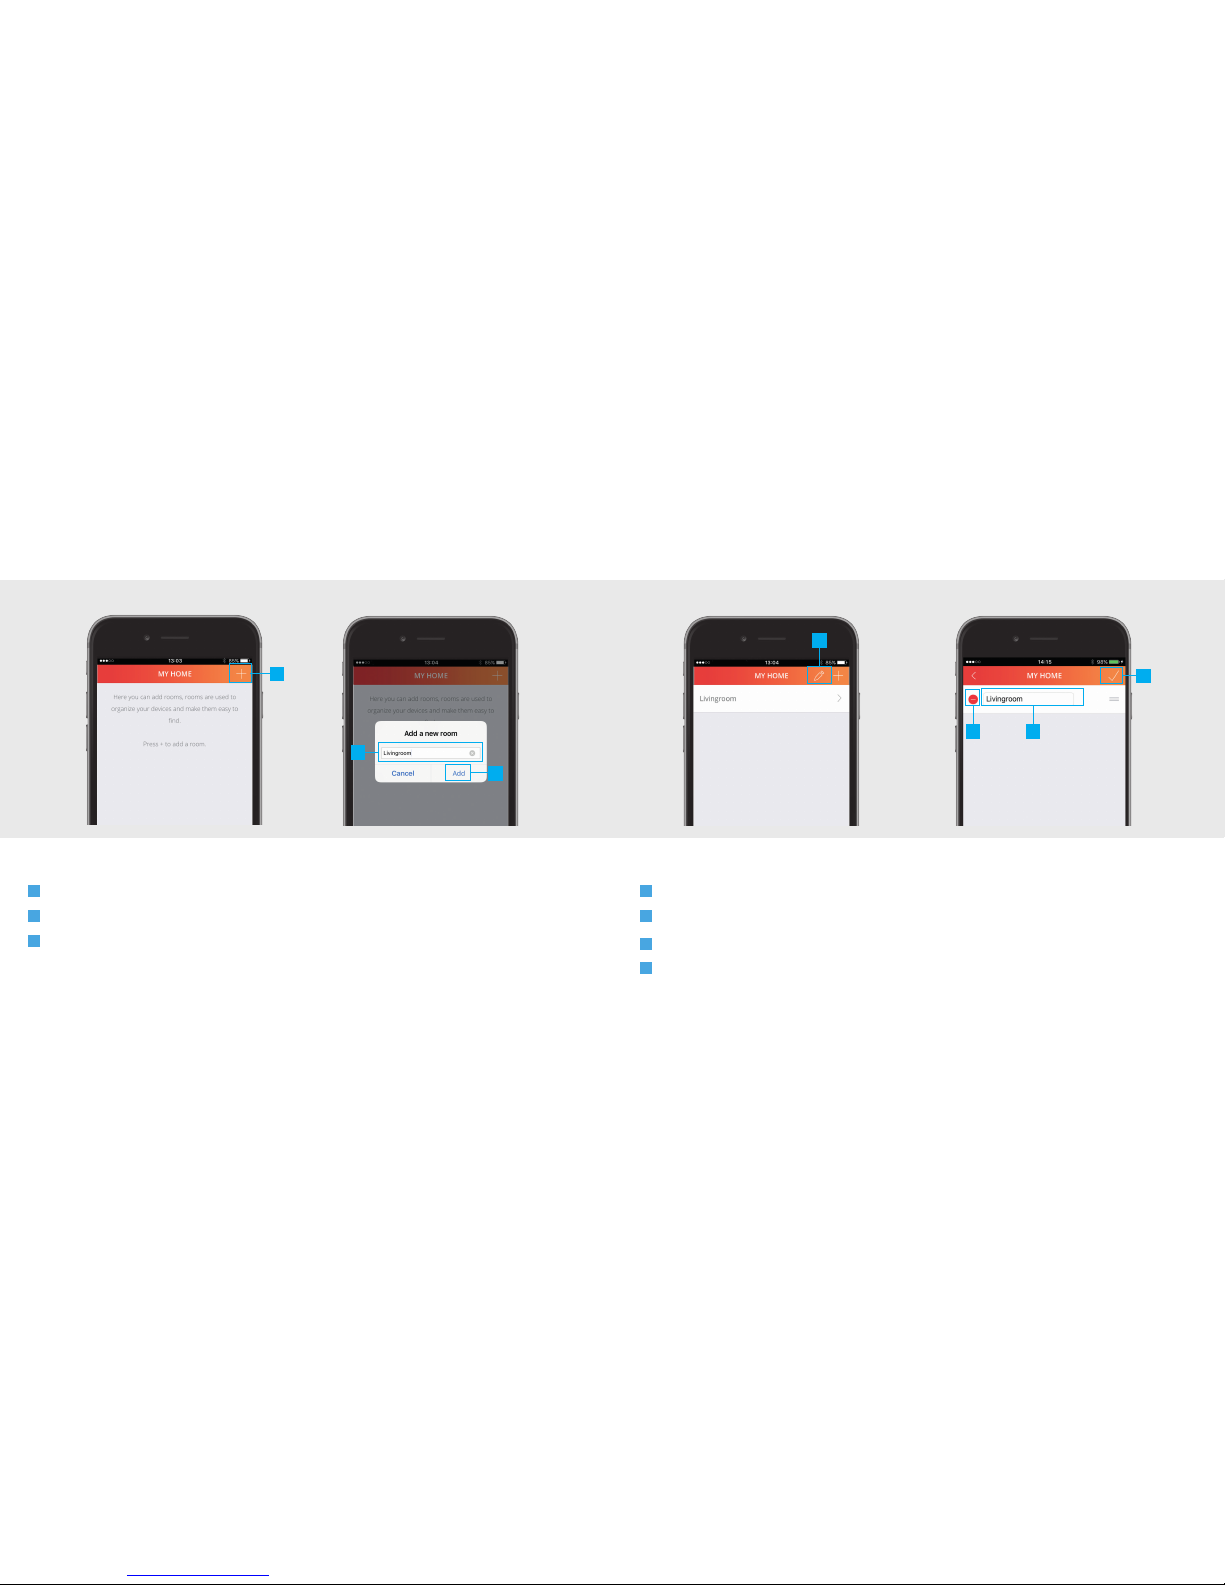
A
Press the + button at the top of the screen to add a new room
B
Fill in a name for the room you want to add.
C
Press the ADD button to save the new room
A
To edit the name of a room press the pencil button at the top of the screen
B
Press on the room name to begin editing.
C
When you are done editing the name press the CONFIRM button.
D
To delete a room press the DELETE button in front of the room when in editing mode. Press the
CONFIRM button to go back to the room overview.
A
B
C
A
BD
C
Page 4
7 8
ICS-2000 OCTOPUS CONTROL STATIONICS-2000 OCTOPUS CONTROL STATION
2.1 Connect a new device
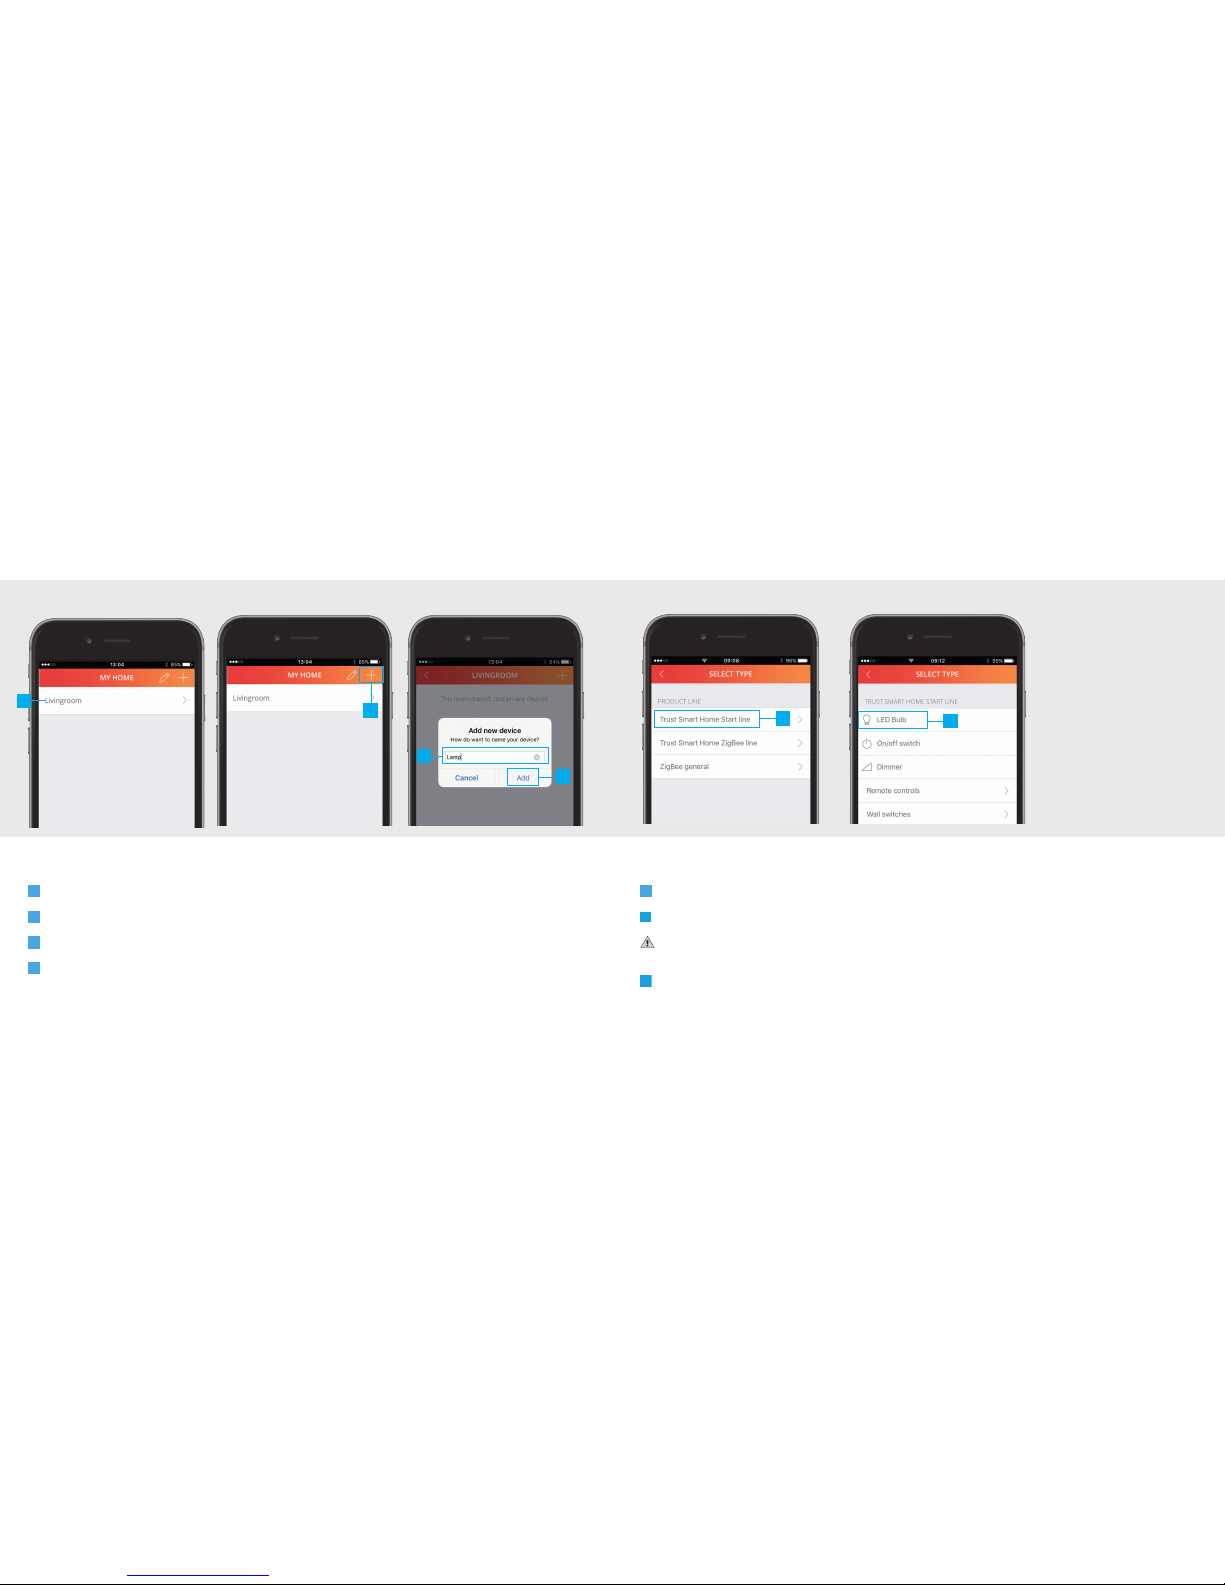
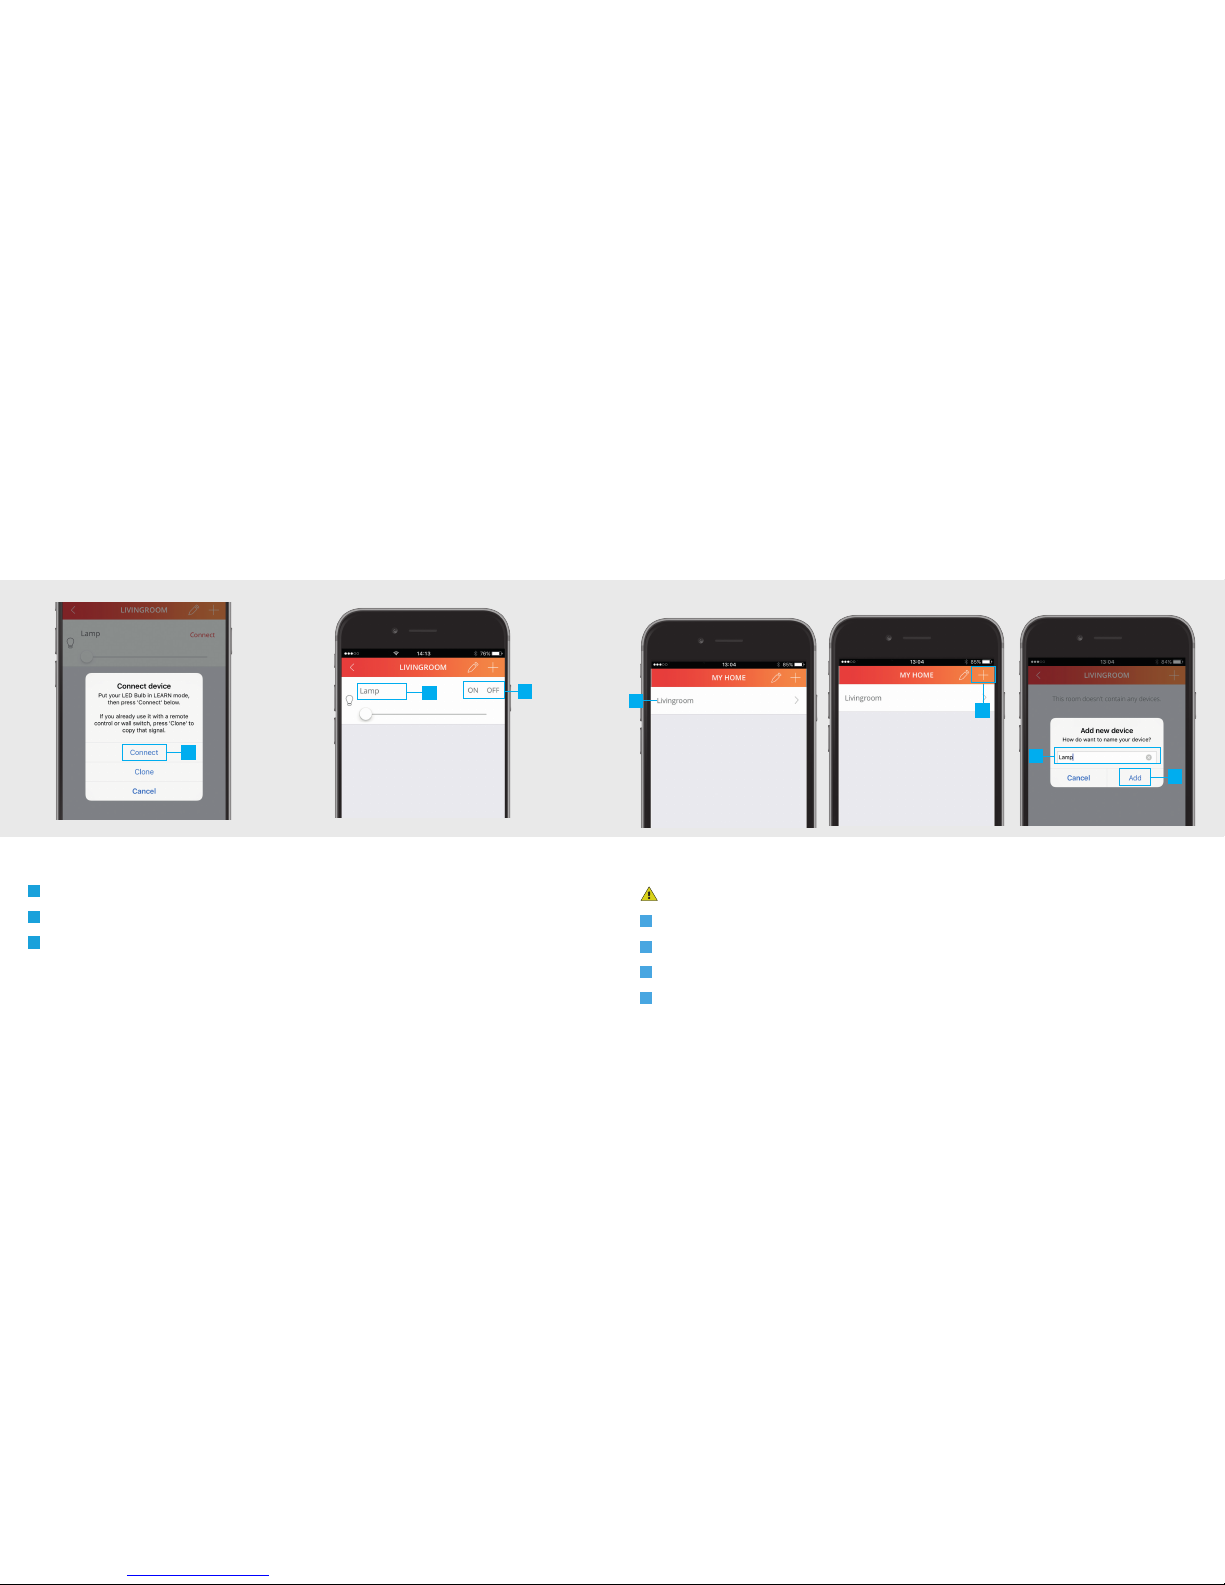
A
Press on a room name to open it.
B
Press the + button at the top of the screen to add a new device.
C
Enter a name for the device you want to add
D
Press ADD
E
Press the desired Product Line.
F
Select the type of device you want to add to your room.
If you already control your Trust Smart Home receiver with a remote control or wall switch
continue to step 7. (Only for Star tline products)
G
Put your receiver in connect/learn mode. (Read the manual of the receiver on how to put it in connect/
learn mode).
2.1
A
B
C
D
E
F
Page 5
ICS-2000 INTERNET CONTROL STATION
9 10
ICS-2000 OCTOPUS CONTROL STATION
H
When the receiver is in connect/learn mode press CONNECT.
I
The device is now added to your room. You can now control the device with the App.
J
Use the buttons to control the device.
H
I
J
2.2 Connect a ZigBee bulb
Make sure the ZigBee bulb is close to the Control Station (Within 4 metres)
A
Press on a room name to open it.
B
Press the + button at the top of the screen to add a new device.
C
Enter a name for the device you want to add
D
Press ADD
2.2
A
B
C
D
Page 6

ICS-2000 INTERNET CONTROL STATION ICS-2000 INTERNET CONTROL STATION
11 12
E
Select Trust Smart Home ZigBee Line
F
Choose for ZigBee light
G
Put the bulb in connect mode. (Check the manual of the bulb on how to put it in connect mode)
E
F
H
When the ZigBee bulb is in connect mode press CONNECT.
I
The bulb is now added to your room. You can now control the device with the App.
J
Use the buttons to control the device.
H
I
J
Page 7

ICS-2000 INTERNET CONTROL STATION ICS-2000 INTERNET CONTROL STATION
13 14
ICS-2000 OCTOPUS CONTROL STATION
K
To change the color of a ZigBee bulb press on the color circle to open the color palette (Only for
RGB or Cold/Warm bulb)
L
Choose the desired color.
M
Press the BACK button to go back to the room.
K
L
M
14
2.3 Connect a ZigBee remote
2.3
A
B
First reset your ZYCT-202 ZigBee remote before you connect it to the ICS-2000. (Check the manual of
the ZigBee remote on how to reset it). Keep the remote within 2 meters from the ICS-2000.
A
Add a new device (See chapter 2.2) and choose for ZigBee Remote control
B
Press CONNECT in the App and wait for confirmation from the App
C
Press and hold the Smart Group button on the remote and wait untill the LEDs under the channels start
to blink. Wait for confirmation from the App that the connection succeeded.
Arm
5
C
Page 8

ICS-2000 INTERNET CONTROL STATION ICS-2000 INTERNET CONTROL STATION
15 1615
D
D
The ZigBee Remote is now connected
To control a bulb which is already connected with the Control station it also needs to be connected
to the ZigBee Remote. (Check the manual of the ZigBee remote on how to connect it with a bulb)
Notice: With the ZYCT-202 ZigBee Remote control RGB and Cold/Warm bulbs can only be turned ON
and OFF and can be dimmed.
16
2.4
A
To edit the name of a device first open the room which contains the device.
B
Press the pencil button the enter edit mode.
C
Press on the device name to begin editing.
D
When you are done editing the name press the confirm button.
E
To delete a device press the DELETE button in front of the device when in editing mode. Press the
CONFIRM button to go back to the device overview.
2.4 Edit/delete device
A
B
C
E
D
Page 9

ICS-2000 INTERNET CONTROL STATION ICS-2000 INTERNET CONTROL STATION
17 18
3.1
With a scene you can trigger dierent devices at the same time or with an delay.
A
Press the scene button in the menu bar
B
Press the + button at the top of the screen to add a new scene.
C
Fill in a desired name for the scene.
D
Press OK.
3.1 Add scenes
A
B
C
D
3.2
A
Press the ADD ACTION button to add ac tions to the scene.
B
Add the desired actions for the devices by pressing the buttons.
C
Press CONFIRM to add the actions to the scene.
D
By pressing the pencil button you enter edit mode.
E
Delete an action by pressing the DELETE button.
F
Press CONFIRM again to save the scene.
3.2 Add/delete actions
A
B
E
F
D
C
Page 10

ICS-2000 INTERNET CONTROL STATION ICS-2000 INTERNET CONTROL STATION
19 20
3.3
It is possible to add a delay between actions. First add an ac tions like described in step 3.2
A
Press the ADD DELAY button.
B
Choose how long the delay must be by selecting a time period.
C
Press the CONFIRM button to add the delay to the scene
D
The delay is now added to your scene.
E
By pressing the pencil button you enter edit mode.
F
Press the DELETE button to delete a delay.
3.3 Add/delete delays
A
B
C
D
E
F
4.1
With a timer you can trigger one or multiple devices on a fixed time, Sunrise or Sunset.
A
Press the Rules button in the menu bar
B
Press the + button at the top of the screen to add a new timer.
C
Press on Timer wizard.
D
Fill in a name for your timer and press OK.
4.1 Configure timers
B
C
D
Page 11

ICS-2000 INTERNET CONTROL STATION ICS-2000 INTERNET CONTROL STATION
21 22
E
Choose the kind of start time for the t imer. (In this example a fixed time is used)
F
Select the desired star t time for the timer and press NEXT.
G
Choose which days and in which months the timer should be triggered. (By default all days and months
are selected). Press NEXT
E
F
G
H
Choose the desired actions for when the timer is triggered. Press NEXT
I
A message appears asking if you want to add a timer to turn the devices OFF. Press Yes
J
Select the time you want the devices to be turned OFF. Press NEXT
K
The timers have been added to the overview.
H
I
J
Page 12

ICS-2000 INTERNET CONTROL STATION ICS-2000 INTERNET CONTROL STATION
23 24
L
Press the pencil button the enter edit mode.
M
Press on the timer name to begin editing.
N
When you are done editing the name press the confirm button.
O
To delete a timer press the DELETE button in front of the timer when in editing mode. Press the
CONFIRM button to go back to the timers/rules overview.
4.2 Edit/delete timer
4.2
K
M
N
O
L
With a rule you can execute an action by choosing a trigger and ac tion.
A
Press the RULES button in the menu bar
B
Press the + button at the top of the screen to add a new rule.
C
Press on RULE.
D
Fill in a name for your rule and press OK.
5.1 Configure rules
5.1
B
C
D
Page 13

ICS-2000 INTERNET CONTROL STATION ICS-2000 INTERNET CONTROL STATION
25 26
E
Add a trigger by pressing the + button next to triggers.
F
Select a trigger to use to execute an action. (In this example a motion sensor is used as tr igger)
G
Choose one of the linked devices
E
F
G
H
Add an action by pressing the + button next to actions .
I
An overview is shown of the available devices that have been linked. Choose an action for the
desired devices. Press the CONFIRM button.
J
The choosen triggers and actions are shown. Press the CONFIRM button again to save the rule.
K
The rule has been added to the rule overview. You can turn the rule ON or OFF by opening or
closing the toggle.
H
J
I
Page 14

ICS-2000 INTERNET CONTROL STATION
28
ICS-2000 INTERNET CONTROL STATION
27
L
Press the pencil button the enter edit mode.
M
Press on the rule name to begin editing.
N
When you are done editing the name press the confirm button.
O
To delete a rule press the DELETE button in front of the rule when in editing mode. Press the CONFIRM
button to go back to the rules overview.
5.2 Edit/delete rule
5.2
K
L
O
M
A
When there is no ICS-2000 found, it is possible to enter the MAC address manually during the
registration process. Press the MANUAL but ton
B
Look at the bottom of the ICS-2000 for the MAC address.
C
Press the “Enter manually” field and enter the MAC address for your ICS-2000. Then press NEX T
6 Connect manually
MAC: 00-00-A2-00-12-11
B
6
A
C
Page 15

ICS-2000 INTERNET CONTROL STATION
30
ICS-2000 INTERNET CONTROL STATION
29
ICS-2000 INTERNET CONTROL STATION
30
ICS-2000 INTERNET CONTROL STATION
29
7 Connect an existing device (Clone)
This step is recommended when you already control your Trust Smart Home receiver with a remote
control or wall switch. (Only for Startline products)
A
Press CLONE
B
A dialogue is shown to clone the signal of the transmitter
C
Give an ON signal on the transmitter that controls the device chosen in step 2.1f.
C
B
A
 Loading...