

Page 1

Trust Handy Scan Colour
User's Manual
Page 2

Copyright Statement
No part of this manual may be reproduced or transmitted, in
any form or by any means, electronic or mechanical, incl uding
photocopying, recording, or information storage and retrieval
systems, for any purpose other than the purchaser's personal
use, without the prior written permission of the manufacturer.
Disclaimer Statement
The manufacturer specifically disclaims all warranties, either
express or implied, including but not limited to implied
warranties of merchantability and fitness for a particular
purpose, with respect to the software, the product manual(s)
and written materials, and any other accompanying hardware.
The manufacturer reserves the right to revise or make
improvements to its product at any time and withou t obligation
to notify any person of such revisions or improvements.
In no event shall th e manufacturer be liable for any
consequential or incidental damages, including any loss of
business profits or any other commercial damages, arisi ng out
of the use of its product.
* All company or product names are trademarks or registered
trademarks or service marks of their respective owners.
08638en.doc
Page 3

i
Table of Contents
Introduction-----------------------------------------------------------------ii
Chapter 1: The Trust Handy Scan Colour------------------------1
Chapter 2: Setup ----------------------------------------------------------3
2.1 Installing the Scan Driver -----------------------------------------3
2.2 Installing the Interface Card--------------------------------------3
2.3 Connecting the scanner-------------------------------------------5
Chapter 3: Launching the Image Source (TWAIN)-------------7
Chapter 4: Scantools----------------------------------------------------9
4.1 Installing Scantools-------------------------------------------------9
4.2 Getting ready to use your scanner--------------------------- 10
4.3 Applying Gamma Correction to Images-------------------- 10
Chapter 5: StitchScan------------------------------------------------- 13
Page 4

ii
Introduction
Congratulations on the purchase of your new Trust Handy Scan
Colour. Trust Computer Products is one of the leading
companies in the world in the development of the high
performance sheet-fed scanner.
Before you install and operate the new scanner, please take a
few minutes to read through the manual. It provides you the
proper instructions on how to unpack, install, operate and
maintain the scanner.
Safety Precautions
•
Keep the scanner out of the sun. Direct sun or excessive
heat may damage the unit.
•
Do not install the scanner in a humid or dusty place.
•
Retain scanner box and packing material for sh ipping
purposes.
Page 5
1
Chapter 1:
The Trust Handy Scan Colour
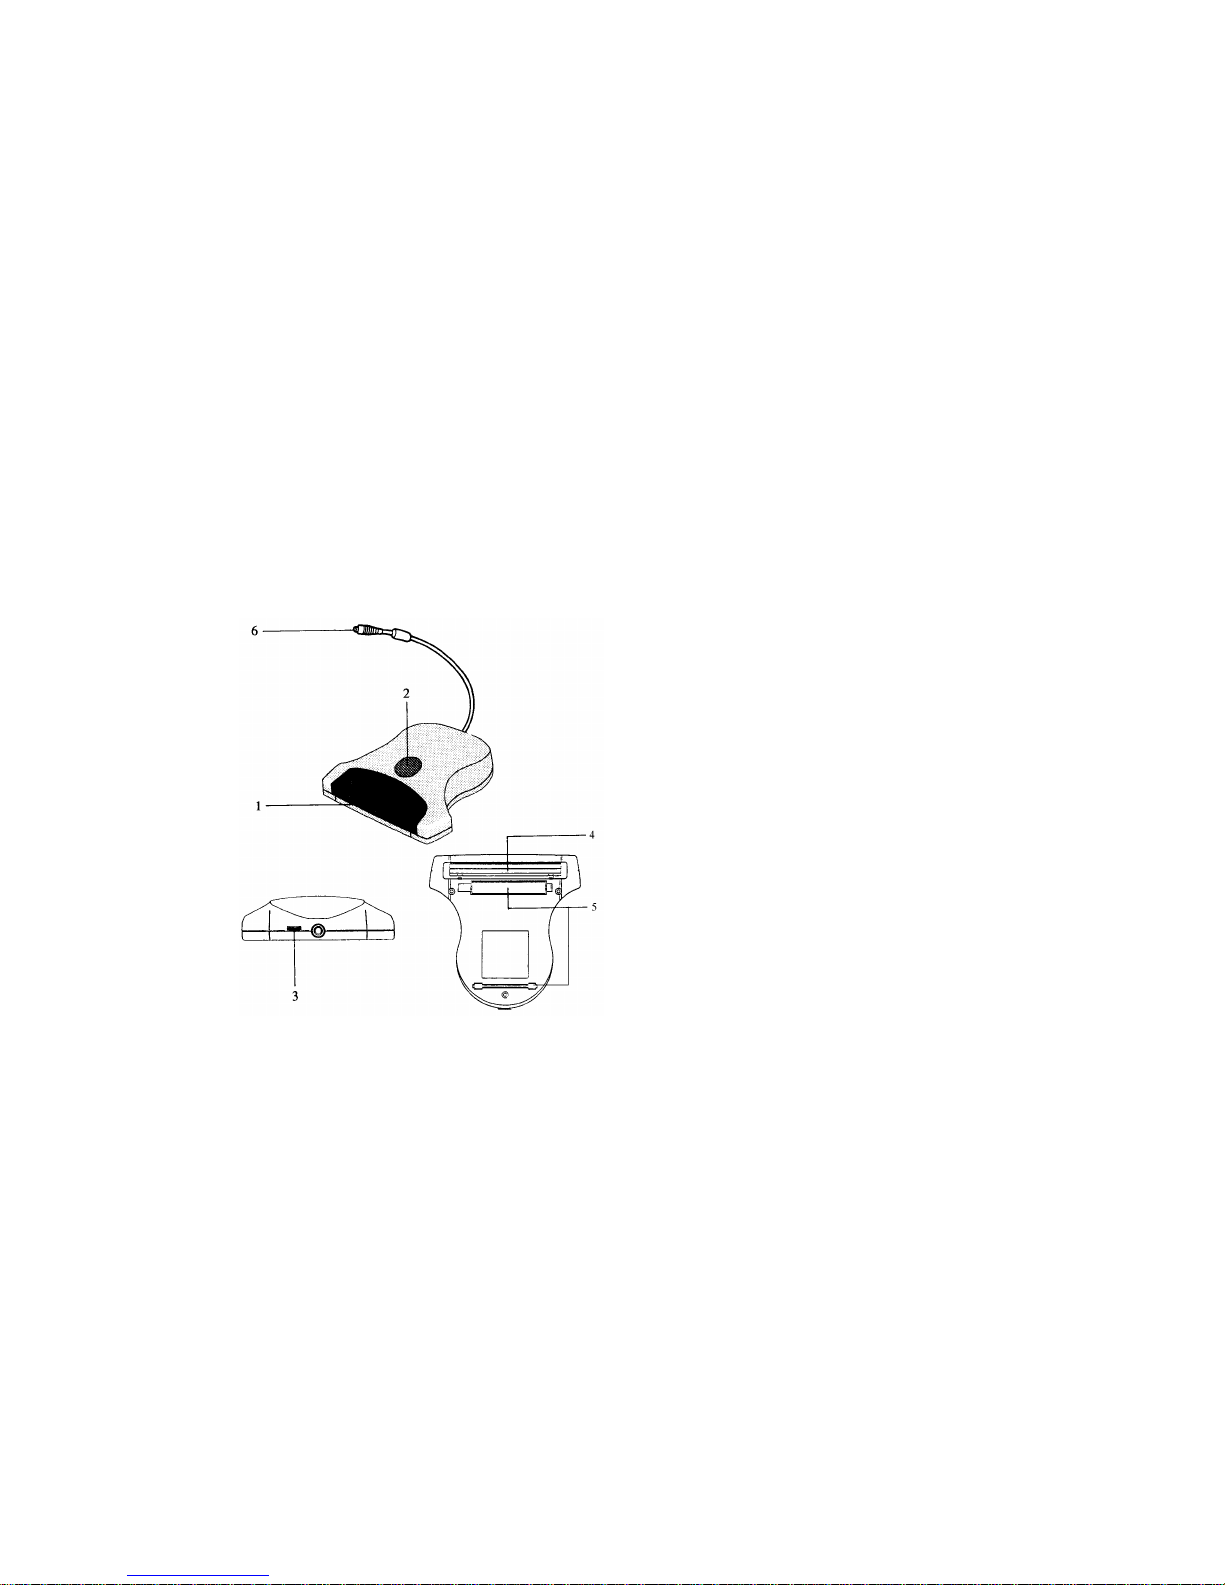
Figure 1 The Scanner Body
1. Viewing Window
2. Start Button
3. Brightness Control Dial
4. Clear Plastic Window
5. Rollers
6. Cable Connector
Page 6

2
Page 7

3
Chapter 2:
Setup
2.1 Installing the Scan Driver
At the beginning of installing ScantoolsTM (the image processing
software that comes with the scanner), if you choose to install
device drivers, the "Installing Device Drivers" dialog box will
appear with a list of drivers for you to choose. Highlight the
driver that corresponds to your scanner model and click the
"Install" button.
2.2 Installing the Interface Card
Figure 2 The 16-bit Interface Card
Note
If you use the parallel port adapter, you don't need to install this interface
card.
The interface card uses four continuous I/O address es to
control the s canning process. The relationship between the I/O
switch setting and the actual I/O addresses are as follows:
Page 8

4
SW1 SW2 SW3 SW4 I/O Address
on off off off 150~151
off on off off 170~171
off off on off 350~351
off off off on 370~371
Only one switch can be set to ON at one time. All othe r
setting combinations are invalid.
To install the interface card, proceed as follows:
1. Turn off your computer and al l peripherals.
2. Remove the computer case as illustrated in Figure 3.
Figure 3 Figure 4
Page 9

5
3. Position the computer so that you have a clear view of the
mainboard and its expansion slots. If your computer is a
tower model, first lay the computer on its side with the
mainboard facing up. Choose any unused 16-bit expansion
slot to insert your interface card.
4. Remove the metal plate on the computer case that covers
the opening of the expansion slot you plan to use. You may
need a screwdriver to do this.
5. Remove the interface card from its protective package.
6. Insert the card into the slot (s ee Figure 4 above). As you
insert the card, always keep the card at a 90° angle to th e
mainboard with i ts golden fingers aligned with the slot. Pus h
the card in firmly .
7. Use the screws to secure the mounting bracket of the
interface card to the computer case.
8. Replace the computer case.
2.3 Connecting the scanner
1. Make sure your system is off.
2. Align th e plug (connector) of the scanner cable with the
socket on the interface card. A small arrow on the plug can
help you with the alignmen t (see figure 5).
3. Push the plug in firmly to make a secure connection.
Figure 5
Page 10

6
Page 11

7
Chapter 3:
Launching the Image Source
(TWAIN)
Before using your scanner, you have to launch an image source
to connect the application and the scanner. The connection
allows the application and the s canner to understan d each
other so th at the application can direct the scanner to
accomplish th e desired scanning tasks.
TWAIN is such an image source, which is the most popular one
and has become an industry standard.
The Handy Scan Colour is TWAIN-compliant. Therefore, you
can use the scanner with any application software that supports
TWAIN.
We will be using ScantoolsTM, a TWAIN-supporting image
processing application, to explain how to launch the image
source.
1. From the "Scan" or "File" menu, choose "Select Source."
The "Select Source" dialog box appears. Highlight the
TWAIN Source you want to use and click the "Select"
button.
2. From the "Scan" or "File" menu, choose "Acquire". Now you
are ready to use your scanner.
Note
Other applications may include the "Select Source" and "Acquire" commands
in a menu other than "Scan" or "File" menu
Page 12

8
Page 13

9
Chapter 4:
Scantools
4.1 Installing Scantools
1. Enter the Microsoft® WindowsTM environment, either
Windows 3.x or Windows 95.
2. Call up the Run dialog box. The followin g is the Run dialog
box under Windows 3.1.
Type in and execut e A:\ SETUP.EXE or B:\ SETUP.EXE.
3. The Scantools Installation di alog box appears as follows:
4. Check both "Install Application" and "Install Device Drivers"
and click "OK" to start th e installation.
5. Wait until the "Installing Device Drivers" dialog box appears.
6. Highlight the driver you want to use, and click the "I nstall"
button. Wait for a few seconds until the Installation
Completion message is displayed.
Page 14

10
7. Click the "OK" button. The following dialog box will pop up to
ask you to restart Windows.
Click "Yes", your system will automatically restart the
Windows. And you are now ready to run Scantools.
4.2 Getting ready to use your scanner
Before using your scanner, you have to launch the image
source:
1. From the "Scan" menu, choose "Select Source", the Select
Source dialog box appears. Highlight the source that
corresponds to y our scanner model and click the Select
button.
2. From the "Scan" menu, choose "Acquire". Now you are
ready to scan your images.
4.3 Applying Gamma Correction to Images
The "Gamma Correction" feature of Scantools allows you to
adjust the brightness of the midtones in an image while keeping
the shadow and highlight parts unchanged.
You can specify a gamma value in the range from 0.01 to 7.99.
The original image has a gamma value of 1.0. A gamma value
above 1.0 brightens the midtones and that below 1.0 darkens
the midtones.
To apply Gamma Correction to an image, proceed as follows:
1. Select the image.
2. From the Image Menu, choose "Gamma Correction". The
"Gamma Correction" dialog box appears as follows:
Page 15

11
3. In th e box labelled "Gamma [0.01..7.99]", directly enter y our
desired gamma value or u se the scroll bar to choose one.
4. Use the "Histogram Scale Factor" to change the scale
factor for the pixel-value distribution curves in the h istogram.
5. Use "Channel" to correct the Red, Green, Blue, or All the
color components in the active image.
6. If you want to preview the result, click on the "Preview"
button.
7. Choose "OK" to confirm your correcti on and leave this
dialog box .
Page 16

12
Page 17

13
Chapter 5:
StitchScan
The StitchScan option is a marvelous feature that compensates
for the scanning width limitation of the handheld scanner. The
compactness and portability that make the handheld scanner
"handy" also limits the scan width of the scanner.
Yet with this StitchScan feature, the scanner is allowed to scan
big images of any size. You can scan the big image one portion
at a time and then stitch these portions back to an intact copy
of the original image.
TWAIN sou r ce allows you to stitch images in three different
ways: Manual Stitch, Semi-Auto Stitch and Auto Stitch.
If you choos e Manual or Semi-Auto stitch, after you have
finished scanning the second image, the following Stitch
window will appear with the first and second image displayed
inside the window:
The menu bar of this window contains three menus: Stitch, Edit
and View, each includes several commands to help you
accomplish the Stitch function.
The Toolbar contains several buttons which act as shortcuts to
some frequently used menu commands.
Page 18

14
Figure 6 StitchScan Toolbar
1. Do Stitch 5. Brightness & Contrast
2. Semi-Auto Stitch 6. Manual Stitch
3. Swap 7. Auto Stitch
4. Gamma Correction 8. Preferences
After you have manually or semi-automatically matched the
distinct features in the two images, click on the "Do Stitch"
button or select the "Do Stitch" command from the Stitch menu.
The two images will be stitched into one as illustrated in the
following fig ure:
Page 19

15
If you have chosen "Auto Stitch" instead, the stitch window will
appear. Rather the stitching will be automatically carried out
after the two image portions h ave been scanned and the
resulting "stitched" image will be displayed inside the
Scan
Window
(not stitch window) of the TWAIN Source window.
 Loading...