

Page 1

Page 2
Page 3

Page 4

Page 5

GXT 162 Illuminated Gaming Mouse - USER’S MANUAL
1
Language
Page
English
2 Deutsch
5 Français
8 Italiano
11 Español
14 Português
17 Nederlands
20 Dansk
23
Suomi
26 Norsk
29 Svenska
32 Polski
35 Česky
38 Slovenčina
41
Magyar
44 Română
47 Български
50 Русский
53 Ελληνικά
56 Türkçe
59 Hrvatski
62 Slovenski
65 Brasileiro
68 српски
Page 6
GXT 162 Illuminated Gaming Mouse - USER’S MANUAL
2
a
- Button 1 (Default = Left mouse button)
b
- Button 2 (Default = Right mouse button)
c
- Button 3 (Default = Mid click)
d
- Button 4 (Default = DPI +)
e
- Button 5 (Default = DPI -)
f
- Button 6 (Default = Triple click)
g
- Button 7 (Default = Forward)
h
- Button 8 (Default = Backward)
i
- Button 9 (Default = Ctrl key)
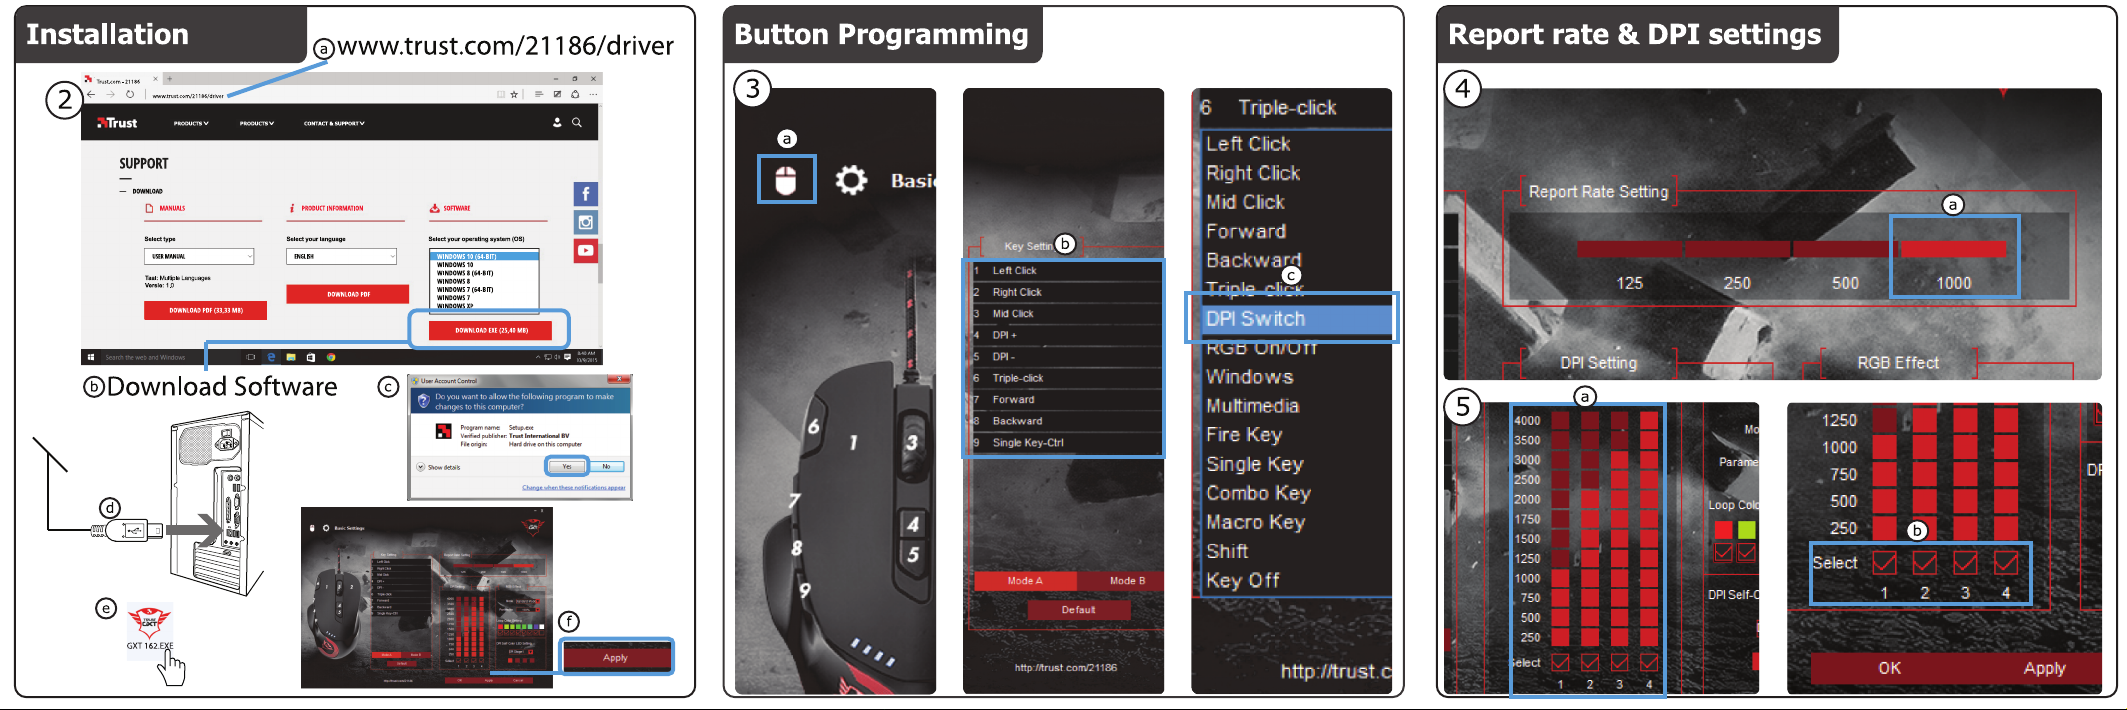
2. Installation
a
b
c
d
e
f
- Open the internet browser and go to www.trust.com/21186/driver.
- Click the “Download EXE” button to download the software.
- Click on the “Setup-GXT 162.exe” and follow the installation wizard.
- Connect the mouse to the USB port of the PC.
- Click on the “GXT 162.exe” shortcut to start the software.
- You can now start to configure the mouse. In the manual will be referred to ‘Apply’ to update the
mouse.
3.
a
b
c
Assign a function
- Click on the ‘Basic Settings’ tab.
- Click on the button you want to re-assign.
- Click on the function you want to assign.
- Click on ‘Apply’ The mouse is beeing updated.
1. Button layout
Button Programming
At least one button must be configured as ‘left mouse button’.
Page 7
GXT 162 Illuminated Gaming Mouse - USER’S MANUAL
3
Report rate & DPI settings
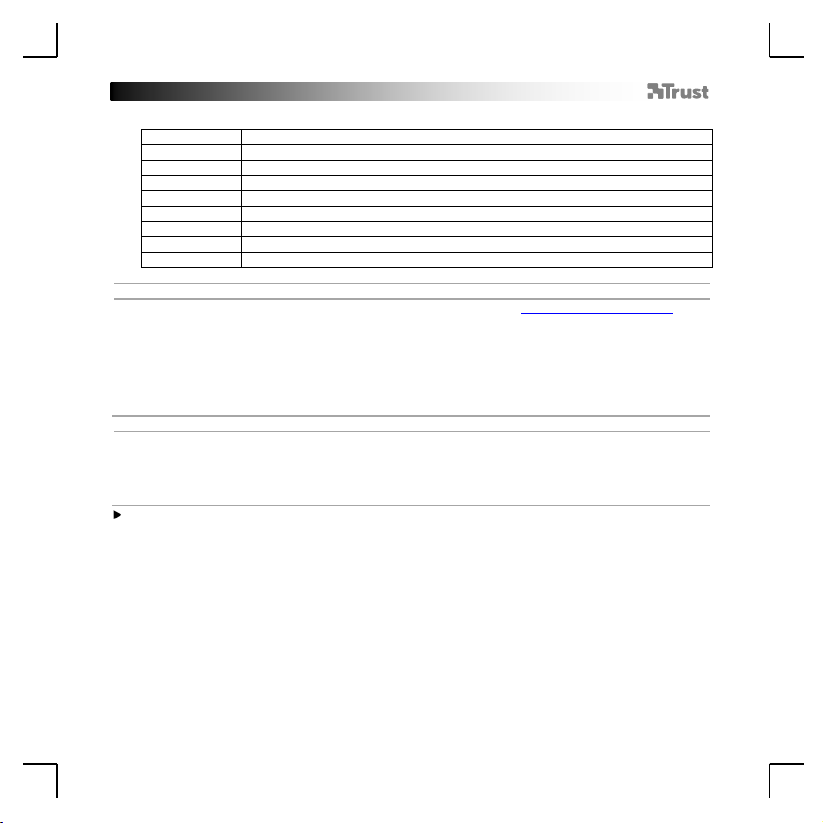
4.
a
Report Rate Setting
- Change the Report Rate by clicking the respective bar.
- Click on ‘Apply’ The mouse is being updated.
5.
a
b
DPI setting
- Change the DPI settings by clicking the respective bar.
- Click the DPI number to enable or disable this setting.
- Click on ‘Apply’ The mouse is being updated.
Light Settings
6.
a
b
c
Change the RGB Effect
- Change the light mode.
- Change the brightness level or breathing speed.
- Select the desired LED color or pick a custom color.
- Click on ‘Apply’ The mouse is being updated.
7.
a
b
c
Custom LED color
- Always check the first color box.
- Click on the color you want to change.
- Click the desired custom color and click on ‘OK’.
- Click on ‘Apply’ The mouse is being updated.
8.
a
b
DPI Self Color LED
- Click on the DPI stage
- Click on the boxes to light up the respective indicators on the mouse.
- Click on ‘Apply’ The mouse is being updated.
Page 8

GXT 162 Illuminated Gaming Mouse - USER’S MANUAL
4
9.
a
b
c
d
Create a Macro (Store a sequence of keys in the software)
- Go to the ‘Advanced’ tab.
- Enter the name of the new macro.
- Enter the amount of times the macro should repeat (loop times).
- Create a new macro by clicking on ‘New’.
10.
a
b
c
d
Record a Macro
- Click on ‘Start Recording’ and ‘OK’ in the pop-up screen to start recording the preferred keyboard
sequence.
- Mouse actions can be added, by using the menu on the right.
- Click on ‘Stop Recording’ and ‘OK’ in the pop-up screen to stop recording.
- Click on ‘Save’ to save the macro.
11.
a
b
c
d
e
Assign a Macro
- Click on the ‘Basic Settings’ tab.
- Click on the button witch you want to re-assign. Choose the ‘Macro Key’ function.
- Choose the macro from the list.
- Choose how the macro should be executed.
- Click on ‘OK’.
- Click on ‘Apply’ The mouse is being updated.
Press and hold the DFM button to gain access to a secondary programmable function on each mouse button.
12.
a
b
c
d
Assign the DFM
- Click on the ‘Basic Settings’ tab.
- Click on the button witch you want to re-assign as “DFM” key.
- Click on ‘Mode B’.
- Repeat step 3 to assign different functions on each mouse button.
- Click on ‘Apply’ The mouse is being updated.
Macro Settings
Double Function Mode (DFM)
Page 9
GXT 162 Illuminated Gaming Mouse - USER’S MANUAL
5
a
- Taste 1 (Standardfunktion = Linke Maustaste)
b
- Taste 2 (Standardfunktion = Rechte Maustaste)
c
- Taste 3 (Standardfunktion = Mittelklick)
d
- Taste 4 (Standardfunktion = DPI +)
e
- Taste 5 (Standardfunktion = DPI -)
f
- Taste 6 (Standardfunktion = Dreifachklick)
g
- Taste 7 (Standardfunktion = Vorwärts)
h
- Taste 8 (Standardfunktion = Rückwärts)
i
- Taste 9 (Standardfunktion = Strg-Taste)
2. Installation
a
b
c
d
e
f
- Öffnen Sie Ihren Internetbrowser und rufen Sie darin die Webseite www.trust.com/21186/driver auf.
- Klicken Sie auf die Schaltfläche „Download EXE“ („Installationsanwendung herunterladen“), um die
Software herunterzuladen.
- Klicken Sie auf „Setup-GXT 162.exe“ und folgen Sie den Anweisungen des wizard.
- Schließen Sie die Maus an den USB-Anschluss des PCs an.
- Klicken Sie auf die Verknüpfung „GXT 162.exe“, um die Software zu starten.
- Sie können nun mit der Konfiguration der Maus beginnen. In der Bedienungsanleitung wird in diesem
Zusammenhang auf „Apply“ („Anwenden“) verwiesen, um die Mauskonfiguration zu aktualisieren.
3.
a
b
c
Zuweisen einer Funktion
- Klicken Sie auf die Registerkarte „Basic Settings“ („Grundeinstellungen“).
- Klicken Sie auf die Taste, deren Funktion Sie ändern möchten.
- Klicken Sie auf die Funktion, die Sie der Taste zuweisen möchten.
- Klicken Sie auf „Apply“ („Anwenden“). Die Mauskonfiguration wird dementsprechend aktualisiert.
1. Tastenanordnung und -funktionen
Tastenprogrammierung
Mindestens eine Taste muss als „ left mouse button“ konfiguriert sein.
Page 10

GXT 162 Illuminated Gaming Mouse - USER’S MANUAL
6
Report rate & DPI settings
4.
a
Abtastrateneinstellung
- Um die Abtastrate zu ändern, klicken Sie auf die entsprechende Leiste.
- Klicken Sie auf „Apply“ („Anwenden“). Die Mauskonfiguration wird dementsprechend aktualisiert.
5.
a
b
DPI-Einstellung
- Um die Abtastrate zu ändern, klicken Sie auf die entsprechende Leiste.
- Klicken Sie auf die DPI-Zahl, um die Einstellung zu aktivieren oder deaktivieren.
- Klicken Sie auf „Apply“ („Anwenden“). Die Mauskonfiguration wird dementsprechend aktualisiert.
Lichteinstellungen
6.
a
b
c
RGB-Effekt ändern
- Ändern Sie den Beleuchtungsmodus.
- Ändern Sie die Helligkeit und die Pulsier-Geschwindigkeit.
- Wählen Sie die gewünschte LED-Farbe oder eine benutzerdefinierte Farbe aus.
- Klicken Sie auf „Apply“ („Anwenden“). Die Mauskonfiguration wird dementsprechend aktualisiert.
7.
a
b
c
Individuelle LED-Farbe
- Setzen Sie immer ein Häkchen in das erste Farbkästchen.
- Klicken Sie auf die Farbe, die Sie ändern möchten.
- Klicken Sie auf die gewünschte individuelle Farbe und dann auf „OK“.
- Klicken Sie auf „Apply“ („Anwenden“). Die Mauskonfiguration wird dementsprechend aktualisiert.
8.
a
b
DPI Eigenfarb-LED
- Klicken Sie auf die DPI-Stufe
- Klicken Sie die Kästchen an, damit die entsprechenden Anzeigen an der Maus aufleuchten.
- Klicken Sie auf „Apply“ („Anwenden“). Die Mauskonfiguration wird dementsprechend aktualisiert.
Page 11
GXT 162 Illuminated Gaming Mouse - USER’S MANUAL
7
9.
a
b
c
d
Erstellen eines Makros (Speichern einer Tastenfolge in der Software)
- Klicken Sie auf die Registerkarte „Advanced“ („Erweitert“).
- Geben Sie den Namen des neuen Makros ein.
- Geben Sie ein, wie oft das Makro wiederholt werden soll („loop times“).
- Erstellen Sie ein neues Makro, indem Sie auf „New“ („Neu“) klicken.
10.
a
b
c
d
Aufzeichnen eines Makros
- Klicken Sie im Popup-Fenster auf „Start Recording“ („Aufzeichnung starten“) und dann auf „OK“, um
die Aufzeichnung der gewünschten Tastensequenz zu starten.
- Mit dem rechts stehenden Menü können Sie Mausaktionen hinzufügen.
- Klicken Sie im Popup-Fenster auf „Stop Recording“ („Aufzeichnung beenden“) und dann auf „OK“, um
die Aufzeichnung zu beenden.
- Klicken Sie auf „Save“ („Speichern“), um das Makro zu speichern.
11.
a
b
c
d
e
Zuweisen eines Makros
- Klicken Sie auf die Registerkarte „Basic Settings“ („Grundeinstellungen“).
- Klicken Sie auf die Taste, deren Makro geändert werden soll. Wählen Sie die Funktion „Macro Key“
(„Makro-Taste“).
- Wählen Sie das Makro aus der Liste aus.
- Legen Sie fest, wie das Makro ausgeführt werden soll.
- Klicken Sie auf „OK“.
- Klicken Sie auf „Apply“ („Anwenden“). Die Mauskonfiguration wird dementsprechend aktualisiert..
Halten Sie die DFM-Taste gedrückt, um die zweite programmierbare Funktion für die jeweilige Maustaste
aufzurufen.
12.
a
b
c
d
DFM zuweisen
- Klicken Sie auf die Registerkarte „Basic Settings“ („Grundeinstellungen“).
- Klicken Sie auf die Taste, der Sie eine neue „DFM“-Funktion zuweisen möchten.
- Klicken Sie auf „Mode B“ („Modus B“).
- Wiederholen Sie Schritt 3, um die verschiedenen Funktionen der jeweiligen Maustaste zuzuweisen.
- Klicken Sie auf „Apply“ („Anwenden“). Die Mauskonfiguration wird dementsprechend aktualisiert..
Makro-Einstellungen
Double Function Mode (DFM)
Page 12

GXT 162 Illuminated Gaming Mouse - USER’S MANUAL
8
a
- Bouton 1 (fonction par défaut = clic gauche de la souris)
b
- Bouton 2 (fonction par défaut = clic droit de la souris)
c
- Bouton 3 (fonction par défaut = clic milieu)
d
- Bouton 4 (fonction par défaut = DPI +)
e
- Bouton 5 (fonction par défaut = DPI-)
f
- Bouton 6 (fonction par défaut = triple clic)
g
- Bouton 7 (fonction par défaut = suivant)
h
- Bouton 8 (fonction par défaut = précédent)
i
- Bouton 9 (fonction par défaut = touche Ctrl)
2. Installation
a
b
c
d
e
f
- Ouvrez le navigateur Internet et allez à l’adresse www.trust.com/21186/driver.
- Cliquez sur le bouton « Download EXE » pour télécharger le logiciel.
- Cliquez sur « Setup-GXT 162.exe » et suivez le wizard assistant d’installation.
- Raccordez la souris au port USB de votre ordinateur.
- Cliquez sur le raccourci « GXT 162.exe » pour démarrer le logiciel.
- Vous pouvez maintenant configurer la souris. Conformément au manuel, le bouton « Apply »
[appliquer] permet de mettre à jour la souris.
3.
a
b
c
Attribuer une fonction
- Cliquez sur l’onglet « Basic Settings » paramètres de base.
- Cliquez sur le bouton que vous souhaitez réattribuer.
- Cliquez sur la fonction que vous souhaitez attribuer.
- Cliquez sur « Apply » appliquer La souris est mise à jour.
1. Configuration des boutons
Programmation des boutons
Au moins un bouton doit être configuré comme « left mouse button » clic gauche de la souris.
Page 13

GXT 162 Illuminated Gaming Mouse - USER’S MANUAL
9 Report rate taux de rapport & DPI settings paramètres DPI
4.
a
Paramètres du taux de rapport
- Modifier le Report Rate taux de rapport en cliquant sur la barre concernée.
- Cliquez sur « Apply » [appliquer] La souris est mise à jour.
5.
a
b
Paramètres DPI
- Modifier les DPI settings [paramètres DPI] en cliquant sur la barre concernée.
- Cliquez sur le numéro DPI pour activer ou désactiver ce paramètre.
- Cliquez sur « Apply » [appliquer] La souris est mise à jour.
Paramètres de luminosité
6.
a
b
c
Modifier l’effet RGB
- Modifier le mode d’éclairage.
- Modifiez le degré de luminosité ou la vitesse de clignotement.
- Sélectionnez la couleur LED souhaitée ou choisissez une couleur personnalisée.
- Cliquez sur « Apply » [appliquer] La souris est mise à jour.
7.
a
b
c
Couleur LED personnalisée
- Cochez toujours la première case couleur.
- Cliquez sur la couleur que vous souhaitez modifier.
- Cliquez sur la couleur personnalisée souhaitée, puis sur « OK ».
- Cliquez sur « Apply » [appliquer] La souris est mise à jour.
8.
a
b
Couleur LED DPI automatique
- Cliquez sur le DPI stage étage DPI
- Cliquez sur les cases pour allumer les voyants correspondants sur la souris.
- Cliquez sur « Apply » [appliquer] La souris est mise à jour.
Page 14

GXT 162 Illuminated Gaming Mouse - USER’S MANUAL
10
9.
a
b
c
d
Créer une macro (enregistrer une série de touches dans le logiciel)
- Sélectionnez l’onglet « Advanced » avancé.
- Entrez le nom de la nouvelle macro.
- Entrez le nombre de fois que la macro doit se répéter (loop times temps de propagation).
- Créez une nouvelle macro en cliquant sur « New » nouvelle.
10.
a
b
c
d
Enregistrer une macro
- Cliquez sur « Start Recording » démarrer l’enregistrement et « OK » dans la fenêtre surgissante pour
commencer à enregistrer la série de touches favorite.
- Il est possible d’ajouter des actions sur la souris à l’aide du menu situé à droite.
- Cliquez sur « Stop Recording » [arrêter l’enregistrement] et « OK » dans la fenêtre surgissante pour
arrêter l’enregistrement.
- Cliquez sur « Save » pour enregistrer la macro.
11.
a
b
c
d
e
Attribuer une macro
- Cliquez sur l’onglet « Basic Settings » [paramètres de base].
- Cliquez sur le bouton que vous souhaitez réattribuer. Choisissez la fonction « Macro Key » touche
macro.
- Choisissez la macro dans la liste.
- Choisissez le mode d’exécution de la macro.
- Cliquez sur « OK ».
- Cliquez sur « Apply » [appliquer] La souris est mise à jour.
Maintenez le bouton DFM enfoncé pour accéder à une fonction programmable secondaire pour chaque bouton
de la souris.
12.
a
b
c
d
Attribuer le DFM mode double fonction
- Cliquez sur l’onglet « Basic Settings » [paramètres de base].
- Cliquez sur le bouton que vous souhaitez réattribuer comme touche « DFM » mode double fonction.
- Cliquez sur « Mode B ».
- Recommencez à l’étape 3 pour attribuer différences fonctions à chaque bouton de la souris.
- Cliquez sur « Apply » [appliquer] La souris est mise à jour.
Paramètres des macros
Double Function Mode (DFM) mode double fonction
Page 15

GXT 162 Illuminated Gaming Mouse - USER’S MANUAL
11
a
- Pulsante 1 (funzione predefinita = pulsante sinistro del mouse)
b
- Pulsante 2 (funzione predefinita = pulsante destro del mouse)
c
- Pulsante 3 (funzione predefinita = clic centrale)
d
- Pulsante 4 (funzione predefinita = DPI +)
e
- Pulsante 5 (funzione predefinita = DPI -)
f
- Pulsante 6 (funzione predefinita = tre clic)
g
- Pulsante 7 (funzione predefinita = avanti)
h
- Pulsante 8 (funzione predefinita = indietro)
i
- Pulsante 9 (funzione predefinita = tasto Ctrl)
2. Installazione
a
b
c
d
e
f
- Aprire il browser Internet e andare su www.trust.com/21186/driver.
- Fare clic sul pulsante “Download EXE” [Scarica EXE] per scaricare il software.
- Fare clic su "Setup-GXT 162.exe" e seguire il wizard di installazione.
- Collegare il mouse alla porta USB del PC.
- Fare clic sulla scorciatoia "GXT 162.exe" per avviare il software.
- Ora è possibile iniziare a configurare il mouse. In questo manuale, il comando ‘Apply’ [Applica] viene
usato per aggiornare il mouse.
3.
a
b
c
Assegnazione di una funzione
- Fare clic sulla scheda ‘Basic Settings’ [Impostazioni di base].
- Fare clic sul pulsante che si desidera riassegnare.
- Fare clic sulla funzione che si desidera assegnare.
- Fare clic su ‘Apply’ [Applica] Il mouse viene aggiornato.
1. Layout dei pulsanti
Programmazione dei pulsanti
Almeno un pulsante deve essere configurato come ‘left mouse button’ [pulsante sinistro del mouse].
Page 16

GXT 162 Illuminated Gaming Mouse - USER’S MANUAL
12
Report Rate & DPI settings [Frequenza di report e impostazioni DPI]
4.
a
Impostazione della Frequenza di report
- Modificare la Frequenza di report facendo clic sulla relativa barra.
- Fare clic su ‘Apply’ [Applica] Il mouse viene aggiornato.
5.
a
b
Impostazione DPI
- Modificare le impostazioni DPI facendo clic sulla relativa barra.
- Fare clic sul numero DPI per attivare o disattivare questa impostazione.
- Fare clic su ‘Apply’ [Applica] Il mouse viene aggiornato.
Impostazioni della luce
6.
a
b
c
Modificazione dell'effetto RGB
- Modificare la modalità di luce.
- Modificare il livello di luminosità o la velocità di lampeggio.
- Selezionare il colore desiderato per il LED oppure scegliere un colore personalizzato.
- Fare clic su ‘Apply’ [Applica] Il mouse viene aggiornato.
7.
a
b
c
LED di colore personalizzato
- Barrare sempre la prima casella del colore.
- Fare clic sul colore che si desidera modificare.
- Fare clic sul colore personalizzato desiderato e poi su ‘OK’.
- Fare clic su ‘Apply’ [Applica] Il mouse viene aggiornato.
8.
a
b
LED Self Color DPI
- Fare clic sulla fase DPI.
- Fare clic sulle caselle per illuminare i rispettivi indicatori sul mouse.
- Fare clic su ‘Apply’ [Applica] Il mouse viene aggiornato.
Page 17
GXT 162 Illuminated Gaming Mouse - USER’S MANUAL
13
9.
a
b
c
d
Creazione di una macro (Memorizzazione di una sequenza di tasti all'interno del software)
- Selezionare la scheda ‘Advanced’ [Avanzate].
- Immettere il nome della nuova macro.
- Inserire la quantità di volte che la macro deve ripetersi (loop times [tempi di ciclo]).
- Creare una nuova macro facendo clic su ‘New’ [Nuova].
10.
a
b
c
d
Registrazione di una macro
- Fare clic su 'Start Recording' [Inizio registrazione] e 'OK' nella schermata pop-up per iniziare a
registrare la sequenza preferita da tastiera.
- È possibile aggiungere azioni del mouse tramite il menu a destra.
- Fare clic su 'Stop Recording' [Arresta registrazione] e 'OK' nella schermata pop-up per interrompere la
registrazione.
- Fare clic su ‘Save’ [Salva] per salvare la macro.
11.
a
b
c
d
e
Assegnazione di una macro
- Fare clic sulla scheda 'Basic Settings' [Impostazioni di base].
- Fare clic sul pulsante che si desidera riassegnare. Selezionare la funzione 'Macro Key' [tasto Macro].
- Selezionare la macro dall'elenco.
- Scegliere come deve essere eseguita la macro.
- Fare clic su 'OK'.
- Fare clic su ‘Apply’ [Applica] Il mouse viene aggiornato.
Premere e tenere premuto il pulsante DFM per ottenere l'accesso a una funzione programmabile secondaria per
ogni pulsante del mouse.
12.
a
b
c
d
Assegnazione della modalità DFM
- Fare clic sulla scheda ‘Basic Settings’ [Impostazioni di base].
- Fare clic sul pulsante che si desidera riassegnare come tatso “DFM”.
- Fare clic su 'Mode B' [Modalità B].
- Ripetere il punto 3 per assegnare funzioni diverse a ciascun pulsante del mouse.
- Fare clic su ‘Apply’ [Applica] Il mouse viene aggiornato.
Impostazioni delle macro
Double Function Mode (DFM) [Modalità doppia funzione]
Page 18
GXT 162 Illuminated Gaming Mouse - USER’S MANUAL
14
a
- Botón 1 (predeterminado = botón izquierdo del ratón)
b
- Botón 2 (predeterminado = botón derecho del ratón)
c
- Botón 3 (predeterminado = clic central)
d
- Botón 4 (predeterminado = DPI +)
e
- Botón 5 (predeterminado = DPI -)
f
- Botón 6 (predeterminado = triple clic)
g
- Botón 7 (predeterminado = avance)
h
- Botón 8 (predeterminado = retroceso)
i
- Botón 9 (predeterminado = tecla Ctrl)
2. Instalación
a
b
c
d
e
f
- Abra el navegador de Internet y visite www.trust.com/21186/driver.
- Haga clic en el botón “Download EXE” para descargar el software.
- Haga clic en el archivo “Setup-GXT 162.exe” y siga el wizard de instalación.
- Conecte el ratón a uno de los puertos USB del ordenador.
- Haga clic en el acceso directo “GXT 162.exe” para iniciar el software.
- Ahora podrá comenzar a configurar el ratón. En el manual se hará referencia a la función “Apply” para
actualizar el ratón.
3.
a
b
c
Asignación de una función
- Haga clic en la ficha “Basic Settings”.
- Haga clic en el botón que desee reasignar.
- Haga clic en la función que desee asignar.
- Haga clic en “Apply”. El ratón se está actualizando.
1. Distribución de los botones
Programación de botones
Al menos un botón debe configurarse como “left mouse button”.
Page 19
GXT 162 Illuminated Gaming Mouse - USER’S MANUAL
15
Report rate & DPI settings
4.
a
Ajuste de la tasa de sondeo
- Cambie la tasa de sondeo haciendo clic en la barra correspondiente.
- Haga clic en “Apply”. El ratón se está actualizando.
5.
a
b
Ajuste de DPI
- Cambie el ajuste de DPI haciendo clic en la barra correspondiente.
- Haga clic en el número de DPI para habilitar o deshabilitar este ajuste.
- Haga clic en “Apply”. El ratón se está actualizando.
Configuración de iluminación
6.
a
b
c
Cambiar el efecto RGB
- Cambie el modo de iluminación.
- Cambie el nivel de brillo o la velocidad de cambio de intensidad luminosa.
- Seleccione el color que desee asignar a la iluminación LED, o elija un color personalizado.
- Haga clic en “Apply”. El ratón se está actualizando.
7.
a
b
c
Color LED personalizado
- Marque siempre la primera casilla de color.
- Haga clic en el color que desee cambiar.
- Haga clic en el color personalizado que desee y, a continuación, en “OK”.
- Haga clic en “Apply”. El ratón se está actualizando.
8.
a
b
LED de color propio de DPI
- Haga clic en la fase de DPI.
- Haga clic en los cuadros para iluminar los indicadores correspondientes en el ratón.
- Haga clic en “Apply”. El ratón se está actualizando.
Page 20

GXT 162 Illuminated Gaming Mouse - USER’S MANUAL
16
9.
a
b
c
d
Creación de una macro (guardar una secuencia de teclas en el software)
- Diríjase a la ficha “Advanced”.
- Escriba el nombre de la nueva macro.
- Introduzca el número de veces que la macro se debe repetir (loop times).
- Cree una macro nueva haciendo clic en “New”.
10.
a
b
c
d
Grabación de una macro
- Haga clic en “Start Recording” y en “OK” en la pantalla emergente para empezar a grabar la secuencia
de teclado que desee.
- Las acciones del ratón pueden añadirse utilizando el menú de la derecha.
- Haga clic en “Stop Recording” y en “OK” en la pantalla emergente para detener la grabación.
- Haga clic en “Save” para guardar la macro.
11.
a
b
c
d
e
Asignación de una macro
- Haga clic en la ficha “Basic Settings”.
- Haga clic en el botón que desee reasignar. Seleccione la función “Macro Key”.
- Seleccione la macro en la lista.
- Elija cómo debe ejecutarse la macro.
- Haga clic en “OK”.
- Haga clic en “Apply”. El ratón se está actualizando.
Mantenga pulsado el botón DFM para acceder a una función programable secundaria en cada botón del ratón.
12.
a
b
c
d
Asignación de la DFM
- Haga clic en la ficha “Basic Settings”.
- Haga clic en el botón que desee reasignar como “DFM”.
- Haga clic en “Mode B”.
- Repita el paso 3 para asignar distintas funciones a cada botón del ratón.
- Haga clic en “Apply”. El ratón se está actualizando.
Configuración de macros
Double Function Mode (DFM)
Page 21

GXT 162 Illuminated Gaming Mouse - USER’S MANUAL
17
a
- Botão 1 (Predefinido = Botão esquerdo do rato)
b
- Botão 2 (Predefinido = Botão direito do rato)
c
- Botão 3 (Predefinido = Clique com o botão do meio)
d
- Botão 4 (Predefinido = DPI +)
e
- Botão 5 (Predefinido = DPI -)
f
- Botão 6 (Predefinido = Triplo clique)
g
- Botão 7 (Predefinido = Avançar)
h
- Botão 8 (Predefinido = Retroceder)
i
- Botão 9 (Predefinido = Tecla Ctrl)
2. Instalação
a
b
c
d
e
f
- Abra o browser da Internet e vá a www.trust.com/21186/driver.
- Clique no botão “Download EXE” [Transferir EXE] para transferir o software.
- Clique em “Setup-GXT 162.exe” e siga o wizard [assistente de instalação].
- Ligue o rato à porta USB do PC.
- Clique no atalho “GXT 162.exe” para iniciar o software.
- Pode agora iniciar a configuração do rato. No manual, será encaminhado para ‘Apply’ [Aplicar], para
atualizar o rato.
3.
a
b
c
Atribuir uma função
- Clique no separador ‘Basic Settings’ [Definições Básicas].
- Clique no botão que pretende reconfigurar.
- Clique na função que pretende atribuir.
- Clique em ‘Apply’ ["Aplicar"] O rato está a ser atualizado.
1. Esquema dos botões
Programar botões
Deve ser configurado, no mínimo, um botão como ‘left mouse button’ [botão esquerdo do rato].
Page 22

GXT 162 Illuminated Gaming Mouse - USER’S MANUAL
18
Report rate & DPI settings [Taxa de relatório e Definições de DPI]
4.
a
Definição da taxa de relatório
- Altere a taxa de relatório clicando na respetiva barra.
- Clique em ‘Apply’ [Aplicar] O rato está a ser atualizado.
5.
a
b
Definição de DPI
- Altere as definições de DPI clicando na respetiva barra.
- Clique no número de DPI para ativar ou desativar esta definição.
- Clique em ‘Apply’ [Aplicar] O rato está a ser atualizado.
Definições de iluminação
6.
a
b
c
Alterar o Efeito RGB
- Altere o modo de iluminação.
- Altere o nível de luminosidade ou a velocidade de cadência.
- Selecione a cor desejada para os LEDs ou escolha uma cor personalizada.
- Clique em ‘Apply’ [Aplicar] O rato está a ser atualizado.
7.
a
b
c
Personalizar a cor dos LEDs
- Selecione sempre a primeira caixa de cor.
- Clique na cor que pretende alterar.
- Clique na cor personalizada desejada e depois em ‘OK’.
- Clique em ‘Apply’ [Aplicar] O rato esta a ser atualizado.
8.
a
b
Cor Automática dos LEDs para DPI
- Clique no nível de DPI
- Clique nas caixas para acender os respetivos indicadores no rato.
- Clique em ‘Apply’ [Aplicar] O rato está a ser atualizado.
Page 23

GXT 162 Illuminated Gaming Mouse - USER’S MANUAL
19
9.
a
b
c
d
Criar uma macro (Guardar uma sequência de teclas no software)
- Vá ao separador ‘Advanced’ [Avançadas].
- Introduza o nome da nova macro.
- Insira o número de vezes que a macro deve ser repetida (loop times) [tempos de reprodução do
ciclo].
- Crie uma nova macro clicando em ‘New’ [Nova].
10.
a
b
c
d
Gravar uma macro
- Clique em ‘Start Recording’ [Iniciar gravação] e em ‘OK’ no ecrã de pop-up para começar a gravar a
sequência de teclas escolhida.
- Podem ser adicionadas ações do rato utilizando no menu à direita.
- Clique em ‘Stop Recording’ [Parar gravação] e em ‘OK’ no ecrã de pop-up para parar de gravar.
- Clique em ‘Save’ [Guardar] para guardar a macro.
11.
a
b
c
d
e
Atribuir uma macro
- Clique no separador ‘Basic Settings’ [Definições Básicas].
- Clique no botão que pretende reconfigurar. Escolha a função ‘Macro Key’ [Tecla Macro].
- Escolha a macro a partir da lista.
- Escolha como deve ser executada a macro.
- Clique em ‘OK’.
- Clique em ‘Apply’ [Aplicar] O rato está a ser atualizado.
Mantenha premido o botão DFM para aceder a uma função programável secundária em cada botão do rato.
12.
a
b
c
d
Atribuir o DFM
- Clique no separador ‘Basic Settings’ [Definições Básicas].
- Clique no botão que pretende reconfigurar como tecla “DFM”.
- Clique em ‘Mode B’[Modo B].
- Repita o passo 3 para atribuir funções diferentes a cada botão do rato.
- Clique em ‘Apply’ [Aplicar] O rato está a ser atualizado.
Definições de macros
Double Function Mode (DFM) [Modo Dupla Função (DFM)]
Page 24

GXT 162 Illuminated Gaming Mouse - USER’S MANUAL
20
a
- Knop 1 (standaardfunctie = linkermuisknop)
b
- Knop 2 (standaardfunctie = rechtermuisknop)
c
- Knop 3 (standaardfunctie = middelste muisknop)
d
- Knop 4 (standaardfunctie = DPI+)
e
- Knop 5 (standaardfunctie = DPI-)
f
- Knop 6 (standaardfunctie = drievoudige muisklik)
g
- Knop 7 (standaardfunctie = vooruit)
h
- Knop 8 (standaardfunctie = achteruit)
i
- Knop 9 (standaardfunctie = Ctrl-toets)
2. Installeren
a
b
c
d
e
f
- Open de internetbrowser en ga naar www.trust.com/21186/driver.
- Klik op de knop “Download EXE” om de software te downloaden.
- Klik op “Setup-GXT 162.exe” en volg de stappen van de installatiewizard.
- Sluit de muis aan op de USB-poort van de pc.
- Klik op de snelkoppeling “GXT 162.exe” om de software te starten.
- U kunt de muis nu configureren. In de handleiding wordt verwezen naar ‘Apply’ om de muis bij te
werken.
3.
a
b
c
Een functie toewijzen
- Klik op het tabblad ‘Basic Settings’.
- Klik op de knop waaraan u een nieuwe functie wilt toewijzen.
- Klik op de functie die u wilt toewijzen.
- Klik op ‘Apply’. De muis wordt bijgewerkt.
1. Lay-out van de knoppen
Knoppen programmeren
Er moet ten minste één knop zijn geconfigureerd als ‘left mouse button’.
Page 25

GXT 162 Illuminated Gaming Mouse - USER’S MANUAL
21
Report rate & DPI settings
4.
a
Rapportsnelheid instellen
- Wijzig de rapportsnelheid door op de bijbehorende balk te klikken.
- Klik op ‘Apply’. De muis wordt bijgewerkt.
5.
a
b
DPI instellen
- Wijzig de DPI-instellingen door op de bijbehorende balk te klikken.
- Klik op het DPI-nummer om deze instelling in of uit te schakelen.
- Klik op ‘Apply’. De muis wordt bijgewerkt.
Licht instellen
6.
a
b
c
Het RGB-effect wijzigen
- Wijzig de lichtmodus.
- Wijzig de helderheid of de knippersnelheid.
- Selecteer de gewenste LED-kleur of kies een aangepaste kleur.
- Klik op ‘Apply’. De muis wordt bijgewerkt.
7.
a
b
c
Aangepaste LED-kleur
- Schakel altijd het eerste kleurvak in.
- Klik op de kleur die u wilt wijzigen.
- Klik op de gewenste aangepaste kleur en vervolgens op ‘OK’.
- Klik op ‘Apply’. De muis wordt bijgewerkt.
8.
a
b
DPI zelfkleurende LED
- Klik op de DPI-fase.
- Klik op de vakjes om de bijbehorende indicatielampjes op de muis te laten branden.
- Klik op ‘Apply’. De muis wordt bijgewerkt.
Page 26

GXT 162 Illuminated Gaming Mouse - USER’S MANUAL
22
9.
a
b
c
d
Een macro maken (een knoppenreeks opslaan in de software)
- Ga naar het tabblad ‘Advanced’.
- Voer de naam van de nieuwe macro in.
- Voer in hoe vaak de macro moet worden herhaald (loop times).
- Maak een nieuwe macro door te klikken op ‘New’.
10.
a
b
c
d
Een macro opnemen
- Klik op ‘Start Recording’ en op ‘OK’ in het pop-upvenster om de gewenste knoppenreeks op te nemen.
- Muisacties kunnen worden toegevoegd via het menu aan de rechterkant.
- Klik op ‘Stop Recording’ en op ‘OK’ in het pop-upvenster om het opnemen te stoppen.
- Klik op ‘Save’ om de macro op te slaan.
11.
a
b
c
d
e
Een macro toewijzen
- Klik op het tabblad ‘Basic Settings’.
- Klik op de knop waaraan u een macro wilt toewijzen. Kies de functie ‘Macro Key’.
- Kies de macro uit de lijst.
- Kies hoe de macro moet worden uitgevoerd.
- Klik op ‘OK’.
- Klik op ‘Apply’. De muis wordt bijgewerkt.
Houd de DFM-knop ingedrukt om naar een tweede programmeerbare functie van de muisknop te gaan.
12.
a
b
c
d
De DFM toewijzen
- Klik op het tabblad ‘Basic Settings’.
- Klik op de knop die u wilt aanwijzen als “DFM”-knop.
- Klik op ‘Mode B’.
- Herhaal stap 3 om andere functies toe te wijzen aan elke muisknop.
- Klik op ‘Apply’. De muis wordt bijgewerkt.
Macro instellen
Double Function Mode (DFM)
Page 27

GXT 162 Illuminated Gaming Mouse - USER’S MANUAL
23
a
- Knap 1 (Standard = Venstre museknap)
b
- Knap 2 (Standard = Højre museknap)
c
- Knap 3 (Standard = Midterknap)
d
- Knap 4 (Standard = DPI +)
e
- Knap 5 (Standard = DPI -)
f
- Knap 6 (Standard = Tredobbelt tryk)
g
- Knap 7 (Standard = Fremad)
h
- Knap 8 (Standard = Tilbage)
i
- Knap 9 (Standard = Ctrl-tast)
2. Installation
a
b
c
d
e
f
- Åbn internetbrowseren, og gå til www.trust.com/21186/driver.
- Tryk på knappen “Download EXE” for at downloade softwaren.
- Tryk på “Setup-GXT 162.exe”, og følg installations-wizard.
- Slut musen til USB-porten på pc'en.
- Tryk på genvejen “GXT 162.exe” for at starte softwaren.
- Du kan nu begynde at konfigurere musen. I vejledningen vil der blive henvist til ‘Apply’ for at opdatere
musen.
3.
a
b
c
Tildel en funktion
- Tryk på fanen ‘Basic Settings’.
- Tryk på den knap. du vil tildele igen.
- Tryk på den funktion, du vil tildele.
- Tryk på ‘Apply’ Musen opdateres.
1. Knap-layout
Knapprogrammering
Der skal konfigureres mindst én knap som ‘left mouse button’.
Page 28

GXT 162 Illuminated Gaming Mouse - USER’S MANUAL
24
Report rate & DPI settings
4.
a
Indstilling af rapportrate
- Du kan skifte rapportraten ved at trykke den Skift rapportraten ved at trykke på den tilhørende linje.
- Tryk på ‘Apply’ Musen opdateres.
5.
a
b
DPI-indstilling
- Du kan skifte DPI-indstillinger ved at trykke på den tilhørende linje.
- Tryk på DPI-nummeret for at aktivere eller deaktivere indstillingen.
- Tryk på ‘Apply’ Musen opdateres.
Lysindstillinger
6.
a
b
c
Skift RGB-effekt
- Skift lyseffekten.
- Ændring af lysstyrkeniveau og udluftningshastighed.
- Vælg den ønskede LED-farve, eller vælg en brugerdefineret farve.
- Tryk på ‘Apply’ Musen opdateres.
7.
a
b
c
Tilpasset LED-farve
- Kontrollér altid den første farveboks.
- Tryk på den farve, du vil ændre.
- Tryk på den ønskede tilpassede farve, og tryk på ‘OK’.
- Tryk på ‘Apply’ Musen opdateres.
8.
a
b
DPI egen farve-LED
- Tryk på DPI-fase
- Tryk på boksene for at oplyse de respektive indikatorer på musen.
- Tryk på ‘Apply’ Musen opdateres.
Page 29

GXT 162 Illuminated Gaming Mouse - USER’S MANUAL
25
9.
a
b
c
d
Opret en makrofunktion (Gem en tastesekvens i softwaren)
- Gå til fanen ‘Advanced’.
- Indtast et navn på den nye makro.
- Indtast det antal gange, makroen skal gentage (loop times).
- Opret en ny makro ved at trykke på ‘New’.
10.
a
b
c
d
Optagelse af en makro
- Tryk på ‘Start Recording’ og ‘OK’ på pop op-skærmen for at begynde optagelse af den foretrukne
tastatursekvens.
- Du kan tilføje musehandlinger ved at bruge menuen til højre.
- Tryk på ‘Stop Recording’ og ‘OK’ på pop op-skærmen for at stoppe optagelse.
- Tryk på ‘Save’ for at gemme makroen.
11.
a
b
c
d
e
Tildeling af en makro
- Tryk på fanen ‘Basic Settings’.
- Tryk på den knap, du vil tildele igen. Vælg funktionen ‘Macro Key’.
- Vælg makroen fra listen.
- Vælg, hvordan makroen skal udføres.
- Tryk på ‘OK’.
- Tryk på ‘Apply’ Musen opdateres.
Tryk, og hold på knappen DFM for at få adgang til en sekundær programmerbar funktion på hver enkelt
museknap.
12.
a
b
c
d
Tildel DFM
- Tryk på fanen ‘Basic Settings’.
- Tryk på den knap, du vil tildele igen som tasten “DFM”.
- Tryk på ‘Mode B’.
- Gentag trin 3, hvis du vil tildele forskellige funktioner til hver enkelt museknap.
- Tryk på ‘Apply’ Musen opdateres.
Makroindstillinger
Double Function Mode (DFM)
Page 30

GXT 162 Illuminated Gaming Mouse - USER’S MANUAL
26
a
- Painike 1 (oletus = vasen hiiren painike)
b
- Painike 2 (oletus = oikea hiiren painike)
c
- Painike 3 (oletus = keskimmäisen painikkeen napsautus)
d
- Painike 4 (oletus = DPI+)
e
- Painike 5 (oletus = DPI-)
f
- Painike 6 (oletus = kolmoisnapsautus)
g
- Painike 7 (oletus = eteenpäin)
h
- Painike 8 (oletus = taaksepäin)
i
- Painike 9 (oletus = Ctrl-painike)
2. Asennus
a
b
c
d
e
f
- Avaa verkkoselain ja siirry osoitteeseen www.trust.com/21186/driver.
- Lataa ohjelmisto napsauttamalla painiketta “Download EXE”.
- Napsauta “Setup-GXT 162.exe” ja noudata wizard-asennusohjeita.
- Liitä hiiri tietokoneen USB-porttiin.
- Käynnistä ohjelmisto napsauttamalla “GXT 162.exe”-pikavalintaa.
- Nyt voit aloittaa hiiren määrittämisen. Ohjekirjassa hiiren päivittämiseen viittaa ‘Apply’.
3.
a
b
c
Toiminnon määrittäminen
- Napsauta ‘Basic Settings’ -välilehteä.
- Napsauta painiketta, jonka haluat määrittää.
- Napsauta toimintoa, jonka haluat määrittää.
- Napsauta ‘Apply’ Hiiri päivitetään.
1. Painikkeet
Painikkeen ohjelmoiminen
Ainakin yksi painike on määritettävä toimintoa ‘left mouse button’ varten.
Page 31

GXT 162 Illuminated Gaming Mouse - USER’S MANUAL
27
Report rate & DPI settings
4.
a
Raportointinopeus-asetus
- Muuta raportointinopeutta napsauttamalla vastaavaa palkkia.
- Napsauta ‘Apply’ Hiiri päivitetään.
5.
a
b
DPI-asetus
- Muuta DPI-asetuksia napsauttamalla vastaavaa palkkia.
- Napsauta DPI-numeroa asetuksen ottamiseksi käyttöön tai sen poistamiseksi käytöstä.
- Napsauta ‘Apply’ Hiiri päivitetään.
Valoasetukset
6.
a
b
c
RGB-tehosteen muuttaminen
- Vaihda valotilaa.
- Vaihda kirkkaustasoa tai hengitysnopeutta.
- Valitse haluamasi LED-väri tai mukautettu väri.
- Napsauta ‘Apply’ Hiiri päivitetään.
7.
a
b
c
Mukautettu LED-väri
- Rastita aina ensimmäinen väriruutu.
- Napsauta väriä, jonka haluat vaihtaa.
- Napsauta haluamaasi mukautettua väriä ja sitten ‘OK’.
- Napsauta ‘Apply’ Hiiri päivitetään.
8.
a
b
DPI Self Color LED
- Napsauta DPI-vaihetta
- Napsauta ruutuja hiiren vastaavien merkkivalojen sytyttämiseksi.
- Napsauta ‘Apply’ Hiiri päivitetään.
Page 32

GXT 162 Illuminated Gaming Mouse - USER’S MANUAL
28
9.
a
b
c
d
Luo makro (Näppäinsarjan tallennus ohjelmistoon)
- Siirry välilehteen ‘Advanced’.
- Syötä uuden makron nimi.
- Syötä makron toistokertojen määrä (loop times).
- Luo uusi makro napsauttamalla ‘New’.
10.
a
b
c
d
Makron tallennus
- Napsauta ponnahdusikkunassa ‘Start Recording’ ja ‘OK’ aloittaaksesi haluamasi näppäinsarjan
tallentamisen.
- Hiiren toimintoja voidaan lisätä oikealla olevaa valikkoa käyttäen.
- Napsauta ponnahdusikkunassa ‘Stop Recording’ ja ‘OK’ lopettaaksesi tallentamisen.
- Tallenna makro napsauttamalla ‘Save’.
11.
a
b
c
d
e
Makron määritys
- Napsauta ‘Basic Settings’ -välilehteä.
- Valitse painike, johon haluat asettaa toiminnon. Valitse ‘Macro Key’ -toiminto.
- Valitse makro luettelosta.
- Valitse makron suoritustapa.
- Napsauta ‘OK’.
- Napsauta ‘Apply’ Hiiri päivitetään.
Paina ja pidä alhaalla DFM-painiketta siirtyäksesi kunkin hiiren painikkeen toissijaiseen ohjelmoitavaan
toimintoon.
12.
a
b
c
d
Määritä DFM
- Napsauta ‘Basic Settings’ -välilehteä.
- Napsauta painiketta, jonka haluat määrittää “DFM” -näppäimeksi.
- Napsauta ‘Mode B’.
- Toista vaihe 3 eri toimintojen määrittämiseksi kuhunkin hiiren painikkeeseen.
- Napsauta ‘Apply’ Hiiri päivitetään.
Makroasetukset
Double Function Mode (DFM)
Page 33

GXT 162 Illuminated Gaming Mouse - USER’S MANUAL
29
a
- Knapp 1 (standard = venstre musetast)
b
- Knapp 2 (standard = høyre musetast)
c
- Knapp 3 (standard = midtklikk)
d
- Knapp 4 (standard = DPI +)
e
- Knapp 5 (standard = DPI -)
f
- Knapp 6 (standard = tredobbelt klikk)
g
- Knapp 7 (standard = forover)
h
- Knapp 8 (standard = bakover)
i
- Knapp 9 (standard = Ctrl-tast)
2. Installasjon
a
b
c
d
e
f
- Åpne nettleseren og gå til www.trust.com/21186/driver.
- Klikk på "Download EXE"-tasten for å laste ned programvaren.
- Klikk på "Setup-GXT 162.exe", og følg installasjonswizard.
- Koble musen til datamaskinens USB-port.
- Klikk på "GXT 162.exe"-snarveien for å starte programvaren.
- Nå kan du starte å konfigurere musen. I bruksanvisningen vil det bli referert til "Apply" (Bruk) for å
oppdatere musen.
3.
a
b
c
Legg til en funksjon
- Klikk på ‘Basic Settings’-fanen (grunnleggende innstillinger).
- Klikk på knappen du vil tilordne på nytt.
- Klikk på den funksjonen du ønsker å tilordne.
- Klikk på ‘Apply’ (Bruk) Musen blir oppdatert.
1. Knapplayout
Programmering av knapper
Minst én knapp må konfigureres som ‘left mouse buttonvenstre musetast.’.
Page 34

GXT 162 Illuminated Gaming Mouse - USER’S MANUAL
30
Report rate & DPI settings
4.
a
Rapportforholdsinnstilling
- Endre rapportforhold ved å klikke på den respektive linjen.
- Klikk på ‘Apply’ Musen oppdateres.
5.
a
b
DPI-innstilling
- DPI-innstillinger ved å klikke på den respektive linjen.
- Klikk på DPI-nummeret for å aktivere eller deaktivere denne innstillingen.
- Klikk på ‘Apply’ Musen oppdateres.
Lysinnstillinger
6.
a
b
c
Endre RGB-effekt
- Endre lysmodusen.
- Endre lysstyrke og pustehastighet.
- Velg ønsket LED-farge, eller velg din egen farge.
- Klikk på ‘Apply’ Musen oppdateres.
7.
a
b
c
Egendefinert LED-farge
- Klikk alltid den første fargeboksen.
- Klikk på fargen du ønsker å endre.
- Klikk på ønsket egendefinert farge, og klikk ‘OK’.
- Klikk på ‘Apply’ Musen oppdateres.
8.
a
b
DPI-selvfarget LED
- Klikk på DPI-trinnet.
- Klikk på boksene for å tenne de respektive indikatorene på musen.
- Klikk på ‘Apply’ Musen oppdateres.
Page 35

GXT 162 Illuminated Gaming Mouse - USER’S MANUAL
31
9.
a
b
c
d
Lag en makro (lagre en sekvens av taster i programvaren)
- Gå til ‘Advanced’-fanen.
- Angi navnet på den nye makroen.
- Angi antall ganger makroen skal gjenta (loop times).
- Opprett en ny makro ved å klikke på ‘New’.
10.
a
b
c
d
Spill inn en makro
- Klikk på ‘Start Recording’ og ‘OK’ for å starte innspilling av ønsket tastatursekvens på popup-skjermen.
- Du kan legge til musbevegelser ved å bruke menyen til høyre.
- Klikk på ‘Stop Recording’ og ‘OK’ for å stoppe innspilling på popup-skjermen.
- Klikk på ‘Save’ for å lagre makroen.
11.
a
b
c
d
e
Tilordne en makro
- Klikk på ‘Basic Settings’ -fanen (grunnleggende innstillinger).
- Klikk på tasten du vil tilordne på nytt. Velg funksjonen ‘Macro Key’.
- Velg en makro fra listen.
- Velg hvordan makroen skal utføres.
- Klikk på ‘OK’.
- Klikk på ‘Apply’ Musen oppdateres.
Trykk og hold nede DFM-knappen for å få tilgang til en sekundært programmerbar funksjon på hver musetast.
12.
a
b
c
d
Tilordne DFM
- Klikk på ‘Basic Settings’-fanen (grunnleggende innstillinger).
- Klikk på den knappen som du ønsker å tilordne på nytt som “DFM”-tast.
- Klikk på ‘Mode B’.
- Gjenta trinn 3 for å tilordne forskjellige funksjoner på hver musetast.
- Klikk på ‘Apply’ Musen oppdateres.
Makroinnstillinger
Double Function Mode (DFM)
Page 36

GXT 162 Illuminated Gaming Mouse - USER’S MANUAL
32
a
- Knapp 1 (standard = vänster musknapp)
b
- Knapp 2 (standard = höger musknapp)
c
- Knapp 3 (standard = mittenklick)
d
- Knapp 4 (standard = DPI +)
e
- Knapp 5 (standard = DPI -)
f
- Knapp 6 (standard = trippelklick)
g
- Knapp 7 (standard = framåt)
h
- Knapp 8 (standard = bakåt)
i
- Knapp 9 (standard = Ctrl-tangent)
2. Installation
a
b
c
d
e
f
- Öppna webbläsaren och gå till www.trust.com/21186/driver.
- Klicka på knappen ”Download EXE” [Hämta EXE-fil] för att ladda ner programvaran.
- Klicka på ”Setup-GXT 162.exe” och följ anvisningarna i wizard [installationsguiden].
- Anslut musen till USB-porten på datorn.
- Klicka på genvägen ”GXT 162.exe” för att starta programmet.
- Du kan nu börja konfigurera musen. I handboken uppdateras musen när du klickar på ”Apply”
[Använd].
3.
a
b
c
Tilldela en funktion
- Klicka på fliken ”Basic Settings” [grundläggande inställningar].
- Klicka på knappen som du vill göra om tilldelningen för.
- Klicka på funktionen som du vill tilldela.
- Klicka på ”Apply” [Använd]. Musen uppdateras.
1. Knapplayout
Knapprogrammering
Minst en knapp måste konfigureras som left mouse button [vänster musknapp].
Page 37

GXT 162 Illuminated Gaming Mouse - USER’S MANUAL
33
Report rate & DPI settings
4.
a
Inställning av Report Rate (avläsningsfrekvens)
- Ändra avläsningsfrekvensen genom att klicka på motsvarande fält.
- Klicka på ”Apply” [Använd]. Musen uppdateras.
5.
a
b
DPI-inställning
- Ändra DPI-inställningarna genom att klicka på motsvarande fält.
- Klicka på DPI-numret för att aktivera eller inaktivera denna inställning.
- Klicka på ”Apply” [Använd]. Musen uppdateras.
Ljusinställningar
6.
a
b
c
Ändra RGB-effekt
- Ändra ljusinställning.
- Ändra ljusstyrkans nivå och andningshastighet.
- Välj önskad LED-färg eller välj en anpassad färg.
- Klicka på ”Apply” [Använd]. Musen uppdateras.
7.
a
b
c
Anpassad LED-färg
- Markera alltid den första färgrutan.
- Klicka på färgen som du vill ändra.
- Klicka på önskad anpassad färg och klicka på ”OK”.
- Klicka på ”Apply” [Använd]. Musen uppdateras.
8.
a
b
DPI Self Color LED [DPI-inställning för LED-färg]
- Klicka på DPI-nivån.
- Klicka på rutorna för att tända motsvarande indikatorer på musen.
- Klicka på ”Apply” [Använd]. Musen uppdateras.
Page 38

GXT 162 Illuminated Gaming Mouse - USER’S MANUAL
34
9.
a
b
c
d
Skapa ett makro (lagra en tangentsekvens i programvaran)
- Gå till fliken ”Advanced” [Avancerat].
- Skriv in namnet på den nya makrot.
- Ange hur många gånger makrot ska upprepas (loop times).
- Skapa ett nytt makro genom att klicka på ”New” [Ny].
10.
a
b
c
d
Spela in ett makro
- Klicka på ”Start Recording” [Börja spela in] och ”OK” i popup-fönstret för att börja spela in den
föredragna tangentbordssekvensen.
- Musåtgärder kan läggas till genom att använda menyn till höger.
- Klicka på ”Stop Recording” [Sluta spela in] och ”OK” i popup-fönstret för att sluta spela in.
- Klicka på ”Save” [Spara] för att spara makrot.
11.
a
b
c
d
e
Tilldela ett makro
- Klicka på fliken ”Basic Settings” [grundläggande inställningar].
- Klicka på knappen som du vill göra om tilldelningen för. Välj funktionen ”Macro Key” [Makrotangent].
- Välj makrot i listan.
- Välj hur makrot ska köras.
- Klicka på ”OK”.
- Klicka på ”Apply” [Använd]. Musen uppdateras.
Tryck in och håll knappen DFM nedtryckt så får du tillgång till en sekundär programmerbar funktion på varje
musknapp.
12.
a
b
c
d
Tilldela DFM
- Klicka på fliken ”Basic Settings” [grundläggande inställningar].
- Klicka på knappen som du vill göra till DFM-tangent.
- Klicka på ”Mode B” [Läge B].
- Upprepa steg 3 om du vill tilldela olika funktioner till de olika musknapparna.
- Klicka på ”Apply” [Använd]. Musen uppdateras.
Makroinställningar
Double Function Mode (DFM) [Dubbelfunktionsläge]
Page 39

GXT 162 Illuminated Gaming Mouse - USER’S MANUAL
35
a
- Przycisk 1 (domyślnie = lewy przycisk myszy)
b
- Przycisk 2 (domyślnie = prawy przycisk myszy)
c
- Przycisk 3 (domyślnie = kliknięcie środkowym przyciskiem)
d
- Przycisk 4 (domyślnie = DPI +)
e
- Przycisk 5 (domyślnie = DPI -)
f
- Przycisk 6 (domyślnie = potrójne kliknięcie)
g
- Przycisk 7 (domyślnie = do przodu)
h
- Przycisk 8 (domyślnie = do tyłu)
i
- Przycisk 9 (domyślnie = klawisz Ctrl)
2. Instalacja
a
b
c
d
e
f
- Otwórz przeglądarkę internetową i przejdź na stronę www.trust.com/21186/driver.
- Kliknij przycisk „Download EXE”, aby pobrać oprogramowanie.
- Kliknij „Setup-GXT 162.exe” i postępuj zgodnie z komunikatami wizard instalacji.
- Podłącz mysz do portu USB komputera.
- Kliknij skrót „GXT 162.exe”, aby uruchomić oprogramowanie.
- Można teraz rozpocząć konfigurację myszy. Aby zaktualizować ustawienia myszy, użyj polecenia
„Apply”.
3.
a
b
c
Przypisanie funkcji
- Kliknij zakładkę „Basic Settings”.
- Kliknij przycisk, który chcesz ponownie przypisać.
- Kliknij funkcję, którą chcesz przypisać.
- Kliknij „Apply”. Ustawienia myszy są aktualizowane.
1. Układ przycisków
Programowanie przycisków
Co najmniej jeden klawisz musi zostać skonfigurowany jako „left mouse button”.
Page 40

GXT 162 Illuminated Gaming Mouse - USER’S MANUAL
36
Report rate & DPI settings
4.
a
Ustawianie częstotliwości
- Zmień częstotliwość, klikając odpowiedni suwak.
- Kliknij „Apply”. Ustawienia myszy są aktualizowane.
5.
a
b
Ustawianie DPI
- Zmień ustawienia DPI, klikając odpowiedni suwak.
- Kliknij numer DPI, aby włączyć lub wyłączyć ustawienie.
- Kliknij „Apply”. Ustawienia myszy są aktualizowane.
Ustawienia podświetlenia
6.
a
b
c
Zmiana efektu RGB
- Zmień tryb podświetlenia.
- Zmień poziom jasności i prędkość pulsowania.
- Wybierz jeden z podstawowych kolorów lampki kontrolnej lub skonfiguruj odcień.
- Kliknij „Apply”. Ustawienia myszy są aktualizowane.
7.
a
b
c
Konfiguracja koloru lampki kontrolnej
- Zawsze zaznaczaj pierwszy blok kolorów.
- Kliknij kolor, który chcesz zmienić.
- Kliknij wybrany skonfigurowany kolor i kliknij „OK”.
- Kliknij „Apply”. Ustawienia myszy są aktualizowane.
8.
a
b
Konfiguracja koloru lampek kontrolnych DPI
- Kliknij pole DPI.
- Kliknij bloki, aby podświetlić odnośne lampki kontrolne myszy.
- Kliknij „Apply”. Ustawienia myszy są aktualizowane.
Page 41

GXT 162 Illuminated Gaming Mouse - USER’S MANUAL
37
9.
a
b
c
d
Tworzenie makra (zapisywanie w oprogramowaniu sekwencji klawiszy)
- Przejdź do zakładki „Advanced”.
- Wprowadź nazwę nowego makro.
- Wprowadź długość czasu, przez jaki makro ma być powtarzane („Loop Times”).
- Utwórz nowe makro, klikając „New”.
10.
a
b
c
d
Zapisywanie makra
- Kliknij „Start Recording” i „OK” na ekranie komunikatu, aby rozpocząć zapisywanie preferowanej
sekwencji klawiszy.
- Działania myszy mogą zostać dodane z wykorzystaniem menu po prawej.
- Kliknij „Stop Recording” i „OK” na ekranie komunikatu, aby zatrzymać zapisywanie.
- Kliknij „Save”, aby zapisać makro w pamięci.
11.
a
b
c
d
e
Przypisywanie makra
- Kliknij zakładkę „Basic Settings”.
- Kliknij przycisk, który chcesz ponownie przypisać. Wybierz funkcję „Macro Key”.
- Wybierz makro z listy.
- Wybierz sposób wykonywania makra.
- Kliknij „OK”.
- Kliknij „Apply”. Ustawienia myszy są aktualizowane.
Naciśnij przycisk DFM i przytrzymaj go, aby uzyskać dostęp do drugorzędnej funkcji programowalnej każdego
przycisku.
12.
a
b
c
d
Przypisywanie DFM
- Kliknij zakładkę „Basic Settings”.
- Kliknij przycisk, który chcesz ponownie przypisać jako przycisk „DFM”.
- Kliknij „Mode B”.
- Powtórz krok 3, aby przypisać różne funkcje do każdego z przycisków.
- Kliknij „Apply”. Ustawienia myszy są aktualizowane.
Ustawienia makro
Double Function Mode (DFM)
Page 42

GXT 162 Illuminated Gaming Mouse - USER’S MANUAL
38
a
- Tlačítko 1 (výchozí = levé tlačítko myši)
b
- Tlačítko 2 (výchozí = pravé tlačítko myši)
c
- Tlačítko 3 (výchozí = prostřední kliknutí)
d
- Tlačítko 4 (výchozí = DPI +)
e
- Tlačítko 5 (výchozí = DPI -)
f
- Tlačítko 6 (výchozí = trojité kliknutí)
g
- Tlačítko 7 (výchozí = vpřed)
h
- Tlačítko 8 (výchozí = zpět)
i
- Tlačítko 9 (výchozí = Ctrl)
2. Instalace
a
b
c
d
e
f
- Otevřete prohlížeč a přejděte na stránky www.trust.com/21186/driver.
- Klikněte na tlačítko „Download EXE“ a stáhněte software.
- Klikněte na možnost „Setup-GXT 162.exe“ a postupujte tak, jak uvádí instalační wizard.
- Myš připojte do USB portu počítače.
- Klikněte na zástupce „GXT 162.exe“ a spusťte software.
- Nyní můžete spustit konfiguraci. V návodu bude aktualizace myši označena jako „Apply“.
3.
a
b
c
Přiřazení funkce
- Klikněte na kartu „Basic Settings“.
- Klikněte na tlačítko, ke kterému si přejete přiřadit jinou funkci.
- Klikněte na funkci, kterou si přejete přiřadit.
- Klikněte na „Apply“ Proběhne aktualizace myši.
1. Rozvržení tlačítek
Programování tlačítek
Alespoň jedno tlačítko musí být nakonfigurováno jako „left mouse button“.
Page 43

GXT 162 Illuminated Gaming Mouse - USER’S MANUAL
39
Report rate & DPI settings
4.
a
Nastavení obnovovací frekvence
- Změňte obnovovací frekvenci kliknutím na příslušnou lištu.
- Klikněte na „Apply“ Proběhne aktualizace myši.
5.
a
b
Nastavení DPI
- Změňte nastavení DPI kliknutím na příslušnou lištu.
- Kliknutím na počet DPI aktivujete nebo deaktivujete toto nastavení.
- Klikněte na „Apply“ Proběhne aktualizace myši.
Nastavení osvětlení
6.
a
b
c
Změna RGB efektu
- Změňte světelný režim.
- Změňte úroveň jasu a rychlost stmívání.
- Vyberte požadovanou barvu osvětlení nebo zvolte vlastní barvu.
- Klikněte na „Apply“ Proběhne aktualizace myši.
7.
a
b
c
Vlastní barva LED osvětlení
- Zaškrtněte vždy první paletu barev.
- Klikněte na barvu, kterou si přejete změnit.
- Klikněte na požadovanou vlastní barvu a potvrďte tlačítkem „OK“.
- Klikněte na „Apply“ Proběhne aktualizace myši.
8.
a
b
DPI - vlastní barvy LED osvětlení
- Klikněte na Fáze DPI
- Kliknutím na políčka rozsvítíte příslušné kontrolky na myši.
- Klikněte na „Apply“ Proběhne aktualizace myši.
Page 44

GXT 162 Illuminated Gaming Mouse - USER’S MANUAL
40
9.
a
b
c
d
Vytvoření makra (uložení kombinace kláves do softwaru)
- Přejděte na kartu „Advanced“.
- Zadejte název nového makra.
- Zadejte, kolikrát se má makro opakovat („Loop Times”).
- Kliknutím na „New“ vytvořte nové makro.
10.
a
b
c
d
Záznam makra
- Klikněte na „Start Recording“ a na „OK“ na vyskakovací obrazovce a začněte zaznamenávat
požadovanou kombinaci kláves.
- Pomocí nabídky umístěné vpravo je možné přidat další akce myši.
- Klikněte na „Stop Recording“ a na „OK“ na vyskakovací obrazovce a ukončete záznam požadované
kombinace kláves.
- Makro uložte kliknutím na možnost „Save“.
11.
a
b
c
d
e
Přiřazení maker
- Klikněte na kartu „Basic Settings“.
- Klikněte na tlačítko, ke kterému si přejete makro přiřadit. Zvolte funkci „Macro Key“.
- Vyberte makro ze seznamu.
- Vyberte, jak má být makro provedeno.
- Klepněte na „OK“.
- Klikněte na „Apply“ Proběhne aktualizace myši.
Stiskněte a přidržte tlačítko DFM, získáte tak přístup k sekundárně programovatelným funkcím pro každé tlačítko
myši.
12.
a
b
c
d
Přiřazení DFM
- Klikněte na kartu „Basic Settings“.
- Klikněte na tlačítko, kterému si přejete přiřadit funkci klávesy „DFM“.
- Klikněte na „Mode B“.
- Opakujte krok 3 a každému tlačítku myši přiřaďte různé funkce.
- Klikněte na „Apply“ Proběhne aktualizace myši.
Nastavení maker
Double Function Mode (DFM)
Page 45

GXT 162 Illuminated Gaming Mouse - USER’S MANUAL
41
a
- Tlačidlo 1 (východiskovo = ľavé tlačidlo myši)
b
- Tlačidlo 2 (východiskovo = pravé tlačidlo myši)
c
- Tlačidlo 3 (Východiskovo = kliknutie stredným tlačidlom)
d
- Tlačidlo 4 (Východiskovo = DPI +)
e
- Tlačidlo 5 (Východiskovo = DPI -)
f
- Tlačidlo 6 (Východiskovo = trojité kliknutie)
g
- Tlačidlo 7 (Východiskovo = dopredu)
h
- Tlačidlo 8 (Východiskovo = dozadu)
i
- Tlačidlo 9 (Východiskovo = tlačidlo Ctrl)
2. Inštalácia
a
b
c
d
e
f
- Otvorte internetový prehliadač a prejdite na www.trust.com/21186/driver.
- Kliknite na tlačidlo „Download EXE“ a stiahnite si softvér.
- Kliknite na „Setup-GXT 162.exe“ a postupujte podľa pokynov wizard inštaláciou.
- Pripojte myš k USB portu počítača.
- Kliknite na odkaz „GXT 162.exe“ a spustite softvér.
- Teraz môžete začať konfigurovať myš. Pri manuálnej sa bude aktualizácia myši vzťahovať na možnosť
„Apply“.
3.
a
b
c
Assign a function
- Kliknite na kartu „Basic Settings“.
- Kliknite na tlačidlo, ktoré chcete opätovne priradiť.
- Kliknite na funkciu, ktorú chcete priradiť.
- Kliknite na možnosť „Apply“. Myš sa začne aktualizovať.
1. Rozloženie tlačidiel
Programovanie tlačidiel
Minimálne jedno tlačidlo musí byť konfigurované ako „left mouse button“.
Page 46

GXT 162 Illuminated Gaming Mouse - USER’S MANUAL
42
Report rate & DPI settings
4.
a
Nastavenie rýchlosti hlásenia
- Rýchlosť hlásenia zmeníte kliknutím na príslušnú lištu.
- Kliknite na možnosť „Apply“. Myš sa začne aktualizovať.
5.
a
b
DPI nastavenie
- DPI nastavenia zmeníte kliknutím na príslušnú lištu.
- Kliknite na číslo DPI a aktivujte alebo deaktivujte toto nastavenie.
- Kliknite na možnosť „Apply“. Myš sa začne aktualizovať.
Nastavenia osvetlenia
6.
a
b
c
Zmena RGB efektu
- Zmeňte režim osvetlenia.
- Zmeňte úroveň jasu a rýchlosť dýchania.
- Vyberte požadovanú farbu LED alebo použite používateľskú farbu.
- Kliknite na možnosť „Apply“. Myš sa začne aktualizovať.
7.
a
b
c
Používateľská farba LED
- Najskôr vždy skontrolujte prvý panel farieb.
- Kliknite na farbu, ktorú chcete zmeniť.
- Kliknite na požadovanú používateľskú farbu a kliknite na „OK“.
- Kliknite na „Apply“. Myš sa začne aktualizovať.
8.
a
b
DPI LED s vlastnými farbami
- Kliknite na stupeň DPI
- Klikajte na polia a rozsvieťte príslušné indikátory na myši.
- Kliknite na „Apply“. Myš sa začne aktualizovať.
Page 47

GXT 162 Illuminated Gaming Mouse - USER’S MANUAL
43
9.
a
b
c
d
Vytvorte makro (uloženie postupnosti tlačidiel v softvéri)
- Prejdite na kartu „Advanced“.
- Zadajte názov nového makra.
- Zadajte, koľkokrát sa má makro opakovať („Loop Times“).
- Vytvorte nové makro kliknutím na možnosť „New“.
10.
a
b
c
d
Nahranie makra
- Na vyskakovacej obrazovke kliknite na „Start Recording“ a „OK“ a spustite nahrávanie
uprednostňovanej postupnosti klávesov.
- Činnosti myši môžete pridať pomocou ponuky vpravo.
- Na vyskakovacej obrazovke kliknite na „Stop Recording“ a „OK“ a zastavte nahrávanie.
- Kliknite na „Save“ a uložte makro.
11.
a
b
c
d
e
Priradenie makra
- Kliknite na kartu „Basic settings“.
- Kliknite na tlačidlo, ktoré chcete opätovne priradiť. Vyberte funkciu „Macro Key“.
- Vyberte makro zo zoznamu.
- Vyberte, ako sa má makro vykonať.
- Kliknite na „OK“.
- Kliknite na „Apply“ Myš sa začne aktualizovať.
Stlačením a podržaním tlačidla DFM získate prístup k sekundárne naprogramovateľnej funkcie pre každé tlačidlo
na myši.
12.
a
b
c
d
Priraďte DFM
- Kliknite na kartu „Basic Settings“.
- Kliknite na tlačidlo, ktoré chcete opätovne priradiť ako tlačidlo „DFM“.
- Kliknite na „Mode B“.
- Opakujte krok 3 a priraďte rôzne funkcie pre každé tlačidlo na myši.
- Kliknite na „Apply“ Myš sa začne aktualizovať.
Nastavenia makro
Double Function Mode (DFM)
Page 48

GXT 162 Illuminated Gaming Mouse - USER’S MANUAL
44
a
- 1. gomb (alapértelmezetten = bal egér gomb)
b
- 2. gomb (alapértelmezetten = jobb egérgomb)
c
- 3. gomb (alapértelmezetten = középső kattintás)
d
- 4. gomb (alapértelmezetten = DPI +)
e
- 5. gomb (alapértelmezetten = DPI -)
f
- 6. gomb (alapértelmezetten = tripla kattintás)
g
- 7. gomb (alapértelmezetten = előre)
h
- 8. gomb (alapértelmezetten = vissza)
i
- 9. gomb (alapértelmezetten = Ctrl billentyű)
2. Telepítés
a
b
c
d
e
f
- Nyissa meg a böngészőt és lépjen ide: www.trust.com/21186/driver.
- Kattintson a „Download EXE” gombra a szoftver letöltéséhez.
- Kattintson a „Setup-GXT 162.exe” lehetőségre, majd kövesse a telepítő wizard.
- Csatlakoztassa az egeret a számítógépe USB portjához.
- Kattintson a „GXT 162.exe” parancsikonra a szoftver elindításához.
- Most elkezdheti az egér konfigurálását. A kézikönyvben az egér frissítésére az „Apply” paranccsal
hivatkozunk.
3.
a
b
c
Funkció hozzárendelése
- Kattintson a „Basic Settings” lapra.
- Kattintson a gombra, amelyet szeretne újra hozzárendelni.
- Kattintson a hozzárendelni kívánt funkcióra.
- Kattintson az „Apply” gombra Az egér funkciói frissülnek.
1. Gombkiosztás
Gomb programozása
Legalább egy gombot be kell állítani az „left mouse button”.
Page 49

GXT 162 Illuminated Gaming Mouse - USER’S MANUAL
45
Report rate & DPI settings
4.
a
Jelentési ráta beállításai
- Módosíthatja a jelentési rátát, ha rákattint a vonatkozó sávra.
- Kattintson az „Apply” gombra Az egér funkciói frissülnek.
5.
a
b
DPI beállítások
- Módosíthatja a DPI beállításokat, ha rákattint a vonatkozó sávra.
- A beállítás engedélyezéséhez vagy letiltásához kattintson a DPI számra.
- Kattintson az „Apply” gombra Az egér funkciói frissülnek.
Fény beállításai
6.
a
b
c
Az RGB hatás módosítása
- Változtassa meg a fénymódot.
- Változtassa meg a fényerőszintet vagy a pulzálás sebességét.
- Válassza ki a kívánt LED színt vagy válasszon egy egyedi színt.
- Kattintson az „Apply” gombra Az egér funkciói frissülnek.
7.
a
b
c
Egyéni LED szín
- Mindig jelölje ki az első színmezőt.
- Kattintson a megváltoztatni kívánt színre.
- Kattintson a kívánt egyedi színre, majd az „OK” gombra.
- Kattintson az „Apply” gombra Az egér funkciói frissülnek.
8.
a
b
DPI saját színű LED
- Kattintson a DPI fokozatra
- Kattintson a mezőkre, hogy kigyulladjanak a vonatkozó jelzések az egeren.
- Kattintson az „Apply” gombra Az egér funkciói frissülnek.
Page 50

GXT 162 Illuminated Gaming Mouse - USER’S MANUAL
46
9.
a
b
c
d
Hozzon létre egy makrót (billentyűsorozatot tárol a szoftveren)
- Lépjen az „Advanced” lapra.
- Adja meg az új makró nevét.
- Adja meg azt, hogy hányszor ismétlődjön meg a makró („Loop Times”).
- Hozzon létre egy új makrót a „New” gombra kattintva.
10.
a
b
c
d
Makró rögzítése
- Kattintson a „Start Recording” és „OK” gombra a felugró képernyőn a kívánt billentyűsorozat
rögzítésének az indításához.
- További egérműveleteket a jobb oldali menü használatával adhat hozzá.
- Kattintson a „Stop Recording” majd az „OK” gombra a felugró képernyőn a rögzítés megállításához.
- Kattintson a „Save” gombra a makró elmentéséhez.
11.
a
b
c
d
e
Makró hozzárendelése
- Kattintson az „Basic Settings” lapra.
- Kattintson a gombra, melyet szeretne újra hozzárendelni. Válassza a „Macro Key” funkciót.
- Válassza ki a makrót a listából.
- Válassza ki, hogyan legyen a makró végrehajtva.
- Kattintson az „OK” gombra.
- Kattintson az „Apply” gombra Az egér funkciói frissülnek.
Nyomja meg és tartsa lenyomva a DFM gombot, hogy hozzáférjen a másodlagos programozható funkcióhoz
mindegyik egérgombon.
12.
a
b
c
d
A DFM hozzárendelése
- Kattintson a „Basic Settings” lapra.
- Kattintson arra a gombra, amelyet szeretne újra hozzárendelni „DFM” billentyűként.
- Kattintson a „Mode B”.
- Ismételje meg a 3. lépést, hogy különböző funkciót rendeljen hozzá mindegyik egérgombhoz.
- Kattintson az „Apply” gombra Az egér funkciói frissülnek.
Makróbeállítások
Double Function Mode (DFM)
Page 51

GXT 162 Illuminated Gaming Mouse - USER’S MANUAL
47
a
- Buton 1 (implicit = buton mouse stânga)
b
- Buton 2 (implicit = buton mouse dreapta)
c
- Buton 3 (implicit = clic mijloc)
d
- Buton 4 (implicit = DPI +)
e
- Buton 5 (implicit = DPI -)
f
- Buton 6 (implicit = triplu click)
g
- Buton 7 (implicit = înainte)
h
- Buton 8 (implicit = înapoi)
i
- Buton 9 (implicit = tastă Ctrl)
2. Instalare
a
b
c
d
e
f
- Deschideți browser-ul de internet și mergeți la www.trust.com/21186/driver.
- Daţi clic pe butonul „Download EXE” pentru a descărca software-ul.
- Daţi clic pe „Setup-GXT 162.exe” și urmați wizard de instalare.
- Conectaţi mouse-ul la portul USB al PC-ului.
- Daţi clic pe scurtătura „GXT 162.exe” pentru a porni software-ul.
- Acum puteţi începe să configuraţi mouse-ul. Consultaţi „Apply” din manual pentru a actualiza mouseul.
3.
a
b
c
Alocarea unei funcţii
- Daţi clic pe tab-ul „Basic Settings”.
- Daţi clic pe butonul pe care doriţi să îl reatribuiţi.
- Daţi clic pe funcţia pe care doriţi să o atribuiţi.
- Daţi click pe „Apply” Mouse-ul este actualizat.
1. Dispunere butoane
Programarea butoanelor
Cel puțin un buton trebuie configurat ca „left mouse button”.
Page 52

GXT 162 Illuminated Gaming Mouse - USER’S MANUAL
48
Report rate & DPI settings
4.
a
Setări rată raport
- Schimbați rată raport făcând clic pe bara respectivă.
- Daţi click pe „Apply” Mouse-ul este actualizat.
5.
a
b
Setare DPI
- Schimbați setările DPI făcând clic pe bara respectivă.
- Daţi click pe numărul DPI pentru a activa sau dezactiva această setare.
- Daţi click pe „Apply” Mouse-ul este actualizat.
Setări luminozitate
6.
a
b
c
Schimbați efecte RGB
- Schimbați modul de iluminare.
- Modificaţi nivelul de luminozitate şi viteza.
- Selectaţi lumina dorită pentru LED, sau alegeţi o culoare personalizată.
- Daţi click pe „Apply” Mouse-ul este actualizat.
7.
a
b
c
Culoare LED client
- Bifați întotdeauna prima casetă de culoare.
- Daţi clic pe culoarea pe care vreți să o schimbați.
- Daţi clic pe culoarea client dorită și daţi clic pe „OK”.
- Daţi clic pe „Apply” Mouse-ul este actualizat.
8.
a
b
DPI self color LED
- Daţi clic pe stare DPI
- Daţi clic pe casete pentru a aprinde indicatoarele respective pe mouse.
- Daţi clic pe „Apply” Mouse-ul este actualizat.
Page 53

GXT 162 Illuminated Gaming Mouse - USER’S MANUAL
49
9.
a
b
c
d
Crearea unui macro (stochează în software o secvenţă de taste)
- Mergeți la tabul „Advanced”.
- Introduceţi numele noului macro.
- Introduceți timpul în care macro-ul trebuie să se repete („Loop Times”).
- Creaţi un nou macro, dând click pe „New”.
10.
a
b
c
d
Înregistrarea unui macro
- Daţi clic pe „Start Recording” și „OK” în ecranul pop-up pentru a porni înregistrarea secvenței preferate
a tastaturii.
- Pot fi adăugate acţiuni pentru mouse, utilizând meniul din partea dreaptă.
- Daţi clic pe „Stop Recording” și „OK” în ecranul pop-up pentru a opri înregistrarea.
- Daţi clic pe „Save” pentru a salva macro-ul.
11.
a
b
c
d
e
Alocarea unui macro
- Daţi clic pe fila „Basic Settings”.
- Daţi clic pe butonul pe care doriţi să îl reatribuiţi. Selectați funcția „Macro Key”.
- Alegeți macro-ul din listă.
- Alegeți cum trebuie executat macro-ul.
- Daţi clic pe „OK”.
- Daţi clic pe „Apply” Mouse-ul este actualizat.
Apăsați și țineți apăsat butonul DFM pentru a ajunge la o funcție secundară programabilă pe fiecare buton al
mouse-ului.
12.
a
b
c
d
Asocierea DFM
- Daţi clic pe tab-ul „Basic Settings”.
- Daţi clic pe butonul pe care doriți să-l reasociați ca tastă „DFM”.
- Daţi clic pe „Mode B”.
- Repetați pasul 3 pentru a asocia diverse funcții fiecărui buton al mouse-ului.
- Daţi clic pe „Apply” Mouse-ul este actualizat.
Setări macro
Double Function Mode (DFM)
Page 54

GXT 162 Illuminated Gaming Mouse - USER’S MANUAL
50
a
- Бутон 1 (По подразбиране = ляв бутон на мишката)
b
- Бутон 2 (По подразбиране = десен бутон на мишката)
c
- Бутон 3 (По подразбиране = щракване със среден бутон)
d
- Бутон 4 (По подразбиране = DPI +)
e
- Бутон 5 (По подразбиране = DPI -)
f
- Бутон 6 (По подразбиране = тройно щракване)
g
- Бутон 7 (По подразбиране = напред)
h
- Бутон 8 (По подразбиране = назад)
i
- Бутон 9 (По подразбиране = клавиш Ctrl)
2. Инсталиране
a
b
c
d
e
f
- Отворете интернет браузъра и отидете на адрес www.trust.com/21186/driver.
- Щракнете бутона „Download EXE”, за да изтеглите софтуера.
- Щракнете върху „Setup-GXT 162.exe” и следайте wizard за инсталация.
- Свържете мишката към USB порта на вашия компютър.
- Щракнете върху прекият път „GXT 162.exe”, за да стартирате софтуера.
- Сега можете да започнете конфигурация на мишката. В наръчника ще бъде посочено като
„Apply”, за да актуализирате мишката.
3.
a
b
c
Назначаване на функция
- Щракнете раздела „Basic Settings”.
- Щракнете на бутон, който искате да преназначите.
- Щракнете на функцията, която искате да назначите.
- Щракнете на „Apply” Мишката се актуализира.
1. Изглед на бутон
Програмиране на бутони
Трябва да бъде конфигуриран като „left mouse button”.
Page 55

GXT 162 Illuminated Gaming Mouse - USER’S MANUAL
51
Report rate & DPI settings
4.
a
Настройка за честота на докладване
- Сменете честотата на докладване като щракнете съответната лента.
- Щракнете на „Apply” Мишката се актуализира.
5.
a
b
DPI настройки
- Сменете DPI настройките като щракнете върху съответната лента.
- Щракнете броя DPI, за да активирате или деактивирате тази настройка.
- Щракнете на „Apply” Мишката се актуализира.
Настройки на светлина
6.
a
b
c
Сменете RGB ефекта
- Сменете режима на светлината.
- Смяна на ниво на яркост и скорост на пулсации.
- Изберете исканият цвят на светодиод или изберете персонален цвят.
- Щракнете на „Apply” Мишката се актуализира.
7.
a
b
c
Персонален цвят на светодиод
- Винаги проверявайте полето с първия цвят.
- Щракнете цветът, който искате да смените.
- Щракнете искания персонален цвят и щракнете върху „OK”.
- Щракнете „Apply” Мишката е актуализирана.
8.
a
b
DPI Собствен цвят на светодиод
- Щракнете състоянието на DPI
- Щракнете върху полетата, за да осветите съответните индикатори на мишката.
- Щракнете „Apply” Мишката се актуализира.
Page 56

GXT 162 Illuminated Gaming Mouse - USER’S MANUAL
52
9.
a
b
c
d
Създаване на макрос (запаметете последователност на клавиши в софтуера)
- Преминете към раздел „Advanced”.
- Въведете името на новия макрос.
- Въведете колко пъти макросът трябва да бъде повторен („Loop Times”).
- Създайте нов макрос като щракнете на „New”.
10.
a
b
c
d
Запишете макрос
- Щракнете на „Start Recording” и „OK” в изскачащият прозорец, за да стартирате записа на
исканата клавишна последователност.
- Могат да бъдат добавени действия на мишката като се използва менюто от дясно.
- За да спрете записа, щракнете на „Stop Recording” и „OK” в изскачащия прозорец.
- Щракнете „Save”, за да запазите макроса.
11.
a
b
c
d
e
Назначаване на макрос
- Щракнете върху раздел „Basic Settings”.
- Щракнете на бутон, който искате да преназначите. Изберете функцията „Macro Key”.
- Изберете макрос от списъка.
- Изберете как макросът трябва да бъде изпълнен.
- Щракнете „OK”.
- Щракнете „Apply” Мишката е актуализирана.
Натиснете и задръжте бутона DFM, за да получите достъп до вторичната функция за програмиране за
всеки бутон на мишката.
12.
a
b
c
d
Назначете DFM
- Щракнете раздела „Basic Settings”.
- Щракнете бутона, който искате да преназначите като „DFM” клавиш.
- Щракнете „Mode B”.
- Повторете стъпка 3, за да назначите различни функции за всеки бутон на мишката.
- Щракнете „Apply” Мишката е актуализирана.
Макро настройки
Double Function Mode (DFM)
Page 57

GXT 162 Illuminated Gaming Mouse - USER’S MANUAL
53
a
- Кнопка 1 (по умолчанию = левая кнопка мыши)
b
- Кнопка 2 (по умолчанию = правая кнопка мыши)
c
- Кнопка 3 (по умолчанию = щелчок средней кнопкой мыши)
d
- Кнопка 4 (по умолчанию = DPI +)
e
- Кнопка 5 (по умолчанию = DPI -)
f
- Кнопка 6 (по умолчанию = тройной щелчок)
g
- Кнопка 7 (по умолчанию = вперед)
h
- Кнопка 8 (по умолчанию = назад)
i
- Кнопка 9 (по умолчанию = клавиша Ctrl)
2. Установка
a
b
c
d
e
f
- Откройте веб-браузер и перейдите по ссылке www.trust.com/21186/driver.
- Щелкните кнопку «Download EXE» для загрузки программного обеспечения.
- Щелкните файл «Setup-GXT 162.exe» и следуйте инструкциям wizard установки.
- Подключите мышь к USB-порту ПК.
- Щелкните ярлык «GXT 162.exe» для запуска программного обеспечения.
- Теперь можно начать настройку мыши. В ручном режиме необходимо щелкнуть кнопку «Apply»
для обновления программного обеспечения мыши.
3.
a
b
c
Назначение функции
- Щелкните вкладку «Basic Settings».
- Нажмите кнопку, которую необходимо переназначить.
- Щелкните функцию, которую необходимо назначить.
- Щелкните «Apply» Программное обеспечение мыши будет обновлено.
1. Схема кнопок
Программирование кнопок
По крайней мере одна из кнопок должна быть настроена как «left mouse button».
Page 58

GXT 162 Illuminated Gaming Mouse - USER’S MANUAL
54
Report rate & DPI settings
4.
a
Настройки частоты опроса
- Измените частоту опроса, щелкнув соответствующую панель.
- Щелкните «Apply» Программное обеспечение мыши будет обновлено.
5.
a
b
Настройки DPI
- Измените настройки DPI, щелкнув соответствующую панель.
- Щелкните номер DPI, чтобы включить или выключить данный параметр.
- Щелкните «Apply» Программное обеспечение мыши будет обновлено.
Параметры подсветки
6.
a
b
c
Изменение RGB-эффекта
- Измените режим подсветки.
- Измените уровень яркости или скорость модуляции.
- Выберите требуемый или подберите пользовательский цвет светодиода.
- Щелкните «Apply» Программное обеспечение мыши будет обновлено.
7.
a
b
c
Пользовательский цвет светодиодной подсветки
- Всегда отмечайте первое поле цвета.
- Щелкните цвет, который необходимо изменить.
- Выберите требуемый пользовательский цвет и щелкните «OK».
- Щелкните «Apply» Программное обеспечение мыши будет обновлено.
8.
a
b
Одноцветная светодиодная подсветка DPI
- Щелкните стадию DPI.
- Щелкните поля, чтобы подсветить соответствующие индикаторы на мыши.
- Щелкните «Apply» Программное обеспечение мыши будет обновлено.
Page 59

GXT 162 Illuminated Gaming Mouse - USER’S MANUAL
55
9.
a
b
c
d
Создание макроса (сохранение последовательности клавиш в программном обеспечении)
- Перейдите на вкладку «Advanced».
- Введите имя нового макроса.
- Укажите количество повторов макроса («Loop Times»).
- Создайте новый макрос, щелкнув кнопку «New».
10.
a
b
c
d
Запись макроса
- Щелкните «Start Recording» и «OK» на всплывающем экране для начала записи требуемого
сочетания клавиш.
- Мыши можно добавить другие действия с помощью специального меню справа.
- Щелкните «Stop Recording» и «OK» на всплывающем экране для остановки записи.
- Щелкните «Save» для сохранения макроса.
11.
a
b
c
d
e
Назначение макроса
- Щелкните вкладку «Basic Settings».
- Нажмите кнопку, которую необходимо переназначить. Выберите функцию «Macro Key».
- Выберите макрос из списка.
- Выберите способ выполнения макроса.
- Щелкните «OK».
- Щелкните «Apply» Программное обеспечение мыши будет обновлено.
Нажмите и удерживайте кнопку DFM для получения доступа ко второй программируемой функции
каждой кнопки мыши.
12.
a
b
c
d
Назначение DFM
- Щелкните вкладку «Basic Settings».
- Щелкните кнопку, которую необходимо переназначить как клавишу «DFM».
- Щелкните «Mode B».
- Повторите шаг 3 для назначения других функций каждой кнопке мыши.
- Щелкните «Apply» Программное обеспечение мыши будет обновлено.
Параметры макросов
Double Function Mode (DFM)
Page 60

GXT 162 Illuminated Gaming Mouse - USER’S MANUAL
56
a
- Πλήκτρο 1 (προεπιλογή = αριστερό πλήκτρο ποντικιού)
b
- Πλήκτρο 2 (προεπιλογή = δεξιό πλήκτρο ποντικιού)
c
- Πλήκτρο 3 (προεπιλογή = μεσαίο κλικ)
d
- Πλήκτρο 4 (προεπιλογή = DPI +)
e
- Πλήκτρο 5 (προεπιλογή = DPI –)
f
- Πλήκτρο 6 (προεπιλογή = τριπλό κλικ)
g
- Πλήκτρο 7 (προεπιλογή = εμπρός)
h
- Πλήκτρο 8 (προεπιλογή = πίσω)
i
- Πλήκτρο 9 (προεπιλογή = πλήκτρο Ctrl)
2. Εγκατάσταση
a
b
c
d
e
f
- Ανοίξτε την εφαρμογή περιήγησης στο Internet που χρησιμοποιείτε και μεταβείτε στη διεύθυνση
www.trust.com/21186/driver.
- Κάντε κλικ στο κουμπί “Download EXE” [Λήψη EXE] για να κάνετε λήψη του λογισμικού.
- Κάντε κλικ στο “Setup-GXT 162.exe” και ακολουθήστε τον wizard [οδηγό] εγκατάστασης.
- Συνδέστε το ποντίκι στη θύρα USB του PC.
- Κάντε κλικ στη συντόμευση “GXT 162.exe” για να εκκινήσετε το λογισμικό.
- Μπορείτε τώρα να ξεκινήσετε τη διαμόρφωση του ποντικιού. Στο εγχειρίδιο χρησιμοποιείται ο όρος
‘Apply’ [Εφαρμογή] για την ενημέρωση των ρυθμίσεων του ποντικιού.
3.
a
b
c
Αντιστοίχιση μιας λειτουργίας
- Κάντε κλικ στην καρτέλα ‘Basic Settings’ [Βασικές Ρυθμίσεις].
- Κάντε κλικ στο πλήκτρο του οποίου θέλετε να αλλάξετε την αντιστοίχιση.
- Κάντε κλικ στη λειτουργία που θέλετε να αντιστοιχίσετε.
- Κάντε κλικ στο ‘Apply’ [Εφαρμογή] Οι ρυθμίσεις του ποντικιού ενημερώνονται.
1. Διάταξη πλήκτρων
Προγραμματισμός πλήκτρων
Τουλάχιστον ένα πλήκτρο πρέπει να έχει διαμορφωθεί ως ‘ left mouse button’ [αριστερό πλήκτρο
ποντικιού].
Page 61

GXT 162 Illuminated Gaming Mouse - USER’S MANUAL
57
Report rate & DPI settings [Ρυθμίσεις ρυθμού αναφοράς & DPI]
4.
a
Ρύθμιση Ρυθμού Αναφοράς
- Μπορείτε να αλλάξετε τον Ρυθμό Αναφοράς κάνοντας κλικ στην αντίστοιχη γραμμή.
- Κάντε κλικ στο ‘Apply’ [Εφαρμογή] Οι ρυθμίσεις του ποντικιού ενημερώνονται.
5.
a
b
Ρύθμιση DPI
- Μπορείτε να αλλάξετε τις ρυθμίσεις DPI κάνοντας κλικ στην αντίστοιχη γραμμή.
- Κάντε κλικ στον αριθμό DPI για να ενεργοποιήσετε ή να απενεργοποιήσετε τη συγκεκριμένη ρύθμιση.
- Κάντε κλικ στο ‘Apply’ [Εφαρμογή] Οι ρυθμίσεις του ποντικιού ενημερώνονται.
Ρυθμίσεις Φωτισμού
6.
a
b
c
Αλλάξτε το Εφέ RGB
- Αλλάξτε την κατάσταση φωτισμού.
- Αλλάξτε το επίπεδο φωτεινότητας ή την ταχύτητα αυξομείωσης.
- Επιλέξτε το επιθυμητό χρώμα για τον φωτισμό LED ή επιλέξτε ένα προσαρμοσμένο χρώμα.
- Κάντε κλικ στο ‘Apply’ [Εφαρμογή] Οι ρυθμίσεις του ποντικιού ενημερώνονται.
7.
a
b
c
Προσαρμοσμένο χρώμα LED
- Το πρώτο πλαίσιο χρώματος πρέπει να επιλέγεται πάντα.
- Κάντε κλικ στο χρώμα που θέλετε να αλλάξετε.
- Κάντε κλικ στο επιθυμητό προσαρμοσμένο χρώμα και κατόπιν κάντε κλικ στο ‘OK’.
- Κάντε κλικ στο ‘Apply’ [Εφαρμογή] Οι ρυθμίσεις του ποντικιού ενημερώνονται.
8.
a
b
Προσαρμογή Χρώματος LED DPI
- Κάντε κλικ στο DPI Stage [Στάδιο DPI].
- Κάντε κλικ στα πλαίσια για να ενεργοποιήσετε τις αντίστοιχες ενδείξεις στο ποντίκι.
- Κάντε κλικ στο ‘Apply’ [Εφαρμογή] Οι ρυθμίσεις του ποντικιού ενημερώνονται.
Page 62

GXT 162 Illuminated Gaming Mouse - USER’S MANUAL
58
9.
a
b
c
d
Δημιουργία μιας Μακροεντολής (αποθήκευση μιας ακολουθίας πλήκτρων στο λογισμικό)
- Μεταβείτε στην καρτέλα ‘Advanced’ [Για Προχωρημένους].
- Εισάγετε το όνομα της νέας μακροεντολής.
- Εισάγετε το πλήθος των επαναλήψεων για τη μακροεντολή (Loop Times).
- Δημιουργήστε μια νέα μακροεντολή κάνοντας κλικ στο ‘New’ [Νέα].
10.
a
b
c
d
Εγγραφή μιας Μακροεντολής
- Κάντε κλικ στο ‘Start Recording’ [Έναρξη Εγγραφής] και κατόπιν στο ‘OK’ του αναδυόμενου
παραθύρου για να ξεκινήσετε την εγγραφή της επιθυμητής αλληλουχίας πλήκτρων.
- Υπάρχει δυνατότητα προσθήκης ενεργειών του ποντικιού, χρησιμοποιώντας το μενού στα δεξιά.
- Κάντε κλικ στο ‘Stop Recording’ [Τερματισμός Εγγραφής] και κατόπιν στο ‘OK’ του αναδυόμενου
παραθύρου για να τερματίσετε την εγγραφή.
- Κάντε κλικ στο ‘Save’ [Αποθήκευση] για να αποθηκεύσετε τη μακροεντολή.
11.
a
b
c
d
e
Αντιστοίχιση μιας Μακροεντολής
- Κάντε κλικ στην καρτέλα ‘Basic Settings’ [Βασικές Ρυθμίσεις].
- Κάντε κλικ στο πλήκτρο του οποίου θέλετε να αλλάξετε την αντιστοίχιση. Επιλέξτε τη λειτουργία
‘Macro Key’ [Πλήκτρο Μακροεντολής].
- Επιλέξτε τη μακροεντολή από τη λίστα.
- Επιλέξτε πώς πρέπει να εκτελείται η μακροεντολή.
- Κάντε κλικ στο ‘OK’.
- Κάντε κλικ στο ‘Apply’ [Εφαρμογή] Οι ρυθμίσεις του ποντικιού ενημερώνονται.
Πατήστε παρατεταμένα το πλήκτρο DFM για να αποκτήσετε πρόσβαση σε μια δευτερεύουσα
προγραμματιζόμενη λειτουργία για κάθε πλήκτρο του ποντικιού.
12.
a
b
c
d
Αντιστοίχιση της κατάστασης DFM
- Κάντε κλικ στην καρτέλα ‘Basic Settings’ [Βασικές Ρυθμίσεις].
- Κάντε κλικ στο πλήκτρο του οποίου θέλετε να αλλάξετε την αντιστοίχιση σε “DFM”.
- Κάντε κλικ στο ‘Mode B’ [Κατάσταση B].
- Επαναλάβετε το βήμα 3 για να αντιστοιχίσετε διαφορετικές λειτουργίες σε κάθε πλήκτρο του
ποντικιού.
- Κάντε κλικ στο ‘Apply’ [Εφαρμογή] Οι ρυθμίσεις του ποντικιού ενημερώνονται.
Ρυθμίσεις Μακροεντολών
Double Function Mode, DFM [Κατάσταση Διπλής Λειτουργίας]
Page 63

GXT 162 Illuminated Gaming Mouse - USER’S MANUAL
59
a
- Tuş 1 (Varsayılan = Sol fare tuşu)
b
- Tuş 2 (Varsayılan = Sağ fare tuşu)
c
- Tuş 3 (Varsayılan = Orta tıklama)
d
- Tuş 4 (Varsayılan = DPI +)
e
- Tuş 5 (Varsayılan = DPI -)
f
- Tuş 6 (Varsayılan = Üçlü tıklama)
g
- Tuş 7 (Varsayılan = İleri)
h
- Tuş 8 (Varsayılan = Geri)
ı
- Tuş 9 (Varsayılan = Ctrl tuşu)
2. Kurulum
a
b
c
d
e
f
- İnternet tarayıcınızı başlatın ve şu adrese gidin: www.trust.com/21186/driver.
- Yazılımı indirmek için “Download EXE” tuşunu tıklatın.
- “Setup-GXT 162.exe” öğesini tıklatın ve kurulum wizard izleyin.
- Fareyi PC’nin USB bağlantı noktasına takın.
- Yazılımı başlatmak için “GXT 162.exe” kısa yolunu tıklatın.
- Şimdi fareyi yapılandırmaya başlayabilirsiniz. Fareyi güncellemek için kılavuzda “Apply” kısmına bakın.
3.
a
b
c
Bir fonksiyon atama
- “Basic Settings” sekmesini tıklatın.
- Yeniden atama yapmak istediğiniz düğmeyi tıklatın.
- Atamak istediğiniz fonksiyonu tıklatın.
- “Apply” öğesini tıklatın Fare güncellenir.
1. Tuş ayarları
Tuş programlama
“Left mouse button” olarak en az bir tuş yapılandırılmalıdır.
Page 64

GXT 162 Illuminated Gaming Mouse - USER’S MANUAL
60
Report rate & DPI settings
4.
a
Rapor Oranı Ayarı
- İlgili çubuğu tıklatarak Rapor Oranını değiştirin.
- “Apply” öğesini tıklatın Fare güncellenir.
5.
a
b
DPI ayarı
- İlgili çubuğu tıklatarak DPI Ayarını değiştirin.
- Bu ayarı etkinleştirmek veya devreden çıkarmak için DPI numarasını tıklatın.
- “Apply” öğesini tıklatın Fare güncellenir.
Işık Ayarları
6.
a
b
c
RGB Efektini Değiştirme
- Işık modunu değiştirin.
- Parlaklık seviyesini veya nefes hızını değiştirin.
- İstediğiniz LED rengini seçin veya özel bir renk seçin.
- “Apply” öğesini tıklatın Fare güncellenir.
7.
a
b
c
Özel LED rengi
- Her zaman ilk renk kutusunu kontrol edin.
- Değiştirmek istediğiniz rengi tıklatın.
- İstediğiniz özel rengi tıklatın ve “OK” öğesini tıklatın.
- “Apply” öğesini tıklatın Fare güncellenir.
8.
a
b
DPI Kendi Renk LED’i
- DPI aşamasını tıklatın
- Fare üzerindeki ilgili göstergeleri aydınlatmak için kutuları tıklatın.
- “Apply” öğesini tıklatın Fare güncellenir.
Page 65

GXT 162 Illuminated Gaming Mouse - USER’S MANUAL
61
9.
a
b
c
d
Bir makro yaratın (Yazılımda bir tuş dizisi kaydedin)
- “Advanced” sekmesine gidin.
- Yeni makronun adını girin.
- Makronun tekrarlanması gereken sayıyı girin (“Loop Times”).
- “New” öğesini tıklatarak yeni bir makro yaratın.
10.
a
b
c
d
Bir Makro Kaydedin
- Tercih edilen klavye dizisini kaydı başlatmak için ekranda “Start Recording” ve “OK” öğelerini tıklatın.
- Sağdaki menü kullanılarak fare işlemleri eklenebilir.
- Kaydı durdurmak için ekranda “Stop Recording” ve “OK” öğelerini tıklatın.
- Makroyu kaydetmek için “Save” öğesini tıklatın.
11.
a
b
c
d
e
Bir Makro Atayın
- “Basic Settings” öğesini tıklatın.
- Yeniden atama yapmak istediğiniz düğmeyi tıklatın. “Macro Key” fonksiyonunu seçin.
- Listeden makroyu seçin.
- Makronun nasıl çalıştırılacağını seçin.
- “OK” öğesini tıklatın.
- “Apply” öğesini tıklatın Fare güncellenir.
Her fare tuşu için ikinci bir programlanabilir fonksiyona erişmek için DFM tuşunu basılı tutun.
12.
a
b
c
d
DFM ataması yapın
- “Basic Settings” sekmesini tıklatın.
- “DFM” tuşu olarak yeniden atama yapmak istediğiniz düğmeyi tıklatın.
- “Mode B” öğesini tıklatın.
- Her fare tuşuna farklı fonksiyonlar atamak için adım 3’ü tekrarlayın.
- “Apply” öğesini tıklatın Fare güncellenir.
Makro Ayarları
Double Function Mode (DFM)
Page 66

GXT 162 Illuminated Gaming Mouse - USER’S MANUAL
62
a
- Tipka 1 (zadano = lijevi klik mišem)
b
- Tipka 2 (zadano = desni klik mišem)
c
- Tipka 3 (zadano = srednji klik)
d
- Tipka 4 (zadano = DPI +)
e
- Tipka 5 (zadano = DPI -)
f
- Tipka 6 (zadano = trostruki klik)
g
- Tipka 7 (zadano = naprijed)
h
- Tipka 8 (zadano = nazad)
i
- Tipka 9 (zadano = tipka Ctrl)
2. Instalacija
a
b
c
d
e
f
- Otvorite internetski preglednik i otvorite www.trust.com/21186/driver.
- Kliknite na gumb „Download EXE“ za preuzimanje programa.
- Kliknite na „Setup-GXT 162.exe“ i slijedite upute wizard za instalaciju.
- Priključite miša na USB priključak na računalu.
- Kliknite na prečac „GXT 162.exe“ za pokretanje programa.
- Sada možete započeti s konfiguriranjem miša. U priručniku će biti navedeno „Apply“ za ažuriranje
miša.
3.
a
b
c
Zadavanje funkcije
- Kliknite na karticu „Basic Settings“.
- Kliknite na tipku kojoj želite promijeniti funkciju.
- Kliknite na funkciju koju želite zadati.
- Kliknite na „Apply“ Miš se ažurira.
1. Raspored tipki
Programiranje tipki
Barem jedan gumb mora biti konfiguriran kao „left mouse button“.
Page 67

GXT 162 Illuminated Gaming Mouse - USER’S MANUAL
63
Report rate & DPI settings
4.
a
Postavke osvježavanja
- Promijenite osvježavanje klikom na odgovarajući segment.
- Kliknite na „Apply“ Miš se ažurira.
5.
a
b
DPI postavke
- Promijenite DPI postavke klikom na odgovarajući segment.
- Kliknite na DPI broj da omogućite ili onemogućite ove postavke.
- Kliknite na „Apply“ Miš se ažurira.
Postavke osvjetljenja
6.
a
b
c
Promijenite RGB učinak
- Promjenite modus svjetla.
- Promjena razine svjetline i brzine uključivanja i isključivanja.
- Odaberite željenu LED boju ili odaberite prilagođenu boju.
- Kliknite na „Apply“ Miš se ažurira.
7.
a
b
c
Korisničke boje LED svjetla
- Uvijek najprije stavite kvačicu u kućicu s bojom.
- Kliknite na boju koju želite promijeniti.
- Kliknite na željenu prilagođenu boju i kliknite na „OK“.
- Kliknite na „Apply“ Miš se ažurira.
8.
a
b
DPI samostalna boja LED
- Kliknite na DPI dio
- Kliknite na odgovarajuće kućice za uključenje indikatora na miša.
- Kliknite na „Apply“ Miš se ažurira.
Page 68

GXT 162 Illuminated Gaming Mouse - USER’S MANUAL
64
9.
a
b
c
d
Kreiranje makro naredbe (pohranite redoslijed tipki u softveru)
- Aktivirajte karticu „Advanced“.
- Unesite naziv nove makro naredbe.
- Unesite broj puta koji se makro treba ponoviti („Loop Times“).
- Izradite novi makro klikom na „New“.
10.
a
b
c
d
Snimanje makro naredbe
- Kliknite na „Start Recording“ i „OK“ u prikazanom prozoru za početak snimanja željene sekvence
tipkovnice.
- Postupci miša mogu se dodati pomoću izbornika na desnoj strani.
- Kliknite na „Stop Recording“ i „OK“ u prikazanom prozoru za završetak snimanja.
- Kliknite na „Save“ za spremanje postavki.
11.
a
b
c
d
e
Dodjela makro naredbe
- Kliknite na karticu „Basic Settings“.
- Kliknite na tipku kojoj želite promijeniti funkciju. Odaberite funkciju „Macro Key“.
- Odaberite makro naredbu s popisa.
- Odaberite kako se makro naredba treba izvršiti.
- Kliknite „OK“.
- Kliknite na „Apply“ Miš se ažurira.
Pritisnite i držite tipku DFM kako biste dobili pristup sekundarnoj programabilnoj funkciji za svaku tipku miša.
12.
a
b
c
d
Dodijelite DFM
- Kliknite na karticu „Basic Settings“.
- Kliknite na tipku koju želite zadati kao “DFM“ tipku.
- Kliknite na „Mode B“.
- Ponovite korak 3 za dodijeliti različitih funkcija za svaku tipku miša.
- Kliknite na „Apply“ Miš se ažurira.
Makro postavke
Double Function Mode (DFM)
Page 69

GXT 162 Illuminated Gaming Mouse - USER’S MANUAL
65
a
- Gumb 1 (privzeto = levi gumb miške)
b
- Gumb 2 (privzeto = desni gumb miške)
c
- Gumb 3 (privzeto = sredinski klik)
d
- Gumb 4 (privzeto = DPI +)
e
- Gumb 5 (privzeto = DPI -)
f
- Gumb 6 (privzeto = trojni klik)
g
- Gumb 7 (privzeto = naprej)
h
- Gumb 8 (privzeto = nazaj)
i
- Gumb 9 (privzeto = tipka Ctrl)
2. Namestitev
a
b
c
d
e
f
- Odprite spletni brskalnik in pojdite na www.trust.com/21186/driver.
- Kliknite na gumb „Download EXE” za prenos programske opreme.
- Kliknite na „Setup-GXT 162.exe” in sledite wizard za namestitev.
- Miško priključite na USB vrata vašega PC-ja.
- Kliknite na bližnjico „GXT 162.exe” za zagon programske opreme.
- Sedaj lahko pričnete s konfiguriranjem miške. V navodilih se bo sklicevalo na „Apply” za posodobitev
miške.
3.
a
b
c
Določite funkcijo
- Kliknite na zavihek „Basic Settings”.
- Kliknite na gumb, ki ga želite ponovno določiti.
- Kliknite na funkcijo, ki jo želite določiti.
- Kliknite na „Apply” Miška se posodablja.
1. Razporeditev gumbov
Programiranje gumbov
Vsaj en gumb mora biti konfiguriran kot „left mouse button”.
Page 70

GXT 162 Illuminated Gaming Mouse - USER’S MANUAL
66
Report rate & DPI settings
4.
a
Nastavitev stopnje poročanja
- Stopnjo poročanja spremenite tako, da kliknete na ustrezno vrstico.
- Kliknite na „Apply” Miška se posodablja.
5.
a
b
Nastavitev DPI
- Nastavitve DPI spremenite tako, da kliknete na ustrezno vrstico.
- Kliknite DPI številke za omogočanje ali onemogočanje teh nastavitev.
- Kliknite na „Apply” Miška se posodablja.
Nastavitve svetlobe
6.
a
b
c
Spremenite učinek RGB
- Spremenite svetlobni način.
- Spremenite stopnjo osvetlitve in hitrost dihanja.
- Izberite želeno barvo LED ali barvo po meri.
- Kliknite na „Apply” Miška se posodablja.
7.
a
b
c
Barva LED po meri
- Vedno preverite prvo barvno polje.
- Kliknite na barvo, ki jo želite spremeniti.
- Kliknite na želeno barvo po meri in nato na „OK”.
- Kliknite na „Apply” Miška se posodablja.
8.
a
b
Samobarvni LED DPI
- Kliknite na fazo DPI
- Kliknite na polja, da osvetlite ustrezne kazalnike na miški.
- Kliknite na „Apply” Miška se posodablja.
Page 71

GXT 162 Illuminated Gaming Mouse - USER’S MANUAL
67
9.
a
b
c
d
Ustvari makro (shranite zaporedje tipk v programsko opremo)
- Pojdite na zavihek „Advanced”.
- Vpišite ime novega makra.
- Vnesite, koliko krat je treba ponoviti makro („Loop Times”).
- Ustvarite nov makro s klikom na „New”.
10.
a
b
c
d
Posnemi makro
- Kliknite na „Start Recording” in „OK” na pojavnem zaslonu za začetek snemanja želenega zaporedja
tipkovnice.
- Dejanja miške se lahko dodajo, z uporabo menija na desni.
- Kliknite na „Stop Recording” in „OK” na pojavnem zaslonu, da ustavite snemanje.
- Kliknite na „Save”, da shranite makro.
11.
a
b
c
d
e
Določite makro
- Kliknite na zavihek „Basic Settings”.
- Kliknite na gumb, ki ga želite ponovno določiti. Izberite funkcijo „Macro Key”.
- Izberite makro s seznama.
- Izberite, kako naj se makro izvede.
- Kliknite na „OK” [„V REDU”].
- Kliknite na „Apply” Miška se posodablja.
Pritisnite in držite gumb DFM za dostop do sekundarne programabilne funkcije na vsakem gumbu miške.
12.
a
b
c
d
Določi DFM
- Kliknite na zavihek „Basic Settings”.
- Kliknite na gumb, ki ga želite ponovno določiti kot tipko „DFM”.
- Kliknite na „Mode B”.
- Ponovite 3. korak, da dodelite druge funkcije posameznim gumbom miške.
- Kliknite na „Apply” Miška se posodablja.
Nastavitve makrov
Double Function Mode (DFM)
Page 72

GXT 162 Illuminated Gaming Mouse - USER’S MANUAL
68
a
- Botão 1 (Padrão = botão esquerdo do mouse)
b
- Botão 2 (Padrão = botão direito do mouse)
c
- Botão 3 (Padrão = clique do meio)
d
- Botão 4 (Padrão = DPI +)
e
- Botão 5 (Padrão = DPI -)
f
- Botão 6 (Padrão = clique triplo)
g
- Botão 7 (Padrão = Avançar)
h
- Botão 8 (Padrão = Voltar)
i
- Botão 9 (Padrão = tecla Ctrl)
2. Instalação
a
b
c
d
e
f
- Abra o navegador da Internet e vá para www.trust.com/21186/driver.
- Clique no botão “Download EXE” para fazer o download do software.
- Clique em “Setup-GXT 162.exe” e siga o wizard de instalação.
- Conecte o mouse à porta USB do PC.
- Clique no atalho “GXT 162.exe” para inicializar o software.
- Agora você pode começar a configurar o mouse. No manual constará "Apply" para atualizar o mouse.
3.
a
b
c
Atribuir uma função
- Clique na guia "Basic Settings".
- Clique no botão que deseja reatribuir.
- Clique na função que deseja atribuir.
- Clique em "Apply" O mouse está sendo atualizado.
1. Layout dos botões
Programação do botão
Pelo menos um botão deve ser configurado como "left mouse button".
Page 73

GXT 162 Illuminated Gaming Mouse - USER’S MANUAL
69
Report rate & DPI settings
4.
a
Configuração de taxa de resposta
- Altere a Taxa de resposta clicando na respectiva barra.
- Clique em "Apply" O mouse está sendo atualizado.
5.
a
b
Configuração de DPI
- Altere as configurações de DPI clicando na respectiva barra.
- Clique no número do DPI para ativar ou desativar essa configuração.
- Clique em "Apply" O mouse está sendo atualizado.
Configurações de luz
6.
a
b
c
Alterar o Efeito RGB
- Altere o modo de iluminação.
- Altere o nível de brilho ou a velocidade de pulsação.
- Selecione a cor de LED desejada ou selecione uma cor personalizada.
- Clique em "Apply" O mouse está sendo atualizado.
7.
a
b
c
Personalizar a cor do LED
- Sempre verifique a primeira caixa de cores.
- Clique na cor que deseja alterar.
- Clique no botão desejado e clique em "OK".
- Clique em "Apply" O mouse está sendo atualizado.
8.
a
b
LED autocolorido DPI
- Clique na etapa DPI
- Clique nas caixas para iluminar os respectivos indicadores do mouse.
- Clique em "Apply" O mouse está sendo atualizado.
Page 74

GXT 162 Illuminated Gaming Mouse - USER’S MANUAL
70
9.
a
b
c
d
Criar uma Macro (Armazenar uma sequência de teclas no software)
- Vá até a guia "Advanced".
- Insira o nome da nova macro.
- Insira a quantidade de vezes que a macro deve repetir (loop times).
- Crie uma nova macro clicando em "New".
10.
a
b
c
d
Gravar uma macro
- Clique em "Start Recording" e "OK" na tela de pop-up para começar a gravar a sequência de teclado
preferencial.
- Ações do mouse podem ser adicionadas utilizando o menu à direita.
- Clique em "Stop Recording" e "OK" na tela de pop-up para interromper a gravação.
- Clique em "Save" para salvar a macro.
11.
a
b
c
d
e
Atribuir uma macro
- Clique na guia "Basic Settings".
- Clique no botão que deseja reatribuir. Escolha a função "Macro Key".
- Escolha a macro na lista.
- Escolha como a macro deve ser executada.
- Clique em "OK".
- Clique em "Apply" O mouse está sendo atualizado.
Pressione e segure o botão DFM para obter acesso a uma função programável secundária em cada botão de
mouse.
12.
a
b
c
d
Atribuir o DFM
- Clique na guia "Basic Settings".
- Clique no botão que deseja reatribuir como tecla "DFM".
- Clique em "Mode B".
- Repita a etapa 3 para atribuir diferentes funções em cada botão do mouse.
- Clique em "Apply" O mouse está sendo atualizado.
Configurações de Macro
Double Function Mode (DFM)
Page 75

GXT 162 Illuminated Gaming Mouse - USER’S MANUAL
71
a
- Кнопка 1 (за замовчуванням = ліва кнопка миші)
b
- Кнопка 2 (за замовчуванням = права кнопка миші)
c
- Кнопка 3 (за замовчуванням = клацнути середню кнопку миші)
d
- Кнопка 4 (за замовчуванням = DPI +)
e
- Кнопка 5 (за замовчуванням = DPI -)
f
- Кнопка 6 (за замовчуванням = потрійне клацання)
g
- Кнопка 7 (за замовчуванням = вперед)
h
- Кнопка 8 (за замовчуванням = назад)
i
- Кнопка 9 (за замовчуванням = клавіша Ctrl)
2. Інсталяція
a
b
c
d
e
f
- Відкрити браузер і перейти за посилання www.trust.com/21186/driver.
- Клацнути кнопку «Download EXE» для завантаження програмного забезпечення.
- Клацнути файл «Setup-GXT 162.exe» і дотримуватися вказівок wizard інсталяції.
- Підключити мишу до USB-порту ПК.
- Клацнути ярлик «GXT 162.exe» для запуску програмного забезпечення.
- Тепер можна розпочинати конфігурацію миші. У ручному режимі необхідно натиснути кнопку
«Apply» для оновлення програмного забезпечення миші.
3.
a
b
c
Призначення функції
- Клацнути вкладку «Basic Settings».
- Натиснути кнопку, яку необхідно повторно призначити.
- Клацнути функцію, яку необхідно призначити.
- Клацнути «Apply» Програмне забезпечення миші буде оновлено.
1. Розташування кнопок
Програмування кнопок
Принаймні одна з кнопок повинна бути налаштована як «left mouse button».
Page 76

GXT 162 Illuminated Gaming Mouse - USER’S MANUAL
72
Report rate & DPI settings
4.
a
Значення частоти опитування
- Змінити частоту опитування, клацнувши відповідну панель.
- Клацнути «Apply» Програмне забезпечення миші буде оновлено.
5.
a
b
Значення DPI
- Змінити значення DPI, клацнувши відповідну панель.
- Клацнути номер DPI, щоб увімкнути або вимкнути цей параметр.
- Клацнути «Apply» Програмне забезпечення миші буде оновлено.
Параметри підсвічування
6.
a
b
c
Зміна RGB-ефекту
- Змінити режим підсвічування.
- Змінити рівень яскравості або швидкість модуляції.
- Виберіть потрібний або оберіть власний колір світлодіода.
- Клацнути «Apply» Програмне забезпечення миші буде оновлено.
7.
a
b
c
Користувацький колір світлодіодного підсвічування
- Завжди позначайте перше кольорове поле.
- Клацніть колір, який необхідно змінити.
- Виберіть потрібний користувацький колір і клацніть «OK».
- Клацнути «Apply» Програмне забезпечення миші буде оновлено.
8.
a
b
Одноколірне світлодіодне підсвічування DPI
- Клацнути стадію DPI.
- Клацнути поля, щоб підсвітити відповідні індикатори на миші.
- Клацнути «Apply» Програмне забезпечення миші буде оновлено.
Page 77

GXT 162 Illuminated Gaming Mouse - USER’S MANUAL
73
9.
a
b
c
d
Створення макросу (збереження сполучення клавіш у програмному забезпеченні)
- Перейдіть на вкладку «Advanced».
- Введіть ім’я нового макросу.
- Вкажіть кількість повторів макросу («Loop Times»).
- Створити новий макрос, натиснувши кнопку «New».
10.
a
b
c
d
Запис макросу
- Клацнути «Start Recording» і «OK» на спливаючому екрані, щоб розпочати запис потрібного
сполучення клавіш.
- Миші можна додати інші дії за допомогою спеціального меню праворуч.
- Клацнути «Stop Recording» і «OK» на спливаючому екрані, щоб зупинити запис.
- Клацнути «Save» для збереження макросу.
11.
a
b
c
d
e
Призначення макросу
- Клацнути вкладку «Basic Settings».
- Натиснути кнопку, яку необхідно повторно призначити. Вибрати функцію «Macro Key».
- Обрати макрос зі списку.
- Вибрати, як буде виконано макрос.
- Клацнути «OK».
- Клацнути «Apply» Програмне забезпечення миші буде оновлено.
Натисніть та утримуйте кнопку DFM для отримання доступу до другої програмованої функції кожної
кнопки миші.
12.
a
b
c
d
Призначення DFM
- Клацнути вкладку «Basic Settings».
- Натиснути кнопку, яку необхідно призначити як клавішу «DFM».
- Клацнути «Mode B».
- Повторити крок 3 для призначення інших функцій кожній кнопці миші.
- Клацнути «Apply» Програмне забезпечення миші буде оновлено.
Параметри макросів
Double Function Mode (DFM)
 Loading...