

Page 1
Page 2
Installation
CLICK
RIGHT CLICK
MIDDLE BUTTON
FIRE KEY...
DPI+
DPI-
SIDE
CLICK
RIGHT CLICK
MIDDLE BUTTON
FORWARD
BACKWARD
SINGLE KEY
COMBO KEY
BASIC
ADVANCED
MEDIA
CLICK
RIGHT CLICK
MIDDLE BUTTON
FIRE KEY...
DPI+
DPI-
SIDE
CLICK
RIGHT CLICK
MIDDLE BUTTON
FORWARD
BACKWARD
SINGLE KEY
COMBO KEY
BASIC
ADVANCED
MEDIA
DPI3DPI2
DPI1
DPI1 DPI2
DPI3DPI2
DPI1
Button Programming DPI & Light Settings
1
a b c
2
a
3
a
2x
b
Your device is ready to use
Device driver software installed successfully.
2:13 PM
27/03/2015
Setup - Trust GXT 155 Gaming Mouse
Completing the Trust GXT 155 Gaming
Mouse Setup Wzard
Setup has finished installing Trust GXT 155 Gaming Mouse
on your computer. The application may be launched by
selecting the installed icons.
Click Finish to exit Setup.
Launch Trust GXT 155 Gaming Mouse
b
4
5
a
a
GENERAL
6
a
c
b
c
DPI+
7
a
L ALT
L CTRL
L SHIFT
b
FORWARD
BACKWARD
c
b
a
b
b
c
Page 3
Macro Settings Profile Settings
CLICK
RIGHT CLICK
MIDDLE BUTTON
FIRE KEY...
DPI+
DPI-
SIDE
1
6
2
3
5
4
New Delete
Left Button
Right Button
Middle Button
Mouse Action...
CLICK
RIGHT CLICK
MIDDLE BUTTON
FORWARD
BACKWARD
SINGLE KEY
COMBO KEY
BASIC
ADVANCED
MEDIA
MACRO
FIRE KEY...
DPI SWITCH
DPI +
DPI -
PROFILE SWITCH
MACRO MANAGER
MACRO #1 <Macro-1>
MACRO #1 <Macro-1>
Macro-1
Battlefield-4.pfd
League-of-Legends.pfd
World-of-Warcraft.pfd
Starcraft.pfd
Starcraft-2.pfd
Counter-Strike.pfd
Counter-Strike-GO.pfd
World-of-Warplanes.pfd
Guild-Wars-2.pfd
World-of Tanks.pfd
Call-of-Duty-Ghosts.pfd
COD-4.pfd
Open
pdf
12/5/2013 3:15 PM PFD File
12/5/2013 3:15 PM PFD File
12/5/2013 3:15 PM PFD File
12/5/2013 3:15 PM PFD File
12/5/2013 3:15 PM PFD File
12/5/2013 3:15 PM PFD File
12/5/2013 3:15 PM PFD File
12/5/2013 3:15 PM PFD File
12/5/2013 3:15 PM PFD File
12/5/2013 3:15 PM PFD File
12/5/2013 3:15 PM PFD File
12/5/2013 3:15 PM PFD File
8
a
9
a
10
b
b
a
c
b
c
11
a
b
a
Page 4

GXT 155 Gaming Mouse - USER’S MANUAL
T
ﺔ
Index
Language Page
English 2
Deutsch 5
Français 8
Italiano 11
Español 14
Português 17
Nederlands 20
Dansk 23
Suomi 26
Norsk 29
Svenska 32
Polski 35
Česky 38
Slovenčina 41
Magyar 44
Română 47
Български 50
Русский 53
Ελληνικά 56
Hrvatski 62
Slovenski 65
српски 68
Brasileiro 71
ürkçe 59
ﯾﺑرﻌﻟا
74
1
Page 5

GXT 155 Gaming Mouse - USER’S MANUAL
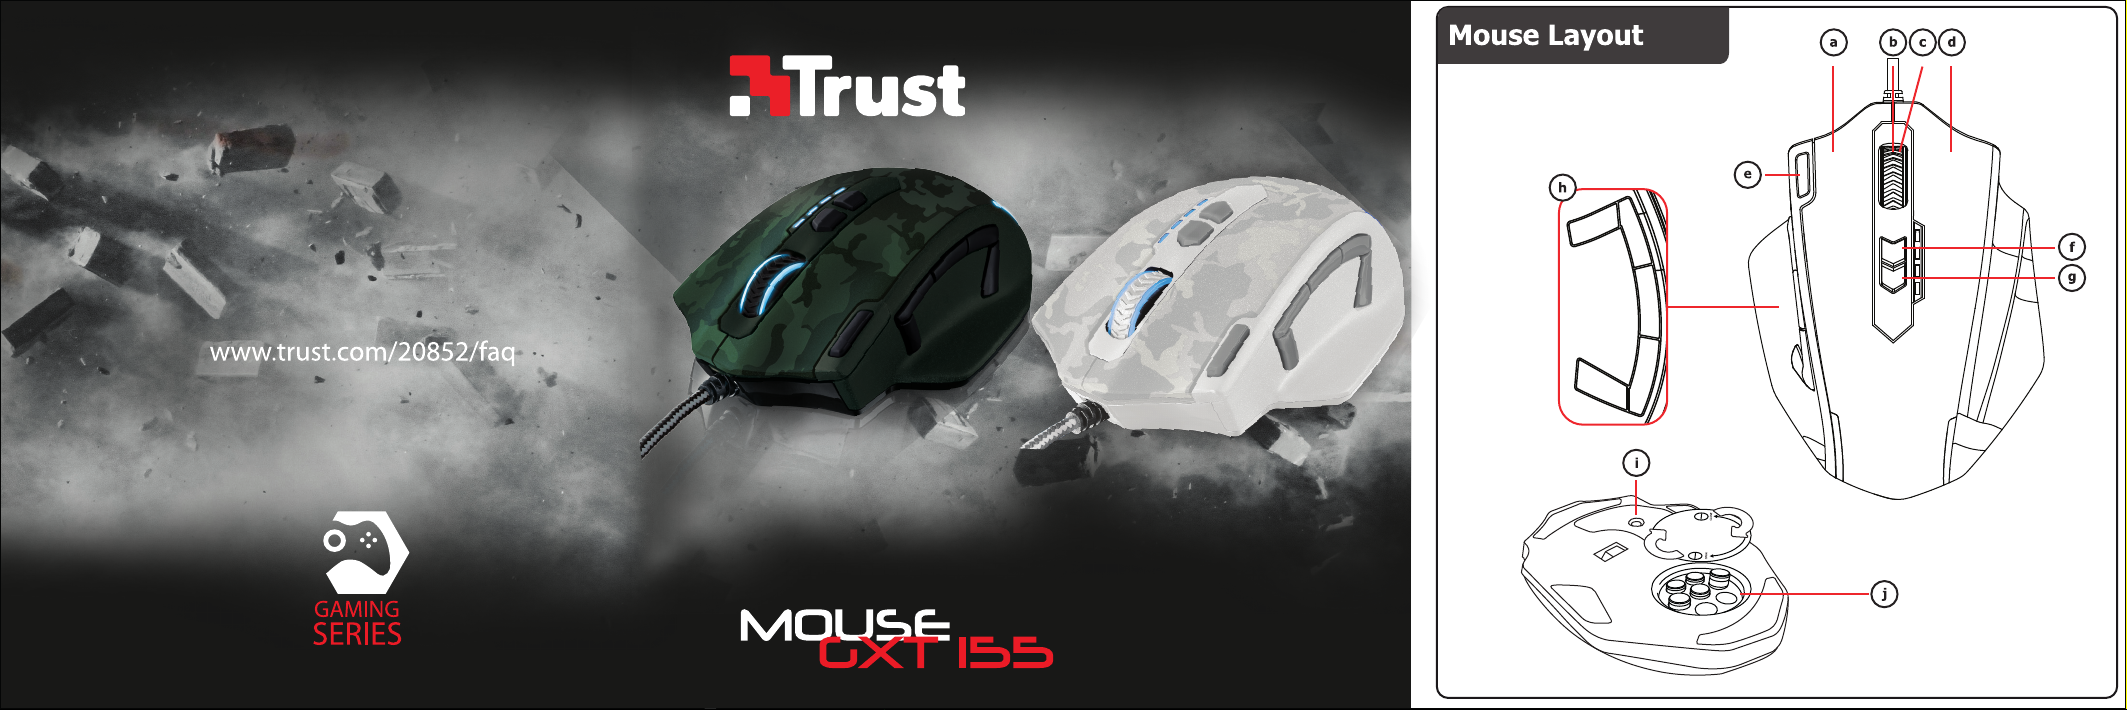
Mouse layout
- Button 1 (left mouse button)
a
- Button 3 (Scroll wheel)
b
- Scroll wheel LED (Profile indicator)
c
d
- Button 2 (default function = right mouse click)
e
- Button 4 (default function = triple mouse click)
f
- Button 5 (default function = DPI+)
g
- Button 6 (default function = DPI-)
h
- Side Buttons 7-11
i
- Profile switch (not programmable)
j
- Adjustable weights compartment
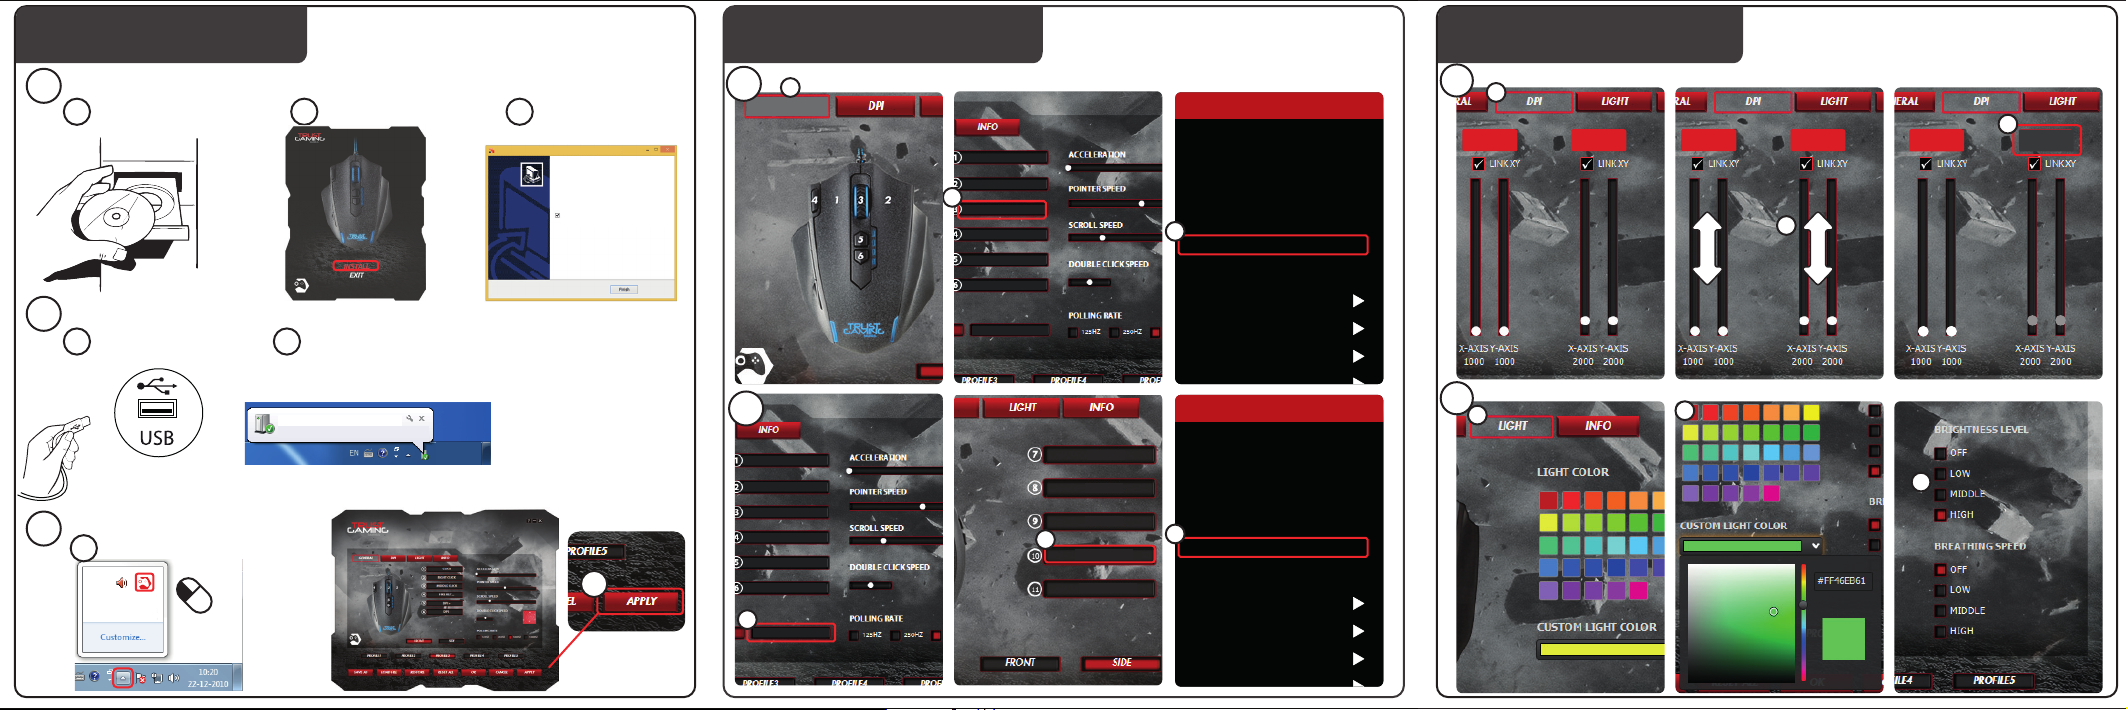
Installation
a - Insert the Trust CD-ROM into your CD drive.
- Click “Run Setup.exe – Published by Trust International BV”.
1.
b - Click “Install driver”.
c - Click ‘Finish’ when the installation is completed.
a - Connect the mouse to the USB port of the PC.
2.
b - Wait until the message ‘Your device is ready to use’ appears.
a - Start the mouse configuration software (located in the taskbar).
3.
b - You can now start to configure the mouse. In the manual will be referred to ‘Apply’ to update the
mouse.
The mouse can store 5 different profiles. You can instantly switch between these profiles by assigning the
profile switch function to one of the 11 buttons, or use the profile switch at the bottom of the mouse.
Yellow Profile 1
Green Profile 2
Blue Profile 3
Purple Profile 4
Red Profile 5
2
Page 6

GXT 155 Gaming Mouse - USER’S MANUAL
Button programming
4.
Assign a function.
a
- Click on the ‘General’ tab.
b
- Click on the button which you want to re-assign.
c
- Click on the function that you want to assign.
- Click on ‘Apply’ The mouse is beeing updated.
5.
Assign a function to the side buttons.
a
- In the ‘General’ tab click on ‘side’ to view the side buttons.
b
- Click on the button which you want to re-assign.
c
- Click on the function that you want to assign.
- Click on ‘Apply’ The mouse is beeing updated.
DPI Settings
6.
Change the DPI settings
a
- Click on ‘DPI’.
b
- Change the DPI settings by moving the sliders.
c
- Click the DPI number to enable or disable this setting.
- Click on ‘Apply’ The mouse is beeing updated.
To set the X and Y axis separately, Untick the ‘LINK XY’ box.
Light Manager Settings
7.
Change the LED light
a
- Click on ‘Light’.
b
- Select the desired LED color Or pick a custom color.
c
- Change the brightness level and breathing speed.
- Click on ‘Apply’ The mouse is beeing updated.
(profiles and DPI settings are linked)
3
Page 7

GXT 155 Gaming Mouse - USER’S MANUAL
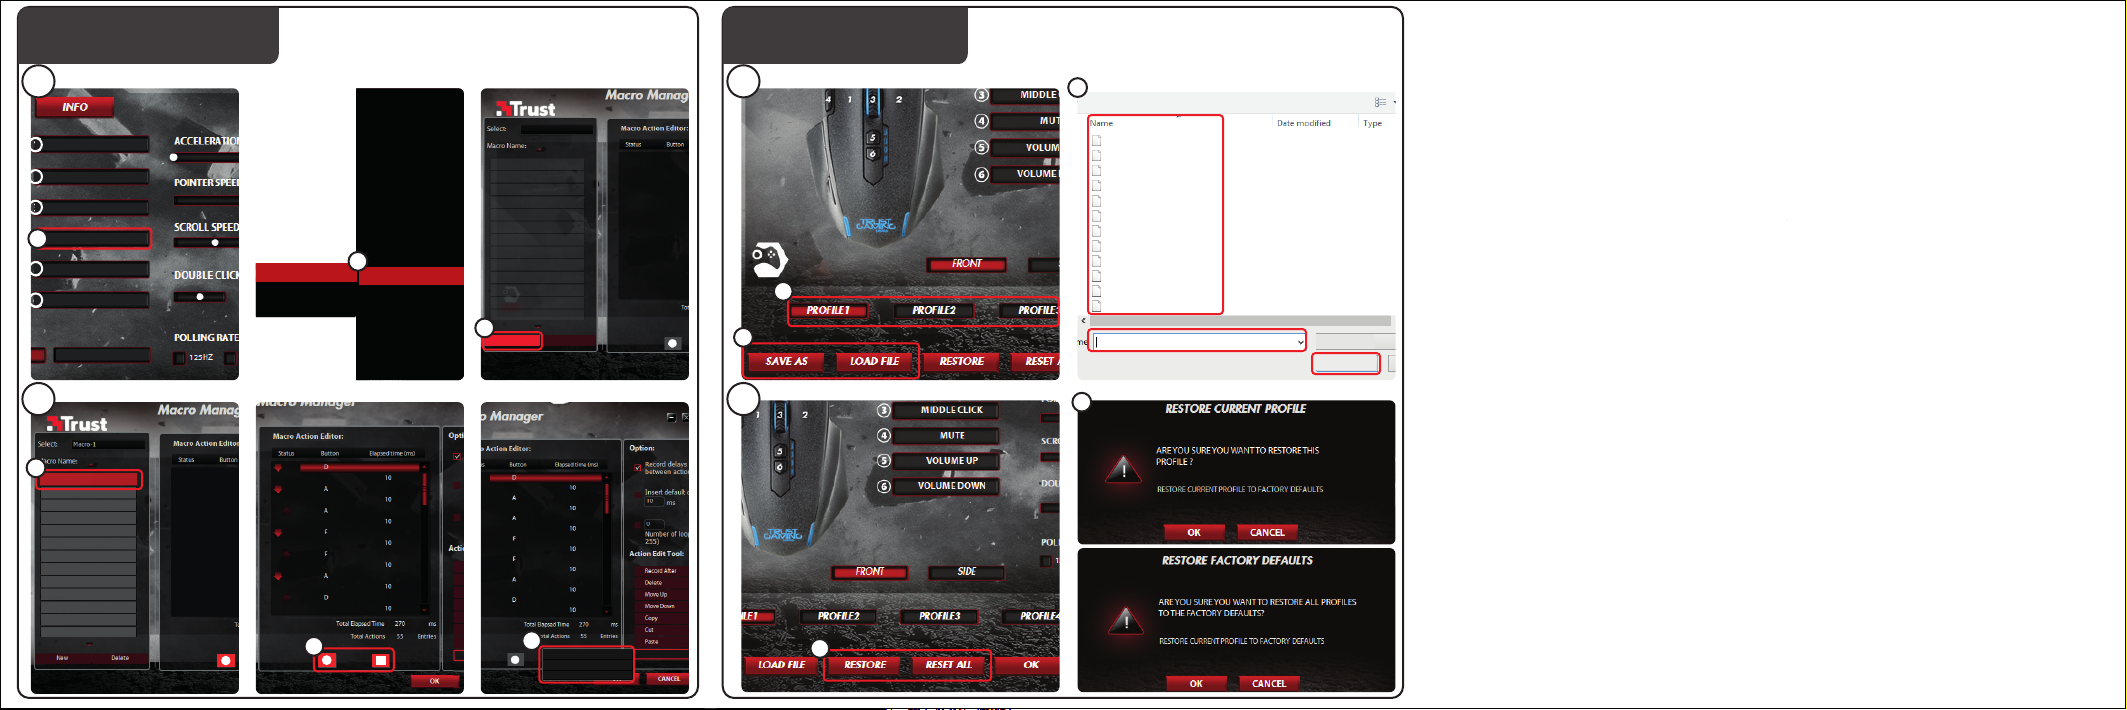
Macro Settings
8.
Create a macro.
- Go to the ‘General’ tab.
a
- Click on the b utton witch you want to re-assign.
b
- Hover over ‘Macro’.
- Click on ‘Macro Manager’.
c
- Create an new macro by clicking on ‘New’.
- Enter the name of the new macro.
- Click on ‘OK’.
9.
Record a macro.
a
- Select a created macro.
b
- Click on the record button to start recording the prefferd keyboard sequence.
- When you’re finished creating your macro. Click the stop button.
c
- Mouse actions can be added, by using the menu on the right. (after recording)
- Close the ‘macro manager’ when your done creating macros.
Assign a macro.
- To assign a macro follow steps 8 a/b and choose the prefered macro from the function list.
- Click on ‘Apply’ The mouse is beeing updated.
Profile Settings
10.
Select a profile
a
- Select one of the 5 profiles bij clicking on the preffered profile.
10.
Save or Load a custom setup
a
- Click on ‘Save as’ to save a setup or ‘Load File’ to load a setup.
b
- Enter a name for the mouse setup, or choose the prefered profile to load.
- Click on ‘Save/Open’
- Your mouse setup is now saved/loaded.
11.
Restore default settings
a
- Click on ‘Reset All’ to reset all profiles.
- Click on ‘Restore’ to restore 1 profile. (currently selected profile)
b
- Click on ‘OK’ to reset all settings.
- Click on ‘Apply’ The mouse is beeing updated.
Download game specific profiles from the Trust website http://www.trust.com/20411
(Store a sequence of keys in the software)
4
Page 8

GXT 155 Gaming Mouse - USER’S MANUAL
Bedienelemente der Maus
– Taste 1 (Linke Maustaste)
a
– Taste 3 (Scrollrad)
b
– Scrollrad-LED (Profile -Anzeige)
c
d
– Taste 2 (Standardfunktion = rechter Mausklick)
e
– Taste 4 (Standardfunktion = dreifacher Mausklick)
f
– Taste 5 (Standardfunktion = DPI+)
g
– Taste 6 (Standardfunktion = DPI-)
h
– Seitentasten 7-11
i
– Profilschalter (nicht programmierbar)
j
– Fach für veränderliche Gewichte
Installation
a – Legen Sie die Trust-CD in das CD-ROM-Laufwerk ein.
– Klicken Sie auf „Run Setup.exe – Published by Trust International BV“ [Setup.exe ausführen –
1.
2.
3.
Die Maus kann 5 verschiedene Profile speichern. Sie können schnell zwischen diesen Profilen wechseln, indem
Sie die Umschaltfunktion für die Profile einer der 11 Tasten zuweisen, oder indem Sie den Profilschalter an der
Unterseite der Maus verwenden.
Veröffentlicht von Trust International BV].
b – Klicken Sie auf „Install driver“ [Treiber installieren].
c – Klicken Sie auf „Finish“ [Fertig stellen], wenn die Installation abgeschlossen ist.
a – Schließen Sie die Maus an den USB-Anschluss des PCs an.
b – Warten Sie, bis die Meldung „Your device is ready to use“ [Das Gerät kann jetzt verwendet werden]
angezeigt wird.
a – Starten Sie die Konfigurationssoftware für die Maus (in der Taskleiste).
b – Sie können nun mit der Konfiguration der Maus beginnen. Die neuen Einstellungen werden mit
einem Klick auf „Apply“ gespeichert.
Gelb Profile 1
Grün Profile 2
Blau Profile 3
Violett Profile 4
Rot Profile 5
5
Page 9

GXT 155 Gaming Mouse - USER’S MANUAL
Tastenprogrammierung
4.
Zuweisen einer Funktion
a
– Klicken Sie auf die Registerkarte „General“.
b
– Klicken Sie auf die Taste, deren Belegung geändert werden soll.
c
– Klicken Sie auf die Funktion, die zugewiesen werden soll.
– Klicken Sie auf „Apply“ Die Einstellungen werden zur Maus übertragen.
5.
Zuweisen einer Funktion zu den Seitentasten.
a
– Klicken Sie auf der Registerkarte „General“ auf „Side“, um die Seitentasten anzuzeigen.
b
– Klicken Sie auf die Taste, deren Belegung geändert werden soll.
c
– Klicken Sie auf die Funktion, die zugewiesen werden soll.
– Klicken Sie auf „Apply“ Die Einstellungen werden zur Maus übertragen.
DPI-Einstellungen
6.
Ändern der DPI-Einstellungen
a
– Klicken Sie auf „DPI“.
b
– Ändern Sie die DPI-Einstellungen über die Schieberegler.
c
– Klicken Sie auf die DPI-Zahl, um die Einstellung zu aktivieren oder deaktivieren.
– Klicken Sie auf „Apply“ Die Einstellungen werden zur Maus übertragen.
Um die X- und Y-Achse getrennt einzustellen, entfernen Sie das Häkchen vom Kontrollkästchen „LINK XY“.
Einstellungen des Light Managers [Light Manager Settings]
7.
Ändern des LED-Lichts
a
– Klicken Sie auf „Light“.
b
– Wählen Sie die gewünschte LED-Farbe aus, oder wählen Sie eine benutzerdefinierte Farbe aus.
c
– Ändern Sie die Helligkeit und die Pulsier-Geschwindigkeit.
– Klicken Sie auf „Apply“ Die Einstellungen werden zur Maus übertragen.
(Profile und DPI-Einstellungen sind miteinander verknüpft)
6
Page 10

GXT 155 Gaming Mouse - USER’S MANUAL
Makro-Einstellungen
8.
Erstellen eines Makros
- Gehen Sie zur Registerkarte „General“.
a
– Klicken Sie auf die Taste, deren Belegung geändert werden soll.
b
– Halten Sie den Mauszeiger über „Macro“.
– Klicken Sie auf „Macro Manager“.
c
– Erstellen Sie ein neues Makro, indem Sie auf „New“ klicken.
– Geben Sie den Namen des neuen Makros an.
– Klicken Sie auf „OK“.
9.
Aufzeichnen eines Makros
a
– Wählen Sie ein erstelltes Makro aus.
b
– Klicken Sie auf die Aufnahme-Schaltfläche, um die Aufzeichnung der gewünschten Tastatureingaben
zu beginnen.
– Nachdem die Makro-Erstellung abgeschlossen ist: Klicken Sie auf die Stopp-Schaltfläche.
c
– Maus-Aktionen können mit dem Menü auf der rechten Seite (nach der Aufzeichnung) hinzugefügt
werden.
– Schließen Sie den „Macro Manager“, wenn Sie die Makrobearbeitung abgeschlossen haben.
Zuweisen eines Makros
– Folgen Sie zur Zuweisung eines Makros den Schritten 8 a/b, und wählen Sie das gewünschte Makro
aus der Liste der Funktionen aus.
– Klicken Sie auf „Apply“ Die Einstellungen werden zur Maus übertragen.
Profileinstellungen
10. a Auswählen eines Profils
– Wählen Sie eines der 5 Profile aus, indem Sie auf das gewünschte Profil klicken.
10.
Speichern oder Laden einer benutzerdefinierten Konfiguration
a
- Klicken Sie auf „Save as“, um eine Konfiguration zu speichern, bzw. auf „Load File“, um eine
Konfiguration zu laden.
b
– Geben Sie einen Namen für die Maus-Konfiguration ein bzw. wählen Sie das zu ladende Profil aus.
– Klicken Sie auf „Save/Open“.
– Die Maus-Konfiguration wird nun gespeichert bzw. geladen.
11.
Wiederherstellen der Standardeinstellungen
a
– Klicken Sie auf „Reset All“, um alle Profile zurückzusetzen.
– Klicken Sie auf „Restore“, um 1 Profil (das derzeit ausgewählte Profil) wiederherzustellen.
b
– Klicken Sie auf „OK“, um alle Einstellungen zurückzusetzen.
– Klicken Sie auf „Apply“ Die Einstellungen werden zur Maus übertragen.
Spezielle Profile für Games können von der Trust-Website http://www.trust.com/20411 heruntergeladen
werden.
(Speichern einer Tastenfolge in der Software)
7
Page 11

GXT 155 Gaming Mouse - USER’S MANUAL
Fonctions de la souris
- Bouton 1 (bouton gauche de la souris)
a
- Bouton 3 (molette de défilement)
b
- Molette de défilement LED (indicateur
c
profil)
d
- Bouton 2 (fonction par défaut = clic droit de la souris)
e
- Bouton 4 (fonction par défaut = triple clic de la souris)
f
- Bouton 5 (fonction par défaut = DPI+)
g
- Bouton 6 (fonction par défaut = DPI-)
h
- Boutons latéraux 7-11
i
- Bouton de profil (non programmable)
j
- Compartiment avec poids de réglage
Installation
a - Insérez le CD-ROM Trust dans votre lecteur de CD.
- Cliquez sur « Run Setup.exe – Published by Trust International BV. » [lancer Setup.exe]
1.
b - Cliquez sur « Install driver » [installer le pilote].
c - Cliquez sur « Finish » lorsque l'installation est terminée.
a - Connectez la souris au port USB de votre ordinateur.
2.
b - Attendez qu'apparaisse le message « Your device is ready to use » [Votre appareil est prêt à
l'utilisation].
a - Lancez le logiciel de configuration de la souris [situé dans la barre des tâches].
3.
b - Vous pouvez maintenant configurer la souris. Conformément au manuel, le bouton « Apply »
La souris peut sauvegarder jusqu'à 5 profils différents. Vous pouvez passer instantanément d'un profil à l'autre
en attribuant la fonction du bouton de profil à l'un des 11 boutons ou bien utiliser le bouton de profil situé sous
la souris.
[appliquer] permet de mettre à jour la souris.
jaune profil 1
vert profil 2
bleu profil 3
pourpre profil 4
rouge profil 5
8
Page 12

GXT 155 Gaming Mouse - USER’S MANUAL
Programmation des boutons
4.
Attribuer une fonction
a
- Cliquez sur l'onglet « General » [paramètres généraux].
b
- Cliquez sur le bouton que vous souhaitez réattribuer.
c
- Cliquez sur la fonction que vous souhaitez attribuer.
- Cliquez sur le bouton « Apply » [appliquer] La souris a été mise à jour.
5.
Attribuer une fonction aux boutons latéraux.
a
- Dans l'onglet « General » [paramètres généraux], cliquez sur « Side » [latéral] pour visualiser les
b
boutons latéraux.
- Cliquez sur le bouton que vous souhaitez réattribuer.
c
- Cliquez sur la fonction que vous souhaitez attribuer.
- Cliquez sur le bouton « Apply » [appliquer] La souris a été mise à jour.
Paramètres DPI
6.
Modifier les paramètres DPI
a
- Cliquez sur « DPI ».
b
- Modifiez les paramètres DPI en déplaçant le curseur.
c
- Cliquez sur le numéro DPI pour activer ou désactiver ce paramètre.
- Cliquez sur le bouton « Apply » [appliquer] La souris a été mise à jour.
Pour configurer les axes X et Y séparément, décochez la case « LINK XY » [lien XY].
Paramètres de luminosité [Light Manager Settings]
7.
Modifier la luminosité de la LED
a
- Cliquez sur « Light » [luminosité].
b
- Sélectionnez la couleur de la LED souhaitée ou choisissez une couleur personnalisée.
c
- Modifiez le degré de luminosité et la vitesse de clignotement.
- Cliquez sur le bouton « Apply » [appliquer] La souris a été mise à jour.
(les profils et les paramètres DPI sont associés)
9
Page 13
GXT 155 Gaming Mouse - USER’S MANUAL
Paramètres des macros
8.
Créer une macro.
- Allez dans l'onglet « General » [paramètres généraux].
a
- Cliquez sur le bouton que vous souhaitez réattribuer.
b
- Déplacez le curseur au-dessus de « Macro » [macro].
- Cliquez sur « Macro manager » [gestionnaire de macros].
c
- Créez une nouvelle macro en cliquant sur « New » [nouveau].
- Entrez le nom de la nouvelle macro.
- Cliquez sur « OK ».
9.
Enregistrer une macro.
a
- Sélectionnez une macro créée.
b
- Cliquez sur le bouton d'enregistrement pour lancer l'enregistrement de la séquence clavier souhaitée.
- Lorsque vous avez fini de créer votre macro, Cliquez sur le bouton « stop » [arrêt].
c
- Il est possible d'ajouter des actions sur la souris à l'aide du menu situé à droite (après
enregistrement).
- Refermez le « macro manager » [gestionnaire de macros] lorsque vous avez créé les macros.
Attribuer une macro.
- Pour attribuer une macro, suivez les étapes 8 a/b et choisissez la macro souhaitée dans la liste de
fonctions.
- Cliquez sur le bouton « Apply » [appliquer] La souris a été mise à jour.
Paramètres du profil
10. a Sélectionner un profil
- Sélectionnez l'un des 5 profils en cliquant sur le profil souhaité.
10.
Enregistrer ou charger une configuration personnalisée
a
- Cliquez sur « Save as » [enregistrer sous] pour enregistrer une configuration ou « Load File » [charger
fichier] pour charger une configuration.
b
- Entrez un nom pour la configuration de la souris ou choisissez le profil souhaité à charger.
- Cliquez sur « Save/Open » [enregistrer/ouvrir].
- Votre configuration est maintenant enregistrée/chargée.
11.
Restaurer les paramètres par défaut
a
- Cliquez sur « Reset All » [tout réinitialiser] pour réinitialiser tous les profils.
- Cliquez sur « Restore » [restaurer] pour restaurer un profil (profil actuellement sélectionné).
b
- Cliquez sur « OK » pour réinitialiser tous les paramètres.
- Cliquez sur le bouton « Apply » [appliquer] La souris a été mise à jour.
(enregistrer une séquence de touches dans le logiciel)
Téléchargez les profils de jeu spécifiques sur le site Internet Trust : http://www.trust.com/20411.
10
Page 14

GXT 155 Gaming Mouse - USER’S MANUAL
Struttura del mouse
- Pulsante 1 (pulsante sinistro del mouse)
a
- Pulsante 3 (rotella di scorrimento)
b
- LED rotella di scorrimento (indicatore
c
profili)
d
- Pulsante 2 (funzione predefinita = clic destro del mouse)
e
- Pulsante 4 (funzione predefinita = tre clic del mouse)
f
- Pulsante 5 (funzione predefinita = DPI+)
g
- Pulsante 6 (funzione predefinita = DPI-)
h
- Pulsanti laterali 7-11
i
- Pulsante di cambio profili (non programmabile)
j
- Vano pesi regolabili
Installazione
a - Inserire il CD-ROM di installazione fornito da Trust nell'unità CD-ROM.
- Fare clic su “Run Setup.exe – Published by Trust International BV” [Esegui Setup.exe - Autore Trust
1.
International BV].
b - Fare clic su “Install driver” [Installa driver].
c - Fare clic su ‘Finish’ [Fine] quando l'installazione è finita.
a - Collegare il mouse alla porta USB del PC.
2.
b - Attendere finché non appare il messaggio ‘Your device is ready to use’ [Dispositivo pronto per l'uso].
a - Avviare il software di configurazione del mouse (situato nella barra delle applicazioni).
3.
b - Ora è possibile iniziare a configurare il mouse. Il manuale usa comando ‘Apply’ (Applica) per
Il mouse può memorizzare fino a 5 diversi profili. È possibile passare immediatamente tra questi profili
assegnando la funzione di cambio profilo a uno dei 11 pulsanti oppure usare il pulsante di cambio profili situato
sul lato inferiore del mouse.
aggiornare il mouse.
Giallo profili 1
Verde profili 2
Blu profili 3
Violetto profili 4
Rosso profili 5
11
Page 15

GXT 155 Gaming Mouse - USER’S MANUAL
Programmazione dei pulsanti
4.
Assegnazione di una funzione.
a
- Fare clic sulla scheda ‘General’.
b
- Fare clic sul pulsante che si desidera riassegnare.
c
- Fare clic sulla funzione che si desidera assegnare.
- Fare clic su ‘Apply’ Il mouse viene aggiornato.
5.
Assegnazione di una funzione ai pulsanti laterali.
a
- Nella scheda ‘General’, fare clic su ‘Side’ per visualizzare i pulsanti laterali.
b
- Fare clic sul pulsante che si desidera riassegnare.
c
- Fare clic sulla funzione che si desidera assegnare.
- Fare clic su ‘Apply’ Il mouse viene aggiornato.
Impostazioni DPI
6.
Modifica delle impostazioni DPI
a
- Fare clic su ‘DPI’.
b
- Modificare le impostazioni DPI spostando i cursori.
c
- Fare clic sul numero DPI per attivare o disattivare questa impostazione.
- Fare clic su ‘Apply’ Il mouse viene aggiornato.
Per impostare l'asse X e Y separatamente, Deselezionare la casella ‘LINK XY’.
Impostazioni della luminosità (Light Manager Settings)
7.
Modifica della luce LED
a
- Fare clic su ‘Light’.
b
- Selezionare il colore desiderato per il LED oppure scegliere un colore personalizzato.
c
- Modificare il livello di luminosità e la velocità di lampeggio.
- Fare clic su ‘Apply’ Il mouse viene aggiornato.
(i profili e le impostazioni DPI vengono collegate)
12
Page 16
GXT 155 Gaming Mouse - USER’S MANUAL
Impostazione di macro
8.
Creazione di una macro.
- Andare alla scheda ‘General’ .
a
- Fare clic sul pulsante che si desidera riassegnare.
b
- Puntare su ‘Macro’.
- Fare clic su ‘Macro Manager’.
c
- Creare una nuova macro facendo clic su ‘New’.
- Immettere il nome della nome della nuova macro.
- Fare clic su ‘OK’.
9.
Registrazione di macro.
a
- Selezionare una macro creata.
b
- Fare clic sul pulsante di registrazione per iniziare a registrare la sequenza preferita da tastiera.
- Al termine della creazione della macro, Fare clic sul pulsante di arresto.
c
- È possibile aggiungere azioni del mouse tramite il menu a destra (dopo la registrazione).
- Chiudere il ‘macro manager’ al termine della creazione delle macro.
Assegnazione di una macro.
- Per assegnare una macro, seguire i punti 8 a/b e scegliere la macro preferita dall'elenco delle funzioni.
- Fare clic su ‘Apply’ Il mouse viene aggiornato.
Impostazioni dei profili
10. A Selezione di un profilo
- Selezionare uno dei 5 profili facendo cli su quello preferito.
10.
Salvataggio o caricamento di un'impostazione personalizzata
a
- Fare clic su ‘Save as’ per salvare un'impostazione o su ‘Load File’ per caricare un'impostazione.
b
- Inserire un nome per l'impostazione del mouse oppure scegliere il profilo preferito da caricare.
- Fare clic su ‘Save/Open’.
- Ora l'impostazione del mouse è salvata/caricata.
11.
Ripristino delle impostazioni di default
a
- Fare clic su ‘Reset All’ per reimpostare tutti i profili.
- Fare clic su ‘Restore’ per ripristinare 1 profilo (profilo attualmente selezionato).
b
- Fare clic su ‘OK’ per reimpostare tutte le impostazioni.
- Fare clic su ‘Apply’ Il mouse viene aggiornato.
(memorizzare una sequenza di tasti nel software)
Scaricare i profili specifici del gioco dal sito web Trust all'indirizzo http://www.trust.com/20411.
13
Page 17

GXT 155 Gaming Mouse - USER’S MANUAL
Distribución del ratón
- Botón 1 (botón izquierdo del ratón)
a
- Botón 3 (rueda de desplazamiento)
b
- LED de la rueda de desplazamiento
c
(indicador de perfil)
d
- Botón 2 (función predeterminada = clic derecho del ratón)
e
- Botón 4 (función predeterminada = triple clic del ratón)
f
- Botón 5 (función predeterminada = aumento de PPP)
g
- Botón 6 (función predeterminada = reducción de PPP)
h
- Botones laterales 7-11
i
- Cambio de perfil (no programable)
j
- Compartimiento para pesos ajustables
Instalación
a - Inserte el CD-ROM de Trust en la unidad de CD.
- Haga clic en “Run Setup.exe – Published by Trust International BV”.
1.
b - Haga clic en “Install driver” [Instalar controlador].
c - Haga clic en “Finish” [Finalizar] cuando concluya el proceso de instalación.
a- Conecte el ratón a uno de los puertos USB del ordenador.
2.
b - Espere hasta que aparezca el mensaje “Your device is ready to use” [El dispositivo está listo para
usarse].
a - Inicie el software de configuración del ratón (situado en la barra de tareas).
3.
b - Ahora podrá comenzar a configurar el ratón. En el manual se hará referencia a la función “Apply”
El ratón puede almacenar un máximo de cinco perfiles diferentes. Puede cambiar instantáneamente entre estos
perfiles mediante la asignación de la función de cambio de perfil a uno de los 11 botones, y también puede
utilizar el interruptor de cambio de perfil situado en la parte inferior del ratón.
[Aplicar] para actualizar el ratón.
Amarillo perfil 1
Verde perfil 2
Azul perfil 3
Morado perfil 4
Rojo perfil 5
14
Page 18

GXT 155 Gaming Mouse - USER’S MANUAL
Programación de botones
4.
Asignación de una función.
a
- Haga clic en la ficha “General” [General].
b
- Haga clic en el botón que desee reasignar.
c
- Haga clic en la función que desee asignar.
- Haga clic en “Apply” [Aplicar]. El ratón se está actualizando.
5.
Asignación de una función a los botones laterales.
a
- En la ficha “General” [General], haga clic en “Side” [Lateral] para ver los botones laterales.
b
- Haga clic en el botón que desee reasignar.
c
- Haga clic en la función que desee asignar.
- Haga clic en “Apply” [Aplicar]. El ratón se está actualizando.
Configuración de PPP
6.
Modificación de la configuración de PPP
a
- Haga clic en “DPI” [PPP].
b
- Cambie la configuración de PPP moviendo los controles deslizantes.
c
- Haga clic en el número de PPP para habilitar o deshabilitar este ajuste.
- Haga clic en “Apply” [Aplicar]. El ratón se está actualizando.
Para ajustar los ejes X e Y por separado, desmarque la casilla “LINK XY” [Vincular XY].
Configuración del administrador de iluminación [Light Manager Settings]
7.
Cambio de la luz LED
a
- Haga clic en “Light” [Luz].
b
- Seleccione el color que desee asignar a la iluminación LED, o elija un color personalizado.
c
- Cambie el nivel de brillo y la velocidad de cambio de intensidad luminosa.
- Haga clic en “Apply” [Aplicar]. El ratón se está actualizando.
(los perfiles y los valores de PPP están vinculados)
15
Page 19

GXT 155 Gaming Mouse - USER’S MANUAL
Configuración de macros
8.
Cree una macro
- Diríjase a la ficha “General” [General].
a
- Haga clic en el botón que desee reasignar.
b
- Coloque el cursor del ratón sobre “Macro” [Macro].
- Haga clic en “Macro manager” [Administrador de macros].
c
- Cree una macro nueva haciendo clic en “New” [Nueva].
- Escriba el nombre de la nueva macro.
- Haga clic en “OK” [Aceptar].
9.
Grabación de una macro.
a
- Seleccione una macro que haya creado.
b
- Haga clic en el botón “record” [Grabar] para iniciar el proceso de grabación de la secuencia de teclas
que desee.
- Cuando haya terminado de crear la macro, haga clic en el botón “stop” [Detener].
c
- Es posible añadir acciones del ratón utilizando el menú de la derecha (una vez finalizada la grabación).
- Cierre el “macro manager” [Administrador de macros] cuando haya terminado de crear macros.
Asignación de una macro.
- Si desea asignar una macro, siga los pasos 8 a/b y elija la macro que desee en la lista de funciones.
- Haga clic en “Apply” [Aplicar]. El ratón se está actualizando.
Configuración de perfil
10. a Seleccione un perfil
- Seleccione uno de los cinco perfiles haciendo clic en el perfil que desee.
Guardar o cargar una configuración personalizada
10.
- Haga clic en “Save as” [Guardar como] para guardar una configuración, o en “Load File” [Cargar
a
archivo] para cargar una configuración.
b
- Escriba el nombre de la configuración del ratón, o elija el perfil que desee cargar.
- Haga clic en “Save/Open” [Guardar/Abrir].
- La configuración del ratón se guardará o cargará.
11.
Restaurar configuración predeterminada
a
- Haga clic en “Reset All” [Restablecer todo] para restablecer todos los perfiles.
- Haga clic en “Restore” [Restaurar] para restaurar un perfil (el perfil actualmente seleccionado).
b
- Haga clic en “OK” [Aceptar] para restablecer toda la configuración.
- Haga clic en “Apply” [Aplicar]. El ratón se está actualizando.
Descargue perfiles específicos para juegos del sitio web de Trust http://www.trust.com/20411.
(guarde una secuencia de teclas en el software).
16
Page 20
GXT 155 Gaming Mouse - USER’S MANUAL
Esquema do rato
a
- Botão 1 (botão esquerdo do rato)
b
- Botão 3 (Roda de deslocação)
c
- Indicador LED da roda de deslocação
(Indicador de perfil)
- Botão 2 (função predefinida = clique como botão direito do rato)
d
- Botão 4 (função predefinida = triplo clique do rato)
e
- Botão 5 (função predefinida = DPI+)
f
- Botão 6 (função predefinida = DPI-)
g
- Botões laterais 7-11
h
- Comutador de perfil (não programável)
i
- Compartimento dos pesos ajustáveis
j
Instalação
a - Insira o CD-ROM Trust na unidade de CD.
- Clique em “Run Setup.exe – Published by Trust International BV” [“Executar Setup.exe – Published
1.
by Trust International BV”].
b - Clique em “Install driver” ["Instalar controlador"].
c - Clique em ‘Finish’ [‘Concluir’] quando a instalação estiver concluída.
a - Ligue o rato à porta USB do PC.
2.
b - Aguarde até surgir a mensagem ‘O dispositivo está pronto a ser utilizado’.
a - Inicie o software de configuração do rato (localizado na barra de tarefas).
3.
b - Pode agora iniciar a configuração do rato. No manual, será encaminhado para ‘Apply’ [‘Aplicar’], para
O rato pode guardar 5 perfis diferentes. Pode alternar instantaneamente entre os perfis atribuindo a função de
comutador de perfil a um dos 11 botões ou utilizando o comutador de perfil na parte inferior do rato.
atualizar o rato.
Amarelo perfil 1
Verde perfil 2
Azul perfil 3
Roxo perfil 4
Vermelho perfil 5
17
Page 21

GXT 155 Gaming Mouse - USER’S MANUAL
Programação de botões
4.
Atribuir uma função.
a
- Clique no separador ‘General’ [‘Geral’].
b
- Clique no botão a que pretende atribuir uma nova função.
c
- Clique na função que pretende atribuir.
- Clique em ‘Apply’ [‘Aplicar’] O rato está a atualizar.
5.
Atribuir uma função aos botões laterais.
a
- No separador ‘General’ [‘Geral’], clique em ‘Side’ [‘lateral’] para visualizar os botões laterais.
b
- Clique no botão a que pretende atribuir uma nova função.
c
- Clique na função que pretende atribuir.
- Clique em ‘Apply’ [‘Aplicar’] O rato está a atualizar.
Definições de DPI
6.
Alterar as definições de DPI
a
- Clique em ‘DPI’.
b
- Altere as definições de DPI deslocando os controlos de deslize.
c
- Clique no número de DPI para ativar ou desativar esta definição.
- Clique em ‘Apply’ [‘Aplicar’] O rato está a atualizar.
Para configurar os eixos X e Y em separado, desmarque a caixa ‘LINK XY’.
Definições do gestor de luz [Light Manager Settings]
7.
Alterar a luz dos LEDs
a
- Clique em ‘Light’ ['Luz'].
b
- Selecione a cor de LED pretendida Ou crie uma cor personalizada.
c
- Altere o nível de brilho e o tempo de intervalo.
- Clique em ‘Apply’ [‘Aplicar’] O rato está a atualizar.
(os perfis e as definições de DPI estão ligados entre si)
18
Page 22

GXT 155 Gaming Mouse - USER’S MANUAL
Definições de macros
8.
Criar uma macro.
- Vá ao separador ‘General’ ['Geral'].
a
- Clique no botão a que pretende atribuir uma nova macro.
b
- Faça pairar o cursor sobre ‘Macro’.
- Clique em ‘Macro Manager’ ['Gestor de macros'].
c
- Crie uma nova macro clicando em ‘New’ ['Nova'].
- Introduza o nome da nova macro.
- Clique em ‘OK’.
9.
Gravar uma macro.
a
- Selecione uma macro criada.
b
- Clique no botão de gravação para iniciar a gravação da sequência de teclas pretendida.
- Quando tiver concluído a criação da sua macro, clique no botão de paragem.
c
- Podem ser adicionadas ações do rato através do menu da direita (após a gravação).
- Feche o ‘macro manager’ ['gestor de macros'] quando tiver concluído a criação das macros.
Atribuir uma macro.
- Para atribuir uma macro, siga os passos 8 a/b e escolha a macro pretendida a partir da lista de
funções.
- Clique em ‘Apply’ [‘Aplicar’] O rato está a atualizar.
Definições de perfil
10. A Selecionar um perfil
- Selecione um dos 5 perfis clicando no perfil pretendido.
10.
Guardar ou carregar uma configuração personalizada
a
- Clique em ‘Save as’ ['Guardar como'] para guardar uma configuração ou em ‘Load File’ ['Carregar
ficheiro'] para carregar uma configuração.
b
- Introduza um nome para a configuração do rato ou escolha o perfil pretendido a carregar.
- Clique em ‘Save/Open’ ['Guardar/Abrir'].
- A sua configuração do rato já está guardada/carregada.
11.
Restaurar as predefinições
a
- Clique em ‘Reset All’ ['Repor todos'] para repor todos os perfis.
- Clique em ‘Restore’ ['Restaurar'] para restaurar um perfil (o perfil presentemente selecionado).
b
- Clique em ‘OK’ para repor todas as definições.
- Clique em ‘Apply’ [‘Aplicar’] O rato está a atualizar.
Descarregue perfis específicos para determinados jogos no website da Trust http://www.trust.com/20411.
(Guardar uma sequência de teclas no software)
19
Page 23

GXT 155 Gaming Mouse - USER’S MANUAL
Bedieningsknoppen
- Knop 1 (linkermuisknop)
a
- Knop 3 (scrollwiel)
b
- Scrollwiel LED (profiel-lampje)
c
d
- Knop 2 (standaardfunctie = rechtermuisknop)
e
- Knop 4 (standaardfunctie = drievoudige muisklik)
f
- Knop 5 (standaardfunctie = DPI+)
g
- Knop 6 (standaardfunctie = DPI-)
h
- Zijknoppen 7-11
i
- Profielschakelaar (niet programmeerbaar)
j
- Compartiment met gewichten
Installatie
a - Plaats de Trust cd-rom in het cd-station van uw computer.
- Klik op “Run Setup.exe – Published by Trust International BV” [Setup.exe uitvoeren].
1.
b - Klik op “Install driver” [Stuurprogramma installeren].
c - Klik op 'Finish' [Voltooien] als de installatie is voltooid.
a - Sluit de muis aan op de USB-poort van de pc.
2.
b - Wacht totdat het bericht ‘Your device is ready to use' [Uw apparaat is klaar voor gebruik] verschijnt.
a - Start de configuratiesoftware van de muis (in de taakbalk).
3.
b - U kunt nu beginnen met het configureren van de muis. In de handleiding wordt verwezen naar
In de muis kunnen 5 verschillende profielen worden opgeslagen. U kunt direct schakelen tussen deze profielen
door de profielschakelaar aan één van de 11 knoppen toe te wijzen of de profielschakelaar aan de onderkant
van de muis te gebruiken.
'Apply' [Toepassen] om de muis bij te werken.
Geel profiel 1
Groen profiel 2
Blauw profiel 3
Paars profiel 4
Rood profiel 5
20
Page 24

GXT 155 Gaming Mouse - USER’S MANUAL
Knoppen programmeren
4.
Een functie toewijzen
a
- Klik op het tabblad ‘General’.
b
- Klik op de knop waaraan u een nieuwe functie wilt toewijzen.
c
- Klik op de functie die u wilt toewijzen.
- Klik op ‘Apply’ De muis wordt bijgewerkt.
5.
Een functie toewijzen aan de knoppen aan de zijkant.
a
- Klik in het tabblad ‘General’ [Algemeen] op ‘Side’ [zijkant] voor weergave van de zijknoppen.
b
- Klik op de knop waaraan u een nieuwe functie wilt toewijzen.
c
- Klik op de functie die u wilt toewijzen.
- Klik op ‘Apply’ De muis wordt bijgewerkt.
DPI-instellingen
6.
De DPI-instellingen wijzigen
a
- Klik op ‘DPI’.
b
- Wijzig de DPI-instellingen door het verplaatsen van de schuifregelaars.
c
- Klik op het DPI-nummer om deze instelling in of uit te schakelen.
- Klik op ‘Apply’ De muis wordt bijgewerkt.
Om de X- en Y-as afzonderlijk in te stellen, dient u het vakje ‘LINK XY’ te deactiveren.
Instellingen Lichtmanager [Light Manager Settings]
7.
De LED-verlichting wijzigen
a
- Klik op ‘Light’.
b
- Selecteer de gewenste LED-kleur of kies een aangepaste kleur.
c
- Wijzig de helderheid en knippersnelheid.
- Klik op ‘Apply’ De muis wordt bijgewerkt.
(profielen en DPI-instellingen zijn gekoppeld)
21
Page 25

GXT 155 Gaming Mouse - USER’S MANUAL
Instellingen voor macro's
8.
Een macro aanmaken.
- Ga naar het tabblad ‘General’ .
a
- Klik op de knop waaraan u een nieuwe functie wilt toewijzen.
b
- Ga met de muisaanwijzer over ‘Macro’.
- Klik op ‘Macro Manager’.
c
- Maak een nieuwe macro door te klikken op ‘New’.
- Voer de naam van de nieuwe macro in.
- Klik op ‘OK’.
9.
Een macro opnemen.
a
- Selecteer een aangemaakte macro.
b
- Klik op de opnameknop om te beginnen met het opnemen van de gewenste toetsenbordreeks.
- Wanneer u klaar bent met het maken van uw macro, klikt u op de stop-knop.
c
- Muisacties kunnen worden toegevoegd via het menu aan de rechterkant (na het opnemen).
- Sluit de ‘Macro Manager’ wanneer u klaar bent met het maken van macro's.
Een macro toewijzen.
- Om een macro toe te wijzen, volg stap 8 a/b en kies de gewenste macro in de functielijst.
- Klik op ‘Apply’ De muis wordt bijgewerkt.
Profielinstellingen
10. a Een profiel selecteren
- Selecteer een van de 5 profielen door te klikken op het gewenste profiel.
10.
Aangepaste instellingen opslaan of laden
a
- Klik op ‘Save as’ om instellingen op te slaan of op ‘Load File’ om instellingen te laden.
b
- Voer een naam in voor de muisinstellingen of kies het gewenste profiel om te laden.
- Klik op ‘Save/Open’.
- Uw muisinstellingen worden nu opgeslagen/geladen.
11.
Standaardinstellingen herstellen
a
- Klik op ‘Reset All’ om alle profielen te resetten.
- Klik op ‘Restore’ om 1 profiel (huidige profiel) te herstellen.
b
- Klik op ‘OK’ om alle instellingen te resetten.
- Klik op ‘Apply’ De muis wordt bijgewerkt.
(Een reeks toetsen in de software opslaan)
Download spelspecifieke profielen op de Trust-website http://www.trust.com/20411.
22
Page 26

GXT 155 Gaming Mouse - USER’S MANUAL
Muselayout
- Knap 1 (venstre museknap)
a
- Knap 3 (rullehjul)
b
- Rullehjul-LED (profil -indikator)
c
d
- Knap 2 (standardfunktion = højre museklik)
e
- Knap 4 (standardfunktion = tredobbelt museklik)
f
- Knap 5 (standardfunktion = DPI+)
g
- Knap 6 (standardfunktion = DPI-)
h
- Sideknapper 7-11
i
- Profilskift (kan ikke programmeres)
j
- Justerbart vægtrum
Installation
a - Indsæt Trust-cd-rom'en i cd-drevet.
- Klik på “Run Setup.exe – Published by Trust International BV” [Kør Setup.exe - Udgivet af Trust
1.
2.
3.
Musen kan gemme 5 forskellige profiler. Du kan øjeblikkeligt skifte mellem profilerne ved at tildele
profilskiftefunktionen til en af de 11 knapper eller bruge profilskiftet i bunden af musen.
International BV].
b - Klik på “Install driver” [Installer driver].
c - Klik på ‘Finish’ [Udfør], når installationen er afsluttet.
a - Slut musen til pc'ens USB-port.
b - Vent, indtil meddelelsen ‘Your device is ready to use’ [Enheden er klar til brug] vises.
a - Start musekonfigurationssoftwaren (findes i proceslinjen).
b - Du kan nu starte konfigurationen af musen. I vedledningen vil der blive henvist til ‘Apply’ [Anvend]
for at opdatere musen.
Gul profil 1
Grøn profil 2
Blå profil 3
Lilla profil 4
Blinker profil 5
23
Page 27

GXT 155 Gaming Mouse - USER’S MANUAL
Æ
Knapprogrammering
4.
Tildeling af en funktion.
a
- Klik på fanen ‘General’ [Generelt].
b
- Klik på knappen, som du vil gentildele.
c
- Klik på funktionen, som du vil tildele.
- Klik på ‘Apply’ [Anvend]. Musen vil blive opdateret.
5.
Tildeling af en funktion til sideknapperne.
a
- I fanen ‘General’ [Generelt] skal du klikke på ‘Side’ [Side] for at vise sideknapperne.
b
- Klik på knappen, som du vil gentildele.
c
- Klik på funktionen, som du vil tildele.
- Klik på ‘Apply’ [Anvend]. Musen vil blive opdateret.
DPI-indstillinger
6.
Skift af DPI-indstillinger
a
- Klik på ‘DPI’.
b
- Ændre DPI-indstillingerne ved at bevæge skyderne.
c
- Klik på DPI-nummeret for at aktivere eller deaktivere indstillingen.
- Klik på ‘Apply’ [Anvend]. Musen vil blive opdateret.
Sådan indstilles X- og Y-aksen separat. Fjern markeringen i feltet ‘LINK XY’.
Indstillinger af Light Manager
7.
ndring af LED-lys
a
- Klik på ‘Light’ [Lys].
b
- Vælg den ønskede LED-farve, eller vælg en brugerdefineret farve.
c
- Ændring af lysstyrkeniveau og udluftningshastighed.
- Klik på ‘Apply’ [Anvend]. Musen vil blive opdateret.
(profiler og DPI-indstillinger forbindes)
24
Page 28

GXT 155 Gaming Mouse - USER’S MANUAL
V
Makroindstillinger
8.
Oprettelse af en makro.
- Gå til fanen ‘General’ [Generelt].
A
- Klik på knappen, som du vil gentilknytte.
B
- Glid hen over ‘Macro’ [Makro].
- Klik på ‘Macro Manager’.
C
- Opret en ny makro ved at klikke på ‘New’ [Ny].
- Indtast et navn på den nye makro.
- Klik på ‘OK’.
9.
Optagelse af en makro.
a
- Vælg en oprettet makro.
b
- Klik på optageknappen for at starte optagelsen af den foretrukne tastatursekvens.
- Når du er færdig med at oprette makroen: Klik på stopknappen.
c
- Musehandlinger kan tilføjes ved at bruge menuen til højre (efter optagelse).
- Luk ‘Macro Manager’, når du er færdig med at oprette makroer.
Tildeling af en makro.
- Når du vil tildele en makro, skal du følge trin 8 a/b og vælge den foretrukne makro fra funktionslisten.
- Klik på ‘Apply’ [Anvend]. Musen vil blive opdateret.
Profilindstillinger
10.
alg af profil
a
- Vælg en af de 5 ved at klikke på den foretrukne profil.
Lagring eller indlæsning af en brugerdefineret konfiguration
10.
- Klik på ‘Save as’ [Gem som] for at gemme en konfiguration, eller på ‘Load File’ [Indlæs fil] for at
a
indlæse en konfiguration.
b
- Indtast navnet på musekonfigurationen, eller vælg den foretrukne profil, der skal indlæses.
- Klik på ‘Save/Open’ [Gem/Åbn].
- Musekonfigurationen er nu gemt/indlæst.
11.
Gendannelse af standardindstillinger
a
- Klik på ‘Reset All’ [Nulstil alle] for at nulstille alle profiler.
- Klik på ‘Restore’ [Gendan] for at gendanne 1 profil (aktuelt valgt profil).
b
- Klik på ‘OK’ [OK] for at nulstille alle indstillinger.
- Klik på ‘Apply’ [Anvend]. Musen vil blive opdateret.
(Lagring af en række tastesekvenser i softwaren)
Hent spilspecifikke profiler fra Trusts websted http://www.trust.com/20411.
25
Page 29

GXT 155 Gaming Mouse - USER’S MANUAL
Hiiren painikkeet
- Painike 1 (vasen hiiren painike)
a
- Painike 3 (selauspyörä)
b
- Selauspyörä LED (profiilin -merkkivalo)
c
d
- Painike 2 (oletustoiminto = hiiren oikean painikkeen napsautus)
e
- Painike 4 (oletustoiminto = hiiren painikkeen kolmoisnapsautus)
f
- Painike 5 (oletustoiminto = DPI+)
g
- Painike 6 (oletustoiminto = DPI-)
h
- Sivupainikkeet 7-11
i
- Profilikytkin (ei ohjelmoitavissa)
j
- Säädettävien painojen osio
Asennus
a - Laita Trust CD-ROM -levy CD-asemaan.
- Napsauta “Run Setup.exe – Published by Trust International BV” [Suorita Setup.exe – Published by
1.
Trust International BV].
b - Napsauta "Install driver" [Asenna ohjain].
c - Napsauta ‘Finish’ [Lopeta], kun asennus on suoritettu loppuun.
a - Liitä hiiri tietokoneen USB-porttiin.
2.
b - Odota kunnes viesti ‘Your device is ready to use’ [Laite on valmis käytettäväksi] tulee näkyviin.
a - Käynnistä hiiren konfigurointiohjelma (tehtäväpalkissa).
3.
b - Nyt voit aloittaa hiiren määrittämisen. Ohjekirjassa hiiren päivittämiseen viittaa ‘Apply’ [Käytä].
Hiiri voi tallentaa 5 eri profiilia. Voit siirtyä välittömästi profiilista toiseen määrittämällä profiilin
kytkentätoiminnon johonkin 11 painikkeesta tai käyttämällä hiiren alaosassa olevaa profiilikytkintä.
Keltainen profiilin 1
Vihreä profiilin 2
Sininen profiilin 3
Purppura profiilin 4
Punainen profiilin 5
26
Page 30

GXT 155 Gaming Mouse - USER’S MANUAL
Painikkeen ohjelmoiminen
4.
Toiminnon asettaminen.
a
- Napsauta ‘General’ [Yleiset] -välilehteä.
b
- Napsauta painiketta, johon haluat asettaa toiminnon.
c
- Napsauta toimintoa, jonka haluat asettaa.
- Napsauta ‘Apply’ [Käytä] Hiiri päivitetään.
5.
Toiminnon määrittäminen sivupainikkeisiin.
a
- Napsauta ‘General’ [Yleiset] -välilehdessä ‘Side’ [Sivu] sivupainikkeiden näkemiseksi.
b
- Napsauta painiketta, johon haluat asettaa toiminnon.
c
- Napsauta toimintoa, jonka haluat asettaa.
- Napsauta ‘Apply’ [Käytä] Hiiri päivitetään.
DPI-asetukset
6.
DPI-asetuksien muuttaminen
a
- Napsauta ‘DPI’.
b
- Muuta DPI-asetuksia liukukytkimiä säätämällä.
c
- Napsauta DPI-numeroa asetuksen ottamiseksi käyttöön tai sen poistamiseksi käytöstä.
- Napsauta ‘Apply’ [Käytä] Hiiri päivitetään.
Aseta X- ja Y-akselit erikseen, Poista rasti ‘LINK XY’ [YHDISTÄ XY] -ruudusta.
Valoasetukset [w Settings]
7.
LED-valon muuttaminen
a
- Napsauta ‘Light’ [Valo].
b
- Valitse haluamasi LED-väri tai mukautettu väri.
c
- Säädä kirkkaustasoa ja hengitysnopeutta.
- Napsauta ‘Apply’ [Käytä] Hiiri päivitetään.
(profiilit ja DPI-asetukset on yhdistetty)
27
Page 31

GXT 155 Gaming Mouse - USER’S MANUAL
Makroasetukset
8.
Makron luominen.
- Siirry ‘General’ [Yleiset] -välilehteen.
a
- Valitse painike, johon haluat asettaa toiminnon.
b
- Siirrä hiiri valintaan ‘Macro’ [Makro].
- Napsauta ‘Macro Manager’.
c
- Luo uusi makro napsauttamalla ‘New’ [Uusi].
- Syötä uuden makron nimi.
- Napsauta ‘OK’.
9.
Makron tallentaminen.
a
- Valitse luotu makro.
b
- Napsauta tallennuspainiketta näppäinsarjan tallentamisen aloittamiseksi.
- Kun olet luonut makron. Napsauta pysäytyspainiketta.
c
- Hiiren toimintoja voidaan lisätä oikealla olevaa valikkoa käyttäen (tallentamisen jälkeen).
- Sulje ‘macro manager’ -toiminto, kun makrot on luotu.
Makron asettaminen.
- Voit asettaa makron noudattamalla vaiheita 8 a/b ja valitsemalla haluamasi makron toimintoluettelosta.
- Napsauta ‘Apply’ [Käytä] Hiiri päivitetään.
Profiiliasetukset
10. a Profiilin valitseminen
- Valitse haluamasi 5 profiilista napsauttamalla sitä.
Oman asetuksen tallentaminen ja lataaminen
10.
- Napsauta ‘Save as’ [Tallenna nimellä] asetuksen tallentamiseksi tai ‘Load File’ [Lataa tiedosto]
a
asetuksen lataamiseksi.
b
- Syötä nimi hiiren asetukselle tai valitse haluamasi profiili latausta varten.
- Napsauta ‘Save/Open’[Tallenna/Avaa].
- Hiiren asetus tallentuu/ladataan.
11.
Oletusasetuksien palauttaminen
a
- Napsauta ‘Reset All’ [Palauta kaikki] kaikkien profiilien asetuksien palauttamiseksi.
- Napsauta ‘Restore’ [Palauta] 1 profiilin asetuksien palauttamiseksi (sillä hetkellä valittu profiili).
b
- Napsauta ‘OK’ kaikkien asetuksien palauttamiseksi.
- Napsauta ‘Apply’ [Käytä] Hiiri päivitetään.
(Näppäinsarjojen tallentaminen ohjelmistoon)
Lataa pelikohtaiset profiilit Trust-verkkosivustolta osoitteesta http://www.trust.com/20411.
28
Page 32

GXT 155 Gaming Mouse - USER’S MANUAL
Oppsett for mus
- Knapp 1 (venstre museknapp)
a
- Knapp 3 (skrollehjul)
b
- Skrollehjul LED (profil -indikator)
c
d
- Knapp 2 (standardfunksjon = høyre museklikk)
e
- Knapp 4 (standardfunksjon = trippelt museklikk)
f
- Knapp fem (standardfunksjon = DPI+)
g
- Knapp 6 (standardfunksjon = DPI-)
h
- Sideknapper 7-11
i
- Profilbryter (kan ikke programmeres)
J
- Justerbart vektrom
Installasjon
a – Sett Trust CD-rom inn i CD-driveren.
– Klikk på “Run Setup.exe – Published by Trust International BV”.
1.
b – klikk på “Install driver” (installer driver).
c – Klikk på ‘Finish’ (Fullfør) når installasjonen er fullført.
a – Koble musen til USB-porten på pc-en.
2.
b – Vent til du ser meldingen ‘Your device is ready to use’ (Enheten er klar til bruk).
a – Start musekonfigurasjonsprogramvaren (på oppgavelinjen).
3.
b – Nå kan du begynne å konfigurere musen. I bruksanvisningen vil det bli referert til 'Apply' (Bruk) for
Musen kan lagre 5 ulike profiler. Du kan kjapt bytte mellom disse profilene ved å tilordne profilbyttefunksjonen
til en av de 11 knappene eller bruke profilbyttebryteren på undersiden av musen.
å oppdatere mus.
Gul profil 1
Grønn profil 2
Blå profil 3
Lilla profil 4
Rød profil 5
29
Page 33

GXT 155 Gaming Mouse - USER’S MANUAL
Programmering av knapper
4.
Tilordne en funksjon.
a
- Klikk på fanen ‘General’.
b
- Klikk på den knappen som du ønsker å tilordne på nytt.
c
- Klikk på den funksjonen du ønsker å tilordne.
- Klikk på ‘Apply’ Musen oppdateres.
5.
Tilordne en funksjon til sideknappene.
a
- I fanen ‘General’ (generelt), klikker du på ‘Side’ for å se sideknappene.
b
- Klikk på den knappen som du ønsker å tilordne på nytt.
c
- Klikk på den funksjonen du ønsker å tilordne.
- Klikk på ‘Apply’ Musen oppdateres.
DPI-innstillinger
6.
Endre DPI-innstillinger
a
- Klikk på ‘DPI’.
b
- Endre DPI-innstillingene ved å bevege glidebryterne.
c
- Klikk på DPI-nummeret for å aktivere eller deaktivere denne innstillingen.
- Klikk på ‘Apply’ Musen oppdateres.
For å stille inn X- og Y-aksen separat, fjern avmerkingen i ‘LINK XY’-ruten
Stille inn lys (Light Manager Settings)
7.
Endre LED-lys
a
- Klikk på ‘Light’.
b
- Velg ønsket LED-farge, eller velg en standardfarge.
c
- Endre lysstyrke og pustehastighet.
- Klikk på ‘Apply’ Musen oppdateres.
(profiler og DPI-innstillinger er lenket)
30
Page 34

GXT 155 Gaming Mouse - USER’S MANUAL
V
Makroinnstillinger
8.
Opprette en makro.
- Gå til fanen ‘General’
a
- Klikk på den knappen som du ønsker å tilordne på nytt.
b
- Hold pekeren over ‘Macro’.
- Klikk på ‘Macro Manager’.
c
- Opprett en ny makro ved å klikke på ‘New’.
- Angi navnet på den nye makroen.
- Klikk på ‘OK’.
9.
Spill inn en makro.
a
- Velt en opprettet makro.
b
- Klikk på registreringsknappen for å starte registrering av ønsket tastatursekvens.
- Når du ferdig med å opprette en makro: Klikk på stoppknappen.
c
- Du kan legge til musbevegelser ved å bruke menyen til høyre (etter registrering).
- Lukk 'macro manager’ (makrobehandler) når du er ferdig med å opprette makroer.
Tilordne en makro.
- For å tilordne en makro, følger du trinn 8 a/b og velger den ønskede makroen fra funksjonslisten.
- Klikk på ‘Apply’ Musen oppdateres.
Profilinnstillinger
10.
elge profil
a
- Velg en av de 5 profilene ved å klikke på ønsket profil.
10.
Lagre eller laste egendefinert oppsett
a
- Klikk på ‘Save as’ for å lagre et oppsett eller ‘Load File’ for å laste et oppsett.
b
- Angi navnet for museoppsettet, eller velg ønsket profil som skal lastes.
- Klikk på ‘Save/Open’.
- Museoppsettet er nå lagret/lastet.
11.
Gjenopprette standardinnstillinger
a
- Klikk på ‘Reset All’ for å tilbakestille alle profiler.
- Klikk på ‘Restore’ for å gjenopprette 1 profil (den profilen som er valgt).
b
- Klikk på ‘OK’ for å tilbakestille alle innstillinger.
- Klikk på ‘Apply’ Musen oppdateres.
(Lagre en tastesekvens i programvaren)
Du kan laste ned spillspesifikke profiler fra Trust nettside http://www.trust.com/20411.
31
Page 35

GXT 155 Gaming Mouse - USER’S MANUAL
Mus-layout
- Knapp 1 (vänster musknapp)
a
- Knapp 3 (rullhjul)
b
- Rullhjul LED (profil -indikator)
c
d
- Knapp 2 (standardfunktion = klick med höger musknapp)
e
- Knapp 4 (standardfunktion = trippelt musklick)
f
- Knapp 5 (standardfunktion = DPI+)
g
- Knapp 6 (standardfunktion = DPI-)
h
- Sidknappar 7-11
i
- Profilväxling (inte programmerbar)
j
- Justerbart viktfack
Installation
a - Sätt i Trust CD-ROM i CD-facket.
- Klicka på “Run Setup.exe [Kör Setup.exe] – Publicerad av Trust International BV”.
1.
b - Klicka på “Install driver” [Installera drivrutin].
c - Klicka på ‘Finish’ [Avsluta] när installationen är slutförd.
a - Anslut musen till datorns USB-port.
2.
b - Vänta tills meddelandet ‘Your device is ready to use’ [Din enhet är klar att användas] visas.
a - Starta programvaran för muskonfigurering (finns i uppgiftsfältet).
3.
b - Nu kan du börja konfigurera musen. I handboken refereras det till ‘Apply’ [Tillämpa] för att
Musen kan lagra 5 olika profiler. Du kan direkt växla mellan dessa profiler genom att tilldela
profilväxlingsfunktionen till en av de 11 knapparna, eller använda profilknappen på musens undersida.
uppdatera musen.
Gul profil 1
Grön profil 2
Blå profil 3
Lila profil 4
Röd profil 5
32
Page 36

GXT 155 Gaming Mouse - USER’S MANUAL
Knapprogrammering
4.
Tilldela en funktion.
a
- Klicka på fliken ‘General’ [Allmänt].
b
- Klicka på knappen som du vill tilldela om.
c
- Klicka på funktionen som du vill tilldela om.
- Klicka på ‘Apply’ [Tillämpa] så uppdateras musen.
5.
Tilldela en funktion till sidknapparna.
a
- Under fliken ‘General’ [Allmänt] klickar du på ‘Side’ [Sida] för att se sidknapparna.
b
- Klicka på knappen som du vill tilldela om.
c
- Klicka på funktionen som du vill tilldela om.
- Klicka på ‘Apply’ [Tillämpa] så uppdateras musen.
DPI-inställningar
6.
Ändra DPI-inställningar
a
- Klicka på ‘DPI’.
b
- Ändra DPI-inställningar genom att flytta på reglagen.
c
- Klicka på DPI-nummer för att aktivera eller inaktivera denna inställning.
- Klicka på ‘Apply’ [Tillämpa] så uppdateras musen.
För att ställa in X- och Y-axeln separat, ta bort markeringen i rutan ‘LINK XY’ [LÄNKA XY].
Inställningar för ljushantering [Light Manager Settings]
7.
Ändra LED-ljuset
a
- Klicka på ‘Light’ [Ljus].
b
- Välj önskad LED-fär eller välj en standardfärg.
c
- Ändra ljusstyrkans nivå och andningshastighet.
- Klicka på ‘Apply’ [Tillämpa] så uppdateras musen.
(profiler och DPI-inställningar är länkade)
33
Page 37

GXT 155 Gaming Mouse - USER’S MANUAL
V
Makroinställningar
8.
Skapa ett makro.
- Gå till fliken ‘General’ [Allmänt].
a
- Klicka på knappen som du vill om-tilldela.
b
- Dra över ‘Macro’ [Makro].
- Klicka på ‘Macro Manager’ [Makrohanterare].
c
- Skapa ett nytt makro genom att klicka på ‘New’ [Ny].
- Ange namnet för det nya makrot.
- Klicka på ‘OK’.
9.
Spela in ett makro.
a
- Välj ett skapat makro.
b
- Klicka på inspelningsknappen för att börja spela in önskad tangentbordssekvens.
- När du är klar med att skapa ditt makro. Klicka på stoppknappen.
c
- Musåtgärder kan läggas till genom att använda menyn till höger (efter inspelning).
- Stäng ‘macro manager’ när du är färdig med att skapa makron.
Tilldela ett makro.
- För att tilldela ett makro följer du steg 8 a/b och väljer önskad makro från funktionslistan.
- Klicka på ‘Apply’ [Tillämpa] så uppdateras musen.
Profilinställningar
10.
älj en profil
a
- Välj en av de 5 profilerna genom att klicka på önskad profil.
Spara eller ladda en anpassad inställning
10.
- Klicka på ‘Save as’ [Spara som] för att spara en inställning eller ‘Load File’ [Ladda fil] för att ladda en
a
inställning.
b
- Ange ett namn på musinställningen eller välj föredragen profil att ladda.
- Klicka på ‘Save/Open’ [Spara/Öppna].
- Din musinställning har nu sparats/laddats.
11.
Återställ grundinställningar
a
- Klicka på ‘Reset All’ [Återställ alla] för att återställa alla profiler.
- Klicka på ‘Restore’ [Återställ] för att återställa 1 profil (aktuellt vald profil).
b
- Klicka på ‘OK’ för att återställa alla inställningar.
- Klicka på ‘Apply’ [Tillämpa] så uppdateras musen.
(Lagra en sekvens av nycklar i programvaran)
Ladda ner spelspecifika profiler från Trusts hemsida http://www.trust.com/20411.
34
Page 38

GXT 155 Gaming Mouse - USER’S MANUAL
Opis myszy
- Przycisk 1 (lewy przycisk myszy)
a
- Przycisk 3 (kółko przewijania)
b
- Lampka kontrolna kółka przewijania
c
(wskaźnik profil)
d
- Przycisk 2 (funkcja domyślna = kliknięcie prawym przyciskiem myszy)
e
- Przycisk 4 (funkcja domyślna = potrójne kliknięcie przyciskiem myszy)
f
- Przycisk 5 (funkcja domyślna = DPI+)
g
- Przycisk 6 (funkcja domyślna = DPI-)
h
- Boczne przyciski 7-11
i
- Przełącznik profilu (nieprogramowalny)
j
- Komora regulowanej przeciwwagi
Instalacja
a - Włóż płytę Trust CD do napędu CD.
- Kliknij „Run Setup.exe – Published by Trust International BV” [„Uruchom Setup.exe – Published by
1.
Trust International BV”].
b - Kliknij „Install driver” [„Zainstaluj sterownik”].
c - Kliknij „Finish” [„Zakończ”], gdy instalacja zostanie zakończona.
a - Podłącz mysz do portu USB komputera.
2.
b - Odczekaj, aż wyświetlony zostanie komunikat „Your device is ready to use” [„Urządzenie jest gotowe
do użycia”].
a - Uruchom oprogramowanie konfiguracyjne myszy (skrót znajduje się na pasku zadań).
3.
b - Możesz teraz rozpocząć konfigurację myszy. Aby zaktualizować ustawienia myszy, użyj polecenia
W pamięci myszy może zostać zapisanych 5 różnych profili. Możesz przełączać między tymi profilami,
przypisując funkcję przełącznika profili do jednego z 11 przycisków lub używać w tym celu znajdującego się na
spodzie myszy przełącznika profili.
„Apply” [„Zastosuj”].
żółta profil 1
zielona profil 2
niebieska profil 3
purpurowa profil 4
czerwona profil 5
35
Page 39

GXT 155 Gaming Mouse - USER’S MANUAL
Programowanie przycisków
4.
Przypisanie funkcji.
a
- Kliknij zakładkę „General” [„Ogólne”].
b
- Kliknij przycisk, który chcesz ponownie przypisać.
c
- Kliknij funkcję, którą chcesz przypisać.
- Kliknij „Apply” [„Zastosuj”] Ustawienia myszy są aktualizowane.
5.
Przypisanie funkcji do przycisków bocznych.
a
- W zakładce „General” [„Ogólne”] kliknij „Side” [„Boczne”], aby przeglądać boczne przyciski.
b
- Kliknij przycisk, który chcesz ponownie przypisać.
c
- Kliknij funkcję, którą chcesz przypisać.
- Kliknij „Apply” [„Zastosuj”] Ustawienia myszy są aktualizowane.
Ustawienia DPI
6.
Zmiana ustawień DPI
a
- Kliknij „DPI”.
b
- Zmień ustawienia DPI, przesuwając suwaki.
c
- Kliknij numer DPI, aby włączyć lub wyłączyć ustawienie.
- Kliknij „Apply” [„Zastosuj”] Ustawienia myszy są aktualizowane.
Aby niezależnie ustawić osie X i Y, odznacz pole „LINK XY” [„Powiąż XY”].
Ustawienia menedżera podświetlenia [Light Manager Settings]
7.
Zmiana koloru lampek kontrolnych
a
- Kliknij „Light” [„Podświetlenie”].
b
- Wybierz jeden z podstawowych kolorów lampki kontrolnej lub skonfiguruj odcień.
c
- Zmień poziom jasności i prędkość pulsowania.
- Kliknij „Apply” [„Zastosuj”] Ustawienia myszy są aktualizowane.
(profile i ustawienia DPI są ze sobą powiązane)
36
Page 40

GXT 155 Gaming Mouse - USER’S MANUAL
Ustawienia makro
8.
Tworzenie makra.
- Przejdź do zakładki „General” [„Ogólne”].
a
- Kliknij przycisk, który chcesz ponownie przypisać.
b
- Przejdź do „Macro” [„Makro”].
- Kliknij „Macro Manager” [„Menedżer makr”].
c
- Utwórz nowe makro, klikając „New” [„Nowe”].
- Wprowadź nazwę nowego makro.
- Kliknij „OK”.
9.
Zapisywanie makra.
a
- Wybierz utworzone makro.
b
- Kliknij przycisk zapisywania, aby rozpocząć zapisywanie nowej preferowanej sekwencji klawiszy
klawiatury.
- Po zakończeniu tworzenia makra kliknij przycisk zatrzymania.
c
- Działania myszy mogą zostać dodane z wykorzystaniem menu po prawej (po zapisaniu).
- Po zakończeniu tworzenia makr zamknij „Macro Manager” [„Menedżer makr”].
Przypisywanie makra.
- Aby przypisać makro, wykonaj działania z kroków 8 a/b i wybierz makro z listy funkcji.
- Kliknij „Apply” [„Zastosuj”] Ustawienia myszy są aktualizowane.
Ustawienia profilu
10. a Wybór profilu
- Wybierz jeden z 5 profili, klikając go.
10.
Zapisywanie lub wczytywanie konfiguracji
a
- Kliknij „Save as” [„Zapisz jako”], aby zapisać konfigurację lub „Load File” [„Wczytaj plik”], aby wczytać
konfigurację.
b
- Wprowadź nazwę konfiguracji myszy lub wybierz profil do wczytania.
- Kliknij „Save/Open” [„Zapisz/Otwórz”].
- Konfiguracja myszy jest teraz zapisana/wczytana.
11.
Przywracanie ustawień domyślnych
a
- Kliknij „Reset All” [„Resetuj wszystkie”], aby zresetować wszystkie profile.
- Kliknij „Restore” [„Przywróć”], aby przywrócić 1 profil (bieżący profil).
b
- Kliknij „OK”, aby zresetować wszystkie ustawienia.
- Kliknij „Apply” [„Zastosuj”] Ustawienia myszy są aktualizowane.
(zapisywanie sekwencji klawiszy w oprogramowaniu)
Pobierz profile skonfigurowane pod określone gry ze strony internetowej Trust: http://www.trust.com/20411.
37
Page 41

GXT 155 Gaming Mouse - USER’S MANUAL
Vzhled myši
- Tlačítko 1 (levé tlačítko myši)
a
- Tlačítko 3 (rolovací tlačítko)
b
- Rolovací tlačítko s LED diodou
c
(indikátor profil)
d
- Tlačítko 2 (výchozí funkce = kliknutí pravým tlačítkem myši)
e
- Tlačítko 4 (výchozí funkce = trojí kliknutí myši)
f
- Tlačítko 5 (výchozí funkce = DPI+)
g
- Tlačítko 6 (výchozí funkce = DPI-)
h
- Boční tlačítka 7-11
i
- Přepínač profilu (neprogramovatelné)
j
- Přihrádka na nastavení závaží
Instalace
a -Vložte CD-ROM společnosti Trust do jednotky CD.
- Klikněte na „Run Setup.exe – Published by Trust International BV“ [„Spustit Setup.exe – Published
1.
by Trust International BV“].
b - Klikněte na „Install driver“ [„Nainstalovat ovladač“].
c - Po dokončení instalace klikněte na „Finish“ [„Dokončit“].
a - Myš připojte do USB portu počítače.
2.
b - Vyčkejte, dokud se nezobrazí zpráva „Your device is ready to use“ [„Zařízení je připraveno k
použití“].
a - Spusťte konfigurační software myši (umístěný na hlavním panelu).
3.
b - Nyní můžete spustit konfiguraci myši. V návodu bude aktualizace myši označena jako „Apply“
Do myši lze uložit 5 různých profilů. Mezi těmito profily můžete okamžitě přepínat přiřazením funkce přepínače
profilu jednomu z 11 tlačítek, případně můžete použít přepínač profilu na spodní části myši.
[„Použít“].
Žlutá profil 1
Zelená profil 2
Modrá profil 3
Fialová profil 4
Červená profil 5
38
Page 42

GXT 155 Gaming Mouse - USER’S MANUAL
Programování tlačítek
4.
Přiřazení funkce.
a
- Klikněte na kartu „General“ [„Obecné“].
b
- Klikněte na tlačítko, ke kterému si přejete funkci přiřadit.
c
- Klikněte na funkci, kterou si přejete přiřadit.
- Klikněte na „Apply“ [„Použít”] Proběhne aktualizace myši.
5.
Přiřazení funkce bočním tlačítkům.
a
- Na kartě „General“ [„Obecné“] zobrazíte boční tlačítka kliknutím na „Side“ [„Boční“].
b
- Klikněte na tlačítko, ke kterému si přejete funkci přiřadit.
c
- Klikněte na funkci, kterou si přejete přiřadit.
- Klikněte na „Apply“ [„Použít”] Proběhne aktualizace myši.
Nastavení DPI
6.
Změna nastavení DPI
a
- Klikněte na „DPI“.
b
- Pohybem posuvníků změňte nastavení DPI.
c
- Kliknutím na počet DPI aktivujete nebo deaktivujete toto nastavení.
- Klikněte na „Apply“ [„Použít”] Proběhne aktualizace myši.
Osu X a Y nastavíte zvlášť, pokud zrušíte zaškrtnutí u políčka „LINK XY“ [„PROPOJIT XY“].
Nastavení správce osvětlení [Light Manager Settings]
7.
Změna LED světla
a
- Klikněte na „Light“ [„Světlo“].
b
- Vyberte požadovanou barvu LED diody nebo zvolte vlastní barvu.
c
- Změňte úroveň jasu a rychlost stmívání.
- Klikněte na „Apply“ [„Použít”] Proběhne aktualizace myši.
(profily a nastavení DPI jsou propojené)
39
Page 43

GXT 155 Gaming Mouse - USER’S MANUAL
V
V
Nastavení maker
8.
ytvoření makra.
- Přejděte na kartu „General“ [„Obecné”].
a
- Klikněte na tlačítko, ke kterému si přejete makro přiřadit.
b
- Přejeďte přes „Macro“ [„Makro”].
- Klikněte na „Macro Manager“ [„Správce maker“].
c
- Kliknutím na „New“ [„Nové“] vytvořte nové makro.
- Zadejte název nového makra.
- Klikněte na „OK“.
9.
Záznam maker.
a
- Vyberte vytvořené makro.
b
- Klikněte na tlačítko pro záznam a spusťte nahrávání požadované kombinace kláves.
- Po dokončení vytvoření makra, klikněte na tlačítko Stop.
c
- Pomocí nabídky umístěné vpravo je možné (po záznamu) přidávat další činnosti myši.
- Po vytvoření maker zavřete „Macro manager“ [„Správce maker“].
Přiřazení maker.
- Makro přiřadíte provedením kroku 8 a/b a volbou požadovaného makra ze seznamu funkcí.
- Klikněte na „Apply“ [„Použít”] Proběhne aktualizace myši.
Profilová nastavení
10.
ýběr profilu
a
- Kliknutím na požadovaný profil vyberte jeden z 5 profilů.
10.
Uložení nebo načtení vlastního nastavení
a
- Kliknutím na „Save as“ [„Uložit jako”] uložíte nastavení, a kliknutím na „Load File“ [„Načíst soubor“]
načtete nastavení.
b
- Zadejte název pro nastavení myši nebo zvolte požadovaný profil, který si přejete načíst.
- Klikněte na „Save/Open“ [„Uložit/Otevřít“].
- Nastavení myši je nyní uloženo/načteno.
11.
Obnovení výchozích nastavení
a
- Všechny profily resetujete kliknutím na „Reset All“ [„Resetovat vše“].
- Kliknutím na „Restore” [„Obnovit“] obnovíte 1 profil (aktuálně vybraný profil).
b
- Všechna nastavení zrušíte kliknutím na tlačítko „OK“.
- Klikněte na „Apply“ [„Použít”] Proběhne aktualizace myši.
(Uložení kombinace kláves v softwaru.)
Stáhněte si profily určené pro hry z webové stránky společnosti Trust http://www.trust.com/20411.
40
Page 44

GXT 155 Gaming Mouse - USER’S MANUAL
Usporiadanie myši
a
- Tlačidlo 1 (ľavé tlačidlo myši)
b
- Tlačidlo 3 (Rolovacie koliesko)
c
- LED rolovacieho kolieska (profil
indikátor)
- Tlačidlo 2 (východisková funkcia = kliknutie pravým tlačidlom myši)
d
- Tlačidlo 4 (východisková funkcia = trojité kliknutie tlačidlom myši)
e
- Tlačidlo 5 (východisková funkcia = DPI+)
f
- Tlačidlo 6 (východisková funkcia = DPI-)
g
- Bočné tlačidlá 7 - 11
h
- Profilový spínač (neprogramovateľný)
i
- Priehradka nastaviteľných zaťažení
j
Inštalácia
a - Do CD mechaniky vložte disk CD-ROM Trust.
- Kliknite na „Run Setup.exe – Published by Trust International BV“ [„Spustiť Setup.exe – Published by
1.
Trust International BV“].
b - Kliknite na „Install driver“ [„Inštalovať ovládač“].
c - Po dokončení inštalácie kliknite na „Finish“ [„Dokončiť“].
a - Pripojte myš k USB portu počítača.
2.
b - Počkajte, kým sa nezobrazí správa „Your device is ready to use“ [„Zariadenie je pripravené na
použitie“].
a - Spustite softvér na konfiguráciu myši (umiestnený na paneli úloh).
3.
b - Teraz môžete začať konfigurovať myš. Pri manuálnej sa bude aktualizácia myši vzťahovať na
Myš môže uložiť 5 rôznych profilov. Medzi týmito profilmi môžete okamžite prepínať priradením funkcie
profilového spínača k jednému z 11 tlačidiel, alebo použitím profilového spínača na dolnej strane myši.
možnosť „Apply“ [„Aplikovať“].
Žltá profil 1
Zelená profil 2
Modrá profil 3
Purpurová profil 4
Červená profil 5
41
Page 45

GXT 155 Gaming Mouse - USER’S MANUAL
Programovanie tlačidiel
4.
Priradenie funkcie.
a
- Kliknite na kartu „General“ [„Všeobecné“].
b
- Kliknite na tlačidlo, ktoré chcete opätovne priradiť.
c
- Kliknite na funkciu, ktorú chcete prideliť.
- Kliknite na možnosť „Apply“ [„Aplikovať“] Myš sa začne aktualizovať.
5.
Priraďte funkcie k bočným tlačidlám.
a
- V karte „General“ [„Všeobecné“] kliknite na „Side“ [„Bočné“] a pozrite si bočné tlačidlá.
b
- Kliknite na tlačidlo, ktoré chcete opätovne priradiť.
c
- Kliknite na funkciu, ktorú chcete prideliť.
- Kliknite na možnosť „Apply“ [„Aplikovať“] Myš sa začne aktualizovať.
Nastavenia DPI
6.
Zmeňte nastavenia DPI
a
- Kliknite na „DPI“.
b
- Nastavenia DPI zmeňte posúvaním posúvačov.
c
- Kliknite na číslo DPI a aktivujte alebo deaktivujte toto nastavenie.
- Kliknite na možnosť „Apply“ [„Aplikovať“] Myš sa začne aktualizovať.
Ak chcete nastaviť os X a Y samostatne, zrušte zaškrtnutie poľa „LINK XY“ [„LINKA XY“].
Nastavenia správcu svetla [Light Manager Settings]
7.
Zmeňte LED osvetlenie
a
- Kliknite na „Light“ [„Osvetlenie“].
b
- Vyberte požadovanú farbu LED alebo použite používateľskú farbu.
c
- Zmeňte úroveň jasu a rýchlosť dýchania.
- Kliknite na možnosť „Apply“ [„Aplikovať“] Myš sa začne aktualizovať.
(profily a nastavenia DPI sú prepojené)
42
Page 46

GXT 155 Gaming Mouse - USER’S MANUAL
V
V
Nastavenia makro
8.
ytvorte makro.
- Prejdite na kartu „General“ [„Všeobecné“].
a
- Kliknite na tlačidlo, ktoré chcete opätovne priradiť.
b
- Prejdite nad možnosťou „Macro“ [„Makro“].
- Kliknite na možnosť „Macro Manager“ [„Správca makier“].
c
- Vytvorte nové makro kliknutím na možnosť „New“ [„Nové“].
- Zadajte názov nového makra.
- Kliknite na „OK“.
9.
Nahrajte makro.
a
- Vyberte vytvorené makro.
b
- Kliknite na tlačidlo nahrávania a spustite nahrávanie uprednostňovanej postupnosti klávesnice.
- Po dokončení vytvárania svojho makra. Kliknite na tlačidlo stop.
c
- Činnosti myši môžete pridať pomocou ponuky vpravo (po nahraní).
- Po dokončení vytvárania makier zatvorte „Macro manager“ [„Správca makier“].
Priraďte makro.
- Ak chcete priradiť makro, postupujte podľa krokov 8 a/b a vyberte si uprednostňované makro zo
zoznamu funkcií.
- Kliknite na možnosť „Apply“ [„Aplikovať“] Myš sa začne aktualizovať.
Nastavenia profilu
10.
yberte profil
a
- Vyberte jeden z 5 profilov kliknutím na uprednostňovaný profil.
10.
Uloženie alebo stiahnutie zákazníckeho nastavenia
a
- Kliknite na možnosť „Save as“ [„Uložiť ako“] a uložte nastavenie alebo na „Load File“ [„Stiahnuť
súbor“] a stiahnite nastavenie.
b
- Zadajte názov pre nastavenie myši, alebo si vyberte uprednostňovaný profil na stiahnutie.
- Kliknite na „Save/Open“ [„Uložiť/Otvoriť“].
- Nastavenie vašej myši sa teraz uložilo/stiahlo.
11.
Obnovenie východiskových nastavení
a
- Kliknite na „Reset All“ [„Resetovať všetko“] a resetujte všetky profily.
- Kliknite na „Restore“ [„Obnoviť“] a obnovte 1 profil (aktuálne zvolený profil).
b
- Kliknite na „OK“ a resetujte všetky nastavenia.
- Kliknite na možnosť „Apply“ [„Aplikovať“] Myš sa začne aktualizovať.
(Uloženie postupnosti tlačidiel v softvéri)
Špecifické profily hry si stiahnite z webovej stránky spoločnosti Trust: http://www.trust.com/20411.
43
Page 47

GXT 155 Gaming Mouse - USER’S MANUAL
Az egér felépítése
- 1. gomb (bal egér gomb)
a
- 3. gomb (görgetőkerék)
b
- Görgetőkerék LED (profil jelző)
c
d
- 2. gomb (alapértelmezett funkció = jobb kattintás)
e
- 4. gomb (alapértelmezett funkció = háromszoros kattintás)
f
- 5. gomb (alapértelmezett funkció = DPI+)
g
- 6. gomb (alapértelmezett funkció = DPI-)
h
- 7-11. oldalgombok
i
- Profil kapcsoló (nem programozható)
j
- Rekesz a változtatható súlyokhoz
Telepítés
a - Helyezze be a Trust CD-ROM telepítőlemezt a CD meghajtóba.
- Kattintson erre: „Run Setup.exe – Published by Trust International BV” [„Setup.exe – Published by
1.
Trust International BV” futtatása].
b - Kattintson az „Install Driver” [„Illesztőprogram telepítése”] opcióra.
c - Miután a program elkészült a telepítéssel, kattintson a „Finish” [„Befejezés”] gombra.
a - Csatlakoztassa az egeret a számítógépe USB portjához.
2.
b - Várjon, míg a „Your device is ready to use” [„A készüléke használatra kész”] üzenet megjelenik.
a - Indítsa el az egér konfiguráció szoftvert (a feladatsávban található).
3.
b - Most elkezdheti az egér konfigurálását. A kézikönyvben az egér frissítésére az „Apply” [„Alkalmazás”]
Az egér 5 különböző profilt képes tárolni. A profilok közt azonnal átválthat, ha a 11 gomb egyikét a profilok közti
váltáshoz rendeli, vagy használja az egér alján található profil kapcsolót.
paranccsal hivatkozunk.
Sárga profil 1
Zöld profil 2
Kék profil 3
Lila profil 4
Vörös profil 5
44
Page 48

GXT 155 Gaming Mouse - USER’S MANUAL
V
A gombok programozása
4.
Funkció hozzárendelése.
a
- Kattintson a „General” [„Általános”] lapra.
b
- Kattintson a gombra, melyet szeretne újra hozzárendelni.
c
- Kattintson a hozzárendelni kívánt funkcióra.
- Kattintson az „Apply” [„Alkalmazás”] gombra Az egér funkciói frissülnek.
5.
Funkció hozzárendelése az oldalgombokhoz.
a
- A „General” [„Általános”] lapon kattintson a „Side” [„Oldal”] gombra az oldalgombok megtekintéséhez.
b
- Kattintson a gombra, melyet szeretne újra hozzárendelni.
c
- Kattintson a hozzárendelni kívánt funkcióra.
- Kattintson az „Apply” [„Alkalmazás”] gombra Az egér funkciói frissülnek.
DPI beállítások
6.
áltoztassa meg a DPI beállításokat
a
- Kattintson a „DPI” gombra.
b
- A csúszkák mozgatásával változtassa meg a DPI beállításokat.
c
- A beállítás engedélyezéséhez vagy letiltásához kattintson a DPI számra.
- Kattintson az „Apply” [„Alkalmazás”] gombra Az egér funkciói frissülnek.
Az X és Y tengely egymástól független beállításához szüntesse meg a kijelölést a „LINK XY” [„XY
ÖSSZEKAPCSOLVA”] mezőben.
A Fénykezelő beállításai [Light Manager Settings]
7.
A LED fény megváltoztatása
a
- Kattintson a „Light” [„Fény”] gombra.
b
- Válassza ki a kívánt LED színt vagy válasszon egy egyedi színt.
c
- Változtassa meg a fényerőszintet és a pulzálás sebességét.
- Kattintson az „Apply” [„Alkalmazás”] gombra Az egér funkciói frissülnek.
(a profilok és a DPI beállítások összeköttetésben állnak)
45
Page 49

GXT 155 Gaming Mouse - USER’S MANUAL
Makróbeállítások
8.
Makró létrehozása.
- Lépjen a „General” [„Általános”] lapra.
a
- Kattintson a gombra, melyet szeretne újra hozzárendelni.
b
- Vigye a kurzort a „Macro” [„Makró”] felirat fölé.
- Kattintson a „Macro Manager” [„Makrókezelő”] gombra.
c
- Hozzon létre egy új makrót a „New” [„Új”] gombra kattintva.
- Adja meg az új makró nevét.
- Kattintson az „OK” gombra.
9.
Makró rögzítése.
a
- Válasszon ki egy elkészített makrót.
b
- Kattintson a felvétel gombra a kívánt billentyűsorozat rögzítésének elindításához.
- Ha elkészült a makró létrehozásával, kattintson a leállítás gombra.
c
- További egérműveleteket a jobb oldali menü használatával adhat hozzá (a felvétel után).
- Ha végzett a makrók létrehozásával, zárja be a „Macro manager” [„Makrókezelőt”].
Makró hozzárendelése.
- Makró hozzárendeléséhez kövesse a 8 a/b lépéseket, majd a funkciólistából válassza ki a kívánt
makrót.
- Kattintson az „Apply” [„Alkalmazás”] gombra Az egér funkciói frissülnek.
Profilbeállítások
10. a Profil kiválasztása
- Válassza ki az 5 profil egyikét: kattintson a kívánt profilra.
10.
Egyéni beállítás mentése vagy betöltése
a
- Kattintson a „Save as” [„Mentés másként”] opcióra a beállítás mentéséhez vagy a „Load File” [„Fájl
betöltése”] opcióra a beállítás betöltéséhez.
b
- Írjon be egy nevet az egérbeállításhoz vagy válassza ki a betölteni kívánt profilt.
- Kattintson a „Save/Open” [„Mentés/Megnyitás”] gombra.
- A program elmenti/betölti az egérbeállítást.
11.
Alapértelmezett beállítások visszaállítása
a
- Kattintson a „Reset All” [„Összes alaphelyzetbe állítása”] opcióra az összes profil alaphelyzetbe
állításához.
- Kattintson a „Restore” [„Visszaállítás”] opcióra 1 profil (a jelenleg kiválasztott profil) visszaállításához.
b
- Kattintson az „OK” gombra az összes beállítás alaphelyzetbe állításához.
- Kattintson az „Apply” [„Alkalmazás”] gombra Az egér funkciói frissülnek.
(Tároljon el egy billentyűsorozatot a szoftverben)
Töltsön le játék-specifikus profilokat a Trust honlapjáról: http://www.trust.com/20411.
46
Page 50

GXT 155 Gaming Mouse - USER’S MANUAL
Prezentare mouse
- Buton 1 (buton mouse stânga)
a
- Butonul 3 (Rotiţă de derulare)
b
- LED rotiţă de derulare (Indicator profil)
c
d
- Buton 2 (funcţie implicită = clic-dreapta mouse)
e
- Buton 4 (funcţie implicită = clic triplu mouse)
f
- Buton 5 (funcţie implicită = DPI+)
g
- Buton 6 (funcţie implicită = DPI-)
h
- Butoane laterale 7-11
i
- Comutare profil (nu poate fi programat)
j
- Compartiment greutăţi ajustabile
Instalare
a - Introduceţi CD-ul Trust în unitatea CD.
- Daţi clic pe „Run Setup.exe – Published by Trust International BV” [„Executaţi Setup.exe – Published
1.
by Trust International BV”].
b - Daţi clic pe „Install driver” [„Instalare driver”].
c - După finalizarea instalării, daţi clic pe „Finish” [„Sfârşit”].
a - Conectaţi mouse-ul la portul USB al PC-ului.
2.
b - Aşteptaţi până la apariţia mesajului „Your device is ready to use” [„Dispozitivul dumneavoastră este
gata de utilizare”].
a - Activaţi software-ul de configurare al mouse-ului (aflat pe bara de activităţi).
3.
b - Acum puteţi începe să configuraţi mouse-ul. Consultaţi „Apply” [„Aplică”] din manual pentru a
Mouse-ul poate stoca 5 profiluri diferite. Puteţi comuta instantaneu între aceste profiluri, alocând funcţia de
comutare a profilului unuia dintre cele 11 butoane sau utilizând funcţia de comutare a profilului din partea
inferioară a mouse-ului.
actualiza mouse-ul.
Galben profil 1
Verde profil 2
Albastru profil 3
Purpuriu profil 4
Roşu profil 5
47
Page 51

GXT 155 Gaming Mouse - USER’S MANUAL
Programarea butoanelor
4.
Alocarea unei funcţii.
a
- Daţi click pe fila „General”.
b
- Daţi clic pe butonul pe care doriţi să îl reatribuiţi.
c
- Daţi clic pe funcţia pe care doriţi să o atribuiţi.
- Daţi click pe „Apply” [„Aplică”] Mouse-ul este actualizat.
5.
Alocaţi o funcţie butoanelor laterale.
a
- De la fila „General” daţi click pe „Side” [„Lateral”] pentru a vedea butoanele de pe lateral.
b
- Daţi clic pe butonul pe care doriţi să îl reatribuiţi.
c
- Daţi clic pe funcţia pe care doriţi să o atribuiţi.
- Daţi click pe „Apply” [„Aplică”] Mouse-ul este actualizat.
Setări DPI
6.
Modificarea setărilor DPI
a
- Daţi clic pe „DPI”.
b
- Modificaţi setările DPI deplasând glisoarele.
c
- Daţi click pe numărul DPI pentru a activa sau dezactiva această setare.
- Daţi click pe „Apply” [„Aplică”] Mouse-ul este actualizat.
Pentru a seta axele X şi Y separat, debifaţi căsuţa „LINK XY” [„Legare XY”].
Setări manager lumină [Light Manager Settings]
7.
Modificarea luminii LED
a
- Daţi clic pe „Light” [„Lumină”].
b
- Selectaţi lumina dorită pentru LED, sau alegeţi o culoare personalizată.
c
- Modificaţi nivelul de luminozitate şi viteza.
- Daţi click pe „Apply” [„Aplică”] Mouse-ul este actualizat.
(profilurile şi setările DPI sunt conectate)
48
Page 52

GXT 155 Gaming Mouse - USER’S MANUAL
Setări macro
8.
Crearea unui macro.
- Mergeţi la fila „General”.
a
- Daţi clic pe butonul pe care doriţi să îl reatribuiţi.
b
- Ţineţi cursorul deasupra „Macro”.
- Daţi click pe „Macro Manager”.
c
- Creaţi un nou macro, dând click pe „New” [„Nou”].
- Introduceţi numele noului macro.
- Daţi clic pe „OK”.
9.
Înregistrarea unui macro.
a
- Selectaţi un macro creat.
b
- Daţi click pe butonul de înregistrare, pentru a începe înregistrarea unei secvenţe preferate a tastaturii.
- După ce aţi creat o macrofuncţie. Daţi click pe butonul stop.
c
- Pot fi adăugate acţiuni pentru mouse, utilizând meniul din partea dreaptă (după înregistrare).
- Închideţi „Macro manager” după ce aţi creat macrofuncţiile.
Alocarea unui macro.
- Pentru a aloca un macro, urmaţi paşii 8 a/b şi alegeţi macro preferat din lista de funcţii.
- Daţi click pe „Apply” [„Aplică”] Mouse-ul este actualizat.
Setările profilului
10. a Selectarea unui profil
- Selectaţi unui dintre cele 5 profiluri bij, făcând click pe profilul preferat.
10.
Salvarea sau încărcarea unei configuraţii personalizate
a
- Daţi click pe „Save as” [„Salvează ca”] pentru a salva o configuraţie sau pe „Load File” [„Încărcare
fişier”] pentru a încărca o configuraţie.
b
- Introduceţi un nume pentru configuraţia mouse-ului sau alegeţi profilul preferat de încărcat.
- Daţi clic pe „Save/Open” [„Salvare/Deschidere”].
- Configuraţia mouse-ului este acum salvată / încărcată.
11.
Restabilirea setărilor implicite
a
- Daţi click pe „Reset All” [„Resetează toate”] pentru a reseta toate profilurile.
- Daţi click pe „Restore” [„Restaurare”] pentru a restaura 1 profil (cel selectat momentan).
b
- Daţi click pe „OK” pentru a reseta toate setările.
- Daţi click pe „Apply” [„Aplică”] Mouse-ul este actualizat.
(Stocarea unei secvenţe de taste în software)
Descărcaţi profilurile specifice pentru jocuri de pe site-ul web al Trust http://www.trust.com/20411.
49
Page 53

GXT 155 Gaming Mouse - USER’S MANUAL
Изглед на мишката
- Бутон 1 (ляв бутон на мишката)
a
- Бутон 3 (колело за превъртане)
b
- Светодиод на колелото за
c
превъртане (профил индикатор)
d
- Бутон 2 (функция по подразбиране = щракване с десен бутон)
e
- Бутон 4 (функция по подразбиране = тройно щракване)
f
- Бутон 5 (функция по подразбиране = DPI+)
g
- Бутон 6 (функция по подразбиране = DPI-)
h
- Странични бутони 7-11
i
- Превключване на профил (не е програмируем)
j
- Отделение за регулируеми тегла
Инсталиране
a - Поставете компактдиска на Trust в CD устройството.
- Щракнете „Run Setup.exe – Published by Trust International BV” [„Стартирай Setup.exe –
1.
Published by Trust International BV”].
b - Щракнете „Install driver” [„Инсталирай драйвер”].
c - Щракнете „Finish” [„Край”], когато инсталацията приключи.
а - Свържете мишката към USB порта на компютъра.
2.
b - Изчакайте, докато се появи съобщението „Your device is ready to use” [„Вашето устройство е
готово за употреба”].
а - Стартирайте софтуера за конфигурация на мишката (от лентата със задачи).
3.
b - Сега можете да започнете конфигурация на мишката. В наръчника ще бъде посочено като
Мишката може да съхранява 5 различни профила. Можете без забавяне да превключите между тези
профили като назначите функция за превключване на профил към един от 11 бутона или да използвате
превключвателя за профил в долната страна на мишката.
„Apply” [„Приложи”], за да актуализирате мишката.
Жълт профил 1
Зелен профил 2
Син профил 3
Пурпурен профил 4
Червен профил 5
50
Page 54

GXT 155 Gaming Mouse - USER’S MANUAL
Програмиране на бутони
4.
Назначаване на функция.
a
- Щракнете на раздел „General” [„Общо”].
b
- Щракнете на бутон, който искате да преназначите.
c
- Щракнете на функцията, която искате да назначите.
- Щракнете на „Apply” [„Приложи”] Мишката се актуализира.
5.
Назначете функция на страничните бутони.
A
- В раздел „General” [„Общо”], щракнете върху „Side” [„Отстрани”], за да видите страничните
бутони.
b
- Щракнете на бутон, който искате да преназначите.
c
- Щракнете на функцията, която искате да назначите.
- Щракнете на „Apply” [„Приложи”] Мишката се актуализира.
DPI Настройки
6.
Смяна на DPI настройки
a
- Щракнете върху „DPI”.
b
- Сменете DPI настройките като движите плъзгачите.
c
- Щракнете броя DPI, за да активирате или деактивирате тази настройка.
- Щракнете на „Apply” [„Приложи”] Мишката се актуализира.
За да зададете X или Y ос отделно, Размаркирайте полето „LINK XY” [„ВРЪЗКА XY”].
Настройки за управление на осветление [Light Manager Settings]
7.
Смяна на светодиодна светлина
a
- Щракнете върху „Light” [„Светлина”].
b
- Изберете исканият цвят на светодиод или изберете персонален цвят.
c
- Смяна на ниво на яркост и скорост на пулсации.
- Щракнете на „Apply” [„Приложи”] Мишката се актуализира.
(профилите и DPI настройките са свързани)
51
Page 55

GXT 155 Gaming Mouse - USER’S MANUAL
Макро настройки
8.
Създаване на макро.
- Преминете към раздел „General” [„Общо”].
a
- Щракнете на бутон, който искате да преназначите.
b
- Преминете през „Macro” [„Макро”].
- Щракнете на „Macro Manager” [„Макро мениджър”].
c
- Създайте нов макрос като щракнете на „New” [„Нов”].
- Въведете името на новия макрос.
- Щракнете „OK”.
9.
Запишете макрос.
a
- Изберете създаден макрос.
b
- Щракнете върху бутона за запис, за да стартирате записването на предпочитаната клавишна
последователност.
- Когато приключите със създаването на вашия макрос. Щракнете бутона за стоп.
c
- Могат да бъдат добавени действия на мишката като се използва менюто от дясно (след
записване).
- Когато приключите със създаването на макроси, затворете „Macro manager”” [„Макро
мениджъра”].
Назначаване на макрос.
- За да назначите макрос, следвайте стъпки 8 a/b и изберете предпочитаният макрос от списъка с
функции.
- Щракнете на „Apply” [„Приложи”] Мишката се актуализира.
Настройки на профил
10. a Избор на профил
- Изберете един от 5-те профила като щракнете върху предпочитания.
10.
Запаметяване или зареждане на персонална настройка
a
- Щракнете на „Save as” [„Запази като”], за да запаметите настройката или „Load File” [„Зареди
файл”], за да заредите настройка.
b
- Въведете име за настройката на мишката или изберете за зареждане предпочитан профил.
- Щракнете върху „Save/Open” [„Запази/Отвори”].
- Сега Вашата настройка на мишката е запаметена/заредена.
11.
Възстановяване на настройки по подразбиране
a
- Щракнете на „Reset All” [„Нулирай всички”], за да нулирате всички профили.
- Щракнете на „Restore” [„Възстанови”], за да възстановите 1 профил (текущо избран профил).
b
- Щракнете на „OK”, за да нулирате всички настройки.
- Щракнете на „Apply” [„Приложи”] Мишката се актуализира.
(Съхранете последователност на клавиши в софтуера)
Изтеглете специфични за игри профили от уебсайта на Trust http://www.trust.com/20411.
52
Page 56

GXT 155 Gaming Mouse - USER’S MANUAL
Назначение кнопок мыши
a
- Кнопка 1 (левая кнопка мыши)
b
- Кнопка 3 (колесо прокрутки)
c
- Светодиод колеса прокрутки
(индикатор профиля)
- Кнопка 2 (функция по умолчанию = щелчок правой кнопкой мыши)
d
- Кнопка 4 (функция по умолчанию = тройной щелчок кнопкой мыши)
e
- Кнопка 5 (функция по умолчанию = DPI+)
f
- Кнопка 6 (функция по умолчанию = DPI-)
g
- Боковые кнопки 7-11
h
- Кнопка переключения профиля (непрограммируемая)
i
- Бокс для грузиков для изменения массы
j
Установка
a - Вставьте диск Trust в привод для компакт-дисков.
- Щелкните «Run Setup.exe – Published by Trust International BV» [«Запустить файл Setup.exe –
1.
Published by Trust International BV»].
b - Щелкните «Install driver» [«Установить драйвер»].
c - Щелкните «Finish» [«Готово»] после завершения процесса установки.
a - Подключите мышь к USB-порту ПК.
2.
b - Подождите, пока появится сообщение «Your device is ready to use» [«Устройство готово к
использованию»].
a - Запустите программу настройки мыши (которая находится на панели задач).
3.
b - Теперь можно начать настройку мыши. В ручном режиме необходимо нажать кнопку «Apply»
Мышь имеет 5 различных профилей. Вы можете мгновенно переключать эти профили, присвоив функцию
переключения профилей одной из 11 кнопок или используя специальную кнопку с нижней стороны
мыши.
[«Применить»] для обновления программного обеспечения мыши.
желтый профиля 1
зеленый профиля 2
синий профиля 3
сиреневый профиля 4
красный профиля 5
53
Page 57

GXT 155 Gaming Mouse - USER’S MANUAL
Программирование кнопок
4.
Назначение функции.
a
- Щелкните вкладку «General» [«Общие»].
b
- Щелкните кнопку, которую необходимо переназначить.
c
- Щелкните функцию, которую необходимо назначить.
- Щелкните «Apply» [«Применить»] Программное обеспечение мыши будет обновлено.
5.
Назначение функций боковым кнопкам.
a
- На вкладке «General» [«Общие»] щелкните кнопку «Side» [«Боковые кнопки»], чтобы
просмотреть параметры боковых кнопок.
b
- Щелкните кнопку, которую необходимо переназначить.
c
- Щелкните функцию, которую необходимо назначить.
- Щелкните «Apply» [«Применить»] Программное обеспечение мыши будет обновлено.
Параметры DPI (точек на дюйм)
6.
Изменение настроек DPI
a
- Щелкните «DPI».
b
- Измените настройки DPI, перемещая ползунки.
c
- Щелкните номер DPI, чтобы включить или выключить данный параметр.
- Щелкните «Apply» [«Применить»] Программное обеспечение мыши будет обновлено.
Чтобы отдельно настроить оси X и Y, уберите галочку рядом с надписью «LINK XY» [«СВЯЗЬ МЕЖДУ X и
Y»].
Настройки диспетчера подсветки [Light Manager Settings]
7.
Изменение цвета светодиода.
a
- Щелкните «Light» [«Подсветка»].
b
- Выберите требуемый или подберите пользовательский цвет светодиода.
c
- Измените уровень яркости и скорость модуляции.
- Щелкните «Apply» [«Применить»] Программное обеспечение мыши будет обновлено.
(профили и параметры DPI связаны между собой)
54
Page 58

GXT 155 Gaming Mouse - USER’S MANUAL
Параметры макросов
8.
Создание макроса
- Перейдите на вкладку «General» [«Общие»].
a
- Щелкните кнопку, которую необходимо переназначить.
b
- Наведите на пункт «Macro» [«Макрос»].
- Щелкните «Macro Manager» [«Диспетчер макросов»].
c
- Создайте новый макрос, щелкнув кнопку «New» [«Новый»].
- Введите имя нового макроса.
- Щелкните «OK».
9.
Запись макроса.
a
- Выберите созданный макрос.
b
- Щелкните кнопку «Запись», чтобы начать процесс записи установленного сочетания клавиш.
- После завершения создания макроса щелкните кнопку «Остановить».
c
- Мыши можно добавить другие действия с помощью специального меню справа (после
завершения записи).
- Закройте «Macro Manager» [«Диспетчер макросов»] после завершения создания макросов.
Назначение макроса.
- Для того чтобы назначить макрос, выполните шаги 8 a/b, а затем выберите требуемый макрос из
списка функций.
- Щелкните «Apply» [«Применить»] Программное обеспечение мыши будет обновлено.
Параметры профиля
10. a Выбор профиля
- Выберите один из 5 профилей и щелкните его.
10.
Сохранение или загрузка пользовательских параметров
a
- Щелкните кнопку «Save as» [«Сохранить как»], чтобы сохранить настройки, или «Load File»
[«Загрузить файл»] для загрузки настроек.
b
- Введите имя для настройки мыши или выберите требуемый профиль для загрузки.
- Щелкните «Save/Open» [«Сохранить/Открыть»].
- После этого будут сохранены/загружены настройки мыши.
11.
Восстановление настроек по умолчанию
a
- Щелкните кнопку «Reset All» [«Сбросить все»] для сброса всех профилей.
- Щелкните кнопку «Restore» [«Восстановить»] для восстановления 1 профиля (выбранный в
дwанный момент).
b
- Щелкните «OK», чтобы сбросить все параметры.
- Щелкните «Apply» [«Применить»] Программное обеспечение мыши будет обновлено.
(сохранение последовательности клавиш в программном обеспечении)
Загрузите специально заданные игровые профили на веб-сайте Trust http://www.trust.com/20411.
55
Page 59

GXT 155 Gaming Mouse - USER’S MANUAL
Διάταξη του ποντικιού
- Πλήκτρο 1 (αριστερό πλήκτρο ποντικιού)
a
- Πλήκτρο 3 (τροχός κύλισης)
b
- LED τροχού κύλισης (ένδειξη προφίλ)
c
d
- Πλήκτρο 2 (προεπιλεγμένη λειτουργία = δεξιό κλικ με το ποντίκι)
e
- Πλήκτρο 4 (προεπιλεγμένη λειτουργία = τριπλό κλικ με το ποντίκι)
f
- Πλήκτρο 5 (προεπιλεγμένη λειτουργία = DPI+)
g
- Πλήκτρο 6 (προεπιλεγμένη λειτουργία = DPI-)
h
- Πλευρικά Πλήκτρα 7-11
i
- Διακόπτης προφίλ (μη προγραμματιζόμενος)
j
- Διαμέρισμα ρυθμιζόμενων βαρών
Εγκατάσταση
a - Εισάγετε το Trust CD-ROM στη μονάδα CD του υπολογιστή.
- Κάντε κλικ στο “Run [Εκτέλεση του] Setup.exe – Published by Trust International BV”.
1.
b - Κάντε κλικ στο “Install driver” [Εγκατάσταση προγράμματος οδήγησης].
c - Όταν ολοκληρωθεί η εγκατάσταση, κάντε κλικ στο ‘Finish’ [Τέλος].
a - Συνδέστε το ποντίκι στη θύρα USB του PC.
2.
b - Περιμένετε μέχρι να εμφανιστεί το μήνυμα ‘Your device is ready to use’ [Η συσκευή σας είναι έτοιμη
για χρήση].
a - Εκκινήστε το λογισμικό διαμόρφωσης του ποντικιού (βρίσκεται στη γραμμή εργασιών).
3.
b - Μπορείτε τώρα να ξεκινήσετε τη διαμόρφωση του ποντικιού. Στο εγχειρίδιο χρησιμοποιείται ο όρος
Το ποντίκι έχει δυνατότητα αποθήκευσης 5 διαφορετικών προφίλ. Μπορείτε να εναλλάσσεστε άμεσα μεταξύ
αυτών των προφίλ αναθέτοντας τη λειτουργία αλλαγής προφίλ σε ένα από τα 11 πλήκτρα ή χρησιμοποιώντας
τον διακόπτη προφίλ στην κάτω πλευρά του ποντικιού.
‘Apply’ [Εφαρμογή] για την ενημέρωση των ρυθμίσεων του ποντικιού.
Κίτρινο προφίλ 1
Πράσινο προφίλ 2
Μπλε προφίλ 3
Μοβ προφίλ 4
Κόκκινο προφίλ 5
56
Page 60

GXT 155 Gaming Mouse - USER’S MANUAL
Προγραμματισμός πλήκτρων
4.
Αντιστοίχιση μιας λειτουργίας.
a
- Κάντε κλικ στην καρτέλα ‘General’ [Γενικά].
b
- Κάντε κλικ στο πλήκτρο του οποίου θέλετε να αλλάξετε την αντιστοίχιση.
c
- Κάντε κλικ στη λειτουργία που θέλετε να αντιστοιχίσετε.
- Κάντε κλικ στο ‘Apply’ [Εφαρμογή] Οι ρυθμίσεις του ποντικιού ενημερώνονται.
5.
Αντιστοίχιση μιας λειτουργίας στα πλευρικά πλήκτρα.
a
- Στην καρτέλα ‘General’ [Γενικά], κάντε κλικ στο ‘Side’ [Πλάγια] για να εμφανίσετε τα πλευρικά
b
πλήκτρα.
c
- Κάντε κλικ στο πλήκτρο του οποίου θέλετε να αλλάξετε την αντιστοίχιση.
- Κάντε κλικ στη λειτουργία που θέλετε να αντιστοιχίσετε.
- Κάντε κλικ στο ‘Apply’ [Εφαρμογή] Οι ρυθμίσεις του ποντικιού ενημερώνονται.
Ρυθμίσεις DPI
6.
Αλλαγή των ρυθμίσεων DPI
a
- Κάντε κλικ στο ‘DPI’.
b
- Αλλάξτε τις ρυθμίσεις DPI μετακινώντας τους συρόμενους μηχανισμούς.
c
- Κάντε κλικ στον αριθμό DPI για να ενεργοποιήσετε ή να απενεργοποιήσετε τη συγκεκριμένη ρύθμιση.
- Κάντε κλικ στο ‘Apply’ [Εφαρμογή] Οι ρυθμίσεις του ποντικιού ενημερώνονται.
Για να καθορίσετε ξεχωριστές ρυθμίσεις για τους άξονες X και Y, καταργήστε την επιλογή του πλαισίου ‘LINK XY’
[Διασύνδεση XY].
Ρυθμίσεις Διαχείρισης Φωτισμού
7.
Αλλαγή του φωτισμού LED
a
- Κάντε κλικ στο ‘Light’ [Φωτισμός].
b
- Επιλέξτε το επιθυμητό χρώμα για τον φωτισμό LED ή επιλέξτε ένα προσαρμοσμένο χρώμα (custom).
c
- Αλλάξτε το επίπεδο φωτεινότητας (brightness level) και την ταχύτητα αυξομείωσης (breathing speed).
Κάντε κλικ στο ‘Apply’ [Εφαρμογή] Οι ρυθμίσεις του ποντικιού ενημερώνονται.
-
(τα προφίλ διασυνδέονται με τις ρυθμίσεις DPI)
57
Page 61

GXT 155 Gaming Mouse - USER’S MANUAL
Ρυθμίσεις Μακροεντολών
8.
Δημιουργία μιας μακροεντολής.
- Μεταβείτε στην καρτέλα ‘General’ [Γενικά].
a
- Κάντε κλικ στο πλήκτρο του οποίου θέλετε να αλλάξετε την αντιστοίχιση.
b
- Τοποθετήστε τον δείκτη του ποντικιού πάνω στην επιλογή ‘Macro’ [Μακροεντολή].
- Κάντε κλικ στο ‘Macro Manager’ [Διαχείριση Μακροεντολών].
c
- Δημιουργήστε μια νέα μακροεντολή κάνοντας κλικ στο ‘New’ [Νέα].
- Εισάγετε το όνομα της νέας μακροεντολής.
- Κάντε κλικ στο ‘OK’.
9.
Εγγραφή μιας μακροεντολής.
a
- Επιλέξτε μια ήδη δημιουργημένη μακροεντολή.
b
- Κάντε κλικ στο κουμπί εγγραφής για να ξεκινήσετε την εγγραφή της επιθυμητής αλληλουχίας
πληκτρολογήσεων.
- Όταν ολοκληρώσετε τη δημιουργία της μακροεντολής. Κάντε κλικ στο κουμπί στοπ.
c
- Υπάρχει δυνατότητα προσθήκης ενεργειών του ποντικιού, χρησιμοποιώντας το μενού στα δεξιά (μετά
την εγγραφή).
- Όταν τελειώσετε τη δημιουργία μακροεντολών, κλείστε το ‘Macro Manager’ [Διαχείριση
Μακροεντολών].
Αντιστοίχιση μιας μακροεντολής.
- Για να αντιστοιχίσετε μια μακροεντολή, ακολουθήστε τα βήματα 8 a/b και επιλέξτε την επιθυμητή
μακροεντολή από τη λίστα λειτουργιών.
- Κάντε κλικ στο ‘Apply’ [Εφαρμογή] Οι ρυθμίσεις του ποντικιού ενημερώνονται.
Ρυθμίσεις Προφίλ
10. a Επιλογή ενός προφίλ
- Επιλέξτε ένα από τα 5 προφίλ κάνοντας κλικ στο επιθυμητό προφίλ.
10.
Αποθήκευση ή φόρτωση μιας προσαρμοσμένης διαμόρφωσης
a
- Κάντε κλικ στο ‘Save As’ [Αποθήκευση Ως] για να αποθηκεύσετε μια διαμόρφωση ή στο ‘Load File’
[Φόρτωση Αρχείου] για να φορτώσετε μια διαμόρφωση.
b
- Εισάγετε ένα όνομα για τη διαμόρφωση του ποντικιού ή επιλέξτε το προφίλ που θέλετε να φορτώσετε.
- Κάντε κλικ στο ‘Save/Open’ [Αποθήκευση/Άνοιγμα].
- Η διαμόρφωση του ποντικιού αποθηκεύεται/φορτώνεται.
11.
Επαναφορά των προεπιλεγμένων ρυθμίσεων
a
- Κάντε κλικ στο ‘Reset All’ [Επαναφορά Όλων] για να επαναφέρετε σε ισχύ τις προεπιλεγμένες
ρυθμίσεις όλων των προφίλ.
- Κάντε κλικ στο ‘Restore’ για να επαναφέρετε τις ρυθμίσεις του προφίλ 1 (τρέχον επιλεγμένο προφίλ).
b
- Κάντε κλικ στο ‘OK’ για να επαναφέρετε όλες τις ρυθμίσεις.
- Κάντε κλικ στο ‘Apply’ [Εφαρμογή]
Μπορείτε να κάνετε λήψη προφίλ για συγκεκριμένα παιχνίδια από την τοποθεσία της Trust στο Web,
http://www.trust.com/20411.
(Αποθήκευση μιας αλληλουχίας πλήκτρων στο λογισμικό)
Οι ρυθμίσεις του ποντικιού ενημερώνονται.
58
Page 62

GXT 155 Gaming Mouse - USER’S MANUAL
Fare atamaları
a
- Tuş 1 (sol fare tuşu)
b
- Tuş 3 (Kaydırma tekerleği)
c
- Kaydırma tekerleği LED’i (profil
göstergesi)
- Tuş 2 (varsayılan fonksiyon = sağ fare tıklatma)
d
- Tuş 4 (varsayılan fonksiyon = üç fare tıklatma)
e
- Tuş 5 (varsayılan fonksiyon = DPI+)
f
- Tuş 6 (varsayılan fonksiyon = DPI-)
g
- Yan Tuşlar 7-11
h
- Profil düğmesi (programlanamaz)
i
- Ayarlanabilen ağırlık bölmesi
j
Kurulum
a - Trust CD-ROM’unu CD sürücünüze yerleştirin.
- “Run Setup.exe – Published by Trust International BV” [“Setup.exe – Published by Trust
1.
International BV’yi çalıştır”] öğesini tıklatın.
b - “Install driver” [“Sürücüyü yükle”] seçeneğini tıklatın.
c - Yükleme tamamlandığında “Finish” [“Bitir”] öğesini tıklatın.
a - Fareyi PC’nin USB bağlantı noktasına takın.
2.
b - “Your device is ready to use” [“Aygıtınız kullanıma hazır”] iletisi görüntülenene kadar bekleyin.
a - Fare yapılandırma yazılımını başlatın (görev çubuğunda yer alır).
3.
b - Şimdi fareyi yapılandırmaya başlayabilirsiniz. Fareyi güncellemek için kılavuzda “Apply” [“Uygula”]
Fare 5 farklı profil saklayabilir. Profil düğme fonksiyonunu 11 tuştan birine atayarak bu profiller arasında hızlı
geçiş yapabilir veya farenin altındaki profil düğmesini kullanabilirsiniz.
kısmına bakın.
Sarıı profil 1
Yeşil profil 2
Mavi profil 3
Mor profil 4
Kırmızı profil 5
59
Page 63

GXT 155 Gaming Mouse - USER’S MANUAL
Y
Tuş programlama
4.
Bir fonksiyon atayın.
a
- “General” [“Genel”] sekmesini tıklatın.
b
- Yeniden atama yapmak istediğiniz düğmeyi tıklatın.
c
- Atamak istediğiniz fonksiyonu tıklatın.
- “Apply” [“Uygula”] öğesini tıklatın Fare güncellenir.
5.
an tuşlara bir fonksiyon atayın.
a
- Yan tuşları görmek için “General” [“Genel”] sekmesi üzerinde “Side” [“Yan”] öğesine tıklatın.
b
- Yeniden atama yapmak istediğiniz düğmeyi tıklatın.
c
- Atamak istediğiniz fonksiyonu tıklatın.
- “Apply” [“Uygula”] öğesini tıklatın Fare güncellenir.
DPI Ayarları
6.
DPI ayarlarını değiştirin
a
- “Apply” [“Uygula”] öğesini tıklatın.
b
- Kaydırıcıları hareket ettirerek DPI ayarlarını değiştirin.
c
- Bu ayarı etkinleştirmek veya devreden çıkarmak için DPI numarasını tıklatın.
- “Apply” [“Uygula”] öğesini tıklatın Fare güncellenir.
X ve Y eksenini ayrı olarak ayarlamak için, “LINK XY” [“BAĞLAMAK XY”] kutusunun işaretini kaldırın.
Işık Yöneticisi Ayarları [Light Manager Settings]
7.
LED ışığını değiştirin.
a
- “Light” [“Işık”] öğesini tıklatın.
b
- İstediğiniz LED rengini seçin veya özel bir renk ayarlayın.
c
- Parlaklık seviyesini ve nefes hızını değiştirin.
- “Apply” [“Uygula”] öğesini tıklatın Fare güncellenir.
(profiller ve DPI ayarları bağlantılıdır)
60
Page 64

GXT 155 Gaming Mouse - USER’S MANUAL
V
Makro Ayarları
8.
Bir makro yaratın.
- “General” [“Genel”] sekmesine gidin.
a
- Yeniden atama yapmak istediğiniz düğmeyi tıklatın.
b
- “Macro” [“Makro”] üzerinde durun.
- “Macro Manager” [“Makro Yöneticisi”] öğesini tıklatın.
c
- “New” [“Yeni”] öğesini tıklatarak yeni bir makro yaratın.
- Yeni makronun adını girin.
- “OK” [“ONAY”] öğesini tıklatın.
9.
Bir makro kaydedin.
a
- Yaratılmış bir makro seçin.
b
- Tercih edilen klavye tuş basma sırasının kaydını başlatmak için kaydet tuşunu tıklatın.
- Makronuzu yaratma işi bittiğinde. Durdur tuşunu tıklatın.
c
- Sağdaki menü kullanılarak fare işlemleri eklenebilir (kayıttan sonra).
- Makro yaratmayı bitirdiğinizde “Macro manager” [“Makro yöneticisi”] öğesini kapatın.
Bir makro atayın
- Bir makro atamak için, 8 a/b adımlarını takip edin ve fonksiyon listesinden tercih edilen makroyu seçin.
- “Apply” [“Uygula”] öğesini tıklatın Fare güncellenir.
Profil ayarları
10. a Bir profil seçin
- Tercih edilen profil üzerine tıklatarak 5 profilden birini seçin.
10.
Özel bir ayar Kaydedin veya Yükleyin
a
- Bir ayar kaydetmek için “Save as” [“Farklı kaydet”] veya bir ayar yüklemek için “Load File” [“Dosya
Yükle”] öğesini tıklatın.
b
- Fare ayarı için bir ad girin veya yüklemek için tercih edilen profili seçin.
- “Save/Open” [“Kaydet/Aç”] öğesini tıklatın.
- Fare ayarınız kaydedilir/yüklenir.
11.
arsayılan ayarları geri yükleme
a
- Tüm profilleri sıfırlamak için, “Reset All” [“Tümünü Sıfırla”] öğesini tıklatın.
- 1 profili (o sırada seçili olan profili) geri yüklemek için “Restore” [“Geri Yükle”] öğesini tıklatın).
b
- Tüm ayarları sıfırlamak için “OK” [“ONAY”] öğesini tıklatın.
- “Apply” [“Uygula”] öğesini tıklatın Fare güncellenir.
(Programda bir tuş sırası kaydedin)
Oyuna özel profilleri Trust web sitesinden indirin: http://www.trust.com/20411.
61
Page 65

GXT 155 Gaming Mouse - USER’S MANUAL
Raspored tipki
- Tipka 1 (lijevi klik mišem)
a
- Tipka 3 (kotačić za pomicanje)
b
- LED kotačića za pomicanje (profil
c
žaruljica)
d
- Tipka 2 (zadana funkcija = desni klik mišem)
e
- Tipka 4 (zadana funkcija = trostruki klik mišem)
f
- Tipka 5 (zadana funkcija = DPI+)
g
- Tipka 6 (zadana funkcija = DPI-)
h
- Bočne tipke 7-11
i
- Prekidač profila (ne može se programirati)
j
- Pretinac s podesivim utegama
Instalacija
a - Umetnite Trust CD-ROM u CD pogon.
- Kliknite na „Run Setup.exe – Published by Trust International BV“ [„Pokreni Setup.exe – Published
1.
2.
3.
Miš može pohraniti 5 različitih profila. Možete odmah prebacivati između tih profila dodjeljivanjem funkcije
zamjena profila jednoj od 11 tipki, ili koristite prekidač profila na dnu miša.
by Trust International BV“].
b - Kliknite na „Install driver“ [„Instaliraj upravljački program“].
c - Kliknite na „Finish“ [„Dovršeno“] kada instalacija bude završena.
a - Priključite miša na USB priključak na računalu.
b - Pričekajte dok se ne pojavi poruka „Your device is ready to use“ [„Vaš uređaj je spreman za
uporabu“].
a - Pokrenite program za konfiguraciju miša (nalazi se na traci sa zadacima).
b - Sada možete započeti s konfiguriranjem miša. U priručniku će biti navedeno „Apply“ [„Primijeni“] da
ažurirate miša.
Žuta profil 1
Zelena profil 2
Plava profil 3
Ljubičasta profil 4
Crvena profil 5
62
Page 66

GXT 155 Gaming Mouse - USER’S MANUAL
Programiranje tipki
4.
Zadavanje funkcije.
a
- Kliknite na karticu „General“ [„Opće“].
b
- Kliknite na tipku kojoj želite promijeniti funkciju.
c
- Kliknite na funkciju koju želite zadati.
- Kliknite na „Apply“ [„Primijeni“] Miš se ažurira.
5.
Zadavanje funkcije bočnim tipkama.
a
- Na kartici „General“ [„Opće“] kliknite na „Side“ [„Bočno“] da biste vidjeli bočne tipke.
b
- Kliknite na tipku kojoj želite promijeniti funkciju.
c
- Kliknite na funkciju koju želite zadati.
- Kliknite na „Apply“ [„Primijeni“] Miš se ažurira.
DPI postavke
6.
Izmjena DPI postavki
a
- Kliknite na „DPI“.
b
- Izmjena DPI postavki pomicanjem klizača.
c
- Kliknite na DPI broj da omogućite ili onemogućite ove postavke.
- Kliknite na „Apply“ [„Primijeni“] Miš se ažurira.
Za postavljanje X i Y osi odvojeno, ispraznite kvadratić „LINK XY“ [„VEZA XY“].
Postavke upravitelja svjetla [Light Manager Settings]
7.
Izmjena LED svjetla
a
- Kliknite na „Light“ [„Svjetlo“].
b
- Odaberite željenu LED boju ili odaberite prilagođenu boju.
c
- Izmjena razine svjetline i brzine uključivanja i isključivanja.
- Kliknite na „Apply“ [„Primijeni“] Miš se ažurira.
(profili i DPI postavke su povezane)
63
Page 67

GXT 155 Gaming Mouse - USER’S MANUAL
V
Makro postavke
8.
Napravite makro.
- Idite na karticu „General“ [„Opće“].
a
- Kliknite na tipku kojoj želite promijeniti funkciju.
b
- Pokazivačem stanite iznad „Macro“ [„Makro“].
- Kliknite na „Macro Manager“ [„Makro menadžer“].
c
- Izradite novi makro klikom na „New“ [„Novo“].
- Unesite naziv novog makroa.
- Kliknite na „OK“ [„U redu“].
9.
Snimanje makroa.
a
- Odaberite napravljeni makro.
b
- Kliknite na tipku za snimanje za početak snimanja preferiranog slijeda tipkovnice.
- Kad završite s kreiranjem makro naredbe. Kliknite na tipku za zaustavljanje.
c
- Postupci miša mogu se dodati pomoću izbornika na desnoj strani (nakon snimanja).
- Zatvorite „Macro manager“ [„Makro menadžer“] kad ste gotovi s kreiranjem makro naredbi.
Dodjela makroa.
- Za dodjelu makroa slijedite korake 8 a/b i odaberite preferirani makro s popisa funkcija.
- Kliknite na „Apply“ [„Primijeni“] Miš se ažurira.
Postavke profila
10. a Odabir profila
- Odaberite jedan od 5 profila klikom na preferirani profil.
10.
Spremanje ili učitavanje prilagođene postave
a
- Kliknite na „Save as“ [„Spremi kao“] za spremanje postave ili „Load File“ [„Učitati datoteku“] za
učitavanje postave.
b
- Unesite naziv postave miša ili odaberite preferirani profil za učitavanje.
- Kliknite na „Save/Open“ [„Spremi/Otvori“].
- Vaša postava miša je sada spremljena/učitana.
11.
raćanje tvorničkih postavki
a
- Kliknite na „Reset All“ [„Resetiraj sve“] da resetirate sve profile.
- Kliknite na „Restore“ [„Vraćanje“] da vratite 1 profil (trenutno izabrani profil).
b
- Kliknite na „OK“ [„U redu“] da resetirate sve postavke.
- Kliknite na „Apply“ [„Primijeni“] Miš se ažurira.
(Spremite slijed tastera u softveru)
Preuzimanje profila za određene igre na Trust web stranici na http://www.trust.com/20411.
64
Page 68

GXT 155 Gaming Mouse - USER’S MANUAL
Razporeditev miške
- Gumb 1 (levi gumb miške)
a
- Gumb 3 (kolešček)
b
- Kolešček LED (profil prikazovalnik)
c
d
- Gumb 2 (privzeta funkcija = desni miškin klik)
e
- Gumb 4 (privzeta funkcija = trikratni miškin klik)
f
- Gumb 5 (privzeta funkcija = DPI+)
g
- Gumb 6 (privzeta funkcija = DPI-)
h
- Stranske tipke 7-11
i
- Profilni gumb (ni programljiv)
j
- Nastavljiv predal za uteži
Namestitev
a - V CD pogon vstavite Trust CD-ROM.
- Kliknite »Run Setup.exe – Published by Trust International BV« [»Zaženi Setup.exe – Published by
1.
Trust International BV«].
b - Kliknite na ukaz »Install driver« [»Namesti gonilnik«].
c - Ko je namestitev končana, kliknite »Finish« [»Končaj«].
a - Miško priključite na USB vrata vašega PC-ja.
2.
b - Počakajte, da se prikaže sporočilo »Your device is ready to use« [»Vaša naprava je pripravljena za
uporabo«].
a - Zaženite programsko opremo za konfiguriranje miške (nahaja se v opravilni vrstici).
3.
b - Sedaj lahko pričnete s konfiguriranjem miške. V priročniku se bo sklicevalo na »Apply« [»Uporabi«]
V miški se lahko shrani 5 različnih profilov. Nemudoma lahko preklapljate med temi profili z dodeljevanjem
funkcij profilnega gumba na enem izmed 11 gumbov ali uporabite profilni gumb na dnu miške.
za posodobitev miške.
Rumena profil 1
Zelena profil 2
Modra profil 3
Vijolična profil 4
Rdeča profil 5
65
Page 69

GXT 155 Gaming Mouse - USER’S MANUAL
Programiranje tipk
4.
Določite funkcijo.
a
- Kliknite na gumb »General« [»Splošno«].
b
- Kliknite na gumb, ki ga želite ponovno določiti.
c
- Kliknite na funkcijo, ki jo želite določiti.
- Kliknite na »Apply« [»Uporabi«] Miška se posodablja.
5.
Dodelite funkcijo stranskim gumbom.
a
- Na zaviku »General« [»Splošno«], kliknite na »Side« [»Stransko«], da bi videli stranske gumbe.
b
- Kliknite na gumb, ki ga želite ponovno določiti.
c
- Kliknite na funkcijo, ki jo želite določiti.
- Kliknite na »Apply« [»Uporabi«] Miška se posodablja.
DPI nastavitve
6.
Spremenite DPI nastavitve
a
- Kliknite na »DPI«.
b
- Spremenite DPI nastavitve s premikanjem drsnikov.
c
- Kliknite DPI številke za omogočanje ali onemogočanje teh nastavitev.
- Kliknite na »Apply« [»Uporabi«] Miška se posodablja.
Za nastavljanje X in Y osi posamezno, odkljukajte okence »LINK XY« [»POVEZAVA XY«].
Upravitelj nastavitve svetlobe [Light Manager Settings]
7.
Spremenite LED svetlobo
a
- Kliknite na »Light« [»Svetloba«].
b
- Izberite želeno LED barvo ali izberite poljubno barvo.
c
- Spremenite stopnjo osvetlitve in hitrost dihanja.
- Kliknite na »Apply« [»Uporabi«] Miška se posodablja.
(profili in DPI nastavitve so povezane)
66
Page 70

GXT 155 Gaming Mouse - USER’S MANUAL
Nastavitve makrov
8.
Ustvari makro.
- Pojdi na zavihek »General« [»Splošno«].
a
- Kliknite na gumb, ki ga želite ponovno določiti.
b
- Lebdi nad »Macro« [»Makrom«].
- Klikni na »Macro Manager« [»Upravitelj makrov«].
c
- Ustvarite nov makro s klikom na »New« [»Novo«].
- Vpišite ime novega makra.
- Kliknite na »OK« [»V redu«].
9.
Posnemi makro.
a
- Izberite ustvarjeni makro.
b
- Kliknite na gumb snemaj, da bi pričeli snemati željeno zaporedje tipk.
- Ko končate z ustvarjanjem vašega makra. Kliknite na gumb stop.
c
- Učinki miške se lahko dodajo, z uporabo menija na desni (po snemanju).
- Ko končate z ustvarjanjem makrov, zaprite »Macro manager« [»Upravitelja makrov«].
Dodelite makro.
Za dodelitev makra, sledite korakom 8 a/b in izberite želeni makro s seznama funkcij.
- Kliknite na »Apply« [»Uporabi«] Miška se posodablja.
Nastavitve profila
10. a Izberite profil
- Izberite enega izmed 5 profilov s klikom na želeni profil.
10.
Shranite ali naložite nastavitve po meri
a
- Kliknite na »Save as« [»Shrani kot«], da shranite nastavitev ali »Load File« [»Zaženi datoteko«], da
zaženete nastavitev.
b
- Vpišite ime za nastavitev miške ali izberite želeni profil za zagon.
- Kliknite na »Save/Open« [»Shrani/Odpri«].
- Nastavitve vaše miške so sedaj shranjene/naložene.
11.
Obnovi privzete nastavitve
a
- Kliknite na »Reset All« [»Ponastavi vse«], da ponastavite vse profile.
- Kliknite na »Restore« [»Obnovi«], da obnovite 1 profil (trenutno izbrani profil).
b
- Kliknite na »OK« [»V redu«], da ponastavite vse nastavitve.
- Kliknite na »Apply« [»Uporabi«] Miška se posodablja.
(Shranite zaporedje tipk v programsko opremo)
Snemite specifične profile za igrice s spletne strani Trust http://www.trust.com/20411.
67
Page 71

GXT 155 Gaming Mouse - USER’S MANUAL
Izgled miša
- Taster 1 (levi taster miša)
a
- Taster 3 (točkić za pomeranje)
b
- LED točkića za pomeranje (profil
c
svetlo)
d
- Taster 2 (unapred određena funkcija = desni klik mišem)
e
- Taster 4 (unapred određena funkcija = trostruki klik mišem)
f
- Taster 5 (unapred određena funkcija = DPI+)
g
- Taster 6 (unapred određena funkcija = DPI-)
h
- Bočni tasteri 7-11
i
- Prekidač profila (ne može se programirati)
j
- Pregrada s podesivim tegovima
Instalacija
a - Stavite Trust CD-ROM u CD drajv.
- Kliknite „Run Setup.exe – Published by Trust International BV“ [„Pokreni Setup.exe – Published by
1.
Trust International BV“].
b - Kliknite „Install driver“ [„Instaliraj drajver“].
c - Kliknite „Finish“ [„Završi“] kada instalacija bude završena.
a- Priključite miš na USB priključak računara.
2.
b- Sačekajte dok se ne pojavi poruka „Your device is ready to use“ [„Vaš uređaj je spreman za
upotrebu“].
a- Pokrenite softver za podešavanje miša (nalazi se na paleti sa zadacima).
3.
b - Sada možete početi s podešavanjem miša. U ovom priručniku komanda „Apply“ [„Primeni“] odnosi
Miš može da memoriše 5 profila. Možete brzo da menjate ove profile dodeljivanjem funkcije zamene profila
nekom od 11 tastera ili tako što ćete koristiti prekidač profila koji se nalazi na dnu miša.
se na ažuriranje miša.
Žuto profil 1
Zeleno profil 2
Plavo profil 3
Ljubičasto profil 4
Crveno profil 5
68
Page 72

GXT 155 Gaming Mouse - USER’S MANUAL
Programiranje tastera
4.
Dodeljivanje funkcije.
a
- Kliknite na karticu „General“ [„Opšte“].
b
- Kliknite na taster čiju funkciju hoćete da promenite.
c
- Kliknite na funkciju koju želite da dodelite.
- Kliknite na „Apply“ [„Primeni“] Miš se ažurira.
5.
Dodeljivanje funkcije bočnim tasterima.
a
- Na kartici „General“ [„Opšte“] kliknite na „Side“ [„Bočno“] da biste videli bočne tastere.
b
- Kliknite na taster čiju funkciju hoćete da promenite.
c
- Kliknite na funkciju koju želite da dodelite.
- Kliknite na „Apply“ [„Primeni“] Miš se ažurira.
DPI postavke
6.
Promena DPI postavki
a
- Kliknite na „DPI“.
b
- Promenite DPI postavke pomeranjem klizača.
c
- Kliknite na DPI broj da biste omogućili ili onemogućili ovu postavku.
- Kliknite na „Apply“ [„Primeni“] Miš se ažurira.
Da biste zasebno podesili X i Y osu, ispraznite kvadratić „LINK XY“ [„VEZA XY“].
Postavke upravljača osvetljenja [Light Manager Settings]
7.
Promena LED osvetljenja
a
- Kliknite na „Light“ [„Svetlo“].
b
- Izaberite željenu boju LED osvetljenja ili izaberite prilagođenu boju.
c
- Promenite jačinu i brzinu uključivanja i isključivanja.
- Kliknite na „Apply“ [„Primeni“] Miš se ažurira.
(profili i DPI postavke su povezani)
69
Page 73

GXT 155 Gaming Mouse - USER’S MANUAL
V
Makro postavke
8.
Izrada makroa.
- Idite na karticu „General“ [„Opšte“].
a
- Kliknite na taster čiju funkciju hoćete da promenite.
b
- Postavite kursor iznad „Macro“ [„Makro“].
- Kliknite na „Macro Manager“ [„Upravljač makroima“].
c
- Napravite novi makro klikom na „New“ [„Novo“].
- Upišite naziv novog makroa.
- Kliknite na „OK“ [„U redu“].
9.
Snimanje makroa.
a
- Izaberite napravljeni makro.
b
- Kliknite na taster za snimanje da biste počeli sa snimanjem željenog niza na tastaturi.
- Kada završite sa izradom makroa. Kliknite na taster za zaustavljanje.
c
- Postupci miša mogu biti dodati korišćenjem menija na desnoj strani (posle snimanja).
- Zatvorite „Macro manager“ [„Upravljač makroima“] kada završite sa izradom makroa.
Dodeljivanje makroa.
- Da biste dodelili makro, sledite korake 8 a/b i izaberite željeni makro sa spiska funkcija.
- Kliknite na „Apply“ [„Primeni“] Miš se ažurira.
Postavke profila
10. a Odabir profila
- Izaberite neki od 5 profila tako što ćete kliknuti na željeni profil.
10.
Čuvanje ili memorisanje prilagođene postavke
a
- Kliknite na „Save as“ [„Sačuvaj kao“] da biste sačuvali postavku ili na „Load File“ [„Učitaj datoteku“] da
biste učitali postavku.
b
- Upišite naziv postavke miša ili izaberite željeni profil koji ćete učitatit.
- Kliknite na „Save/Open“ [„Sačuvaj/Otvori“].
- Vaša postavka miša je sada sačuvana/učitana.
11.
raćanje unapred određenih postavki
a
- Kliknite na „Reset All“ [„Resetuj sve“] da biste resetovali sve profile.
- Kliknite na „Restore“ [„Vraćanje“] da biste vratili 1 profil (trenutno izabrani profil).
b
- Kliknite na „OK“ [„U redu“] da biste resetovali sve postavke.
- Kliknite na „Apply“ [„Primeni“] Miš se ažurira.
(Sačuvajte niz tastera u softveru)
Preuzmite profile specifične za neku igru sa Trust vebsajta na http://www.trust.com/20411.
70
Page 74

GXT 155 Gaming Mouse - USER’S MANUAL
Layout do mouse
- Botão 1 (botão esquerdo do mouse)
a
- Botão 3 (Roda de rolagem)
b
- LED da roda de rolagem (indicador
c
perfil)
d
- Botão 2 (função padrão = clique com o botão direito do mouse)
e
- Botão 4 (função padrão = clique triplo no mouse)
f
- Botão 5 (função padrão = DPI+)
g
- Botão 6 (função padrão = DPI-)
h
- Botões laterais 7-11
i
- Mudança de perfil (não programável)
j
- Compartimentos de pesos ajustáveis
Instalação
a - Insira o CD-ROM da Trust em sua unidade de CD.
- Clique em “Run Setup.exe – Published by Trust International BV” [Executar Setup.exe – Publicado
1.
2.
3.
O mouse pode armazenar 5 perfis diferentes. É possível alternar entres esses perfis instantaneamente ao
atribuir a função de alternância de perfil a um dos 11 botões ou usar a alternância de perfil na parte inferior do
mouse.
pela Trust International BV].
b - Clique em “Install driver” [Instalar driver].
c - Clique em ‘Finish’ [Terminar] quando a instalação estiver concluída.
a - Conecte o mouse à porta USB do PC.
b - Aguarde até a mensagem ‘Your device is ready to use’ [Seu dispositivo está pronto para uso]
aparecer.
a - Inicie o software de configuração do mouse (localizado na barra de tarefas).
b - Agora é possível configurar o mouse. No manual constará ‘Apply’ [Aplicar] para atualizar o mouse.
Amarelo perfil 1
Verde perfil 2
Azul perfil 3
Roxo perfil 4
Vermelho perfil 5
71
Page 75

GXT 155 Gaming Mouse - USER’S MANUAL
Programação do botão
4.
Atribuir uma função.
a
- Clique na guia ‘General’ [Geral].
b
- Clique no botão que deseja reatribuir.
c
- Clique na função que deseja atribuir.
- Clique em ‘Apply’ [Aplicar] O mouse está sendo atualizado.
5.
Atribuir uma função aos botões laterais.
a
- Na guia ‘General’ [Geral], clique em ‘Side’ [lateral] para visualizar os botões laterais.
b
- Clique no botão que deseja reatribuir.
c
- Clique na função que deseja atribuir.
- Clique em ‘Apply’ [Aplicar] O mouse está sendo atualizado.
Configurações de DPI
6.
Alterar as configurações de DPI
a
- Clique em ‘DPI’.
b
- Altere as configurações de DPI ao mover os controles deslizantes.
c
- Clique no número do DPI para ativar ou desativar essa configuração.
- Clique em ‘Apply’ [Aplicar] O mouse está sendo atualizado.
Para definir os eixos X e Y separadamente, Desmarque a caixa ‘LINK XY’.
Configurações de gerenciador de luz [Light Manager Settings]
7.
Alterar a luz do LED
a
- Clique em ‘Light’ [Luz].
b
- Selecione a cor de LED desejada ou selecione uma cor personalizada.
c
- Altere o nível do brilho e a velocidade de breathing.
- Clique em ‘Apply’ [Aplicar] O mouse está sendo atualizado.
(configurações de perfis e DPI são vinculadas)
72
Page 76

GXT 155 Gaming Mouse - USER’S MANUAL
Configurações de Macro
8.
Criar uma macro.
- Acesse a guia ‘General’ [Geral].
a
- Clique no botão que deseja reatribuir.
b
- Passe o cursor sobre ‘Macro’.
- Clique em ‘Macro Manager’ [Gerenciador de Macro].
c
- Crie uma nova macro ao clicar em ‘New’ [Novo].
- Insira o nome da nova macro.
- Clique em ‘OK’.
9.
Gravar uma macro.
a
- Selecione uma macro criada.
b
- Clique no botão gravar para iniciar a gravação da sequência de teclado preferida.
- Quando terminar de criar sua macro. Clique no botão ‘stop’ [parar].
c
- Ações do mouse podem ser adicionadas utilizando o menu à direita (após a gravação).
- Feche o ‘macro manager’ [gerenciador de macros] quando concluir a criação de macros.
Atribuir uma macro.
- Para atribuir uma macro, siga as etapas 8 a/b e escolha a macro de preferência na lista de funções.
- Clique em ‘Apply’ [Aplicar] O mouse está sendo atualizado.
Configurações de perfil
10. a Selecionar um perfil
- Selecione um dos 5 perfis clicando no perfil de preferência.
10.
Salvar ou Carregar uma configuração personalizada
a
- Clique em ‘Save as’ [Salvar como] para salvar uma configuração ou ‘Load File’ [Carregar arquivo] para
carregar uma configuração.
b
- Insira um nome para a configuração do mouse ou escolha o perfil de preferência para carregar.
- Clique em ‘Save/Open’ [Salvar/Abrir].
- A configuração do seu mouse está salva/carregada.
11.
Restaurar configurações padrão
a
- Clique em ‘Reset All’ [Redefinir todos] para redefinir todos os perfis.
- Clique em ‘Restore’ [Restaurar] para restaurar 1 perfil (perfil atualmente selecionado).
b
- Clique em ‘OK’ para redefinir todas as configurações.
- Clique em ‘Apply’ [Aplicar]
(Armazenar uma sequência de teclas no software)
O mouse está sendo atualizado.
Faça o download de perfis específicos para jogos no site da Trust http://www.trust.com/20411.
73
Page 77

GXT 155 Gaming Mouse - USER’S MANUAL
- ﺮﺷﺆﻣ ﺔﻠﺠﻌﻟا ةراوﺪﻟا )ﺮﺷﺆﻣ ﻂـــﻤﻨﻟا(
ﺮﻔﺻأ ﻂـــﻤﻨﻟا 1
ﺮﻀﺧأ ﻂـــﻤﻨﻟا 2
قرزأ ﻂـــﻤﻨﻟا 3
ﻲﻧاﻮﺟرأ ﻂـــﻤﻨﻟا 4
ﺮﻤﺣأ ﻂـــﻤﻨﻟا 5
ﻂﻄﺨﻣ سوﺎﻤﻟا
- رﺰﻟا 1 )رز سوﺎﻤﻟا ﺮﺴﻳﻷا(
a
- رﺰﻟا 3 )ﺔﻠﺠﻌﻟا ةراوﺪﻟا(
b
c
d
- رﺰﻟا 2 )ﺔﻔﯿظﻮﻟا ﺮﺘﻓﻻاﺔﯿﺿا =ﺮﻘﻧ سوﺎﻤﻟا ﻦﻤﻳﻷا(
e
- رﺰﻟا 4 )ﺔﻔﯿظﻮﻟا ﺔﯿﺿاﺮﺘﻓﻻا =ﺮﻘﻧ سوﺎﻤﻟا ﺔﯿﺛﻼﺜﻟا(
f
- رﺰﻟا 5 )ﺔﻔﯿظﻮﻟا ﺔﯿﺿاﺮﺘﻓﻻا =DPI+(
g
- رﺰﻟا 6 )ﺔﻔﯿظﻮﻟا ﺔﯿﺿاﺮﺘﻓﻻا =DPI-(
h
- رارزﻷا ﺔﯿﺒﻧﺎﺠﻟا 7-11
i
- حﺎﺘﻔﻣ ﻂﻤﻨﻟا )ﺮﯿﻏ ﻞﺑﺎﻗ ﺔﺠﻣﺮﺒﻠﻟ(
j
- ﺔﺒﻠﻋ نازوﻷا ﺔﻠﺑﺎﻘﻟا ﻞﻳﺪﻌﺘﻠﻟ
ﺖﯿﺒﺜﺘﻟا
a - ﻞﺧدأ صﺮﻘﻟا طﻮﻐﻀﻤﻟا Trust ﻲﻓ كﺮﺤﻣ صاﺮﻗﻷا ﺔطﻮﻐﻀﻤﻟا.
- ﺮﻘﻧا ﻰﻠﻋ "Run Setup.exe – Published by Trust International BV."
1.
b - ﺮﻘﻧا ﻰﻠﻋ "Install driver" (ﺖﯿﺒﺜﺗ ﻞﻐﺸﻤﻟا).
c - ﺮﻘﻧا ﻰﻠﻋ "Finish" ﺪﻨﻋ لﺎﻤﺘﻛا ﺖﯿﺒﺜﺘﻟا.
a - ﻢﻗ ﻞﯿﺻﻮﺘﺑ وﺎﻤﻟاس ﺬﻔﻨﻤﺑ USB ﺮﺗﻮﯿﺒﻤﻜﻟﺎﺑ.
2.
b - ﺮﻈﺘﻧا ﻰﻟإ نأ ﺮﮫﻈﺗ ﺔﻟﺎﺳر "Your device is ready to use" (كزﺎﮫﺟ ﺰھﺎﺟ ماﺪﺨﺘﺳﻼﻟ).
a - ﻢﻗ ﻞﯿﻐﺸﺘﺑ ﺞﻣﺎﻧﺮﺑ ﺔﺌﯿﮫﺗ سوﺎﻤﻟا )دﻮﺟﻮﻤﻟا ﻲﻓ ﻂﻳﺮﺷ مﺎﮫﻤﻟا).
3.
b - ﻚﻨﻜﻤﻳ ءﺪﺑ ﺔﺌﯿﮫﺗ سوﺎﻤﻟا نﻵا .فﻮﺳ رﺎﺸﻳ ﻲﻓ ﻞﯿﻟﺪﻟا ﻰﻟإ 'Apply' ﺚﻳﺪﺤﺘﻟ سوﺎﻤﻟا.
ﺘﺴﻳﻊﯿﻄ سوﺎﻤﻟا ﻦﻳﺰﺨﺗ 5 طﺎﻤﻧأ ﺔﻔﻠﺘﺨﻣ .ﻚﻨﻜﻤﻳ ﻞﻳﺪﺒﺘﻟا ﻰﻠﻋ رﻮﻔﻟا ﻦﯿﺑ هﺬھ طﺎﻤﻧﻷا ﻦﯿﯿﻌﺘﺑ ﺔﻔﯿظو حﺎﺘﻔﻣ ﻂﻤﻨﻟا ﻰﻠﻋ ﺪﺣأ ـﻟا
11 ارز وأ ماﺪﺨﺘﺳا حﺎﺘﻔﻣ ﻂﻤﻨﻟا ﻲﻓ ﻞﻔﺳأ سوﺎﻤﻟا.
74
Page 78

GXT 155 Gaming Mouse - USER’S MANUAL
ﻢ
ﻢ
ﺮ
ﺮ
ﺔﺠﻣﺮﺑ رارزﻷا
ﻗ ﻦﯿﯿﻌﺘﺑ ﺔﻔﯿظو.
4.
- ﺮﻘﻧا ﻰﻠﻋ ﺔﻣﻼﻋ ﺐﻳﻮﺒﺘﻟا 'General' .
a
- ﺮﻘﻧا ﻰﻠﻋ رﺰﻟا يﺬﻟا ﺪﻳﺮﺗ دﺎﻋإة ﻪﻨﯿﯿﻌﺗ.
b
- ﺮﻘﻧا ﻰﻠﻋ ﺔﻔﯿظﻮﻟا ﻲﺘﻟا ﺪﻳﺮﺗ ﺎﮫﻨﯿﯿﻌﺗ.
c
- ﺮﻘﻧا ﻰﻠﻋ ‘Apply ’ ﻢﺘﻳ ﺚﻳﺪﺤﺗ سوﺎﻤﻟا.
ﻗ ﻦﯿﯿﻌﺘﺑ ﺔﻔﯿظو رارزﻸﻟ ﺔﯿﺒﻧﺎﺠﻟا.
5.
- ﺮﻘﻧا ﻰﻠﻋ 'Side 'ﻲﻓ ﺔﻣﻼﻋ ﺐﻳﻮﺒﺘﻟا 'General 'ضﺮﻌﻟ رارزﻷا ﺔﯿﺒﻧﺎﺠﻟا.
a
- ﺮﻘﻧا ﻰﻠﻋ رﺰﻟا يﺬﻟا ﺪﻳﺮﺗ ةدﺎﻋإ ﻪﻨﯿﯿﻌﺗ.
b
- ﺮﻘﻧا ﻰﻠﻋ ﯿظﻮﻟاﺔﻔ ﻲﺘﻟا ﺪﻳﺮﺗ ﺎﮫﻨﯿﯿﻌﺗ.
c
- ﺮﻘﻧا ﻰﻠﻋ ‘Apply ’ ﻢﺘﻳ ﺚﻳﺪﺤﺗ سوﺎﻤﻟا.
تاداﺪﻋإ DPI
)طﺎﻤﻧأ تاداﺪﻋإو DPI ﺔﻄﺒﺗﺮﻣ(
ﯿﯿﻐﺗ تاداﺪﻋإ DPI
6.
- ﺮﻘﻧا ﻰﻠﻋ ‘DPI.’
a
- ﻢﻗ ﺮﯿﯿﻐﺘﺑ تاداﺪﻋإ DPI ﻚﻳﺮﺤﺘﺑ ﻂﺋاﺮﺷ ﺮﻳﺮﻤﺘﻟا.
b
- ﺮﻘﻧا ﻰﻠﻋ ﻢﻗر DPI ﻦﯿﻜﻤﺘﻟ وأ ﻞﯿﻄﻌﺗ اﺬھ داﺪﻋﻹا.
c
- ﺮﻘﻧا ﻰﻠﻋ ‘Apply ’ ﻢﺘﻳ ﺚﻳﺪﺤﺗ سوﺎﻤﻟا.
ﻦﯿﯿﻌﺘﻟ رارزأ رﻮﺤﻤﻟا X و Y ﻞﻜﺸﺑ ،ﻞﺼﻔﻨﻣ ﻢﻗ ءﺎﻐﻟﺈﺑ ﻢﯿﻠﻌﺘﻟا ﻰﻠﻋ ﺔﻧﺎﺧ ‘LINK XY.’
تاداﺪﻋإ Light Manager
ﯿﯿﻐﺗ ءﻮﺿ ﺮﺷﺆﻤﻟا
7.
- ﺮﻘﻧا ﻰﻠﻋ ‘Light.’
a
- ﺮﺘﺧا نﻮﻟ ﺮﺷﺆﻤﻟا بﻮﻠﻄﻤﻟا وأ ﺮﺘﺧا ﺎﻧﻮﻟ ﺎﺼﺼﺨﻣ.
b
- ﺮﯿﯿﻐﺗ ىﻮﺘﺴﻣ عﻮﻄﺴﻟا ﺔﻋﺮﺳو ﺲﯿﻔﻨﺘﻟا.
c
- ﺮﻘﻧا ﻰﻠﻋ ‘Apply ’ ﻢﺘﻳ ﺚﻳﺪﺤﺗ سوﺎﻤﻟا.
75
Page 79

GXT 155 Gaming Mouse - USER’S MANUAL
ﻢ
ﻢ
ﻢ
ﺮ
ﻆ
تاداﺪﻋإ وﺮﻛﺎﻤﻟا
)ﻢﻗ ﻦﻳﺰﺨﺘﺑ ﻞﺴﻠﺴﺗ ﺢﯿﺗﺎﻔﻤﻟا ﻲﻓ ﺞﻣﺎﻧﺮﺒﻟا(
ﻗ ءﺎﺸﻧﺈﺑ وﺮﻛﺎﻣ.
8.
- ﻞﻘﺘﻧا ﻰﻟإ ﺔﻣﻼﻋ ﺐﻳﻮﺒﺘﻟا ‘General.’
- ﺮﻘﻧا ﻰﻠﻋ رﺰﻟا يﺬﻟا ﺪﻳﺮﺗ ةدﺎﻋإ ﻪﻨﯿﯿﻌﺗ.
a
– ﻢﻗ ﻢﻳﻮﺤﺘﻟﺎﺑ قﻮﻓ ‘Macro.’
b
- ﺮﻘﻧا ﻰﻠﻋ ‘Macro Manager.’
- ﻢﻗ ءﺎﺸﻧﺈﺑ وﺮﻛﺎﻣ ﺪﻳﺪﺟ ﺮﻘﻨﻟﺎﺑ ﻰﻠﻋ ‘New.’
c
- ﻞﺧدأ ﻢﺳا وﺮﻛﺎﻤﻟا ﺪﻳﺪﺠﻟا.
- ﺮﻘﻧا ﻰﻠﻋ ‘OK.’
ﻗ ﻞﯿﺠﺴﺘﺑ وﺮﻛﺎﻣ.
9.
- ﺮﺘﺧا وﺮﻛﺎﻣ ﻢﺗ هؤﺎﺸﻧإ.
a
- ﺮﻘﻧا ﻰﻠﻋ رز ﻞﯿﺠﺴﺘﻟا ءﺪﺒﻟ ﻞﯿﺠﺴﺗ ﻞﺴﻠﺴﺗ ﺔﺣﻮﻟ ﺢﯿﺗﺎﻔﻤﻟا ﻞﻀﻔﻤﻟا.
b
- ﺪﻨﻋ ءﺎﮫﺘﻧﻻا ﻦﻣ ءﺎﺸﻧإ وﺮﻛﺎﻤﻟا .ﺮﻘﻧا ﻰﻠﻋ رز ﻒﻗﻮﺘﻟا.
- ﻦﻜﻤﻳ ﺔﻓﺎﺿإ تاءاﺮﺟإ سوﺎﻤﻟا ماﺪﺨﺘﺳﺎﺑ ﺔﻤﺋﺎﻘﻟا ةدﻮﺟﻮﻤﻟا ﻰﻠﻋ ﻦﯿﻤﯿﻟا )ﺪﻌﺑ ﻞﯿﺠﺴﺘﻟا.(
c
- ﻖﻠﻏأ ‘macro manager ’ﺎﻣﺪﻨﻋ ﻢﺘﻳ ءﺎﺸﻧإ تاﺪﺣو وﺮﻛﺎﻤﻟا.
ﻗ ﻦﯿﯿﻌﺘﺑ وﺮﻛﺎﻣ.
- ﻦﯿﯿﻌﺘﻟ ،وﺮﻛﺎﻣ ﻊﺒﺗا تاﻮﻄﺨﻟا 8 a/b ﺮﺘﺧاو وﺮﻛﺎﻤﻟا ﻞﻀﻔﻤﻟا ﻦﻣ ﺔﻤﺋﺎﻗ ﻒﺋﺎظﻮﻟا.
- ﺮﻘﻧا ﻰﻠﻋ ‘Apply ’ ﻢﺘﻳ ﺚﻳﺪﺤﺗ سوﺎﻤﻟا.
تاداﺪﻋإ ﻂﻤﻨﻟا
ﺘﺧا ﺎﻄﻤﻧ
10.
- ﺮﺘﺧا ﺪﺣأ طﺎﻤﻧأ ﺔﺴﻤﺨﻟا ﺮﻘﻨﻟﺎﺑ ﻰﻠﻋ ﻂﻤﻨﻟا ﻞﻀﻔﻤﻟا.
a
ﻔﺣ وأ ﻞﯿﻤﺤﺗ داﺪﻋإ ﺺﺼﺨﻣ
10.
- ﺮﻘﻧا ﻰﻠﻋ ‘Save as ’ﻆﻔﺤﻟ داﺪﻋإ وأ ﻰﻠﻋ ‘Load File ’ ﻞﯿﻤﺤﺘﻟ داﺪﻋإ.
a
- ﻞﺧدأ ًﺎﻤﺳا داﺪﻋﻹ سوﺎﻤﻟا وأ ﺮﺘﺧا ﻂﻤﻨﻟا ﻞﻀﻔﻤﻟا ﻪﻠﯿﻤﺤﺘﻟ.
b
- ﻧاﺮﻘ ﻰﻠﻋ ‘Save/Open.’
- ﻢﺘﻳ نﻵا ﻆﻔﺣ/ﻞﯿﻤﺤﺗ داﺪﻋإ سوﺎﻤﻟا.
ةدﺎﻌﺘﺳا تاداﺪﻋﻹا ﺔﯿﺿاﺮﺘﻓﻻا
11.
- ﺮﻘﻧا ﻰﻠﻋ ‘Reset All ’ةدﺎﻋﻹ ﻂﺒﺿ ﻊﯿﻤﺟ طﺎﻤﻧﻷا.
a
- ﺮﻘﻧا ﻰﻠﻋ ‘Restore ’ةدﺎﻌﺘﺳﻻ ﻂﻤﻨﻟا 1 )ﻂﻤﻨﻟا رﺎﺘﺨﻤﻟا ﺎﯿﻟﺎﺣ.(
- ﺮﻘﻧا ﻰﻠﻋ ‘OK’ ةدﺎﻋﻹ ﻂﺒﺿ ﻊﯿﻤﺟ تاداﺪﻋﻹا.
b
- ﺮﻘﻧا ﻋﻰﻠ ‘Apply ’ ﻢﺘﻳ ﺚﻳﺪﺤﺗ سوﺎﻤﻟا.
ﻢﻗ ﻞﻳﺰﻨﺘﺑ طﺎﻤﻧأ ةدﺪﺤﻣ ﺔﺒﻌﻠﻟ ﻦﻣ ﻊﻗﻮﻣ Trust http://www.trust.com/20411.
76
 Loading...