

Page 1

Page 2
Page 3
Page 4
Page 5

GXT 144 Gaming Mouse - USER’S MANUAL
1
Language
Page 2
Index
Page 6
GXT 144 Gaming Mouse - USER’S MANUAL
2
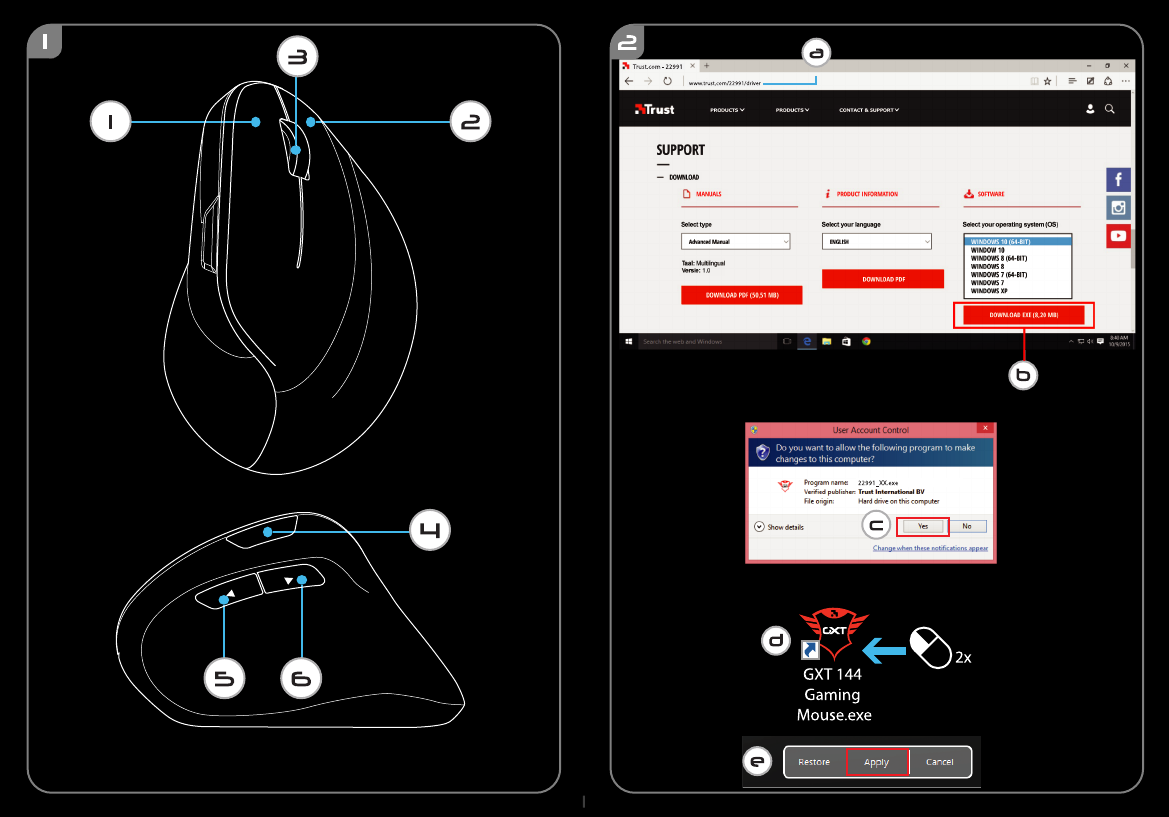
1. Button layout (default)
- Button 1 (Default = Left mouse button)
- Button 2 (Default = Right mouse button)
- Button 3 (Default = Middle button)
- Button 4 (Default = Forward)
- Button 5 (Default = Backward)
- Button 6 (Default = DPI Loop)
2. Installation
a
b
c
d
e
- Open the internet browser and go to www.trust.com/22991/driver.
-
-
-
to the mouse.
Button Programming
3.
a
b
c
Key Setting
-
-
-
-
Choose your operation system and click the “Download EXE” button to download the software.
Click on the “22991_XX.exe” and follow the installation wizard.
Click on the “GXT 144 Gaming Mouse.exe” shortcut to start the software.
You can now start to configure the mouse. In the manual will be referred to ‘Apply’ to update settings
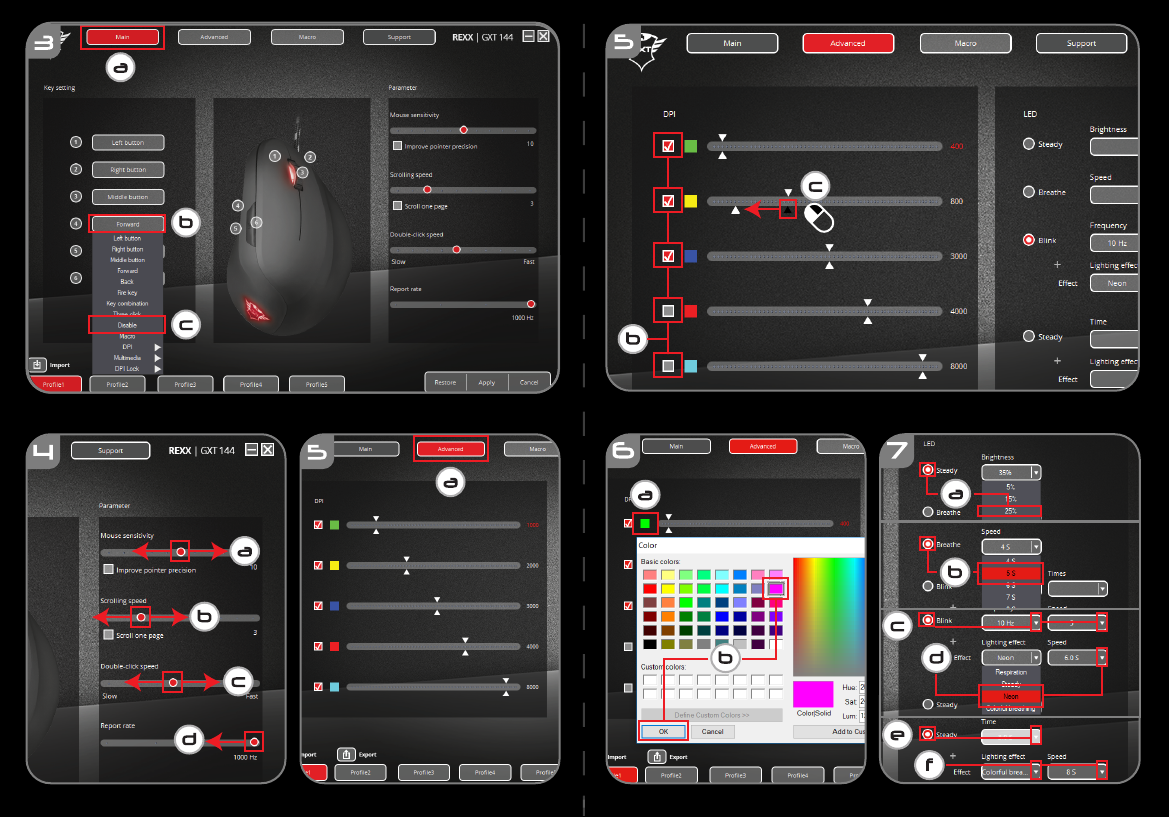
Click on the ‘Main’ tab.
Click on the button you want to re-assign
Click on function you want to assign.
Click on ‘Apply’, the mouse is being updated.
- At least one button has to be assigned as “Left Button”.
Page 7

GXT 144 Gaming Mouse - USER’S MANUAL
3
4. Mouse settings & report rate
a
b
c
d
- Change the mouse sensitivity
- Click on ‘Apply’, the mouse is being updated.
5.
a
b
c
DPI Setting
-
-
-
-
6.
a
b
Custom color
-
-
-
7.
a
b
c
d
e
f
Light effects
-
-
-
-
time.
-
- Click on ‘Apply’, the mouse is being updated.
- Change the scrolling speed
- Change the Double-click speed
- Change the Report Rate
Click on the ‘Advanced’ tab
Assign up to 5 DPI variables (Check/uncheck boxes).
Choose a DPI speed for each DPI setting (min 200 / max 10.000 DPI).
Click on ‘Apply’, the mouse is being updated.
Click on the color you want to change
Click the desired custom color and click on ‘OK’
Click on ‘Apply’, the mouse is being updated.
Click on ‘Steady’ and change the brightness
Click on ‘Breathe’ and change the speed
Click on ‘Blink’ and change the frequency + times (when switching DPI the mouse will blink)
Change the lighting effect and change the speed
Click on ‘Steady’ and change the ‘Time’ (when pressing ‘Apply’ the mouse will light up for the selected
Change the effect and change the speed
Page 8

GXT 144 Gaming Mouse - USER’S MANUAL
4
8.
a
b
c
d
e
f
g
h
i
Create a Macro
(Store a sequence of keys in the software)
-
-
-
-
-
-
-
-
-
- The next step shows how to assign your recorded macro.
9.
a
b
c
d
e
Assign a Macro
(Store a sequence of keys in the software)
-
-
-
-
-
-
Macro Settings
Click on the ‘Macro’ tab
Click on the ‘New macro’ button
Enter Macro Name and click ‘OK’
Choose to record the button delay and choose how the macro is executed
Click on ‘Start record’ to start recording the macro.
Now enter your preferred macro sequence (max. 60 actions)
Click on ‘Stop Recording’ to stop recording the macro
Click on ‘Insert event’ to insert a mouse action
Click on ‘Save’ to save the macro.
Assign a Macro
Click on the ‘Main’ tab
Click on the button you want to assign a macro to
Click on the function ‘Macro’
Select your preferred macro.
Click on ‘OK’.
Click on ‘Apply’, the mouse is being updated.
Page 9
GXT 144 Gaming Mouse - USER’S MANUAL
5
10.
a
b
c
d
Save or Load Profiles
-
-
-
-
-
11.
a
b
c
Factory reset
-
-
-
Problem
Solution
The software is not starting.
The mouse is not being detected.
- Make sure the GXT 144 mouse is connected and try to start the
software again
- Try another USB port, restart your PC and try again.
Choose the profile you want to save/load
Click on the ‘Import’ icon to load a setup, click on the ‘Export’ icon to save a setup
Enter the desired name for your setup, or search the previously saved setup.
Click on ‘Save/Open’ to save/load your setup
Click on ‘Apply’, the mouse is being updated
Choose the profile you want to reset
Click on the ‘Restore’ button
Click on the ‘OK’ button to restore all settings to factory default
Trouble shooting
.
If your problem is not solved, please contact the help desk at www.trust.com/22991/faq.
Page 10
GXT 144 Gaming Mouse - USER’S MANUAL
6
1. Tastenanordnung (Standardfunktionen)
- Taste 1 (Standardfunktion = linke Maustaste)
- Taste 2 (Standardfunktion = rechte Maustaste)
- Taste 3 (Standardfunktion = mittlere Maustaste)
- Taste 4 (Standardfunktion = vorwärts)
- Taste 5 (Standardfunktion = rückwärts)
- Taste 6 (Standardfunktion = DPI-Wert weiterschalten)
2. Installation
a
b
c
d
e
- Öffnen Sie Ihren Internetbrowser und gehen Sie auf die Seite www.trust.com/22991/driver.
Software herunterzuladen.
-
-
Klick auf „Apply“ in d
Tastenprogrammierung
3.
a
b
c
Tasteneinstellung
-
-
-
-
Wählen Sie Ihr Betriebssystem aus und klicken Sie auf die Schaltfläche „Download EXE“, um die
Klicken Sie auf „22991_XX.exe“ und folgen Sie den Anweisungen des Installationswizards.
Klicken Sie auf die Verknüpfung „GXT 144 Gaming Mouse.exe“, um die Software zu starten.
Sie können nun mit der Konfiguration der Maus beginnen. Die neuen Einstellungen werden mit einem
Klicken Sie auf den Menüreiter „Main“.
Klicken Sie auf die Taste, deren Funktion Sie ändern möchten.
Klicken Sie auf die Funktion, die Sie der Taste zuweisen möchten.
Klicken Sie auf „Apply“, um die Änderungen in der Maus zu speichern.
- Mindestens eine Taste muss als „Left Button“ konfiguriert sein.
er Maus gespeichert.
Page 11
GXT 144 Gaming Mouse - USER’S MANUAL
7
4. Mauseinstellungen und Abtastrate
a
b
c
d
- Empfindlichkeit ändern
- Klicken Sie auf „Apply“, um die Änderungen in der Maus zu speichern.
5.
a
b
c
DPI-Einstellung
-
daraus entfernen).
-
-
6.
a
b
Farbeinstellungen
-
-
-
7.
a
b
c
d
e
f
Lichteffekte
-
-
die Maus)
-
Maus für diese Zeitdauer auf).
-
- Klicken Sie auf „Apply“, um die Änderungen in der Maus zu speichern.
- Scrollgeschwindigkeit ändern
- Doppelklickgeschwindigkeit ändern
- Abtastrate ändern
Klicken Sie auf den Menüreiter „Advanced“
Weisen Sie bis zu 5 DPI-Variablen zu (Häkchen in die betreffenden Auswahlkästchen setzen oder
Wählen Sie für jede DPI-Einstellung eine DPI-Geschwindigkeit aus (min. 200, max. 10.000 DPI).
Klicken Sie auf „Apply“, um die Änderungen in der Maus zu speichern.
Klicken Sie auf die Farbe, die Sie ändern möchten
Klicken Sie auf die gewünschte individuelle Farbe und danach auf „OK“.
Klicken Sie auf „Apply“, um die Änderungen in der Maus zu speichern.
Klicken Sie auf „Steady“ und ändern Sie die Helligkeit
Klicken Sie auf „Breathe“ und ändern Sie die Geschwindigkeit
Klicken Sie auf „Blink“ und ändern Sie die Frequenz und Häufigkeit (beim Umschalten auf DPI blinkt
Ändern des Lichteffekts und der Geschwindigkeit
Klicken Sie auf „Steady“ und ändern Sie den „Time“-Wert (beim Betätigen von „Apply“ leuchtet die
Ändern des Lichteffekts und der Geschwindigkeit
Page 12
GXT 144 Gaming Mouse - USER’S MANUAL
8
8.
a
b
c
d
e
f
g
h
i
Erstellen eines Makros
(Speichern einer Tastenfolge in der Software)
-
-
-
wird
-
-
-
-
-
- Der nächste Schritt zeigt Ihnen, wie Sie Ihr aufgezeichnetes Makro zuweisen.
9.
a
b
c
d
e
Zuweisen eines Makros
(Speichern einer Tastenfolge in der Software)
-
-
-
–
-
Makro-Einstellungen
Klicken Sie auf den Menüreiter „Macro“.
Klicken Sie auf die Schaltfläche „New macro“.
Geben Sie den Namen für das Makro ein und klicken Sie auf „OK“.
Auswählen, um die Tastenverzögerung aufzuzeichnen und um festzulegen, wie das Makro ausgeführt
Klicken Sie auf „Start record“, um mit der Aufzeichnung des Makros zu beginnen.
Führen Sie nun die gewünschte Makrosequenz aus (max. 60 Aktionen)
Klicken Sie auf „Stop Recording“, um die Aufzeichnung des Makros zu beenden
Klicken Sie auf „Insert Event“ um einen Mausbefehl einzufügen
Klicken Sie auf „Save“, um das Makro zu speichern.
Zuweisen eines Makros
Klicken Sie auf den Menüreiter „Main“
Klicken Sie auf die Taste, der Sie ein Makro zuweisen möchten
Klicken Sie auf „Macro“
Wählen Sie das gewünschte Makro aus.
Klicken Sie auf „OK“.
Klicken Sie auf „Apply“, um die Änderungen in der Maus zu speichern.
Page 13

GXT 144 Gaming Mouse - USER’S MANUAL
9
10.
a
b
c
d
Ein Profil speichern oder laden
-
aktuelle Setup zu speichern
Konfigurat
-
-
11.
a
b
c
Auf Standardeinstellungen zurücksetzen
-
-
-
Problem
Lösung
Die Software startet nicht.
Die Maus wird nicht erkannt.
- Vergewissern Sie sich, dass die GXT 144 angeschlossen ist und
versuchen Sie, die Software neu zu starten.
starten Sie den PC neu.
Wählen Sie das Profil aus, das Sie speichern bzw. laden möchten
Klicken Sie auf das „Import“-Symbol, um ein Setup zu laden bzw. auf das „Export“-Symbol, um das
Geben Sie einen Namen für Ihre Konfiguration ein oder suchen Sie nach der zuvor gespeicherten
Fehlerbehebung
ion.
Klicken Sie auf „Save/Open“, um das Setup zu laden bzw. zu speichern.
Klicken Sie auf „Apply“, um die Änderungen in der Maus zu speichern.
Wählen Sie das Profil aus, das Sie zurücksetzen möchten
Klicken Sie auf die Schaltfläche „Restore“
Klicken Sie auf „OK“, um alle Einstellungen auf ihre werkseitigen Grundwerte zurückzusetzen
Falls das Problem fortbesteht, wenden Sie sich an den Helpdesk unter www.trust.com/22991/faq.
Schließen Sie die Maus an einen anderen USB-Anschluss an und
Page 14

GXT 144 Gaming Mouse - USER’S MANUAL
10
1. Configuration des boutons (par défaut)
- Bouton 1 (fonction par défaut = clic gauche de la souris)
- Bouton 2 (fonction par défaut = clic droit de la souris)
- Bouton 3 (fonction par défaut = bouton du milieu)
- Bouton 4 (fonction par défaut = suivant)
- Bouton 5 (fonction par défaut = précédent)
- Bouton 6 (fonction par défaut = DPI Boucle)
2. Installation
a
b
c
d
e
- Ouvrez le navigateur Internet et allez à l’adresse www.trust.com/22991/driver.
logiciel.
-
-
[appliquer] permet de mettre à jour la souris.
Programmation des boutons
3.
a
b
c
Paramètres des touches
-
-
-
-
Choisissez votre système d’exploitation et cliquez sur le bouton « Download EXE » pour télécharger le
- Au moins un bouton doit être attribué comme « Left Button » [clic gauche de la souris].
Cliquez sur « 22991_XX.exe » et suivez l’assistant d’installation.
Cliquez sur le raccourci « GXT 144 Gaming Mouse.exe » pour démarrer le logiciel.
Vous pouvez maintenant configurer la souris. Conformément au manuel, le bouton « Apply »
Cliquez sur l'onglet « Main » [principal].
Cliquez sur le bouton que vous souhaitez réattribuer.
Cliquez sur la fonction que vous souhaitez attribuer.
Cliquez sur « Apply » [appliquer], la souris est mise à jour.
Page 15

GXT 144 Gaming Mouse - USER’S MANUAL
11
4. Paramètres de la souris et taux de rapport
a
b
c
d
- Modifier la sensibilité de la souris
- Cliquez sur « Apply » [appliquer], la souris est mise à jour.
5.
a
b
c
Paramètres DPI
-
-
-
-
6.
a
b
Couleur personnalisée
-
-
-
7.
a
b
c
d
e
f
Effets de lumière
-
-
-
et modifiez la fréquence + les temps (lors du changement de DPI,
la souris clignotera)
-
-
, la
souris s’illuminera pendant le temps sélectionné).
-
- Cliquez sur « Apply » [appliquer], la souris est mise à jour.
- Modifier la vitesse de défilement
- Modifier la vitesse du double-clic
- Modifier le taux de rapport
Sélectionnez l'onglet « Advanced » [avancé].
Attribuez jusqu’à 5 variables DPI (cochez/décochez les cases).
Choisissez une vitesse DPI pour chaque paramètre DPI (min. 200/max. 10.000 DPI).
Cliquez sur « Apply » [appliquer], la souris est mise à jour.
Cliquez sur la couleur que vous souhaitez modifier
Cliquez sur la couleur personnalisée souhaitée, puis sur « OK ».
Cliquez sur « Apply » [appliquer], la souris est mise à jour.
Cliquez sur « Steady » [fixe] et modifiez la luminosité
Cliquez sur « Breathe » [clignotement progressif] et modifiez la vitesse
Cliquez sur « Blink » [clignotement]
Modifier l’effet de lumière et la vitesse
Cliquez sur « Steady » [fixe] et modifier le « Time » [temps] (en appuyant sur « Apply » [appliquer]
Modifiez l’effet et la vitesse
Page 16

GXT 144 Gaming Mouse - USER’S MANUAL
12
8.
a
b
c
d
e
f
g
h
i
Créer une macro (
enregistrer une série de touches dans le logiciel)
-
-
-
-
-
-
-
-
-
- L’étape suivante montre comment attribuer votre macro enregistrée.
9.
a
b
c
d
e
Attribuer une macro (
enregistrer une série de touches dans le logiciel)
-
-
-
-
-
-
Paramètres des macros
Cliquez sur l'onglet « Macro ».
Cliquez sur le bouton « New macro » [nouvelle macro].
Renseignez le nom de la macro, puis cliquez sur « OK ».
Choisissez d’enregistrer le délai du bouton et comment exécuter la macro
Cliquez sur « Start Record » [commencer enregistrement] pour commencer à enregistrer la macro.
Saisissez à présent votre séquence de macros préférée (60 actions max.)
Cliquez sur « Stop Recording » [arrêter enregistrement] pour arrêter l’enregistrement de la macro
Cliquez sur « Insert event » [insérer événement] pour insérer une action de la souris
Cliquez sur « Save » [enregistrer] pour enregistrer la macro.
Attribuer une macro
Cliquez sur l'onglet « Main » [principal]
Cliquez sur le bouton auquel vous souhaitez attribuer une macro
Cliquez sur la fonction « Macro ».
Sélectionnez la macro souhaitée.
Cliquez sur « OK ».
Cliquez sur « Apply » [appliquer], la souris est mise à jour.
Page 17

GXT 144 Gaming Mouse - USER’S MANUAL
13
10.
a
b
c
d
Enregistrer ou charger un profil
-
«
enregistrée.
-
-
11.
a
b
c
Restauration des paramètres d’usine
-
-
-
Problème
Solution
Le logiciel ne démarre pas.
La souris n’est pas détectée.
- Assurez-vous que la souris GXT 144 est connectée et réessayez
de démarrer le logiciel.
- Essayez un autre port USB, redémarrez votre PC et réessayez.
Choisissez le profil que vous souhaitez enregistrer/charger
Cliquez sur l’icône « Import » [importer] pour charger une configuration et cliquez sur l’icône
Export » [exporter] pour enregistrer une configuration.
Entrez le nom souhaité pour votre configuration ou cherchez la configuration précédemment
Dépannage
Si votre problème persiste, veuillez contacter l'assistance technique via l'adresse www.trust.com/22991/faq.
Cliquez sur « Save/Open » [enregistrer/ouvrir] pour enregistrer/charger votre configuration
Cliquez sur « Apply » [appliquer], la souris est mise à jour.
Choisissez le profil que vous souhaitez réinitialiser
Cliquez sur le bouton « Restore » [restaurer].
Cliquez sur le bouton « OK » pour restaurer tous les paramètres d’usine.
Page 18

GXT 144 Gaming Mouse - USER’S MANUAL
14
1. Disposizione dei pulsanti (impostazione predefinita)
- Pulsante 1 (impostazione predefinita = pulsante sinistro del mouse)
- Pulsante 2 (impostazione predefinita = pulsante destro del mouse)
- Pulsante 3 (impostazione predefinita = pulsante centrale)
- Pulsante 4 (impostazione predefinita = avanti)
- Pulsante 5 (impostazione predefinita = indietro)
- Pulsante 6 (impostazione predefinita = ciclo DPI)
2. Installazione
a
b
c
d
e
- Aprire il browser Internet e andare su www.trust.com/22991/driver.
-
-
-
manuale si farà riferimento al comando 'Apply' [Applica].
Programmazione dei pulsanti
3.
a
b
c
Impostazione dei tasti
-
-
-
-
Scegliere il sistema operativo e fare clic sul pulsante "Download EXE" per scaricare il software.
Fare clic su “22991_XX.exe” e seguire la procedura di installazione guidata.
Fare clic sulla scelta rapida “GXT 144 Gaming Mouse.exe” per avviare il software.
Ora è possibile iniziare a configurare il mouse. Per aggiornare le impostazioni nel mouse, in questo
Fare clic sulla scheda ‘Main’.
Fare clic sul pulsante che si desidera riassegnare.
Fare clic sulla funzione che si desidera assegnare.
Fare clic su ‘Apply’, il mouse viene aggiornato.
- Almeno un pulsante deve essere assegnato come “Left Button”.
Page 19

GXT 144 Gaming Mouse - USER’S MANUAL
15
4. Impostazioni del mouse e report rate
a
b
c
d
- Modificare la sensibilità del mouse
- Fare clic su ‘Apply’, il mouse viene aggiornato.
5.
a
b
c
Impostazioni DPI
-
-
-
-
6.
a
b
Colore personalizzato
-
-
-
7.
a
b
c
d
e
f
Effetti luminosi
-
-
mouse lampeggia)
-
selezionat
-
- Fare clic su ‘Apply’, il mouse viene aggiornato.
- Modificare la velocità di scorrimento
- Modificare la velocità doppio clic
- Modificare il report rate
Fare clic sulla scheda ‘Advanced’
Assegnare fino a 5 variabili DPI (Selezionare/deselezionare le caselle di controllo).
Scegliere una velocità DPI per ciascuna impostazione DPI (min 200 / max 10.000 DPI).
Fare clic su ‘Apply’, il mouse viene aggiornato.
Fare clic sul colore che si desidera modificare
Fare clic sul colore personalizzato desiderato e poi su ‘OK’
Fare clic su ‘Apply’, il mouse viene aggiornato.
Fare clic su ‘Steady’ e modificare la luminosità
Fare clic su ‘Breathe’ e modificare la velocità
Fare clic su ‘Blink’ e modificare la frequenza + numero lampeggiamenti (quando si cambia DPI il
Modificare l'effetto luminoso e la velocità
Fare clic su ‘Steady’ e modificare ‘Time’ (quando si preme ‘Apply’ il mouse si illuminerà per il tempo
Modificare l'effetto e la velocità
o.
Page 20

GXT 144 Gaming Mouse - USER’S MANUAL
16
8.
a
b
c
d
e
f
g
h
i
Creare una macro
(memorizzare una sequenza di tasti nel software)
-
-
-
-
-
-
-
-
-
- Il passo successivo è l'assegnazione della macro registrata.
9.
a
b
c
d
e
Assegnare una macro
(memorizzare una sequenza di tasti nel software)
-
-
-
-
-
-
Impostazioni delle macro
Fare clic sulla scheda ‘Macro’
Fare clic sul pulsante ‘New macro’
Inserire il nome della macro e fare clic su ‘OK’
Scegliere di registrare il ritardo pulsante e scegliere la modalità di esecuzione della macro
Fare clic su ‘Start record’ per iniziare a registrare la macro.
A questo punto, inserire la sequenza macro preferita (max 60 comandi)
Fare clic su ‘Stop Recording’ per interrompere la registrazione della macro
Fare clic su ‘Insert event’ per inserire un comando del mouse
Fare clic su ‘Save’ per salvare la macro.
Assegnare una macro
Fare clic sulla scheda ‘Main’
Fare clic sul tasto cui si desidera assegnare la macro
Fare clic sulla funzione ‘Macro’
Selezionare la macro desiderata.
Fare clic su ‘OK’.
Fare clic su ‘Apply’, il mouse viene aggiornato.
Page 21

GXT 144 Gaming Mouse - USER’S MANUAL
17
10.
a
b
c
d
Salvare o caricare un profilo
-
configurazione
-
-
-
11.
a
b
c
Ripristino delle impostazioni di fabbrica
-
-
-
Problema
Soluzione
Il software non si avvia.
Il mouse non viene rilevato.
- Assicurarsi che il mouse GXT 144 sia collegato e riprovare a
avviare il software.
- Provare un'altra porta USB, riavviare il PC e riprovare.
Scegliere il profilo che si desidera salvare/caricare
Fare clic sull'icona ‘Import’ per caricare una configurazione, fare clic sull'icona ‘Export’ per salvare una
Inserire il nome desiderato per la configurazione o cercare la configurazione salvata in precedenza.
Fare clic su ‘Save/Open’ per salvare/caricare la propria configurazione
Fare clic su ‘Apply’, il mouse viene aggiornato
Scegliere il profilo che si desidera ripristinare
Fare clic sul pulsante ‘Restore’
Fare clic sul pulsante ‘OK’ per ripristinare tutte le impostazioni di fabbrica
Risoluzione dei problemi
Se il problema persiste, contattare il servizio di assistenza tecnica all'indirizzo www.trust.com/22991/faq.
Page 22

GXT 144 Gaming Mouse - USER’S MANUAL
18
1. Distribución de los botones (predeterminada)
- Botón 1 (predeterminado = botón izquierdo del ratón)
- Botón 2 (predeterminado = botón derecho del ratón)
- Botón 3 (predeterminado = botón central)
- Botón 4 (predeterminado = avance)
- Botón 5 (predeterminado = retroceso)
- Botón 6 (predeterminado = ciclo de DPI)
2. Instalación
a
b
c
d
e
- Abra el navegador de Internet y visite www.trust.com/22991/driver.
-
-
-
-
nzar a configurar el ratón. En el manual se hará referencia a la función “Apply” para
actualizar la configuración en el ratón.
Programación de botones
3.
a
b
c
Configuración de teclas
-
-
-
-
Elija su sistema operativo y haga clic en el botón “Download EXE” para descargar el software.
Haga clic en el archivo “22991_XX.exe” y siga el asistente de instalación.
Haga clic en el acceso directo “GXT 144 Gaming Mouse.exe” para iniciar el software.
Ahora podrá come
Haga clic en la ficha “Main”.
Haga clic en el botón que desee reasignar.
Haga clic en la función que desee asignar.
Haga clic en “Apply” y el ratón se actualizará.
- Al menos un botón se debe asignar como “Left Button”.
Page 23

GXT 144 Gaming Mouse - USER’S MANUAL
19
4. Configuración y tasa de sondeo del ratón
a
b
c
d
- Cambie la sensibilidad del ratón.
- Haga clic en “Apply” y el ratón se actualizará.
5.
a
b
c
Ajuste de DPI
-
-
-
-
6.
a
b
Color personalizado
-
-
-
7.
a
b
c
d
e
f
Efectos de luz
-
-
-
-
periodo de tiempo
-
- Haga clic en “Apply” y el ratón se actualizará.
- Cambie la velocidad de desplazamiento.
- Cambie la velocidad de doble clic.
- Cambie la tasa de sondeo.
Haga clic en la ficha “Advanced”.
Asigne hasta 5 variables de DPI (marcando o desmarcando casillas).
Elija una velocidad de DPI para cada ajuste de DPI (mín. 200/máx. 10.000 DPI).
Haga clic en “Apply” y el ratón se actualizará.
Haga clic en el color que desee cambiar.
Haga clic en el color personalizado que desee y, a continuación, en “OK”.
Haga clic en “Apply” y el ratón se actualizará.
Haga clic en “Steady” y cambie el brillo.
Haga clic en “Breathe” y cambie la velocidad.
Haga clic en “Blink” y cambie la frecuencia y las veces (al cambiar de DPI, el ratón parpadeará).
Cambie el efecto de iluminación y la velocidad.
Haga clic en “Steady” y cambie el valor de “Time” (al pulsar “Apply”, el ratón se iluminará durante el
Cambie el efecto y la velocidad.
seleccionado.
Page 24

GXT 144 Gaming Mouse - USER’S MANUAL
20
8.
a
b
c
d
e
f
g
h
i
Creación de una macro
(guardar una secuencia de teclas en el softw are)
-
-
-
-
-
-
-
-
-
- En los próximos pasos se muestra cómo asignar la macro grabada.
9.
a
b
c
d
e
Asignación de una macro
(guardar una secuencia de teclas en el softw are)
-
-
-
-
-
-
Configuración de macros
Haga clic en la ficha “Macro”.
Haga clic en el botón “New macro”.
Escriba el nombre de la macro y haga clic en “OK”.
Elija para grabar el retraso entre botones y el modo de ejecución de la macro.
Haga clic en “Start Recording” para empezar a grabar la macro.
Ahora, introduzca la secuencia de macro que desee (máximo 60 acciones).
Haga clic en “Stop Recording” para detener la grabación de la macro.
Haga clic en “Insert event” para insertar una acción de ratón.
Haga clic en “Save” para guardar la macro.
Asignación de una macro
Haga clic en la ficha “Main”.
Haga clic en el botón al que desea asignar una macro.
Haga clic en la función “Macro”.
Seleccione la macro que desee.
Haga clic en “OK”.
Haga clic en “Apply” y el ratón se actualizará.
Page 25

GXT 144 Gaming Mouse - USER’S MANUAL
21
10.
a
b
c
d
Guardar o cargar perfiles
-
configuración.
guardado.
-
-
11.
a
b
c
Restablecimiento de fábrica
-
-
-
Problema
Solución
El software no se inicia.
El ratón no se detecta.
- Asegúrese de que el ratón GXT 144 está conectado e intente
iniciar
- Pruebe con otro puerto USB, reinicie el PC e inténtelo de nuevo.
Elija el perfil que quiere guardar o cargar.
Haga clic en el icono “Import” para cargar una configuración, o en “Export” para guardar una
Escriba el nombre que desee asignar a la configuración, o busque una configuración anterior que ha
Haga clic en “Save/Open” para guardar o cargar la configuración.
Haga clic en “Apply” y el ratón se actualizará.
Elija el perfil que quiere restablecer.
Haga clic en el botón “Restore”.
Haga clic en el botón “OK” para restablecer la configuración a los valores predeterminados de fábrica.
Resolución de problemas
Si no puede resolver el problema, póngase en contacto con el departamento de servicio al cliente a través de
www.trust.com/22991/faq.
el software de nuevo.
Page 26

GXT 144 Gaming Mouse - USER’S MANUAL
22
1. Lay-out van de knoppen (standaardfunctie)
- Knop 1 (standaardfunctie = linkermuisknop)
- Knop 2 (standaardfunctie = rechtermuisknop)
- Knop 3 (standaardfunctie = middelste knop)
- Knop 4 (standaardfunctie = vooruit)
- Knop 5 (standaardfunctie = achteruit)
- Knop 6 (standaardfunctie = DPI-loop)
2. Installeren
a
b
c
d
e
- Open de internetbrowser en ga naar www.trust.com/22991/driver.
-
-
-
-
ding wordt verwezen naar 'Apply' om de instellingen van
de muis bij te werken.
Knoppen programmeren
3.
a
b
c
Toetsinstelling
-
-
-
-
Kies het besturingssysteem en klik op de knop "Download EXE" om de software te downloaden.
Klik op "22991_XX.exe" en volg de stappen van de installatiewizard.
Klik op de snelkoppeling "GXT 144 Gaming Mouse.exe" om de software te starten.
U kunt de muis nu configureren. In de handlei
Klik op het tabblad 'Main'.
Klik op de knop waaraan u een nieuwe functie wilt toewijzen.
Klik op de functie die u wilt toewijzen.
Klik op 'Apply'. De muis wordt bijgewerkt.
Er moet ten minste een knop worden toegewezen als "Left Button".
Page 27

GXT 144 Gaming Mouse - USER’S MANUAL
23
4. Muisinstellingen en rapportsnelheid
a
b
c
d
- Wijzig de gevoeligheid van de muis
- Klik op 'Apply'. De muis wordt bijgewerkt.
5.
a
b
c
DPI-instelling
-
-
-
-
6.
a
b
Aangepaste kleur
-
-
-
7.
a
b
c
d
e
f
Lichteffecten
-
-
-
-
geselecteerde tijd.
-
- Klik op 'Apply'. De muis wordt bijgewerkt.
- Wijzig de scrollsnelheid
- Wijzig de dubbelkliksnelheid
- Wijzig de rapportsnelheid
Klik op het tabblad 'Advanced'
Wijs maximaal 5 DPI-variabelen toe (vakjes aanvinken/uitschakelen).
Kies een DPI-snelheid voor elke DPI-instelling (min 200 / max 10,000 DPI).
Klik op 'Apply'. De muis wordt bijgewerkt.
Klik op de kleur die u wilt wijzigen
Klik op de gewenste aangepaste kleur en op 'OK'
Klik op 'Apply'. De muis wordt bijgewerkt.
Klik op 'Steady' en wijzig de helderheid
Klik op 'Breathe' en wijzig de snelheid
Klik op 'Blink' en wijzig de frequentie + aantal keer (bij het wisselen van DPI knippert de muis)
Wijzig het lichteffect en verander de snelheid
Klik op 'Steady' en wijzig de 'Time' (als u op 'Apply' drukt, gaat de muis branden gedurende de
Wijzig het effect en de snelheid
Page 28

GXT 144 Gaming Mouse - USER’S MANUAL
24
8.
a
b
c
d
e
f
g
h
i
Een macro maken
(een toetsenreeks opslaan in de softw are)
-
-
-
-
-
-
-
-
-
- In de volgende stap wordt weergegeven hoe u de vastgelegde macro toewijst.
9.
a
b
c
d
e
Een macro toewijzen
(een toetsenreeks opslaan in de softw are)
-
-
-
-
-
-
Macro instellen
Klik op het tabblad 'Macro'
Klik op de knop 'New macro'
Voer de macronaam in en klik op 'OK'
Kies ervoor om de knopvertraging vast te leggen en kies hoe de macro wordt uitgevoerd
Klik op 'Start record' om het vastleggen van de macro te starten.
Voer nu de gewenste macroreeks in (max. 60 acties)
Klik op 'Stop Recording' om het vastleggen van de macro te stoppen
Klik op 'Insert event’ om een muisactie in te voegen
Klik op 'Save' om de macro op te slaan.
Een macro toewijzen
Klik op het tabblad 'Main'
Klik op de toets waaraan u een macro wilt toewijzen
Klik op de functie 'Macro'
Selecteer de gewenste macro.
Klik op 'OK'.
Klik op 'Apply'. De muis wordt bijgewerkt.
Page 29

GXT 144 Gaming Mouse - USER’S MANUAL
25
10.
a
b
c
d
Profielen opslaan of laden
-
instelling op te slaan
-
-
-
11.
a
b
c
Fabrieksinstellingen resetten
-
-
-
Probleem
Oplossing
De software start niet.
De muis wordt niet gedetecteerd.
- Zorg dat de GXT 144-muis is aangesloten en probeer de
software opnieuw op te starten.
probeer het opnieuw.
Kies het profiel dat u wilt opslaan/laden
Klik op het pictogram 'Import' om een instelling te laden, klik op het pictogram 'Export' om een
Voer de gewenste naam voor de instelling in, of zoek naar de eerder opgeslagen instelling.
Klik op 'Save/Open' om de instelling op te slaan/te laden
Klik op 'Apply'. De muis wordt bijgewerkt
Kies het profiel dat u wilt resetten
Klik op de knop 'Restore'
Klik op de knop 'OK'' om alle instellingen terug te zetten naar de fabrieksinstellingen
Problemen oplossen
Als het probleem nog niet is opgelost, neemt u contact op met de klantenservice via www.trust.com/22991/faq.
Probeer een andere USB-poort, start de pc opnieuw op en
Page 30

GXT 144 Gaming Mouse - USER’S MANUAL
26
1. Przypisanie przycisków (domyślne)
- Przycisk 1 (domyślnie = lewy przycisk myszy)
- Przycisk 2 (domyślnie = prawy przycisk myszy)
- Przycisk 3 (domyślnie = środkowy przycisk myszy)
- Przycisk 4 (domyślnie = do przodu)
- Przycisk 5 (domyślnie = do tyłu)
- Przycisk 6 (domyślnie = zmiana DPI)
2. Instalacja
a
b
c
d
e
- Otwórz przeglądarkę internetową i przejdź na stronę www.trust.com/22991/driver.
oprogramowanie.
-
-
[Zastosuj] b
w celu ich aktualizacji.
Programowanie przycisków
3.
a
b
c
Ustawienia przycisków
-
-
-
-
Wybierz system operacyjny i kliknij przycisk „Download EXE” [Pobierz plik wykonywalny], aby pobrać
Kliknij „22991_XX.exe” i postępuj zgodnie z komunikatami kreatora instalacji.
Kliknij skrót „GXT 144 Gaming Mouse.exe”, aby uruchomić oprogramowanie.
Można teraz rozpocząć konfigurację myszy. W niniejszej instrukcji polecenie użycia przycisku „Apply”
Kliknij zakładkę „Main”.
Kliknij przycisk, który chcesz ponownie przypisać.
Kliknij funkcję, którą chcesz przypisać.
Kliknij „Apply” — ustawienia myszy są aktualizowane.
- Do co najmniej jednego przycisku musi być przypisana funkcja „Left Button”.
ędzie stosowane zawsze wtedy, kiedy ustawienia myszy będą musiały zostać potwierdzone
Page 31

GXT 144 Gaming Mouse - USER’S MANUAL
27
4. Ustawienia myszy i częstotliwość
a
b
c
d
- Zmiana czułości myszy.
- Kliknij „Apply” — ustawienia myszy są aktualizowane.
5.
a
b
c
Ustawienie DPI
-
-
-
-
6.
a
b
Kolor niestandardowy
-
-
-
7.
a
b
c
d
e
f
Efekty świetlne
-
-
miga).
-
wybrany czas).
-
- Kliknij „Apply” — ustawienia myszy są aktualizowane.
- Zmiana szybkości przewijania.
- Zmiana szybkości dwukrotnego kliknięcia.
- Zmiana częstotliwości.
Kliknij zakładkę „Advanced”.
Przypisz maksymalnie 5 zmiennych DPI (zaznacza/odznacz pola wyboru).
Wybierz wartość DPI dla każdego ustawienia DPI (min. 200 / maks. 10.000 DPI).
Kliknij „Apply” — ustawienia myszy są aktualizowane.
Kliknij kolor, który chcesz zmienić.
Kliknij wybrany kolor niestandardowy i kliknij „OK”.
Kliknij „Apply” — ustawienia myszy są aktualizowane.
Kliknij „Steady” i zmień jasność.
Kliknij „Breathe” i zmień szybkość.
Kliknij „Blink” i zmień częstotliwość oraz czas trwania (przy przełączaniu DPI podświetlenie myszy
Zmiana efektu świetlnego i zmiana szybkości.
Kliknij „Steady” i zmień ustawienie „Time” (po naciśnięciu „Apply” podświetlenie myszy zaświeci się na
Zmiana efektu i zmiana szybkości.
Page 32

GXT 144 Gaming Mouse - USER’S MANUAL
28
8.
a
b
c
d
e
f
g
h
i
Tworzenie makra
(zapisyw anie w oprogramow aniu sek wencji klaw iszy)
-
-
-
-
-
-
-
-
-
- W kolejnym kroku znajdują się instrukcje odnośnie do przypisywania zapisanego makra.
9.
a
b
c
d
e
Przypisywanie makra
(zapisanie kombinacji klawiszy w oprogramowaniu)
-
-
-
-
-
-
Ustawienia makro
Kliknij zakładkę „Macro”.
Kliknij przycisk „New macro”.
Wprowadź nazwę makra i kliknij „OK”.
Wybierz, aby zapisać opóźnienie przycisku i wybrać sposób wykonania makra.
Kliknij „Start record”, aby rozpocząć zapis makra.
Teraz ustaw preferowaną sekwencję makr (maks. 60 akcji).
Kliknij „Stop Recording”, aby zatrzymać zapis makra.
Kliknij „Insert event”, aby wstawić akcję wykonywaną myszą.
Kliknij „Save”, aby zapisać makro w pamięci.
Przypisywanie makra
Kliknij zakładkę „Main”.
Kliknij przycisk, do którego chcesz przypisać makro.
Kliknij funkcję „Makro”.
Wybierz makro.
Kliknij „OK”.
Kliknij „Apply” — ustawienia myszy są aktualizowane.
Page 33

GXT 144 Gaming Mouse - USER’S MANUAL
29
10.
a
b
c
d
Zapisywanie i wczytywanie profili
-
-
-
-
-
11.
a
b
c
Przywracanie ustawień fabrycznych
-
-
-
Problem
Rozwiązanie
Oprogramowanie nie uruchamia si
Mysz nie
- Upewnij się, że mysz GXT 144 jest podłączona i spróbuj
ponownie uruchomi
spróbuj ponownie.
Wybierz profil, który chcesz zapisać/wczytać.
Kliknij ikonę „Import”, aby wczytać konfigurację; kliknij „Export”, aby zapisać konfigurację.
Wprowadź nazwę dla konfiguracji lub wyszukaj zapisaną wcześniej konfigurację.
Kliknij „Save/Open”, aby zapisać/wczytać konfigurację.
Kliknij „Apply” — ustawienia myszy są aktualizowane.
Wybierz profil, który chcesz zresetować.
Kliknij przycisk „Restore”.
Kliknij przycisk „OK”, aby przywrócić wszystkie domyślne ustawienia fabryczne.
Rozwiązywanie problemów
jest wykrywana.
Jeżeli problem nie został rozwiązany, skontaktuj się z działem pomocy pod adresem www.trust.com/22991/faq.
ę.
Skorzystaj z innego portu USB, uruchom ponownie komputer i
ć oprogramowanie.
Page 34

GXT 144 Gaming Mouse - USER’S MANUAL
30
1. Расположение кнопок (по умолчанию)
- Кнопка 1 (по умолчанию = левая кнопка мыши)
- Кнопка 2 (по умолчанию = правая кнопка мыши)
- Кнопка 3 (по умолчанию = средняя кнопка мыши)
- Кнопка 4 (по умолчанию = вперед)
- Кнопка 5 (по умолчанию = назад)
- Кнопка 6 (по умолчанию = циклическое изменение DPI)
2. Установка
a
b
c
d
e
- Откройте веб-браузер и перейдите по ссылке www.trust.com/22991/driver.
-
чтобы
-
-
[«
Программирование кнопок
3.
a
b
c
Настройка кнопок
-
-
-
-
Выберите операционную систему и нажмите кнопку «Download EXE» [Загрузить файл EXE],
- Как минимум одной кнопке следует назначить функцию «Left Button» [Левая кнопка мыши].
скачать программу.
Щелкните файл «22991_XX.exe» и следуйте инструкциям мастера установки.
Щелкните ярлык «GXT 144 Gaming Mouse.exe» для запуска программы.
Теперь можно начать настройку мыши. В ручном режиме необходимо нажать кнопку «Apply»
Применить»] для обновления настроек мыши.
Щелкните вкладку «Main» [Главное].
Нажмите кнопку, которую необходимо переназначить.
Щелкните функцию, которую необходимо назначить.
Щелкните «Apply» [Применить], программное обеспечение мыши будет обновлено.
Page 35

GXT 144 Gaming Mouse - USER’S MANUAL
31
4. Настройки мыши и частота опроса
a
b
c
d
- Change the mouse sensitivity [Изменение чувствительности мыши]
- Щелкните «Apply» [Применить], программное обеспечение мыши будет обновлено.
5.
a
b
c
Настройки DPI
-
-
-
-
6.
a
b
Пользовательский цвет
-
-
-
7.
a
b
c
d
e
f
Световые эффекты
-
-
-
подсветка
-
-
]
мышь
-
- Щелкните «Apply» [Применить], программное обеспечение мыши будет обновлено.
- Change the scrolling speed [Изменение скорости прокрутки]
- Change the Double-click speed [Изменение скорости двойного щелчка]
- Change the report rate [Изменение частоты опроса]
Щелкните вкладку «Advanced» [Дополнительно].
Установите до 5 переменных DPI (установите или снимите флажки в полях).
Выберите скорость DPI для каждой настройки DPI (минимум 200/максимум 10 000 DPI)
Щелкните «Apply» [Применить], программное обеспечение мыши будет обновлено.
Щелкните цвет, который необходимо изменить
Выберите требуемый пользовательский цвет и щелкните « OK».
Щелкните «Apply» [Применить], программное обеспечение мыши будет обновлено.
Щелкните «Steady» [Равномерно] и измените яркость
Щелкните «Breathe» [Дыхание] и измените скорость
Щелкните «Blink» [Пульсация] и измените частоту и количество раз (при переключении DPI
мыши будет пульсировать)
Измените эффект подсветки и скорость
Щелкните «Steady» [Равномерно] и измените «Time» [Время] (при нажатии «Apply» [Применить
будет равномерно подсвечиваться на протяжении выбранного времени.
Измените эффект и скорость
Page 36

GXT 144 Gaming Mouse - USER’S MANUAL
32
8.
a
b
c
d
e
f
g
h
i
Создание макроса
(сохранение последовательности клавиш в программном
обеспечении)
-
-
-
-
-
-
-
-
-
- Процедура назначения записанного макроса описана в следующем пункте.
9.
a
b
c
d
e
Назначьте макрос
(сохраните последовательность клавиш в программе).
-
-
-
-
-
-
Параметры макросов
Щелкните вкладку «Macro» [Макрос].
Щелкните кнопку «New macro» [«Новый макрос»].
Введите название макроса и щелкните «OK».
Выберите, нужно ли записать задержку кнопки, и выберите способ исполнения макроса.
Чтобы начать запись макроса, нажмите на кнопку «Start record» [Начать запись].
Теперь введите желаемую последовательность действий макроса (максимум 60 действий)
Чтобы остановить запись макроса, нажмите на кнопку «Stop Recording» [Остановить запись]
Щелкните «Insert event» [Вставить событие], чтобы вставить действие мыши
Щелкните «Save» [Сохранить] для сохранения макроса.
Назначение макроса
Щелкните вкладку «Main» [Главное].
Нажмите на кнопку, которой следует назначить макрос
Щелкните функцию «Macro» [Макрос]
Выберите нужный макрос.
Щелкните «OK».
Щелкните «Apply» [Применить], программное обеспечение мыши будет обновлено.
Page 37

GXT 144 Gaming Mouse - USER’S MANUAL
33
10.
a
b
c
d
Сохранить или загрузить профили
-
[
-
-
-
11.
a
b
c
Сброс к заводским настройкам
-
-
-
Проблема
Решение
Программа
Мышь
- Убедитесь, что мышь GXT 144 подключена, и повторите
запуск
компьютер и повторите.
Выберите профиль, который вы хотите сохранить или загрузить.
Щелкните значок «Import» [Импортировать] для загрузки настроек. Щелкните значок «Export»
Экспортировать] для сохранения настроек
Введите нужное имя для вашей настройки или выполните поиск ранее сохраненной настройки.
Щелкните «Save/Open» [Сохранить/Открыть], чтобы сохранить или загрузить настройку.
Щелкните «Apply» [Применить], программное обеспечение мыши будет обновлено
Выберите профиль, настройки которого вы хотите сбросить
Щелкните кнопку «Restore» [Восстановить].
Нажмите кнопку «OK», чтобы сбросить все настройки до заводских настроек по умолчанию.
Устранение неисправностей
не запускается.
не обнаруживается.
Если неисправность устранить не удалось, обратитесь в службу технической поддержки:
www.trust.com/22991/faq.
программы.
Попробуйте использовать другой порт USB, перезапустите
 Loading...