

Page 1

Frequently asked questions:
www.trust.com/23091/faq
ZEEBO
Gaming
Mouse
Page 2

1
1
2
2
Trust.com - 23091
a
www.trust.com/23091/driver
1 3
4
5
6
7
b
Trust GXT 121 Gaming Mouse
c
d
2x
GXT 121.exe
e
Page 3
3
6
a
4 5
a
a
b
b
c
7
a
b
a
d
b
c
Page 4

8
d
a
b
e
c
10
9
g
f
ab
1 1
a
b
Save / Open
b
c d
a
12
a
Page 5

GXT 121 Gaming Mouse - USER’S MANUAL
1
Language
Page 2
Index
Page 6

GXT 121 Gaming Mouse - USER’S MANUAL
2
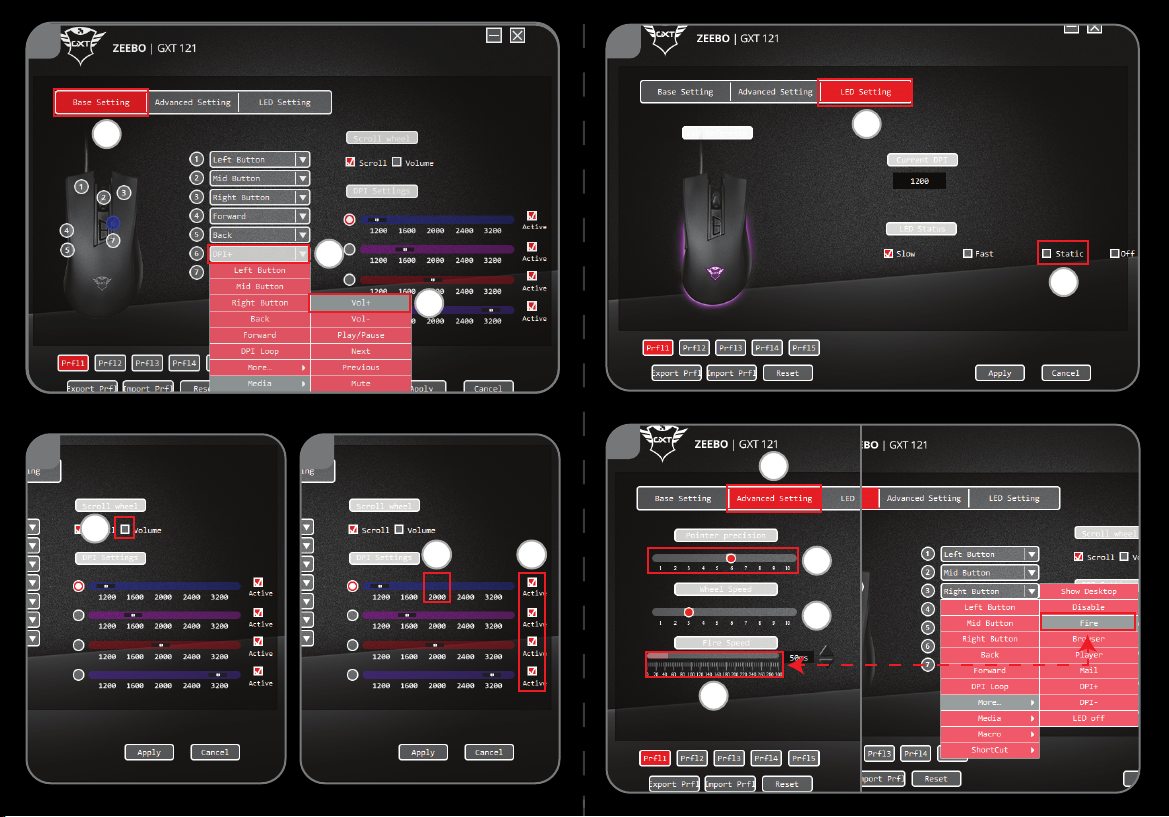
1. Button layout (default)
- Button 1 (Default = Left mouse button)
- Button 2 (Default = Mid button)
- Button 3 (Default = Right mouse button)
- Button 4 (Default = Forward)
- Button 5 (Default = Back)
- Button 6 (Default = DPI +)
- Button 7 (Default = DPI -)
Installation
2.
a
b
c
d
e
-
-
-
-
-
to update settings
to the mouse.
Button Programming
3.
a
b
c
Key Setting
-
-
-
-
Open the internet browser and go to www.trust.com/23091/driver.
Choose your operation system and click the “Download EXE” button to download the software.
Click on the “23091_XX.exe” and follow the installation wizard.
Click on the “GXT 121.exe” shortcut to start the software.
You can now start to configure the mouse. In the manual will be referred to ‘Apply’
Click on ‘Base Setting’.
Click on the key setting you want to re-assign.
Click on function you want to assign.
Click on ‘Apply’, the mouse is being updated. (The selected key mode mode will be active)
- At least one button has to be assigned as “Left Button”.
Please note it can take approx. 10 seconds for the settings to be updated to the mouse.
Page 7

GXT 121 Gaming Mouse - USER’S MANUAL
3
Scroll wheel setting, DPI settings & Light Effect
4.
a.
Scroll wheel setting
-
-
5.
a
b
DPI Setting
-
-
-
6.
a
b.
Light Effect
-
-
-
Set scroll wheel function to ‘scroll’ or ‘volume’.
Click on ‘Apply’, the mouse is being updated.
.
Assign up to 4 DPI variables (Check/uncheck boxes).
.
Click to adjust the DPI speed (min 1200 / max 3200).*
Click on ‘Apply’, the mouse is being updated.
.
Click on ‘LED Setting’.
To change the light effect, choose a LED Status.
Click on ‘Apply’, the mouse is being updated.
*The LED colors are linked to the DPI bar.
Page 8

GXT 121 Gaming Mouse - USER’S MANUAL
4
7.
a
b
c
d.
Mouse Speed
-
Scroll
-
Fire Speed
-
-
8.
a
b
c
d
e
f
g
Create a Macro
(Store a sequence of keys in the software)
-
-
-
-
-
-
-
- The next step shows how to assign your recorded macro.
9.
a
b
c
d
Assign a Macro
(Store a sequence of keys in the software)
-
-
-
-
- Click on ‘Apply’, the mouse is being updated.
Mouse, Scroll & Double-click Speed
.
Click on the ‘Advanced Settings’.
.
Click on 1 (slow) to 10 (fast) to adjust windows mouse speed.
.
Click on 1 (slow) to 10 (fast) to adjust windows scrolling speed.
Click on a preferred fire speed, this is linked to the ‘Fire’ function.
Click on ‘Apply’, the mouse is being updated.
Macro Settings
Enter a Macro Name
Click on ‘New’
Click on ‘Record’ to start recording the macro.
Now enter your preferred macro sequence. (max. 108 key entries).
Click on ‘Stop’ to stop recording the macro.
Right click in the key list to add a mouse action, modify delay or delete a specific action.
Click on ‘Save’ to save the macro.
Assign a Macro
Click on ‘Basic Setting’.
Click on the key you want to assign a macro.
Click on ‘Macro’.
Select your preferred macro.
ing Speed
Page 9

GXT 121 Gaming Mouse - USER’S MANUAL
5
10.
a
b
Change profiles
-
-
- Click on ‘Apply’, the mouse is being updated.
11.
a
b
Import & Export profiles
Please note that Macros cannot be saved/loaded.
-
-
- Click on ‘Apply’, the mouse is being updated.
12
a
Reset to factory default
Please note that resetting the mouse cannot be undone, all the changed settings will be lost. All macros
made will be deleted from the software!
- Click on ‘Reset’. The mouse immediately resets to factory default.
Problem
Solution
The software is not starting.
My settings are not saved to the
mouse.
software again
settings are lost when connecting the mouse
Profiles
All settings changed are linked to the currently active profile.
Click on the profile you want to change to.
Click on ‘Export Prfl’ or ‘Import Prfl’ to save/load a profile.
Choose the location where you want to save/load the profile and click on ‘Save’/’Open’.
.
Trouble shooting
If your problem is not solved, please contact the help desk at www.trust.com/23091/faq.
Make sure the GXT 121 mouse is connected and try to start the
The GXT 121 doesn’t have onboard memory, all changed
.
to a different device.
Page 10
GXT 121 Gaming Mouse - USER’S MANUAL
6
1. Tastenanordnung (Standardfunktionen)
- Taste 1 (Standardfunktion = linke Maustaste)
- Taste 2 (Standardfunktion = mittlere Maustaste)
- Taste 3 (Standardfunktion = rechte Maustaste)
- Taste 4 (Standardfunktion = vorwärts)
- Taste 5 (Standardfunktion = rückwärts)
- Taste 6 (Standardfunktion = DPI-Wert erhöhen)
- Taste 7 (Standardfunktion = DPI-Wert verringern)
Installation
2.
a
b
c
d
e
- Öffnen Sie Ihren Internetbrowser und gehen Sie auf die Seite www.trust.com/23091/driver.
Software herunterzuladen.
-
-
Klick auf „
Tastenprogrammierung
3.
a
b
c
Tasteneinstellung
-
-
-
-
(Der ausgewählte Tastenmodus
wird akti
Wählen Sie Ihr Betriebssystem aus und klicken Sie auf die Schaltfläche „Download EXE“, um die
Klicken Sie auf „23091_XX.exe“ und folgen Sie den Anweisungen des Installationswizards.
Klicken Sie auf die Verknüpfung „GXT 121.exe“, um die Software zu starten.
Sie können nun mit der Konfiguration der Maus beginnen. Die neuen Einstellungen werden mit einem
Apply“ in der Maus gespeichert. Der Speichervorgang dauert jeweils ungefähr 10 Sekunden.
Klicken Sie auf „Base Setting“.
Klicken Sie auf die Taste, deren Zuweisung Sie ändern möchten.
Klicken Sie auf die Funktion, die Sie der Taste zuweisen möchten.
Klicken Sie auf „Apply“, um die Änderungen in der Maus zu speichern.
viert.)
- Mindestens eine Taste muss als „Left Button“ konfiguriert sein.
Page 11

GXT 121 Gaming Mouse - USER’S MANUAL
7
Einstellungen für Scrollrad, DPI und Lichteffekt
4.
a.
Scrollradeinstellungen
-
-
5.
a.
b.
DPI-Einstellung
daraus entfernen).
-
-
6.
a.
b.
Lichteffekt
–
-
-
Setzen Sie die Scrollradfunktion auf „scroll“ oder „volume“.
Klicken Sie auf „Apply“, um die Änderungen in der Maus zu speichern.
Weisen Sie bis zu 4 DPI-Variablen zu (Häkchen in die betreffenden Auswahlkästchen setzen oder
Klicken Sie hier, um die DPI-Geschwindigkeit einzustellen (min. 1200, max. 3200).*
Klicken Sie auf „Apply“, um die Änderungen in der Maus zu speichern.
Klicken Sie auf „LED Setting“.
Wählen Sie einen LED-Status, um den Lichteffekt zu ändern.
Klicken Sie auf „Apply“, um die Änderungen in der Maus zu speichern.
*Die LED-Farben sind mit der DPI-Leiste verknüpft.
Page 12

GXT 121 Gaming Mouse - USER’S MANUAL
8
7.
a.
b.
c.
d.
Mausgeschwindigkeit
-
Scrollgeschwindigkeit
-
Feuergeschwindigkeit
-
-
8.
a
b
c
d
e
f
g
Erstellen eines Makros
(Speichern einer Tastenfolge in der Software)
-
-
-
-
-
Verzögerung zu ändern oder eine bestimmte Aktion zu lös
-
- Der nächste Schritt zeigt Ihnen, wie Sie Ihr aufgezeichnetes Makro zuweisen.
9.
a
b
c
d
Zuweisen eines Makros
(Speichern einer Tastenfolge in der Software)
-
-
-
-
- Klicken Sie auf „Apply“, um die Änderungen in der Maus zu speichern.
Maus-, Scroll- und Doppelklickgeschwindigkeit
Klicken Sie auf „Advanced Settings“.
Klicken Sie auf 1 (langsam) bis 10 (schnell), um die Windows-Mausgeschwindigkeit anzupassen.
Klicken Sie auf 1 (langsam) bis 10 (schnell), um die Windows-Scrollgeschwindigkeit anzupassen.
Klicken Sie auf die gewünschte Feuergeschwindigkeit (verknüpft mit der Funktion „Fire“).
Klicken Sie auf „Apply“, um die Änderungen in der Maus zu speichern.
Makro-Einstellungen
Geben Sie einen Namen für das Makro ein
Klicken Sie auf „New“
Klicken Sie auf „Record“, um mit der Aufzeichnung des Makros zu beginnen.
Führen Sie nun die gewünschte Makrosequenz aus (max. 108 Einträge).
Klicken Sie auf „Stop“, um die Aufzeichnung des Makros zu beenden.
Klicken Sie mit der rechten Maustaste in die Tastenliste, um eine Mausaktion hinzuzufügen, eine
Klicken Sie auf „Save“, um das Makro zu speichern.
Zuweisen eines Makros
Klicken Sie auf „Basic Setting“.
Klicken Sie auf die Taste, der Sie ein Makro zuweisen möchten
Klicken Sie auf „Macro“.
Wählen Sie das gewünschte Makro aus.
chen.
Page 13

GXT 121 Gaming Mouse - USER’S MANUAL
9
10.
a
b
Profil wechseln
-
-
- Klicken Sie auf „Apply“, um die Änderungen in der Maus zu speichern.
11.
a
b
Profile importieren und exportieren
Hinweis: Makros können nicht gespeichert bzw. geladen werden.
-
-
- Klicken Sie auf „Apply“, um die Änderungen in der Maus zu speichern.
12.
a
Auf Werkseinstellungen zurücksetzen
Hinw
dabei verloren. Auch alle erstellen M
- Klicken Sie auf „Reset“. Die Maus wird sofort auf Werkseinstellungen zurückgesetzt.
Problem
Lösung
Die Software startet nicht.
Die Einstellungen werden nicht von der
Maus übernommen.
- Vergewissern Sie sich, dass die GXT 121 angeschlossen ist und
versuchen Sie, die Software neu zu starten.
geänderten Einstellungen verloren gehen, wenn die Maus an ein
anderes Gerät angeschlossen wird.
Profile
Alle geänderte Einstellungen gehören zum aktuell aktiven Profil.
Klicken Sie auf das Profil, auf das Sie wechseln möchten.
Klicken Sie auf „Export Prfl“ oder „Import Prfl“, um ein Profil zu speichern bzw. zu laden.
Wählen Sie den Dateipfad zum Speichern bzw. Laden des Profils und klicken Sie auf „Save“/„Open“.
eis: Dieser Vorgang kann nicht rückgängig gemacht werden, alle geänderte Einstellungen gehen
Fehlerbehebung
Falls das Problem fortbesteht, wenden Sie sich an den Helpdesk unter www.trust.com/23091/faq.
akros werden gelöscht!
Die GXT 121 hat keinen eigenen Onboard-Speicher, sodass alle
Page 14

GXT 121 Gaming Mouse - USER’S MANUAL
10
1. Configuration des boutons (par défaut)
- Bouton 1 (fonction par défaut = clic gauche de la souris)
- Bouton 2 (fonction par défaut = clic milieu)
- Bouton 3 (fonction par défaut = clic droit de la souris)
- Bouton 4 (fonction par défaut = suivant)
- Bouton 5 (fonction par défaut = précédent)
- Bouton 6 (fonction par défaut = DPI+)
- Bouton 7 (fonction par défaut = DPI-)
Installation
2.
a
b
c
d
e
-
logiciel.
-
-
[appliquer] permet de mettre à jour la souris.
souris peut prendre environ 10 secondes.
Programmation des boutons
3.
a
b
c
Paramètres des touches
-
-
-
activé)
Ouvrez le navigateur Internet et allez à l’adresse www.trust.com/23091/driver.
Choisissez votre système d’exploitation et cliquez sur le bouton « Download EXE » pour télécharger le
- Au moins un bouton doit être attribué comme « Left Button » [clic gauche de la souris].
Cliquez sur « 23091_XX.exe » et suivez l’assistant d’installation.
Cliquez sur le raccourci « GXT 121.exe » pour démarrer le logiciel.
Vous pouvez maintenant configurer la souris. Conformément au manuel, le bouton « Apply »
Cliquez sur « Base setting » [paramètres de base]
Cliquez sur le paramètre de touche que vous souhaitez réattribuer.
Cliquez sur la fonction que vous souhaitez attribuer.
Cliquez sur « Apply » [appliquer], la souris est mise à jour. (Le mode de touche sélectionné sera
Veuillez noter que la mise à jour des paramètres de la
Page 15

GXT 121 Gaming Mouse - USER’S MANUAL
11
Configuration de la molette de défilement, paramètres DPI et effets de lumière
4.
a.
Configuration de la molette de défilement
-
-
5.
a.
b.
Paramètres DPI
-
-
-
6.
a.
b.
Effets de lumière
-
-
-
Configurez la fonction de la molette de défilement sur « scroll » [défiler] ou « volume ».
Cliquez sur « Apply » [appliquer], la souris est mise à jour.
Attribuez jusqu’à 4 variables DPI (cochez/décochez les cases).
Cliquez pour ajuster la vitesse DPI (1200 min./3200 max.).*
Cliquez sur « Apply » [appliquer], la souris est mise à jour.
Cliquez sur « LED setting » [paramètres de LED]
Pour modifier l’effet de lumière, choisissez un État LED.
Cliquez sur « Apply » [appliquer], la souris est mise à jour.
*Les couleurs LED sont liées à la barre DPI.
Page 16

GXT 121 Gaming Mouse - USER’S MANUAL
12
7.
a.
b.
c
d.
Vitesse
-
Vitesse de défilement
-
Vitesse de tir
-
-
8.
a
b
c
d
e
f
g
Créer une macro (
enregistrer une série de touches dans le logiciel)
-
-
-
-
-
supprimer un
-
- L’étape suivante montre comment attribuer votre macro enregistrée.
9.
a
b
c
d
Attribuer une macro (
enregistrer une série de touches dans le logiciel)
-
-
-
-
- Cliquez sur « Apply » [appliquer], la souris est mise à jour.
Vitesse de souris, de défilement et de double-clic
Cliquez sur « Advanced Settings » [paramètres avancés].
.
Paramètres des macros
Attribuer une macro
de la souris
Cliquez sur 1 (lent) à 10 (rapide) pour régler la vitesse de la souris Windows.
Cliquez sur 1 (lent) à 10 (rapide) pour régler la vitesse de défilement Windows.
Cliquez sur la vitesse de tir souhaitée, celle-ci est liée à la fonction « Fire » [tir].
Cliquez sur « Apply » [appliquer], la souris est mise à jour.
Saisissez le nom de la macro
Cliquez sur « New » [nouveau].
Cliquez sur « Record » [enregistrer] pour commencer à enregistrer la macro.
Saisissez à présent votre séquence de macros préférée. (108 entrées de touche max.)
Cliquez sur « Stop » pour arrêter d’enregistrer la macro.
Faites un clic-droit dans la liste des touches pour ajouter une action de la souris, modifier le délai ou
Cliquez sur « Save » [enregistrer] pour enregistrer la macro.
Cliquez sur « Basic setting » [paramètres de base].
Cliquez sur la touche à laquelle vous souhaitez attribuer une macro.
Cliquez sur « Macro ».
Sélectionnez la macro souhaitée.
e action particulière.
Page 17

GXT 121 Gaming Mouse - USER’S MANUAL
13
10.
a
b
Changer de profil
-
-
- Cliquez sur « Apply » [appliquer], la souris est mise à jour.
11.
a
b
Importer et exporter des profils
Veuillez noter qu’il n’est pas possible d’enregistrer/charger des macros.
-
pour enregistrer/charger
un profil.
«
- Cliquez sur « Apply » [appliquer], la souris est mise à jour.
12.
a
Restaurer les paramètres d’usine
Veuillez noter que la réinitialisation de la sour
seront perdus.
- Cliquez sur « Reset » [ réinitialiser]. Les paramètres d’usine de la souris sont immédiatement restaurés.
Problème
Solution
Le logiciel ne démarre pas.
Mes réglages ne sont pas enregistrés
dans la sour
- Assurez-vous que la souris GXT 121 est connectée et réessayez
de démarrer le logiciel.
paramètres modifiés sont perdus lorsque vous connectez la souris
à un autre appareil.
Profils
Tous les paramètres modifiés sont liés au profil actuellement actif.
Cliquez sur le profil que vous souhaitez modifier.
Cliquez sur « Export Prfl » [exporter profil] ou « Import Prfl » [importer profil]
Dépannage
Si votre problème persiste, veuillez contacter l'assistance technique via l'adresse www.trust.com/23091/faq.
Choisissez l'emplacement où vous souhaitez enregistrer/charger le profil et cliquez sur
Save »/ « Open » [enregistrer/ouvrir].
Toutes les macros seront supprimées du logiciel !
is.
is ne peut pas être annulée, tous les paramètres modifiés
La GXT 121 ne dispose pas d’une mémoire intégrée, tous les
Page 18

GXT 121 Gaming Mouse - USER’S MANUAL
14
1. Disposizione dei pulsanti (impostazione predefinita)
- Pulsante 1 (impostazione predefinita = pulsante sinistro del mouse)
- Pulsante 2 (impostazione predefinita = pulsante centrale)
- Pulsante 3 (impostazione predefinita = pulsante destro del mouse)
- Pulsante 4 (impostazione predefinita = avanti)
- Pulsante 5 (impostazione predefinita = indietro)
- Pulsante 6 (impostazione predefinita = DPI +)
- Pulsante 7 (impostazione predefinita = DPI -)
Installazione
2.
a
b
c
d
e
-
-
-
-
manuale si farà riferimento al coma
impostazioni del mouse può richiedere circa 10 secondi.
Programmazione dei pulsanti
3.
a
b
c
Impostazione dei tasti
-
-
-
-
Aprire il browser Internet e andare su www.trust.com/23091/driver.
Scegliere il sistema operativo e fare clic sul pulsante "Download EXE" per scaricare il software.
Fare clic su “23091_XX.exe” e seguire la procedura di installazione guidata.
Fare clic sulla scelta rapida “GXT 121.exe” per avviare il software.
Ora è possibile iniziare a configurare il mouse. Per aggiornare le impostazioni del mouse, in questo
Fare clic su ‘Base Setting’.
Fare clic sull'impostazione del tasto che si desidera riassegnare.
Fare clic sulla funzione che si desidera assegnare.
Fare clic su ‘Apply’, il mouse viene aggiornato. (La modalità del tasto selezionata sarà attiva)
- Almeno un pulsante deve essere assegnato come “Left Button”.
ndo ‘Apply’. Si prega di notare che l'aggiornamento delle
Page 19

GXT 121 Gaming Mouse - USER’S MANUAL
15
Impostazione della rotella di scorrimento, impostazioni DPI ed effetti luminosi
4.
a.
Impostazione della rotella di scorrimento
-
-
5.
a.
b.
Impostazioni DPI
-
aggiornato.
6.
a.
b.
Effetti luminosi
-
-
-
Impostare la funzione della rotella di scorrimento su ‘scroll’ o ‘volume’.
Fare clic su ‘Apply’, il mouse viene aggiornato.
Assegnare fino a 4 variabili DPI (Selezionare/deselezionare le caselle di controllo).
Fare clic per regolare la velocità DPI (min 1200 / max 3200).*- Fare clic su ‘Apply’, il mouse viene
Fare clic su ‘LED Setting’.
Per cambiare l'effetto luminoso, scegliere uno Stato LED.
Fare clic su ‘Apply’, il mouse viene aggiornato.
*I colori dei LED sono collegati alla barra DPI.
Page 20

GXT 121 Gaming Mouse - USER’S MANUAL
16
7.
a.
b.
c.
d.
Mouse Speed [Velocità mouse]
finestre.
Scrolling Speed [Velocità di scorrimento]
finestre.
Velocità di fuoco
-
-
8.
a
b
c
d
e
f
g
Creare una macro
(memorizzare una sequenza di tasti nel software)
-
-
-
-
-
modificare il ritardo o eliminare
-
- Il passo successivo è l'assegnazione della macro registrata.
9.
a
b
c
d
Assegnare una macro
(memorizzare una sequenza di tasti nel software)
-
-
-
-
- Fare clic su ‘Apply’, il mouse viene aggiornato.
Velocità Mouse, Scorrimento e Doppio clic
Fare clic su ‘Advanced Settings’.
Fare clic su una delle caselle da 1 (lento) a 10 (veloce) per regolare la velocità del mouse delle
Fare clic su una delle caselle da 1 (lento) a 10 (veloce) per regolare la velocità di scorrimento delle
Fai clic su una velocità di fuoco preferita che è collegata alla funzione ‘Fire’.
Fare clic su ‘Apply’, il mouse viene aggiornato.
Impostazioni delle macro
Immettere il nome della macro
Fare clic su ‘New’
Fare clic su ‘Record’ per iniziare la registrazione della macro.
A questo punto, inserire la sequenza macro preferita. (max 108 inserimenti).
Fare clic su ‘Stop’ per interrompere la registrazione della macro.
Fare clic con il tasto destro del mouse nell'elenco dei tasti per aggiungere un comando del mouse,
Fare clic su ‘Save’ per salvare la macro.
Assegnare una macro
Fare clic su ‘Basic Setting’.
Fare clic sul tasto cui si desidera assegnare la macro.
Fare clic su ‘Macro’.
Selezionare la macro desiderata.
un comando specifico.
Page 21

GXT 121 Gaming Mouse - USER’S MANUAL
17
10.
a
b
Modificare i profili
-
-
- Fare clic su ‘Apply’, il mouse viene aggiornato.
11.
a
b
Importare ed esportare profili
Si noti che le macro non possono essere salvate/caricat
-
-
- Fare clic su ‘Apply’, il mouse viene aggiornato.
12.
a
Ripristinare le impostazioni di fabbrica
Si noti che non è possibile annullare il ripristino del mouse, tutte le impostazioni modificate andran
perse. Tutte le macro create verranno eliminate dal software!
- Fare clic su ‘Reset’. Il mouse ritorna immediatamente alle impostazioni di fabbrica.
Problema
Soluzione
Il software non si avvia.
Le mie impostazioni non sono salvate
nel mouse.
- Assicurarsi che il mouse GXT 121 sia collegato e riprovare a
avviare il software.
modificate andranno perse quando si col
dispositivo.
Profili
Tutte le impostazioni modificate sono collegate al profilo attualmente attivo.
Fare clic sul profilo che si desidera modificare.
Fare clic su ‘Export Prfl’ o ‘Import Prfl’ per salvare/caricare un profilo.
Scegliere la posizione in cui si desidera salvare/caricare il profilo e cliccare su ‘Save’/’Open’.
Risoluzione dei problemi
Se il problema persiste, contattare il servizio di assistenza tecnica all'indirizzo www.trust.com/23091/faq.
Il GXT 121 non ha una memoria integrata, tutte le impostazioni
e.
no
lega il mouse a un altro
Page 22

GXT 121 Gaming Mouse - USER’S MANUAL
18
1. Distribución de los botones (predeterminada)
- Botón 1 (predeterminado = botón izquierdo del ratón)
- Botón 2 (predeterminado = botón central)
- Botón 3 (predeterminado = botón derecho del ratón)
- Botón 4 (predeterminado = avance)
- Botón 5 (predeterminado = retroceso)
- Botón 6 (predeterminado = DPI +)
- Botón 7 (predeterminado = DPI -)
Instalación
2.
a
b
c
d
e
-
-
-
-
-
” para
actualizar la configuración en el ratón. Tenga en cuenta que los ajustes pueden tardar unos 1
segundos en actualizarse en el ratón.
Programación de botones
3.
a
b
c
Configuración de teclas
-
-
-
-
Abra el navegador de Internet y visite www.trust.com/23091/driver.
Elija su sistema operativo y haga clic en el botón “Download EXE” para descargar el software.
Haga clic en el archivo “23091_XX.exe” y siga el asistente de instalación.
Haga clic en el acceso directo “GXT 121.exe” para iniciar el software.
Ahora podrá comenzar a configurar el ratón. En el manual se hará referencia a la función “Apply
Haga clic en “Base Setting”.
Haga clic en el ajuste de tecla que desee reasignar.
Haga clic en la función que desee asignar.
Haga clic en “Apply” y el ratón se actualizará. (el modo de tecla seleccionado será el modo activo).
- Al menos un botón se debe asignar como “Left Button”.
0
Page 23

GXT 121 Gaming Mouse - USER’S MANUAL
19
Ajuste de la rueda de desplazamiento, ajustes de DPI y efecto de iluminación
4.
a.
Ajuste de la rueda de desplazamiento
-
-
5.
a.
b.
Ajuste de DPI
-
-
-
6.
a.
b.
Efecto de iluminación
-
-
-
Ajuste la función de la rueda de desplazamiento como “Scroll” o “Volume”.
Haga clic en “Apply” y el ratón se actualizará.
Asigne hasta 4 variables de DPI (marcando o desmarcando casillas).
Haga clic para ajustar la velocidad de DPI (mín. 1200/máx. 3200).*
Haga clic en “Apply” y el ratón se actualizará.
Haga clic en “LED Setting”.
Para cambiar el efecto de iluminación, elija un estado de LED.
Haga clic en “Apply” y el ratón se actualizará.
*Los colores de LED están vinculados a la barra de DPI.
Page 24

GXT 121 Gaming Mouse - USER’S MANUAL
20
7.
a.
b.
c.
d.
Velocidad de ratón
-
Velocidad de desplazamiento
Windows.
Velocidad de disparo
-
-
8.
a
b
c
d
e
f
g
Creación de una macro
(guardar una secuencia de teclas en el software)
-
-
-
-
-
retraso o eliminar una acción concreta.
-
- En los próximos pasos se muestra cómo asignar la macro grabada.
9.
a
b
c
d
Asignación de una macro
(guardar una secuencia de teclas en el software)
-
-
-
-
- Haga clic en “Apply” y el ratón se actualizará.
Velocidad de ratón, desplazamiento y doble clic
Haga clic en la ficha “Advanced Settings”.
Haga clic en desde 1 (lento) a 10 (rápido) para ajustar la velocidad del ratón en Windows.
Haga clic en desde 1 (lento) a 10 (rápido) para ajustar la velocidad de desplazamiento del ratón en
Haga clic en la velocidad de disparo preferida; este ajuste está vinculado a la función “Fire”.
Haga clic en “Apply” y el ratón se actualizará.
Configuración de macros
Escriba el nombre del a macro.
Haga clic en “New”.
Haga clic en “Record” para empezar a grabar la macro.
Ahora, introduzca la secuencia de macro que desea (máx. 108 entradas de tecla).
Haga clic en “Stop” para detener la grabación de la macro.
Haga clic con el botón derecho en la lista de teclas para añadir una acción de ratón, modificar el
Haga clic en “Save” para guardar la macro.
Asignación de una macro
Haga clic en “Basic Setting”.
Haga clic en la tecla a la que desea asignar una macro.
Haga clic en “Macro”.
Seleccione la macro que desee.
Page 25

GXT 121 Gaming Mouse - USER’S MANUAL
21
10.
a
b
Cambio de perfiles
-
-
- Haga clic en “Apply” y el ratón se actualizará.
11.
a
b
Importación y exportación de perfiles
Tenga en cuenta que las macros no se pueden guardar o cargar.
-
-
- Haga clic en “Apply” y el ratón se actualizará.
12.
a
Restablecimiento de valores de fábrica
Tenga en cu
modificada se perderá. Se eliminarán t
- Haga clic en “Reset”. El ratón se restablece inmediatamente a la configuración de fábrica.
Problema
Solución
El software no se inicia.
Mis ajustes
- Asegúrese de que el ratón GXT 121 está conectado e intente
iniciar el software de nuevo.
se pierden al conectar el ratón a otro dispositivo.
Perfiles
Todos los ajustes modificados se vinculan al perfil actualmente activo.
Haga clic en el perfil al que desee cambiar.
Haga clic en “Export Prfl” o “Import Prfl” para guardar o cargar un perfil.
Elija la ubicación donde desea guardar o cargar el perfil, y haga clic en “Save/Open”.
Resolución de problemas
Si no puede resolver el problema, póngase en contacto con el departamento de servicio al cliente a través de
www.trust.com/23091/faq.
enta que el restablecimiento del ratón no se puede deshacer y que toda la configuración
no se guardan en el ratón.
odas las macros del software.
El GXT 121 no dispone de memoria integrada, todos los ajustes
Page 26

GXT 121 Gaming Mouse - USER’S MANUAL
22
1. Lay-out van de knoppen (standaardfunctie)
- Knop 1 (standaardfunctie = linkermuisknop)
- Knop 2 (standaardfunctie = middelste knop)
- Knop 3 (standaardfunctie = rechtermuisknop)
- Knop 4 (standaardfunctie = vooruit)
- Knop 5 (standaardfunctie = achteruit)
- Knop 6 (standaardfunctie = DPI +)
- Knop 7 (standaardfunctie = DPI -)
Installeren
2.
a
b
c
d
e
-
-
-
-
-
om de instellingen van
de muis bij te werken. Let op: het
te werken.
Knoppen programmeren
3.
a
b
c
Toetsinstelling
-
-
-
-
Open de internetbrowser en ga naar www.trust.com/23091/driver.
Kies het besturingssysteem en klik op de knop "Download EXE" om de software te downloaden.
Klik op "23091_XX.exe" en volg de stappen van de installatiewizard.
Klik op de snelkoppeling "GXT 121.exe" om de software te starten.
U kunt de muis nu configureren. In de handleiding wordt verwezen naar 'Apply'
Klik op 'Base Setting'.
Klik op de toetsinstelling waaraan u een nieuwe functie wilt toewijzen.
Klik op de functie die u wilt toewijzen.
Klik op 'Apply'. De muis wordt bijgewerkt. (De geselecteerde toetsmodus is actief)
- Er moet ten minste een knop worden toegewezen als "Left Button".
kan ongeveer 10 seconden duren om de instellingen van de muis bij
Page 27

GXT 121 Gaming Mouse - USER’S MANUAL
23
Bladerwieltje instellen, DPI-instellingen en lichteffect
4.
a.
Bladerwieltje instellen
-
-
5.
a.
b.
DPI-instelling
-
-
-
6.
a.
b.
Lichteffect
-
-
-
Stel de functie van het bladerwieltje in op 'scroll' of 'volume'.
Klik op 'Apply'. De muis wordt bijgewerkt.
Wijs maximaal 4 DPI-variabelen toe (vakjes aanvinken/uitschakelen).
Klik om de DPI-snelheid aan te passen (min 1200/max 3200).*
Klik op 'Apply'. De muis wordt bijgewerkt.
Klik op 'LED Setting'.
Kies een LED-status om het lichteffect te wijzigen.
Klik op 'Apply'. De muis wordt bijgewerkt.
*De LED-kleuren zijn gekoppeld aan de DPI-balk.
Page 28

GXT 121 Gaming Mouse - USER’S MANUAL
24
7.
a.
b.
c.
d.
Mu
-
Scrollsnelheid
-
Vuursnelheid
-
-
8.
a
b
c
d
e
f
g
Een macro maken
(een toetsenreeks opslaan in de software)
-
-
-
-
-
passen of een spec
-
- In de volgende stap wordt weergegeven hoe u de vastgelegde macro toewijst.
9.
a
b
c
d
Een macro toewijzen
(een toetsenreeks opslaan in de software)
-
-
-
-
- Klik op 'Apply'. De muis wordt bijgewerkt.
Snelheid van muis, scrollen & dubbelklikken
Klik op de 'Advanced Settings'.
issnelheid
Klik op 1 (langzaam) tot 10 (snel) om de windows-muissnelheid aan te passen.
Klik op 1 (langzaam) tot 10 (snel) om de windows-scrollsnelheid aan te passen.
Klik op een gewenste vuursnelheid, deze is gekoppeld aan de functie 'Fire'.
Klik op 'Apply'. De muis wordt bijgewerkt.
Macro instellen
Voer een macronaam in
Klik op 'New'
Klik op 'Record' om het vastleggen van de macro te starten.
Voer nu de gewenste macroreeks in. (max. 108 toetsinvoeren).
Klik op 'Stop' om het vastleggen van de macro te stoppen.
Klik met de rechtermuisknop in de toetsenlijst om een muisactie toe te voegen, een vertraging aan te
Klik op 'Save' om de macro op te slaan.
Een macro toewijzen
Klik op 'Basic Setting'.
Klik op de toets waaraan u een macro wilt toewijzen.
Klik op 'Macro'.
Selecteer de gewenste macro.
ifieke actie te verwijderen.
Page 29

GXT 121 Gaming Mouse - USER’S MANUAL
25
10.
a
b
Profielen wijzigen
-
-
- Klik op 'Apply'. De muis wordt bijgewerkt.
11.
a
b
Profielen importeren en exporteren
Let op dat macro's niet kunnen worden opgeslagen/geladen.
-
-
- Klik op 'Apply'. De muis wordt bijgewerkt.
12.
a
Reset naar fabrieksinstellingen
Let op: het resetten van de muis kan niet ongedaan worden gemaakt, alle gewijzigde instellingen gaan
verloren. Alle gemaakte macro's worden
- Klik op 'Reset'. De muis wordt onmiddellijk teruggezet naar de fabrieksinstellingen.
Probleem
Oplossing
De software start niet.
Mijn instellingen worden niet in de
muis bijgewerkt.
- Zorg dat de GXT 121-muis is aangesloten en probeer de
software opnieuw op te starten.
instellingen gaan verloren wanneer de muis op een ander
apparaat wordt aangesloten.
Profielen
Alle gewijzigde instellingen worden gekoppeld aan het profiel dat momenteel actief is.
Klik op het profiel waarnaar u wilt wijzigen.
Klik op 'Export Prfl' of 'Import Prfl' om een profiel op te slaan/te laden.
Kies de locatie waar u het profiel wilt opslaan/laden en klik op 'Save'/'Open'.
Problemen oplossen
Als het probleem nog niet is opgelost, neemt u contact op met de klantenservice via www.trust.com/23091/faq.
uit de software verwijderd!
De GXT 121 heeft geen ingebouwd geheugen, alle gewijzigde
Page 30

GXT 121 Gaming Mouse - USER’S MANUAL
26
1. Przypisanie przycisków (domyślne)
- Przycisk 1 (domyślnie = lewy przycisk myszy)
- Przycisk 2 (domyślnie = środkowy przycisk myszy)
- Przycisk 3 (domyślnie = prawy przycisk myszy)
- Przycisk 4 (domyślnie = do przodu)
- Przycisk 5 (domyślnie = do tyłu)
- Przycisk 6 (domyślnie = DPI +)
- Przycisk 7 (domyślnie = DPI -)
Instalacja
2.
a
b
c
d
e
-
oprogramowanie.
-
-
[Zastosuj] b
w celu ich aktualizacji. Nale
Programowanie przycisków
3.
a
b
c
Ustawienia przycisków
-
-
-
-
Otwórz przeglądarkę internetową i przejdź na stronę www.trust.com/23091/driver.
Wybierz system operacyjny i kliknij przycisk „Download EXE” [Pobierz plik wykonywalny], aby pobrać
Kliknij „23091_XX.exe” i postępuj zgodnie z komunikatami kreatora instalacji.
Kliknij skrót „GXT 121.exe”, aby uruchomić oprogramowanie.
Można teraz rozpocząć konfigurację myszy. W niniejszej instrukcji polecenie użycia przycisku „Apply”
Kliknij „Base Setting”.
Kliknij ustawienie przycisku, który chcesz ponownie przypisać.
Kliknij funkcję, którą chcesz przypisać.
Kliknij „Apply” — ustawienia myszy są aktualizowane. (Wybrany tryb przycisku będzie aktywny).
- Do co najmniej jednego przycisku musi być przypisana funkcja „Left Button”.
ędzie stosowane zawsze wtedy, kiedy ustawienia myszy będą musiały zostać potwierdzone
ży pamiętać, że aktualizacja ustawień myszy może potrwać ok. 10 sekund.
Page 31

GXT 121 Gaming Mouse - USER’S MANUAL
27
Ustawienie kółka przewijania, ustawienia DPI i efekt świetlny
4.
a.
Ustawienie kółka przewijania
-
-
5.
a.
b.
Ustawienie DPI
-
-
-
6.
a.
b.
Efekty świetlne
-
-
-
Ustawić funkcję kółka przewijania na „Scroll” lub „Volume”.
Kliknij „Apply” — ustawienia myszy są aktualizowane.
Przypisz maksymalnie 4 zmienne DPI (zaznacza/odznacz pola wyboru).
Kliknąć, aby dostosować wartość DPI (min. 1200 / maks. 3200).*
Kliknij „Apply” — ustawienia myszy są aktualizowane.
Kliknij „LED Setting”.
Aby zmienić efekt świetlny, wybierz opcję „LED Status”.
Kliknij „Apply” — ustawienia myszy są aktualizowane.
*Kolory diod LED są powiązane z paskiem DPI.
Page 32

GXT 121 Gaming Mouse - USER’S MANUAL
28
7.
a
b.
c.
d.
Szybko
wska
Szybko
przewijania okien.
Szybko
-
-
8.
a
b
c
d
e
f
g
Tworzenie makra
(zapisywanie w oprogramowaniu sekwencji klawiszy)
-
-
-
-
-
-
nienie
lub usun
-
- W kolejnym kroku znajdują się instrukcje odnośnie do przypisywania zapisanego makra.
9.
a
b
c
d
Przypisywanie makra
(zapisanie kombinacji klawiszy w oprogram owaniu)
-
-
-
-
- Kliknij „Apply” — ustawienia myszy są aktualizowane.
Szybkość wskaźnika myszy, przewijania i podwójnego kliknięcia
.
Kliknij „Advanced Settings”.
Ustawienia makro
Przypisywanie makra
ść wskaźnika myszy
Zaznacz na pasku wyboru wartość od 1 (wolno) do 10 (szybko), aby dostosować ustawienie szybkości
źnika myszy systemu Windows.
ść przewijania
Zaznacz na pasku wyboru wartość od 1 (wolno) do 10 (szybko), aby dostosować ustawienie szybkości
Zaznacz na pasku wyboru wartość szybkości strzału — jest ona powiązana z funkcją „Fire”.
Kliknij „Apply” — ustawienia myszy są aktualizowane.
Wprowadź nazwę makra.
Kliknij „New”.
Kliknij „Record”, aby rozpocząć zapisywanie makra.
Teraz ustaw preferowaną sekwencję makr. (Maks. 108 akcji klawiszy).
Kliknij „Stop”, aby zatrzymać zapis makra.
Kliknij prawym przyciskiem myszy na liście klawiszy, aby dodać akcję myszy, zmodyfikować opóź
Kliknij „Save”, aby zapisać makro w pamięci.
Kliknij „Basic Setting”.
Kliknij przycisk, do którego chcesz przypisać makro.
Kliknij „Macro”.
Wybierz makro.
ść strzału
ąć określoną akcję.
Page 33

GXT 121 Gaming Mouse - USER’S MANUAL
29
10.
a
b
Zmiana profili
-
-
- Kliknij „Apply” — ustawienia myszy są aktualizowane.
11.
a
b
Importowanie i eksportowanie profili
Nale
-
-
- Kliknij „Apply” — ustawienia myszy są aktualizowane.
12.
a
Przywracanie domyślnych ustawień fabrycznych
Nale
utracone. Wszystkie utworzone makra zostan
-
fabrycznych.
Problem
Rozwiązanie
Oprogramowanie nie uruchamia się.
Moje ustawienia myszy nie s
zapisywane.
- Upewnij się, że mysz GXT 121 jest podłączona i spróbuj
ponownie uruchomi
zmienione ustawienia s
urządzenia.
Profile
Wszystkie zmienione ustawienia są powiązane z bieżącym aktywnym profilem.
Kliknij profil, który chcesz aktywować.
ży pamiętać, że makra nie mogą być zapisywane/wczytywane.
Kliknij „Export Prfl” lub „Import Prfl”, aby zapisać/wczytać profil.
Wybierz lokalizację, w której chcesz zapisać / z której chcesz wczytać profil i kliknij „Save”/„Open”.
ży pamiętać, że resetowanie myszy nie można cofnąć, a wszystkie zmiany w ustawieniach zostaną
Kliknij „Reset”. Konfiguracja myszy zostanie natychmiast przywrócona do domyślnych ustawień
Rozwiązywanie problemów
Jeżeli problem nie został rozwiązany, skontaktuj się z działem pomocy pod adresem www.trust.com/23091/faq.
ą
ą usunięte z oprogramowania!
ć oprogramowanie.
Mysz GXT 121 nie posiada wbudowanej pamięci; wszystkie
ą tracone wraz z podłączeniem do innego
Page 34

GXT 121 Gaming Mouse - USER’S MANUAL
30
1. Расположение кнопок (по умолчанию)
- Кнопка 1 (по умолчанию = левая кнопка мыши)
- Кнопка 2 (по умолчанию = щелчок средней кнопкой мыши)
- Кнопка 3 (по умолчанию = правая кнопка мыши)
- Кнопка 4 (по умолчанию = вперед)
- Кнопка 5 (по умолчанию = назад)
- Кнопка 6 (по умолчанию = DPI +)
- Кнопка 7 (по умолчанию = DPI -)
Установка
2.
a
b
c
d
e
-
-
чтобы
-
-
[«
настроек
мыши
Программирование кнопок
3.
a
b
c
Настройка кнопок
-
-
-
-
режим
Откройте веб-браузер и перейдите по ссылке www.trust.com/23091/driver.
Выберите операционную систему и нажмите кнопку «Download EXE» [Загрузить файл EXE],
- Как минимум одной кнопке следует назначить функцию «Left Button» [Левая кнопка мыши].
скачать программу.
Щелкните файл «23091_XX.exe» и следуйте инструкциям мастера установки.
Щелкните ярлык «GXT 121.exe» для запуска программы.
Теперь можно начать настройку мыши. В ручном режиме необходимо нажать кнопку «Apply»
Применить»] для обновления настроек мыши. Обратите внимание, что для обновления
потребуется примерно 10 секунд.
Щелкните «Base Setting» [Базовая настройка].
Щелкните настройку кнопки, которую необходимо переназначить.
Щелкните функцию, которую необходимо назначить.
Щелкните «Apply» [Применить], программное обеспечение мыши будет обновлено. (Выбранный
работы кнопок будет активен).
Page 35

GXT 121 Gaming Mouse - USER’S MANUAL
31
Настройка колесика прокрутки, настройки DPI и эффекта подсветки
4.
a.
Настройка колеса прокрутки
-
-
5.
a.
b.
Настройки DPI
-
-
-
6.
a.
b.
Световой эффект
-
-
-
Задайте для колеса прокрутки функцию «scroll» [прокрутка] или «volume» [громкость].
Щелкните «Apply» [Применить], программное обеспечение мыши будет обновлено.
Установите до 4 переменных DPI (установите или снимите флажки в полях).
Щелкните, чтобы отрегулировать скорость DPI (минимум 1200 / максимум 3200).*
Щелкните «Apply» [Применить], программное обеспечение мыши будет обновлено.
Щелкните «LED Setting» [«Настройка светодиодной подсветки»].
Чтобы изменить эффект подсветки, выберите статус светодиодной подсветки.
Щелкните «Apply» [Применить], программное обеспечение мыши будет обновлено.
*Цвета светодиодной подсветки привязаны к панели DPI.
Page 36

GXT 121 Gaming Mouse - USER’S MANUAL
32
7.
a.
b.
c.
d.
-
Скорость
(
Скорость
10 (
Скорость
-
-
8.
a
b
c
d
e
f
g
Создание макроса
(сохранение последовательности клавиш в программном
обеспечении)
-
-
-
-
клавиш
-
-
задержку
-
- Процедура назначения записанного макроса описана в следующем пункте.
9.
a
b
c
d
Назначьте макрос
(сохраните последовательность клавиш в програм ме).
-
-
-
-
- Щелкните «Apply» [Применить], программное обеспечение мыши будет обновлено.
Мышь, скорость прокрутки и двойного щелчка
Щелкните «Advanced Settings» [Дополнительные настройки].
Параметры макросов
Назначение макроса
мыши
Чтобы настроить скорость мыши в системе Windows, нажмите на цифру: от 1 (медленно) до 10
быстро).
прокрутки
Чтобы настроить скорость прокрутки в системе Windows, нажмите на цифру: от 1 (медленно) до
быстро).
стрельбы
Выберите желаемую скорость стрельбы, она связана с функцией «Fire» [Стрельба].
Щелкните «Apply» [Применить], программное обеспечение мыши будет обновлено.
Войдите в режим работы с макросами
Щелкните «New» [Новый]
Щелкните «Record» [Запись], чтобы начать запись макроса.
Теперь введите требуемую последовательность действий макроса. (максимум 108 вводов
).
Чтобы остановить запись макроса, щелкните «Stop» [Остановить].
Щелкните правой кнопкой мыши по списку клавиш, чтобы добавить действие мыши, изменить
или удалить определенное действие.
Щелкните «Save» [Сохранить] для сохранения макроса.
Щелкните «Basic Setting» [Базовая настройка].
Щелкните кнопку, которой следует назначить макрос.
Щелкните «Macro» [«Макрос»].
Выберите нужный макрос.
Page 37

GXT 121 Gaming Mouse - USER’S MANUAL
33
10.
a
b
Изменить профили
-
-
- Щелкните «Apply» [Применить], программное обеспечение мыши будет обновлено.
11.
a
b
Импорт и экспорт профилей
Обратите
-
[
- Щелкните «Apply» [Применить], программное обеспечение мыши будет обновлено.
12.
a
Сбросить настройки до заводских
Обратите
будут
- Щелкните «Reset» [Сбросить]. Настройки мыши сразу же вернутся к исходным заводским.
Проблема
Решение
Программа не запускается.
Мои
сохраняются.
- Убедитесь, что мышь GXT 121 подключена, и повторите
запуск
теряются при подключении мыши к другому устройству.
Профили
Все измененные настройки связаны с текущим активным профилем.
Щелкните профиль, который необходимо изменить.
Устранение неисправностей
настройки мыши не
Если неисправность устранить не удалось, обратитесь в службу технической поддержки:
www.trust.com/23091/faq.
внимание, что макрос нельзя сохранить или загрузить.
Щелкните «Export Prfl» или «Import Prfl», чтобы сохранить или загрузить профиль.
Выберите место, куда вы хотите сохранить или загрузить профиль, и нажмите «Save/Open»
Сохранить/Открыть].
внимание, что сброс настроек мыши нельзя будет отменить, все измененные настройки
утеряны. Все созданные макросы будут выдалены из программы!
программы.
У GXT 121 нет встроенной памяти, все измененные настройки
 Loading...