

Page 1

TRUST FAMILYC@M 500 FLASH
UK
TRUST FAMILYC@M 500 FLASH
Instruction Manual
Version 1.0
Page 2

TRUST FAMILYC@M 500 FLASH
12640_UK.DOC
Thank you
Thank you very much for purchasing this product from the TRUST range. We wish you hours of
fun with it. Please read this manual carefully before using the product.
Registration
Register your purchase via our Internet site at www.TRUST.com so that you can receive optimal
guarantee and service support. You will be automatically informed of developments to your
product and other TRUST products. You will also have the chance of winning some spectacular
prizes.
Copyright statement
No part of this instruction manual may be reproduced or transmitted, in any form or by any means,
electronic or mechanical, including photocopying, recording, or information storage and retrieval
systems, for any purpose other than the purchaser's own personal use, without prior written
permission from the manufacturer.
Disclaimer statement
The manufacturer specifically disclaims all warranties, either express or implied, including, but not
limited to, warranties for the marketability and suitability for a particular purpose, with respect to
the software, the accompanying product manual(s) and written material, and all other
accompanying hardware. The manufacturer reserves the right to revise or make improvements to
its product at any time and without obligation to notify any person of such revisions or
improvements.
In no event shall the manufacturer be liable for any consequential or incidental damages, including
any loss of business profits or any other commercial damages, arising out of the use of its
products.
All company or product names are trademarks or registered trademarks of their respective
owners.
Page 3

TRUST FAMILYC@M 500 FLASH
1
UK
Contents
1. Introduction ..................................................................................................................................... 3
1.1 Conventions used in the manual ........................................................................................... 3
1.2 Contents of the box ................................................................................................................. 3
1.3 Minimum system requirements .............................................................................................. 3
2. Safety ............................................................................................................................................... 4
2.1 General information................................................................................................................. 4
2.2 Batteries.................................................................................................................................... 4
3. Functions of the ‘TRUST FAMILYC@M 500 FLASH’ ................................................................... 5
3.1 Camera functions..................................................................................................................... 5
3.2 LCD functions .......................................................................................................................... 5
3.2.1 Battery condition............................................................................................................... 5
3.2.2 Camera functions.............................................................................................................. 6
4. Installation ....................................................................................................................................... 7
4.1 Inserting the batteries ............................................................................................................. 7
4.2 Installing the driver for the ‘TRUST FAMILYC@M 500 FLASH’........................................... 8
4.2.1 Windows 98 / Windows ME / Windows 2000 .................................................................. 8
4.2.2 Windows XP..................................................................................................................... 10
4.3 Installing Photo Express 4.0 .................................................................................................12
4.4 Installing Photo Explorer 6.0 ................................................................................................15
4.5 Installing COOL 360............................................................................................................... 17
4.6 Installing VideoLive Mail ....................................................................................................... 20
4.7 Installing Ulead VideoStudio 4.0 SE Basic .......................................................................... 22
5. Using the camera and the applications ...................................................................................... 29
5.1 Taking photographs .............................................................................................................. 29
5.2 Flash........................................................................................................................................ 30
5.3 Recording video clips............................................................................................................ 30
5.4 Deleting the memory ............................................................................................................. 30
5.4.1 Deleting the last recording............................................................................................. 30
5.4.2 Deleting all the photographs and video clips .............................................................. 30
5.5 WEBCAM................................................................................................................................. 31
6. Applications................................................................................................................................... 31
6.1 Camera Manager .................................................................................................................... 31
6.2 Photo mode ............................................................................................................................ 31
6.3 Using Photo Express 4.0....................................................................................................... 32
6.4 Loading photographs............................................................................................................ 32
6.4.1 Loading video clips......................................................................................................... 36
6.4.2 Live video images ........................................................................................................... 37
Page 4

TRUST FAMILYC@M 500 FLASH
2
6.5 Using PhotoExplorer 6.0 ....................................................................................................... 37
6.6 COOL 360................................................................................................................................ 38
6.7 VideoLive Mail ........................................................................................................................ 38
6.7.1 Description of the function buttons .............................................................................. 40
6.7.2 Making a VideoMail .........................................................................................................41
6.8 Using VideoStudio ................................................................................................................. 42
7. Troubleshooting ........................................................................................................................... 42
8. Specifications................................................................................................................................ 44
9. TRUST Customer Care Centers...................................................................................................45
Page 5

TRUST FAMILYC@M 500 FLASH
3
UK
1. Introduction
This instruction manual is for users of the TRUST FAMILYC@M 500 FLASH. Basic knowledge of computers
is necessary to be able to install this product. Please consult one of the TRUST Customer Care Centers if
you have any problems. The last page of this electronic instruction manual, as well as the back on the printed
installation manual, contains more information about these Customer Care Centers.
1.1 Conventions used in the manual
The following conventions have been used in the manual to indicate instructions:
<Key> Here you should press a key. The name of the key is given between brackets.
‘System’ This is a specific term used in a program. These are terms used by, for example, Microsoft
Windows 98.
[DIR] Type the text shown between brackets [….].
Extra information will be shown as follows:
Note: If you connect the ‘TRUST FAMILYC@M 500 FLASH’ to a USB HUB, then this USB HUB should
have its own power supply.
The examples assume that the letter "D" has been assigned to your CD-ROM drive. If your system uses a
different letter for your CD-ROM drive, for example "E", you should replace "D" by "E".
1.2 Contents of the box
Check the contents of the box before reading the instruction manual. It should contain the following:
• TRUST FAMILYC@M 500 FLASH
• Camera stand
• CD-ROM containing the driver, applications and instruction manuals.
• USB cable
• 2 AA batteries
• Quick installation manual
If anything is missing or damaged, please contact one of the TRUST Customer Care Centers. You can find
more information at the end of this instruction manual.
1.3 Minimum system requirements
• Intel Pentium 166 MMX CPU
• USB port
• Windows 98
• 32 MB RAM
• 60 MB free hard disk space
• 4-speed CD-ROM drive
Recommended system configuration for full use of the applications:
• ISDN adapter or modem
• Sound card with speakers and microphone
• Internet connection
Page 6

TRUST FAMILYC@M 500 FLASH
4
2. Safety
2.1 General information
1. Do not use this device in a damp environment.
2. Do not try to repair this device yourself.
3. Under the following circumstances, have the device repaired by qualified personnel:
a) The cable or plug is damaged or worn.
b) Liquid has entered the device.
c) The device has been dropped and/or the casing has been damaged.
4. Position the device so that the cables cannot be damaged.
2.2 Batteries
1. The alkaline batteries supplied are not rechargeable. Do not try to recharge them, because this may
cause them to explode.
2. Never throw the batteries onto an open fire. The batteries may explode.
3. Never drill holes into the batteries.
4. Keep the batteries out of the reach of small children.
5. Only use AA alkaline or rechargeable NiMH batteries with this camera.
When the batteries are empty, ask your local authority where you can dispose of them.
Note: Standard NiCd batteries are unsuitable for use with this camera.
Note: When the batteries are low or empty, all the photographs you wish to keep should first be
uploaded onto your computer and saved before the batteries are replaced. When replacing the
batteries, you have 5 minutes to insert the new batteries before the photographs are deleted from
the camera’s memory.
Note: The internal battery has a back-up time of 5 minutes and is charged by the USB port and the
replaceable batteries.
Note: Do not use old and new batteries at the same time, because the old batteries may deplete the
new ones.
Note: The batteries should be removed if the camera is not going to be used for some time. This will
save the battery capacity. Save the photographs in the camera’s memory onto your computer
before removing the batteries for a long period of time.
Page 7
TRUST FAMILYC@M 500 FLASH
5
UK
3. Functions of the ‘TRUST FAMILYC@M 500 FLASH’
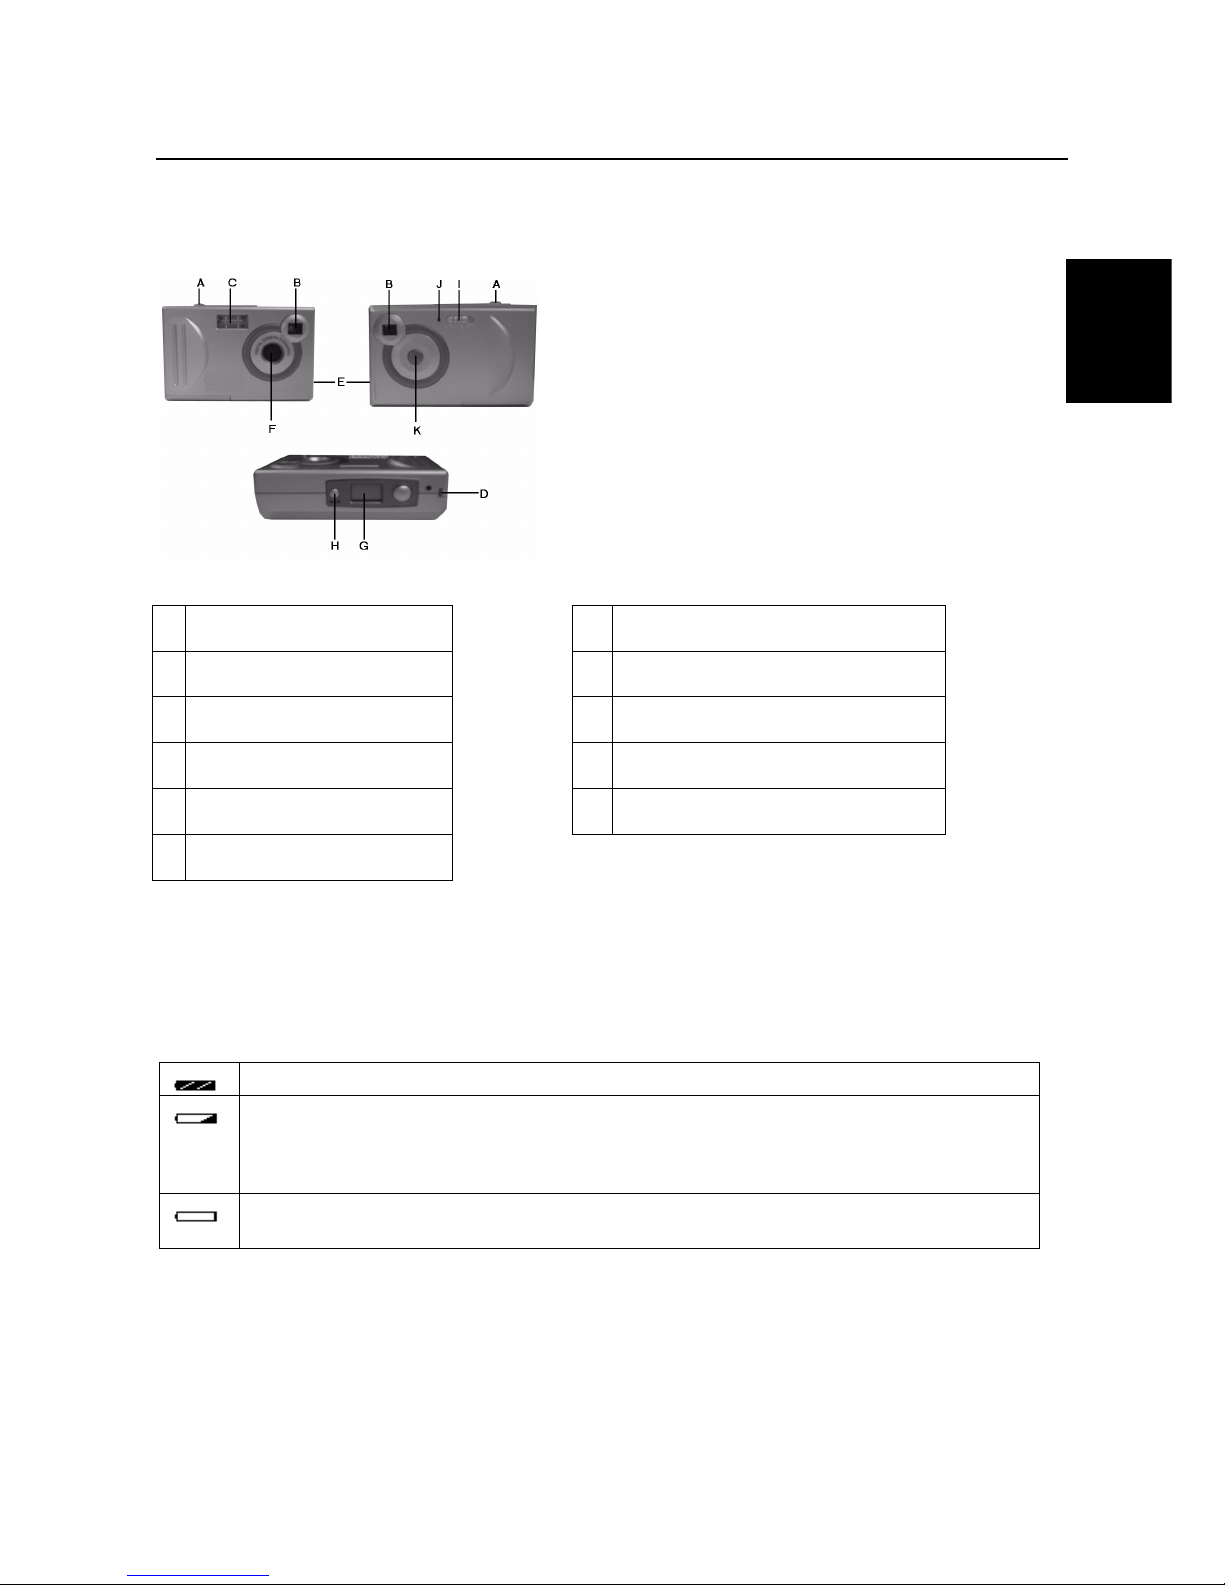
3.1 Camera functions
Figure 1: Functions of the ‘TRUST FAMILYC@M 500 FLASH’
A
Exposure button
G
LCD display
B
Viewfinder
H
Menu button
C
Flash
I
Flash button
D
Fixing point for wrist band
J
Flash indicator
E
USB port
K
ON / OFF button
F
Lens
Table 1: Functions of the FAMILYC@M 500 FLASH
3.2 LCD functions
3.2.1 Battery condition
The battery condition is shown on the LCD screen G (figure 1) as follows:
The batteries are full.
The battery capacity is low. When the camera is turned on, the symbol will flash three times
and the camera will make a sound to indicate that the batteries should be replaced. A few
photographs can still be taken. To avoid loosing the photographs, all the photographs should
be uploaded onto your computer before replacing the batteries.
The batteries are empty. When the camera is turned on, this symbol will flash five times and
the camera will turn itself off automatically. Replace the batteries.
Table 2: Battery conditions
Note: The TRUST FAMILYC@M 500 has an internal battery for saving the camera’s memory when
replacing the batteries. This battery has a back-up time of 5 minutes and is charged by the USB
port and the replaceable batteries.
Note: When the batteries are low or empty, all the photographs you wish to keep should first be
uploaded onto your computer and saved before the batteries are replaced. After 5 minutes, all the
photographs will be deleted from the camera’s memory when the batteries are replaced.
Page 8
TRUST FAMILYC@M 500 FLASH
6
Note: Do not use old and new batteries at the same time, because the old batteries may deplete the
new ones.
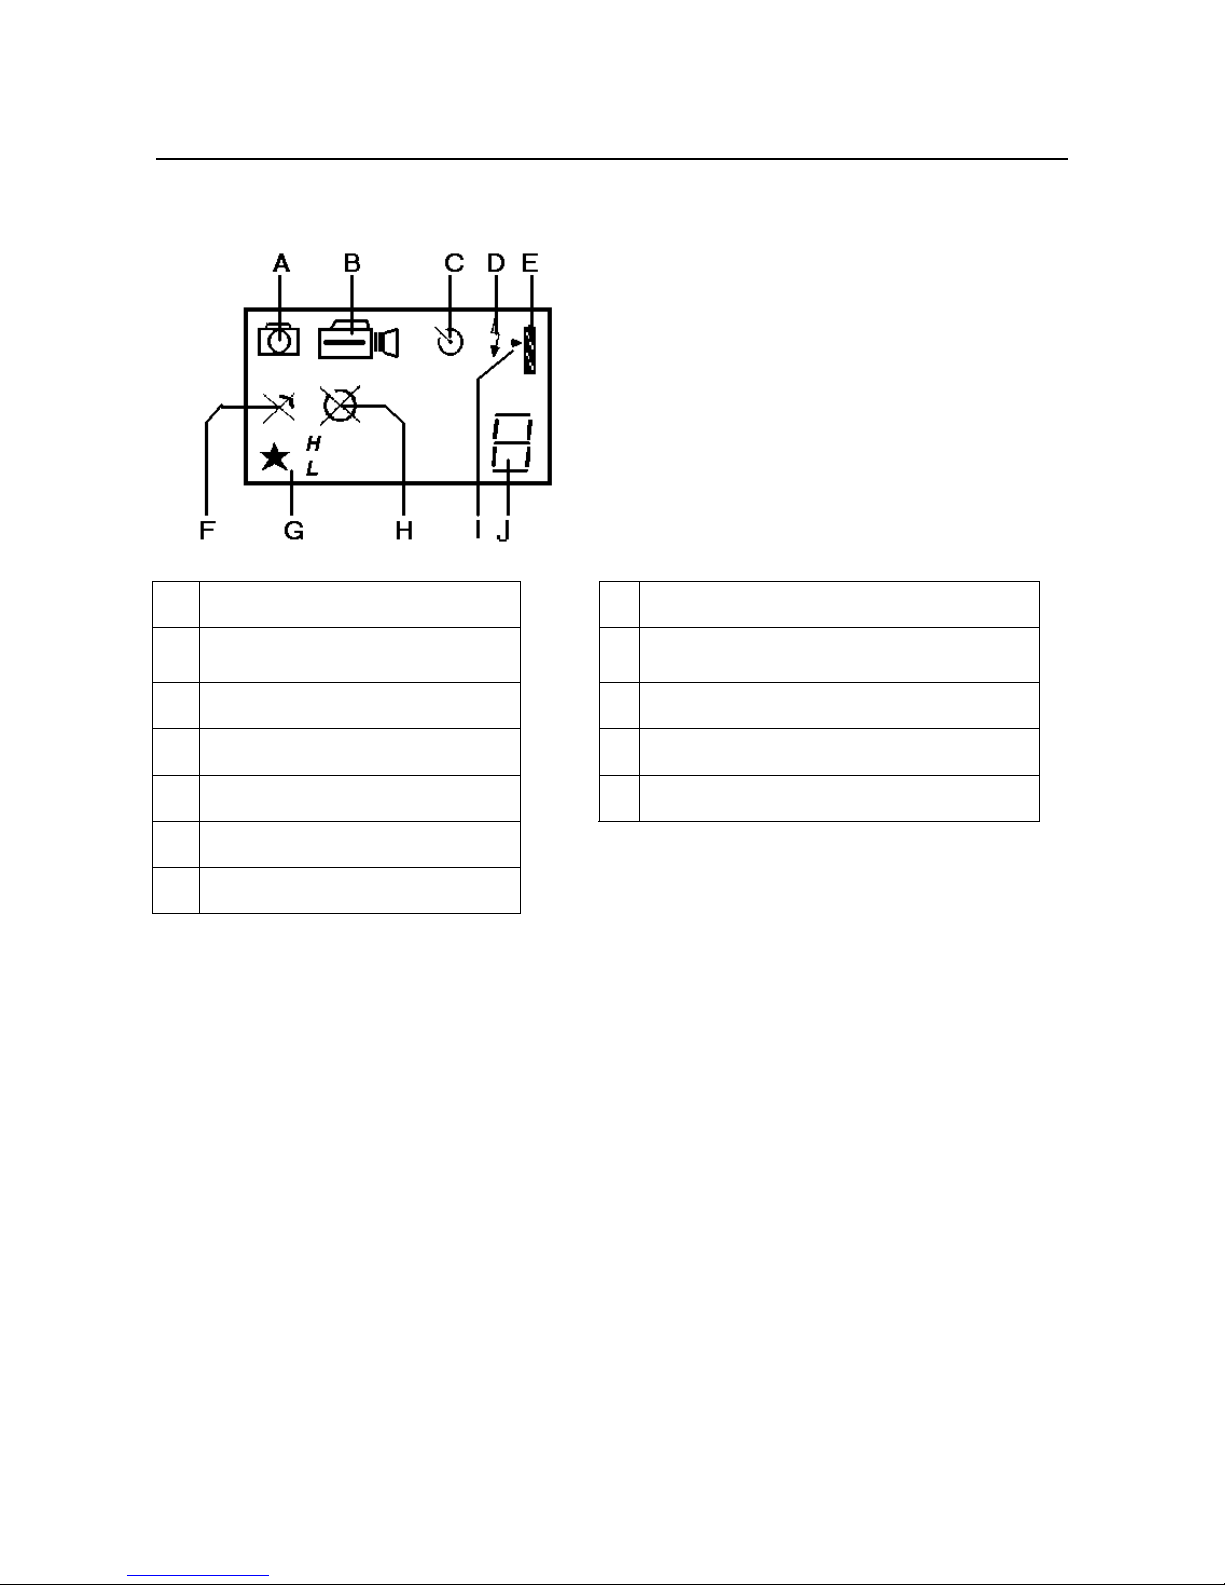
3.2.2 Camera functions
Figure 2: LCD display
Function description Function description
A
Photo mode
G
H resolution (1280 x 1024)
L resolution (640 x 480)
B
Video mode
H
Delete all recordings
C
Automatic exposure
I
Camera is connected to the computer
D
Flash setting (ON, OFF or AUTO)
J
Number of recordings in the camera’s memory
E
Battery condition
F
Delete last recording
Table 3: Camera functions
Page 9
TRUST FAMILYC@M 500 FLASH
7
UK
4. Installation
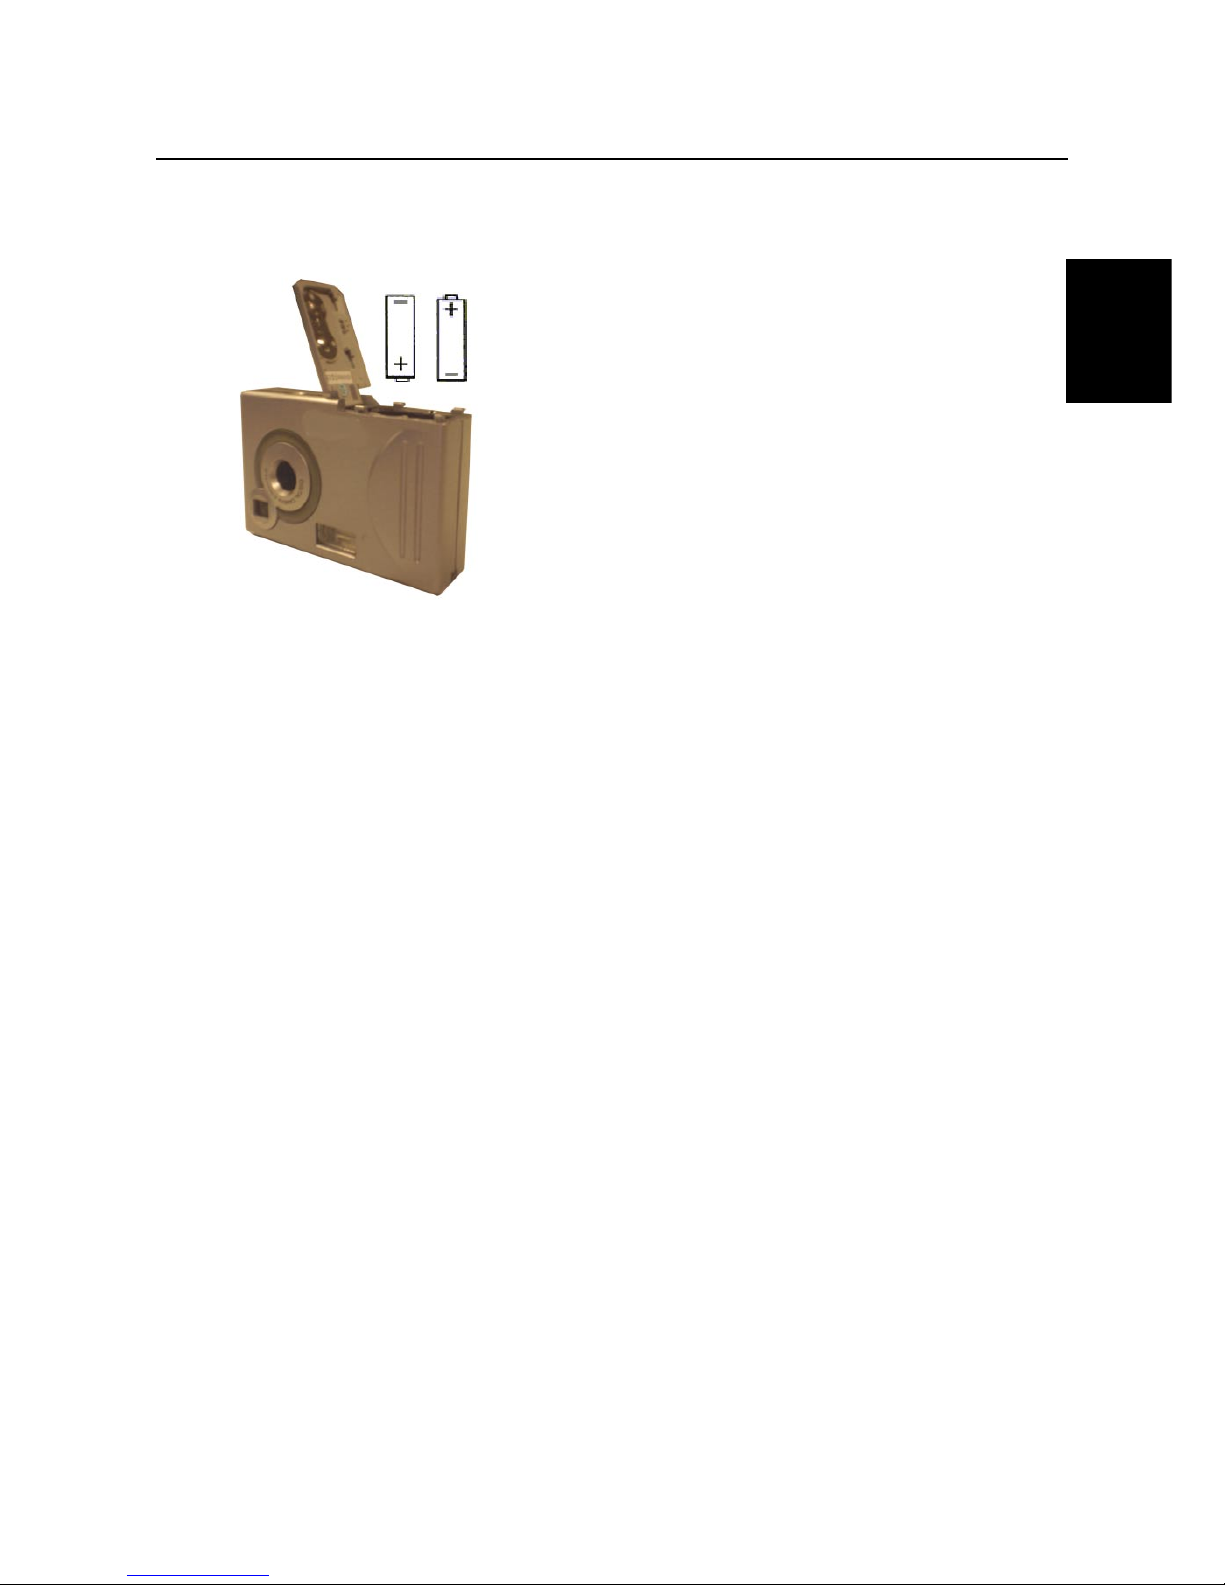
4.1 Inserting the batteries
Figure 3a: Inserting the batteries
1. Open the battery compartment on the bottom of the camera as shown on the battery flap.
2. Insert the batteries into the battery compartment as shown in figure 3a. You can also see how the
batteries must be inserted into the camera on the inside of the battery flap.
3. Close the battery flap.
Note: Inserting the batteries incorrectly will cause damage.
Note: Standard NiCd batteries are unsuitable for use with this camera.
Note: Only replace the batteries with the same type of alkaline or rechargeable NiMH batteries (AA).
Note: When the batteries are low or empty, all the photographs you wish to keep should first be
uploaded onto your computer and saved before the batteries are replaced. When replacing the
batteries, you have 5 minutes to insert the new batteries before the photographs are deleted from
the camera’s memory.
Note: The internal battery has a back-up time of 5 minutes and is charged by the USB port and the
replaceable batteries.
Note: Do not use old and new batteries at the same time, because the old batteries may deplete the
new ones.
Note: The batteries should be removed if the camera is not going to be used for some time. This will
save the battery capacity. Save the photographs in the camera’s memory onto your computer
before removing the batteries for a long period of time.
Page 10

TRUST FAMILYC@M 500 FLASH
8
4.2 Installing the driver for the ‘TRUST FAMILYC@M 500 FLASH’
4.2.1 Windows 98 / Windows ME / Windows 2000
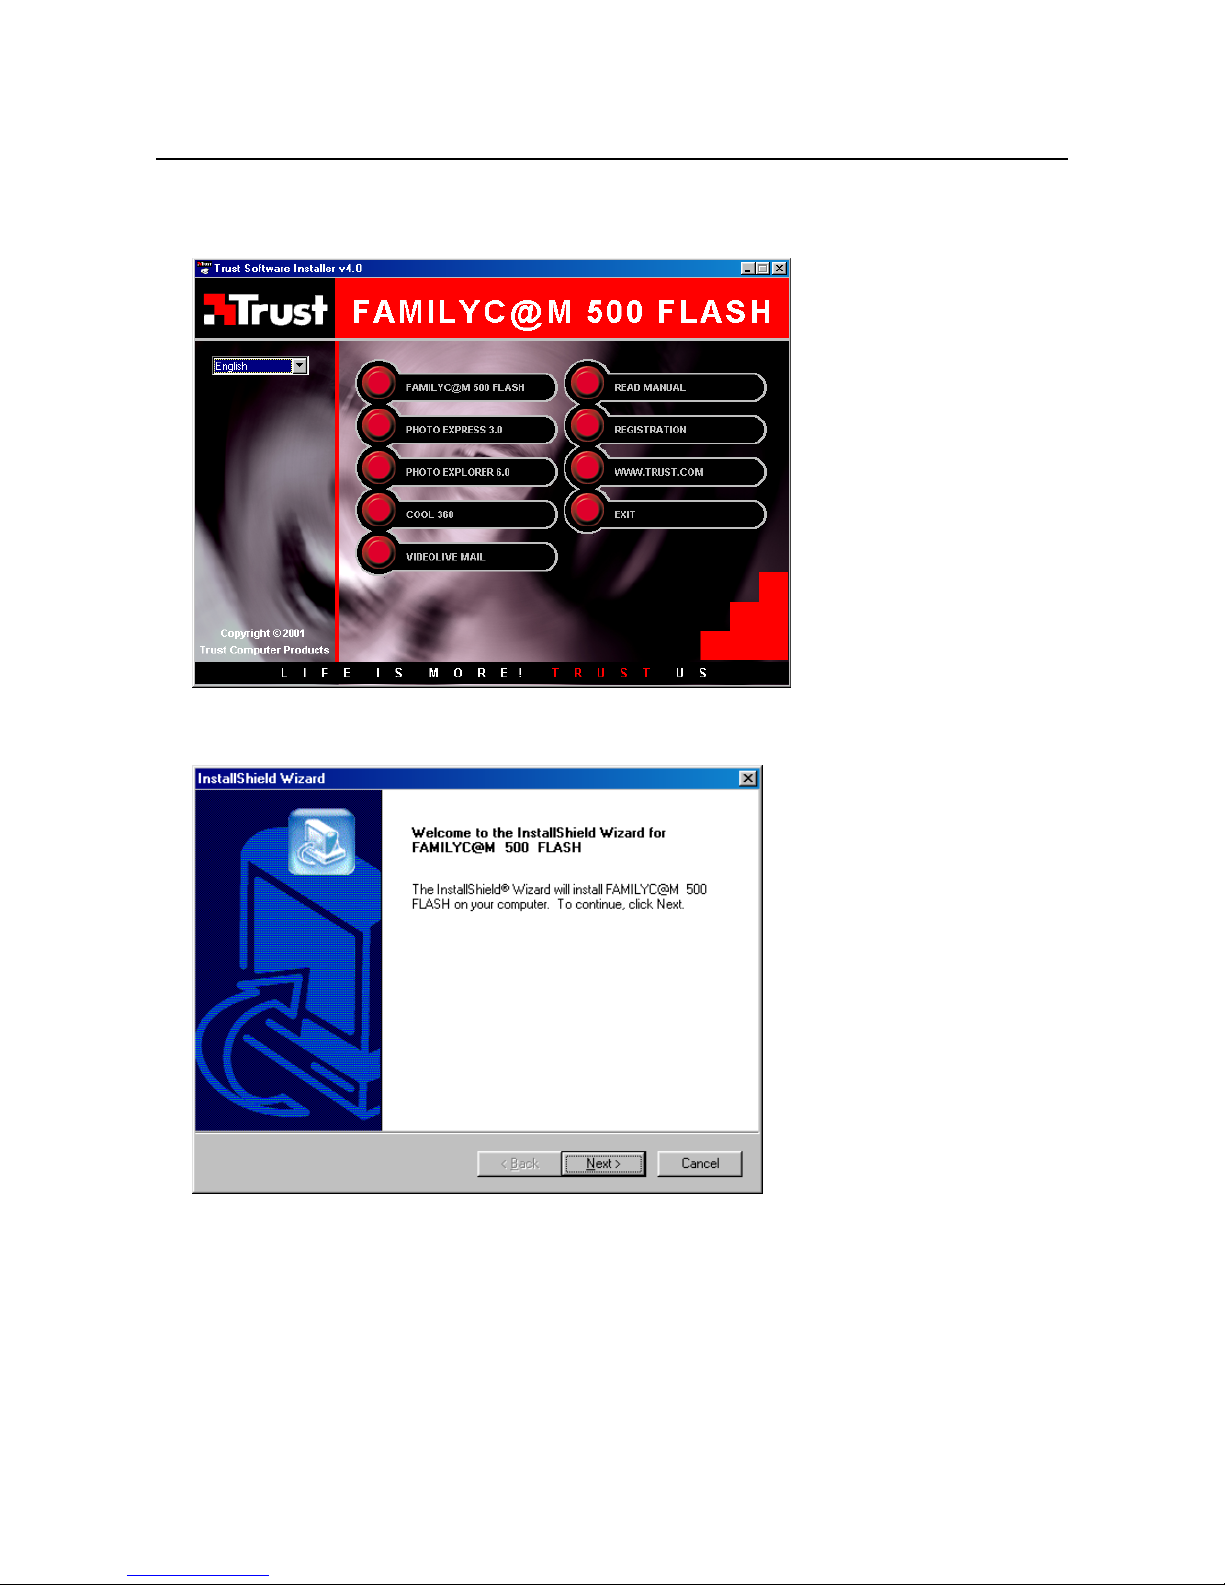
1. Insert the CD-ROM into your CD drive. The installation program will start automatically. If the installation
program does not start automatically, run 'Setup.exe' on the CD-ROM. Figure 4 will appear.
Figure 4: Installing the driver
2. Click on ‘FAMILYC@M 500 FLASH’ to install the driver in W indows 98, Windows ME or Windows 2000.
Figure 5 will appear.
Figure 5: Installing the driver
3. Select the language you wish to use for the installation and click on ‘OK’. Figure 6 will appear.
Page 11
TRUST FAMILYC@M 500 FLASH
9
UK
Figure 6: Installing the driver
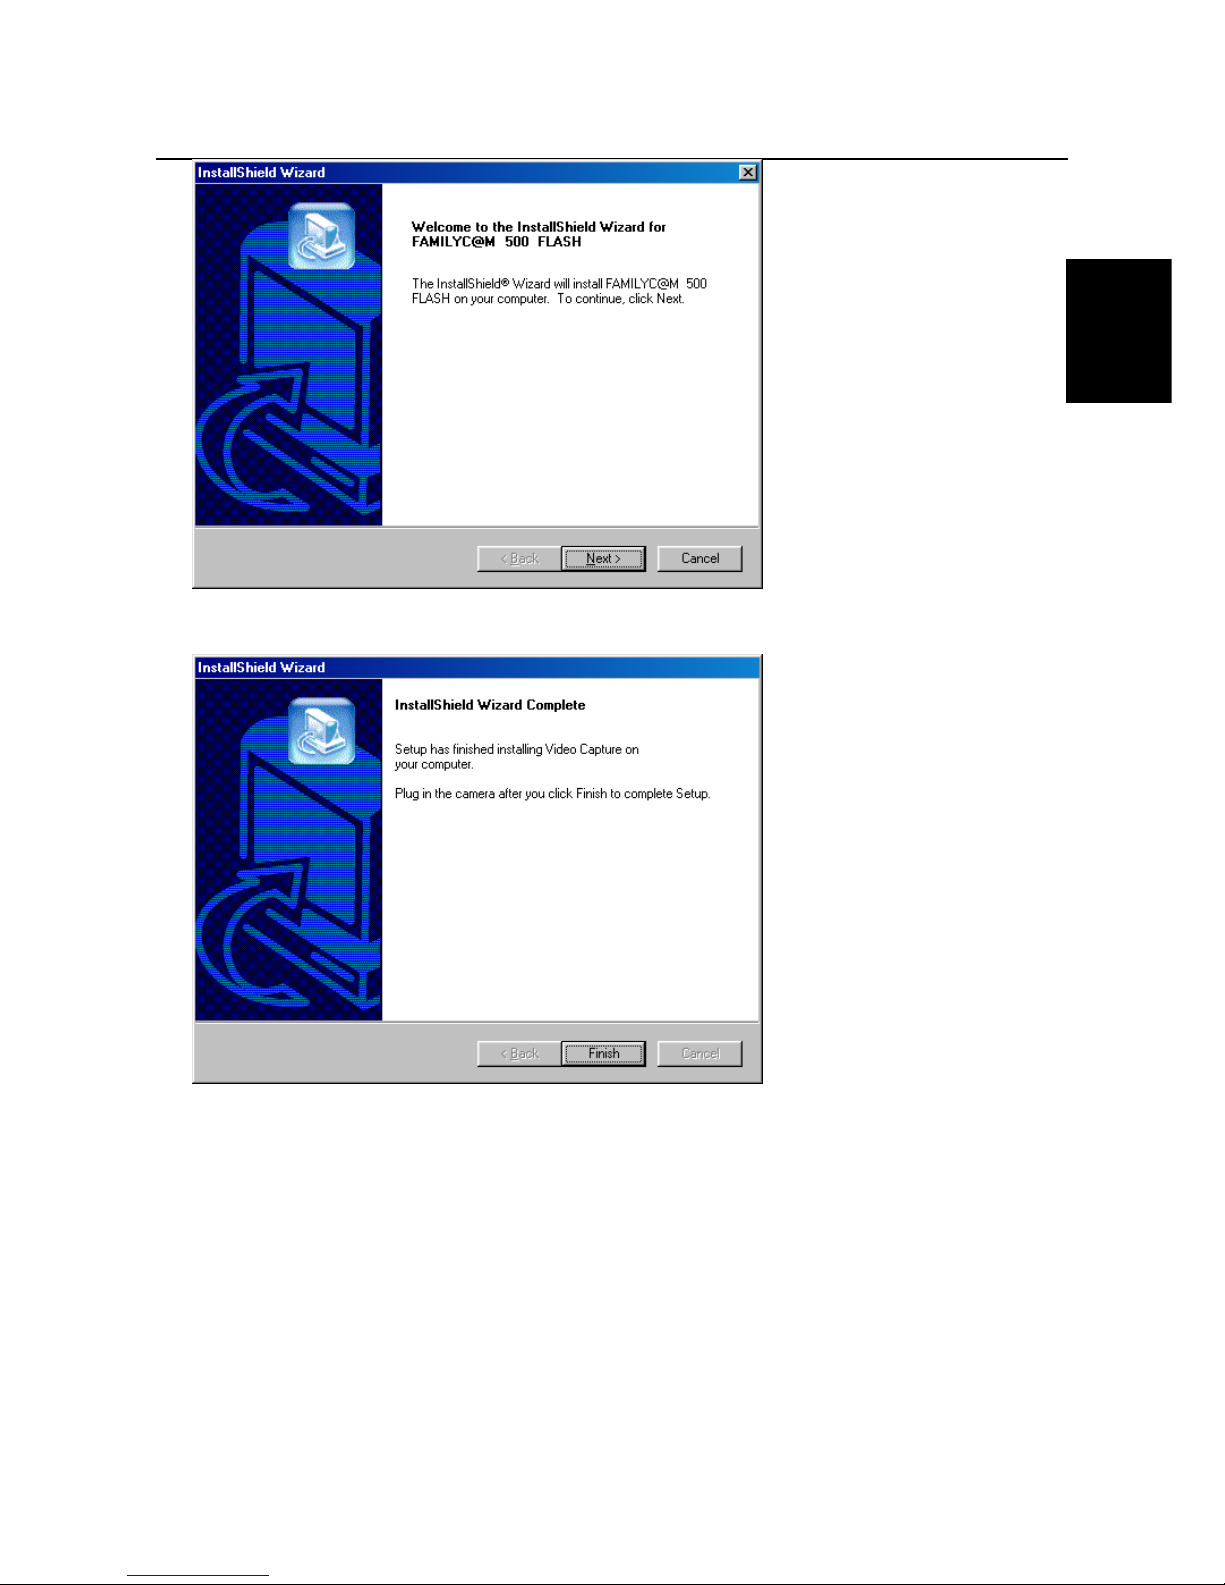
4. Click on 'Next' to start the installation. Figure 7 will appear after the installation.
Figure 7: Installing the driver
5. Click on ‘Finish’ to complete the installation.
6. Connect the USB cable provided to the USB connection E on the camera (see figure 1). Connect the
other end of the USB cable to a free USB port on your computer. W indows will detect new hardware and
will automatically install the driver for the TRUST FAMILYC@M 500 FLASH.
You have now completed the installation of the driver. Continue to chapter 4.3 for instructions on how to
install Photo Express 4.0.
Page 12
TRUST FAMILYC@M 500 FLASH
10
4.2.2 Windows XP
1. Insert the CD-ROM into your CD drive. The installation program will start automatically. If the installation
program does not start automatically, run 'Setup.exe' on the CD-ROM. Figure 4a will appear.
Figure 4a: Installing the driver
2. Click on ‘FAMILYC@M 500 FLASH’ to install the driver in Windows XP. Figure 5a will appear.
Figure 5a: Installing the driver
3. Click on 'Next' to start the installation.
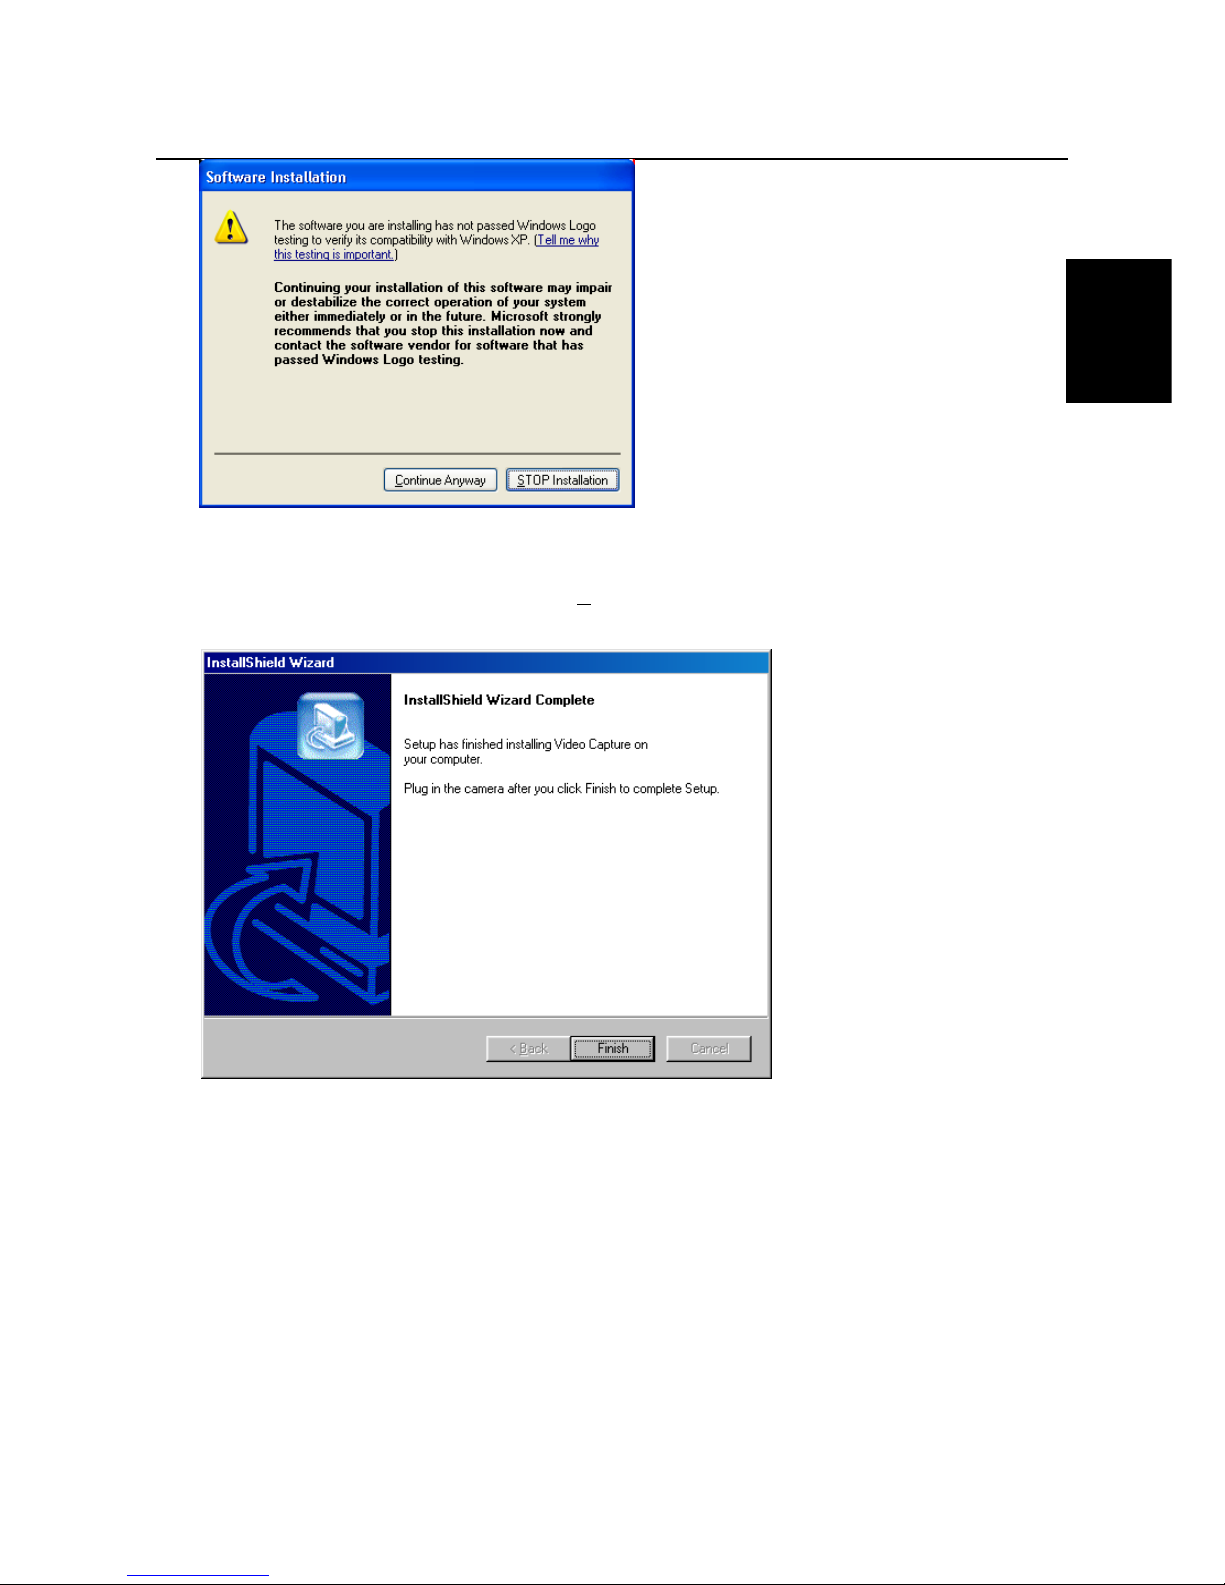
4. Figure 6a may appear several times during the installation.
Page 13
TRUST FAMILYC@M 500 FLASH
11
UK
Figure 6a: Installation in Windows XP
This is not an error message, but a message by Windows XP saying that the driver has not yet been
verified. Windows XP had not been released when the TRUST FAMILYC@M 500 FLASH was
developed. If this message appears, click on ‘Continue Anyway’ to continue with the installation.
5. Figure 7a will appear after the installation.
Figure 7a: Installing the driver
6. Click on ‘Finish’ to complete the installation.
7. Connect the USB cable provided to the USB connection E on the camera (see figure 1). Connect the
other end of the USB cable to a free USB port on your computer. W indows will detect new hardware and
will automatically install the driver for the TRUST FAMILYC@M 500 FLASH.
You have now completed the installation of the driver. Continue to chapter 4.3 for instructions on how to
install Photo Express 4.0.
Page 14
TRUST FAMILYC@M 500 FLASH
12
4.3 Installing Photo Express 4.0
Photo Express 4.0 is an image editing program that can be used to load and edit the photographs on your PC
which you have taken using your FAMILYC@M 500 FLASH. Follow the instructions below to install Photo
Express 4.0.
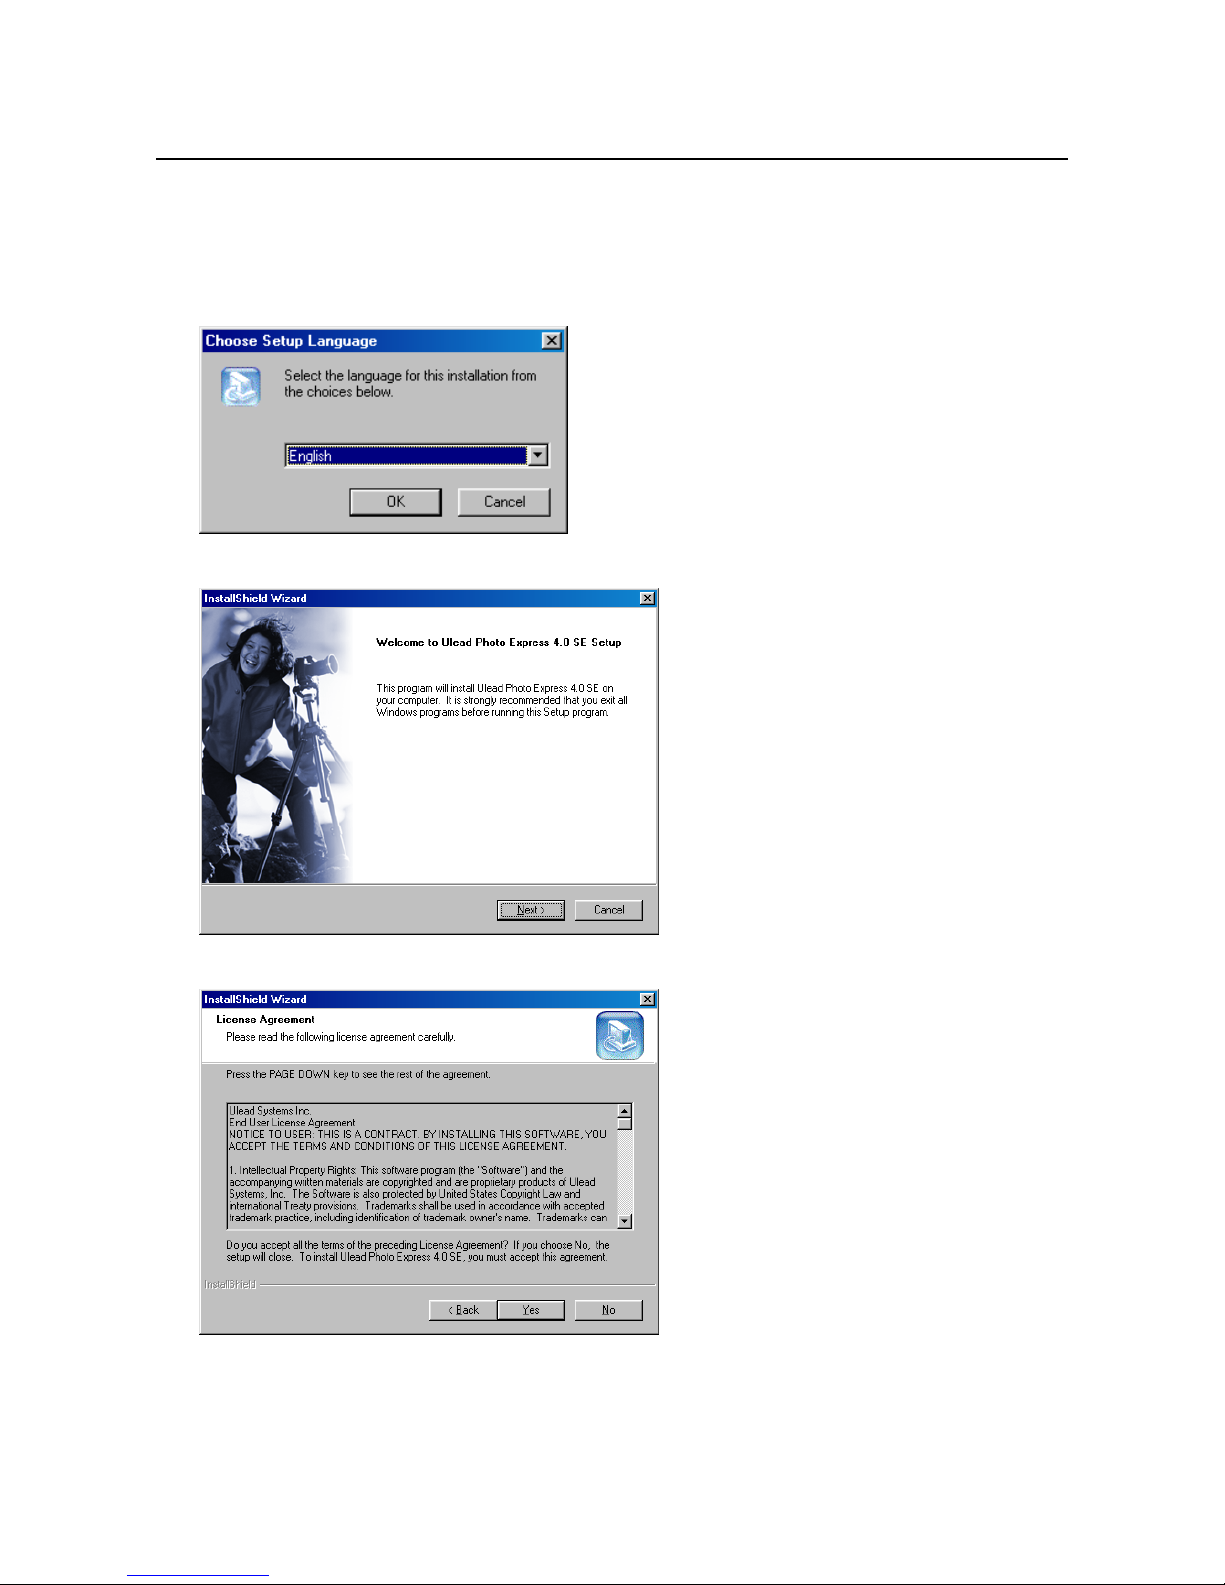
1. Start the Trust Software Installer and click on ‘Photo Express 4.0’ (see figure 4). Figure 8 will appear.
Figure 8: Installing Photo Express 4.0
2. Select the language you wish to use and click on ‘OK’. Figure 9 will appear.
Figure 9: Installing Photo Express 4.0
3. Click on 'Next'. Figure 10 will appear.
Figure 10: Installing Photo Express 4.0
4. Click on 'Yes' to accept the license agreement and continue with the installation. Figure 11 will appear.
Page 15
TRUST FAMILYC@M 500 FLASH
13
UK
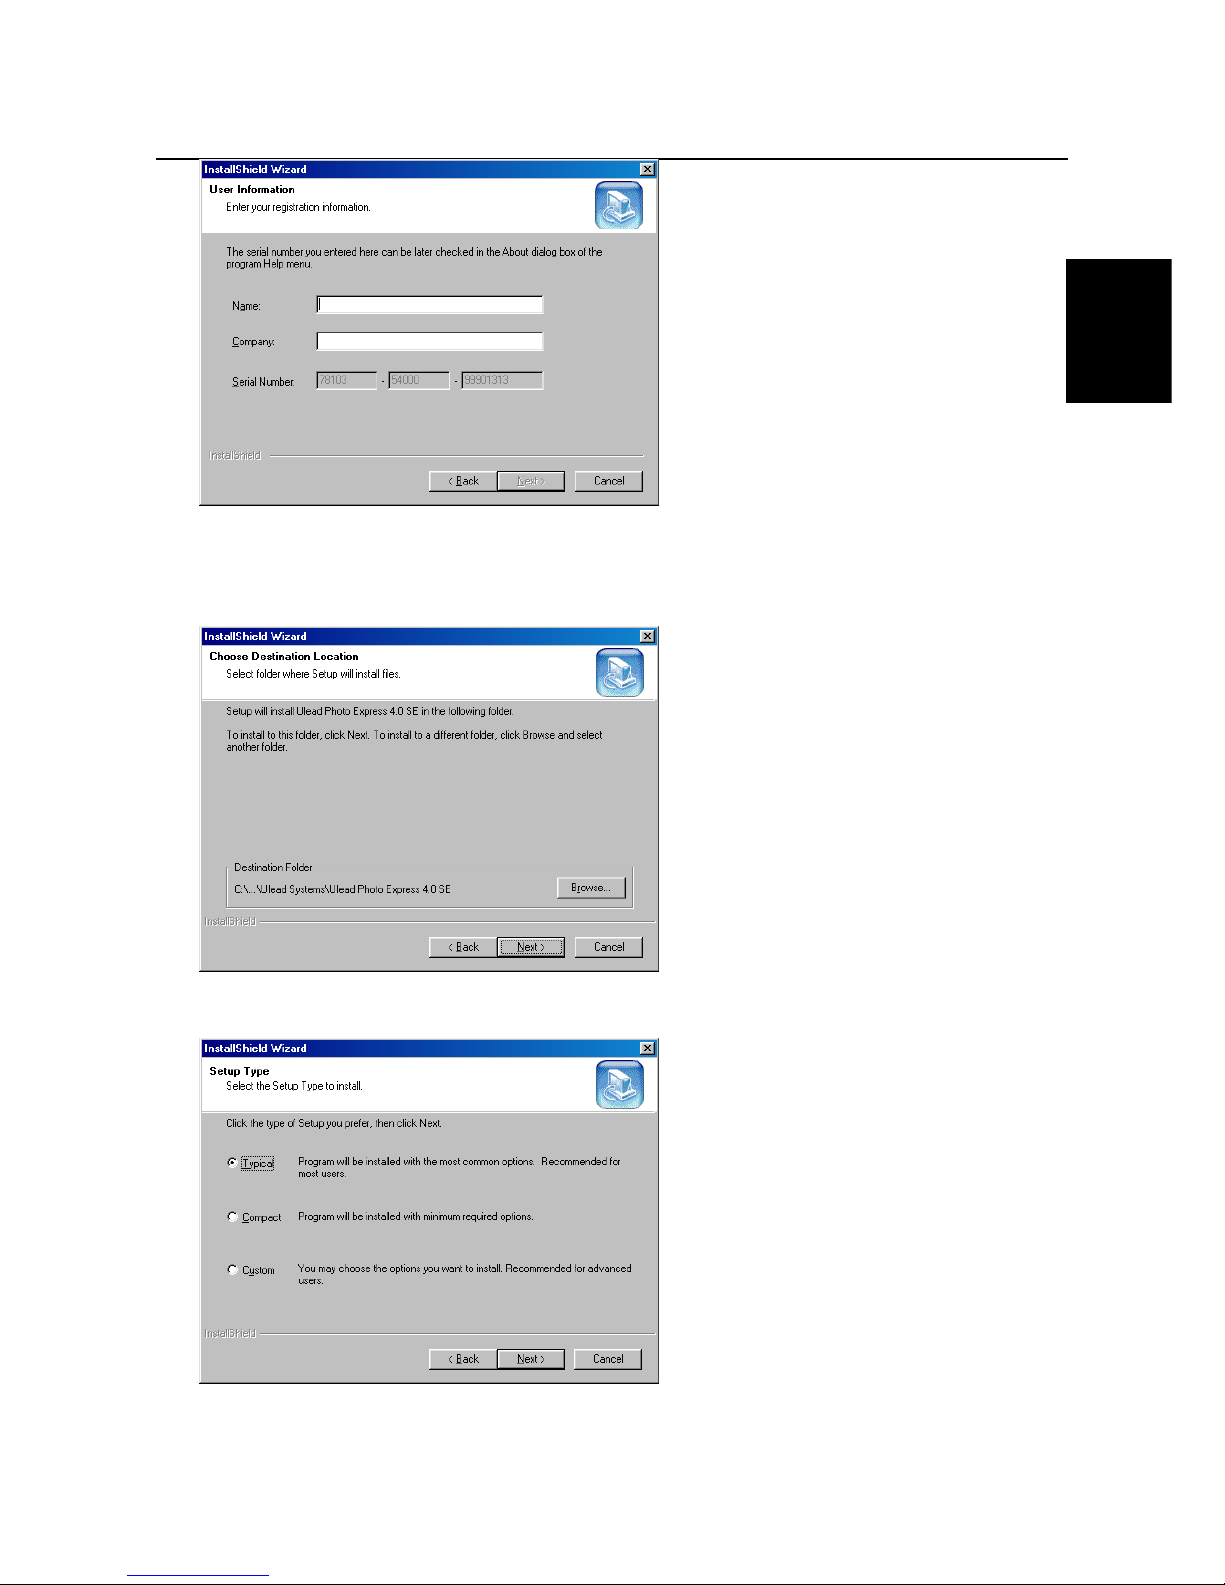
Figure 11: Installing Photo Express 4.0
5. Fill in your name and the name of your company.
Note: The installation will be stopped if you do not fill in a company name. Always give a company name.
6. Click on 'Next'. Figure 12 will appear.
Figure 12: Installing Photo Express 4.0
7. Click on 'Next'. Figure 13 will appear.
Figure 13: Installing Photo Express 4.0
Page 16

TRUST FAMILYC@M 500 FLASH
14
8. Select ‘Typical’ and click on ‘Next’. Figure 14 will appear.
Figure 14: Installing Photo Express 4.0
9. Click on 'Next'. Figure 15 will appear.
Figure 15: Installing Photo Express 4.0
10. Click on 'Next'. Photo Express 4.0 will now be installed. Figure 16 will appear after the installation.
Figure 16: Installing Photo Express 4.0
11. Click on ‘Finish’ to complete the installation.
You have now completed the installation of Photo Express 4.0. See chapter 4.4 for instructions on how to
install Photo Explorer 6.0.
Page 17

TRUST FAMILYC@M 500 FLASH
15
UK
4.4 Installing Photo Explorer 6.0
Ulead Photo Explorer 6.0 is an image editing program that can be used to load and edit the photographs on
your PC which you have taken using your FAMILYC@M 500 FLASH. Follow the instructions below to install
Photo Explorer 6.0.
1. Start the Trust Software Installer and click on ‘Photo Explorer 6.0’ (see figure 4). Select the language you
wish to use and click on ‘OK’. Figure 17 will appear.
Figure 17: Installing Photo Explorer 6.0
2. Click on 'Next'. Figure 18 will appear.
Figure 18: Installing Photo Explorer 6.0
3. Click on ‘Yes’ to accept the license agreement and continue with the installation. Figure 19 will appear.
Page 18

TRUST FAMILYC@M 500 FLASH
16
Figure 19: Installing Photo Explorer 6.0
4. Enter your information and click on ‘Next’. Figure 20 will appear.
Figure 20: Installing Photo Explorer 6.0
5. Click on 'Next'. Figure 21 will appear.
Figure 21: Installing Photo Explorer 6.0
6. Click on 'Next' to start the installation. Figure 22 will appear after the installation.
Page 19

TRUST FAMILYC@M 500 FLASH
17
UK
Figure 22: Installing Photo Explorer 6.0
7. Do not select the option ‘I would like to launch Ulead Photo Explorer’ and click on ‘Finish’ to complete the
installation.
You have now completed the installation of Photo Explorer 6.0 SE. See chapter 4.5 for instructions on how to
install COOL 360.
4.5 Installing COOL 360
COOL 360 is an image editing program that can be used to change the photographs you have taken using
the Trust FamilyC@m 500 Flash into panoramic photographs. Follow the instructions below to install COOL
360.
1. Start the Trust Software Installer (see figure 4) and click on ‘COOL 360’. Figure 23 will appear.
Figure 23: Installing Ulead COOL 360
Page 20

TRUST FAMILYC@M 500 FLASH
18
2. Click on 'Next'. Figure 24 will appear.
Figure 24: Installing Ulead COOL 360
3. Click on ‘Yes’ to accept the license agreement and continue with the installation. Figure 25 will appear.
Figure 25: Installing Ulead COOL 360
4. Click on 'Next'. Figure 26 will appear.
Figure 26: Installing Ulead COOL 360
Page 21

TRUST FAMILYC@M 500 FLASH
19
UK
5. Click on 'Next'. Figure 27 will appear.
Figure 27: Installing Ulead COOL 360
6. Click on 'Next'. Figure 28 will appear.
Figure 28: Installing Ulead COOL 360
7. Click on ‘Yes’. Figure 29 will appear.
Figure 29: Installing Ulead COOL 360
8. Do not select the option to register the application ‘Online’ and click on ‘Finish’.
You have now completed the installation of Ulead COOL 360.
Continue to chapter 4.6 for instructions on how to install VideoLive Mail.
Page 22

TRUST FAMILYC@M 500 FLASH
20
4.6 Installing VideoLive Mail
VideoLive Mail can be used to send video and audio multimedia e-mails. To be able to use this application,
you will need a modem or ISDN device, a sound card with speakers, a microphone and an Internet
connection.
Follow the instructions below to install VideoLive Mail.
1. Start the Trust Software Installer (see figure 4) and click on ‘VideoLive Mail’. Figure 30 will appear.
Figure 30: Installing VideoLive Mail
2. Click on 'Next'. Figure 31 will appear.
Figure 31: Installing VideoLive Mail
3. Click on 'Yes' to accept the license and continue with the installation. Figure 32 will appear.
Page 23

TRUST FAMILYC@M 500 FLASH
21
UK
Figure 32: Installing VideoLive Mail
4. Fill in your name, company name and the CD-Key. The CD-Key can be found on the CD jewel case.
Note: The installation will be stopped if you do not fill in a company name. Always give a company name.
Click on 'Next'. Figure 33 will appear.
Figure 33: Installing VideoLive Mail
5. Click on 'Next'. Figure 34 will appear.
Figure 34: Installing VideoLive Mail
Page 24

TRUST FAMILYC@M 500 FLASH
22
6. Click on 'Next'. VideoLive Mail will now be installed. Figure 35 will appear after the installation.
Figure 35: Installing VideoLive Mail
7. Do not select the option to ‘Register Now’ and click on ‘Finish’ to complete the installation.
You have now completed the installation of VideoLive Mail. Continue to chapter 4.7 for instructions on how to
install Ulead VideoStudio 4.0 SE Basic.
4.7 Installing Ulead VideoStudio 4.0 SE Basic
Follow the instructions below to install Ulead VideoStudio 4.0:
1. Start Windows.
2. Insert the VideoStudio CD-ROM into your CD-ROM drive. The installation will start automatically (see
figure 36).
Note: If the Trust Software Installer does not start automatically when the CD-ROM is inserted into your
CD-ROM drive, go to ‘Start – Run’ in Windows and type [D:\Setup.exe] in the command line.
Next, click on ‘OK’ to start the Trust Software Installer.
Figure 36: Selecting the language
3. Select the language you wish to use for the installation and click on ‘OK’. The ‘Welcome’ window will
appear.
Page 25

TRUST FAMILYC@M 500 FLASH
23
UK
Figure 37: VideoStudio Welcome
4. Click on 'Next' to continue with the installation
5. The ‘Software License Agreement’ window will appear. Click on ‘Yes’ to accept the license agreement
and continue with the installation (see figure 38).
Figure 38: Software License Agreement
6. The ‘User Information’ window will appear. Fill in your name and possible company name. Click on ‘Next’
(see figure 39).
Figure 39: User Information
Page 26

TRUST FAMILYC@M 500 FLASH
24
7. The ‘Choose Destination Location’ window will appear. Click on ‘Next’ to install the application in the
given location (see figure 40).
Figure 40: Choose Destination Location
8. The ‘Select Components’ window will appear. Select the ‘Microsoft Netshow Tools 3.0’ option if you wish
to record and play using Microsoft ASF streaming media and the ‘Apple Quick Time 4.0’ option if you
wish to record and play using QuickTime MOV streaming media (ideal for Internet use) (see figure 41).
Figure 41: Select Components
9. Click on 'Next' to continue with the installation.
10. The ‘Select Program Folder’ window will appear. Click on ‘Next’ (see figure 42).
Figure 42: Select Program Folder
Page 27

TRUST FAMILYC@M 500 FLASH
25
UK
11. The ‘Start Copying Files’ window will appear. Click on ‘Next’. The Ulead VideoStudio and the selected
components will now be installed at the given location (see figure 43).
Figure 43: Start Copying Files
12. If you have selected the ‘Apple QuickTime 4.0’ option (see figure 41), then the ‘QuickTime 4 Setup’
window will appear after Ulead VideoStudio has been installed. Click on ‘Next’ (see figure 44).
Figure 44: QuickTime 4 Setup
13. The ‘Welcome’ window will appear. Click on 'Next' to continue with the installation (see figure 45).
Figure 45: QuickTime Welcome
14. The ‘Software License Agreement’ window will appear. Click on 'Agree’ to accept the license agreement
and continue with the installation (see figure 46).
Page 28

TRUST FAMILYC@M 500 FLASH
26
Figure 46: Software License Agreement
15. The ‘Choose Destination Location’ window will appear. Click on ‘Next’ (see figure 47).
Figure 47: Choose Destination Location
16. The ‘Choose Installation Type’ window will appear. Select the ‘Full’ option to install all the components
and click on ‘Next’ (see figure 48).
Figure 48: Choose Installation Type
17. The ‘Select Program Folder’ window will appear. Click on ‘Next’ (see figure 49).
Page 29

TRUST FAMILYC@M 500 FLASH
27
UK
Figure 49: Select Program Folder
18. The ‘QuickTime Plugin Options’ window will appear. Select the browser the QuickTime plugin must be
installed for and click on ‘Next’ (see figure 50).
Figure 50: QuickTime Plugin Options
19. The ‘Connection Speed’ window will appear. Select the speed of your Internet connection and click on
‘Next’ (see figure 51).
Figure 51: Connection Speed
20. The ‘Enter Registration’ window will appear. Do not type anything in the fields and click on ‘Next’. If you
wish, you may register QuickTime at a later date (see figure 52).
Page 30

TRUST FAMILYC@M 500 FLASH
28
Figure 52: Enter Registration
21. The ‘Finished’ window will appear after QuickTime has been installed. Click on ‘Close’ to complete the
installation (see figure 53).
Figure 53: Finished
Note: If the QuickTime program folder is still open, this may be closed.
22. After closing the QuickTime installation, the ‘Setup’ window for Ulead VideoStudio will still be visible.
Select the desired options and click on ‘Next’ to complete the installation of Ulead VideoStudio (see
figure 54).
Figure 54: Completing the set-up of Ulead VideoStudio
23. The ‘Setup Complete’ window will appear. Click on ‘Finish’ to restart your computer (see figure 55).
Page 31

TRUST FAMILYC@M 500 FLASH
29
UK
Figure 55: Setup complete
You have now completed the installation of Ulead VideoStudio 4.0. See chapter 5 for instructions on how to
use the camera and the applications.
5. Using the camera and the applications
5.1 Taking photographs
Note: The number of photographs that can be taken is dependent on the number of colours and
the brightness of the object to be photographed. A photograph of a colourful, bright object
requires more memory than a photograph of a dark object in dark surroundings.
Follow the instructions given below to take photographs (see chapters 3.1 and 3.2).
1.
Press the ON/OFF button (K) for 2 seconds and then release it to turn the camera on. The LCD screen
(G) will turn on and the camera will be ready for use.
2.
Set the camera flash to the desired setting using the flash button (I) (AUTO, ON or OFF).
3.
Search for the subject that you wish to photograph in the viewfinder (B).
Note: When the distance to the object is less than 10 cm from the lens, the distance is too small
to use the viewfinder.
4.
Press the exposure button (A) to photograph the subject.
5.
If you wish to use the flash, wait a couple of seconds until the flash indicator light (J) lights up before
taking a new photograph.
6.
The camera is then ready to take a new photograph.
7.
If the memory is full, the indicator (J) (see figure 2) in the LCD screen will flash. The memory must be
emptied before taking new photographs. See chapter 5.4 for more information.
8.
You can take photographs in two different resolutions, i.e. High (1280x1024) and Low (640x480). The
resolution can be changed by pressing the MENU button (H) until the star and H shown in figure 2
appear. The resolution can then be changed to either High (H) or Low (L) by pressing the exposure
button (A). The high resolution (1280x1024) is the default resolution.
9.
The camera has an automatic exposure which gives a time delay of 10 seconds before the photograph
is taken. This can be turned on by pressing the MENU button (H) twice. The automatic exposure symbol
(C) will appear in the LCD screen (see figure 2). Now press the exposure button (A) to activate the
automatic exposure. The automatic exposure symbol (C) in the LCD screen will now start to flash. A
peeping sound will be heard during the 10 seconds whilst counting down.
10.
The camera will turn itself off automatically if it is not used for more than one minute. This also depends
on the condition of the batteries. The lower the batteries, the quicker the camera will turn itself off.
Note: Keep the glass lens clean so as not to effect the quality of the photographs.
Page 32

TRUST FAMILYC@M 500 FLASH
30
To take good photographs, the object should first be held in view for a couple of seconds before taking the
photograph.
5.2 Flash
The FAMILYC@M 500 FLASH has a flash. The flash can be set to three different modes using the button I
(see figure 1).
OFF : Flash is OFF
: Flash is on
AUTO : The flash will work automatically
5.3 Recording video clips
You can record video clips in two different resolutions, i.e. High (1280x1024) and Low (640x480). Also see
figure 1 for the controls and figure 2 for the symbols used in the LCD screen.
1. Press the ON/OFF button (K) to turn the camera on. The LCD screen (G) will turn on and the camera will
be ready for use.
2. Press the MENU button (H). A film camera symbol (B) as shown in figure 2 will appear in the LCD
screen.
3. Press the exposure button (A) to start recording. The counter (J) on the LCD screen will increase during
the recording. This shows how many seconds have been recorded.
4. Press the exposure button (A) to stop recording. The counter (J) on the LCD screen will increase by 1.
5.4 Deleting the memory
When deleting the memory, a choice can be made to either delete all the photographs and video clips or to
only delete the last recording.
5.4.1 Deleting the last recording
1. Press the MENU button (H) three times until the symbol F appears (see figure 2).
2. Press the exposure button (A) to delete the last recording.
5.4.2 Deleting all the photographs and video clips
1. Press the MENU button (H) four times until the symbol G appears (see figure 2).
2. Press the exposure button (A) to delete all the recordings.
Page 33

TRUST FAMILYC@M 500 FLASH
31
UK
5.5 WEBCAM
The TRUST FAMILYC@M 500 FLASH can also be used as a webcam in programs such as NetMeeting.
NetMeeting is a Microsoft program and is supplied with Windows.
Please refer to the Windows instruction manual supplied with your computer for instructions on how to install
NetMeeting.
The camera can also be used for your Internet page.
A number of informative sites are given below:
http://www.camarades.com
http://www.teveo.com
At these sites, you can download software that you can use to send live video images over the Internet.
Please refer to the sites concerned for information on how to install and use the software.
6. Applications
6.1 Camera Manager
Click on the Camera Manager Icon on your desktop to start the camera manager. Figure 56a will appear.
6.2 Photo mode
Figure 56a: Camera Manager
A
DSC: Photo mode
G
Close or minimize the program
B
LIVE: Video image
H
Worksheet
C
Upload photographs from the
camera’s memory to the computer
I
Send recordings via e-mail
D
Upload videos from the camera’s
memory to the computer
J
Save recordings
E
Make a video recording
K
Delete recordings
F
Recording from the camera’s
memory
Page 34

TRUST FAMILYC@M 500 FLASH
32
To upload the pictures from camera to computer, you can handle as next:
1. Click the Upload button (C) of figure 56a. Figure 56b appears.
Figure 56b: Camera manager
Description Description
A
Re-read the camera memory
E
Picture format (VGA or SXGA)
B
Download the pictures in the high
resolution mode (3.1 Mpixel)
F
Apply the new picture format
C
Transfer the pictures from camera to
computer
G
Make a picture
D
Erase the camera memory
H
Stop
2. Select ‘Enhanced’ option to upload the pictures in 2048x1536 resolution. If this option is not selected the
pictures will be uploaded in the 1280x1024 resolution.
3. Select the picture format VGA of SXGA (E) and click ‘Apply Format’ to confirm the new setting.
4. Click ‘Upload’ (C) to transfer the pictures from camera to computer.
The pictures you just uploaded from camera to computer can be modified by ‘Photo Express’ or ‘Photo
Explorer’. Read the next chapters you can read how to do this.
6.3 Using Photo Express 4.0
A short description of how to use Photo Express 4.0 is given below. For more information, please see this
program’s instruction manual which is included on the CD-ROM provided.
6.4 Loading photographs
1. Connect the USB port (E) (see figure 1) on the camera to your computer using the USB cable.
2. Start Photo Express 4.0. Figure 57 will appear.
Page 35

TRUST FAMILYC@M 500 FLASH
33
UK
Figure 57: Selecting a camera
3. In the main Photo Express menu, select ‘Get Photo’ (A) and then select ‘Digital Camera’ (B). Figure 58
will appear once.
Figure 58: Selecting a camera
4. ‘Trust FAMILYC@M 500 FLASH’ will be visible in the window. Select ‘Digital camera’ and click on ‘OK’.
5. Figure 59 will appear after the camera has been selected.
Page 36

TRUST FAMILYC@M 500 FLASH
34
Figure 59: Using Photo Express
6. ‘FAMILYC@M 500 FLASH’ will be displayed for ‘Select data source’ (C). You may have more cameras
installed on your computer. If this is the case, a different model may be visible. If so, select the
‘FAMILYC@M 500 FLASH’.
7. Click on ‘Acquire’ (E). The TWAIN window (figure 60) will appear.
Page 37

TRUST FAMILYC@M 500 FLASH
35
UK
Figure 60: TWAIN window for the FAMILYC@M 500 FLASH
Function Description
A Photo The photograph in the camera’s memory
B Videoclip Can be recognized by the blue edge around the image
C Exit Closes the TWAIN window
D Video mode Live image
E Camera
mode
The photographs in the camera’s memory
F Transfer Transfers the chosen recording to the application
G Transfer All Transfers all the recordings to the application
H SAVE AVI Saves the video clip (B) to the computer
I Snap Shot Takes a photograph
J Format To change into Enhanced mode (3.1 Mpixel)
Table 4: Explanation of the TWAIN window for the FAMILYC@M 500 FLASH
8. Select the photograph (A) that you wish to transfer to Photo Express by clicking on it with the mouse.
9. Click on ‘Transfer’ (F) to transfer the photograph to Photo Express 4.0. Figure 61 will appear.
Page 38

TRUST FAMILYC@M 500 FLASH
36
Figure 61: Editing photographs in Photo Express
10. Double-click on the photograph. The photograph will now appear in the window.
This photograph can now be edited and/or saved on the computer.
For more information on how to edit photographs in Photo Express, please refer to this program’s instruction
manual. To read this manual, click on “START Æ Programs Æ Photo Express 4.0 Æ Screenbook”. Acrobat
Reader must be installed on your computer to be able to read this.
6.4.1 Loading video clips
Please refer to figure 60 for loading video clips.
1. Click on the video clip (B).
2. Click on ‘SAVE AVI’ (H) to save the video clip. Figure 62 will appear.
Figure 62: Saving a video recording
3. Select a location where you wish to save the video clip and click on ‘Open’.
4. The video clip will now be saved to the chosen location. Depending on the file size of the recording, this
may take some time.
5. To play the video clip, go to the location where it was saved and double-click on the file.
Page 39

TRUST FAMILYC@M 500 FLASH
37
UK
6.4.2 Live video images
1. Click on ‘Video mode’ (D) (see figure 60).
2. Click on ‘Format’ (J) to alter the camera’s image settings. Figure 63 will appear.
Figure 63: Image settings
A
Colour settings (I420 / RGB 24)
B
Image size (320x240 / 640x480)
Table 5: Live video images
3. Click on ‘Snap Shot’ (I) to take a photograph of the live video image.
4. The photograph will be automatically loaded into Photo Express as a thumbnail (see figure 61).
5. Double-click on the photograph. The photograph will now appear in the window.
This photograph can now be edited and/or saved on the computer.
6.5 Using PhotoExplorer 6.0
A short description of how to use Photo Explorer 6.0 is given below. For more information, please see this
program’s instruction which is included on the CD-ROM provided.
1. Connect the camera to your computer as described in chapter 4.2.1, point 6.
2. Start Photo Explorer 6.0. Figure 64 will appear.
Page 40

TRUST FAMILYC@M 500 FLASH
38
Figure 64: Photo Explorer main screen
3. Go to “File Æ TWAIN Acquire Æ Select Source”. Figure 65 will appear.
Figure 65: Selecting a camera
4. Select the ‘Trust FAMILYC@M 500 FLASH’ and click on ‘Select’.
5. The correct camera has now been installed and photographs can be loaded from the camera’s memory.
For more information on how to edit photographs in Photo Express, please refer to this program’s Help
function.
6.6 COOL 360
For instructions on how to use COOL 360, please refer to the instruction manual
included on the CD-ROM. The manual can be found at the following location:
D:\Software\Cool360\Manual\C360.pdf
Acrobat Reader has to be installed on your computer to be able to read this manual.
6.7 VideoLive Mail
1. Start the program by double clicking on the icon on your desktop. The program will start automatically
after you have completed the Set-up Wizard for the first time.
2. Figure 66 will appear.
Page 41

TRUST FAMILYC@M 500 FLASH
39
UK
Figure 66: VideoLive Mail
Page 42

TRUST FAMILYC@M 500 FLASH
40
6.7.1 Description of the function buttons
A description of the function buttons is given below.
Figure 67: Function description
1 Exit VideoLive Mail Closes VideoLive Mail
2 Minimize Minimizes VideoLive Mail
3 Help Menu Activates the VideoLive Mail Help
function
4 Recording Wizard Starts the Wizard for recording and
sending video messages
5 Save Video File Saves the video
6 Send Mail Sends the video via e-mail
7 Load Video File Opens a saved video
8 System Configuration Program settings
9 Increase/Decrease Mic Volume Adjusts the recording level
10 Increase/Decrease Speaker
Volume
Adjusts the speaker volume
Table 6: Function description (see figure 67)
Page 43

TRUST FAMILYC@M 500 FLASH
41
UK
Figure 68: Function description
1 Start Playback Plays a video
2 Stop recording/playback Stops the recording or playing of a video
3 Start Recording Starts the recording of a video
4 Pause Pauses
Table 7: Function description (see figure 68)
Figure 69: Function description
1 Snapshot to File Takes and saves a snapshot
2 Video Configuration Configures the video
Table 8: Function description (see figure 69)
6.7.2 Making a VideoMail
A video e-mail can be easily made and sent using the VideoMail W izard.
1. Click on the ‘Recording wizard’ button (button 4, figure 67). The ‘Select Mail Type’ window will appear.
2. Select ‘Message Containing Video and Audio’ and click on ‘Next’ to continue. The ‘Video Quality Control’
window will appear.
3. Configure the video quality and click on ‘Next’ to continue.
4. The ‘Recording wizard – Audio Quality’ window will appear. Adjust the audio quality and click on ‘Next’ to
continue.
5. The ‘Start to Record Video Mail’ window will appear.
6. Click on the ‘Record’ button to start recording. Click on the ‘Stop’ button to finish the recording. Click on
‘Next’ to continue. The ‘Complete VideoLive Mail’ window will appear.
Page 44

TRUST FAMILYC@M 500 FLASH
42
7. In this window, select the following:
‘Play’ to play the video,
‘Save’ to save the video,
‘Mail’ to sent the video as an .exe file.
8. Click on ‘Finish’ to close the Wizard.
This program has many more functions and possibilities.
For more information, please see this program’s Help function.
6.8 Using VideoStudio
Please read the VideoStudio ReadMe file for instructions on how to use VideoStudio.
(Start -> Programs -> Ulead VideoStudio 4.0 SE Basic -> ReadMe)
7. Troubleshooting
Problem Cause Possible solution
The batteries have been installed
incorrectly.
Insert the batteries as described in
chapter 4.1.
The camera does not do
anything.
The batteries are empty. Replace the batteries as described
in chapter 4.1.
The batteries become empty
quickly.
Old or NiCd batteries are used. Replace the batteries with AA
alkaline or NiMH batteries.
Windows does not detect a
new device after connecting
the camera.
The computer's USB port does
not work.
Delete the USB port from the
‘Device Manager’ and reinstall it.
The camera is connected to
a USB HUB.
A USB HUB does not have its
own power supply.
Check whether the adapter for the
USB HUB is connected.
The computer becomes
jammed when using the
USB connection.
The USB port has shared an IRQ
with another device.
Remove cards from the computer or
divide the IRQ's differently. See your
Windows and/or PC instruction
manual for more information.
The camera is not connected to
the USB port.
Connect the camera to a USB port.Error message ‘Capture
device was not detected’ is
displayed.
The camera is connected to a
USB HUB which does not have a
power supply.
Connect the camera to a USB HUB
which has a power supply or to a
USB port on your computer.
The TRUST FAMILYC@M
500 FLASH is marked with
an exclamation mark ‘!’ in
the ‘Device Manager’.
The camera is connected to a
USB HUB which does not have a
power supply.
Connect the camera to a USB HUB
which has a power supply or to a
USB port on your computer.
The FAMILYC@M 500
FLASH does not work in
combination with the
TV/capture card.
There is a conflict between the
camera and the TV card.
Carry out the following:
1) Remove the TV Capture card
2) Install the FAMILYC@M 500
FLASH
3) Install the TV Capture card
The problem is not listed
here.
The latest FAQ update is
available on the Internet.
Go to www.trust.com/12640 for FAQ
and other product information.
Table 9: Troubleshooting
Page 45

TRUST FAMILYC@M 500 FLASH
43
UK
Check the FAQ's on the Internet (www.TRUST.com). You can also register your product at
www.TRUST.com, so that you can receive optimal guarantee and service support. You will be automatically
informed of developments to your product and other TRUST products. You will also have the chance of
winning some spectacular prizes.
If you still have problems after trying these solutions, please contact one of the TRUST Customer Care
Centers. The last page of this electronic instruction manual, as well as the back on the printed quick
installation manual, contains more information. Please have the following information available:
• The article number. This is 12640.
• Your hardware information.
• A good description of what does not work.
• A good description of when the problem occurs.
Page 46

TRUST FAMILYC@M 500 FLASH
44
8. Specifications
Sensor type CMOS
Recording element (CCD) ½”
Focus Fixed focus
Pixel resolution 1.2M pix (1280 x 960)
Software resolution (max) 3.1M pix (2048x1536)
Colour depth 24 bits
Exposure 1/4 – ½.000 sec (auto)
Minimum lighting 50 Lux
Data transfer speed VGA: 8fps, 30 sec. SIF: 8fps, 120sec.
Webcam speed VGA: 10fps, SIF: 20fps
Flash Yes
TWAIN interface Yes
Memory 16MB SDRAM
Extendable memory No
Max. number of photos 160 (640x480), 40 (1280x960)
Max. video clip time 60 sec. CIF & 20 sec. VGA
Connection USB 1.0
Power supply 2 1.5 V alkaline AA batteries and via the
USB port
Windows support Windows 98 / Windows ME / Windows 2000
/ Windows XP
Size (HxWxD) 63 x 99 x 32 mm
Weight 200 grams
Table 10: Specifications
Page 47

TRUST FAMILYC@M 500 FLASH
45
UK
9. TRUST Customer Care Centers
TRUST CUSTOMER CARE CENTERS
Internet www.trust.com
Office Open Phone
UK 9:30 - 17:00 +44-(0)1376-500000
Italia 9:00–13:00 / 14:00-18:00 051-6635947
france 9:00 à 17:00 +33-(0)803-083080
Deutschland 9:00 - 17:00 0800-00TRUST (0800-0087878)
España 9:00 - 17:00 +34-902 160937
Nederland 9:00 - 17:00 0800-BELTRUST (0800-23587878)
Other countries 9:00 - 17:00 +31-(0)78-6549999
 Loading...