

Page 1

Easy Scan 9600 Plus
Easy Scan 9600 Plus
User’s Manual
Version 1.0
Page 2

Easy Scan 9600 Plus
Copyright Statement
No part of this manual may be reproduced or transmitted, in any form
or by any means, electronic or mechanical , including photocopying,
recording, or in formation storage and retrieval systems, for any
purpose other than the purchaser's personal use, without the prior
written permission of the manufacturer.
Disclaimer S tatement
The manufacturer specifically disclaims all warranties, either express
or implied, including but not limited to implied warranties of
merchantability and fitness for a particular purpose, with respect to the
software, the product manual(s) and written materials, and any other
accompanying h ardware. The manufacturer reserves the right to
revise or make improvements to its product at any time and without
obligation to notify any person of such revisions or improvements.
In n o event shall the manufacturer be liable for any consequential or
inciden tal damages, including any loss of business profits or any other
commercial damages, arising out of the use of its product.
* All company or product names are trademarks or registered
trademarks or service marks of their respective owners.
16 EN 10678 ES96P.DOC
Page 3

Easy Scan 9600 Plus
1
Table of Contents
1. Introduction....................................................................................2
1.1 Conven tions...............................................................................2
1.2 Contents....................................................................................2
1.3 Minimum system requirements ..................................................3
2. Safety .............................................................................................4
3. Connecting.....................................................................................5
4. Installing the software...................................................................6
4.1 Installation of the TWAIN program.............................................6
4.2 Ins tallation of TextBridge............................................................6
4.3 Installation of Adobe Photo Deluxe............................................8
5. Working with the scanner.............................................................9
5.1 Activating the TWAIN program ..................................................9
5.1.1 From the Start menu...........................................................9
5.1.2 From the software...............................................................9
5.2 The TWAIN program ...............................................................10
5.2.1 Main..................................................................................10
5.2.2 Advanced window .............................................................12
5.2.3 Preferences window..........................................................13
5.3 Using the scan key...................................................................14
6. Working with Adobe PhotoDeluxe.............................................15
6.1 One-off setting of the scanner..................................................15
6.2 Scanning with Adobe PhotoDeluxe..........................................15
7. Working with Tex tBridge............................................................17
7.1 Setting the scanner..................................................................17
7.2 Scanning with TextBridge Classic............................................17
8. Troublesh ooting..........................................................................19
9. Specifications..............................................................................22
Page 4

Easy Scan 9600 Plus
2
1. Introduction
This manual is intended for users of the Easy Scan 9600 Plus
scanner. No specific knowledge is required for installing or using this
product.
The scanner works only under Windows 95/98 and Windows NT 4.0.
Note: The scanner does not operate under MS-DOS, Windows
3.1x/NT3.x and Apple Macintosh.
1.1 Conventions
This manual uses the following conventions to illustrate instructions:
<key> Here you must press a key. The name of the key will
appear between brackets.
‘System’ This is a specific term from a program; e.g. a term
used in Windows.
[DIR] Text in this font i ndicates that you are required to ty pe
in text.
Additional information will be shown as follows:
Note: Turn off the computer before connecting the keyboard.
1.2 Contents
After unpacking, you should have the following items:
• Scanner
• Power supply adapter
• Interface cable
• CD-ROM with drivers and applications
• CD-ROM with Adobe Photo Deluxe
• This manual
Contact your dealer if something is missing or has been damaged.
Page 5

Easy Scan 9600 Plus
3
1.3 Minimum system requirements
• Compatible PC with an 80486 CPU and 8 MB RAM
• Microsoft Windows 95/98 or Windows NT 4.0
• Printer port (EPP)
• Hard disk with at least 60 MB of available hard-dis k space (for
installation)
• VGA card, 256 colours
• CD-ROM player
Page 6

Easy Scan 9600 Plus
4
2. Safety
Read the following instructions thoroughly before using the product:
1. Remove the plugs from the outlet before cleaning the device. Do
not use any cleaning fluids or spray cans to clean the product.
Wipe off the device with a damp cloth.
2. Do not use this device in damp or wet environments; e.g.
bathrooms, damp cellars, s wimming pools, etc.
3. Make sure that nothing rests on the power cord. Do n ot put this
device in a place where the cord can wear or be damaged.
4. Never insert objects into the openi ngs on the outside of the
device, as you can come into contact with live electrical
components. This can cause fire or give strong electrical shocks.
5. Do not try and repair this device by yourself. The device may be
maintained by qualified personnel only.
6. Remove the plug from the outlet and have the device repaired by
qualified personal when:
a) the cord or plug is damaged or worn
b) fluid has penetrated the device
c) the device has fallen and/or the casi ng is damaged
7. Do not place thi s product in di rect sunli ght. Direct exposure to sun
or excessive warmth can damage the casing.
Page 7
Easy Scan 9600 Plus
5
3. Connecting
Note: Turn off the computer before you connect any peripheral
equipment.
Follow the instructions below to connect the scanne r to your computer:
1. Turn off the computer and all its peripheral equipment.
2. Remove the plug of the printer cable from the parallel port (if
present) located on the back of your computer.
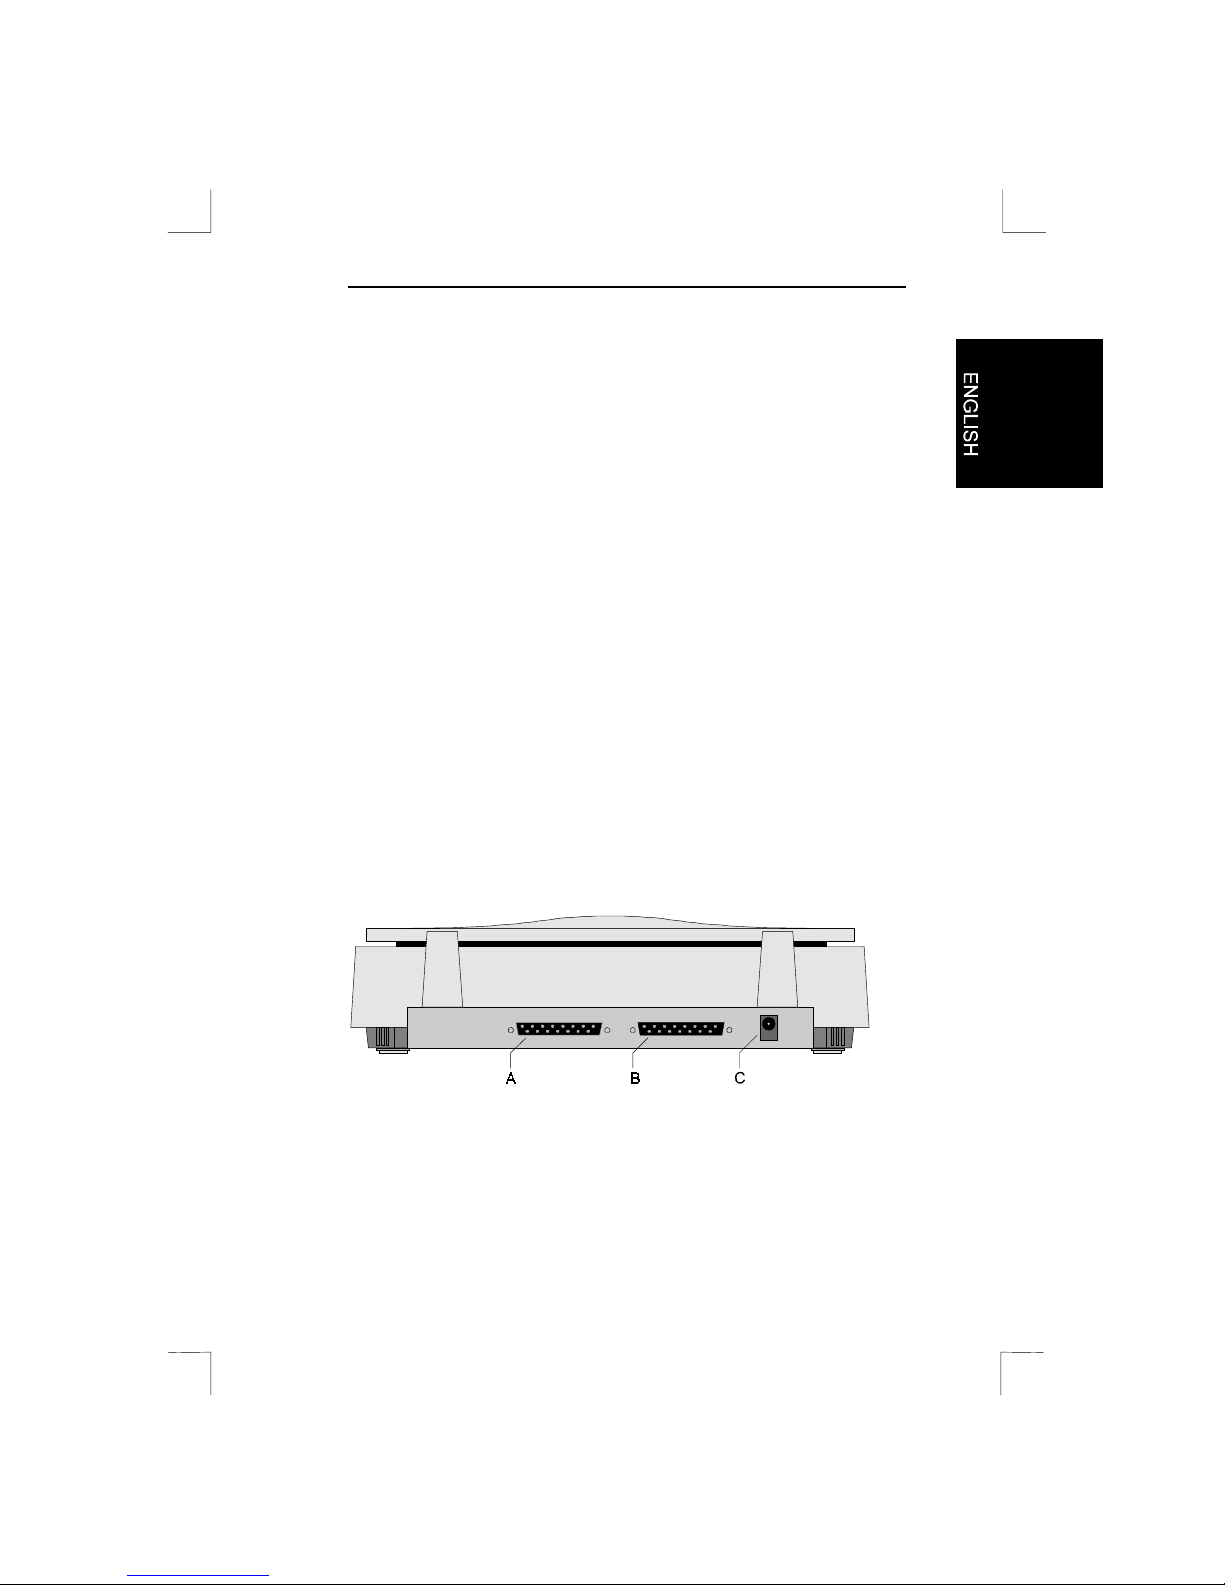
3. Connect the printer cable (if present) to the ‘Print’ connection at
the rear of the scanner (Figure B, Connector B).
4. Remove the interface cable from the packaging and connect it to
the parallel port of your computer.
5. Connect the other side of the cable to the ‘Host’ connection of
the scanner (Figure 1, Conn ector A).
6. Connect the cable of the power supply adapter to the scanner
(Figure 1, Connector C).
7. Plug the power supply adapter into the wall outl et.
Your scan ner (and printer) are connected. You are now ready to install
the driver and the applications.
Note: The scanner is turned on and off automatically. This is
why it does not have an on/off switch.
Figure 1: Rear of the scanner
Page 8
Easy Scan 9600 Plus
6
4. Instal ling the software
All files required for installing the drivers and applications are on the
CD-ROM.
Note: The following drive letters are used in the examples: Hard
disk: driver ’C:’, CD-ROM player: driver ‘D:’
Substitute these letters if your system uses different
ones.
In order to be able to use your scanner in Windows, you must first
install the TWAIN driver and the applications.
Quit all programs before you install the software.
4.1 Installation of the TWAIN program
1. Re-start Windows.
2. Insert the CD-ROM with the driver into your CD-ROM player.
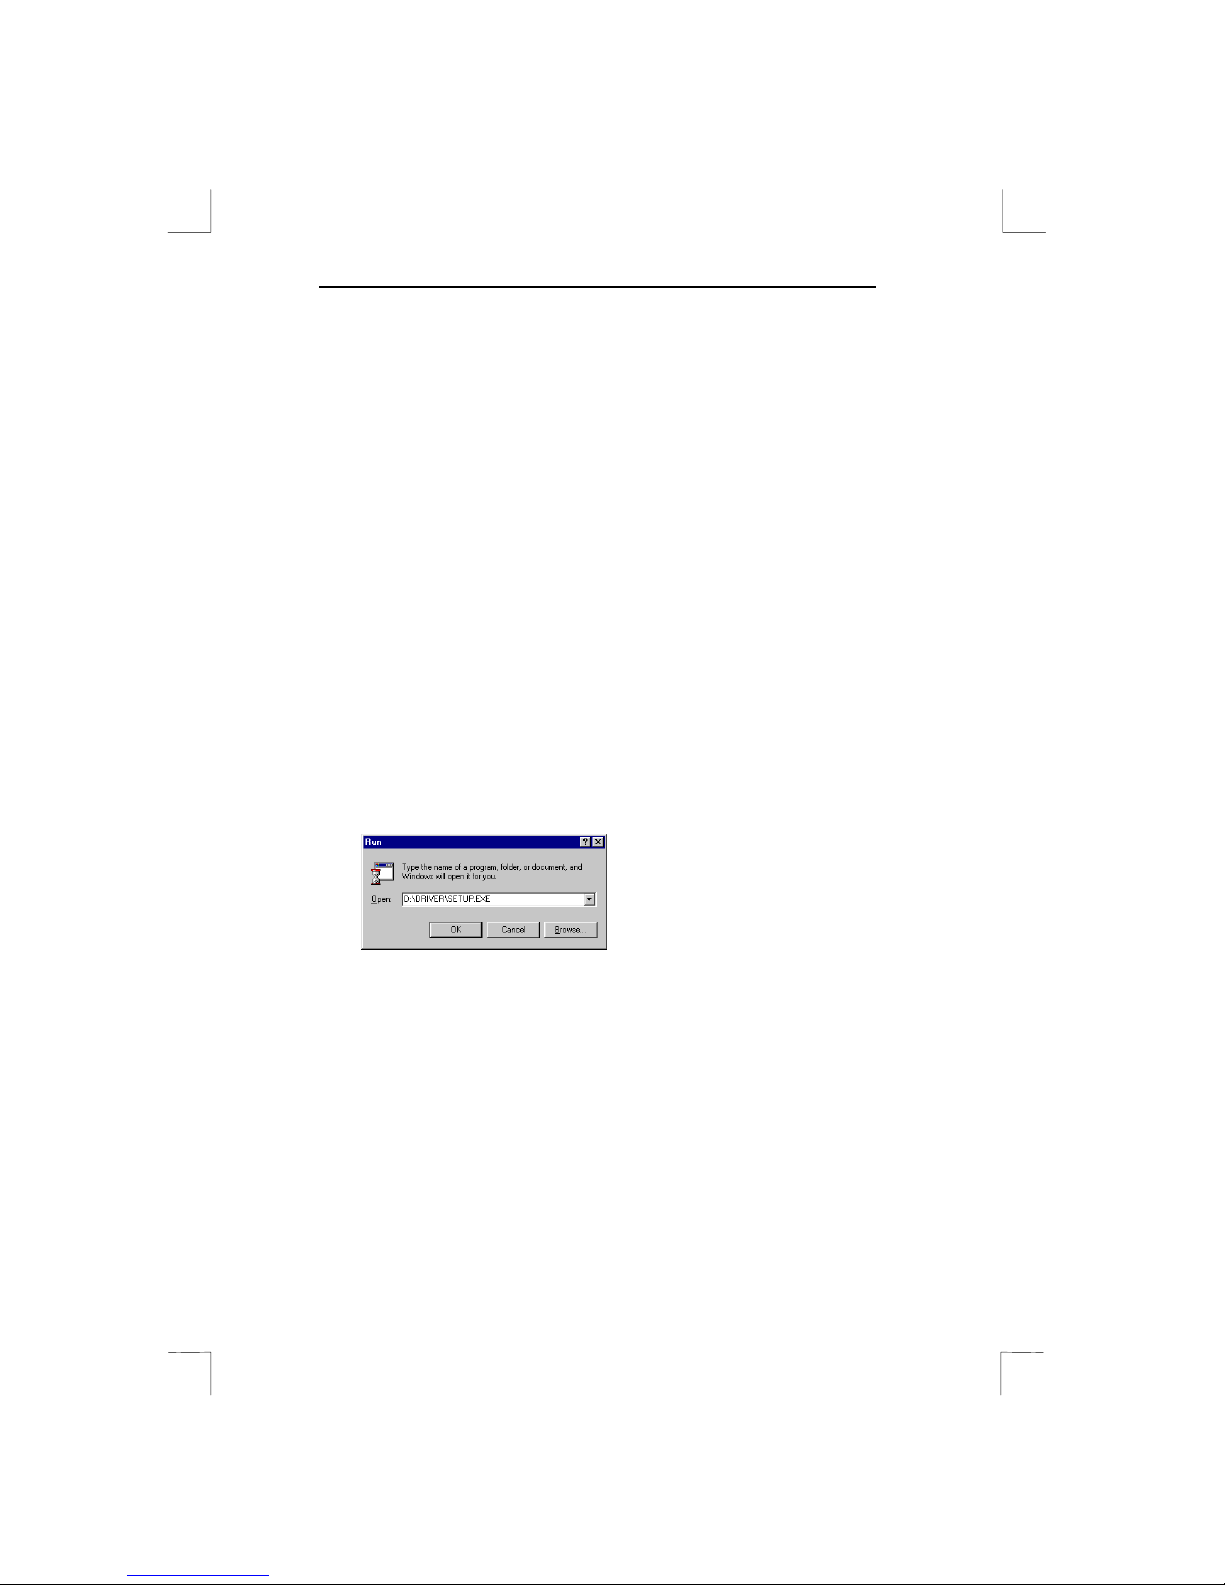
3. Click the ‘Start’ button wi th your mous e and select ‘Run’.
4. Type in [D:\DRIVER\SETUP.EXE] on the command line (see
Figure 2) and click ‘OK’.
Figure 2: Starting setup
5. The installation process will start. Files are copied to your hard disk
and a program group is created.
Continue with the installation of the software.
4.2 Installation of TextBridge
1. Click on the ‘Start’ button with you r mouse and then select ‘Run’.
2. Type in
[D:\TBRIDGE\SETUP.EXE]
on the command line
(Figure 2) and click ‘OK’. The installation program will then start.
3. Select the language you want to use during installation.
Page 9

Easy Scan 9600 Plus
7
4. At the next screen, select ‘Full Installation (software and scanner)’
and then click ‘Continue’. A screen with a license agreement will
appear.
5. Click ‘Yes’ to accept the license agreement and continue with the
installation.
6. Select all languages for OCR recognition (Figure 3) and click on
‘Continue’. You will only be able to recognise text in the
languages which you have selected here.
Figure 3: Selecting languages
7. Click ‘Continue’ to accept the installation directory of TextBridge
Classic.
8. After the installation, you mu st select the scanner type. Choose
‘TWAIN’ and ‘Continue’ (see Figure 4). A window containing the
present TWAIN drivers will appear.
Figure 4: Selecting the device for input
9. Choose ‘Trust Easy Scan 9600 Plus’ from the li st and click
‘Select’. A window will appear as in Figure 5.
Page 10

Easy Scan 9600 Plus
8
Figure 5: Completing the installation
10. Click ‘End’ to complete the installation.
After Text Bridge Classic has been installed, you can install Adobe
Photo Deluxe, which has been supplied on a separate CD-ROM.
4.3 Installation of Adobe Photo Deluxe
Adobe Photo Deluxe is a program used to scan and edit images.
1. Insert the CD-ROM ‘Adobe Photo Deluxe’ into your CD-ROM
player.
2. Click on the ‘Start’ button with you r mouse and then select ‘Run’
if the installation does not start automatically.
3. Type in
[D:\AUTORUN.EXE]
on the command line (see Figure 2)
and click ‘OK’. The installation program appears.
4. Click on ‘Adobe PhotoDeluxe 2.0’ to start the installation
program.
5. Select ‘Typical’. Click on ‘Next’ to continue.
6. Fill in your personal data in the next window. You will find the
serial number on the packaging of the CD-ROM.
7. Follow the instructions on the screen to complete the installation .
8. If you have a modem, you can register the software
electronically. If you do n ot have a modem, then you must
deactivate this option. Click on ‘Finish’ to complete the
installation.
Page 11

Easy Scan 9600 Plus
9
5. Working with the scanner
You must start the TWAIN program in order to be able to work with
the scanner. The TWAIN program can be started in two ways.
5.1 Activating the TWAIN program
5.1.1 From the St art menu
Execute the following to activate the TWAIN program from the start
menu:
1. Click ‘Start’
2. Click ‘Programs’
3. Select ‘Trust Easy Scan 9600 Plus’
4. Select the program ‘Trust Easy Scan 9600 Plus’.
5. The TWAIN program now appears on your display screen (see
Figure 6).
5.1.2 From the so f t ware
Execute the following to activate the TWAIN program from the
software:
1. Start the application software; e.g. Adobe PhotoDeluxe.
2. Click ‘Acquire’ in the ‘File’ menu.
3. Click ‘Select TWAIN source...’
4. Select the relevant scanner (Trust Easy Scan 9600 Plus V2.0)
from the list that appears, and click ‘Select’.
5. Click ‘Acquire’ in the ‘File’ menu and select ‘TWAIN’.
6. The TWAIN program now appears on your screen (see
Figure 6).
It is possible that this is different in your application. Con sult the
application’s manual.
Page 12

Easy Scan 9600 Plus
10
5.2 The TWAIN program
The TWAIN program consists of 3 tabs:
Main
Advanced
Preferences
5.2.1 Main
This main functions needed in order to be able to work with the
scanner are displayed here.
Figure 6: The main window
Page 13

Easy Scan 9600 Plus
11
Function
1 Tabs used to move between the different windows.
• Main: This window contains the main functions for
scanning.
• Adv anced: This wi ndow contains the same functions as
the Main window but also includes correction functions.
• Preferences: This window enables you to record preferred
settings.
2 Sets unit of measurement; e.g. inch, cm, pixel
3 Sets length and width
4 Preview key
5 Scan key
6 Activates the help function
7 Closes the TWAIN window
8 Sets the contrast
9 Sets the brightness
10 Sets the resolution
11 Sets the filter (grey, red, green and blue).
12 Sets Scan Mode
• Color Mode: Scans in colour (24 bit).
• Gray Mode: Scans in grey tones (8 bit).
• Line Art Mode: Scans i n black/white (1 bit).
Page 14

Easy Scan 9600 Plus
12
13 Sets destination
• Send to A pplication: The scanned image is copied to y our
application software (works only if you scan from an
application (e.g. TextBridge)).
The remaining options work if you have started the TWAIN
program from the start menu.
• Send to Disk: the scanned image is stored on a disk or
hard disk.
• Send to Printer: The scan ned image is printed by your
printer (Printer required).
• Send to Mail: The scanned image is sent via e-mail. You
must enter the e-mail address into the ‘Preferences’
window (Modem and Internet account requi r ed).
• Send to Fax: The scanned images is sent by fax. You must
enter the fax number into the ‘Preferences’ window
(Modem with fax option required)
• Send to Clipboard: The scanned image is stored
temporarily on the clipboard. You can paste the image in
another application later on.
5.2.2 Advanced window
Extra functions have been added to the basic one in this window.
Figure 7: The Adv anced window
Page 15

Easy Scan 9600 Plus
13
Function
1
Zoom: Magnifies scanning area.
2
Mirror: Flips scanning area.
3
Invert: Sets inversion.
4
Descreen: Eliminates moiré patterns in the printed matter.
5
Gamma: Sets gamma.
6
HSV: Sets colour, tone and saturation
7
Tone adjustment : Edits colours
8
Auto Color Control: Automatic setting
9
Special Effect: Initiates special effects. (Left: fuzzy image;
Middle: normal image; and Ri ght: sharp image)
Functions 1 to 8 are also explained i n Help. To call Help, press the
question-mark key (?) located at the bottom of the window.
5.2.3 Preferences window
This window enables you to record certain preferences.
Figure 8: Preferences window
Page 16

Easy Scan 9600 Plus
14
Prescan setting: Activates and deactivates ‘Automatic area
detection’.
Auto scanning setting: Activates and deactivates scanning key
usage. See Chapter 5.3.
Destination default setting: Defines the l o cation where the files must
be stored or sent to.
Monitor Calibration button: Sets the gamma value of the display
screen to that of the scanner.
5.3 Using the scan key
The scan key is located on the front of the scanner (see Figure 9).
Follow the instructions below to scan with the s can key:
1. Start the program ‘Trust Easy Scan 9600 Plus’. See Chapter
5.1.1.
2. Find the auto-scan key on the front of the scanner (Figure 9, Key
A).
3. Press button (A). The scanner now starts the scanning process.
4. A prescan is carried out if you have activated the option
‘Prescan’. The result is displayed in the preview window.
5. The scanner carries out area detection for the area to be
scanned. This area is used for the scan.
6. The scanning process starts and the result is transported to the
destination you s elected: file, application, e-mail, fax, printer or
clipboard. This works only if you have activated the option ‘Scan
and Send to destination’.
The program Trust Easy Scan 9600 Plus is then closed.
Figure 9: Location of scan key
Page 17

Easy Scan 9600 Plus
15
6. Working wi th Adobe PhotoDeluxe
Adobe PhotoDeluxe is a drawing and editing program with many
options. With it, you can edit your scanned images.
6.1 One-off setting of the scanner
1. Start the ‘Adobe PhotoDeluxe’ program.
2. Click ‘File’, select ‘Open Special’ and then select ‘Scan Photo...’
(See Figure 10).
Figure 10: Selecting and start ing TWAIN
3. Select ‘Trust Easy Scan 9600 Plus’ from the window.
4. Click ‘OK’.
The scanner is now set for use.
6.2 Scanning with Adobe PhotoDeluxe
1. Start the ‘Adobe PhotoDeluxe’ program.
2. Place the document th at must be scanned on the scanner.
3. Click on ‘Fil e’, select ‘Open Special’ and then select ‘Scan
Photo...’ (see Figu re 10). The TWAIN window appears.
4. Click ‘Preview’ to execute a prescan.
5. Using y our mouse, set th e area you want to scan.
6. Set scan mode to ‘Color mode’.
7. Set the desired res olution. You are advised to choose 300 DPI.
Page 18

Easy Scan 9600 Plus
16
8. Click ‘Scan’. After scanning is completed, the image is
transported to Adobe PhotoDeluxe.
9. When the scanner is finished scanning, click ‘Exit’ to return to
Adobe PhotoDeluxe. You can now edit the image.
This was a brief introduction to the program. Consult the program’s
Help facilities (‘?’) for more information.You will find a manual for the
program on the CD-ROM.
Page 19

Easy Scan 9600 Plus
17
7. Working wi th TextBridge
TextBridge is a program used to scan text and to edit it i n a word
processor. You will find an extensive manual for the program on the
CD-ROM.
7.1 Setting the scanner
The scanner is adjusted for using the software during the installation of
the application.
7.2 Scanning with TextBridge Classic
1. Start up TextBridge Classic.
2. Place the document th at must be scanned on the scanner.
3. Press the ‘GO’ button in TextBridge. The TWAIN window now
appears on the display screen.
4. Click ‘Preview’ to execute a prescan.
5. Using y our mouse, set th e area you want to scan.
6. Set scan mode to ‘Line art mode’ (see Figure 6, option 12)
7. Set the resolution to 300 DPI.
8. Click ‘Scan’. After scanning is completed, TextBridge Classic will
ask whether any other items must be scanned. You can scan
additional pages.
9. Click ‘END’ to conclude the sca nning. The text recognition facility
will now start automatically. Afterwards, a window will appear and
you will be asked whether you want to store the scanned text.
10. Type in a name for your recognised text in ‘File Name’.
11. Select the format of the file in ‘Save as Type’. When doing so,
choose a file format that you r word processor can use. When in
doubt, choose ‘ASCII Std. (*.txt)’.
12. Click ‘Save’ to store the file. You are finished with recognition.
13. Quit TextBridge Classic.
Now you need a word process or in order to be able to edit the
scanned text you have just stored. Enter the name of the file that you
saved when carrying out step 12.
Page 20

Easy Scan 9600 Plus
18
TextBridge also has more advanced options. Look in the on-line help
and the documentation on the CD-ROM for more information.
Page 21

Easy Scan 9600 Plus
19
8. Troubleshooting
Problem Cause Possible solution
The window ‘Cannot
operate!’ appears.
Interface cable is
not connected.
Connect the interface cable
properly (Chapter 3).
Power supply
adapter is not
connected.
Connect the power supply
adapter properly
(Chapter 3).
Parallel Port mode
is not set properly.
Set Parallel Port mode to
EPP mode or normal mode
in your BIOS (see manual of
computer/ motherboard).
Cannot acti vate
scanner.
Interface cable is
not connected.
Connect interface cable
properly (Chapter 3).
Power supply
adapter is not
connected.
Connect the power supply
adapter properly
(Chapter 3).
Scan key does not
work.
Tru st Easy Scan
9600 Plus program
is not started.
Start the Trust Eas y Scan
9600 Plus program
(Chapter 5.1.1).
Auto scanning is
not activated.
Activate ‘Auto Scanning’
(Chapter 5.2.3) in the Trust
Easy Scan 9600 Plus
program.
Computer does not
start when s canner is
on.
Safety feature of
the computer
power supply is
activated.
Activate the computer first,
and then the scanne r.
Scan is too dark. Monitor is set too
dark.
Modify the brightness of the
monitor.
Brightness in the
TWAIN program is
not set properly.
Set the brightness of the
TWAIN program properly
(Chapter 5.2.1).
Page 22

Easy Scan 9600 Plus
20
Scan is of bad
quality.
Resolution is too
low.
Set the resolution to 300
DPI (Chapter 5.2.1).
Number of colours
of display adapter
is set too low.
Adjust your display adapter
to a minimum of 65,536
colours.
Glass surface is
dirty.
Clean the glass surface.
The printer does not
respond.
Printer is
incompatible.
The printer connection of
the scanner can have
problems with a number of
printers. You are advised to
add a printer card.
Scanner is not
connected to the
electrical mains.
Make sure that the scanner
is connected to the electrical
mains.
Printer works
according to the
GUI principle.
Use a separate printer card,
or connect your printer
directly to the parallel port if
you want to print.
Error message
during scanning.
The hard disk is
full.
You need 3 times the room
of the item to be scanned
on your hard disk as
available dis space. The
required space can be
viewed in the TWAIN
window. Free some space
or choose a lower
resolution.
Resolution is too
high.
Choose 300 DPI maximally
when scanning an A4format document.
Too large a surface
is selected.
Choose 4800 or 9600 DPI
only for small originals (5x5
mm).
Check the FAQ and the latest version of the driver at www.trust.com
on the I nternet.
Page 23

Easy Scan 9600 Plus
21
Contact your dealer if you are still having problems with your scanner
after having tried these solutions. Have the following information
ready:
1. Operating system
2. Hardware configuration
CPU (MHz)
Memory (MB)
Available free space on hard disk (MB)
Display adapter: resolution and number of colours
3. Scanner settings
Scan mode (colour, grey, black/white)
Resoluti on (DPI)
Move to (application, printer, etc.)
Size:
4. Version of TWAIN program
5. Name and version of application software
Page 24

Easy Scan 9600 Plus
22
9. Specifications
Type Flatbed, CIS scanner
Optic resolu tion (H x V) 300 x 600 DPI
Maximum resolution by
interpolation
9600 x 9600 DPI
Scanning method
• 1 bit black/white
• 10 bit grey val ue
• 30 bit colour
Document format 210 x 297 mm (A4)
8.5 x 11 inch (Letter)
In terface Paral lel po rt EPP/SPP
Voltage source
• 220 VAC - 240 VAC
• 50 - 60 Hz
• External
Capacity 15 Watt
Dimensions (W x H x D) 270 x 70 x 375 mm
Weight (exclusive packaging) 2.95 Kg
 Loading...