

Page 1

Easy Scan 19200 Plus
EASY SCAN 19200 PLUS
User’s manual
Version 1.0
Page 2

Easy Scan 19200 Plus
Thank you
Thank you very much for purchasi ng t hi s pr oduct f r om the Trust range. We wish you
hours of fun with i t . Pl ease read this manual carefully before using the product.
Registration
Register your purchase now at the Trust Internet site (www.trust.com) and you could
win one of the fabulous prizes. The web site is also the place to look for dealer
addresses, comprehensive product information, drivers, and FAQ (Frequently Asked
Questions) sheets.
Copyright Sta t e m e nt
No part of this manual may be reproduced or transmi t ted, in any form or by any
means, electronic or m echanical , i ncluding photocopying, recording, or information
storage and retrieval systems, for any pur pose other than the purchaser's personal
use, without the prior writ ten permission of the manufact urer.
Disclaimer Statement
The manufacturer specifically disclaims al l warranties, either express or implied,
including but not l imited to implied warranties of merchantability and fit ness for a
particular pur pose, wit h r espect to the software, the product manual(s) and written
materials, and any ot her accompanying hardware. The manufacturer reserves the
right to revise or m ake improvements to its product at any t i me and without obligation
to notify any person of such revisions or improvements.
In no event shall the manufacturer be liabl e for any consequential or i ncidental
damages, including any loss of business profits or any other com mercial damages,
arising out of t he use of its product .
* All company or pr oduct names are trademarks or registered trademarks or service
marks of their r espective owners.
01 UK 11126 ES19200PLUS.DOC
Page 3

Easy Scan 19200 Plus
1
Contents
1. Introduction.....................................................................................................2
1.1. Conventions...............................................................................................2
1.2. Contents....................................................................................................2
2. Safety...............................................................................................................4
3. Connecting the scanner..................................................................................5
3.1. Unlocking the transport locks.....................................................................5
3.2. Connecting the scanner .............................................................................6
4. Installing the driver and software...................................................................7
4.1. Installing the driver.....................................................................................7
4.2. Installing TextBridge Classic 2.0 ................................................................9
4.3. Inst alling Adobe PhotoDeluxe 2.0.............................................................12
5. Making a scan ............................................................................................... 16
5.1. TWAIN main menu..................................................................................16
5.2. Advanced TWAIN menu...........................................................................18
5.3. Monitor calibration...................................................................................20
5.4. Preferences.............................................................................................21
5.5. Making a scan.........................................................................................22
6. Working with Adobe PhotoDeluxe................................................................ 23
6.1. Ini tial scanner settings ............................................................................. 23
6.2. Scanning wi t h Adobe PhotoDeluxe...........................................................24
7. Working with TextBridge.............................................................................. 25
7.1. Settings...................................................................................................25
7.2. Scanning wi t h TextBridge Classic............................................................. 26
8. Maintenance.................................................................................................. 28
9. Troubleshooting............................................................................................29
9.1. Testing the scanner.................................................................................. 29
10. Specifications...............................................................................................32
11. Trust Service Centers...................................................................................33
Page 4

Easy Scan 19200 Plus
2
1. Introduction
This manual is intended for users of the Easy Scan 19200 Plus scanner. No previous
knowledge is required for installati on and use of t hi s pr oduct.
Note:
This scanner will not work with MS-DO S, Windows 3.1x/NT3.x, or Apple
Macintosh computers.
If you have any questions after reading t his manual, please cont act one of t he
Trust service centres. You will find information on the service centre nearest to
you at the back of this m anual . You can al so visit the Trust website
(www.trust .com) for suppor t, comprehensive product information, drivers, and
FAQ (Frequently Asked Questions) sheet s.
1.1. Conventions
This manual uses the foll owing layout conventions for instruct i ons:
<
key
> Requires the user to press a key. The key legend is shown between
the angle brackets.
‘
System
’ This is a software-specific t erm, e.g. a term used by Wi ndows.
[
DIR
] Text in this font is to be typed by the user.
(term)
The text between the parentheses (….) is the English term, e.g.
(File), referred to in the accompanyi ng illustration.
Additional i nf or mation is shown as follows:
Note:
Switch off the computer before connect ing the scanner
The examples assume that your computer system has assigned the letter “D” to your
CD-ROM drive. If your com put er uses a diff erent drive designation f or your CD-ROM
drive, e.g. “E”, replace “D” in the text with “E”.
1.2. Contents
After unpacking, you should have the following i t em s:
•
Scanner
•
Power supply adapter
•
Interface cable
•
CD-ROM with drivers, applic at i ons, and user's manual
•
Adobe PhotoDeluxe 2.0 CD-ROM
•
Quick Installation Manual
Page 5

Easy Scan 19200 Plus
3
Minimum system requirements
•
IBM Compatible PC with Pentium 75MHz CPU and 16 MB RAM
•
Microsoft Windows 95 / 98 or W i ndows NT 4.0
•
Printer po r t (EPP)
•
Hard disk drive with at least 60 MB free disk space (for installation)
•
4-speed CD-ROM dr ive
Page 6

Easy Scan 19200 Plus
4
2. Safety
Read the following instructions car efully before use:
1. Disconnect any power plugs from the mains supply before cleaning the
equipment.
2. Do not use this equipment in humid environments like bathrooms, damp cellars,
swimm i ng pools, etc.
3. Make sure nothing is placed on the power supply lead.
4. Do not insert any objects into the slots in the equipment's casing.
5. Do not attempt to repair this equipment yourself.
6. If any of the following condit ions occur, remove the power plug from the mains
supply and have the equipment serviced by qualified personnel:
a) the power lead or plug have become damaged or worn;
b) liquid has entered the equipment;
c) the equipment has been dropped, and/or the casing has become damaged;
7. Do not place this product in direct sunlight. Exposure to direct sunlight or
excessive heat can damage the product.
Page 7
Easy Scan 19200 Plus
5
3. Connecting the scanner
Note:
Switch off the computer before connecting peripheral equipment.
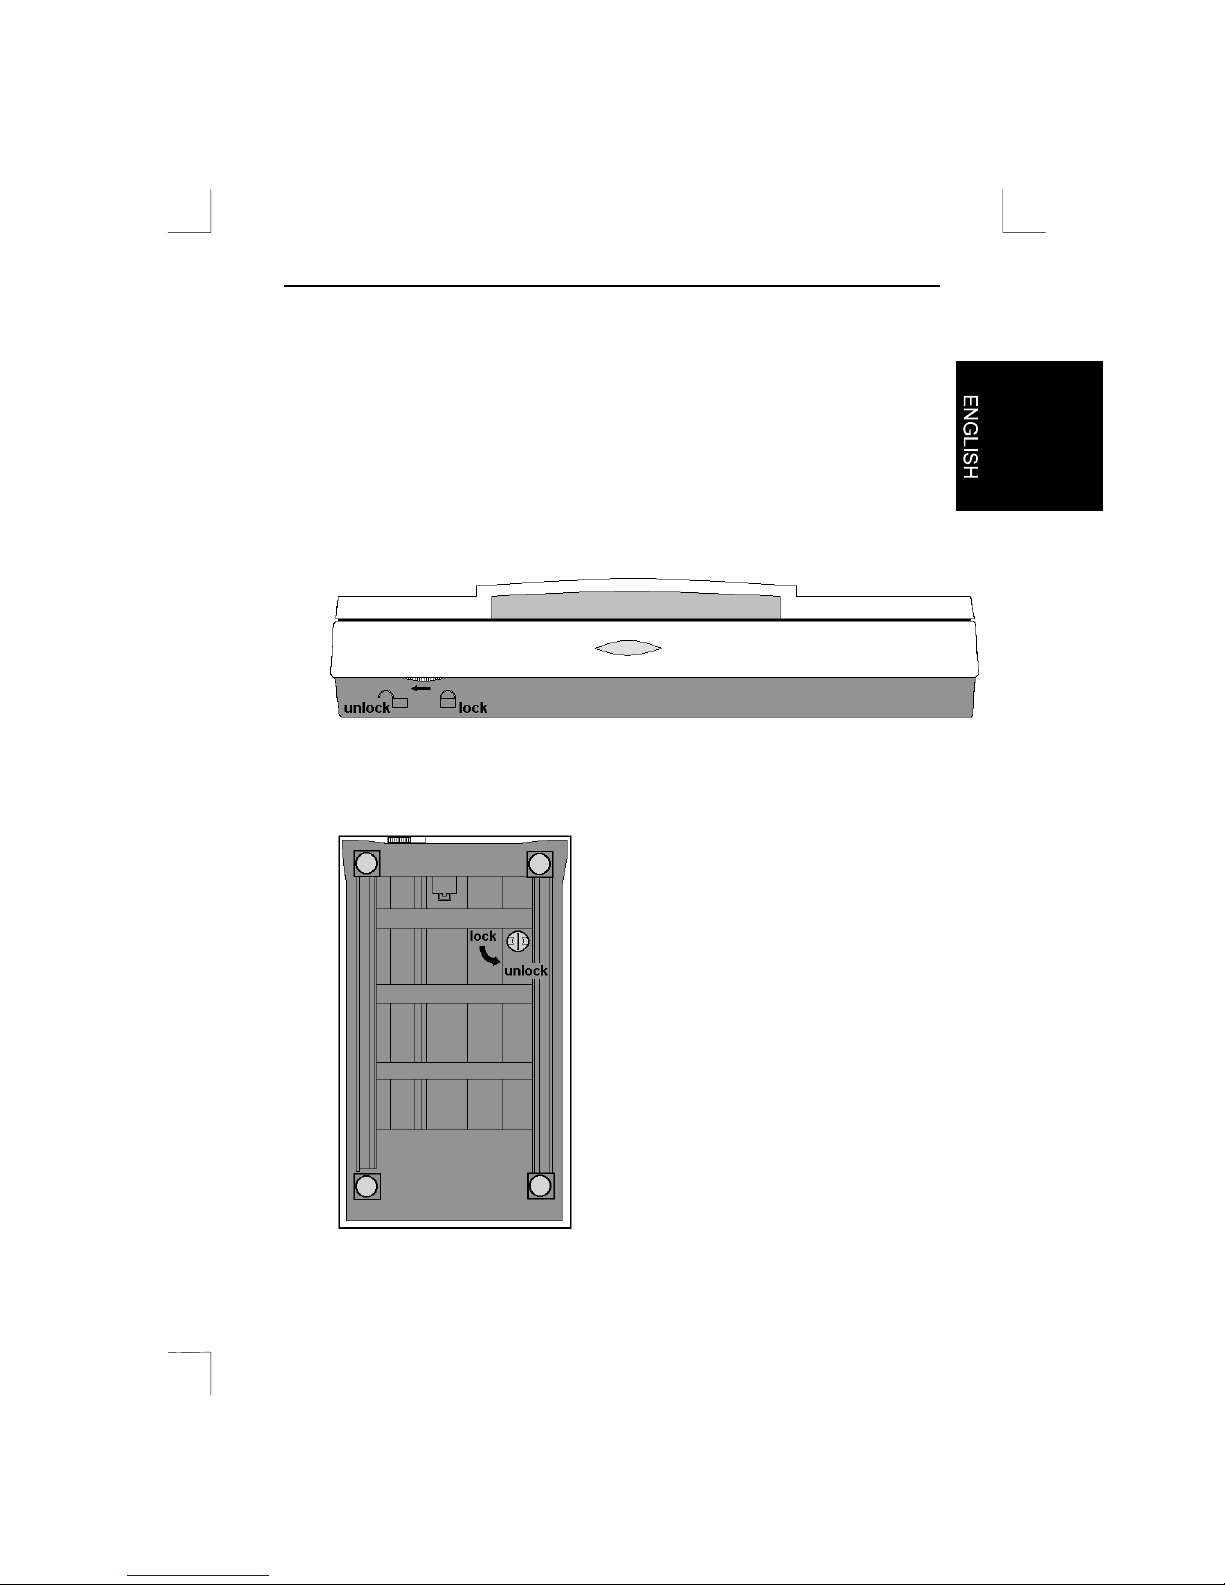
3.1. Unlocking the transport locks
1. The scanner has 2 locks to prevent damage during tr anspor t . Before the
scanner can be used, these must be unlocked.
2. The first lock is on the front of t he scanner. Slide the lever to the left to unlock
(Figure 1).
Figure 1: Unlocking the t r anspor t locks
3. The second lock is on the underside of the scanner. Turn the knob a quarter
turn anti-cl ockwis e to unlock ( Fi gur e 2).
Figure 2: Unlocking the t r anspor t locks
Page 8
Easy Scan 19200 Plus
6
3.2. Connecting the scanner
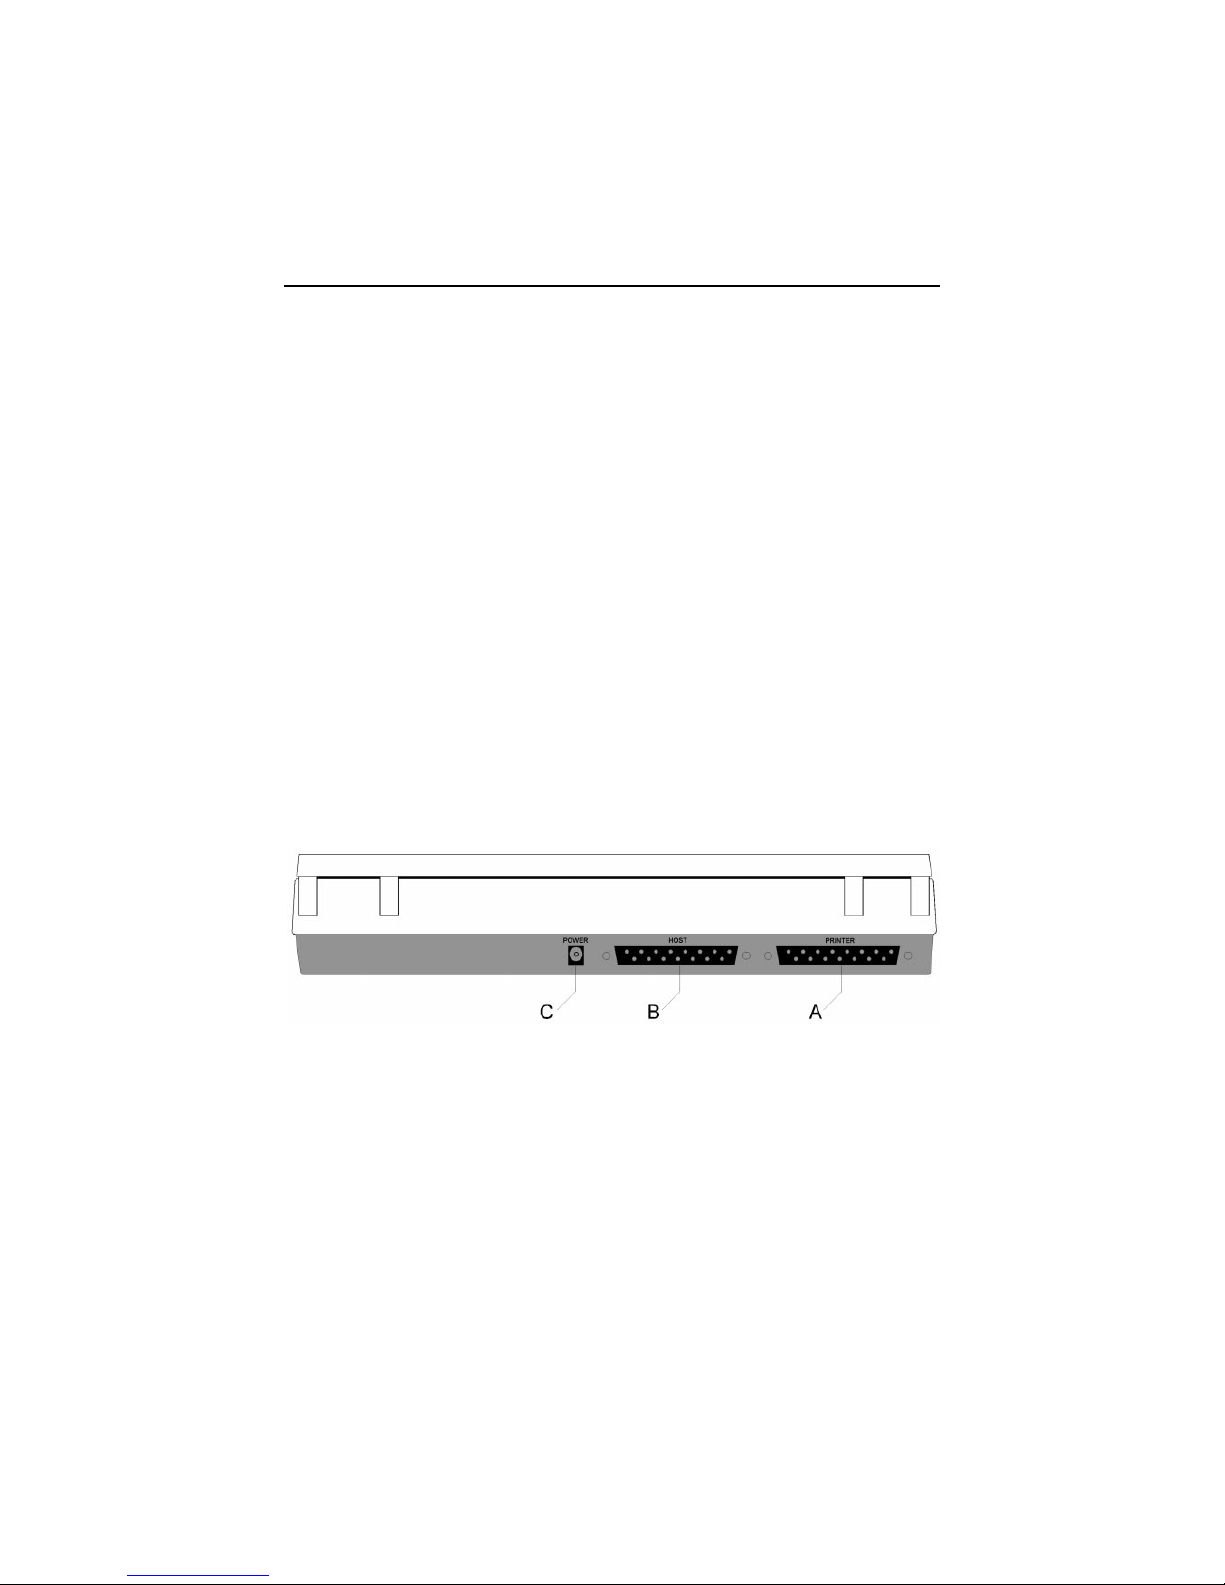
Proceed as follows to connect the scanner to your computer:
1. Switch off the computer and any peripheral equipm ent.
2. Disconnect the power plug from the mains supply.
3. Disconnect the printer cable plug from the parallel port at the rear of the
computer (if i n use).
4. Connect the printer cable (if in use) to the ‘Printer’ connection at the rear of the
scanner (connector A, Figure 3).
5. Take the interface cable supplied and connect it to the parall el port of your
computer.
6. Connect the other end of the cable to the ‘Host’ connection on the scanner
(connector B, Figure 3).
7. Connect the power supply adapter lead to the scanner (connector C, Figure 3).
8. Connect the power supply adapter to the mains supply.
9. Connect the power plug of your comput er to t he m ains supply.
Your scanner (and printer) have now been connected and you are ready to start
installi ng t he driv er and appli c at i on software. You may have to reinstall your printer.
Note:
The scanner is switched on and off automatically by the driver. This is
why the scanner has no on/off switch.
Figure 3: Rear view of the scanner
Page 9
Easy Scan 19200 Plus
7
4. Installing the driver and software
4.1. Installing the driver
In order for you to be able to use your scanner under Windows, t he TWAIN driver
and applications sof t ware m ust first be installed.
Close any active programs before installing the software.
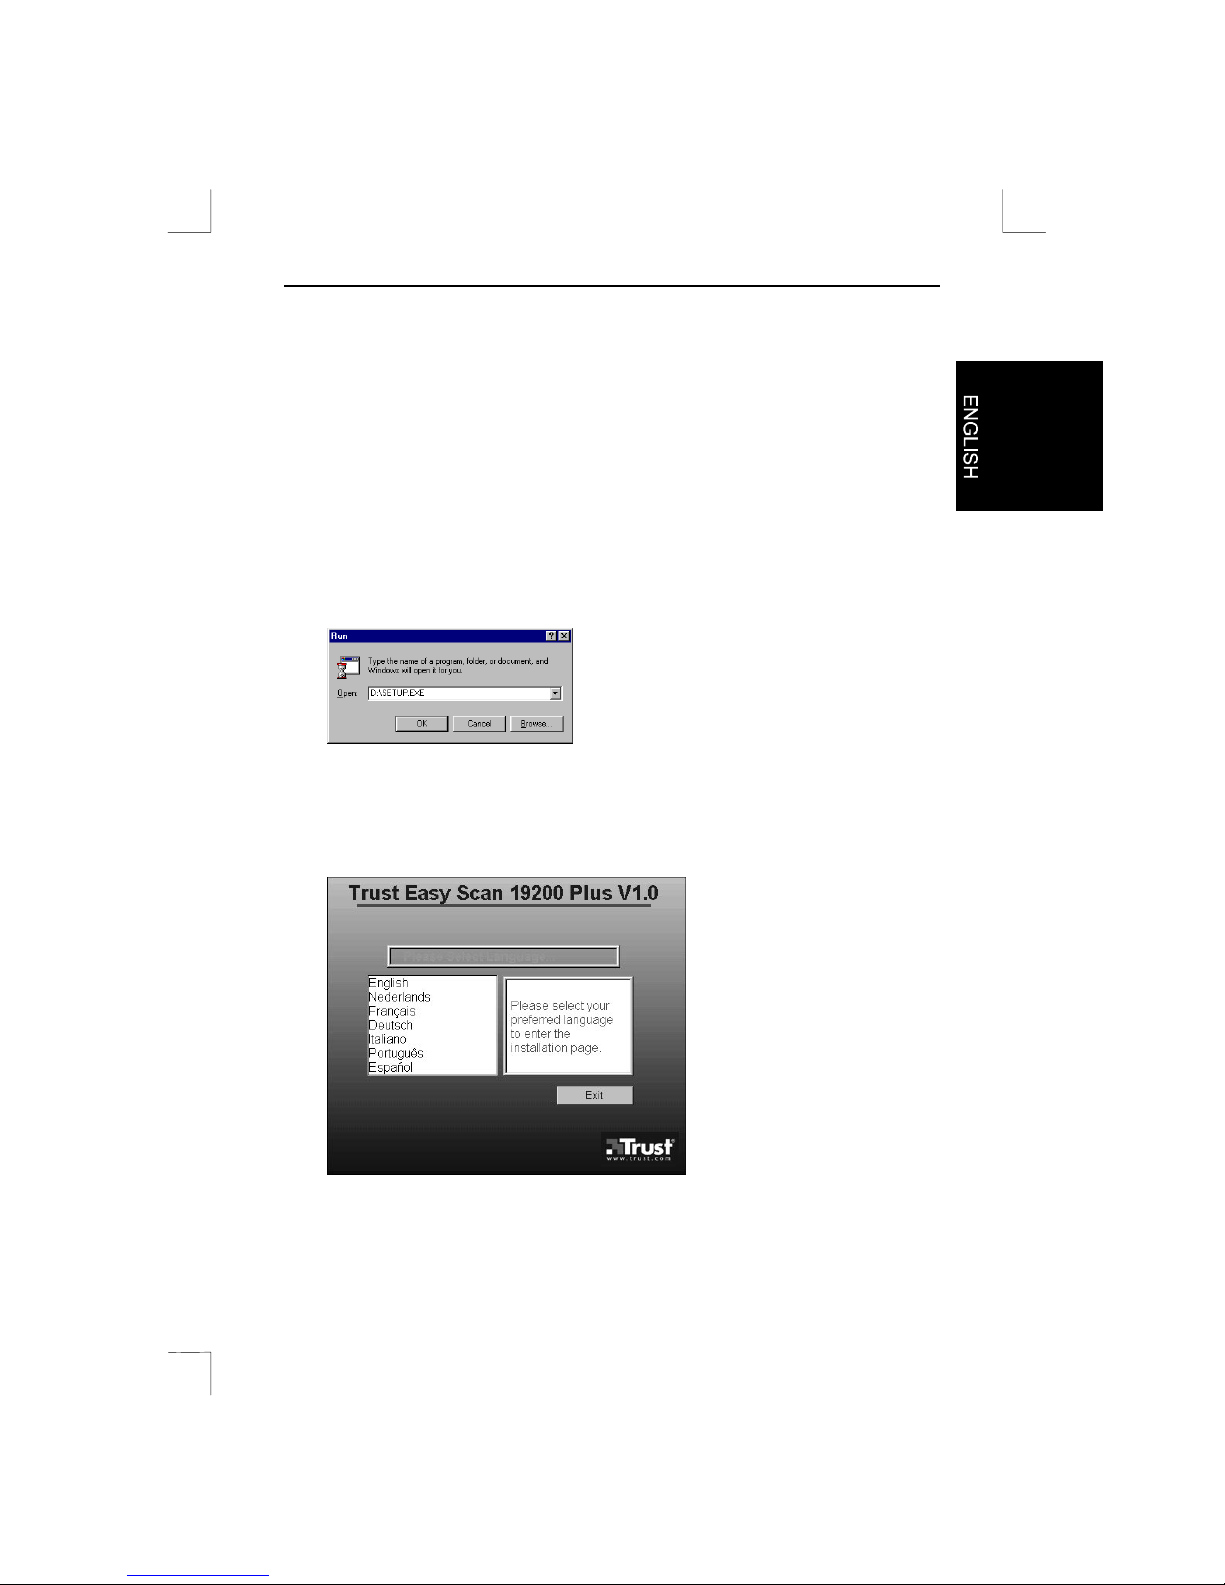
1. Start Windows.
2. Insert the application CD-ROM supplied into your CD-ROM dri ve.
3. Using the mouse, click on ‘Start’ and select ‘Run’.
4. On the command line, type [D:\SETUP.EXE], t hen click on ‘OK’ (Figure 4).
Figure 4: Instal l a t i on in Windows 95, 98 and NT 4
5. Using the mouse, select your preferred language for the installation (English,
French, German, It al ian, Spanish, Portuguese, or Dutch, see Figure 5). After
you have selected the preferred language, a screen like the one shown in
Figure 6 is displayed.
Figure 5: Language selecti on
Page 10
Easy Scan 19200 Plus
8
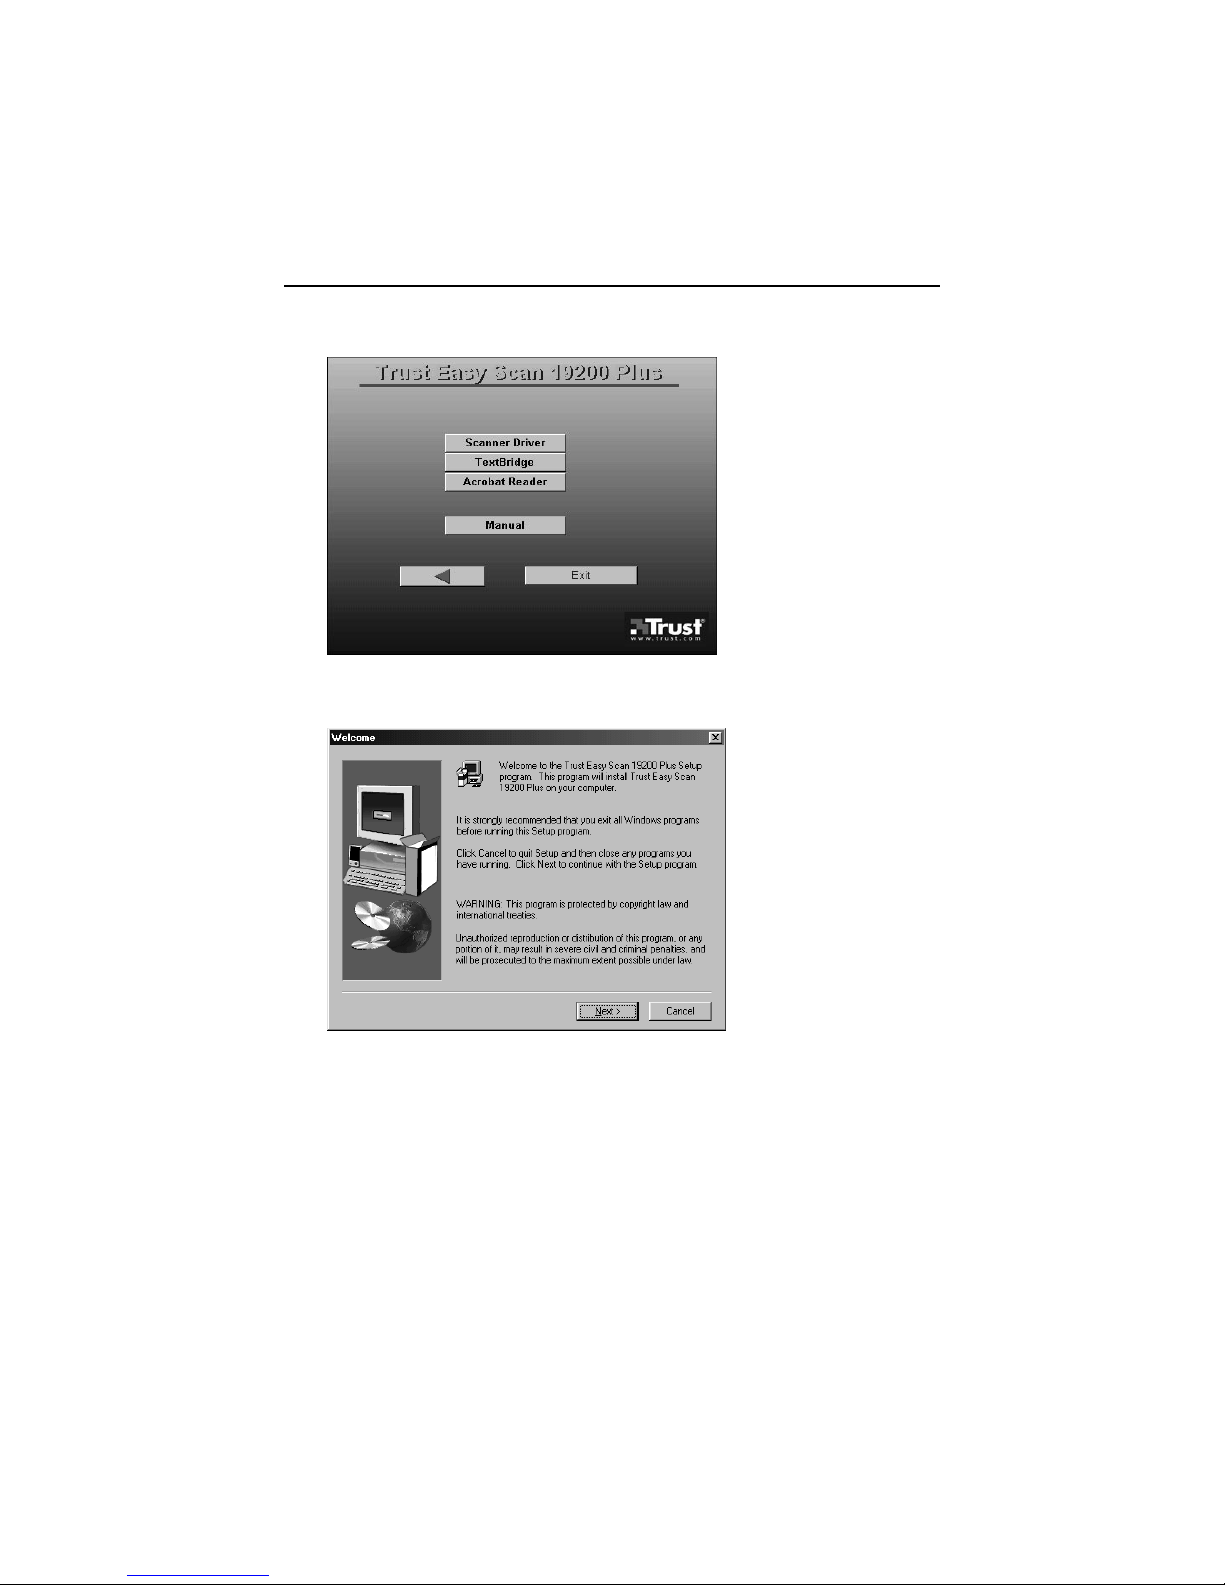
6. Click on ‘Scanner Driver’. A screen as in Figure 7 is displayed.
Figure 6: Instal lation menu
7. Click on ‘Next’. The driver is installed.
Figure 7: Driver I nst al lation
8. You have now completed the driver installation. Proceed with section 4.2 to
install TextBridge Classic 2.0.
Page 11
Easy Scan 19200 Plus
9
4.2. Installing TextBridge Classic 2.0
After the driver installation, the installation menu will remain visible (Figure 6). If this
is not the case, repeat steps 1 to 5 from section 4.1. Proceed as follows to i nst al l
TextBridge.
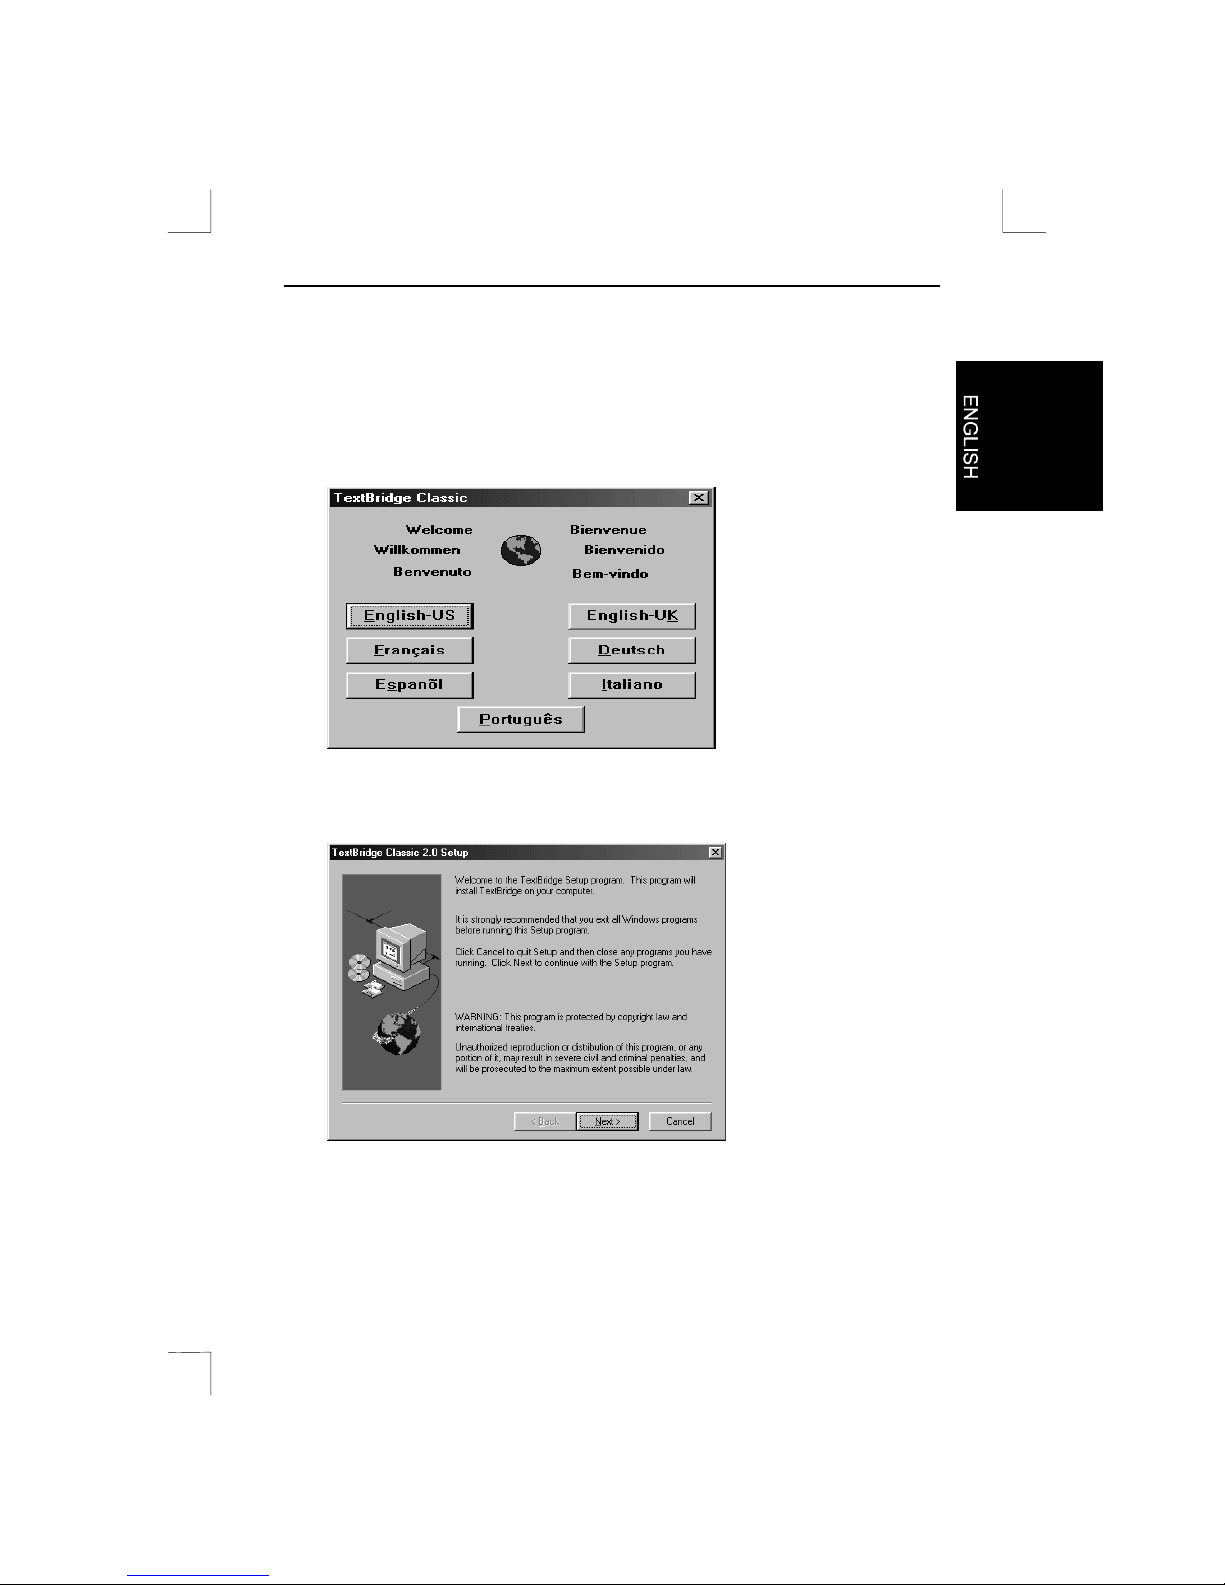
1. In the installation menu (Figure 6), click on ‘TextBridge’. A screen as in Figure 8
is displayed.
Figure 8: Language selecti on
2. Select the language for TextBridge Classic (US English, UK English, French,
Spanish, Itali an, or Portuguese). A screen as in Figure 9 is displayed.
Figure 9: Instal l ing TextBridge Classic 2.0
Page 12

Easy Scan 19200 Plus
10
3. Click on ‘Next’. A screen as in Figure 10 is displayed.
Figure 10: Instal l ing TextBridge Classic 2.0
4. Click on ‘Yes’ to accept the license agreement and continue with the installation.
A screen as in Figure 11 is displayed.
Figure 11: Instal l ing TextBridge Classic 2.0
5. Click on 'Custom' so a bullet appears in the box.
6. Click on 'Next' to select the languages you wish to use for OCR. A new window
is displayed.
Page 13

Easy Scan 19200 Plus
11
7. Click on 'Language packs' to select the languages to use (Figure 12).
Figure 12: Language selecti on
Note
: You will b e able to rec ognize text only in the languages you select at this
point. Once the installation has been completed, you will be a ble t o add
other languages for OCR.
8. Click on ‘Next’ to continue with the installation of TextBridge Classic. A new
window about the registration of TextBridge is displ ayed.
9. Click on 'Next'. A window about product registration is displayed.
10. Click on 'Cancel'. You are asked to confirm the cancellation of the product
registration.
11. Click on 'Yes'. A screen is displayed informing you that you will receive a
registration rem i nder two weeks after the installat ion of TextBridge.
12. Click on 'OK' to complete the installation of TextBridge Classic.
13. Click on ‘OK’ to restart your computer.
14. You have now completed the installation of TextBridge Classic 2.0. Pr oceed
with section 4.3 for t he installation of Adobe PhotoDeluxe 2.0.
Page 14

Easy Scan 19200 Plus
12
4.3. Installing Adobe PhotoDeluxe 2.0
Adobe PhotoDeluxe 2.0 is a program that will enable you to scan and edit images.
Follow the instructi ons below for t he installation of PhotoDeluxe.
1. Insert the ‘Adobe PhotoDeluxe’ CD-ROM into the CD-ROM drive.
2. Using the mouse, click on ‘Start’. Select ‘Run’ if the installat i on does not star t
automati c al ly.
3. On the comm and line, type [D:\AUTORUN.EXE] and click on ‘O K’. A s c r een as
in Figure 13 is displayed.
Figure 13: Language selecti on
Page 15

Easy Scan 19200 Plus
13
4. Select your preferred language and click on ‘Next’. A screen as in Figure 14 is
displayed.
Figure 14: Licence agreement
5. Click on ‘Accept’ to accept the license agreement and continue with the
installat i on. A scr een as in Figure 15 is displ ayed.
Figure 15: Instal ling Adobe PhotoDeluxe 2.0
6. Click on ‘Adobe PhotoDeluxe 2.0’ to start the install at ion.
Page 16

Easy Scan 19200 Plus
14
7. In the next screen, click on ‘Next’. A screen as in Figure 16 is displayed.
Figure 16: Instal ling Adobe PhotoDeluxe 2.0
8. Select ‘Typical’ and click on ‘Next’ to continue. A screen as in Figure 17 is
displayed.
Figure 17: Instal ling Adobe PhotoDeluxe 2.0
9. You are prompted to enter information in this window. The serial num ber can be
found on the CD-ROM box. Click on ‘Next’ to continue.
Page 17

Easy Scan 19200 Plus
15
10. The next screen will ask you to confirm the information you have provided. Click
on ‘Yes’. A screen as in Figure 18 is displayed.
Figure 18: Instal ling Adobe PhotoDeluxe 2.0
11. Click on ‘Next’. A screen as in Figure 19 is displayed.
Figure 19: Instal ling Adobe PhotoDeluxe 2.0
12. Disable the on-line registrati on opt ion for PhotoDeluxe (Figure 19). Click on
‘Finish’ to complete the installation.
13. Click on ‘OK’ to restart your computer.
14. You have now completed the installati on of Adobe PhotoDeluxe 2.0. If you have
a modem, you can regist er the software on-line after installation. For
instructions, r efer to the software m anual supplied on the CD-ROM. Refer to the
next sections for instructions on using the scanner and the applications.
Page 18

Easy Scan 19200 Plus
16
5. Making a scan
To make a scan with the scanner, open the TWAIN dial og box. You can open the
TWAIN dialog box by selecting it f r om the Windows Start menu, or by selecting it
from a TWAIN compati ble application.
For instructi ons on how t o select the scanner and start TWAIN, refer to the manual of
the application you plan to use.
5.1. TWAIN main menu
Go to ‘Start - Programs - Trust Easy Scan 19200 Plus’ and select ‘Trust Easy Scan
19200 Plus’. The TWAIN dial og box is displayed (Figure 20).
Figure 20: TWAIN dialog box main menu
Button Description Function
Prescan Makes a test scan of the image on the glass plate.
Scan Scans the selected area.
Help Help function.
Exit Close the TWAIN dialog box.
Page 19

Easy Scan 19200 Plus
17
Button Description Function
Object Type Normal/Phot o Optim um setting for scanning
photographs.
Newspaper Optim um setting for scanning
newsprint.
Catalog/Magazine Optimum sett i ng f or scanning
magazines.
Art Magazine Optim um setting for scanning art
magazines.
User Define Object User defined settings.
Scan Mode Color Scan colour picture (photogr aphs) .
Gray Scan greyscale values (black & white
photographs).
BW Scan black and white originals ( t ext).
Destination Application Sends the scanned image data to an
application ( e.g. Phot oDeluxe).
Disk Transfers the scanned image data to
a diskette or hard disk drive.
Printer Sends the scanned image data to the
printer.
EMail Sends the scanned image data to an
e-mail address.
Fax Sends the scanned image data to a
fax device.
Clipboard Sends the scanned image data to the
Windows cl ipboard.
Page 20

Easy Scan 19200 Plus
18
Setting Function
Resolution Adjusts resolution.
Scaling Adjusts the size of the scanned image.
Brightness Adjusts the brightness.
Contrast Adjusts the contrast.
5.2. Advanced TWAIN menu
In the TWAIN dialog box (Figure 20) click on the ‘Advanced’ tab. A screen as in
Figure 21 is displayed.
Figure 21: Advanced TWAIN menu
Color
Correction
Select ‘Color Correction’ for a natural reproduction of the colour in
the scanned area.
Batch scan Scan several areas in one pass.
Add area. Select the area for the Prescan.
Remove the active area.
Show properties of the active area.
Page 21

Easy Scan 19200 Plus
19
Button Description Function
Image
enhancement
tools
Gamma Set gamma correction value.
HSV Set colour hue and saturation..
Tone Correct colour.
Mirror Mirror the image vertically.
Zoom Zoom i n on the image.
Invert Show colours in negative.
Levels Adjust colours spread over a 256-colour
scale.
Filter Fi lter out certain colours (red, green, or
blue).
Effects Add effects to the image (blurred or
sharper image).
Page 22

Easy Scan 19200 Plus
20
5.3. Monitor calibration
In the TWAIN dialog box (Figure 20), click on the ‘Monitor’ tab. A screen as in
Figure 22 is displayed. In thi s window you can al t er the colour settings of the scanned
image. When the scanned image is pri nt ed, the colours ar e reproduced exactly as
shown in this window.
Figure 22: M oni t or calibration
Monitor calibration Gamma Adjustment Alter ‘Gamma’ settings.
Gain Adjustment Alter ‘Gain’ settings.
Reset Restore factory settings.
Page 23

Easy Scan 19200 Plus
21
5.4. Preferences
In the TWAIN dialog box (Figure 20), click on the ‘Preferences’ tab. A screen as in
Figure 23 is displayed.
Figure 23: Preferences
Auto Scanning With this feature selected you can make a test scan and
scan an image into an appl i cation with one touch of a
button (on the front of t he scanner).
Area Auto Detection This feature autom at ically detects the size of the scanned
image.
Power Saving This feature automatically switches off the lamp in the
scanner when the TWAIN dialog box is closed. The power
indicator on the scanner remains l i t.
Destination Setting By clicking on thi s i con you can select a pri nt er.
Works onl y if a printer has been connected.
By clicking on this icon you can select a fax
device. Works only if a f ax device has been
connected.
Page 24

Easy Scan 19200 Plus
22
5.5. Making a scan
Proceed as follows to make a scan.
1. Position the image or docum ent face downwards on the glass plate.
2. Using the mouse, click on the ‘Prescan’ button (Figure 20).
3. Select the desired scan mode (colour, greyscale, black & white).
4. Using the mouse, select the scan area in the prescan window.
5. Set the resolution. 300 DPI will be sufficient for most purposes.
6. Using the mouse, click on the ‘Scan’ button to start t he scan. The results are
copied to the currently active application.
Tip:
The scan process can be interrupted by clicking on ‘Cancel’.
Page 25

Easy Scan 19200 Plus
23
6. Wor k ing with Adobe PhotoDe luxe
Adobe PhotoDeluxe is a drawing and image editing program with a l ar ge number of
options. You can use this program to edit the scanned images.
6.1. Initial scanner settings
1. Start the ‘Adobe PhotoDeluxe’ program.
2. Go to ‘File - Open Special - Scan Photo…’ (Figure 24).
Figure 24: Selecti ng TWAIN, starting TWAIN
3. From the window, select ‘Trust Easy Scan 19200 Plus’ (Figure 25).
Figure 25: Scanner selecti on
4. Click on ‘OK’. The TWAIN dialog box is di splayed (Figure 20).
You have now adjusted the scanner settings ready for use.
Page 26

Easy Scan 19200 Plus
24
6.2. Scanning with Adobe PhotoDeluxe
1. Start the ‘Adobe PhotoDeluxe’ program.
2. Position the document to be scanned on the scanner.
3. Click on ‘File’, select ‘Open Special’, and then select ‘Scan Photo...’ (Figure 24).
The TWAIN dialog box is di splayed (Figure20).
4. Click on ‘Prescan’ to make a test scan.
5. Using the mouse, select the area you wish to scan.
6. Set the scan mode to ‘Color mode’.
7. Set the ‘Destination’ to ‘Appli cat ion’.
8. Set the desired resolution (300 dpi recom mended).
9. Click on ‘Scan’. When the scan process has finished, the image data are
transferred to Adobe PhotoDeluxe.
10. When the scanner has finished scanning, cl ick on ‘Exit’ to return to Adobe
PhotoDeluxe. You can now start editing the image.
This has been a short introduction t o t he program. Please refer to the Help feature of
the program for more informat i on. The CD-ROM contains a manual.
Page 27

Easy Scan 19200 Plus
25
7. Wor k ing with TextBridge
TextBridge is a program for scanning text and converting it to a document format for
editing in a word processor. You will find a complete manual on the CD-ROM.
7.1. Settings
1. Start TextBridge.
2. Click on 'File'.
3. Click on 'Select Scanner…'. A new window is displayed.
4. Next, select the 'Trust Easy Scan 19200 Plus’.
5. Click on 'OK'.
6. You can now select the language of the document to be scanned. Click on
'Process'.
7. Click on 'Settings'. A new window is displayed.
8. Click on the 'Processing' tab.
9. Select the language in the 'Process With' box by cli cking on the triangle and
selecting the language (Figure 26).
Figure 26: Language selecti on
10. Click on 'OK'.
11. You have now completed the TextBridge Classic settings. Continue with
section 7.2.
Page 28

Easy Scan 19200 Plus
26
7.2. Scanning with TextBridge Classic
Note:
To show some non-English language characters, e.g. in Polish, ‘Multilanguage Support’ should be selected in Windows. See the Windows
‘Help’ feature for more information. You should also make sure your
application is capable of showing non-English language characters.
1. Position the document to be scanned on the scanner.
2. Click on the button marked 'Auto Process' (Figure 27). A new window is opened.
Figure 27: Auto Process button
3. Select the document type.
4. Set 'Page Source' to 'Scanner' by clicking with the mouse (Figure 28).
Figure 28: Selecti ng 'Page Source'
5. Click on 'OK'. The TWAIN dialog box (Figure 20) is opened.
6. Click on ‘Prescan’ to make a test scan.
7. Using the mouse, select the area you wish to scan.
Page 29

Easy Scan 19200 Plus
27
8. Set ‘Scan Mode’ to ‘BW’ (black & white).
9. Set ‘Destination’ to ‘Application’.
10. Set the resolution to 300 dpi.
11. Click on ‘Scan’.
12. After completing the scan, TextBridge will start the OCR process of the scanned
document and will ask you if you wish to scan additional documents.
13. Click on 'More Pages' or 'Other side' to scan more pages.
14. Click on ‘No More’ to stop scanning. A window is displ ayed asking f or a l ocat ion
to save the scanned text in.
15. Under ‘File Name’, type a name for the text produced.
16. Under ‘Save as Type’ select the format for the file. Select a file format that will
be recognized by your word processor applicati on. I f in doubt, select ‘ASCII Std.
(*.txt)’.
17. Click on ‘Save’ to save the file. This completes the OCR process.
18. Close TextBridge Classic.
In order to edit the scanned text you have just saved to disk, you need a word
processing program. Star t the program and point it t o t he nam e you used to save the
file in step 15.
TextBridge includes a number of advanced options. Refer to the on-line help and the
documentation on the CD-ROM for more information.
Page 30

Easy Scan 19200 Plus
28
8. Maintenance
Clean the glass plate regularly with a soft, clean cloth to remove dust and dirt. A
clean glass plate is important since any dirt will show up in the scanned image.
When cleaning the equipment, observe the following safety m easures:
1. Disconnect the power plug from the mains supply before cleaning the
equipment.
2. Do not use aggressive cleaning liquids, liquid cleansers, or aerosols to clean the
scanner or the glass plate.
Page 31

Easy Scan 19200 Plus
29
9. Troubleshooting
9.1. Testing the scanner
During the installation of the TWAIN driver and the applications, a test program was
also install ed. The test program pr ovides a simple means of checking the correct
operation of the basic features of the scanner.
Note:
The te st p rog ram will be displayed in t he language selected under the
regional settings of your Windows version.
1. Start the ‘Trust Scanner Test Program’. (Star t - Programs - Trust Easy Scan
19200 Plus - Test Program). A screen as in Figure 29 is displayed.
Figure 29: Test Program
2. Click on ‘Test Scanner’. The transport mechanism will m ove up and down once.
Note:
You cannot use the ‘Test Scanner’ button if the interface cable or the
power supply of the scanner are not connected.
3. Click on ‘Test Printer’ if you have install ed a print er on your computer. A
standard text is printed.
4. Press the button on the front of the scanner. The icon in the test program shoul d
light up green.
5. Click on ‘Exit’ to close the test program.
Page 32

Easy Scan 19200 Plus
30
Problem Possible cause Solution
Scan too dark. Monitor set too dark. Adjust t he monitor's brightness.
Incorrect TWAIN settings. Adjust the brightness in the TWAIN
settings menu.
See section 5.
Low-quality scan. Resolution too low. In the TWAIN driver, set the
resolution to at least 300 DPI.
Incorrect TWAIN settings. Adjust the TWAIN settings. See
section 5.
Glass plate dirty. Dirt on the
glass pl ate shows up in the
scanned image.
Thoroughly clean the glass of the
scanner.
Sc anner operates very
slowly.
Computer printer port not set
to EPP.
In the BIOS setup program, change
the printer port of your computer to
EPP. Refer to the computer manual.
High resolution setting. For normal purposes, a maximum
resolution of 600 DPI should suffice.
Use higher resolutions for small
originals only.
Insuffici ent memory. You need a minimum of 16 MB
RAM. Recommended value is 64
MB for Windows 95, 98, and
Windows NT 4.
Error message during
scan.
Hard disk full. You need 3 times the space
required by the scanned image as
free space on you r har d disk drive.
The amount of disk space requi red
can be viewed in the TWAIN
window. Free up disk space or
select a lower resolution.
Res olution set too high. Select a maximum resolution of 600
DPI when scanning an A4 area.
Area selected too large. Use the 4800 or 19200 DPI settings
for small originals only (5x5 mm).
No response from
printer.
Printer is incompatible. The printer connection of the
scanner can pose problems with a
number of printers. Consider adding
a printer port expansion card.
Scanner is not connected to
the mains supply.
Make sure the scanner is connected
to the mains supply.
Page 33

Easy Scan 19200 Plus
31
Problem Possible cause Solution
Printer only works directly
with the Windows interface.
Install a separate printer card, or
connect your printer directly to the
parallel port.
‘Flatbed scanner not
ready’ error message is
displayed.
The inter face cable has not
been connected.
Conn ect the interface cable (see
section 3).
Power supply adapter not
connected.
Connect power supply adapter (see
section 3).
If the above list does not help you solve the problem with your scanner, pl ease
contact your dealer, or visit our Internet site (www.trust.com) to check the FAQ and
the latest version of the driver software. Please have the following inform at i on r eady:
1.
Operating system
2.
Hardware configuration
CPU (MHz)
Memory (MB)
Free hard disk space (MB)
Display adapter: resolution and colour depth
3.
Scanner settings
Scan mode (colour, greyscale, black & whit e)
Resolution (DPI)
Destination (application, printer, etc.)
Size:
4.
Version of TW AIN pr ogr am
5.
Name and version of the applicati on sof t war e
Page 34

Easy Scan 19200 Plus
32
10. Specifications
Type Flatbed, CCD scanner
Optical resolut i on ( H x V) 600 x 1200 DPI
Maximum resolution through
interpolation
19200 DPI
Scan modes
•
1-bit black and whit e
•
12-bit greyscale
•
36-bit colour
Document size 210 x 297 mm (A4)
8.5 x 11 inch (Letter)
Interface Parallel port EPP
Power supply
•
220 Vac - 240 Vac
•
50 - 60 Hz
•
external
Power consumption 15 W
Dimensions (B x H x D) 297 x 93 x 475 mm
Weight (excl. packaging) 2.7 kg
Page 35

Easy Scan 19200 Plus
33
11. Trust Service Centers
Country: Contact:
UK
Ireland
UK Offi c e
Internet www.trust.com
E-mail trustuk@ globalnet.co.uk
Mail Aashima Distr ibution U.K. Ltd.
Trust Support
PO Box 5277
Witham
CM8 3XU
United Kingdom
Fax +44-(0)1376-514633
Italy
Italian Office
Internet www.trust.com
E-mail trusttdp@tin.it
Mail Aashima Italia s.r.l.
Trust Support
via dei Pignattari 174
Blocco 37 CENTERGROSS
Funo di Argelato (BO)
Italia
Fax 051-6635843
France
North Africa
French Office
Internet www.trust.com
E-mail aashimatec@aol.com
Mail Aashima France sarl
Trust Support
BP 50002
95945 Roissy C.D.G.
France
Fax +33-(0) 1-48174918
All other
countries
European Head Office
Internet www.trust.com
E-mail support@aashi ma.nl
Mail Aashima Technology B.V.
Trust Support
P.O. Box 8043
3301 CA Dordrecht
The Netherlands
Fax +31-(0) 78-6543299
Fax +49-(0)2821-58873 (for Germany)
 Loading...