

Page 1

Easy Scan 19200
Easy Scan 19200
User’s Manual
Version 1.2
Page 2

Easy Scan 19200
Copyright
Without the written consent of the manufacturer it is prohibited to
reproduce or transfer any part of this manual in any format, either
electronically or mechanically, as photocopy or recording, in
information or search systems, other than for personal use by the
purchaser.
Liability
The manufacturer accepts no liability for any explicit or implicit
guarantees, including but not limited to the guarantees for saleability
and suitability pertaining to a given objective with respect to the
software, the enclosed product manual or manuals and written
documentation and all other hardware included. The manufacturer
reserves the right to modify or improve its product without prior
warning or ackn owledgement of any kind to third parties.
The manufacturer accepts no liability for any ensuing or accidental
damages, inclu ding damages resulting in any form of business or
commercial forfeiture on the stren gth of use of the product.
All company and product names are trademarks or registered
trademarks of the relevant owners.
01es-gb.doc
Page 3

Easy Scan 19200
Preface
This manual is for users of the Easy Scan 19200. No specific
knowledge is required for installa tion or operation of this product.
This user’s manual uses the following conventions for commands:
‘Configurati on scr een’
Software term, shown on the screen.
<ENTER>
Key that has to be pressed on the keyboard.
[c:\set-up]
A command t hat is to be entered using the
keyboard.
Important information i s given in the form shown below:
Note: The disk should not be formatted.
Page 4

Easy Scan 19200
Blank Page
Page 5

Easy Scan 19200
Contents
1. Introduction....................................................................................1
2. Safety First.....................................................................................2
3. Installing the scanner....................................................................3
3.1 Contents of th e packaging.........................................................3
3.2 Transport safety catch...............................................................3
3.3 Connecti o n.................................................................................3
4. Software installation.....................................................................6
4.1 Installing the TWAIN driver ........................................................6
4.1.1 Windows 3.1x.........................................................................6
4.1.2 Windows 95 / Windows NT.....................................................7
4.2 Installing MGI PhotoSuite SE.....................................................8
4.2.1 Windows 3.1x.........................................................................8
4.2.2 Windows 95 / Windows NT.....................................................9
4.3 Installing TextBridge...................................................................9
4.3.1 Windows 3.1x.........................................................................9
4.3.2 Windows 95 / Windows NT...................................................10
4.4 Installing PaperCom.................................................................12
4.4.1 Windows 3.1x.......................................................................12
4.4.2 Windows 95..........................................................................12
5. Working with MGI PhotoSuite SE ..............................................14
5.1 Once-onl y set-up......................................................................14
5.2 Scanning with MGI PhotoSuite SE...........................................15
6. Working with Tex t Bridge............................................................18
6.1 TextBridge 3.0 OCR for Windows 3.1x....................................18
6.1.1 Once-only set-up of the scanner...........................................18
6.1.2 Producing a scan with TextBridge 3.0 OCR..........................18
6.2 TextBridge Cl assic for Windows 95.........................................20
Page 6

Easy Scan 19200
6.2.1 Setting up the scanne r.......................................................... 20
6.2.2 Scanning with TextBridge Classic.........................................20
7. Working with PaperCom ............................................................22
8. Maintenance.................................................................................23
9. Troublesh ooting..........................................................................24
Appendix A: Technical Specifications...........................................27
Page 7

Easy Scan 19200
1
1. Introduction
The scanner can be used to scan texts an d images. The bundl ed
software enables the scanned images to be edited.
Take time to read this manual thoroughly so th at you can make
optimal use of the scanner’s features.
Note: The scanner does NOT work under DOS, OS/2 or with an
Apple Macintosh computer. You must be running Windows
3.1x, Windows 95 or Windows NT on a PC.
System requirements
Your computer must meet the follo wing minimum requirements for you
to be able to operate this scanner:
• Compatible PC with 486 processor running at 33MHz
• Microsoft Windows 3.1x
• Printer port
• Hard disk with at l east 20 MB free space
• 16 MB RAM
• Graphics card that can display at least 65,535 colours
• CD-ROM drive
Page 8

Easy Scan 19200
2
2. Safety First
Please read the following instructions carefully:
1. Remove the plugs from the sockets before cleaning the
equipment. Do not use liqu id cleaning agents or spray cans.
Wipe off the equipment with a damp cloth.
2. Do not use this equipment in damp environments such as in
bathrooms, damp cellars or at swimming pools etc.
3. Make sure there is nothing on the power cable. Do not place the
equipment where the mains cable may be subject to wear and
tear or become damaged.
4. Never insert objects into the slots on the outside of the equipment
as you can touch live components. This can cause fire or sev ere
electric shocks .
5. Never attempt to repair the equipment yourself. If you open or
remove the housing, you may accidentally touch parts carryi ng a
voltage. You may also face other hazards. Thi s equipment may
only be serviced by special ly trained personnel.
6. Remove the plug from the socket under the following conditions
and have the equipment repaired by specially trained personnel:
a) the cable or the plug has been damaged or worn;
b) liquid has been spilled into the equipment;
c) the equipment has been exposed to rain or water;
d) the equipment is not working normally;
e) the equipment has been dropped and/or the housing is
damaged;
f) the equipment is clearly performing poorly .
7. Do not place the scanner i n direct sunlight. Direct exposure to the
sun or excessive heat can damage the housing.
Page 9
Easy Scan 19200
3
3. Install ing the scanner
3.1 Contents of the packaging
After unpacking you should have the following items:
• Scanner
• Mains adapter
• Interface cable
• CD with drivers and applications
• User’s guide
Contact your dealer if anything is missing or damaged.
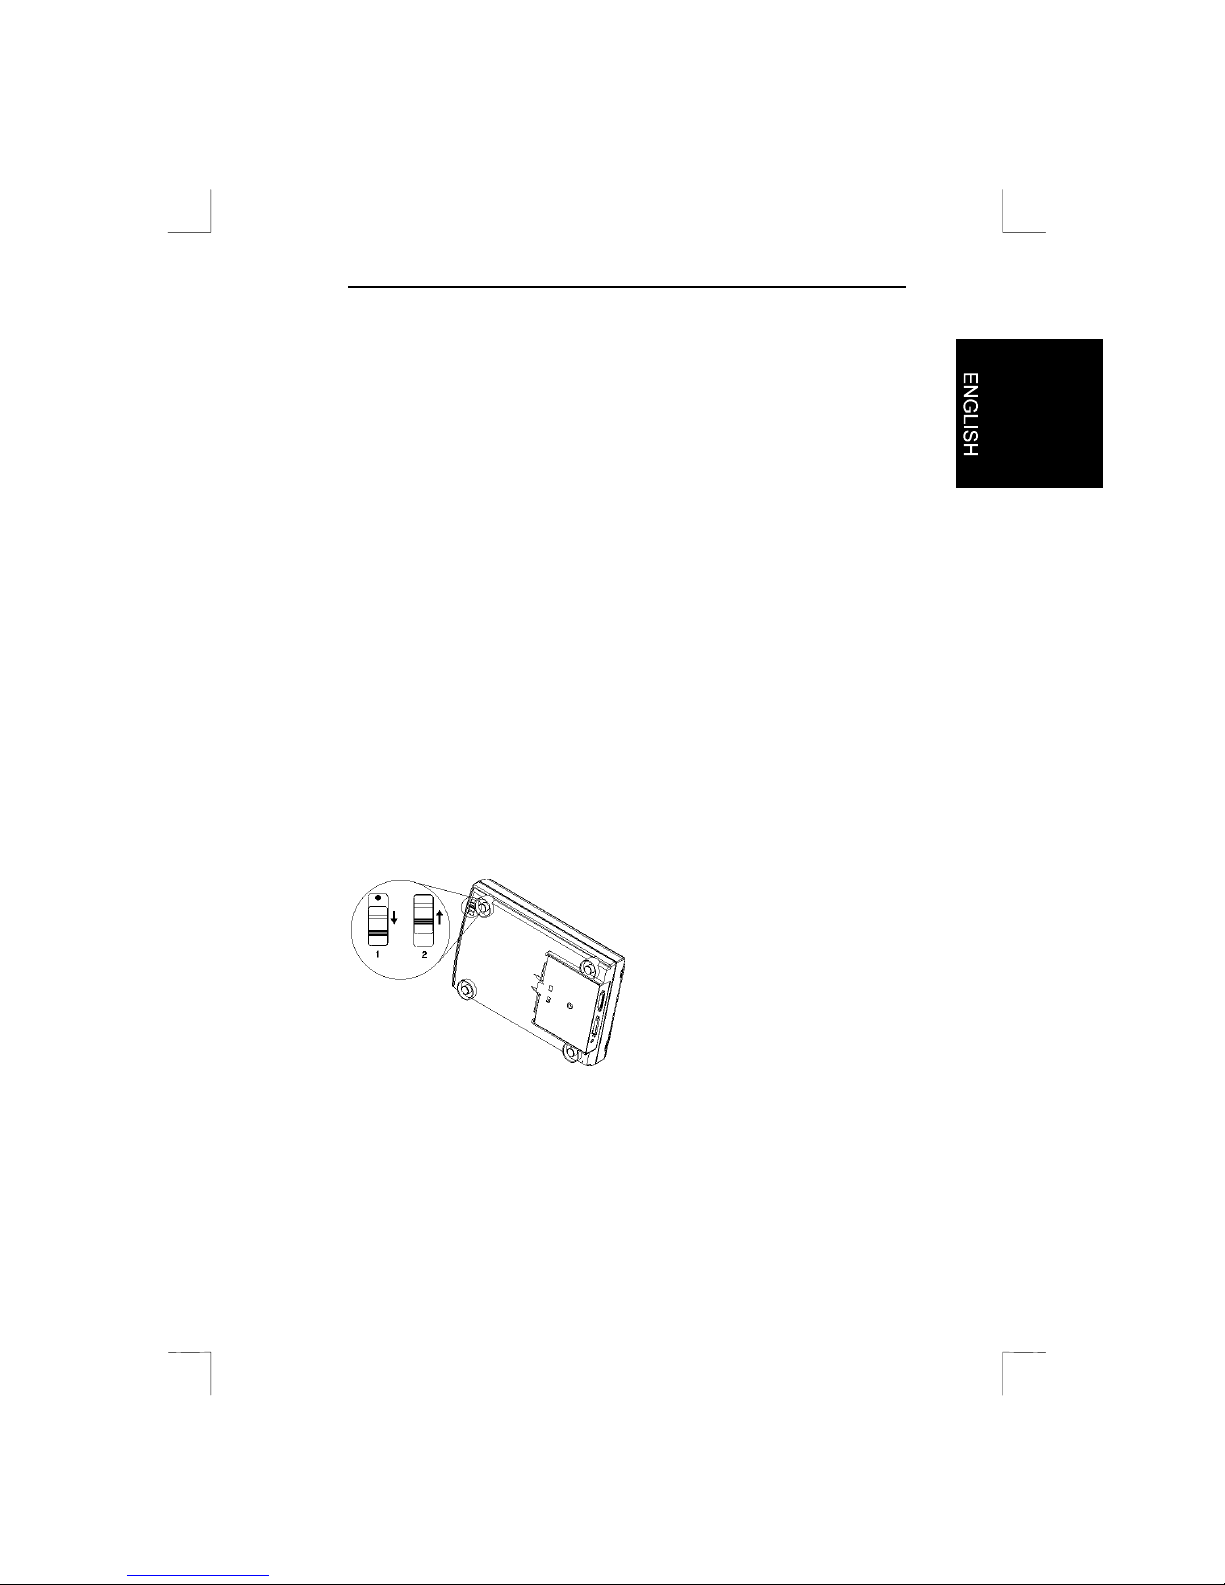
3.2 Transport safety catch
The scanner is delivered with the transport safety catch engaged. This
is position 1 (figure 1). Move this to position 2 to disengage the safety
catch. The switch for the transport safety catch is on the bottom of the
scanner.
Figure 1: Transit safety catch (1 = transport, 2 = operation)
3.3 Connection
Note: Only connect peripherals when the computer is switched off.
Page 10

Easy Scan 19200
4
Proceed as follows to conn ect the scanner to your PC:
1. Switch off the computer and all the peripherals connected.
2. Unplug the printer cable from the parallel port on the rear pan el
of your computer.
3. Connect the printer cable to the ‘Printer’ connection on the rear
panel of the scanner. See figure 2.
4. Now take the scanner cable out of the package. Connect it to the
parallel port of your computer. This is the connection to which
your printer was connected.
5. Conn ect the other end of the cable to the remaining connection
on the scanner. See figure 2.
6. Conn ect the mains adapter cable to the scanner.
7. Then plug the main s adapter into the socket.
Your scan ner and printer are now connected. You are ready to install
the driver and the applications.
Note: The scanner is switched on and off automatically and
therefore has no on/off switch.
Page 11

Easy Scan 19200
5
Figure 2: Connecting the scanner, printer and PC
1. Scanner
2. Mains adapter
3. Scanner cable
4. Computer
5. Printer cable
Page 12

Easy Scan 19200
6
4. Software installation
All the files required to ins tall the drivers and the application software
are on the CD.
Note: It is assumed in the examples that your computer uses the
following drive designations: drive ‘C:’ for the hard disk and
drive ‘D:’ for the CD-ROM drive. Replace these if necessary
by the designations used by your system.
4.1 Installing the TWAIN driver
The TWAIN driver is the software that drives the scanner. All the
applications that work with your scanner use this driver. You must,
therefore, instal l at least the TWAIN driver in order to be able to
operate the scanner.
4.1.1 Windows 3.1x
1. Restart Windows 3.1x.
2. Place the CD in your CD-ROM drive.
3. In ‘Program Manager’ select the ‘Run’ option from the ‘File’
menu. See figure 3.
Figure 3: Installation under Windows 3.1x
4. Type
[D:\SET-UP.EXE]
in the command line and press
<ENTER>
. See figure 4. After a few seconds the installation
program starts. See figure 6.
Page 13

Easy Scan 19200
7
Figure 4: Starting installation under Windows 3.1x
5. Click on ‘Scanner Driver’. The ‘Select Model’ window will appear.
6. Click the button of the 19200 Easy Scan.
7. In the menu select the langu age you want to use and follow the
instructions on the screen. As far as possible choose the values
that the system suggests. Installation takes a few minutes.
8. Restart Windows once installati on is complete.
4.1.2 Windows 95 / Windows NT
1. Restart Windows.
2. Place the CD in your CD-ROM drive. The program usually starts
automatically. If so, go on to item 5.
3. If you r CD-ROM does not start automatically, click ‘Start’ with the
mouse and select ‘Run’.
4. Type
[D:\SET-UP.EXE]
in the command line and press
<ENTER>
. See figure 5. After a few seconds the installation
program starts. See figure 6.
Figure 5: Starting the installation program
5. Click on ‘Scanner Driver’. The ‘Select Model’ window will appear.
6. Click the button of the 19200 Easy Scan.
Page 14

Easy Scan 19200
8
Figure 6: The main screen f or the scanner set-up
7. In the menu select the langu age you want to use and follow the
instructions on the screen during installation. Restart the
computer once installation of the TWAIN driver is complete.
See the next section for details of installing the applications.
4.2 Installing MGI PhotoSuite SE.
MGI PhotoSuite is a program for scanning and editing images.
4.2.1 Windows 3.1x
1. Restart Windows 3.1x.
2. Place the CD in your CD-ROM drive.
3. In ‘Program Manager’ select the ‘Run’ option from the ‘File’
menu. See figure 3.
4. Type
[D:\SET-UP.EXE]
in th e command line. Then click ‘OK’.
See figure 4. After a few seconds, the installation program starts.
See figure 6.
5. Click on ‘Install Application’. A new window will be visible.
6. Click ‘PhotoSuite’.
7. Select the l anguage in which you wish to install
MGI PhotoSuite SE.
Page 15

Easy Scan 19200
9
8. Follow the instructions on the screen. Installation takes a few
minutes.
Now go to the ‘Installing TextBridge’ chapter.
4.2.2 Windows 95 / Windows NT
Note: The MGI PhotoSuite program can also be installed by
starting the program
[D:\editor\ieditor.exe]
.
1. Restart Windows.
2. Place the CD in your CD-ROM drive. The program usually starts
automatically If so, go on to item 5.
3. If you r CD-ROM does not start automaticall y, click ‘Start’ with
the mouse an d select ‘Run’.
4. Type
[D:\SET-UP.EXE]
in the command line and press
<ENTER>
. See figure 5. After a few seconds, the installation
program starts. See figure 6.
5. Click on ‘Install Application’. A new window will be visible.
6. Click ‘MGI PhotoSuite’.
7. Select the l anguage in which you wish to install
MGI PhotoSuite SE.
8. Follow the instructi ons on the screen.
Now go to the ‘Installing TextBridge’ chapter.
4.3 Installing TextBridge
TextBridge is intended for scanning and recognising texts. The
scanned text is converted into real text which you can later edit using a
word processor. Retyping thus becomes superfluous.
4.3.1 Windows 3.1x
1. Restart Windows 3.1x.
2. Place the CD in your CD-ROM drive.
3. In ‘Program Manager’ select the ‘Run’ option from the ‘File’
menu. See figure 3.
4. Type
[D:\SET-UP.EXE]
in th e command line. Then click ‘OK’.
See figure 4. After a few seconds, the installation program starts.
See figure 6.
Page 16

Easy Scan 19200
10
5. Click on ‘Install Application’. A new window will be visible.
6. Click ‘Xerox TextBridge’. The TextBridge installation window is
displayed.
7. Select the language you wish to us e during installation and click
‘OK’. A TextBridge 3.0 OCR installation screen appears.
8. Click ‘Continue’.
9. Click ‘Accept’ to accept the licence agreement.
10. Click ‘Continue’ to install TextBridge 3.0 OCR.
11. Select the languages for OCR recognition (multiple languages
possible). You can only recognise texts in the languages that you
select here.
12. Click ‘Continue’. TextBridge 3.0 OCR is now installed. This takes
a few minutes.
The scanner is automatically recognised by TextBridge. Now go to
the ‘Installing ‘PaperCom’ chapter.
4.3.2 Windows 95 / Windows NT
1. Restart Windows.
2. Place the CD in your CD-ROM drive. The program usually starts
automatically. If so, go on to item 5.
3. If you r CD-ROM does not start automatically, click ‘Start’ with the
mouse and select ‘Run’.
4. Type
[D:\SET-UP.EXE]
in the command line and press
<ENTER>
. See figure 5. After a few seconds, the installation
program starts. See figure 6.
5. Click on ‘Install Application’. A new window will be visible.
6. Click ‘Xerox TextBridge OCR’ with the mouse. After a few
seconds the installation window i s displayed.
7. Select the language you wish to us e during installation and click
‘OK’.
8. In the nex t screen select ‘Full Installation (software and scanner)’
and then click ‘Continue ’. A screen showing the licence
agreement is dis played.
9. Click ‘Yes’ to accept the licence and continue the installation.
Page 17

Easy Scan 19200
11
10. Select the languages for OCR recognition (multiple languages
possible) and click ‘Continue’. You can only recognise text in the
languages that you select here.
11. Click ‘Continue’ to accept the installation folder for TextBri dge
Classic.
12. After installation you have to sel e ct the scanner type. Select
‘TWAIN’ and ‘Continue’. See figure 7. A window showing the
available TWAIN drivers is displayed.
Figure 7: Selecting the input equipment
13. Select ‘Trust Easy Scan 19200 / 32’ from the list and click
‘Select’. A window as in figu re 8 is displayed.
Figure 8: Finish installation
14. Click ‘End’ to finish th e install a tion.
Page 18

Easy Scan 19200
12
4.4 Installing PaperCom
Note: PaperCom does not run under Windows NT 4.0
PaperCom is an application with which you can process a piece of text
or an image from a single menu with the scanner.
4.4.1 Windows 3.1x
1. Restart Windows 3.1x.
2. Place the CD in your CD-ROM drive.
3. In ‘Program Manager’ select the ‘Run’ option from the ‘File’
menu. See figure 3.
4. Type
[D:\SET-UP.EXE]
in th e command line. Then click ‘OK’.
See figure 4. After a few seconds, the installation program starts.
See figure 6.
5. Click on ‘Install Application’. A new window will be visible.
6. Click ‘PaperCom’. A screen is n ow displayed in which you can
choose the language to install.
7. Select the language you wish to us e and press ‘OK’. Follow the
instructions on the screen. I nstallation takes a few minutes. After
installation of the software the PC will be restarted.
You are now ready to use the scanner.
4.4.2 Windows 95
1. Restart Windows.
2. Place the CD in your CD-ROM drive. The program usually starts
automatically. If so, go on to item 5.
3. If you r CD-ROM does not start automatically, click ‘Start’ with the
mouse and select ‘Run’.
4. Type
[D:\SET-UP.EXE]
in the command line and press
<ENTER>
. See figure 5. After a few seconds, the installation
program starts. See figure 6.
5. Click on ‘Install Application’. A new window will be visible.
6. Click ‘PaperCom’. A screen is n ow displayed in which you can
choose the language to install.
7. Select the language you wish to us e and press ‘OK’. Follow the
instructions on the screen. I nstallation takes a few minutes. After
installation of the software the PC will be restarted
You are now ready to use the scanner.
Page 19

Easy Scan 19200
13
Page 20

Easy Scan 19200
14
5. Working with MGI PhotoSuite SE
5.1 Once-only set-up
Proceed as follows to set up MGI PhotoSuite SE for the scanner:
1. Start ‘MGI PhotoSuite SE’. A window as in figure 9 appears.
Figure 9: The location of the ‘Work on your own’
button
2. Click ‘Work on your own’.
3. Click ‘File’.
4. Click ‘Get Photos From ->’.
5. Select ‘Select Source’. See figure 10. A list of available scanners
is displayed.
Figure 10: Setting up the scanner
Page 21

Easy Scan 19200
15
6. From the list select the Trust Easy Scan 19200/16 if you are
running Windows 3.1x or the Trust Easy Scan/32 if you are
running Windows 95 or NT4.
7. Then click ‘Select’.
You can now use your scanner in MGI PhotoSuite SE. The scanner
only has to be set up once.
5.2 Scanning with MGI PhotoSuite SE
1. Start the ‘MGI PhotoSuite SE’ program.
2.
Click ‘Work on your own’. See figure 9.
3.
Click ‘File’.
4. Click ‘Get Photos From ->’.
5. Select ‘Camera/Scanner...”. See figure 10.
6. The ‘TWAIN’ window appears. See figure 12.
7. Place the original that you wish to scan on the scanner’s glass
plate, with th e image downwards (figure 11).
8. Click ‘Preview’. The scanner now produces a test scan.
9. Use the mou se to select the s ize, resolution etc. of the image
that you wish to scan. For images the ‘Colour’ option and 300 dpi
resolution generally yield the best results.
10. Click ‘Scan’. The scanner now begin s to scan.
11. Once the scanner has finished scanning, click ‘Exit’ to return to
PhotoSuite. You can now further edit the image. Please refer to
the on-line help for more information.
This was a brief introduction to the program. Consult the on-line help
for more information.
Page 22

Easy Scan 19200
16
Figure 11: Positioning a document (1 = reference point)
Figure 12: TWAI N window
Page 23

Easy Scan 19200
17
1. Scanning source: Flatbed or transparency
2. Number of colours:
a) Line-Art: black-and-white scanning, to use with an OCR
program such as TextBridge.
b) Diffusion: black-and-white scanning, with the transition
between black and white being spread with small dots. Use
this for black-and-white photos if you need to restrict the
space they take up on the disk.
c) Halftone: black-and-white scanning using dots of varying size
as used for photos in a newspaper. Use this if the i mage h as
to be faxed.
d) GrayScale: scanning in 256 grey scales, to use with black-
and-white photos.
e) True Colour: scanning in 16.7 million colours, for use with
colour photos.
3. Result of the ‘Preview’. Specify the area to be scanned here.
4. Area to be scanned framed in red.
5. Max imum area to be selected.
6. Resolution setting (50 - 9,600 dpi ).The higher the resolution, the
sharper the scan.You are recommended not to use a resolution
above 1,200 dpi.Thi s does not improve sharpness any further
and costs a lot of memory.
7. Brightness: Brightness setting (-50 0 50).
8. Contrast: Contrast setting (-50 0 50).
9. Exit: Close the TWAIN window and return to the application.
10. Scan: Produce a scan of the selected area.
11. Preview: Produce a test scan. The result of this is displayed after
a few seconds in the ‘Preview’ wind ow.
Page 24

Easy Scan 19200
18
6. Working with TextBridge
TextBridge is a program for scanning text and editin g the text with a
text editor or word processor. A detailed user’s guide to the program
can be found on the CD-ROM.
6.1 TextBridge 3.0 OCR for Windows 3.1x
6.1.1 O nce-only set-up of the scanner
1. Start the ‘Scanner Set-u p ’ program in the TextBridge OCR
program group.
2. Click ‘Type’.
3. Select ‘TWAIN’.
4. Then click ‘File’.
5. Select ‘Select Source...’. See figure 13.
Figure 13: Scanner set-u p
6. Select ‘Trust Eas y Scan 19200/16’ and click ‘Select’.
Your TextBridge is now ready to use.
6.1.2 Producing a scan with TextBridge 3. 0 OCR
1. Start ‘TextBridge’ by double-clicking the icon. A screen such as i n
figure 14 appears.
Page 25

Easy Scan 19200
19
Figure 14: TextBridge 3.0 OCR for Windows 3.1x
2. Under ‘Input From’ you must select ‘Scanner’.
3. Deactivate the ‘Save Page Images’ option.
4. Click ‘GO!’ to scan the text. The TWAIN window (see figure 12)
now appears.
5. Click ‘Preview’ to produce a test scan first.
6. Use the mouse to select the text you wi sh to scan. This is usual ly
the whole page.
7. Click ‘Line-art’.
8. Set the resolution to 400 dpi.
9. Now press ‘Scan’ to begin scanning. This takes a few seconds. A
window then appears asking whether you wish to add more
pages. You can now recognise a number of pages of text.
10. Click ‘End’. This ends the scanning process. Now save the
recognised text file so that you can use it with a text editor or
word processor.
11. Under ‘Fil e Name’ type a name for the file consisting of a
maximum of 8 letters.
12. In ‘List Files of Type’ select the file format that your text editor or
word processor can use. The ‘ASCII Std (*.TXT)’ option will
usually work.
13. Press ‘OK’ to save this and to cl ose the scanning session. You
now return to the beginning.
14. Click ‘Exit’ to close TextBridge 3.0 OCR.
Page 26

Easy Scan 19200
20
To edit the scanned text that you have just saved you must open a tex t
editor, for example ‘Notepad’. You can also use your own text editor or
word processor.
6.2 TextBridge Classic for Windows 95
6.2.1 Set t ing up the scanner
The scanner was already set up to use the s oftware duri ng installation
of the application.
6.2.2 Scanning wi t h TextBridge Classic
1. Start TextBridge Classic.
2. Place the docu ment that is to be scanned on the scanner.
3. Press the ‘Go’ button (figure 15) in TextBridge. The TWAIN
window (figure 12) now appears on the screen.
Figure 15: ‘Go’ button
4. Click ‘Preview’ to produce a test scan.
5. Use the mou se to select the area you wish to s can.
6. Click ‘Line-art’.
7. Set the resolution to 300 dpi.
8. Click ‘Scan’. Once scanning is complete, TextBridge Classic asks
whether there is anything else to scan. You can now scan more
pages.
9. Click ‘End’ to finish scanning. Text recognition now starts
automatically . A window then appears asking you to save the text
that has been scanned.
10. Type a name for your text under ‘File Name’.
11. Under ‘Save as Type’ select the file format. You should choose a
file format that is supported by your text editor or word processor.
If in doubt, select ‘ASCII Std. (*.txt)’.
12. Click ‘Save’ to save the file. You have now finished the
recognition process.
Page 27

Easy Scan 19200
21
13. Close TextBridge Classic.
To be able to edit the scanned text you have just been saved you, you
need a text editor or /word processor. Enter the name of the file that
you saved in item 12.
TextBridge also has more advanced options. Refer to the on-line help
and the documen tation on the CD for further information.
Page 28

Easy Scan 19200
22
7. Working with PaperCom
Note: PaperCom does not run under Windows NT 4.0
PaperCom gives you fast access to the scanner’s many functions. You
are hardly required to make any settings. Once PaperCom is running,
a window as in figure 16 is dis played.
Figure 16: PaperCom (Quick Selector) window
Function of the buttons:
1. Close PaperCom
2. To Inbox Manager
3. Start Scan (the action which you chose in items 4 to 11 is carried
out)
4. Set scanning to ‘Inbox’
5. Set scanning to database
6. Set scanning to file
7. Set scanning to your printer (copier function)
8. Set document to be sent by e-mail. You need an e-mail program
and a network or Internet connection for this.
9. Set document to be sent by fax. You need a fax/modem for this.
10. Set scanning and editing of images
11. Set scanning and recognition of text (OCR)
12. Change PaperCom settings
Page 29

Easy Scan 19200
23
8. Maintenance
Clean the glass plate regularly with a soft, clean cloth to remove dust
and other marks. A clean glass plate is important because marks can
be seen in the scanned image.
Observe the follo wing safety measures when cleaning the equipment:
1. Remove the plugs from the sockets before cleaning the
equipment.
2. Do not u se any aggressive liquids to clean the scanner/glass
plate.
3. Do not u se liquid cleaning agents or spray cans.
4. Wipe off the equipment with a damp cloth.
Page 30

Easy Scan 19200
24
9. Troubleshooting
Problem Possible cause Solution
Scan too dark. Scanner not yet
warmed up.
Let the scanner warm up
for a few minutes before
scanning.
Monitor too dark. Change the monitor
brightness.
Brightness in the
TWAIN incorrectly
set.
Set the brightness of the
TWAIN driver.
Scan is of poor
quality.
Resolution too low. Set the resolution of the
TWAIN driver to at least
300 dpi.
Number of colours
on VGA card too
low.
Set your display adapter to
a minimum of 65,536
colours.
Glass plate is dirty. Clean the glass plate.
Scanner working
sluggishly.
Printer port not set
to EPP in the
BIOS.
Consult the user’s guide of
your
computer/motherboard for
details of setting the printer
port in the BIOS.
Resolution is set too
high.
Only use high resolutions
(>300 dpi) for small
originals.
Normally 300 dpi is
sufficient for an image or
text.
Insufficient memory. Minimum 8MB necessary.
16 MB is recommended
for Windows 3.1x or 32
MB for Windows 95.
Page 31

Easy Scan 19200
25
Problem Possible cause Solution
Error message
during the
scanning.
Hard disk full. You need 3 times the
space of the image to be
scanned as free space on
the hard disk.
Free up space on your
hard disk.
Choose a lower resolution.
Resolution is set too
high.
Select a maximum of 300
dpi when scanning an A4
format in colour.
Too large an area
selected.
Select a resolution above
1200 dpi for small originals
only (1.3 x 1.3 cm).
Printer not
respondin g.
Printer
incompatible.
The scanner’s printer
connection can have
problems with a number of
printers.
You are recommended to
add a printer card.
Scanner not
connected to mains.
Ensure that the scanner is
connected to the mains.
Printer working in
accordance with
GUI principle.
Use a separate printer
card.
Connect your printer
directly to the parallel port
when you wish to print.
If you are still having problems with your scanner after having tried
these solutions, contact your dealer or the Trust helpdesk.
Page 32

Easy Scan 19200
26
Before contacting your dealer or the Trust Helpdesk, ensure that you
have the following information on hand.
1. Serial n umber of the scanner
2. Model number of the scanner
3. Operating system
4. Hardware configuration:
a) CPU (MHz)
b) Memory (MB)
c) Free space on the hard disk: (MB)
d) Display adapter: resolution + number of colours
5. Version of TWAIN driver
6. Name and version of application software
Page 33

Easy Scan 19200
27
Appendix A: Technical Specifications
Type Flatbed
Optical resolution (H x V) 600 x 1200 optical
Maximum resol ution (H x V) 19200 x 19200 dpi
Scanning method
• 1 bit black-and-white
• 10 bit grey scale
• 30 bit colour
Document format
• A4
• Letter
Interface
Printer port
Mains source
• 220 Vac - 240 V ac
• 50 - 60 Hz
• External
Output 12 watts
Dimensions (WxHxD) 399 x 73 x 260 mm
Weight (excl. packaging) 2.7 kg
 Loading...