

Page 1
DIRECT WEBSCAN 19200
UK
DE
FR
IT
ES
PL
NL
PT
GR
User’s manual
V
3.0
Page 2

DIRECT WEBSCAN 19200
UK
DE
FR
IT
ES
PL
NL
PT
GR
Thank you for your purchase. Register your product via our Internet site at
www.trust.com/register, so that you will be eligible for optimal guarantee and service support. You
will also be automatically informed of the development of your and other Trust products.
Page 3
DIRECT WEBSCAN 19200
Page 4

DIRECT WEB SCAN 19200
1
UK
Table of contents
1 INTRODUCTION.........................................................................................2
2 SAFETY......................................................................................................2
3 APPROVAL................................................................................................ 2
4 INSTALLATION ..........................................................................................2
4.1 UNINSTALLING OLD DRIVERS AND DEVICES ............................................................. 2
4.2 INSTALLING TWAIN IN WINDOWS 98, WINDOWS ME, W INDOWS 2000 AND WINDOWS
XP 2
4.3 INSTALLING FINEREADER 4.0 SPRINT.....................................................................3
4.4 INSTALLING ULEAD PHOTO EXPRESS 4.0................................................................3
4.5 CONNECTING THE DIRECT WEBSCAN 19200 .....................................................4
5 CHECKING AFTER THE INSTALLATION..................................................5
6 USING THE SCANNER ..............................................................................5
6.1 DIRECT SCAN APPLICATION ...................................................................................5
6.2 TWAIN INTERFACE WINDOW................................................................................. 6
6.3 TWAIN SETTINGS.................................................................................................8
6.4 USING THE SCANNER IN FINEREADER SPRINT.......................................................10
7 MAINTENANCE........................................................................................ 10
8 TROUBLESHOOTING..............................................................................11
9 WARRANTY CONDITIONS ......................................................................14
Page 5

DIRECT WEB SCAN 19200
2
1 Introduction
This instruction manual is for users of the TRUST DI RECT WEBSCAN 19200 V3.0.
The TRUST DIRECT WEBSCAN 19200 V3.0 is a 600x1200 dpi, high r esolution, USB
scanner with a slim-line design. You can use it to produce optimal results with 48-bit
colour scanning.
The Direct Scan buttons on the scanner allow you to easily scan, copy, fax and e-mail
at the touch of a button.
2 Safety
Carefully read the following instructions before use.
- The TRUST DIRECT WEBSCAN 19200 does not req uire any special
maintenance. Use a slightly damp, soft cloth to clean the scanner.
- Do not use aggressive substances, such as white spirit, to clean the device.
These may harm the material.
- Do not submerge the device in liquid. This may be dangerous and will
damage the device. Do not use this device near water.
- Make sure nothing is placed on the cable. Do not use this device in an area
where the cable can become worn or damaged as a result of people walking
over it.
- Do not repair this device yourself. If you open this device, you may touch live
components. This device must only be repaired by qualified personnel.
- Under the following circumstances, have the device repaired by qualified
personnel:
- The cable or plug is damaged or worn.
- The device has come into contact with rain, water or another liquid.
3 Approval
This device meets the essential requirements and other relevant conditions of
the applicable European directives. The Declaration of Conformity (DoC) is
available at www.trust.com/12389/ce.
4 Installation
4.1 Uninstalling old drivers and devices
The most common cause of faults during installation is the presence of a driver for a
similar, old device. The best solution is to first remove all drivers related to old
devices before installing the new driver. Make sure you only delete programs for old,
unused (similar) devices.
1. Enter the Windows ‘Safe Mode’. (Press F8 when starting Windows befor e the
Windows start screen is displayed and select ‘Safe Mode’.)
2. Click on ‘Start – Settings – Control Panel’ and double-click on the
‘Add/Remove Programs’ icon.
3. Find all the programs for similar, old devices and remove these by clicking on
the ‘Add/Remove’ button. When in the ‘Safe Mode’, it is possible for some
programs to appear twice. In that case, remove all the programs which appear
twice.
4. Restart the computer.
4.2 Installing TWAIN in Windows 98, Windows ME,
Windows 2000 and Windows XP
Note: The latest drivers can be downloaded from
www.trust.com/12389. Make sure you use the 12389-03 scanner
version 3.0 (48bit HW) driver. Check whether a new driver is
available and use this for the installation.
Page 6

DIRECT WEB SCAN 19200
3
UK
Note: Make sure all other programs (except Windows) are closed
during the installation.
Note: When installing the Trust Direct Webscan 19200, you must first
install the software and then connect the scanner to your
computer’s USB port.
1. Start Windows.
2. Insert the CD-ROM containing the drivers and the applications into your CDROM drive.
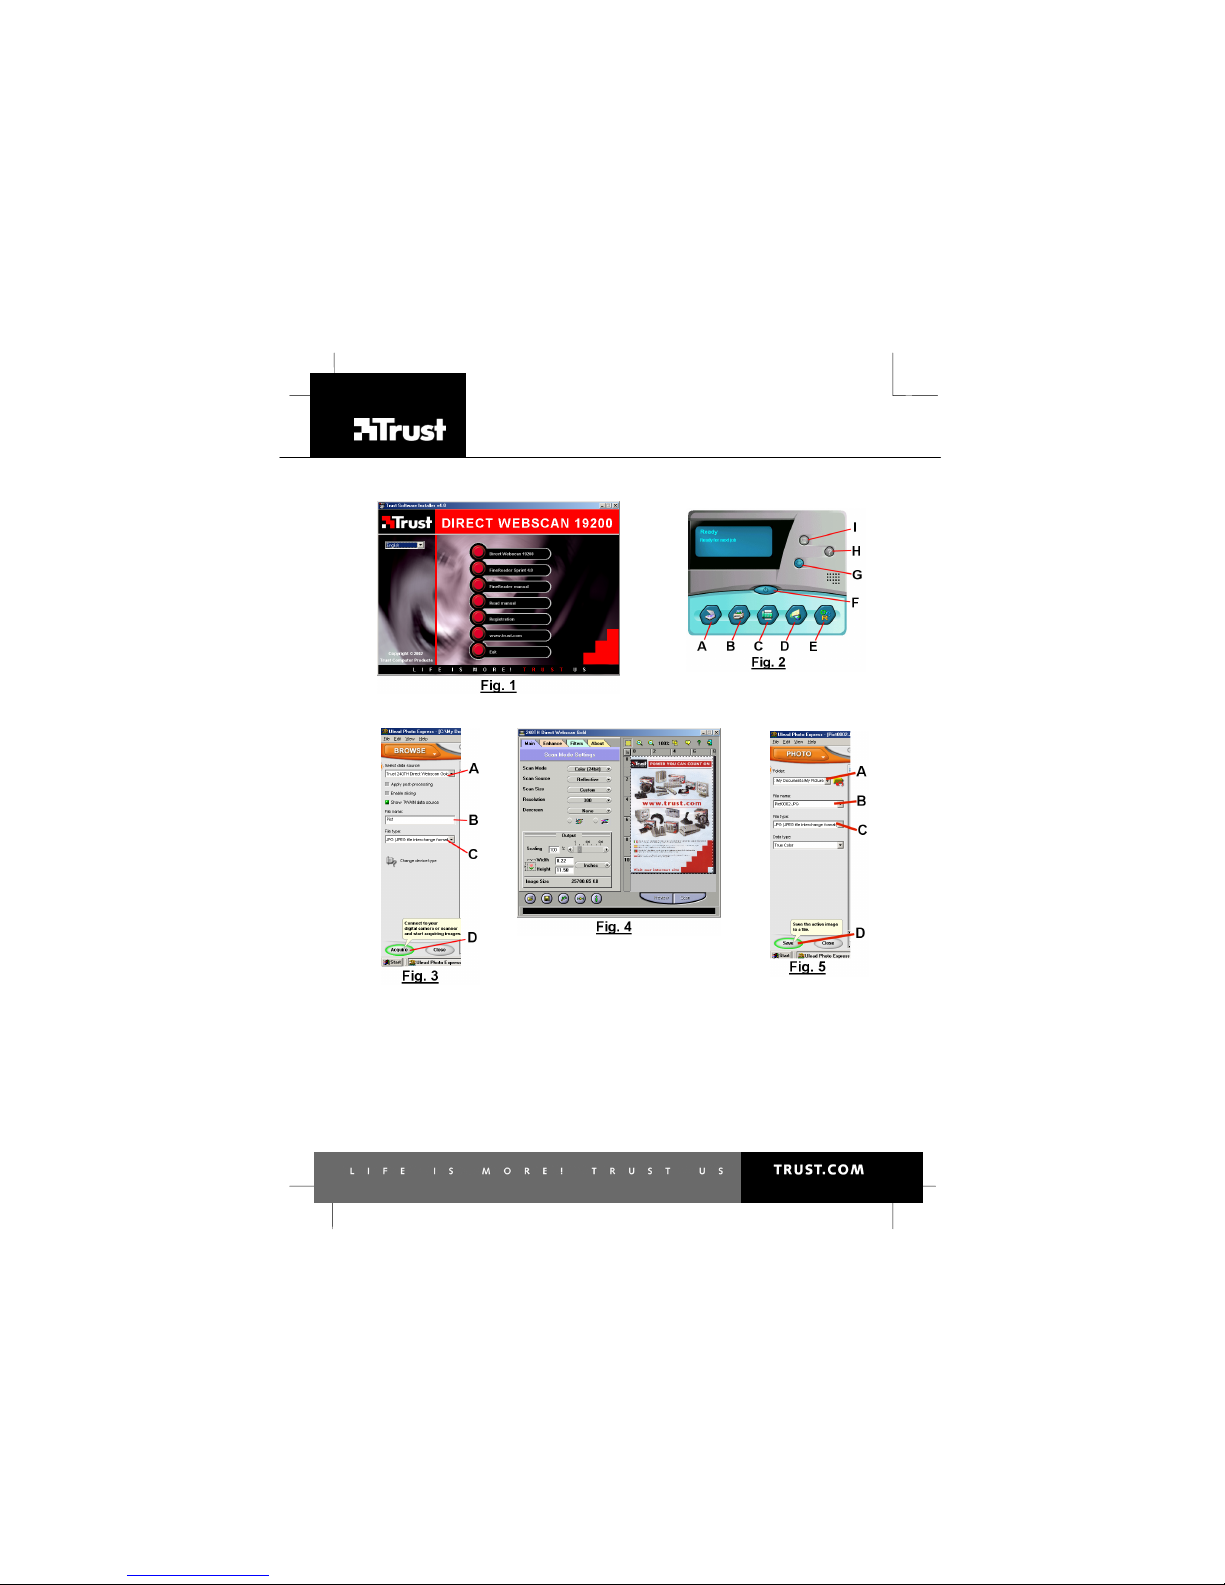
3. The Trust Software Installer will start automatically (see fig ure 1). If it does not
start automatically, select ‘Run’ from the W indows ‘Start’ menu. Type
[D:\SETUP.EXE] and click on ‘OK’.
Note: In the example, ‘D’ is used to indicate the CD-ROM drive. Check
which letter is used to indicate your CD-ROM drive.
4. Click on ‘Direct Webscan 19200’ to start the installation of the TWAIN driver.
5. Select the language version of the TWAIN dr iver you wish to use and click on
'OK'.
6. Click on 'Next' to continue with the installation.
7. Specify a location to save the driver to (if necessary) and click on ‘Next’.
8. Select ‘Custom’ and select both options in the next window. Click on ‘Next’.
9. Specify a location to save the program icons to (if necessary) and click on
‘Next’.
10. Click on ‘Start Install’ to copy the files to the specified location.
11. After the files have been copied, click on ‘Yes’ if you wish to view the
hardware tour. This tour explains how to connect the scanner. Click on ‘No’ to
complete the installation if you do not wish to view the hardware tour.
12. Click on ‘OK’ to complete the installation and restart your computer
You have now completed the installation of the driver. Continue to the next chapter
for instructions on how to install the software and connect the scanner.
4.3 Installing FineReader 4.0 Sprint
FineReader 4.0 Sprint should be installed to make full use of the scanner’s OCR
(Optical Character Recognition) function. FineReader is a program which scans text
and converts it into a text document. This text can then be edited in a word
processing program. The CD-ROM contains a detailed instruction manual for t his
program, which can be viewed via the Trust Software Installer menu (see figure 1).
Follow the instructions given below to install the program.
1. Follow points 1 to 3 in chapter 4.2 to start the Trust Software Installer
2. Click on 'FineReader Sprint 4.0' to start the installation (see fig ure 1).
3. Select the language you wish to use for the installation and click on ‘Next’.
4. Click on 'Agree’ to accept the license agreement and continue with the
installation
5. Fill in your name and possible company name. Click on ‘Next’.
6. Click on ‘Next’ again to confirm your information.
7. Click on ‘Full Installation’ to install all the components.
8. If desired, specify a location to install FineReader to and click on ‘Next’.
9. Click on ‘Next’ again to confirm the location.
10. Click on ‘Go’ to install the program in the specified location.
11. After the program has been installed, you have the option to register online.
Click on ‘Skip’ if you do not wish to register the program.
12. You have now completed the installation. Click on ‘OK’ to close the installation
program.
4.4 Installing Ulead Photo Express 4.0
Ulead Photo Express 4.0 is a drawing and editing program that offers a larg e number
of options. This program can be used to edit your scanner photographs.
Follow the instructions given below to install the program.
Page 7

DIRECT WEB SCAN 19200
4
1. Insert the Ulead Photo Express 4.0 CD-ROM into your CD-ROM drive.
2. This program’s installation window will appear automatically. If it does not
appear automatically, click on ‘Start – Run’, type [D:\SETUP.EXE] and click
on ‘OK’
3. Select the language you wish to use during the installation and click on ‘OK’.
4. Click on 'Next' to continue with the installation.
5. Click on ‘Yes’ to accept the license agreement.
6. Fill in your name and company name. Click on ‘Next’.
Note: The installation will be stopped if you do not fill in a company
name. Always give a company name.
7. If desired, specify a location to install Photo Express in and click on ‘Next’.
8. If desired, specify another location for the program icons and click on 'Next'.
9. Click on ‘Next’ again to confirm all the settings.
10. After the installation, click on ‘Finish’ to complete the installation process.
You have now completed the installation of Ulead Photo Express 4.0. Continue to the
next chapter.
4.5 Connecting the DIRECT WEBSCAN 19200
Note: A USB device is ‘hot-swappable’. This means that the device can
be connected and disconnected from your computer whilst your
computer is turned on.
Note: During installation in Windows 2000 and Windows XP, you may
receive a message saying that the driver has not been signed.
This does not cause a problem for the functionality. If you
register at www.trust.com/12389, you will be inform ed as soon
as a signed driver is available.
Connect the scanner after the software has been installed.
1. Start Windows.
2. Connect the scanner’s USB plug to a free USB port on your computer.
3. New hardware will be detected and the scanner will be automatically installed.
4. In Windows XP, select the option to automatically search for the best driver.
Make sure the Trust installation CD-ROM is inserted into your CD-ROM drive.
5. Windows XP will find the drivers. Select the ‘Trust Direct W ebscan 19200’
driver in the ‘WinXP’ folder on the Trust inst allation CD-ROM and click on
‘Next’.
6. If the driver has not been signed, click on ‘Continue Anyway’ in the next
window. This message will not be displayed if the driver has been signed.
7. Click on ‘Finish’ to complete the installation.
Your scanner is now ready for use.
Page 8

DIRECT WEB SCAN 19200
5
UK
5 Checking after the installation
After installing the device and the driver, the following are installed on your computer
and can be checked:
Taskbar
- Direct Scan icon in the right-hand corner of the W indows taskbar. This icon is not
displayed in Windows XP. In Windows XP, this function is integ rated with the
Scanner and Camera Wizard.
‘Start – Settings – Control Panel’. Double-click on the ‘System’ icon and select the
‘Device Manager’ tab.
- Imaging Devices – Trust Direct Webscan 19200
‘Start – Settings – Control Panel’ and then double-click on the ‘Add/Remove
Programs’ icon.
- Trust Direct Webscan 19200
Start - Programs - Trust - Direct W ebscan 19200
- ‘Help’: help function for the scanner and the Direct Scan software.
- ‘Direct Scan’ icon: click on the Direct Scan icon in the right-hand corner of t he
Windows taskbar to use the scan buttons. This icon is not displayed in W indows XP.
In Windows XP, this function is integrated with the Scanner and Camera W izard.
- ‘Panel’ icon: opens the ‘Direct Scan’ panel.
- ‘Scanner Settings’ icon: opens the settings window for the Direct Scan panel.
- ‘Uninstall Direct Webscan’: removes the TW AIN driver and the applications.
Note: The infor mation given above will vary when the installation has been
altered by the user (for example, not everything has been installed or
locations other than the default locations have been selected).
Note: Deviat ions may also occur as a result of using new drivers available on
the Internet.
Note: The location or name may vary in the ‘Control Panel’ for different
operating systems.
6 Using the scanner
Scans can be made in two different ways using the Trust Direct Webscan 19200,
namely via the Direct Scan application (the easiest way) or via the TWAIN interface
window (more options). See the chapters below for instructions on how to use the
scanner.
6.1 Direct Scan application
The Direct Scan application is the easiest way to scan. With one touch of the butt ons
on the scanner, you can scan a photograph or document and open it in a photo
editing program (Photo Express), send it by fax, print it or send it via e-mail. Follow
the instructions given below.
1. After the software has been installed, a Direct Scan icon will be included in the
Windows taskbar. If this icon is not visible, click on ‘Start – Programs – Trust Direct Webscan 19200’ and select ‘Direct Scan’ from the menu. The scanner
buttons can now be used to make a scan.
Note: The Direct Scan icon is not included in the taskbar in Windows
XP. The Direct Scan function is integrated in the Windows XP
Scanner & Camera Wizard.
Note: You must have installed Photo Express on your computer to be
able to scan directly to this application. See chapter 4 for more
information.
Note: If there is a cross through the Direct Scan icon, then the scanner
has not been connected correctly. Check the USB connection
and, if necessary, restart your computer.
Page 9

DIRECT WEB SCAN 19200
6
2. Double-click on the Direct Scan icon to start the Direct Scan application (see
figure 2). This application includes all the buttons found on the scanner.
3. Place an image in the scanner with the section to be scanned facing the glass
plate and close the lid.
4. Click on one of the scanner buttons or one of the buttons in the Direct Scan
application to scan the image and send it to the specified location.
5. See the table below for a description of the various buttons available in the
Direct Scan application.
Button Function Description
A
Scan Scans the image and sends it directly to Photo
Express. The image can then be edited and
saved on the computer.
Note: Ulead Photo Express must be installed on
your computer.
B
Copy Scans the image and sends it directly to your
printer. Before it is printed, a window appears in
which you can alter various settings.
Note: You must have a printer installed on your
computer to use this option.
C
Fax Scans the image and sends it directly to your fax
application.
Note: You must have an analogue modem
which supports a fax installed on your computer
to use this option.
D
E-mail Scans the image and sends it directly to your
default e-mail program. The image is linked t o
your e-mail message as a JPG file.
E
OCR Scans the text document and sends it to your
default OCR application (FineReader 4.0
Sprint), where the document is converted into a
text file. The text file can now be edited using a
word processing program.
Note: FineReader Sprint must be installed on
your computer.
F
Exit Closes the Direct Scan application.
G
Personal Style Using this button, you can alter various
Windows components to your own
requirements. You can change your start-up
screen, desktop, system logo, screen saver,
shutdown screen, mouse pointers, etc.
H
Help Opens the Direct Scan application’s Help
function.
I
Settings Alters the settings for the Direct Scan
application. For example, you can alter the
scanner, OCR and e-mail settings.
See the Help function (H) for a detailed description of the various components
available in the Direct Scan application.
6.2 TWAIN interface window
The TWAIN interface window has a large number of opt ions for altering the scanner
settings. You can open the TWAIN window by selecting it from the W indows Start
menu or by selecting it from a TWAIN com patible application, such as Ulead Photo
Express.
Page 10

DIRECT WEB SCAN 19200
7
UK
You can read how to select the scanner and start the TWAIN window in the
instruction manual for the application that you use.
Ulead Photo Express 4.0 has many options for editing your scanned images, such
as:
- Adding and altering colour s.
- Adding text to the im age.
- Adding various eff ects to the image, such as ‘Morphing’.
- Making postcards and greet ings cards using the image.
- And many more.
See the Ulead Photo Express instruction manual for a detailed explanation of the
possibilities available with this program. This instruction manual is located in the
‘Manual’ folder on the Ulead CD-ROM. In the ‘Manual’ folder, select the language you
wish to use to read the instruction manual. The instruction manual is located in this
folder in the PDF format. Adobe Acrobat Reader must be installed on your computer
to be able to read the instruction manual. This program can be found on the T rust
Installation CD-ROM in the ‘Acrobat’ folder.
A short description of how the scanner’s TWAIN interf ace window can be opened in
Photo Express is given below.
1. Start Ulead Photo Express.
2. A registration window will appear the first time Photo Express is started. Click
on ‘Register Now’ if you wish to register Photo Express. If you do not wish to
register Photo Express, select ‘Don’t show again’ and click on ‘Register Later’.
3. Click on ‘Get Photo’ at the top of the main menu of Photo Express and select
‘Scanner’
4. The 'Device Type' window will appear only once. Choose the ‘Flatbed
scanner’ option to select the Trust DIRECT WEBSCAN 19200 and click on
'OK'.
5. A number of scanner options will be displayed in the left-hand window of
Photo Express. For ‘Select data source’ (A), select the ‘Trust DIRECT
WEBSCAN 19200’ (see figure 3).
6. For ‘File name’ (B), give a name for the image to be scanned (see figur e 3).
7. For ‘File type’ (C), give a file format for the imag e to be scanned (see figure
3).
Note: If you wish to scan an image with 48 bit colours, the ‘TIF’ file
format must be selected for ‘File type’ (C). This is the only format
which can handle 48 bit colours.
8. Click on ‘Acquire’ (D) to open the scanner’s TWAI N interface window (see
figure 3).
9. In the TWAIN interface window, click on ‘Preview’ to make a preview scan of
the image on the glass plate. This will now be visible in the right-hand window
(see figure 4).
10. A dotted line will automatically appear on the preview scan of the image. This
is the area that will be used when the scan is made. You can also select an
area to be scanned by dragging the mouse over the preview scan (keep the
left mouse button pressed).
11. Alter the settings in the left-hand window as required and then click on ‘Scan’
to scan the selected area with your settings. See chapter 6.3 for the various
TWAIN settings.
12. Close the TWAIN interface window when the scan has been made. The
scanned image will be automatically sent to the editing window of Photo
Express. Double-click on the scanned image to edit it.
13. Click on ‘Edit’ at the top of the main menu of Photo Express. The three
submenus ‘Adjust’, ‘Selection’ and ‘Test’ will appear, in which you have
various options for editing your image.
14. After the image has been edited, you can print it by clicking on ‘Print’ at the
top of the main menu of Photo Express and then selecting ‘Normal’.
Page 11

DIRECT WEB SCAN 19200
8
Note: You must have a printer installed on your computer to use the
‘Print’ option.
15. Click on ‘Share’ at the top of the main menu of Photo Express and select
‘Save’ to save the edited image.
16. In the left-hand window of Photo Express, give the location (A), file name (B)
and the file format (C) and then click on ‘Save’ (D) (see fig ure 5).
You have now made a scan. See the Ulead Photo Express instruction manual for a
detailed explanation of the possibilities available with this program.
6.3 TWAIN settings
The TWAIN interface window contains a number of buttons ( see figure 4). See the
table below for a description of the buttons.
Button Function
Cropping tool Selects an area in the preview window.
Zoom Increases or decreases the size of the image
in the preview window.
Batch scan Makes a number of scans from different areas
of the document. You can scan up to 10
selected areas at the same time.
Language Sets the language for the TW AIN window.
Help Information about the scanner and the
software functions.
Exit Closes the TWAIN dialogue window.
Preview Preview scan.
Scan Makes a scan of the selected area using the
selected settings.
Load Loads the settings.
Save Saves the settings.
Previous Loads the previous settings.
Reset Resets the default settings.
Info Displays information about the settings.
The TWAIN interface also contains a number of tabs for the various settings. See the
chapters below for a description of the various tabs.
6.3.1 Scan Mode Settings (Main)
The ‘Main; Scan Mode Settings’ folder contains the settings necessary for specifying
the scan parameters (see figure 4). See the table below for the various options.
Function Option Description
LineArt
• For scanning text.
• For scanning black-and-white
drawings.
• For using the OCR software.
Grey
• For scanning images in
greyscale.
• For scanning coloured
originals that must be
converted into greyscale.
Scan mode
Colour
24 or 48 bits
For scanning images in colour.
Scan Source Reflective For scanning an image which you
cannot see through (for example, a
photograph).
Page 12

DIRECT WEB SCAN 19200
9
UK
Function Option Description
A4 For setting the scan size to 21 x 29.6
cm.
A5 For setting the scan size to 14.8 x 21
cm.
Letter For setting the scan size to 8.5 x 11
inch.
Scan Size
Custom For setting the scan area in the
selection window yourself.
50 - 19200 For selecting a set resolution. Resolution
Custom For inputting a resolution yourself
between 50 and 19200 dpi.
Note: 2400 dpi is often sufficient to
produce a high-quality scan of a
photograph. Scanning at 19200 dpi
requires a lot of hard disk space and
is only intended for detailed scanning
of small originals (for example,
postage stamps).
None No raster pattern is selected.
Newspaper Selects the raster pattern for a
newspaper.
Magazine Selects the raster pattern for a
magazine or printed material.
Art Print Selects the raster pattern for an art
print.
Descreen
Custom For setting your own raster pattern.
On Displays the true colours of the
image.
Colour Match
Off Increases the colour range. The
image may vary from the original.
Colour
Balance
For maintaining the colour balance between the brightest and
darkest colours.
Scaling For increasing or decreasing the size of the image.
Width &
Height
Displays the height and width of the selected area.
Image Size Displays the computer memory or disk space necessary for
scanning and saving the selected area.
6.3.2 Advanced Settings (Enhance)
The ‘Enhance; Advanced Settings’ folder contains settings which you can apply to the
original image before making the final scan.
This folder also contains two small images of the preview scan. All changes made in
this folder are visible in the right-hand image. See the table below for the various
settings:
Function Option Description
Master The uniform addition or reduction of
all colours.
Channel
selector
Red, green or blue Addition or reduction in the quantity
of the chosen colour.
Brightness For adjusting the brightness of the image.
Contrast For adjusting the contrast of the image.
Level For adjusting the level of the brightness, mid-tones and shadows.
Curve For improving the image quality of grey tints and colour images.
Page 13

DIRECT WEB SCAN 19200
10
Function Option Description
Hue For adjusting the colours red, yellow, green, blue and purple.
Note: This function is not active with 48 bit colour scans.
Saturation For adjusting the clarity of a colour.
Note: This function is not active with 48 bit colour scans.
6.3.3 Image Settings (Filters)
The ‘Filters; Image Settings’ folder contains settings which you can use to produce
special effects. This folder also contains two small images of t he preview scan. The
selected effect is visible in the right-hand image. See the table below for the various
settings:
Option Description
None Default setting. No filt er is selected.
Blur Softens or tones down the image.
Sharpen Adds more detail to hazy images.
Invert Converts the colours int o their complement colours.
Flip Produces a horizontal mirror image of the image.
Emboss Sinks or raises elements in the image.
Unsharp Mask Searches for ang les in the image and emphasizes them.
6.4 Using the scanner in FineReader Sprint
You can use the OCR (Optical Character Recognition) program FineReader Sprint
4.0 to convert scanned text documents to digital text documents, which can then be
edited in a word processing program.
See the FineReader Sprint 4.0 instruction manual for a detailed explanation of the
options available with this program. This can be selected in the Trust Software
Installer menu which starts automatically when the Trust Installation CD-ROM is
inserted into your CD-ROM drive. The program also contains a detailed Help
function.
7 Maintenance
Regularly clean the glass plate with a soft, clean cloth to remove dust, fingerprints
and other dirt. It is important to keep the glass plate clean, because dirt on the glass
plate will be visible in the scanned image.
Note: Do not use any aggressive liquids, liquid cleaning products or
sprays to clean the scanner or the glass plate.
Page 14

DIRECT WEB SCAN 19200
11
UK
8 Troubleshooting
Method
1. Read the solutions given below.
2. Check for up-to-date FAQ’s, drivers and instruction manuals on
the Internet (www.trust.com/12389).
The scanner
does not
function after
being connected
to the USB port.
Scanner connected to
the USB port of the
computer before the
TWAIN driver and the
applications were
installed.
Remove the scanner from the
USB port, first install the TW AIN
driver and the applications, and
then connect the scanner. See
chapter 4.
Scanner cannot
be installed in
Windows 2000 or
Windows XP.
You have no
‘administrator’ rights to
the Windows 2000 or
Windows XP system.
Make sure you are logged on as
‘administrator’ before installing
the scanner.
The USB port is
switched off in the BIOS
of your computer.
Consult the manual of your
computer for switching on the
USB port.
Windows does
not detect any
new hardware
after the scanner
is connected.
The scanner has
already been partially
installed in your
computer.
Start up the computer in the safe
mode, remove all setup program
files of the scanner and restart
the computer.
Scanner is not properly
connected to the
computer.
Connect the scanner to the USB
port of the computer correctly
(see chapter 4).
The computer
does not
recognise the
scanner.
Wrong Windows version
in the computer.
The USB scanner will not function
in Windows 95 and NT. Only use
the scanner in Windows 98, Me,
2000 or XP.
USB cable is not
properly connected.
Connect the USB cable properly.
See chapter 4.
The error report
‘The scanner is
not connected’
appears.
The driver of the
scanner has not been
installed properly.
Reinstall the TWAIN driver. See
chapter 4.
The scan
command is not
carried out.
Scanner not properly
connected to the
computer.
Check whether the scanner is
properly connected. See chapter
4.
Computer
crashes when
using USB.
USB scanner interferes
with other USB devices.
Set the other devices to a
different address in the BIOS of
the computer or switch them off.
Consult the manual of your
computer for this.
Monitor is set too dark. Change the brightness on the
monitor.
Scan result is
too dark.
The number of colours
of your screen is set too
low.
Set your screen adapter to a
minimum of 65,535 colours (16
bits).
Scan result is
poor quality
.
Resolution set too low. Set the resolution to a minimum
of 300 DPI.
Problem Cause Possible solution
Page 15

DIRECT WEB SCAN 19200
12
Problem Cause Possible solution
Number of colours of
your screen adapter is
set too low.
Set your screen adapter to a
minimum of 65,535 colours (16
bits).
poor quality.
Surface of the glass is
dirty. All dirt on the glass
plate is visible in the
image.
Clean the glass of the scanner
thoroughly. See chapter 7.
Set for a very high
resolution.
In practise, a resolution of 2400
dpi, at maximum, is sufficient.
Use higher solutions only for
small original images.
Scanner
functions slowly.
Insufficient memory. You need a minimum of 32MB
RAM memory. 64MB or more is
recommended.
Hard disk is full. You need 3 times the space of
the image to be scanned as free
space on the hard disk. Free up
more space on the hard disk or
select a lower resolution.
Error report
during scanning.
Resolution is too high. In practise, a resolution of 2400
dpi, at maximum, is sufficient.
Use higher solutions only for
small original images.
A cross is visible
through the
Direct Scan icon
and the
application does
not start.
Scanner is not correctly
connected to the USB
port.
Connect the scanner to the USB
port correctly. See chapter 4.
An error
message is
displayed when
clicking on the
‘Scan’ button in
the Direct Scan
application.
No editing software
(Photo Express) has
been installed.
Install the editing software (Ulead
Photo Express). See chapter 4.
An error
message is
displayed when
clicking on the
‘Copy’ button in
the Direct Scan
application.
No printer installed in
your computer.
Install a printer in your computer.
An error
message is
displayed when
clicking on the
‘Fax’ button in
the Direct Scan
application.
No modem or fax has
been installed in your
computer.
Install a modem and fax in your
computer.
Page 16

DIRECT WEB SCAN 19200
13
UK
Problem Cause Possible solution
An error
message is
displayed when
clicking on ‘Email’ button in
Direct Scan
application.
No E-mail application
installed in your
computer.
Install an E-mail application in
your computer, e.g. Outlook
Express or Netscape.
USB printer no
longer functions
after installation
of USB scanner.
Driver of the scanner
may cause problems.
First uninstall the printer and
scanner; now install the scanner,
then reinstall the USB printer.
An error
message is
displayed when
clicking on the
‘OCR’ button in
the Direct Scan
application.
No OCR software
(FineReader 4.0 Sprint)
has been installed on
your computer.
Install the OCR software
‘FineReader 4.0 Sprint’. See
chapter 4.
Resolution set too low. Use a higher resolution when
scanning the document.
Poor OCR result.
Wrong recognition
language installed.
Install the desired recognition
languages of the OCR program.
See the FineReader 4.0 Sprint
instruction manual.
Scanner does
not function on a
notebook.
Notebook battery
voltage is not sufficient
for USB scanner.
Use an external USB hub with
power adapter.
The scanner no
longer functions
after use of a
USB extension
cable.
A USB cable may not be
longer than 3 to 5
metres.
Remove the USB extension
cable.
If you still have problems after trying these solutions, please contact one of the T rust
Customer Care Centers. You can find more information at the back of this instruction
manual. Please have the following information available:
• The item number. This is Item no 12389-03
• A good description of what does not work.
• A good description of when the problem occurs.
Page 17

DIRECT WEB SCAN 19200
14
9 Warranty conditions
- Our products have a two-year manufacturer's warranty which is effective from
the date of purchase.
- If there is a fault, return the product to your dealer and include an explanation
of the fault, the proof of purchase and all the accessories.
- During the warranty period, you will receive a similar model, if one is available.
If no similar product is available, your product will be repaired.
- Please contact our help desk for missing components, such as the inst ruction
manual, software or other components.
- The warranty becomes invalid if the product has been opened, if there is
mechanical damage, if the product has been misused, if alter ations have been
made to the product, if the product has been repaired by a third party, in the
case of negligence or if the product has been used for a purpose other than
that originally intended.
- Excluded from the warranty:
• Damage caused by accidents or disasters, such as fire, flood,
earthquakes, war, vandalism or theft.
• Incompatibility with other hardware/software which is not stated in the
minimum system requirements.
• Accessories, such as batteries, fuses (if applicable).
- Under no circumstances will the manufacturer be held responsible for any
incidental or consequential damage, including the loss of income or ot her
commercial losses resulting from the use of this product.
Copyright disclaimer
Reproduction of this manual or any part of it is prohibited without permission
from Trust International B.V.
Page 18

SERVICE CENTRE
24 HOURS free service: www.trust.com
Residents in the UK and Ireland should contact:
Mon - Fri
From 8:00 - 16:00
UK Office
Phone +44-(0)845-6090036
Fax +31-(0)78-6543299
I residenti in Italia possono contattare:
lun - ven
9:00 – 17:00
Ufficio italiano
Telefono +39-(0)51-6635947
Fax +31-(0)78-6543299
Les habitants de la France et de l’Afrique du Nord peuvent contacter :
Lundi-vendredi
De 9:00 à 17:00
Bureau français
Téléphone +33-(0)825-083080
Fax +31-(0)78-6543299
Kontaktadresse für Einwohner Deutschlands:
Mo – Fr
9:00 - 17:00
Deutsche Geschäftsstelle
Telefon +49-(0)2821-58835
Fax +31-(0)78-6543299
Los habitantes de España pueden ponerse en contacto con:
lun – viernes
De las 9:00 a las 17:00
horas
Oficina española
Teléfono +34-(0)902-160937
Fax +31-(0)78-6543299
Osoby mieszkające na terytorium Polski powinny skontaktować się:
Pon do pią
w godz 09:00-17:00
Biuro w Polska
Tel +48-(0)22-8739812
Fax +31-(0)78-6543299
Inwoners van Nederland kunnen contact opnemen met:
ma – vr
9:00 - 17:00 uur
Kantoor Nederland
Tel +31 (0)78-6543387
Fax +31-(0)78-6543299
All other countries / Alle anderen Länder / Tous les autres pays
Tutti gli altri paesi / Todos los demás países / Alle andere landen
Mon - Fri
From 9:00 - 17:00
European Head Office
Phone +31-(0)78-6549999
Fax +31-(0)78-6543299
 Loading...