

Page 1

DC-4700 POWERCAM OPTICAL ZOOM
1
Digital Camera User’s Manual
All specifications and information are subject to changes without further notice
Page 2

DC-4700 POWERCAM OPTICAL ZOOM
2
Warning
TO PREVENT THE RISK OF FIRE OR ELECTRIC SHOCK, DO NOT EXPOSE THE UNIT
TO RAIN OR MOISTURE
FOR AMERICAN USERS AND CANADA
This equipment has been tested and found to comply with the limits for a Class B digital
device, pursuant to Part 15 of the FCC rules. These limits are designed to provide
reasonable protection against harmful interference in a residential installation. This
equipment generates uses and can radiate radio frequency energy and, if not installed and
used in accordance with the instructions, may cause harmful interference to radio
communications. However, there is no guarantee that interference will not occur in a
particular installation. If this equipment does cause harmful interference to radio or
television reception, which can be determined by turning the equipment off and on, the
user is encouraged to try to correct the interference by one or more of the following
measures:
Reorient or relocate the receiving antenna.
Increase the separation between the equipment and receiver.
Connect the equipment into an outlet on a circuit different from that to which the
receiver is connected.
Consult the dealer or an experienced radio/TV technician for help.
Chargers or modifications not expressly approved by the party responsible for compliance
could void the user’s authority to operate the equipment.
Page 3

DC-4700 POWERCAM OPTICAL ZOOM
3
Contents
1. Quick Start for using camera 4
Identifying the parts 4
Charging battery pack 6
Battery pack installation and uninstallation 6
SD Memory Card installation and uninstallation
7
Formatting an SD card
7
Camera power on/off
8
Date and Time configuration
8
Language selection
8
2. Basic Still Image Capturing 9
Zoom to desired image sizes 9
Digital Zoom for further enlargement
9
Hot-keys for more selections
9
Shooting without the use of LCD monitor
10
Advanced still image shooting
10
3. Video capturing 13
Basic video capturing 13
Advanced video capturing
13
4. Replay recorded image/video 14
Delete Picture 14
Scale up picture
14
Configuration Menu
14
5. Choose Images to Print 16
6. Installing USB Driver Software (For Windows 98SE only) 17
7. View or download Image file to PC 17
8. More Camera Settings 18
9. Specifications
20
Page 4
DC-4700 POWERCAM OPTICAL ZOOM
4
1. Quick Start for using camera
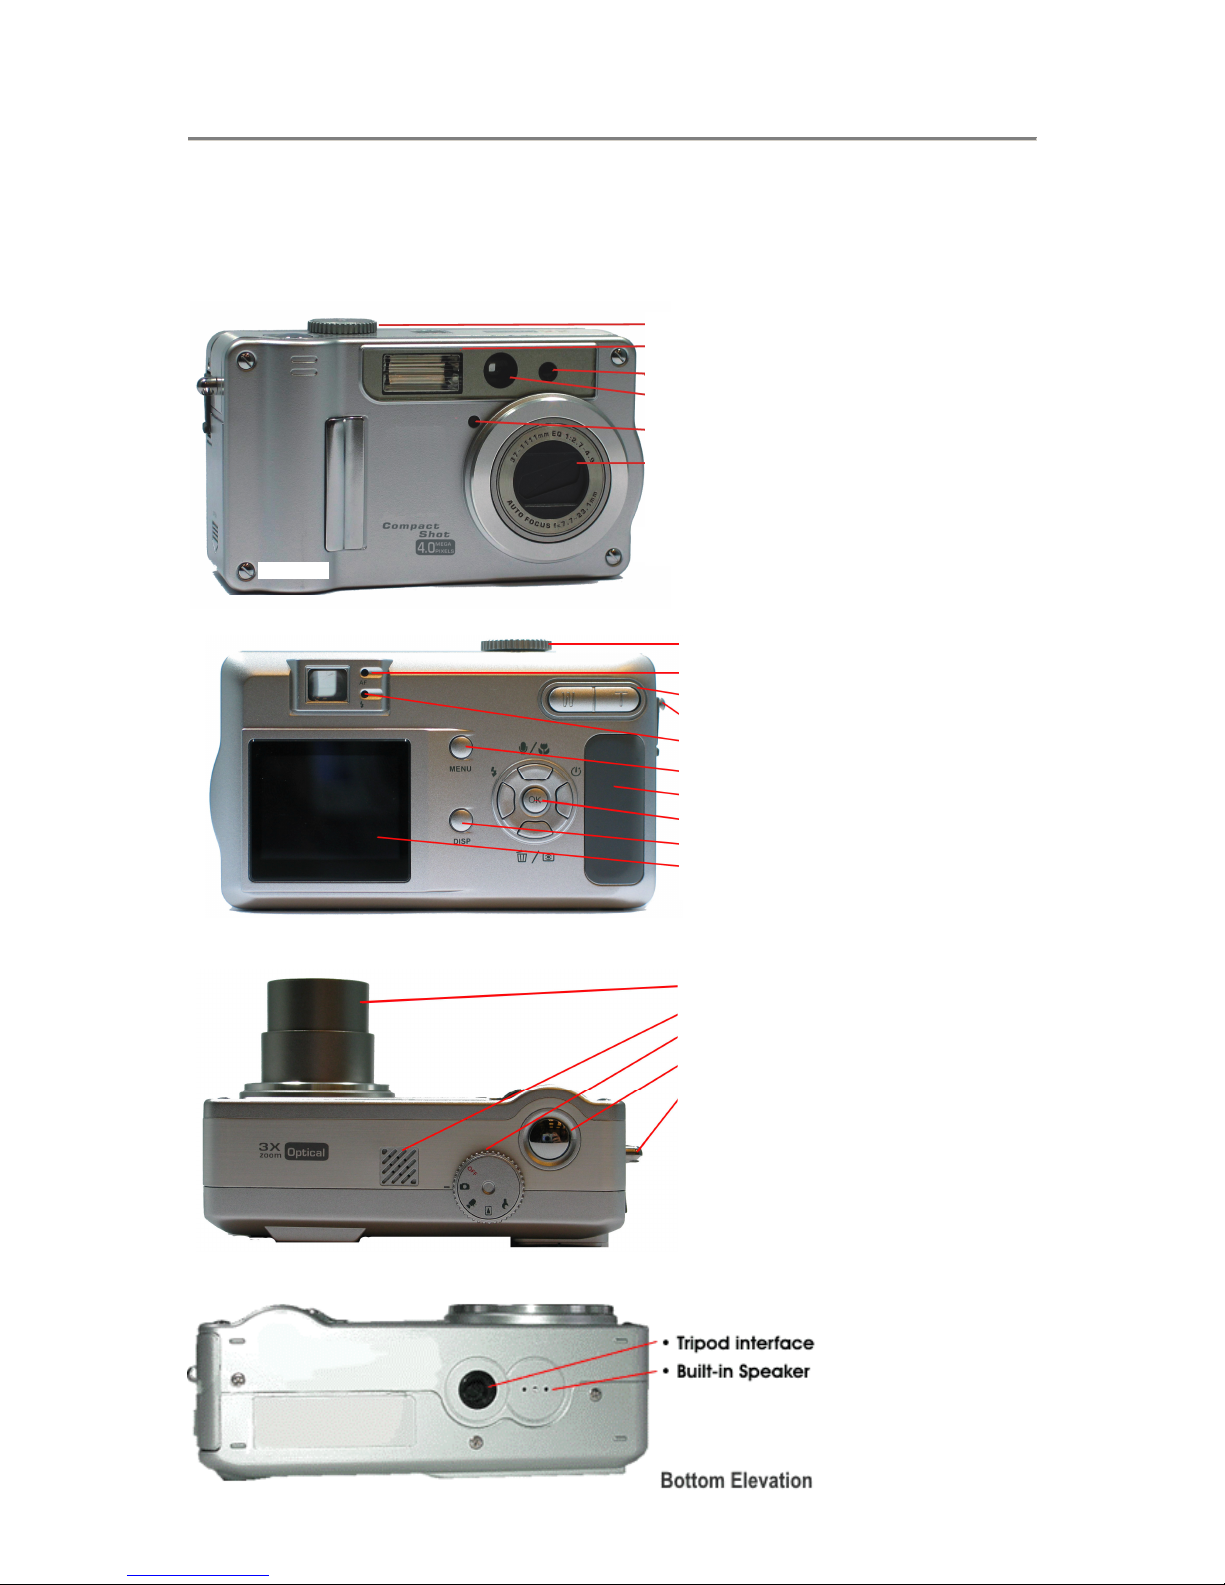
Identifying the parts
- Knowing your camera and its features
Zoom Lens
Microphone
Mode Dial
Shutter
Strap holder ringlet
Mode Dial
Flash
AF assisted LED
Optical ViewFinder
Self-Timer LED
Zoom Lens
Mode Dial
Optical Viewfinder
Zoom Key
Strap Holder ringlet
AF & Flash LEDs
Menu Key
Rubber grip
Control Pad
Display Key
LCD panel
Rear Elevation
Top Elevation
Front Elevation
Page 5
DC-4700 POWERCAM OPTICAL ZOOM
5
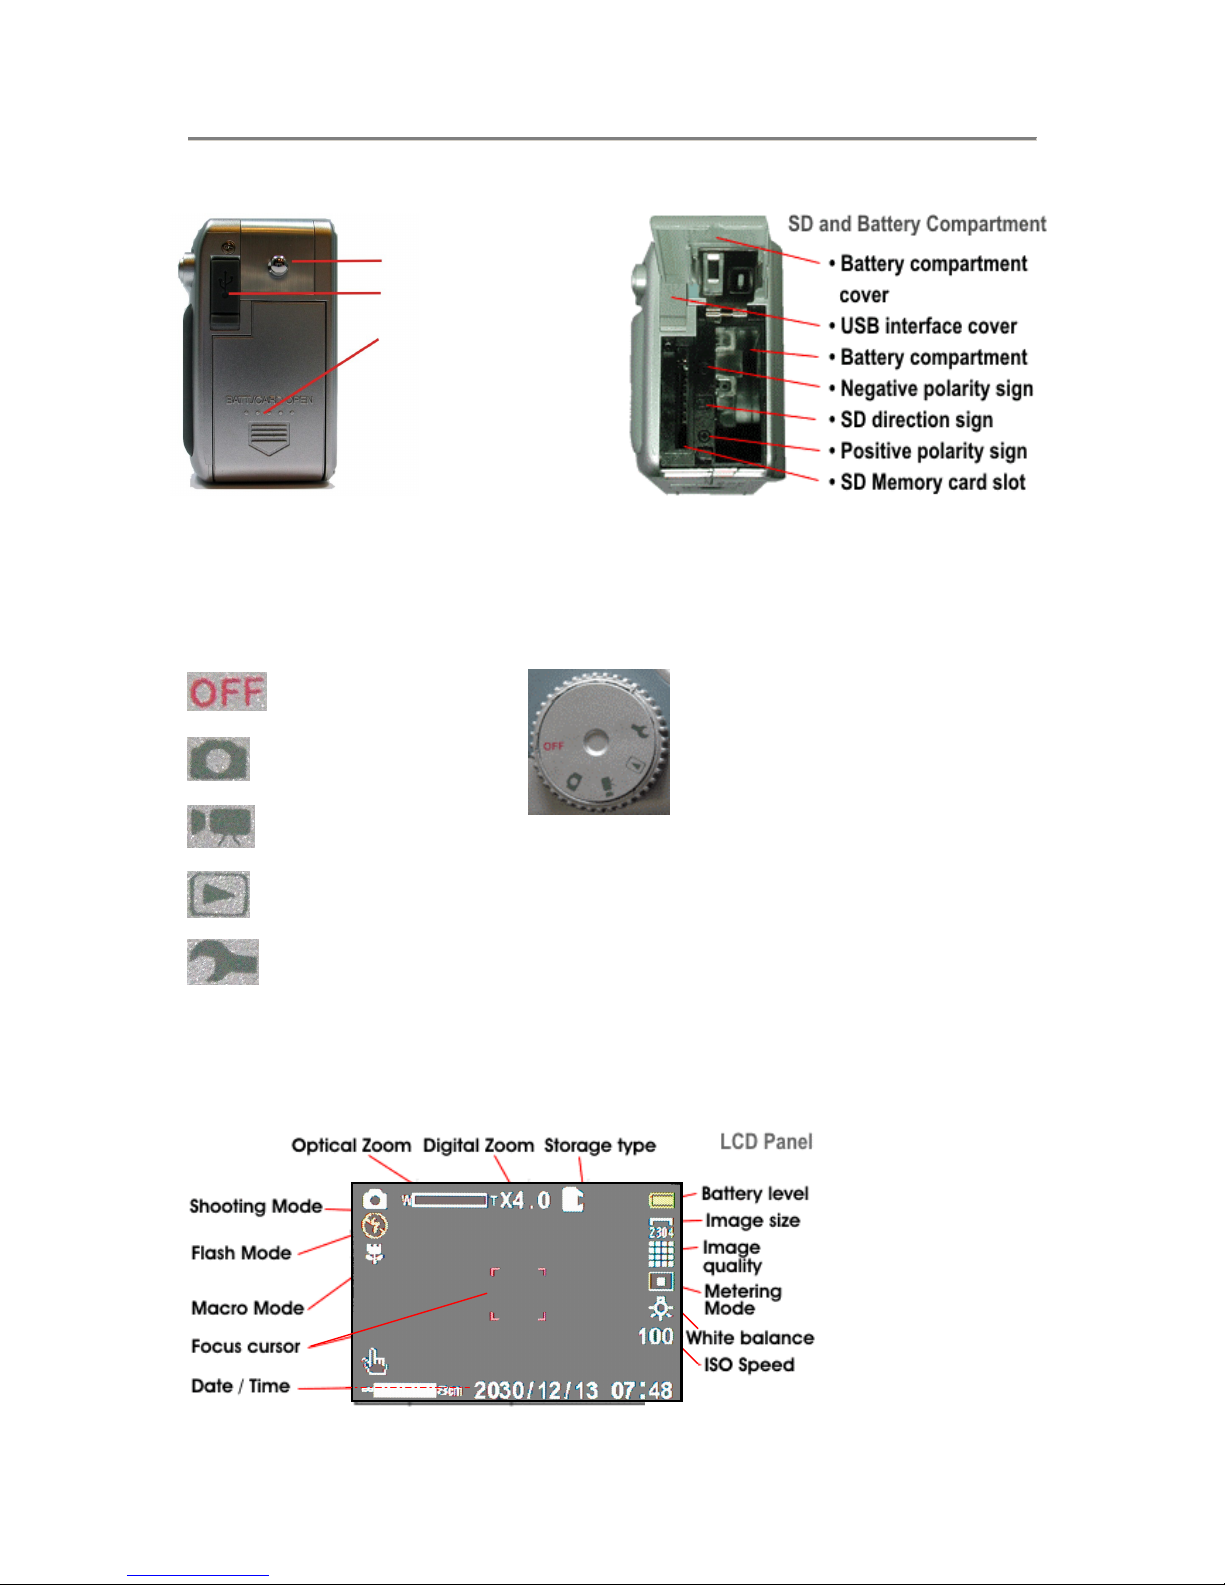
Mode Dial
- Power Off
- Still Image Mode
- Video Mode
- Playback Mode
- Setup Mode
LCD Panel icons representation
Strap holder ringlet
USB rubber cover
Mini USB interface
SD MemoryCard and
Battery compartment
door
End Elevation
Page 6
DC-4700 POWERCAM OPTICAL ZOOM
6
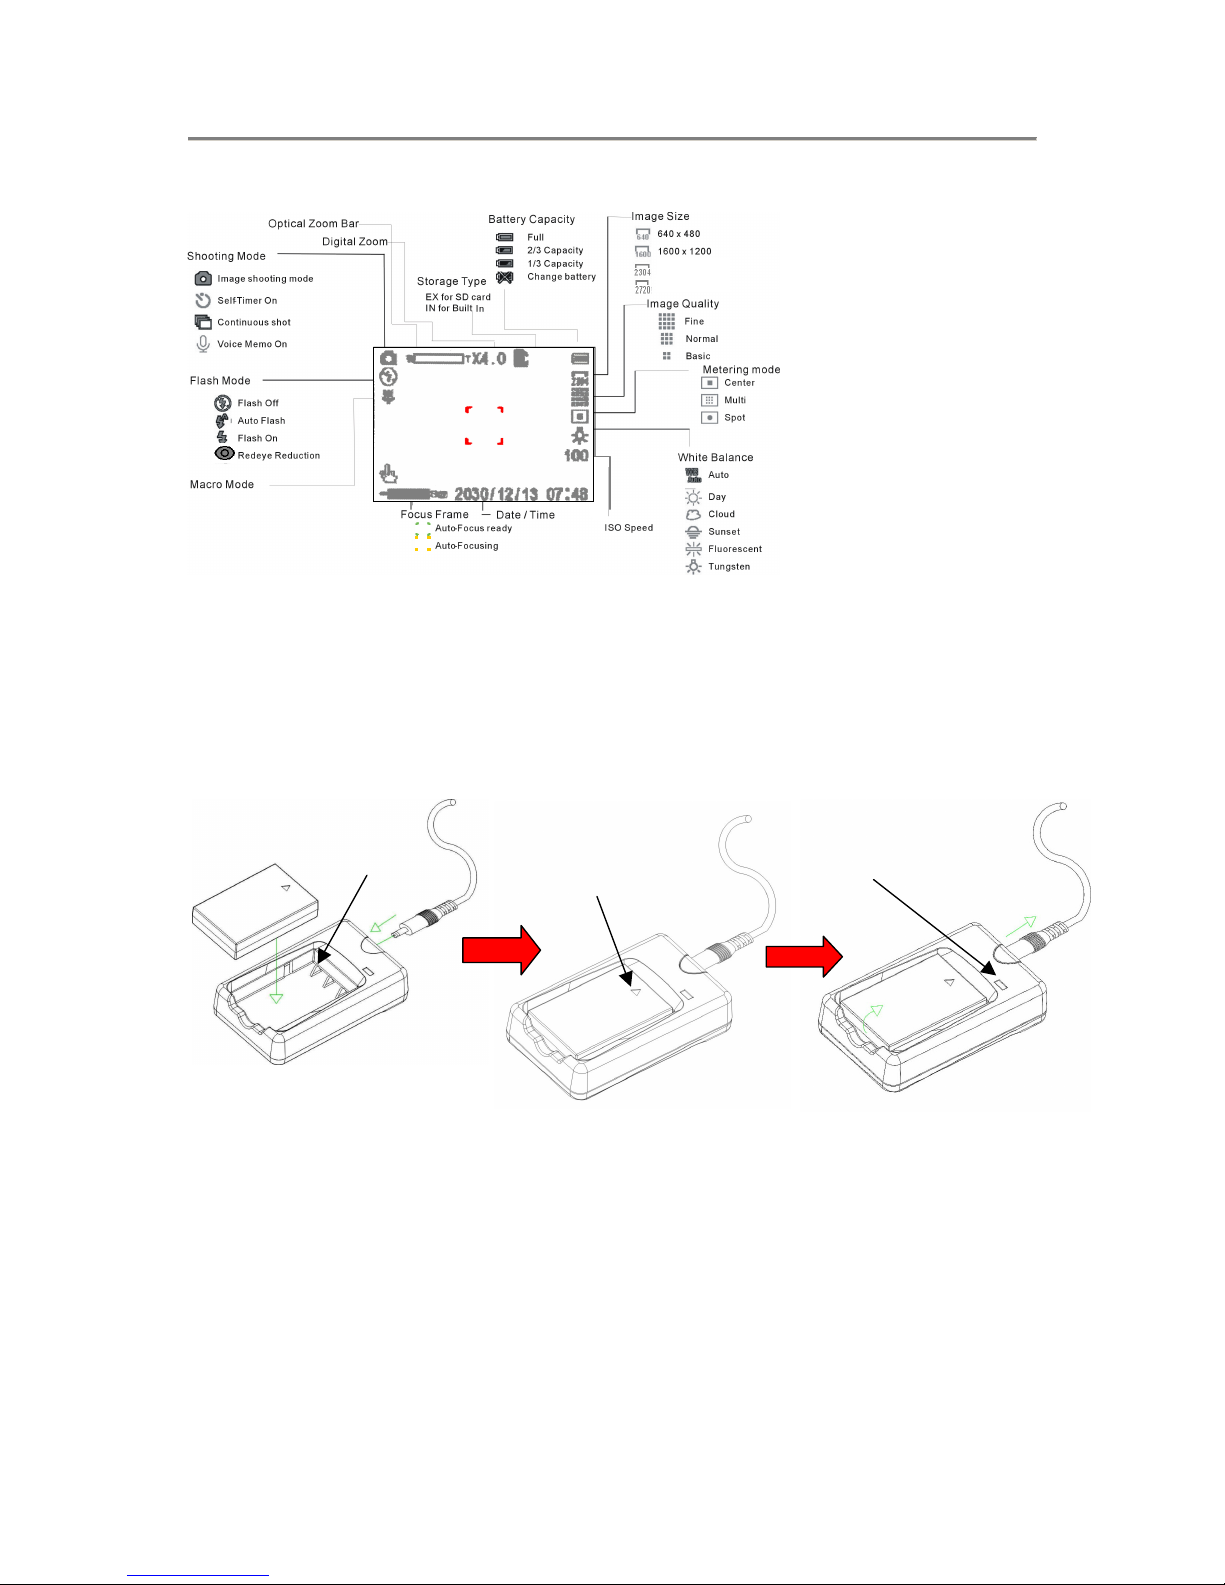
LCD Status icons
Charging battery pack
1. Connect the AC plug cord to the battery charger and insert the power plug into the power source outlet.
2. Insert the battery pack (NB-1L model) into the charger as illustrated below with the arrow symbol
pointing towards the charging point.
3. The Charging will begin once power is turned on and the LED will turn red in colour.
4. Once completed, remove the battery pack from the battery charger.
Battery pack installation and uninstallation
- Be sure to turn off your camera when open the battery/SD card cover
1. Open the Battery compartment / SD Card cover by sliding the cover in the direction of the printed arrow.
2. Slide in (Arrow side facing the front of the camera) or Pull out the battery pack from the battery
compartment.
3. Close the Battery compartment / SD Card cover by closing the cover and slide back towards the body to
lock.
Charging Points
A
rrow pointing towards Charging Points
Red LED will light up during charging
2304 x 1712
2720 x 2016
Page 7

DC-4700 POWERCAM OPTICAL ZOOM
7
Open battery compartment cover
on the digital camera side.
Insert the Battery pack
Close the battery compartment cover.
SD Memory Card installation and uninstallation
- Be sure to turn off your camera when opening the Battery compartment / SD card cover
1. Open the Battery compartment / SD Card cover by sliding the cover in the direction of the arrow
2. Install the SD Memory card by inserting it into the SD slot in the same position as the printed image in the
compartment.
3. Close the Battery / SD Card cover
Note: There are 16MB of built-in memory in the camera, it is only used when are no SD card inserted.
Open battery compartment cover
on the digital camera side.
Insert the card all the way
Close battery compartment
cover.
Formatting an SD card
1. Insert the SD Card and close the Battery / SD card cover
2. Turn the Mode Dial to the
(playback mode)
3. Press the Menu Key and the Delete menu will appear first which is the default.
4. Select
DELETE, and then press f: OK
5. Choose Format from the list, press f: OK and then Ye s to confirm formatting the card.
6. Note: Use with care. If there are no SD Card in the camera, it will proceed to erase the images in the
camera’s own memory.
Camera power on/off
1. Turn the Mode Dial to any of the function modes and Digital Camera will be powered on.
2. Turn the Mode Dial
to power off camera
Mode Dial
Push In
Mark
1
2
3
Push In
1
2
3
Page 8

DC-4700 POWERCAM OPTICAL ZOOM
8
Power Saving
Camera has power saving. To wake up, press Shutter.
Date and Time configuration
1. Turn the Mode Dial to Setup mode
2. Press d to
DATE FORMAT, and then press OK or f
3. Press cd and then OK to set Date/Time format. Press OK
4. Press d to DATE/TIME, and then press OK or f
5. Press cd to change and press efto select.
6. Press OK to store.
7. To exit, turn the Mode Dial to another mode or
to shutdown the camera.
Language selection
1. Turn the Mode Dial on the top to Setup mode
2. Press d to “abc – LANGUAGE”, and then press OK or f
3. Press cd and then OK to set the language
4. To exit, turn the Mode Dial to another mode or
to shutdown the camera
Page 9

DC-4700 POWERCAM OPTICAL ZOOM
9
2. Basic Still Image Capturing
- Capturing your favorite or important moments or subjects of concern
1. Turn the Mode Dial to
(Still Image Capturing mode), and LCD will be automatically turned on
with a red focus cursor in the center.
2. Frame your subject in your preferred pose and hold the camera steadily with both hands
3. Ensure the lens and flash are not blocked by your finger or strap.
4. Press and hold the shutter button halfway down to lock the focusing on the subject.
When the focus cursor turned to green, the focus has been adjusted and is ready for
image capturing., or check AF LED.
5. Press the shutter button fully to capture the image.
Zoom to the desired image sizes
Press for telephoto; zoom in your subject, or
Press
for wide angle; capturing an entire scenery or coverage.
Digital Zoom for further enlargement
Press continuously until the end of the scale and press further to enter into the Digital Zoom mode.
(5 step digital zoom: 1.6x, 2.2x, 2.8x, 3.4x and 4.0x). The subject image will be digitally enlarge and
enhance with the Digital zoom feature.
Press
to reduce the scale of the Digital zoom, and exit the Digital Zoom mode.
Hot-keys for more selections
Press c to enable Macro mode
Macro Mode
– For close-up photography (10-50 cm)
Press e
for using flash mode
Auto
Fill-in
Auto with the redeye reduction
Off
Press f
to enable Self-timer or press twice to enable Continue shots, or press three times to
enable voice memo
Self-timer
1. The enabled Self-timer icon will be displayed at top left corner of the LCD
2. Press the shutter button to begin the countdown.
Shutter button
Page 10

DC-4700 POWERCAM OPTICAL ZOOM
10
Continue shots
– Camera takes 3 continuous shots after the shutter button is depressed.
Voice mode
– For recording voice memo after picture capturing (within 15 sec). Press
Shutter to stop recording.
Press d
to enable Manual focus mode
Press
to focus the subject manually, and then depress the shutter when ready to capture
the image.
Under this function, auto-focus function is disabled.
Shooting without the use of LCD monitor
- Capturing images without the use of the LCD panel
1. Press the DISP
key twice to turn off LCD.
2. Use the Viewfinder to frame and position the subject.
3. When ready, press the Shutter button to take the picture.
Advanced Still Image Shooting
- Press Menu Key to turn on/off Menu and use Control Button to configure settings:
Remark: LCD monitor must turn on.
Image Size
Select the different sizes for your images; the larger the resolution, the better the quality but the file size
is also increased. If the resolution is increased, the image quality will improve, but the number of images
can be taken will decrease due to the large image file size. Select the resolution according to the desired
image quality and purpose.
Image Quality
3 different quality selections for your different imaging requirements. Even if the same resolution is
used, you can change the image quality to increase or decrease the image file size so that you can
capture less or more images. Select the image quality according to the desired image quality and
purpose.
2720 x 2016
2304 x 1712
1600 x 1200
640 x 480
Page 11

DC-4700 POWERCAM OPTICAL ZOOM
11
Fine
Normal
Basic
Metering
3 different ways of measuring your subject (s) light exposure levels.
Center
Center-weight: light is measured from the entire shooting screen, but gives more importance to
the values near the center.
Multi
Multi-section: light is measured by sampling from multiple areas of the entire shooting screen.
Spot
Spot light: You can compose the picture and capture the image after first measuring the light only
at the center spot of the LCD monitor.
White Balance
This digital camera automatically adjusts the white balance under most lighting conditions. For manual
adjustments, the White Balance adjustments allow the camera to adjust to many different light
conditions that affects the subject exposure.
EV Offset
When capturing images, you can make the image lighter or darker by setting the exposure level before a
shot is taken.
-1.5 to 1.5 step 0.3
ISO
The ISO sensitivity is default to set automatically according to the brightness of the subject. However,
the ISO sensibility can be fixed at the equivalent of ISO 100 or 200 for further flexibility in capturing
your image.
Auto
100
200
Auto
Daylight
Cloudy
Sunset
Fluorescent
Tungsten
Page 12

DC-4700 POWERCAM OPTICAL ZOOM
12
Sharpness
This adjustment makes the subject sharper, and clearer before a shot is taken for different subject
themes.
Sharpen
Medium
Low
Color Effect
There are 3 types of color effects that can be applied to your images before capturing.
Normal
Natural and normal color condition
W/B
Make your picture only color in back & white
Sepia
Make you picture in sepia
Self-Timer
Take your subject (s) with this hands-off feature. Set the self-timer in seconds before the camera takes
the shot by itself without the need to depress the shutter.
Default to 10 sec, or User defined (0-59 sec)
Focus Select
You can determine the focus position (s) when you want the subject to offset from the center of LCD
monitor for more creative pose (s).
Left
Center
Right
All
Page 13

DC-4700 POWERCAM OPTICAL ZOOM
13
3. Video Capturing
Basic video capturing
1. Turn the Mode Dial at the top to the Video mode, and LCD will be turned on.
2. Hold the camera steadily with both hands and frame the subject (s)
3. Press the shutter button to start video capturing with clock count at top-left corner of the LCD panel.
4. Press the shutter again to stop the recording.
Advanced video capturing
- Press Menu Key to turn on/off Menu and use Control Pad to configure settings:
Image Size
Adjust the size level to suit your recording file sizes. If the resolution is increased, the video quality will
improve, but the remaining volume of memory that can be taken will decrease. Select the resolution
according to the desired quality and purpose.
Normal
Low
Image Quality
Set to Fine for high quality image results and Normal for average quality, balancing pixels and file sizes.
Even if the same resolution is used, you can change the image quality to increase or decrease the image
data so that you can clip less or more images. Select the image quality according to the desired image
quality and purpose.
Fine
Normal
Page 14

DC-4700 POWERCAM OPTICAL ZOOM
14
4. Replay recorded image/video
1. Turn the Mode Dial at the top to Playback mode, and LCD will be turned on and display 9-index
of stored pictures
2. Press cdef to select the picture/video, and then press OK to enlarge the picture/video, and then can
use ef to scroll the pictures or press
to return to 9-index
Note:
denotes there is voice memo recorded with the image file
denotes this is a video file
Delete Picture by pressing Hot-key
1. Turn the Mode Dial at the top to Playback mode, and LCD will be turned on and display 9-index of
stored pictures
2. Press cdef to select the picture/video, and then press OK to enlarge the picture/video
3. Press d to delete the specified picture
Using the Zoom Key to scale up picture
1. Turn the Mode Dial at the top to Playback mode, and LCD will be turned on and display 9-index of
stored pictures
2. Press cdef to select the picture/video, and then press OK to enlarge the picture/video
3. Constantly press
to enlarge the picture with icon x1.0 (zoom 1.6x, 2.0x, 3.2x, 4.0x)
4. Press
to reduce scale of the picture
Back to 9-Index
Press to return to 9-index display mode
Turn on Configuration Menu in Playback mode
- Press Menu Key to turn on/off Menu and use Control Pad to configure settings:
Delete
You can erase data that is stored on the built-in memory or SD card if you no longer need it. Either
format the internal memory or SD Memory Card
Single
All
Format
Page 15

DC-4700 POWERCAM OPTICAL ZOOM
15
Voice Memo
Play recorded voice memo or add/replace voice memo onto the image file.
Record
Play
Erase
Protect
Add this secure function to each file to make it inerasable/erasable.
Single On
All On
Single Off
All Off
DPOF
You can mark still images that you want to have printed. This function is convenient when you have
images printed at a shop or using a printer that conforms to the DPOF (Digital Print Order Format)
standard.
Note: Use DPOF with memory card only
Single On
All On
Single Off
All Off
Slide Show
Make and run a slide show on the LCD panel; Default on 3 sec (can be set to 03-59 seconds)
Page 16

DC-4700 POWERCAM OPTICAL ZOOM
16
5. Choose Images to Print
- You can mark still images that you want to have printed. This function is convenient when you have images
printed at a shop or using a printer that conforms to the DPOF (Digital Print Order Format) standard.
Turn the Mode Dial on the top to
Playback mode, and LCD will be turned on and show 9-index of
pictures
Press cdef to select the picture/video, and then press OK to enlarge the picture/video
Press Menu Key and then select
DPOF function
Select quantity (0-99) of copies.
Select the setting of what you desire, and press OK
If DPOF enable, then configure the quantity of copy
Note: You can not mark video file.
Page 17

DC-4700 POWERCAM OPTICAL ZOOM
17
6. Installing USB Driver Software (For Windows 98SE only)
· Install the software only if you are using Windows 98SE. If you are using Windows ME/2000/XP, you do
not need to install it.
· Do not connect the Camera to your Computer before installing the Camera Driver.
1. Turn on your computer and start Windows 98SE
2. Insert the Driver CD-ROM supplied into the CD-ROM drive.
3. The installation program will start automatically. If the installation program does not start automatically,
go to your desktop and double click on My Computer CD-ROM to start it.
4. Click the “Camera Driver” to start installing the driver.
5. Reboot your computer after the installation completes.
6. After restarting, connect the camera and PC using the USB cable supplied and turn on the camera.
Windows will locate the driver and complete the installation.
7. View or download Image file to PC
- You must install the USB driver if you are using Windows 98SE, refer to chapter 6 for more details.
1. Turn off the camera
2. Use the supplied USB interface cable and connect between the camera’s Mini-USB interface and the USB
port of your computer.
Turn on the camera.
3. When the camera connected to your computer, it will function as a Mass Storage Device (MSD). MSD is
similar to a standard storage device and allows you to view, copy, and delete files between your camera
and your computer.
4. View and download image files via Windows Explorer under Windows® 98SE/ME/2000/XP system.
To USB connector on PC
Page 18

DC-4700 POWERCAM OPTICAL ZOOM
18
8. More Camera Settings
Turn the Mode Dial on the top to Setup
mode, and use Control Pad to configure settings.
Auto Power Off
Default 1 minute or User defined, set to 0 to disable Auto Power Off (0-5 min; steps of 30 sec)
Language
English
French
Germany
Italian
Spanish
Sound Effect
On
Off
Date Format
D/M/Y 12
D/M/Y 24
M/D/Y 12
M/D/Y 24
Date Imprint
On
Off
Date/Time
D/M/Y 12hrs
D/M/Y 24hrs
M/D/Y 12hrs
M/D/Y 24hrs
LCD Brightness
High
Normal
Low
Default Setting
Ye s
No
Page 19

DC-4700 POWERCAM OPTICAL ZOOM
19
Start-up Sound
Sound 1
Sound 2
Sound 3
Sound 4
Format
Ye s
No
Page 20

DC-4700 POWERCAM OPTICAL ZOOM
20
9. Specifications
Recording Format
Movie clip: AVI(Motion JPEG)
Still image: JPEG format (DCF 1.0, DPOF 1.0 and Exif ver. 2.1)
Recording Media
SD
Picture Mode
Fine/Normal/Basic
Sensor
1/1.8-inch CCD
Resolution
Still image : 2720 x 2016 pixels
2304 x 1712 pixels
1600 x 1200 pixels
640 x 480 pixels
Video : 320 x 240 pixels
192 x 144 pixels
Recording Mode
Fine/Normal/Basic
Playback Mode
Single and 9-index
Delete Mode
Single/All/Format
Shutter Speed
1/1000 sec.
ISO Sensitivity
AUTO , 100, 200
ViewFinder
Optical direct image zoom viewfinder
Monitor Display
1.6” TFT LCD, 354x240
Built-In Memory
16M Byte
Lens (F, f)
Wide: f:7.95;F#:2.79 – 6.65
Tele: f:22.73;F#:5.00 – 11.77
Focus /
Shooting Range
Macro : Wide 10cm – 80 cm
Normal: 80 cm - infinity
Focus Mode
Focus Left
Focus Center
Focus Right
Focus All
Exposure Mode
Auto
Exposure Adjustment
-1.5 to 1.5 step 0.3
Other Features
Voice memo for captured pictures
Support DPOF 1.0 (Digital Print Order Format)
Five languages users interface
White Balance
Auto/Daylight/Cloudy/Sunset/Fluorescent/Tungsten
Self-Timer
Default 10 seconds, or adjusted by user (0-59 sec)
Support System
Windows 98SE/ME/2000/XP
Page 21

DC-4700 POWERCAM OPTICAL ZOOM
21
Connectivity
USB 1.1 Mass Storage Interface
Power
3.7 V Lithium-ion battery (type NB-1L)
Dimension (WxHxD)
102.30mm X 60.10mm X 33.00mm
Weigh t
200.30g ; 173.15g (without battery)
 Loading...