


Using the Bluetooth
TM
Utility
Actual examples of how to establish a connection to a Bluetooth
TM
wireless technology device
using the Bluetooth
TM
Utility are described in this section.
Also provided are descriptions of more convenient methods as well as detailed information on the
Bluetooth
TM
Utility functions.
l
Flow of operation
l
Basic settings
l
Make the most of your Bluetooth
TM
wireless technology device
l
Advanced features
l
Details of Bluetooth™ Utility functions
Note
l
The Bluetooth
TM
Utility operates under Windows XP and Windows 2000.
The descriptions in the examples mainly pertain to operation under Windows XP.
Windows XP: Microsoft® Windows® XP Operating System
Windows 2000: Microsoft® Windows® 2000 Operating System

Flow of operation
The procedure below is used to set up Bluetooth
TM
wireless technology devices using the
Bluetooth
TM
Utility.
Note
l
It is assumed that the set-up is performed from the [Bluetooth Settings] window.
:Enter Bluetooth passkey (PIN code), if required by the device.

Basic settings
Methods for registering new devices using the Bluetooth
TM
Utility shall now be described.
As an example, a Bluetooth
TM
wireless technology-compatible mouse shall be connected
and configured using [Bluetooth Settings].
[Bluetooth Settings] provides two set-up methods: "Express Mode" and "Custom Mode."
l
Express Mode
[Bluetooth Settings] will automatically detect and register services. If several services
(profiles) are supported by the device, the service that has been set to the highest priority
shall be selected and registered.
Express Mode is normally recommended for device set-up.
l
Custom Mode
After having been detected, the services supported by the device are displayed as a list,
from which you can select the desired function(s).
Custom Mode must be used to set up a device if, for example, you wish to use a
modem station to send a fax (because in Express Mode, the DUN profile will be
automatically selected since it has a higher priority than the FAX profile).
The differences between setting up the same device (a Bluetooth
TM
wireless technology-
compatible mouse) using Express Mode and Custom Mode are described on the following pages.
Express Mode Set-up
The procedure for setting up the device using Express Mode shall now be described. In this case, a
mouse device is used as sample device.
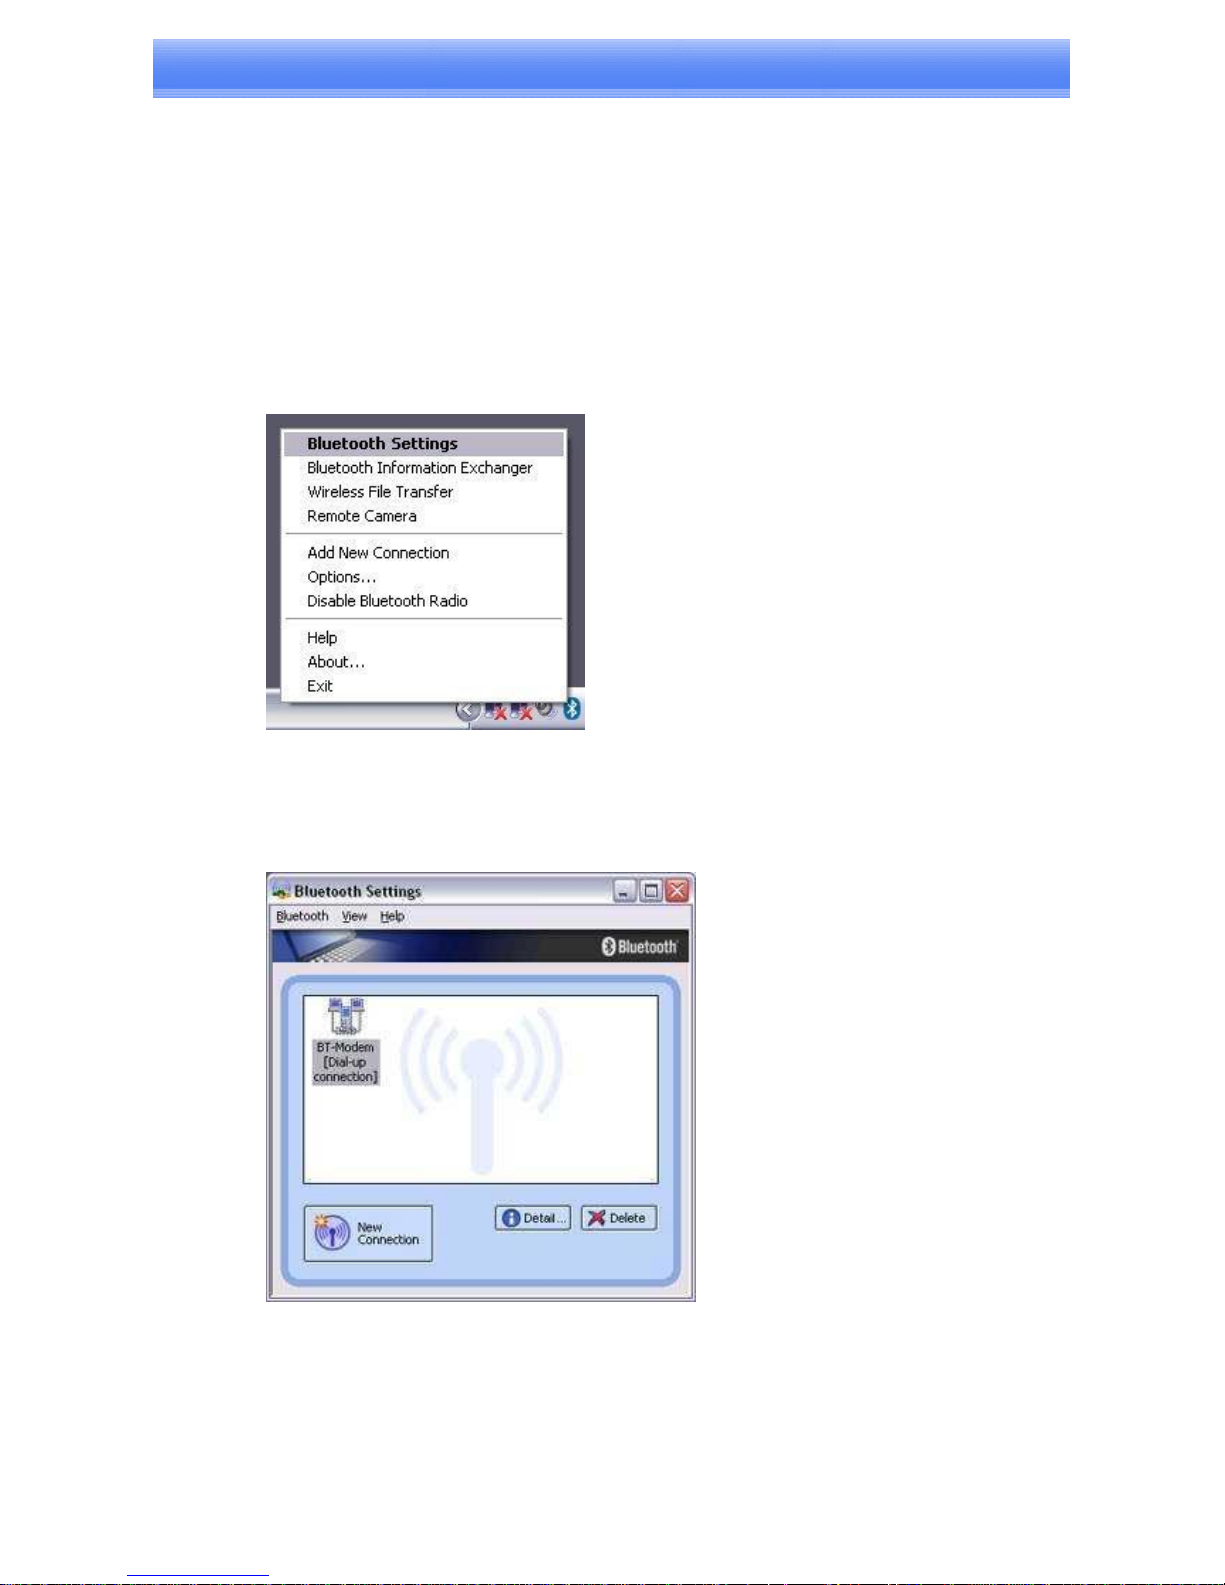
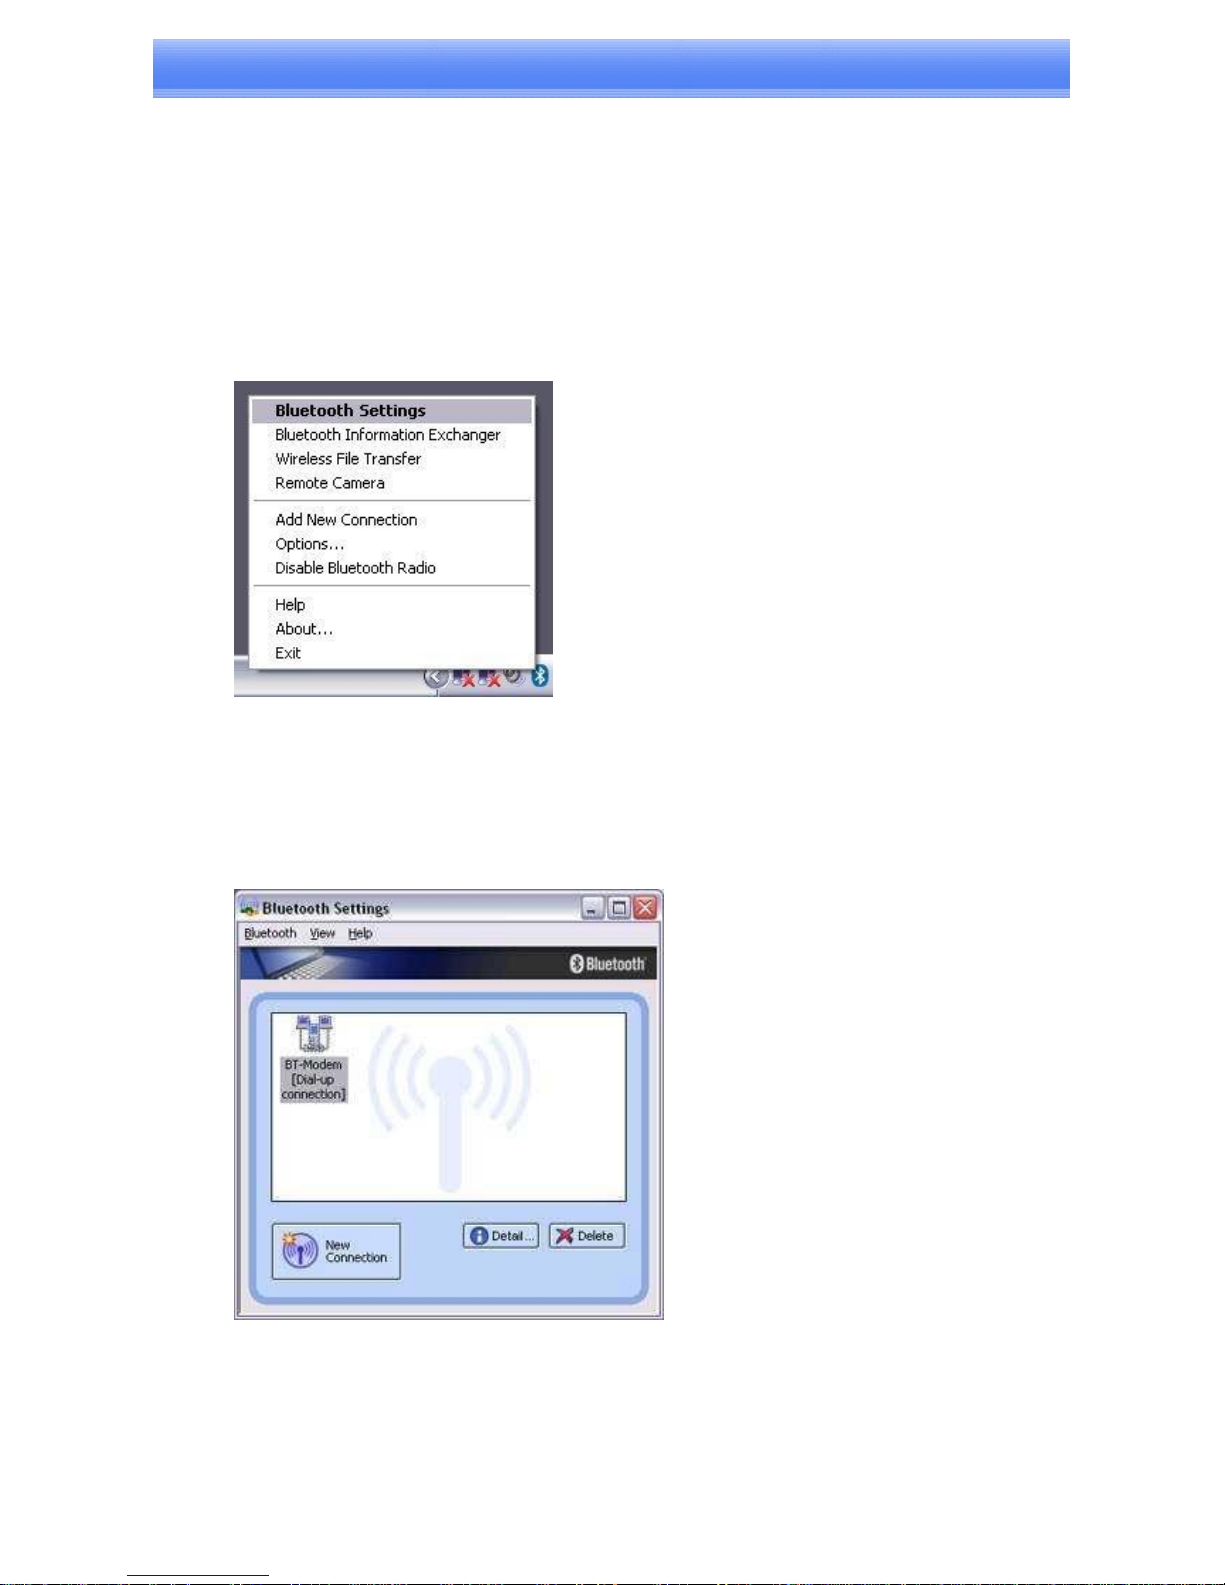
Starting Bluetooth Settings
Procedure
1. Right-click on the Bluetooth
TM
wireless technology icon in the task tray, and select
[Bluetooth Settings] from the menu that appears.
Note
Alternatively, click [Start]→[All Programs]→[Bluetooth]→[Bluetooth Settings].
(Under Windows 2000, click [Start]→[Programs]→[Bluetooth]→[Bluetooth Settings].)
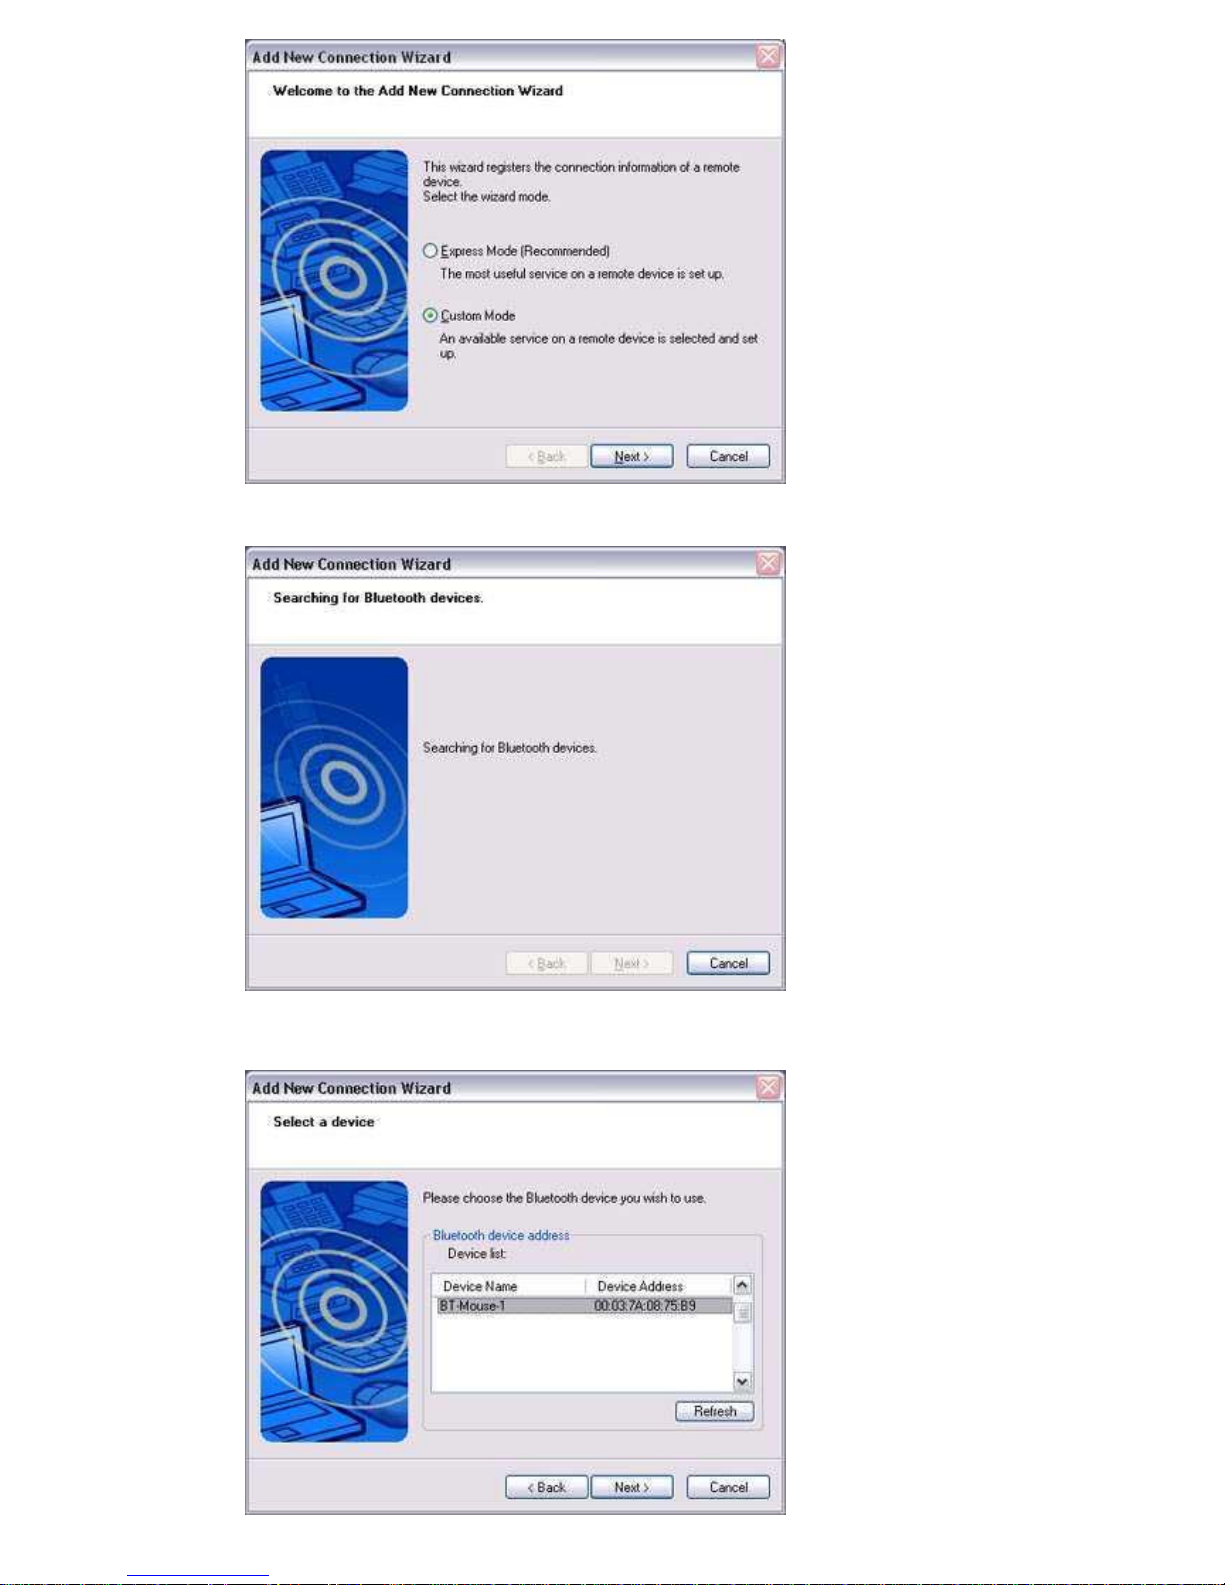
The [Bluetooth Settings] window will appear when other devices have already been registered.
Please click the [New Connection] button to open the [Add New Connection
Wizard] window. If no devices have been registered yet, please proceed directly
to "Detecting Bluetooth
TM
wireless technology Devices."
2. Switch the mouse power ON to make it connectable.
Please refer to the mouse instruction manual for details on this procedure.
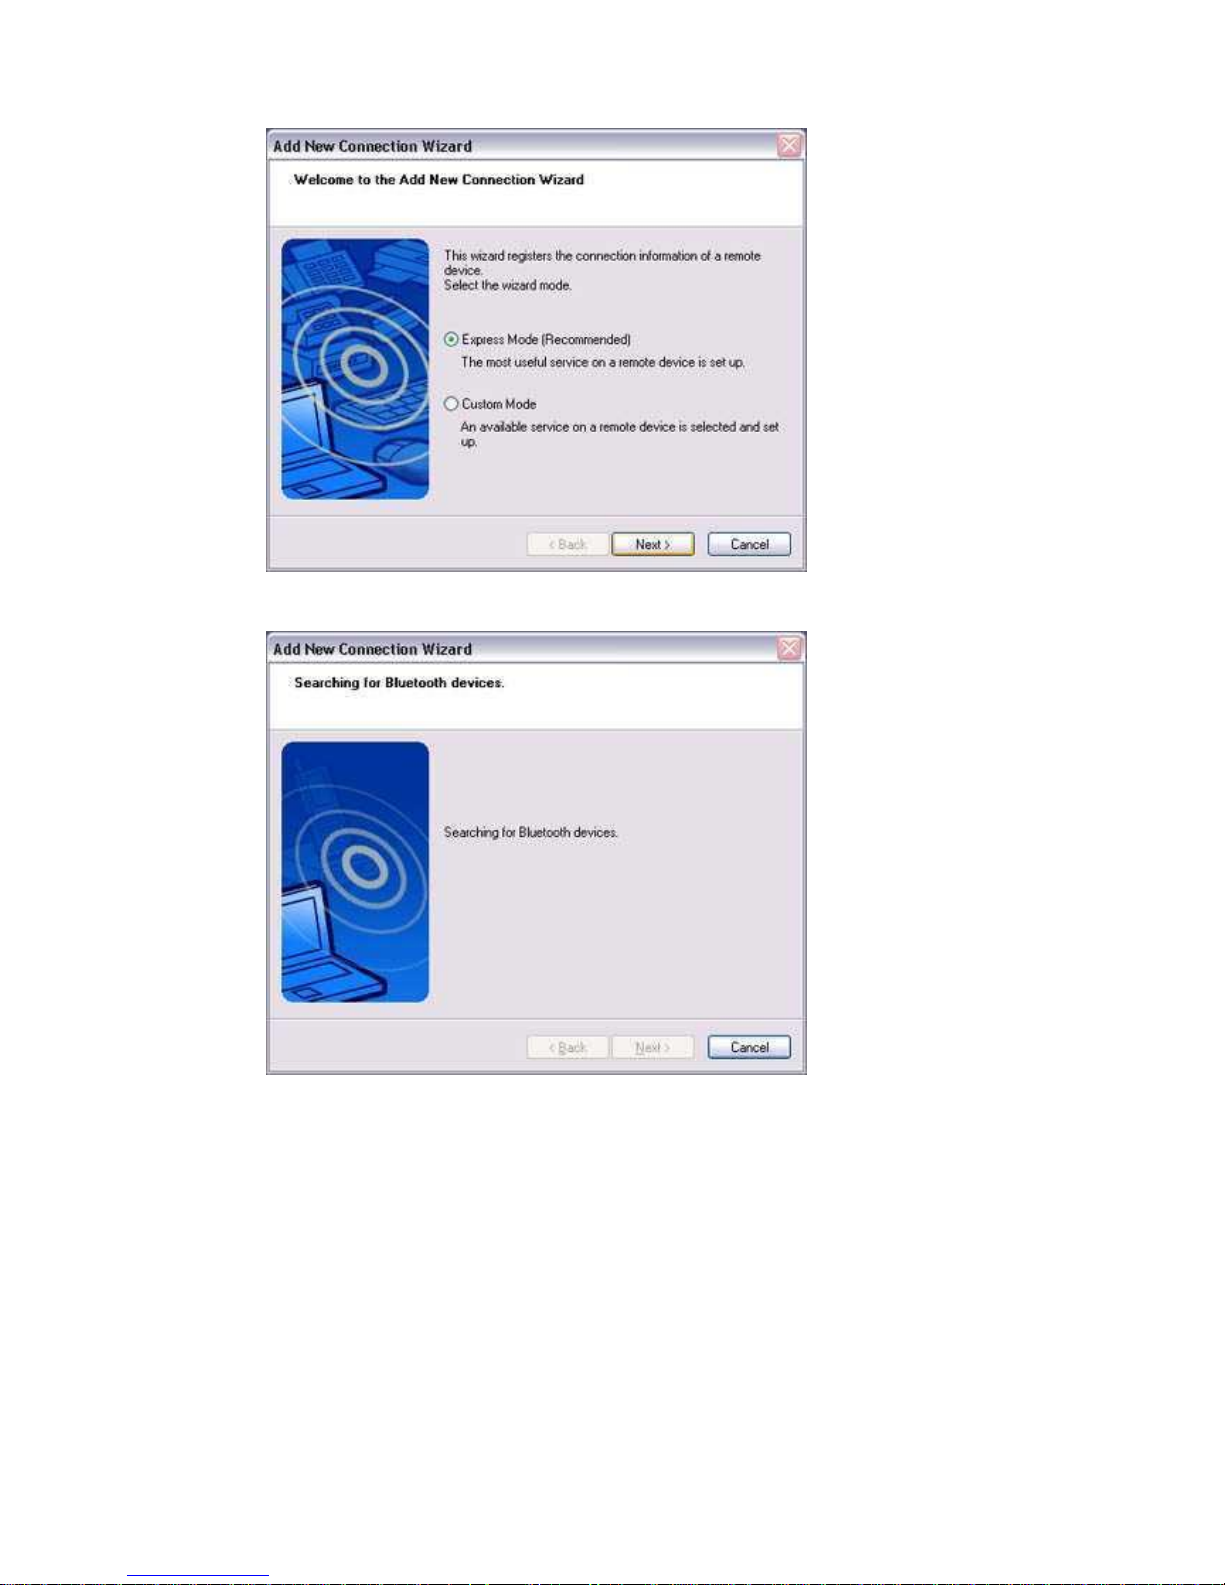
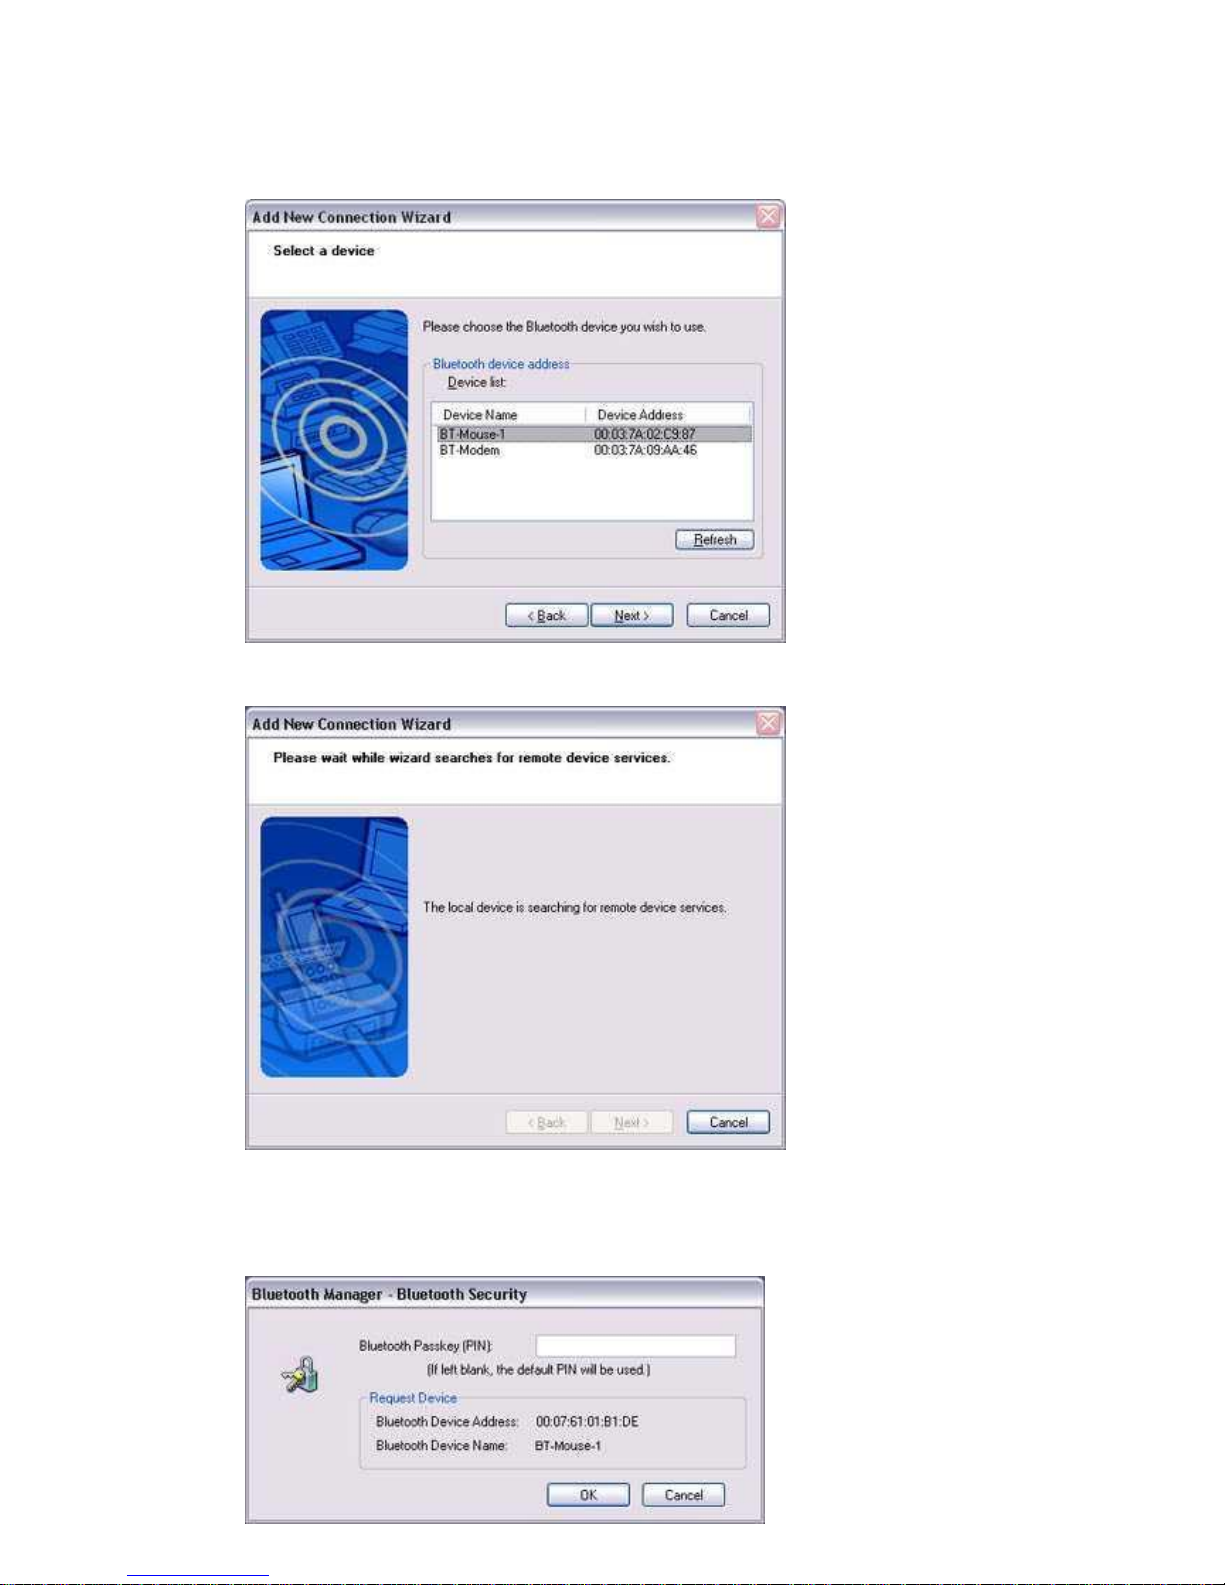
3. Confirm that [Express Mode] has been selected in the [Add New Connection Wizard
(Welcome to the Add New Connection Wizard)] window, and click on the [Next] button.
Searching for devices will start.
When the mouse has been detected, the name and address of the device will appear in the [Add
New Connection Wizard (Select Device)] window.
Note
If no device is found, please confirm that the device has been made connectable,
and click on the [Update] button.
A further device search will be performed.
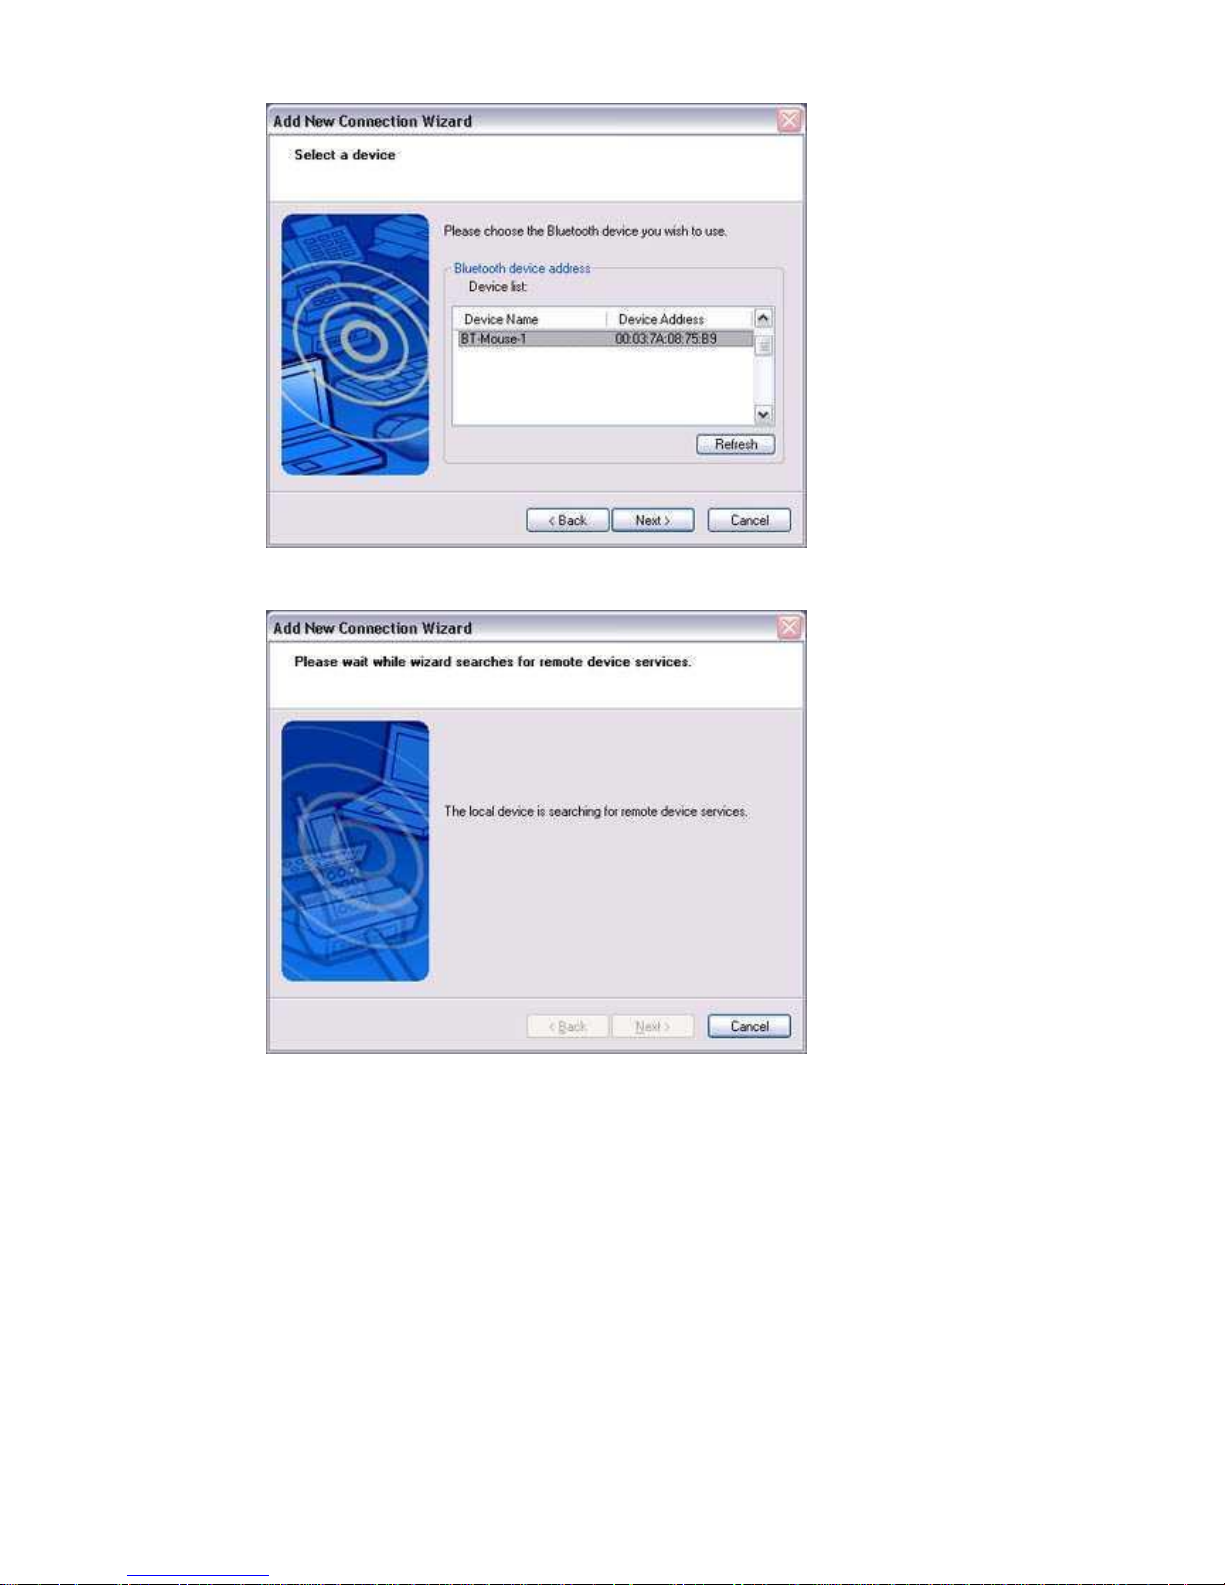
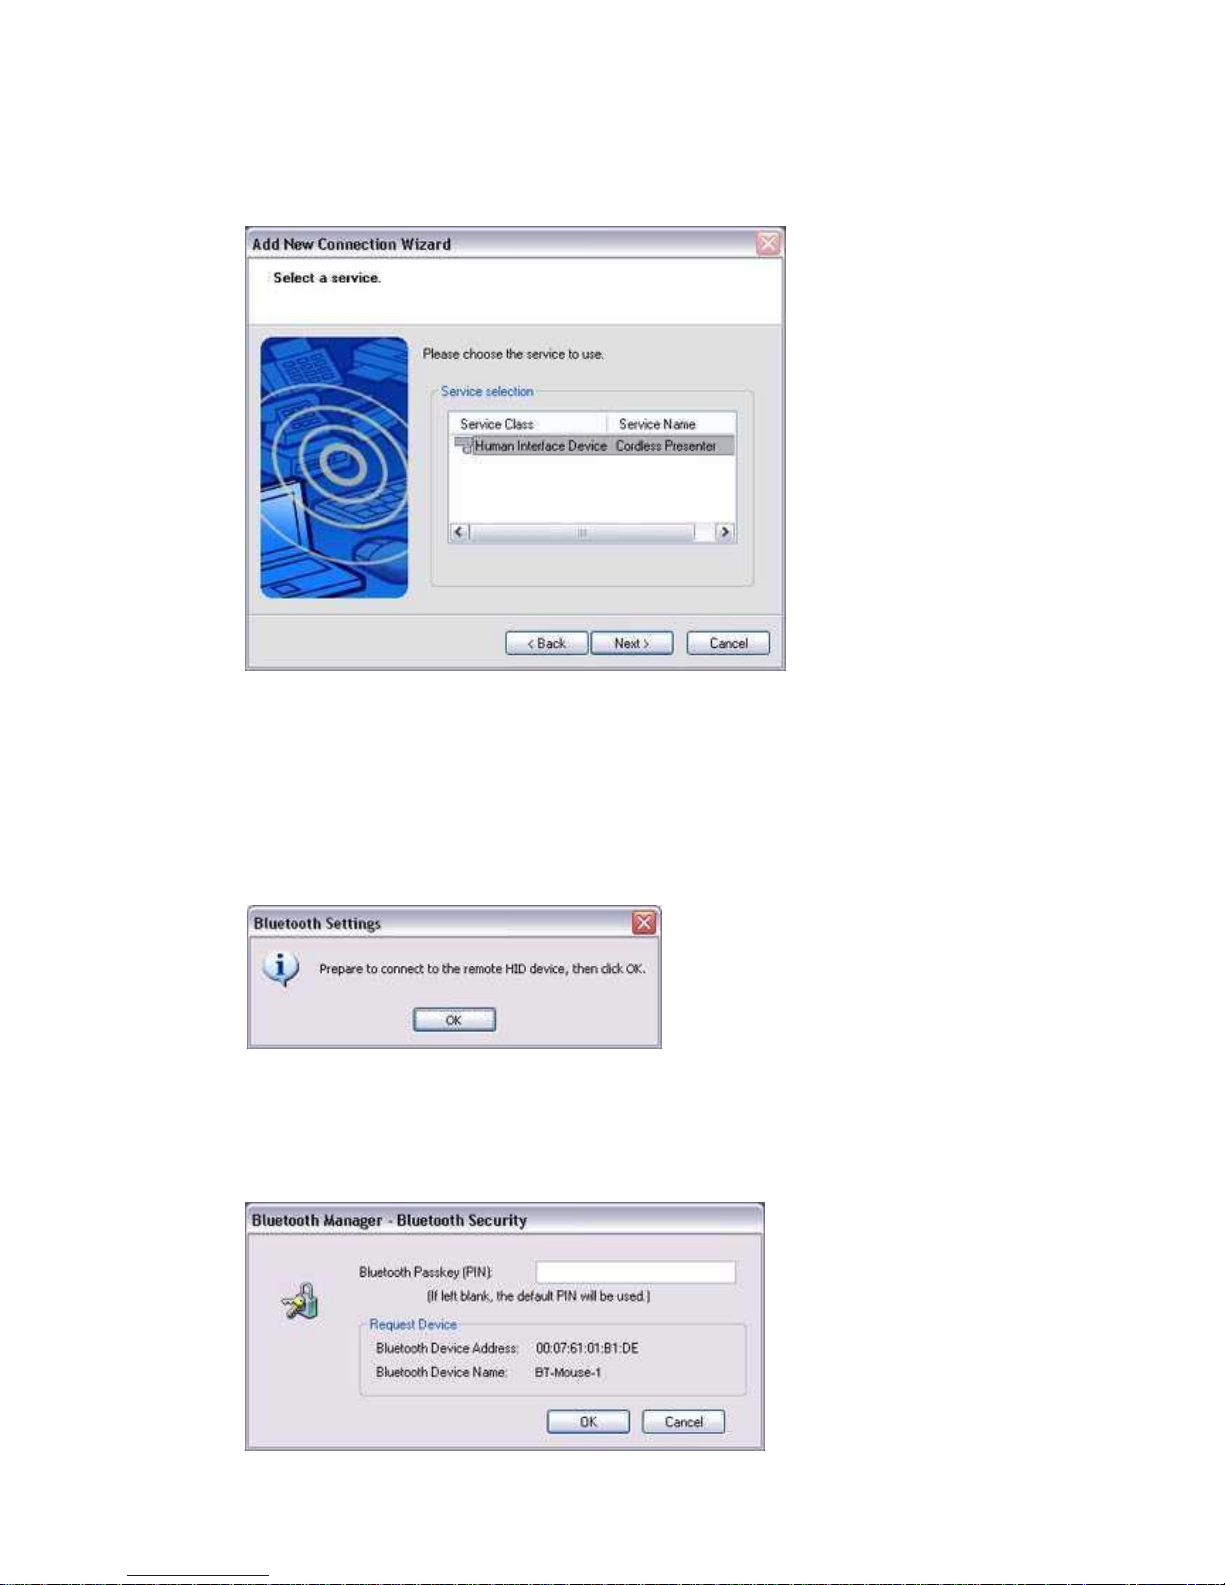
4. Select the mouse device name from [Device List] and click on the [Next] button.
Searching for services will start.
Note
If several services (profiles) are supported by the device, the service that has been set
to the highest priority shall be automatically selected and set up in Express Mode.
Please use Custom Mode if you wish to select desired services manually.
When a service has been detected, a window prompting you to enter the Bluetooth passkey
(PIN code) may appear. Please enter the passkey and click on the [OK] button.
Please refer to your device instruction manual for information on which passkey to use.
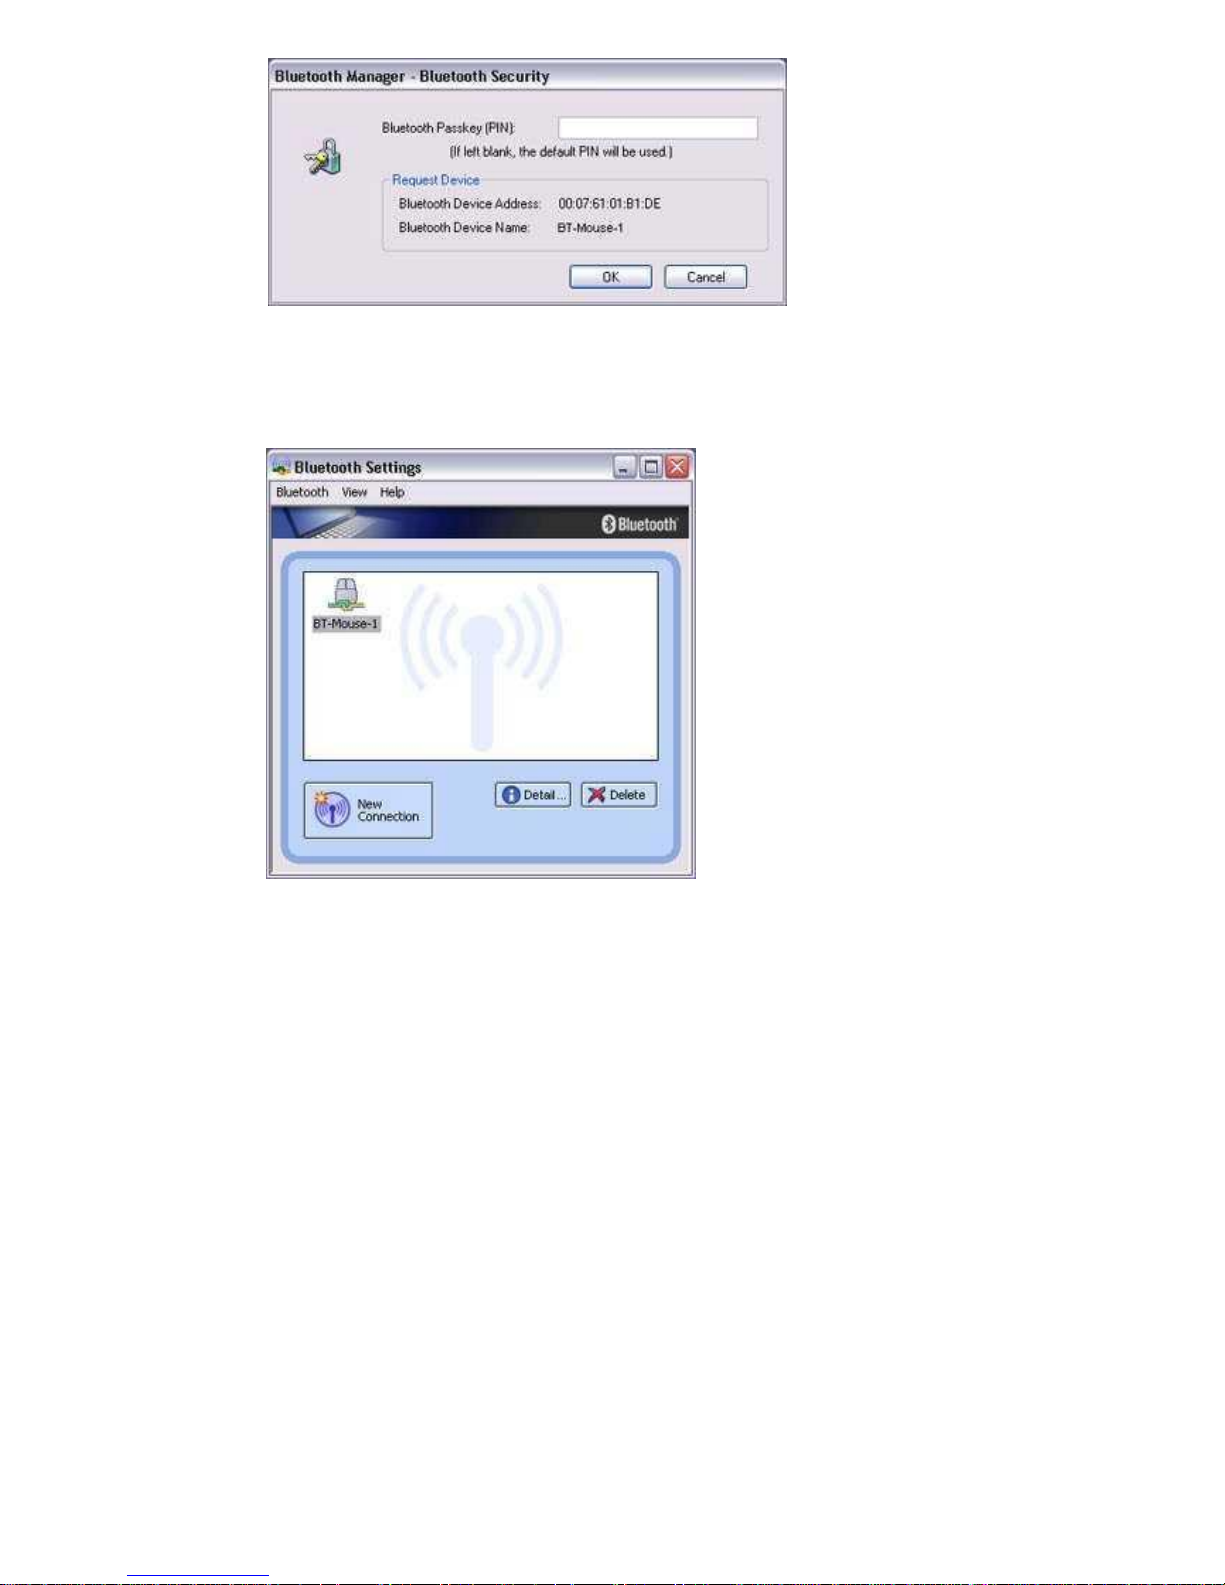
If you have not entered your Bluetooth passkey after a certain amount of time has passed,
the connection process will be cancelled for security reasons. Please perform the passkey
entry process again.
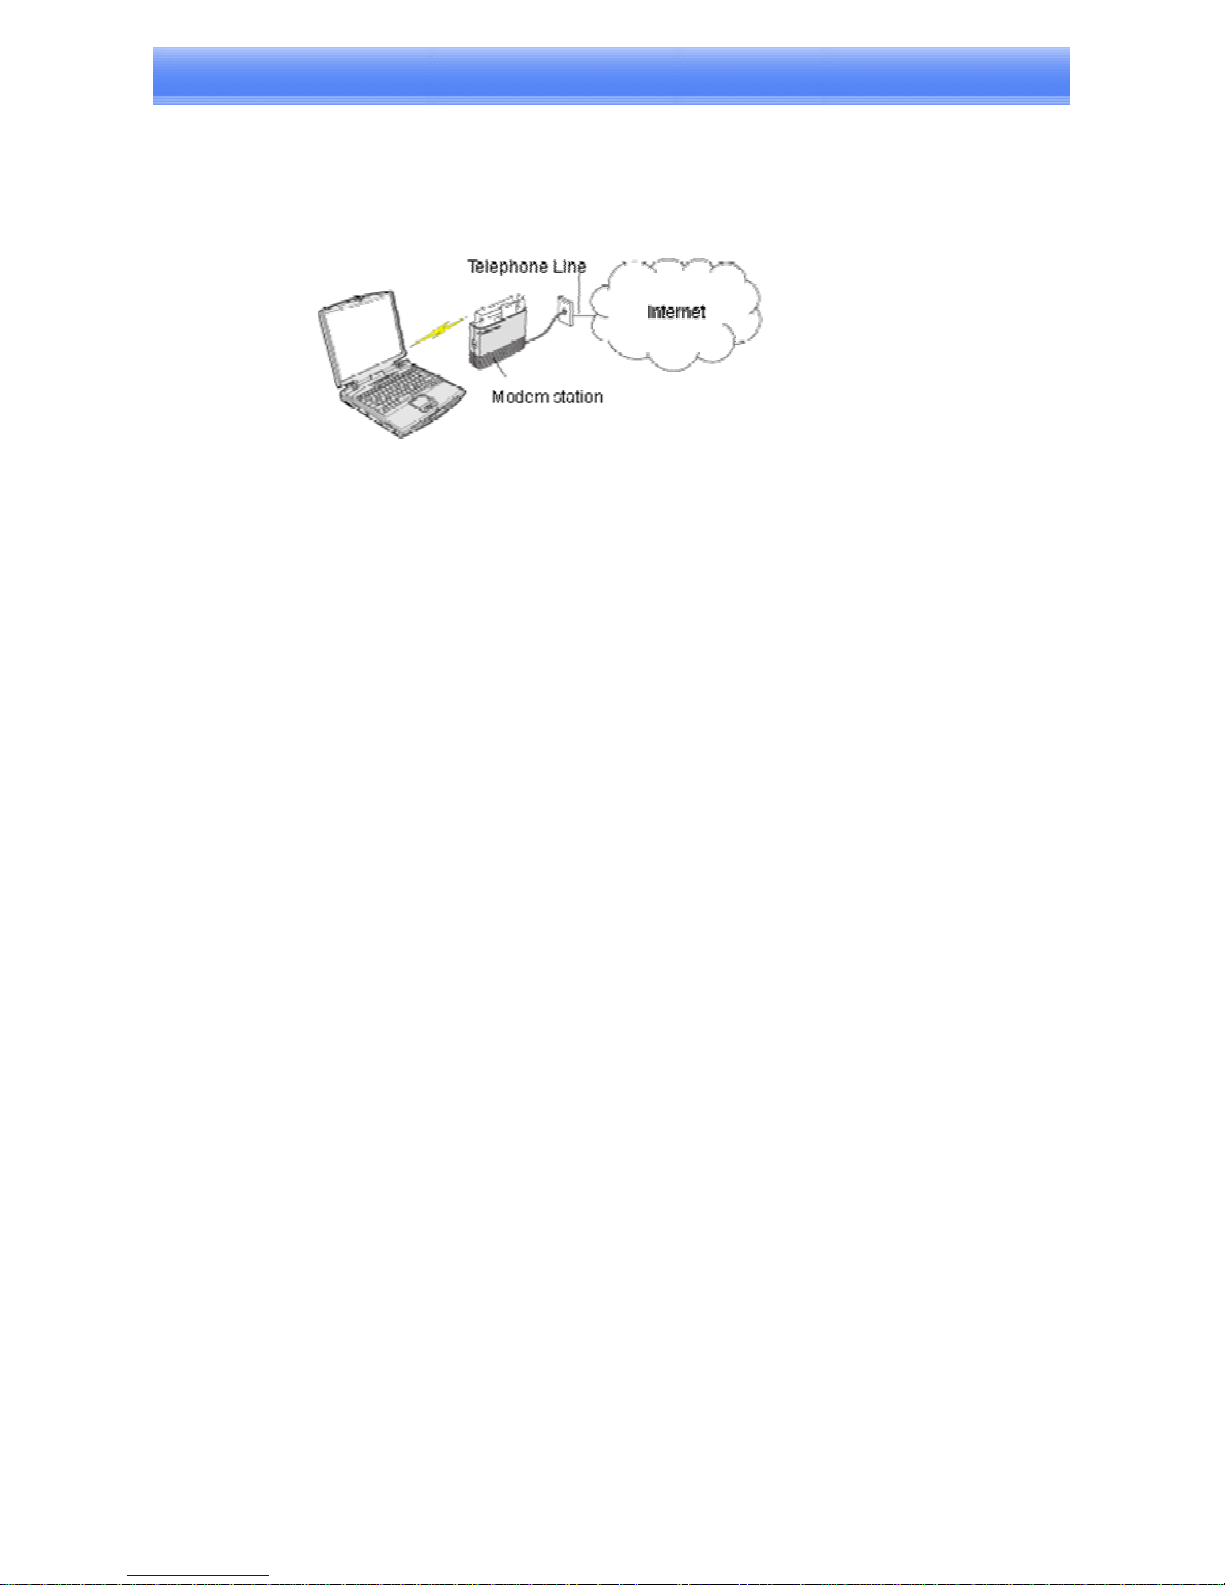
5. Finally, the [Bluetooth Settings] window will automatically appear and the icons of the
registered devices will appear and the devices will be ready to use.
Custom Mode Set-up
The procedure for setting up the device using Custom Mode shall now be described. In this case, a
mouse device is used as sample device.
Starting Bluetooth Settings
Procedure
1. Right-click on the Bluetooth
TM
wireless technology icon in the task tray, and select [Bluetooth
Settings] from the menu that appears.
Note
Alternatively, click [Start]→[All Programs]→[Bluetooth]→[Bluetooth Settings].
(Under Windows 2000, click [Start]→[Programs]→[Bluetooth]→[Bluetooth
Settings].)
The [Bluetooth Settings] window will appear when other devices have already been registered.
Please click the [New Connection] button to open the [Add New Connection Wizard]
window. If no devices have been registered yet, please proceed directly to "Detecting
Bluetooth
TM
wireless technology Devices".
2. Switch the mouse power ON to make it connectable.
Please refer to the mouse instruction manual for details on this procedure.
3. Confirm that [Custom Mode] has been selected in the [Add New Connection Wizard
(Welcome to the Add New Connection Wizard)] window, and click on the [Next] button.
Searching for devices will start.
When the mouse has been detected, the name and address of the device will appear in
the [Add New Connection Wizard (Select Device)] window.
Note
If no device is found, please confirm that the device has been made connectable, and
click on the [Update] button.
A further device search will be performed.
4. Select the mouse device name from [Device List] and click on the [Next] button
Searching for services will start.
Note
When a service has been detected, a window prompting you to enter the Bluetooth passkey (PIN
code) may appear. Please enter the passkey and click on the [OK] button.
Please refer to your device instruction manual for information on which passkey to use.
If you have not entered your Bluetooth passkey after a certain amount of time has passed, the
connection process will be cancelled for security reasons. Please perform the passkey entry process
again.
The services supported by the device will be displayed.
5. Select the desired service and click on the [Next] button
Note
When a device supports several services
If the device supports several services, you can use Custom Mode to manually select the services
(profiles) you wish to use from the list that appears under [Select Services].
If Express Mode is used to perform the set-up, the highest-priority service in the device will
be automatically selected and configured.
6. Click on the [OK] button.
Note
When the settings information has been registered, a window prompting you to enter the
Bluetooth passkey (PIN code) may appear. Please enter the passkey and click on the [OK] button.
Please refer to your device instruction manual for information on which passkey to use.
If you have not entered your Bluetooth passkey after a certain amount of time has passed, the
connection process will be cancelled for security reasons. Please perform the passkey entry process
again.

The [Add New Connection Wizard (Connection Name Setup)] window will appear if a service has
been properly detected.
7. Select the type and name of the icon to be displayed once the device has been
registered, and click on the [Next] button.
Note
If you wish to change the icon, please click on the [Change Icon] button and select your preferred
icon from the list that appears.
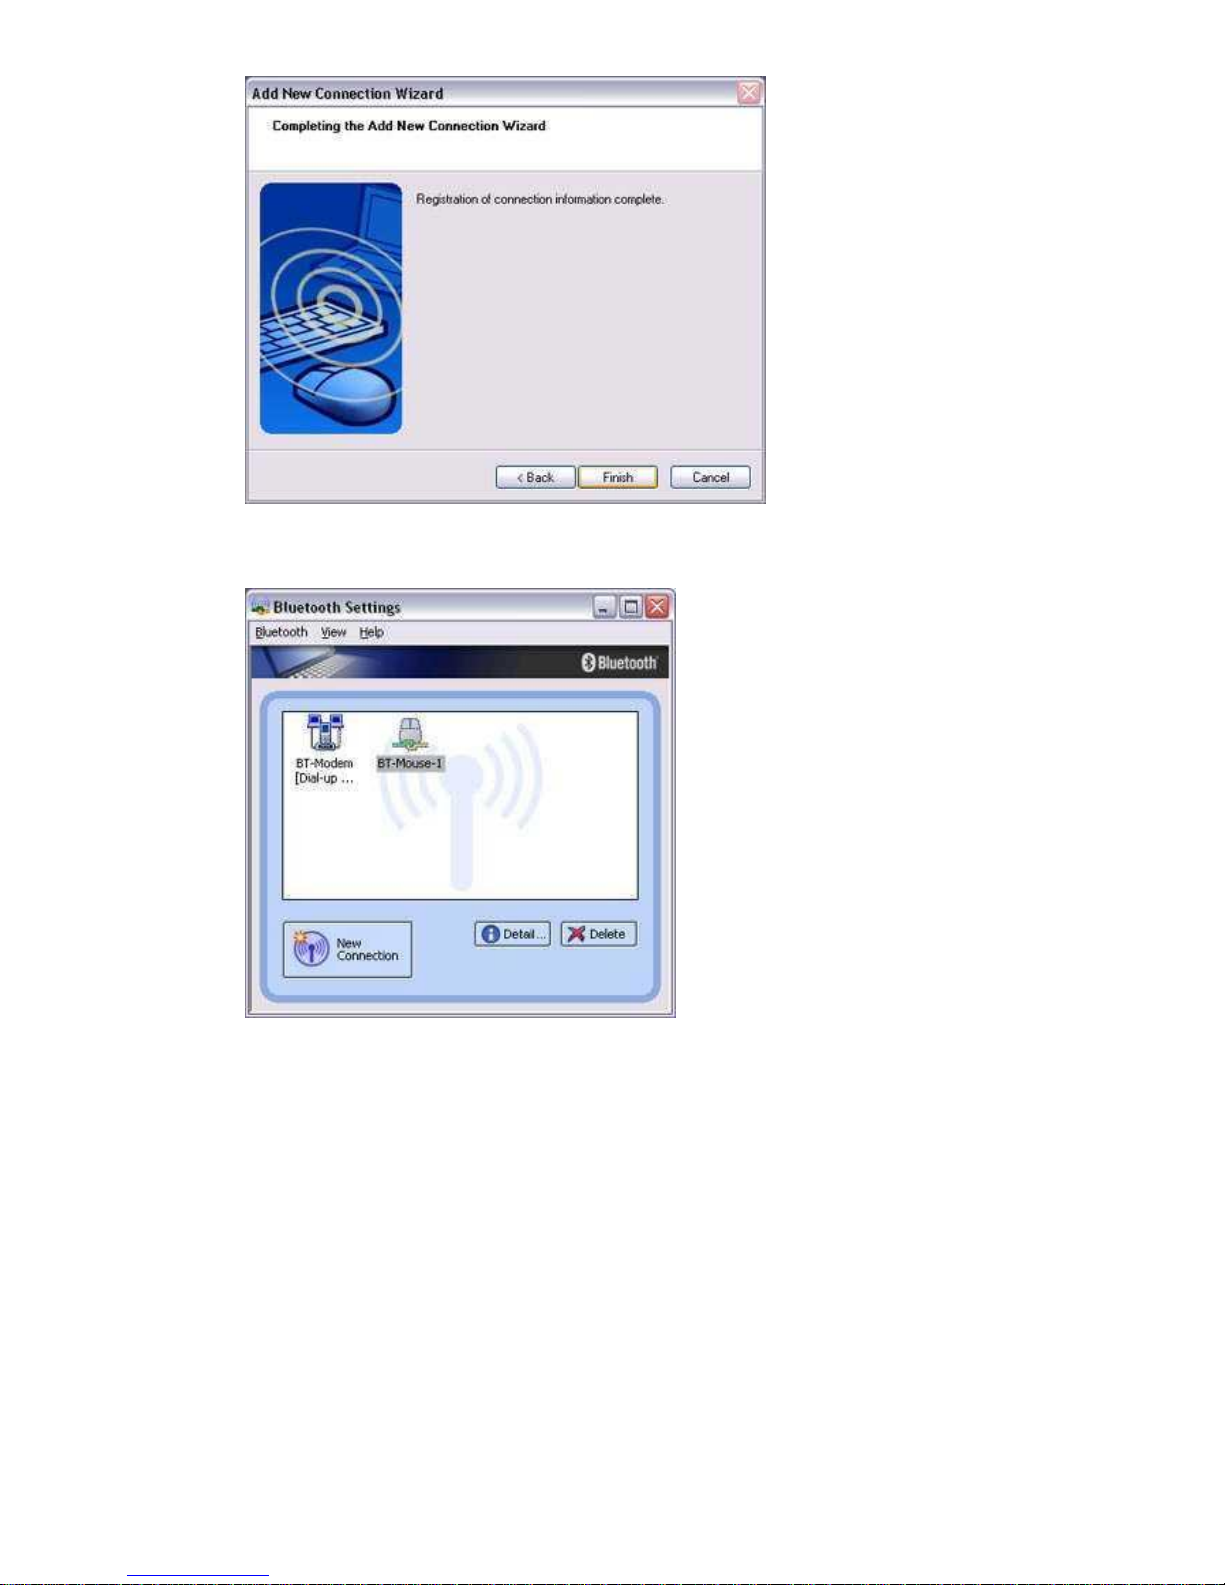
8. Click on the [Finish] button
The [Bluetooth Settings] window will appear.
The icons of the registered devices will appear, and the devices will be ready to use.
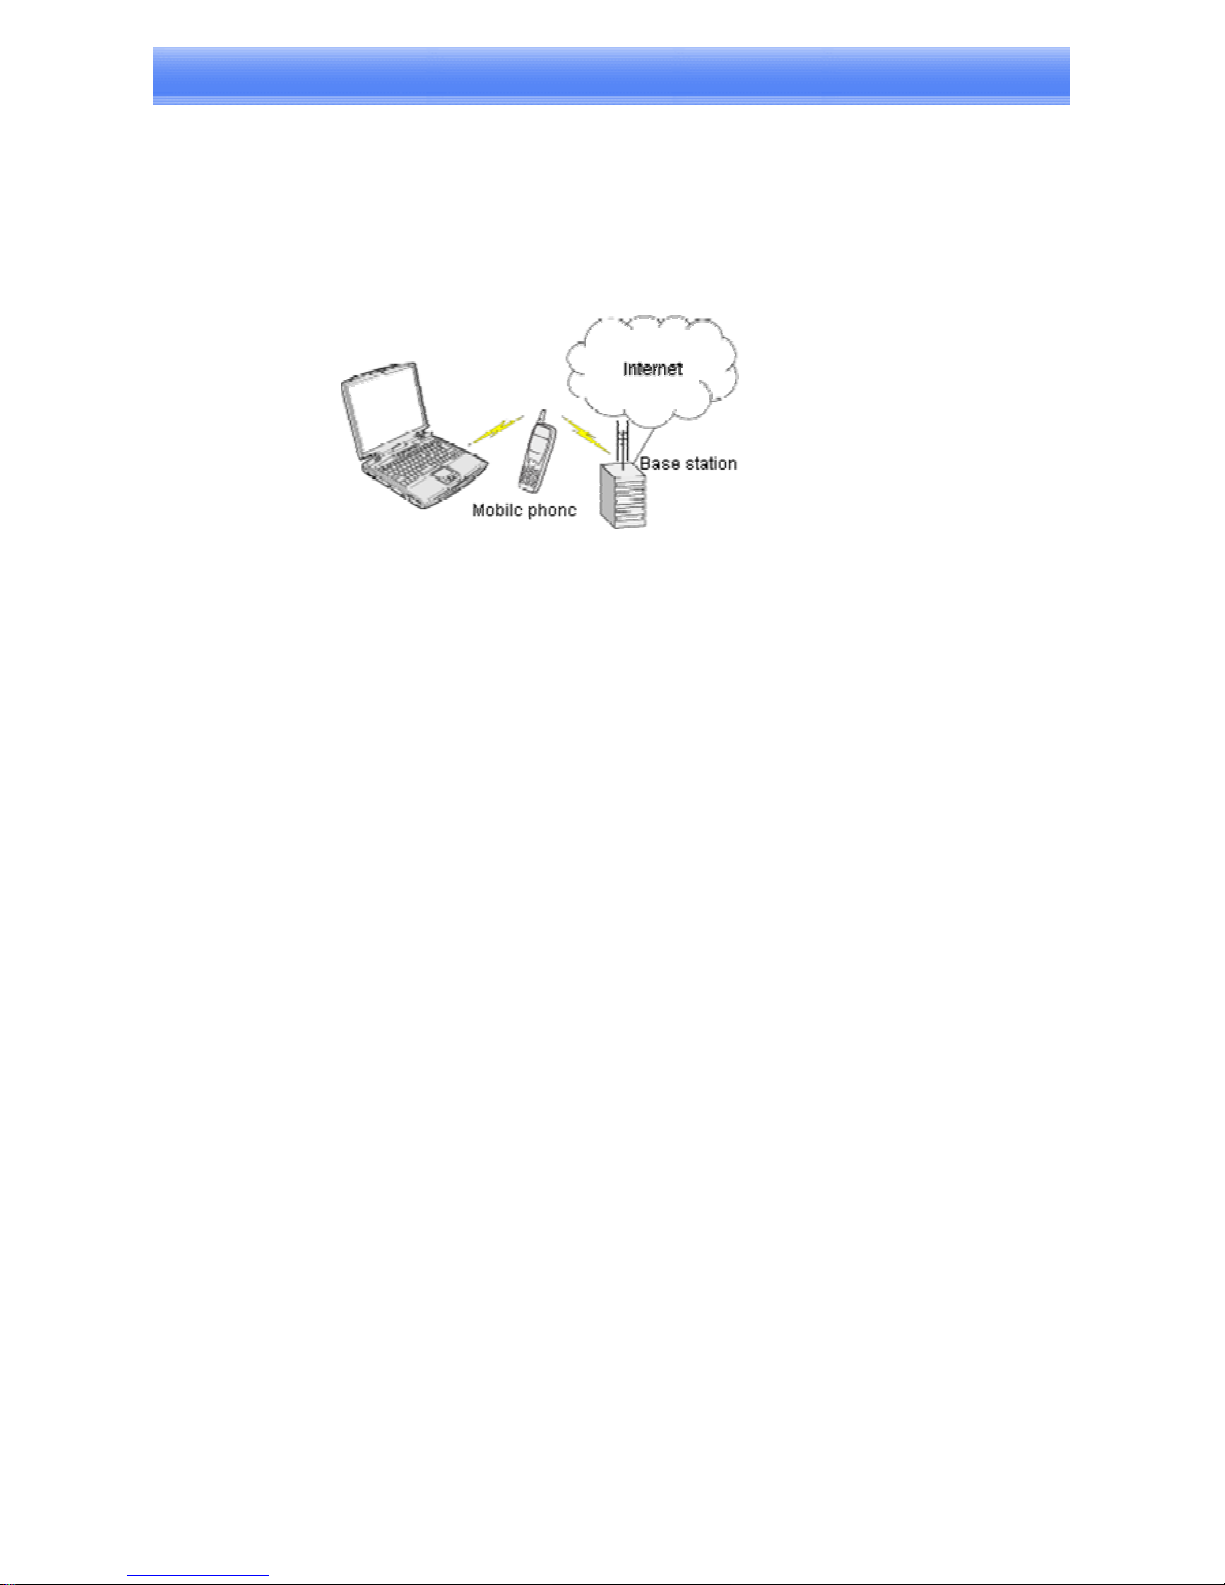
Connecting to the Internet using a modem station
[DUN]
You can use a Bluetooth
TM
wireless modem to connect to the Internet via a telephone line.
Important
l
In order to connect to the Internet, you must have already signed up with a provider and obtained a
connection ID and password. Please ensure you have confirmed the ID, password and telephone
number of your provider's access point before you begin the set-up process.
l
Please refer to your instruction manual for information on connecting the modem station to a
telephone line.
l
A Bluetooth passkey (PIN code) is required for you to connect to the modem station. Please
make a note of your Bluetooth passkey before you start the set-up process.
Setting up the modem station
Procedure
1. Turn on the wireless modem station
2. Right-click the Bluetooth
TM
wireless technology icon in the task tray, and then click on
[Add New Connection]
Note
Alternatively, click [Start]→[All Programs]→[Bluetooth]→[Bluetooth Settings], and then click
on [New Connection] from the active [Bluetooth Settings] window.
The [Add New Connection Wizard (Welcome to the Add New Connection Wizard)] window will
appear.
3. Confirm that [Express Mode] has been selected, and then click on the [Next] button.
The [Add New Connection Wizard (Searching for devices)] window will appear.
4. Select the device name of the wireless modem station from [Device List], and then click on
the [Next] button.
The [Add New Connection Wizard (Searching for Services)] window will appear.
Once a service has been detected successfully, connection to the device and COM port
creation will be performed automatically, after which the [Add New Connection Wizard
(Modem Settings)] window will appear.
5. If you are connecting to a wireless modem station for the first time, enter the passkey for the
modem station under [Bluetooth Passkey (PIN code)], and then click on the [OK] button.
Once the program has finished searching for the devices, the [Add New Connection
Wizard (Device Selection)] window will appear.
6. Click on the [Next] button
Certain modems require you to configure initialization commands separately.
Please click on the [Additional initialization Command Settings] button, enter the initialization
commands, and then click on the [OK] button.

Note
Please refer to the modem or mobile phone instruction manual for further details on the
initialization commands.
7. Enter the connection name (optional), telephone number (of your provider's access point), user
name and password (as issued by your provider), and then click on the [Finish] button.
Important
Please use your own telephone number, ID and password according to the arrangement with
your provider.
The settings will be registered, and an icon will appear in the [Bluetooth Settings] window.
Connecting to the Internet
You can connect to the Internet by following the procedure below if the connection destination
registered when you configured the wireless modem has been set as the default connection
destination.
1. Start your browser, e-mail application or other application
Important
Please enter the e-mail settings separately if you are going to use e-mail (the set- up method
will vary with the application).
2. Enter the URL of the Web page you wish to display and then press the [Enter] key, or use the
e-mail tool to send/receive items or perform other activities.
The [Dial-up Connection] window will appear.
3. Click on the [Connect] button.
Important
A connection will be automatically established with the modem station if COM Auto Connect is
available. If COM Auto Connect is not available, please manually connect to the modem station.
Once you have connected to the Internet, a balloon message and a connection icon will appear in
the task tray. The web page appears and e-mails will be sent/received.
4. End the connection
A window will appear if you double-click on the icon in the task bar.
Please click on the [Disconnect] button when you want to disconnect from the Internet.
Alternatively, please right-click on the icon, and then click on [Disconnect].
Note
l
You can start an application to make an automatic connection to the Internet, but you can also
make a manual connection using the connection destination icon.
The procedure is described below.
1. From the [Bluetooth Settings] window, right-click on the connection destination icon, and then
click on [Connect] from the menu that appears.
A window indicating that the connection is being established will appear.
If the connection has been established successfully, a balloon message and
the connection icon will appear in the task tray.
You will be able to browse Web pages using your browser and send and receive e-mail.
Important
Please enter the e-mail settings separately if you are going to use e-mail (the set- up method
will vary with the application).

2. End the connection
Right-click on the icon, and then click [Disconnect] to end the
connection. A message will appear. Click on the [Yes] button.
When the icon appears as shown below, the connection will have ended.
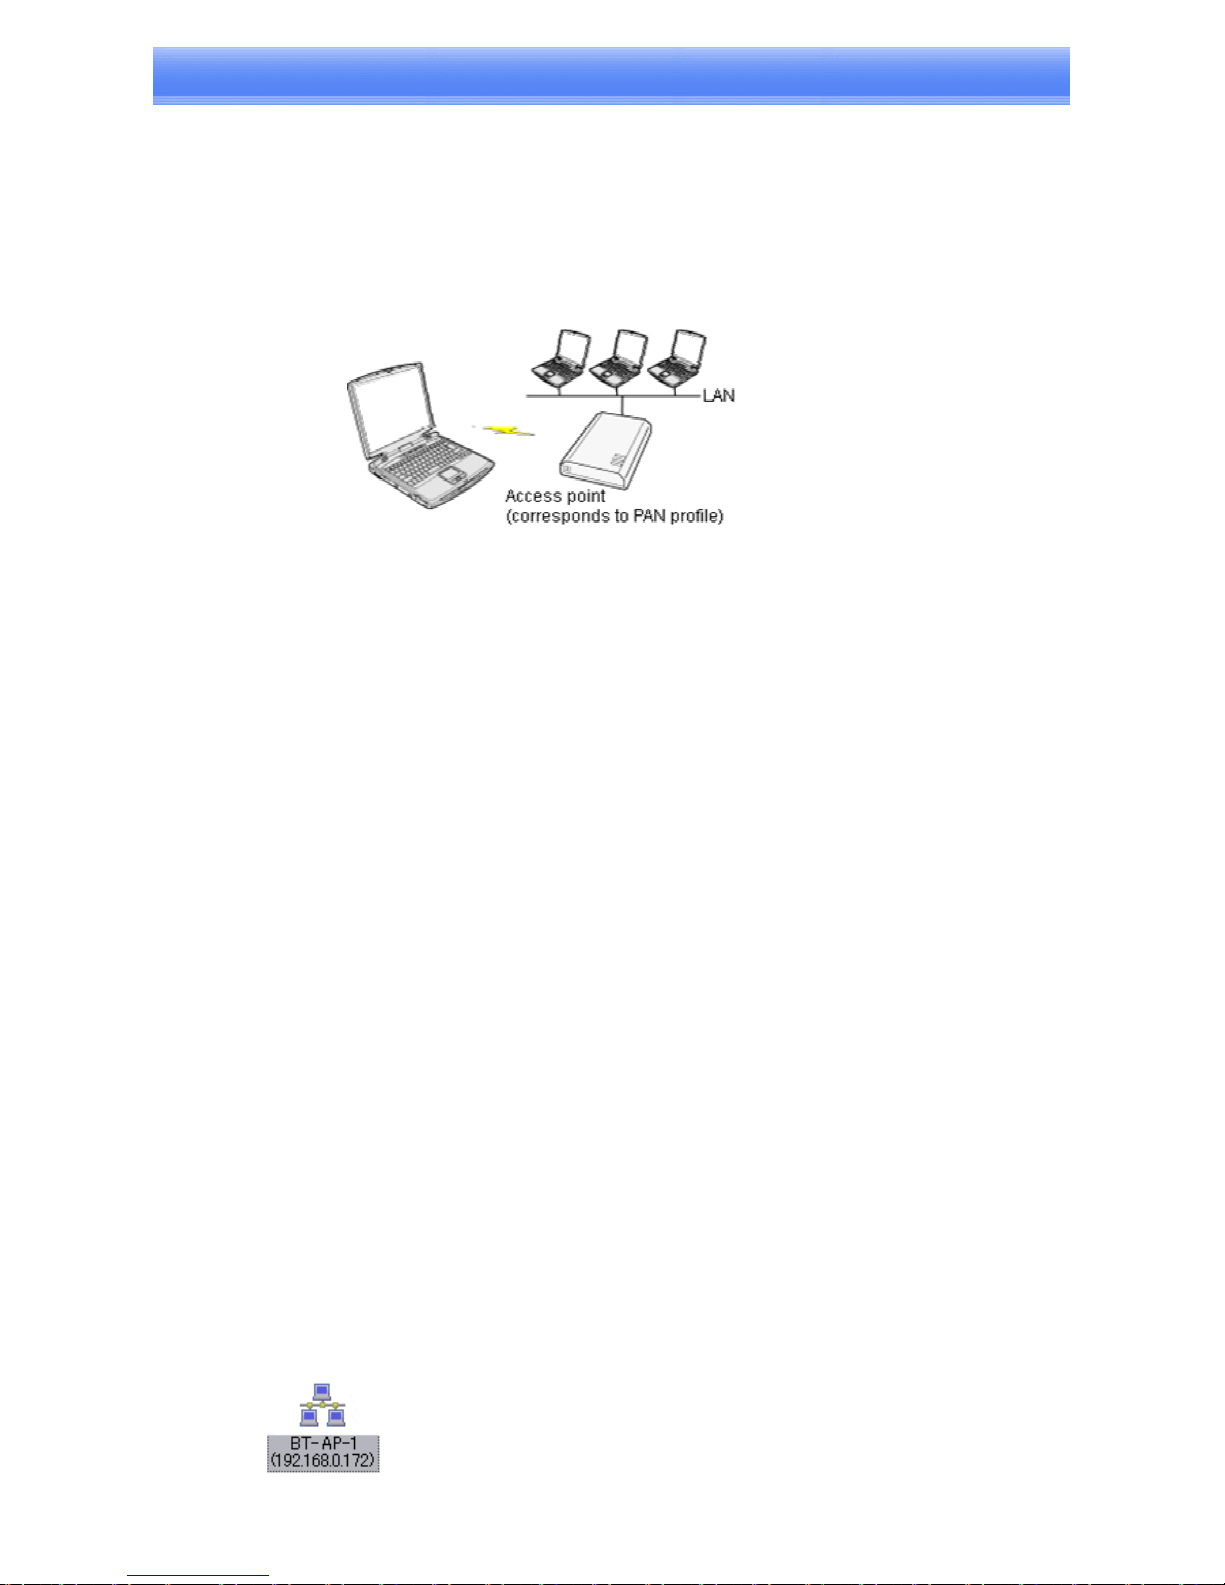
Connecting to the Internet using a mobile telephone
[DUN]
This section describes how to connect to the Internet via a telephone line, using a
mobile telephone.
Important
l
In order to connect to the Internet, you must have already signed up with a provider and obtained a
connection ID and password. Please ensure you have confirmed the ID, password and telephone
number of your provider's access point before you begin the set- up process.
l
A Bluetooth passkey (PIN code) is required for you to connect to the mobile telephone.
Please make a note of your Bluetooth passkey before you start the set-up process.
Configuring a mobile telephone for use as a modem
Procedure
1. Turn on the mobile telephone, and set it to be connectable
Note
Please refer to the mobile telephone instruction manual for information on how to operate the
device.
2. Right-click on the Bluetooth
TM
wireless technology icon in the task tray, and then click on
[Add New Connection]
Note
Alternatively, click [Start]→[All Programs]→[Bluetooth]→[Bluetooth Settings], and then
click on [New Connection] from the active [Bluetooth Settings] window.
The [Add New Connection Wizard (Welcome to the Add New Connection Wizard)]
window will appear.
3. Confirm that [Express Mode] has been selected, and then click on the [Next] button.
The [Add New Connection Wizard (Searching for devices)] window will appear.
4. Select the device name of the mobile telephone from [Device List], and then click on the
[Next] button.
The [Add New Connection Wizard (Searching for Services)] window will appear.
Once a service has been detected successfully, connection to the device and COM port
creation will be performed automatically, after which the [Add New Connection
Wizard (Modem Settings)] window will appear.
5. If you are connecting to a mobile telephone for the first time, enter the passkey for the
wireless modem station under [Bluetooth Passkey (PIN code)], and then click on the
[OK] button.
Once the program has finished searching for the devices, the [Add New Connection
Wizard (Device Selection)] window will appear.
6. Click on the [Next] button
Certain modems require you to configure initialization commands separately.
Please click on the [Additional Initialization Command Settings] button, enter the
initialization commands, and then click on the [OK] button.

Note
Please refer to the modem or mobile phone instruction manual for further details on the
initialization commands.
7. Enter the connection name (optional), telephone number (of your provider's access point), user
name and password (as issued by your provider), and then click on the [Finish] button.
Important
Please use your own telephone number, ID and password according to the arrangement with
your provider.
The settings will be registered, and an icon will appear in the [Bluetooth Settings] window.
Connecting to the Internet
You can connect to the Internet by following the procedure below if the connection
destination registered when you configured the mobile telephone has been set as the default
connection destination.
1. Start your browser, e-mail application or other application
Important
Please enter the e-mail settings separately if you are going to use e-mail (the set- up method will
vary with the application).
2. Enter the URL of the Web page you wish to display and then press the [Enter] key, or use the email tool to send/receive items or perform other activities.
The [Dial-up Connection] window will appear.
3. Click on the [Connect] button
Important
A connection will be automatically established with the mobile telephone if COM Auto Connect is
available. If COM Auto Connect is not available, please manually connect to the mobile telephone.
Once you have connected to the Internet, a balloon message and a connection icon will appear in
the task tray. The web page appears and e-mails will be sent/received.
4. End the connection
A window will appear if you double-click on the icon in the task bar.
Please click on the [Disconnect] button when you want to disconnect from the Internet.
Alternatively, please right-click on the icon, and then click on [Disconnect].
Note
l
You can start an application to make an automatic connection to the Internet, but you can also
make a manual connection using the connection destination icon. The procedure is described
below.
1. From the [Bluetooth Settings] window, right-click on the connection destination icon, and then
click on [Connect] from the menu that appears
A window indicating that the connection is being established will appear.
If the connection has been established successfully, a balloon message and the connection icon
will appear in the task tray.
You will be able to browse Web pages using your browser and send and receive e-mail.

Important
Please enter the e-mail settings separately if you are going to use e-mail (the set- up method will vary
with the application).
2. End the connection
Right-click on the icon, and then click [Disconnect] to end a connection.
A message will appear. Click on the [Yes] button.
When the icon appears as shown below, the connection will have been ended.

Connecting to a LAN using an access point (LAP)
[LAP]
This section describes how to connect to a network (for example, a company LAN or a personal home
network) using a LAP profile-compatible access point.
Please refer to Using an access point (PAN) to connect to a LAN if you are using a PAN profilecompatible access point.
Important
l
The access point must have been started and a normal connection already established to the network
before the access point is set up. Please refer to the access point instruction manual for information on
how to set up the access point.
l
A Bluetooth passkey (PIN code) is required for you to connect to the access point. Please make a note of
your Bluetooth passkey before you start the set-up process.
Setting up the access point
Procedure
1. Turn on the access point, and confirm that a connection has been established with the network
2. Right-click the Bluetooth
TM
wireless technology icon in the task tray, and then click on
[Add New Connection]
Note
Alternatively, click [Start]→[All Programs]→[Bluetooth]→[Bluetooth Settings], and then click on
[New Connection] from the active [Bluetooth Settings] window.
The [Add New Connection Wizard (Welcome to the Add New Connection Wizard)] window will
appear.
3. Confirm that [Express Mode] has been selected, and then click on the [Next] button
The [Add New Connection Wizard (Searching for devices)] window will appear.
Once the program has finished searching for the devices, the [Add New Connection Wizard (Device
Selection)] window will appear.
4. Select the device name of the access point from [Device List], and then click on the [Next]
button
The [Add New Connection Wizard (Searching for Services)] window will appear.
You will be asked for the Bluetooth passkey in the window that appears.
5. Enter the passkey under [Bluetooth Passkey (PIN code)], and then click on the [OK]
button
Service detection and COM port creation will be performed automatically.
The [Add New Connection Wizard (Create Connection Destination)] window will appear.

6. Enter the connection name, user name and password, then click on the [Next] butt
on
Note
The user name and password are entered here to allow you to connect to the access point.
The [Add New Connection Wizard (Confirm Dial-up Settings)] window will appear.
7. Click on the [Confirm Settings] button
The [Internet Options] window will appear.
8. Configure the connection method, and then click on the [OK] button
Set the connection destination used for the LAN connection set up in (6) above as the default
connection destination, and then select "Always dial my default connection."
9. Click on the [Next] button
The access point icon will be registered in the [Bluetooth Settings] window.
This will complete the access point set-up process.

Connecting to a LAN (LAP)
Procedure
1. Right-click on the connection icon in the [Bluetooth Settings] window, and then click on [Connect]
The [Dial-up Connection] window will appear.
2. Confirm that "Direct connection" has been selected under [Connection Destination], and then
click on the [Connect] button
A connection will be initiated.
Note
This is an example of what happens when you use "Direct connection" as a connection name under
"Connect to access point." If a name different from the connection name is used, that name will
appear under [Connection Destination].
Please simply click on [Settings] if no user name or password have been entered(i.e., if those fields
have been left blank)
Please change the connection destination if a different connection name (for a dial-up connection)
appears in [Connection Destination].
Once you connect to the network, Internet Explorer will start automatically, and you will be able to
exchange data with other computers on the network.
Note
Please follow the procedure below if you need to set up a proxy server to connect to the Internet (the
following procedure is not necessary if the PC you are going to use has already been set up as a proxy
server).
1 Select [Internet Options...] from the [Tools] menu in Internet Explorer
The [Internet Options] window will appear.
2 Click on the [Connections] tab, and then click on the [Settings...] button
3 Enter the IP address and port number of the proxy server under [Proxy Server], and
then click on the [OK] button
3. End the connection
Right-click either on the connection icon under the [Bluetooth Settings] window or on
the icon in the task tray, and then click on [Disconnect].
Click on the "Yes" button in the disconnection confirmation dialog box that appears.
Connecting to a LAN using an access point (PAN)
[PAN]
This section describes how to connect to a network (for example, a company LAN or a personal home
network) using a PAN profile-compatible access point.
Please refer to "Using an access point (LAP) to connect to a LAN" if you are using a LAP profile-
compatible access point.
Important
l
The access point must be started and a normal connection already established to the network before the
access point is set up. Please refer to the access point instruction manual for information on how to set
up the access point.
l
A Bluetooth passkey (PIN code) is required for you to connect to the access point. Please make a note of
your Bluetooth passkey before you start the set-up process.
Setting up the access point
Procedure
1. Turn on the access point, and confirm that a connection has been established with the network
2. Right-click the Bluetooth
TM
wireless technology icon in the task tray, and then click on
[Add New Connection]
Note
Alternatively, click [Start]→[All Programs]→[Bluetooth]→[Bluetooth Settings], and then click on
[New Connection] from the active [Bluetooth Settings] window.
The [Add New Connection Wizard (Welcome to the Add New Connection Wizard)] window will
appear.
3. Confirm that [Express Mode] has been selected, and then click on the [Next] button
The [Add New Connection Wizard (Searching for devices)] window will appear.
Once the program has finished searching for the devices, the [Add New
Connection Wizard (Device Selection)] window will appear.
4. Select the device name of the access point from [Device List], and then click on the [Next] button
The [Add New Connection Wizard (Searching for Services)] window will appear. You will be asked
for the Bluetooth passkey in the window that appears.
5. Enter the passkey under [Bluetooth Passkey (PIN code)], and then click on the [OK] button
Service detection will be performed automatically.
The access point icon will be registered in the [Bluetooth Settings] window.
This will complete the access point set-up process.

Connecting to a LAN (PAN)
Procedure
1. Right-click on the connection icon in the [Bluetooth Settings] window, and then click on [Connect]
You will be asked for the Bluetooth passkey in the window that appears.
2. Enter the passkey under [Bluetooth Passkey (PIN code)], and then click on the [OK] button
A connection will be initiated.
Once you have connected to the network, Internet Explorer will start automatically, and you will
be able to exchange data with other computers on the network.
Note
Please follow the procedure below if you need to set up a proxy server to connect to the Internet (the
following procedure is not necessary if the PC you are going to use has already been set up as a proxy
server).
1 Select [Internet Options...] from the [Tools] menu in Internet Explorer
The [Internet Options] window will appear.
2 Click on the [Connections] tab, and then click on the [LAN Settings...] button
3 Enter the IP address and port number of the proxy server under [Proxy Server], and
then click on the [OK] button
3. End the connection
Right-click either on the connection icon under the [Bluetooth Settings] window or on the icon in the
task tray, and then click on [Disconnect].
Click on the "Yes" button in the disconnection confirmation dialog box that appears.
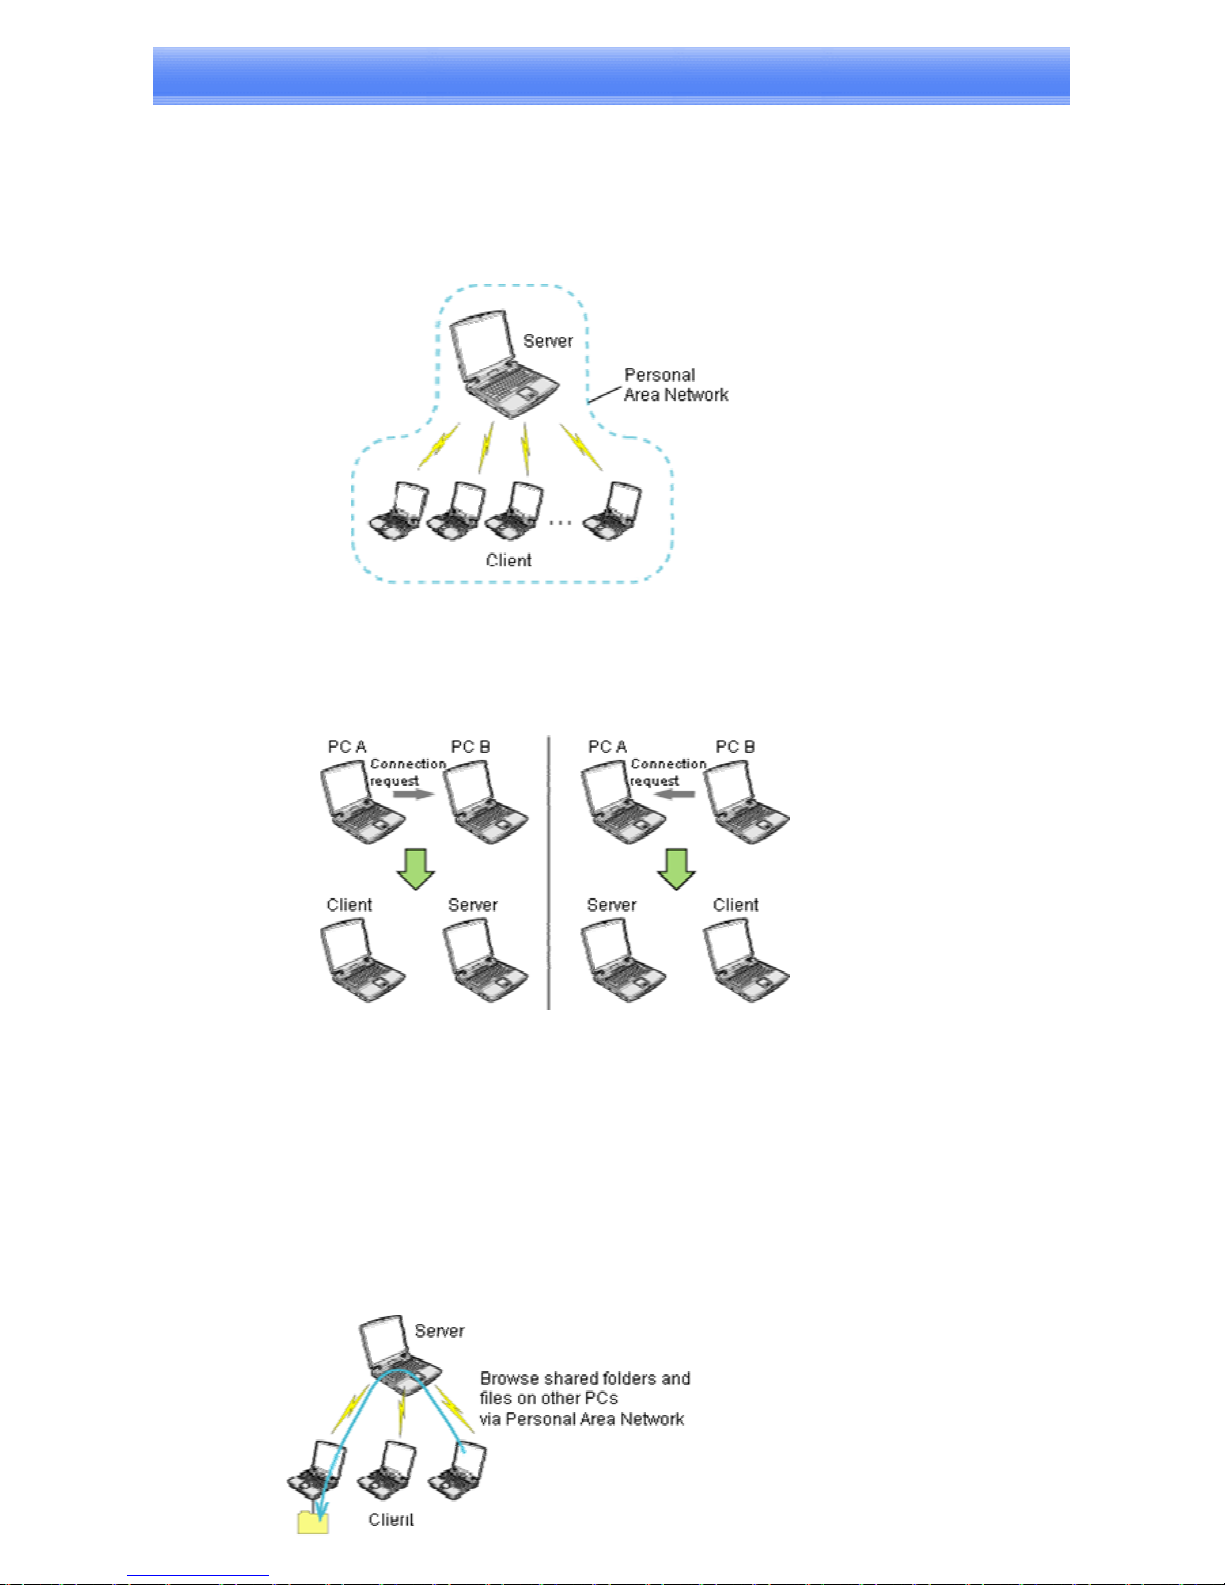
Building a personal area network
[PAN]
You can use the PAN profile to build a network of Bluetooth
TM
wireless technology-
enabled devices.
A personal area network comprises a client-server architecture. The device to which other devices connect
is called the "server", and a device that connects to the server is called a "client."
The client-server relationship is not necessarily a fixed one. The first of two devices to establish a
connection can be the server when one other device is present, and can be the client in other instances.
Note
l
The maximum total number of devices that can be used to constitute a single personal area network is
seven: one server and six clients.
A network comprising as many as seven devices could theoretically be built, but a operating environment
that involves the use of other Bluetooth
TM
wireless technology devices, leaving aside other
complications, might require the network to comprise fewer components.
By using the PAN profile, you will be able to build a network that uses the same TCP/IP protocol used in
regular LANs. Accordingly, the machine designated as the server can be used for configuration tasks that
utilize DHCP, such as assigning IP addresses to clients.
In addition, you will be able to configure folder and file sharing, which will allow data to
be browsed by other servers or clients on the network.

Important
l
Please refer to Windows Help for further information on TCP/IP, DHCP and configurations for sharing.
Operating as a server
The following icon will appear in the tasktray when the PAN server function has been activated.
Should the icon not appear, please follow the procedure below to activate the PAN server function.
1. Right-click the Bluetooth
TM
wireless technology icon in the task tray , click on [Option] and
make sure the "PAN Networking Service" is checked in [Enable Services] under [General] tab.
A message will appear asking you to confirm whether you wish to activate the PAN group ad-hoc
network.
2. Click the [Yes] button
The PAN server will be activated, and an icon will accordingly appear in the tasktray. Other devices
that use the PAN profile will now be able to connect over the network.
Important
l
When using the device as the server, make sure that all user accounts have a password set for the
security reasons.
l
The IP address of the server is automatically set up when it starts. Please do not change this IP
address.
l
When the device starts as the server, it starts the DHCP server function. We recommend that you
should use the IP addresses provided from this DHCP server for the clients connected. Please do not
change these IP addresses.
By clicking on the icon, the [Bluetooth PAN Server] window will appear. One client has established a
connection below.
Note
l
When you try to connect to another server as a client, the task tray icon will disappear, and your
machine will not be able to function as a server in response to connection requests originating from
other devices.
l
During server starting, it is not possible to stop the DHCP server.
Operating as a client
Connecting to a server as a client is performed from the [Bluetooth Settings] window, as described below.
Procedure
1. Right-click on the Bluetooth
TM
wireless technology icon in the task tray, and click on
[Add New Connection]
Note
Alternatively, click on [Start]→[All Programs]→[Bluetooth]→[Bluetooth Settings], and then on [New
Connection] from the [Bluetooth Settings] window.
2. Confirm that [Express Mode] has been selected, and then click on the [Next] button
3. Click on the [Next] button in the advisory dialog box
The [Add New Connection Wizard (Searching for devices)] window will appear.
Once the program has finished searching for the devices, the [Add New Connection Wizard (Device
Selection)] window will appear.
4. Select the name of the device designated as the server from [Device List], and then click on the
[Next] button
The registered icon will appear in the [Bluetooth Settings] window.

■Connecting to a server
Procedure
1. Right-click on the icon in the [Bluetooth Settings] window, and then click on [Connect]
Once you have connected, the icon will change to indicate that the device is connected.
■Ending a connection to a server
Procedure
1. Right-click on the icon in the [Bluetooth Settings] window, and then click on [Disconnect]
A message confirming whether you wish to disconnect will appear. Click on the [Yes] button.
Once you have disconnected, the icon will change to indicate that the device is not connected.

Using a modem station for fax transmissions [FAX]
This section describes how to send a fax using a Bluetooth
TM
wireless modem station.
Important
l
Please refer to the modem station instruction manual for information on how to connect the station to a
telephone line.
l
Please ensure that any drivers used to connect the PC to the modem have been installed.
l
A Bluetooth passkey (PIN code) is required for you to connect to the modem station. Please make a
note of your Bluetooth passkey before you start the set-up process.
l
A fax application is required for you to be able to send and receive faxes. The description below is
based on a example using Microsoft Fax, which is installed with Windows XP as standard.
If you are going to use a commercially available fax application, then please refer to the manual that
came with the application for information on how to send and receive faxes.
Setting up the modem station
Set up and register the modem station as a fax service.
Procedure
1. Turn on the wireless modem station
2. Right-click on the Bluetooth
TM
wireless technology icon in the task tray, and then click
on [Add New Connection]
Note
Alternatively, click [Start]→[All Programs]→[Bluetooth]→[Bluetooth Settings], and then click on
[New Connection] from the active [Bluetooth Settings] window.
The [Add New Connection Wizard (Welcome to the Add New Connection Wizard)] window will
appear.
3. Select [Custom Mode], and then click on the [Next] button
The [Add New Connection Wizard (Searching for devices)] window will appear. Once the program
has finished searching for the devices, the [Add New Connection Wizard (Select Device)] window
will appear.
4. Select the device name of the wireless modem station from [Device List], and then click on the
[Next] button
The [Add New Connection Wizard (Searching for Services)] window will appear.
5. If you are connecting to the wireless modem station for the first time, enter the passkey for the
device from the [Bluetooth Passkey (PIN Code)] window, and then click on the [OK] button
Once the program has finished searching for the services, the [Add New Connection Wizard (Select
Service)] window will appear.
6. Select "Fax" under [Select Service], and then click on the [Next] button
The COM port and modem registration process dependent on your Bluetooth software conditions.
6.1 Case 1: COM port and modem registration process will be automatically performed
The COM port and modem registration process will then be automatically performed.
Once the COM port and modem (standard 33600 bps type) registration is complete, the
[Add New Connection Wizard (Setting Connection Name)] screen will appear.

6.2 Case 2: COM port and modem registration process will be manually performed
The COM port and modem registration process will then be manually
performed using the original modem .inf file.
Once the COM port and modem registration is completed by following the wizard
process, the [Add New Connection Wizard (Setting Connection Name)] screen will
appear.
7. Configure the type and name of the icon to appear after registration, and click on the [Next]
button.
Please click only on the [Next] button once you are satisfied with the configuration. The [Add New
Connection Wizard (Completing the Add New Connection Wizard)] screen will appear.
8. Click on the [Finish] button
The settings will be registered, and the icon will appear on the [Bluetooth Settings] screen.
Setting FAX information
Configure send/receive settings and register fax information.
Procedure
1. Select [Start]→[Control Panel], and then double-click on the [Printers and Other Hardware]
icon
Note
If the control panel is displayed in "Classic view", and you use Windows 2000, please start from
Step (2).
2. Double-click on the [Printers and Faxes] icon
The [Printers & Faxes] window will appear.
3. Click on "Install a local fax printer" in the [Printers and Faxes] window
A window showing installed programs will appear, and a Fax icon will have been created in the
[Printers and Faxes] screen.
4. Click on "Send a fax" under "Printer Tasks" on the left side of the window
If you have not yet configured a fax device, the [Fax Configuration Wizard] window will appear. In
the window you can enter settings pertaining to the sender (yourself).
Note
If the fax configuration information has already been registered, the [Send Fax Wizard] window,
which can be viewed under "Sending a fax" below, will appear instead of the [Fax Configuration
Wizard] window.
5. Enter the sender information, and click on the [Next] button
Note
The sender information that you configure here will be automatically appended as header
information when you send a fax.
The [Fax Configuration Wizard (Select Device for Sending or Receiving Faxes)] window will
appear.
6. Select a device to be used for fax transmissions, enable the device for sending or receiving,
and then click on the [Next] button
Note
If [Enable Receive] is selected, the device will be on standby for receiving faxes even if it is not
sending or receiving anything, and therefore will be in continuous connection to the wireless
modem (when COM Auto Connect is on).
Please decide whether to select this option based on the desired objective and/or frequency of
transmission.
The [Fax Configuration Wizard (Transmitting Subscriber Identification (TSID))] window will
appear.

7. Click on the [Next] button
It is important that you do not change the transmitter subscriber identification.
The [Fax Configuration Wizard (Completing the Fax Configuration Wizard)] window will appear.
8. Click on the [Finish] button
The fax information will be have been registered, and the [Fax Console] window will appear.
This will complete the fax set-up process.

Sending a fax
This section describes how to send a fax from the Fax Console.
Important
l
The Fax service must be enabled for sending in order for you to send a fax.
Please refer to "Using a wireless modem station" under "Troubleshooting" for how to change the send
and receive settings once the service has been configured.
Procedure
1. Double-click on the [Fax] icon in the Control Panel
The [Fax Console] window will appear.
2. In the [Fax Console] window, click [File]→[Send fax]
The [Send Fax Wizard (Starting the Send Fax Wizard)] window will appear.
3. Click on the [Next] button
The [Send Fax Wizard (Recipient Information)] window will appear.
4. Enter the name and fax number of the destination party, and then click on the [Next] button
The [Send Fax Wizard (Preparing the Cover Page)] window will appear.
5. Specify the cover page template, subject line, and note (body text), and then click on the
[Next] button
The [Send Fax Wizard (Schedule)] window will appear.
6. If you wish to send the fax immediately, select "Now", and then click on the [Next] button
The [Send Fax Wizard (Completing the Send Fax Wizard)] window will appear.
7. Confirm the destination information and transmission details, and then click on the [Finish]
button
The software will automatically dial the number and send the fax.
Once the fax has been sent, Fax Monitor will revert to standby mode.

Receiving a fax
This section describes what to do when a fax arrives after you have established a connection to
a modem station.
Important
l
The Fax service must be enabled for receiving in order for you to receive a fax.
Please refer to "Using a wireless modem station" under "Troubleshooting" for information on how to
change the send and receive settings once the fax service has been configured.
l
Please ensure you have connected to a modem station before you receive a fax (the device will be
connected to the modem if "Enable Receive" has been selected or COM Auto Connect has been
activated).
Procedure
1. When a fax arrives, the Fax Monitor will start automatically as the fax is received
Once the fax has been received, the Fax Monitor will revert to standby mode.
Note
If you have enabled manual fax reception, a message will appear in the task tray. Click on the message
with your mouse to receive the fax.
2. Double-click on the [Fax] icon in the Control Panel
The [Fax Console] window will appear.
3. In the [Fax Console] window, double-click on the fax that has arrived
An image of the received fax will be displayed.

Using a mobile telephone for fax transmissions
[FAX]
This section describes how to send a fax using a mobile telephone as a modem.
Important
l
Please ensure that any drivers used to connect the PC to the mobile telephone have been installed.
l
A Bluetooth passkey (PIN code) is required for you to connect to the mobile telephone. Please make a
note of your Bluetooth passkey before you start the set-up process.
l
A fax application is required for you to be able to send and receive faxes. The description below is based
on a example using Microsoft Fax, which is installed with Windows XP as standard.
If you are going to use a commercially available fax application, then please refer to the manual that came
with the application for information on how to send and receive faxes.
Setting up the mobile telephone
Set up and register the mobile telephone as a fax service.
Procedure
1. Turn on the mobile telephone, and set it to be connectable
Note
Please refer to the instruction manual for information on how to operate the telephone.
2. Right-click on the Bluetooth
TM
wireless technology icon in the task tray, and then click on [Add
New Connection]
Note
Alternatively, click [Start]→[All Programs]→[Bluetooth]→[Bluetooth Settings], and then click on [New
Connection] from the active [Bluetooth Settings] window.
The [Add New Connection Wizard (Welcome to the Add New Connection Wizard)] window will appear.
3. Select [Custom Mode], and then click on the [Next] button
The [Add New Connection Wizard (Searching for devices)] window will appear. Once the program has
finished searching for the devices, the [Add New Connection Wizard (Select Device)] window will
appear.
4. Select the device name of the mobile telephone from [Device List], and then click on the [Next]
button
The [Add New Connection Wizard (Searching for Services)] window will appear.
5. If you are connecting to the mobile telephone for the first time, enter the passkey for the device
from the [Bluetooth Passkey (PIN Code)] window, and then click on the [OK] button.
Once the program has finished searching for the services, the [Add New Connection Wizard (Select
Service)] window will appear.
6. Select "Fax" under [Select Service], and then click on the [Next] button
The COM port and modem registration process dependent on your Bluetooth software conditions.

6.1 Case 1: COM port and modem registration process
will be automatically performed
The COM port and modem registration process will then be automatically performed.
Once the COM port and modem (standard 33600 bps type) registration is complete, the
[Add New Connection Wizard (Setting Connection Name)] screen will appear.
6.2 Case 2: COM port and modem registration process will be manually performed
The COM port and modem registration process will then be manually performed using
the original modem .inf file.
Once the COM port and modem registration is completed by following the wizard
process, the [Add New Connection Wizard (Setting Connection Name)] screen will
appear.
7. Configure the type and name of the icon to appear after registration, and click on the [Next] button.
Please click only on the [Next] button once you are satisfied with the configuration. The [Add New
Connection Wizard (Completing the Add New Connection Wizard)] screen will appear.
8. Click on the [Finish] button
The settings will be registered, and the icon will appear on the [Bluetooth Settings] screen.
Setting fax information
Configure send/receive settings and register fax information.
Procedure
1. Select [Start]→[Control Panel], and then double-click on the [Printers and Other Hardware] icon
Note
If the control panel is displayed in "Classic view", and you use Windows 2000, please start from Step (2).
2. Double-click on the [Printers and Faxes] icon
The [Printers & Faxes] window will appear.
3. Click on "Set up faxing" in the [Printers and Faxes] window
A window showing installed programs will appear, and a Fax icon will have been created in the [Printers
and Faxes] screen.
4. Click on "Send a fax" under "Printer Tasks" on the left side of the window
If you have not yet configured a fax device, the [Fax Configuration Wizard] window will appear. In the
window you can enter settings pertaining to the sender (yourself).
Note
If the fax configuration information has already been registered, the [Send Fax Wizard] window, which
can be viewed under "Sending a fax" below, will appear instead of the [Fax Configuration Wizard]
window.
5. Enter the sender information, and click on the [Next] button
Note
The sender information that you configure here will be automatically appended as header information
when you send a fax.
The [Fax Configuration Wizard (Select Device for Sending or Receiving Faxes)] window will appear.
6. Select a device to be used for fax transmissions, enable the device for sending or receiving, and then
click on the [Next] button
Note
If [Enable Receive] is selected, the device will be on standby for receiving faxes even if it is not sending
or receiving anything, and therefore will be in continuous connection to the wireless modem (when
COM Auto Connect is on).

Ple
ase decide whether to select this option based on to the desired objective and/or frequency of
transmission.
The [Fax Configuration Wizard (Transmitting Subscriber Identification (TSID))] window will appear.
7. Click on the [Next] button
It is important that you do not change the transmitter subscriber identification.
The [Fax Configuration Wizard (Completing the Fax Configuration Wizard)] window will appear.
8. Click on the [Finish] button
The fax information will be have been registered, and the [Fax Console] window will appear.
This will complete the fax set-up process.

Sending a fax
This section describes how to send a fax from the Fax Console.
Important
l
The Fax service must be enabled for sending in order for you to send a fax.
Please refer to "Using a mobile telephone" under "Troubleshooting" for how to change the send and
receive settings once the service has been configured.""
Procedure
1. Double-click on the [Fax] icon in the Control Panel
The [Fax Console] window will appear.
2. In the [Fax Console] window, click [File]→[Send fax]
The [Send Fax Wizard (Starting the Send Fax Wizard)] window will appear.
3. Click on the [Next] button
The [Send Fax Wizard (Recipient Information)] window will appear.
4. Enter the name and fax number of the destination party, and then click on the [Next] button
The [Send Fax Wizard (Preparing the Cover Page)] window will appear.
5. Specify the cover page template, subject line, and note (body text), and then click on the [Next]
button
The [Send Fax Wizard (Schedule)] window will appear.
6. If you wish to send the fax immediately, select "Now", and then click on the [Next] button
The [Send Fax Wizard (Completing the Send Fax Wizard)] window will appear.
7. Confirm the destination information and transmission details, and then click on the [Finish]
button
The software will automatically dial the number and send the fax.
Once the fax has been sent, Fax Monitor will revert to standby mode.

Receiving a fax
This section describes what to do when a fax arrives after you have established a connection to a modem
station.
Important
l
The Fax service must be enabled for receiving in order for you to receive a fax.
Please refer to "Using a mobile telephone" under "Troubleshooting" for information on how to change
the send and receive settings once the fax service has been configured.
l
Please ensure you have connected to a modem station before you receive a fax (the device will be
connected to the modem if "Enable Receive" has been selected or COM Auto Connect has been
activated).
Procedure
1. When a fax arrives, the Fax Monitor will start automatically as the fax is received
Once the fax has been received, the Fax Monitor will revert to standby mode.
Note
If you have enabled manual fax reception, a message will appear when a fax arrives.
Click on the message with your mouse to receive the fax.
2. Double-click on the [Fax] icon in the Control Panel
The [Fax Console] window will appear.
3. In the [Fax Console] window, double-click on the fax that has arrived
An image of the received fax will be displayed.
Printing
This section describes how to use a Bluetooth
TM
wireless technology-compatible printer
for printing.
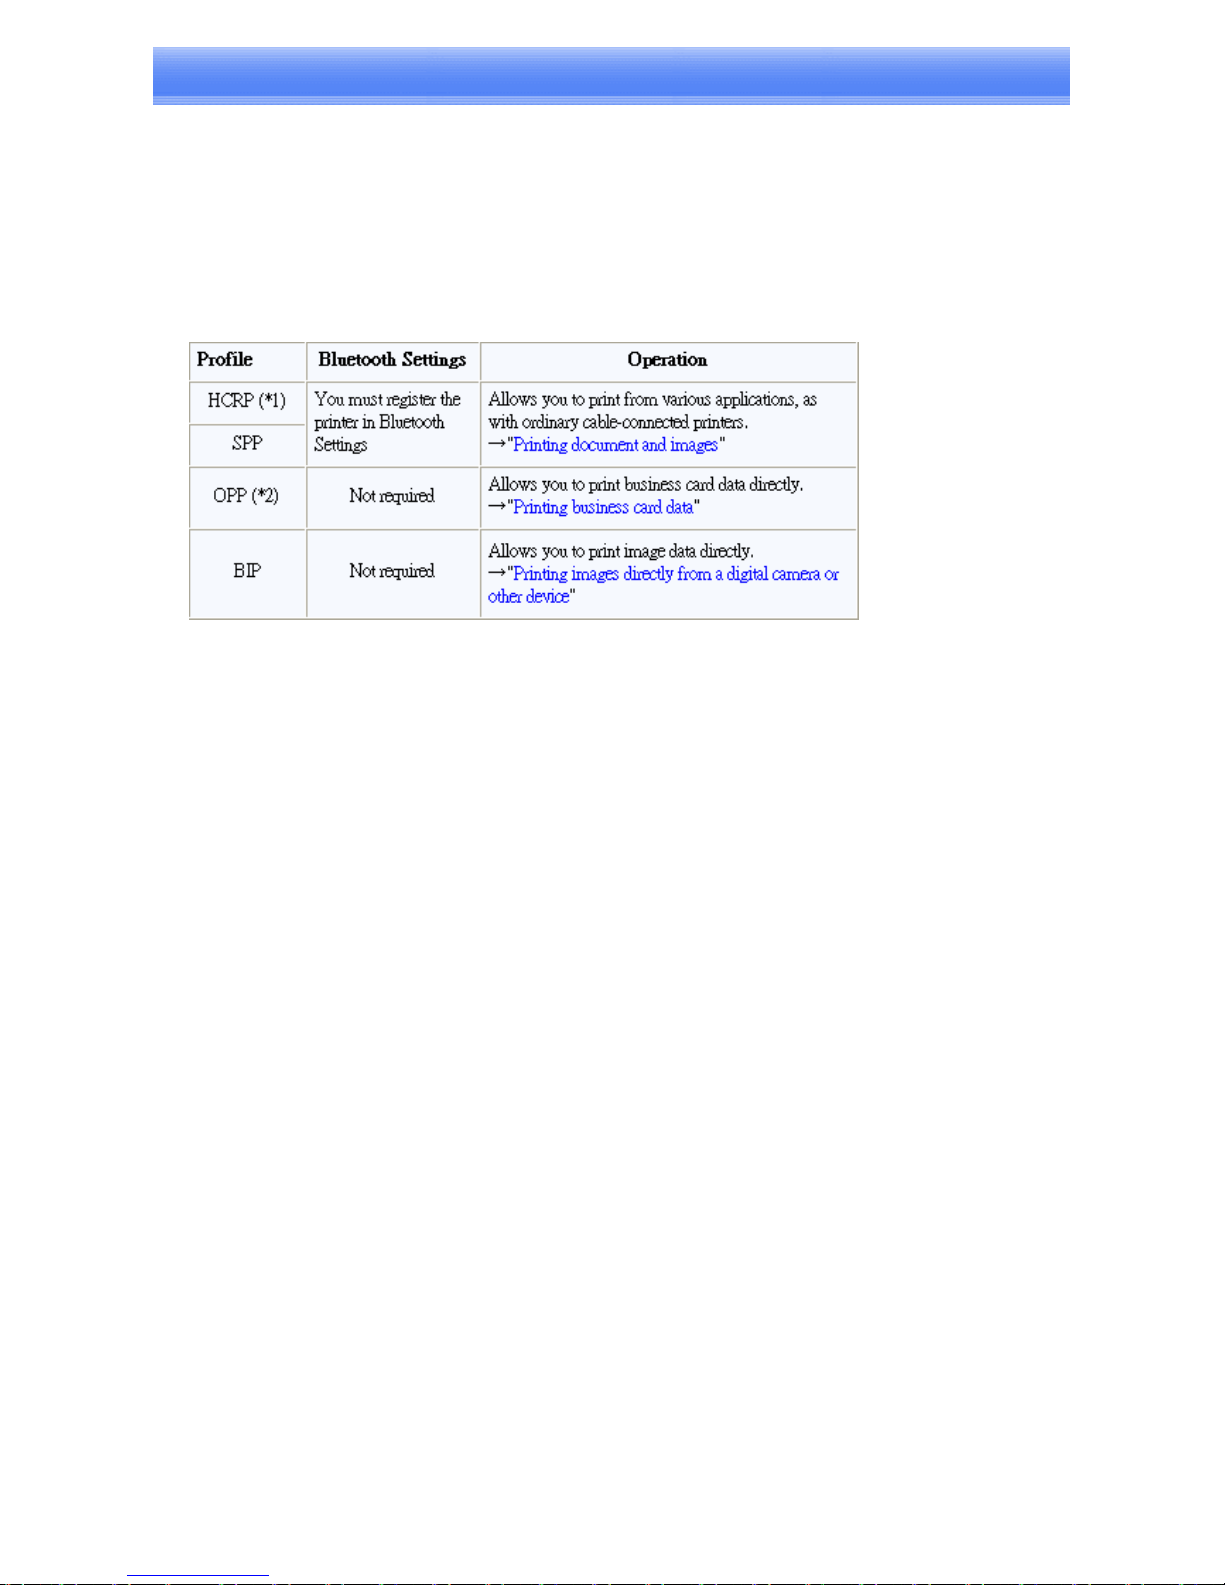
Types of printer functions
When printing using Bluetooth
TM
wireless technology, the methods for configuring and using the printer
will vary with the corresponding profile.
Note
l
(*1) The majority of Bluetooth
TM
wireless technology-compatible printers support HCRP.
If you have selected Express Mode, HCRP will be chosen as the default profile. If the printer does not
support HCRP, then SPP will be the next choice.
l
(*2) The printing of business cards using OPP complies exclusively with the business card (vCARD)
standard.

Printing documents and images
[HCRP] [SPP]
This section describes how to print using a Bluetooth
TM
wireless technology-compatible printer.
Important
l
Please ensure that any printer-specific drivers have been installed on the PC before you have established
a Bluetooth
TM
wireless technology connection.
l
A Bluetooth passkey (PIN code) is required for you to connect to the printer. Please make
a note of your
Bluetooth passkey before you start the set-up process.
Setting up the printer
Procedure
1. Turn on the printer
2. Right-click on the Bluetooth
TM
wireless technology icon in the task tray, and then click on [Add
New Connection]
Note
Alternatively, click [Start]→[All Programs]→[Bluetooth]→[Bluetooth Settings], and then click on
[New Connection] from the active [Bluetooth Settings] window.
The [Add New Connection Wizard (Welcome to the Add New Connection Wizard)]
window will appear.
3. Confirm that [Express Mode] has been selected, and then click on the [Next] button
The [Add New Connection Wizard (Searching for devices)] window will appear. Once the program has
finished searching for the devices, the [Add New Connection Wizard (Device Selection)] window will
appear.
4. Select the device name of the printer from [Device List], and then click on the [Next] button
The [Add New Connection Wizard (Searching for Services)] window will appear.
5. If you are connecting to the printer for the first time, enter the passkey for the device from the
[Bluetooth Passkey (PIN Code)] window, and then click on the [OK] button.
Once the services have been detected successfully, connection to the device and creation of the HCRP
port will be performed automatically.
If you have not yet installed a printer, a message prompting you to install a printer will appear.
6. Click on the [OK] button
The [Add Printer Wizard (Starting the Add Printer Wizard)] window will appear.
7. Click on the [Next] button
The [Add Printer Wizard (Local Printer or Network Printer)] window will appear.

8. Select "Local printer attached to this computer", remove the check next to "Automatically detect
and install my Plug and Play printer", and then click on the [Next] button
The [Add Printer Wizard (Select Printer Port)] window will appear.
9. Select the desired port, and then click on the [Next] button
The [Add Printer Wizard (Install Printer Software)] window will appear.
10. Select the [Manufacturer] and [Printer] as pertains to the printer to be installed, or click on the
[Use Device] button, and then click on the [Next] button
Please install the printer according to the instructions in the windows that follow. Once installation is
complete, a message of confirmation will appear in the [Add New Connection Wizard (Printer
Settings)] window.
11. Click on [Next]
The registered icon will appear in the [Bluetooth Settings] window.
Note
You can change the connection icon and icon name.
Printing
Try to print from the message pad.
1. Click [File]→[Print]
The [Print] screen will appear.
2. Select wireless printer from under [Select Printer], and then click on the [Print] button
Printing will commence.
Note
l
If you have connected to a printer using HCRP or SPP profiles, all future Bluetooth
TM
wireless
technology connections to that printer will be established automatically once you have printed a
document from your PC.

Printing images directly from a digital camera or other device
[BIP]
If you have a printer that supports BIP (Basic Imaging Profile), you can send images directly to a printer
to be printed out, without having to perform any special set-up procedure.
Note
l
Below is a list of file types (extensions) of images that can be printed out directly.
◎Bitmap (*.bmp)
◎JPEG (*.jpg; *.jpeg)
◎PNG (*.png)
Procedure
■Printing image files on a printer (using icons)
1. Turn on the printer
2. Open Bluetooth Information Exchanger
Note
Please refer to Contents of the Bluetooth
TM
Utility on how to open Bluetooth Information Exchanger
3. Double-click on the [Image Transfer] icon
A list of devices will appear in the [Image Transfer] window.
Note
If your desired printer does not appear in the list, please confirm that the printer has been turned
on, and then click on [Bluetooth]→[Search Devices] A device search will be performed.
4. Drag and drop the file to be sent on top of the icon of the destination printer
The file will be sent to the printer.
If the file has been sent to the printer successfully, a message will appear, and the image will be printed
out. Please click on the [OK] button.
A message will appear if the file transmission was unsuccessful. Please click on the [OK] button to
close the message, and repeat the printing procedure.
Note
If the printer does not support the BIP profile, a message will appear.
■Printing image files to a printer (by right-clicking the mouse)
1. Turn on the printer
2. Right-click on the file to be sent, and then click on the destination printer under [to Bluetooth]
Note
If your desired device does not appear in the list, please confirm that the device has been
turned on, and then click on [to Bluetooth] →[Search Other Devices]
Once the device has been detected, select the destination device and click on the [Send] button.
A window indicating that the file is being sent to the printer will appear.
If the file has been sent to the printer successfully, a message will appear, and the image will be
printed out. Please click on the [OK] button.
A message will appear if the file transmission was unsuccessful. Please click on the [OK] button to
close the message, and repeat the printing procedure.
Note
If the printer does not support the BIP profile, a message will appear.

Printing business card data
[OPP]
If you have a printer that supports OPP (Object Push Profile), you can directly send business card data that
conforms to the "vCard" standard to a printer and print it out.
Procedure
■Printing business card data (using icons)
1. Turn on the printer
2. Open Bluetooth Information Exchanger
Note
Please refer to Contents of the Bluetooth
TM
Utility on how to open Bluetooth Information Exchanger
3. Double-click on the [Object Push] icon
A list of devices will appear in the [Object Push] window. Here, the image will be sent to the target
printer.
Note
If your desired printer does not appear in the list, please confirm that the printer has been turned
on, and then click on [Bluetooth]→[Search Devices] A device search will be performed.
4. Drag and drop the business card data to be sent on top of the icon of the destination printer
The business card will be sent to the printer.
If the business card has been sent to the printer successfully, a message will appear, and the image will
be printed out. Please click on the [OK] button.
A message will appear if the business card transmission was unsuccessful. Please click on the [OK]
button to close the message, and repeat the printing procedure.
■Printing business card data (by right-clicking the mouse)
1. Turn on the printer
2. Right-click on the business card data to be sent, and then click on the destination printer under
[to Bluetooth]
Note
If your desired device does not appear in the list, please confirm that the device has been
turned on, and then click on [to Bluetooth] →[Search Other Devices]
Once the device has been detected, select the destination device, and click on the [Send] button.
The business card will be sent to the printer.
If the business card has been sent to the printer successfully, a message will appear, and the image
will be printed out. Please click on the [OK] button.
A message will appear if the business card transmission was unsuccessful. Please click on the
[OK] button to close the message, and repeat the printing procedure.

Listening to music using the stereo headphones
[GAVDP] [A2DP] [AVRCP]
This section describes how to use the stereo headphones to listen to your favourite music or other
audio files stored on your PC.
Configuring the stereo headphones
Procedure
1. Right-click on the Bluetooth
TM
wireless technology icon in the task tray, and click on
[Add New Connection].
Note
Alternatively, click [Start]→[All Programs]→[Bluetooth]→[Bluetooth Settings], and then click on
[New Connection] from the [Bluetooth Settings] screen that has opened.
The [Add New Connection Wizard (Welcome to the Add New Connection Wizard)] will appear.
2. Switch ON the stereo headphones and activate "Discoverable" mode
Please refer to the user guide for the stereo headphones for further information on how to operate them.
3. Confirm that [Express Mode] has been selected, and then click on the [Next] button
The [Add New Connection Wizard (Searching for Devices)] screen will appear.
Once the search for the devices has ended, the [Add New Connection Wizard (Select Device)] screen
will appear.
4. Select the device name of the stereo headphones from the list, and click on the [Next] button
The [Add New Connection Wizard (Searching for Services)] screen will appear.
The settings will be registered, and the icon will appear on the [Bluetooth Settings] screen.
Connecting to the stereo headphones
You can connect to the stereo headphones from the icon registered in [Bluetooth Settings]. Please refer to
the user guide for information on how to make a connection from the stereo headphones.
Important
l
Please close the following audio applications before any connection is made between your stereo
headphones and PC.
◎ Music/video playback applications
◎ e-Conferencing applications
◎ Voice-recognition applications
Please finish connecting the stereo headphones before launching any of these applications.

Listening to music or other audio files
1. Playing music or other audio files on your PC
Important
Please confirm the points below if you are unable to hear anything despite having properly connected
the stereo headphones.
Click [Start]→[All Programs]→[Accessories]→[Entertainment]→[Volume Control].
Remove the tick next to [Mute] if it has been ticked. If the volume is at its lowest setting, please
adjust it to an appropriate level.
Music playback may be interrupted if other Bluetooth
TM
wireless technology devices are currently
connected to your PC. When you are listening to music, it is recommended that the stereo headphones
be the only connected device.
Music playback may be interrupted if you are some distance away from the PC, or if there are any
obstructions between you and the PC.
If you are unable to hear any sound out of your stereo headphones while music or audio is currently
playing in a related application, please stop the files being played, open [Sounds and Audio Devices]
from the Control Panel, and change the default device to "Toshiba Bluetooth Wave."
If you are still unable to hear any sound from the stereo headphones even after having set "Toshiba
Bluetooth Wave" as the default device, please re-launch the application.
2. Finishing listening to music and disconnecting
1. Right-click on the icon for the currently connected mode from [Bluetooth Settings] on your
PC, and click on "Disconnect."
A message confirming the disconnection may appear.
2. Click on the "Yes" button after having followed the instructions in the message.
The icon will indicate that the device has been disconnected.
Important
Please close the following audio applications before you disconnect the stereo headphones from
your PC:
n
Music/video playback applications
n
e-Conferencing applications
n
Voice-recognition applications
Please completely disconnect the stereo headphones before launching any of these applications.
Please refer to the user guide for information on terminating a connection from the stereo
headphones.
Playing music using remote control
Music applications and video playback applications installed on your PC(e.g.,"Windows Media Player 9"
and "InterVideo WinDVD") may be operated with the remote control button/switch on your stereo
headphones.
The remote control used with the stereo headphones must be compliant with the Bluetooth
TM
wireless
technology AVRCP profile. Please refer to the headphones user guide for further information.
You can configure the application to be operated using the switch/button according to the following
procedure.
Procedure
1. Double-click on the Bluetooth
TM
wireless technology icon in the taskbar
Launches "Bluetooth Settings."
2. Right-Click the Bluetooth(TM) Wireless Technology icon and Click on [Options]->[Other] Tab
->[Av Player] in [AV player section]
The [Select AV Player] screen will appear.
3. Select the application, and click on the [OK] button
The functions and switch/button that can be operated may differ depending on the application used for
music/video playback as well as the version.

The procedure below can be performed in order to change the position where the receive command is
displayed or to not have the command displayed.
Procedure
1. Double-click on the Bluetooth
TM
wireless technology icon in the taskbar
Launches "Bluetooth Settings."
2. Right-Click the Bluetooth(TM) Wireless Technology icon and Click on [Options]->[Other] Tab
->[Av Player] in [AV player section]
The [Select AV Player] screen will appear.
3. Select the appropriate item from the pull-down menu of positions where the receive command is
to be displayed, and then click on the [OK] button.
If the receive command appears but does not function properly, sometimes the problem may be rectified
by changing the setting to "Do not display."
The commands supported by this application are shown below. Please refer to the headphone user guide
for commands that are supported by the stereo headphones. Problems with operation may be encountered
with certain versions of "Windows Media Player 9" and "InterVideo WinDVD."
Copyright protection function
A copyright protection function is supported according to the SCMS-T format as defined in the
Bluetooth
TM
wireless technology specifications.

Using a wireless keyboard
[HID]
This section describes how to connect a Bluetooth
TM
wireless technology-compatible keyboard to a PC.
Setting up the wireless keyboard
Procedure
1. Right-click on the Bluetooth
TM
wireless technology icon in the task tray, and then click on [Add
New Connection]
Note
Alternatively, click [Start]→[All Programs]→[Bluetooth]→[Bluetooth Settings], and then click on
[New Connection] from the active [Bluetooth Settings] window.
The [Add New Connection Wizard (Welcome to the Add New Connection Wizard)] window will
appear.
2. Confirm that [Express Mode] has been selected, and then click on the [Next] button
The [Add New Connection Wizard (Searching for devices)] window will appear. Once the program has
finished searching for the devices, the [Add New Connection Wizard (Device Selection)] window will
appear.
3. Select the device name of the keyboard from [Device List], and then click on the [Next] button
The [Add New Connection Wizard (Searching for Services)] window will appear.
4. Use the wireless keyboard to enter the numbers that appear in [Bluetooth Passkey (PIN Code)],
and then hit the [Enter] key
Once the program has detected the services successfully, connection to the device and registration of
settings information will be performed automatically.
The settings information will be registered, and an icon will appear in the [Bluetooth Settings] window.
Note
l
Pressing any key on the wireless keyboard will automatically connect it to the PC thereafter.
Please connect manually if automatic connection is unsuccessful.

Using a wireless mouse
[HID]
This section describes how to connect a Bluetooth
TM
wireless technology-compatible mouse to a PC.
Setting up the wireless mouse
Procedure
1. Turn on the wireless mouse, and set it to be connectable
Please refer to the instruction manual for details on how to operate the mouse.
Note
If the security mode on your PC has been set to "Enable Link-Level Security," then any mouse not
ordinarily requiring a passkey will require one. If your mouse's user guide does not contain any
passkey-related information, please consult the outlet where you purchased your mouse or the relevant
support center.
2. Right-click on the Bluetooth
TM
wireless technology icon in the task tray, and then click on [Add
New Connection]
Note
Alternatively, click [Start]→[All Programs]→[Bluetooth]→[Bluetooth Settings], and then click on
[New Connection] from the active [Bluetooth Settings] window.
The [Add New Connection Wizard (Welcome to the Add New Connection Wizard)] window will
appear.
3. Confirm that [Express Mode] has been selected, and then click on the [Next] button
The [Add New Connection Wizard (Searching for devices)] window will appear. Once the program has
finished searching for the devices, the [Add New Connection Wizard (Device Selection)] window will
appear.
4. Select the device name of the mouse from [Device List], and then click on the [Next] button
The [Add New Connection Wizard (Searching for Services)] window will appear.
A message confirming a device connection will appear.
5. Click on the [OK] button
The settings information will be have been registered, and an icon will appear in the [Bluetooth Settings]
window.
Note
Clicking on one of the mouse buttons or otherwise operating it will automatically connect it to the PC
thereafter. Please connect manually if automatic connection is unsuccessful.

Exchanging files with a PC or PDA
[FTP]
You can send and receive files other than business card data with a PC or PDA that has onboard
Bluetooth
TM
wireless technology.
Use "File transfer" in the Bluetooth Information Exchanger to exchange files.
Note
l
The same operations will be valid as long as the PC and PDA support the FTP profile.
l
"File transfer" cannot be used to send or receive business card data. Please instead use "Object Push" to
perform these activities.
Procedure
■Sending files to a PC or PDA (using icons)
1. Turn on the PC or PDA
2. Open Bluetooth Information Exchanger
Note
Please refer to Contents of the Bluetooth
TM
Utility on how to open Bluetooth Information Exchanger
3. Double-click on the [File transfer] icon
A list of devices will appear in the [File transfer] window.
Note
If the desired device does not appear in the list, please confirm that the device has been turned on, and
then select [Bluetooth]→[Search Devices].
A device search will be performed.
You can also use "Image transfer" when sending individual image files.
4. Use the mouse to drag and drop the file you wish to send over the destination icon
Note
When using "File transfer", you can send individual files as well as entire folders.
5. Confirm that the file is being sent
The file will be sent to the PC.
Note
When sending files using "File transfer", a message requesting permission to receive the files may
appear on the destination (receiving) device. The content of the message will vary with the software
that supports the Bluetooth
TM
wireless technology function on the destination device, so please be
sure to follow the instructions provided.
If you are using the Bluetooth
TM
Utility, a message will appear.
If the file has been sent successfully, a message will appear. Please click on the [OK] button.
A message will appear if the file transmission was unsuccessful.
Please click on the [OK] button to close the message, and repeat the procedure.

Note
Files that have been sent will be saved in a file transfer shared folder on the destination device.
Additionally, with "File transfer", you can open the shared folder on the destination device using
Explorer, specify a subfolder, and then send the file there.
You can use the Settings on [Bluetooth Information Exchanger] tab in [Options] to change the
location of the "Shared folder" on the hard drive.
■Sending files to a PC or PDA (by right-clicking the mouse)
1. Turn on the PC or PDA
Confirm that a connection has been enabled before proceeding to the next step.
2. Right-click on the file you wish to send, and then select its destination from [to Bluetooth]
Note
If the desired device does not appear in the list, please confirm that the device has been turned on, and
then select [to Bluetooth]→[Search other devices].
Once the devices have been detected, a window will appear. Please select the destination device, and
then click on the [Send] button.
3. Confirm that the file is being sent
The file will be sent to the PC.
Note
When sending files using "File transfer," a message requesting permission to receive the files may
appear on the destination (receiving) device. The content of the message will vary with the software
installed on the destination device, so please be sure to follow the instructions provided.
If the file has been sent successfully, a message will appear. Please click on the [OK] button.
A message will appear if the file transmission was unsuccessful.
Please click on the [OK] button to close the message, and then repeat the procedure.
Note
Files that have been sent will be saved in a file transfer shared folder on the destination device.
■Receiving files from a PC or PDA
Your PC is able to receive files that have been saved in the shared folder on the destination PC or PDA.
Received files will be saved in the shared folder under "File transfer".
1. Turn on the PC or PDA
Confirm that a Bluetooth
TM
wireless technology connection has been enabled before proceeding to
the next step.
2. Open Bluetooth Information Exchanger
Note
Please refer to Contents of the Bluetooth
TM
Utility on how to open Bluetooth Information Exchanger
3. Double-click on the [File transfer] icon
A list of devices will appear in the [File transfer] window.
4. Double-click on the destination icon
The file saved in the destination's shared folder will appear.
5. Right-click on the file you wish to receive, and then select "Receive file".
The file will be received from a PDA.
Note
With "File transfer", you can send individual files as well as entire folders.
Please right-click on the folder you wish to receive, and select "Receive folder". Subsequent
operations should be performed in the same manner as when receiving individual files.

If the file has been received successfully, a message will appear. Please click on the [OK] button.
A message will appear if the file transmission was unsuccessful. Please click on the [OK] button to
close the message, and repeat the procedure.
Note
The received file will be saved in the "Shared folder" under "File transfer" in the Bluetooth
Information Exchanger
You can use the Settings on [Bluetooth Information Exchanger] tab in [Options] to specify the
location of the "Shared folder" on the hard drive.

Sending images to a mobile telephone
[BIP]
You can send image data to a Bluetooth
TM
wireless technology-compatible mobile telephone. Large
images will be automatically reduced to fit on the telephone display screen.
Images are sent using "Image transfer" under Bluetooth Information Exchanger.
Note
l
The mobile telephone must support the BIP profile.
l
The following image file formats can be sent and received using "Image transfer":
◎
Bitmap (*.bmp)
◎
JPEG (*.jpg, *.jpeg)
◎
PNG (*.png)
Procedure
■Sending images to a mobile telephone (using icons)
1. Turn on the PC or PDA
Confirm that a Bluetooth
TM
wireless technology connection has been enabled before proceeding.
2. Open Bluetooth Information Exchanger
Note
Please refer to Contents of the Bluetooth
TM
Utility on how to open Bluetooth Information Exchanger
3. Double-click on the [Image transfer] icon
A list of devices will appear in the [Image transfer] window.
Note
If the desired device does not appear in the list, please confirm that the device has been turned on, and
then select [Bluetooth]→[Search Devices].
A device search will be performed.
4. Drag and drop the file you wish to send over the destination icon
The image will be sent. If the image has been sent successfully, a message will appear. Please click on
the [OK] button.
A message will appear if the image transmission was unsuccessful.
Please click on the [OK] button to close the message, and repeat the procedure.
■Sending images to a mobile telephone (by right-clicking the mouse)
1. Turn on the mobile telephone
Confirm that a Bluetooth
TM
wireless technology connection has been enabled before proceeding.
2. Right-click on the file you wish to send, and then click on its destination from [to Bluetooth]
Note
If the desired device does not appear in the list, please confirm that the device has been turned on, and
then select [to Bluetooth]→[Search other devices].
Once the devices have been detected, a window will appear. Please select the destination device, and
then click on the [Send] button.

The image will be sent. If the image has been sent successfully, a message will appear. Please click on
the [OK] button.
A message will appear if the image transmission was unsuccessful.
Please click on the [OK] button to close the message, and repeat the procedure.

Sending images to a PC or PDA
[BIP]
You can send image data to a Bluetooth
TM
wireless technology-enabled PC or PDA. Images are sent using
"Image transfer" under Bluetooth Information Exchanger.
Note
l
The following image file formats can be sent and received using "Image transfer":
◎
Bitmap (*.bmp)
◎
JPEG (*.jpg, *.jpeg)
◎
PNG (*.png)
Procedure
■Sending images to a PC or PDA (using icons)
1. Turn on the PC or PDA
Confirm that a Bluetooth
TM
wireless technology connection has been enabled before proceeding.
2. Open Bluetooth Information Exchanger
Note
Please refer to Contents of the Bluetooth
TM
Utility on how to open Bluetooth Information Exchanger
3. Double-click on the [Image transfer] icon
A list of devices will appear in the [Image transfer] window.
Note
If the desired device does not appear in the list, please confirm that the device has been turned on, and
then select [Bluetooth]→[Search Devices]. A device search will be performed.
4. Drag and drop the file you wish to send over the destination icon
The image will be sent. If the image has been sent successfully, a message will appear. Please click on
the [OK] button.
A message will appear if the image transmission was unsuccessful.
Please click on the [OK] button to close the message, and repeat the procedure.
Note
Images that have been sent will be saved in an image transfer folder on the destination device.
Images received using "Image transfer" in the Bluetooth Information Exchanger will be saved in the
"Image Box" in "Image transfer".
You can use the Settings on [Bluetooth Information Exchanger] tab in [Options] to change the
location of the "Image Box" folder on the hard drive.
■Sending images to a PC or PDA (by right-clicking the mouse)
1. Turn on the PC or PDA
Confirm that a Bluetooth
TM
wireless technology connection has been enabled before proceeding
2. Right-click on the file you wish to send, and then click on its destination from [to
Bluetooth]

Note
If the desired device does not appear in the list, please confirm that the device has been turned on,
and then select [to Bluetooth]→[Search other devices].
Once the devices have been detected, a window will appear. Please select the destination device, and
then click on the [Send] button.
The image will be sent. If the image has been sent successfully, a message will appear. Please click
on the [OK] button.
A message will appear if the image transmission was unsuccessful.
Please click on the [OK] button to close the message, and repeat the procedure.
Note
When you send images by right-clicking the mouse, the image data that has been sent will be saved
in the image transfer shared folder on the destination device. This is also the case when you send
images using icons.

Exchanging business card data with a PC or PDA
[OPP]
You can exchange business card data with a Bluetooth
TM
wireless technology-enabled PC or PDA.
Business card data are exchanged using "Object Push" under Bluetooth Information Exchanger.
Note
l
Data compliant with the "vCARD" standard are the only type of business card data able to be sent and
received with "Object Push".
Business card data can be used by applications such as Microsoft Outlook.
l
Business card data can be created in vCARD format by Microsoft Outlook and other similar applications.
l
You can send business card data directly from Microsoft Outlook.
l
The OPP profile must be supported by the PC or PDA of the other party.
Procedure
■Selecting a business card and sending it to a PC or PDA (using icons)
Select a business card you wish to send from among all the business card data you have already received
through exchanges with your business or other contacts, and then send it to another party.
1. Turn on the PC or PDA
Confirm that a Bluetooth
TM
wireless technology connection has been enabled before proceeding.
2. Open Bluetooth Information Exchanger
Note
Please refer to Contents of the Bluetooth
TM
Utility on how to open Bluetooth Information Exchanger
3. Double-click on the [Object Push] icon
A list of devices will appear in the [Object Push] window.
Note
If the desired device does not appear in the list, please confirm that the device has been turned on, and
then select [Bluetooth]→[Search Devices].
A device search will be performed.
4. Use the mouse to drag and drop the business card you wish to send over the destination icon
The business card will be sent.
Note
When you try to send a business card, a message requesting permission to receive the card may
appear on the device belonging to the other party (i.e., on the receiving end). The content of the
message will vary with the software installed on the destination device, so please be sure to follow the
instructions provided.
If the business card has been sent successfully, a message will appear. Please click on the [OK] button.
A message will appear if the business card transmission was unsuccessful.
Please click on the [OK] button to close the message, and repeat the procedure.
Memo
Data that have been sent will be saved in a folder for exchanged business cards on the destination
device.
You can configure an associated application (Microsoft Outlook etc) to start automatically when you
have received a business card, allowing you to view the card details.

You can use the Settings on [Bluetooth Information Exchanger] tab in [Options] to configure whether
or not you would like such an application to start automatically.
■Selecting a business card and sending it to a PC or PDA (by right-clicking the mouse)
1. Turn on the PC or PDA
Confirm that a Bluetooth
TM
wireless technology connection has been enabled before
proceeding.
2. Right-click on the business card you wish to send, and then click on its destination from [to
Bluetooth]
Note
If the desired device does not appear in the list, please confirm that the device has been turned on, and
then select [to Bluetooth]→[Search other devices].
Once the devices have been detected, a window will appear. Please select the destination device, and
then click on the [Send] button.
The business card will be sent.
Note
When you try to send a business card, a message requesting permission to receive the files may
appear on the device belonging to the other party (i.e., on the receiving end). The content of the
message will vary with the software installed on the destination device, so please be sure to follow the
instructions provided.
If you are using the Bluetooth
TM
Utility, a message will appear.
If the business card has been sent successfully, a message will appear. Please click on the [OK] button.
A message will appear if the business card transmission was unsuccessful.
Please click on the [OK] button to close the message, and repeat the procedure.
Note
Data that have been sent will be saved in a folder for exchanged business cards on the destination
device.
■Sending your personal business card
You can prepare a business card bearing your name and other details such as your company and
telephone numbers, and then send it to another party.
Note
l
You can use the Settings on [Bluetooth Information Exchanger] tab in [Options] beforehand to
configure which data to use for your own business card.
l
You can only have one business card registered as your own that is able to be sent.
1. Turn on the PC or PDA
Confirm that a Bluetooth
TM
wireless technology connection has been enabled before proceeding
2. Open Bluetooth Information Exchanger
Note
Please refer to Contents of the Bluetooth
TM
Utility on how to open Bluetooth Information Exchanger
3. Double-click on the [Object Push] icon
A list of devices will appear in the [Object Push] window.
Note
If the desired device does not appear in the list, please confirm that the device has been turned on, and
then select [Bluetooth]→[Search Devices]. A device search will be performed.
4. Right-click on the destination icon, and then click on [Send business card To]
The business card will be sent.
Note
When you try to send a business card, a message requesting permission to receive the files may appear
on the device belonging to the other party (i.e., on the receiving end). The content of the message will
vary with the software installed on the destination device, so please be sure to follow the instructions
provided.
If you are using the BluetoothTMUtility, a message will appear.

Business cards that have been sent will be saved in the Inbox of the destination party.
If your business card has been sent successfully, a message will appear. Please click on the [OK] button.
A message will appear if the business card transmission was unsuccessful. Please click on the [OK]
button to close the message, and repeat the procedure.
Note
Data that has been sent will be saved in a folder for exchanged business cards on the destination device.
■Acquiring a business card from another party
You can use your PC to acquire a business card from a party containing their details.
1. Turn on the PC or PDA
Confirm that a Bluetooth
TM
wireless technology connection has been enabled before proceeding
2. Open Bluetooth Information Exchanger
Note
Please refer to Contents of the Bluetooth
TM
Utility on how to open Bluetooth Information Exchanger
3. Double-click on the [Object Push] icon
A list of devices will appear in the [Object Push] window.
Note
If the desired device does not appear in the list, please confirm that the device has been turned on, and
then select [Bluetooth]→[Search Devices].
A device search will be performed.
4. Right-click on the icon of the party whose card you wish to acquire, and then click on
[Receive business card]
The business card will be received.
Note
When you try to acquire a business card, a message requesting permission to send the files may
appear on the device belonging to the other party (i.e., on the sending end). The content of the
message will vary with the software installed on the destination device, so please be sure to follow the
instructions provided.
If you are using the Bluetooth
TM
Utility, a message will appear.
If the business card has been received successfully, a message will appear. Please click on the [OK]
button.
A message will appear if the business card was unsuccessfully received.
Please click on the [OK] button to close the message, and repeat the procedure.
Note
Business card data that have been received will be saved in the Inbox under "Object Push".
You can use the Settings on [Bluetooth Information Exchanger] tab in [Options] to change the location
of the Inbox on the hard drive.
■Exchanging business cards
Simultaneously exchange your business card with one belonging to another party.
1. Turn on the PC or PDA
Confirm that a Bluetooth
TM
wireless technology connection has been enabled before proceeding.
2. Open Bluetooth Information Exchanger
Note
Please refer to Contents of the Bluetooth
TM
Utility on how to open Bluetooth Information Exchanger
3. Double-click on the [Object Push] icon
A list of devices will appear in the [Object Push] window.

Note
If the desired device does not appear in the list, please confirm that the device has been turned on, and
then select [Bluetooth]→[Search Devices].
A device search will be performed.
4. Right-click on the icon of the party with whom you wish to exchange business cards, and then
click on [Object Push]
The business card from the party who executed the "Exchange business cards" command will be sent
first.
Note
When you try to send a business card, a message requesting permission to receive the files may
appear on the device belonging to the other party (i.e., on the receiving end). The content of the
message will vary with the software installed on the destination device, so please be sure to follow the
instructions provided.
If you are using the Bluetooth
TM
Utility, a message will appear.
A message of confirmation will appear if the card has been successfully sent.
Note
Business cards that have been sent will be saved in the Inbox of the destination party.
Once your business card has finished being sent, the program will start receiving the
business card belonging to the other party.
Note
When a business card is to be received, a message may appear on the device belonging to the other
party.
Please click on the [Yes] button if you give permission for the business card to be sent.
A message of confirmation will appear if the card has been successfully received.
Note
Business cards that have been received will be saved in the "Inbox" under "Object Push".
You can use the Settings on [Bluetooth Information Exchanger] tab in [Options] to change the
location of the Inbox on the hard drive.

Using a Bluetooth
TM
wireless technology-compatible camera
[BIP]
By connecting a Bluetooth
TM
wireless technology-compatible digital camera to your PC, you will
be able
to operate the camera shutter from the PC and transmit captured images to it as well.
Connecting the camera
Use the "Remote Camera" tool in the Bluetooth
TM
Utility to connect the camera to your PC.
Procedure
1. Click on [Start ] →[All Programs]→[Bluetooth]→[Remote Camera]
Note
In Windows 2000, click on [Start]→[Programs]→[Bluetooth]→[Remote Camera].
The [Remote Camera] window will appear.
2. Turn on the camera, and set it to be connectable via Bluetooth
TM
wireless technology
Note
Different cameras are operated in different ways, depending on the manufacturer and model used.
Please refer to the instruction manual for further details on how to operate your camera.
3. Click on the [Camera Search...] button
The camera will be detected and its icon displayed.
4. Right-click on the camera icon, and select [Connect]
The camera will be connected, and images from the camera will appear on-screen.
Taking pictures
By placing the mouse cursor over the on-screen image, the camera's operating window will appear.
You can operate the camera from this window.
Procedure
■Taking a single picture
1. Click on the button in the operating window.
A single image will be captured and sent to the PC.
■Taking several consecutive frames
1. Click on the button in the operating window
A succession of images will be captured and sent to the PC.

Note
The remote camera shutter cannot be operated while the camera is connected to the PC.
The number of consecutive pictures taken can be set to anywhere between 2 and 16
1. In the [Remote Camera] window, click on [Bluetooth]→[Properties]→[Consecutive Image Settings]
The [Change number of consecutive images] dialog box will appear
2. Click on the [<][>] buttons to select the number of consecutive images to be captured
Important
Images are not only sent to the PC, but are stored in the camera's on-board memory as well.
Please be aware of the remaining memory capacity when you are taking a large number of pictures.
Large file sizes are common for high-resolution images, and may take some time to be transferred to
the PC.
Viewing images saves on your PC
A "Remote Camera" folder will be created in the "Bluetooth" folder under "My Documents" during initial
set-up. A folder bearing the same name as the camera will be created in it, and images will be saved in this
folder.
Click the [Explorer] button in the [Remote Camera] window to display the folder where the images have
been saved.
Note
l
This window is an example showing pictures when [Filmstrip] has been selected from the [View] menu
in Explorer.

Synchronizing information using ActiveSync [SPP]
This section describes how to synchronize information on your PDA (calendars, contacts,
inboxes etc) with your PC using Microsoft ActiveSync.
When you connect via Bluetooth
TM
wireless technology instead of with a standard cable, you
will always be able to synchronize your data without the hassle of having to connect the cable.
Important
l
Please use ActiveSync v.3.7 or higher. Also please establish a partnership between the devices using a
USB or infrared link before you connect via Bluetooth
TM
wireless technology.
l
Please refer to the ActiveSync Help or other manuals for information on how to use the
application.
l
Microsoft Outlook 2002 or another schedule management tool must also be installed on the PC.
Connecting using ActiveSync
Both the PC and PDA must be set up in order for a connection to be established.
■Preparing the PC
Procedure
1. On the PC, click on [Start]→[All Programs]→[Microsoft ActiveSync]
The initial ActiveSync set-up window will appear.
It is assumed in the explanation below that no ActiveSync connections have been established with
other devices.
2. Click [File]→[Connection Settings]
The [Connection Settings] window will appear.
3. Place a check next to [Allow serial cable or infrared connection to this COM port], and then
select "COM7".
Note
In the standard set-up, the port is configured to "COM7" (refer to Steps (3) and (4) under "Preparing
the PDA" below). When using a different port, please also change the port number selected in this
window.
■Preparing the PDA
Procedure
1. Tap on the Bluetooth
TM
wireless technology icon in the bottom right of the screen
Important
The connection procedure may be different depending on the manufacturer or model of PDA you
use. Please refer to the product instruction manuals for further details.
The [Bluetooth Settings] window will open.
The message "Connection not registered" will appear if no Bluetooth
TM
wireless technology device
has been registered.
Please tap on [OK] to close the message.
2. Double click on [Tools]→[Search for peripheral components]
The application searches for nearby devices.

3. Tap and hold on the destination PC icon, and then select [Update Services]
A search for services will be carried out, and then a list of service names and their connection status
will appear as list in the lower window.
4. Tap and hold on "COM7" from the list of service names, and then select "Register ActiveSync".
5. Tap [OK] in the confirmation message window
An ActiveSync connection will be initiated.
Establishing a partnership between ActiveSync and a PDA
Once a connection has been successfully established with a PDA, the procedure for establishing a
partnership with the PDA will be started by the ActiveSync application on the PC. Performing this set-up
procedure will enable data to be synchronized between your PC and PDA.
Procedure
1. In the [New Partnership (Set Up a Partnership)] window, select "Standard partnership", and then
click on the [Next] button
The [New Partnership (Specify Data Synchronization Method)] window will appear.
2. Select "Synchronize with this PC", and then click on the [Next] button
The [New Partnership (Select Synchronization Settings)] window will appear.
3. Select the type of information to be synchronized between your PC and PDA, and then click on the
[Next] button
The [New Partnership (Completing Setup)] window will appear.
4. Click on the [Finish] button
When you click on the [Finish] button, ActiveSync will begin to synchronize your information.
[Confirming changes]
↓
(Synchronization process)
↓
[Synchronization complete]
While the ActiveSync connection is active, synchronization will be performed whenever information is
changed on either the PC or the PDA.
Once a partnership has been established, every time you start your PC (and PDA) thereafter, a
Bluetooth
TM
wireless technology connection will be opened and ActiveSync will synchronize your
information.
Finishing an ActiveSync connection
Follow the procedure below on your PDA if you want to end an ActiveSync
connection manually.
Procedure
1. Tap and hold on "COM7" in the [Bluetooth Settings] window, and select [ActiveSync
Release]
Cancelling a partnership
Follow the procedure below from the ActiveSync window on the PC if you want to cancel
the partnership between your PC and PDA.
Procedure
1. Click on [File]→ "Delete partnership"
Click on the [Yes] button when the confirmation message appears.
Note
If you wish to create another ActiveSync connection, you will have to repeat the above
procedure to re-establish a partnership.

Using a
headset to communicate [HSP]
This section provides a description of how to use a Bluetooth
TM
wireless technology-compatible wireless
headset to communicate (chat) using Microsoft NetMeeting or other software.
Registering the headset Procedure
Procedure
1. Right-click on the Bluetooth
TM
wireless technology icon in the tasktray, then click on [Add New
Connection Wizard]
Note
Alternatively, you can click on [Start]>[All Programs]>[Bluetooth]>[Bluetooth Settings], then click on
[New Connection] in the [Bluetooth Settings] screen that has opened.
The [Add New Connection Wizard (Welcome to the Add New Connection Wizard)] screen will appear.
2. Turn the headset power on
Once you have turned on the headset, set the mode to enable a connection. Important
The procedure for operating the headset may differ depending on the manufacturer and model.
Please consult your user guide for a detailed description of how to operate the unit.
3. Confirm that [Express Mode] has been selected, then click on the [Next] button
The [Add New Connection Wizard (Searching for Devices)] screen will appear.
Once the device search has been completed, the [Add New Connection Wizard (Select a Device)] screen
will appear.
4. Select the name of the headset device from the list, then click on the [Next] button
5. Answering with the headset
If the service has been properly detected, a screen will appear indicating that the headset is being called, and
a tone will accordingly sound in the headset.
Please press the headset switch.
Important
The procedure for operating the headset may differ depending on the manufacturer and model.
Please consult your user guide for a detailed description of how to operate the unit.
The [Add New Connection Wizard (Configuring (Connecting to Voice Circuit))] screen will appear, and
device configuration will be performed.
Note
If you are connecting to the headset for the first time, or if another audio device has not yet been registered,
the following [Found New Hardware Wizard] screen will appear, from which you can proceed to install the
driver.
If another audio device has already been registered (i.e., the driver has been installed), you can proceed to
Step 9 without having to install the driver.
6. Click on the [Next] button
The [Install Hardware] screen will appear.

7. Click on the [Continue Anyway] button
The following screen will appear automatically. You may disregard it and click on the [Continue Anyway]
button.
The [Add New Connection Wizard (Completing the Found New Hardware Wizard)] screen, which is the
final screen of the installation wizard, will appear.
8. Click on the [Finish] button
Once driver installation is complete, click on the [Finish] button.
The configuration information will be registered, and an icon will be displayed in the [Bluetooth Settings]
screen.
Making a connection to the headset
You can make a connection to the headset from an icon that has been registered in [Bluetooth Settings].
Important
l
Before making a connection to the headset, please check that you have turned on the headset's power, and that
it has been enabled for a Bluetooth
TM
wireless technology connection.
Please ensure that the following audio-related applications have been closed before you connect the headset to
your PC.
Windows Media Player, BeatJam, InterVideo WinDVD and other music/audio playback software.
Windows Messenger and other e-conferencing software.
If you wish to use these applications, please terminate the headset connection before you launch them.
Procedure
1. Right-click on the headset icon, then click on [Connect].
2. Answer with the headset
A screen will appear indicating that the headset is being called, and a tone will accordingly sound in the
headset.
Please press the headset switch.
If the connection has been properly established, the icon's appearance will change to indicate a connected
state.
You may now launch conferencing and voice-recognition software and use the headset.
Disconnecting from the headset
Please follow the steps below to disconnect from the headset.
Procedure
1. Right-click on the headset icon in the [Bluetooth Settings] screen, then click on [Disconnect].
A message will appear, requesting confirmation that you wish to disconnect. Click on the [Yes] button.
The icon on the [Bluetooth Settings] screen will appear as shown below, indicating that the device has been
disconnected.

Making a device undiscoverable to other users
For security purposes, you may not wish your device to be detected by other users. The procedure for
accomplishing this is provided below.
Procedure
1. Right-click on the Bluetooth
TM
wireless technology icon in the task tray, click on [Options] and
select [security] tab.
The [Bluetooth Security Level] will appear.
2. Select [Custom Level ...] in [Bluetooth Security Level] under [security] tab.
3. Check the [Not Discoverable] in Mode on [Security Settings]
Your device will now be undetectable by other users, even when they search for other
devices.
Note
l
Other devices are still able to establish connections with your device even if you have enabled the
Non-discoverable mode.
Please enable "Connection denied" if you wish to reject connections from other devices.

Encrypting the content of your transmissions
Since Bluetooth
TM
wireless technology is conducted wirelessly, there is always the possibility that a third
party may be able to intercept your transmissions.
You can use encryption to render the content indecipherable to anyone who manages to intercept it.
Important
l
Encrypting your transmissions will still not guarantee complete security. Accordingly, please be aware
that transmitting data is conducted with an element of risk for the user.
Procedure
1. Right-click on the Bluetooth
TM
wireless technology icon in the task tray, click on [Option] and
select [security] tab.
The [Bluetooth Security Level] will appear.
2. Select [Custom Level ...] in [ Bluetooth Security Level] under [security] tab.
3. Check the Link level enforced security [Authentification and encryption] in [Link Level Enforced Security]
on [Security Settings]
Your device will now be encryptable by other users, even when they connect for other devices.
Note
Once you have configured the security mode, a window will appear when you first make a connection
to another device, prompting you to enter a Bluetooth passkey (PIN code).
Please click on the [OK] button after you have entered the passkey.
The window in which you enter the passkey will not appear once you have connected more than two
times to the device.

Changing the default connection
The "default connection" refers to the dial-up connection configured for use whenever a connection
is made to the Internet.
If several connections have been registered, you can change the default connection by following
the procedure below.
Procedure
1. Start Internet Explorer
2. Click on [Tools]→[Internet Options...]
The [Internet Options] window will appear.
3. Click on the [Connections] tab
Change the settings so that "London A (as a sample)" will always be dialed when you connect to the
Internet.
4. Select "Always dial my default connection"
5. Click on "London A", and then click on the [Set Default] button
"London A" has been changed to the default connection.
Note
l
Alternatively, if you wish to connect to the Internet from a LAN in a company or other environment
where a LAN can be accessed, select "Never dial a connection" if you have a dial-up configuration,
but do not want dial-up to occur automatically.
l
When connecting to the Internet via a LAN, you must enter the appropriate LAN settings under [LAN
Settings...].

Sending business card data from Outlook
This section describes how to send business card data wirelessly using Microsoft Outlook
Note
l
The explanation below relates to an example in which Microsoft Outlook 2002 or higher has been used
to perform the procedure. Subtle differences may arise when using other versions of the software.
Sending business card data
You can send business card data directly from the "Contacts" window in Outlook.
Procedure
1. Start Microsoft Outlook, and open the "Contacts" window
2. Double-click on the contact whose details you wish to send as a business card
The details of the contact you selected will appear.
3. Click on the [to Bluetooth] from the toolbar
The [Device List] window will appear.
Note
If the [to Bluetooth] button does not appear on the toolbar, please refer to
Installing business card-sending functionality in Outlook as an Add-in" below and change the settings
accordingly.
4. Select the destination for the business card data, and then click on the [Send] button
Note
If you cannot find the destination device in the list, please click on the [Searching for devices] button to
discover it.
The business card will be sent.
Note
If the transmission was unsuccessful, please attempt to send the data once more after having confirmed
the operating conditions (power status, security settings, etc) of the destination device.
■Installing business card-sending functionality in Outlook as an Add-in
You can install one of the functions of the Bluetooth
TM
Utility in Outlook as an "Add-in", which will
enable you to send business cards from the Outlook toolbar.
Procedure
1. Click on [Tools]-[Options...] in Outlook
The [Options] dialog box will appear.
2. Select the [Other] tab, and then click on the [Advanced Options...] button in the "General" field
The [Advanced Options] dialog box will appear
3. Click on the [COM Add-Ins...] button
The [COM Add-Ins] dialog box will appear.
4. Click on the [Add...] button
The [Add Add-In] dialog box will appear.
5. Select "TosBTAddin.dll", and then click on the [OK] button
Note
"TosBTAddin.dll" can be found on the hard drive at the address below. C:\Program
Files\Toshiba\Bluetooth Toshiba Stack
6. Confirm that "Send to Bluetooth" has been added to the list and that a check appears next to it,
and then click on the [OK] button
This will complete the Add-in process.

Manually creating a virtual Bluetooth COM port
In order for a PC to connect to and communicate with a Bluetooth
TM
wireless technology device,
the
Bluetooth
TM
Utility will create a gateway for data to be exchanged between the respective devices. This
gateway is known as a "port" (or "virtual COM port").
Since one virtual COM port will be allocated to each device, trouble-free communication will still be
possible even if several devices are being used.
When you use the Bluetooth
TM
Utility, a virtual COM port will be automatically created on set-up;
however, virtual COM ports can be created manually if so needed.
Note
l
Bluetooth Manager must be active in order for you to be able to use Bluetooth Local COM.
Clients and servers
When Bluetooth
TM
wireless technology communications are performed, there will always be a
"client/server" relationship between the various devices. A "client" is a device that sends certain requests
to another device, while a "server" is a device that provides a service on receipt of such requests from
another device.
For example, when a PC issues a print command to a wireless printer, the PC functions as the client, while
the printer functions as the server.
When a PDA or other device attempts to receive files located on a PC by means of file transfer protocol,
the PC functions as the server, while the PDA functions as the client.
Virtual Bluetooth COM ports can be created both for clients and servers.
l
Bluetooth virtual COM port for a client
Virtual COM port used when your device is the client, and requests are sent to another device.
l
Bluetooth virtual COM port for a server
Virtual COM port used when your device is the server, and requests are received from another device.
Creating a virtual COM port
Bluetooth virtual COM ports are created according to the procedure below.
Procedure
1. Click on the [Printers and Other Hardware] icon in the Control Panel
The [Printers and Other Hardware] window appears.
2. Double-click on the [Bluetooth Local COM] icon
The main Bluetooth Local COM window will appear.
Note
Even when the Control Panel appears in Classic view, please simply click on the [Bluetooth Local
COM] icon.
No such distinction between viewing formats exists in Windows 2000.
3. Click on the [Add...] button
The [Bluetooth Local COM Wizard] window, from where you can create a virtual COM port, will
appear.
Start from this window when creating Bluetooth virtual COM ports for either servers or clients.
Deleting a virtual COM port
Please follow the procedure below to delete a virtual COM port when it is no longer needed.
Note
l
You can only delete virtual COM ports created by the Bluetooth Local COM utility.
1. Select the port you wish to delete from the [Bluetooth Local COM] window, and then click on the
[Delete] button
A message will appear asking you to confirm that you wish to delete the port.

2. Click on the [Yes] button
The port will be deleted.
3. Click on the [OK] button
Optional Properties
This section describes the settings categories for each of the tabs in the Optional Properties window.
Note
The contents in the following description fields are explanatory notes, not same as messages on screen.
[General] tab
Note
The default device name is the name of your computer. The device address is set for every module.
Please select the model type that you are using for the Model to use. It may be used to differentiate
destination devices (for example, as a device icon display).
[Security] tab
Sets the security settings in Slider. High, Medium, Standard, Low and Customize (individual settings
possible) can be set for the security level. The authentication information (link key) can also be deleted


[Bluetooth Information Exchanger] tab
Displays or changes the settings used in Bluetooth Information Exchanger.
[Other] tab
Performs settings for COM Auto Connect, AV player selection and copyright protection.
[Diagnostics] tab
There are some diagnostic functions. Selects the appropriate one as the need arises. These are maintenance
purpose only.

Bluetooth Settings
This section provides detailed information on the [Bluetooth Settings] window.
Main window
Menu
■[Bluetooth] menu
■[View] menu

■[Help] menu
Device List
Displays a list of devices that have been registered in [Bluetooth Settings].
Function buttons

One-touch connection to Bluetooth
TM
wireless technology devices
Creating a Shortcut
If you have created a shortcut icon on the Desktop, you can easily establish a connection to a device that
has been registered using Bluetooth Settings without having to open the [Bluetooth Settings] window.
Procedure
1. Right-click on Bluetooth
TM
wireless technology icon in task tray and click on [Bluetooth Settings]
Note
Alternatively, you can click [Start]→[All Programs]→[Bluetooth]→[Bluetooth Settings].
The [Bluetooth Settings] screen will appear, from where you can create a Shortcut entitled
"Bluetooth Mouse."
2. Right-click on the mouse registration icon, and then click on [Create Shortcut on Desktop]
A shortcut icon of the mouse will appear on the Desktop.
■Establishing a connection from the Shortcut
1. Double-click on the mouse registration icon from the Desktop
The [Bluetooth Settings] window will open.
2. Turn on the mouse, set it to connectable mode, and then click on the [OK] button in the
[Bluetooth Settings] window.
The mouse will be connected.

Manually connecting to a Bluetooth
TM
wireless technology device
After a keyboard or mouse (HID profile), printer (HCRP or SPP profiles), or other device has been
set up for the first time, subsequent connections will be automatically restored whenever you operate the
device, print out a document from the PC, or perform another similar activity.
Should the connection not have been properly restored, please establish a manual connection to the device
using the procedure below.
Procedure
1. Right-click on Bluetooth
TM
wireless technology icon in task tray and click on [Bluetooth Settings]
Note
Alternatively, click [Start]→[All Programs]→[Bluetooth]→[Bluetooth Settings].
The [Bluetooth Settings] screen will appear, from where you can connect a mouse manually.
2. Right-click on the mouse registration icon, and then click on the [Connect] button
The [Bluetooth Settings] window will open.
3. Turn on the mouse, enable connection mode, and click on the [OK] button in the [Bluetooth
Settings] window.
The mouse will be connected.
Note
If you wish to manually disconnect a device, right-click on its icon and click [Disconnect].
When a message appears, click on the [Yes] button.

Changing a connection icon
You can change a device icon that has been registered on the [Bluetooth Settings] screen.
Procedure
1. Right-click on the Bluetooth
TM
wireless technology icon in the task tray, and then click on
[Bluetooth Settings]
Note
Alternatively, click [Start]→[All Programs]→[Bluetooth]→[Bluetooth Settings].
The [Bluetooth Settings] window will appear. Now try to change the icon for "My Mobile."
2. Right-click on the "My Mobile" icon, and then click on [Change Icon]
A list of available icons will appear.
3. Select the icon, and then click on the [OK] button
The new icon will appear.

Changing a connection icon name
You can change a the name of a device icon that has been registered on the [Bluetooth Settings] screen.
Procedure
1. Right-click on the Bluetooth
TM
wireless technology icon in the task tray, and then click on
[Bluetooth Settings]
Note
Alternatively, click [Start]→[All Programs]→[Bluetooth]→[Bluetooth Settings].
The [Bluetooth Settings] window will appear. Now try to change the connection name for "My Mobile"
to "Pocket PC."
2. Right-click on "My Mobile", and then click on [Rename]
You will now be able to enter a name.
3. Enter "Pocket PC", and then hit the [Enter] key
The new name will appear.

Bluetooth Manager
This section provides detailed information on the settings categories in Bluetooth Manager.
Main menu


Bluetooth Information Exchanger
This section provides detailed information on the settings categories in Bluetooth Information Exchanger.
Main window
[Bluetooth] menu

Data exchange folders
Three folders are available for data exchange: "Image transfer", "File transfer" and "Object Push".

Remote Camera
This section provides detailed information on the settings categories in Remote Camera.
Main window
Menu
■[Bluetooth] menu

■[Help] menu
List of cameras
A list of cameras that have been registered as remote cameras will be displayed.
[Camera Search...] button
Clicking on this button will execute a search for remote cameras.
Display images
Images transferred to the PC from a remote camera will be displayed.
[Explorer...] button
Clicking on this button will display the folders on the hard drive where images that have been transferred
to the PC have been stored.
Note
l
A folder for saving your images will be created automatically.
Camera operation window
Camera images
Images as seen through the lens of your remote camera will be displayed.
Display magnification
The size of the operating window display can be adjusted from 100% (1x) to 300% (3x).
Important
l
Increasing the size of the operating window will impede its ability to display images, and will have an
adverse effect on other processes being performed by your PC. Please adjust the magnification as
appropriate for your intended use.
[Explorer...] button
Clicking on this button will display the folders on the hard drive where images that have been transferred
to the PC have been stored.
Shutter button (consecutive images)
Clicking this button will cause the camera to take the number of images specified in [Consecutive image
settings] under the [Bluetooth] menu and then send those images to your PC.

Shutter button (single images)
Clicking this button will cause the camera to take one picture and then send the image to your PC.

Bluetooth Local COM
This section provides detailed information on the settings categories in Bluetooth Local COM.
Main window
Port
Displays a list of configured ports.
Description
Displays the function of each port.
Ports displayed as "Toshiba BT Port (COMxx)" are Bluetooth virtual COM ports.
Owner
Displays the application used to create those COM ports.
The following information will appear for ports created by Bluetooth Local COM.
Function buttons

Wireless File Transfer
This section provides detailed information on the settings categories in Wireless File Transfer.
Main window
Files/folders
Displays a list of files/folders to be sent.
Devices to which data can be sent
Displays other devices to which you are able to send files. Files will be sent to those devices that have
been checked.
Name
Displays name of destination devices.
Connection method
Displays method used to connect to other devices.
Note
l
If a device to which you would like to send data is not listed, you can click on the [Search] button to
search for other devices.
Function buttons

Troubleshooting
This section describes possible causes and countermeasures to be considered when your Bluetooth
TM
wireless technology device cannot be configured properly, functions abnormally, or presents other
problems related to its operation.
Troubleshooting by application
l
General operation of the Bluetooth
TM
Utility
l
Using a wireless modem station
l
Using an access point
l
Using a printer
l
Using a headset
l
Using a keyboard or mouse
l
Using a camera
l
Using a PDA
l
Using a mobile telephone
General operation of the Bluetooth
TM
Utility
Bluetooth Manager
Bluetooth
TM
wireless technology icon does not appear in task tray
l
If the Bluetooth
TM
wireless technology icon does not appear in the Tasktray, Bluetooth Manager
will not be active, and you will be unable to use any of the functions of the Bluetooth
TM
Utility.
Start the utilities as instructed below to enable Bluetooth Manager to start automatically and allow
all functions to be utilized.
Bluetooth Settings
(from Windows XP)
[Start] > [All Programs] > [Bluetooth] > [Bluetooth Settings]
(from Windows 2000)
[Start] > [Programs] > [Bluetooth] > [Bluetooth Settings]
Remote Camera
(from Windows XP)
[Start] > [All Programs] > [Bluetooth] > [Remote Camera]
(from Windows 2000)
[Start] > [Programs] > [Bluetooth] > [Remote Camera]
Wireless File Transfer
(from Windows XP)
[Start] > [All Programs] > [Bluetooth] > [Wireless File Transfer]
(from Windows 2000)
[Start] > [Programs] > [Bluetooth] > [Wireless File Transfer]
Bluetooth Settings
Clicking on the [New Connection] button brings up the message "Unable to prepare Bluetooth."
l
The wireless communication switch is turned off. Please switch it on.
Remote device(s) cannot be detected
l
The other device(s) may have been set to Non-discoverable mode. Please check the mode settings
on the device.
Services on a remote device are undiscoverable
TM

Ple
ase check the profile being used on the other device.
l
The following profiles are compatible with [Bluetooth Settings].
DUN, FAX, LAP, SPP, HID, HCRP, FTP, OPP, HSP, PAN and BIP
Devices running profiles other than those above will not be able to be registered with
[Bluetooth Settings].
Bluetooth Information Exchanger
An error occurs when you try to send a file using the right-click menu.
l
Select and right-click on a file, and then you can choose either the FTP or OPP profile to use
when you click on [Send to Bluetooth Device].
If neither profile is supported by the destination device, the file will not be able to be sent from
the right-click menu.
The transmission will also fail if you use FTP to send a file to a device that only supports the OPP
profile.
Should this occur, please click on [Bluetooth]->[Options]-[Bluetooth Information Exchanger]tab>[Advanced]->[Preferred Profile] tab to configure the Transfer mode.
Cannot open shared folder on remote device using [File Transfer].
l
The other device may have a certain security level enforced (Non-connectable mode etc). Please
confirm the security settings of the other device. Please enter the correct password if you are
asked to enter one.
Remote Camera
l
See "Using a camera"
Bluetooth Local COM
Cannot add port
l
A maximum of 64 virtual COM ports can be added. You will be unable to add another port if 64
ports have already been configured.
Using a wireless modem station
Modem station cannot be detected
l
If the modem station is connected to and is being used by another device, the modem station will be
undetectable even if you search for it.
Cannot connect to modem station
l
If the modem station is connected to and is being used by another device, no other device will be
able to connect to the modem station.
Bluetooth passkey entry failed
l
The Bluetooth passkey (PIN code) comprises a sequence of alphanumeric characters, with the
letters able to be rendered in upper and lower case.
If [Caps Lock] is on, the Bluetooth passkey may not be able to be entered correctly.
Cannot connect to telephone line
l
Please ensure that the telephone cable is connected from the socket to the "LINE" terminal on the
modem station.
Note
If the telephone cable has come loose because it has not been fully inserted into the socket, the
resulting poor contact may prevent data from being transmitted accurately.
Communication will be impossible if the interior of the cable has been broken. Please replace the
cable with another one.
l
Please ensure that the two slide switches on the underside of the main unit have been set to the
"NORMAL" and "MODEM" positions respectively.

Cannot connect to the Internet
l
The telephone number of the connection (i.e., the telephone number for the access point of your
Internet service provider) may not be correct. Please check the telephone number.
l
The user ID and/or password for the provider with whom you have signed up may have been
entered incorrectly. Please check the user ID and password.
l
The default connection may have been configured with different settings. Please set the connection
configured for mobile telephone use as the default connection.
l
When you place a call using a company switchboard or other exchange, the system may require
you to enter a "0" before the telephone number itself. Please check the type of telephone line you
are using
Cannot send or receive faxes
l
Once you have registered a wireless modem station as your fax server, you will need to enter the
fax settings from the [Printer and Faxes] window in the Control Panel.
Please refer to "Using a modem station for fax transmissions" for information on the
configuration procedure.
l
The telephone number of the fax destination may have been entered incorrectly. Please check the
telephone number.
l
If the setting under COM Auto Connect Settings has been set to "Off", a connection will not
automatically be established with the modem. Please connect to the modem manually.
l
When you place a call using a company switchboard or other exchange, the system may require
you to enter a "0" before the telephone number itself. Please check the type of telephone line you
are using.
l
The fax service may not have been enabled for sending (or receiving). Please check the settings
by following the procedure below.
1. Open [Printers and Faxes] from the Control Panel, right-click on the [Fax] icon, and
then click on [Properties]
The [Fax properties] window will appear.
2. Select the [Device] tab, right-click on the modem you wish to use, and then click on
[Properties]
3. Select the [Send] tab, and then confirm that "Enable device to send" has been checked.
4. Select the [Receive] tab, and then confirm that "Enable device to receive" has been
checked (when you wish to receive faxes)
5. Click on the [OK] button
Using an access point
Access point cannot be detected
l
If the access point is connected to and is being used by another device, the access point will be
undetectable even if you search for it.
Cannot connect to access point
l
If the access point is connected to and is being used by another device, no other device will be
able to connect to the access point.
Cannot connect to LAN
l
The LAN cable may not be properly connected to the access point. Please check the connection
status.
Note
If the LAN cable has come loose because it has not been fully inserted into the socket, the

resu
lting poor contact may prevent data from being transmitted accurately.
Communication will be impossible if the interior of the LAN cable has been broken. Please
replace the cable with another one.
l
The access point may not have been configured correctly, and may not be able to maintain the
connection to the LAN.
Please refer to the product instruction manual for information on how to configure your access
point.
Cannot connect to the Internet
l
If you are using a LAN to connect to the Internet, the LAN environment of the company or
location where you are trying to establish the connection may require you to connect via a proxy
server .
Using a printer
Printer cannot be detected
l
If the printer is connected to and is being used by another device, the printer will be undetectable
even if you search for it.
Cannot connect to printer
l
If the printer is connected to and is being used by another device, no other device will be able to
connect to the printer.
Cannot print/garbled print output
l
The printer driver of the printer you are using may not have been installed correctly. Please refer to
your product instruction manual and re-install the driver.
l
Please check to see if the printer has run out of paper, ink or other consumable item.
l
If you are using a printer while several Bluetooth
TM
wireless technology devices are connected to
the PC, the devices may not function normally. Please disconnect the other devices and try to
print again.
Using a Headset
Headset cannot be detected
l
If the Headset is connected to and is being used by another device, the Headset will be undetectable
even if you search for it.
Cannot connect to Headset
l
If the Headset is connected to and is being used by another device, no other device will be able to
connect to the Headset.
l
A Bluetooth
TM
wireless technology connection will be impossible if the Headset is connected to a
power adaptor. Please remove the power adaptor and re-connect.
Sound cuts out/cannot hear anything
l
Using a headset with other Bluetooth
TM
wireless technology devices may cause problems such as
interruptions in sound, reduced transfer speed or errors during file transfer, and disconnection of
other devices. We strongly recommend using the headset on its own, not
in conjunction with any other device.
l
Please confirm that the headset is being operated correctly.
l
Please check the volume settings on your headset and PC.
l
If Windows Media Player or another audio-related application is active when you try
to connect your headset, you may find it impossible to connect properly to the
headset, or even to use it at all.

Using a keyboard or mouse
Keyboard or mouse cannot be detected
l
If the keyboard or mouse is connected to and is being used by another device, the keyboard or
mouse will be undetectable even if you search for it.
Cannot connect to keyboard or mouse
l
If the keyboard or mouse is connected to and is being used by another device, no other device will
be able to connect to the keyboard or mouse.
Using a camera
Camera cannot be detected
l
If the camera is connected to and is being used by another device, the camera will be undetectable
even if you search for it.
Cannot connect to camera
l
If the camera is connected to and is being used by another device, no other device will be able to
connect to the camera.
Images from the camera can be displayed, but no pictures can be taken
l
The memory card in the camera may be full.
Please make a backup of all your necessary data on alternative media, then delete the images from
the memory card, and ascertain how much free space remains.
Camera images do not appear in window
l
The camera may not have been set to remote camera mode (image browse mode, configuration
mode, etc).
With some devices, the connection will be automatically terminated if you change the settings while
in a mode other than remote camera mode. Please re-connect to the camera when you next wish to
use the device in remote camera mode.
Using a PDA
Cannot make an ActiveSync connection
l
Please confirm that you have installed ActiveSync v3.7 or higher on your PC.
l
ActiveSync is installed to COM7 as a default. Please refer to "Synchronising information using
ActiveSync" and re-configure your ActiveSync connection.
If a port other than COM7 has been used, please amend the ActiveSync connection settings
accordingly.
Cannot locate a saved file
l
The type of file sent to your PDA, as well as the profile used to send the file, may affect where
folders saved on your PDA are located.
Examples:
Images transferred to your PDA using "Image transfer" > saved in the "Image transfer" folder
Images transferred to your PDA using "File transfer" > saved in the "Shared folder"

Using a mobile telephone
Mobile telephone cannot be detected
l
If the mobile telephone is connected to and is being used by another device, the mobile telephone
will be undetectable even if you search for it.
Cannot connect to mobile telephone
l
If the mobile telephone is connected to and is being used by another device, no other device will
be able to connect to the mobile telephone.
Cannot send images to mobile telephone
l
Please use the appropriate transfer method, according to the profiles supported by your mobile
telephone.
If OPP is supported: right-click on a file to send it
If BIP is supported: use "Image transfer" under Bluetooth Information Exchanger to send images
Cannot connect to the Internet
l
The telephone number of the connection (i.e., the telephone number for the access point
of your Internet service provider) may not be correct. Please check the telephone number.
l
The user ID and/or password for the provider with whom you have signed up may have been
entered incorrectly. Please check the user ID and password.
l
The default connection may have been configured with different settings. Please set the connection
configured for mobile telephone use as the default connection.
Cannot send or receive faxes
l
Once you have registered a mobile telephone as your fax server, you will need to enter the fax
settings from the [Printer and Faxes] window in the Control Panel.
Please refer to "Using a modem station for fax transmissions" for information on the configuration
procedure.
l
The telephone number of the fax destination may have been entered incorrectly.
Please check the telephone number.
l
If the setting under COM Auto Connect Settings has been set to "Off", a connection
will not automatically be established with the modem. Please connect to the mobile
telephone manually.
l
The fax service may not have been enabled for sending (or receiving). Please check the settings by
following the procedure below.
1. Open [Printers and Faxes] from the Control Panel, right-click on the [Fax] icon, and
then click on [Properties]
The [Fax properties] window will appear.
2. Select the [Device] tab, right-click on the modem you wish to use, and then click on
[Properties]
3. Select the [Send] tab, and then confirm that "Enable device to send" has been checked.
4. Select the [Receive] tab, and then confirm that "Enable device to receive" has been
checked when you wish to receive faxes)
5. Click on the [OK] button
 Loading...