

Trust Ami Mouse Wireless 200 Instruction Manual

Trust Ami Mouse W ireless 200
GB
TRUST AMI MOUSE WIRELESS 200
Instruction Manual
Version 1.0

Trust Ami Mouse W ireless 200
01 UK 11803 AMIWIREL200.DOC
Thank you
Thank you very much for purchasing this product from the Trust range. We wish you hours of fun
with it. Please read this manual carefully before using the product.
Registration
Register your purchase now at the Trust Internet site www.trust.com, so that you are able to
receive optimal guarantee and service support. You will be automatically informed of
developments to your product and of other Trust products. You will also have the chance to win
some spectacular prizes.
Copyright statement
No part of this instruction manual may be reproduced or transmitted, in any form or by any means,
electronic or mechanical, including photocopying, recording, or information storage and retrieval
systems, for any purpose other than the purchaser's own personal use, without prior written
permission from the manufacturer.
Disclaimer statement
The manufacturer specifically disclaims all warranties, either express or implied, including, but not
limited to, implied warranties for the marketability and suitability for a particular purpose, with
respect to the software, the accompanying product manual(s) and written material, and all other
accompanying hardware. The manufacturer reserves the right to revise or make improvements to
its product at any time and without obligation to notify any person of such revisions or
improvements.
In no event shall the manufacturer be liable for any consequential or incidental damages, including
any loss of business profits or any other commercial damages, arising out of the use of its
products.
All company or product names are trademarks or registered trademarks of their respective
owners.

Trust Ami Mouse W ireless 200
1
GB
Contents
1. Introduction ..................................................................................................................................... 2
1.1 Conventions used in the manual............................................................................................ 2
1.2 Contents of the package.......................................................................................................... 2
1.3 Minimum system requirements ..............................................................................................2
2. Safety................................................................................................................................................ 3
2.1 General information ................................................................................................................. 3
2.2 Batteries .................................................................................................................................... 3
3. Installing the batteries .................................................................................................................... 4
4. Channel selection............................................................................................................................ 5
5. Connecting the mouse ...................................................................................................................5
6. Use....................................................................................................................................................6
7. Installation .......................................................................................................................................6
7.1 Trust Software Installer ...........................................................................................................6
7.2 Installing the mouse software................................................................................................. 7
8. Setting the mouse properties ........................................................................................................8
8.1 'Buttons' tab.............................................................................................................................. 8
8.1.1 Button assignment............................................................................................................ 9
8.1.2 Mode ................................................................................................................................... 9
8.1.3 Profile configuration ......................................................................................................... 9
8.2 'Pointers' tab........................................................................................................................... 10
8.3 'Quick Access Wheel' tab ...................................................................................................... 10
8.3.1 Quick Access Selection .................................................................................................. 11
8.4 'Scroll' tab ...............................................................................................................................12
8.5 'Action' tab .............................................................................................................................. 13
8.6 'Orientation' tab ...................................................................................................................... 14
8.7 'Cursor' tab.............................................................................................................................. 15
8.8 'Wireless' tab........................................................................................................................... 15
8.9 'Information' tab .....................................................................................................................16
9. Maintenance .................................................................................................................................. 16
10. Removing the driver ..................................................................................................................... 17
11. Troubleshooting............................................................................................................................18
12. Specifications ................................................................................................................................ 19
13. Trust Customer Care Centers ...................................................................................................... 20
Appendix A: Functions for button assignment ....................................................................... 21
Appendix B: Preference settings ........................................................................................... 23

Trust Ami Mouse W ireless 200
2
1. Introduction
This instruction manual is intended for users of the Trust Ami Mouse Wireless 200. If you have any
questions, please consult one of the Trust Customer Care Centers. You can find more information about
these Customer Care Centers on the last page of this electronic manual, as well as at the back of the quick
installation manual.
1.1 Conventions used in the manual
The following conventions have been used in this manual to indicate instructions:
<
key
> Here you should press a key. The name of the key is given between brackets.
‘
System
’ This is a specific term used in a program. These are the terms used by, for example,
Microsoft Windows 98.
[
DIR
] Key in the text shown in square brackets [….].
(term)
The text between the parentheses (….) is the English term, e.g. (File) used in the figure
referred to.
Additional information will be shown as follows:
Note: The Ami Mouse Wireless 200 does not work correctly when the batteries are low.
The examples assume that the letter “D” has been assigned to your CD-ROM drive. If your system uses a
different drive letter for your CD-ROM drive, for example “E”, you should replace “D” by “E”.
1.2 Contents of the package
Please check the contents of the package before reading the instruction manual. It should contain the
following:
• Wireless mouse
• RF Receiver
• CD-ROM containing the drivers, applications and electronic instruction manual
• Quick installation manual
• 2 AAA batteries
If anything is missing or damaged, please contact one of the Trust Care Centers. You can find more
information at the back of this instruction manual.
1.3 Minimum system requirements
• 80486 processor
• Windows 95
• 16 MB RAM
• 10 MB free hard disk space (mouse program only)
• 4 speed CD-ROM drive
• PS/2 connection

Trust Ami Mouse W ireless 200
3
GB
2. Safety
2.1 General information
1. Do not use the device in a damp environment, such as a bathroom, damp basements, swimming pools,
etc.
2. Do not try to repair this device yourself.
3. Under the following circumstances, have the device repaired by qualified personnel:
a) The cable or plug is damaged or worn.
b) Fluid has entered the device.
c) The device has been dropped and/or the housing is damaged.
d) The performance of the device is clearly becoming worse.
4. Position the device so that the cables cannot be damaged.
5. If the device must be cleaned, use a damp cloth. Do not use a liquid cleaner or a spray.
6. Make sure that the mouse is not used in a dusty environment. This will shorten the life span of the
device.
2.2 Batteries
1. The batteries are not rechargeable. Do not try to recharge them, because this may cause an explosion.
2. Never throw the batteries onto an open fire. The batteries may explode.
3. Never drill into the batteries.
4. Keep the batteries out of the reach of small children.
When the batteries are empty, ask your local authority where you can dispose of them.
Trust Ami Mouse W ireless 200
4
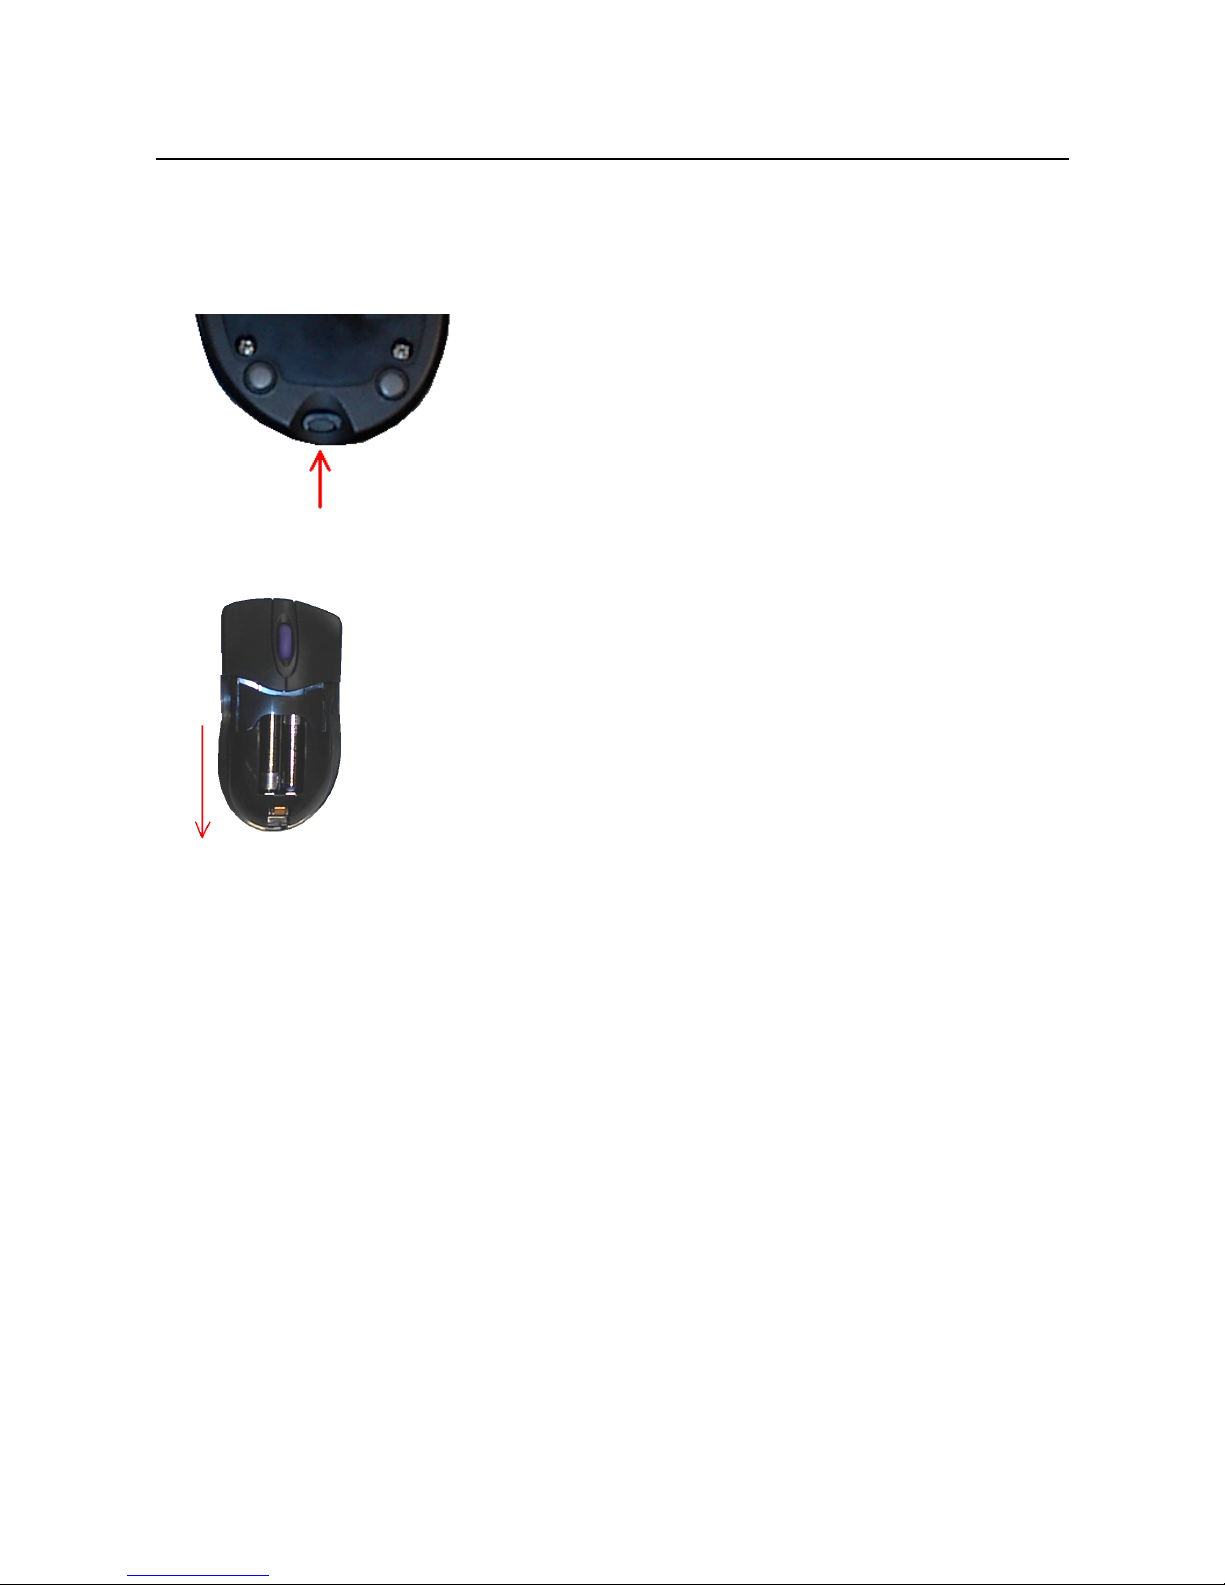
3. Installing the batteries
The batteries must be installed before you can use the mouse. This is carried out as follows:
1. Push the button on the bottom of the mouse (see figure 1).
The battery flap comes loose.
Figure 1: Bottom of the mouse
2. Remove the battery flap from the top of the mouse by sliding it off of the mouse. The battery
compartment will be visible (figure 2).
Figure 2: Battery compartment
3. Insert the two AAA batteries provided into the battery compartment as shown by the diagram inside the
battery compartment.
4. Slide the battery flap back onto the mouse until a click is heard. The batteries have been successfully
installed.
Note: Inserting the batteries incorrectly may cause damage to the mouse!
Trust Ami Mouse W ireless 200
5
GB
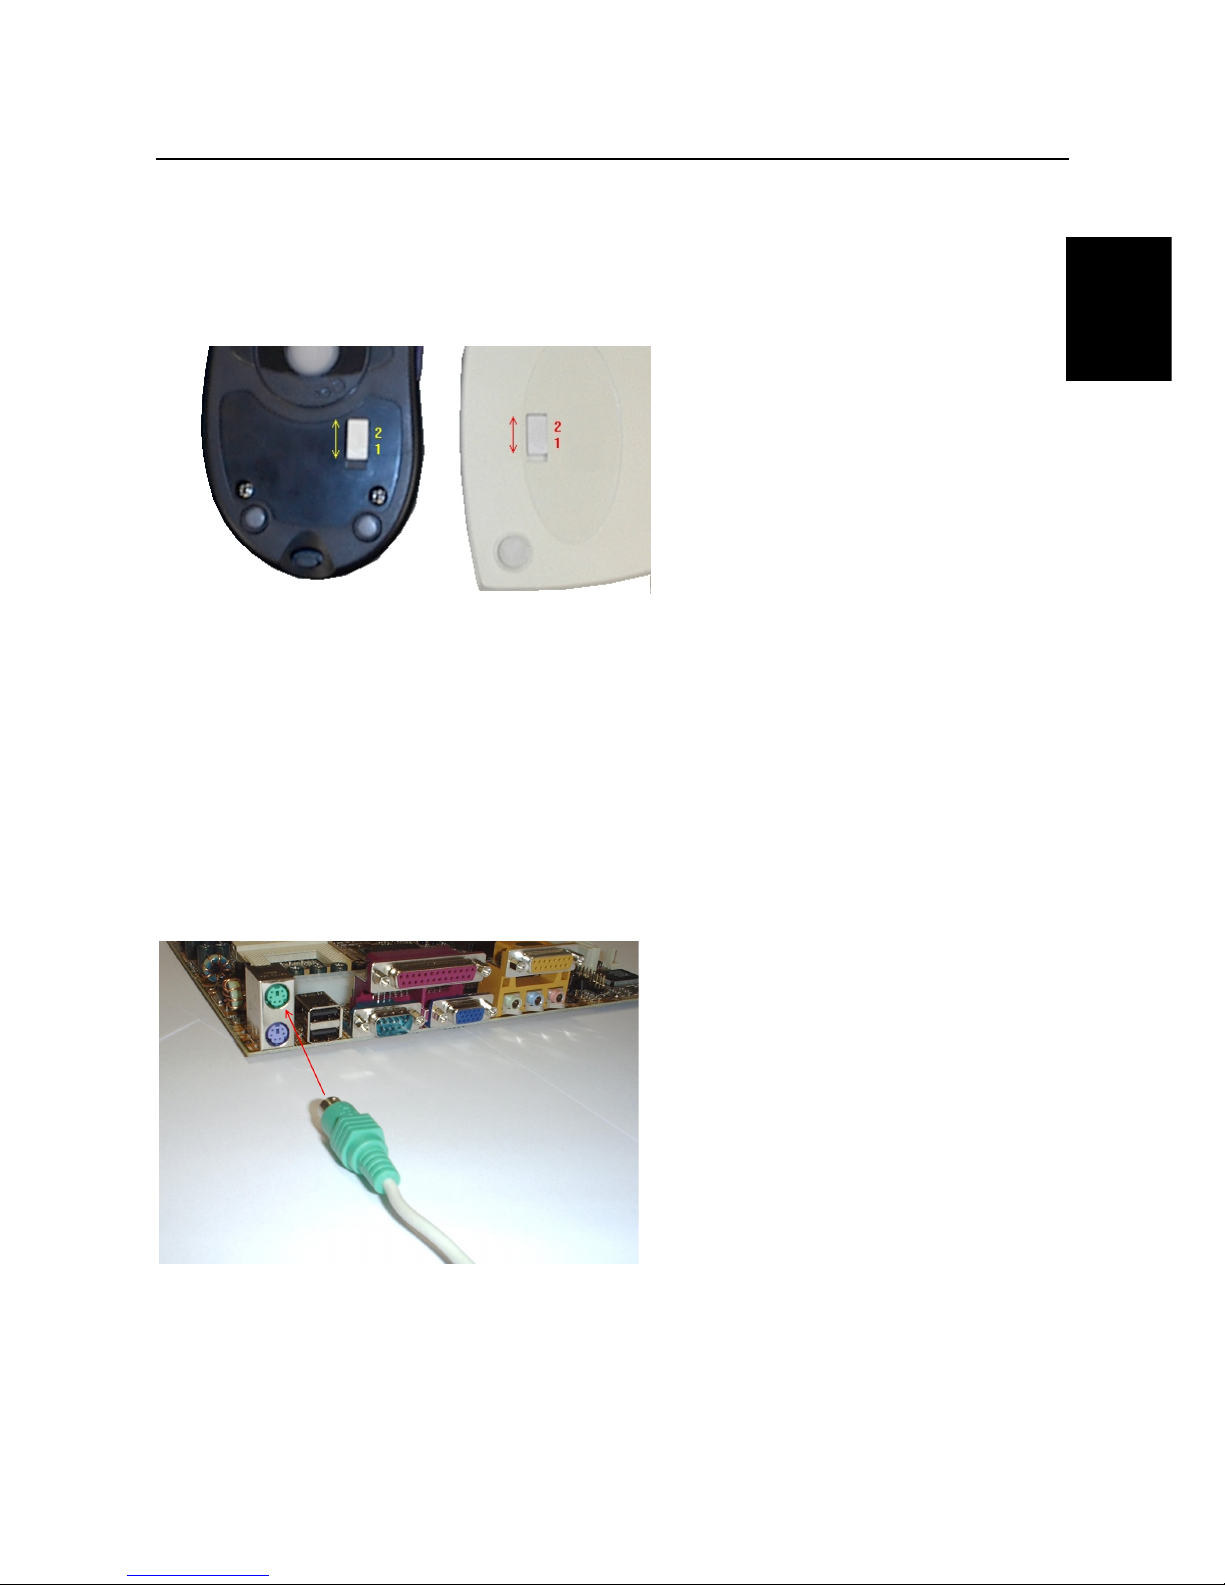
4. Channel selection
Before you can use the mouse, you must make sure the channel that the mouse is using is the same
channel as the RF Receiver.
1. Locate the switch on the bottom of the mouse used to change the channel (see figure 3).
2. Move this down or up (respectively channel 1 or 2). Channel 1 is recommended.
Figure 3: Bottom of the mouse (left) and the RF Receiver (right)
3. Locate the switch on the bottom of the RF receiver used to change the channel (figure 3).
4. Set this to the same channel as you have just set the mouse to (position 1 or 2).
5. Connecting the mouse
Note: The drivers for your old mouse must be removed before installing the software for the Ami Mouse
Wireless 200. Read the instruction manual for your previous mouse for instructions on how to do
this.
Follow the points below to connect your mouse.
1. Turn off your computer and all the connected peripheral devices.
2. Remove the old mouse from your computer.
3. Connect the RF Receiver to the PS/2 port for the mouse on your computer (figure 4).
Figure 4: Connecting the mouse to the PS/2 port on the computer
4. Next, turn on the computer and all the connected peripheral devices.
Trust Ami Mouse W ireless 200
6
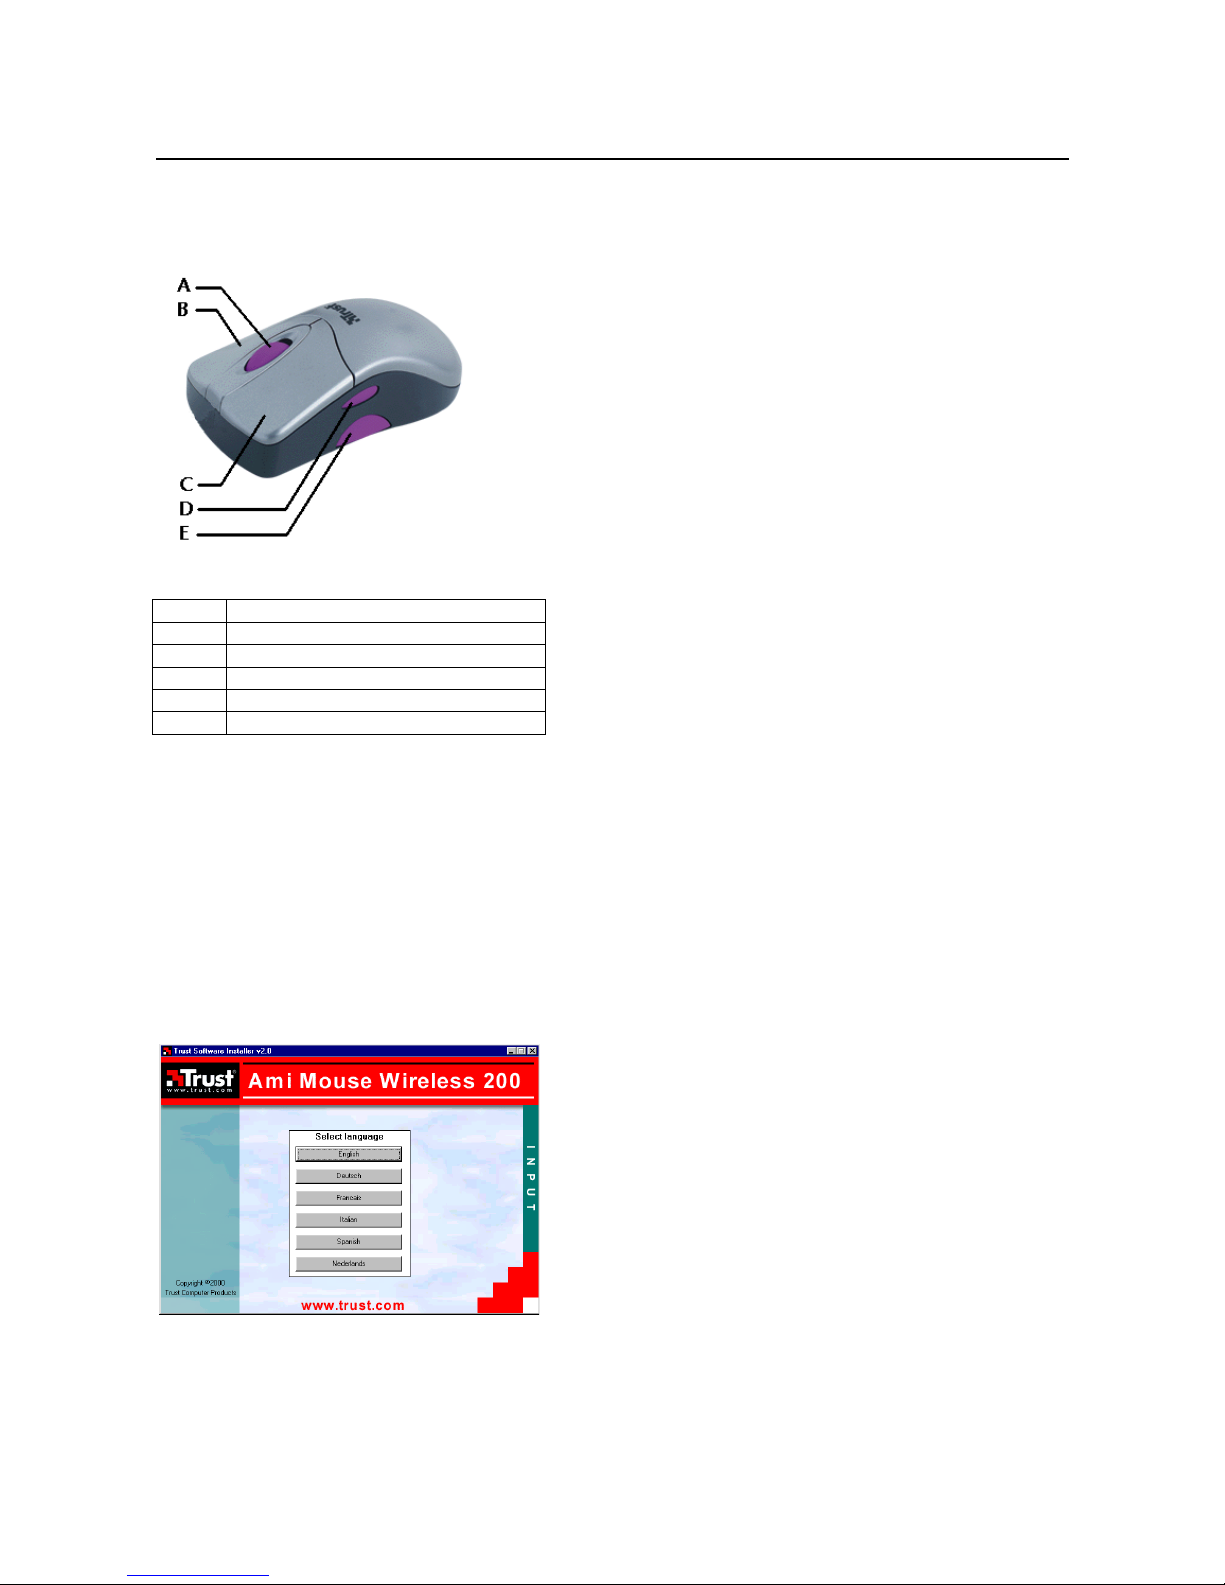
6. Use
Figure 5: Position of the buttons
Button Function
A Scroll wheel + third mouse button
B Right mouse button
C Left mouse button
D Fourth mouse button
E Fifth mouse button
Table 1: Description of figure 5
7. Installation
Close all programs before installing the driver.
7.1 Trust Software Installer
Follow the points given below to start the Trust Installer:
1. Turn on the computer and start Windows.
If you are using Windows NT or 2000, log on as 'Administrator'.
2. Insert the CD-ROM into your CD-ROM drive.
3. Select 'Run' from the Start menu.
4. In the command line, type [D:\SETUP.EXE] and click on 'OK'. Figure 6 will appear.
Figure 6: Trust Software Installer
5. Select the language you wish to use. Figure 7 will appear.
 Loading...