

Page 1
200P SOUNDFORCE
UK
1 Introduction
This manual is intended for users of the ‘TRUST 200P SOUNDFORCE‘. The TRUST 200P
SOUNDFORCE can be used for playing games or music on your PC.
This product complies with all essential requirements and other relevant stipulations of the pertinent
European directives. The Declaration of Conformity (DoC) is available on www.trust.com/12558/ce.
2 Safety
1. Unplug the plugs from the power outlet before you clean the speaker set. Do not use liquid
cleansers or spray cans. First wipe the set with a damp cloth.
2. Do not use the speaker set near water.
3. Make sure no objects are placed on the power cable. Do not place the speaker set in a spot
where the cable can be worn down.
4. Never insert an object, of any nature whatsoever, in one of the slits in the speaker set housing.
5. Do not attempt to repair the speaker set yourself. Maintenance on the set may only be
performed by qualified personnel.
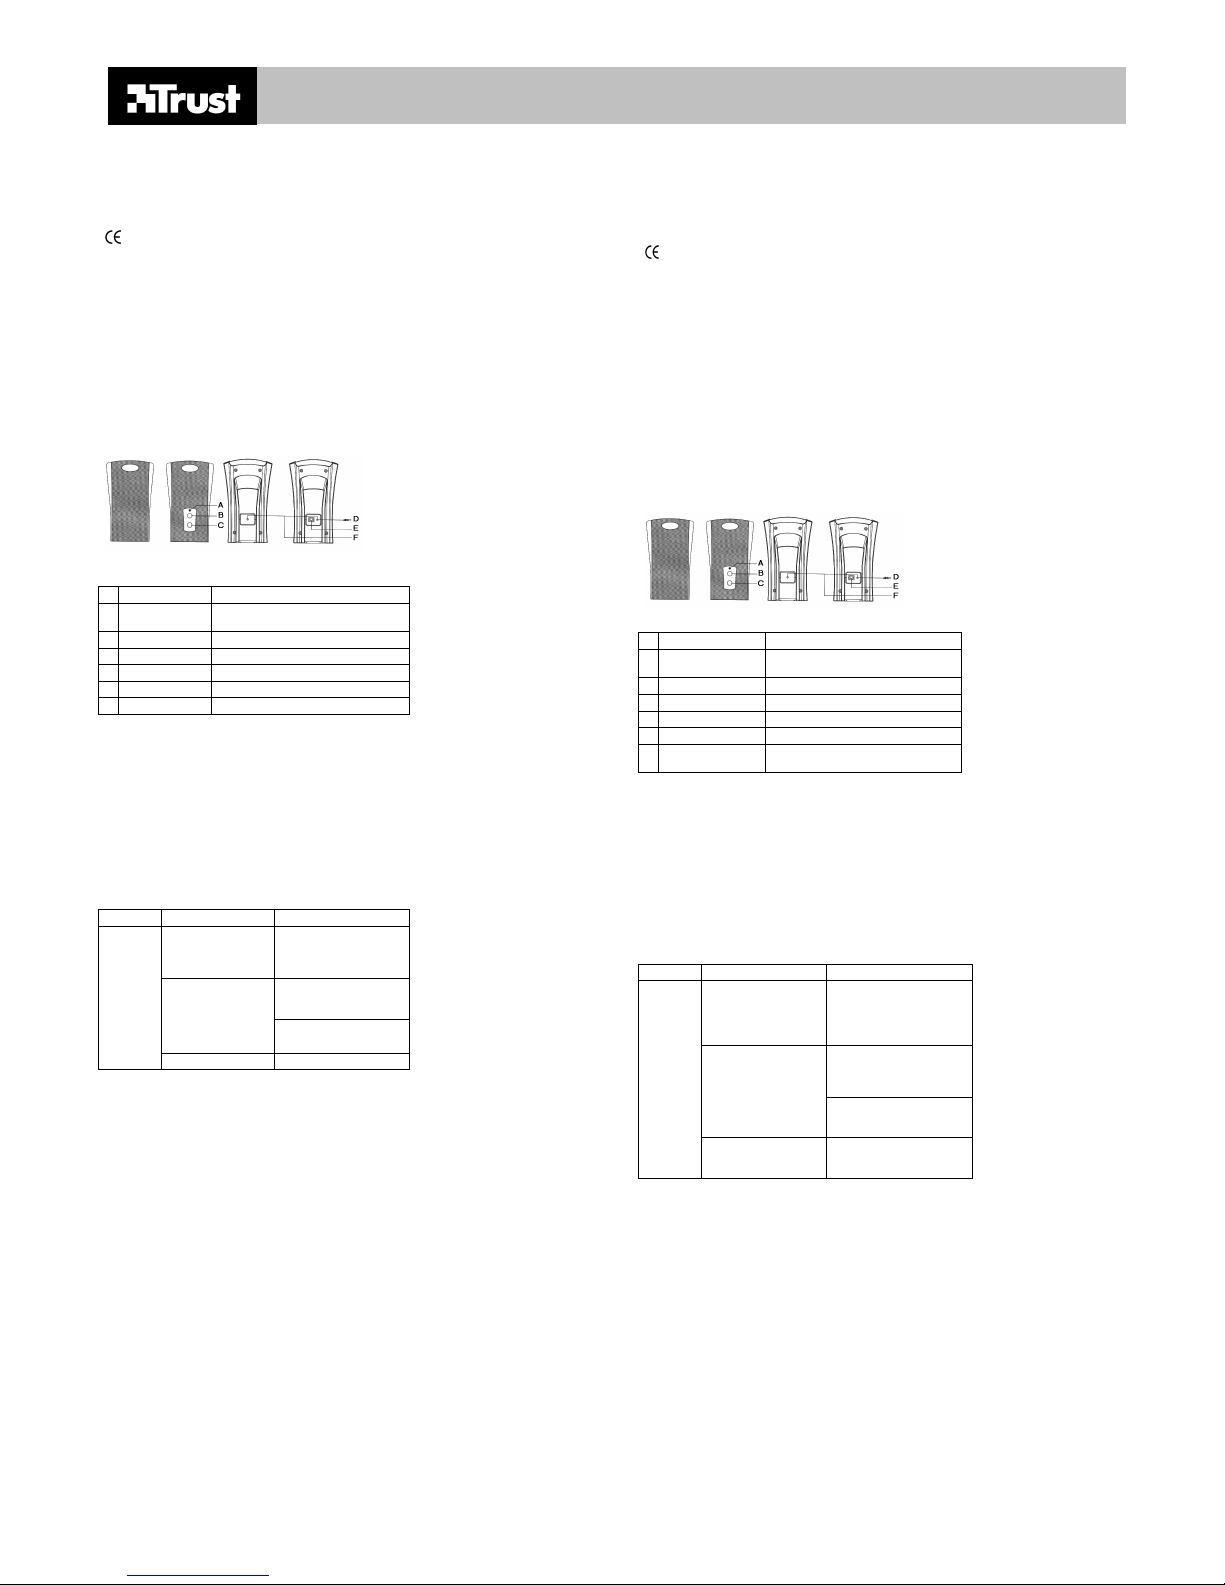
3 Connection
Figure 1. 200P SOUNDFORCE connection
Function Description
A
LED Goes on when the speaker set is
connected to the power outlet.
B
ON / OFF button Switching the speaker set ON or OFF
C
Volume Turning the sound up or down
D
Audio In Connection to the sound card
E
AC IN Connection for adapter
F
Speaker cable Cable between right and left speaker.
Table 1: Connections
1. Connect the Power adapter to connection E.
2. Connect speaker cable F to the “LINE-OUT” (= line) of the “SPEAK” (= speaker) output of the
sound card.
4 Use
1. Switch the speakers on. Light A will go on.
2. Let your computer produce sound.
3. Adjust the sound to your liking with Volume button C.
5 Troubleshooting
Problem Cause Possible solution
Audio cable not
correctly connected
to the sound card.
Check connection to the
sound card. If necessary,
consult the sound card
manual.
Check whether the
adapter is connected to
the speaker correctly.
Adapter not
connected correctly.
Check whether the
adapter is plugged in.
No sound
from the
speakers.
Volume button is low. Turn the volume up.
Table 1: connections
Register your product via www.trust.com so that you are able to receive optimal guarantee and service
support such as up-to-date FAQ. You will be automatically informed of developments to your product
and of other Trust products. You will also have the chance to win some spectacular prizes.
If you still have any problems after trying these solutions, please contact one of the Trust Customer
Care Centers. Please have the following information available:
1. The article number. This is: 12558;
2. A good description of what precisely does not work;
3. A good description of when precisely the problem takes place.
DE
1 Einleitung
Diese Anleitung wendet sich an die Benutzer des TRUST 200P SOUNDFORCE. Der TRUST 200P
SOUNDFORCE wird beim Spielen von Computerspielen und zum Abspielen von Musik auf dem PC
verwendet.
Dieses Produkt erfüllt die grundlegenden Anforderungen sowie alle übrigen relevanten Bestimmungen
der anwendbaren Europäischen Richtlinien. Die Konformitätserklärung (DoC) ist unter
www.trust.com/12558/ce erhältlich.
2 Sicherheitshinweise
1. Ziehen Sie die Stecker aus der Steckdose, ehe Sie die Lautsprecher reinigen. Verwenden Sie
keine flüssige Reinigungsmittel oder Sprays. Reinigen Sie die Lautsprecher mit einem feuchten
Tuch.
2. Benutzen Sie die Lautsprecher nicht in der Nähe von Wasser.
3. Achten Sie darauf, das nichts auf dem Stromkabel steht. Stellen Sie die Lautsprecher nicht an
eine Stelle, wo das Kabel verschleißen kann.
4. Stecken Sie niemals Gegenstände - gleich welcher Art - in eine der Gehäuseöffnungen der
Lautsprecher.
5. Versuchen Sie niemals, die Lautsprecher selbst zu reparieren. Wartungsarbeiten an diesen
Lautsprechern dürfen ausschließlich von qualifizierten Servicetechnikern ausgeführt werden.
3 Anschließen
Abbildung 1: Anschließen des 200P SOUNDFORCE
Funktion Beschreibung
A
Betriebsanzeige Leuchtet, wenn die Lautsprecher an die
Steckdose angeschlossen sind.
B
Ein-/Ausschalter Lautsprecherset ein- oder ausschalten
C
Lautstärkeregler Ton lauter oder leiser einstellen
D
Audioeingang Anschluss für die Soundkarte
E
AC-Eingang Anschluss für einen Netzadapter
F
Lautsprecherkabel Kabel zwischen dem rechten und dem
linken Lautsprecher
Tabelle 1: Anschlüsse
1. Schließen Sie den Netzadapter an Anschluss E an.
2. Schließen Sie das Lautsprecherkabel an den „LINE OUT“-Ausgang oder an den „SPEAK“Ausgang (Lautsprecherausgang) der Soundkarte an.
4 Verwendung
1. Schalten Sie die Lautsprecher ein. Anzeige A fängt an zu leuchten.
2. Lassen Sie Ihren Computer Klang erzeugen.
3. Stellen Sie den Ton mit dem Lautstärkeregler C nach Wunsch ein.
5 Fehlerbehebung
Problem Mögliche Ursache Mögliche Lösung
Das Audiokabel ist nicht
richtig an die
Soundkarte
angeschlossen.
Überprüfen Sie den
Anschluss an die
Soundkarte. Lesen Sie dazu,
wenn notwendig, die
Anleitung der Soundkarte.
Kontrollieren Sie, ob der
Adapter richtig an den
Lautsprecher angeschlossen
ist.
Der Netzadapter ist
nicht richtig
angeschlossen.
Überprüfen Sie, ob der
Netzadapter in der
Steckdose steckt.
Aus den
Lautsprec
hern
kommt
kein Ton.
Der Lautstärkeregler
steht auf leise
eingestellt.
Stellen Sie den Ton lauter
ein.
Tabelle 1: Anschlüsse
Sie können Ihr Produkt auf www.trust.com registrieren, um von der Garantie und Serviceunterstützung,
die unter anderem die aktuellen FAQ und die neuesten Treiber umfasst, optimal genießen zu können.
Außerdem werden Sie automatisch über Entwicklungen auf dem Gebiet Ihres Produkts und anderer
Produkte von Trust auf dem Laufenden gehalten. Und Sie können fantastische Preise gewinnen.
Wenn das Problem damit nicht behoben werden kann, wenden Sie sich an eine der TrustKundenbetreuungsstellen. Die folgenden Angaben sollten Sie in jedem Fall zur Hand haben:
1. Die Artikelnummer, in diesem Fall: 12558;
2. beschreiben Sie genau, was nicht funktioniert;
3. beschreiben Sie genau, wann das Problem auftritt.
Page 2

200P SOUNDFORCE
FR
1 Introduction
Ce manuel est destiné aux utilisateurs du ‘TRUST 200P SOUNDFORCE‘. Le TRUST 200P
SOUNDFORCE peut être utilisé pour les jeux ou pour la lecture de CD sur votre PC.
Ce produit respecte toutes les exigences essentielles et autres stipulations des directives européennes
correspondantes. La Déclaration de Conformité (DoC) est disponible sur www.trust.com/12558/ce.
2 Sécurité
1. Retirez les fiches des prises avant de nettoyer les haut-parleurs. N’utilisez ni des détergents
liquides, ni des bombes aérosols. Nettoyez les haut-parleurs à l’aide d’un chiffon humide.
2. N’utilisez pas les haut-parleurs à proximité d’un point d’eau.
3. Ne posez aucun objet sur le fil électrique. Disposez les haut-parleurs de manière à ne pas
endommager les câbles.
4. N’introduisez jamais d’objets, de quelque nature que ce soit, dans l’une des fentes du boîtier
des haut-parleurs.
5. N’essayez pas de réparer les haut-parleurs vous-même. L’entretien des haut-parleurs ne peut
être effectué que par un technicien qualifié.
3 Connexion
Figure 1. Connexion du 200P SOUNDFORCE
Fonction Description
A
Voyant DEL S’allume lorsque les haut-parleurs sont
branchés sur la prise.
B
Bouton
MARCHE /
ARRET
Permet de mettre en marche ou d’arrêter
le fonctionnement des haut-parleurs
C
Volume Permet d’augmenter ou de baisser le
volume
D
Audio In Connexion à la carte son
E
AC IN Connexion pour l’adaptateur
F
Câble hautparleur
Câble situé entre le haut-parleur de
gauche et de droite.
Tableau 1 : connexions
1. Branchez l’adaptateur sur la connexion E.
2. Branchez le câble du haut-parleur F sur la sortie “LINE-OUT” (= ligne) ou à la sortie “SPEAK” (=
haut-parleur) de la carte son.
4 Utilisation
1. Mettez les haut-parleurs sous tension. Le petit voyant A s’allume.
2. Votre ordinateur émet un signal sonore.
3. Réglez le volume à l’aide du bouton C.
5 Dépannage
Problème Cause Solution
Le câble audio n’a
pas été branché
correctement sur la
carte son.
Vérifiez la connexion de la carte
son. Consultez, si nécessaire, le
manuel de votre carte son.
Vérifiez si l’adaptateur a été
branché correctement sur le hautparleur.
L’adaptateur n’a pas
bien été branché.
Vérifiez si l’adaptateur a été
branché correctement sur la
prise.
Les hautparleurs
n’émetten
t aucun
son.
Le volume est faible. Augmentez le volume du son.
Tableau 1 : connexions
Enregistrez votre produit sur www.trust.com, pour pouvoir obtenir une garantie et une assistance
optimales telle qu’une FAQ actualisée et les derniers pilotes. De plus, vous serez automatiquement
tenus au courant des développements de vos produits Trust et des autres. Et vous pourrez gagner des
prix spectaculaires.
Si vos problèmes n’étaient pas résolus après avoir essayé ces solutions, contactez alors l’un des Trust
Customer Care Centers. Dans tous les cas, vous êtes prié d’avoir les informations suivantes à portée
de main :
1. Le numéro d’article, dans ce cas : 12558 ;
2. Une description précise du dysfonctionnement ;
3. Une description précise du moment où le problème survient.
IT
1 Introduzione
Questo manuale è destinato agli utenti del prodotto ‘TRUST 200P SOUNDFORCE’. Il prodotto TRUST
200P SOUNDFORCE può venire utilizzato durante l’esecuzione di giochi o la riproduzione di brani
musicali con il PC.
Il presente prodotto è conforme a tutti i requisiti essenziali ed alle ulteriori normative pertinenti delle
relative direttive europee. La Dichiarazione di Conformità (DoC) è disponibile su
www.trust.com/12558/ce.
2 Norme di sicurezza
1. Staccare la spina dalla presa di corrente prima di pulire il set di altoparlanti. Non utilizzare
detergenti liquidi o prodotti in spray. Pulire il set di altoparlanti con un panno umido.
2. Non utilizzare il set di altoparlanti in prossimità di acqua.
3. Accertarsi che non vi sia nulla sul cavo di alimentazione. Non utilizzare il set di altoparlanti in
un luogo in cui il cavo si può usurare.
4. Non inserire mai oggetti di alcun tipo nelle fessure presenti nell’alloggiamento del set di
altoparlanti.
5. Non tentare di riparare da soli il set di altoparlanti. Il presente set deve venire riparato e
manutenzionato esclusivamente da personale qualificato.
3 Collegamento
Figura 1. Collegamento del set 200P SOUNDFORCE
Funzione Descrizione
A
LED Si illumina quando il set di altoparlanti è
collegato alla rete elettrica.
B
Pulsante di
ACCESO /
SPENTO
Permette di accendere o spegnere il set di
altoparlanti
C
Volume Regolazione del volume
D
Audio In Presa per il collegamento con la scheda audio
E
AC IN Presa per il collegamento del trasformatore
F
Cavo
altoparlanti
Cavo di collegamento tra l’altoparlante destro e
l’altoparlante sinistro
Tabella 1: collegamenti
1. Collegare il trasformatore alla presa E.
2. Collegare il cavo altoparlanti F all’uscita “LINE-OUT” (= linea) o all’uscita “SPEAK” (=
altoparlante) della scheda audio.
4 Utilizzo
1. Accendere gli altoparlanti. La spia A si illumina.
2. Iniziare con il PC la riproduzione di un frammento sonoro.
3. Regolare il volume all’intensità desiderata tramite il potenziometro per il Volume C.
5 Risoluzione dei problemi
Problema Causa Possibile soluzione
Il cavo audio non è
stato collegato alla
scheda audio in
modo corretto.
Controllare il collegamento con
la scheda audio. Se necessario
consultare a tale scopo il
manuale di istruzioni della
scheda audio.
Assicurarsi che il trasformatore
sia stato collegato
correttamente agli altoparlanti.
Il trasformatore
non è stato
collegato
correttamente.
Assicurarsi che il trasformatore
sia stato inserito nella presa di
corrente.
Gli
altoparlan
ti non
emettono
alcun
suono.
Il volume è
regolato su
un’intensità troppo
bassa.
Aumentare il volume.
Tabella 1: collegamenti
Le consigliamo di effettuare la registrazione dell'articolo presso il sito Internet della Trust
(www.trust.com) per assicurarsi così un’assistenza clienti e una garanzia ottimali, quali un servizio FAQ
(le risposte alle domandi più frequenti) costantemente aggiornato e le ultime versione dei driver dei
prodotti. Inoltre, registrando il prodotto sarà possibile venire messi regolarmente al corrente delle novità
e degli aggiornamenti relativi al Vostro e agli altri prodotti Trust. E potrete anche partecipare
all’estrazione di fantastici premi!
Nel caso queste soluzioni non siano in grado di risolvere i problemi del prodotto, rivolgersi a uno dei
Centri di Assistenza Clienti Trust.
Si prega in ogni caso di tenere a portata di mano le seguenti informazioni:
1. il numero articolo, in questo caso: 12558;
2. una descrizione ottimale di cosa non funziona;
3. una descrizione ottimale di quando il problema si verifica.
Page 3

200P SOUNDFORCE
ES
1 Introducción
Este manual va destinado a los usuarios de los altavoces ‘TRUST 200P SOUNDFORCE ‘. Utilice los
altavoces TRUST 200P SOUNDFORCE para los juegos o para la reproducción de música en su PC.
Este producto cumple todos los requisitos esenciales y las condiciones pertinentes de las directivas
europeas vigentes. En la página www.trust.com/12558/ce se halla disponible la Declaración de
conformidad (DoC).
2 Normas de seguridad
1. Retire las clavijas del enchufe antes de limpiar los altavoces. No utilice productos de limpieza
líquidos ni en aerosol. Limpie los altavoces con un paño humedecido.
2. No utilice los altavoces cerca del agua.
3. No coloque ningún objeto sobre el cable de corriente. No coloque los altavoces en lugares
donde el cable pueda dañarse.
4. Nunca introduzca objetos, cualquiera que sea su naturaleza, en una de las ranuras de la caja
de los altavoces.
5. No intente reparar usted mismo los altavoces. Este producto debe ser reparado únicamente
por personal cualificado.
3 Conexión
Figura 1. Conexión del 200P SOUNDFORCE
Función Descripción
A
LED Se ilumina cuando los altavoces están
conectados a la toma de corriente.
B
Botón de
ENCENDIDO/
APAGADO
Para ENCENDER o APAGAR los
altavoces.
C
Volumen Para reducir o aumentar el volumen.
D
Audio In Conexión para tarjeta de sonido.
E
AC IN Conexión para adaptador.
F
Cable del altavoz Cable entre el altavoz izquierdo y el
derecho.
Cuadro 1: Conexiones
1. Conecte el adaptador de energía a la conexión E.
2. Conecte el cable del altavoz F a la salida “LINE-OUT” (= línea) o a la salida “SPEAK” (=
altavoz) de la tarjeta de sonido.
4 Uso
1. Encienda los altavoces. Se iluminará la lámpara A.
2. Haga que su ordenador produzca sonido.
3. Ajuste el sonido según sus deseos con el control del volumen C.
5 Resolución de problemas
Problema Causa Posible solución
El cable de
audio no está
conectado
correctament
e a la tarjeta
de sonido.
Controle la conexión de la tarjeta de
sonido. Si es necesario, consulte el
manual de la tarjeta.
Controle si el adaptador está
conectado correctamente al altavoz.
El adaptador
no está
conectado
correctament
e.
Controle si el adaptador está
enchufado en la toma de corriente.
Los
altavoces
no
producen
ningún
sonido.
El control del
volumen está
puesto
demasiado
bajo.
Aumente el volumen.
Cuadro 1: Conexiones
Registre su producto a través de www.trust.com, y benefíciese de una óptima garantía y un excelente
servicio de apoyo como, por ejemplo, las FAQ más recientes y los últimos controladores. De esta
forma, además, no sólo se mantendrá informado automáticamente de las mejoras del producto que
usted ha comprado y de los nuevos productos de Trust, sino que también tendrá la oportunidad de
ganar premios espectaculares.
Si después de haber intentado estas soluciones sigue teniendo problemas, póngase en contacto con
uno de los Centros de Atención al Cliente de Trust. Tenga a mano los siguientes datos:
1. El número del producto, en este caso: 12558;
2. Una descripción clara y exacta de lo que no funciona;
3. Una buena definición de las circunstancias en las que ocurre el problema.
PL
1 Wstęp
Podręcznik ten przeznaczony jest dla użytkowników ‘TRUST 200P SOUNDFORCE‘. TRUST 200P
SOUNDFORCE przeznaczony jest do gier lub odtwarzania muzyki w komputerze.
Produkt spełnia główne wymogi oraz wszelkie odnośne postanowienia zawarte w obowiązujących
normach europejskich. Deklaracja zgodności (DoC) znajduje się na stronie www.trust.com/12558/ce.
2 Środki bezpieczeństwa
1. Przed przystąpieniem do czyszczenia zestawu głośników należy odłączyć wtyki z gniazda. Nie
należy używać środków czyszczących w płynie lub aerozolu. Wytrzyj kurz z zestawu przy
pomocy wilgotnej ściereczki.
2. Nie używaj zestawu głośników w pobliżu wody.
3. Uważaj, żeby nic nie stało na przewodzie zasilającym. Zestawu nie umieszczaj w miejscu,
gdzie przewód mógłby się wytrzeć.
4. Nigdy nie wkładaj jakichkolwiek przedmiotów do otworów w obudowie zestawu głośników.
5. Nie należy podejmować prób samodzielnej naprawy zestawu głośników. Zestaw może być
naprawiany tylko przez wykwalifikowany personel.
3 Podłączenie
Rysunek 1. Podłączenie zestawu 200P SOUNDFORCE
Funkcja Opis
A
Dioda kontrolna Zaczyna się świecić, kiedy zestaw głośników
jest podłączony do kontaktu
B
Włącznik główny Włączenie lub wyłączenie zestawu głośników
C
Głośność Regulacja natężenia dźwięku
D
Wejście audio Złącze dla karty dźwiękowej
E
Wejście AC Złącze dla zasilacza
F
Kabel głośnika Kabel pomiędzy lewym a prawym
głośnikiem.
Tabela 1: Łącza
1. Podłącz zasilacz do złącza E.
2. Podłącz kabel głośnikowy F do wyjścia "LINE-OUT" (= linia) lub do wyjścia "SPEAK" (= głośnik)
karty dźwiękowej.
4 Korzystanie z urządzenia
1. Włącz głośniki. Kontrolka A zacznie się świecić.
2. Uzyskaj dźwięk za pomocą komputera.
3. Ustaw dźwięk według własnych upodobań przy pomocy regulatora dźwięku C.
5 Rozwiązywanie problemów
Problem Przyczyna Możliwe rozwiązanie
Przewód audio nie
jest poprawnie
podłączony do karty
dźwiękowej.
Sprawdź podłączenia karty
dźwiękowej. W razie
potrzeby zajrzyj do instrukcji
obsługi karty dźwiękowej.
Sprawdź, czy zasilacz jest
właściwie podłączony do
głośnika.
Zasilacz nie jest
poprawnie
podłączony.
Sprawdź, czy zasilacz
włączony jest do kontaktu.
Brak
dźwięku w
głośnikach.
Regulator dźwięku
ustawiony jest zbyt
cicho.
Zwiększ głośność.
Tabela 1: Łącza
Zarejestruj swój zakup na stronie www.trust.com, dzięki czemu uzyskasz optymalną gwarancję i
pomoc, w formie aktualnych odpowiedzi na najczęściej zadawane pytania oraz najnowszych
sterowników. Ponadto będziesz automatycznie informowany o wszelkich zmianach odnośnie tego
i innych produktów firmy Trust. Można też wygrać jedną ze wspaniałych nagród.
Jeśli żadne z proponowanych rozwiązań nie pomogło w usunięciu problemu Twojego urządzenia,
skontaktuj się z jednym z centrów obsługi konsumenta (Trust Customer Care Centers). Zawsze
powinieneś przygotować następujące dane:
1. Numer produktu; jest to: 12558;
2. Dokładny opis problemu.
3. Dokładny opis sytuacji, w których pojawia się problem.
Page 4

200P SOUNDFORCE
NL
1 Inleiding
Deze handleiding is bedoeld voor gebruikers van de ‘TRUST 200P SOUNDFORCE ‘. De TRUST
SOUNWAVE 200P is te gebruiken bij het spelen van spellen of het afspelen van muziek op uw PC.
Dit product voldoet aan de essentiële eisen en aan de overige relevante bepalingen van de geldende
Europese richtlijnen. De Verklaring van Conformiteit (DoC) is beschikbaar op www.trust.com/12558/ce.
2 Veiligheid
1. Haal de stekkers uit het stopcontact voordat u de luidsprekerset schoonmaakt. Gebruik geen
vloeibare schoonmaakmiddelen of spuitbussen. Neem de luidsprekerset af met een vochtige
doek.
2. Gebruik de luidsprekerset niet in de nabijheid van water.
3. Zorg ervoor dat er niets op het stroomsnoer staat. Zet de luidsprekerset niet op een plek waar
het snoer kan slijten.
4. Steek nooit een object, van welke aard dan ook, in één van de sleuven in de behuizing van de
luidsprekerset.
5. Probeer de luidsprekerset niet zelf te repareren. De set mag alleen worden onderhouden door
gekwalificeerd personeel.
3 Aansluiting
Figuur 1. Aansluiting 200P SOUNDFORCE
Functie Omschrijving
A
LED Gaat branden als de speakerset aangesloten
is op het stopcontact.
B
AAN / UIT knop Speakerset AAN of UIT zetten
C
Volume Geluid harder of zachter zetten
D
Audio In Aansluiting naar de geluidskaart
E
AC IN Aansluiting voor adapter
F
Speaker kabel Kabel tussen linker en rechter speaker.
Tabel 1: Aansluitingen
1. Sluit de Power adapter aan op aansluiting E.
2. Sluit de speakerkabel F aan op de “LINE-OUT” (= lijn) uitgang of de “SPEAK” (= luidspreker)
uitgang van de geluidskaart.
4 Gebruik
1. Schakel de speakers in. Het lampje A gaat branden.
2. Laat uw computer geluid voortbrengen.
3. Stel het geluid naar wens in met de Volume knop C.
5 Probleem oplossen
Probleem Oorzaak Mogelijke oplossing
Audiokabel niet
correct aangesloten
op de geluidskaart.
Controleer aansluiting op de
geluidskaart. Raadpleeg indien
nodig de handleiding van de
geluidskaart.
Controleer of de adapter goed
is aangesloten op de
luidspreker.
Adapter niet goed
aangesloten.
Controleer of de adapter in het
stopcontact zit.
Geen
geluid uit
de
speakers.
Volume knop staat
zacht.
Zet het volume harder.
Tabel 1: Aansluitingen
Registreer uw product via www.trust.com, zodat u in aanmerking komt voor optimale garantie- en
service ondersteuning zoals actuele FAQ en de laatste drivers. Bovendien wordt u automatisch op de
hoogte gehouden van de ontwikkeling van uw en andere Trust producten. En u maakt kans op
spectaculaire prijzen.
Mocht u na deze oplossingen geprobeerd te hebben nog problemen hebben, neem dan contact op met
één van de Trust Customer Care Centers. U dient de volgende gegevens in ieder geval bij de hand te
hebben:
1. Het artikelnummer, in dit geval: 12558;
2. Een goede omschrijving wat er precies niet werkt;
3. Een goede omschrijving wanneer het probleem precies optreedt.
PT
1 Introdução
Este manual de instruções destina-se aos utilizadores do "TRUST 200P SOUNDFORCE". O TRUST
200P SOUNDFORCE pode ser utilizado para jogar ou ouvir música no PC.
Este produto satisfaz as exigências essenciais e as outras determinações relevantes das directivas
europeias em vigor. A Declaração de Conformidade (DoC) está disponível em
www.trust.com/12558/ce.
2 Segurança
1. Desligue as fichas da tomada de electricidade antes de limpar o conjunto de colunas. Não
utilize agentes de limpeza líquidos ou pulverizadores. Limpe o conjunto de colunas com um
pano húmido.
2. Não utilize o conjunto de colunas perto de água.
3. Certifique-se de que nada se encontra colocado em cima do cabo de alimentação. Não coloque
as colunas num local onde o cabo possa ficar gasto.
4. Nunca introduza quaisquer objectos numa das aberturas da caixa das colunas.
5. Não tente reparar as colunas. As colunas devem ser reparadas apenas por pessoal qualificado.
3 Ligação
Figura 1. Ligação das colunas 200P SOUNDFORCE
Função Descrição
A
Indicador
luminoso
Acende-se quando as colunas são
ligadas à tomada de electricidade.
B
Botão ON / OFF
(Ligar / Desligar)
Permite ligar (ON) e desligar (OFF) as
colunas.
C
Volume Aumenta ou diminui o volume.
D
Entrada de áudio Ligação à placa de som.
E
Entrada CA Ligação para o adaptador.
F
Cabo das
colunas
Cabo entre as colunas esquerda e
direita.
Tabela 1: Ligações
1. Ligue o adaptador de Corrente à ligação E.
2. Ligue o cabo das colunas F à saída "LINE-OUT" (= linha) ou "SPEAK" (= colunas) da placa de
som.
4 Utilização
1. Ligue a alimentação das colunas. A luz A acender-se-á.
2. Faça o computador emitir um som.
3. Ajuste o volume do som utilizando o botão de Volume C.
5 Resolução de problemas
Problema Causa Solução possível
O cabo de áudio não
foi correctamente
ligado à placa de
som.
Verifique a ligação da
placa de som. Se
necessário, consulte o
manual da placa de som.
Verifique se o adaptador
está correctamente ligado
à coluna.
O adaptador não foi
correctamente ligado.
Verifique se o adaptador
está ligado à tomada de
electricidade.
Não é
emitido
som das
colunas.
O volume está baixo. Aumente o volume.
Tabela 1: ligações
Registe o produto através do site www.trust.com, de modo a poder receber a melhor assistência
técnica e garantia, tais como a FAQ actualizada. Será automaticamente informado acerca de
desenvolvimentos para o seu produto e outros produtos da Trust. Pode ainda ganhar prémios
fabulosos.
Caso os problemas subsistam após estas soluções, contacte um dos Centros de Apoio ao Cliente da
Trust. Tenha presente as seguintes informações:
1. O número do artigo. Neste caso: 12558;
2. Uma descrição detalhada do que não funciona;
3. Uma descrição detalhada do momento exacto da ocorrência do problema.
Page 5

200P SOUNDFORCE
GR
1 Εισαγωγή
Το εγχειρίδιο αυτό προορίζεται για τους χρήστες του «TRUST 200P SOUNDFORCE». Το TRUST 200P
SOUNDFORCE Μπορεί να χρησιµοποιηθεί για να παίξετε παιχνίδια ή να ακούσετε µουσική στον Η/Υ
σας.
Το προϊόν αυτό πληροί όλες τις βασικές απαιτήσεις και τις αντίστοιχες διατάξεις των ευρωπαϊκών
οδηγιών εν ισχύ. Η ∆ήλωση Συµµόρφωσης (DoC) είναι διαθέσιµη στη διαδικτυακή τοποθεσία
www.trust.com/12558/ce.
2 Ασφάλεια
1. Αποσυνδέστε τους ρευµατολήπτες από τον ρευµατοδότη πριν καθαρίσετε το σύνολο ηχείων. Μη
χρησιµοποιείτε υγρά καθαριστικά ή σπρέι. Πρώτα σκουπίστε το σύνολο ηχείων µε ένα νωπό
πανί.
2. Μη χρησιµοποιείτε το σύνολο ηχείων κοντά σε χώρους µε νερό.
3. Φροντίστε να µην τοποθετείται τίποτα πάνω στο καλώδιο. Μην τοποθετείτε το σύνολο ηχείων σε
σηµείο όπου το καλώδιο µπορεί να φθαρεί.
4. Μην εισάγετε ποτέ αντικείµενα σε κάποιο από τα ανοίγµατα του περιβλήµατος του συνόλου
ηχείων.
5. Μην αποπειραθείτε ποτέ να επισκευάσετε µόνοι σας το σύνολο ηχείων. Η συντήρηση του
συνόλου ηχείων µπορεί να πραγµατοποιηθεί µόνο από εξειδικευµένο προσωπικό.
3 Σύνδεση
Σχήµα 1. Σύνδεση 200P SOUNDFORCE
Λειτουργία Περιγραφ ή
A
Λυχνία LED Ανάβει όταν το σύνολο ηχείων έχει συνδεθεί
στον ρευµατοδότη.
B
Πλήκτρο ON/OFF Ανοίγει (ON) και κλείνει (OFF) το σύνολο
ηχείων.
Γ
Ένταση Αυξ οµειώνει την ένταση του ήχου.
∆
Είσοδος ήχου Σύνδεση µ ε την κάρτα ήχου.
E
Είσοδος
τροφοδοσίας AC
Σύνδεση για τον προσαρµογέα.
Σ
Τ
Καλώδιο ηχείου Καλ ώδιο που συνδέει το δεξί και το
αριστερό ηχείο.
Πίνακας 1: Συνδέσεις
1. Συνδέστε τον προσαρµογέα ισχύος στη σύνδεση E.
2. Συνδέστε το καλώδιο ηχείων ΣΤ στην υποδοχή «LINE-OUT» (= γραµµή) της εξόδου «SPEAK» (=
ηχείο) της κάρτας ήχου.
4 Χρήση
1. Ανοίξτε τα ηχεία. Η λυχνία Α θα ανάψει.
2. Φροντίστε για την παραγωγή κάποιου ήχου από τον υπολογιστή σας.
3. Ρυθµίστε τον ήχο στο επίπεδο της αρεσκείας σας µε το κουµπί «Volume» C (Ένταση).
5 Αντιµετώπιση προβληµάτων
Πρόβληµα Αιτία Πιθανή λύση
Το καλώδιο ήχου δεν
έχει συνδεθεί σωστά
στην κάρτα ήχου.
Ελέγξτε τη σύνδεση στην
κάρτα ήχου. Αν χρειαστεί,
δείτε το εγχειρίδιο της κάρτας
ήχου.
Ελέγξτε αν ο προσαρµογέας
έχει συνδεθεί σωστά στο
ηχείο.
Ο προσαρµογέας
δεν έχει συνδεθεί
σωστά.
Ελέγξτε κατά πόσον έχει
συνδεθεί ο προσαρµογέας.
∆εν
ακούγεται
κανένας
ήχος από τα
ηχεία.
Το κουµπί της
έντασης είναι
χαµηλά.
Ανεβάστε την ένταση.
Πίνακας 1: συνδέσεις
Στο www.trust.com µπορείτε επίσης να καταχωρίσετε την αγορά σας, έτσι ώστε να ισχύει η εγγύηση και
να δικαιούστε την καλύτερη δυνατή τεχνική υποστήριξη, όπως είναι η τελευταία ενηµέρωση του FAQ.
Θα ενηµερώνεστε αυτόµατα για την ανάπτυξη του προϊόντος σας αλλά και άλλων προϊόντων της Trust.
Μπορείτε επίσης να κερδίσετε καταπληκτικά δώρα.
Αν εξακολουθείτε να έχετε προβλήµατα αφού έχετε δοκιµάσει τις παραπάνω λύσεις, επικοινωνήστε µε
ένα από τα Κέντρα Εξυπηρέτησης Πελατών της Trust. Θα πρέπει να έχετε διαθέσιµα τα εξής στοιχεία:
1. Τον αριθµό προϊόντος. Αυτός είναι: 12558.
2. Μια καλή περιγραφή του τι ακριβώς δε λειτουργεί.
3. Μια καλή περιγραφή της στιγµής κατά την οποία παρουσιάζεται το πρόβληµα.
DK
1 Introduktion
Denne brugerhåndbog er beregnet til brugere af ‘TRUST 200P SOUNDFORCE‘. TRUST 200P
SOUNDFORCE kan anvendes til at spille computerspil eller musik på pc’en.
Dette produkt overholder alle de vigtige krav og andre relevante bestemmelser i de relevante
europæiske direktiver. Overensstemmelseserklæringen er tilgængelig på www.trust.com/12558/ce.
2 Sikkerhed
1. Træk stikket ud af stikdåsen før højtaleren rengøres. Brug ikke flydende rengøringsmidler eller
spraymidler. Rengør højtaleranlægget med en fugtig klud.
2. Brug ikke højtaleranlægget i nærheden af vand.
3. Sørg for at der ikke ligger noget på kablet. Sørg for ikke at placere højtaleren et sted hvor kablet
kan slides.
4. Stik aldrig genstande af nogen art ind i åbningerne på højtaleren.
5. Forsøg ikke at reparere højtaleranlægget selv. Højtaleranlægget må kun repareres af
kvalificerede fagfolk.
3 Forbindelse
Figur 1. 200P SOUNDFORCE-forbindelse
Funktion Beskrivelse
A
Lysdiode Tændes når højtaleranlægget er
tilsluttet stikdåsen.
B
ON/OFF-knap Tænder og slukker for højtaleranlægget.
C
Volumen Skruer op eller ned for lyden.
D
Audio In Tilslutning til lydkortet.
E
AC IN Tilslutning for adapter.
F
Højtalerkabel Kabel mellem venstre og højre højtaler.
Tabel 1: Forbindelser
1. Forbind strømadapteren til tilslutning E.
2. Tilslut højtalerkablet F til “LINE-OUT” (= linie)-udgangen eller “SPEAK”-udgangen (=
højtalerudgang) på lydkortet.
4 Anvendelse
1. Tænd højtalerne. Lysdiode A lyser.
2. Lad computeren producere lyd.
3. Justér lyden med volumenknappen C.
5 Fejlafhjælpning
Problem Årsag Mulig løsning
Lydkablerne er ikke
forbundet korrekt
med lydkortet.
Kontroller forbindelsen til
lydkortet. Se evt.
brugerhåndbogen til
lydkortet.
Kontroller om adapteren
er tilsluttet korrekt til
højtaleren.
Adapter ikke tilsluttet
korrekt.
Kontroller om adapteren
er tilsluttet.
Ingen lyd
fra
højtalerne
.
Volumeknappen er
lav.
Skru op for volumen.
Tabel 1: Tilslutninger
Få produktet registreret via www.trust.com så du kan modtage optimal garanti- og
serviceunderstøttelse såsom opdaterede Hyppigt Stillede Spørgsmål (FAQ). Du vil automatisk blive
informeret om videreudvikling af dit produkt og andre Trust produkter. Du har også mulighed for at
vinde nogle spektakulære præmier.
Hvis der stadig er problemer efter at disse løsninger er afprøvet, kontaktes et af Trusts
kundeservicecentre. Hav venligst følgende informationer klar:
1. Artikelnummer. Det er: 12558;
2. En god beskrivelse af hvad der ikke virker.
3. En god beskrivelse af hvornår problemet opstår.
Page 6

200P SOUNDFORCE
SE
1 Inledning
Denna handbok är avsedd för användare av ‘TRUST 200P SOUNDFORCE‘. TRUST 200P
SOUNDFORCE kan användas för att spela spel eller musik på din PC.
Produkten uppfyller alla krav och fordringar i gällande Europeiska direktiv. Intyget om
överensstämmelse (Declaration of Conformity - DoC) finns på www.trust.com/12558/ce.
2 Säkerhet
1. Koppla ur kontakterna från vägguttaget innan du rengör högtalarna. Använd inte flytande
rengöringsmedel eller sprejburkar. Torka först av högtalarna med en fuktig trasa.
2. Ställ inte högtalarna i närheten av vatten.
3. Kontrollera att inga föremål ställs på strömkabeln. Placera inte högtalarna där kabeln kan nötas
ut.
4. Sätt aldrig in något föremål i springorna i högtalarhöljet.
5. Försök inte att reparera högtalarna själv. Underhåll ska endast utföras av utbildad personal.
3 Anslutning
Bild 1. 200P SOUNDFORCE anslutning
Funktion Beskrivning
A
Lampa Tänds när högtalarna är anslutna till
vägguttaget.
B
Strömbrytare Slå på eller stäng av högtalarna
C
Volym Höja eller sänka ljudet
D
Audio In
(ljudingång)
Anslutning till ljudkortet
E
AC IN (Ström) Anslutning för adapter
F
Högtalarkabel Kabel mellan höger och vänster
högtalare.
Tabell 1: Anslutningar
1. Anslut strömadaptern till anslutning E.
2. Anslut högtalarkabel F till “LINE-OUT” (= linjeutgång) på “SPEAK” (= högtalarutgången) på
ljudkortet.
4 Användning
1. Slå på högtalarna. Lampa A tänds.
2. Låt din dator skapa ljud.
3. Justera ljudet med Volymknapp C.
5 Felsökning
Problem Orsak Möjlig lösning
Ljudkabeln är inte
korrekt kopplade till
ljudkortet.
Kontrollera kontakterna t ill
ljudkortet. Se manualen till
ljudkortet vid behov.
Kontrollera om adaptern
är ansluten till högtalarna.
Adaptern inte
ordentligt ansluten.
Kontrollera om adaptern
är inkopplad.
Inget ljud
från
högtalarna.
Volymknappen är
inställd på låg volym.
Höj volymen.
Tabell 1: anslutningar
Du registrerar produkten via www.trust.com så att du kan få optimal garanti och service som
uppdaterade vanliga frågor. Dessutom informeras du då automatiskt om utvecklingen av din och andra
Trust-produkter. Och du har chans att vinna spektakulära priser.
Om du fortfarande skulle ha problem sedan du har följt dessa instruktioner kan du kontakta ett av våra
Trust Customer Care Centres. Se till att du har följande uppgifter till hands:
1. Produktnummer. Det är 12558;
2. En bra beskrivning av vad det är som inte fungerar.
3. En bra beskrivning av när problemet precis uppträder.
HU
1 Bevezetés
Ez az útmutató a TRUST 200P SOUNDFORCE hangszórókészlet használóinak szól. A TRUST 200P
SOUNDFORCE számítógépes játékokhoz vagy zenehallgatáshoz használható.
A termék teljesíti a vonatkozó európai irányelvek alapvető követelményeit és azok egyéb vonatkozó
kikötéseit. A Megfelelőségi nyilatkozat (DoC) a www.trust.com/12558/ce helyen érhető el.
2 Biztonság
1. A hangszórókészlet tisztítása előtt húzza ki a dugókat a dugaszolóaljzatból. Ne használjon
folyékony tisztítószereket vagy permeteket. Benedvesített kendővel törölje le a
hangszórókészletet.
2. Ne használja a hangszórókészletet víz közelében!
3. Ügyeljen arra, hogy semmilyen tárgy ne kerüljön a tápfeszültség-kábelre! Ne helyezze a
hangszórókészletet olyan helyre, ahol a kábel elkophat.
4. Tilos bármilyenfajta tárgyat a hangszórókészlet dobozainak réseibe dugni!
5. A hangszórókészletet tilos saját kezűleg javítani! A hangszórókészlet karbantartását kizárólag
szakképzett személyek végezhetik.
3 Csatlakoztatás
1. ábra: A 200P SOUNDFORCE csatlakozói
Funkció Leírás
A
LED Világít, amikor a hangszórókészletet
csatlakoztatják a tápfeszültséghez.
B
Be-/kikapcsolás
gomb
A hangszórókészlet be- és
kikapcsolásához.
C
Hangerő A hangerő növeléséhez vagy
csökkentéséhez.
D
Hangbemenet Csatlakozó a hangkártyához.
E
Váltófeszültség
bemenet
Az adapter csatlakozója.
F
Hangszórókábel A jobb és bal hangszóró közötti kábel.
1. táblázat: Csatlakozók
1. Csatlakoztassa a tápfeszültség-adaptert az E jelű csatlakozóhoz.
2. Csatlakoztassa az F jelű kábelt a hangkártya „LINE-OUT” (=vonal) vagy „SPEAK” (=hangszóró)
kimenetéhez.
4 Használat
1. Kapcsolja be a hangszórókat. Elkezd világítani az A jelű lámpa.
2. Adasson ki valamilyen hangot a számítógéppel.
3. A C jelű hangerő-szabályozó gombbal állítsa be a kívánt hangerőt.
5 Hibaelhárítás
Probléma Ok Lehetséges megoldás
A hangkábel nincs
megfelelően
csatlakoztatva a
hangkártyához.
Ellenőrizze a hangkártya
csatlakoztatását. Szükség
esetén lapozza fel a
hangkártya útmutatóját.
Ellenőrizze, hogy az
adapter megfelelően
csatlakozik-e a
hangszóróhoz.
Az adapter nincs
megfelelően
csatlakoztatva.
Ellenőrizze, be van-e
dugva az adapter a
dugaszolóaljzatba.
Nem jön
hang a
hangszórókból.
A hangerő-
szabályozó gomb
alacsony hangerőre
van állítva.
Növelje a hangerőt.
1. táblázat: Csatlakozók
A garancia egyszerű érvényesítése és a szerviztámogatás (pl. a naprakész GYIK – angolul FAQ)
biztosítása érdekében regisztrálja a terméket a www.trust.com webhelyen. Ekkor folyamatosan
értesítjük a termékkel és az egyéb Trust termékekkel kapcsolatos fejlesztésekről. A regisztrálással
értékes nyereményeket is nyerhet.
Ha ezek után még mindig problémákba ütközik, kérjük, forduljon a Trust Vevőszolgálati Központok
valamelyikéhez. Kérjük, álljon készen a következő információk megadására:
1. A termék cikkszáma: 12558.
2. Megfelelő leírás arról, hogy pontosan mi nem működik.
3. Megfelelő leírás arról, hogy pontosan mikor fordulnak elő a problémák.
Page 7

200P SOUNDFORCE
CZ
1 Úvod
Tento návod je určen uživatelům “TRUST 200P SOUNDFORCE”. TRUST 200P SOUNDFORCE je
určena ke hraní her a k přehrávání hudby na Vašem PC.
Tento produkt vyhovuje všem základním požadavkům a ostatním součástem evropských nařízení
týkajících se produktu. Deklarace o způsobilosti (DoC – Declaration of Confirmity) je k dispozici na
www.trust.com/12558/ce.
2 Bezpečnost
1. Odpojte konektory z napájecích zásuvek než začnete čistit reproduktory. Nepoužívejte
alkoholové čističe nebo spreje. Nejprve otřete zařízení vlhkým hadrem.
2. Nepoužívejte zařízení v blízkosti vody.
3. Ujistěte se, že žádné objekty neleží na napájecím kabelu. Neumísťujte reproduktory na místo,
kde by mohl být poškozen kabel.
4. Nikdy nestrkejte žádné předměty do štěrbin krytu reproduktoru.
5. Nepokoušejte se sami reproduktor opravit. Údržbu přístroje přenechte kvalifikovaným osobám.
3 Zapojení
Schéma 1. Zapojení 200P SOUNDFORCE
Funkce Popis
A
LED Rozsvítí se, když je zařízení zapojeno
do elektrické sítě.
B
Tlačítko ON /
OFF
Slouží k vypnutí a zapnutí přístroje.
C
Knoflík Volume Slouží k ovládání hlasitosti.
D
Audio In Zapojení do zvukové karty.
E
AC IN Zapojení adaptéru.
F
Kabel
reproduktoru
Kabel mezi pravým a levým
reproduktorem.
Tabulka 1: Zapojení
1. Zapojte napájecí adaptér do zásuvky E (dle tabulky).
2. Zapojte kabel F do výstupu (= “LINE OUT”) pro reproduktor (= “SPEAK” nebo “SPEAKER”) na
zvukové kartě.
4 Použití
1. Zapněte reproduktory. Dioda A se rozsvítí.
2. Přehrajte na počítači nějaký zvuk.
3. Nastavte hlasitost na Vámi požadovanou hodnotu knoflíkem “VOLUME” – C.
5 Řešení problémů
Problém Příčina Možné řešení
Audio kabel není
správně zapojen do
zvukové karty.
Zkontrolujte zapojení do
zvukové karty. V případě
potřeby se řiďte návodem
ke zvukové kartě.
Zkontrolujte, zda je
adaptér správně připojen
k reproduktoru.
Adaptér není správně
připojen.
Zkontrolujte, zda je
adaptér zapojen.
Z
reproduktorů
nevychází
žádný
zvuk.
Hlasitost je příliš
nízká.
Zvyšte hlasitost.
Tabulka 1: Zapojení
Zaregistrujte si produkt na www.trust.com. Zajistíte si tím optimální záruky a podporu, jako třeba
aktuální odpovědi na časté otázky. Budete automaticky informováni o novinkách týkajících se Vašeho
produktu i o ostatních produktech Trust. Získáte možnost vyhrát zajímavé zákaznické ceny.
Pokud i po vyzkoušení navrhovaných řešení problémů potíže přetrvávají, kontaktujte prosím Centrum
zákaznické péče Trust. Připravte si prosím následující:
1. Číslo výrobku. Tohle je: 12558;
2. Výstižný popis, co vše nefunguje;
3. Přesný popis, kdy a v jakých situacích se problém objevuje.
SK
1 Úvod
Tento návod je určený pre užívateľov reproduktorov ‘TRUST 200P SOUNDFORCE‘. TRUST 200P
SOUNDFORCE sa môže používať pri hraní hier alebo na prehrávanie hudby na Vašom PC.
Tento výrobok je v súlade so všetkými podstatnými požiadavkami a ďalšími relevantnými
ustanoveniami príslušných európskych smerníc. Vyhlásenie o zhode (VoZ) je k dispozícii na
www.trust.com/12558/ce.
2 Bezpečnosť
1. Pred čistením reproduktorovej sústavy vytiahnite zástrčky zo zásuvky. Nepoužívajte tekuté
čistiace prostriedky alebo spreje. Reproduktorovú sústavu najprv utrite vlhkou textíliou.
2. Reproduktorovú sústavu nepoužívajte v blízkosti vody.
3. Zaistite, aby na napájacom kábli nebolo nič položené. Neumiestňujte reproduktorovú sústavu na
miesto, kde by sa mohol napájací kábel poškodiť.
4. Nikdy nevkladajte predmety akéhokoľvek charakteru do jednej zo štrbín v kryte reproduktorovej
sústavy.
5. Nepokúšajte sa reproduktorovú sústavu opravovať svojpomocne. Údržbu reproduktorovej
sústavy smú vykonávať len kvalifikovaní pracovníci.
3 Pripojenie
Obrázok 1. Pripojenie 200P SOUNDFORCE
Funkcia Popis
A
LED dióda Rozsvieti sa, keď je reproduktorová
sústava pripojená k sieťovej zásuvke.
B
Tlačidlo ON /
OFF (ZAP/VYP)
Zapína alebo vypína reproduktorovú
sústavu.
C
Hlasitosť Zvyšuje alebo znižuje hlasitosť zvuku
D
Audio In Pripojenie k zvukovej karte
E
AC IN Prípojka pre adaptér
F
Reproduktorový
kábel
Kábel medzi ľavým a pravým
reproduktorom.
Tabuľka 1: Pripojenia
1. Zapojte sieťový adaptér do prípojky E.
2. Zapojte reproduktorový kábel F do “LINE-OUT” (= linka) výstupu “SPEAK” (= reproduktor) na
zvukovej karte.
4 Použitie
1. Zapnite reproduktory. Rozsvieti sa kontrolka A.
2. Zaistite, aby Váš počítač vydával zvuk.
3. Tlačidlom hlasitosti C nastavte zvuk ako sa Vám páči.
5 Riešenie problémov
Problém Príčina Možné riešenie
Audio kábel nie je
správne pripojený
k zvukovej karte.
Skontrolujte pripojenie
k zvukovej karte.
V prípade potreby použite
návod k zvukovej karte.
Skontrolujte, či je adaptér
správne pripojený
k reproduktoru.
Adaptér nie je
správne pripojený.
Skontrolujte, či je adaptér
zapojený do zásuvky.
Z reprodu
ktorov
nejde
zvuk.
Tlačidlo hlasitosti je
nastavené na nízku
hodnotu.
Zvýšte hlasitosť.
Tabuľka 1: pripojenia
Výrobok si zaregistrujte na www.trust.com, aby ste mali zabezpečenú optimálnu záručnú a servisnú
podporu, ako napr. aktuálne často kladené otázky. Budete automaticky informovaný o ďalšom vývoji
svojho výrobku a iných výrobkov značky Trust. Získate tiež možnosť vyhrať niekoľko pozoruhodných
cien.
Ak sa problém neodstráni ani po vyskúšaní týchto riešení, obráťte sa na centrá starostlivosti o
zákazníkov spoločnosti Trust. Pripravte si prosím nasledujúce informácie:
1. Číslo výrobku. Je to: 12558;
2. Podrobný popis toho, čo presne nefunguje.
3. Podrobný popis toho, kedy presne sa problém vyskytuje.
Page 8

200P SOUNDFORCE
FI
1 Johdanto
Tämä ohjekirja on tarkoitettu TRUST 200P SOUNDFORCE -kaiutinsarjan käyttäjille. TRUST 200P
SOUNDFORCE -kaiutinsarjaa voi käyttää pelien pelaamiseen tai musiikin kuunteluun PC:llä.
Tämä tuote on asiaankuuluvien EY-direktiivien vaatimusten ja muiden asiaankuuluvien säännösten
mukainen. Vaatimustenmukaisuusvakuutus on saatavana osoitteesta www.trust.com/12558/ce.
2 Turvallisuus
1. Irrota pistokkeet pistorasiasta ennen kaiutinsarjan puhdistamista. Älä käytä nestemäisiä
puhdistusaineita tai suihkeita. Pyyhi kaiutinsarja ensin kostealla rätillä.
2. Älä käytä kaiutinsarjaa veden lähellä.
3. Varmista, ettei virtakaapelin päälle ole asetettu esineitä. Älä sijoita kaiutinsarjaa paikkaan,
jossa virtakaapeli voi kulua.
4. Älä työnnä esineitä kaiutinkotelon aukkoihin.
5. Älä yritä korjata kaiuttimia itse. Kaiutinsarjan saa huoltaa vain tarvittavan koulutuksen saanut
henkilö.
3 Kaiutinsarjan kytkeminen
Kuva 1. 200P SOUNDFORCE -kaiutinsarjan kytkeminen
Toiminto Kuvaus
A
LED Merkkivalo syttyy, kun kaiutinsarja
kytketään pistorasiaan.
B
Käytössä (ON) /
Ei käytössä
(OFF) -painike
Kytkee kaiutinsarjan käyttöön (ON) tai
pois käytöstä (OFF).
C
Äänenvoimakkuus Äänenvoimakkuuden säätö
D
Äänen sisääntulo
(Audio In)
Äänikortin liitäntä
E
Virtaliitäntä (AC
IN)
Verkkolaiteliitäntä
F
Kaiutinjohto Oikean- ja vasemmanpuoleisen
kaiuttimen välinen johto
Taulukko 1: Kytkennät
1. Kytke verkkolaite liitäntään E.
2. Kytke kaiutinjohto F äänikortin kaiutinlähdön (SPEAK) linjalähtö -liitäntään (LINE-OUT).
4 Käyttö
1. Kytke kaiuttimiin virta. Merkkivalo A syttyy.
2. Tuota tietokoneella ääntä.
3. Säädä äänenvoimakkuus sopivaksi äänenvoimakkuuden säätimestä C.
5 Vianmääritys
Ongelma Syy Mahdollinen ratkaisu
Audiokaapelia ei ole
liitetty oikein
äänikorttiin.
Tarkista äänikortin liitäntä
Lisätietoja saat äänikortin
ohjekirjasta.
Tarkista, että verkkolaite
on liitetty kaiuttimeen
asianmukaisesti.
Verkkolaitetta ei ole
kytketty oikein.
Tarkista, onko verkkolaite
liitetty kaiuttimeen.
Kaiuttimista ei
kuulu
ääntä.
Äänenvoimakkuus on
heikko.
Lisää äänenvoimakkuutta.
Taulukko 2: vianmääritys
Rekisteröi tuote sivustossa www.trust.com, jotta saat parhaan mahdollisen hyödyn tuotteen takuusta ja
tukipalveluista, kuten tuoreimmista usein kysytyistä kysymyksistä. Saat automaattisesti tietoa tuotteesi
päivityksistä ja muista Trustin tuotteista. Voit samalla voittaa hienoja palkintoja.
Jollet onnistu ratkaisemaan ongelmaasi näillä ohjeilla, ota yhteyttä Trustin asiakaspalveluun. Ota
selville seuraavat tiedot:
1. tuotteen numero, joka on 12558
2. selkeä vian kuvaus,
3. selkeä kuvaus siitä, milloin ongelma esiintyy.
NO
1 Introduksjon
Denne håndboken er beregnet på brukere av TRUST 200P SOUNDFORCE. TRUST 200P
SOUNDFORCE kan brukes til å spille spill eller musikk på PCen.
Produktet er i samsvar med alle nødvendige krav og andre relevante bestemmelser i de gjeldende
europeiske direktivene. Samsvarserklæringen (DoC) er tilgjengelig på www.trust.com/12558/ce.
2 Sikkerhet
1. Ta ut støpslene fra strømkontaktene før du rengjør høyttalersettet. Ikke bruk flytende
rengjøringsmidler eller spraybokser. Tørk først av høyttalerne med en fuktig klut.
2. Ikke bruk høyttalersettet i nærheten av vann.
3. Pass på at det ikke er plassert gjenstander oppå strømkabelen. Ikke plasser høyttalersettet på
et sted der kabelen kan utsettes for slitasje.
4. Stikk aldri gjenstander av noe slag inn i spaltene på høyttalerkassen.
5. Ikke prøv å reparere høyttalersettet selv. Settet må bare vedlikeholdes av kvalifiserte
personer.
3 Tilkopling
Figur 1. 200P SOUNDFORCE-tilkopling
Funksjon Beskrivelse
A
Lampe Lyser når høyttalersettet er koplet til
strøm
B
PÅ/AV-knapp Slår høyttalersettet PÅ eller AV
C
Volum Skrur lyden opp eller ned
D
Audio inn Tilkopling til lydkort
E
Strøm inn Tilkopling for vekselstrømsadapter
F
Høyttalerkabel Kabel mellom høyre og venstre
høyttaler
Tabell 1: Tilkoplinger
1. Kople strømadapteren til kontakt E.
2. Kople høyttalerkabel F til ”LINE OUT” (=linje) på utgangen ”SPEAK” (=høyttaler) på lydkortet.
4 Bruk
1. Slå på høyttalerne. Lampen A lyser.
2. La datamaskinen produsere lyd.
3. Juster lyden til et komfortabelt nivå med volumbryter C.
5 Feilsøking
Problem Årsak Mulig løsning
Lydkabelen er ikke
riktig koplet til
lydkortet.
Kontroller tilkoplingen til
lydkortet. Se om
nødvendig i håndboken
for lydkortet.
Kontroller om adapteren
er riktig koplet til
høyttaleren.
Adapteren er ikke
riktig koplet til.
Kontroller om adapteren
er koplet til.
Ingen lyd
fra
høyttaler
ne.
Volumknappen står
på lav lydstyrke.
Øk lydstyrken.
Tabell 2: Feilsøking
Registrer produktet på www.trust.com slik at du kan få optimal garanti- og servicestøtte, f.eks. tilgang til
oppdaterte hyppig stilte spørsmål. Du vil automatisk motta informasjon om utvikling av produktet og om
andre produkter fra Trust. Du får også mulighet til å vinne flotte premier.
Dersom du fremdeles har problemer etter at du har forsøkt disse løsningene, vennligst ta kontakt med
en av Trusts kundesentre. Vennligst ha følgende informasjon tilgjengelig:
1. Varenummer. Dette er: 12558.
2. En god beskrivelse av hva som ikke virker.
3. En god beskrivelse av nøyaktig når problemet oppstår.
Page 9

200P SOUNDFORCE
TR
1 Giriş
Bu tâlimat kılavuzu ‘TRUST 200P SOUNDFORCE’ kullanıcıları içindir. TRUST 200P SOUNDFORCE
ürününü kişisel bilgisayarınızda oyun oynamak veya müzik çalmak için kullanabilirsiniz.
Bu aygıt, yürürlükteki Avrupa yönergelerinde belirtilen gereksinimleri karşılamakta ve diğer koşulları
yerine getirmektedir. Uygunluk Bildirimi (DoC) belgesini www.trust.com/12558/ce adresinde
bulabilirsiniz.
2 Güvenlik
1. Hoparlör setini temizlemeden önce fişleri prizden çekin. Sıvı temizleyiciler veya spreyler
kullanmayın. Hoparlör setini önce nemli bir bezle silin.
2. Hoparlör setini suya yakın yerlerde kullanmayın.
3. Güç kablosunun üzerinde herhangi bir nesne bulunmamasına dikkat edin. Hoparlör setini
kablosunun aşınabileceği ve çiğnenebileceği yerlere koymayın.
4. Hoparlör seti mahfazasındaki aralıklara/deliklere kesinlikle hiçbir yabancı cisim sokmayın.
5. Hoparlör setini kendiniz onarmaya kalkışmayın. Bu sete sâdece yetkili uzman personel
tarafından bakım yapılabilir.
3 Bağlantı
Şekil 1. 200P SOUNDFORCE bağlantısı
İşlev Açıklama
A
LED Hoparlör seti elektrik prizine bağlıyken
yanar.
B
AÇIK / KAPALI
düğmesi
Hoparlör setini AÇAR veya KAPATIR.
C
Ses Sesi açar veya kısar.
D
Ses Girişi Ses kartı bağlantısı içindir
E
AC IN Adaptör bağlantısı içindir.
F
Hoparlör kablosu Sağ ve sol hoparlör arasındaki kablo
Tablo 1: Bağlantılar
1. Elektrik adaptörünü E bağlantısına bağlayın.
2. Hoparlör kablosunu (F) ses kartının “SPEAK” (=hoparlör) çıkışının “LINE-OUT” (=hat çıkışı)
bağlantı noktasına bağlayın.
4 Kullanım
1. Hoparlörleri açın. A göstergesi yanacaktır.
2. Bilgisayarınız ses çıkartır.
3. C Ses düğmesini kullanarak ses yüksekliğini istediğiniz gibi ayarlayabilirsiniz.
5 Sorun Giderme
Sorun Neden Olası çözüm
Ses kablosu ses
kartına doğru
bağlanmamış.
Ses kartı bağlantısını
kontrol edin. Gerekirse,
ses kartının kullanım
kılavuzuna bakın.
Adaptörün hoparlöre
doğru bağlanıp
bağlanmadığını kontrol
edin.
Adaptör doğru
bağlanmamış.
Adaptörün prize takılı olup
olmadığını kontrol edin.
Hoparlörl
erden ses
gelmiyor.
Ses düğmesi kısık
durumda.
Sesi açın.
Tablo 2: Sorun giderme
Ürününüzü www.trust.com adresinde tescil ettirin; bu sâyede garanti olanaklarından âzamî ölçüde
yararlanabilir ve güncel SSS bilgileri gibi servis desteği hizmetleri de alabilirsiniz. Ürününüz ve diğer
Trust ürünleri ile ilgili gelişmeler size otomatik olarak bildirilecektir. Bâzı özel ödüller kazanma
olasılığınız da söz konusudur.
Bu çözümleri denedikten sonra sorun hâlâ devam ediyorsa, lütfen, Trust Customer Care Centers
birimlerinden biriyle temasa geçin. Lütfen aşağıdaki bilgileri iletin:
1. Ürün numarası. Örneğimizde: 12558;
2. Sorunun tam bir açıklaması.
3. Sorunun ne zaman meydana geldiği konusunda net açıklama.
RU
1 Введение
Это руководство предназначено для пользователей колонок «TRUST 200P SOUNDFORCE».
Колонки «TRUST 200P SOUNDFORCE» можно использовать для игры или прослушивания
музыкальных записей на компьютере.
Данное изделие соответствует основным требованиям и другим условиям, изложенным в
директивах Европейского сообщества. С Декларацией о соответствии (Declaration of Conformity
— DoC) можно ознакомиться на web-узле www.trust.com/12558/ce.
2 Безопасность
1. Перед очисткой колонок отключите шнур питания устройства от электросети. Не
используйте жидкие моющие средства и аэрозоли. Сначала протрите колонки влажной
тканью.
2. Не устанавливайте колонки около источников воды.
3. Не ставьте предметы на шнур питания. Не размещайте колонки в местах, где кабель
будет подвергаться трению и изнашиваться.
4. Никогда не вставляйте никакие предметы в прорези на корпусе колонок.
5. Не пытайтесь ремонтировать колонки самостоятельно. Техническое обслуживание
колонок должно производиться только квалифицированным персоналом.
3 Подключение
Рисунок 1. Подключение колонок «200P SOUNDFORCE»
Функция Описание
A
Светодиод Горит, когда колонки подключены к
сети электропитания.
B
Кнопка ON / OFF
(вкл./выкл.)
Включение и выключение колонок.
C
Громкость Регулировка громкости.
D
Звуковой вход
(Audio In)
Служит для подключения к
звуковой карте.
E
AC IN (гнездо для
подключения
источника
переменного тока)
Гнездо для подключения
адаптера.
F
Кабель колонок Кабель между правой и левой
колонками.
Таблица 1. Элементы подключения
1. Подключите адаптер электропитания к гнезду E.
2. Подключите кабель колонок F к гнезду «LINE-OUT» (= линейный выход) выхода
«SPEAK» (= колонка) звуковой карты.
4 Использование
1. Включите колонки. Загорится лампочка A.
2. Включите на компьютере воспроизведение звуков.
3. Отрегулируйте звук по своему желанию при помощи регулятора громкости C.
5 Устранение неполадок
Неполадка Причина Возможное решение
Звуковой кабель
неправильно
подключен к
звуковой карте.
Проверьте подключение
к звуковой карте. Если
необходимо, обратитесь
к руководству по
использованию звуковой
карты.
Проверьте, правильно
ли адаптер подключен к
колонке.
Неправильно
подключен
адаптер.
Проверьте, подключен
ли адаптер к сети
электропитания.
Колонки не
воспроизв
одят звуки.
Установлена
недостаточная
громкость.
Увеличьте громкость.
Таблица 2. Устранение неполадок
Зарегистрируйте приобретенное изделие по адресу www.trust.com, чтобы получить оптимальную
гарантию и обслуживание, например, доступ к обновленным вопросам и ответам (FAQ). Вы
будете автоматически проинформированы об усовершенствованиях вашего устройства и других
изделиях «Trust». Кроме того, вы сможете выиграть замечательные призы.
Если предложенные выше советы не помогли устранить возникшую проблему, пожалуйста,
обратитесь в один из сервисных центров «Trust». Для обращения в центр технической
поддержки, пожалуйста, подготовьте следующие сведения:
1. Номер изделия. Номер этого изделия: 12558;
2. Подробное и точное описание возникшей неполадки;
3. Подробное и точное описание ситуации, при которой возникла неполадка.
Page 10

SP-2350S 2.0 Speaker Set (200P SOUNDFORCE)
SL
1 Uvod
Ta priročnik je namenjen uporabnikom “Kompleta zvočnikov TRUST SP-2350S 2.0”. TRUST SP-2350S
2.0 Speaker Set lahko uporabljate za igranje igric ali za poslušanje glasbe na vašem PC-ju.
Ta izdelek je v skladu z vsemi bistvenimi zahtevami in drugimi relevantnimi določbami ustreznih
Evropskih smernic. Deklaracija o skladnosti (DoC) je na voljo na naslovu www.trust.com/12558/ce.
2 Varnost
1. Pred čiščenjem zvočnikov izklopite vtič iz vtičnice. Ne uporabljajte tekočih čistil ali pršil. Komplet
obrišite z vlažno krpo.
2. Zvočnikov ne uporabljajte v bližini vode.
3. Na električni kabel ne smete polagati nikakršnih predmetov. Ne namestite zvočnikov na mesto,
kjer bi lahko prišlo do obrabe kabla.
4. Nikoli ne vstavljajte nikakršnega predmeta v zareze na ohišju zvočnikov.
5. Zvočnikov ne poskušajte popravljati sami. Vzdrževanje zvočnikov lahko izvede samo kvalificiran
tehnik.
3 Povezava
Slika 1. Povezava SP-2350S 2.0 Speaker Set
Funkcija Opis
A
LED Zasveti ob priključitvi zvočnikov v
električno vtičnico
B
Gumb
VKLOP/IZKLOP
(ON/OFF)
Za VKLOP ali IZKLOP kompleta
zvočnikov
C
Glasnost Za večjo ali manjšo glasnost
D
Avdio In Povezava na zvočno kartico
E
AC IN Povezava na adapter
F
Kabel zvočnika Kabel med desnim in levim zvočnikom
Tabela 1: Povezave
1. Povežite električni adapter na povezavo E.
2. Povežite kabel zvočnika F na "IZHODNA LINIJA" (“LINE-OUT”) (= linijo) na izhodu "GOVOR"
("SPEAK") (=zvočnik) zvočne kartice.
4 Uporaba
1. Vklopite zvočnike. Zasvetila bo lučka A.
2. Naj vaš računalnik ustvari zvok.
3. Glasnost po želji naravnate z gumbom za glasnost C.
5 Odpravljanje težav
Težava Vzrok Možna rešitev
Avdio kabel ni
pravilno povezan na
zvočno kartico.
Preverite povezavo na
zvočno kartico. Če je
potrebno, si preberite
priročnik za zvočno
kartico.
Preverite ali je adapter
pravilno povezan na
zvočnik.
Adapter ni pravilno
povezan.
Preverite ali je adapter
vklopljen v vtičnico.
Zvočniki
ne dajo
glasu.
Gumb za glasnost je
na položaju za tiho.
Poveèajte glasnost.
Tabela 1: povezave
Registrirajte vaš izdelek na spletni strani www.trust.com tako, da boste lahko prejemali optimalno
garancijo in servisno podporo kot so na primer posodobljena Pogosto zastavljena vprašanja FAQ.
Obveščeni boste o razvoju vašega izdelka in drugih Trust izdelkih. Prav tako boste imeli možnost, da
zadenete spektakularne nagrade.
Če imate še vedno težave, po tem ko ste preizkusili te rešitve se obrnite na Trust Customer Care
Center za podporo stranki. Pri roki imejte naslednje informacije:
1. Številko artikla. Ta je: 12558;
2. Natančen podatek o težavi in delu ki ne deluje;
3. Natančen podatek o tem kdaj natanko se je težava začela.
 Loading...