

Page 1
K
A
i
J
Installation
1
Phone Line
B C D E F
G H i
ADSL Splitter
J
L
K
Page 2
2 3
L
Configuration
4 5
6 7
Page 3

Wireless Configuration
1
98
2
1
3
Make wireless connection with PC/ Laptop
Vista
10
2
3
4
XP
1211
Page 4
Opening ports (port forwarding)
13 14
15
‘Destination IP adress’:
16
+
1
2
3
4 6
5
9
7
8
Page 5

Page 6
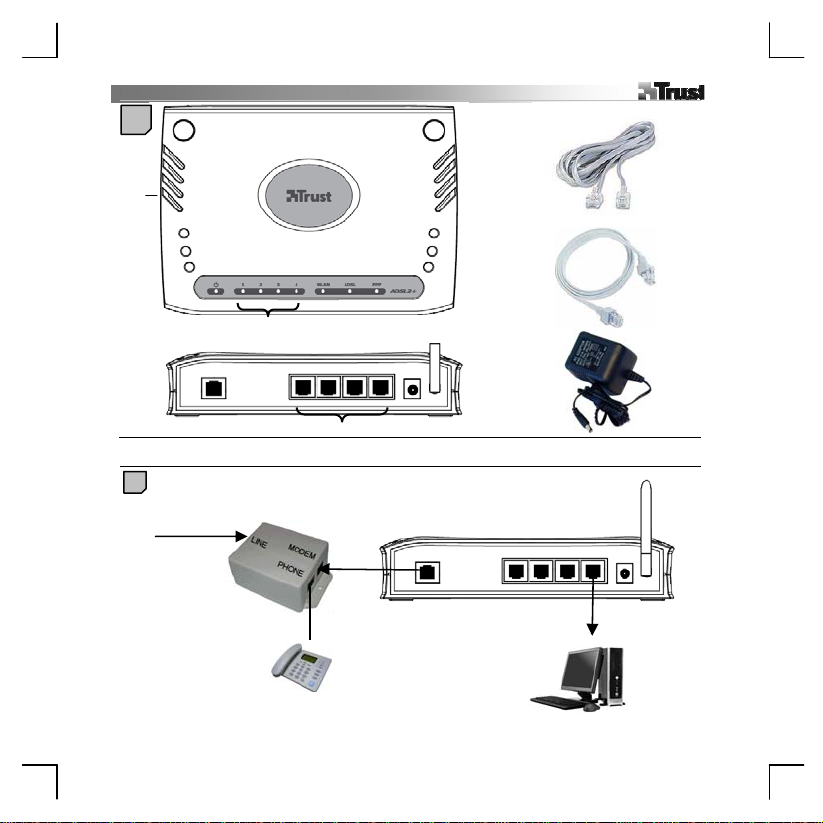
Product information
A: Reset button (use: press 5 seconds with
paperclip)
B: Power indicator
C: LAN activity indicators: steady=PC connected /
flashing=data transfer
D: Wireless LAN indicator: steady=enabled /
flashing=data transfer
E: ADSL sync indicator: Steady=ADSL-OK /
flashing=connecting
F: PPP indicator; only lights when connected
through PPPoA/PPPoE
Installation
Connect the phone line, phone and ADSL modem to ADSL splitter box as indicated. Connect PC to ADSL
1
modem with the Network cable. (K) (First configuration must be done via the cable)
Note: Splitter not included. For exact details on how to install your ADSL line contact Internet Provider.
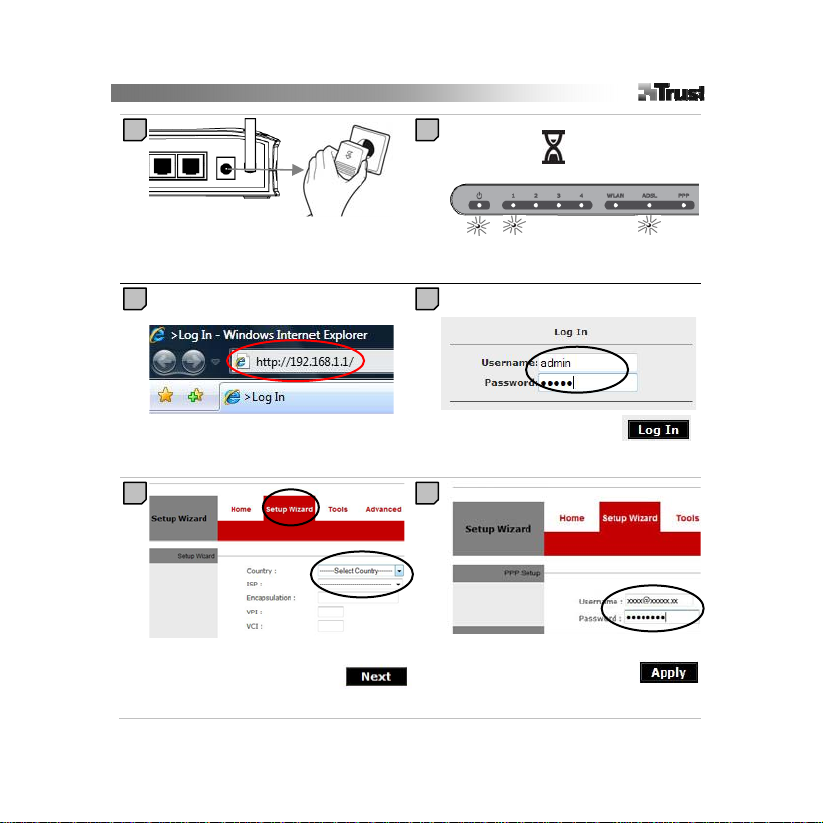
2
Connect power adapter (L) to connection (I) and insert power adapter in wall power socket.
3
Modem will power on. Power, LAN and ADSL indicators light.
Configuration
Start Internet explorer, type in address bar: http://192.168.1.1
4
Note: If the page can not be found, disconnect and reconnect network cable, restart PC and reset modem.
If this does not help, check Internet settings. (Advanced CD manual, page 17 and 18)
- Type username admin and password admin
5
- Click ‘Login’
- Click ‘Setup Wizard’
6
- Select ‘Country’(Country) and ‘ISP’ (Internet service provider)
- Click ‘Next’
- Fill in username/ password that you have received from your Internet provider.
7
- Click ‘Apply’
- Wait until the ADSL sync indicator (E) stops flashing. Internet should now work.
Note: If the
check your Username / password and other settings.
ADSL sync indicator
does not stop flashing after 30 minutes, contact your internet p r ovider,
G: ADSL line connection
H: LAN (PC) connection
I: Power adapter connections
J: ADSL cable
K: Network cable (Cable to PC)
L: Power adapter
and [press Enter]
1
English
Page 7

Wireless configuration
1. Click ‘Advanced’
8
3. Click ‘Wireless’
2. Click ‘Security’
Select:
9
1. WPA
2. WPA
3. Pre Shared Key.
4. Fill in a hard-to-guess password and also write it down on a piece of paper.
Click ‘Apply’, ‘RestartAP’ and again ‘Apply’
Make wireless connection with PC/ Laptop
Make sure no network cables are connected to the PC/Laptop anymore and that a wireless network dongle
10
or card is installed correctly.
Vista: Click on indicated taskbar icon and select: connect to a network.
XP: Right click on indicated icon and select: View Available Networks
11
Select the network and click ‘Connect’
12
Fill in the password from step and click ‘Connect’. Internet should now work.
Note: If Windows asks for a network location, choose: ‘Home’ (Home)
Note: If there is no Internet put modem more close to the PC and go through steps to again.
9
114
2
Page 8

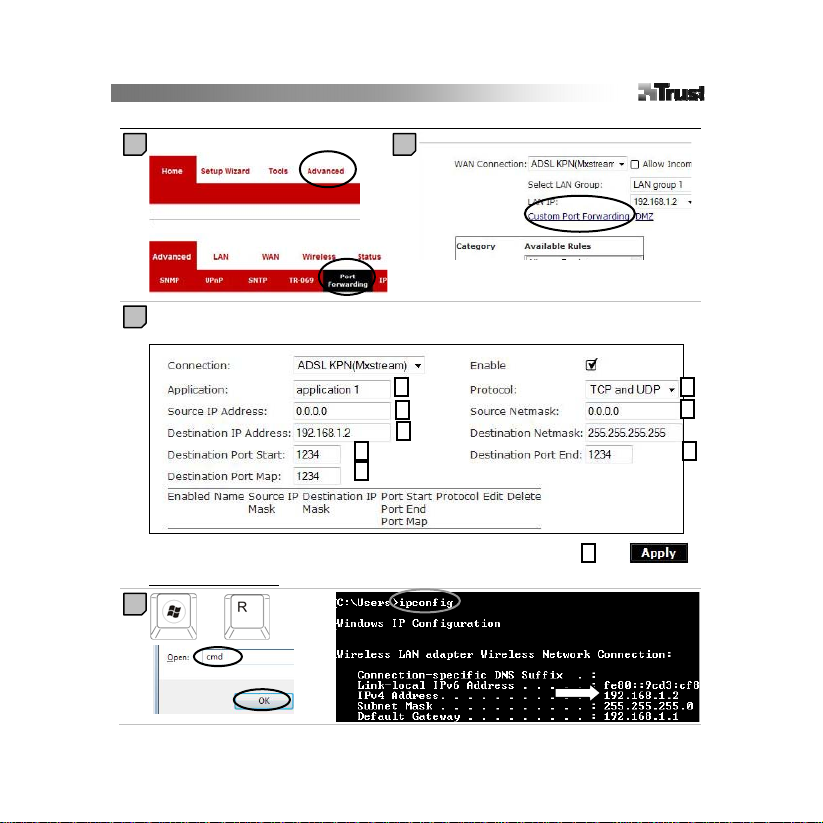
Opening ports (‘port forwarding’) – Advanced Users only
- Click ‘Advanced’
13
- Click ‘Port Forwarding’
14
Click on ‘Custom Port Forwarding’
Fill in:
15
1. Name of the program. Like: ‘torrent’.
2. ‘Source IP Address’: Normally you should fill in here: 0.0.0.0
3. ‘Destination IP address’: This is the IP address of your PC. Find this address as indicated in step .
4. ‘Destination Port Start’: This is the port number you need to open. (12324 is example)
5. ‘Destination Port Map’: Normally you should fill the same number here.
6. ‘Destination Port End’: Normally you should fill the same number here.
7. ‘Protocol’: Select ‘TCP and UDP’ for best compatibility.
8. ‘Source Netmask’: Normally you should fill in here: 0.0.0.0
9. Click: ‘Apply’ and port should be opened.
Note: Windows Firewall and other software firewalls must also be configured accept the application / open
the port. When you start the program, choose to ‘Unblock’ (Unblock) the program.
Note: See Advanced CD manual, page 71 for in depth information on port forwarding.
‘Destination IP adress’:
16
1. Press the Windows Key + R
2. Type: cmd in the box and click OK
3. Type: ipconfig and [press Enter]
4. IP Address of your PC is indicated with the white arrow in the manual picture.
Notes
General
If you have an internet subscription that is being paid for by time unit, disconnect the modem after you finish
using internet. See manual on CD-ROM. (pages 153 and 156)
This modem only works on analogue (POTS, PSTN, Annex A) ADSL, ADSL2, ADSL2+ or DSL/TDSL line
The up- and download speed is very depending on the quality of your home ADSL (telephone) wiring
installation.
The built in firewall is enabled by default. If you want to disable it see the manual on CD-ROM. (page 150)
Before installation make sure your ADSL line and account are activated.
This modem is not compatible with SDSL standard.
To play games over the LAN it must be supported by the game refer to the instructions from the game how
to configure it.
To configure the advanced router options from the modem/router see the English advanced manual on CD-
ROM.
To set the modem to default settings use a paperclip or other pointy object press the reset button (A). All
settings including username and password will be lost.
3
16
English
Page 9

Wireless
There are an increasing number of wireless products ( video, audio, computer, etc.) which work in the same
frequency range as this device. It may, therefore, be possible that the functionality of this product is limited
by or is limiting for other wireless products. This can only be avoided by paying attention to the distance
between products and, where possible, by changing channels.
Be careful when using wireless devices if you have a pacemaker or are dependent on other life-saving,
sensitive electronic equipment, because this device transmits radio signals.
4
Page 10

Produktinformationen
A: Reset-Taste (Verwendung: 5 Sekunden mit
Büroklammer drücken)
B: Betriebsanzeige
C: LAN-Aktivitätsanzeigen: leuchtet = PC
verbunden/blinkt = Datenübertragung
D: WLAN-Anzeige: leuchtet = aktiviert/blinkt =
Datenübertragung
E: ADSL-Synchronisierungsanzeige: leuchtet = ADSL
OK/blinkt = Verbindungsaufbau
F: PPP-Anzeige: leuchtet nur bei Verbindung über
PPPoA/PPPoE
Installation
Verbinden Sie Telefonanschluss, Telefon und ADSL-Modem entsprechend der Abbildung mit der ADSL-
1
Splitterbox. Schließen Sie den PC mit dem Netzwerkkabel (K) an das ADSL-Modem an. (Die erste
Konfiguration muss über das Kabel erfolgen.)
Hinweis: Der Splitter ist nicht im Lieferumfang enthalten. Ausführliche Informationen zum Installieren des
ADSL-Anschlusses erhalten Sie bei Ihrem Internetdienstanbieter.
2
Schließen Sie das Netzteil (L) an den Netzanschluss (I) und an einer Steckdose a n.
3
Das Modem ist damit betriebsbereit. Die Betriebs-, LAN- und ADSL-Anzeigen leuchten.
Konfiguration
Starten Sie Internet Explorer, und geben Sie in der Adressleiste Folgendes ein: http://192.168.1.1
4
[Drücken Sie dann die Eingabetaste.]
Hinweis: Wenn die Webseite nicht gefunden werden kann, trennen Sie das Netzwerkkabel vom PC, und
schließen Sie es dann wieder an. Starten Sie den PC neu, und setzen Sie das Modem zurück. Wenn das
Problem dadurch nicht behoben wird, überprüfen Sie die Interneteinstellungen (Erweiterte Anleitung auf
CD, Seite 17 und 18).
– Geben Sie den Benutzernamen admin und das Kennwort admin ein.
5
– Klicken Sie auf „Login“ (Anmelden).
– Klicken Sie auf „Setup Wizard“ (Setup-Assistent).
6
– Wählen Sie unter „Country“ (Land) ein Land und unter „ISP“ einen Internetdienstanbieter aus.
– Klicken Sie auf „Next“ (Weiter).
– Geben Sie den Benutzernamen und das Kennwort ein, die Sie von Ihrem Internetdienstanbieter erhalten
7
haben.
– Klicken Sie auf „Apply“ (Übernehmen).
– Warten Sie, bis die ADSL-Synchronisierungsanzeige (E) nicht mehr blinkt. Die Verbindung mit dem
G: ADSL-Anschluss
H: LAN-(PC-)Anschluss
I: Netzteilanschluss
J: ADSL-Kabel
K: Netzwerkkabel (Kabel zum PC)
L: Netzteil
1
Deutsch
.
Page 11

V
Internet sollte damit hergestellt sein.
Hinweis: Wenn die
Ihren Internetdienstanbieter wenden und Benutzername/Kennwort und die a nderen Einstellungen
überprüfen.
Drahtlose Konfiguration
1. Klicken Sie auf „Advanced“ (Erweitert).
8
2. Klicken Sie auf „Wireless“ (Drahtlos).
2. Klicken Sie auf „Security“ (Sicherheit).
Aktivieren Sie folgende Optionen:
9
1. WPA
2. WPA
2. Pre-Shared Key (Vorinstallierter Schlüssel)
4. Geben Sie ein schwer zu erratendes Kennwort ein, und notieren Sie sich dieses Kennwort.
Klicken Sie auf „Apply“ (Übernehmen), „RestartAP“ (AP neu starten) und dann erneut auf „Apply“
(Übernehmen).
Stellen Sie eine drahtlose Verbindung mit dem PC oder Laptop her.
ergewissern Sie sich, dass am PC oder Laptop keine Netzwerkkabel mehr angeschlossen sind und dass ein
10
Dongle oder eine Karte für ein drahtloses Netzwerk ordnungsgemäß installiert ist.
Vista: Klicken Sie auf das abgebildete Symbol in der Taskleiste, und wählen Sie folgende Option aus: Mit
einem Netzwerk verbinden.
XP: Klicken Sie mit der rechten Maustaste auf das abgebildete Symbol, und wählen Sie folgende Option
aus: Verfügbare drahtlose Netzwerke anzeigen.
11
Wählen Sie das Netzwerk aus, und klicken Sie auf „Connect“ (Verbinden).
12
Geben Sie das Kennwo rt aus Schritt ein, und klicken Sie auf „Connect“ (Verbinden). Die Verbindung
mit dem Internet sollte damit hergestellt sein.
Hinweis: Wenn Sie unter Windows zur Eingabe eines Netzwerkpfads aufgefor d ert werden, wählen Sie
folgende Option aus: „Home“ (Startseite).
Hinweis: Wenn keine Verbindung mit dem Internet hergestellt ist, platzieren Sie das Modem näher am PC,
und führen Sie die Schritte bis erneut a us.
ADSL-Synchronisierungsanzeige
9
114
nach 30 Minuten immer noch blinkt, sollten Sie sich an
2
Page 12

Öffnen von Ports („Port Forwarding“) – Nur für fortgeschrittene Benutzer
– Klicken Sie auf „Advanced“ (Erweitert).
13
– Klicken Sie auf „Port Forwarding“ (Portweiterleitung).
14
Klicken Sie auf „Custom Port Forwarding“ (Benutzerdefinierte Portweiterleitung).
Geben Sie Folgendes ein:
15
1. Name des Programms, z. B. „Torrent“.
2. „Source IP Address“ (Quell-IP-Adresse): Normalerweise geben Sie hier Folgendes ein: 0.0.0.0
2. „Destination IP Address“ (Ziel-IP-Adresse): Dies ist die IP-Adresse Ihres PCs. Diese Adresse ist in Schritt
16
angegeben.
4. „Destination Port Start“ (Beginn Zielport): Dies ist di e Nummer d es Ports, der geöffnet werden soll (z. B.
12324).
5. „Destination Port Map“ (Zuordnung Zielport): Normalerweise geben Sie hier die gleiche Po rtnummer ein.
6. „Destination Port End“ (Ende Zielport): Normalerweise geben Sie hier die g l eiche Po rtnummer ein.
7. „Protocol“ (Protokoll): Wählen Sie „TCP and UDP“ (TCP und UDP) für optimale Kompatibilität aus.
8. „Source Netmask“ (Quellnetzmaske): Normalerweise geben Sie hier Folgendes ein: 0.0.0.0
9. Klicken Sie auf „Apply“ (Übernehmen). Der Port sollte damit geöffnet sein.
Hinweis: Windows Firewall und andere Software-Firewalls müssen ebenfalls so konfiguriert werden, dass
die Anwendung akzeptiert und der Port geöffnet wird. Wählen Sie beim Starten der Anwendung die Op tion
„Unblock“ zum Entsperren des Programms aus.
Hinweis: In der erweiterten Anleitung auf CD finden Sie auf Seite 71 ausführliche Informationen zur
Portweiterleitung.
„Destination IP Address“ (Ziel-IP-Adresse):
16
1. Drücken Sie die Windows-Taste + R.
2. Geben Sie im Feld die Zeichenfolge „cmd“ ein, und klicken Sie auf „OK“.
2. Geben Sie „ipconfig“ ein. [Drücken Sie dann die Eingabetaste.]
4. Die IP-Adresse Ihres PCs ist in der Abbildung durch einen weißen Pfeil gekennzeichnet.
Anmerkungen
Allgemein
Wenn Sie die Verbindung mit dem Internet nach Zeiteinheiten zahlen, trennen Sie das Modem na ch
Verwendung des Internets vom PC. Informationen dazu finden Sie in der Anleitung auf CD-ROM (Seite 153
und 156).
Dieses Modem funktioniert nur mit einer analogen Leitung (POTS, PSTN, Annex A) oder einer ADSL-, ADSL2-,
ADSL2+- bzw. DSL/TDSL-Leitung.
Die Upload- und Downloadgeschwindigkeit hängt weitgehend von der Qualität Ihrer ADSL-Verdrahtung
(Telefonverdrahtung) ab.
Die integrierte Firewall ist standardmäßig aktiviert. Anweisungen zum Deaktivieren der Firewall finden Sie in
der Anleitung auf CD-ROM (Seite 150).
Überprüfen Sie vor der Installation, ob Ihre ADSL-Leitung und Ihr Internetzugang aktiviert sind.
3
Deutsch
Page 13

Dieses Modem ist nicht mit dem SDSL-Standard kompatibel.
Spiele können nur über das LAN-Netzwerk gespielt werden, wenn das betreffende Spiel dies unterstützt
(siehe Anweisungen zur Konfiguration des entsprechenden Spiels).
Die Konfiguration der erweiterten Routeroptionen für dieses Gerät ist in der englischen erweiterten Anleitung
(„Advanced Manual“) auf der CD-ROM beschrieben.
Wenn Sie das Modem auf die Standardeinstellungen zurücksetzen möchten, drücken Sie die Reset-Taste (A)
mit einer Büroklammer oder einem anderen kleinen spitzen Gegenstand. Alle vorgenommenen Einstellungen,
auch der Benutzername und das Kennwort, gehen dann verloren.
Drahtloser Betrieb
Es sind immer mehr drahtlose Produkte erhältlich (z. B. in den Bereichen Video , Audio oder Computer), die im
selben Frequenzbereich wie dieses Gerät betrieben werden. Dadurch kann dieses Gerät möglicherweise in
seiner Funktionalität beeinträchtigt werden oder sich störend auf andere drahtlose Produkte auswirken. Diese
Auswirkungen können nur eingeschränkt werden, indem die Abstände zwischen den einzelnen Geräten
beachtet und eventuell andere Kanäle ausgewählt werden.
Wenn Sie einen Herzschrittmacher tragen oder von anderen lebenswichtigen empfindlichen elektronischen
Geräten abhängig sind, lassen Sie beim Gebrauch dieses Geräts Vorsicht walten, da es Funksignale
aussendet.
4
Page 14

Informations produit
A : bouton de réinitialisation (utilisation : appuyer
pendant 5 secondes avec l'extrémité d'un
trombone)
B : témoin d'alimentation
C : témoins d'activité du réseau local : constant=PC
connecté / clignotant=transfert de données
D : témoin du réseau local sans fil : constant=activé
/ clignotant=transfert de données
E : témoin de synchronisation ADSL :
constant=ADSL OK / clignotant=connexion en
cours
F : témoin PPP ; s'éclaire uniquement si connecté
par PPPoA/PPPoE
Installation
Raccordez la ligne téléphonique, le téléphone et le modem ADSL modem au répartiteur ADSL, comme
1
illustré. Connectez le PC au modem ADSL au moyen du câble réseau. (K) (La première configuration doit
être effectuée au moyen du câble.)
Remarque : le répartiteur n’est pas fourni. Pour des informations détaillées sur l’installation de vot r e ligne
ADSL, consultez votre fournisseur d’accès Internet.
2
Branchez l’adaptateur d’alimentation (L) sur le connecteur (I) et dans la prise électrique murale.
3
Le modem s’allume. Les témoins d’alimentation, de réseau local et d’ADSL s’allument.
Configuration
Ouvrez Internet explorer et saisissez l'adresse suivante dans la b arre d'adresse : http://192.168.1.1
4
pressez [Entrée].
Remarque : si la page est introuvable, débranchez puis rebranchez le câble réseau, redémarrez
l'ordinateur et réinitialisez le modem. Si ces opérations sont infructueuses, vérifiez les paramètres Internet.
(Voir le manuel complet sur CD, pp. 17 et 18)
- Tapez le nom d’utilisateuradmin et le mot de passeadmin
5
- Cliquez sur "Login" (Connexion).
- Cliquez sur "Setup Wizard" (Assistant d'installa tion).
6
- Sélectionnez votre pays (Country) et votre fournisseur d'accès Internet (Internet service provider).
- Cliquez sur "Next" (Suivant).
- Saisissez le nom d'utilisateur et le mot de passe fournis par votre fournisseur d'accès Internet (FAI).
7
- Cliquez sur "Appliquer" (Apply).
- Attendez jusqu'à ce que le témoin de synchronisation ADSL (E) s'arrête de clignoter. La connexion
G : connecteur de ligne ADSL
H : connecteur de réseau local (PC)
I : connecteur de l'adaptateur d’alimentation
J : câble ADSL
K : câble réseau (câble vers le PC)
L : adaptateur d’alimentation
1
, puis
Français
Page 15

Internet devrait fonctionner normalement.
Remarque : si le
contactez votre FAI, vérifiez votre nom d'utilisateur, votre mot de passe et les autres paramètr es Internent.
Configuration sans fil
1. Cliquez sur "Avanced" (Advancé).
8
3. Cliquez sur "Wireless" (Sans fil).
2. Cliquez sur "Security" (Sécurité).
Sélectionnez :
9
1. WPA
2. WPA
3. Pre Shared Key.
4. Saisissez un mot de passe difficilement devinable et consignez-le par écrit.
Cliquez sur "Apply" (Appliquer), "RestartAP" (Redémarrer AP), puis de nouveau sur "Apply" (Appliquer).
Établissez la connexion avec votre ordinateur de bureau ou portable.
Assurez-vous qu'aucun câble réseau ne soit raccordé à l'ordinateur et qu'une carte ou une clé USB de
10
réseau sans fil est installée correctement.
Vista : cliquez sur l'icône présente dans la barre de tâche et sélectionnez : se connecter à un réseau.
XP : effectuez un clic droit sur l'icône indiquée et sélectionnez : Afficher les réseaux sans fil disponibles
11
Sélectionnez votre réseau et cliquez sur "Connect" (Connecter).
12
Saisissez le mot de passe de l'étape et cliquez sur "Connect" (Connecter). La connexion Internet
devrait fonctionner normalement.
Remarque : si Windows demande un emplacement réseau, choisissez "Home" (Home)
Remarque : en cas d'absence de connexion Internet, rapprochez le modem de l'ordinateur et
recommencez les étapes à .
voyant de synchronisation ADSL
9
114
n'arrête pas de clignoter au bout de 30 minutes,
2
Page 16

Ouverture de ports (‘port forwarding’) – Utilisateurs avancés uniquement
- Cliquez sur "Avanced" (Advancé).
13
- Cliquez sur "Port Forwarding " (Ouverture de ports).
14
- Cliquez sur "Custom Port Forwarding" (Ouverture de ports personnalisés).
Saisissez :
15
1. Le nom du programme. Exemple : "torrent".
2. L'adresse IP source (Source IP Address) : vous devriez normalement utiliser : 0.0.0.0
3. L'adresse IP de destination (Destination IP Add r ess) : il s'agit de l'adresse de votre PC. Cette adresse est
indiquée à l'étape .
4. Port start de destination (Destination Port Start) : il s'agit du numéro du port que vous souhaitez ouvrir
(par exemple, 12324).
5. Port map de destination (Destination Port Map) : vous devriez normalement saisir le même numéro ici.
6. Port End de destination (Destination Port Map) : vous devriez normalement saisir le même numéro ici.
7. ‘Protocole’ : sélectionnez "TCP" et "UDP" pour une meilleure compatibilité.
8. Masque de réseau source (Source Netmask) : vous devriez normalement utiliser : 0.0.0.0
9. Cliquez sur "Apply" (Appliquer) et le port devrait être ouvert.
Remarque : le pare-feu Windows et les autres logiciels de pare-feu doivent aussi être configurés pour
autoriser l'application ou ouvrir le port. Quand vous lancez le programme, sélectionnez "Unblock"
(Débloquer).
Remarque : voir le manuel complet sur CD, page 71 pour plus d'informations sur l'ouverture de ports.
Adresse IP de destination (Destination IP Address) :
16
1. Appuyez sur les touches Windows + R.
2. Tapez : cmd dans la ligne de saisie et cliquez sur OK.
3. Tapez : ipconfig et pressez la touche [Entrée].
4. L'adresse IP de votre ordinateur figure à l'endroit indiqué par la flèche blanche, dans l'illustration du
manuel.
Remarques
Généralités
Si votre consommation Internet est facturée par unité de temps, déconnectez votre modem quand vous avez
terminé d'utiliser Internet. Voir le manuel sur CD-ROM (pages 153 et 156).
Ce modem fonctionne uniquement sur une ligne analogique (POTS, PSTN, Annexe A) ADSL, ADSL2, ADSL2+
ou DSL/TDSL.
La vitesse de téléchargement en aval et en amont dépend fortement de votre installation de câblage
(téléphonique) ADSL domestique.
Le pare-feu intégré est activé par défaut. Si vous souhaitez le désactiver, voir le manuel sur CD-ROM (page
150).
Avant l’installation, assurez-vous que votre ligne et votre compte d’accès ADSL sont activés.
Ce modem n’est pas compatible avec la norme SDSL.
16
3
Français
Page 17

Pour jouer à des jeux sur le LAN, celui-ci doit être compatible avec le jeu ; reportez-vous aux instructions du
jeu pour le configurer.
Pour configurer les options de routeur avancées du modem/routeur, consultez le manuel avancé français sur
CD-ROM.
Pour rétablir les paramètres par défaut du modem, utilisez l'extrémité d'un trombone ou un objet pointu pour
appuyer sur le bouton de réinitialisation (A). Tous les paramètres, y compris le nom d’utilisateur et le mot de
passe, seront perdus.
Réseau sans fil
De plus en plus d'appareils utilisent des connexions sans fil (vidéo, audio, ordinateur, etc.). Certains d'entre
eux peuvent employer la même fréquence que cet appareil. Dans ce cas, les fonctionnalités de ce produit s'en
trouveraient réduites, ou peuvent affecter les fonctionnalités des autres produits. Vous pouvez éviter ces
désagréments en tenant compte de la distance entre les différents appareils ou, si cela est possible, en
changeant les canaux.
Si vous portez un stimulateur cardiaque ou si votre santé dépend d'un appareil électronique similaire, soyez
prudents quand vous utilisez des appareils sans fil qui émettent des signaux radio, comme le présent
appareil.
4
Page 18

Informazioni sul prodotto
A: Tasto Reset (uso: premere per 5 secondi con un
oggetto appuntito)
B: Spia di alimentazione
C: Indicatori di attività LAN: luce fissa = PC
collegato / lampeggiante = trasferimento dati
D: Indicatore LAN wireless: luce fissa = attiva /
lampeggiante = trasferimento dati
E: Indicatore di sincronizzazione ADSL: luce fissa =
ADSL OK / lampeggiante = connessione in corso
F: Indicatore PPP: lampeggia solo se connesso
tramite PPPoA/PPPoE
Installazione
Collegare la linea telefonica, il telefono e il modem ADSL allo splitter ADSL come indicato. Collegare il PC al
1
modem ADSL con il cavo di rete (K) (la prima configurazione deve essere eseguita tramite il cavo).
N.B.: lo splitter non è incluso. Per informazioni sull'installazione della linea ADSL, contattare il proprio
provider Internet.
2
Collegare l'alimentatore (L) al connettore (I) e inserire la spina in una presa elettrica.
3
Il
modem si accende. Gli indicatori di alimentazione, LAN e ADSL verranno attivati.
Configurazione
Avviare Internet Explorer e digitare http://192.168.1.1 nella barra degli indirizzi, quindi [premere Invio]
4
N.B.: se risulta impossibile trovare la pagina, scollegare e ricollegare il cavo di rete, riavviare il PC e
resettare il modem. Se questa operazione non ha effetto, controllare le impostazioni Internet (ma nuale
avanzato su CD, pagg. 17 e 18).
- Digitare admin nel campo username e admin nel campo password
5
- Fare clic su "Login" (Accesso)
- Fare clic su "Setup Wizard" (Configurazione guidata)
6
- Selezionare "Country" (Paese) e "ISP" (Provider Internet)
- Fare clic su "Next" (Avanti)
- Digitare il nome utente e la password ricevuti dal provider Internet.
7
- Fare clic su "Apply" (Applica)
- Attendere che l'indicatore di sincronizzazione ADSL (E) cessi di lampeggiare. La connessione Internet
dovrebbe funzionare regolarmente.
N.B.: se l'
provider Internet e verificare il nome utente, la password e altre impostazioni.
indicatore di sincronizzazione ADSL
non cessa di lampeggiare dopo 30 minuti, contattare il
G: Connessione linea ADSL
H: Connessione LAN (PC)
I: Connettore alimentatore di corrente
J: Cavo ADSL
K: Cavo di rete (cavo al PC)
L: Alimentatore
1
Italiano
Page 19

Configurazione wireless
1. Fare clic su "Advanced" (Avanzate)
8
3. Fare clic su "Wireless"
2. Fare clic su "Security" (Sicurezza)
Selezionare:
9
1. WPA
2. WPA
3. Pre Shared Key (Chiave precondivisa).
4. Digitare una password (possibilmente difficile da indovinare) e annotarla su carta.
Fare clic su "Apply" (Applica), quindi su "RestartAP" (Riavvia AP) e nuovamente su "Apply" (Applica)
ssione wireless con PC/notebook
Conne
Verificare che al PC/notebook non siano collegati cavi di rete e che siano installati correttamente un
10
adattatore o una scheda di rete.
a: fare clic sull'icona della barra della applicazioni indicata e selezionare: "Connect to a network"
Vist
(Connetti a una rete).
XP: fare clic con il tasto destro sull'icona indicata e selezionare: "View Available Networks" (Visualizza reti
disponibili)
11
Selezionare la rete e fare clic su "Connect" (Connetti)
12 9
serire la password indicata al passaggio e fare clic su "Connect" (Connetti). La connessione
In
dovrebbe funzionare regolarmente.
N.B.: se Windows richiede una posizione di rete, scegliere: "Home" (Home)
N.B.: se la connessione Internet non funziona, avvicinare il modem al PC e ripetere nuovamente i passaggi
4 11
da a .
2
Page 20

Apertura porte (port forwarding) – Solo per utenti esperti
- Fare clic su "Advanced" (Avanzate)
13
- Fare clic su "Port Forwarding"
14
Fare clic su "Custom Port Forwarding" (Port forwarding personalizzato)
are:
Digit
15
1. Nome del programma. Es.: "torrent".
2. "Source IP Address" (Indirizzo IP di origine): nella maggior parte dei casi digitare: 0.0.0.0
3. "Destination IP address" (Indirizzo IP di destinazione): l'indirizzo IP del PC in uso. Identificare l'indirizzo
come indicato al passaggio .
4. "Destination Port Start" (Porta di destinazione iniziale): numero di porta da ap rire. (es. 12324)
5. "Destination Port Map" (Mappa porta di destinazione): nella maggior parte dei casi inserire lo stesso
numero.
6. "Destination Port End" (Porta di destinazione finale): nella maggior parte dei casi inserire lo stesso
numero.
7. "Protocol" (Protocollo): selezionare "TCP and UDP" (TCP e UDP) per assicurare la migliore compatibilità.
8. "Source Netmask" (Maschera di rete di origine): nella maggior parte dei casi digitare: 0.0.0.0
9. Fare clic su "Apply" (Applica). La porta dovrebbe aprirsi regolarmente.
N.B.: è necessario configurare anche Windows Firewall e altri firewall per accettare l'a pplicazione o aprire la
porta. All'avvio del programma, scegliere l'opzione "Unblock" (Sblocca).
Per informazioni dettagliate sul port forwarding, vedere il manuale avanzato su CD, pag. 71.
N.B.:
"Destination IP address" (Indiriz
16
1. Premere il tasto Windows + R
2. Digitare: cmd nella casella e fare clic su OK
3. Digitare: ipconfig e [premere Invio]
4. L'indirizzo IP del PC è indicato con la freccia bianca in figura.
Note
In generale
Se è stato sottoscritto un abbonamento Internet a consumo, scollegare il modem dopo aver utilizzato
Internet. Vedere il manuale su CD-ROM (pagg. 153 e 156).
Questo modem funziona solo con linee analogiche (POTS, PSTN, Annex A) ADSL, ADSL2, ADSL2+ o
DSL/TDSL.
La velocità di upload e download dipende molto dalla qualità della propria installazione ADSL (linea
telefonica).
Il firewall integrato è attivato di default. Se si desidera disattivarlo, vedere il manuale su CD-ROM (pag. 150).
Prima dell'installazione assicurarsi che siano state attivate la connessione ADSL e l'account.
Questo modem non è compatibile con lo standard SDSL.
Per giocare in rete è necessario che la funzione sia supportata dal videogame; consultare le istruzioni del
gioco relative alla configurazione.
16
zo IP di destinazione):
3
Italiano
Page 21

Per configurare le opzioni avanzate del router dal modem/router, consultare il manuale avanzato in inglese su
CD-ROM.
Per riportare il modem alle impostazioni predefinite, premere il tasto Reset (A) con un oggetto appuntito.
Tutte le impostazioni, tra cui il nome utente e la password, andranno perdute.
Wireless
Sempre più prodotti wireless (video, audio, computer, ecc.) funzionano alla stessa frequenza di questo
dispositivo. Pertanto, il funzionamento del prodotto potrebbe essere limitato da altri prodotti wireless.
Viceversa, anche questo prodotto potrebbe incidere sul funzionamento di altri dispositivi. Questo fenomeno
può essere evitato solo prestando attenzione alla distanza tra i prodotti e, se possibile, cambiando i rispettivi
canali di funzionamento.
Poiché i dispositivi wireless trasmettono segnali radio, prestare attenzione se si utilizzano pacemaker o altri
dispositivi salvavita e apparecchi elettronici sensibili.
4
 Loading...