

TruPace M120 Owner's Manual
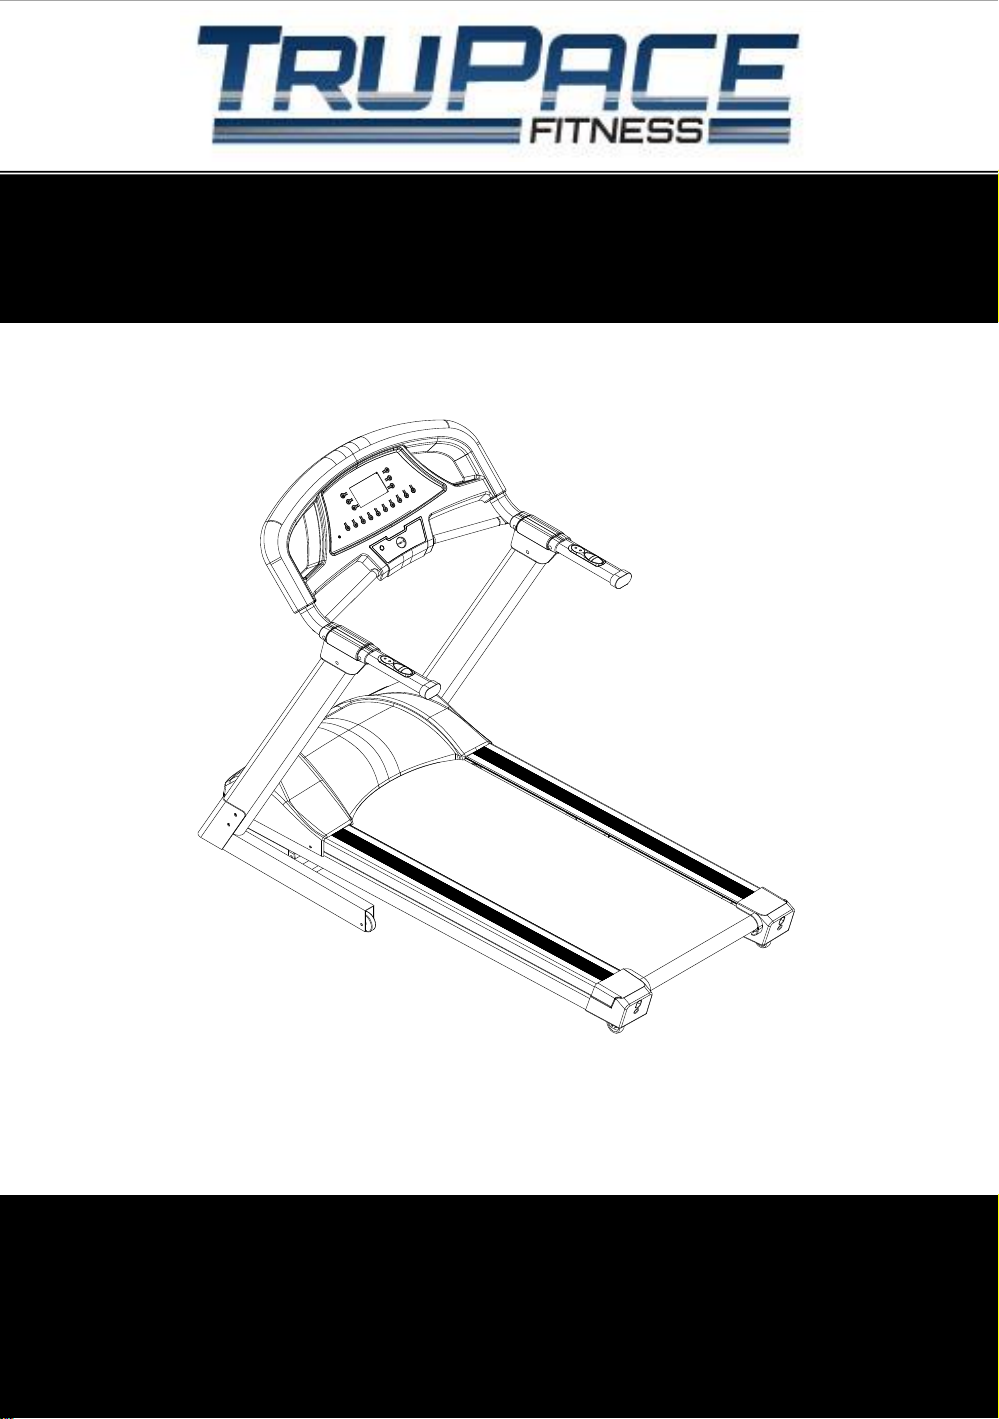
Motorized Treadmill
M120 Owner’s Manual
Retain this owner’s manual for future reference
Read and follow all instructions in this owner’s manual
Version A
INTRODUCTION
Owner’s Manual 1
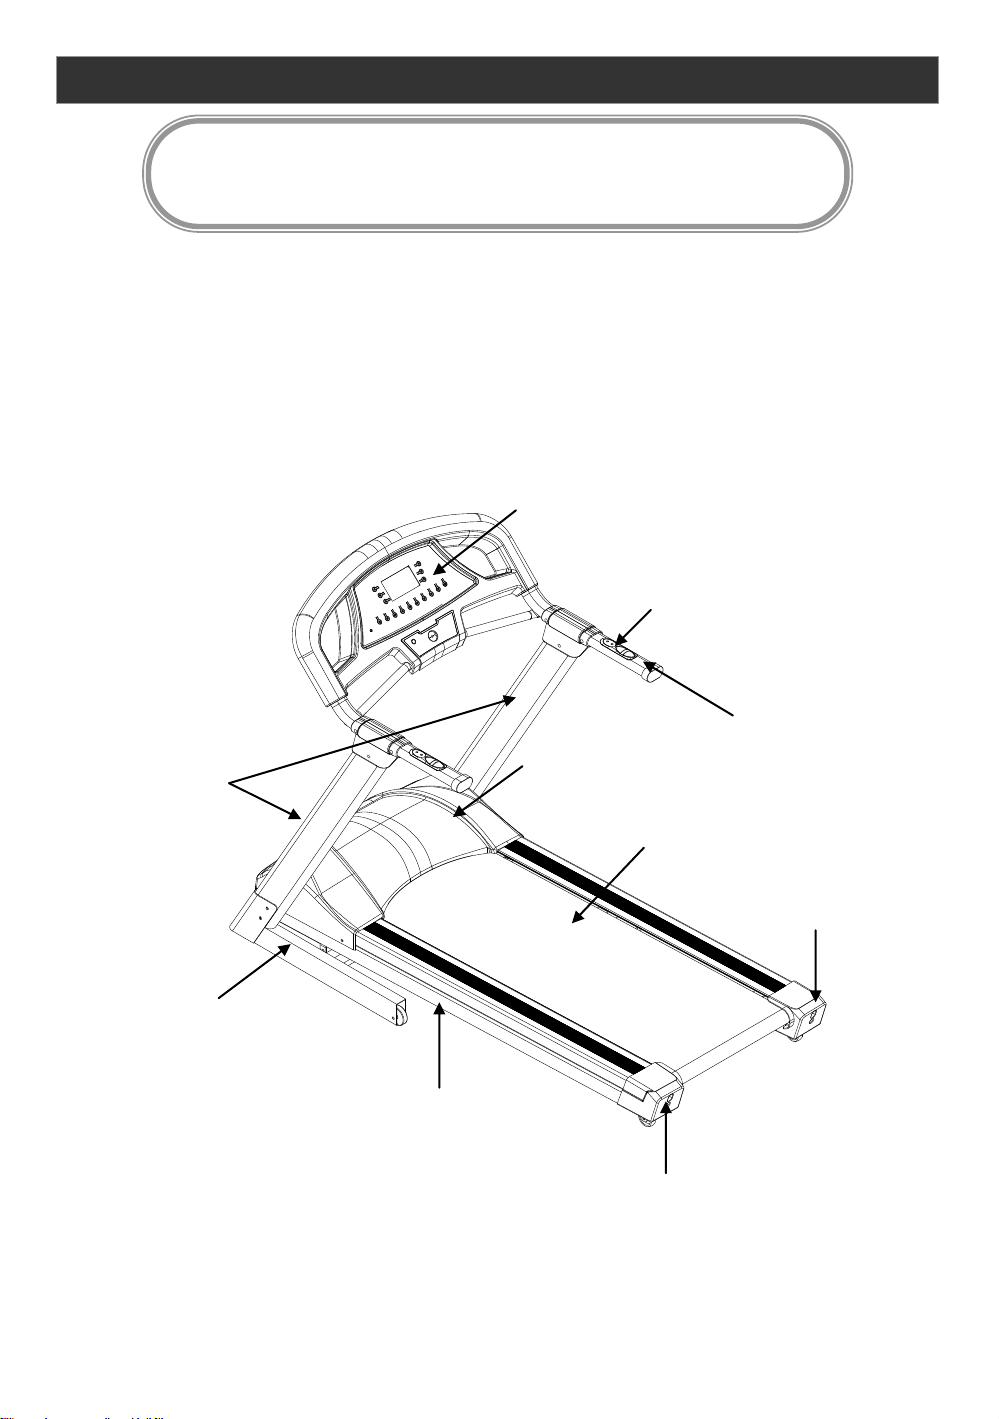
Console
Speed buttons
Handle bar
Motor cover
Running belt
Right End cap
Left end cap
Treadmill frame
Base frame
Upright post
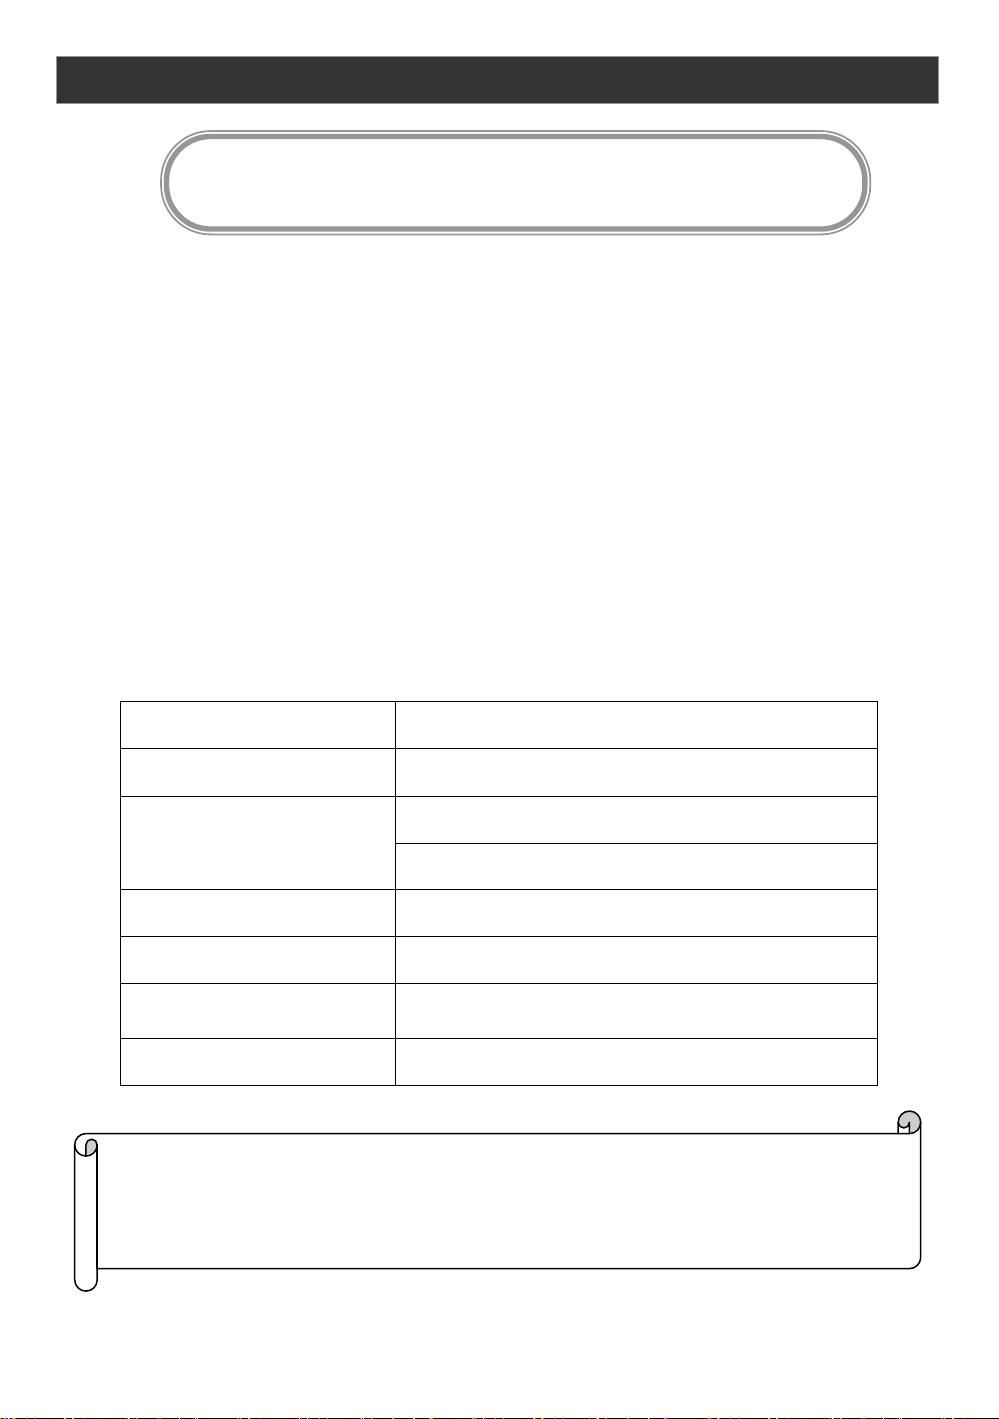
Voltage
AC-110V 50/60Hz
Max weight
275 LBS.
Dimension
Folding: 43”L x 37”W x 61”H
Unfolding: 72”L x 37”W x 51”H
Running belt
55”L x 20”W
Horsepower
2.0 HP
Speed
0.6-10 MPH
Incline
0-12 Levels
Owner’s Manual 2
CAUTION:
Before beginning any exercise program always consult your physician. If you experience chest
pain, nausea, dizziness or shortness of breath, stop exercising and consult your physician before
continuing.
KEY FEATURES
Thank you for choosing this treadmill.
You have taken the first step to a healthier and more rewarding lifestyle.
This treadmill is especially designed to give you reliable performance and enjoyable workouts in
the comforts of your home. Below you find below the features and benefits of your new
treadmill.
◇ Multiple level electronic incline system.
◇ Low impact cushioning system
◇ Foldable design for convenient storage.
◇ Mobility wheels for easy moving and relocation.
◇ Hand contact heart-rate system to monitor cardio performance.
◇ Emergency safety key for quick motor shut-off.
TECHNOLOGY DATA

Owner’s Manual 3
WARNING: To reduce the risk of burns, fire, electric shock, or injury to persons, read the
following important precautions and information before operating the treadmill. It is the
responsibility of the owner to ensure that all users of this treadmill are adequately informed of all
warnings and precautions.
●Use the treadmill only as described in this manual.
●Place the equipment on a level surface, with 6 feet (2 m) of clearance behind it. Do not place
the treadmill on any surface that blocks air openings. To protect the floor or carpet from
damage, place a mat under the treadmill.
●When choosing a location for the treadmill be sure that the location and position permit access
to a plug.
●Keep the treadmill indoors, away from moisture and dust. Do not put the treadmill in a garage
or covered patio, or near water.
●Do not operate the treadmill where aerosol products are used or where oxygen is being
administered.
●Keep children under the age of 12 and pets away from the treadmill at all times.
●The treadmill should not be used by persons weighing more than 275LBS.
●Never allow more than one person on the treadmill at a time. Wear appropriate exercise
clothing when using the treadmill. Do not wear loose clothing that could become caught in the
treadmill. Athletic support clothes are recommended for both men and women. Always wear
athletic shoes. Never use the treadmill with bare feet, wearing only stockings, or in sandals.
●When connecting the power cord, plug the power cord into a grounded circuit. No other
appliance should be on the same circuit.
●Always straddle the belt and allow it to start moving before stepping onto the belt.
●Always examine your treadmill before using to ensure all parts are in working order.
●Allow the belt to fully stop before dismounting.
●Never insert any object or body parts into any opening.
●Follow the safety information in regards to plugging in your treadmill.
●Keep the power cord away from the incline wheels and do not run the power cord underneath
your treadmill. Do not operate the treadmill with a damaged or frayed power cord.
●Always unplug the treadmill before cleaning and/or servicing. Service to your treadmill
should only be performed by an authorized service representative, unless authorized and/or
instructed by the manufacturer. Failure to follow these instructions will void the treadmill
warranty.
●Never leave the treadmill unattended while it is running.
●Use “safety key” when operating the treadmill and make sure the “safety key” is clipped to the
users clothing.
Remove the “safety key” and store it in a safe place when the treadmill is not in use. Keep the
“safety key” away from children.
Owner’s Manual 4
Power Requirements:
IMPROPER CONNECTION OF THE EQUIPMENT GROUNDING CONNECTOR CAN
RESULT IN THE RISK OF AN ELECTRIC SHOCK. CHECK WITH A QUALIFIED
ELECTRICIAN OR SERVICE MAN IF YOU ARE IN DOUBT AS TO WHETHER THE
PRODUCT IS PROPERLY GROUNDED. DO NOT MODIFY THE PLUG PROVIDED WITH
THE PRODUCT, IF IT WILL NOT FIT THE OUTLET; HAVE A PROPER OUTLET INSTALLED
BY A QUALIFIED ELECTRICIAN.
This treadmill can be seriously damaged by sudden voltage changes in your home’s electrical
power. Voltage spikes, surges and noise interference can result from weather conditions or
from other appliances being turned on or off. To reduce the possibility of treadmill damage,
always use a surge protector (not included) with your treadmill.
Surge protectors can be purchased at most hardware stores. The manufacturer recommends
a single outlet surge protector with a UL 1449 rating as a Transient Voltage Surge Suppressor
(TVSS) with a UL suppressed voltage rating of 400V or less and an electrical rating 110VAC, 15
amps.
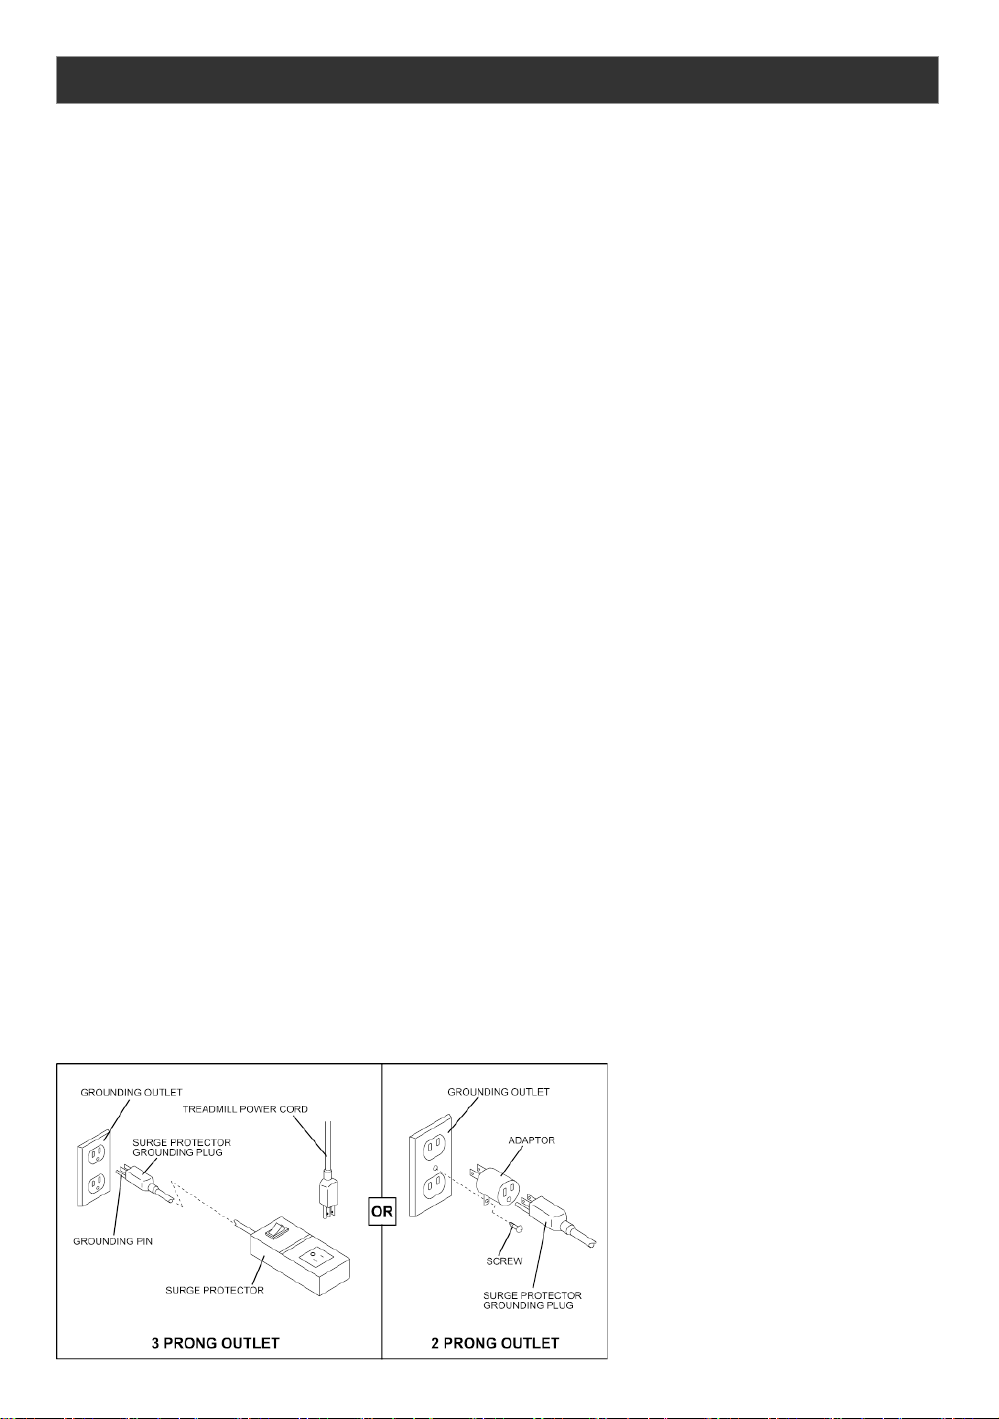
This treadmill must be grounded to reduce the risk of electrical shock. Grounding provides a
path of least resistance for electric current, should the treadmill malfunction. This treadmill is
equipped with an electrical cord that has an equipment-grounding conductor and a grounding
plug. Always plug the power cord into a surge protector, and plug the surge protector into an
appropriate outlet that is properly installed and grounded in accordance with all local codes and
ordinances.
This product is for use on a nominal 110-volt circuit, and has a grounding plug that looks like the
plug illustrated in the drawing below.
GFCI outlets and GFCI Circuit Breakers are NOT recommended for use on this product. GFCI
outlets and GFCI Circuit Breakers may cause this equipment to function improperly.
ASSEMBLY INSTRUCTIONS
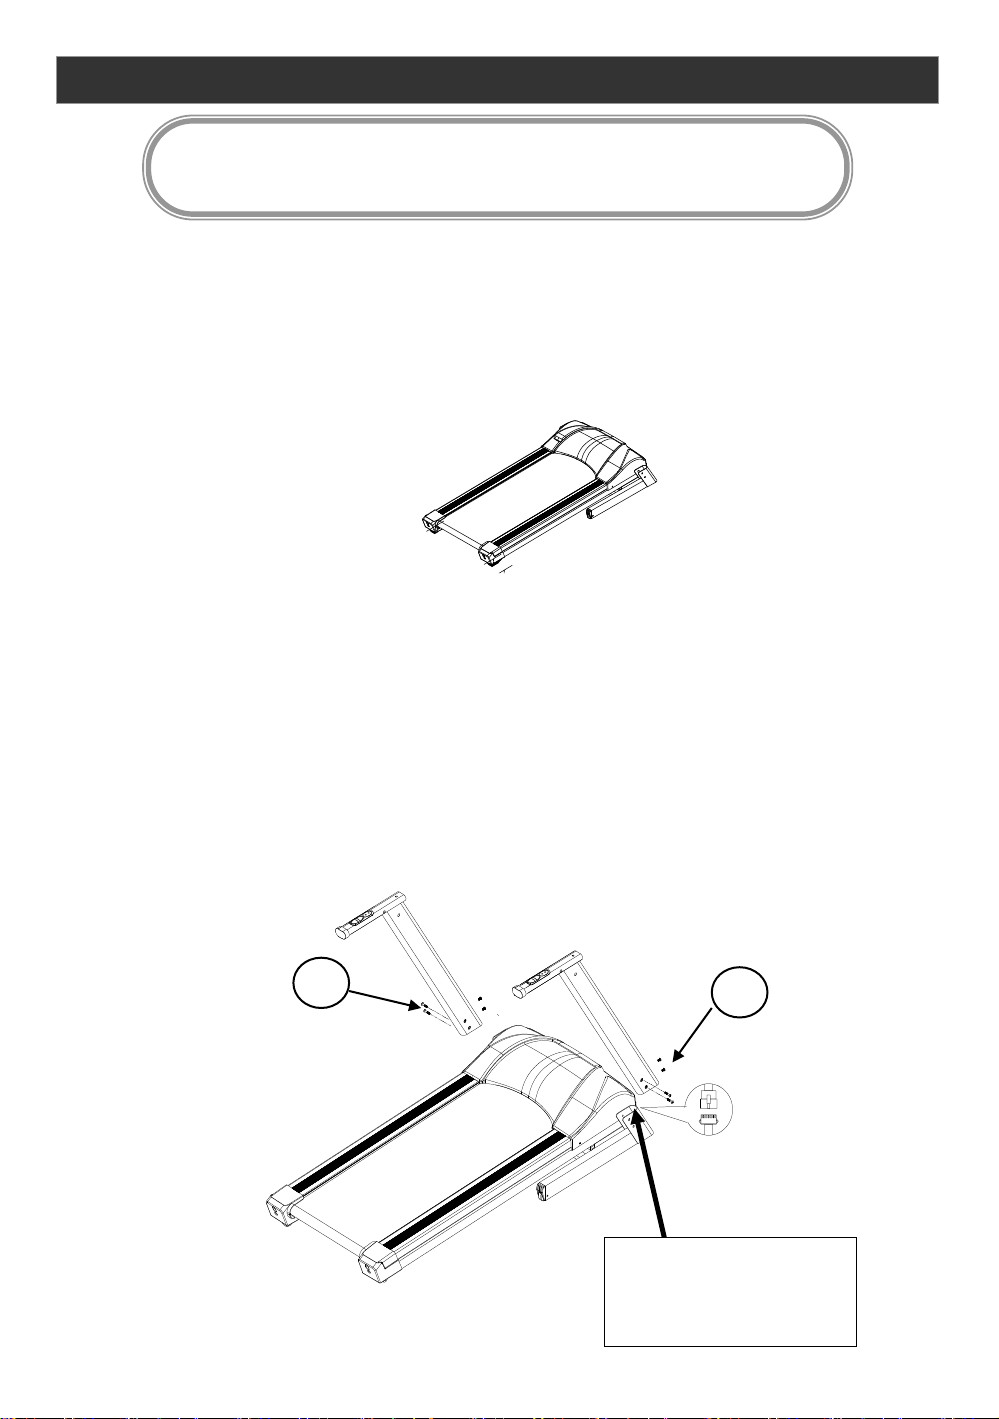
Owner’s Manual 5
Caution Pinch point. Do not
pinch the wire between the
frame components
64
65
Step 1: Unpacking the Equipment
A.Place the product in the area it will be used.
Note: Treadmill must be placed on a level surface
B.Remove the treadmill from the packaging
Step 2: Upright Assembly
Caution: Do not pinch the computer wire between the treadmill frame and the upright post
A.Attach the middle computer cable in the left upright, to the lower computer cable in the left
side of the treadmill frame. Put the excess cable into the upright post.
B.Attach the left upright post to the left side of the treadmill frame with 2 x M8*15 Allen head
bolts (64) and 2 x M8*50 Allen head bolt (65)
C. Attach the right upright post to the right side of the treadmill frame with 2 x M8*15 Allen head
bolts (64) and 2 x M8*50 Allen head bolt (65)
D. Do not fully tighten the bolts until the end of step 3
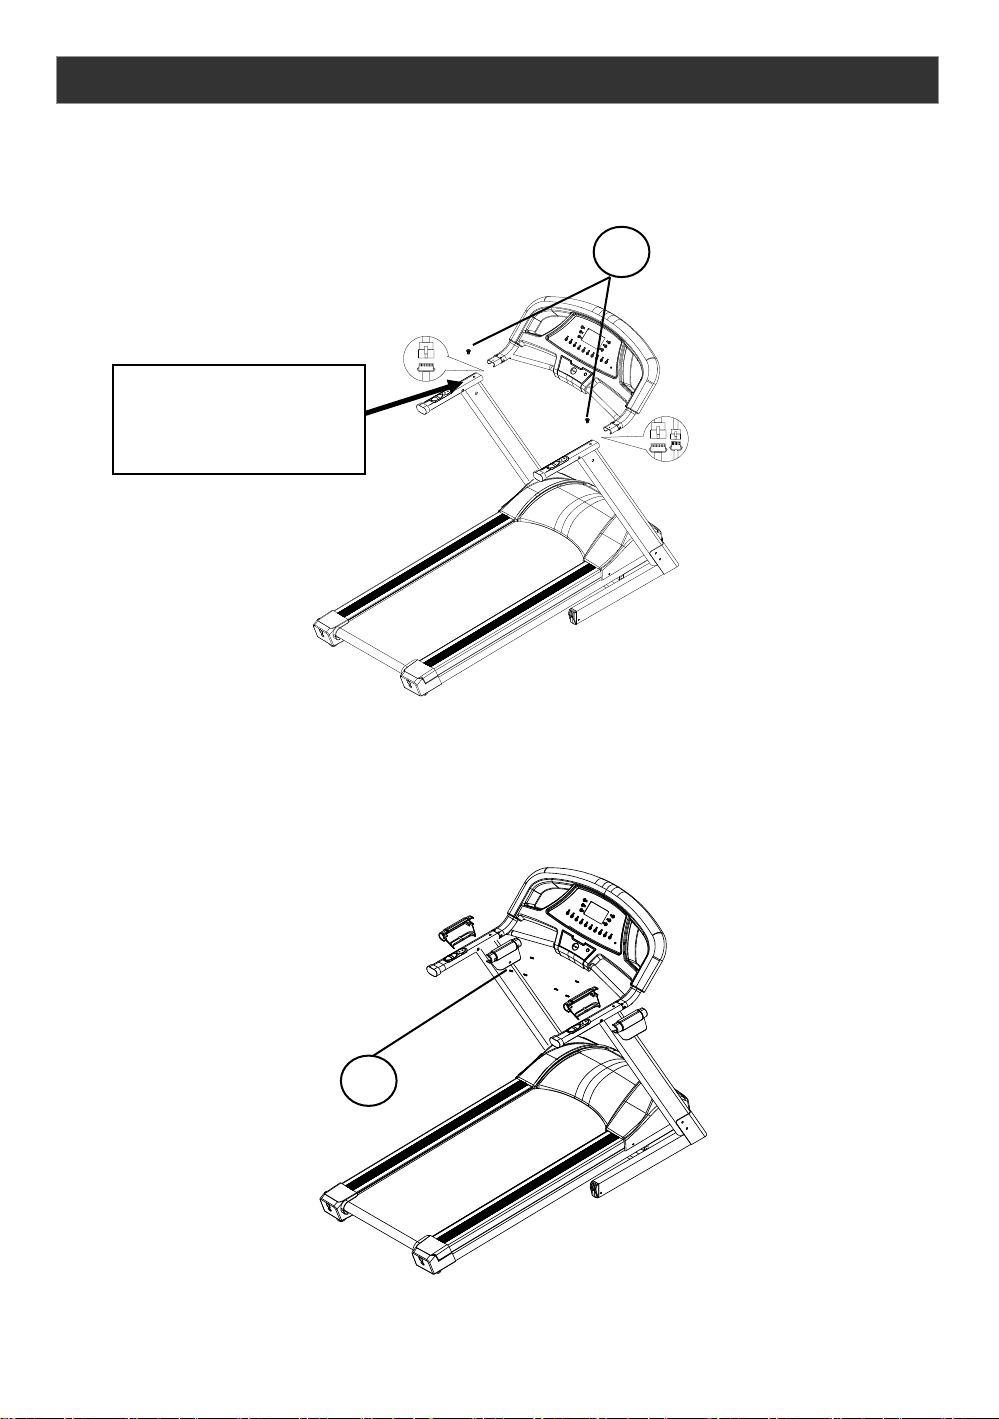
Owner’s Manual 6
Caution Pinch point. Do not
pinch the wire between the
frame components
74
76
Step 3: Console Assembly
A.Slide the console assembly onto the left and right uprights.
B.Secure the console assembly to the upright post with 2pcs M6*15 Phillips screw (74)
C.Tighten all bolts now
Step 4:
A. Attach the handlebar covers to the upright masts and handlebar rail using 6 x ST4x15 screws
(76)

SETTING UP YOUR TREADMILL
CAUTION!
Make sure the running deck is level. If the deck is positioned on an uneven surface,it may cause
damage to the electronics system.
Owner’s Manual 7
PLACEMENT IN YOUR HOME
·Do not place the treadmill outdoors.
·Do not place the treadmill near water or in high moisture content environment.
·If your room is carpeted, check the clearance to make sure there is enough space
between the carpet fiber and the treadmill deck. If you are uncertain, it is best to place
mat beneath your treadmill.
·Place the treadmill at least 4 feet from walls or furniture.
·Allow the safety area of 3’ x 2’ behind the treadmill so that you can easily get on and
off the treadmill especially if there is an emergency.
Occasionally after extended use you will find a black dust below your treadmill. This is normal
wear and does not mean there is anything wrong with your treadmill. This dust can be easily
removed with a vacuum cleaner. If you wish to prevent this dust from getting on your floor or
carpet, place a mat beneath your treadmill.
LEVELING THE BASE
It is important that you place the treadmill on a firm level surface.
Check the treadmill to ensure the frame is level once you have moved the treadmill into the
place of your choice.

Owner’s Manual 8
GETTING STARTED
WARNING!
Never use this treadmill without first securing the safety tether clip to our clothing.
CAUTION!
For your safety, step onto the belt when the speed is no more than 3km/h.
TURN POWER ON
The On/Off switch for the treadmill is located next to the power supply cord at the front of the
motor cover. Flip this switch to the “ON” position.
SAFETY TETHER KEY AND CLIP
The safety key is designed to cut the main power to the treadmill should your fall. Therefore, the
safety key is designed to bring the treadmill to an immediate stop. At high speeds, it may be
uncomfortable and somewhat dangerous to come to a complete stop immediately. So, use the
safety key as emergency top only. Under normal use, to bring the treadmill to a safe and
comfortable stop, use the red stop button.
Your treadmill will not start unless the safety key is properly inserted into the key holder on the
middle of the console. The other end of the safety key should be securely clipped to your
clothing so that if there is an emergency the key will pull off and the treadmill will stop the risk of
injury. For your safety, never use the treadmill without securing the safety key clipped to your
clothing. Pull on the safety key clip to make sure it is firmly secured to your clothing.
GETTING ON AND OFF THE TREADMILL
Take care when getting on or off the treadmill. Use the handlebars while getting on or off. Do not
stand on the running belt when starting the treadmill. Straddle the running belt by placing your
feet on both side rails of the treadmill deck. Place your foot on the belt only after the belt has
begun to move at a slow and consistent speed.
During your exercise, keep your body and head facing forward at all times. Never attempt to
turn around on the treadmill when the running belt is still moving. When you have finished
exercising, stop the treadmill by pressing the red stop button. Wait until the treadmill comes to a
complete stop before attempting to get off the treadmill.
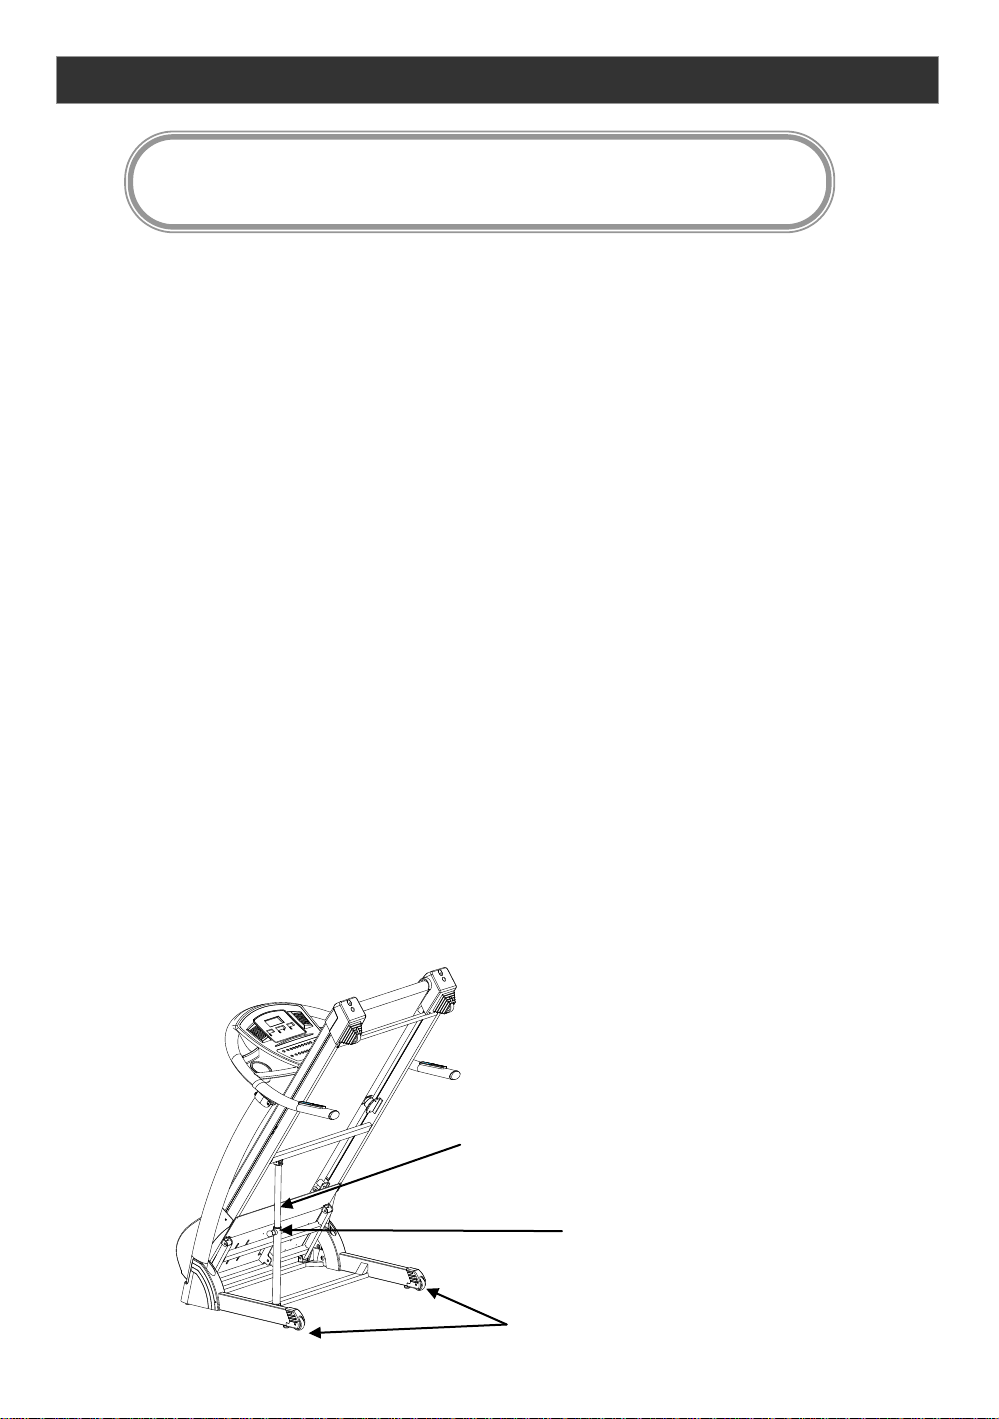
Owner’s Manual 9
HANDLING YOUR TREADMILL
Cylinder
Knob
Transport wheels
Caution: This equipment is heavy and, if it is not handled properly, may cause injury
FOLDING THE TREADMILL
1. Before folding the treadmill, turn the power off.
2. The treadmill incline must be set at its lowest incline level
3. Lift the treadmill deck until it is parallel to the upright, the locking knob will lock automatically
4. Carefully pull down on the frame to verify the folding lock has engaged.
UNFOLDING THE TREADMILL
1.Be sure there is enough space behind the treadmill so the main frame can fully unfold without
hitting any obstructions.
2.Hold the deck frame and press the folding latch with your foot.
3.While pressing the folding latch gently pull down on the main frame.
4.The treadmill frame will slowly drop to the floor.
MOVING THE TREADMILL
This treadmill is easy to move.
To move the treadmill
Caution: Make sure the folding system is locked before moving the treadmill.
1.Switch off the power
2.Unplug the power cord;
3.Tilt the treadmill back approx. 30 – 40 degrees on to the transport wheels. You can now wheel
the treadmill to a new location.
 Loading...