


MB52 (TR-MB5) User’s Guide
Contents
Before Use
Introduction........................................................... 5
About this Manual....................................................... 7
Safety Instructions....................................................... 8
Features of the Product................................................... 14
Information on the Watch’s Mechanics....................................... 15
Setting up............................................................ 18
Basic Operations
Part Names and Functions................................................ 22
Operating the Screw Lock Crown........................................... 29
Attaching............................................................. 31
Locations Suitable for Receiving Signals from GPS Satellites........................ 32
Setting In-flight Mode................................................... 33
Checking the Battery Level................................................ 34
About the Sleep Feature.................................................. 37
About Charging........................................................ 38
Contents
Adjusting Time (Receiving GPS Satellite Signals) (TIME)
Notes on Receiving GPS Satellite Signals...................................... 41
Adjusting the Time..................................................... 42
Setting the Time Zone and Time............................................ 45
About the Automatic Time Reception Feature.................................. 48
About Receiving Leap Second Information.................................... 50
Checking Reception Results............................................... 51
Adjusting Time (Manual) (TIME)
Setting the Time Zone................................................... 56
Setting Daylight Saving Time.............................................. 60
Adjusting the Time..................................................... 62
Stopwatch (TIME)
Using the Stopwatch..................................................... 65
Example Using the Stopwatch.............................................. 69
Altitude Measurements (ALT)
Notes on Measuring Altitude.............................................. 73
Measuring Altitude..................................................... 75
Calibrating the Altitude.................................................. 78
2

MB52 (TR-MB5) User’s Guide
Barometric Pressure Measurements (BAR)
Notes and Mechanism on Measuring Barometric Pressure......................... 81
Measuring Barometric Pressure............................................ 82
Calibrating the Barometric Pressure......................................... 85
Maintenance
Maintenance.......................................................... 88
About Adjusting the Metal Band............................................ 89
About Power Source for the Watch.......................................... 90
Troubleshooting
Troubleshooting....................................................... 92
Correcting Misalignment of the Hands or the Date............................. 101
If the Problem Continues (System Reset)..................................... 107
Information on Service and Support........................................ 111
Contact Information................................................... 112
Contents
Product Specifications
Watch Specifications................................................... 114
Measurement Related Specifications........................................ 116
Display List of Time and Measurement Results
Display List of Time and Measurement Results................................ 117
3

MB52 (TR-MB5) User’s Guide
Before Use
Before Use
U “Introduction” on page 5
U “About this Manual” on page 7
U “Safety Instructions” on page 8
U “Features of the Product” on page 14
U “Information on the Watch’s Mechanics” on page 15
U “Setting up” on page 18
4
MB52 (TR-MB5) User’s Guide
Before Use
Introduction
Thank you very much for purchasing the “TRUME".
Make sure you read the manual supplied to use this product correctly.
This product is not intended for taking measurements that requires professional precision. Measurement
function readings are intended for general reference only.
This product can identify the current time zone by receiving GPS satellite signals and adjust it to the correct local time.
Also, the Automatic Time Reception feature is constantly automatically correcting the time.
*However, you need to set Daylight Saving Time (DST) manually.
You can check which direction is north using the magnetic sensor built into the watch.
The watch continues to operate when it is charged by light. This watch is an environmentally friendly product that
generates electricity through natural resources and does not require regular battery replacement.
The following provides a quick introduction on using this product.
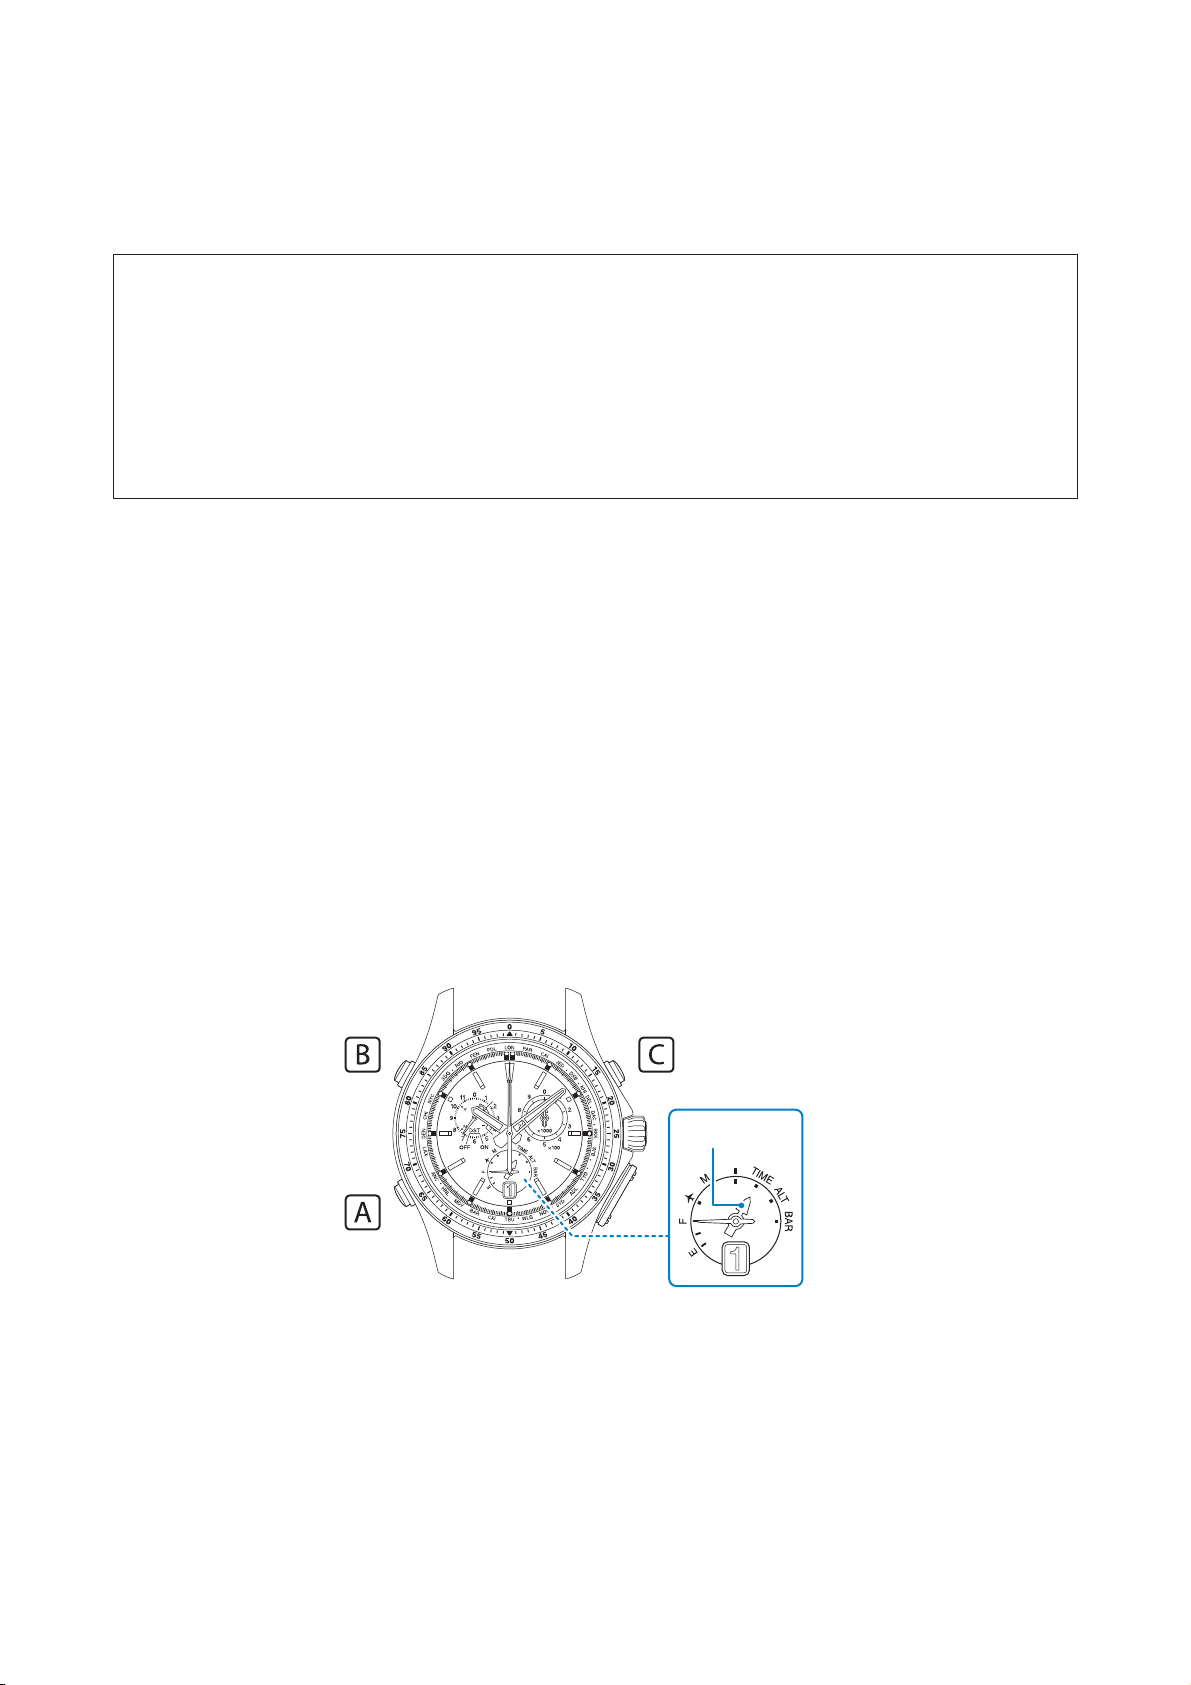
To select the item you want to measure, press and release the A button to move the mode hand to ALT (altitude) or
BAR (barometric pressure). You can then start or stop measuring by simply pressing the C button.
Mode hand
5
MB52 (TR-MB5) User’s Guide
Before Use
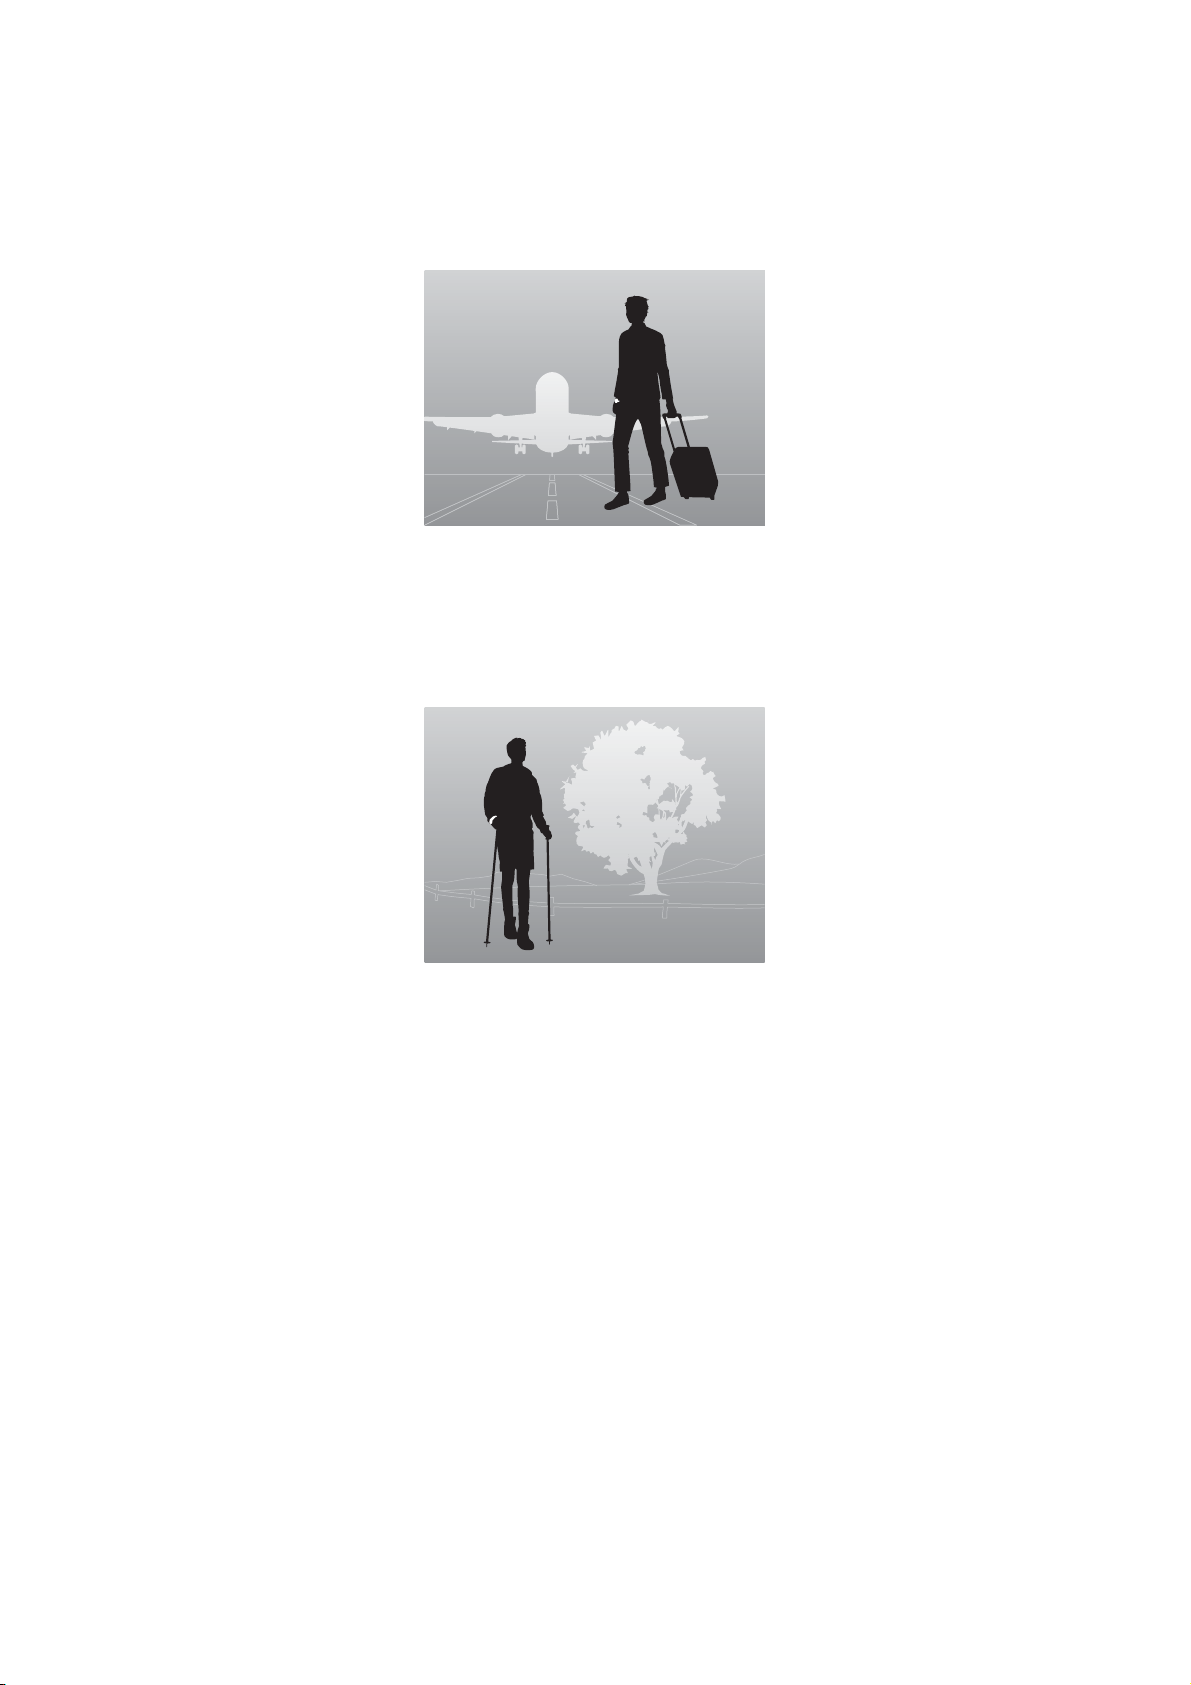
For example, if you have been traveling abroad.
The watch has a built-in GPS satellite signal reception system called "SATELLITELINK" that receives a GPS signal by
one action and automatically enters the current time zone when you leave the airport at your destination.
Many people enjoy heading to the countryside on their holidays.
When you are planning such a trip, wear the watch when you go out. You can check the altitude or pressure at the
current location with two actions at anytime. The ability to check the measurements for a built-in sensors by simply
glancing at the hands of your watch allows you to feel closer to nature.
We hope you will make use of this product in a wide variety of scenarios.
6

MB52 (TR-MB5) User’s Guide
Before Use
About this Manual
Composition of this manual
The following manuals are available for this product. Use each manual to suit your purpose.
Handy Manual Explains basic operations for this product.
This handy manual is supplied with this product.
User’s Guide (this manual) Explains general operations for this product.
This is an electronic manual available from the Epson Website. You can view
the manual in HTML or PDF format.
Symbols, marks, and notes used in this manual
Important:
c
Note:
U
A/B/C
Trademarks
❏ EPSON and TRUME are registered trademarks of Seiko Epson Corporation.
❏ Other product names are the trademarks or registered trademarks of their respective owners.
General notifications
❏ Reprinting all or part of this manual without prior permission is strictly prohibited.
❏ The content of this manual are subject to change without notice.
❏ If you have any questions or notice any errors, omissions, and so on in this manual, please contact us directly.
❏ We cannot accept any responsibility for damage caused by the user or a third party through use of this product.
Use of this product is strictly at the user’s own risk.
❏ We cannot accept any responsibility for malfunctions and so on that occur due to ignoring the content of this
manual, this product being handled inappropriately, or repairs or modifications performed by a third party that is
not our company or appointed by our company.
Make sure you always observe the content of these instructions. Failure to
follow the instructions may result in mishandling this product which may
cause the product to fail or malfunction.
Indicates additional explanations and reference information.
Indicates reference pages for related content.
Indicates buttons of this product.
7
MB52 (TR-MB5) User’s Guide
Before Use
Safety Instructions
Make sure you read the manual supplied with this product to use it safely.
Failure to handle the product as described in this manual may cause a malfunction or accident to occur.
Meaning of symbols used in this manual
This manual contains warnings indicated by the following symbols that denote dangerous operations/handling and
are designed to prevent harm to the users and third parties or damage to property. Make sure you understand the text
before use.
Warning
Caution
Indicates that serious injury or death could occur if this is ignored and this product is
handled incorrectly.
Indicates that injury or damage to property could occur if this is ignored and this product is
handled incorrectly.
Indicates items (instructions/actions) that must be performed.
Indications an action that should not be performed (prohibited).
8
MB52 (TR-MB5) User’s Guide
Safety instructions
Do not use if it is damaged.
Failure to do so may result in injury, malfunction, or fire. In the following situations, stop using it
immediately, and contact TRUME customer support.
❏ When the watch or band become sharp due to corrosion and so on
❏ When the pins protrude from the band
U “Contact Information” on page 112
Do not leave the watch or parts of the watch within easy reach of small children.
❏ Touching the watch may cause injuries, allergic reactions, inflammation, and so on. In case of
injuries or any skin abnormalities, consult a doctor immediately.
Before Use
Warning
❏ If parts are swallowed accidentally, it will be harmful to the body. If parts are swallowed
accidentally, consult a doctor immediately.
Do not disassemble/repair the watch yourself.
This could cause an electric shock or accident to occur.
Do not use the watch for scuba diving or saturation diving.
This may cause an accident or malfunction to occur. Use a dedicated diver’s watch when doing scuba
diving and saturation diving.
Do not use the watch when flying gliders, paragliding, and so on.
This may cause an accident to occur.
Caution
Make sure you frequently wipe off any moisture, sweat, or dirt that sticks to the watch.
❏ Continuing using the watch when moisture, sweat, or dirt are attached may cause itching or
inflammation. If you notice any abnormalities on your skin, stop using the watch immediately
and consult a specialist.
❏ Continuing using the watch when moisture, sweat, dirt, and so on are attached may cause the
waterproofing to fail.
When taking off the watch, place it on a soft clean cloth.
If you remove the watch and place it as it is, the back cover and the band rub against each other and
may cause scratches on the rear cover.
If you notice any abnormalities on your skin, stop using the watch immediately.
Depending on the conditions when using the watch it could cause allergies or skin irritation. If you
notice any abnormalities on your skin, stop using the watch immediately and consult a specialist.
9

MB52 (TR-MB5) User’s Guide
Do not adjust the metal band yourself.
This could cause an injury to occur. Adjusting the metal band takes expertise and skill, so be sure to
contact your local dealer or TRUME customer support.
U “Contact Information” on page 112
Do not store or leave in the following locations.
❏ Locations subject to extreme changes in temperature and humidity
❏ Locations subject to extremely high temperature, low temperature, and high humidity
❏ Locations with volatile substances
❏ Locations subject to a lot of soot and dust
❏ Locations subject to fires
❏ Locations subject to strong vibrations
Before Use
Caution
❏ Locations subject to magnetism and static electricity
This could cause an electric shock or fire to occur. It could also cause failure or malfunction to occur.
Notes on charging and batteries
Do not remove the secondary battery from the watch.
When using an ordinary silver oxide battery for the watch, it may explode, overheat, or catch fire.
Replacing the secondary battery takes expertise and skill, so be sure to contact your local dealer or
TRUME customer support.
U “Contact Information” on page 112
Do not charge the watch under light bulbs, spot lights, and so on, or on the dashboard of a
car.
The watch may overheat causing a malfunction to occur.
Warning
10
MB52 (TR-MB5) User’s Guide
Before Use
Notes on waterproofing
The watch is water resistant to 10 ATM (WATER RESISTANT 10BAR).
You can use the watch for water sports (swimming, fishing, yachting, and so on) and skin diving.
Warning
Do not hold the device directly under high pressure water from a faucet.
Water pressure from a faucet is high and could effect the quality of the waterproofing.
Do not use in the bath or in a sauna.
It could effect the quality of the waterproofing or cause rust.
Do not operate the crown/buttons on the watch when underwater or when there is water on
the watch.
It could cause the waterproofing to fail or cause a malfunction.
Notes on signals
In areas in which usage is restricted, such as on airplanes and in hospitals, follow the rules and
regulations provided.
Do not bring this watch into an operating room, intensive care unit, and so on, and do not use
the device near medical equipment.
Radio waves from this watch may interfere with electronic medical equipment causing the
equipment to malfunction and cause an accident.
If you are using an implanted medical device, make sure you follow the instructions and
warnings for that device.
Warning
Caution
Radio waves from this watch may interfere with implanted medical devices such as cardiac
pacemakers.
11

MB52 (TR-MB5) User’s Guide
Before Use
Notes on measurements
Warning
This product is not intended for taking measurements that requires professional precision.
When using the measurement feature, make decisions and take actions at your own risk.
The measurement results may differ from the actual values or statuses. Also, the watch may not be
able to perform measurements accurately due to environmental factors such as barometric
pressure, altitude, and temperature.
Measurement function readings are intended as a guide only.
We cannot accept any responsibility for damage caused by the user or a third party through use of
the measurement function.
See the following for notes on each measurement mode.
U “Notes on Measuring Altitude” on page 73
U “Notes and Mechanism on Measuring Barometric Pressure” on page 81
Certification information
Regarding EMC Regulations
The watch's GPS satellite signal receiving feature conforms with EMC (Electromagnetic Wave Regulation) standards
for Europe, FCC rule, Korean EMC standards, and the Comité International Spécial des Perturbations
Radioélectriques (CISPR) standards. As the manufacturer of the product, we have confirmed it operates within
acceptable noise levels.
Model: TR-MB5
USA/CANADA
This device complies with part 15 of the FCC Rules. Operation is subject to the following two conditions: (1) This
device may not cause harmful interference, and (2) this device must accept any interference received, including
interference that may cause undesired operation.
FCC CAUTION
Changes or modications not expressly approved by the party responsible for compliance could void the user’s
authority to operate the equipment.
Note: This equipment has been tested and found to comply with the limits for a Class B digital device, pursuant to
part 15 of the FCC Rules. These limits are designed to provide reasonable protection against harmful interference
in a residential installation. This equipment generates, uses and can radiate radio frequency energy and, if not
installed and used in accordance with the instructions, may cause harmful interference to radio communications.
However, there is no guarantee that interference will not occur in a particular installation. If this equipment does
cause harmful interference to radio or television reception, which can be determined by turning the equipment
o and on, the user is encouraged to try to correct the interference by one or more of the following measures:
– Reorient or relocate the receiving antenna.
– Increase the separation between the equipment and receiver.
– Connect the equipment into an outlet on a circuit dierent from that to which the receiver is connected.
– Consult the dealer or an experienced radio/TV technician for help.
CAN ICES-3(B)/NMB-3(B)
12

MB52 (TR-MB5) User’s Guide
This product does not require SAR testing.
This equipment complies with FCC/IC radiation exposure limits set forth for an uncontrolled environment and
meets the FCC radio frequency (RF) Exposure Guidelines and RSS-102 of the IC radio frequency (RF) Exposure
rules. This equipment has very low levels of RF energy that is deemed to comply without maximum permissive
exposure evaluation (MPE).
Cet équipement est conforme aux limites d’exposition aux rayonnements énoncées pour un environnement non
contrôlé et respecte les règles les radioélectriques (RF) de la FCC lignes directrices d’exposition et d’exposition
aux fréquences radioélectriques (RF) CNR-102 de l’IC. Cet équipement émet une énergie RF très faible qui est
considérée comme conforme sans évaluation de l’exposition maximale autorisée (MPE).
This equipment complies with IC radiation exposure limits set forth for an uncontrolled environment and meets
RSS-102 of the IC radio frequency (RF) Exposure rules. This equipment has very low levels of RF energy that is
deemed to comply without testing of specic absorption rate (SAR).
Cet équipement est conforme aux limites d’exposition aux rayonnements énoncées pour un environnement non
contrôlé et respecte les règles d’exposition aux fréquences radioélectriques (RF) CNR-102 de l’IC. Cet équipement
émet une énergie RF très faible qui est considérée comme conforme sans évaluation du débit d’absorption
spécique (DAS).
Before Use
Korea
R-REM-EIH-TR-MB7-5
Contact TRUME customer support for the date of manufacture.
SEIKO EPSON CORPORATION
Europe
RE Directives
Wireless: EN 303 413
EMC: EN 301 489-1/19
Safety: EN 60950-1
International Standards Compliance
Japan and Other Countries
CISPR 16 IEC 61000-6-1, IEC 61000-6-3
13

MB52 (TR-MB5) User’s Guide
Before Use
Features of the Product
Adjusting the time by receiving signals from GPS satellites (SATELLITELINK)
Your watch can automatically adjust to the correct time by receiving signals from GPS satellites.
However, you need to set Daylight Saving Time (DST) manually.
U “Adjusting the time by receiving signals from GPS satellites” on page 15
Light charging feature (LIGHT CHARGE)
You can charge the watch by exposing the dial to sunlight or fluorescent light.
As it can take some time to recharge the battery after it runs out, we recommend exposing the dial to light as often as
possible.
U “Charging the watch” on page 38
Altimeter/barometric feature with pressure sensor
You can measure altitude and barometric pressure using the pressure sensor built into the watch.
U “Mechanism for measuring altitude” on page 73
U “About barometer feature” on page 81
14
MB52 (TR-MB5) User’s Guide
Before Use
Information on the Watch’s Mechanics
Adjusting the time by receiving signals from GPS satellites
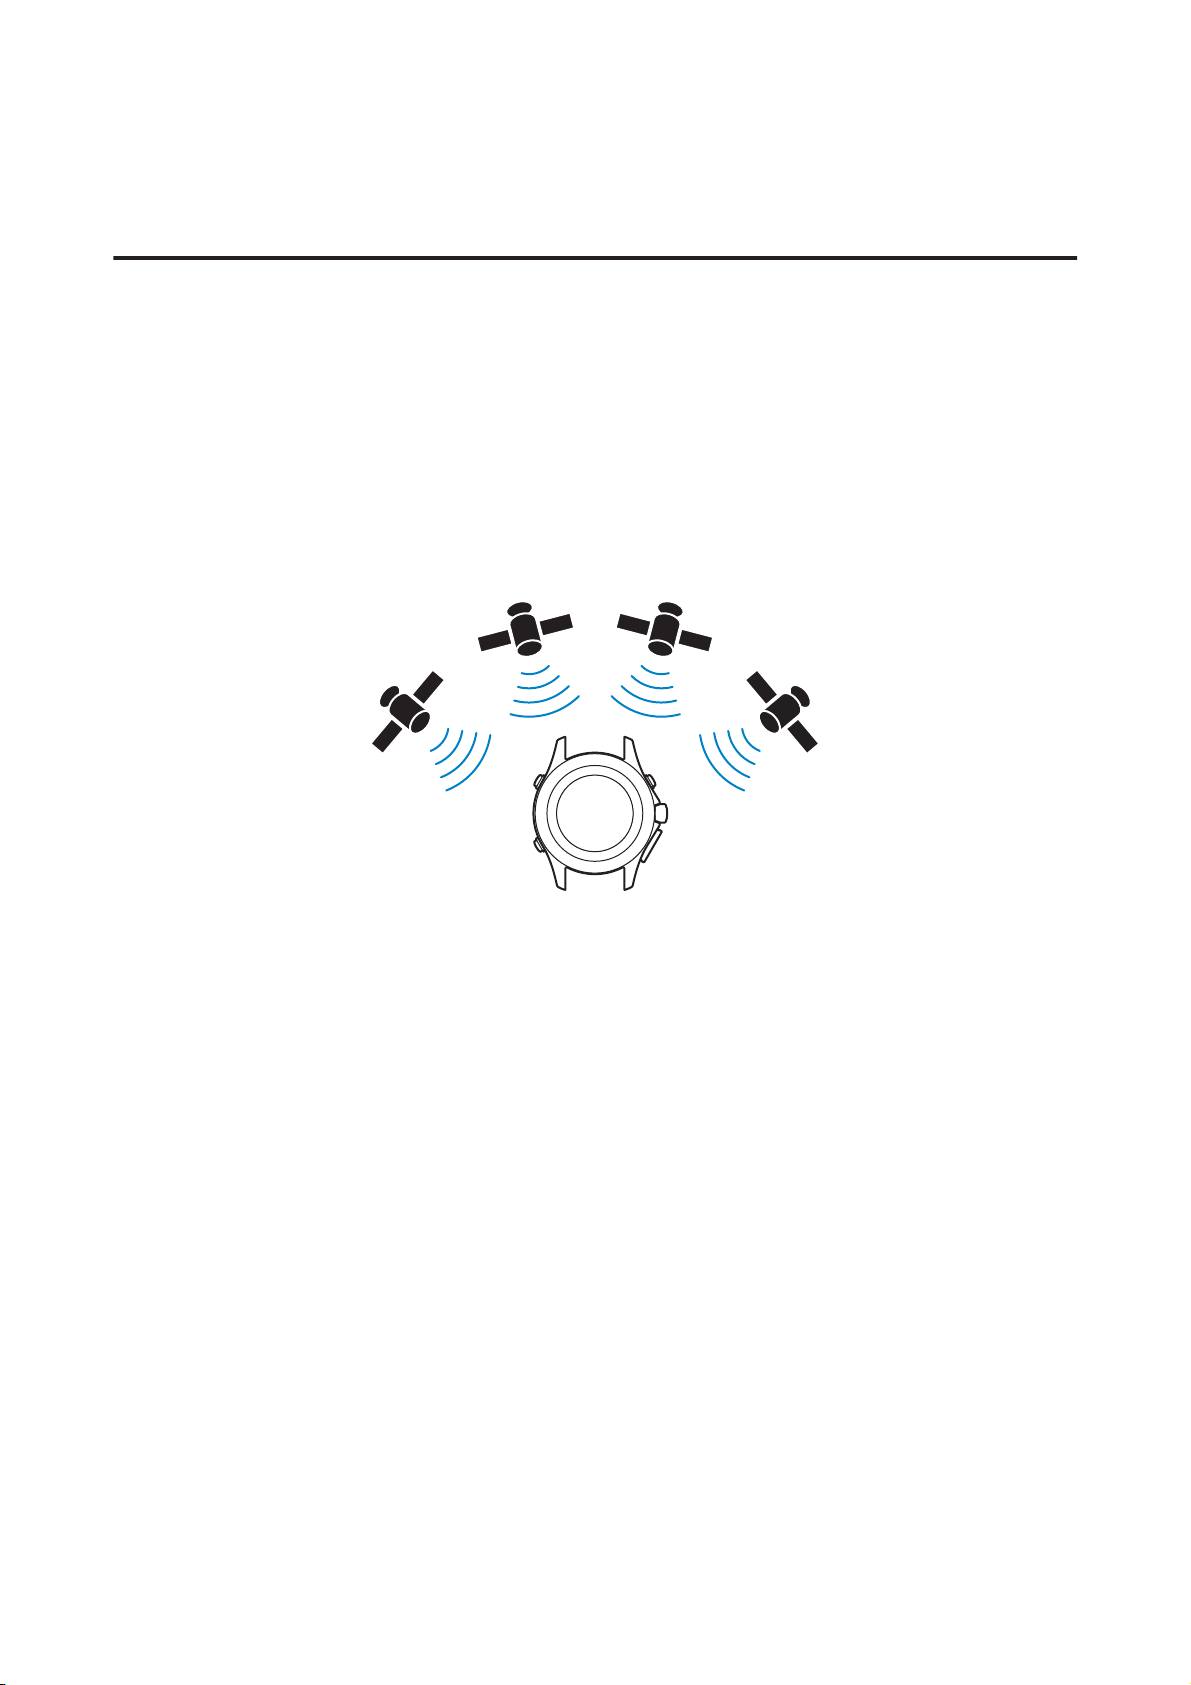
GPS satellites are equipped with high-precision atomic clocks with a margin of error of one second every 100,000
years. Signals sent from the GPS satellite to earth contain "time information" based on the atomic clock.
With the touch of a button, this product receives signals from the GPS satellite and adjusts the time according to the
following information.
❏ Received from one satellite:
Exact time and date based on the atomic clock
❏ Received from multiple satellites (at least four):
Time zone information for your current location
*Unlike navigation devices, this product is not designed to constantly receive GPS satellite signals.
15
MB52 (TR-MB5) User’s Guide
Before Use
Note:
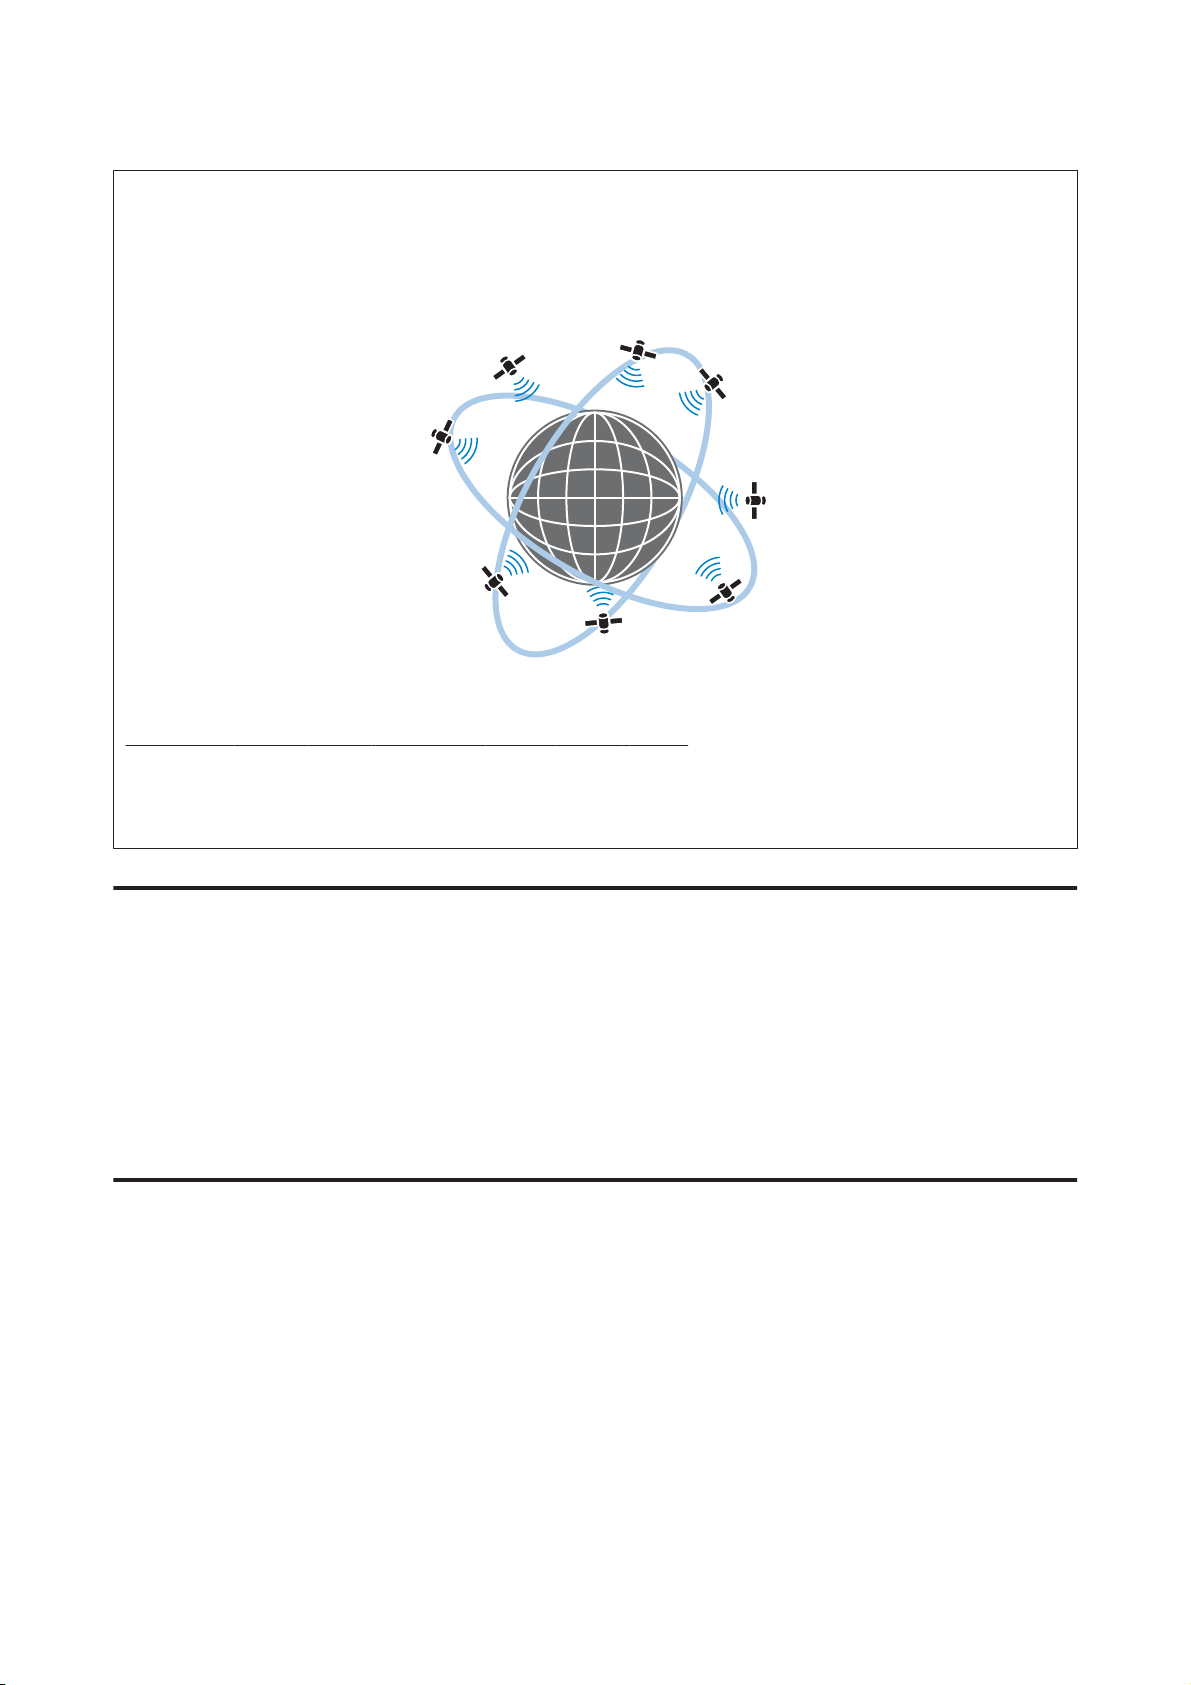
About GPS satellites
The satellites are controlled by the United States Department of Defense and orbit at an altitude of 20,000 km.
Originally, these satellites were designed for military purposes, but now some of the information they send is for consumer
use and is used in a variety of devices such as car navigation systems and smart phones.
Supports the Quasi-Zenith Satellite System
This product supports the first Quasi-Zenith Satellite System (QZSS).
The QZSS is a system of satellites that passes directly over Japan and sends positioning signals that are very similar to current
GPS signals. This allows signals to be sent to wider areas of Japan that were previously trouble spots, such as mountainous
regions, or areas with a high density of skyscrapers.
Coordinated Universal Time (UTC) and time zones
UTC is a universal, standardized time set by international accord. This is used as the official time when time is recorded
around the world.
Around the world, countries and regions use common standard times based on Coordinated universal time (UTC).
Standard times are determined by specific countries and regions, and a region that uses the same standard time is
called a time zone.
* The time zone for each region may change depending on the circumstances of the country or region.
Daylight Saving Time (DST)
Daylight Saving Time (DST) is a system that advances standard time by one hour (or another specific time) during
long periods of daylight, normally during summer. Also known as summer time.
This system is used in approximately 80 countries around the world, mainly in Europe and the United States, in
countries at a high latitude and long daylight hours in the summer.
* The way DST is implemented may change depending on the circumstances of the country or region. Also, the period during which
this is applied varies by country/region.
16

MB52 (TR-MB5) User’s Guide
Before Use
Leap seconds
Coordinated universal time is adjusted based on universal time (UT) and international atomic time (TAI). The time
(seconds) used for this adjustment is called leap seconds.
17
MB52 (TR-MB5) User’s Guide
Before Use
Setting up
Before using this product, make sure you take the following steps.
1. Check the content of the package
In the unlikely event that anything is missing or damaged, contact the dealer where you purchased this product.
❏ Watch
❏ Safety Instructions
❏ Handy Manual
❏ Request to Issue Guarantee postcard (temporary guarantee)
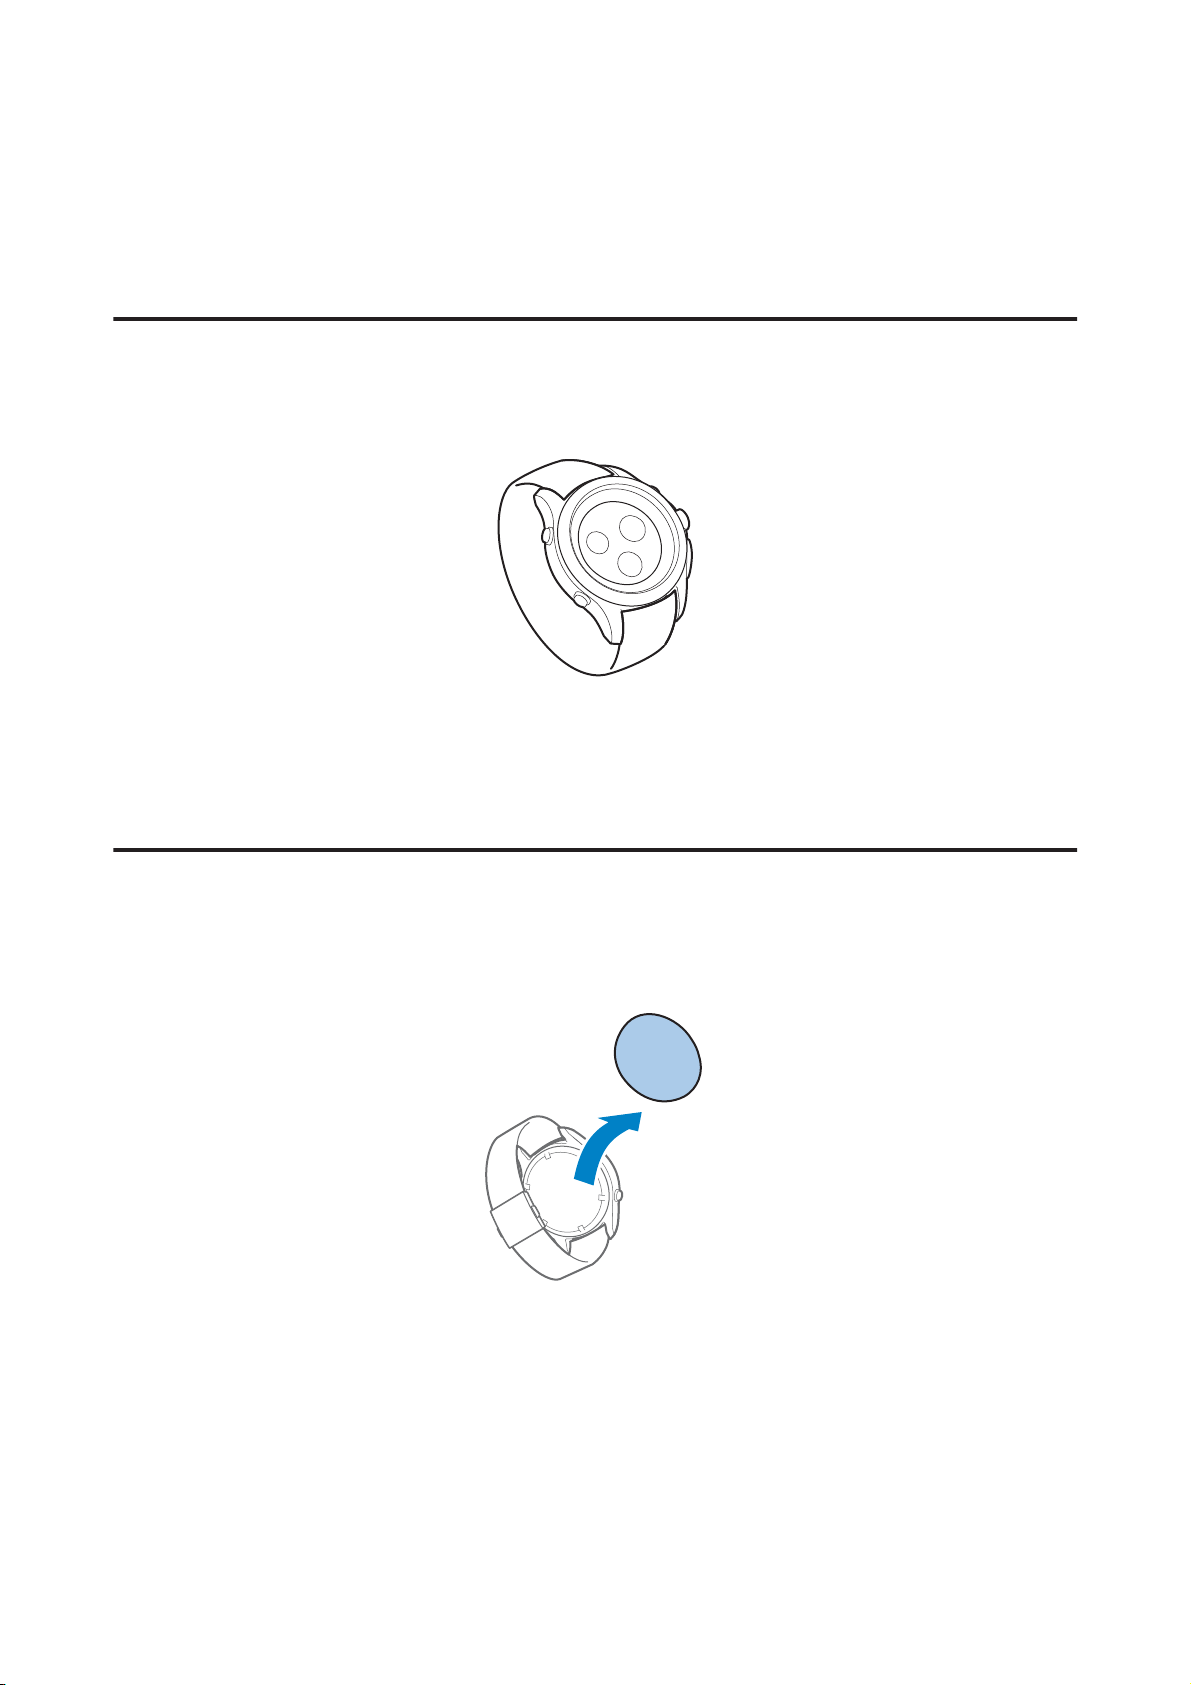
2. Remove the protective film
Remove the protective film stuck to the rear case of the watch.
If you use the watch with the film attached, it may cause dirt, sweat, trash, moisture, and so on to stick to the watch
causing rust to occur.
18
MB52 (TR-MB5) User’s Guide
Before Use
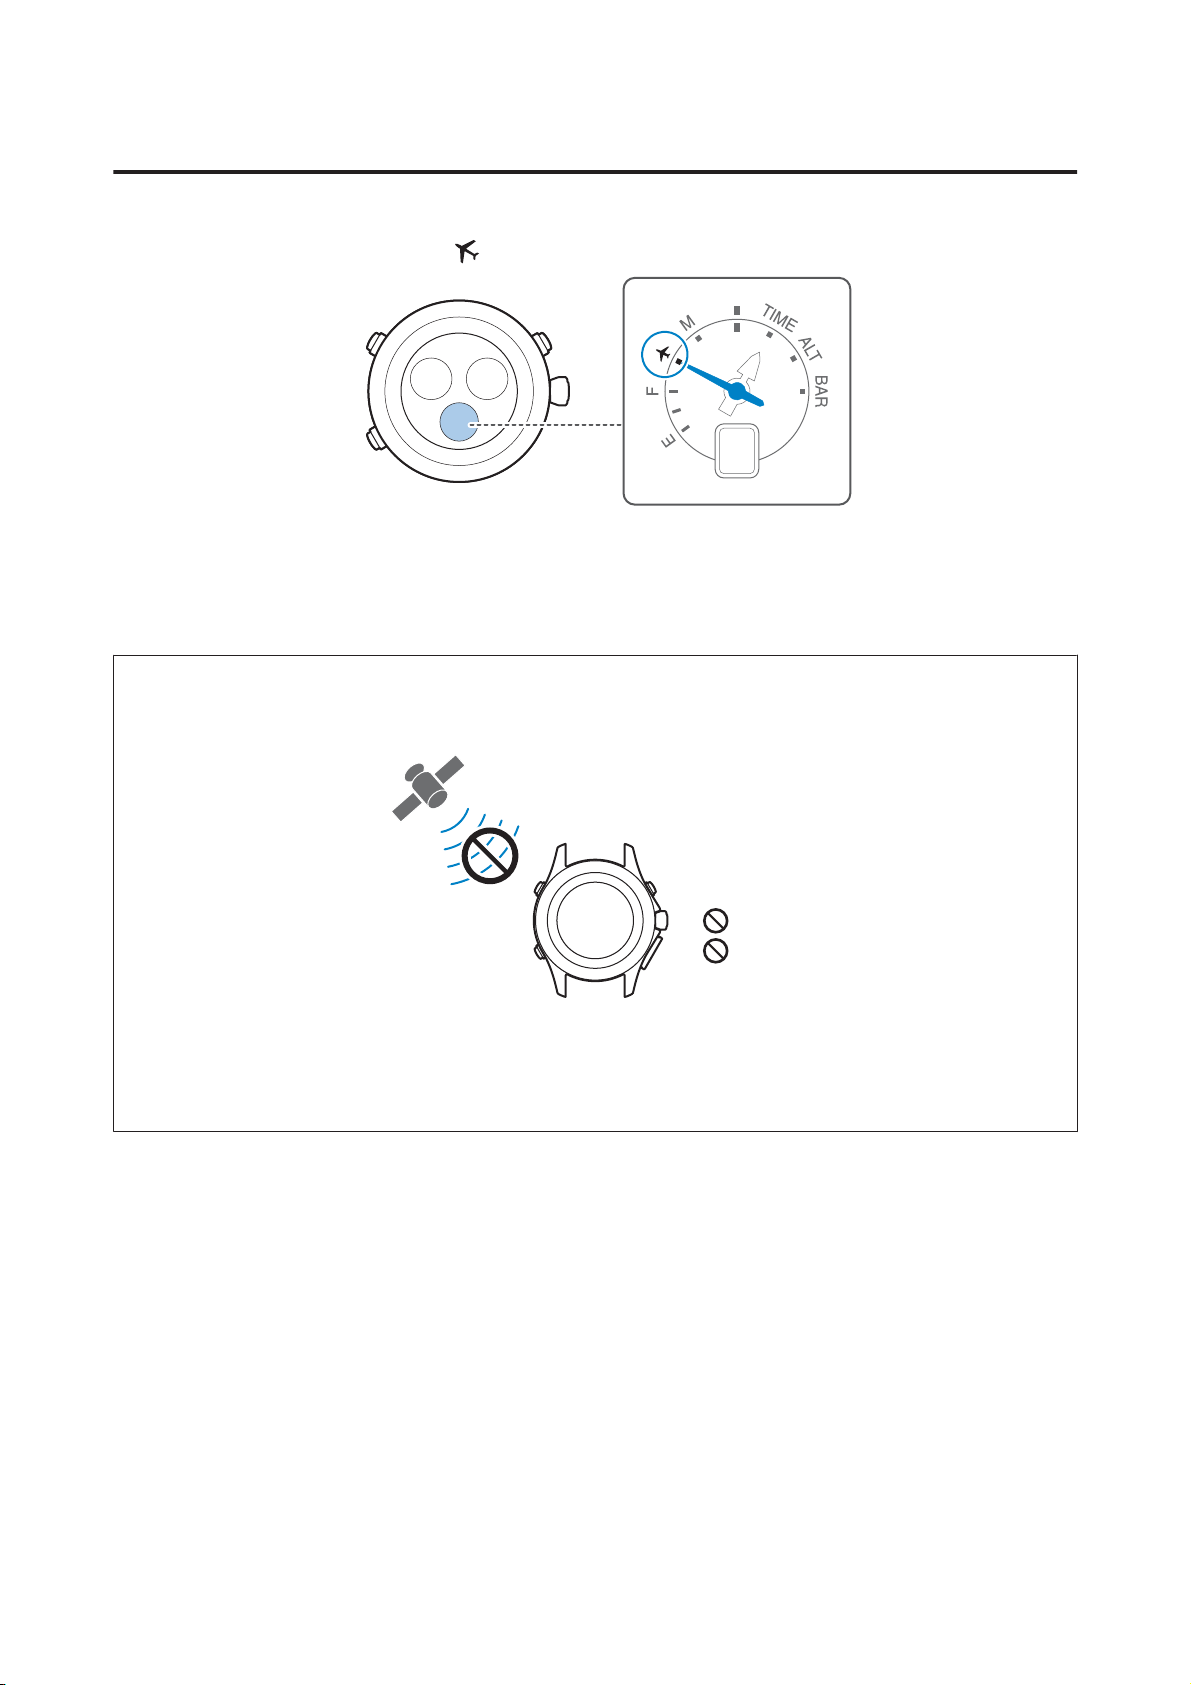
3. Release In-flight mode
The watch is shipped in In-flight mode ( ) in accordance with aviation law.
If the watch is set to In-flight mode when you purchase it, make sure you release the mode before use.
U “Setting In-flight Mode” on page 33
When In-flight mode is released, the indicator hand shows the remaining battery level.
Note:
❏ When In-flight mode is on, signals from GPS satellites are not received, and sensor functions (altitude and barometer)
do not operate.
ALT
BAR
❏ After releasing In-flight mode, move to a location outdoors with a clear view of the sky and high visibility to adjust the
time by receiving signals from GPS satellites.
U “Locations Suitable for Receiving Signals from GPS Satellites” on page 32
19
MB52 (TR-MB5) User’s Guide
Before Use
4. Register as a user (procedure for extending the warranty period)
We recommend performing user registration to extend the warranty period from one to two years.
❏ Registering from the Website
Access the following URL and enter the necessary information.
<trume.jp/hosho/>
❏ Registering using the Request to Issue Guarantee postcard
Enter the necessary information on the Request to Issue Guarantee postcard supplied with this product, and post
it to us.
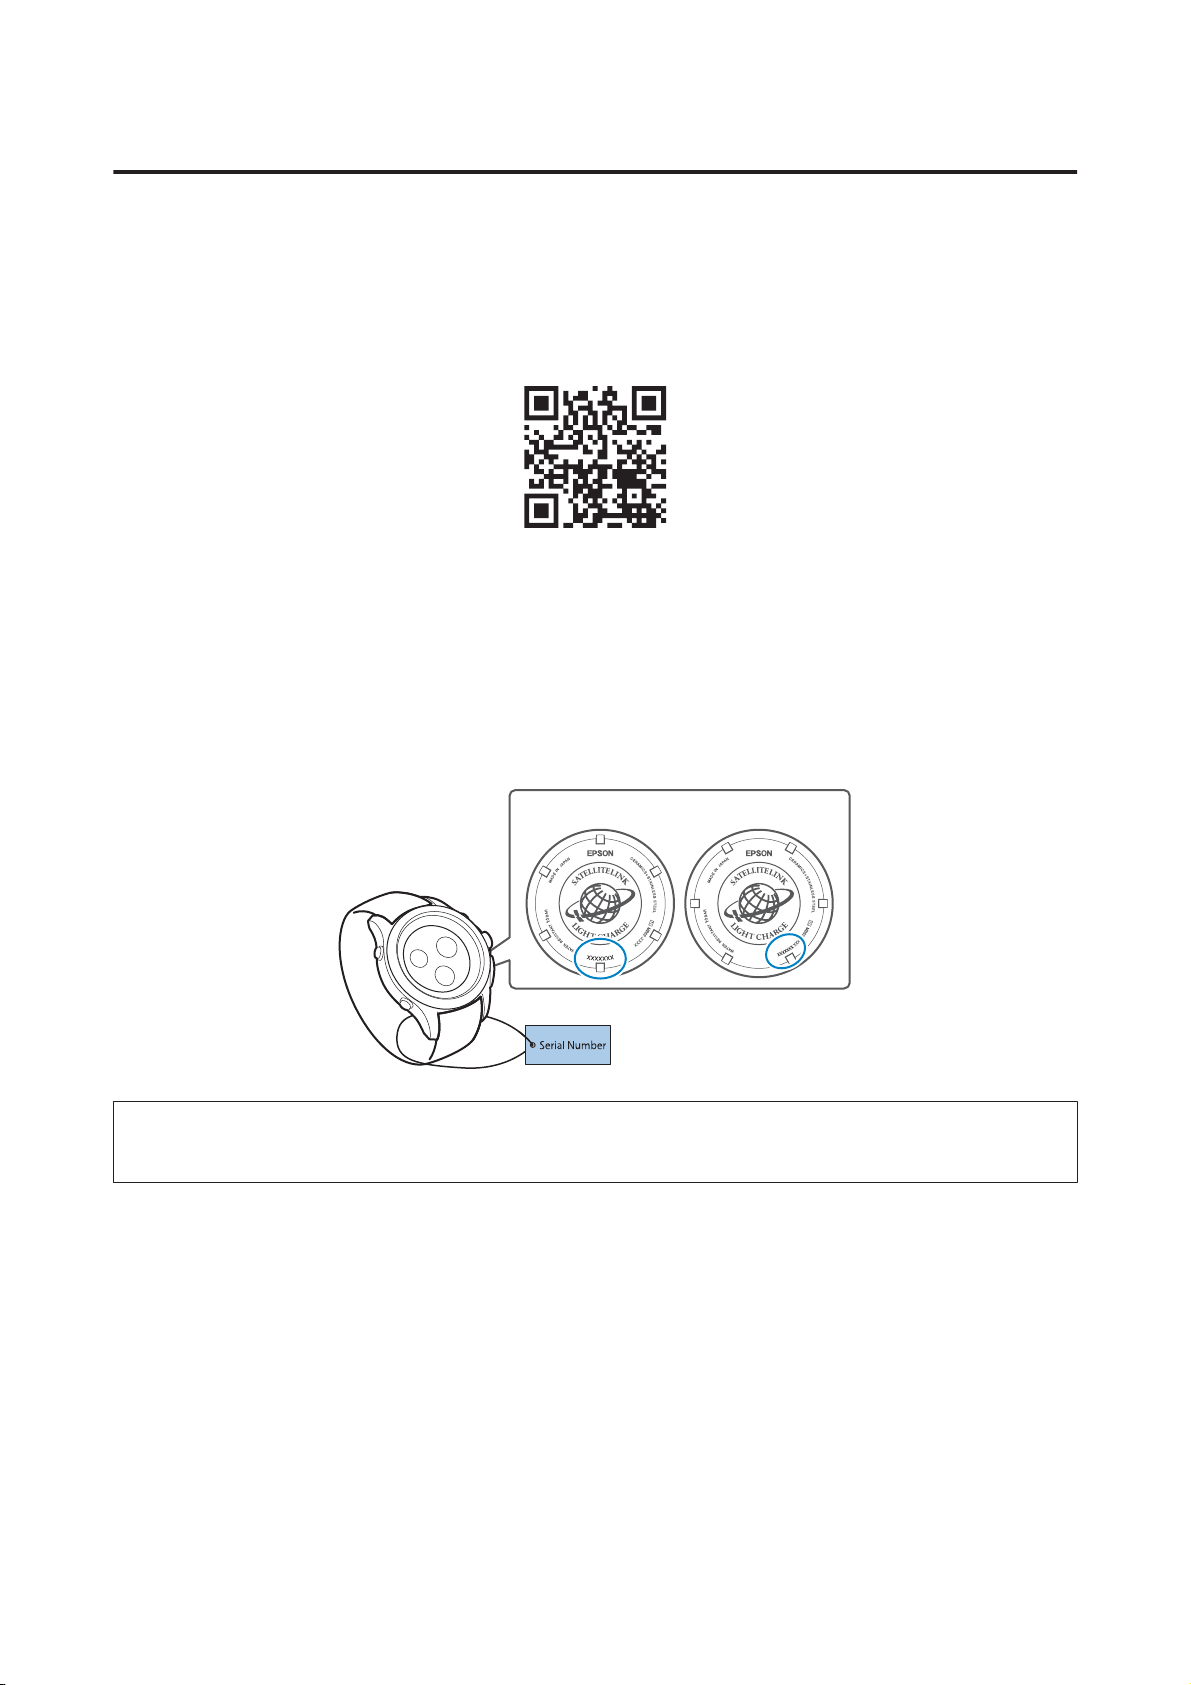
You need to provide a serial number for the user registration. The serial number is comprised of seven alphanumeric
characters. It is inscribed on the back cover of the watch and written on the tag attached to the watch at the time of
purchase.
Example for the back cover
Note:
The location of the serial number may differ depending on the model and the time of sale.
20

MB52 (TR-MB5) User’s Guide
Basic Operations
Basic Operations
U “Part Names and Functions” on page 22
U “Operating the Screw Lock Crown” on page 29
U “Attaching” on page 31
U “Locations Suitable for Receiving Signals from GPS Satellites” on page 32
U “Setting In-flight Mode” on page 33
U “Checking the Battery Level” on page 34
U “About the Sleep Feature” on page 37
U “About Charging” on page 38
21

MB52 (TR-MB5) User’s Guide
Basic Operations
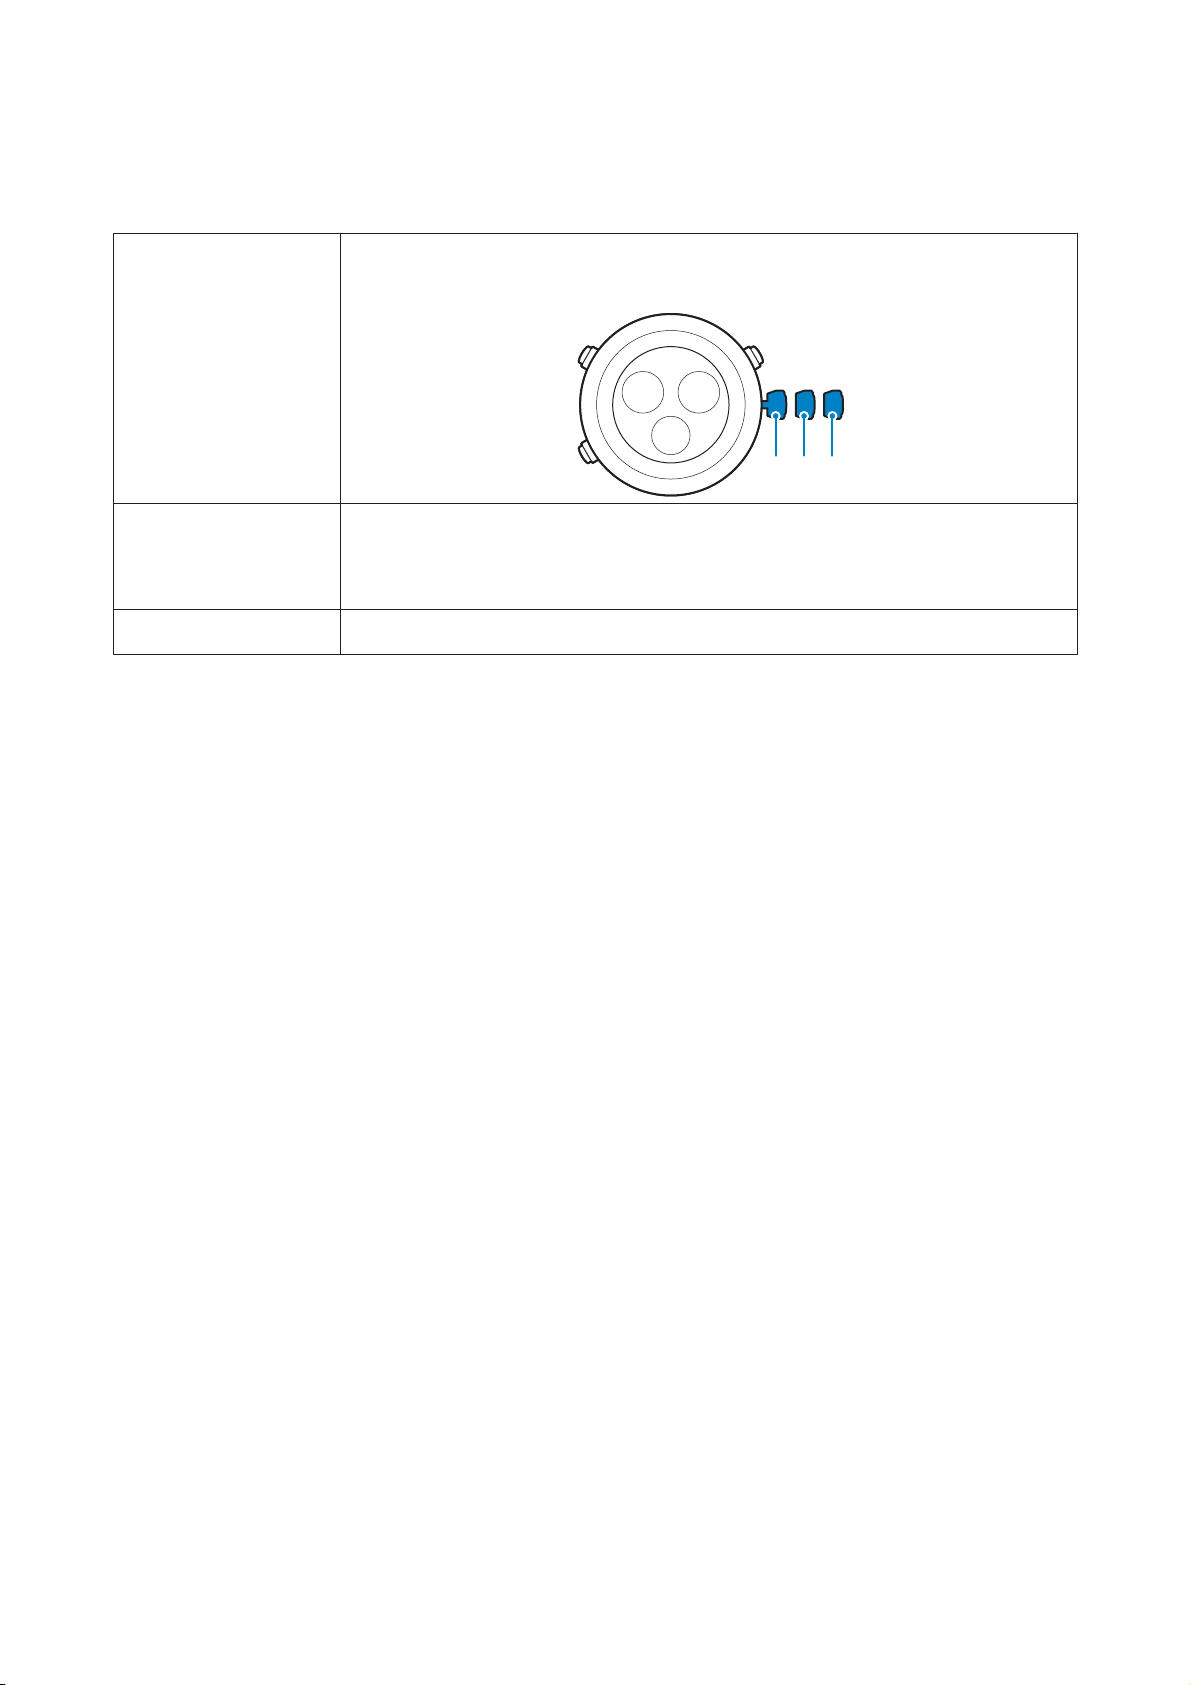
Part Names and Functions
This section explains how to read the hand indications.
*The dial display may vary depending on the model.
1
2
5
6
3
4
1Hour hand
2 Small second hand
U “Small second hand display” on page 23
3 Minute hand
4 Indicator hand (long hand)/mode hand (short hand)
U “Indicator hand/mode hand display” on page 24
5 Measurement hand (short hand/long hand)
U “Measurement hand display” on page 25
6 Screw lock crown
U “Buttons/screw lock crown” on page 27
U “Operating the Screw Lock Crown” on page 29
7
8
7 Pressure sensor
8 Center hand
U “Center hand display” on page 26
22
MB52 (TR-MB5) User’s Guide
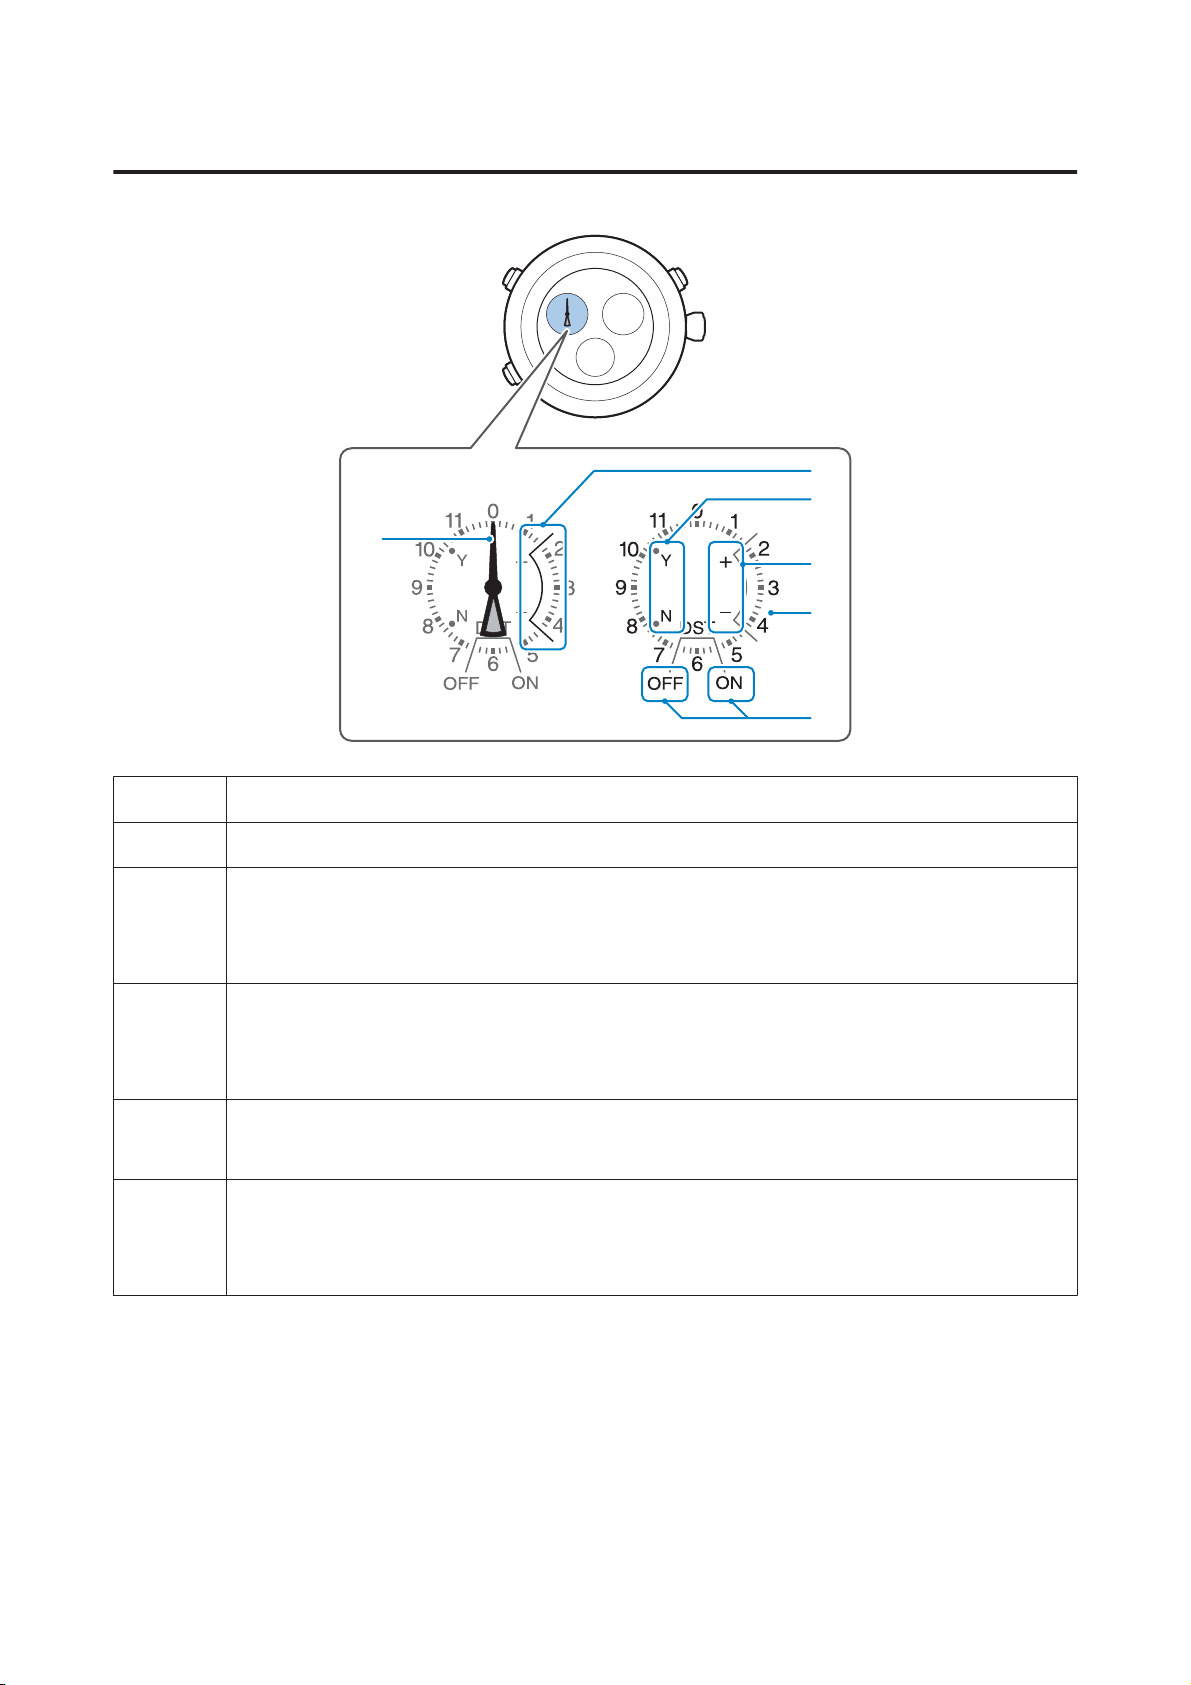
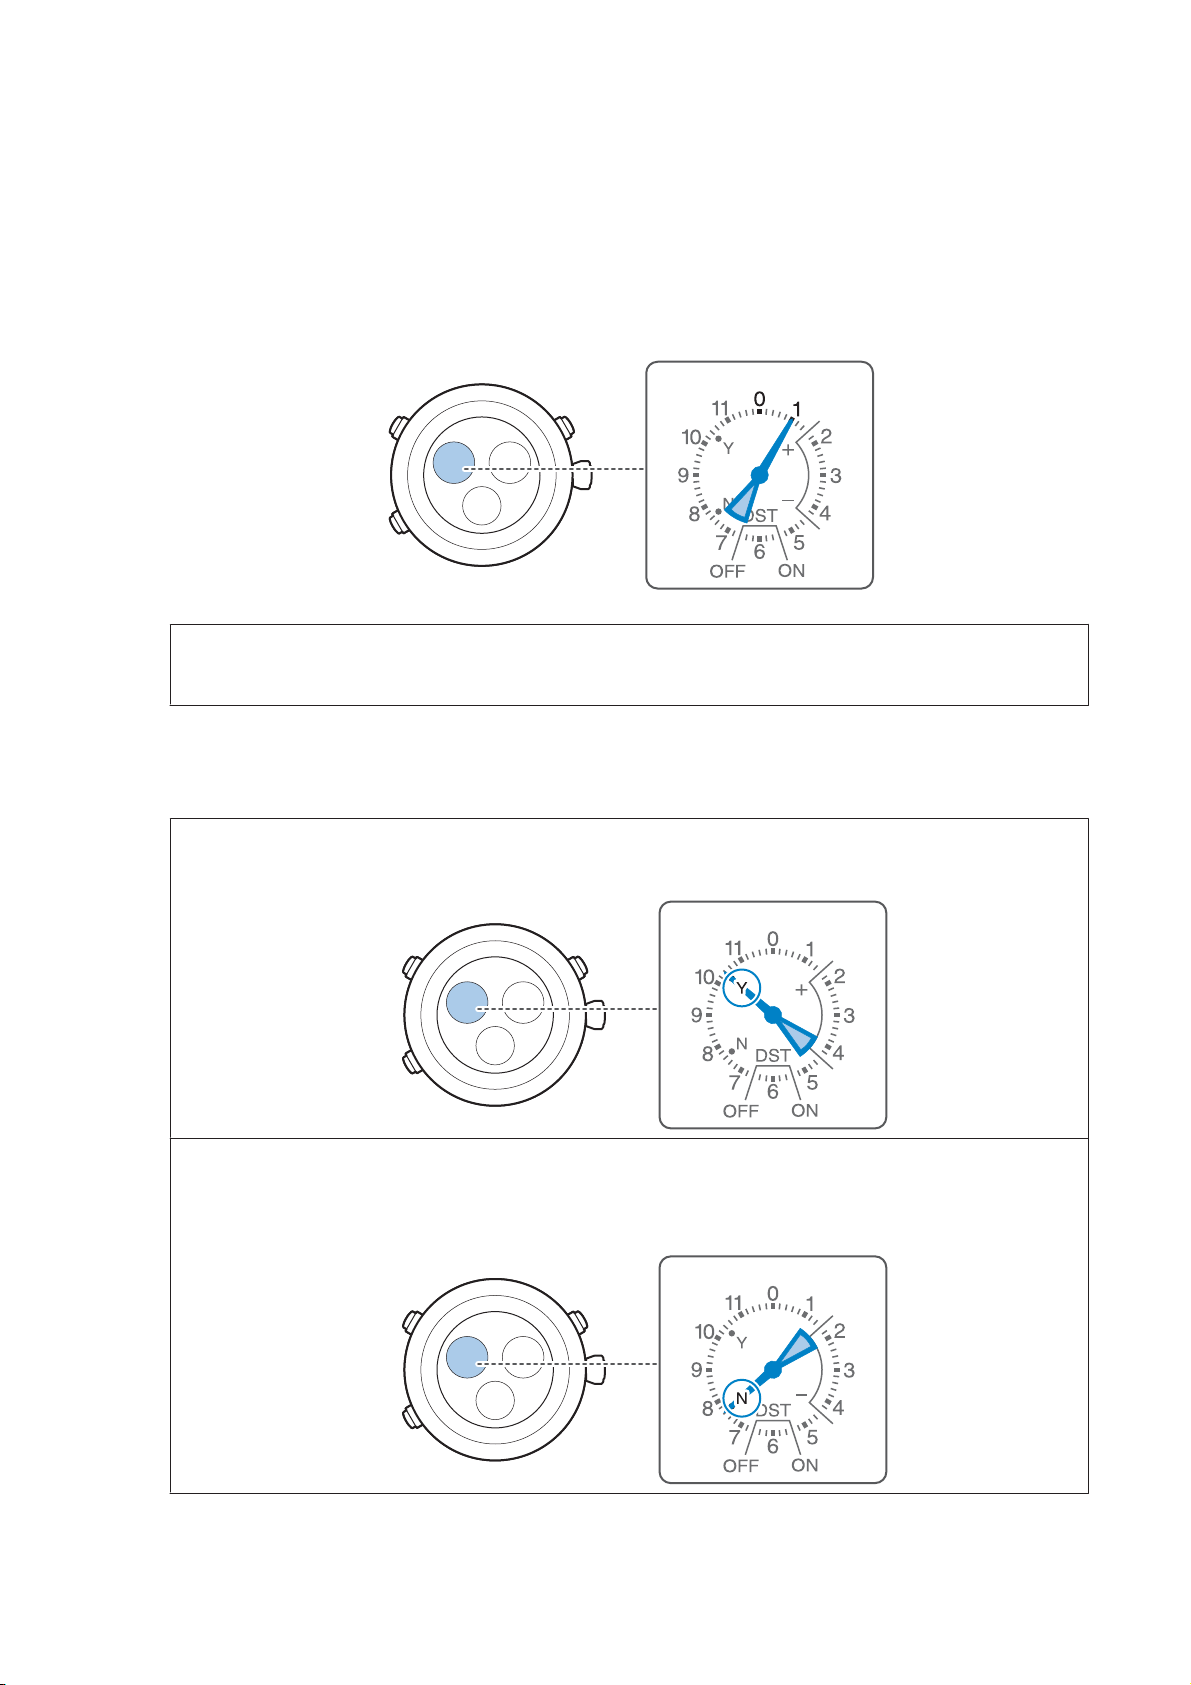
Small second hand display
1
Basic Operations
2
3
4
5
1 Small second hand
2 Display range of barometric tendency
3 Display results
Y (52 seconds position): Success
N (38 seconds position): Failure
4 Symbol for measurements
+ (8 seconds position): 0 or higher
- (22 seconds position): Less than 0
5Numbers
Number of GPS satellites acquired
6 Setting Daylight Saving Time (DST)
OFF (33 seconds position)
ON (27 seconds position)
6
23
MB52 (TR-MB5) User’s Guide
Basic Operations
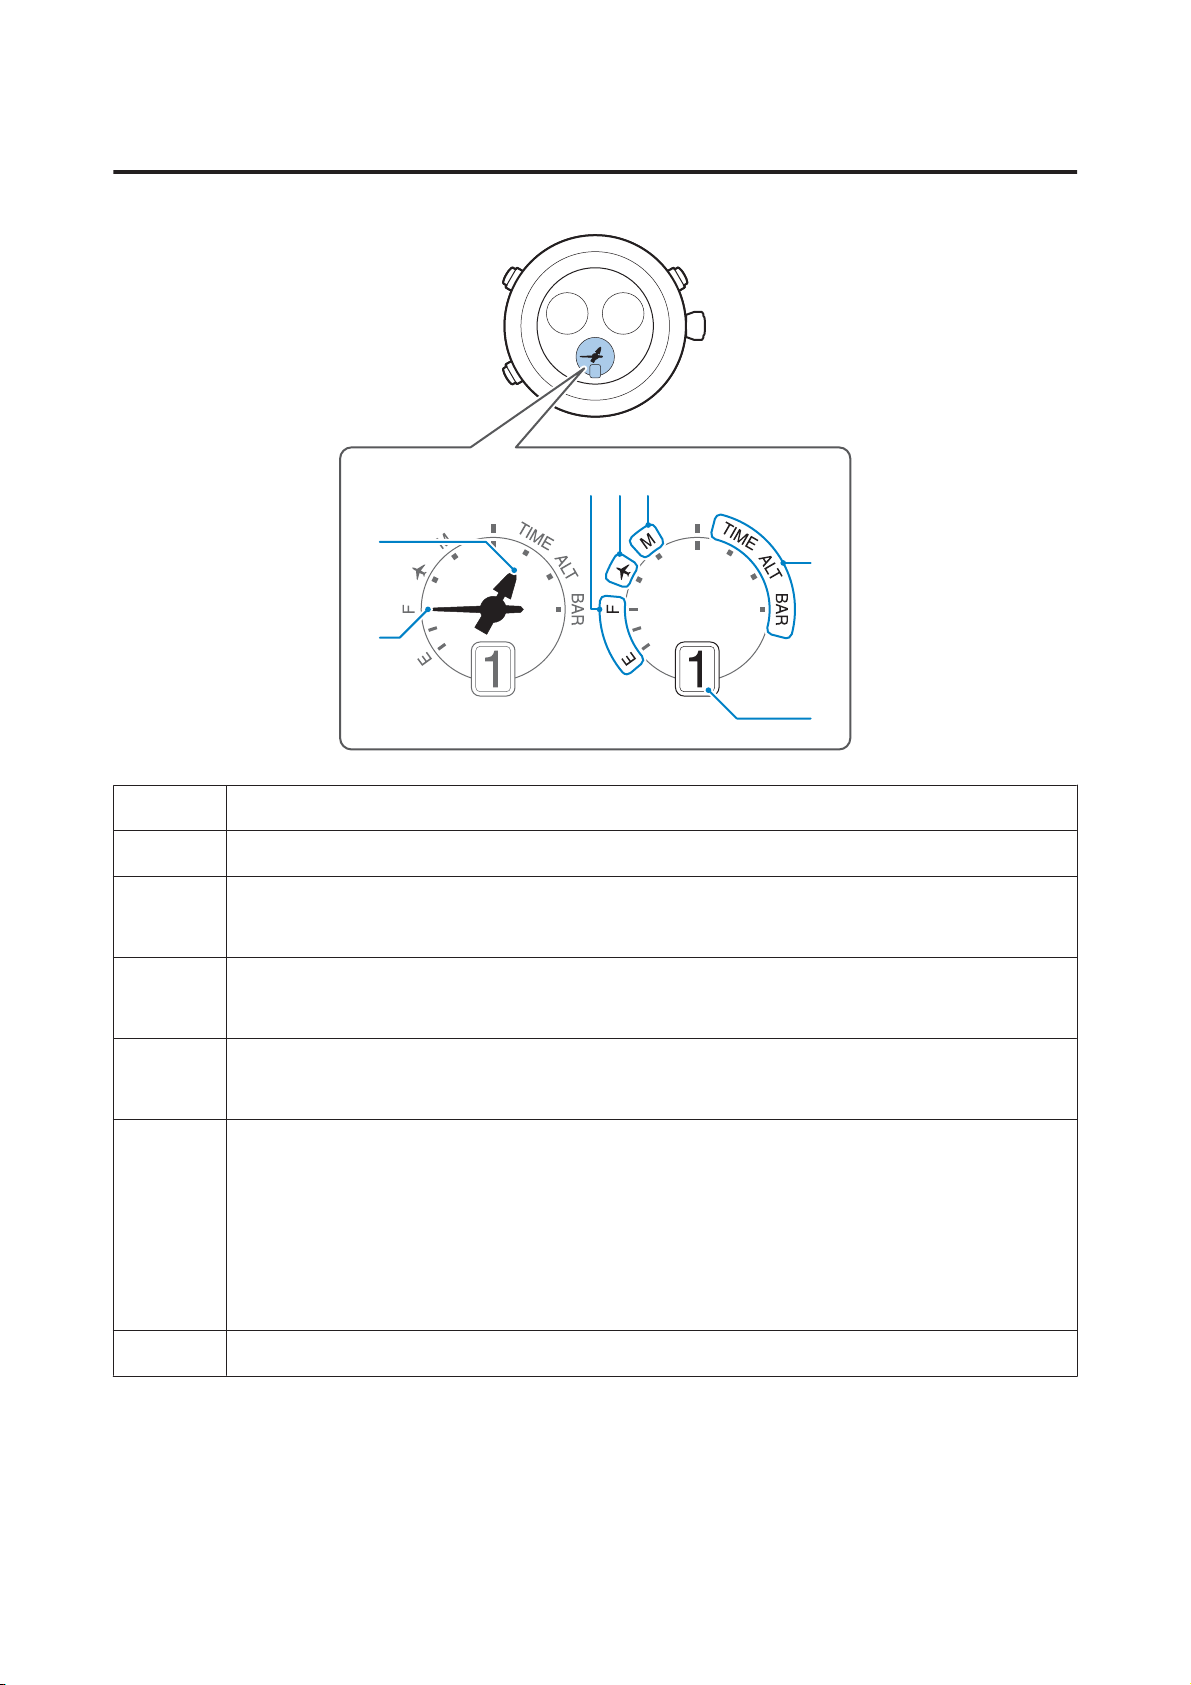
Indicator hand/mode hand display
345
1
6
2
1 Mode hand (short hand)
2 Indicator hand (long hand)
3 Battery remaining level
U “Checking the Battery Level” on page 34
4 In-flight mode
U “Setting In-flight Mode” on page 33
5Operating
Indicates that the watch is performing an operation such as measuring or receiving.
6Mode
TIME: Time mode
ALT: Altimeter mode
7
BAR: Barometer mode
The mode switches each time you press and release the A button.
7Calendar
24
MB52 (TR-MB5) User’s Guide
Measurement hand display
1
2
Basic Operations
1 Measurement hand (short hand)
2 Measurement hand (long hand)
3Numbers
Short hand: Indicates thousandths when measuring
Long hand: Indicates hundredths when measuring
3
25
MB52 (TR-MB5) User’s Guide
Center hand display
1
Basic Operations
2
1 Center hand
2 Bezel
Display ones to tens when measuring
3Dial ring
Stopwatch scale
Time zone display
3
26
MB52 (TR-MB5) User’s Guide
Basic Operations
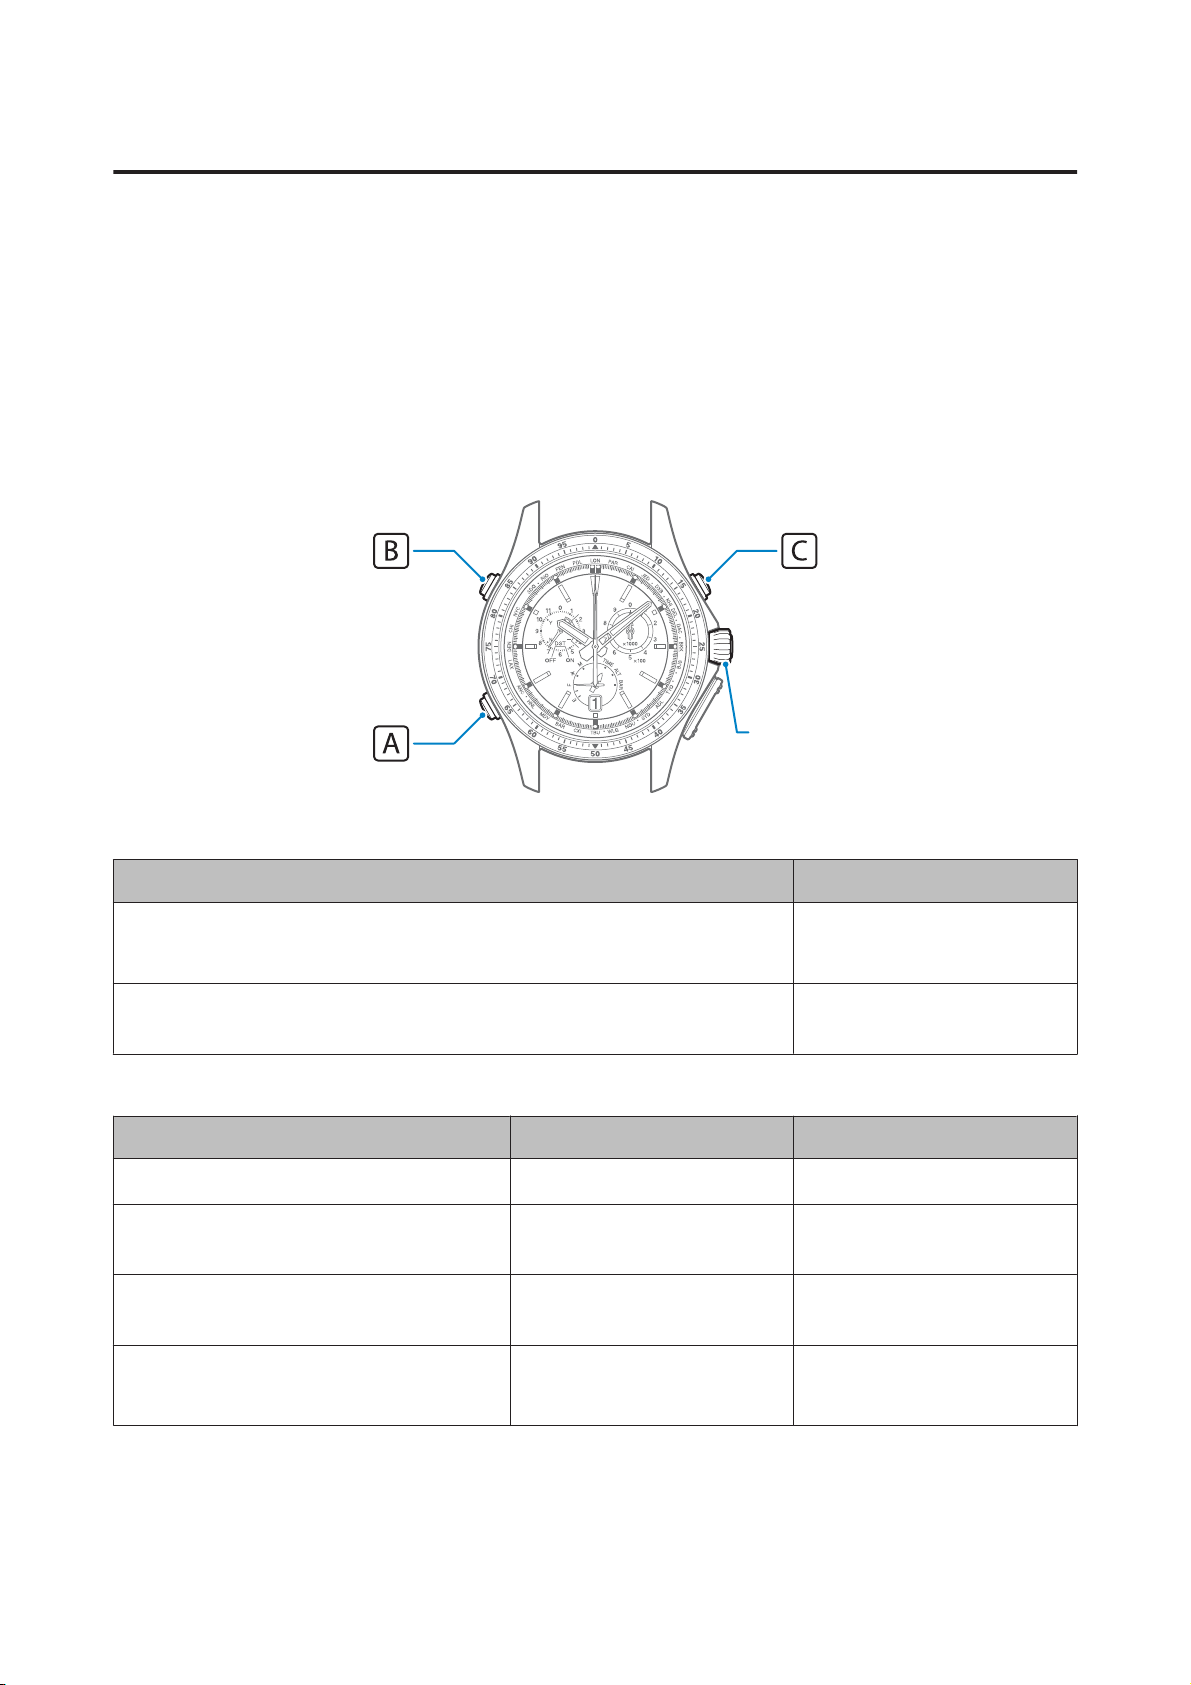
Buttons/screw lock crown
This section explains the main features and basic operations.
The following shows the button layout:
Button A: Changes the feature
Button B: Receives GPS satellite signal/various features
Button C: Starts/stops measuring
Screw lock crown: Confirm, set/select
It is useful to memorize this layout.
Screw lock
crown
Button A: <Changes the feature>
Feature Button Operations
Switches the mode
Press and release
In the order TIME > ALT > BAR > TIME
Setting/releasing In-flight mode Press for at least three
seconds
Button B: <Receives GPS satellite signals/various features>
Feature Mode Button Operations
Resetting the stopwatch
Measuring/releasing split measurements
for the stopwatch
Adjusting time (Receiving GPS satellite
signals)
TIME
TIME
TIME
Press and release for three
Press
Press
seconds
Setting the time zone/time
(Receiving GPS satellite signals)
27
TIME
Press for at least five seconds

MB52 (TR-MB5) User’s Guide
Button C: <Starts/stops measuring>
Feature Mode Button Operations
Basic Operations
Starting/stopping the stopwatch
Starting/stopping measurement
Screw lock crown: < Confirm, set/select >
Feature Mode Crown Operations
Setting the time zone
Setting Daylight Saving Time (DST)
Correcting the measurement results
Calibrating time
TIME
ALT/BAR
TIME
TIME
ALT/BAR
TIME
Press
Press
Pulled out one step
Pulled out one step
Pulled out one step
Pulled out two steps
28
MB52 (TR-MB5) User’s Guide
Basic Operations
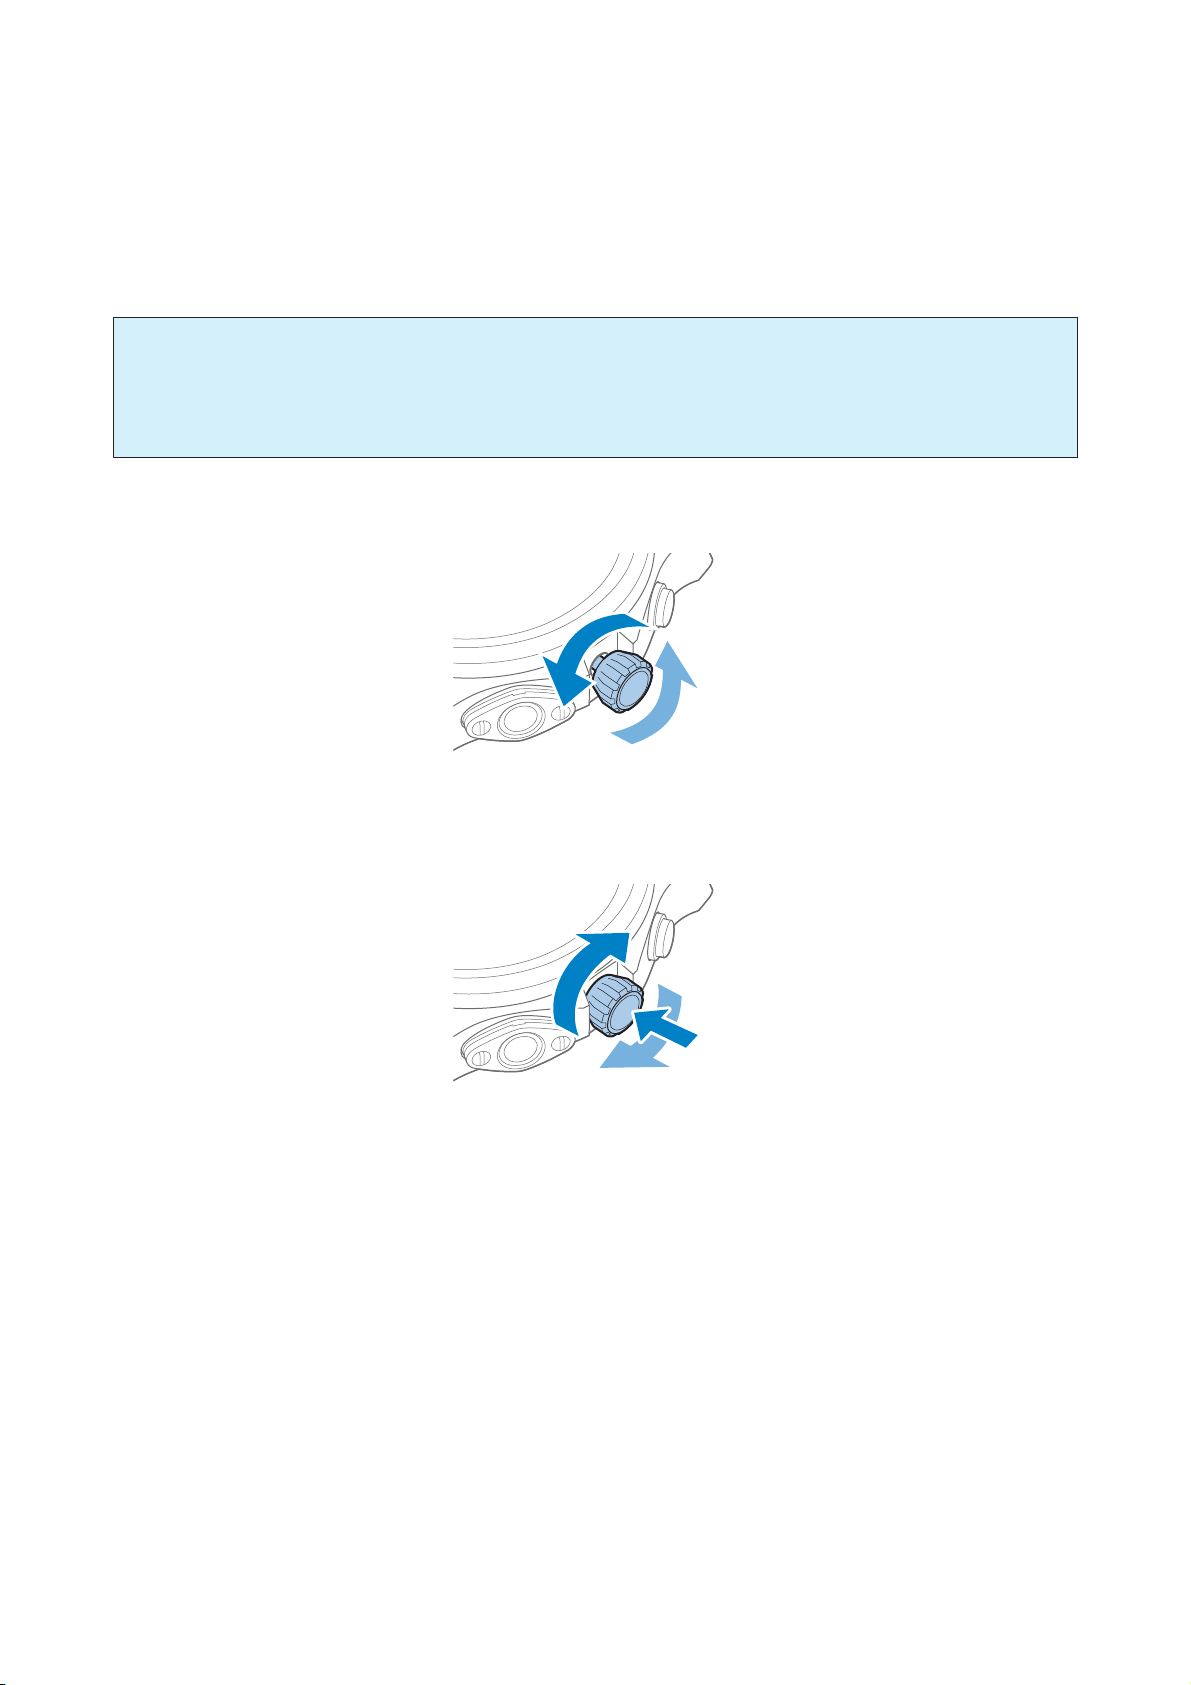
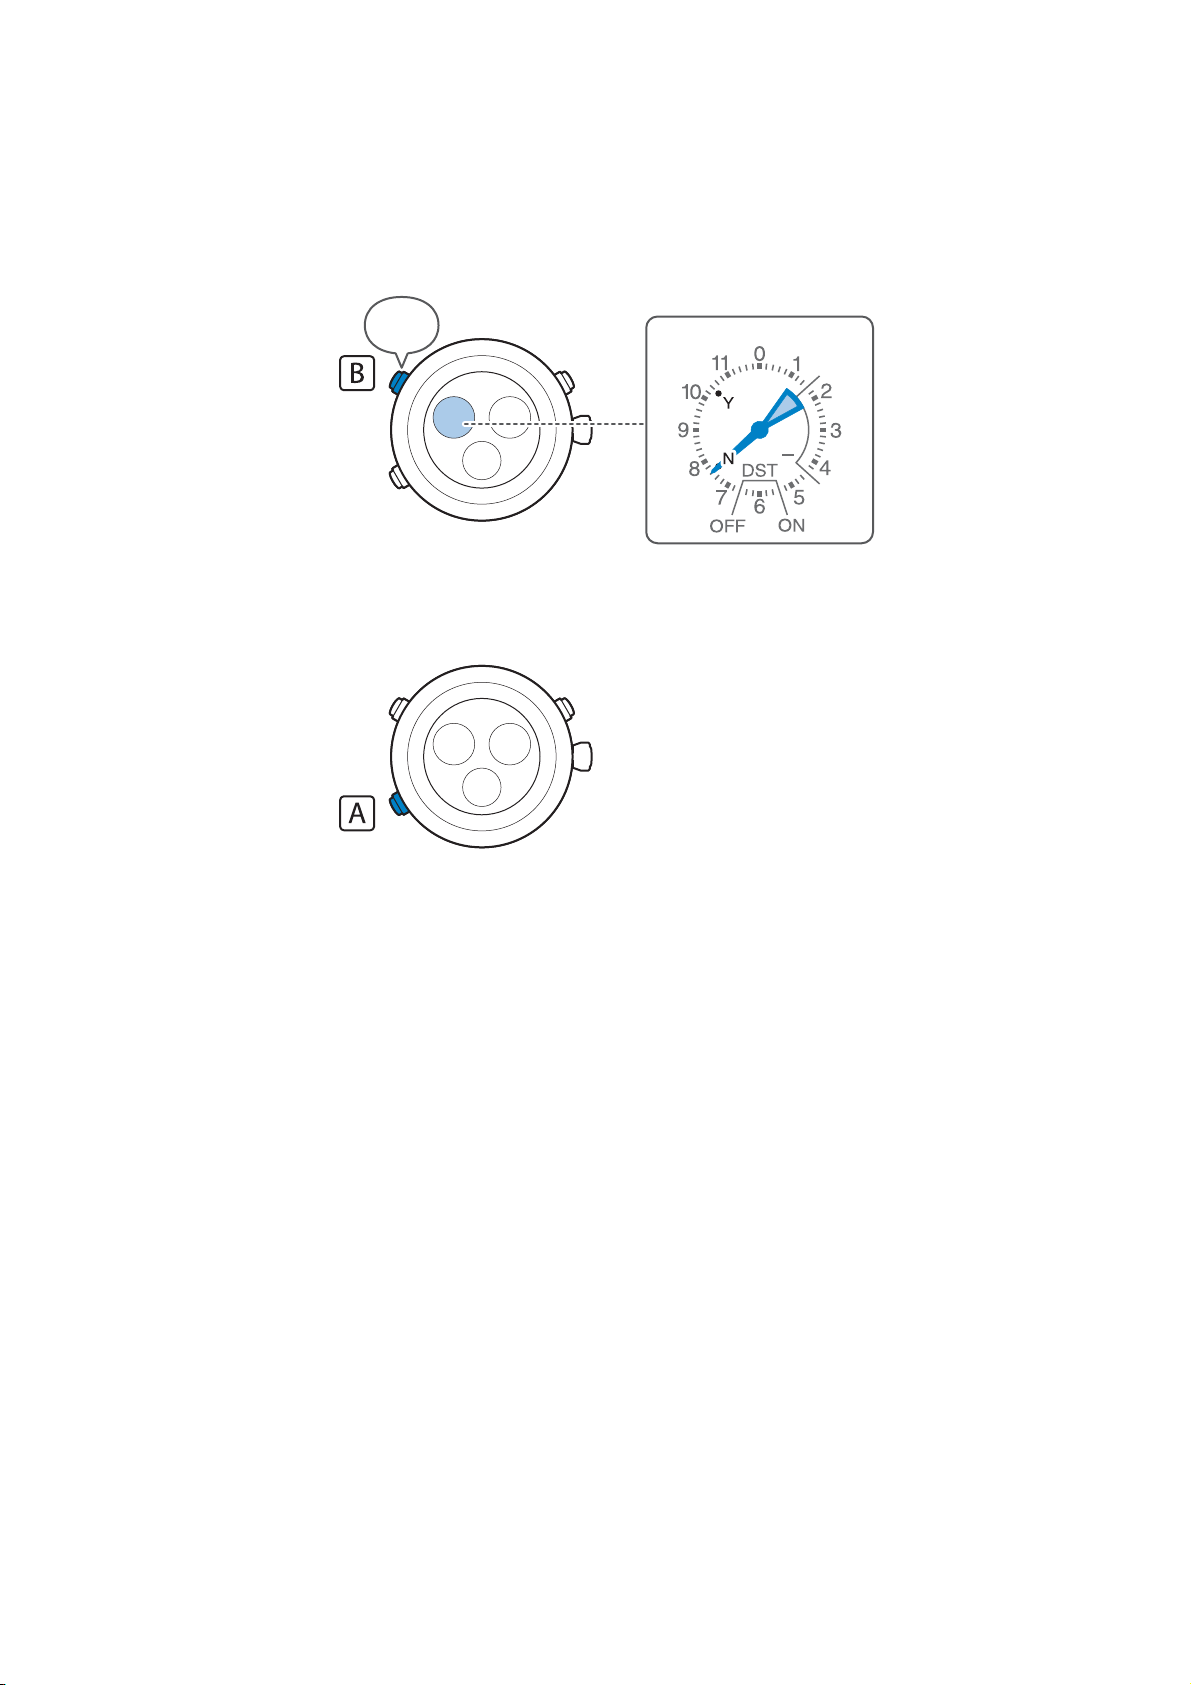
Operating the Screw Lock Crown
The screw lock crown is a crown that is secured to the watch by a screw. Follow the steps below to release/set the
lock.
Important:
c
Make sure you lock the crown when you have finished the procedure.
If you use the watch while the crown is unlocked, it may cause the waterproofing to fail or a malfunction to
occur.
Unlocking
Turn the crown to the left (until the crown pops up)
Locking
Push the crown in and turn to the right (tighten securely)
29
MB52 (TR-MB5) User’s Guide
Basic Operations
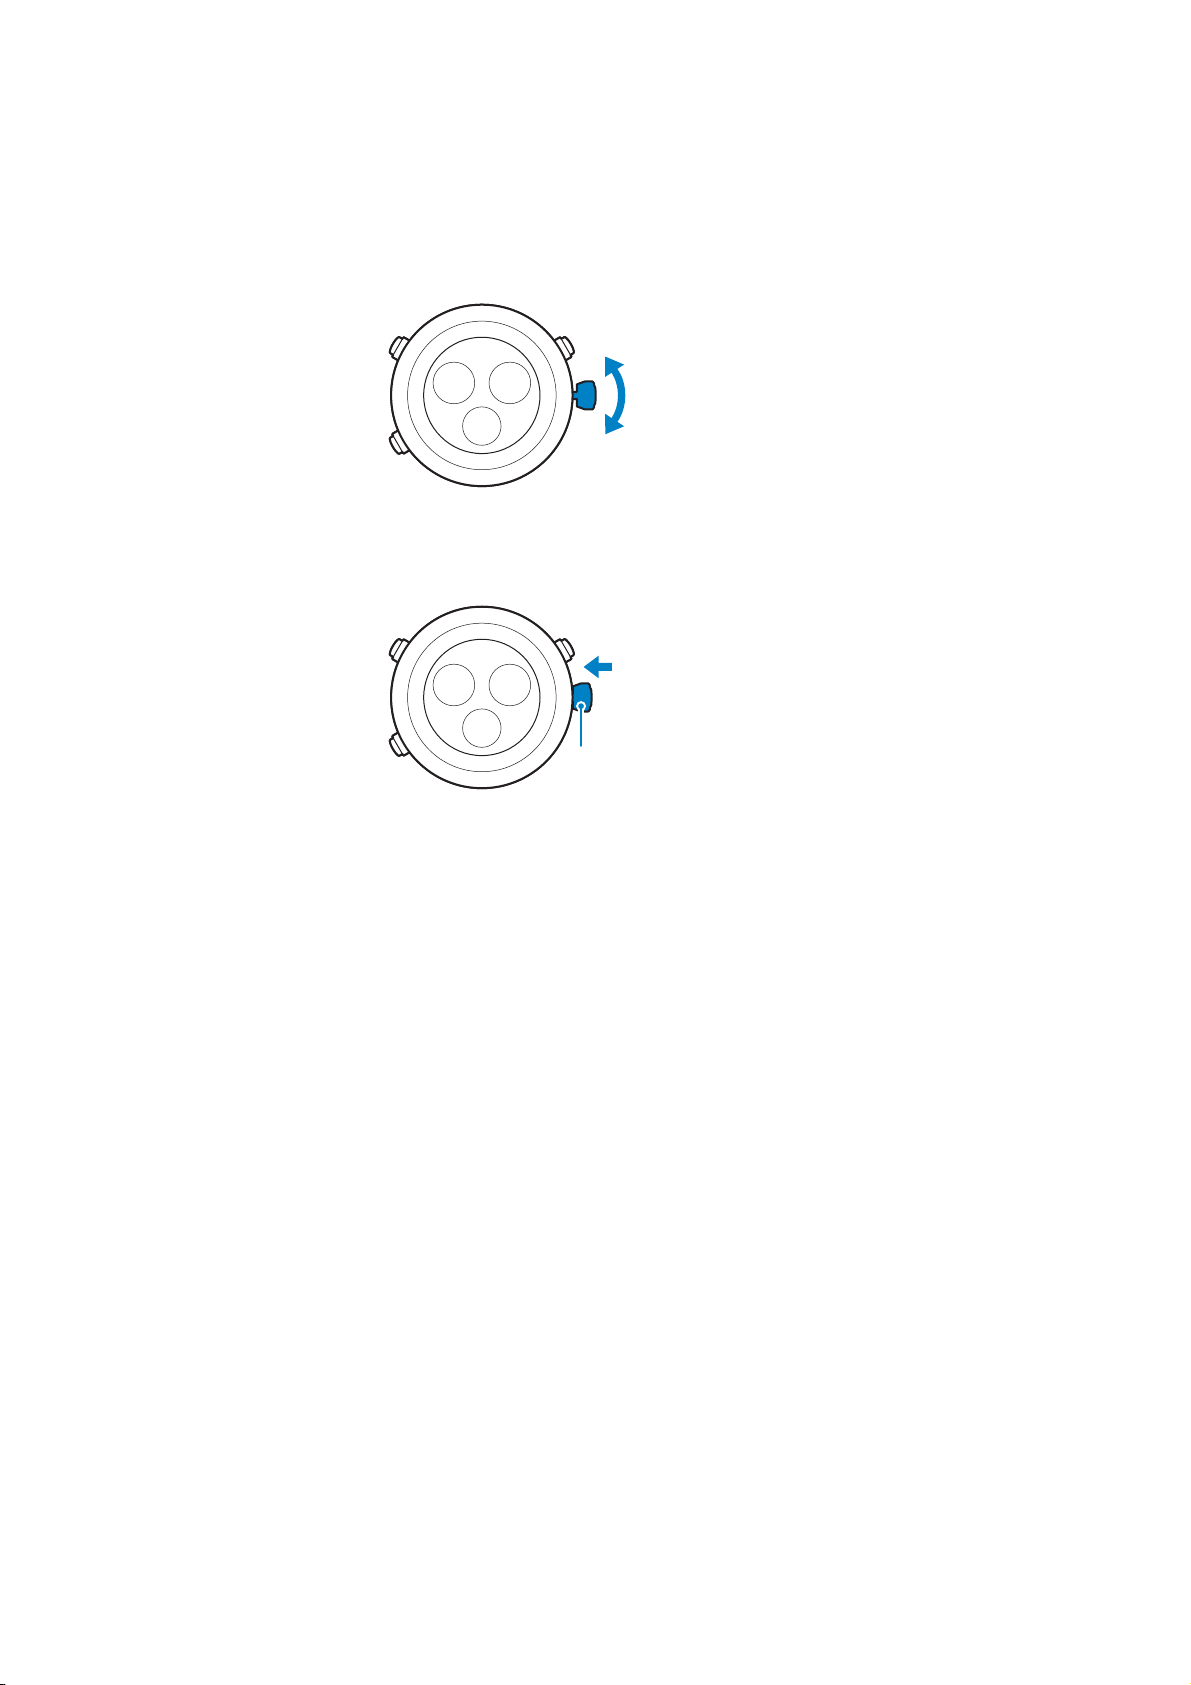
When the crown is unlocked, you can pull it out and turn it.
Pull out
Turn
Push in
You can extend the crown in two stages.
The operation differs depending on the position the crown is in.
012
Turn the crown quickly to wind the hands forward/backward quickly.
To stop winding the hands backward/forward quickly, turn the crown again in or
wind in the opposite direction.
To return the crown, push it back into the watch.
30

MB52 (TR-MB5) User’s Guide
Basic Operations
Attaching
Press the band’s push button to open the clasp and remove it.
31

MB52 (TR-MB5) User’s Guide
Basic Operations
Locations Suitable for Receiving Signals from GPS Satellites
When receiving signals from GPS satellites, move to a location where signals can be easily received and then perform
operations.
Locations that is easy to receive signals
The best location for receiving GPS signals is outside with no obstructions overhead, and no buildings or trees that
obstruct your vision.
Point the dial at the sky when receiving signals. Also, try to keep the watch as still as possible.
Location that is hard to receive signals
The following locations make it hard to receive GPS signals.
❏ Locations where you can only see a small amount of sky
❏ Near trees and buildings
❏ Inside buildings with windows (depending on the type of glass, signals may not be received.)
Locations that cannot receive signals
The following locations cannot receive GPS signals.
❏ Locations where you cannot see the sky or only a part can be seen
❏ Inside buildings without windows
❏ Near devices that emit noise (radio waves, magnetic waves and so on) such as wireless communication devices
Note:
Also, make sure you check the notes when receiving GPS signals.
U “Notes on Receiving GPS Satellite Signals” on page 41
32

MB52 (TR-MB5) User’s Guide
Basic Operations
Setting In-flight Mode
While on an airplane or in a hospital, this product may interfere with electronic equipment.
U “Notes on signals” on page 11
Follow the rules and regulations provided by airline companies, hospitals, and so on, and set this product to In-flight
mode.
Setting: Hold down the A button for approximately three seconds
Each time you hold down the A button for approximately three seconds, In-flight mode is set or released.
3 sec.
Enabling In-flight
mode settings
Releasing In-flight
mode
Important:
c
When In-flight mode is enabled, the following features are unavailable. Release In-flight mode when you
disembark from the airplane.
❏ Receiving signals from GPS satellites (Setting the time zone and adjusting the time)
❏ Measuring altitude and barometric pressure
❏ Calibrating altitude and barometric pressure
The indicator hand points to
The indicator hand points to the battery level.
.
33

MB52 (TR-MB5) User’s Guide
Basic Operations
Checking the Battery Level
You can check the battery level for the watch from the position of the indicator hand.
Important:
c
You cannot check the battery level in the following situations.
❏ The indicator hand points to
❏ The indicator hand points to M (operating)
Note:
❏ As it can take some time to recharge the battery after it runs out, we recommend exposing the dial to light as often as
possible.
U “Approximate charging time” on page 39
❏ When using the watch in a low temperature environment, the battery level may drop temporarily.
Battery level 4 (approx. 70 % to fully charged)
All features are available.
Battery level 3 (approx. 30 to 70%)
All features are available.
(In-flight mode)
Battery level 2 (approx. 5 to 30%)
All features are available, but you should charge the watch soon.
U “About Charging” on page 38
When using the watch in a low temperature environment, it may enter
"Power Save" status.
U “Power Save feature” on page 36
34

MB52 (TR-MB5) User’s Guide
Basic Operations
Battery level 1 (approx. 5% or less)
Measuring/receiving features are unavailable. You need to charge the watch.
U “About Charging” on page 38
You cannot operate the buttons if the small second hand is moving as
follows.
❏ 2 seconds hand movement (The small second hand moves every two
seconds)
❏ 5 seconds hand movement (The small second hand moves every five
seconds)
The hour/minute hands/calendar also stop.
Charge the battery sufficiently, and then adjust the time if necessary.
U “Adjusting the Time” on page 42
35

MB52 (TR-MB5) User’s Guide
Basic Operations
Power Save feature
When the watch is in a low power status for a continuous time, the watch enters "Power Save" status, and the small
second hand stops at the 45 second position.
Charge the battery sufficiently, and then adjust the time.
U “About Charging” on page 38
U “Adjusting the Time” on page 42
Note:
Hands other than the small second hand stop in the following positions.
❏ Hour/minute hands: Time when entering to "Power Save" status
❏ Calendar: 1
❏ Indicator hand: E
❏ Mode hand: TIME
36

MB52 (TR-MB5) User’s Guide
Basic Operations
About the Sleep Feature
The Sleep feature prevents battery power from being consumed unnecessarily.
If the watch is not exposed to light for 72 hours or more continuously, the watch enters "Sleep" status, and the small
second hand stops at the 15 seconds position. All displays except for the small second hand are stopped.
To restart the watch and display the current time, expose the watch to light at least five seconds or press any button.
37

MB52 (TR-MB5) User’s Guide
Basic Operations
About Charging
The optical charging feature (LIGHT CHARGE) is built-in to the dial of the watch.
By frequently exposing the watch to sunlight or fluorescent light, you can continue using the watch for a long time.
Charging the watch
You can charge the watch by exposing it to light.
Make sure you use and store the watch in locations where it is easily exposed to light.
Warning
Avoid charging the watch under high temperatures as shown below.
❏ On the dashboard of a car under blazing sun
❏ Near to heating elements such as incandescent lamps and so on
❏ Locations subject to direct sunlight for extended periods that would heat up the watch
Depending on the conditions and environment for the light source, the watch may overheat causing a fire,
failure, or malfunction to occur.
Note:
Charging may take some time if the watch is not frequently exposed to light or when it is too dim, such as when it is covered by
clothes.
Also, the watch cannot charge in locations where it is not exposed to any light, such as when it is in a draw.
38

MB52 (TR-MB5) User’s Guide
Basic Operations
Approximate charging time
The following shows the approximate charging time.
Approximate charging time
Illuminati
on
lx (lux)
100,000
10,000
3,000
700
Environmental
Standards
Sunlight (good
weather)
Sunlight (cloudy
weather)
Approximately 5 cm
from a 30 W
fluorescent light
Approximately 20 cm
from a 30 W
fluorescent light
General office
environment
(Fluorescent light)
When the clock stops
To use the watch for
one day
1 second hand
movement until each
feature becomes
available
When the clock stops
Fully charged
20 minutes 10 hours 150 hours
40 minutes 18 hours 270 hours
1.3 hours 35 hours 600 hours
4.5 hours - -
❏ The time needed to charge depends on the strength of the light and the remaining battery level in the watch.
❏ See the following for the remaining battery power of the watch.
U “Checking the Battery Level” on page 34
39

MB52 (TR-MB5) User’s Guide
Adjusting Time (Receiving GPS Satellite Signals) (TIME)
Adjusting Time (Receiving GPS Satellite
Signals) (TIME)
U “Notes on Receiving GPS Satellite Signals” on page 41
U “Adjusting the Time” on page 42
U “Setting the Time Zone and Time” on page 45
U “About the Automatic Time Reception Feature” on page 48
U “About Receiving Leap Second Information” on page 50
U “Checking Reception Results” on page 51
40

MB52 (TR-MB5) User’s Guide
Adjusting Time (Receiving GPS Satellite Signals) (TIME)
Notes on Receiving GPS Satellite Signals
Receiving GPS satellite signals consumes a lot of power. We recommend using this feature only when necessary.
❏ When the watch is in the following status, you cannot receive signals from the GPS satellites.
❏ When the battery level for the watch is running low
Check the battery level and charge the watch as necessary.
U “Checking the Battery Level” on page 34
U “About Charging” on page 38
❏ When the watch is set to In-flight mode (
Release In-flight mode.
U “Setting In-flight Mode” on page 33
❏ When measuring using the stopwatch feature
Stop measuring, and then reset.
U “Using the Stopwatch” on page 65
)
41

MB52 (TR-MB5) User’s Guide
Adjusting Time (Receiving GPS Satellite Signals) (TIME)
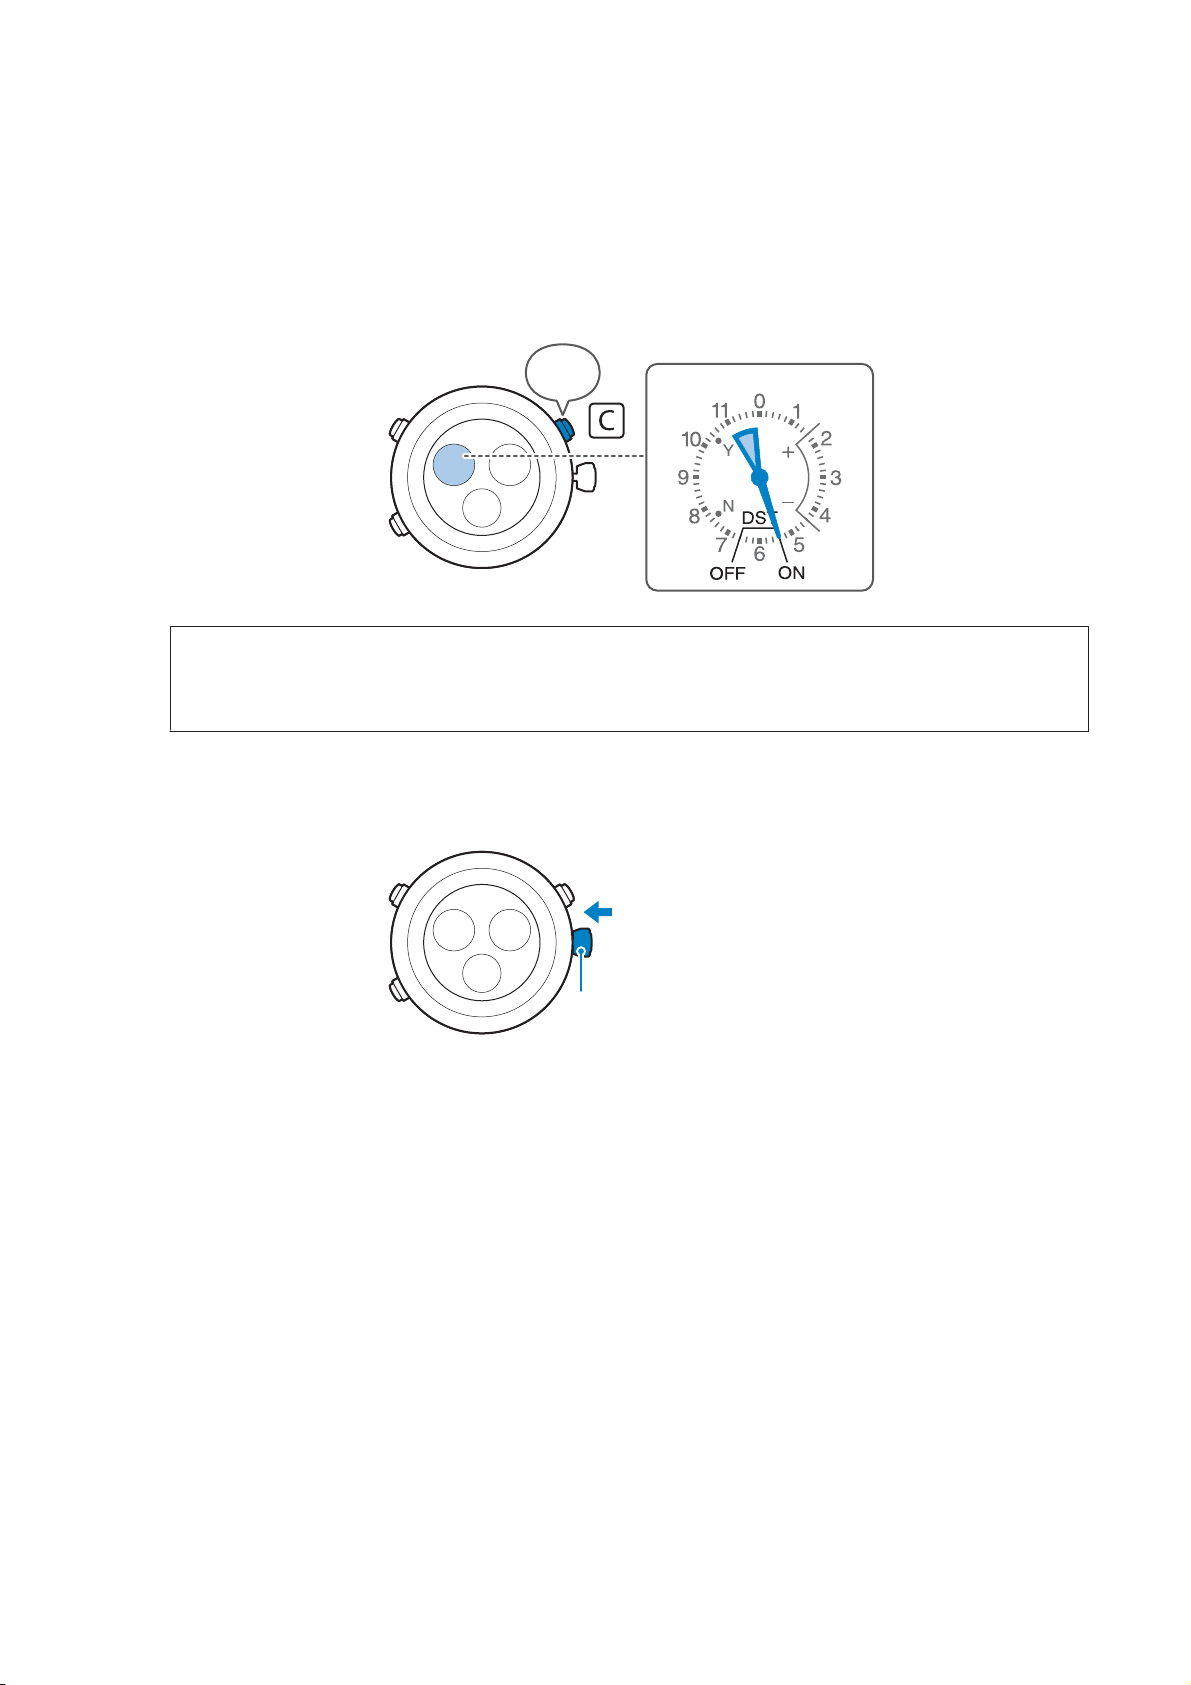
Adjusting the Time
By operating the buttons, you can receive time information from GPS satellite signals and adjust the current date and
time.
Note:
❏ You need to set the time zone if you want to adjust the time to your travel destination.
U “Setting the Time Zone and Time” on page 45
❏ You need to set Daylight Saving Time (DST) manually.
U “Setting Daylight Saving Time” on page 60
Move to a location suitable for receiving signals from GPS satellites
A
U “Locations Suitable for Receiving Signals from GPS Satellites” on page 32
Press and release the A button several times to enter TIME mode
B
42

MB52 (TR-MB5) User’s Guide
Adjusting Time (Receiving GPS Satellite Signals) (TIME)
Hold down the B button for approximately three seconds, and release when the small
C
second hand points to 0 seconds position
The indicator hand points to M.
3 sec.
Note:
When the B button is released before the small second hand points to 0 seconds position, the watch does not perform
time adjustment and displays the reception results (Y or N) of the previous GPS satellite signal for five seconds before
returning to the time display.
U “Checking Reception Results” on page 51
If this happens, hold down the B button for approximately three seconds again, and release when the small second
hand points to 0 seconds position.
43
MB52 (TR-MB5) User’s Guide
Adjusting Time (Receiving GPS Satellite Signals) (TIME)
With the dial facing straight up, wait until the reception result is displayed (the small
D
second hand points to Y or N)
Receiving a signal takes approximately six seconds to one minute.
When receiving signals
When receiving signals from a GPS satellite, the small second hand points to 1.
Note:
To stop receiving signals, press and release the B button.
When receiving signals is complete
When the small second hand points to Y or N, reception is complete. The reception results are displayed for five
seconds.
Reception successful
The date and time are automatically synced based on the time information acquired.
Reception failed
The date and time are still displayed incorrectly.
Move to a location more suitable for receiving signals, and then try again.
44

MB52 (TR-MB5) User’s Guide
Adjusting Time (Receiving GPS Satellite Signals) (TIME)
Setting the Time Zone and Time
By using the watch buttons, you can receive GPS satellite signals and acquire positional information for your current
location. You can specify the time zone based on the acquired positional information, and match it to the current date
and time.
Important:
c
❏ When using this feature near the edge of a time zone, the adjacent time zone may be set. When setting the
time zone, try to stay away from the edge of the time zone as much as possible. After making settings, make
sure the time zone has been set correctly by checking the time display.
❏ If the time zone you are traveling to has been changed since January 2017, this feature cannot set the time
zone correctly.
If it is not set correctly, adjust the time zone and time manually.
U “Setting the Time Zone” on page 56
U “Adjusting the Time” on page 62
Note:
You need to set Daylight Saving Time (DST) manually.
U “Setting Daylight Saving Time” on page 60
Move to a location suitable for receiving signals from GPS satellites
A
U “Locations Suitable for Receiving Signals from GPS Satellites” on page 32
Press and release the A button several times to enter TIME mode
B
45

MB52 (TR-MB5) User’s Guide
Adjusting Time (Receiving GPS Satellite Signals) (TIME)
Hold down the B button for approximately five seconds, and release when the small
C
second hand points to 30 seconds position
After holding down the B button for three seconds, the small second hand points to 0 seconds position, but you
need to continue to hold down the button.
The indicator hand points to M.
5 sec.
46

MB52 (TR-MB5) User’s Guide
Adjusting Time (Receiving GPS Satellite Signals) (TIME)
With the dial facing straight up, wait until the reception result is displayed (the small
D
second hand points to Y or N)
Receiving a signal takes approximately 20 seconds to two minutes.
When receiving signals
The small second hand indicates the number of GPS satellites acquired.
Note:
❏ You need to acquire at least four GPS satellites to acquire positional information.
However, reception may fail even if the watch indicates four or more satellites.
❏ To stop receiving signals, press and release the B button.
When receiving signals is complete
When the small second hand points to Y or N, reception is complete. The reception results are displayed for five
seconds.
Reception successful
The date and time are automatically synced based on the positional information acquired.
Reception failed
The date and time are still displayed incorrectly.
Move to a location more suitable for receiving signals, and then try again.
47

MB52 (TR-MB5) User’s Guide
Adjusting Time (Receiving GPS Satellite Signals) (TIME)
About the Automatic Time Reception Feature
Using the Automatic Time Reception feature, the watch automatically receives time information from the GPS
satellite signals, and as a general rule, adjusts the time every three days.
At the time of purchase, this feature is set to operate when the dial is exposed to strong light, such as sunlight.
U “Light Detection settings” on page 48
Note:
❏ Only the time is adjusted using the Automatic Time Reception feature. The time zone and Daylight Saving Time (DST)
settings are not adjusted.
❏ Automatic Time Reception feature may not be performed depending on the Light Detection settings, reception status,
and so on.
Light Detection settings
You can set the conditions under which the Automatic Time Reception feature operates.
Light Detection settings Conditions under which the Automatic Time Reception feature operates
Enabled (Y) Operates when the dial is exposed to strong light
Disabled (N) Operates when a specific time is reached (The time that was previously set
successfully using the following operation)
U “Adjusting the Time” on page 42
Note:
You can set Light Detection from any mode.
Hold down the A button and the B button at the same time for approximately three
A
seconds
The small second hand indicates the current Light Detection setting.
Y when Light Detection is enabled, and N when Light Detection is disabled.
3 sec.
3 sec.
48
MB52 (TR-MB5) User’s Guide
Adjusting Time (Receiving GPS Satellite Signals) (TIME)
When you want to change the settings, hold down the B button for approximately
B
three seconds
The small second hand changes to Y or N.
3 sec.
Press and release the A button
C
Returns to the time display.
49

MB52 (TR-MB5) User’s Guide
Adjusting Time (Receiving GPS Satellite Signals) (TIME)
About Receiving Leap Second Information
A leap second is a second that is inserted (or removed) to adjust the deviation between world time and international
atomic clock time.
When the watch receives GPS satellite signals after June 1st and December 1st, it also automatically receives leap
second information.
The leap second is received within up to 18 minutes after completing time adjustment using GPS satellite signals.
While receiving signals, the indicator hand points to M.
When the leap second information is received successfully, the leap second is automatically inserted (or removed)
when it is time to use the leap second.
Note:
Follow the steps below to check if you are receiving leap second information.
U “Checking the reception results for leap second information” on page 53
50

MB52 (TR-MB5) User’s Guide
Adjusting Time (Receiving GPS Satellite Signals) (TIME)
Checking Reception Results
You can view the reception results of the last GPS satellite signal and the results of leap second.
Checking the reception results for GPS satellite signals
Press and release the A button several times to enter TIME mode
A
Press and release the B button
B
The indicator hand points to M.
The small second hand indicates the reception results of GPS satellite signals.
51

MB52 (TR-MB5) User’s Guide
Adjusting Time (Receiving GPS Satellite Signals) (TIME)
Check the reception results for GPS satellite signals
C
The reception results (the small second hand points to Y or N) are displayed for five seconds, and then the
display returns to the time display.
Reception successful
Reception failed
❏ Move to a location more suitable for receiving GPS satellite signals.
❏ After approximately five days after successful signal reception, the reception result changes to N.
52

MB52 (TR-MB5) User’s Guide
Adjusting Time (Receiving GPS Satellite Signals) (TIME)
Checking the reception results for leap second information
Press and release the A button several times to enter TIME mode
A
Press and release the B button
B
The indicator hand points to M, and the small second hand indicates the reception results of GPS satellite
signals.
Press and release the B button again within five seconds of performing step 2
C
The center hand points to 45 seconds.
The small second hand indicates the reception results for the leap second.
53

MB52 (TR-MB5) User’s Guide
Adjusting Time (Receiving GPS Satellite Signals) (TIME)
Check the reception results for leap second information
D
The reception results (the small second hand points to Y or N) are displayed for five seconds, and then the
display returns to the time display.
Reception successful
Reception failed
If reception of the leap second information fails, the leap second information is automatically received
when the next GPS satellite signal is received.
54

MB52 (TR-MB5) User’s Guide
Adjusting Time (Manual) (TIME)
Adjusting Time (Manual) (TIME)
U “Setting the Time Zone” on page 56
U “Setting Daylight Saving Time” on page 60
U “Adjusting the Time” on page 62
55

MB52 (TR-MB5) User’s Guide
Adjusting Time (Manual) (TIME)
Setting the Time Zone
If you cannot receive signals from GPS satellites, or if the time zone you are traveling to has been changed since January
2017, set the time zone manually.
Note:
See the following for details on Daylight Saving Time (DST).
U “Setting Daylight Saving Time” on page 60
Press and release the A button several times to enter TIME mode
A
Unlock the crown and pull it out one step
B
The center hand indicates the city code for the representative city of the current time zone.
1
Note:
The small second hand indicates the Daylight Saving Time (DST) setting.
56
MB52 (TR-MB5) User’s Guide
Adjusting Time (Manual) (TIME)
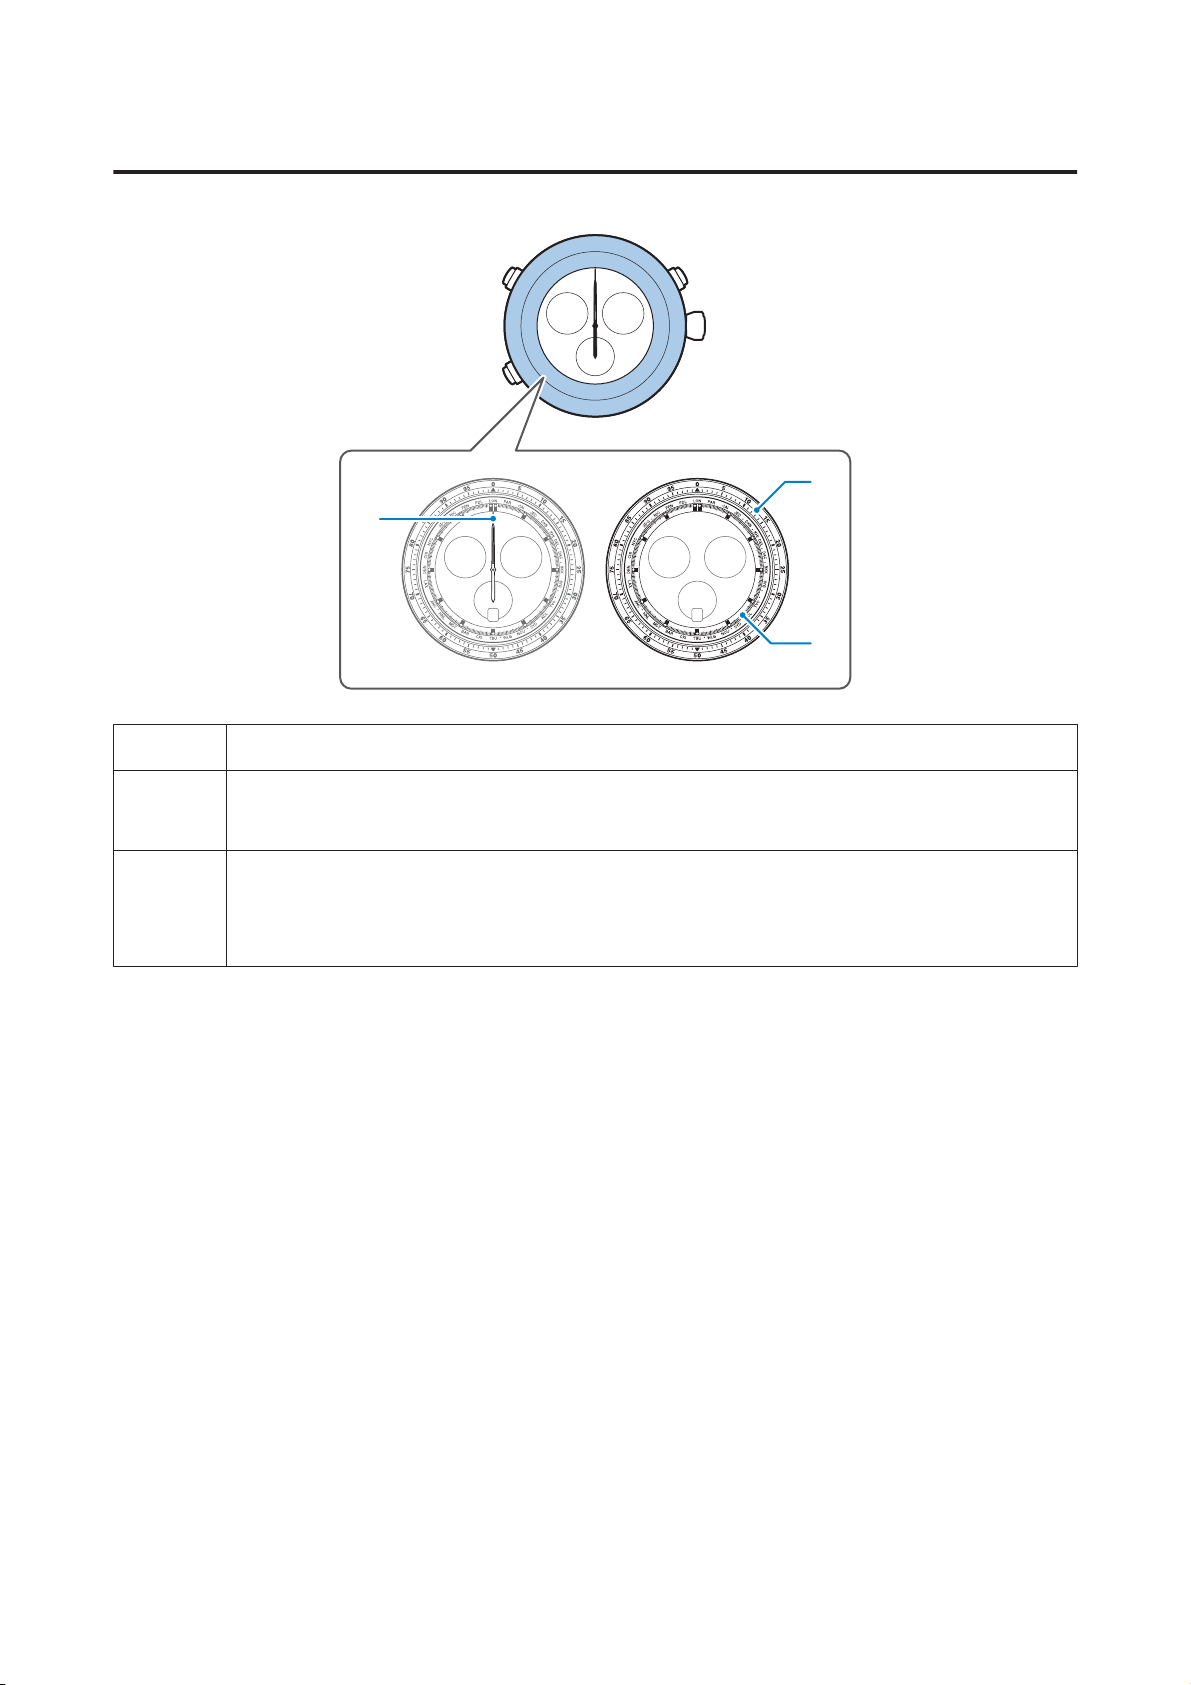
Turn the crown to select the time zone
C
See the following to select the time zone.
U “Time zone display and time difference list” on page 58
Push the crown back in to lock it
D
The small second hand returns to the current second display.
0
57

MB52 (TR-MB5) User’s Guide
Adjusting Time (Manual) (TIME)
Time zone display and time difference list
As of January 2017, the watch supports 39 time zones.
Standard city codes for each time zone are displayed on the dial ring. To use the watch in a city that is not displayed on
the dial ring, set a city code in the same time zone.
*The dial ring display may vary depending on the model.
The "" on the dial ring indicates that there is a time zone at that position.
City Code
(Dial ring display)
Representative City
(Time zone)
LON London 0 hours (UTC)
PAR Paris +1 hour
CAI Cairo +2 hours
JED Jeddah +3 hours
Tehran +3.5 hours
DXB Dubai +4 hours
Kabul +4.5 hours
KHI Karachi +5 hours
DEL Delhi +5.5 hours
Kathmandu +5.75 hours
DAC Dhaka +6 hours
Time Difference from UTC
Yangon +6.5 hours
BKK Bangkok +7 hours
BJS Beijing +8 hours
-+8.5 hours
Eucla +8.75 hours
TYO Tokyo +9 hours
58

MB52 (TR-MB5) User’s Guide
Adjusting Time (Manual) (TIME)
City Code
(Dial ring display)
Representative City
(Time zone)
ADL Adelaide +9.5 hours
SYD Sydney +10 hours
Lord Howe Island +10.5 hours
NOU Nouméa +11 hours
WLG Wellington +12 hours
Chatham Islands +12.75 hours
TBU Nuku'alofa +13 hours
CXI Kiritimati +14 hours
BAR Baker Island -12 hours
MDY Midway Atoll -11 hours
HNL Honolulu -10 hours
Marquesas Islands -9.5 hours
Time Difference from UTC
ANC Anchorage -9 hours
LAX Los Angeles -8 hours
DEN Denver -7 hours
CHI Chicago -6 hours
NYC New York -5 hours
SDQ Santo Domingo -4 hours
St. John’s -3.5 hours
RIO Rio de Janeiro -3 hours
FEN Fernando de Noronha -2 hours
PDL Archipelago of the Azores -1 hour
(As of January, 2017)
59

MB52 (TR-MB5) User’s Guide
Adjusting Time (Manual) (TIME)
Setting Daylight Saving Time
Daylight Saving Time (DST) is not set automatically. You need to set it manually.
Note:
When Daylight Saving Time (DST) finishes, or when moving from a region that uses DST to a region that does not, make
sure you set DST to OFF.
Press and release the A button several times to enter TIME mode
A
Unlock the crown and pull it out one step
B
The small second hand indicates the Daylight Saving Time (DST) setting (OFF or ON).
1
Note:
The center hand indicates the city code for the representative city of the current time zone.
60
MB52 (TR-MB5) User’s Guide
Adjusting Time (Manual) (TIME)
Hold down the C button for approximately three seconds
C
You can switch the Daylight Saving Time (DST) setting.
ON: Advances the time by one hour
OFF: Returns the time by one hour
3 sec.
Note:
In the time zone of the Australian territory's Lord Howe Island (+10.5 hours), the time advances (or returns) by 30
minutes.
Push the crown back in to lock it
D
The small second hand returns to the current second display.
0
61

MB52 (TR-MB5) User’s Guide
Adjusting Time (Manual) (TIME)
Adjusting the Time
If you are in a location where GPS signals cannot be received, adjust the time manually.
Note:
❏ You can adjust the time manually from any mode.
❏ You cannot adjust the calendar manually.
Unlock the crown and pull it out two steps
A
The mode hand points to 0 hours position.
2
Press and release the A button
B
The small second hand points to 0 seconds position.
Turn the crown to adjust the time
C
Turn the crown quickly to wind the hands forward/backward quickly.
To stop winding the hands backward/forward quickly, turn the crown again in or wind in the opposite
direction.
Note:
The date changes at midnight. Make sure you set the morning or afternoon correctly.
62
MB52 (TR-MB5) User’s Guide
Adjusting Time (Manual) (TIME)
Push the crown back in to lock it
D
The small second hand begins moving from 0 seconds.
Note:
If you press the crown back in according to the time signal and so on, you can adjust the time more accurately.
0
63

MB52 (TR-MB5) User’s Guide
Stopwatch (TIME)
Stopwatch (TIME)
U “Using the Stopwatch” on page 65
U “Example Using the Stopwatch” on page 69
64

MB52 (TR-MB5) User’s Guide
Stopwatch (TIME)
Using the Stopwatch
The stopwatch feature allows you to measure up to 99 minutes 59.8 seconds in increments of 0.1 (1/5) second.
Note:
If the measurable time is exceeded, measuring stops automatically and the measured value is reset.
Measuring elapsed time
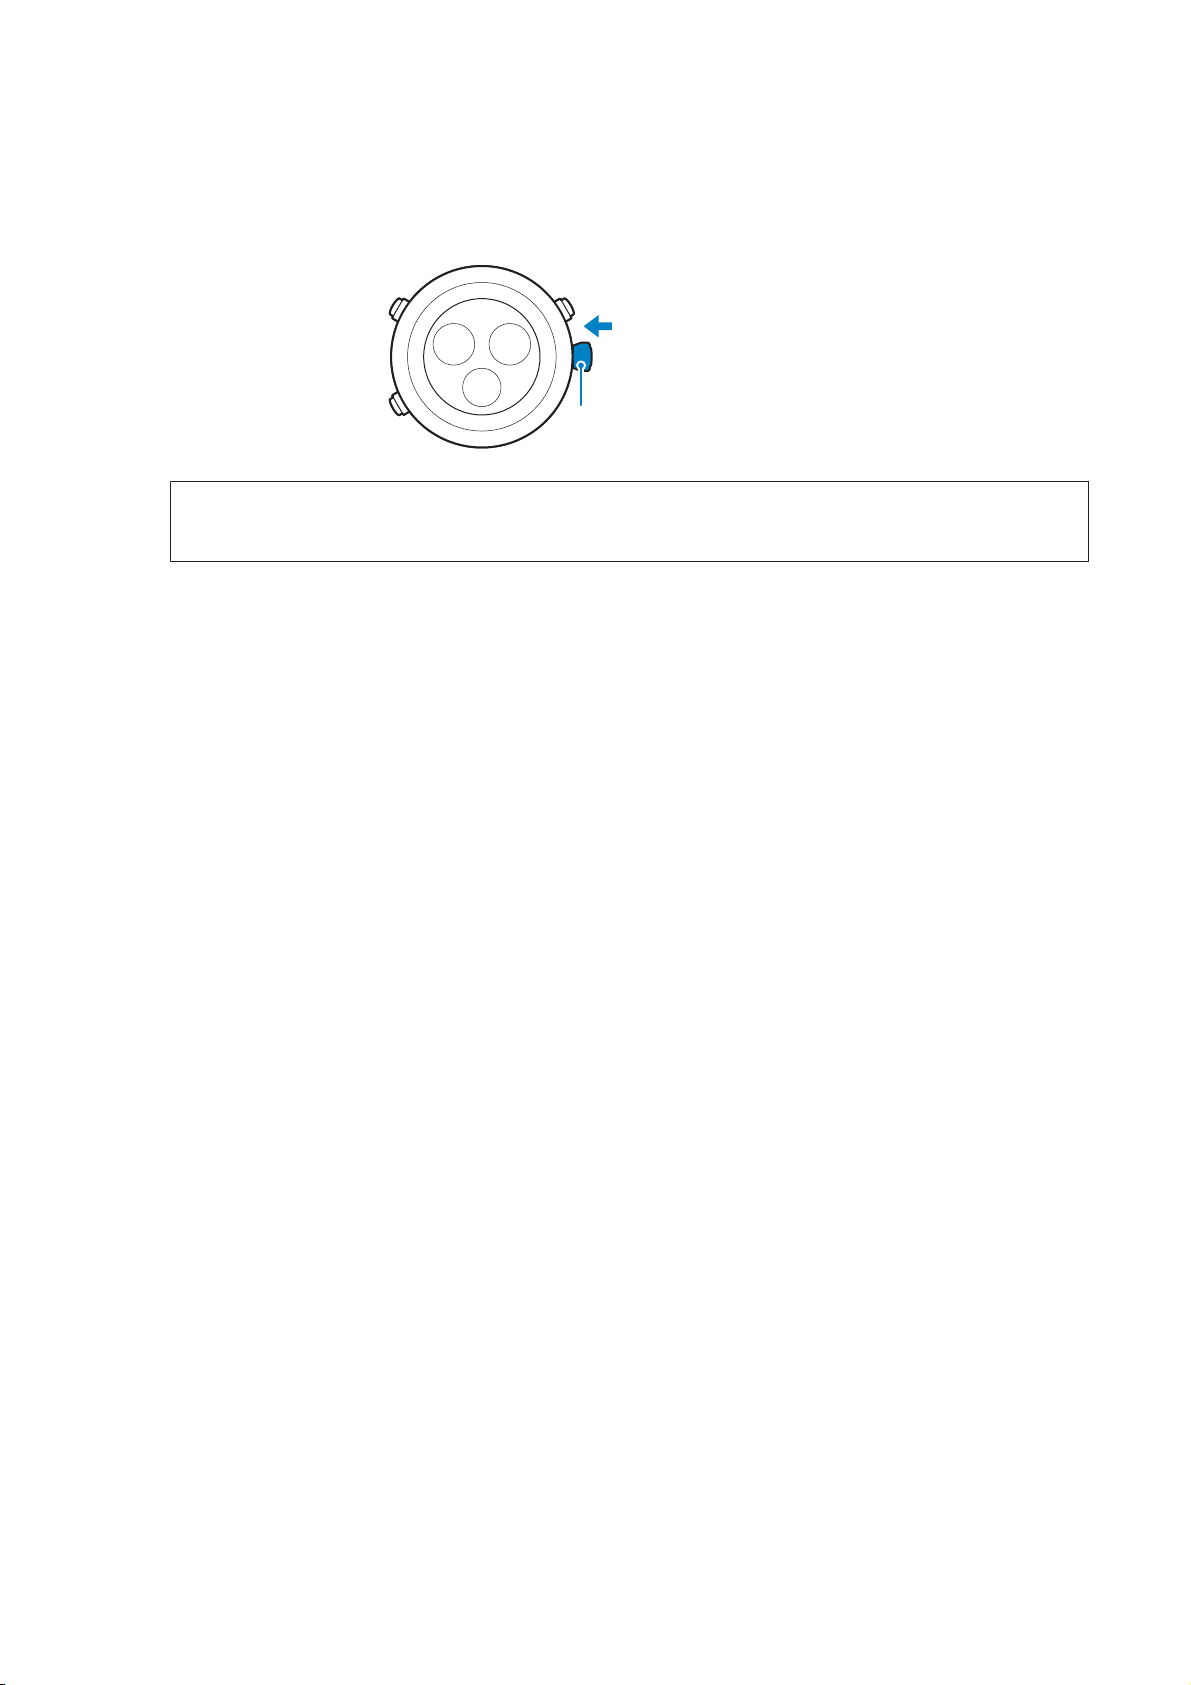
Press and release the A button several times to enter TIME mode
A
Press the C button to start measuring
B
While measuring the indicator hand points to M.
Press the C button to stop measuring
C
See the following for details on checking your measurement results.
U “Reading the progress” on page 68
Note:
Measuring restarts if you press the C button again after you stop measuring.
65

MB52 (TR-MB5) User’s Guide
Stopwatch (TIME)
Press the B button to reset measuring
D
The center hand and the measurement hand (short hand/long hand) return to 0, and then the indicator hand
points to the remaining battery level.
Measuring the halfway point (split)
You can measure the amount of time that has elapsed (Split) from the start of measuring.
Press and release the A button several times to enter TIME mode
A
Press the C button to start measuring
B
While measuring the indicator hand points to M.
66

MB52 (TR-MB5) User’s Guide
Press the B button to measure a split time
C
Measuring continues.
Press the B button to release the split time
D
The display returns to the time during measuring.
Stopwatch (TIME)
Press the C button to stop measuring
E
See the following for details on checking your measurement results.
U “Reading the progress” on page 68
Note:
Measuring restarts if you press the C button again after you stop measuring.
Press the B button to reset measuring
F
The center hand and the measurement hand (short hand/long hand) return to 0, and then the indicator hand
points to the remaining battery level.
67

28.4 sec
MB52 (TR-MB5) User’s Guide
Stopwatch (TIME)
Reading the progress
<Example> When split time is 26 minutes 28.4 seconds
1
2
1
2
Minutes: Tens/ones position (0 to 9)
The short hand indicates tens and the long hand indicates ones.
Since the short hand operates with the long hand, they may point between the scale marks on the
watch.
26 minutes is displayed in the following illustration.
Seconds (0.0 to 59.8)
The center hand indicates the number.
The center hand advances 0.2 (1/5) one mark on the scale every second, and one full rotation in 60
seconds.
28.4 seconds is displayed in the following illustration.
28.4 sec
28.4 sec.
When the hand moves for up to 10 minutes, the center hand stops at the 0 second position, but
when you stop split measurement or measuring, it points to the measurement time.
68

MB52 (TR-MB5) User’s Guide
Stopwatch (TIME)
Example Using the Stopwatch
Depending on the situation, you may need to use the split feature to measure.
Use the C button to start/stop measuring.
Use the B button to measure/release the split feature. Measuring does not stop while a split is being measured using the
B button.
69

MB52 (TR-MB5) User’s Guide
Stopwatch (TIME)
<When measuring a split/lap for three laps of a track>
Start
Start measuring.
Split
Measure split for the timing of the first lap around the track.
Record the split/lap for the first lap.
Release split
Split
Measure split for the timing of the second lap around the track.
Record the split for the second lap.
Also calculate the second lap (second split - first split).
Release split
Stop
Measuring stops after timing the third track.
Record the third lap time (split).
Also calculate the third lap (third time - second split).
Reset
70

MB52 (TR-MB5) User’s Guide
<When measuring the time for two people>
Start
Start measuring.
Split
Measures splits at the timing for the first person goal.
Stop
Measuring stops at the timing for the second person goal.
Stopwatch (TIME)
Check the split display on the watch and record the time for the first person.
Release split
Load and record the time for the second person and record it.
Reset
71

MB52 (TR-MB5) User’s Guide
Altitude Measurements (ALT)
Altitude Measurements (ALT)
U “Notes on Measuring Altitude” on page 73
U “Measuring Altitude” on page 75
U “Calibrating the Altitude” on page 78
72

1,013.25
hPa
955 hPa
901 hPa
0 m
500 m
1,000 m
Relative altitude
Atmospheric pressure
at the current location
Example
MB52 (TR-MB5) User’s Guide
Altitude Measurements (ALT)
Notes on Measuring Altitude
Mechanism for measuring altitude
The watch is a pressure altimeter that calculates altitude from the atmospheric pressure. By using the atmospheric
pressure at the current location, the relative altitude is calculated based on the relationship between the altitude and the
atmospheric pressure for International Standard Air (ISA) determined by the International Civil Aviation
Organization (ICAO).
Atmospheric pressure
Atmospheric pressure
at the current location
at the current location
901 hPa
901 hPa
955 hPa
955 hPa
Relative altitude
Relative altitude
1,000 m
1,000 m
500 m
500 m
1,013.25
1,013.25
hPa
hPa
0 m
0 m
Note:
The relative altitude is calculated from the atmospheric pressure, temperature, and the sea level pressure for the
international standard atmosphere at your current location.
❏ Atmospheric pressure at current location: Value measured with built-in pressure sensor
❏ Temperature at current location: 15 °C
❏ Sea level pressure: 1,013.25 hPa
If the atmospheric pressure changes due to weather conditions or the temperature at the measurement location, the
actual altitude and the relative altitude will not match. Therefore, the watch comes with a feature to calibrate the
deviation in the relative altitude.
The calibration value is added to the relative altitude and this altitude is displayed on the watch.
Calibration
value
Example
(25 m)
Displayed
altitude
(1,345 m)
Relative
altitude
(1,320 m)
About the altitude calibration feature
By setting the actual altitude at a location where you already know the altitude, the difference between the relative
altitude measured at that location and the actual altitude is stored in the watch as the correction value by the altitude
calibration feature.
73

When relative altitude is
lower than actual altitude
When relative altitude is
higher than actual altitude
MB52 (TR-MB5) User’s Guide
Altitude Measurements (ALT)
At the time of purchase, the calibration value is set to 0.
3
3
1
When relative altitude is
When relative altitude is
lower than actual altitude
lower than actual altitude
2
1
When relative altitude is
When relative altitude is
higher than actual altitude
higher than actual altitude
2
(1) Actual altitude
(2) "Relative altitude" measured by the watch (pressure sensor)
(3) Difference between (1) and (2) = "Calibration value"
Notes on altitude measurements
❏ This product is not intended for taking measurements that requires professional precision. Measurement
function readings are intended for general reference only.
❏ The altitude displayed by this product is calculated using atmospheric pressure data. When measuring in ALT
mode, altitude information acquired by receiving GPS satellite signals is not used.
❏ Weather conditions change over time. Whenever possible, calibrate the altitude before measuring.
Notes on the effects of temperature
Measurement results may differ due to the effects of changes in temperature.
74

MB52 (TR-MB5) User’s Guide
Altitude Measurements (ALT)
Measuring Altitude
You can calculate the altitude of your current location using the pressure sensor built into the watch.
Important:
c
If the atmospheric pressure changes due to weather conditions or the temperature at the measurement location,
the measurement results and the actual altitude may differ.
Move to a location where you know the altitude, and then calibrate the altitude.
U “Calibrating the Altitude” on page 78
If you do not correct the altitude, there may be a discrepancy of tens of meters or more.
Measuring
Press and release the A button several times to enter ALT mode
A
Note:
The watch automatically measures altitude approximately every 10 minutes (the indicator hand does not point to M
at this time).
When you switch to ALT mode, the altitude measured last time is displayed. If the altitude measured last time is
negative, the small second hand points to −. Go to step 2 to measure the altitude of your current location in real time.
Press the C button to start measuring
B
While measuring (for one minute) the indicator hand points to M.
Note:
While measuring with the C button, the measurement results are updated every second.
75

MB52 (TR-MB5) User’s Guide
Altitude Measurements (ALT)
Check the measurement results
C
See the following for details on checking your measurement results.
U “Reading the results” on page 76
Note:
❏ When measuring is complete, the indicator hand points to the battery level, and the small second hand indicates
the current seconds.
❏ To cancel measuring before it is complete, press the C button.
When measuring is complete, the measurement results are updated every 10 minutes.
Reading the results
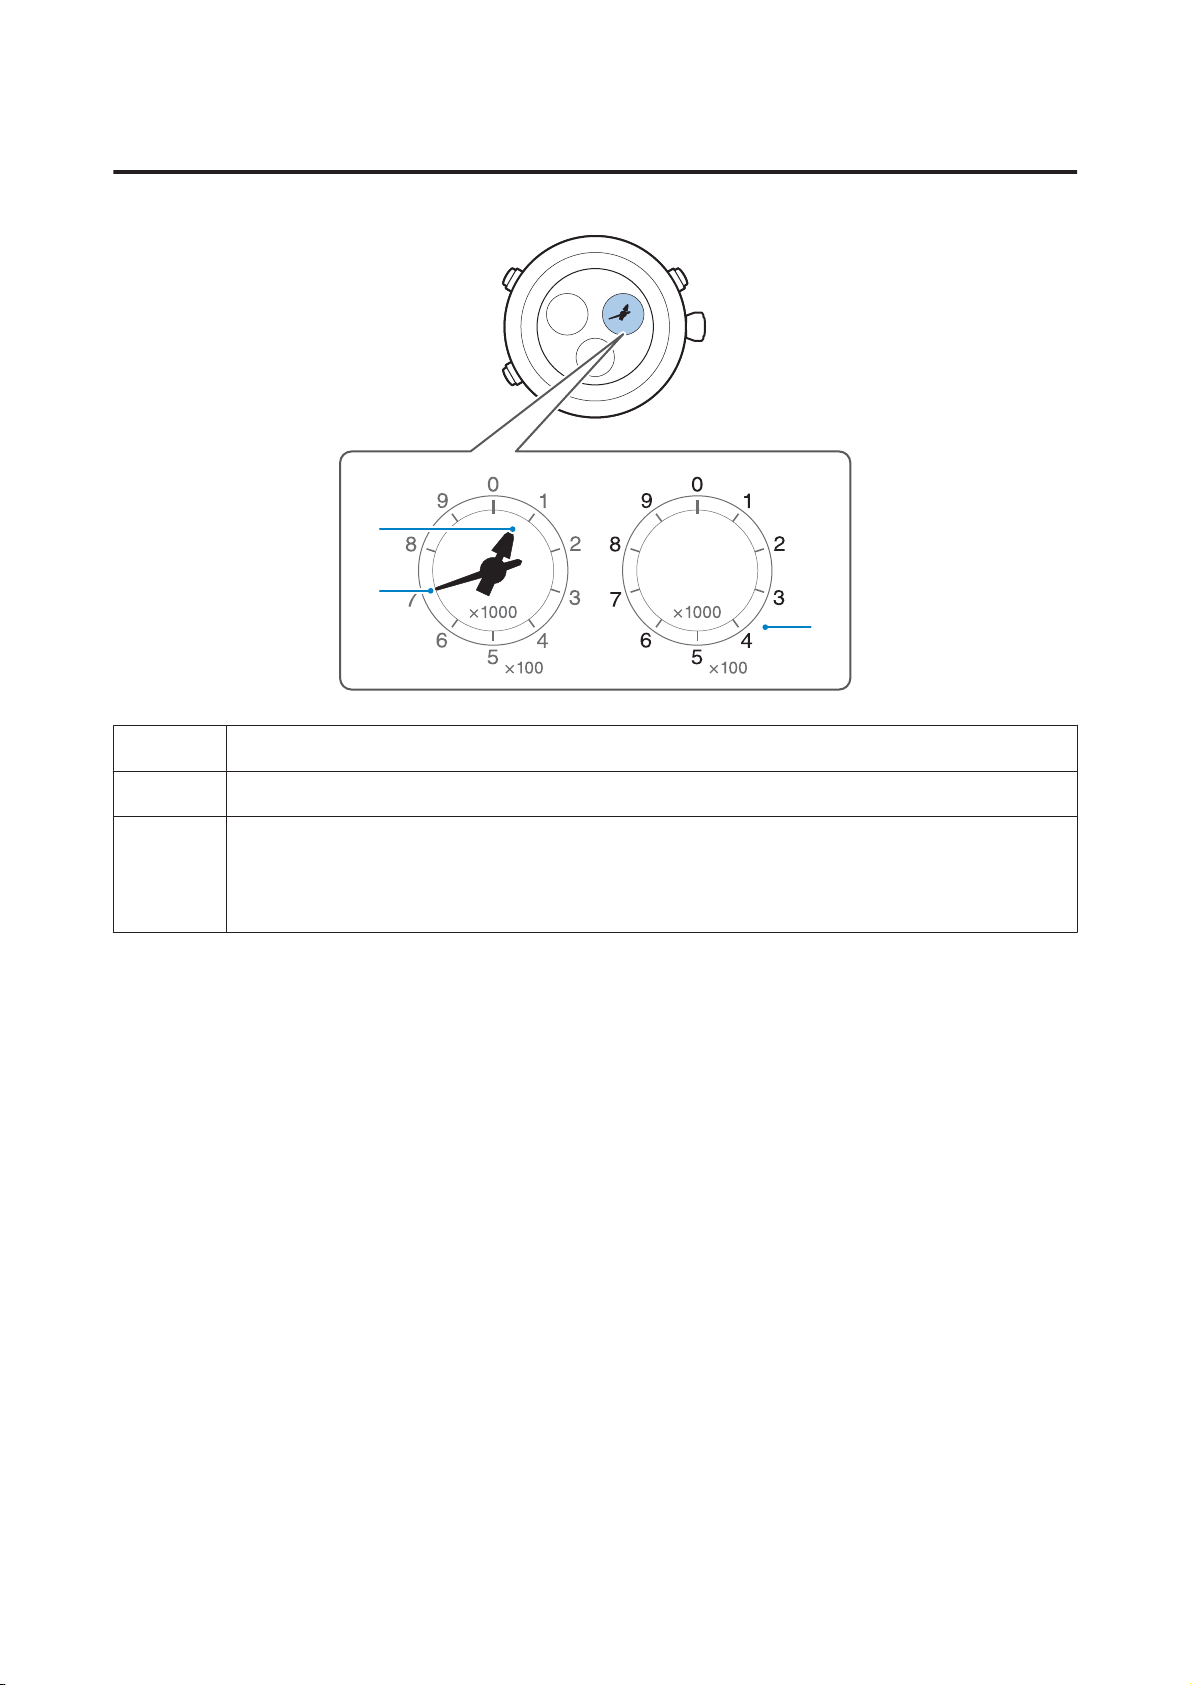
<Example> When the altitude is 2,660 m
1
2
3
1
+ -
Indicates whether the measured value is positive or negative.
The altitude may be displayed as a negative value depending on the altitude calibra tion status, or
the change in pressure status.
A positive value is displayed in the following illustration.
76

MB52 (TR-MB5) User’s Guide
Altitude Measurements (ALT)
2
Thousandths/hundredths position (0 to 9)
The short hand indicates thousands and the long hand indicates hundreds.
Since the short hand operates with the long hand, they may point between the scale marks on the
watch.
2,600 is displayed in the following illustration.
3
Tens/ones position (0 to 99)
The center hand indicates the number.
60 is displayed in the following illustration.
Note:
The display range is -1,000 m to 9,999 m (units: 1 m).
77

MB52 (TR-MB5) User’s Guide
Altitude Measurements (ALT)
Calibrating the Altitude
Move to a location where you know the altitude, and then calibrate the altitude.
Move to a location where you know the altitude
A
You can check the altitude using maps, signs, the Internet, and so on.
Press and release the A button several times to enter ALT mode
B
Note:
If the altitude measured last time is negative, the small second hand points to −.
Unlock the crown and pull it out one step
C
The altitude is measured and displayed.
See the following to read the altitude.
U “Reading the results” on page 76
Turn the crown to set the actual altitude
D
You can set the altitude in units of 1 m.
1
78
MB52 (TR-MB5) User’s Guide
Altitude Measurements (ALT)
Push the crown back in to lock it
E
The small second hand returns to the current second display.
Note:
See the following for the mechanism to calibrate the altitude.
U “About the altitude calibration feature” on page 73
0
79

MB52 (TR-MB5) User’s Guide
Barometric Pressure Measurements (BAR)
Barometric Pressure Measurements (BAR)
U “Notes and Mechanism on Measuring Barometric Pressure” on page 81
U “Measuring Barometric Pressure” on page 82
U “Calibrating the Barometric Pressure” on page 85
80

MB52 (TR-MB5) User’s Guide
Barometric Pressure Measurements (BAR)
Notes and Mechanism on Measuring Barometric Pressure
About barometer feature
The watch uses a built-in pressure sensor to measure the atmospheric pressure of the current location.
Note:
This differs from the atmospheric pressure (sea level pressure) displayed in weather charts.
Notes on pressure measurements
This product is not intended for taking measurements that requires professional precision. Measurement function
readings are intended for general reference only.
About barometric tendency
❏ The barometric tendency is displayed based on the measurement results of atmospheric pressure for the past three
hours. If you continue measuring atmospheric pressure at the same location, you can use it as a guide for
predicting the weather.
❏ The barometric tendency measured and the actual barometric tendency at the measurement location may differ
due to differences in altitude due to movement to different heights, or rapid changes in weather and temperature.
❏ In environments where the atmospheric pressure changes rapidly in a short period of time, such as during a
typhoon, the measured barometric tendency may differ from the actual barometric pressure change.
81

MB52 (TR-MB5) User’s Guide
Barometric Pressure Measurements (BAR)
Measuring Barometric Pressure
Measuring
Press and release the A button several times to enter BAR mode
A
Note:
The watch automatically measures pressure approximately every 10 minutes (the indicator hand does not point to M
at this time).
When you switch to BAR mode, the pressure measures last time is displayed. Go to step 2 to measure the pressure of
your current location in real time.
Press the C button to start measuring
B
While measuring (for one minute) the indicator hand points to M.
Note:
While measuring with the C button, the measurement results are updated every second.
Check the measurement results
C
See the following for details on checking your measurement results.
U “Reading the results” on page 83
82

MB52 (TR-MB5) User’s Guide
Barometric Pressure Measurements (BAR)
Note:
❏ When measuring is complete, the indicator hand points to the battery level, and the small second hand indicates
the current seconds.
❏ To cancel measuring before it is complete, press the C button.
When measuring is complete, the measurement results are updated every 10 minutes.
Reading the results
<Example> When the atmospheric pressure is 970 hPa
1
2
3
1
2
Thousandths (0 to 1)/hundredths (0 to 9) position
The short hand indicates thousands and the long hand indicates hundreds.
Since the short hand operates with the long hand, they may point between the scale marks on the
watch.
900 is displayed in the following illustration.
Tens/ones position (0 to 99)
The center hand indicates the number.
70 is displayed in the following illustration.
83

MB52 (TR-MB5) User’s Guide
Barometric Pressure Measurements (BAR)
3
Barometric tendency
+ value: Pressure tends to rise
- value: Pressure tends to drop
In the following illustration, the pressure is rising and indicates a positive (+) trend.
Note:
The display range for pressure is 300 hPa to 1,100 hPa (units: 1 hPa).
84

MB52 (TR-MB5) User’s Guide
Barometric Pressure Measurements (BAR)
Calibrating the Barometric Pressure
The pressure sensor built-in to the watch does not normally need to be calibrated.
However, if a deviation occurs for any reason, calibrate the measurement value for the barometric pressure.
Important:
c
Do not make calibration if you do not know the exact atmospheric pressure.
Press and release the A button several times to enter BAR mode
A
Unlock the crown and pull it out one step
B
The pressure for the current location is measured and displayed.
1
See the following to read the pressure.
U “Reading the results” on page 83
Note:
When calibrating the atmospheric pressure measurement value, the small second hand points to +.
Turn the crown to set the correct pressure
C
You can set the pressure in units of 1 hPa.
85

MB52 (TR-MB5) User’s Guide
Barometric Pressure Measurements (BAR)
Push the crown back in to lock it
D
The small second hand returns to the current second display.
0
86

MB52 (TR-MB5) User’s Guide
Maintenance
Maintenance
U “Maintenance” on page 88
U “About Adjusting the Metal Band” on page 89
U “About Power Source for the Watch” on page 90
87

MB52 (TR-MB5) User’s Guide
Maintenance
Maintenance
Make sure you maintain the product regularly to keep it in optimum operating condition.
Maintaining the watch
❏ Make sure you frequently wipe off any moisture, sweat, or dirt that sticks to the watch using a soft cloth.
❏ At points where dirt can easily stick to the watch such as the gap between th e bezel and the glass surface, remove the
dirt using the tips of a soft toothbrush, and wash it thoroughly in a small bowl and so on filled with clean water.
Next, wipe off any moisture with a soft, dry cloth and allow it to dry thoroughly.
❏ If any seawater sticks to the watch, wash it thoroughly in a small bowl etc. filled with clean water. Next, wipe off any
moisture with a soft, dry cloth and allow it to dry thoroughly.
Important:
c
When washing the watch, do not pull out the crown or operate the buttons. Also, do not hold the device directly
under high pressure water from a faucet. Either way, water may enter the watch causing the waterproof feature to
fail or a malfunction to occur.
❏ Periodically turn the crown or press the buttons. If they are not used for an extended period, rusting may occur.
Maintaining the band
The band differs depending on the watch model. Read the section applicable to your model.
Maintaining the metal band
❏ Make sure you frequently wipe off any moisture, sweat, or dirt that sticks to the band using a soft cloth.
❏ Remove the dirt from gaps in the band using the tips of a soft toothbrush, and wash it thoroughly in a small bowl
etc. filled with clean water. Next, wipe off any moisture with a soft, dry cloth and allow it to dry thoroughly.
Important:
c
If the band is not cleaned frequently eno ug h, i t m ay ru st a nd th e pi ns m ay po k e o ut o r f al l o ut . If th e pi ns c om e o u t
of the band, the watch may fall off the band, or the clasp on the band may not fasten correctly. If the pins come out,
stop using it immediately, and contact TRUME customer support.
U “Contact Information” on page 112
Maintaining the leather band
❏ If any moisture or sweat sticks to the band, wipe it off quickly using a soft, absorbent cloth. This could cause the
leather to deteriorate or discoloration to occur.
❏ When you are not using the watch, store it in a location that is not exposed to direct sunlight.
Important:
c
The leather band is vulnerable to water, sweat, and direct sunlight. Although the watch is water resistant to 10
ATM, do not use the watch for any work and so on that involves water.
88

MB52 (TR-MB5) User’s Guide
Maintenance
About Adjusting the Metal Band
Contact your local dealer or TRUME customer support to adjust the metal band.
U “Contact Information” on page 112
Note:
Except for at the store of purchase there may be a fee charged, or we may not be able to perform adjustments.
89

MB52 (TR-MB5) User’s Guide
Maintenance
About Power Source for the Watch
The watch uses a dedicated lithium ion rechargeable battery.
Since a secondary battery (a battery that can be repeatedly charged and discharged) is charged using light received by
the dial, and do not need to be replaced periodically like a primary battery.
However, the capacity and charging efficiency of the secondary battery may decline depending on the long-term use
and operating environment. If the performance declines, contact your local dealer or TRUME customer support.
Also, if the battery is not charged for an extended period of time, it may discharge completely and you may not be able
to charge. If you cannot charge the watch even after exposing it to light, contact your local dealer or TRUME customer
support.
U “Contact Information” on page 112
Important notes
Warning
Do not remove the secondary battery from the watch.
This could cause an electric shock, fire, or accident to occur.
Replacing the secondary battery takes expertise and skill, so be sure to contact your local dealer or TRUME
customer support.
U “Contact Information” on page 112
Do not place the watch near light sources that generate heat while charging (such as lights for
photography or incandescent lights).
The watch may overheat causing a fire, failure, or malfunction to occur.
When charging using sunlight, do not place it on the dashboard of your car and so on.
The watch may overheat causing a fire, failure, or malfunction to occur.
Overcharging prevention feature
Since the watch comes with a built-in overcharging prevention feature, the battery cannot be charged beyond fully
charged status.
U “Checking the Battery Level” on page 34
90

MB52 (TR-MB5) User’s Guide
Troubleshooting
Troubleshooting
U “Troubleshooting” on page 92
U “Correcting Misalignment of the Hands or the Date” on page 101
U “If the Problem Continues (System Reset)” on page 107
U “Information on Service and Support” on page 111
U “Contact Information” on page 112
91

MB52 (TR-MB5) User’s Guide
Troubleshooting
Troubleshooting
If you have any problems, check the related page.
Problems related to watch operations
U “Operating buttons and the crown” on page 93
U “Hand movement/position” on page 93
Problems related to charging
U “Charging” on page 95
Problems related to receiving GPS satellite signals (time adjustment and so on)
U “GPS satellite signal reception” on page 95
U “Adjusting time” on page 96
Problems related to the measuring feature
U “Stopwatch” on page 97
U “Altitude measurements” on page 98
U “Barometric pressure measurements” on page 99
Other problems
U “Other problems” on page 100
Note:
If problems continue, contact your local dealer or TRUME customer support.
U “Contact Information” on page 112
92

MB52 (TR-MB5) User’s Guide
Troubleshooting
Operating buttons and the crown
Trouble Causes and Solutions
There is no response even
after operating the buttons or
the crown
You cannot perform operations while the hand/calendar is moving
forward quickly.
Wait until the hand/calendar starts moving normally.
If the indicator hand is pointing to
Release In-flight mode on the watch.
U “Setting In-flight Mode” on page 33
If the small second hand moves every two or five seconds, there is not
enough battery power remaining to perform operations.
Charge the watch until the remaining battery level is 2 or higher.
U “Charging the watch” on page 38
The stopwatch may be operating.
Reset the measuring feature.
U “Using the Stopwatch” on page 65
If you cannot clear the problem after trying the items above, perform a
system reset for the watch.
U “If the Problem Continues (System Reset)” on page 107
If you still cannot clear the problem after performing a system reset, contact
TRUME customer support.
, the watch is set to In-flight mode.
U “Contact Information” on page 112
Cannot turn the crown
The crown is locked.
Unlock the crown.
U “Operating the Screw Lock Crown” on page 29
Hand movement/position
Trouble Causes and Solutions
The small second hand moves
every two seconds
The small second hand moves
every five seconds
The battery is running low.
Charge the watch until the remaining battery level is 2 or higher.
U “Charging the watch” on page 38
93

MB52 (TR-MB5) User’s Guide
Trouble Causes and Solutions
Troubleshooting
The small second hand has
stopped moving
The hand moves forward
quickly when no operations
are being performed
When the small second hand is pointing to 15 seconds, the watch is in
"Sleep" status.
Expose the watch to light at least five seconds, or press any button.
U “About the Sleep Feature” on page 37
When the small second hand is pointing to 45 seconds, the watch is in
"Power Save" status.
Charge the watch until the remaining battery level is 2 or higher.
When the hand starts to move, adjust the time if necessary.
U “Power Save feature” on page 36
U “Charging the watch” on page 38
When the small second hand is pointing to -, it indicates that the
previous altitude measurement result is a negative value.
To check the current seconds, switch the watch mode to TIME.
Press the C button to start measuring.
The watch is returning from "Sleep" status to normal status.
Wait until the hand starts moving normally.
U “About the Sleep Feature” on page 37
The indicator hand points to
M when no operations are
being performed
A deviation has occurred in
the hand position or the date
The watch is returning from "Power Save" status to normal status.
Wait until the hand starts moving normally.
When the hand starts moving normally, adjust the time if necessary.
U “Power Save feature” on page 36
U “Adjusting the Time” on page 42
Time adjustment has been performed.
Wait until the hand starts moving normally.
Hand deviations are calibrated automatically.
Wait until the hand starts moving normally.
The Automatic Time Reception feature or the leap second information
feature may be operating.
Wait until the indicator hand points to the remaining battery level.
The stopwatch may be operating.
Reset the measuring feature.
U “Using the Stopwatch” on page 65
The watch may have been affected by magnetism or a shock.
Calibrate the deviation in the hand position.
U “Correcting Misalignment of the Hands or the Date” on page 101
94

MB52 (TR-MB5) User’s Guide
Charging
Trouble Causes and Solutions
Troubleshooting
The battery level does not
reach level 4 even after
charging
If the battery runs out, it takes several days to fully charge.
Charge using the following times as a guide.
U “Approximate charging time” on page 39
If the battery has not been charged for a long time, it may have
deteriorated or discharged completely.
Contact your local dealer or TRUME customer support.
U “Contact Information” on page 112
GPS satellite signal reception
Trouble Causes and Solutions
Cannot receive signals from
GPS satellites
If the indicator hand is pointing to
Release In-flight mode on the watch.
U “Setting In-flight Mode” on page 33
It may be difficult to receive GPS signals in your current environment.
Move to an environment suitable for receiving GPS satellite signals, and then
try again.
, the watch is set to In-flight mode.
U “Locations Suitable for Receiving Signals from GPS Satellites” on
page 32
When the indicator hand is pointing to E, there is not enough battery
remaining to receive GPS satellite signals.
Charge the watch until the remaining battery level is 2 or higher.
U “Charging the watch” on page 38
Cannot reset the stopwatch.
Reset the stopwatch.
U “Using the Stopwatch” on page 65
95

MB52 (TR-MB5) User’s Guide
Adjusting time
Trouble Causes and Solutions
Troubleshooting
The watch successfully
received GPS satellite signals,
but the time is out of sync
The watch may have been set to a different time zone to the current time
zone.
You need to set the time zone manually.
U “Setting the Time Zone” on page 56
The Daylight Saving Time (DST) being used at your current location may
differ from the DST setting on the watch.
Check the Daylight Saving Time (DST) being used at your current location,
and then reset the DST on your watch.
U “Setting Daylight Saving Time” on page 60
Daylight Saving Time (DST) is not set automatically.
You need to set it manually.
U “Setting Daylight Saving Time” on page 60
The hand position may be deviated.
Calibrate the deviation in the hand position.
U “Correcting Misalignment of the Hands or the Date” on page 101
The time zone you are traveling to may have been changed since
January 2017.
I am not sure if my watch is
receiving leap second
information
You need to set the changed time zone manually.
U “Setting the Time Zone” on page 56
Check if you are receiving leap second information.
U “Checking the reception results for leap second information” on
page 53
<When receiving leap second information>
Th e lea p secon d is a utoma ticall y ins erted (or r emove d) whe n it is time t o use
the leap second.
<When not receiving leap second information>
Leap second information is received automatically. This is performed within
18 minutes after successfully receiving a GPS satellite signal for one of the
following features.
U “Adjusting the Time” on page 42
U “About the Automatic Time Reception Feature” on page 48
If the watch fails to receive leap second information, it will try again the
following day or the next time a GPS satellite signal is received successfully.
The watch continues to attempt to receive leap second information until it
succeeds.
96

MB52 (TR-MB5) User’s Guide
Stopwatch
Trouble Causes and Solutions
Troubleshooting
Cannot start measuring
The center hand stops while
measuring
The center hand/
measurement hand (short
hand/long hand) has
returned to 0 seconds
position
Time adjustment (receiving GPS satellite signals) is being performed.
Wait until adjusting the time is complete, or press and release the B button to
stop receiving the signal.
If you do not operate any of the buttons within 10 minutes, the center
hand stops at 0 seconds position.
Measuring continues.
By pressing Split (B button) or stop measuring (C button) you can check the
measurement time at the time of operation.
U “Using the Stopwatch” on page 65
The time that can be measured has been exceeded.
U “Using the Stopwatch” on page 65
97

MB52 (TR-MB5) User’s Guide
Altitude measurements
Trouble Causes and Solutions
Troubleshooting
Cannot measure
There is a discrepancy
between the measurement
results and actual altitude
Measurements performed at
the same location do not
match
If the indicator hand is pointing to E, there is not enough battery power
remaining to perform measurements.
Charge the watch until the remaining battery level is 2 or higher.
U “Charging the watch” on page 38
If the indicator hand is pointing to
Release In-flight mode on the watch.
U “Setting In-flight Mode” on page 33
If the small second hand points to N after pressing the C button, an error
may have occurred in the pressure sensor.
If this continues to occur, contact your local dealer or TRUME customer
support.
U “Contact Information” on page 112
If the atmospheric pressure changes due to weather conditions or the
temperature at the measurement location, the measurement results
may differ.
Correct the altitude.
U “Notes on Measuring Altitude” on page 73
U “Calibrating the Altitude” on page 78
, the watch is set to In-flight mode.
98

MB52 (TR-MB5) User’s Guide
Troubleshooting
Barometric pressure measurements
Trouble Causes and Solutions
Cannot measure
The measurement results of
barometric tendency do not
seem correct
If the indicator hand is pointing to E, there is not enough battery power
remaining to perform measurements.
Charge the watch until the remaining battery level is 2 or higher.
U “Charging the watch” on page 38
If the indicator hand is pointing to
Release In-flight mode on the watch.
U “Setting In-flight Mode” on page 33
If the small second hand points to N after pressing the C button, an error
may have occurred in the pressure sensor.
If this continues to occur, contact your local dealer or TRUME customer
support.
U “Contact Information” on page 112
Barometric tendency is calculated based on the measurement results of
atmospheric pressure over the last three hours (automatically
measured approximately every 10 minutes). Depending on the
automatic measurement timing, barometric tendency may not be
calculated correctly.
U “Notes and Mechanism on Measuring Barometric Pressure” on
page 81
, the watch is set to In-flight mode.
The small second hand does
not stop
When an altitude difference occurs due to movements to different
heights, barometric tendency may not be calculated correctly.
U “Notes and Mechanism on Measuring Barometric Pressure” on
page 81
If the barometric tendency rises or falls, the small second hand vibrates
back and forth.
99

MB52 (TR-MB5) User’s Guide
Other problems
Trouble Causes and Solutions
Troubleshooting
The inside of the watch is
misty
The band is broken Stop using the watch, and contact your local dealer or TRUME customer
The watch malfunctions
Watch operations are
unstable
Moisture may have entered the watch.
Stop using the watch, and contact your local dealer or TRUME customer
support.
U “Contact Information” on page 112
support.
U “Contact Information” on page 112
Perform a system reset for the watch.
U “If the Problem Continues (System Reset)” on page 107
If you still cannot clear the problem after performing a system reset, contact
TRUME customer support.
U “Contact Information” on page 112
100
 Loading...