

This thermometer has a memory for
10 readings. After each reading, the
temperature is automatically
recorded in the first empty memory.
If all the memory space is used, the
first memory is automatically
deleted and replaced by the new
reading and so on.
To read the memorised
temperatures: The product must be
switched off.
• Press the button until
MEMORY appears on the screen.
The information appears on the
screen alternately.
example :
• To read all of the 10 temperature
readings in the memory, press
briefly and successively on :
the different temperatures are
displayed one after another as
the ear or forehead mode in
which they have been taken.
• To exit the memory mode, press
the button or wait for the
thermometer to switch off
automatically.
To delete the memorised
temperatures:
• Enter in memory mode .
• Press until appears.
The thermometer switches off
Switching off
To switch the appliance off:
Press the button until the
screen displays OFF. Or the
appliance switches off automatically
after 60 seconds.
Memory function
Infrared Ear & Forehead Thermometer
MODEL: TET-340
User Manual
Rev.00 2011/06/14
MANUFACTURER: Truly Instrument Ltd.
2/F.,
Chung Shun Knitting Centre,
1-3 Wing Yip St, Kwai Chung,
N.T., HONG KONG
TEL: (852) 2487 9803
FAX: (852) 2146 5756, 2480 0018, 2480 0126
EC-REPRESENTATIVE:
Wellkang Ltd t/a
Wellkang Tech Consulting Suite B,
29 Harley Street,
LONDON W1G 9QR,
United Kingdom
-1- -2- -3- -4-
-8--7--6--5-
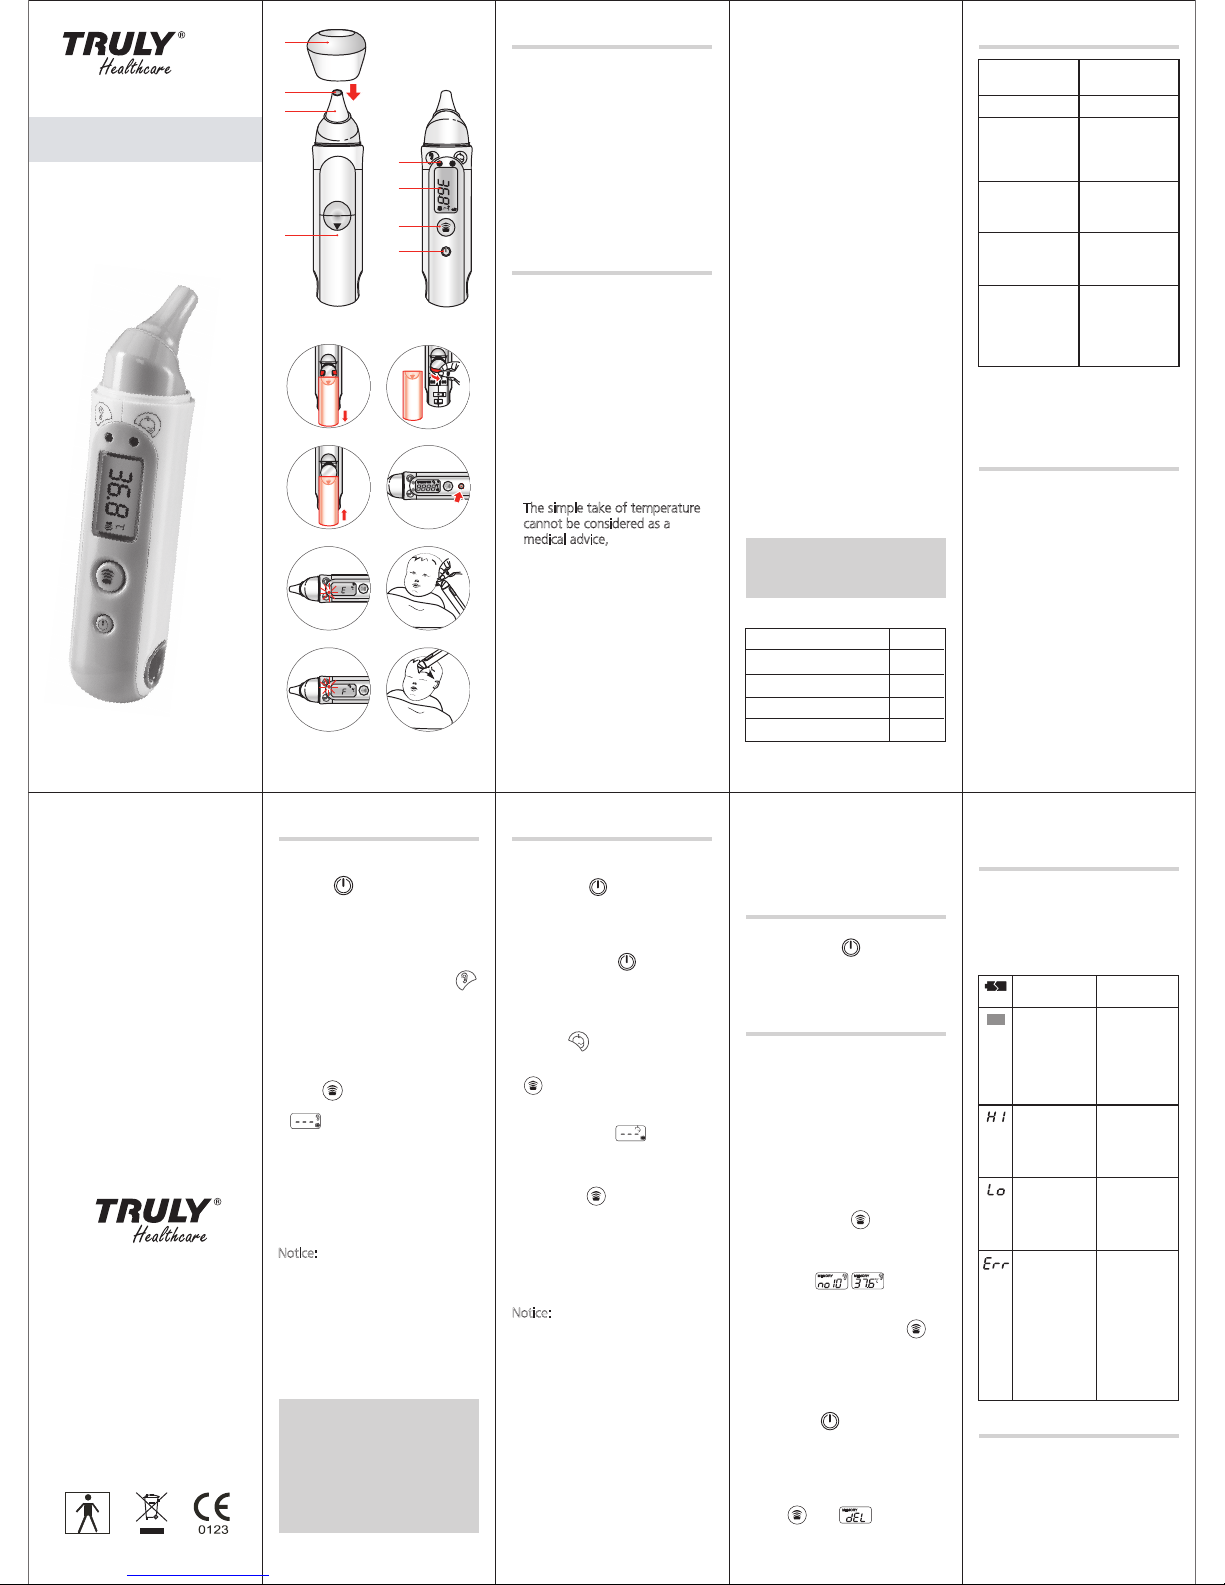
1. Lens
2. Probe
3. Battery compartment
4. Luminous diodes to show
temperature mode : ear or
forehead
5. Screen
6. Take temperature and
memory function button
7. On/Off and Ear or forehead
temperature Mode button
8. Protection/vertical storage cap.
Description
Precautions for use
This ear and forehead
thermometer receives the infra-red
rays emitted by the skin’s surface
and in the ear drum area. It allows
you to check your child’s
temperature easily. This is how to
use the appliance:
• TET-340 is exclusively dedicated
to take ear or forehead
temperatures. We would like to
re-iterate that this appliance does
not replace the advice of a doctor.
In case of doubt or fever, contact
your doctor.
The simple take of temperature
cannot be considered as a
medical advice, DO NOT modify
the proportion of any drugs
prescribed by your doctor without
seeking medical advice first.
• To ensure the reading is accurate,
the probe and the lens must be
absolutely clean.
• Do not use the thermometer if it
has been dropped or shows any
signs of damage.
• Always place the protection cap
back after use.
• In cases of movement from one
Warning, this appliance is
not suitable for detecting
hypothermia.
Average temperatures
room to another, wait for half an
hour minimum before using the
appliance.
• Wait for half an hour after
physical training, bathing or
eating before measuring
temperature.
• Keep the thermometer out of
reach of children.
• Do not expose the thermometer:
- To any warm sources (radiator,
sun rays, ...)
- To dust or humidity.
• Never immerse the thermometer
in liquid.
• Do not touch the lens with your
fingers.
BODY TEMPERATURE: the normal
human body temperature varies
during the day. It is measured
along a scale of values defined
according to the part of the body
where the temperature is taken:
- Rectal measurement:
36,6°- 37,8°C
- Axillary measurement
(under the arm): 34,7°- 37,3°C
- Oral measurement (in the
mouth) or forehead:
35,5°- 37,5°C
- Ear measurement:
35,8°- 37,8°C
Forehead temperature
Ear temperature
Rectal temperature
Oral temperature
Axillary temperature
36.1°C
36.4°C
37.0°C
36.6°C
36.1°C
Technical specifications
Comments: these technical
specifications may be subject to
modifications to improve the
appliance, without prior warning.
Installing the battery
The appliance is delivered with a
lithium battery 3V (CR2032)
already in place. At the first use,
open the battery cover then
remove the strip which ensures the
protection of the battery (fig. 1/
fig. 2). Replace the cover (fig. 3).
Installing the battery, Open the
battery compartment and place a
new button lithium battery CR2032
3 volts polarity + on the top.
Replace the cover.
Keep the battery out of reach of
children.
IMPORTANT: When installing a new
battery. always wait half hour an
hour before using the appliance.
Screen resolution
0.1°C
Measurement
range
20°C - 42.2°C
Precision
32°C ~ 42°C:
+/-0.2°C
<32°C and >42°C
+/-0.3°C
Operation
conditions-room
temperature
+16°C / + 35°C
Relative humidity
less than 85%
Storage conditions
-20°C / +80°C
Relative humidity
less than 95%
Energy source
1 lithium battery
3V type CR2032
Service life:
approximately
5000 measures
As for all thermometers, slight
variations in temperature may be
displayed one after another:
it is therefore recommended to
take several readings (removing the
thermometer from the ear between
each reading) and take the highest
reading into account.
Forehead measurement
• Remove the protection cap.
• To switch on press and maintain
the button until the
indications in fig. 4 are displayed
in the screen the appliance comes
automatically displays the Ear
mode.
• Press the button to select the
forehead mode. The screen
shows the corresponding
function fig. 7 and the luminous
diode corresponding to the
symbol blink 5 times.
• Place the probe in the middle of
the forehead. Press the button
. Slowly slide the probe on
the skin to the temple fig. 8.
• While taking the temperature, the
screen indicates and audible
bips sound.
• As soon as the probe is placed on
the area of the temple, release
the button , wait for the
validation sound beep before
removing the thermometer.
• Read the temperature on the
screen.
• The temperature is automatically
recorded.
Notice:
This temperature reading must be
considered as an estimation.
The temperature reading of the
forehead can be influence by
environmental conditions
because the probe is more sensitive
to perspiration, sebum, physical
activity and environmental
temperature.
It is recommended that you wipe
the forehead before taking a
reading. In case of important
differences or if in any doubt, the
ear measurement must be pointed
Ear measurement
• Remove the protection cap.
• To switch on press and hold the
button until the indications
in fig. 4 are displayed in the
screen the appliance automatically
displays the Ear mode. The screen
shows the corresponding function
fig. 5 and the luminous diode
corresponding to the symbol
blink 5 times.
• Gently pull the ear upwards and
backwards to straighten the ear
canal. Insert the thermometer into
the ear canal fig. 6.
• While continuing to hold the ear,
press . During the taking of
temperature, the screen indicates
.
• Wait for the validation sound
beep before releasing the button
and removing the thermometer.
• Read the temperature on the
screen.
• The temperature is automatically
recorded.
Specific messages
Specific messages
Notice:
• For optimal precision, the ear
should not be obstructed by wax
or a plug.
• Do not use this thermometer with
an ear infection (otitis). Moreover,
if your child has had several ear
infections, the measurement will
be less accurate.
out. We remind you that there is a
significant difference between an
ear temperature reading and a
forehead temperature reading.
automatically.
The ear and forehead thermometer
has been designed to give precise
information.
If the following messages appear
on the screen, refer to the table
below and follow the instructions :
Battery energy
is low.
The battery is
dead.
The temperature
reading exceeds
the range of
possible
temperatures.
The temperature
reading is below
the range of
possible
temperatures.
The temperature
reading is out
the range of
possible
temperatures.
Change the
battery. If the
screen remains
white, contact a
TRULY after
sales service
center.
Change the
battery.
Take the
temperature
reading again.
Take the
temperature
reading again.
Place the
thermometer in
a room where
the temperature
is between
16°C and 35°C
and wait at
least 30 minutes
before taking
the temperature
again.
8
1
2
3
4
5
6
7
fig. 2
fig. 1
fig. 8
fig. 3
fig. 6
fig. 5
fig. 4
fig. 7
clean the body of the thermometer
using a soft cloth; The probe can be
cleaned with cotton soaked in
disinfectant; The lens can be
cleaned with cotton gently soaked
in disinfectant.

FCC Caution.
§ 15.19 Labelling requirements.
This device complies with part 15 of the FCC Rules. Operation is subject to the
following two conditions: (1) This device may not cause harmful interference, and (2)
this device must accept any interference received, including interference that may
cause undesired operation.
If the labelling area is considered too small and therefore it is impractical (smaller
than the palm of the hand) to display the compliance statement, then the statement
may be placed in the user manual or product packaging.
§ 15.21 Information to user.
Any Changes or modifications not expressly approved by the party responsible for
compliance could void the user's authority to operate the equipment.
§ 15.105 Information to the user.
Note: This equipment has been tested and found to comply with the limits for a Class
B digital device, pursuant to part 15 of the FCC Rules. These limits are designed to
provide reasonable protection against harmful interference in a residential installation.
This equipment generates uses and can radiate radio frequency energy and, if not
installed and used in accordance with the instructions, may cause harmful interference
to radio communications. However, there is no guarantee that interference will not
occur in a particular installation. If this equipment does cause harmful interference to
radio or television reception, which can be determined by turning the equipment off
and on, the user is encouraged to try to correct the interference by one or more of the
following measures:
-Reorient or relocate the receiving antenna.
-Increase the separation between the equipment and receiver.
-Connect the equipment into an outlet on a circuit different from that to which the
receiver is connected.
-Consult the dealer or an experienced radio/TV technician for help.
 Loading...