

Blood Glucose / Cholesterol 2 in 1
Monitoring System
User's Manual
2012/03/12 Rev.00
Model: TBG-460GC

-1-
Table of Contents
Chapter 1 TBG-460GC Monitoring System
1.1 Introduction..............................................................................
1.2 Precautions..............................................................................
1.3 Intended Use............................................................................
1.4 Labelling and Informations.....................................................
1.5 System Components...............................................................
Chapter 2 Setup the meter
2.1 Set the Year/Month/Day/Hour/Minute/ Measurement unit........
Chapter 3 How to perform Test
3.1 Before Testing..........................................................................
3.2 Perform the Blood Glucose Test...............................................
.........................................
3.4 Special messages...................................................................
3.5 Care after the test..................................................................
Chapter 4 ............................................................
Chapter 5 Meter Memory Function..............................................
Chapter 6 Installing/Replacing the Batteries................................
Chapter 7 Storage and Handling of Meter and Strips..................
Chapter 8 Error Message and Trouble Shooting..........................
Chapter 9 Specification................................................................
3.3 Perform the Total Cholesterol Test
Quality Control
2
2
3
4
6
7
9
10
11
11
12
13
14
15
15
17
4

-2-
Chapter 1 TBG-460GC Monitoring System
1.1 Introduction
Thank you for choosing Blood Glucose / Cholesterol Monitoring
System. Please read the "User's Manual" for your convenient and for
safe use.
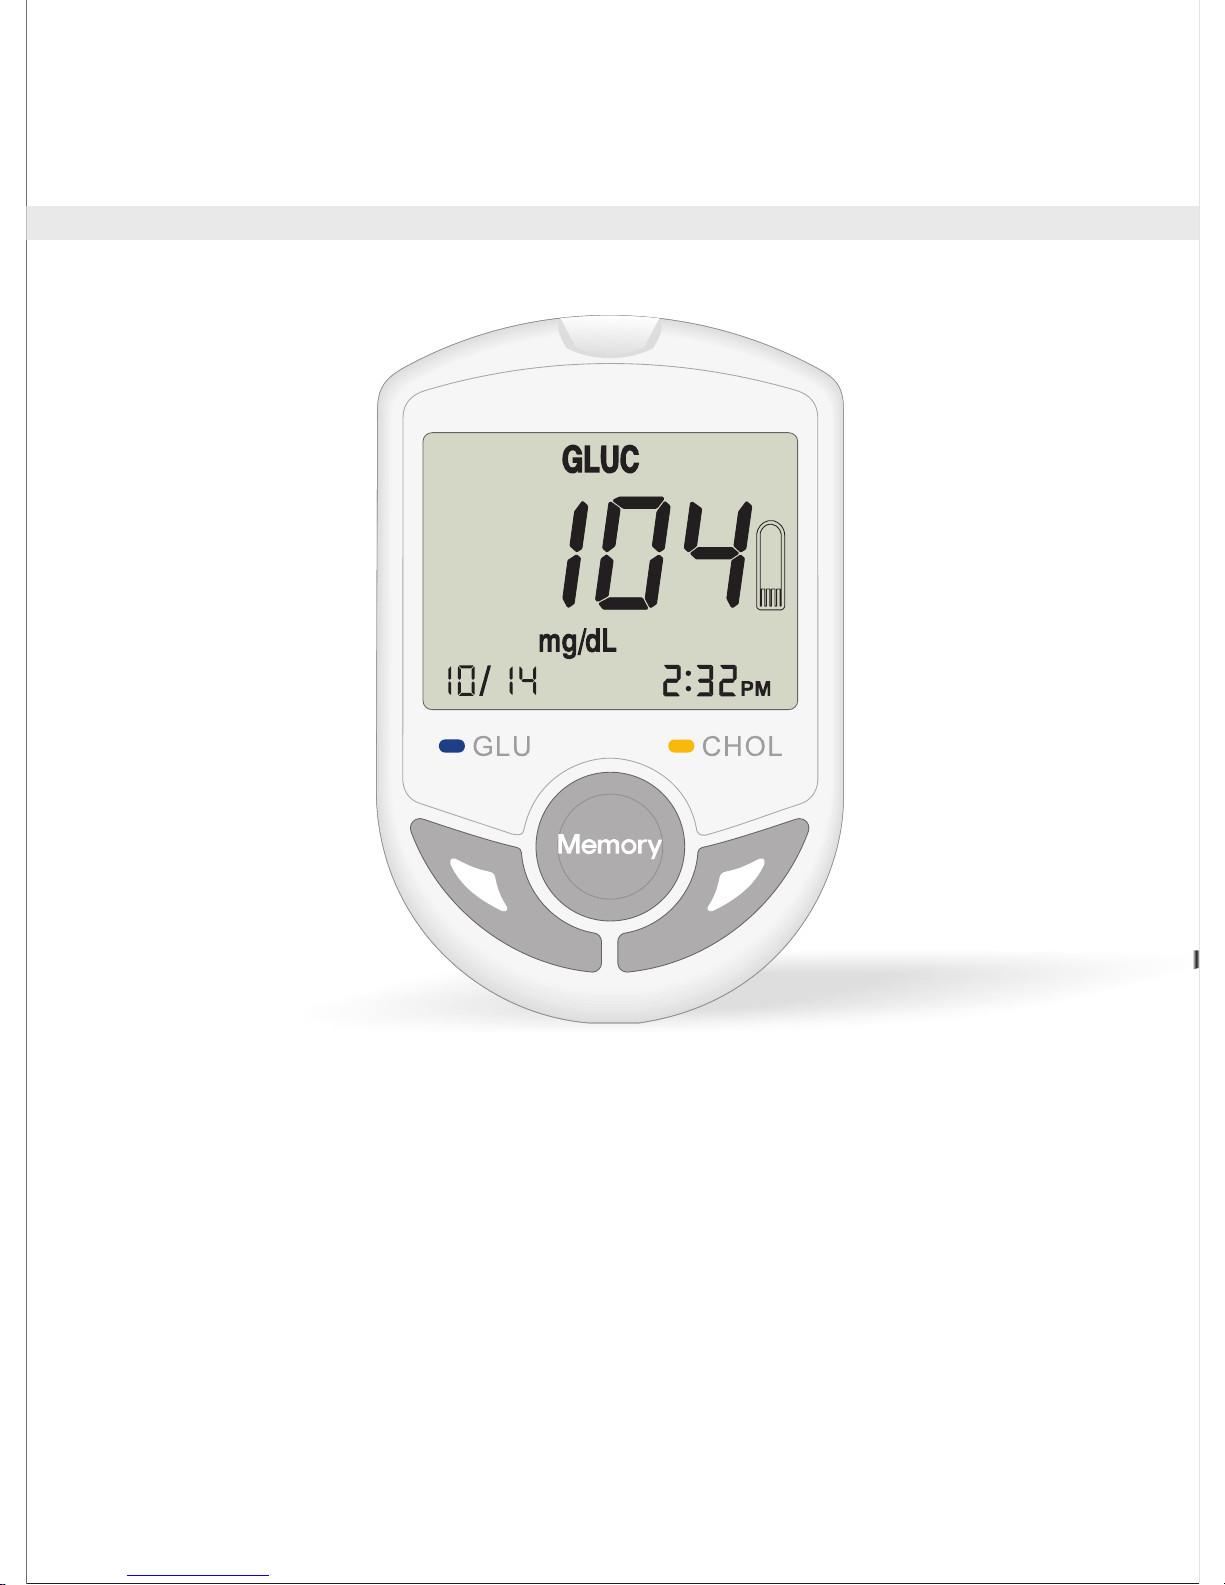
The Blood Glucose / Cholesterol Monitoring System provides you
with accurate, plasma-calibrated results based on electrochemical sense
technology and the superior capillary sampling. The Blood
Glucose / Cholesterol Monitoring System require only a small amount of
blood, the result is precisely calculated and displayed.
Please read the entire "User's Manual" carefully before using the
Blood Glucose / Cholesterol Monitoring System. The "User's Manual"
guides you through the operation procedures with illustrated directions
and help you find the required informations.
Please contact the local distributor for questions and enquiries.
WARNING:
Please carefully read the instructions in this "User's Manual" and
become familiar with the test procedures before using the system. User
should do the quality check and consult with a healthcare professional
before doing any important medical decision.
1.2 Precautions
Please observe the following limitations for obtaining accurate results
of Blood Glucose / Cholesterol Monitoring System.
- The measurements are only for reference purposes. For an analysis
of the measurements, consult specialists.
- For In-vitro diagnostic use only (External use only).
- Single use only, please do not reuse the test strip.
- Do not use this product for those who cannot express their opinions
properly including infants or babies.

-3-
- Handle the strip with clean and dry hands; lancing site for the test
should be cleaned and dried thoroughly.
- Do not perform the test while a cell phone is used beside; prevent
the electronic signal interference.
- Oxygen concentration in air is low may cause the test inaccurate;
there is no effect from altitude up to 10,000 feet above sea level.
- Medical therapy for intravenous injection, such as immunoglobulin
preparations and peritoneal dialysis solutions,containing sugar
compounds may cause higher test results.
- Hematocrit (Hct) range from 30-55% is acceptable.Hct less than
30% may cause elevated result.Hct above 55% may cause reduced
glucose results versus a whole blood reference.
- Do not drop the product.
- Keep the lancets and lancing device out of the reach of the children.
o
- Keep the meter and test strips at room temperature (10-30 C).
1.3 Intended Use
TBG-460GC Blood Glucose and Cholesterol Monitoring System
is intended to be used for quantitative measurement of blood glucose
level and cholesterol level in fresh capillary whole blood drawn from the
fingertips. It is intended for use outside of body (In Vitro diagnostic
use). It should be use only as an aid to monitor blood glucose and
cholesterol level by individuals at home and by healthcare professionals
at clinical settings.
-4-
1.4 Labelling and Informations
Do not re-use
Keep dry
Operation temperature
limitation
In-vitro diagnostic
Lot number
CE certification
Read instructions
Caution, consult
accompanying documents
Storage temperature
limitation
Use by
EU Representative
Catalogue number
(Product number)
Manufactured by
0123
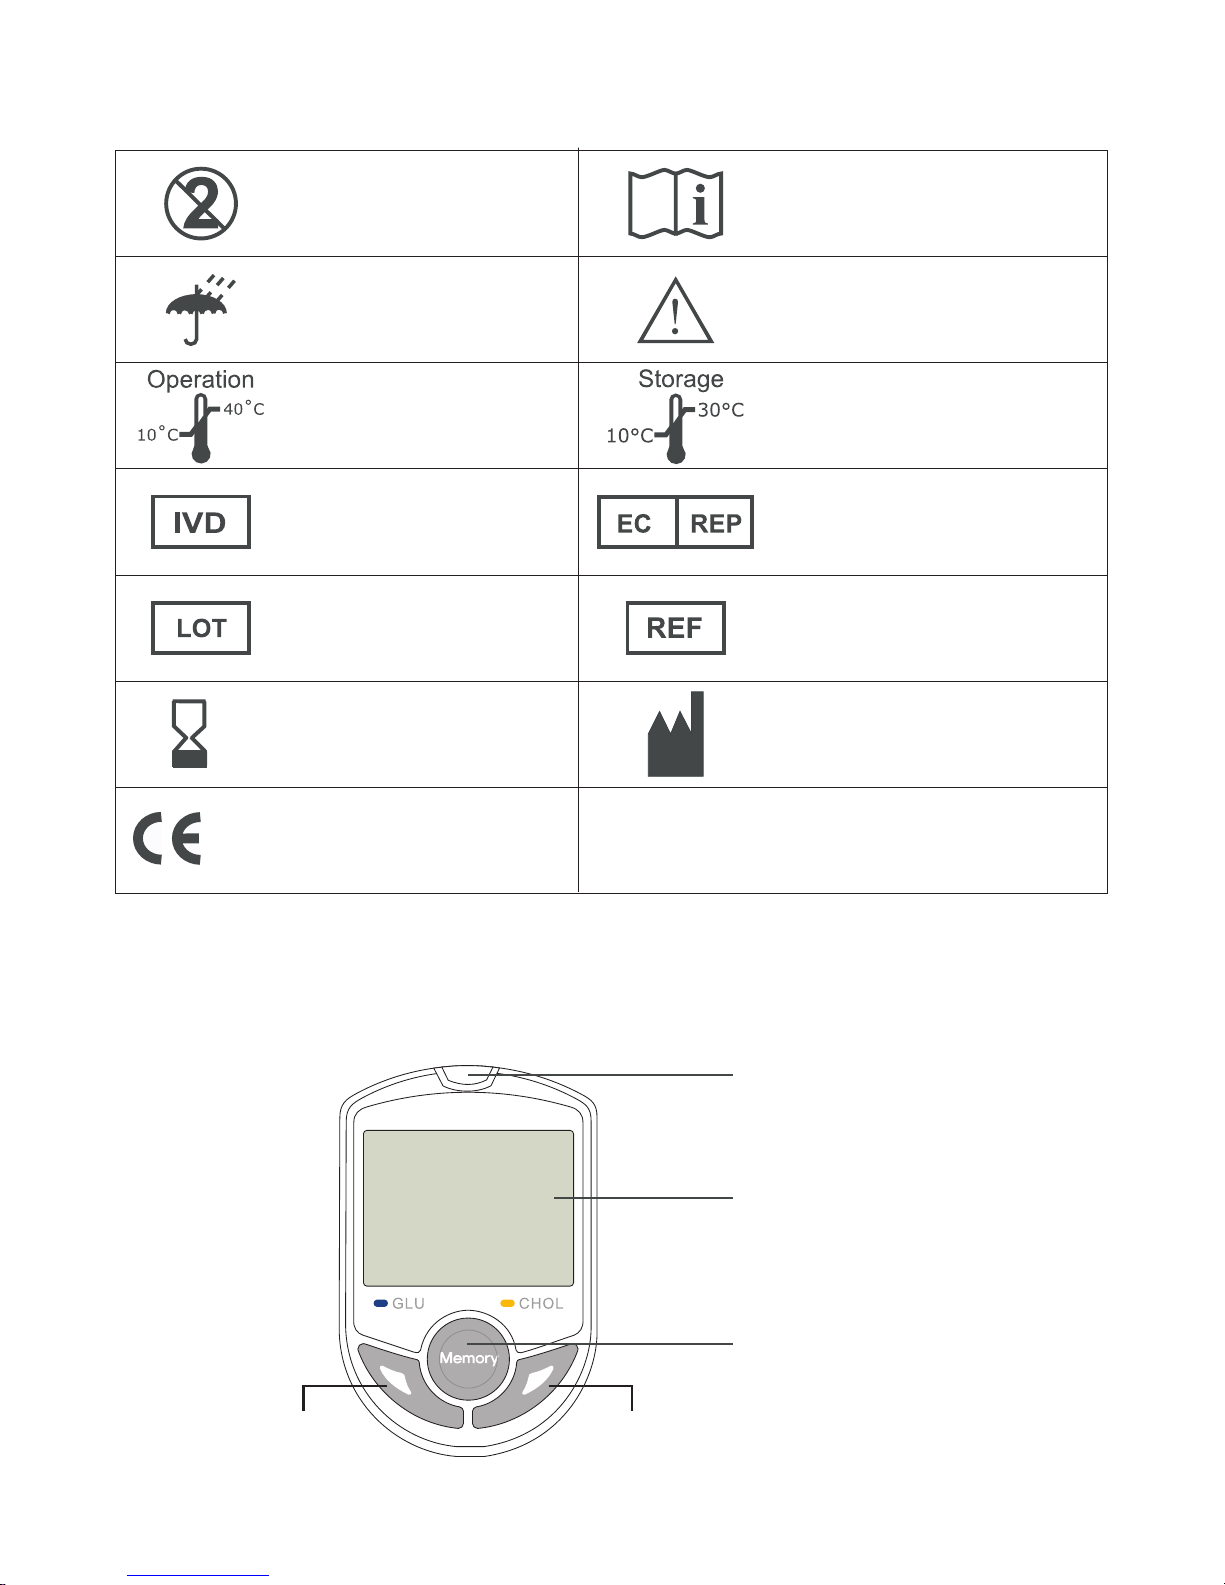
1.5 System Components
设定
Test Strip Port:
Insert test strip here.
The meter will turn on
automatically.
LCD Screen :
For display of operating
information and test
results.
Memory Button :
Enter memory
mode operation.
Down ButtonUp Button
Meter (Front Side)
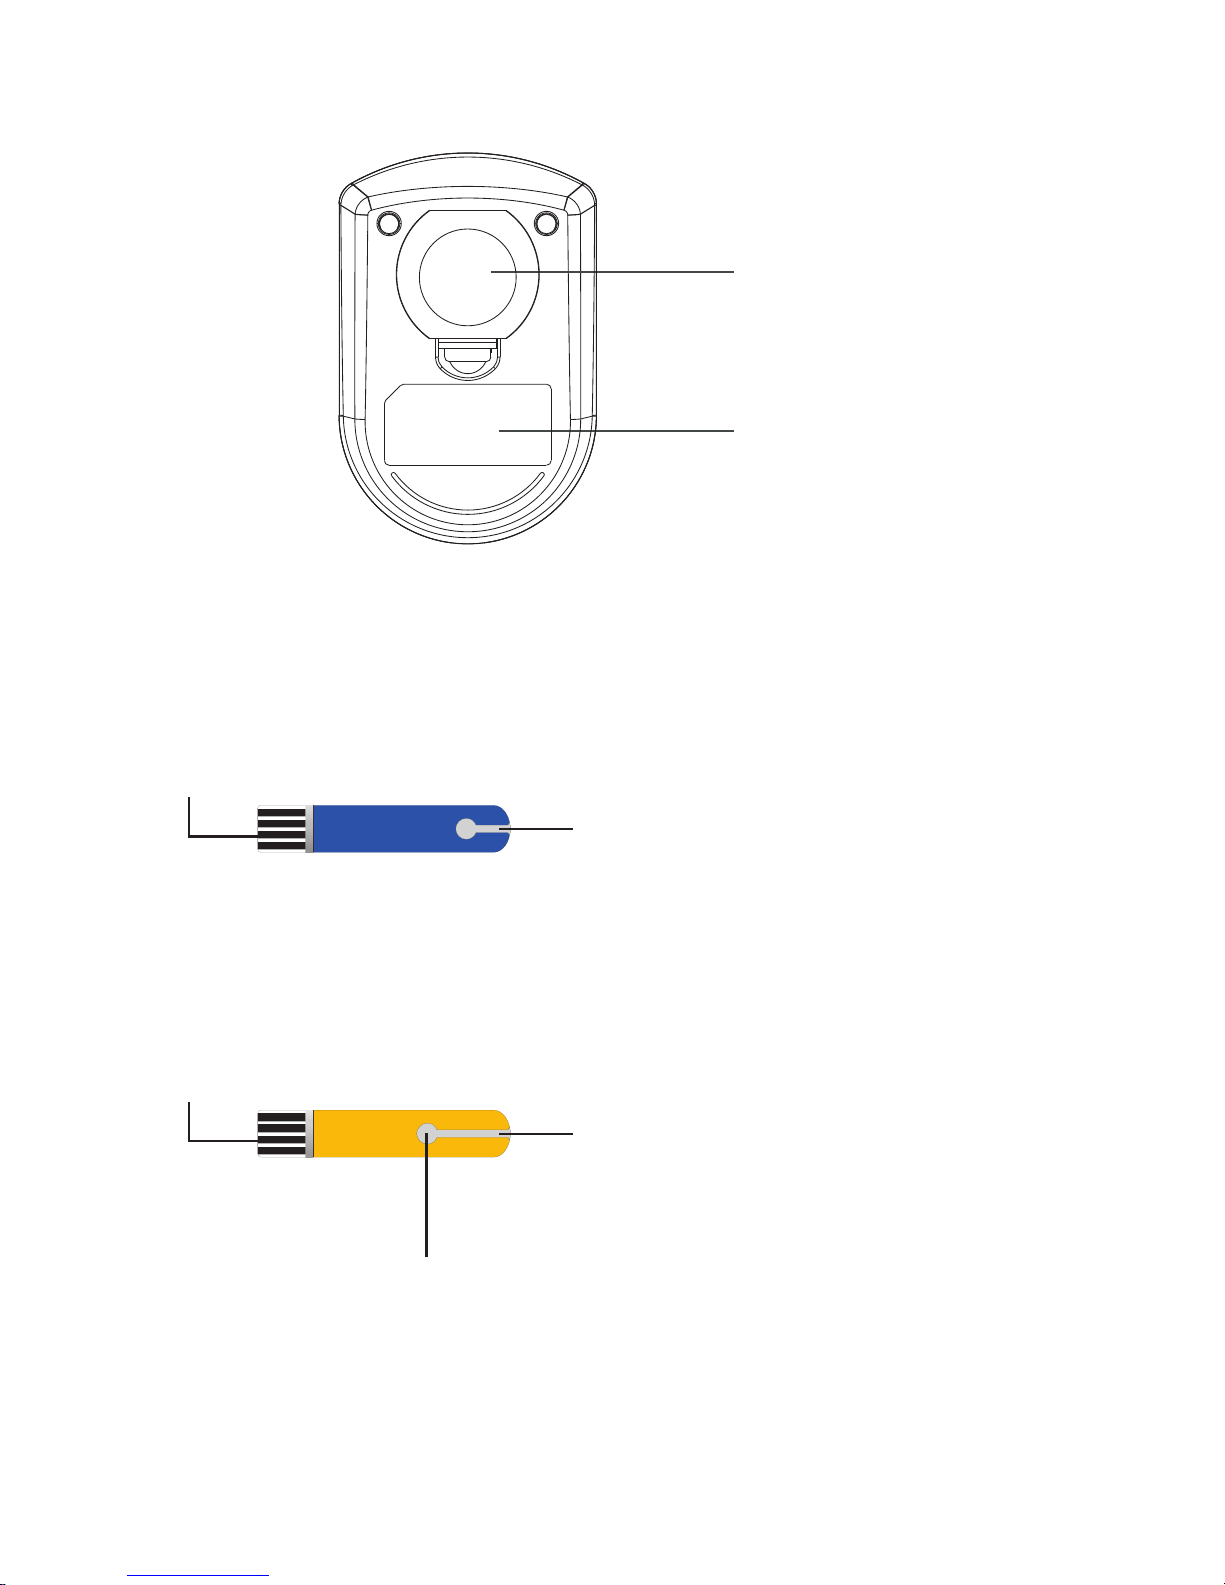
Cholesterol Test Strip(Yellow Color)
Electronic Contact Bar :
Insert Electronic Contact Bar of the
test strip into the Test Port of the
meter to activate it.
Sample Inlet :
The inlet where the whole blood or control
solution is drawn in. Touching a blood
sample or control solution will result in a
capillary action automatically. At least
10uL of blood sample is essential.
Reaction Zone :
Reaction zone of
Total Cholesterol
CHOL
Glucose Test Strip (Blue Color)
Sample Inlet :
The inlet where the whole blood or control
solution is drawn in. Touching a blood
sample or control solution will result in a
capillary action automatically
Electronic Contact Bar :
Insert Electronic Contact Bar of the
test strip into the Test Port of the
meter to activate it.
GLUC
Tag :
Display information
about the meter.
Meter (Back Side)
Battery Cover :
For holding a 3V lithium
battery
-5-

Code Strip ( Front View )
-6-
Chapter 2 Setup the meter
2.1 Set the Year/ Month/ Day/ Hour/ Minute/ Measurement unit
Press and hold the “memory” button for over three seconds, the meter
will sound one beep and enter the setting mode. Please follow the
directions below to set the meter.
Under the setup mode, the LCD screen of the meter shows all setting
items start from a blinking year “20XX” and the rest setting items are
listed as follows:
Set the Year
1. When the meter enter setting mode, the first
item on the screen such as “2012” will blink on
screen, which means Year.
2. Press the up/ down button to
.
3. After you set the desired year number, Press the
“memory” button again then the month segment
starts blinking.
until the correct
year appears
Set the Month
1. Press the up/ down button until the correct
month appears.
2. Press the “memory” button, and then the day
segment starts blinking.
Contact Bar :
Insert this end into
the Test Port of the
meter.
Code Number
Test Mode :
GLUC - Glucose
CHOL - Total Cholesterol
CHOL A412
GLUC 0709

Set the Day
1. Press up/dowm button until the correct day
appears.
2. Press the “memory” button, and the hour segment
will start blinking.
Set the Hour
1. Press up/ down button until the correct hour
appears.
2. Press the “memory” button, and the minute
segment will start blinking.
Set the Minute
1. Press up/ down button until the correct minute
appears.
2. Press the “memory” button then measurement unit
segment starts blinking.
1. Press the up/dowm button until
the correct measurement unit
appears.
2. Press the “memory" button
will show "OFF" on the screen
and power off.
Chapter 3 How to perform Test
3.1 Before Testing
-7-
Coding the Meter
TBG-460GC meter should be coded before testing with test Strips for
the first time, or every time a new box of test strips is used. Each vial of
test strips has an assigned code number. The code strip is packaged
with the test strip in order to calibrate/code the meter. Every time a test
strip is inserted, please be sure to check the code number appearing on
the screen is the same as the code number marked on the test strip vial.

设定
-8-
Directions :
1. Insert code strip into the test port of
the meter. Wait for the code number
and test mode to appear on the
screen.
2. Make sure the code number on the
screen is the same as the code
number on the code strip, and the
test mode is also the same as
marked on the test vial. Remove the
code strip. “ ” should appear on the
screen, indicating that the meter has
been successfully coded.
Cautions :
If “E-E” appears on the screen during coding procedure, there
may be a problem with the code strip or a wrong category
code strip may be misused. Perform the coding procedures
again, and if “E-E” continues to appear, please contact the
authorized distributor for service.
Use of Lancing Device
1.
2.
3.

-9-
3.2 Perform the Blood Glucose Test
GLUC
1. Insert a Blood Glucose test strip (blue
color) into the test strip port of the
meter and immediately cover the vial
to keep the strips in dry condition.
The meter will turn on automatically.
Directions :
1. Remove the end cap by gently pushing it down and away from the
lancing device.
2. Insert the lancet firmly into the lancet holder until it comes to a stop
and remove the protective lancet cover.
3. Replace the end cap by snapping it back onto the lancing device
body.
4. Select the skin penetration depth by turning the depth selector until
the desired number can be seen in the selection window. 5 levels of
skin penetration: The higher the number, the deeper it pricks.
5. Pull the part located at the back of the device until it comes to a stop
and then release.
6. Place the lancing device firmly against the finger and press the
release button to obtain a blood sample. After finishing your blood
test, dispose the used lancet safely in an appropriate container.
8
4.
5.
6.

2. Be careful to make sure the
marked
re-code
test
mode and code number on the
screen are the same as the one
on the test strip vial. Icon
“GLUC” and “CHOL” indicate
measuring mode of glucose and
total cholesterol respectively. If not,
remove the test strip and the
meter.
3. Obtain a drop of blood with a
device.
Do not squeeze your fingertip hard
to obtain a drop of blood. It may
influence the result.
lancing
4. Touch the sample Inlet of the strip to
the drop of blood sample until the
meter sounds a “beep”, which
means the sample has drawn into
strip successfully.
5. The screen will display a count down
from 10 seconds for glucose testing.
设定
1. Insert a Total Cholesterol test strip (yellow color) into the test strip
port of the meter and follow the procedure as performing the blood
glucose test.
2. Make sure to get enough blood sample volume.
3. The screen will display a count down from 26 seconds for cholesterol
testing.
3.3 Perform the Total Cholesterol Test
-10-

-11-
Note :
The TBG-460GC Monitoring System includes glucose and
total cholesterol test that are all plasma calibrated. The user does
not have to convert it into plasma result.
2. Use the strips before the date, the strips can only be used
within 3 months remaining shelf life after the first opening of the
vial.
3. Apply the blood sample onto the correct position of the strip
precisely, follow the directions to
4. Prohibited applying the blood sample to the test strip twice, it will
cause inaccurate test results.
1.
expiry
avoid incorrect operations.
3.5 Care after the Test
Directions:
1. Improper usage of the meter, such as dropping, bumping or other
violent impact may cause the meter damaged.
2. Please keep meter away by interferences of magnetic,
electromagnetic, and radioactive.
Warning :
Do not disassemble the meter for any reason.
2. Please follow local regulations to discard used test strips
and lancets.
3. Used test strips, lancets and any other materials that have
come in contact with blood should be treated as potential
biohazards. If a user has an infectious disease, used test
strips and other materials could be a sources of infection.
1.
3.4 Special messages
Mode Lo Hi
Glucose < 20 mg/dL (1.11 mmol/L) > 600 mg/dL (33.3 mmol/L)
Total Cholesterol < 100 mg/dL (2.59 mmol/L) > 400 mg/dL (10.35 mmol/L)

Intended to use:
The control solution is used to check the performance of the system,
including Blood Glucose and Cholesterol Monitor System, Glucose and
Cholesterol strip, user's test skill. The system is performing adequately
if the control solution test result falls within the indicated control range
listed on the test strips vial label.
A control test should be proceeded:
1. When you suspect that the meter or test strips are not working
properly.
2. When your blood glucose or cholesterol test results are not
consistent with how you feel, or when you think your results are not
accurate.
3. When you drop or bump your meter.
4. Upon the advice of the healthcare professional.
How to perform a control test.
1. Insert a test strip into the test strip port of the meter and immediately
cover the vial to keep the strips in dry condition.
2. Be careful to make sure the test mode and code number on the
screen are the same as the one marked on the test strip vial. If not,
remove the test strip and re-code the meter to correct test mode and
code number.
3. Shake the control Solution vial vigorously then open the cap to
discard the first three drops of control solution, after wiping the
dispense tip and cleaning with tissue then drop some control solution
onto a clean object such as transparency. If it is a cholesterol test,
Please drop out enough control solution (at least 10uL).
4. Touch the Sample Inlet of the Glucose or Cholesterol Test Strip to the
drop of Control Solution until the Meter sounds a “beep”, The screen
will display a count down from 10 seconds for Glucose Test Strip or
26 seconds for Cholesterol Test Strip.
5. After counting down, the Screen will display the control Test results,
Compare the results to the control range listed on the Test Strip Vial.
Warning:
-12-
Chapter 4 Quality Control

-13-
TBG-460GC meter automatically stores up 360 blood glucose and 50
cholesterol test results. It also provides you with 7-, 14-, 21- and
28-day averages of the blood glucose test results. Please follow
these directions to recall stored test results.
Directions :
1. Make sure that no test strip is inserted in the meter.
2. Press the “memory” button once to turn the meter on. After a short
“beep” sound a full display will appear on screen then the meter
enters standby mode.
3. Press the “memory” button once again and the meter stays at
memory mode. The 7-day average (7 DAY.A) will display on the
screen.
4. Followed by 14, 21 and 28-day average when press the “memory”
button repeatedly.
Note :
The day average function can be applied to glucose test mode only,
total cholesterol test mode do not have the day average function.
Chapter 5 Meter Memory Function
. Please read this user's manual for control solution test carefully
before use.
. Do not reuse the Test Strips and close the Test Strip Vial lid tightly
after use.
. The first three drops of Control Solution must be discarded and the
vial should be shaked well before use when the vial is newly opened.
. Newly opened vial of Control Solution and Test Strips must be
marked with the opening date.
. Glucose Control Solution is used for glucose test mode And
Cholesterol Control Solution is used for cholesterol test mode.
. If the test results fall outside the control range, please reconfirm and
repeat the test, if it is still fall outside the range, please contact
authorized distributor for help and service.
. Control solutions are not included in the system, please contact your
distributor if you want to do a quality control test.

-14-
Chapter 6 Installing/Replacing the Batteries
Batteries
A 3V lithium battery (CR2032) is included in the meter package.
Use only 3V lithium batteries. Do not use or replace the battery with
different types of batteries. Doing so will damage the electronics of
the meter.
Instructions :
1. Hold the meter with one hand, slightly lift the back cover lid to open
the back cover.
2. Insert a new battery in the meter with the "+" side facing up, you
will hear a "beep" sound which indicates that meter is .
3. Place back the cover onto the meter.
ready
5. After the 28day-average, the latest stored result M01 appears on the
screen. Then you can read the stored result from M01 to
M360(Glucose mode) or from M01 to M50(Cholesterol mode) by
pressing Down or UP Button.
6. Press the “memory” button for over 3 seconds and the meter will turn
off after a long “beep” sound. Meter will also automatically shut down
after 3 minutes without any operation.
Note :
If 360 test results are already stored and a new one is added, the
oldest test result is automatically overwrited. The newest result will
be shown in M01.

-15-
Chapter 8 Error Message and Trouble Shooting
Message Cause Solution
There will be a problem with
the test strip.
Repeat the test with a new test
strip. If the problem persists,
please contact the dealer for
service.
E-0
E-b
The power of the battery is
too low to run a test.
Replace the battery at once.
E-A
The reference voltage or
other circuit is error.
Call local authorized distributor
for help and service.
The test strip may be
removed after applying
blood the absorbent hole.
Revlew the instructiona and try
again with a new test strip.
If the problem persists, please
contact the dealer for service.
E-9
Chapter 7 Storage and Handling of Meter and Strips
Due to sensitive to heat and humidity, the performance of test strips
may be affected by improper storage and handling. Please store the
test strips and meter carefully according to the specifications listed in
chapter 8.
Note:
● Store the meter, code strip, test strips at room temperature. Do
not expose them beyond the range described in Chapter 8.
● Do not freeze or refrigerate the meter and strips.
● Keep the meter clean by wiping the exterior of the meter with
a tissue or lint-free cloth.

E-E 1. There may be a problem
with self-check of the
meter.
2. Use of the wrong or
damaged code strip or
the code strip was
inserted improperly.
Power off then retry, if the error
appears again, contact the
authorized distributor for service.
Check that the code number on
the meter display matches the
code number on the test strip
vial. Code the meter or retest as
necessary. If the error message
appears again, please contact
the dealer for service.
E-t &
Temperature
Icon Sign
The temperature is below
or above the system
operating range.
Repeat the test after the meter
and the test strip have reached
at temperature within the
operating range.
E-U It could be caused by a
used test strip or a
temporary or permanent
electronic problem.
Repeat the test with a new test
strip. If the error message
appears again, please contact
the dealer for service.
Message Cause Solution
HI 1. Blood glucose level is
higher than 600 mg/dL.
2. Test strip has problem.
1. Review the instructions and
try again with a new test
strip.
2. Check the test strip vial to
make sure that it is not
marked beyond the expiration
date.
Lo 1. Blood glucose level is
lower than 20 mg/dL.
2. Test strip has problem.
1. Review the instructions and
try again with a new test
strip.
2. Check the test strip vial to
make sure that it is not
marked beyond the expiration
date.
-16-

-17-
Weight
Dimensions
Battery Life
Battery Type
Memory
Relative Humidity
Operation Temperature
Strip Storage Condition
Hematocrit Range
Sample Volume
Measuring Range
Measuring Time
About 10 seconds (Glucose),
26 seconds (Total Cholesterol)
Test Sample
Fresh Capillary whole blood
Calibration
Principle
System Accuracy
± 20% at Glucose level ≥75 mg/dL (4.17mmol/L)
± 20% at Total Cholesterol ≥150mg/dL(3.88mmol/L)
Electrochemical Biosensor
Plasma-equivalent
Glucose 20 - 600 mg/dL (1.1 - 33.3 mmol/L)
Total Cholesterol 100 - 400 mg/dL (2.59 - 10.35 mmol/L)
About 1 - 1.5 µL (Glucose)
About 10 µL (Total Cholesterol)
30 - 55% (for Glucose)
35 - 50% (for Total Cholesterol)
10 - 30ºC (50 - 86ºF)
10 - 40ºC (50 - 104ºF)
Less than 95%
360 for Glucose, 50 for Total Cholesterol
One 3V (CR2032) lithium battery
Approximately 1,000 tests
82*54*21.5mm (Length, Width, Height)
About 45 g (with battery)
Chapter 9 Specification

 Loading...