

Truly Pic 'N Roll Pic 'N RollDigital Photo & Audio Player, Pic ’N Roll User Manual
User’s Manual
http://www.truly.net
Pic ’N Roll
Digital Photo & Audio Player

Welcome
Welcome to the World of Pic ’N Roll! We are pleased that
you have chosen the Pic ’N Roll MP310 Digital Photo &
Audio Player.
1.
2.
3.
4.
5.
6.
7.
8.
This player is a high precision electronic product and
is serviceable only by authorized personnel. Please do
not attempt to open the unit.
Do not subject the unit to severe impact.
Do not subject the unit to splash or spill of water or
other liquid.
Keep the unit from extreme high / low temperatures,
high humidity, strong magnetic field, dust and exposure
to direct sunlight.
Select proper volume when using the unit to avoid
causing eternal harm to hearing.
Do not attempt to modify any part of this unit.
Use only batteries, charger and accessories approved
by the manufacturer. Use of non-manufacturer
approved parts may invalidate warranty.
Please observe your local environmental regulations
when disposing of any electronic product.
Safety and General Information
Please read this manual carefully before using this product
for the first time.

Important
1.
2.
Truly Electronics Mfg. Ltd. assumes no responsibility
for any damaged or loss data caused by accidental
deletion of data as a result of malfunction, repairs or
battery replacement. Backing up of all important data
on other media to protect against data loss is strongly
recommended.
For the latest operation instructions and updates,
please refer to the enclosed CD ROM or visit our
company website.
FCC Notice:
This device complies with Part 15 of the FCC Rules.
Operation is subject to the following two conditions:
This device may not cause harmful interference.
This device must accept any interference received,
including interference that may cause undesirable
operation.
(1)
(2)
9.
10.
Use damp cloth to clean the unit only. Do not use any
chemical solution.
Please contact your local authorized Truly retailer, or
Truly’s Marketing Department directly, with any
problems you might have encountered while using
this product.

I.
II.
III.
7
7
8
8
9
10
11
11
15
16
17
17
18
20
24
25
25
27
27
29
29
Getting Started
1. About the Pic ’N Roll MP310
2. What is in the package?
3. Minimum system requirements
4. Connecting to your PC
5. Specifications
What does this button do?
1. Buttons & connections on the MP310
2. Power supply
3. Memory bar
Learning to use your MP310
(I) Transfer photos, music, and other files
(II) Play Music
1. How to setup EQ adjustment, play mode,
play duration and lyric synchronization?
2. How to use section repeat (A-B) & timed
repeat?
(III)Recording mode & settings
1. Using the MP310 recording function
2. Selecting your recording source
3. Setting your recording options
4. Operating Line-In recording
5. How to play back your recording
Contents

(IV) Listening to FM radio
1. Selecting & saving channels
2. Recording FM radio program
3. Deleting saved channels
4. Setting frequency, step size, frequency
band, channel and channel saving mode
5. Customizing your radio channel names
(V) View pictures on your MP310
(VI)E-book
1. Listen to music and radio when reading
e-book
2. How to set and use a bookmark?
3. Setting e-Book options
(VII)Games
1. Diamond
2. Enter the Dragon
3. Push Box
(VIII) Setting up your MP310
1. Language
2. Scrolling Menu
3. Adjust contrast
4. Duration of backlight
5. System update
6. Wallpaper Setup
7. Canceling wallpaper
8. Deleting bookmark
9. Setting Auto Power Timer
Contents
30
31
33
33
34
35
35
37
37
39
39
40
42
42
42
43
43
43
43
44
44
44
44
44
45

IV.
V.
VI.
VII.
10.System reset
11.Version information
(IX) Memory management
1. Memory Information
2. File management
(X) Formatting your MP310
(XI) Setting display scheme
USB Removable Disk
Unplugging your MP310 from the PC safely
Installing, using, and deleting your MP310
software
1. Installing the software
2. Using the software
(I) Image2Lgo for MP310
(II) MP310 Radio Station Editing Tools
(III)MP310 System Update Tools
(IV)Using the LRC Lyric Editor
3. Deleting the software from your PC
(I) Deleting the MP310 software
(II) Deleting the MP310 USB driver
Frequently asked questions
Technical Support
Contents
45
45
46
46
46
47
47
48
48
49
49
50
50
56
59
63
70
70
71
71
72

I. Getting Started
I. Getting Started
1. About the Pic ’N Roll MP310
The Pic ’N Roll MP310 digital photo & audio player
is among the first flash-based ultra-big LCD COLOR
display that integrates digital music enjoyment,
digital picture viewing, radio listening, e-book, games
and other unique features. It supports digital image
viewing in JPEG, BMP, and a user friendly photo
editing file format developed for TRULY, and digital
music in MP3 / WMA formats. The MP310 also
supports wallpaper setup, synchronization of audio
and text, auto shut off and bookmarker. Driver-free
operation (Except Win98), timed repeating, internal
FM recording, voice recording using the built- in
microphone, and external audio recording (LINE IN)
are also available in the MP310. You can now enjoy
crisp digital music and read an e-book on the road.
This is a vast improvement over the traditional MP3
player that only allows you to listen to FM
programming while reading back text files. The
simple and elegant design of this 64K Color LCD
Display digital player from Truly will undoubtedly
reflect your personality and provide a totally new
personal digital experience!
7

2. What is in the package?
Your Pic ’N Roll MP310 is packaged with the following
accessories. Please contact your local retailer if any
of these contents is missing. Optional accessories are
available to customize your MP310 for maximum
performance and portability. Please visit your local
Pin ’N Roll retailers, or visit our website at www.
picnroll.com for available accessories.
Stereo Earbuds (1 pair)
Battery Charger (1)
USB cable (1)
Stereo LINE-IN cable (1)
Activity Jacket with Velcro Snap (1)
Installation Software CD-ROM ( 1 )
User’s manual (1)
■
■
■
■
■
■
■
3. Minimum system requirements
Microsoft Windows 98/2000/ ME/XP
Pentium 200MHz CPU or above
USB interface
CD-ROM drive
40MB hard disk space
32MB RAM
■
■
■
■
■
■
8

4. Connecting to your PC
Connect the MP310 to your PC using the USB cord.
Connect the circular end of the USB cord to the USB
port on the player, and connect the rectangular end
of the USB cord to the available USB port on your
PC.
WINDOWS 98 USERS:
To avoid installation problem, complete installing the
driver from the included CD-ROM before connecting
the MP310 to the PC.
ATTENTION!
9

5. Specifications
Model
Storage media
Interface
Transmission speed
Record form
Bit rate
Recording time
Screen
Power
Recharging time
The maximum
output
FM frequency range
Size
MP310
512MB Built-in Flash memory
USB1.1
>500Kbps
MP3
8KBps~384KBps for MP3
playing, 32KBps~320KBps for
WMA
About 494 minutes (512 MB)
TN color LCD (Model); 65536
Colors (Color); 128 x 160 (Pixies)
Rechargeable lithium ion
battery
Three hours
For earphone output,
4.0mw x 2
87.500~108.000MHz ;
76.000~108.000 MHz (wide
frequently mode)
79mm(L)x50mm(W)x13mm(H)
:
:
:
:
:
:
:
:
:
:
:
:
:
10
II. What does this button do?
II. What does this button do?
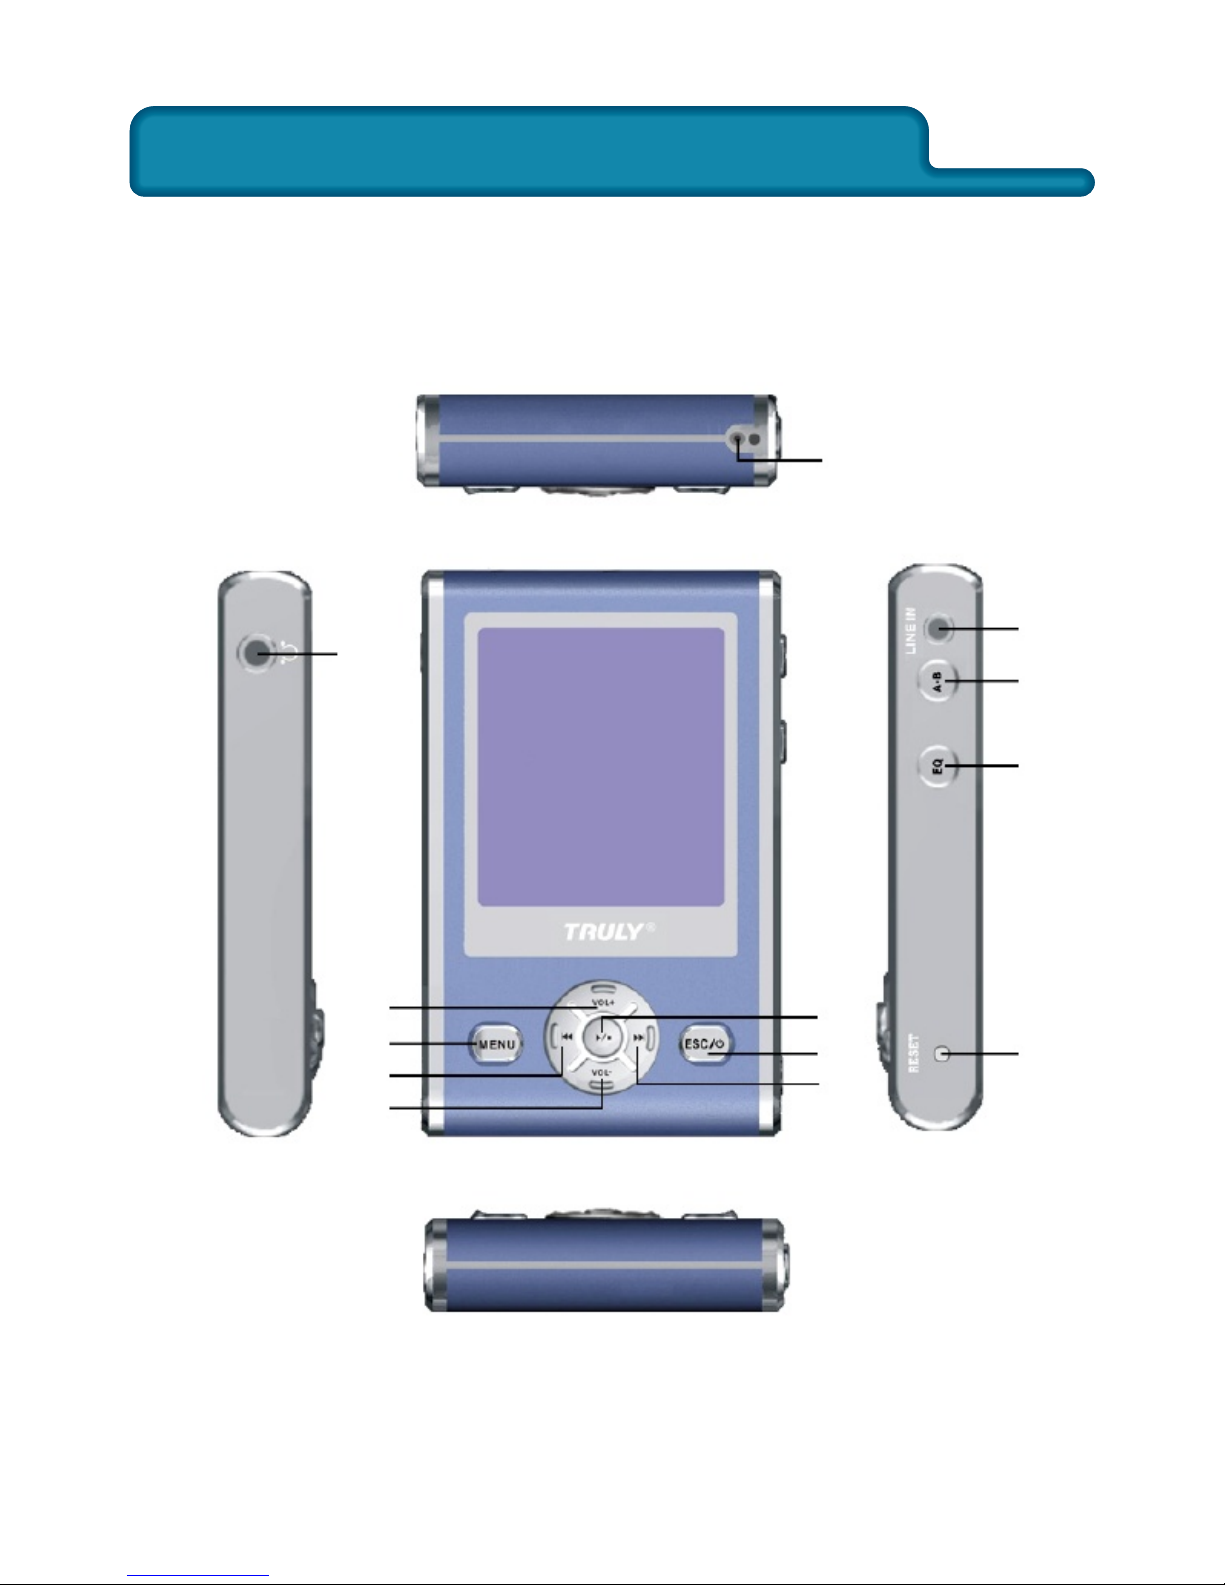
1. Buttons & connections on the MP310
(12)
(11)
(10)
(9)
(13)
(4)
(6)
(2)
(5)
(1)
(7)
(3)
(8)
11
Play and Pause track.
(1) Play / Pause
/
Press ( ) once to rewind current File /voice to
the previous (next) one. Hold ( ) while playing
to fast rewind (forward ) in current track.
In selecting tone, press the two buttons to shift
between audio frequencies;
In setting the repeat duration and start time, press
the two buttons to shift between hour, minute and
second.
In selecting tone, press the two buttons to shift
between audio frequencies.
In channel search, press this button to search forward
(backward).
In the directory, press ( ) to move cursor up
(down).
(2) / (3)
/
(4) / (5) V– (Reduce Volume) /
V+ (Increase Volume)
12

Press this button to access the menu. During music
playback, FM radio, or recording, press and hold this
button to lock all the keys. Press and hold this button
again to unlock all keys.
(6) MENU
Reset the unit by pressing this button when the player
is not performing properly.
(8) RESET
During music playback, press this button to select EQ
settings. While playing songs, audio files, FM radio,
or recording, press and hold this button to turn the
screen off. Press any button to turn the screen back
on. Press this button during game play will restart
game.
(9) EQ
This button is mainly to exit out of the current
operation and Power On/Off; In “Independent
diamond” and “Box pushing” game, press this Key
to cancel the previous step.
(7) ESC /
13

Repeat between two points and within set time.
(10) A-B / TRP
(11) LINE IN / USB port / Charging port
(12) Microphone
(13) Earphone jack
14
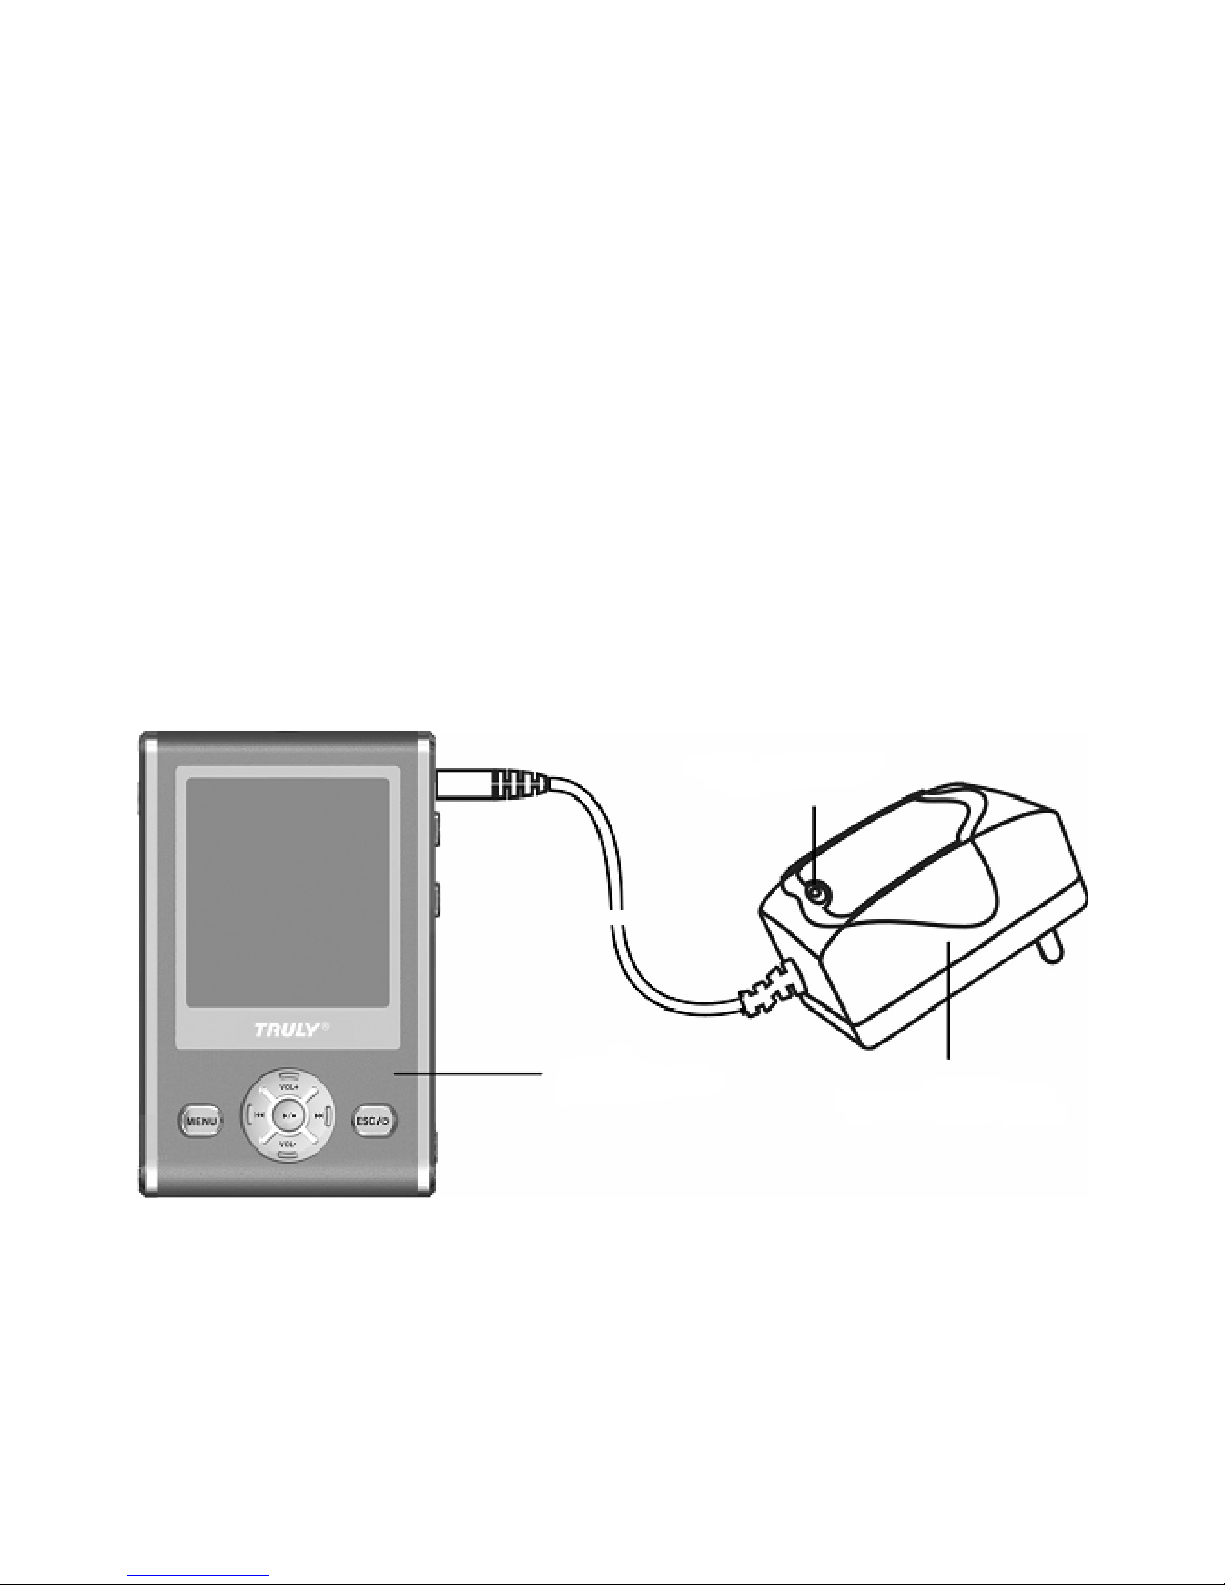
2. Power supply
A green bar indicates the unit power level.
Charging the unit
(1) Using charger
Connect the charger to the unit to recharge the
battery. Battery can be charged with the unit turned
ON or OFF. See Fig.:
Charger LED
Power Charger
MP3 Player
15

(1) Using USB to charge
Connect the player to PC by the supplied USB cable.
Click the removable media icon in the task bar on
your PC to stop the USB equipments (Do not unplug
USB cord or press any button). When the MP310
restarts, battery will be automatically recharged
if low. To start recharging manually, press key
“A - B” and hold. If unit is powered off when it is
connected to the PC, automatic charging will be
ON.
The battery bar in the main menu will display
the battery charging process. When
recharging finishes, the battery bar will
display at full strength. A full recharge will
take about 3 to 4 hours. Unplug the charger
when the battery is fully recharged. Do not
connect the charger to the unit for a
prolonged period of time.
Note:
3. Memory Bar
In the main menu, the blue bar indicates memory
used, and green indicates unused memory.
16

III. Learning to use your MP310
III. Learning to use your MP310
Power ON: Press ESC / and hold to power the unit on.
Power ON: Press ESC / and hold to power the unit off.
*
The MP310 is equipped with the Automatic Power
off feature to save power. The unit will turn itself off
after three minutes of non-operation.
Transfer photos, music, and other files(I)
PC with Windows 98 OS needs to install
the MP310 driver before connecting,
supplied with the MP310 Installation CDROM.
Caution:
Connect your MP310 to your PC with the supplied
USB cable. Your PC will automatically recognize your
MP310 as a new Removable Disk. Go to the My
Computer screen in your PC, and look for a new
Removable Disk icon. Transfer your favorite photos,
music, and other files to and from the MP310 as you
would with a regular Removable Disk.
Additional software is needed to rip MP3 /
WMA files from CDs.
Note:
17
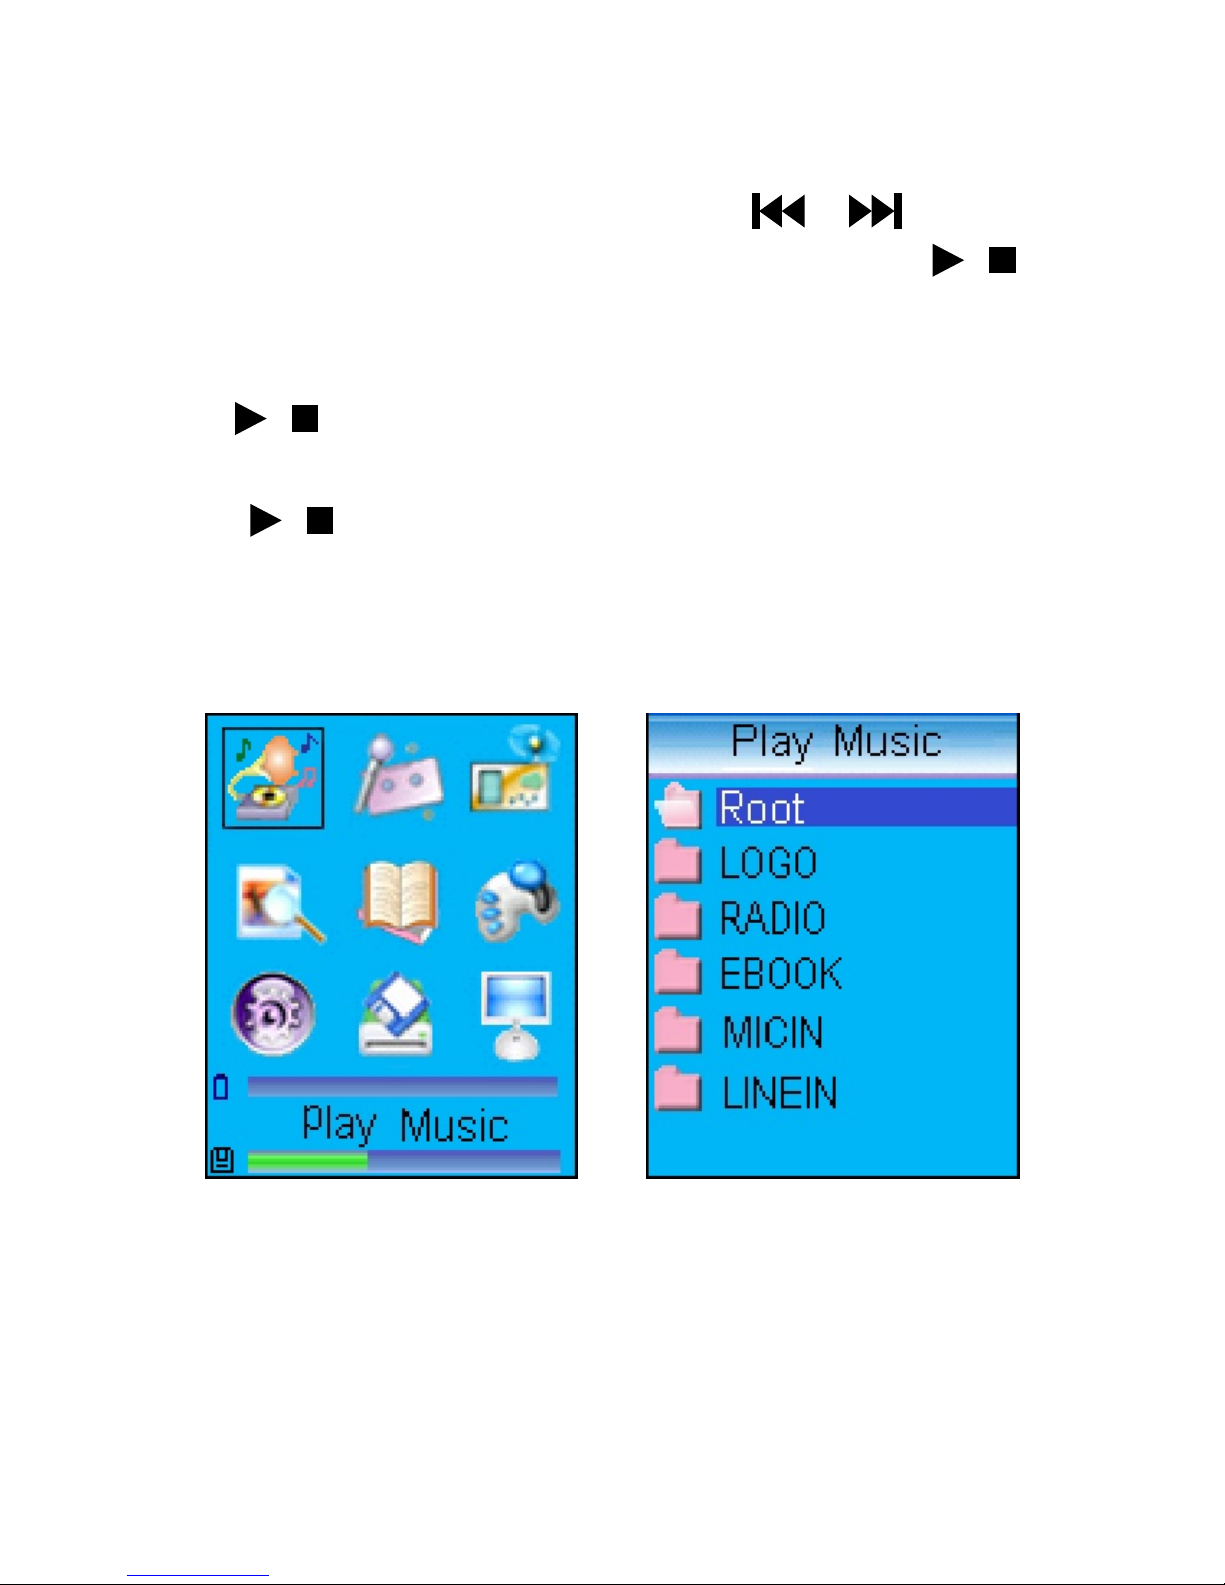
Play Music(II)
In the Main Menu (Fig. 1), press or “VOL+”
/ “VOL–” to select the music icon. Press “ ” to
access the Directory. List ( Fig. 2). Press “VOL+” /
“VOL–” to select the Root Directory and press
“ ” . A playlist of all available audio tracks in
your unit will be displayed. Select a track and press
“ ” to play . (Fig. 3 with lyric display). Click
“ESC” during playback of a track to return to the
playlist.
/
/
/
/
Fig. 1 Fig. 2
18
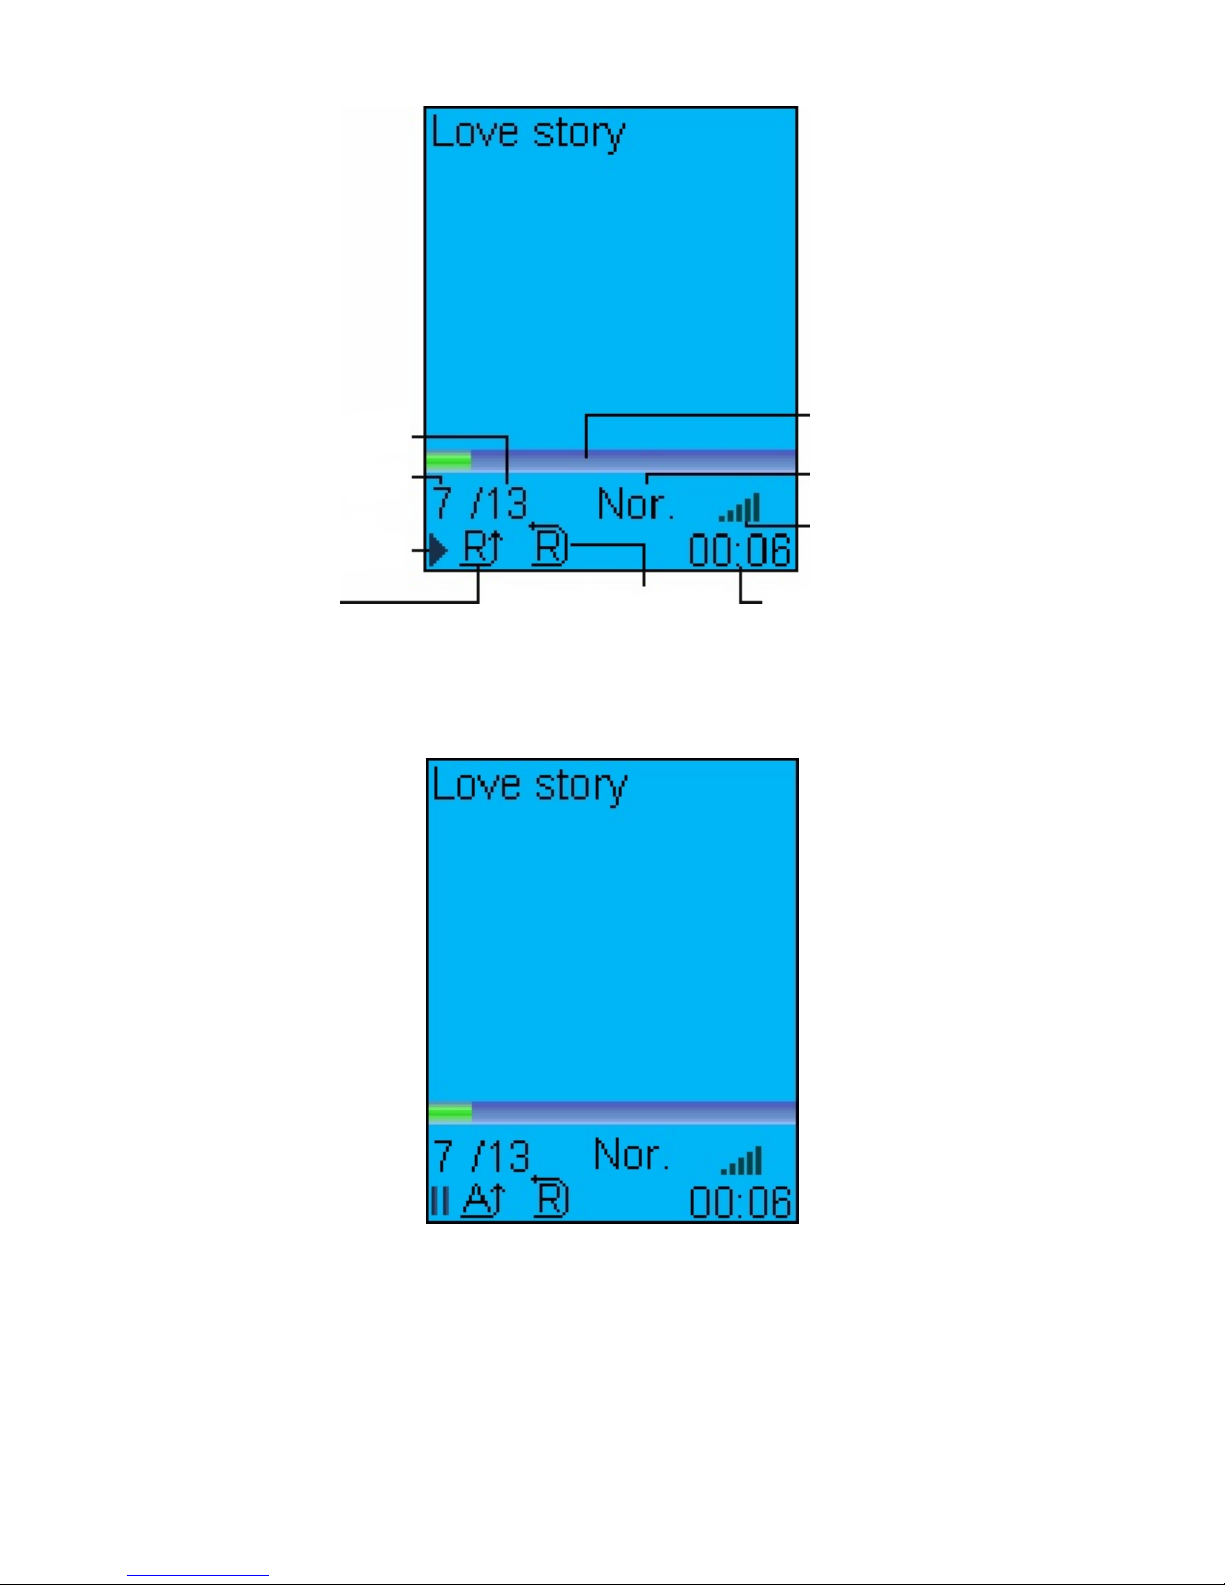
Fig. 3
Total tracks
Current track
number
Play mode
Play status
Timed repeat
Current played
time
Volume
EQ
Progress bar
of playing
Fig. 4
19

Downloading MP3 Music
There are websites on the internet where you can
download music in MP3 files to play back on your MP310.
Most of these websites charge a fee for the service. You
can visit some of these websites to get more information,
the latest techniques, and software related to MP3.
Examples of websites with MP3 contents:
• www.audible.com
• www.emusic.com
• www.mp3.com
• www.songs.com
1.
Press EQ key during play to shift between five preset
EQ modes. EQ can be manually set in the EQ Adjustment
menu. (Fig 6.)
How to setup EQ adjustment, play mode, play
duration and lyric synchronization?
When playing a track, click “MENU” to enter Play Setup
menu. (fig 5) Use “VOL+” / “VOL–” button to select
setting and press “ ” to confirm. There are four
settings in the Play Setup menu: EQ adjustment, play
mode, play duration, and lyric synchronization.
/
20
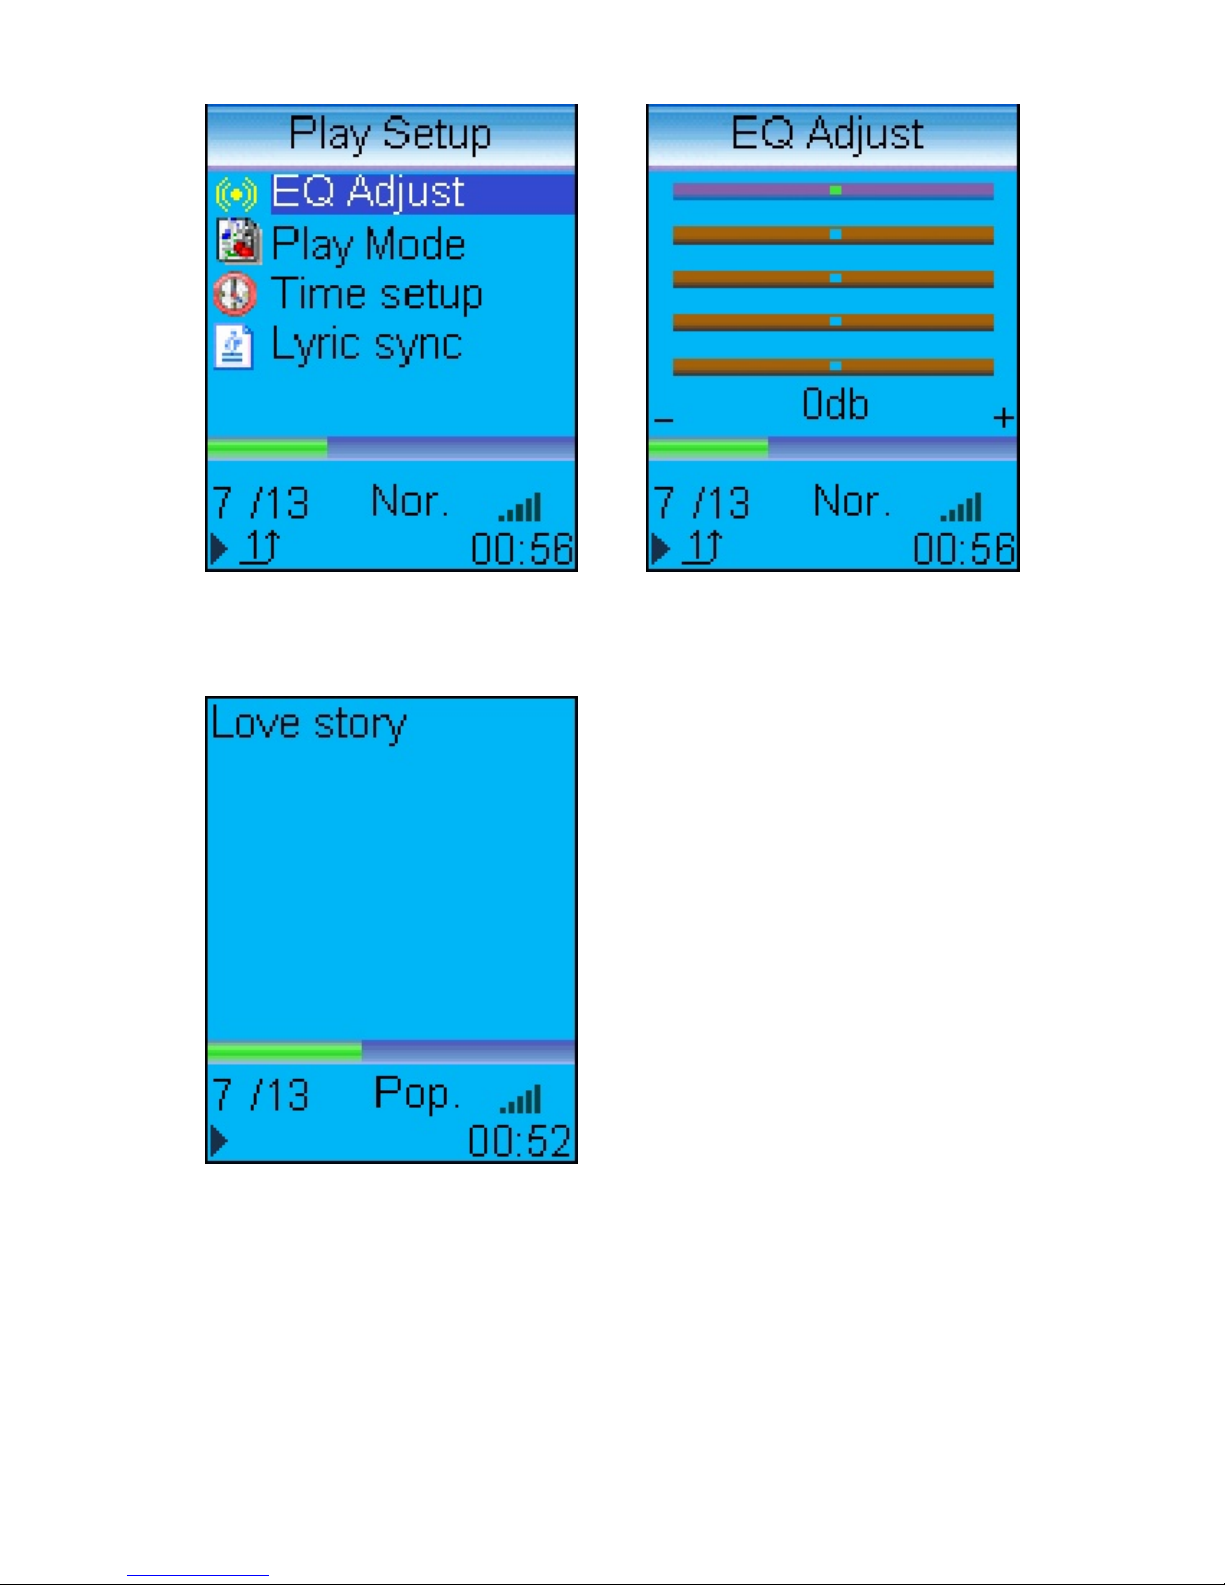
Fig. 5 Fig. 6
Fig. 7
21

Fig 6. Click “VOL+” / “VOL–” to shift to another audio
frequency then press “ ” to adjust. When done,
press “ ” to confirm and return to play menu.
(WMA only supports setting of Play Mode & Lyric
Synchronization.)
/
EQ adjustment:
/
Repeat playing current track. (Icon “ ”) Fig.5
Single track repeat:
Keep playing from the current track in the play list to
the last track. The screen will not display the Repeat icon.
(Fig. 7)
Normal play:
Repeat playing all files in the play list or in the player.
(Icon “ ”) Fig. 4
Repeat all:
Randomly playing tracks in the play list or in the player.
Icon in Fig 3 will be displayed when Random Repeat is
selected.
Random Repeat:
22

Including repeating duration and starting time. Press
“ ” and “ ” to shift between hour, minute
and second, then press “VOL+” / “VOL–” to adjust the
selected value. The repeating duration is the specified
repeating time. If the starting time of the preset
repeating time is not 0, the player will start playing
from the specified time. (WMA does not support this
function.)
Duration setting:
Select “ON” and press “ ” to confirm your
selection. Only tracks with lyric files will be able to
use this function. Lyric will not be displayed if the Lyric
Synchronization is set to “OFF”.
Lyric synchronization:
/
23
 Loading...