


HD900 User’s Manual
http://www.truly.net
http://www.picnroll.com
Digital Video, Photo & Audio Player

Welcome to the World of Pic’N Roll! We are pleased that you have
chosen the Pic’N Roll HD900 Digital Video & Photo & Audio
Player. Please be sure to read this manual carefully before using this
unit for the first time.
Overview
Safety Instructions
This electronic unit is of high precision. Please do not try to
disassemble this unit yourself.
Do not subject this unit to severe impact.
Do not expose to extreme temperatures, moistures, dusty area,
magnetic field or direct sunlight.
Clean the unit with soft cloth. Avoid using any chemical solutions.
Do not subject to water. Avoid placing this unit near objects that
contain liquid.
To avoid permanent hearing loss, please adjust the volume properly
before use.
Do not try to modify any part of this unit.
Only use the battery, charger and accessories that are recommended
by the manufacturer. Using non-manufacturer approved parts might
result in injuries and void of product warranty.
Dispose of this unit and its accessories according to your local
environmental regulations.
If you have any problems when using this unit, please contact your
local dealer or our customer service center at 1-866-pic-n-roll (U.S.).
Outside of U.S. please contact us at www.picnroll.com or
www.truly.net.
1.
2.
3.
4.
5.
6.
7.
8.
9.
10.
2

Declarations
Truly Electronics Mfg. Ltd. assumes no responsibility for any
damaged or loss data caused by accidental deletion of data as a
result of malfunction, repairs or battery replacement. Making
backups of important data on other media to protect against data
loss is strongly recommended.
This manual is based on the first version of this unit. Should there
be any changes, please see the revised manual in the supplied
installation CD or the corresponding manual on our company’s
website at www.truly.net.
Should there be any upgrade, please visit our website at
http://www.truly.net to download the latest drivers.
is a trademark of SRS Labs, Inc. SRS WOW technology is
incorporated under license from SRS Labs, Inc.
The pictures shown in this manual may be different from the actual
product screen.
Design of this unit is subject to change without notice.
1.
2.
3.
4.
5.
6.
FCC Notice:
This device complies with Part 15 of the FCC Rules. Operation is subject
to the following two conditions:
(1) This device may not cause harmful interference.
(2) This device must accept any interference received, including
interference that may cause undesirable operation.
3

Introduction
64K COLOR Display
Built-In 5GB, Store 1500+ songs / 5000+ photos
Photo Browser, support JPG / BMP / GIF formats
High Quality MP3 & WMA Music, DRM10 compatible
Voice Recording w/ built-in MIC / Direct encoding to MP3 format
E-Book / ASCII, Unicode, Txt
MPEG4 Video Playback (AVI in XVID codec)
Games
USB HOST / Link directly to other USB device
Synchronized Lyric Display (LRC)
Built-in Rechargeable Battery – 10 hours playback
❏
❏
❏
❏
❏
❏
❏
❏
❏
❏
❏
Product Features1.
Package Contents2.
Earphone
Charger
USB Cable
USB Adaptor
Silicon Holder with Clip
Armband
Lanyard
Installation CD
Quick Start Manual
Warranty Card
❏
❏
❏
❏
❏
❏
❏
❏
❏
❏
Please check the accessories in the package. Contact your local
dealer for any missing contents.
4

Microsoft Windows 98/2000/XP/ME
USB port
CPU Pentium 200MHz
CD-ROM
Up to 60MB of available hard-disk space
32MB of RAM
❏
❏
❏
❏
❏
❏
The supplied USB cable has 3 ports (see picture below). Port “A” for
charger, Port “B” for external device and Port ”C” for PC.
USB Port
Connect to
Charger
Connect to
External device
USB
Cable
USB
Port(PC)
RESET
System Requirements3.
Connecting to PC4.
5

Model:
Storage Media:
Port:
Transmission Speed:
Recording format:
Bit ratio:
Video File Format:
Recording time:
Display:
Battery:
Battery Charging time:
Playing time:
Maximum Output:
FM frequency range:
Size:
TRULY HD900
Built-in 5GB Micro Drive
USB2.0 High Speed
Over 14MBps
MP3/ADPCM
MP3 (32 Kbps ~ 320 Kbps),
WMA (32 Kbps ~ 256 Kbps)
AVI Format in XVID
50 hours (High Quality with power supply)
STN Colour LCD (Model), 65536 Colour
(Colour), 128 x 160 (pixels)
Lithium Polymer (950 mAh)
approx.4hours
Approx.10hours
Earphone 28mw° x 2
76.0~108.0MHz (Broadband)
80mm (length) x 54mm (width) x
19.5mm (height)
Technical Specifications5.
6
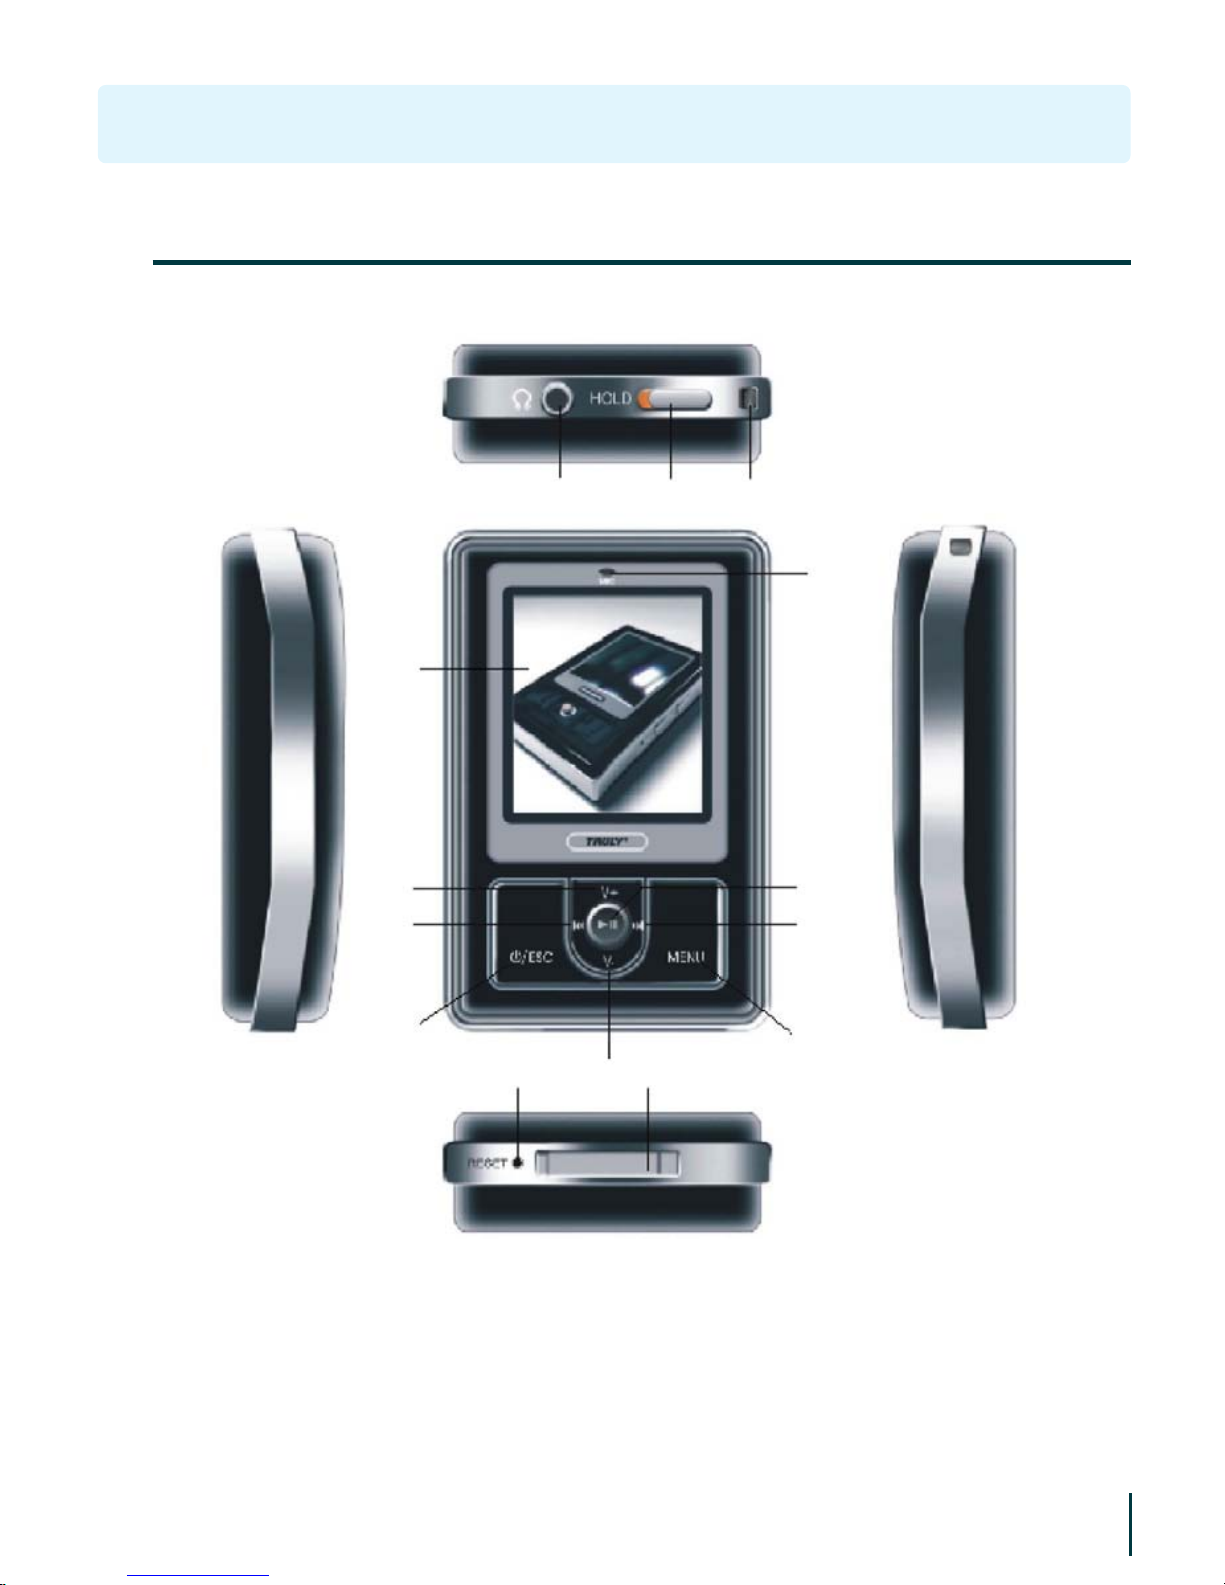
Buttons & Controls
Functions of the buttons / ports1.
(1) (2) (3)
(4)
(14)
(5)
(7)
(9)
(8)
(11)
(10)
(12)
(13)(6)
To lock up buttons from accidentally pressed. Slide button to HOLD
to lock. Slide button away from HOLD to unlock.
Earphone Port(1)
HOLD Button:(2)
7

Lanyard Hole(3)
• While listening to audio or the radio, press to adjust volume.
• While setting sound effects, press to alter sound level.
• In Game mode, press to move up/down.
• In Menu mode, press to move cursor up/down.
• While reading text, press to go to previous/next page.
Volume Up (V+) /(5)
Built-in Microphone(4)
Volume down (V–):(6)
• Press to rewind to the previous track. It will go to the last track if
the current track is the first in the list.
• While reading text, press to skip 10 pages back.
• In Play mode, press and hold to rewind to the beginning of
current track.
• In Sound Effect mode, press to switch between different sound
effects.
• While browsing a channel manually, press to reduce frequency.
• In Game mode, press to move to the left.
Previous / Rewind ( ):(7)
• Press to go to previous track. It will go to the first track if the
track is the last in the list.
• While reading text, press to skip 10 pages forward.
• In Play mode, press and hold key to fast forward in the current
track.
• In Sound Effect mode, press to switch between different sound
effects.
• While browsing a channel manually, press to increase frequency.
• In Game mode, press to move right.
Next / Fast forward ( ):(8)
8

• When power is on, press to play.
• While playing / recording, press to pause.
• Press to undo the pause function.
• Press to confirm and enter a menu.
• While listening to music / radio, press and hold to return to audio
menu. The player will continue playing allowing you to access
other menus. You can play games or view images while listening
to music / radio.
Play / Pause / Confirm:(9)
• Press and hold to turn the power on/off.
• In Menu mode, press to exit and go back to previous menu.
• While recording, press to save document.
Power ( ) / Escape ( ESC ):(10)
• Click to enter available menu options.
• Press and hold to switch between interfaces (Without stopping
the audio).
MENU:(11)
Press to reset when there is an error occurs.
RESET:(12)
• Connect to PC via the USB cable for USB connection.
• Connect to the charger via the USB cable for charging battery.
• Connect to external device, such as another MP3 player, via the
USB cable for external device connection.
USB Port:(13)
Display HD900 status and other useful information.
LCD Screen:(14)
9
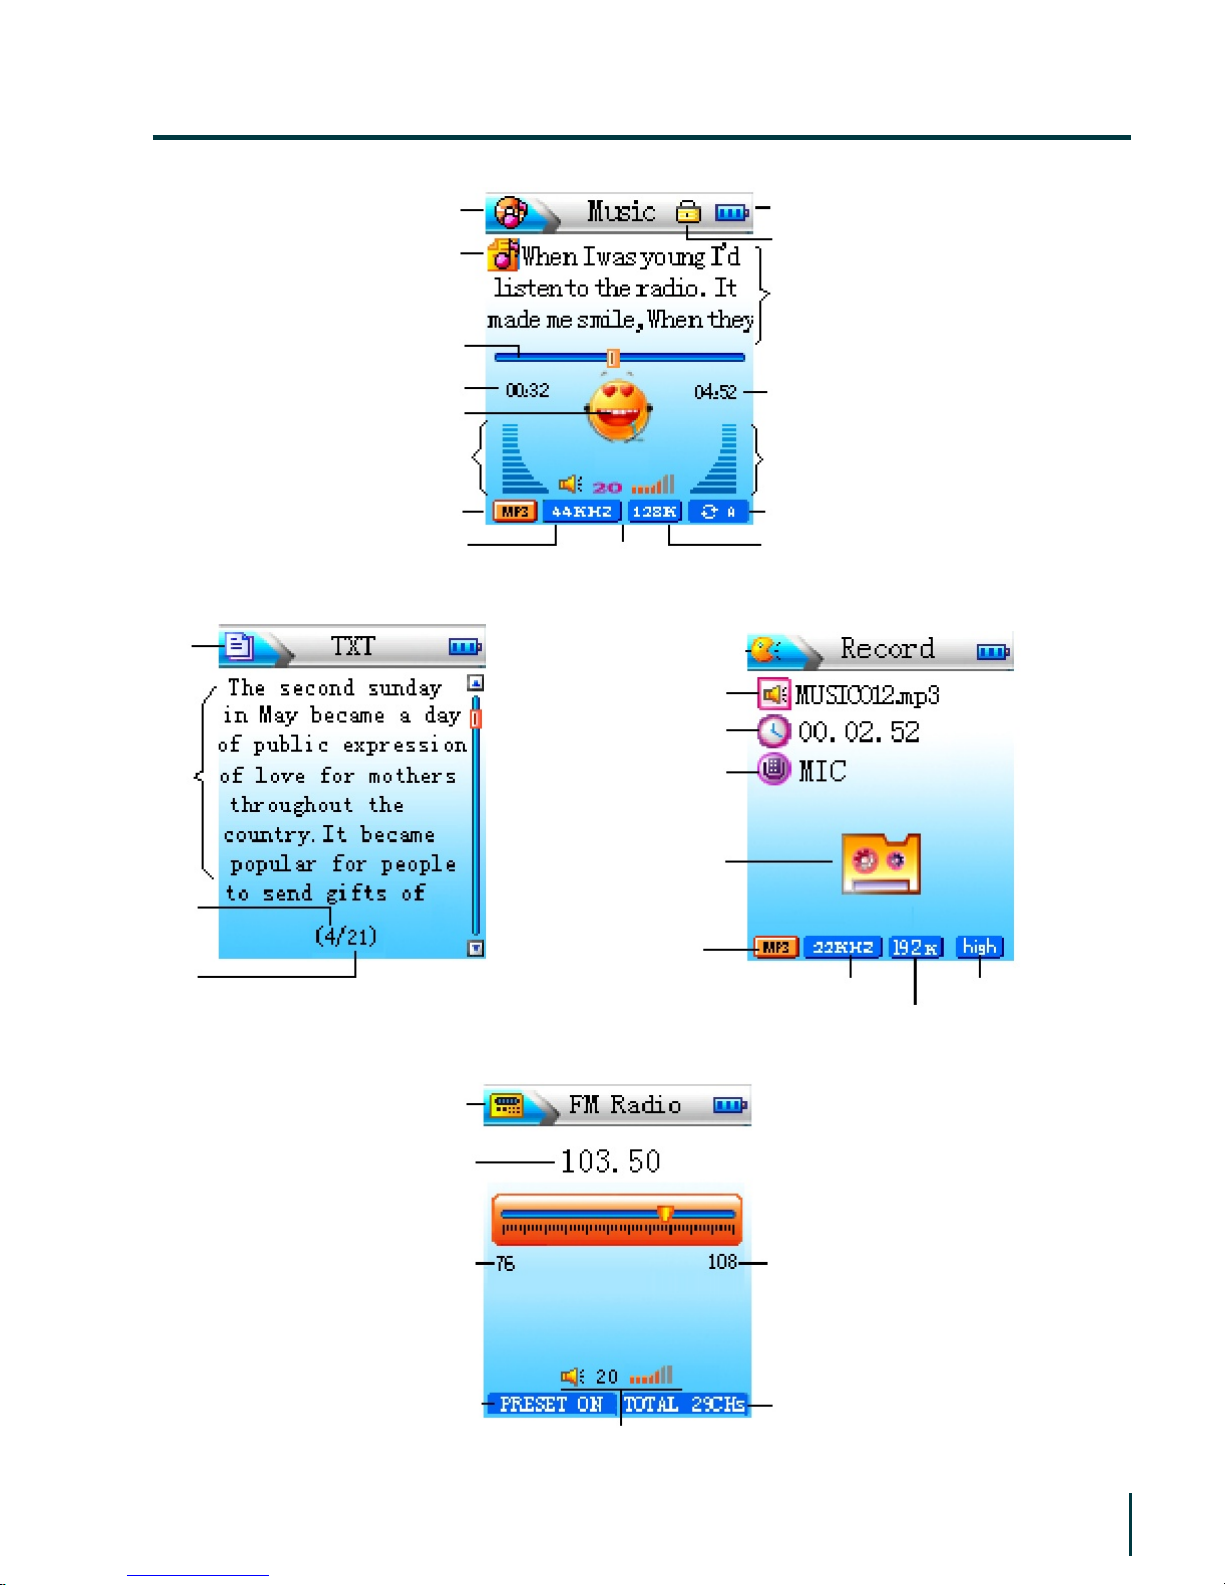
E-Book
Icon
Content
Current
Total
LCD Screen2.
Recording Icon
File Number
Elapsed Time
Source
Animation
File Type
Sample Rate
Bit Rate
Quality
Radio Icon
Current Station
Min Frequency
Preset Status
Volume
No. of Stations
Max Frequency
Music Icon
Music File
Progress bar
Elapse Time
Play Animation
Left Track
File Type
Sample Rate
Volume
Bit Rate
Repeat mode (all)
Right Track
Total Time
Lyric
Locked
Battery Information
10

There are two ways to charge the battery:
You can charge your HD900 by connecting it to your PC, using the
USB cable provided, or you can charge your HD900 by connecting it
to the charger using the USB cable, as shown in the picture below:
Hard drive USB interface
RESET
Charger
Power
indicator
USB port for
charger
USB port for
external device
USB port for PC
Note:
Always use the charger to recharge the battery to ensure a full
charge. Charging through USB connection as a secondary option
only.
❏
The running battery indicator bars on the screen will show the
charging progress. The indicator bars will be fully lit when the
battery is fully charged.
❏
Power3.
11

Please disconnect the charger when the battery is fully charged.
After using up the battery for the first time, it is recommended
that you charge the battery for two extra hours before
unplugging the charger.
❏
The battery status is showed by the indicator bar colors:
Blue – full Orange – middle Red – low
If the battery icon is empty, the alert message “Low battery,
recharge please!” will appear.
❏
12
Operation
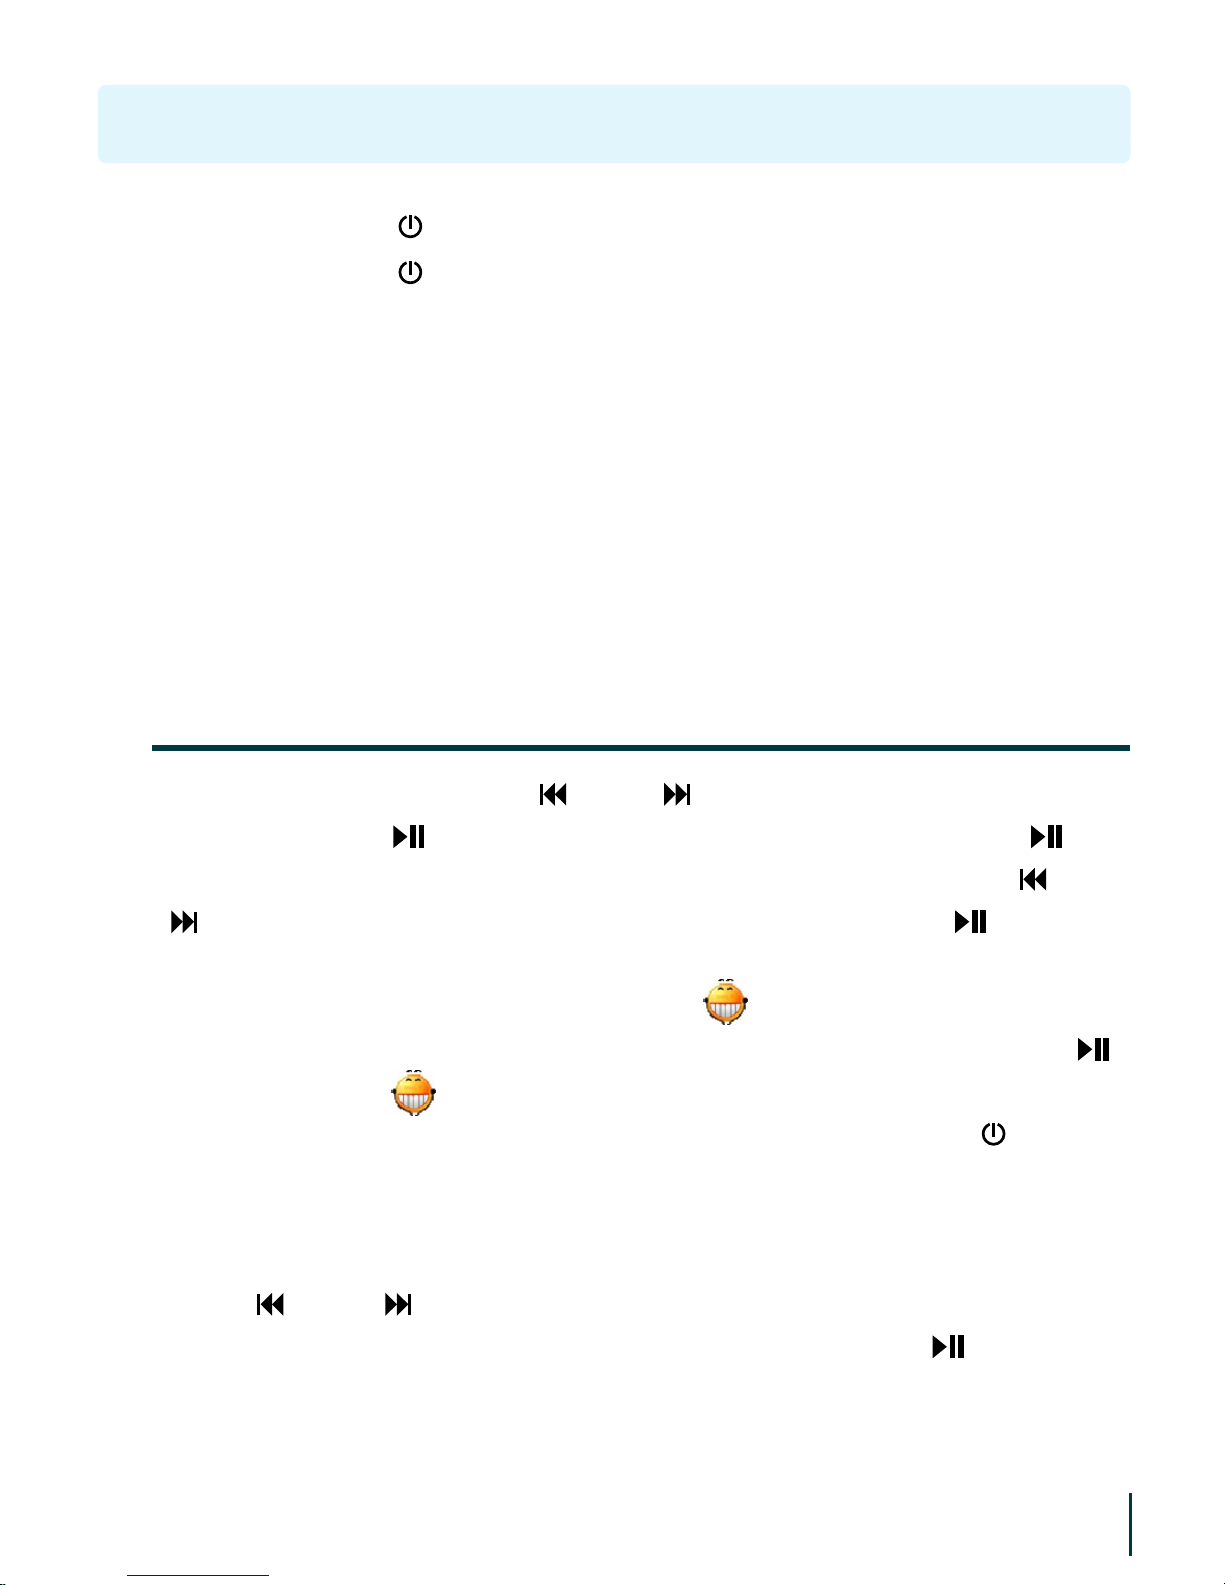
Press and hold [ /ESC] to turn the player on when power is off.ON:
Press and hold [ /ESC] to turn the player off when power is on.OFF:
TRULY HD900 player has an automatic power saving function, which
switches the power off if the unit is left idle for a period of time (set
by user). This function is non-active during the following activities: If
the player is connected to an operating computer; while playing
audio or video files; while in FM radio mode, or recording is in
progress.
❖
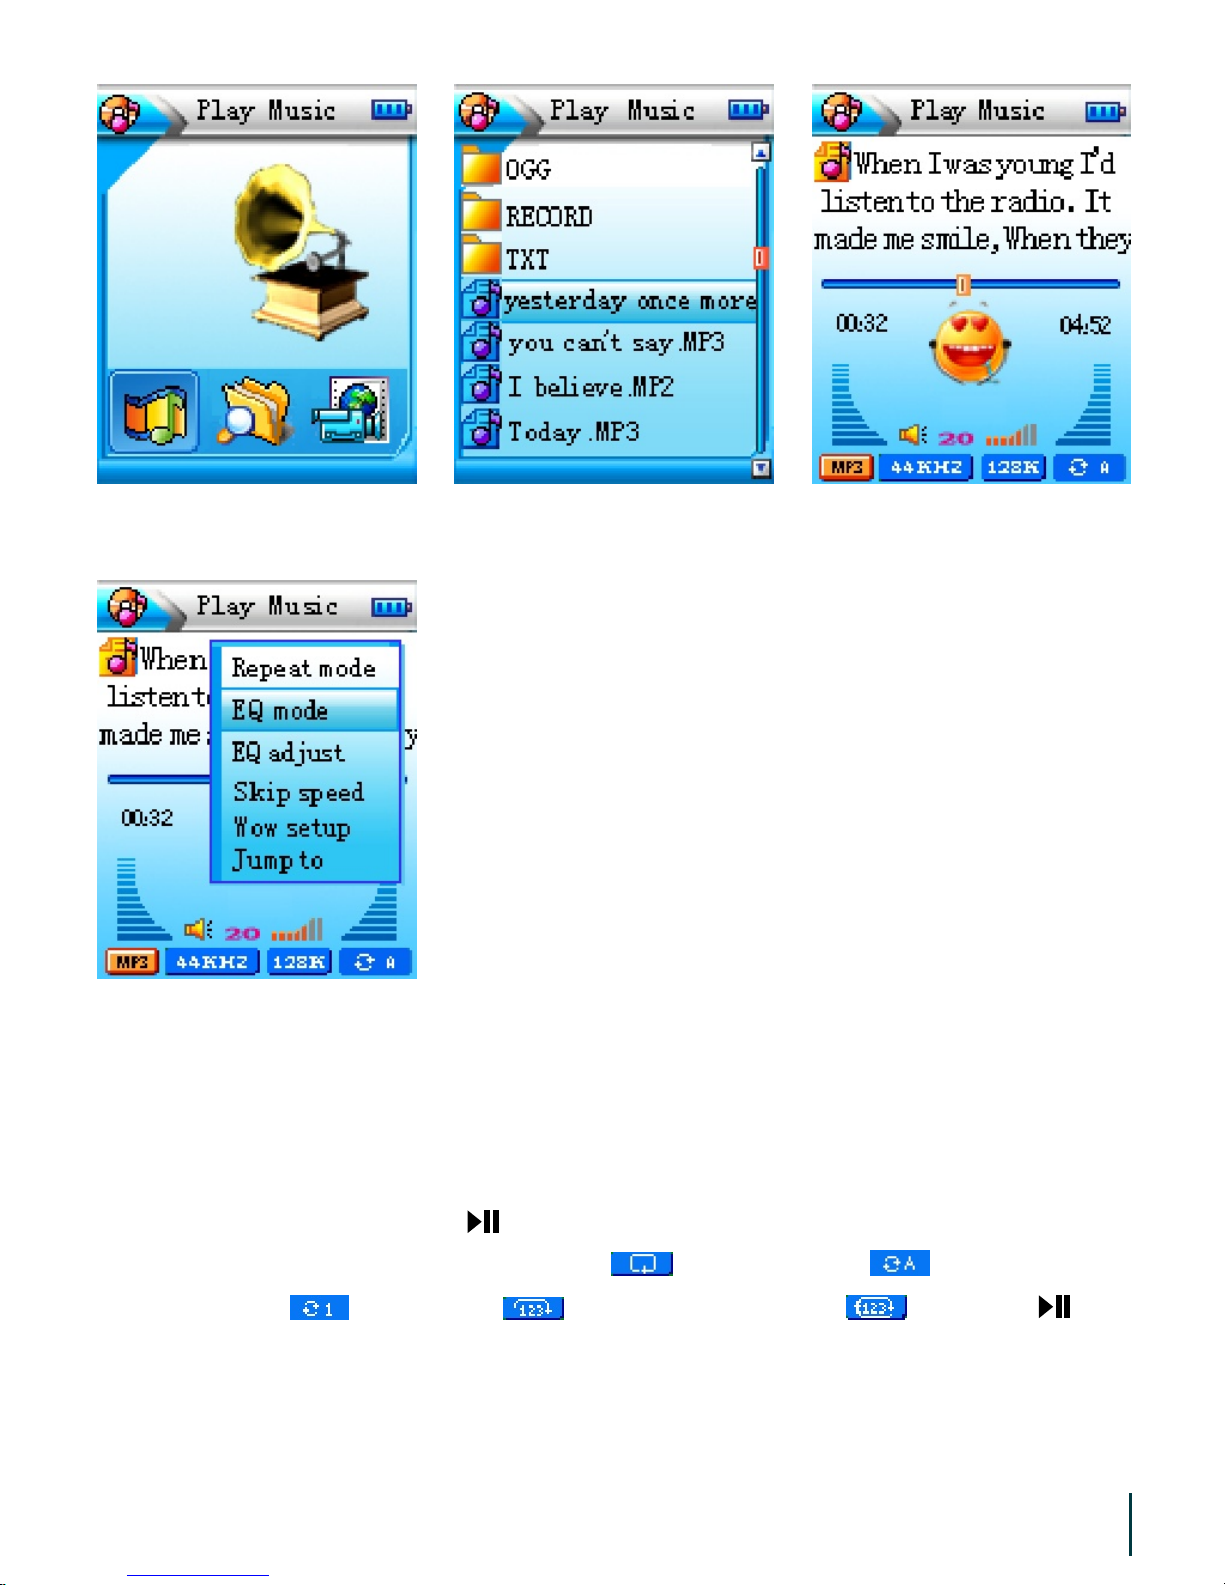
In the Main menu, press [ ] or [ ] to choose “Play Music”, see
figure 1. Click [
] to enter the hard drive menu, press [ ] to
confirm and enter a menu or a song list, see figure 2. Press [
] and
[
]to scroll through the menu or song list, then press [ ] to enter
the menu or play a song. The play mode interface is illustrated in
figure 3 (with lyrics displayed). Icon “ ” and “Left / Right Audio
Channel” will appear on the screen while playing a song. Click [
]
to pause, icon “ ” and “Left / Right Audio Channel” will be still.
Click the again to undo pause and resume playing. Click [
/ESC ] to
go back to the menu or song list interface.
In Play mode, Click [ MENU ] to enter the option menu, as shown in
figure 4.
Press [
] or [ ] to select “Repeat Mode, EQ Mode, EQ Adjust,
Skip Speed, WOW Setup or Jump To”, then press [
] to enter.
Music1.
13
Enter the menu option, press [ V+ ] and [ V– ] to select “Repeat
Mode” and press [
] to enter menu.
Press and to select Normal , Repeat All , Repeat One
Track , Shuffle or Repeat Shuffle , press [
] to
confirm.
a)
14
figure 1 figure 2 figure 3
figure 4
How to set Repeat Mode, EQ Mode and Lyrics Synchronization?(1)
15
Normal: Play all tracks in list once. “ ” will appear
on the screen.
Repeat All: Repeat all the tracks in the hard drive or in the
menu. “ ” will appear on the screen.
Repeat One Track: Play the selected track repeatedly. “ ” will
appear on the screen.
Shuffle: Randomly play all tracks in the hard drive or in
the list. “ ” will appear on the screen.
Repeat Shuffle: Repeat all tracks in the hard drive or in the list
in a random order. “ ” will appear on the
screen.
Enter menu options, press [ V+ ] and [ V– ] to select “EQ Mode”
press [
] to enter menu.
Press or to select Flat, UserEQ, Rock, Classic, Jazz or Bass, press
[
] to confirm.
b)
You just need to download the lyrics file of the selected song in
LRC format from the Internet and save them under the same
name in the same menu. For example, if the song file is named
“Angel.MP3” in the hard drive, your downloaded lyrics file
should be named “Angel.lrc”. Rename the file name in a PC if the
file names are different. Do not change the file extension. When
you play the song, lyrics will appear at the same time, as
illustrated in figure 3.
c)
16
How to use EQ Adjust, Skip Speed, WOW Setup and Jump To?(2)
In Music Menu mode, press [ V+ ] and [ V– ] to select
“EQ Adjust” and press [
] to enter.
EQ Adjust:
In Music Menu mode, press [ V+ ] and [ V– ] to select
“Skip Speed” and press [
] to enter. There are 4
options: 1X, 2X, 3X and 4X.
Music will fast forward at the speed you set. Select
“OFF” to undo.
Skip Speed:
There are 5 settings for SRS: WOW ON/OFF, WOW
SPEAKER, WOW FOUS, WOW WIDTH and WOW
TRUBASS. Surround sound is only applicable when
WOW is ON.
WOW Setup:
In Music Menu mode, press [ V+ ] and [ V– ] to select
“Jump To” and press [
] to enter the skip setting.
Press [
] or [ ] to select second, minute or hour,
then press [ V+ ] / [ V– ] to adjust the value.
Afterwards, press [
] to play. If the selected time
exceeds the length of the song, the player will
automatically skip to and play the next audio file.
Jump To:
Navigate within music mode: Press and hold [ ] to go back to
all play lists interface while playing music (the player will
continue playing the current track), then select a new play list.
a)
How to set music navigation?(3)
Navigate outside music mode: In music mode, press and hold
[ MENU ] to go back to the main menu. The player will continue
playing the current track. Press [ V+ ] and [ V– ] to select the new
mode you would like to enter. Press and hold Menu to go back to
your play list. You can read text files, view images, play games
and navigate while listening to music.
b)
17
Note:
If there is an error in Lyrics Synchronizations, please download
the lyrics again from the internet.
❏
Our Music software support files in WMA, MP3, WAV, OGG, MP2,
ADPCM format.
❏
You can only play audio files in the selected menu/ playlist.❏
When you connect to TMusic the system will categorize all the
audio files in the hard drive and save the list under the submenu
of Music, see figure 5.
❏
figure 5

18
In the main menu, Click [ ] or [ ] to select “Explorer” as
illustrated in figure 6. Press [
] to enter main menu. Select
[ MENU ] and press [
] to see Memory Status: Disk Space and Free
space, see figure 7. Press [
] to enter folder list, see figure 8. Press
[ MENU ] to enter the option menu, see figure 9. The options are:
Copy, Paste, Delete, Go to Disk List. Press [ V+ ] / [ V– ] to select
function and press [
] to confirm.
Files Management2.
figure 6 figure 7 figure 8
figure 9

19
figure 10
For example, if you select “Copy”, please select a location, then press
[ MENU ] and a menu will pop up as illustrated in figure 10. Press
[ V+ ] / [ V– ] to select “Paste” then press [
] to confirm.
Copy files or folders in the hard drive or external
device.
Copy:
Paste copied files or folders in selected location.Paste:
Delete files or folders.Delete:
Go back to the main menu.Go to Disk List:
Connecting to an external device
❖
Besides transferring data within the hard drive, you can connect the
HD900 to an external device via the supplied USB cable to transfer
data, or playback files directly from external device.

20
In “Explorer” main menu, connect the player and the external
device via the supplied USB cable, using the USB port for external
device as illustrated in the picture:
a)
USB Port
External Device
Connect to the
charger
RESET
Connect to the
external device
Connect to PC
The external device icon (D :) will appear in the file management
menu, see figure 11.
b)
figure 11

21
Press [ V+ ] / [ V– ] to select “Hard Drive ( C : )” or “External
Device ( D : )”, press [
] to enter submenu.
c)
All files will be displayed in the browsing menu. External Device
will be recognized as DEVICE. Loading time depends on the
external device size and saving format.
d)
Press [ V+ ] / [ V– ] to select folder or file. Press [ MENU ] for Tool
List.
e)
Press [ V+ ] / [ V– ] to select COPY. Press [ ] to confirm and copy
file.
f)
Select location, then press [ MENU ] to enter Tool List.g)
Press [ V+ ] / [ V– ] to select Paste, Press [ ] to confirm and paste
file.
h)
Note:
Host function only works with common USB drives or storage.❏
Please connect your player to the charger while using the Host
function to ensure there is no low power interruption.
❏
You can only copy one file or folder at a time. If you are copying
a folder, all files in that folder will be copied. Subfolders will not
be copied.
❏
Follow the same procedures to copy files from the HD900 to an
external device.
❏
You can delete files or folders by selecting “Delete”. However, if
there are subfolders in the selected folder, you cannot delete the
files in the subfolders directly.
❏
You can browse up to 500 folders / 1000files.❏
In “Explorer” mode, you can play documents in all formats.❏

22
In the Main Menu, Click [ ] or [ ] to select “Play Video”, see
figure 12. Press [
] to enter menu, then press [ ] to confirm and
enter a menu or a video file list, see figure 13. Press [
] or [ ] to
select menu or video file and press [
] to confirm and play. Press
[ V+ ] or [ V– ] to adjust volume (without volume control indicator).
Press [
] or [ ] to scroll through files (playing). Press and hold
[
] or [ ] to rewind or fast forward the current track. Press
[ MENU ] to enter the video menu options, see figure 14.
Video3.
figure 12 figure 13 figure 14
Press [ V+ ] or [ V– ] to select Repeat Mode.Repeat Mode:
Normal, Repeat All and Repeat One Track. (Please
refer to Music for more information.)
Options:

23
Note:
For files in AVI format, streaming audio must be in MP3 format.❏
Maximum frame size is 158 x 126. File will be played in horizontal
full screen.
If frame size is smaller than or equal to 128 x 160, file will be
played in vertical screen.
❏
Rewind / Fast Forward Speed Setting available (Please refer to
Music for more information).
❏
AVI files can be played in Explorer.❏
Surround Sound can be switched off.❏

24
The earphones serve as the antenna in radio mode. Please plug in
the earphones during frequency navigation or you will not be able
to tune in to any radio stations.
FM Radio4.
Important Note:
In the main menu, click [ ] and [ ] to select “FM Tuner”, see
figure 15. Press to enter broadcast interface, see figure 16. If there
are channels saved in the player already, press [ MENU ] to enter the
menu options, see figure 17. Select Station List, see figure 18. Press
[ V+ ] or [ V– ] to select station and press [
] to listen, broadcast
interface is illustrated in figure 16. Press [ V+ ] or [ V– ] to adjust
volume while listening. Press [
] or [ ] to change station. Press
[
/ESC ] to exit and go back to the previous menu.
figure 15 figure 16

25
figure 17 figure 18
Navigating and saving frequencies(1)
In reception interface, press [ MENU ] to turn off Preset mode.
Click [
] or [ ] to start navigating manually. When you find
the channel you want, press [
] to save.
Manual search and store radio stationsa)
In reception interface, press [ MENU ] to turn off Preset mode.
Press and hold [
] or [ ] to start navigating automatically, all
channels scanned will be saved automatically.
Automatic search and store radio stationsb)
Note:
Some channels maybe inaccessible in area where radio signals
are weak.
❏
You can save up to 30 channels. You can always add new stations
by deleting the old ones.
❏
The player cannot navigate channels automatically when Preset
mode is on.
❏

26
How to set Preset, Frequency Level and Step Setting?(2)
In the FM menu options, select Preset and press
[
] to enter Preset ON/OFF mode.
Preset:
Press [ ] or [ ] to select “Frequency Level” and
press [
] to enter setting. Use [ V+ ] or [ V– ] to
set level for automatic navigation. This function
helps minimize interruption while receiving
signals in different geographic locations.
Frequency Level:
Press [ ] or [ ] to select “Step setting” and
press [
] to enter. To set the rate for manual
navigation, press [ V+ ] or [ V– ] to select location
(0.10MHZ, 0.05MHZ, 0.01MHZ), then press [
] to
confirm.
Step setting:
FM Recording(3)
Deleting a channel(4)
In Radio Stations List interface, Pres [ V+ ] or
[ V– ] to select the channel to delete. Press
[ MENU ] and “Delete Station” menu will
pop up, see figure19. Press [
] to delete.
Press [
/ESC ] when “Delete Channel”
pops up to cancel.
figure 19
While receiving a radio station signal, click [ MENU ] to enter the
the option menu, Press [ V+ ] or [ V– ] to select “FM Recording” and
press [
] to record. Icon “ ” will pop up. Click [ ] to pause.
Press [
/ESC ] to stop recording and the system will save the file
automatically.

27
In the main menu, click [ ] or [ ] to select “Photo Browser”, see
figure 20. Press [
] to enter hard disk menu, then press [ ] to
confirm and enter the image list, see figure 21. Press [ V+ ] / [ V– ] to
select image file and press [
] to view, see figure 22. In viewing
mode, press [ V+ ] / [ V– ] to view the previous / next image. Press
[ MENU ] to enter the option menu, see figure 23. There are three
options: Zoom, Move, Slideshow.
figure 20 figure 21 figure 22
figure 23
Image viewing5.

28
Press [ V+ ] / [ V– ] to select “Zoom” and press [ ] to confirm.
Icon “ ” will appear in the right bottom of the image, press
[
] or [ ] to zoom in and out the image.
a)
Press [ V+ ] / [ V– ] to select “move” and press to confirm. Icon
“ ” will appear in the right bottom of the image. Press [
]
and [
] or [ V+ ] and [ V– ] to move image.
b)
Press [ V+ ] or [ V– ] to select “Slideshow” and press [ ] to
confirm, set the slideshow time, from 1 to 6 seconds. Slideshow
will be OFF when it turns to the last page.
c)
How to listening to music or FM radio while viewing images?
Listening to music:
While viewing an image, press and hold [ MENU ] to go back to
main menu. Press [
] or [ ] to select “Play Music”, select a song
and press [
] to play. Press and hold [ MENU ] again to go back to
main menu, press [
] or [ ] to select “Photo Browser”. Press
[
] again to continue viewing the current image. Then, you can
enjoy listening to music and viewing images at the same time.
FM Radio: Same as above.
Note:
You can only move image after you zoom in the image.❏
Press [ ] to browse between “Zoom and Move”.❏
This player support JPG, BMP, GIF, and LOGO format.❏
Images with higher resolution may take longer to open.❏
JPEG supports images up to 5000 x 5000 pixels, in 4:2:0, 4:2:2,
4:4:4 or any other ratio in whole figure. Maximum 5000:5000 for
BMP images.
❏

29
In the main menu, click [ ] and [ ] to select “E-Book”, see
figure 24. Press [
] to enter hard drive menu, press [ ] to
confirm and enter menu or text file list, see figure 25. Press [
]
and [
] to select menu or text file and press [ ] to confirm and
enter text reading interface, see figure 26. Press [ V+ ] / [ V– ] to
scroll up and down pages, press and hold [ V+ ] / [ V– ] to speed up
page scrolling, press [
] and [ ] to skip 10 pages. In text reading
mode, click [ MENU ] to enter the option menu. There are 4 options:
Set Bookmark, Bookmark List, Auto Page Down, Locate Page, as
illustrated in figure 27.
E-book6.
figure 24 figure 25 figure 26
figure 27

30
Click [ ] and [ ] to select “Set Bookmark”, icon “ ” will
appear, see figure 26. Maximum 7 files can be set for each file. If
more than 7 files are set, new bookmarks added will overwrite
the previous ones (starting from the first).
a)
How to add bookmark and use bookmark list?(1)
Press [ ] or [ ] to select “Bookmark List”, see figure 28. Click
[
] to enter. Press [ V+ ] and [ V– ] to select a bookmark, then
click [
] to go to the bookmarked page.
b)
figure 28
Enter text reading option menu, see figure 27. Press [ V+ ] and
[ V– ] to select “Auto Page Down” and press [
] to confirm.
Pres [ V+ ] or [ V– ] to set page turning time (1~6S). To undo the
automatic page turning function, select “OFF”.
a)
How to use the Auto Page Down and Locate page?(2)
After setting “Auto Page Down”, press [ ] and [ ] or [ V+ ] /
[ V– ] to pause the function. Press [
] again to resume the
automatic page turning function.

31
Enter text reading option menu, see figure 27. Press [ V+ ] / [ V– ]
to select “Locate Page” and press [
] to confirm and enter.
Press [
] or [ ] to scroll between units, then press [ V+ ] / [ V– ]
to set value. Afterwards, press [
] to skip to the page selected.
If the page number you set exceeds the total number of pages in
the text file, it will skip to the last page automatically.
b)
Listening to music: While reading a text file, press and hold
[ MENU ] to go back to main menu. Press [
] or [ ] to select
“Play Music”, select a song and press [
] to play. Press and hold
[ MENU ] again to go back to main menu. Press [
] or [ ] to
select “E-Book”. Press [
] again to continue reading the E-Book.
Then, you can enjoy listening to music and reading an E-Book at the
same time.
How to listening to music or FM radio while reading an E-book?(3)
Note:
The HD900 supports text file in txt, ANSI, Unicode, Unicode
Big Endian format.

32
This player allows you to make high quality recordings, such as FM
line-in recordings, external recording via a MIC (with its built-in
microphone), etc. The length of time available for your recordings
depends on the quality and the size selected.
Setting Up recording7.
In the main menu, click [ ] and [ ] to select “Recorder”, see
figure 29. Press [
] to confirm and enter recording menu, see
figure 30. There are 3 options: Start Recording, Recording Format
and Recording Quality.
figure 29 figure 30
In recording menu, press [ ] or [ ] to select “Start Recording”
and press [
] to start. Recording icon will pop up as illustrated in
figure 31. Click [
] to pause, click [ ] again to continue. Press
[
/ESC ] to save the recording and go back to the main menu.
Record(1)

33
figure 31
Note:
Please make sure there is sufficient power before recording.❏
Recording will stop automatically if the unit is running out of
free space.
❏
Audio playback will be interrupted while the unit is in recording
mode.
❏
Recorded files will be named and saved as “MUSIC001.mp3” or
“MUSIC001.adp” etc ...
❏
Recorded files will be saved in the folder of “RECORD” in the
system.
❏

34
Press [ ] or [ ] to select “Recording Format” and press [ ] to
enter, see figure 32. You can choose between MP3 format and
ADPCM format.
Recording format(2)
Press [ V+ ] or [ V– ] to select “Recording Quality” and press [ ] to
enter, see figure 33. Press [ V+ ] or [ V– ] to select quality: Low,
Medium and High. For MP3 format, Low quality is 96kbps, 44.1 kHz.
Medium quality is 128kbps, 44.1 kHz. High quality is 192kbps,
44.1 kHz. Press [
] to go back to the previous menu after setting
the quality.
Recording Quality(3)
figure 32
figure 33

35
In the main menu, press [ ] and [ ] to select “Games”, see
figure 34. Press [
] to enter game menu, see figure 35. Press [ ]
or [
] to scroll between games (Escape! / Push Box / Guess What /
Snake). Press [
] to start. Press [ /ESC ] to exit.
Games8.
figure 34 figure 35
The player will control the thief. The object of the game is to get all
the gold blocks and get to the top of the ladder without being
caught by the cops. During game play, player can dig holes, each
hole can trap one cop. However, player can only dig holes on the
green ground. The player cannot dig holes on the bronze ground or
under a staircase. When the player gets all the gold blocks, a ladder
will appear in the sky. The player can go to the top of the stairs and
enter the next level. Press [
] to enter the game option menu.
Operation:
There are 10 levels to pass.
Level:
Escape !(1)

36
Move the characters to push all the boxes into the blue area. You
are only allowed to push one box at a time. The character can go
into the blue area. Press [ MENU ] to select level.
Operation:
There are 30 levels to pass.
Level:
Push Box(2)
There will be a set of 4 different hidden numbers. The player will
enter 4 numbers each time, Press [
] and [ ] to select location
and press [
] to confirm. Press [ V+ ] / [ V– ] to select a number,
press [
] to confirm. If both number and location placed are
correct, it will be marked as A. If the correct number is placed in a
wrong place, it will be marked as B. They player can try 8 times. A
hint will be given after each correct guess. The answer will be given
after 8 tries, which means the game is over. (Please do not enter the
same number, the first digit cannot be “0” or empty.)
Operation:
Guess What(3)

37
Press [ ] and [ ] or [ V+ ] and [ V– ] to control the snake so to eat
fruit. The snake will grow longer according to the amount of fruits
it eats. When its head touches its tail, or when it goes outside the
border, the game is over. Press [ MENU ] to select level.
Operation:
There are 8 levels to pass.
Level:
Snake(4)
Note:
The player can go to the Main Menu to select other functions,
for example, playing an audio track or listening to the FM
radio, by pressing and holding [ MENU ] while playing games.
The game will pause automatically. The player can continue
the game once return to the game mode.

38
When the power is on, click [ ] and [ ] to select “System
Setting”, see figure 36. Press [
] to confirm and enter the menu,
see figure 37. Press [ V+ ] or [ V– ] to select and press [
] to enter.
You will find the following functions in the menu: Language,
Contrast, Backlight, Power Off Setting, Color Themes, Default
Settings, Memory Status and Version Information etc.
System Settings9.
figure 36 figure 37
Enter system setting, click [ V+ ] or [ V– ] to select “Language”, then
click [
] to enter language option interface. The user can choose
English, Simplified Chinese or Traditional Chinese. Press [ V+ ] or
[ V– ] to set the language, then click [
] to confirm.
Language(1)
Click [ V+ ] or [ V– ] to select “Contrast” and click [ ] to enter, use
[ V+ ] or [ V– ] to adjust the brightness, then press [
] to confirm.
Contrast(2)

39
Click [ V+ ] or [ V– ] to select “Backlight Setting” and press [ ] to
enter. The options are: Backlight Time Setting and Backlight Mode.
Backlight(3)
Enter “Backlight Time Setting” interface,
press [ V+ ] or [ V– ] to select “Always On”,
“3 sec.”, “5 sec.”, “7 sec.”, “10 sec.”, “30
sec.”, “1 min.” or “2 min.”, then press [
]
to confirm. Background light will turn off
automatically after the period of time set
and default the Backlight mode you set.
Backlight Time Setting:
Backlight off or Backlight Translucent.Backlight Mode:
Click [ V+ ] or [ V– ] to select “Power Off Settings” and press [ ] to
enter menu. There are two options: “Auto Power Off” and “Timer
Power Off”.
Power Off Settings(4)
User can set their own “Auto Power Off” shut
down time. Press [ V+ ] or [ V– ] to set time, then
press [
] to confirm. The system will shut down
automatically if the unit is left idle for the set
period of time.
Auto Power Off:
Press [ ] or [ ] to select “Timer Power Off” and
press [
] to enter preset interface. Click [ V+ ] or
[ V– ] to set time.
e.g. OFF~05:00. The system will close all the
programmes in use and shut down at the preset
time. Click “OFF” to undo the preset function.
Timer Power Off:

40
Click [ V+ ] or [ V– ] to select “Color Themes” and press [ ] to
enter menu. Press [ V+ ] or [ V– ] to set colour, press [
] to confirm.
Color Theme(5)
Click [ V+ ] or [ V– ] to select “Default Settings” and press [ ], a
dialogue box will pop up. Use or to select “Yes” or “No”.
Load Default(6)
Click [ V+ ] or [ V– ] to select “Memory Status” and press [ ] to see
“Disk Space” and “Free Space”. Then press [
] to exit.
Disk Information(7)
Click [ V+ ] or [ V– ] to select “Version Information”. Press [ ] to
see Version information such as MP3 model / Version / Date.
Version Information(8)

41
Removable Storage
This product can be used as a USB flash disk in WIN 2000 / XP / ME
operating system to upload / download files in any format. If the file
types being stored in the HD900 are not in WMA, MP3, WAV, OGG, MP2,
ADPCM or recording format, they cannot be playback by the HD900.
Safe USB removal
To avoid data loss from sudden removal of USB port, please click the
icon “ ” in the right bottom of the Windows desktop, and follow
the instructions to exit USB safely.
Note:
In some Windows XP systems, the icon may be hidden. Click
“Display hidden icon” to see all hidden hardware icons.
1)
During the operation of some programs, such as Windows Explorer
or Windows Media Player, “Safe Hardware Removal” may not be
applicable. Please exit all programs before you operate “Safe
Hardware Removal”.
2)
In some Windows systems, “Safe Hardware Removal” may have
temporary failure. Please try again later.
3)

42
Installing, using, and uninstalling
of the supplied software
Insert the supplied installation CD in the CD-ROM drive, wait until
the main interface appears, see figure 38.
Note:
The following operations are performed in a Win2000 system.
The screenshot may be different when these operations are
performed in other operating system.
Installation1.
figure 38

43
Click “Install TMusic”, then follow the instructions to install “LRC
Lyrics editor”, “TMusic” and “U drive detector”.
(1)
Click “Install Video Converter For HD900”, then follow instructions
to install.
(2)
You can install DirectX 9 if necessary.(3)
Click “Read User Manual” to browse the instructions of the player.
The instruction manual is in PDF format. If your computer cannot
read PDF files, click “Install Adobe Acrobat Reader” to install the
software, see figure 38.
(4)
Insert the supplied installation CD in the CD-ROM drive, wait until
the main interface appears, see figure 38.
Using T-Music Music Manager (Figure 39)2.
Play
Previous
Next
My Libray
MP3 Player
Volume
Playlist
Audio CD
Repeat Mode
Play Mode
Add files
figure 39

44
Please see the help files for LRC lyric editor for details.
LRC lyric editor(1)
How to convert music from a CD to MP3 using your T-Music
software:
(2)
Run the Install T-Music Music Manager software from the HD900
Installation CD. You only need to install the software once before
using it for the first time.
a)
Once successfully installed, open the T-Music software.b)
Insert a music CD into your computer’s CD-ROM.c)
Press Audio CD once in the directory to the left of the program
screen.
d)
A list of music contain in the CD will display in the content
screen.
e)
Click on the track to be converted once, then Right-Click on
mouse to select the “Extract selected CD tracks to MP3”. More
than one track can be converted using the multiple files selection
method. (e.g. Ctrl + Left Click on mouse to select multiple tracks)
f)
In the CD tracks to MP3 file screen, you have the options to select
Bit Rate & Sample Rate. Selecting the default setting is always
recommended.
g)
Options for saving copies of the tracks onto your T-Music library
are also available. If you do not desire to save the music in your
T-Music library, uncheck the “Add to My music library” and “Add
to list” options.
h)

45
Press the Browse to locate the folder on your PC where you
would like to music to be saved. If you would like to save the
converted music directly onto your HD900, connect the HD900 to
your PC before starting the conversion process. You will be able
to locate your HD900 in your PC as a Removable Disk Drive. In
this case select the Removable Disk Drive as the destination when
browsing.
i)
The music conversion status bars will disappear when done.j)
Please refer to the program’s help menu for other program
instructions.
k)
This software coverts *.avi, *.mpg, *.mpeg, *.mpr files into *.avi
format.
Video Converter For HD9003.
If T-Music can not find the player, use U Disk Detector to help the
system identifying the Removable Drive.
U disk detector(3)
Double Click the icon “ ” on the desktop or click “Start /
Programme / VirtualDub / VirtualDub” on the desktop to start the
software. The following interface will appear, see figure 40.

46
Click “Video-Filters” in the menu, then press “Add” in the dialogue
box. Select “Resize-OK”, and a dialogue box will pop up, see
figure 41. Then reset New width to 160 and New height to 128 in
the dialogue box and click “OK”.
(1)
Operation:
figure 40
figure 41

47
Click “Video-Frame Rate”. Select “Convert to fps” in dialogue box
and enter “13”.
(2)
Click “Video-Compression”. Select “Xvid MPEG-4 Codec” in
dialogue box. Click “Configure” in dialogue box (load defaults
setting Profile@Level: Simple@L3 Target bitrate (kbps): 128 ), then
click “OK”.
(3)
Click “Video-Full processing mode”, “Audio-Full processing mode”.(4)
Click “Audio-Conversion”. Select 44100Hz 16-bits Stereo - OK.(5)
Click “Audio-Compression”. Select Lame mp3 and 44100Hz,128kbps
CBR,Stereo - OK.
(6)
Click “File-Open video file”. Select the file format to convert into.(7)
Click “File-Save as avi” to save the converted file.(8)
Connect the player to the computer via a cable. “USB ready” will
appear on the player, double click “My Computer” and find an extra
local disk [for example, local disk K (K:)]
HD900 Update tool and Usage4.
Copy the file to be downloaded from the computer, and paste it
in K: drive directly.
Download (from computer to player)(1)
Copy the file to be uploaded in K: drive and paste it in your
selected location in the computer drive directly.
Upload (from player to computer)(2)

48
Select the file to be deleted in “Local disk (K:)”, then right click
and select “Delete”, or press [ Delete ] in the keyboard.
Delete(3)
After you connect the player to the USB port of a computer,
you will find a “Removable Drive” in “My Computer”. Select
it, then right click and choose “Formatting”, see figure 42.
Choose “FAT32” in “File system” (Do NOT select “FAT” or
“NTFS”) and click “Start” to start formatting. When
formatting is complete, click “Close”.
Note:
Please make sure there is sufficient battery before
formatting.
figure 42
Formattinga)

49
Connect the unit to the computer, download the “SYS” folder
of the supplied CD into removable drive, then remove USB
cable.
Programme Updateb)
Double click “Add or remove programs” in Control Panel, see
figure 43. Select “VirtualDub v1.5.10”, click “Change / Remove” and
follow the instructions, or you can click “Start / Programme /
VirtualDub / Uninstall VirtualDub” on desktop (Same as Uninstall
“Tmusic music manage software”)
Uninstall HD900 software5.
figure 43

50
Appendix
Why can some WMA format songs on the digital player not be
played?
Q:
There are many different music formats for songs on the Internet
and many of them are in WMA format. Some of these WMA format
songs are subject to DRM (license) copyright protection, which may
cause unauthorized copies of some songs to become unplayable.
This system protects the original owner of the songs. Some websites
offer songs without license protection, and you may copy and play
them as you wish - just like songs in mp3 format. However, some
websites only offer songs in WMA format with license protection
(for example: www.napster.com and www.musicmatch.com). To play
these songs you can only use your PC with a Windows Media Player
that has obtained the correct license protection. (Windows Media
Player is a free Microsoft product that allows you to play WMA
streaming media files. You can download it from many websites.)
You cannot copy and play these songs on another PC without
license protection. This prevents the spreading of unauthorized and
illegal copies of songs and protects the song’s copyright owner. If
you have WMA format songs with the corresponding license
protection, you still cannot just copy the songs from your PC to the
digital player. You need to open Windows Media Player first. From
its menu select “document”, “open” and open all the WMA songs
you want to copy (if all of them can be played, you can transfer
them to your player). Connect the digital player to your PC via a USB
cable, and the screen of the player will display “Communicating”.
Next a portable disk (e.g. F:\) will be displayed.
A:
Trouble shooting

51
Now click the “portable device” option on the left hand side of the
Windows Media Player. A list of the music to copy will appear. Select
all the songs you want to copy and then click the “copy music”
button in the top left hand corner of the screen. The selected songs
can now be transferred to your player with the required license
protection authorization.
How many minutes of MP3/WMA songs can be stored on the
player?
Q:
This depends upon the player’s memory capacity, and how much is
available for storage. One minute’s MP3/WMA music occupies
approximately 1Mb of space, so if the capacity of the memory is 5GB
(5*1024MB) then it can store around 85 hours (5*1024 Minutes) of
music.
A:
Lost data?Q:
Some data loss can be caused by an unstable power supply during
the transfer process. Our company does take responsibility for any
files that are lost or damaged. We strongly recommend that our
customers keep back-up copies of all important files.
A:
Having problems transferring files?Q:
A:
Please make sure that the USB cable is properly connected to the
player and the PC.
1)
Please check that there is enough memory available to
accommodate the files that you wish to transfer.
2)

52
Why do different songs play at different volumes?Q:
Depending on how a song is recorded, and how the volume levels
were set at that time, songs can have different volumes levels and
some can sound much louder than others.
A:
Why can some files, which are smaller in size than the available
space on the player, still not be transferred?
Q:
The CMOS chip inside the player allocates 16KB or 32KB to one
memory track. A one Byte file will take one track. Therefore some
files are smaller than the available memory but still cannot be
transferred to the player.
A:
My player won’t start, what has happened?Q:
During an upgrade of the player’s hardware, an accidental error
might have occurred or the USB cable was unplugged.
1)
The Removable Hard Drive has been physically damaged.2)
An unreliable power supply has resulted in an automatic power
off after start up.
3)
Could the following have occurred?:A:

53
How to avoid data loss in the hard drive?Q:
You may not be able to edit or delete files, or the file names may
change if the power supply is cut off suddenly during data
transfer.
1)
Constant insufficient power supply may cause hard disk damage
in the long run.
2)
Sudden shock may cause damage to the hard drive.3)
The following situation may cause hard drive or file system damage:A:
Please protect your player from the above situations. Truly® does
not take responsibility for any files that are lost or damaged due to
misuse. Please repair with a professional software restoration hard
disk if there is system damage.
How to use Bootloader?Q:
When the power is off, press [ /ESC ] and MENU at the same time
to turn the power on and display Bootloader interface:
A:
Run program
USB Connect (there are two functions):
1) Run program in SDRM from hard drive
2) Reset program when there is a failure
Disk information
Format Disk
–
–
–
–

54
Synchorizing DRM Protected Tracks From Your
Web Music Stores
Power up your HD900 Digital Player. Select “Settings”, then “USB
Connect Mode”.
Select “DRM Mode” and press the [
] button.
Connect the HD900 to your PC. Connect the power adapter when
connecting to your PC to assure you have sufficient power on the unit
to perform file transfer.
Your PC would recognize the new device as an MTP Player.
At the new device pop up screen, select the web music store that you
would like to sync to your HD900.
Follow the on-screen instructions to set up the Device Partnership with
your web music store software.
Your HD900 will display in the web music store as a Portable Device.
Follow your web music store’s instructions to transfer DRM protected
music to your HD900.
Unplug the HD900 from your PC when done.
Switch the connection mode back to USB by selecting “USB Mode” in
“USB Connect Mode” under the “Settings” menu.
Technical Support
Please visit our website at www.picnroll.com for the latest product
information & downloads. If you are unable to find the solution in the
FAQs, please contact us at techsupport@trulyusa.com, or call us at 1-866pic-n-roll (1-866-742-6765).
1)
2)
3)
4)
5)
6)
7)
8)
9)
10)
Switching the unit back to USB Mode will enable you to use it as
a Removable Disk Drive, and copy non-DRM protected music to it.
Note:
 Loading...