

TRULY Netpad Tablet PC
N701 Series Manual
Suitable for the following models:
N701 N7 01 E N701G N 70 1E G
N701T N 70 1W N701 TG N 70 1WG

Netpad N701 Series Manual
Guide to safe and eff ective use
For safe and effective use , please read carefully
the following inf ormation before use.
Always pay full atten ti on d ur in g dr iv in g. C he ck in g navigation system screen
during driving may le ad t o se ri ou s tr affic accident. In order to avo id a cc id en t,
please pull over the ca r be fo re o pe ra ti ng t he G PS s ys te m. The map data i ns id e
the GPS system may be dif fe re nt from actual road conditions, so it can o nl y be
used as a reference. Pl ea se u se t he s ys te m in c om pl ia nc e with actual traff ic
rules. Th e Co mp an y wi ll n ot b e held responsible for any traffi c ac ci de nt o r
other accident caus ed b y th e us e of t he s ys te m.
When using the files in t he T-F la sh c ar d, d o no t pull out the card so as to avoid
damage to the memory ca rd o r th e ma ch in e.
When using the headse t, p le as e ma ke s ur e th e he ad se t vo lume is within the
acceptable range to a vo id d am ag e to y ou r he ar in g.
Do not let the machine an d it s ac ce ss or ie s co me i nt o co nt act with liquid or
moisture environm en t.
Do not place the machin e in t he e nv ir on me nt w it h to o hi gh o r too low
temperature.
Do not place the machin e as id e th e fl am e or l ig ht ed c ig ar o r cigarette.
Do not paint or varnish t he m ac hi ne .
Do not drop or throw the ma ch in e.
Do not place the machin e at w he re t he t em pe ra tu re m ay e xc eed 60°C such as on
the car dashboard, wi nd ow s il l or b eh in d th e gl as s ex po sed to direct sunlight etc.
Do not attempt to disas se mb le t he m ac hi ne , an d do n ot r ep air the machine and
accessories witho ut a ut ho ri za ti on .
The charg in g vo lt ag e of t he m achine is 5.0V. Ple as e co nf ir m be fore use.
Do not use any charge r no t sp ec ified by the manufacturer of the machin e,
otherwise there wil l be p ot en ti al d an ge r.
Use only a damp or anti-s ta ti c cl ot h to c le an t he m ac hi ne . Do not use dry cloth
or cloth with static to w ip e th e ma ch in e.
- 1-

As the components suc h as L CD a re b re ak ab le p ar ts , pl ea se take good care
and do not let the machin e un de r im pa ct o r st ro ng c om pr es sion.
Do not let children pla y wi th t he m ac hi ne o r it s ac ce ss or ies. Children are
likely to cause injur y to t he ms el ve s or o th er s, a nd m ay i nadvertently
damage the machine or i ts a cc es so ri es .
Do not freely uninsta ll t he a pp li ca ti on i n th e sy st em s o as to avoid that the
machine or part of the fe at ur e is n ot f un ct io na l.
The adapter of this pro du ct s ho ul d no t be s ub je ct ed t o wa ter splashing or
water droplets, and i te ms f il le d wi th l iq ui d su ch a s va se should not be
placed on the adapter.
- 2-

Content
1. Bef ore use………………… …………… …………………… -4-
1.1 The a pp ea ra nc e an d va ri ous parts…………………………………… -4-
1.2 Before use ……………… …… …… …… …… …… …… …… …… … -5-
1.2.1 Buttons …………… …… …… …… …… …… …… …… …… … -5-
1.2.2 Batteries ……… …… …… …… …… …… …… …… …… …… …. -5-
1.2.3 MICRO SD card ……… …… …… …… …… …… …… …… …… . -5-
1.2.4 SIM or USIM card …… …… …… …… …… …… …… …… …… . - 5-
1.2.5 Con ne ct in g th e co mputers ……………………… …… …… …… -6-
2. Main interface ope ra ti on a nd s et ti ng … …… …… …… …… ……………… -7-
2.1 Main interface …… …… …… …… …… …… …… …… …… …… … -8-
2.2 Task bar and task bar icon ……………………………… …… …… …… -9-
2.3 Setting ………………… …… …… …… …… …… …… …… …… … -10-
2.3.1 Wi-F i co nn ec ti on … …… …… …… …… …… …… ……...……… -10-
2.3.2 3G network conn ec ti on …… …… …… …… …… …… …… …… … - 12 -
2.3.3 Sound and displ ay … …… …… …… …… …… …… …… …… …… -17-
2.3.4 Location and se cu ri ty … …… …… …… …… …… …… …… …… -18 -
2.3.5 Applic at io n …… …… …… …… …… …… …… …… …… …… … -18-
2.3.6 Accoun t an d sy nc hr on iz at io n …… …… …… …… …………………. -19-
2.3.7 SD card and syste m me mo ry … …… …… …… …… …… …… …… -20-
2.3.8 Language and ke yb oa rd … …… …… …… …… …… …… …… … -2 0-
2.3.9 Date and events … …… …… …… …… …… …… …… …… …… … -2 0-
2.4.0 About th e mo bi le m ul ti me di a …… …… …… …… …… ………… -21 -
3. Electronic Marke t …… …… …… …… …… …… …… …… …… …… …… -22-
3.1 Login and use of the El ec tr on ic M ar ke t …… …… …… …… …… … -22-
4. Browser …………………… …… …… …… …… …… …… …… …… … -25-
5. GPS and MAPS ………………… …… …… …… …… …… …… …… … -26 -
5.1 MAPS ………………………… …… …… …… …… …… …… …… … -2 6-
5.2 GPS maps …………………… …… …… …… …… …… …… …… … -27-
Appendix I: Technical Data ………………………… …… …… …… …… -28-
Appendix II: Technical Data ……………………… …… …… …… …… … -29-
- 3-
1.Before use
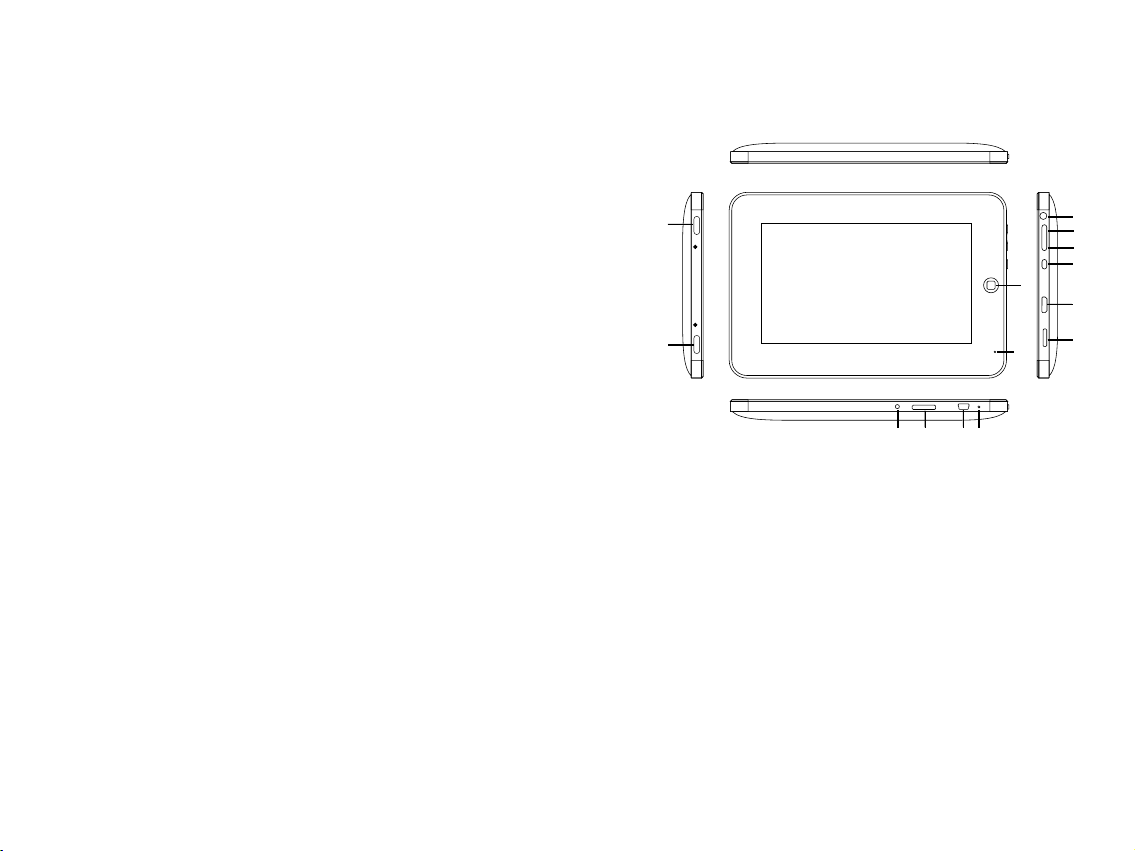
1.1 The appearance and var iou s parts
1
4
5
6
7
3
8
2
1 0
1 1 1 2
1, 2: Sp eaker
3: Bac k button
4: Hea dphone jack
5: MEN U button
6: Mai n interface butt on
7: On/ Off button
8: HDM I port
9: MIC RO SD card
10: Po wer chargin g port
11: USIM/SIM c ard por t (suitable for mo dels wi th 3G function)
12: US B port
13: Re set button
14: MI C
Figure 1.1 App ea ra nc e
- 4-
1 4
1 3
9

1.2Before use
1.2.1 Buttons
On/Off button:
Menu button:
Back button:
Reset button:
Main interface butt on :
Tip: D ur in g us ing, if you d o no t kn ow how to ope ra te , pre ss t he "menu
Butto n" o r "b ack butto n" w il l de finitel y he lp
1.2.2 Batteries
This machine uses 450 0m Ah p ol ym er b at te ry. During the charg in g th e
following matters s ho ul d be p ai d at te nt io n to :
1. Th e ch arging voltage of the machine is 5.0V. Please confirm before use to
avoid damage to the mac hi ne a nd o th er d an ge rs ;
2. If the battery is too lo w, th e ma ch in e will automatically shut down. Pleas e
charg e th e ba tt er y. The m ac hi ne c an b e ch arged in both the power on or
power off m od e;
3. Wh en t he m ac hi ne i s be in g ch arged in the powe r on m od e, t he b at te ry i co n
in the task bar will disp la y th e ch arge mode;
4.When the charg in g is c om pl eted, please pull out the plug and unplug t he
charg er f ro m th e po we r ou tl et;
Charg in g ti me : it n ee ds 4 .5 h ours to charge wi th s ta nd ar d ch arger in the
shutdown mode. If cha rg in g in the power on mode, due to the simultaneo us
consumption of elec tr ic it y, it n eeds more time to fully charg e th e ba tt er y.
Using time: 3-4 hours ' co nt in uo us u se ( th e sp ec if ic u sing time depends on the
using function and ma ch in e se tt in gs ).
1.2.3 MICRO SD card
This ma ch in e su pp orts 32GB o r lo we r MI CRO SD card. Be ca us e so me applicat io ns
requi re t he s up po rt of SD card , it i s su gg ested to conf ig ur e wi th a SD card.
Tip: W hen acc essin g the fil es in the S D card, do n ot pull o ut the ca rd, so as t o
avo id dama ge to the S D card. To rem ove the S D, plea se firs tly uni nstal l the SD
card i n the "Se tting s/SD ca rd and mo bil e phone m emory ”
1.2.4 USIM or SIM c ar d
When selecting 3G net wo rk s er vi ce s, y ou n ee d to p ur ch ase a USIM/SIM card
from network provid er s (r es pe ct iv el y fo r WCDMA or EVDO netw or k) , wh ic h
contains detailed p ur ch as in g in fo rm at io n, s uc h as personal identification
number (PIN) and opti on al s er vi ce s.
in the shutdown mode, s ho rt p re ss t hi s bu tt on t o pe rf or m
power on operation; i n th e po we r on m od e, s ho rt p re ss t hi s
button to let the machi ne b e in t he s le ep m od e; l on g pr es s th is
button to enter the mod e sw it ch d ia lo gu e in te rf ac e, w here you
can select shutdown o pt io n to s hu t off the machine.
press this button to a po p- up m en u of t he p ro gr am i n th e
current interface .
press this button to ba ck t o th e la st i nt er fa ce . Re pe at edly press the
back button can exit th e pr og ra m an d re tu rn t o th e ma in i nt erface.
Pres s th e re set butto n to c om eb ack the mac hi ne f rom abror mi ty ,
and the n tu rn o n the machi ne v ia .press t he p ow er b utton.
short press this butt on t o qu ic kl y re tu rn t o th e sy st em 's
main interface and lo ng p re ss t o re ca ll
the last running prog ra m fo r qu ic k ac ce ss .
- 5-
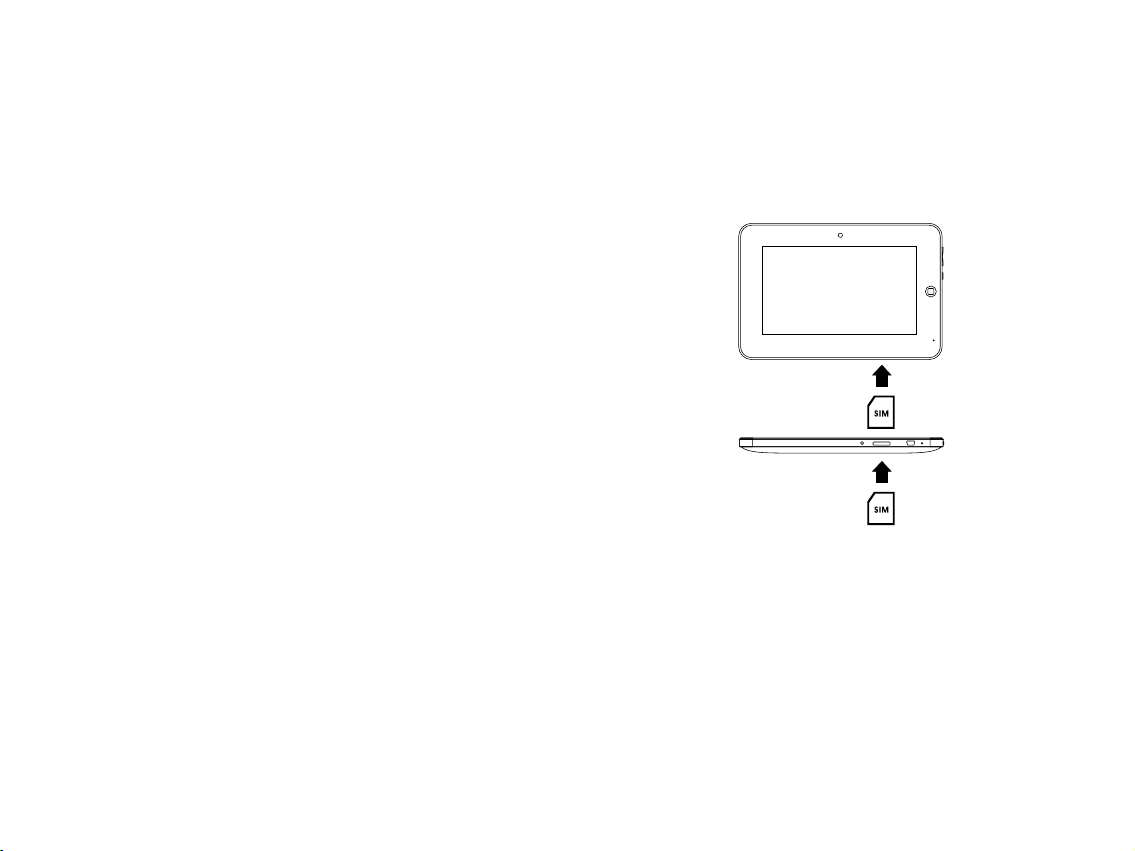
To install the USIM or SI M ca rd :
1. Please turn off th e ma ch in e.
2. Insert the USIM/SI M ca rd i nt o th e ma ch in e wi th t he g ol d contact point
downward.
3. Push the USIM/SIM ca rd i nt o th e ca rd s lo t un ti l it l oc ks i nto place.
To remove t he U SI M/ SI M ca rd :
1. Please turn off th e ma ch in e.
2. Gently push inward t he U SI M/ SI M ca rd u nt il i t is d et ac hed from th
e machine.
3. Pull out the USIM/SI M ca rd f ro m th e US IM /S IM c ar d sl ot .
Not e: Do not i nsert t he MICR O SD card in to the US IM/SI M card slo t.
Fig ure 1.2 P resen tatio n of USIM /SIM ca rd inse rtion
1.2.5 Connecting th e co mp ut er s
The operation of file s in t he S D ca rd s uc h as a dd , de le te a nd s o on can be
done through USB conn ec ti on . Be fo re c on ne ct in g th ere should be a SD card in
the machine.
1. Connect the machin e to t he P C vi a US B ca bl e.
2. Wh en t he U SB c on ne ct io n ic on appears in the task bar, press and hold the task
bar and drop down to open t he t as k ba r (w he n th e ta sk b ar i s op en , you can not
press and hold the task b ar t o dr op d ow n ag ai n. The next figure is only an
indication).
3. Open the USB connect io n me ss ag e an d se le ct " Lo ad ", t hen you can operate
the files in the SD card as t he o pe ra ti on o f U di sk . And y ou c an also copy
files to the SD card.
- 6-

2.Main interface operation and setting
After turnin g on a nd u nl oc ki ng , th e ma ch in e wi ll e nter the system main interface.
Thi s se ct io n de sc ri be s so me of the basic operation of the ma in inter fa ce a nd
machine settings, m ai nl y in cl ud in g th e cr ea ti on a nd deleting of shortcuts, switch
between interface s, w al lp ap er r ep la ce me nt , ta sk bar, t he ma chin e la ng uage
environment setti ng s, W I-FI and 3G network settings etc.
2.1 Ma in interface
The main interface op er at io ns a re s ho wn a s be lo w fi gu re. The main in te rf ac e
menu will appear afte r pr es si ng t he me nu but to n on t he ma in int er fa ce . The main
interface has three p ag es . Pr es s an d ho ld t he i nt er fa ce and drag to switch the
pages, and each page ca n be d ef in ed o f di fferent functions accordi ng t o in di vi du al
needs. For example: w he n de fi ni ng a p ag e as g am e pa ge , th e effective p ag e
will contain only the s ho rt cu t to g am es .
Task ba r
Sho rtcut
Pre ss and dr op down t o
ope n the tas k bar
Pre ss and dr ag to the l eft and
rig ht to swi tch the m ain int erfac e
Pro grams l ist
Mus ic
Elec troni c Marke t
Sho rtcut
Add
Fig ure 2.1 Gr aphi cal pre senta tion of t he oper ation o f the mai n inter face
Wallpa per
Sear ch
Noti ce
Sett ing
Men u of main i nterf ace
Click the program int er fa ce s wi tc h bu tt on t o sw it ch b etween the ma in interface
and the program inter fa ce . The program interface shows the icons o f al l th e
installed applica ti on s.
You can create a shortcut f or s om e fr eq ue nt ly u se d pr og ra m in the ma in interface.
main interface, and t he n dr ag t he i co n to a n ap pr op ri at e location to set such icon
as a shortcut of the ma in i nt er fa ce a nd p la ce i t in t he ma in int er fa ce.
- 7-

Pand a readi ng AppM anage r
Advan ced Task
Mana ger fre e
ASTRO
Dev to ols
Glob al Time
Gmail
PicSa y
Photo g alle ry
Goog le Talk
Quic koffic e
Merid ian Pla yer
Goog le maps
Ring droid
Cale ndar
Spar e parts
Medi apiay er
Mark et
Send ing mes sage
Brow ser Touch sc reen ca libra tion
Note p ad
Strai ght fl ush gam e
(hig h-end v ersio n)
Setti ng
(Pr ess and h old, th e
inte rfac e will au tomati call y
swit ch to th e main in terfa ce,
and th en dra g to the ap propr iate
loc ation a nd rele ase.)
Figure 2.2 Create sho rt cu ts i n th e ma in i nt er fa ce
The unnecessary mai n in te rf ac e sh or tc ut i co n ca n be d ragged to the recycle
bin to delete. Th e de le ti ng o f the shortcut icon does not affe ct t he p ro gr am 's u se.
Recycle bin will be for me d by t he i nt er fa ce s wi tc h bu tt on after pressing the
shortcut icon.
Rec ycle bi n is loca ted at
the b utton a rea of th e
Pro gram li st
Dra g the sho rtcut t o the
Rec ycle bi n
Music Elect ronic M arket
Photo g aller y
Gmai l
Brows er
Map
Figure 2.3 To delete a shortcut
- 8-
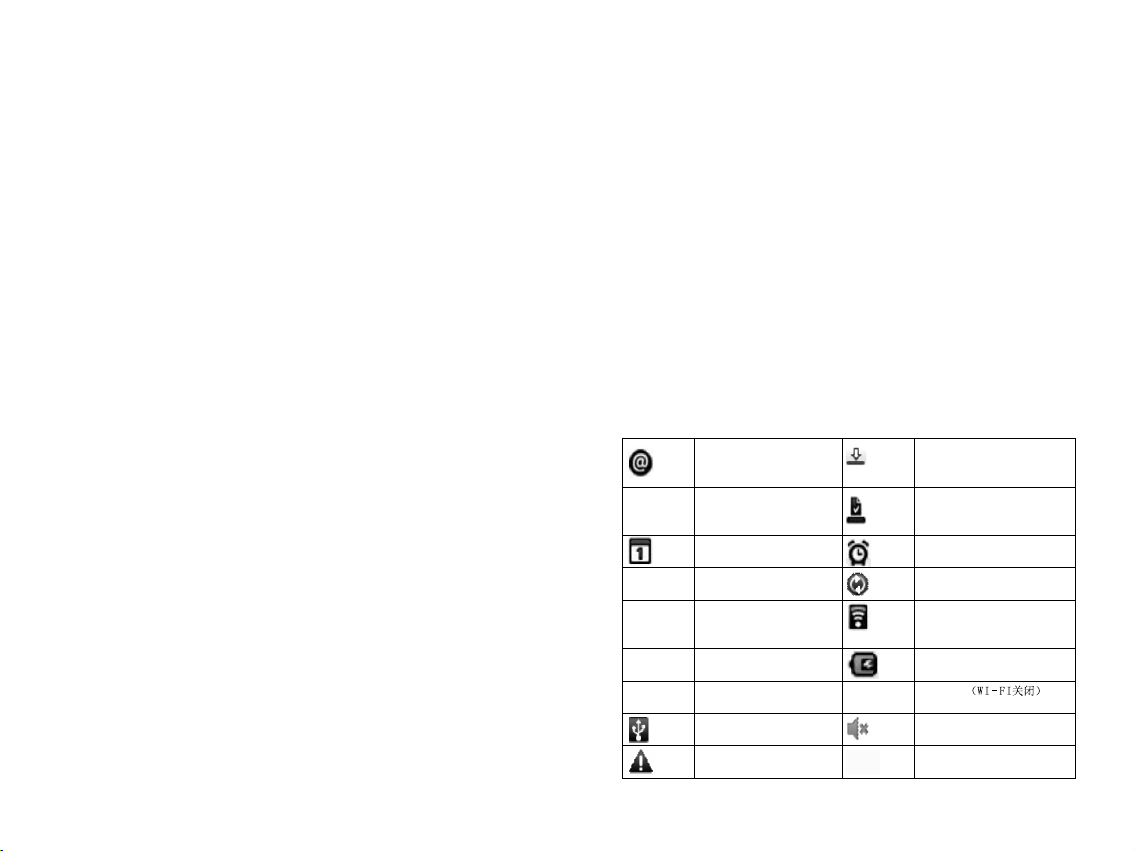
2.2 Task b ar and ta sk ba r icon
The taskbar interfa ce d is pl ay s th e cu rr en t sy st em t ime, battery status,
WI-FI status, appli ca ti on s, U SB c on ne ct iv it y an d other information.
Aug ust 6, 20 10
Ong oing
Con necte d USB deb uggin g
Choo se to dis able th e USB deb uggin g.
Not ice
card is n ot n or mally rem ov ed
Ple ase uni nstal l the SD ca rd and th en remo ve it to av oid dat a loss
Fig ure 2.4 Task ba r int erfac e
Task b ar ic on and th e meani ng
New message
GPS status
Agent events
Audio playing
SD card space not enough
Battery change indication
No SD card
USB connection
Warning
Tabl e 1 Task b ar ic on an d the mea ning
Data download
Download completed
Alarm
Data synchronizing
WI-FI connection
Charging
Flight mode (WI-FI off)
Mute icon
3G network and signal
Cli ck to cle ar
the n otifi catio n
mes sage
Ong oing ta sk
Task st art tim e
Not ifica tion
mes sage
- 9-

2.3 Setting
You can adjust the machin e st at e to f it t he i nd iv id ua l' s us ing habits through
machine settings. Wi -F i, 3 G ne tw or k co nn ection, sound, brightness, machin e
pattern lock, syste m la ng ua ge , ap pl ic at io ns m an agement and more can be set
in the settings.
Set ting
Wire less an d netwo rk
Sou nd and di splay
Loc ation an d safe ty
App licat ions
Acc ount an d synch roniz ation
Pri vacy
Figur e 2. 5 Se tting int er fa ce
2.3.1 Wi-Fi connection
Enter the "Settings /w ir el es s an d ne tw or k" t o se t th e Wi-Fi, and
the Android sy st em 's p ow er fu l ne tw or ki ng c ap abilities after the network
connection.
Set tings
Conn ected t o SMIT MTV- 1
Net work no tific ation
Not ify me wh en ther e is an ope n netwo rk avai lable
Netw ork
Con necte d
Ope n netwo rk
Pro tecte d by WPA2
Sca n
Re- scan th e netwo rk
Adv anced s ettin gs
Adv anced s ettin gs for Wi-F i
Fig ure 2.6 Wi -Fi set up inte rface
- 10-
Experience
Ico n showi ng that Wi- Fi
is co nnect ed
Turn o ff or turn o n Wi-Fi
Not ifica tion op tions
The n etwor k is not
enc rypte d
Whi te curv e is the
sig nal str ength
The n etwor k is encr ypted
Enc rypti on meth od is on
the l eft sid e
Wi-F i menu

Fig ure 2.7 Wi -Fi pas sword c onnec tion in terfa ce
Some Wi-Fi n et wo rk s et ti ng s ar e no t th e sa me a s the initial settings of the
machine. You can press the "menu button" in th e "Wi -Fi settin gs i nt er fa ce "
and then enter the adva nc ed s et ti ng s to a dj us t th e ma ch ine to adapt to the
appropriate Wi-F i ne tw or ks .
Adv anced s ettin gs
Wi-F i sleep m ode str ategy
Spe cify th e desir ed time t o switc h from th e Wi-Fi to mo bile ph one dat a
MAC a ddres s
00. 11.F6. 8B.0E .AA
IP set tings
Use s tatic I P
IP addre ss
Gat eway
Net mask
Figure 2.8 Wi- Fi a dv an ce d se tt in gs i nt er face
- 11-
Set w hen the Wi- Fi
wil l be in sle ep mode
MAC a ddres s of
the m achin e
Set w hethe r the
mac hine wi ll
aut omati cally
obt ain IP

2.3.2 3G network connection
Please firstly inse rt t he 3 G US IM /S IM c ar d in to t he U SI M/SIM card port at
the underside of the ma ch in e at t he p ow er-off st at us . Aft er t ur ni ng on the
machine, if the 3G netw or k si gn al i s su cc es sf ul ly d et ected, the icon shown in
Figure 2.9 will be disp la ye d in t he s ys te m ta sk b ar :
3G ne twork s ignal
is su ccess fully
rec eived
Musi c
Phot o galle ry
If the 3G network signa l is n ot d et ec te d, t he i co n sh ow n in F igure 2.10 will
Fig ure 2.9 3 G signa l icon
Brow ser
be displayed in the sys te m ta sk b ar :
Musi c
Phot o galle ry
Brow ser
Sett ing
Map
Sett ing
Map
3G ne twork i s
not d etect ed
Ple ase tur n off
the m achin e and
che ck whet her
the U SIM/S IM
car d is
ins erted c orrec tly
Fig ure 2.1 0 3G sign al icon i s not det ected
Touc h th e "S et ti ng s" i n th e main menu to enter the system setting int er fa ce .
Touc h th e "w ir el es s an d ne twork settings" option to select the "m ob il e ne tw or k"
in the interface, and t he n se le ct t he " ac ce ss p oi nt n am e.”
- 12-

Wirel ess and n etwor k setti ngs
Wi-F i
Turn on t he Wi-Fi
Wi-F i setti ngs
Set an d manag e wirel ess acc ess poi nts
Virt ual pri vate ne twork s ettin gs
Set an d manag e virtu al priv ate net work
Mob ile net work
Sett ing roa ming, n etwor k, APN opt ions
Fig ure 2.11 Wi reles s and net work se tting s
Mobi le netw ork set tings
Dat a roami ng
Con nect to d ata ser vice wh en roam ing
Acc ess poi nt name
Use o nly 2G ne twork
Net work op erato rs
Sele ct a netw ork ope rator
Fig ure 2.1 2 Mobil e netwo rk sett ings
New APN
Rese t to defa ult set tings
Figure 2.13 Set the acc es s po in t na me
- 13-

Press the system's "m en u" b ut to n in t he " ac ce ss p oi nt s ettings" interface and the
APN settings menu wil l po p up . Then select the "new APN" option. Fi gu re 2 .1 4
shows the access poin t se tt in g mo de o f th e Ch in a Un ic om WCDMA 3G ne tw or k,
and Figure 2.15 shows t he a cc es s po in t se tt in g mo de o f th e China Tele co m EV DO
3G network. Please se le ct t he c or re sp on di ng n et wo rk access point settings
according to the conf ig ur ed 3 G ne tw or k mo du le o f th e ma chine.
Configure the acces s po in t in fo rm at io n in a cc or da nce with the information shown
in the figure, and keep o th er o pt io ns a s th e de fa ul t se tt ings.
Mod ify the a ccess p oint
Nam e
Age nt
(No t set)
Por t
(No t set)
Use rname
Pas sword
Ser ver
Mod ify the a ccess p oint
Nam e
Age nt
(No t set)
Por t
(No t set)
Use rname
Pas sword
Ser ver
Fig ure 2.1 4 WCD MA acces s point s ettin gs
Fig ure 2.1 5 EVDO ac cess po int set tings
Use rs can se t
the n ame
The n ame of th e
Chi na Unic om
WCD MA netwo rk
acc ess is 3g net
Car d for ent ering
the u serna me
Car d for ent ering
the p asswo rd
Use rs can se t
the n ame
The n ame of th e
Chi na Teleco m
EVD O netwo rk
acc ess is ct net
Car d for ent ering
the u serna me
Car d for ent ering
the p asswo rd
- 14-

After completion of t he n et wo rk a cc es s po in t se tt in gs, click the system's "menu"
button and then click t he " sa ve " bu tt on o n th e sc re en t o sa ve the current APN
settings. If you do not n ee d th e cu rr en t se tt in gs , cl ic k the "abandon" button.
Mod ify the a ccess p oint
Nam e
WCDMA
3gne t
Age nt
(Not s et)
Por t
(Not s et)
Use rname
Card
Fig ure 2.1 6 Save th e curre nt acce ss poin t setti ngs
Sav e the cur rent APN
set tings a nd exit t he
cur rent se tting s page
Aba ndon th e curre nt
APN s ettin gs and ex it
the c urren t setti ngs
pag e
After successful se tt in gs , th e ju st s et AP N ac ce ss point can be seen in the APN
list. Click the circu la r bu tt on o n th e ri gh t of t he c or re sponding APN (the center
of selected button is g re en ) to i ni ti at e th e co nn ec ti on to the 3G wireless networks.
APN c urren tly
use d
Fig ure 2.1 7 Selec t the 3G ne twork a ccess p oint to b e used
- 15-

If you need to delete the AP N ac ce ss p oi nt , pl ea se c li ck the APN name in the
APN list and enter the "m od if y th e ac ce ss p oi nt " se tt in g interface and click the
system's "menu" but to n to s el ec t th e "d el et e APN " option.
Modi fy the ac cess po int
Nam e
EVDO
APN
Ctne t
Age nt
(No t set)
Por t
(Not s et)
Use rname
Card
Pas sword
Del ete APN
Save
Aban don
Del ete the AP N
set ting
Fig ure 2.1 8 Delet e A PN
After a successful co nn ec ti on t o th e 3G n et wo rk , th e ic on shown in Figure
2.18 will be displaye d in t he s ys te m ta sk b ar.
3G ne twork h as
bee n succe ssful ly
con necte d
Musi c
Phot o galle ry
Brow ser
Figure 2.18 3G networ k is s uc ce ss fu ll y co nn ec te d
- 16 -
Sett ing
Map

2.3.3 Sound and display
In this interface you c an a dj us t th e vo lu me a nd d is pl ay -related items, such as
mute, media volume, s cr ee n br ig ht ne ss , ti me r eq ui red for entering the power
saving mode when the ma ch in e is n ot u nd er o pe ra ti on a nd s o on.
Soun d and dis play se tting s
Soun d setti ngs
Mut e mode
All so unds ar e set to mu te exce pt that o f the med ia and th e alarm c lock
Rin g volum e
Set th e volum e of syst em and no tific ation
Med ia volu me
Set th e volum e of musi c and vid eo
Sys tem ton e
Set de fault s ystem t one
Sys tem vib ratio n
Syst em tone v ibrat ion
Not ifica tion to ne
Set de fault n otifi catio n tone
Fig ure 2.9 Volu me and di splay i nterf ace 1
Soun d and dis play se tting s
Touc h fee dback
Vibrat e when pr essin g soft bu ttons a nd when c arryi ng out so me UI int eract
SD ca rd noti ficat ion
Play S D card no tific ation s ounds
Disp lay set tings
Dir ectio n
Auto matic ally ch ange th e displ ay dire ction w hen rot ating t he mobi le
Ani matio n
Show a ll wind ow anim ation
Bri ghtne ss
Adju st scre en brig htnes s
Scr een sta ndby
Adju st the de lay bef ore the a utoma tic scr een loc k
Phon e
Fig ure 2.1 0 Volum e and d ispla y inter face 2
Sys tem mut e
Volume r egula tion
Sys tem ton e setti ngs
Thi s item is n ot vali d
Set n otifi catio n tone
Thi s item is n ot vali d
Set w hethe r to open S D
car d inser tion no tific ation
Set w hethe r to use th e
gra vity se nsing
Wind ow anim ation
set tings
Bri ghtne ss adju stmen t
Mac hine sl eep mod e
set tings
- 17-

2.3.4 Location and security
Open the "using wirel es s ne tw or k" , an d yo u ca n vi ew t he I P add re ss u se d by
the machine and the loc at io n on t he G oo gl e Ma ps .
To us e the GPS po si ti on in g, please make s ur e t he "enable GP S s at el li te s setting"
is on. If do not use GPS for a lo ng t im e, y ou c an t ur n off this option to save power.
When setting the unlo ck p at te rn p as sw or d, p le as e ma ke sure to keep in mind the
pattern to avoid that t he m ac hi ne c an n ot b e un lo ck ed w he n there is need to use.
Fig ure 2.1 2 Secur ity and l ocati on inte rface
2.3.5 Application
When installing som e pr og ra ms w it h un kn ow n so ur ce , you need to set the
machine to allow the in st al la ti on o f pr og ra m wi th u nk nown source, but this may
bring risk of virus to th e ma ch in e, s o pl ea se c on fi rm t he s ecurity of program
before installati on .
Appl icati on sett ings
Unk nown so urce
Allo wed to in stall a pplic ation s not pro vided b y the Ele ctron ic Mark et
Qui ck star t
Set sh ortcu t to star t the app licat ion
Man age app licat ions
Mana ge and re move in stall ed appl icati ons
Run ning se rvice s
View an d contr ol curr ently r unnin g servi ces
Dev elopm ent
Sett ing up th e appli catio n devel opmen t optio ns
Sel ect thi s optio n to
all ow the in stall ation
of pr ogram f rom the
SD ca rd
Thi s item is n ot vali d
Man ageme nt of
ins talle d progr ams
Man ageme nt of
run ning pr ogram s
Dev elopm ent rel ated
mat ters
Fig ure 2.1 3 Progr am mana gemen t inter face
- 18-

Enter the "manageme nt a pp li ca ti on ", a nd y ou c an v ie w relevant information of
the application, an d yo u ca n al so d el et e un wa nt ed a pp lications.
Mana gemen t of appl icati ons
Cli ck and en ter the
pro gram li st to car ry
out o perat ion suc h
as de lete, e tc.
Sor t list
Sel ect the p rogra m
Sort ing by si ze
Filt er
to be d ispla yed
Fig ure 2.1 4 The l ist of ap plica tions
2.3.6 Account and synchronization
Manage Google accou nt a nd s et n et wo rk s yn ch ro ni za tion of Gmail, calendar
and contacts of the acc ou nt .
Acco unt and s ynchr oniza tion se tting s
Conv entio nal syn chron izati on sett ings
Bac kgrou nd data
You can sy nchro nize ap plica tions a nd send a nd rece ive dat a at any ti me
Aut omati c synch roniz ation
Appl icati on auto matic ally sy nchro nize da ta
Mana ge acco unt
Sync hroni zatio n is turn ed on
Syn chron izing d ata
All ow the pr ogram
to be u pdate d at any
tim e
Set w hethe r to
aut omati cally
syn chron ize acc ount
dat a
Exi sting a ccoun t
Add a ccoun t
Fig ure 2.11 Ac count m anage ment in terfa ce
- 19-
Add a n ew acco unt

2.3.7 SD card and system memory
You can view the SD card and re ma in in g sp ac e of t he b ui lt -i n Fl ash as well
as manage the SD card in th is i nt er fa ce .
Total s ize of SD c ard
Rem ainin g space
of SD c ard
Uni nstal l the SD ca rd
fro m the mac hine
For mat the S D card
(ne ed to uni nstal l first )
Rem ainin g space o f the
Fig ure 2.1 5 T-Fl ash c ard a nd the st orage m anage ment in terfa ce
bui lt-in F LASH in t he
mac hine
2.3.8 Language and keyboard
You can set language, key bo ar d an d in pu t me th od o f th e ma ch ine at the
region and text setti ng s.
Sys tem lan guage
sel ectio n. Chin ese
is in t he fina l posit ion
Key board s elect ion
opt ion. You can u se
the C hines e input w hen
cli cking t his opt ion
Inp ut meth od sett ing
Fig ure 2.1 7 Regio n and tex t setti ngs
2.3.9 Date and events
You can set the display met ho d of d at e an d ti me o f th e ma ch in e in t his interface.
You can also set whether to a ut om at ic al ly m at ch t o th e ne tw ork time.
- 20 -

Date a nd time s ettin gs
Aut omati c
Usin g the val ued pro vided b y the net work
Set ting th e date
Sel ect tim e zone
Chin a stand ard tim e
Set ting th e time
Use 2 4-hou r forma t
Sel ect the d ate for mat
Set w hethe r to
aut omati cally
syn chron ize tim e
Dat e setti ng
Time z one
set ting
Time s ettin g
Time d ispla y
for mat
Dat e displ ay
for mat
Fig ure 2.1 6 Set the d ate and t ime
2.4.0 About mobile multimedia
You can view the machine' s fi rm wa re v er si on , sy st em v er sion, MAC address,
machine productio n nu mb er a nd o th er r el ev an t in fo rmation in the "About"
interface.
Fig ure 2.1 8 Machi ne info rmati on
- 21 -

3. Electronic Market
Market offe rs a l arge variety of software to t he u se r fo r ex pe ri en ci ng a nd u si ng,
which generally can b e di vi de d in to t wo v er si on s (p ai d and free) to meet the
diffe re nt n ee ds o f di fferent users. Soft wa re i n th e Ma rk et a re p ro vi de d,
maintained and upda te d by s of tw ar e en gi ne er s fr om a round the world.
Logi n and use of the Marke t
3. 1
Before using the Mark et , pl ea se m ak e su re t he d at e is c or rect and the
Wi-Fi is connected successfully.
When initial using th e Ma rk et o r us in g af te r th e ac co un t unbundling, you need
to log in using the Gmail a cc ou nt . If y ou d o no t ha ve a G ma il a cc ount, you can
apply through PC or dir ec tl y cl ic k th e "c re at e" b ut to n to apply for a new
Google account. Ple as e ke ep i n mi nd t he a cc ou nt a nd a cc ount retrieve
condition after suc ce ss fu l ap pl ic at io n.
Add G oogle a ccoun t
No Go ogle ac count ?
Cre ate
Alr eady ha s a Googl e accou nt?
Log in
Bac k
Fig ure 3.1 L ogin in terfa ce
Enter the Market main i nt er fa ce a ft er t he c om pl et io n of login.
Application: appl ic at io ns w il l be d is pl ay ed a cc ording to category, an d yo u ca n
choose the applicat io n th at y ou w an t to d ow nl oa d ac co rding to the category;
Game: games will be dis pl ay ed a cc or di ng t o ca te go ry, and you can choose to
download diff er en t ga me s;
Download contents : to m an ag e th e do wn lo ad ed a pp li cations and applications
that used to be downloa de d an d vi ew t he u pd at es o f th e in st alled applications.
- 22 -

Electronic Market
App licat ions
Hon g Kong pr ice
Gam es
Fig ure 3.2 M arket m ain int erfac e
Dow nload c onten t
Free
Free
Free
Free
Free
Download content sh ow s th e in st al la ti on s ta tu s of t he selected software.
Yellow bar refers to the do wn lo ad in g so ft wa re . The one with "install ed "
shown on the right refe rs t o th e in st al le d so ft wa re , an d the one with "free"
shown on the right refe rs t o fr ee s of tw ar e no t in st al le d. If the installed so
ftware has update, it w il l sh ow t he " up da te s av ai la bl e" information which
you can click to update t he s of tw ar e.
Down load content
Dow nload i s underg oing
Down load is s tarti ng
Down load is s tarti ng
Down load co ntent
- 23 -
Upda te avai lable
Free
Pro gram
sea rch
Tasks w aitin g
for d ownlo ad
Pro gram
sta tus

My ra ting
Rat ing
Down load ti mes
Uninstal l ap pl ic at ion
The Wea ther Ch annel w ill be re moved
fro m this mo bile ph one.
You can i nstal l the pro duct on ce agai n in
you r mobil e phone f or free
OK
Ope n
Fig ure 3.4 U ninst allin g the sof tware
Can ce
Uni nstal l
If you do not want to use any s of tw ar e or t he s of tw ar e ca n no t me et demand,
you can choose uninst al l su ch s of tw ar e. F or t he f in al s tep in the uninstall
process, you need to ch oo se a r ea so n of u ni ns ta ll in g th e software to complete
the uninstall proce ss . Pl ea se c ho os e th e re as on t o pr ovide help for the
software writer to im pr ov e th e so ft wa re .
- 24 -

4. Browser
Before using a browse r, please make su re t ha t th e WI-FI connection is normal.
Press the "menu butto n" i n th e br ow se r ma in i nt er fa ce a nd the browser menu
will pop up. Th e sp ec if ic f un ctions are shown as below.
Webpag e
Perip heral
Nform ation
More
Pictu res
Add ress ba r
Open b ookma rk
Crea te a new
inte rface a nd hist ory
wind ow
New wi ndow Book mark
Windo w
mana gemen t
Windo w
Refr esh the p age
Refr esh Forw ard
Go int o the
prev ious pa ge
Brow ser set tings
mana gemen t
More
Fig ure 5.1 B rowse r menu in terfa ce
You can open a new window, swi tc h wi nd ow a nd close the window through
the "window managem en t" .
The settings of brows er a re s im il ar t o th at o f PC . Pr es s th e "menu button" in the
browser interface i n th e br ow se r pr es s an d se le ct t he " more/settings" to enter
the browser setting s. I n th e se tt in gs i nt er fa ce y ou c an set the browser home
page, close page, man ag e pa ss wo rd , ma na ge p ri va cy a nd manage security. You
can also restore the br ow se r to f ac to ry s et ti ng s.
Clea r all bro wser da ta and re set all s ettin gs to def ault
Fig ure 5.2 B rowse r setti ngs
- 25 -

5. GPS and MAPS
The maps in this machin e in cl ud e GP S ma ps a nd M AP S. G PS m ap s are mainly
used for navigation , wh ic h ha s th e ad va nt ag e of a cc ur ately locating the
machine's real-ti me p os it io n. M ea nw hi le , th e MA PS is more convenient in
searching the map, wh ic h ca n be v ie we d th ro ug h th e ma p or s atellite. Whe n
viewing in the satell it e mo de , yo u ca n cl ea rl y se e th e ge ographical environment
of the surrounding on t he m ap , bu t MA PS 's m ac hi ne p os it ioning uses a Wi-Fi IP
address, therefor e th e lo ca ti on s ho wn o n th e ma p ma y no t match the actual
location.
5.1 MAPS
MAPS is a map system come s wi th t he An dr oi d sy st em , wh ose map data is
downloaded throug h th e ne tw or k in r ea l ti me . The data will be cleare d af te r th e
closure of the map, so pl ea se m ak e su re t he Wi -F i network is connected
properly before usi ng t he M AP S.
Press the menu button o n th e ma p, a nd y ou c an c om pl et e th e ad dress search,
route planning, lay er s el ec ti on a nd o th er f un ct io ns.
MAPS can display thre e la ye rs : sa te ll it e la ye r, st an da rd l ay er a nd r oad
condition layer. The r oad condition layer can cover the stand ar d la ye r or t he
satellite layer.
The satellite layer i s a sa te ll it e ae ri al v ie w of t he m ap s, by which you can view
the geographical de ta il s of t he s ur ro un di ng . The map data will tak e a lo ng t im e
to update, so it may have a g re at er d ifference from the actual environ me nt .
Fig ure 6.1 M APS's s atell ite lay er
- 26 -

The standard layer ha s li tt le d ifference from the GPS map.
After adding the road c on di ti on l ay er, y ou c an v ie w th e re al -t im e tr affic
conditions of major r oa ds i n or de r to c ho os e a re la ti ve ly smooth road.
Gre en indi cates
smo oth roa d
sur face
Bro wn indi cates
roa d block o r
red t raffic l ight
Yello w indic ates
a bus y road
Loc ation o f the
mac hine IP
Laye r
Sear ch
Rout e
Fig ure 6.3 D ispla y of the st andar d layer + r oad con ditio n layer
My Loc ation
Addi ng vert ical
and ho rizon tal
Men u
5.2 GPS maps
GPS map uses the global p os it io ni ng s ys te m to p os it io n the location, so the
positioning is more a cc ur at e an d su it ab le f or c ar n av igation
Check the navigatio n sy st em s cr ee n du ri ng d ri vi ng m ay lead to serious traffi c
accidents. To avoid accidents, please p ul l ov er t he c ar b ef or e op er at in g the
GPS system. The m ap d at a in si de the GPS system may be diff er en t fr om a ct ua l
road conditions, so i t ca n on ly b e us ed a s a re fe re nc e. P le ase use the system in
compliance with act ua l tr affic rules. Th e Co mp an y wi ll n ot b e he ld r es po ns ible
for any traff ic a cc id en t or o ther accident caused by the use of the syst em .
Driving in the buildi ng i nt en si ve a re as a nd u nd er t he v iaduct, and the weather
change or turning off o f th e sa tellite signals and other factors may a ff ec t th e
receiving of GPS sign al s, r es ul ti ng i n th e po si ti on ing failure or inaccurate
positioning, navi ga ti on f ai lu re , sy st em d ys fu nction and other phenomenon.
GPS is a U.S. Governmen t- ow ne d gl ob al s at el li te p os itioning system. Th e
system and the Compan y or i ts a ge nt s ca n no t gu ar an te e it s positioning
accuracy at all times .
During operation, p le as e fo ll ow t he o pe ra ti ng r ul es and requirements of related
mobile devices, oth er wi se t he s ys te m ma y no t fu nc ti on properly or stop
responding. In thes e ca se s pl ea se r es ta rt t he s ys te m. See GPS manual for
detailed using meth od .
- 27 -

Product name
Screen
Processor
Operating
system
Pro gram ru nning
mem ory
Built-in memory
SD card slot
WiFi
GPS
3G network
Batteries
Appendix I: Technical Data
Pro du ct S pe ci fi ca ti on s
Netpad
800*480 WVG A res ol ut ion 7 TFT tou ch s cr ee n
ARM11 + DSP
Android 2.1
256MB DDR
2- 32 GB ( can choos e)
Supports standard M ic ro SD C AR D
WiFi802.11 b /g
Receiving frequen cy : 15 75 .4 2M Hz ( L1 b an d C/ A code)
(suitable for N701G N 70 1E G N7 01 WG N 701TG models )
WCDMA (suita bl e fo r N7 01 W N701WG models)
EVD O/ CDM A200 0 (sui tabl e for N701 E N701 EG mode ls)
TD-SCDMA (su it ab le f or N 70 1T N701TG models)
Polymer recharg ea bl e ba ttery 4500mAh
Power adapter
Supported
languages
Tra nsmission
method
Temp er at ur e
Main frame size
Weig ht
Input: 100-240V AC
Output: DC 5V, 2A
Chinese, English, G er ma n, F re nc h, S pa ni sh , It al ian
USB 2.0
Operating tempera tu re : 0- 40 °C
Storage temperatu re : -1 0- 60 °C
203.5*136.5*15. 5m m
The non-3G module wei gh ts 4 30 g
- 28 -

Category
Audio playing
Video pl ay in g
Appendix II: Technical Data
Audio and Vide o Specifications
Description
Format: mp3, wav, ar m, o gg
Format: 3gp, mp4, avi , mp eg , wm v
Play time
Audio
Video
More th an 6 h ou rs of conti nu ou s pl aying
More th an 4 h ou rs of conti nu ou s pl aying
- 29 -

Your Natpad is a radio transmitter and receiver. It is
designed and manufactured not to
exceed the emission limits for exposure to
radiofrequency (RF) energy set by the Federal
Communications Commission of the U.S. Government.
These limits are part of comprehensive
guidelines and establish permitted levels of RF energy
for the general population. The guidelines
are based on standards that were developed by
independent scientific organizations through
periodic and thorough evaluation of scientific studies.
The standards include a substantial safety
margin designed to assure the safety of all persons,
regardless of age and health. The exposure
standard for wireless mobile Netpad employs a unit
of measurement known as the Specific
Absorption Rate, or SAR. The SAR limit set by the FCC
is 1.6 W/kg.
Tests for SAR are conducted with the Netpad
transmitting at its highest certified power level in all
tested frequency bands. Although the SAR is determined
at the highest certified power level, the
actual SAR level of the Netpad while operating can be
well below the maximum value. This is
because the Netpad is designed to operate at multiple
power levels so as to use only the power
required to reach the network. In general, the closer you
are to a wireless base station antenna, the
lower the power output. Before a Netpad model is
available for sale to the public, it must be tested
and certified to the FCC that it does not exceed the limit
established by the government adopted
requirement for safe exposure. The tests are performed
in positions and locations (e.g., at the ear
and worn on the body) as required by the FCC for each
model. The highest SAR value for this
model Netpad when tested for use at the body is
1.572 W/Kg While there may be
differences between the SAR levels of various USB WIFI
and at various positions, they all meet the
government requirement for safe exposure. The FCC
has granted an Equipment Authorization for
this model Netpad with all reported SAR levels
evaluated as in compliance with the FCC RF
exposure guidelines. SAR information on this model
Netpad is on file with the FCC and can be found under
the Display Grant section of http://www.fcc.gov/ oet/fccid
after searching on FCC ID: ZM2-N701.
- 30 -

Truly Industr ial ( Sha nwe i) Co., Ltd.
Addr ess: Industria l City, Nort h Dongchong Rd.,
Shan wei, Guangdong P rovin ce, China
Fax: 0 660-3380759
E-ma il: service.sa le@tr uly.com.cn
http ://www.truly.com.h k
Free a dvisory hotlin e: 400- 830-1989
Headquarters: Tr uly I nte rna tional Holdings Li mit ed
Addr ess: Building 2, C hung Sh un Knitting Cent re, 1-3
Wing Yip Street, Kwai Chu ng, New Territories, Ho ng Kong
Tel: (852) 2487 9803
Fax: ( 852) 2146 5756, 24 80 0018 , 2480 0126
http ://www.truly.com.h k
Free a dvisory hotlin e: 400- 830-1989
 Loading...