

FC606/FC606+
.周杰
伦发
如雪
0
0 /08
1
0
0
: 2
:0
6
1 3
www.picnroll.com
User's Manual
Table of Content
1
1
Quick Start
Safety Instructions
Product Features
Ready to Use
Buttons and Controls
Connecting to PC
Managing Music Files
2
Basic Operations
Power On/Off
Adjusting the Volume
Lock / Unlock
3
Using FC606/ FC606+
Playing Music
Playing Video
FM Radio
Recording
Viewing Images
System Settings
4
Managing your FC606/ FC606+
Installing, Using, and Uninstalling
the Software
Upgrading the Firmware
Formatting
5
Miscellaneous
Troubleshooting
FAQ
Product Specifications
Copyright and Declarations
Certifications and Environmental
Protection

1
Safety Instructions
Product Features
Ready to Use
Buttons and control
Connecting to PC
Managing Music Files
Quick Start
2

3
Quick Start
Safety Instructions
Power
1.Make sure that the adapter is firmly plugged into the power outlet.
Unplug it when it is not in use.
2.Do not try to bend or fold the power cable. Do not put heavy objects
on the power cable.
3.Turn off the player and unplug the adapter immediately if the player
is accidentally contacted with water or other liquids.
4.Turn off the player and unplug the adapter immediately if the player
or the adapter emits smoke or unusual odor.
5.Avoid using the adapter during thunder storms.
Product
1.Do not place heavy objects on the player.
2.Do not place or use the player in moist, dusty, or smoky areas.
3.Do not subject to water or other liquids.
4.Do not press the button with excessive force.
5.Do not subject this player to severe impact.
6.Avoid using any chemical solutions to clean the player.
7.Do not subject to magnetic fields.
8.Do not try to dissemble or modify this player.
9.Do not disconnect the USB cable when the data is in transfer.

Other
1.Do not use earplug/earphone when riding a bike or driving a car.
2.Adjust the volume to a lower level when walking, especially when
crossing a street.
3.Limit the volume to an appropriate level when using earphone.
4.If your ear rings, adjust the volume to a lower level or stop using
the player.
5.Place the earphone/earphone cable properly to avoid damages.
Quick Start
Safety Instructions
4

5
Quick Start
Product Features
Display
64K ultra-clear COLOR display
Simple design
Simple design. Sporty rubberized finish.
Crystal Clear Sound
Top-line USA decoding chips provide clear and smooth sound.
The built-in EQ equalizer provides personalized sound effects.
Support Multiple Music Formats
Support WMA, MP1, MP2, MP3,,WAV, ADPCM formats.
Support SRS WOW Sound Effect
SRS WOW sound effect provides enhanced music experience
High Quality Recording
The built-in high quality microphone provides professional quality
recording.
FM Radio
Listening to the Hi-Fi stereo radio.
Clear and fluid Video Playback
Share video clips with your family and friends.

6
Quick Start
Product Features
Playback time
The built-in Li-on battery provides 20+ hours continuous music
playback.
Firmware upgrade
Add new features to your FC606 by downloading the latest firmware
from our website.
Act as a removable disk
The player will be recognized as a removable disk when it is connected
to your PC (Additional USB driver needed for Win98 system).
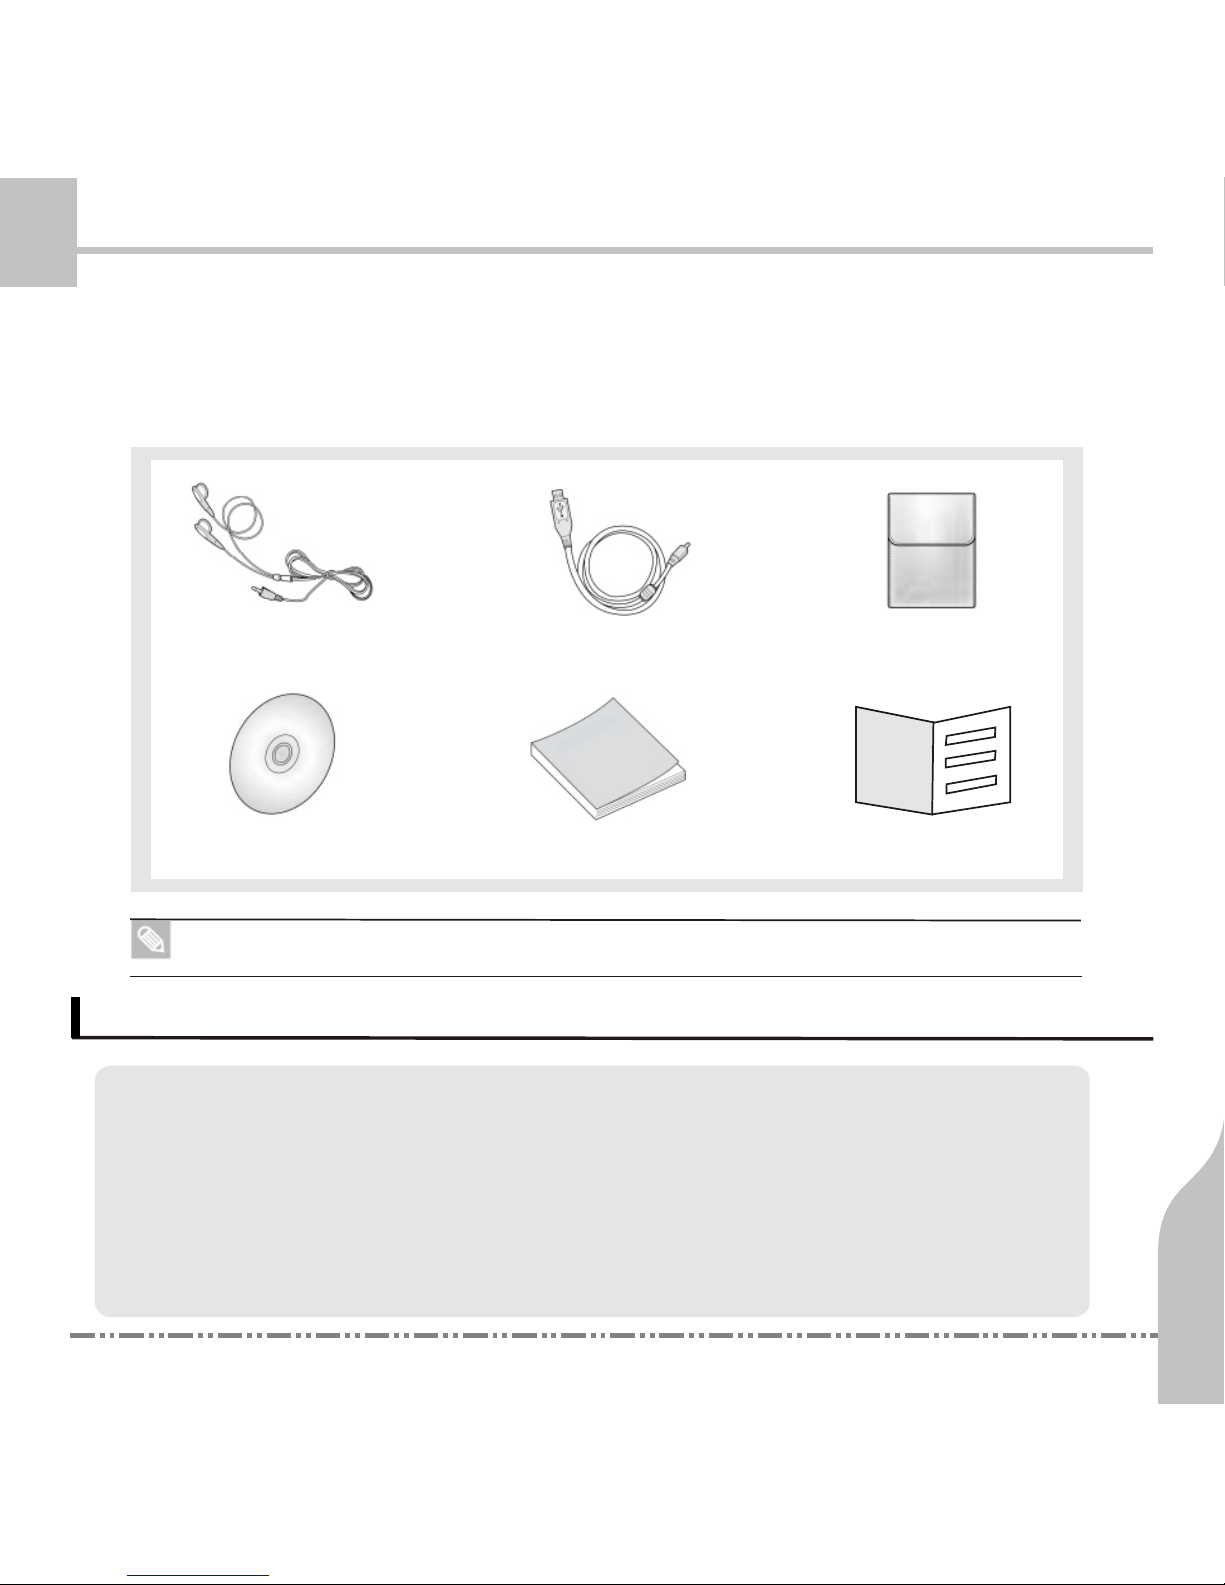
carrying bag
Warranty card
7
Quick Start
Ready to Use
Note:Carrying pouch is optional.
TRULY FC606/FC606+ includes the following accessories in the package.
Contact your local dealer for any missing contents.
CPU clock 200MHZ
Microsoft Windows WIN98/ME/2000/XP
CD-ROM driver
32MB RAM
60MB hard driver space
Earphone
Installation CD
USB cable
Quick start manual
ty c
rWarra
n
a
d
Q i
s
u
ck
tart ma nual
Minimum System requirements:
(2)
(3)
(4)
(6)
(1)
(5)
(10)
(9)
(8)
(7)
(13)
(11)
(12)
8
Quick Start
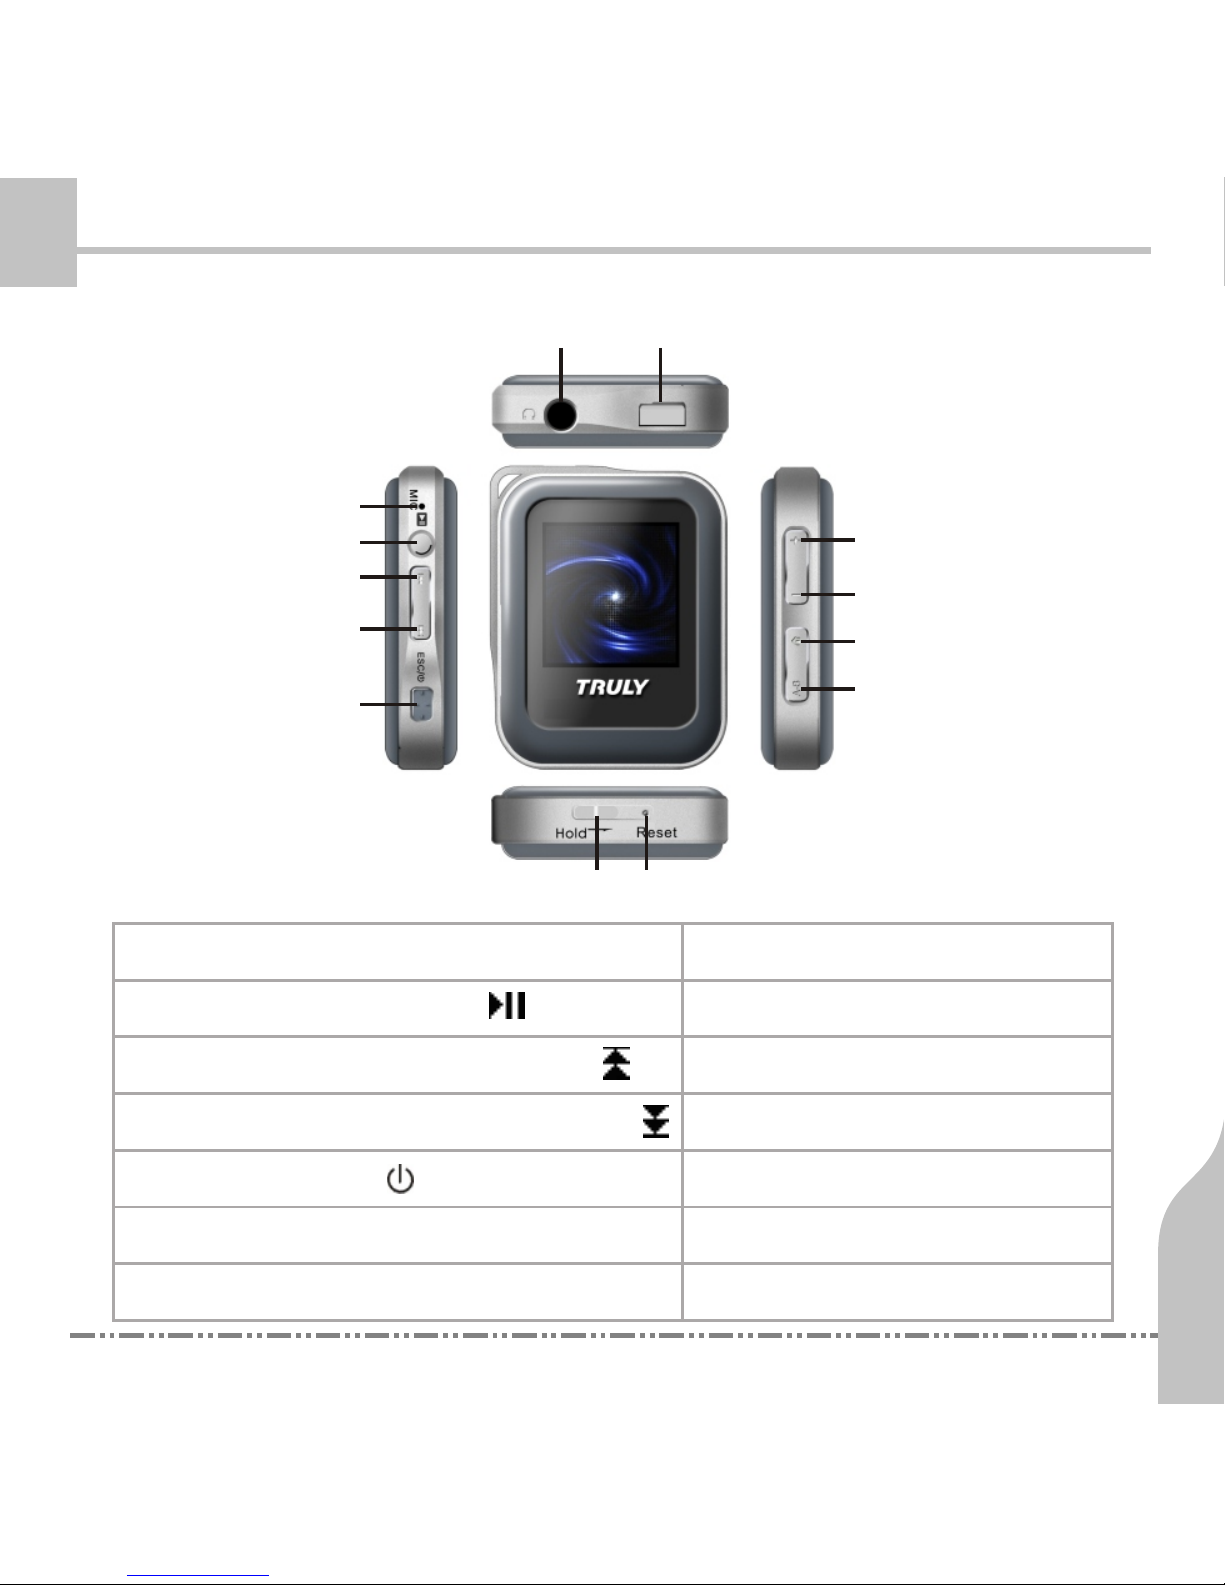
Buttons and Control
(1)Microphone(MIC)
(5)Power on/off ( )/Escape (ESC)
(6)Lock / Unlock (Hold)
(7)RESET
(8)A-B Repeat /REC
(9)Menu(MENU)/Browe
(10)Volume down(V-)
(11)Volume up (V+)
(12)USB Jack/charging jack
(13) Earphone Jack
(2)Play/Pause/Confirm ( )
(3)Move up/ Previous / Rewind ( )
(4)Move down/ Next / Fast For ward ( )
9
Quick Start
Connecting to /Disconnecting from PC
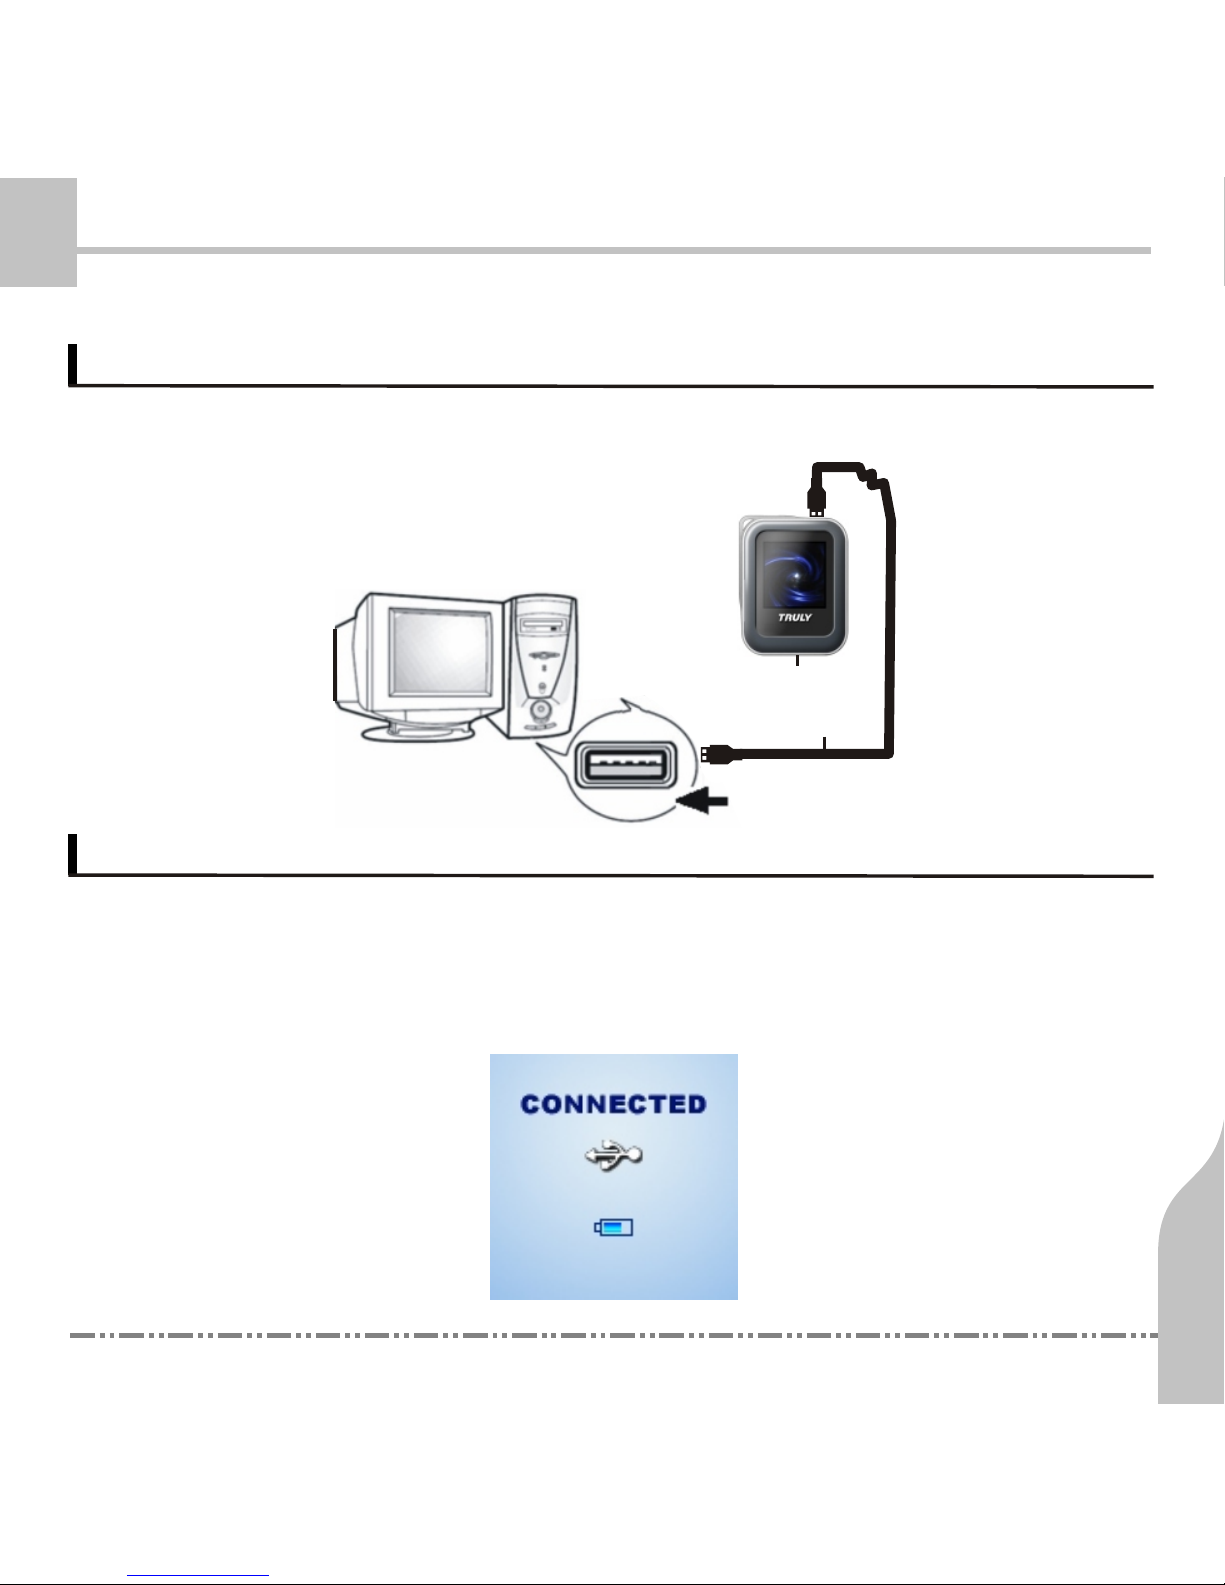
Connectin g to PC using USB cable
Use the supplied USB cable to connect the player to your PC.
USB jack on computer
U S B Cable
F C 6 0 6 / F C 6 0 6 + Pla yer
Charge the Battery
Connect the player to your PC using the supplied USB cable. When
the connection interface appears, the player will start charging the
battery automatically.

10
Quick Start
Connecting to /Disconnecting from PC
It takes approximately 3 hours to charge the battery to full capacity.
Please use the supplied USB cable. Using other USB cable may
cause charging problem.
The running battery indicator bar on the screen will show the
charging progress. The indicator bars will be fully lit when the
battery is fully charged.
Note:
For better battery performance, it is recommended that you charge
the battery for an extra hour before unplugging the charger. If the
battery has been fully charged, do not leave the player connected
to the charger for a long time. After using up the battery for the
first time, it is recommended that you charge the battery for two
extra hours before unplugging the charger.

11
Quick Start
Connecting to /Disconnecting from PC
Removable Disk
This player will be recognized as a removable disk when it is
connected to a computer. You can download/upload files in any
formats to/from your player. It is recommended to use TMUSIC
to synchronize music files to the player. Please refer to the section
of Managing Music Files for more information. You can also use
Windows Explorer to transfer supported media files to your FC606
/FC606+for future playback.
Note:
If you have successfully installed the FC606/FC606+
updating program and drivers in your Window 98
operating system, you do not need to install any
additional usb driver.
12
Quick Start
Connecting to /Disconnecting from PC
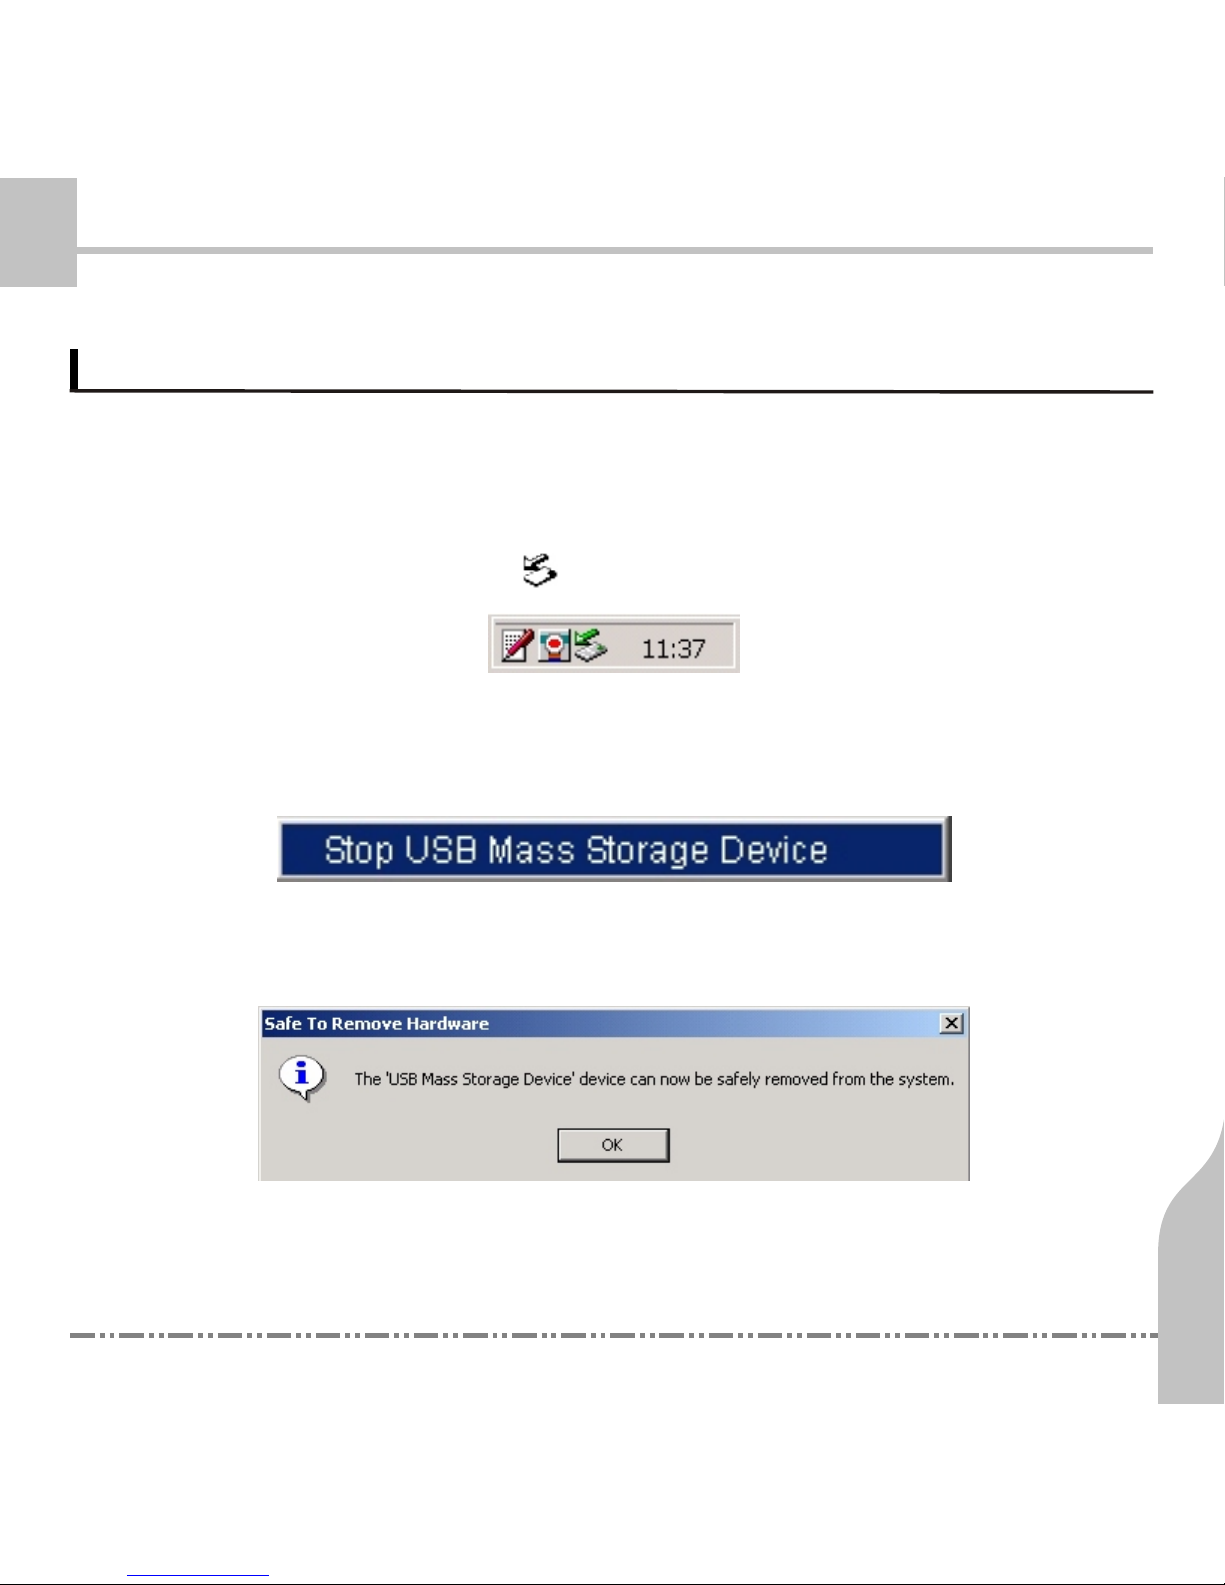
Disconnecting from PC
Follow these steps to disconnect the player from your PC:
1. Right click the USB icon “ ” in the Taskbar area.
3. Click “OK” to safely disconnect the player from your PC.
2. Select [unplug or eject devices] or [Stop USB Mass Storage Device].
4. Unplug the USB cable.
13
Quick Start
Managing Music Files
1. Download MP3 Files
Install the Tmusic music management software. See Part 4
for instructions on how to install the software.
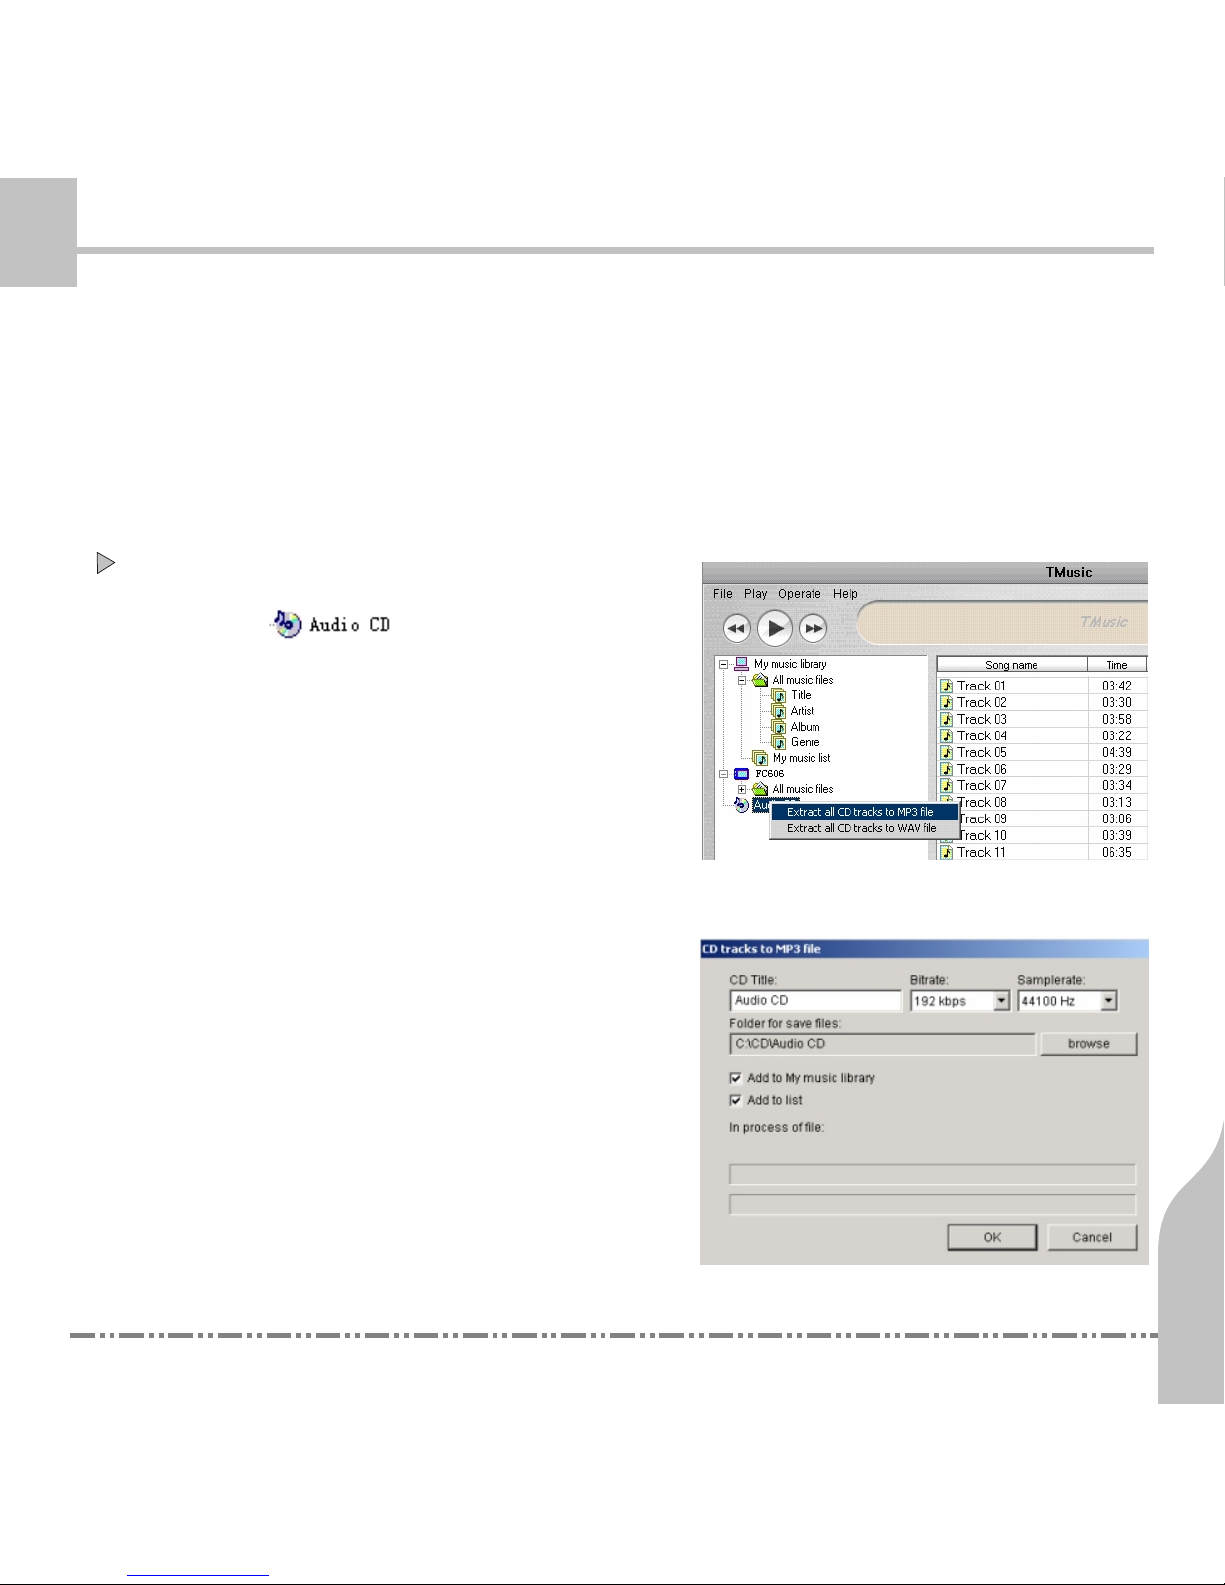
Extract CD tracks to MP3 files
A. Select ,then right click
it toselect “Extract ALL CD tracks
to MP3 files” in the pop up menu.
B. In the editing panel, input the
name of the album, bit rate,
sample rate, directory where
generated MP3 files are saved,
and other options.
14
Quick Start
Managing Music Files
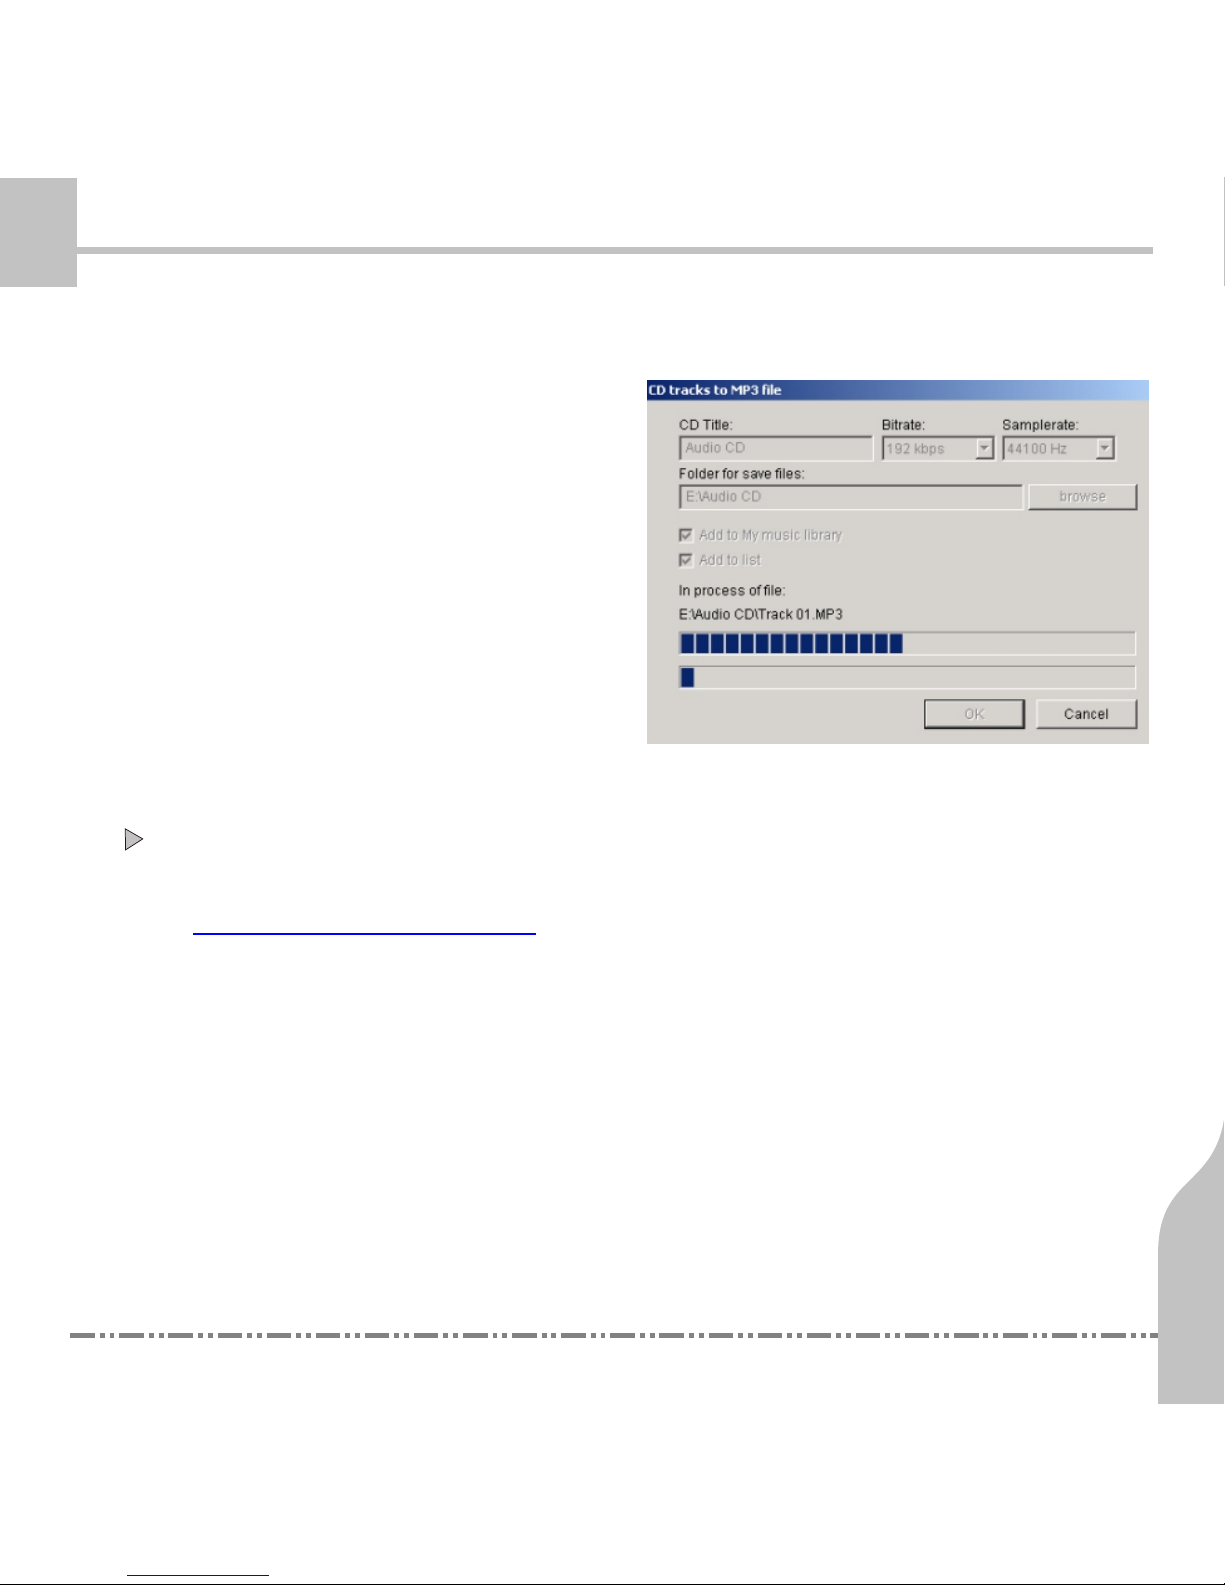
C. Click OK, TMusic will start to
convert the select tracks into
MP3 files.
Download music from internet
Music tracks can be purchased from Internet, such as
.www.musicmatch.com
15
Quick Start
Managing Music Files
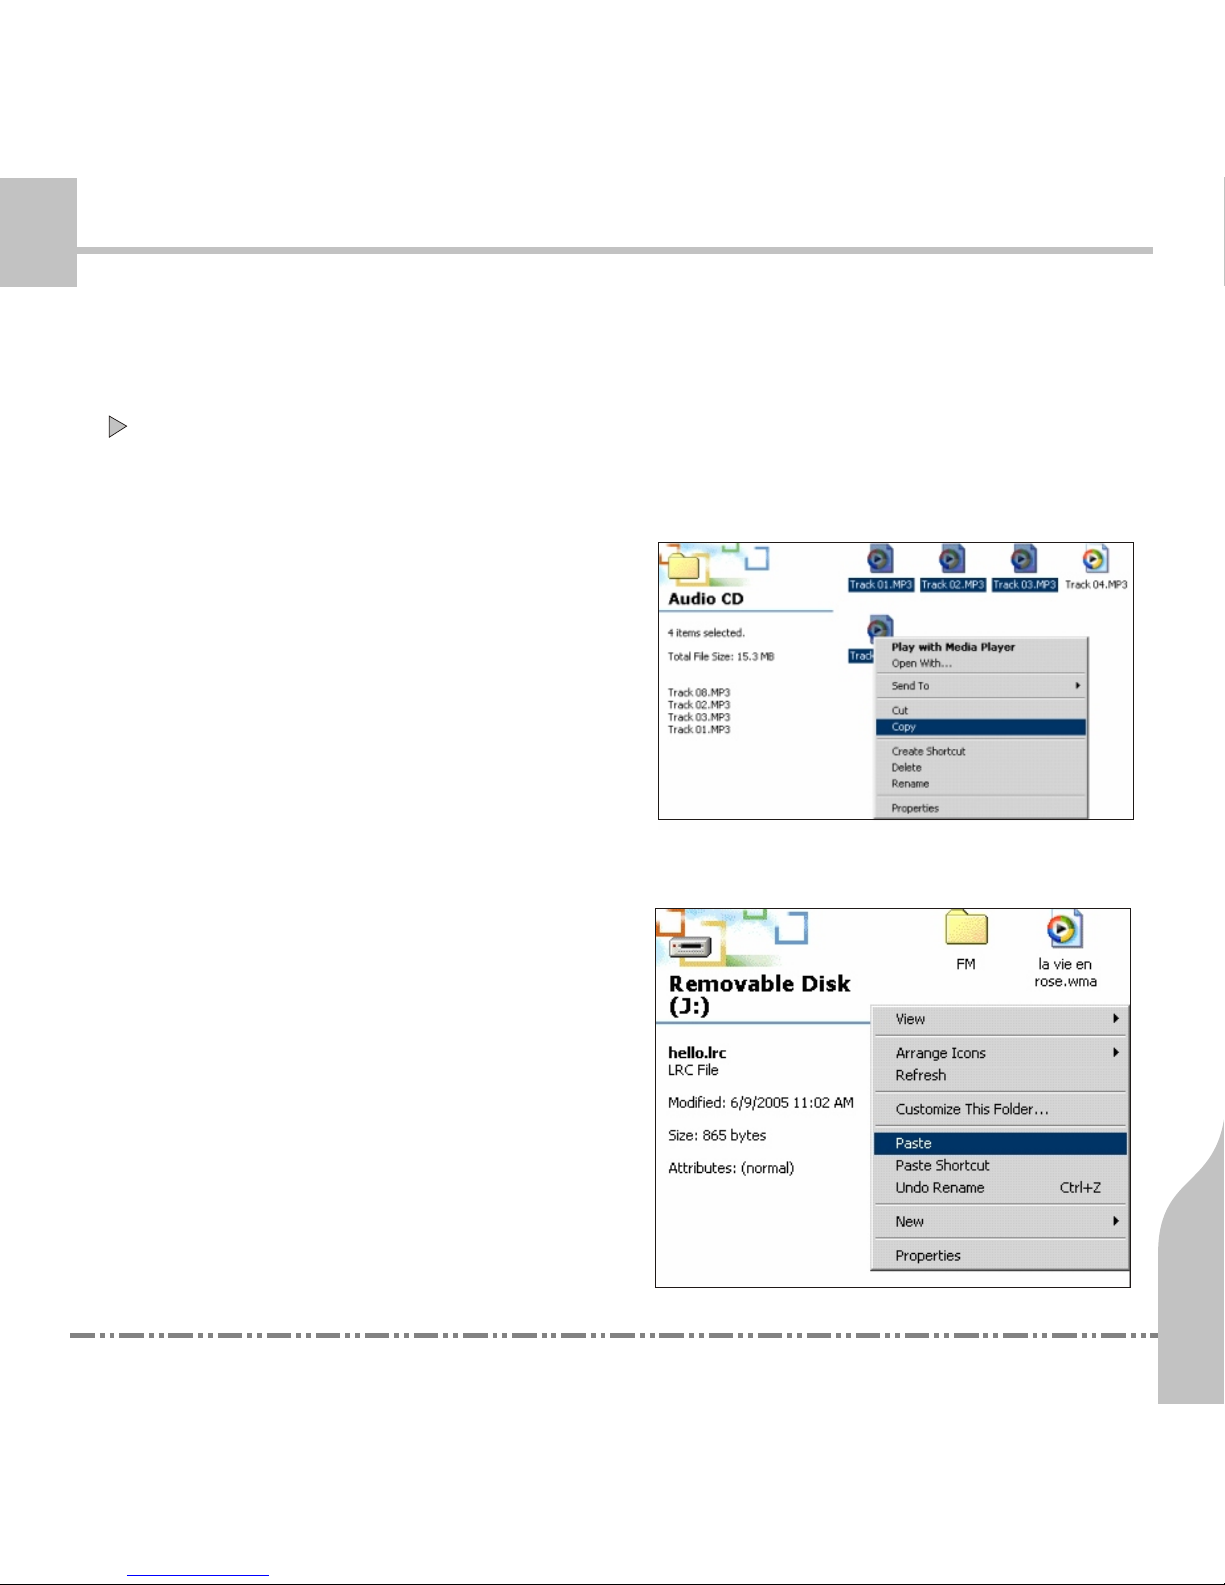
2.Transfer music files
Using Explorer to transfer music files
A. Copy the files that you want to
transfer in Windows Explorer.
B. Paste the files to the removable
disk (your player).
16
Quick Start
Managing Music Files
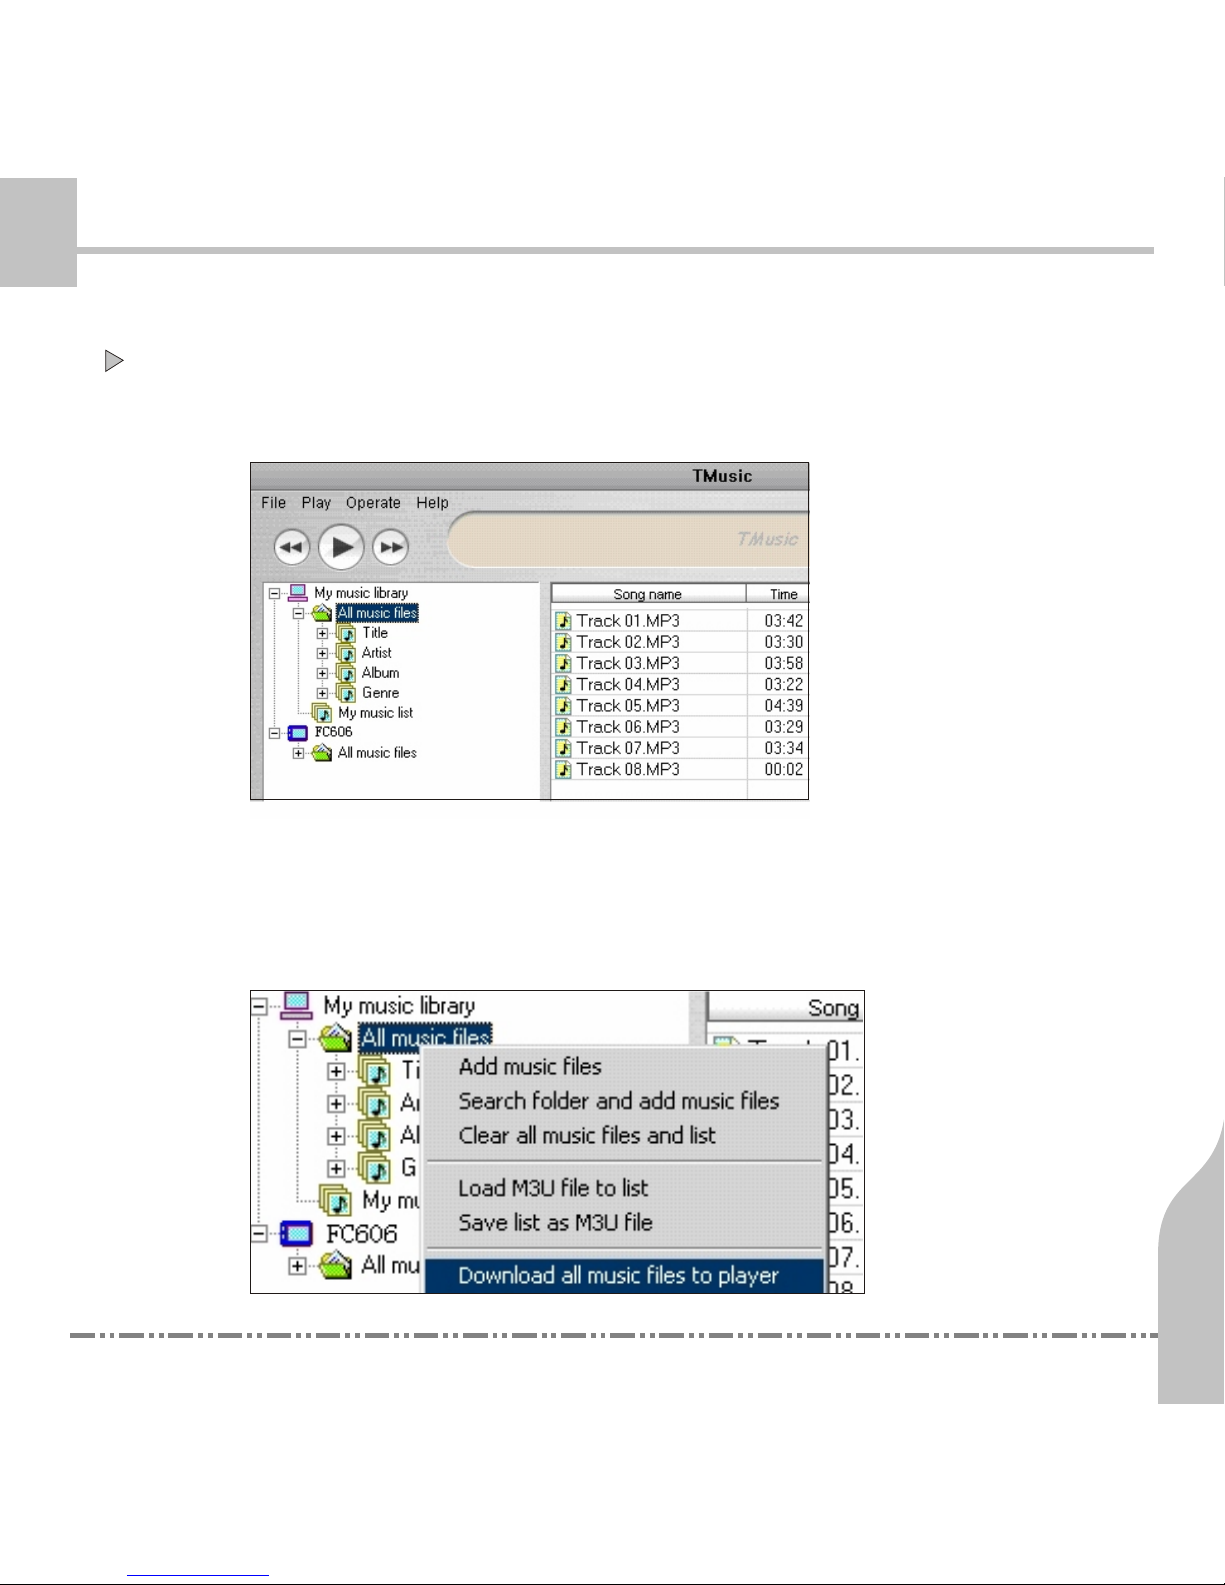
Using TMusic to transfer music files
A. Click All Music Files in My Music Library.
B. Right click to select download all music files to player
from the pop up menu, or select File/My music library/
download all music files to player in the main menu.

17
Quick Start
Managing Music Files
C. All music files in My music library will be copied to the player.
A.Right click My Music Library and select Search folders and
add music files in the pop up menu.
B.Select the files that you want to add to My Music Library.
★Build my music library
18
Quick Start
Managing Music Files
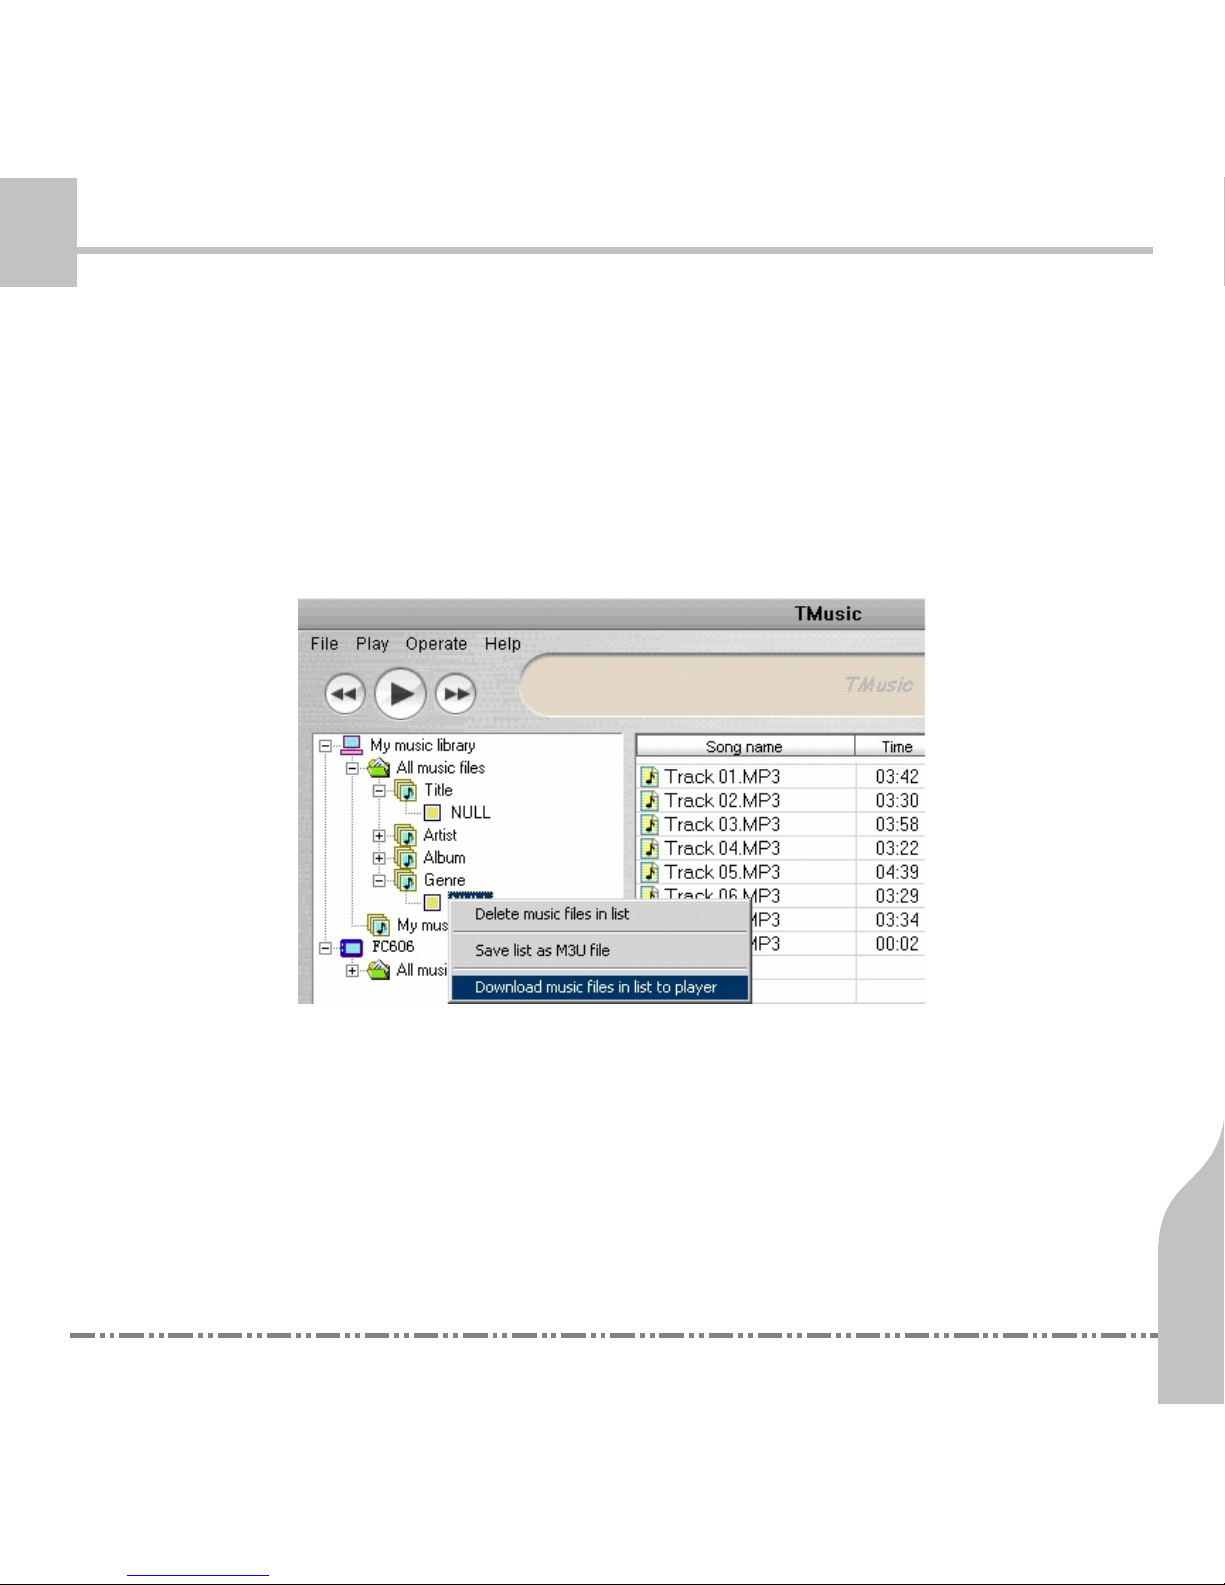
★ Download a list of tracks to the player
A.Click “+” to expand the lists of Titles, Artists, and Genres.Select a
list of files to be downloaded to the player.
B.Right click on the list and select Download music files in list to
player. The selected files will be downloaded to the player.
19
Quick Start
Managing Music Files
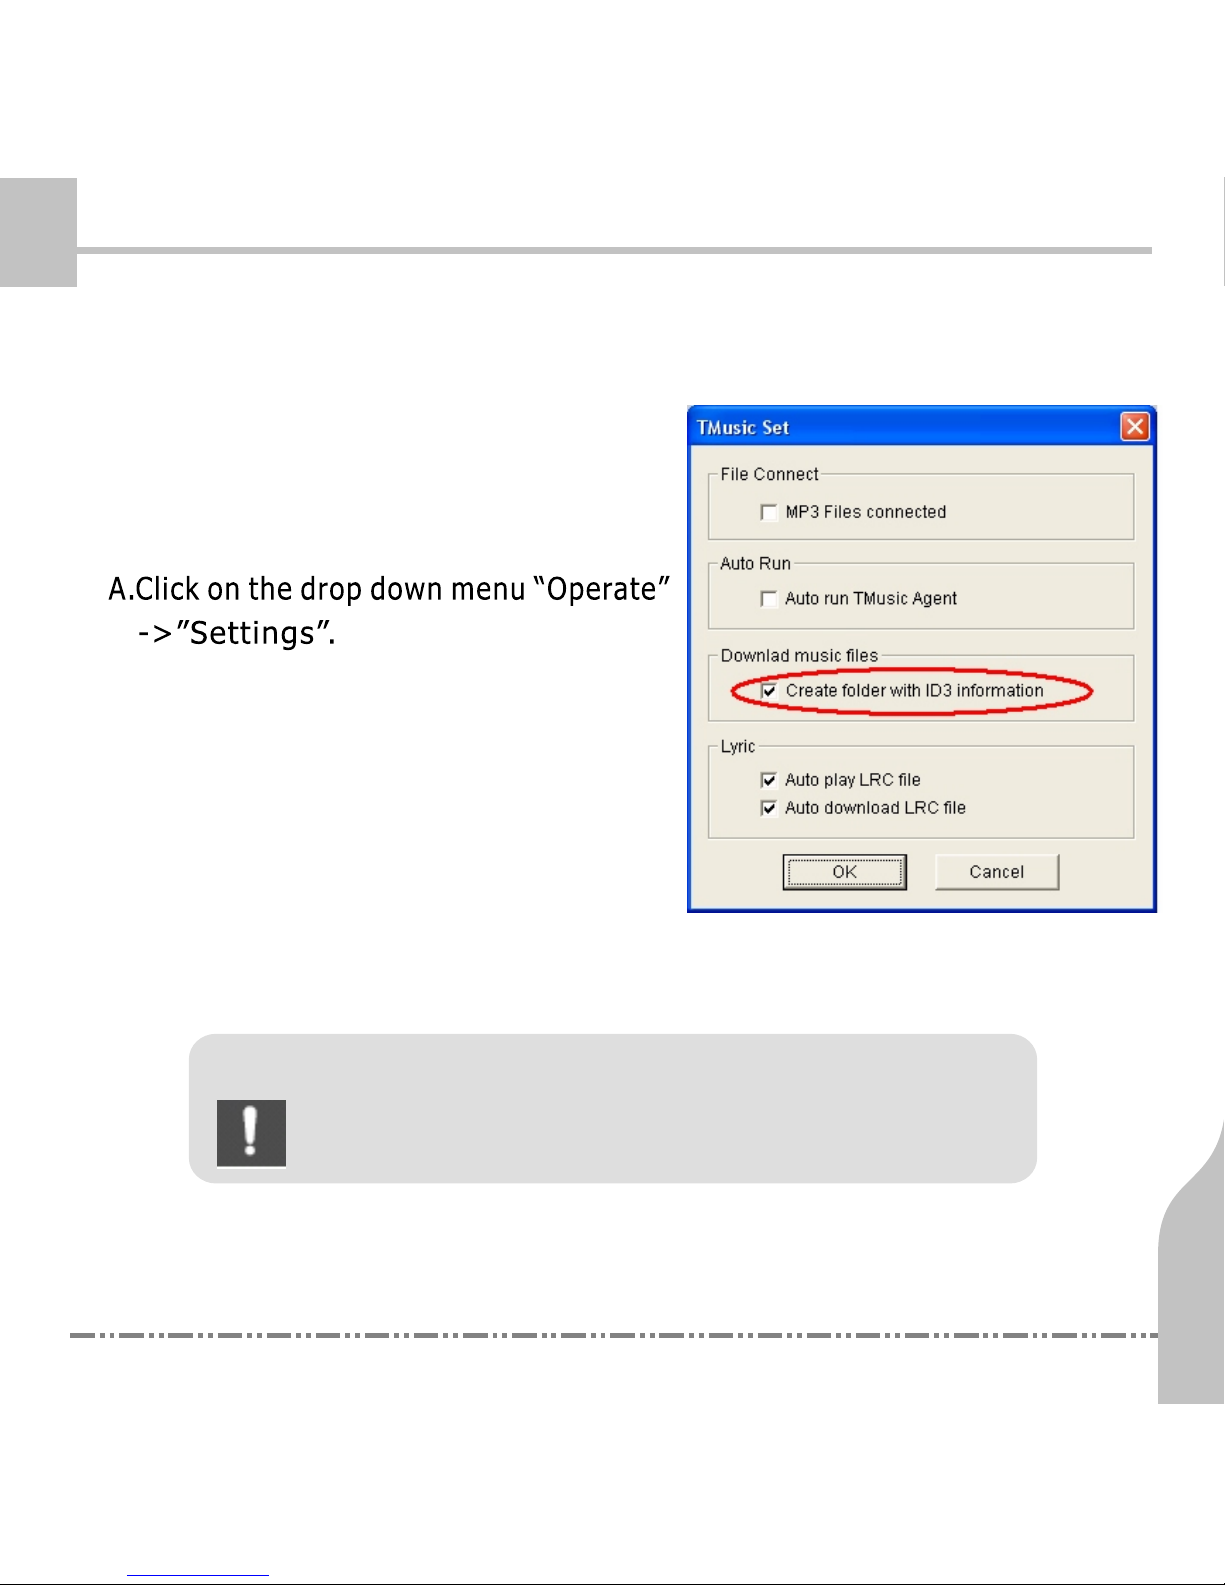
★ Build up hierarchy folders for tracks of songs
You can use TMusic to store songs in
the player in hierarchy orders of “..\
Artist\Album\Tracks” to easily, quickly
locate tracks.
B.In the “Do wn load mus ic files” section,
check the item “ Create folder with ID3
information”. Click OK to confirm.
C.All tracks will be transferred to the
player into hierarchy folders of “..
\Artist\Album\Tracks”.
Note: Please refer to the Help Topics in TMusic on
using Tmusic to manage your music files.
20
Quick Start
Managing Music Files
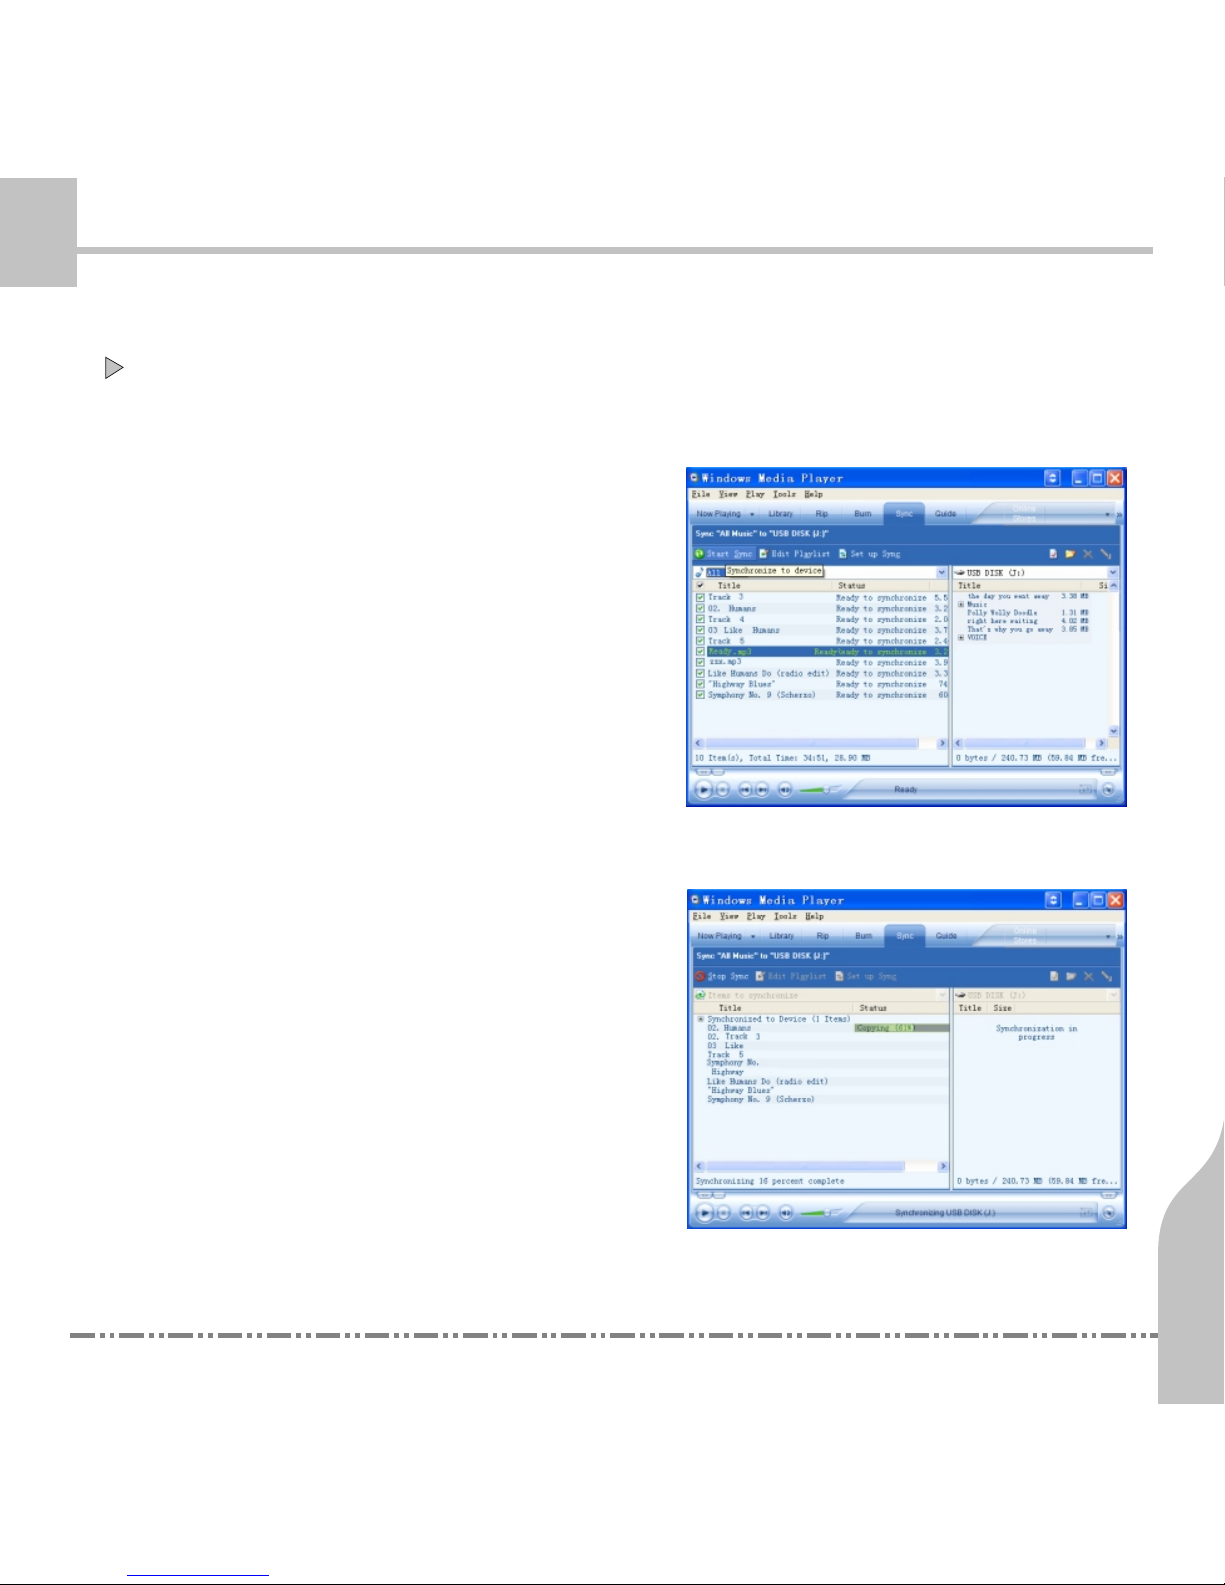
Using Windows Media Player 10 to transfer music files
A. Start Windows Media Player 10.
Select the files that you want to
transfer to your player. You can
select files based on artists,
albums, or genres.
B. Click “Start Sync” to transfer
the selected files to your
player.

c. Transfer completed.
21
Quick Start
Managing Music Files
Note:
you must have Windows Media Player 10 installed
in your PC. Please refer to the Help section in
Windows Media Player 10 for details on how to
transfer files to portable devices.

22
Quick Start
Managing Music Files
You can also use WMP10 to create folder hierarchy for music files in
the player.
A. Select “Tools”->”Options..” from the menu.
B. In the “Device” section, click on the device that represents your
FC606/FC606+ player.
C. Click on “Properties”. In the pop up window, check the item“Create
folder hierarchy on device”. Click “OK” to confirm.

23
Quick Start
Managing Music Files
D.Tracks will be stored in the player in the hierarchy of ”..\Artist\
Album\Song” in future synchronization.
There can be hundreds of tracks being stored in a 1GB/2GB
player. Therefore it could be difficult to locate a certain
track if all tracks are stored in a same directory. To avoid
such difficulties, always use TMusic or Windows Media
Player to sync songs to the player with folder hierarchy.
** Important Notice:

24
Quick Start
Managing Music Files
3.Deleting Files
Select the files you want to delete in the “removable disk”,right
click and select “Delete” from the pop up menu.

2
Adjusting Volume
25
Basic Operations
Power On/Off
Lock / Unlock

Power On/Off
Adjusting Volume
Lock / Unlock
26
Basic operations
Use ESC to turn on or turn off the player.
ON: Press and hold /ESC to turn the player on when power is off.
OFF: Press and hold /ESC to turn the player off when power is on.
User <+/-> to adjust volume.
Volume can be adjusted from level 00 to level 63.
Volume up:press +.
Volume down:press -.
Push HOLD to lock and unlock the player.
A icon will display on the screen when the player is locked.
When is on, all buttons are disabled.
If the player is locked after power off, the player cannot be turned on
until it is unlocked.

3
Using FC606/FC606+
Music
Video
Fm tuner
Record
Photo
Setting
27

28
Using fc606/fc606+
Music
Play files in MP3, WMA, MP1, MP2, WAV, ADPCM formats
1.Select icon to Music mode.

29
Using fc606/fc606+
Music
(1)
(2)
(3)
(4)
(5) (6)
(7)
(8)
(9)
(10)
(12) (11)(13)
2.You can select the music from the list by pressing or ,
and press to entry music playing interface:
(1) Playback Status
(2) Volume level indicator
(3) Volume level indicator bar
(4) Volume display
(5) Track number/Tota l tr ack number
(6) Total time
(7) Lyrics/ID3 info
(8) Elapsed time
(9) A-B segment Repeat
(10) Battery indicator bar
(11) Repeat mode indicator
(12) Play mode indicator
(13) EQ Mode

30
Using fc606/fc606+
Music
3.Basic operation:
Pause: Press to pause/play.
Volume control: Press“+”to increase volume,Press“-”to decrease
volume.
Previous/Next: Press for previous track or Press for Next track,
Press and hold for fast forward or rewind.
Escape from Music Mode: Press ESC,back to playlist interface,
music will continue playing until you enter into FM radio, Video mode
Or Recording mode.
Options menu/ Browse: Press MENU to access the Options Menu,
press and hold MENU to back to main menu.
A-B Repeat: When in the music playing mode, press A-B to set the
starting point A. The display shows A-. Press A-B again to set the
ending point B. The display shows A-B. Press A-B again to cancel
A-B repeat.

31
Using fc606/fc606+
Music
4.The Options Menu:
1) EQ settings(EQ):
In the play mode, press ( ) to access the options menu, press or
to select ”EQ mode”, press to enter:

32
Using fc606/fc606+
Music
In the play mode, press EQ to switch among the following different
sound effects:
Normal..........................
SRS sound effect............
Rock.............................
Jazz..............................
Classical.......................
POP..............................
Treble...........................
Bass.............................
UserEQ.........................
2) Play modes:
In the play mode, press ( ) to access the
options menu, press or to select ”Play
mode”, press to enter:

33
Using fc606/fc606+
Music
In the play mode, press /ESC to switch among different repeat modes:
Normal..........................
Repeat one....................
Repeat All......................
Random.........................
Repeat Random..............
3) Synchronized lyrics
Download the lyric file of the selected song in LRC format from the
internet.
Save the lyric file under the same name in the
same directory.
-For example, if the song file is named “yours.
mp3”, your downloaded lyric file should be
name “yours.LRC”.
When you play the song, press (MENU),
Lyrics will appearat the same time.

34
Using fc606/fc606+
Music
4) Customize EQ:
Built-in EQ equalizer. Press or to switch among different
frequencies. Press + or to adjust the value of the selected frequency.
Press to confirm and return to the music playing interface.
5.Using other features when listening to the music.
While playing Music, you can press and hold the MENU ( ) button
to switch to Main Menu for other functions.
Music will be stopped if FM radio, Re cording or Video mo de is selected.

35
Using fc606/fc606+
Video
Select icon to enter the video mode:
Plays SMV file.
You can easily create your SMV video file using the Truly Video
Converter tool.
1. Search video files
Press or to select a video clip from the list of video files.
Press to play the selected file:

36
Using fc606/fc606+
Video
2. Playing Video
Press to select previous video
clip,press and hold to rewind.
Press to select next video clip,
press and hold to fast forward.
Press to pause, press again to
resume.
Notice:
Supports video in SMV format.
The maximum resolution is 128*128.
For using Truly Video Converter, please refer to
Truly Video Converter section

37
Using fc606/fc606+
FM Tuner
1. FM radio
Select icon to enter FM radio mode:

38
Using fc606/fc606+
FM Tuner
Notice:
When finish searching, the player will jump
to the first station and start to play.
Enter ”Search Station“,, select “Auto Search” or “Manual Search”.

39
Using fc606/fc606+
FM Tuner
(1)
(2)
(3)
(6)
(5)
(4)
(1)Current radio station
(2)Station list indicator
(3)Current status
(4)Sound mode:mono;stereo
(5)Frequency range: 76-90 or 87-108
(6)Current station indicator
40
Using fc606/fc606+
FM Tuner
2. basic operation:
While Listening to FM Radio:
Press to pause/play.
Press or to select the previous or next station.
Press + or - to adjust volume.
press ESC to go back to the main interface.
press MENU to access the options menu, FM radio will not be stopped
until other mode is entered.
3. Search and save stations
Automatic Search:
press MENU to enter the options menu.
Select Auto Search Low, Auto Search Medium, or Auto Search High
to start automatic search.
When a station is found during search, it will be automatically saved.
Wh en search is completed, the player will jump to the first stationand
Start to play.
The higher the search level, the less, but higher quality, stations
the player will find. This feature is used to optimize
Notice:
41
Using fc606/fc606+
FM Tuner
Notice:
The earphones serve as the antenna in radio mode.
Please plug in the earphones during frequency
navigation or you will not be able to tune in to any
radio stations.
4.Other FM radio settings
1) Frequency width: Japan, USA, Others.
2) Frequency step: High, Middle, Low.
3) Sensitivity: High, Middle, Low.
Manual Search:

42
Using fc606/fc606+
FM Tuner
5. Deleting station
Press MENU to call out the delete menu
Press “Delete station” to delete selected station.
Press ”Delete all station“ to delete all saved stations.
Notice:
FC606/FC606+ can save up to 20 stations

43
Using fc606/fc606+
Record
Recording using the built-in microphone
Select icon to enter the recording mode:
44
Using fc606/fc606+
Record
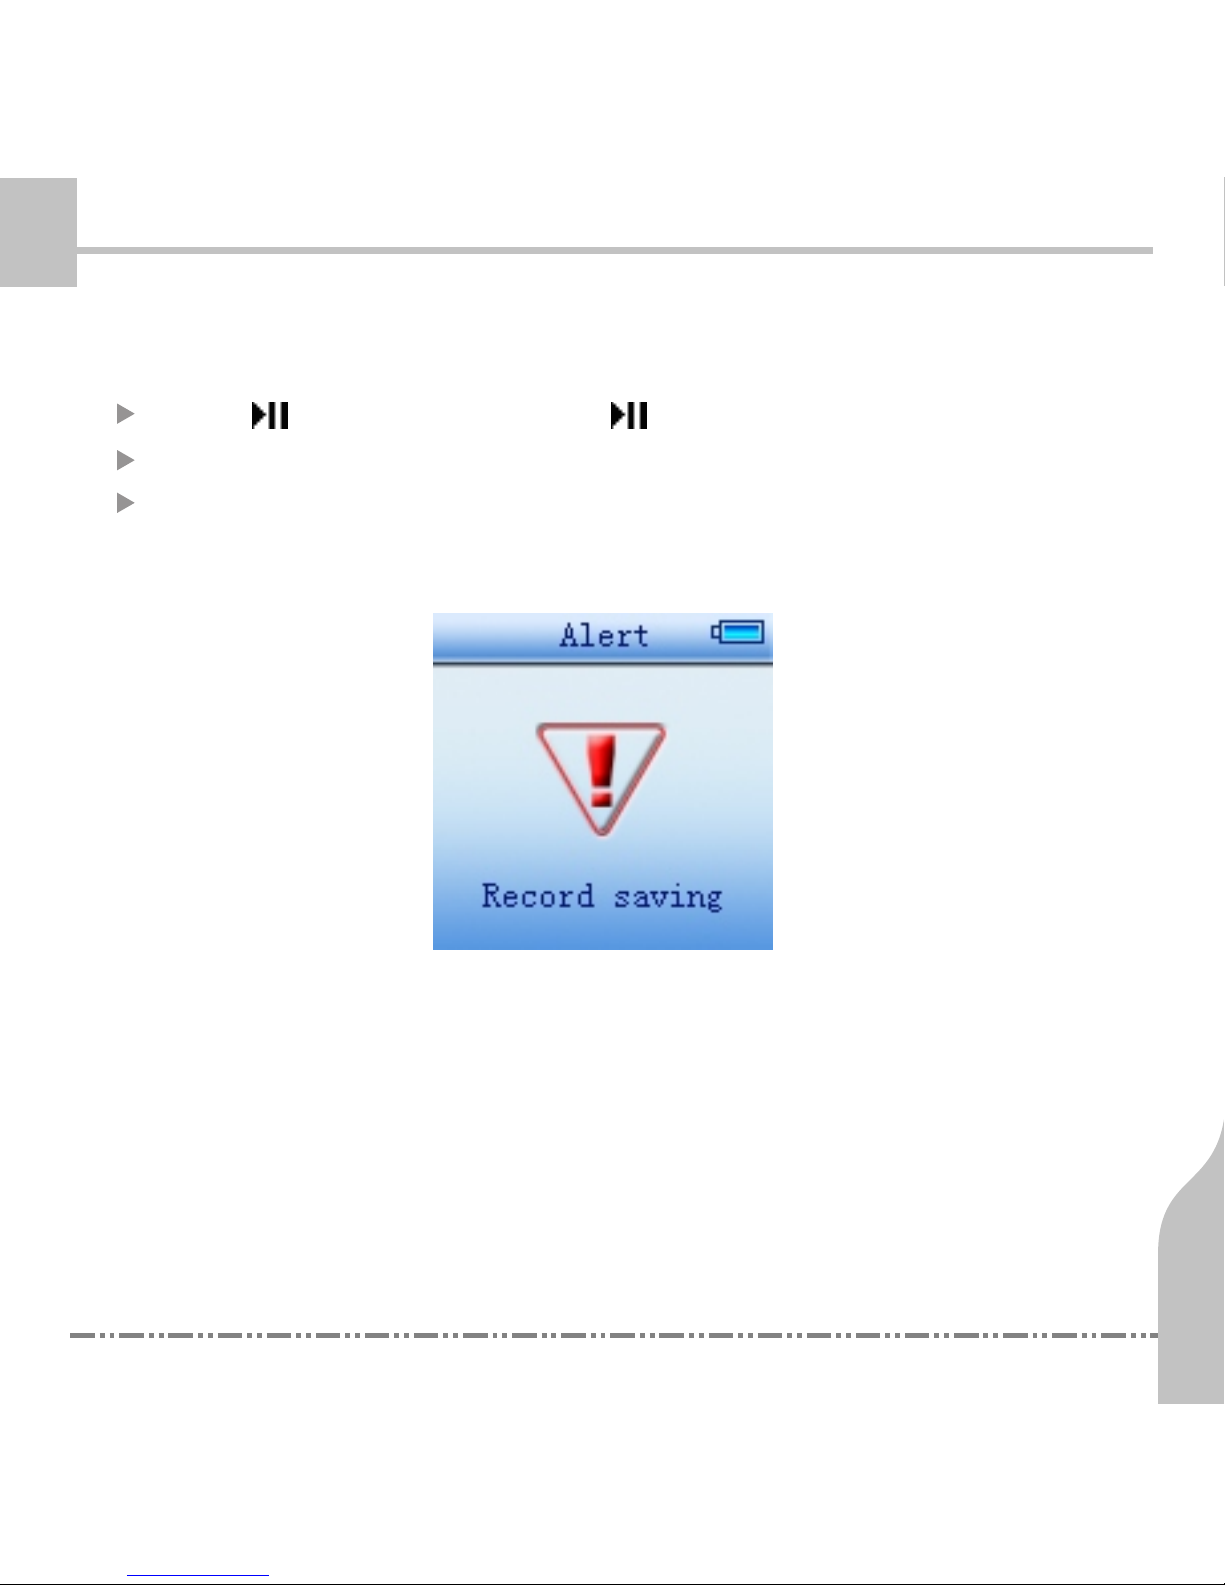
Start recording:
Press to pause, and Press again to resume.
An animated cassette will show up when recording.
Press ESC to save the recording and go back to the recording
interface.

45
Using fc606/fc606+
Record
Status
Elapsed Time
Remaining time
Animation
File name
Notice:
Recording will stop automatically if the unit is running
out of free space.
Recorded files will be saved using the following naming
schema: “WAV” in the Voice directory.

46
Using fc606/fc606+
Photo
view images in JPG and BMP formats.
Select icon to enter Photo mode:

47
Using fc606/fc606+
Photo
Press or to select photo file, press to play and ESC to escape
from Photo mode.
Options Menu:
Press MENU to pop up the options menu:
Slide show: Select to start or stop slide show.
Slide time: Adjust the time between slides.

48
Using fc606/fc606+
Setting
Select icon from main menu to enter System Setting interface:
You can adjust the settings of your FC606/FC606+ in the system
setup list.
press or to select a system setup option.,setting included:

49
Using fc606/fc606+
Setting
Languages: change the language.
Backlight timer: Background light will turn off automatically after
the period of time set.

50
Using fc606/fc606+
Setting
Auto power off: this player will automatically turn off if there is
no operation after a time period set by the user.
Power off timer: The system will close all the programs in use
and shut down at the preset time.

51
Using fc606/fc606+
Setting
contrast:Adjust brightness of display.
System reset: Restore all settings to default values.
Version information: display model number / version / date.

4
Installing, using, and
uninstalling softwares
Upgr adi ng the Fi rmware
Formatting
52
Managing your FC606/FC606+

Installing, using, and uninstalling softwares
53
1. Installing the softwares
Insert the supplied installation CD into your PC. Wait for the auto-run
interface.
Click on the software to be installed. Follow the on-screen installation
instructions
Managing your FC606/ FC606+

Installing, using, and uninstalling softwares
54
2. Using TRULY Video Converter
You can use Truly Video Converter tool to create SMV video files for
your FC606/FC606+.
Overview of the main interface:
Double click on the icon on desktop or choose ”Start/Program
/Truly Video Converter/Truly Video Converter" to open video converter.
Following is a screenshot of the main interface of converter:
Managing your FC606/ FC606+

Installing, using, and uninstalling softwares
55
Overview of the main interface:
1.Click ”Browse” for Input Video to select the source video file.
2.Click “Browse” for Output File with Path and file name.
3.Click ”Convert” to to start converting.
4.The progress bar shows the progress of the conversion process.
3. Uninstalling Transcoder
Choose uninstall icon form “Start/program/Truly Video Converter/
uninstall Truly Video Converter” .
Double click “Add or remove programs” in Control Panel. Select
“Truly Video Converter” and click “Change/Remove”. Follow the
instructions for uninstall Transcoder from your PC.
Managing your FC606/ FC606+

Upgrading the Firmware
56
1) Download the latest firmware from http://www.picnroll.com.
2) Connect the player to your PC using the supplied USB cable.
3) Install and run the Truly FC606/FC606+ Firmware Download program.
4) Click on Start to start upgrading the firmware.
5) When done, click on Close to finish upgrading firmware.
Managing your FC606/ FC606+

Formatting
57
Be sure the backup your important data before formatting.
1.Connect your player to your PC
using the USB cable.
2.click “My computer/removable
disk”.
3.right click on the removable disk,
and select “format”.
When the format window pops
up, click “Start” to begin
formatting. Click “close” when
formatting is completed.
4.This player does NOT support
NTFS format. Using NTFS format
may damage your player.
Please choose either FAT or FAT32 when formatting.
Managing your FC606/ FC606+

Formatting
58
Notice:
All menus will be restored to their original states
after formatting.
Please make backups of all important files before
formatting. All files will be erased after formatting.
If the battery is too low, please plug in the power
adapter during formatting. Otherwise, formatting
may fail.
Managing your FC606/ FC606+

5
Troubleshooting
FAQ
Product Speci fi cations
Copyrights and Declarations
59
Certif ications and
Environmental Protectio n
Miscellaneous

Miscellaneous
Troubleshooting
60
1. Cannot turn the player on
Check whether the player is running out of battery. Retry after
charging the battery.
Make sure that HOLD is in the “unlocked” position. Unlock the
player and retry.
Press “Reset” to reset your player.
Error occurs or the USB connection is broken when upgrading the
firmware.
The flash memory is physically damaged.
2. There is noise, distortion, or completely no sound when playing.
Make sure the volume level is not set to 0.
Make sure that the earphone is securely plugged in and is not broken.
Make sure the music file is intact.
When using MP3, WMA files, it is possible to have noises when the
source file is of low quality. Try another file.

Miscellaneous
Troubleshooting
61
3. The characters on the display are messed up.
Make sure you have selected the correct language.
You can change the language setting in “System settings language
setting”.
4. Poor FM radio quality
Make sure that the earphone is securely plugged in. (The earpho
cable also serves as the antenna when in radio mode).
Reposition the player and the earphone.
In order to avoid any interference, turn off all electronic devices
nearby.
5. Cannot download
Make sure that the USB cable is securely plugged in.
Make sure you have sufficient memory space before downloading.
6. The player showed an error message and stopped.
Reset your player. However, all files and data in your player will be
lost.

Miscellaneous
Troubleshooting
62
7. Display does not respond.
Restart the player.
If the problem persists, reset your player.
8. Data is missing.
Unstable power supply could lead to missing data. It is recommended
that you backup all your important data.

Miscellaneous
FAQ
63
Why some WMA format songs on the digital player cannot
be played?
Some websites only offer songs in WMA format with DRM (Digital
Rights Management) license protection (for example:www.
Napster.com and www.musicmatch.com). These DRM
Protected songs are also known as Secure WMA songs. These
Secure WMA songs cannot be played in the digital player unless
They are synchronized to the player using Windows Media
Player.
How many minutes of MP3/WMA songs can be stored on the
player?
This depends on the player's memory capacity, and how much is
available for storage. One minute's MP3/WMA music occupies
approximately 1Mb of space, so if the capacity of the memory is
1GB then it can store around 1000 minutes of music.
Why do different songs play at different volumes?
Depending on how a song is recorded, and how the volume levels were
Set at that time, songs can have different volumes levels and some can
Sound much louder than others.

Miscellaneous
Product Specifications
64
Model Numbe
TRULY Pic 'N Roll FC606 (1GB) / FC606+ (2GB)
Storage Media
Built-in 1GB/2GB NAND flash
Interface to PC
USB2.0 Full Speed
Transmission
Speed
Downloading > 1000 kbps
Uploading > 700 kbps
Recordin g Format
WAV
Bit Rate
MP3 (8KBps-384KBps)
WMA (32KBps-320KBps)
Video Format
Support SMV format
Recording time
Approx. 17 hours(256MB)
Display LCD
64K (Color),128×128(Resolution)
Battery
Built-in Lithium battery
Rec har gi ng time
Approx. 3 hours
Playing time
20+ hours
Max. Output
Earphone 25mw*2
FM Frequency
76.0 - 108.0MHz
Dimension
58mm(L)×46mm(W)×14mm(H)

Miscellaneous
Copyrights and Declarations
65
Copyrights
All rights reserved. Without written permissions from Truly Electronics
Mfg. Ltd., all information in this publication shall not be redistributed
in any format, such as electronic versions,mechanical versions,
Records, copies, and so on, and shall not be translated to any Other
Natural languages or computer languages.
Declarations
Truly assumes no implicit or explicit guarantees or declarations on
The quality and accuracy of the informa tion covered in this publication.
Information covered in this publication may subject to change
Without further notice.
Windows and Windows Media Player are registered trademarks of
Microsoft (US) Inc. All related tradema rks and products are properties
of Microsoft.
SRS is a registered trademark of SRS Labs., Inc. All related
trademarks and products are properties of SRS Labs., Inc.
Always backup your important data. Truly assumes no responsibilities
for any loss resulted from data loss.
This user manual (content and screenshots) are created based on
the initial version of the player.

Miscellaneous
Copyrights and Declarations
66
Features and related operations are subjected to change without
Further notice. The latest user manual can be found in the Supplied
Installation CD and Truly's website.
Should you need more information on an upgraded version of this
player, please visit http://www.picnroll.com. You can also contact
our service hot line at 1-866-PIC-N-ROL (1-866-742-6765).
Miscellaneous
Certifications and Environmental Protection
67
FCC Certification
This player has been certified by FCC, and complied with the
requirements outlined in FCC Rule section 15. These restrictions
protect radio receivers and television sets against interference.
This player can emit radio signals. It may cause interference to
radio communications if it is used inappropriately. However, we
assume no guarantees that there are no interferences under any
circumstance. If you detect any interference (you can turn on and
turn off the unit to find whether there is any interference), please
try the following ways to minimize interference:
Reposition the receiver or the antenna.
Move the player away from the receiver.
Use different power outlets for the player and the receiver.
When necessary, consult with a dealer or a professional
technician.
Notice:
Unauthorized modification to the player may result
in the loss of certain rights of the user. Truly assume
no responsibilities for any loss resulted from
unauthorized modification to the player.

Miscellaneous
Certifications and Environmental Protection
68
Environmental Protection
Disposal of electronic devices (applicable to EU members and other
European countries that have recycle regulations in force.)
Products with this icon printed on the
product itself or on its package must
be di sposed prop er ly. It must be ret urne d
to local organizations in order to be
properly recycled. Your assistance
would help us protect ourselves
against potential health threats. For
more information about how to recycle
this product, please contact your dealer
or our local offices.
 Loading...