

Page 1

TRULY Industrial(ShanWei)Ltd.
Address: North Truly Industrial City, Dong Chong
St., Shanwei City, Guangdong Province, China
Toll-free service line: 400-830-1989
Fax: +86-660-338-0759
E-mail:[email protected]
Websit:www.trulymid.com
Quick Start Guide
A61o2
Page 2

1 2
User Guide and Safety Information
To en sur e safety a nd proper usa ge, please read the following
information carefully prior to use:
>> To prev e nt damage to the Micro SD card and device,
pl ease do no t remove t he Micro S D c ard whi l e in use.
>> When using headphones, please ensure that the volume is
set to an appropriate level to prevent damage to hearing.
>> Keep de vic e a nd accessories away from liquids and damp
environments.
>> Avoid exposing device to extremely high or low temperatures.
>> Keep device from flames or lit cigars and cigarettes.
>> Do not paint or otherwise change the color of your device.
>> Avoiding dropping or throwing the device.
>> Never set the device in a place where the temperature might
rise above 60°C, such as on a car dashboard, on a windowsill,
or in the line of direct sunlight behind a piece of glass.
>> Do not dis ass emble the de vic e nor attempt to fix or repair
it by yourself.
>> The charging voltage of the devi ce is 5.0 V. Ensure that
power outlet is appropriate for the device voltage prior to
charging.
>> Do not use parts t hat have n ot be en authorized by the
manufacturer. Doing so may be dangerous.
>> Use only a damp or an tis tat ic cloth to clean the device.
Do not use a dry or static cloth.
>> Device par ts, su ch as the LCD display, may be fragile.
Use with care, avoid h itt ing parts against othe r objects,
and do not apply heavy pressure to the parts.
>> K eep the device and accessories away fro m children.
Children ma y cause harm to themselves or others, and
may damage the device and accessories.
>> Do not un install ap plications withou t ensuring that
doing so will n ot result in the crashing o f the d evice or o f
certain functions.
>> Kee p the pow er ad apter away fr om wa ter and av oid
pl acing it in anywh ere th at wa ter ma y drip , suc h as
un derne ath a vas e or othe r conta iners f illed w ith wat er.
Page 3
3
4
Table of Contents
Important Tips:
Keep numbe r of sim ult ane ous ly running applications to
a minimum t o prevent the device from run nin g slowly or
otherwise sub-optimally. When device beg ins to exh ibi t
such symptoms, pro mpt ly close applications that are not
in use to prevent insufficient device memory.
When installing third party software, please note :
Some third party app lic ati ons are in compatible with the
device and ma y cause malfunction. Please uninstall such
applications to ensure proper functioning of the device.
System upgrade, firmware download and upgrade
Please visit our offi cia l website at .
For instructions on upgrades, ple ase refer to the upgrade
guidelines in th e firmware upgrade pac kag e or connect to
the network and upgrade via OTA.
www.trulymid.com
1. Product overview
2. Package checklist
3. Device introduction
4. First-time Usage
5. Operating the interface
3.1 Keys
3.2 Ports
3.3 Ports diagram
4.1 Battery charging and maintenance
4.2 Switching the device on and off
and unlocking the screen
4.3 USB port
4.4 Internet access
4.5 Bluetooth transmission
4.6 GPS navigation
4.7 Cameras
4.8 NFC transmission
4.9 PLAY store
6
9
10
11
12
14
15
15
16
17
19
21
21
22
22
23
24
Page 4
5
5.1 Main interface
5.2 Functions Menu
5.3 Wid get s
5.4 Switching between tasks
7.1 Wi- Fi se tti ngs
7.2 Flow settings
7.3 Sound settings
7.4 Display settings
7.5 Storage settings
7.6 Application settings
7.7 Language and input method settings
7.8 Date and time settings
7.9 About the tablet
6. Viewing images and videos
7. Setting the interface
8. Installing applications
9. FAQ
6
Product overview
BT4.0
Built-in GPS
Bluetooth
Navigation
HD Naked Ey e 3D di s p lay
technology, seamless switching
between 2D and 3D video
TI OMAP4470 1.5GHz dualco r e C o rt e x- A 9+ dua l -c o re
M3 , w it h GP U( S G X5 4 4) 3D
hardware accelerator
1GB memory, 16GB or 32GB
(optional) built-in flash,supports
TF card expansion (Max: 32GB)
10.1 inch full HD Naked Eye 3D
TFT Display,120 0*1 920
resolution, up to 224 PPI
10-point capacitive touch screen
WIFI 802.11 a/b/g/n, (2.4GHz
and 5.0GHz dual-band support)
Android 4.0 ICS
Operating System
Naked Eye 3D
Processor
Storage
Display
Touch scree n
Wirele ss co nne cti vit y
24
24
25
26
26
28
28
28
29
29
29
29
29
30
30
31
32
Page 5
7 8
Micro-USB, mini-HDMI, 3.5mm
headphone port,Micro-SD (TF)
card port, 2.5mm DC charging port
Lithium polymer 7000mAh battery
2D/3D Video, 1080p HD,
mainstream video and audio formats
NFC-enabled data transmission
(optional)
2.0 megapixel front camera, 5.0
megapixel auto-focus rear camera
Gravity acceleration sensor,
brightness sensor
Near field communication
Camera
Sensors
Standard ports
Battery
AV transmission
270×171×12.2mm
Dimensions
Approx. 690g
Weight
Local upgrade or OTA upgr ade
Firmware upgrade
Built-in microphone, recording
and voice messaging available
through third-party software
Other
Frequency band
A6101:
3G:WCDMA 900/2100MHz.
A6102:
3G:WCDMA 850/1900MHz.
A6103:
3G:WCDMA 850/2100MHz.
A6105:
EVDO/CDMA2000: 800/1900MHz.
A6106:
A6107:
3G:TD-SCDMA/HSDPA 2010 ~20 25M Hz/ 188 0~1 920 MHz .
2G:GSM/GPRS/EDGE:850/900/1800/1900MHz.
2G:GSM/GPRS/EDGE:850/900/1800/1900MHz.
2G:GSM/GPRS/EDGE:850/900/1800/1900MHz.
EVDO/CDMA2000: 800MHz.
2G:GSM/GPRS/EDGE:900/1800MHz.
Page 6
Package Checklist
1
1
1
1
Power adapter
USB cable
Hi-fi headphones
Quick guide
1
Device certification
9
10
RST
5.0
Mega Pixel
Auto focus
Full HD Video
21
3
5
6
7
8
9
10
11
12
4
13
14
15
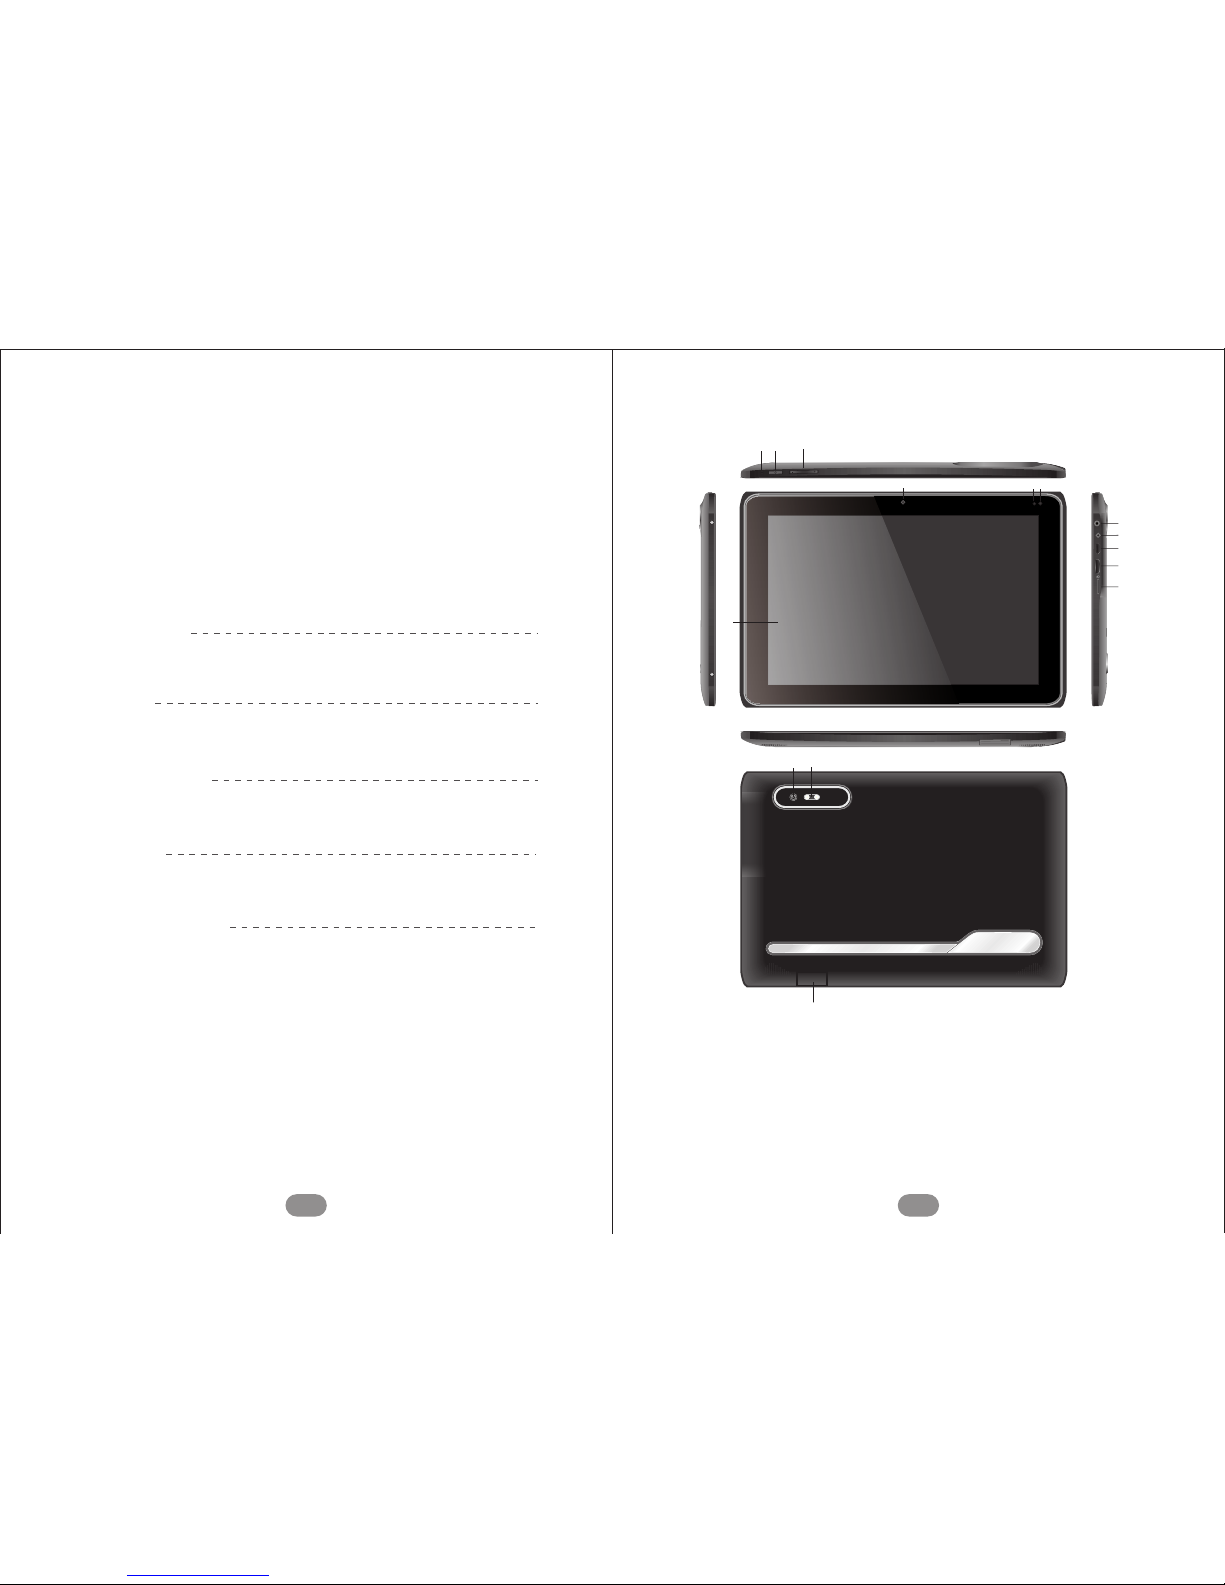
1. Reset button
2. Power button
3. Volume keys
4. Touch screen
5. Front camera
6. Battery and charging indicator
7. Light sensor
8. Headphone jack
9. Power connector
10. USB port
11. HDMI o utp ut po rt
12. TF card slot
13. Rear camera
14. Flash
15. SIM card slot
Device introduction
Page 7

4. Touch screen
Ports
5 &13. Cameras
6. Battery and charging indicator
7. Light sensor
8. Headphone jack
9. Power connector
Convenient 10-point capacitive touch screen.
Front: 2.0 megapixels; Rear: 5.0 megapixels
Indicates the battery and charging status.
Ambient l igh t sensor automatically adjusts the brightness of the screen (“A uto mat ic amb ien t l igh t s ens or” must
be selected in the settings).
3.5 mm headphone port.
Connects the power adapter to the device for battery charging.
2
12
Keys:
1.Reset button
Note:
2. Power button
Power on:
Power off:
Note:
3. Volume keys
If the operating system exhibits signs of malfunction, push
and release the RST button to force the device to restart.
Use the reset button o nly w hen the device cannot be
powered off. Otherwise, use the normal power button to
switch off th e device in or der to prevent damage to the
operating system.
Hold down the power button until the operating
system appears on the main screen.
Holding down the power button for approximately two seconds on any screen will prompt a pop-up that
asks, “Do you want to shut down your device?” Choose
“Yes” to safely shut off your device. To lock the screen,
quickly press and release the power button.
When the device’s battery is too low to power the
device, it will automatically shut off.
Press the +/- keys to control volume level.
1
11
Page 8
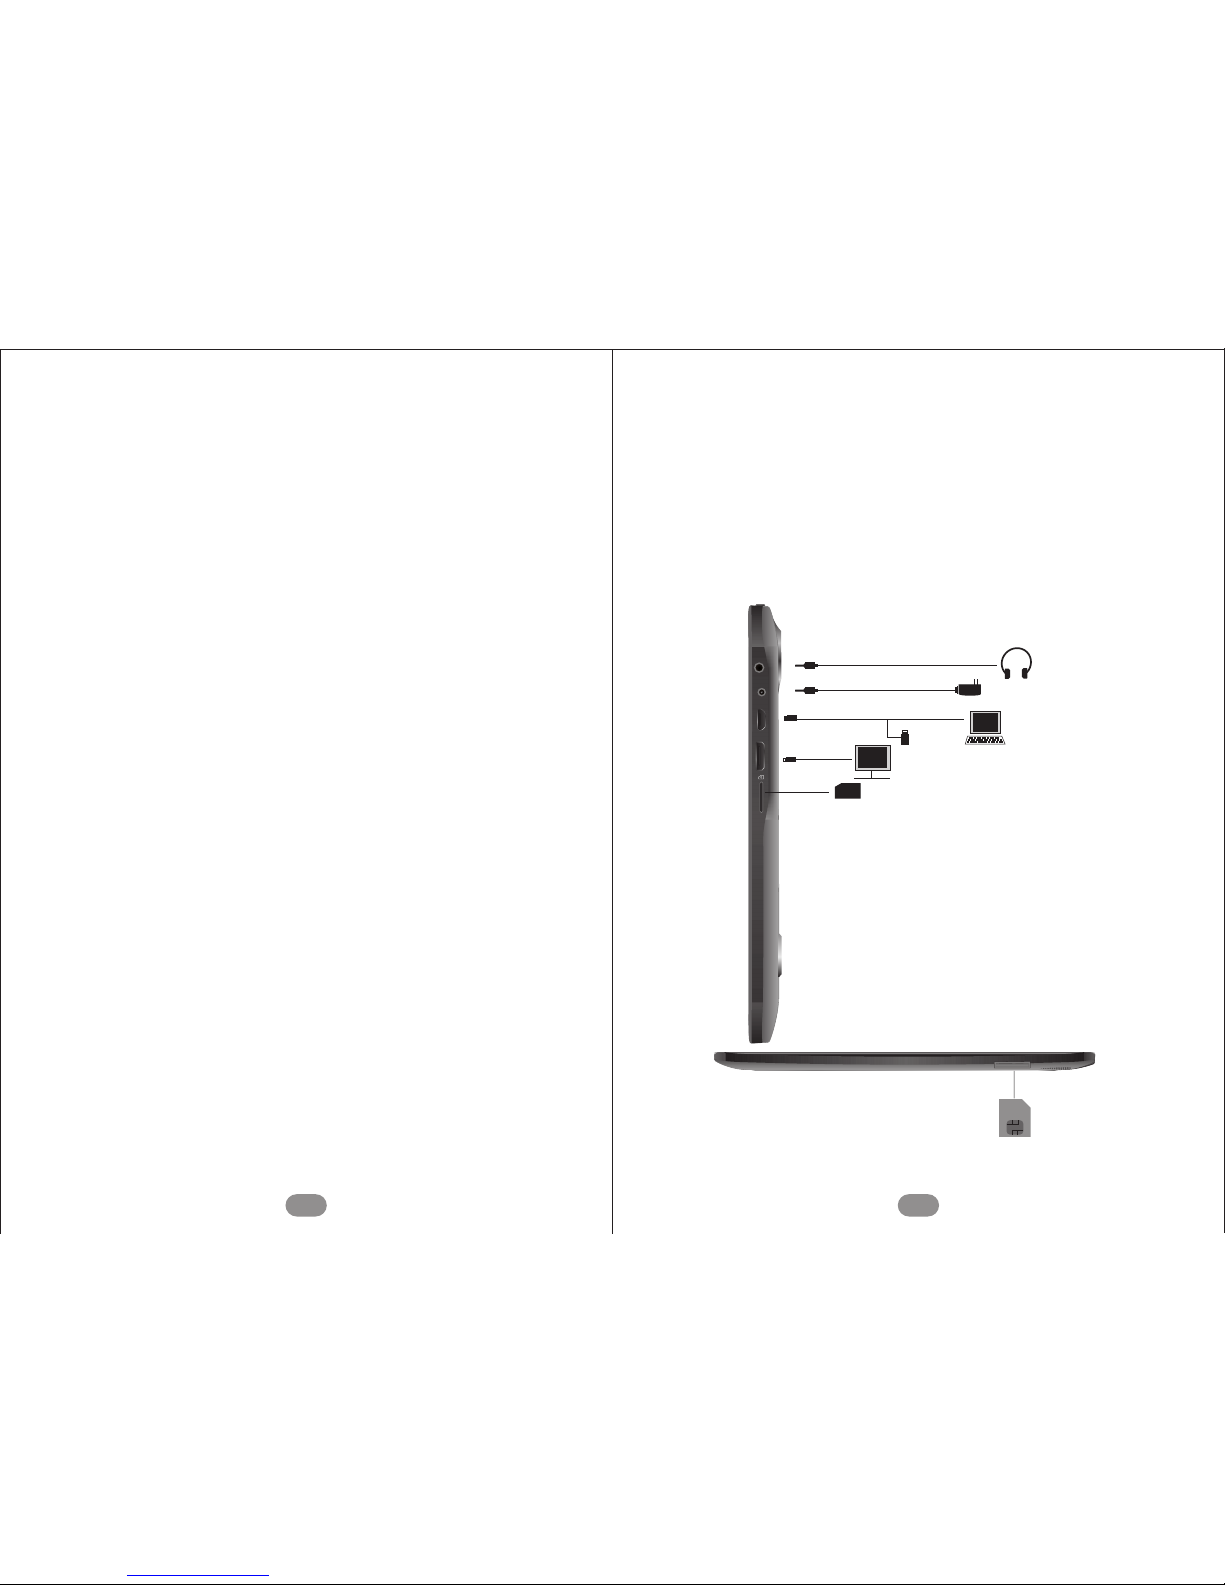
10. USB port
11. HDMI output port
12. TF card slot
15. SIM card slot
Connect yo ur PC to the device vi a a U SB for data
transferring. An OTG cable may be u sed in the port for
accessing U-disks. The port may also be use d to connect
expansion devices, such as a keyboard or mouse.
Mini-HDMI high-definition output; the HDM I v ide o
output connection may be connected with an HDMI
display device via an HDMI cable.
Micro-SD (TF ) card slot; may be us ed to expand the
external TF card, supports up to 32 GB.
When you select 3G wireless service, you will need to
purchase a USIM/SIM card (based on device compati-
bility, you will choose one of the following networks:
WCDMA/EVDO/TD-SCDMA). Additional instructions
will be included with purchase of the card, such as
personal PIN information or personal settings.
13
Ports diagram
3
14
TV
Headphones
Powe r
PC
U-Di sk
TV
Micr o- SD card
USIM /SIM
Page 9

other chemical batteries (such as dry cells), batteries with
different capacities, or batteries of different brands. If the
battery begins to emit an odor, heats up, changes in color,
changes in shape, or exhibits any other abnormal signs
during charging or storage, immediately remove the
battery from the device and stop charging. If the battery is
no longer charging, please disconnect it from the power
adapter. The battery must be placed out of the reach of
children. If the battery is accidentally swallowed, go to
the hospital immediately. If the battery begins to leak or
emits a gas-like smell, quickly remove it from the
presence of any fire to prevent the battery from catching
on fire. If the battery is leaking and electrolyte liquid
comes into contact with the eyes, do not rub the eyes.
Flush the eyes with clean water and go to the hospital
immediately to prevent long-term damage. Using an
incompatible replacement battery model may result in
risk of explosion. Batteries should be disposed of at
authorized battery recycling centers.
When the devi ce is powered off, press an d hold the power
bu tton down for app roxima tely two se conds. T h e
indicator ligh t will b eco me blue and the de vic e will
Switching the device on and off
and unlocking the screen
2
16
Battery charging and maintenance
Note:
Note:
When using in the first time, please charge the battery
until it is fully charged. Charging can be performed with
just the power adapter. For the first two times, charge
the device for eight hours. Subsequently, simply charge
the device until the battery indicator shows that the
device is fully charged.
The device uses a built-in polymer batter y. The
appropriate adapter must be used in charging the device.
While charging, the battery icon will move in a scrolling
motion. When charging is complete, the battery icon
will stop scrolling. To prolong the lifetime of the
device, it is recommended to use the batteries.
If the device will be left unused for long periods
of time, charge the phone once a month and allow the
power to drain to prevent damage resulting from the
battery dying. When the device automatically turns off
due to low battery power, connect it to the power
adapter. The screen will notify you that the device
cannot be powered on until it has been sufficiently
charged. The device will require more time to charge
when it is charging while in use. We recommend
charging the device when it is not in use.
Do not place the battery in the microwave or a
pressure tank; do not use the battery in conjunction with
1
First-time Usage
15
Page 10
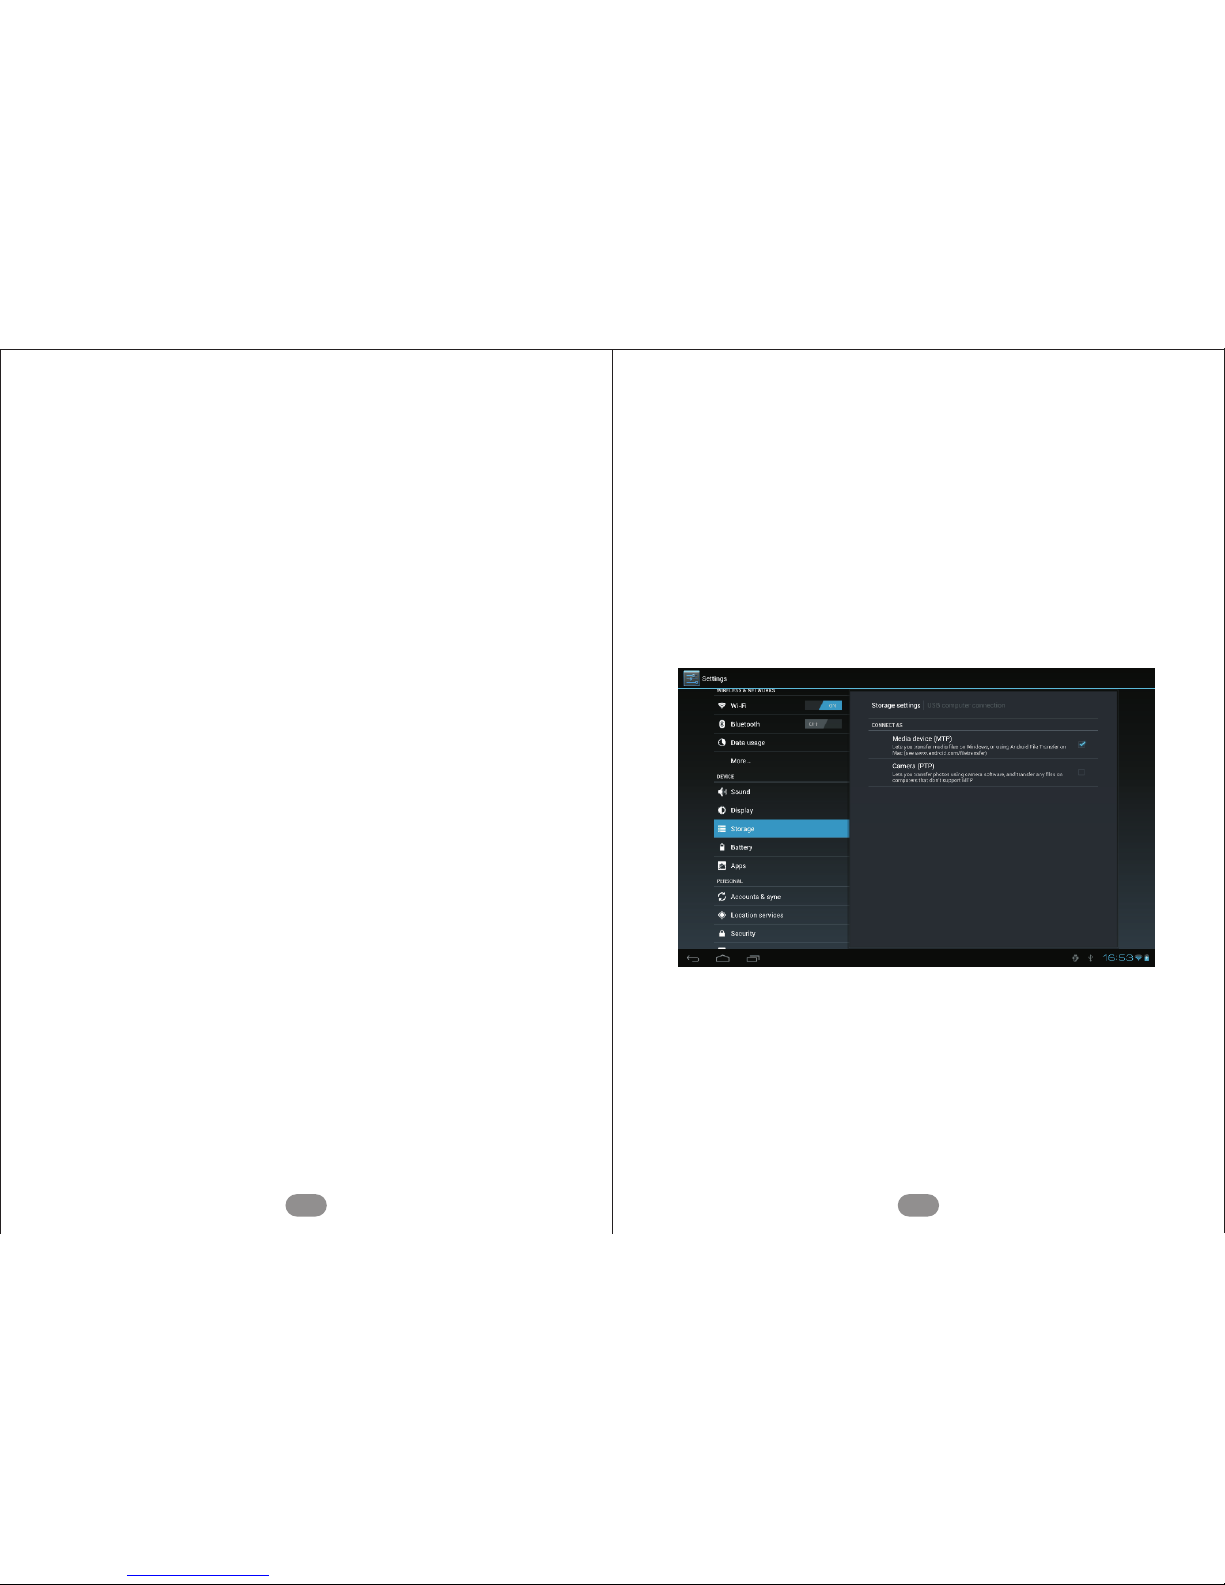
on your PC first. To transfer data or use certain files,
unselect the “USB debugging” option on the tablet. Use
the USB cable to connect to your PC, and enable the
“Media Settings (MTP)” located on the bottom right
corner of the tab l e t . If do w nloading th i r d - party
ap p li c at i on s or ga m es vi a 9 1 PC S u i te , “U S B
debugging” must be enabled befo re the software can be
downloaded and installed.
18
3
display the boot ing -up screen. Once the boot animation
has ended, the syst em wil l auto mat ica lly be set to the
locked-screen mode. To unlock the screen, swipe in the
direction of the wa ter rip ple s displayed across the screen.
When the device is powered on , quickly pressing and
releasing the power but ton w ill acti vat e sleep mode and
lock the screen. To unlock the device, simply p ress and
release the power button. Once the screen has lit up,
unlock t he screen by swiping in th e direction o f the
water ripples displayed across the screen.
While on any screen, holding down th e power button for
approximately two seconds will prompt a pop- up that
asks, “ Do you want to shut down your device?” Choose
“Yes” to shut off your device. To for ce the device to
shutdown, hold down the po wer button for 10 seconds,
and the operating system will automatically power off.
To conn ect the tablet with y our PC, you must i nst all
Versio n 11 or newer version o f Win dow s Media Player
Sleep mode and locking the screen
Powering off
USB port
17
Page 11
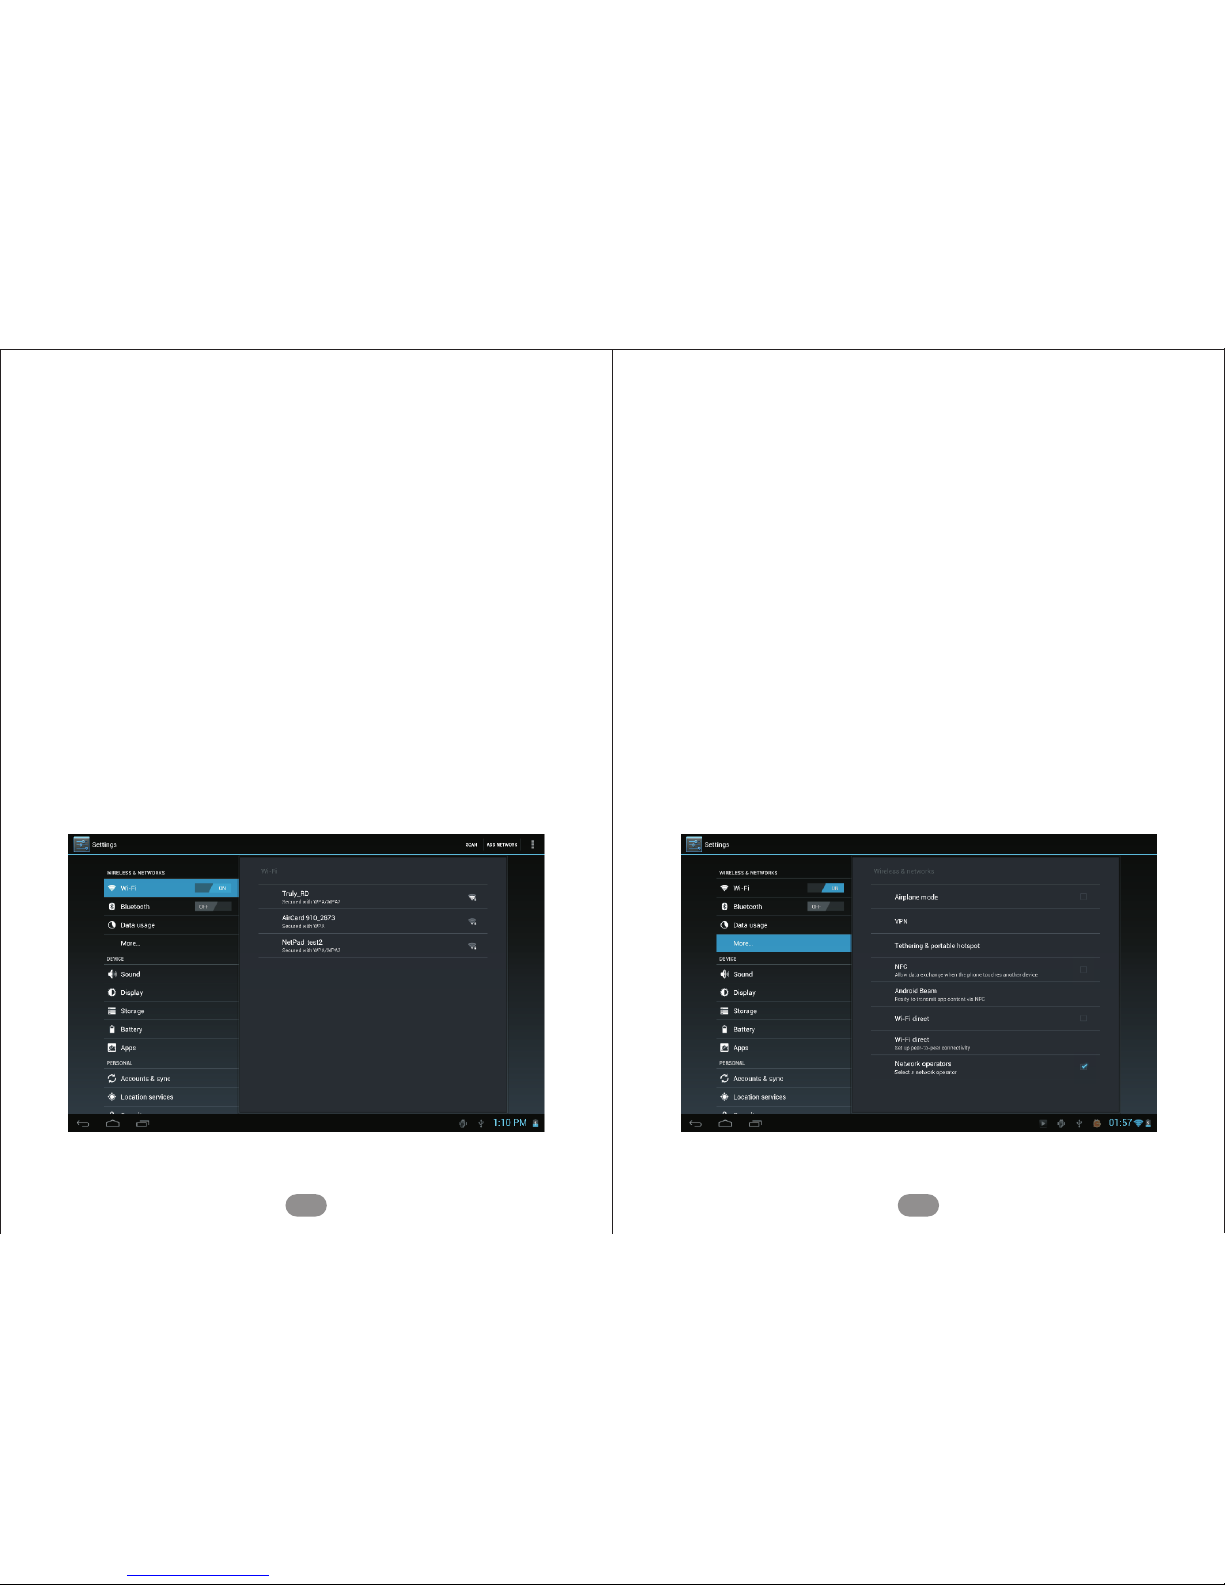
While th e de v i c e is powered off, in s e r t th e 3G
USIM/SIM card in to the USIM/SIM card sl ot located on
the back of the tablet. After turning on the device, select
“More - M obi le Networks” under “Settings” to beg in
data usage. A di fferent Internet co nnectivity ic on will
appear in the lower rig ht hand corner of the tablet whe n
the tablet is connected to a 3G networ k. W hen data
roaming is necessary, select the “Data roaming” option.
3G Internet
19
4
Internet access
Wi-Fi access
To i nst all Wi-Fi, select “Wi-Fi” via the “Settings” icon ,
or s ele ct the batt ery and Int ern et icon in the lower right
hand co rne r of the main page and select “Wi-Fi ” fro m
the “Internet” menu. After accessing “Internet settings,”
turn on “Wi-Fi” an d the s yst em will automatically search
for connectable Wi-F i n etw ork s. Man ual ly sca n f or WiFi networks by clicking on “Scan”. If no connectable
networks are found, networks c an be added manually by
clicking on “Add network”.
20
Page 12
Cameras
NFC transmission
Click on “Camera” to access the camera interface and
begin using the camera or video functions.
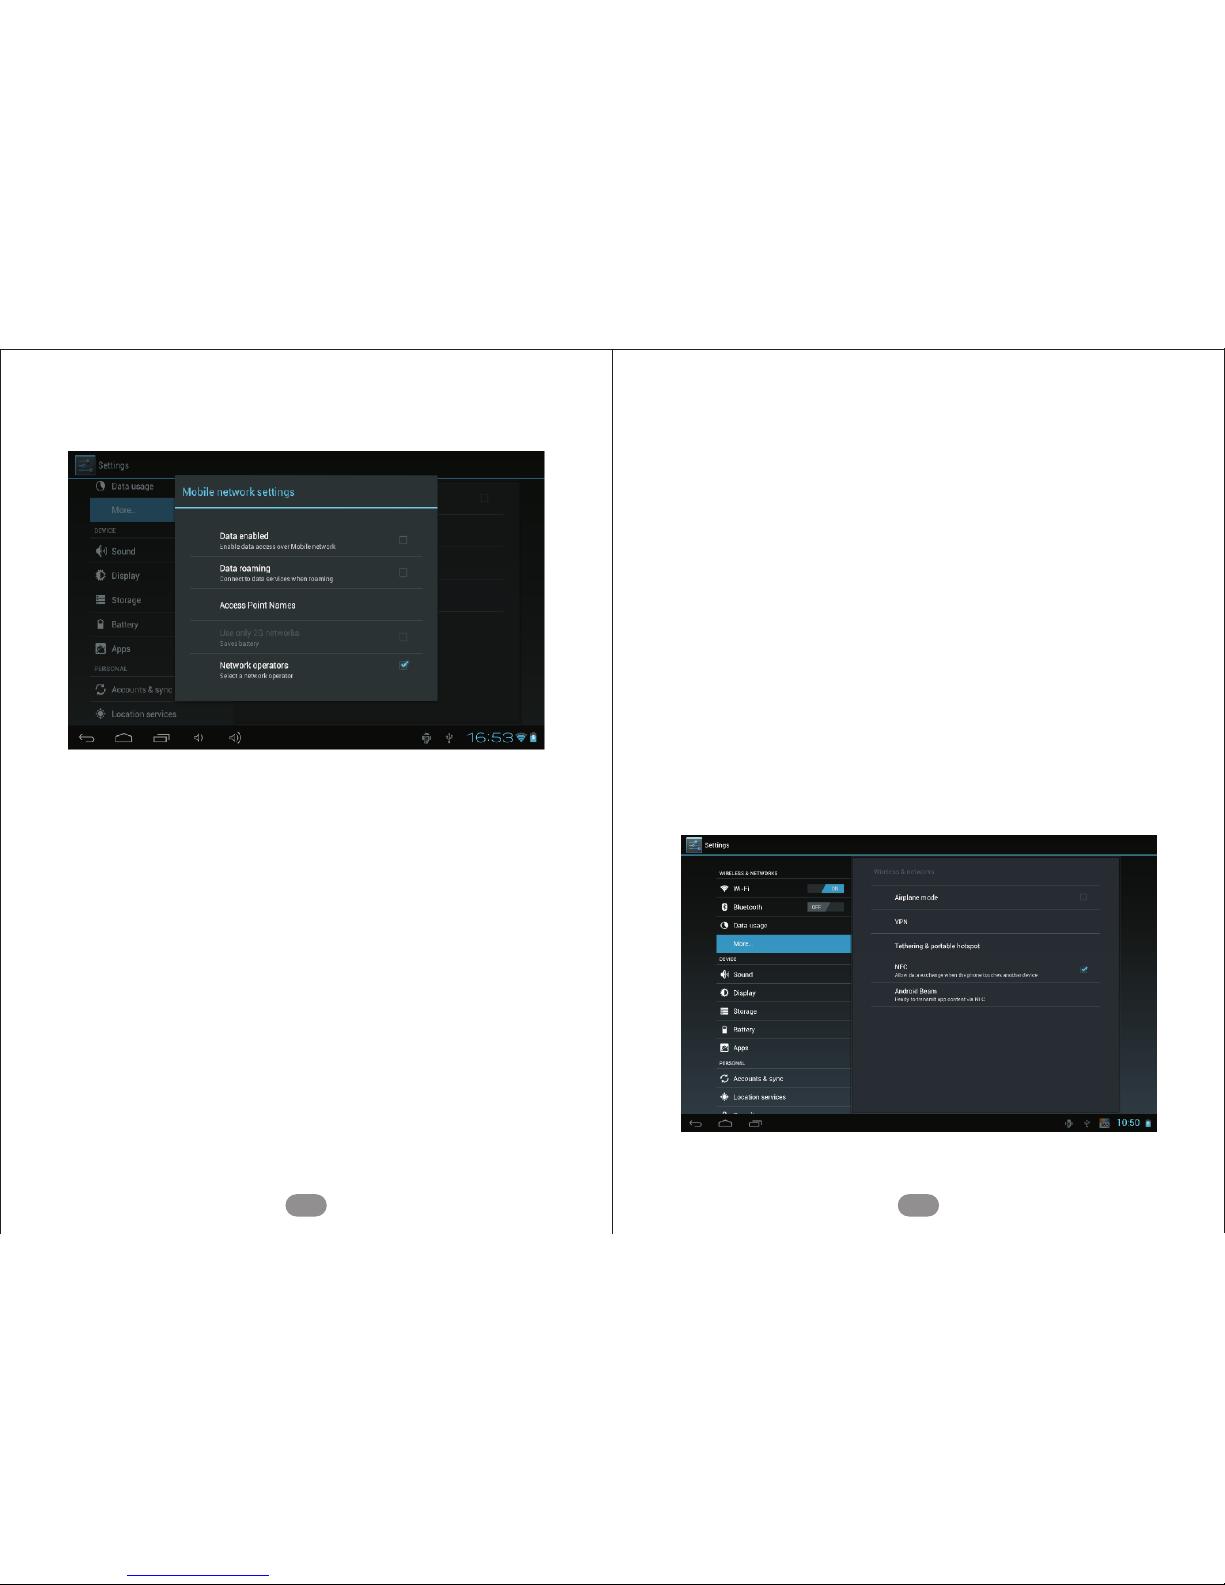
The device supports NFC transmission capabi lit ies ,
allowing you to sha re lin ks, addresses, and locations
with another device. Both devices must support NFC
capabilities fo r transmission . Click on “Settings – More
– NFC” to enable NFC transmission. Devices should be
placed ba ck- to- back or clos e again st each other during
transfers.
22
8
7
5
6
Bluetooth transmission
GPS navigation
From the “Settings” menu, select the “Turn on Bluetooth”
option. After Bluetooth has been turned on, click on “Scan
for networks” to search for nearby Bluetooth networks.
To use the GP S navigation function, you must first
enable th e “Location Ser vic es – GPS Satellite” function
under “Settings.” For more information, click “SettingsLocation Services-other selections”.
21
Page 13
2
Main interface
Functions Menu
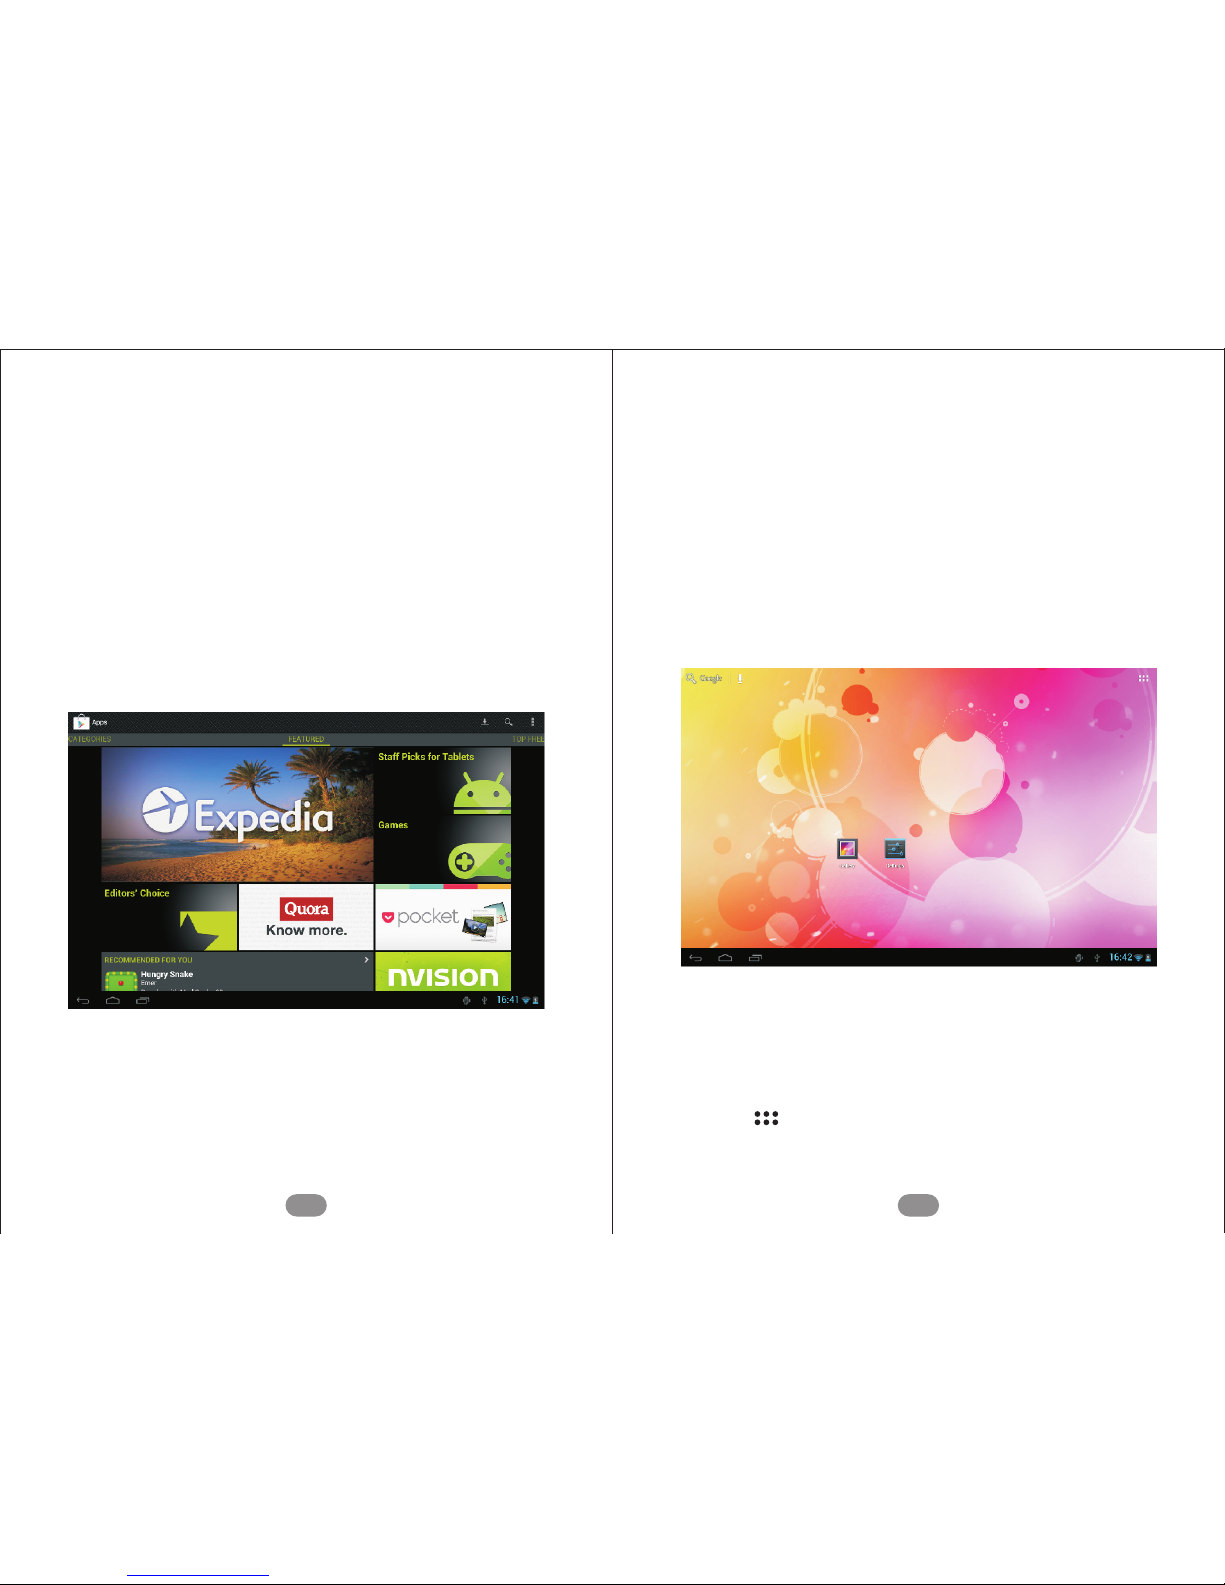
After unlocking the dev ice , the main page wi ll ap pea r.
The main page is di vid ed i nto a five-screen di spl ay.
Swiping yo ur fingers left and rig ht across the screen wi ll
allow you to flip between page s. You can also set your
favorite applications to the main page.
Click on to access the Functions Menu.
24
1
Operating the Interface
9
PLAY store
Third-party ap plications can be downloaded through the
PLAY St ore . Before using t he PLAY St ore , ensure that
the date shown is correct and that th e dev ice i s connected
to t he Internet. You will be p rom pted to sign in w ith your
Gmail account the first tim e you use the PLAY Store or
any time after yo u have restored factory settings to your
device.
23
Page 14
Switching between tasks
Viewing images and videos
Viewing images and videos
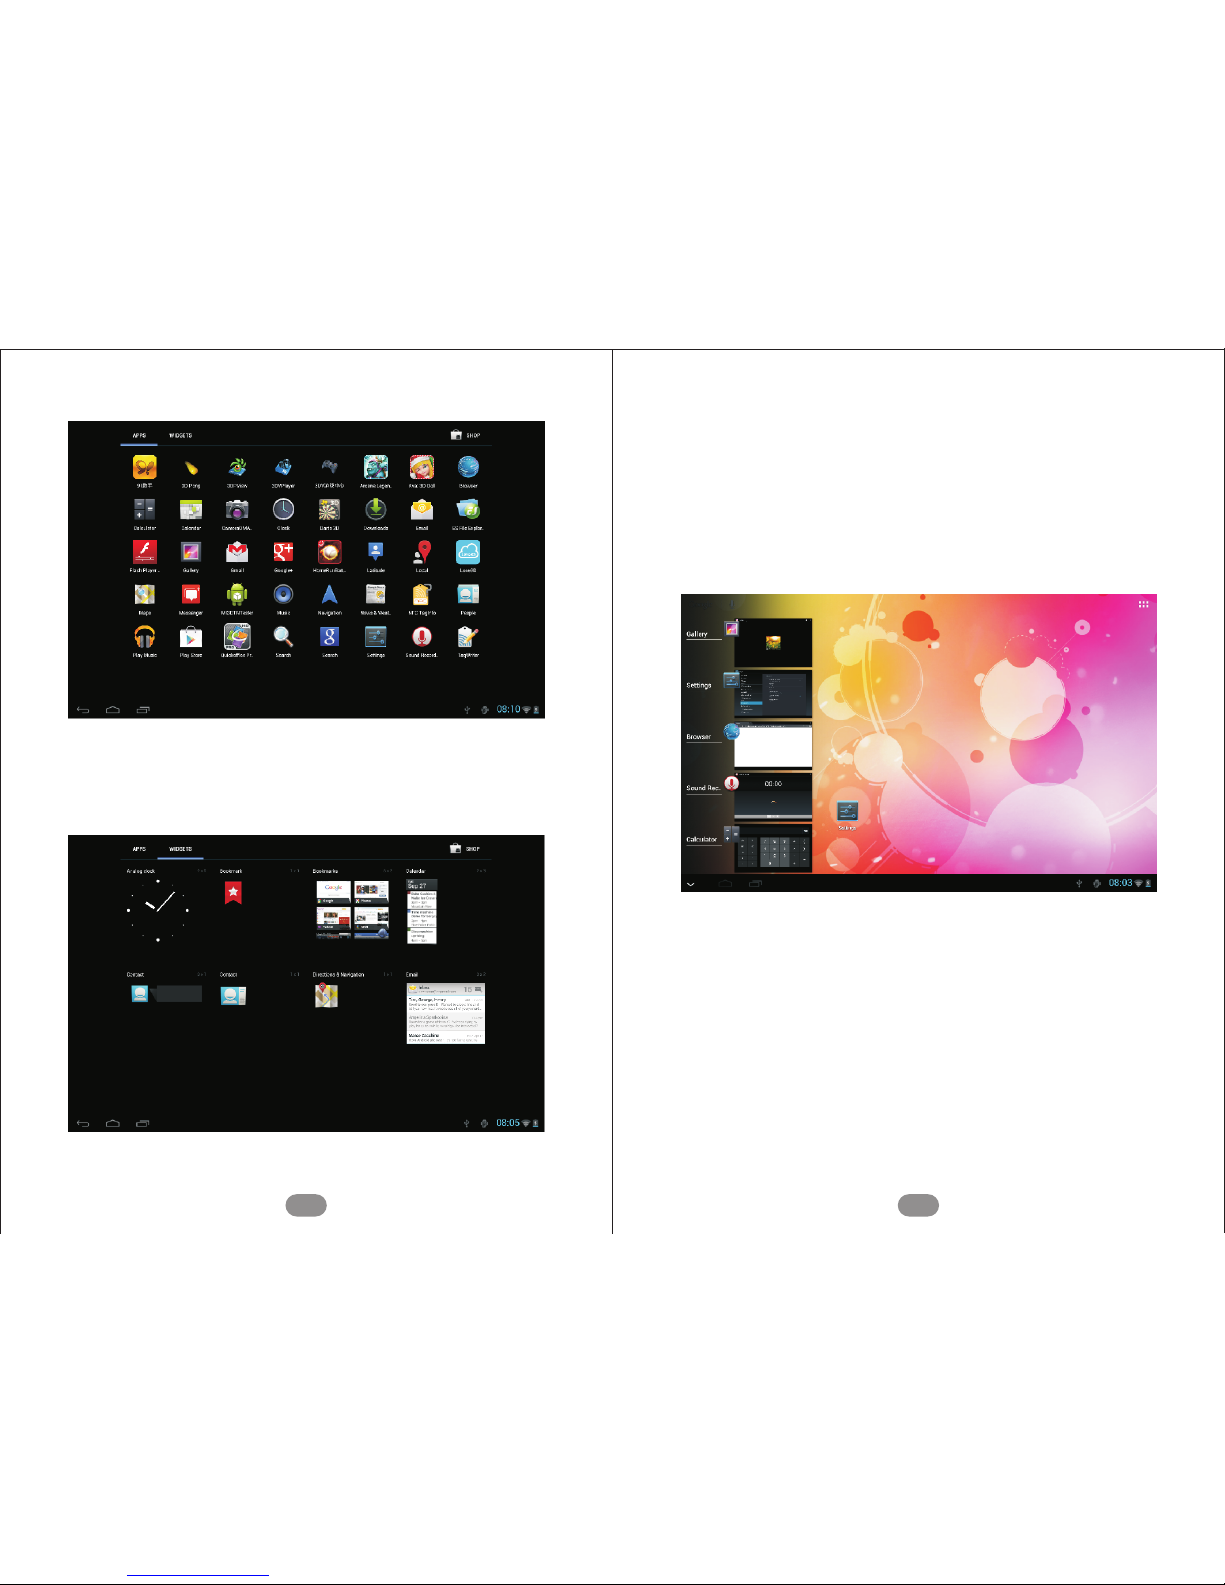
The tablet supports the op era tio n of several tasks
simultaneously. To view or switch between the active
operations, click on the Backstage Operations Icon.
Click on “Gallery” to view images as well as 2D/3D videos.
1
26
4
Widgets
Select a widget, an d keeping y our finger do wn, slide it
onto the main page for easy access.
3
25
Page 15
Setting the interface
2
Wi-Fi settings
Flow settings
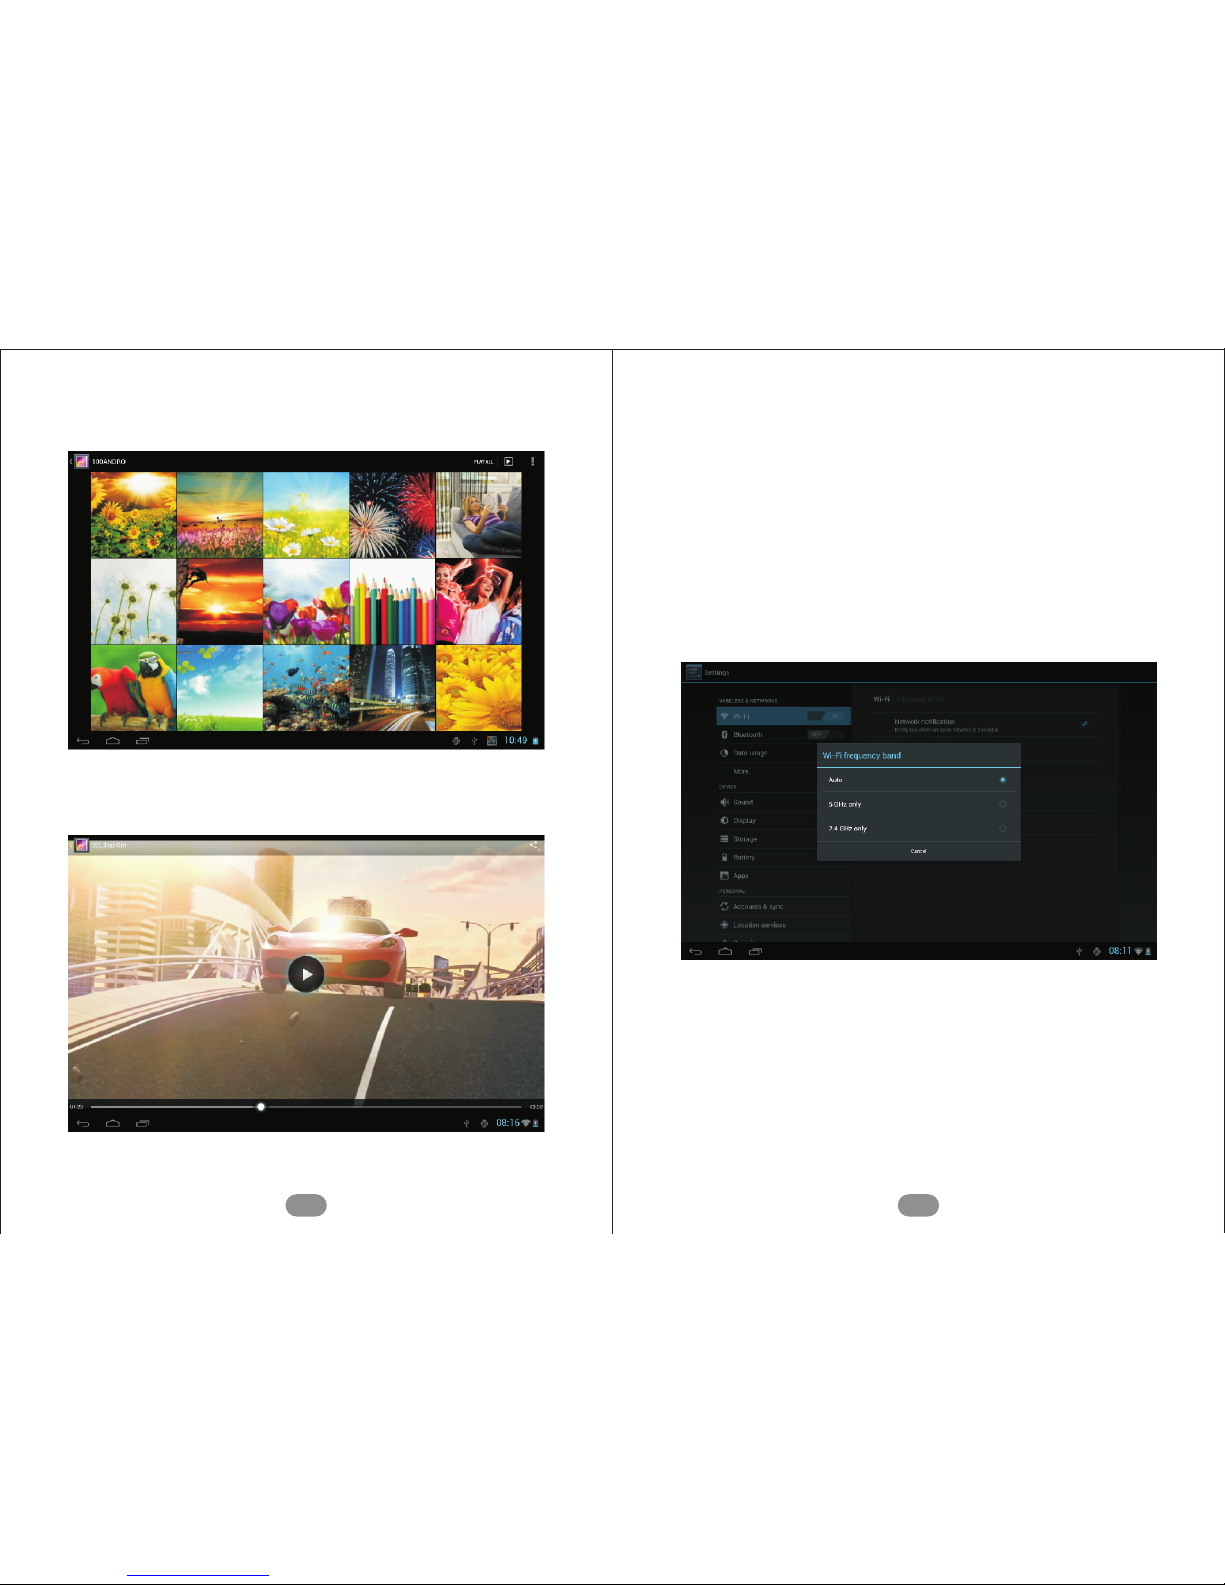
After click ing into “Wi-Fi Sett ing s”, s elect “Advanced
Settings” in the up per r igh t-h and c orn er an d choose
“Au t o m a t i c” and th e 5GHz an d 2.4GHz netw o r k
connections under “Wi-Fi bandwidth”.
Once “ Traffic usage” is enabled in “Settin gs” , you ca n
monitor your mobile network data usage.
28
1
27
Page 16
9
Set th e language, keyboard, and input methods. The
de v i c e su pp o rt s mu l t i pl e la n g u ag e s, inc l u d in g :
Sim p l i f i e d Chinese, Tra d i t i o n al Chinese, En glish,
French and Japanese.
Date and time can be set both automatically and manually.
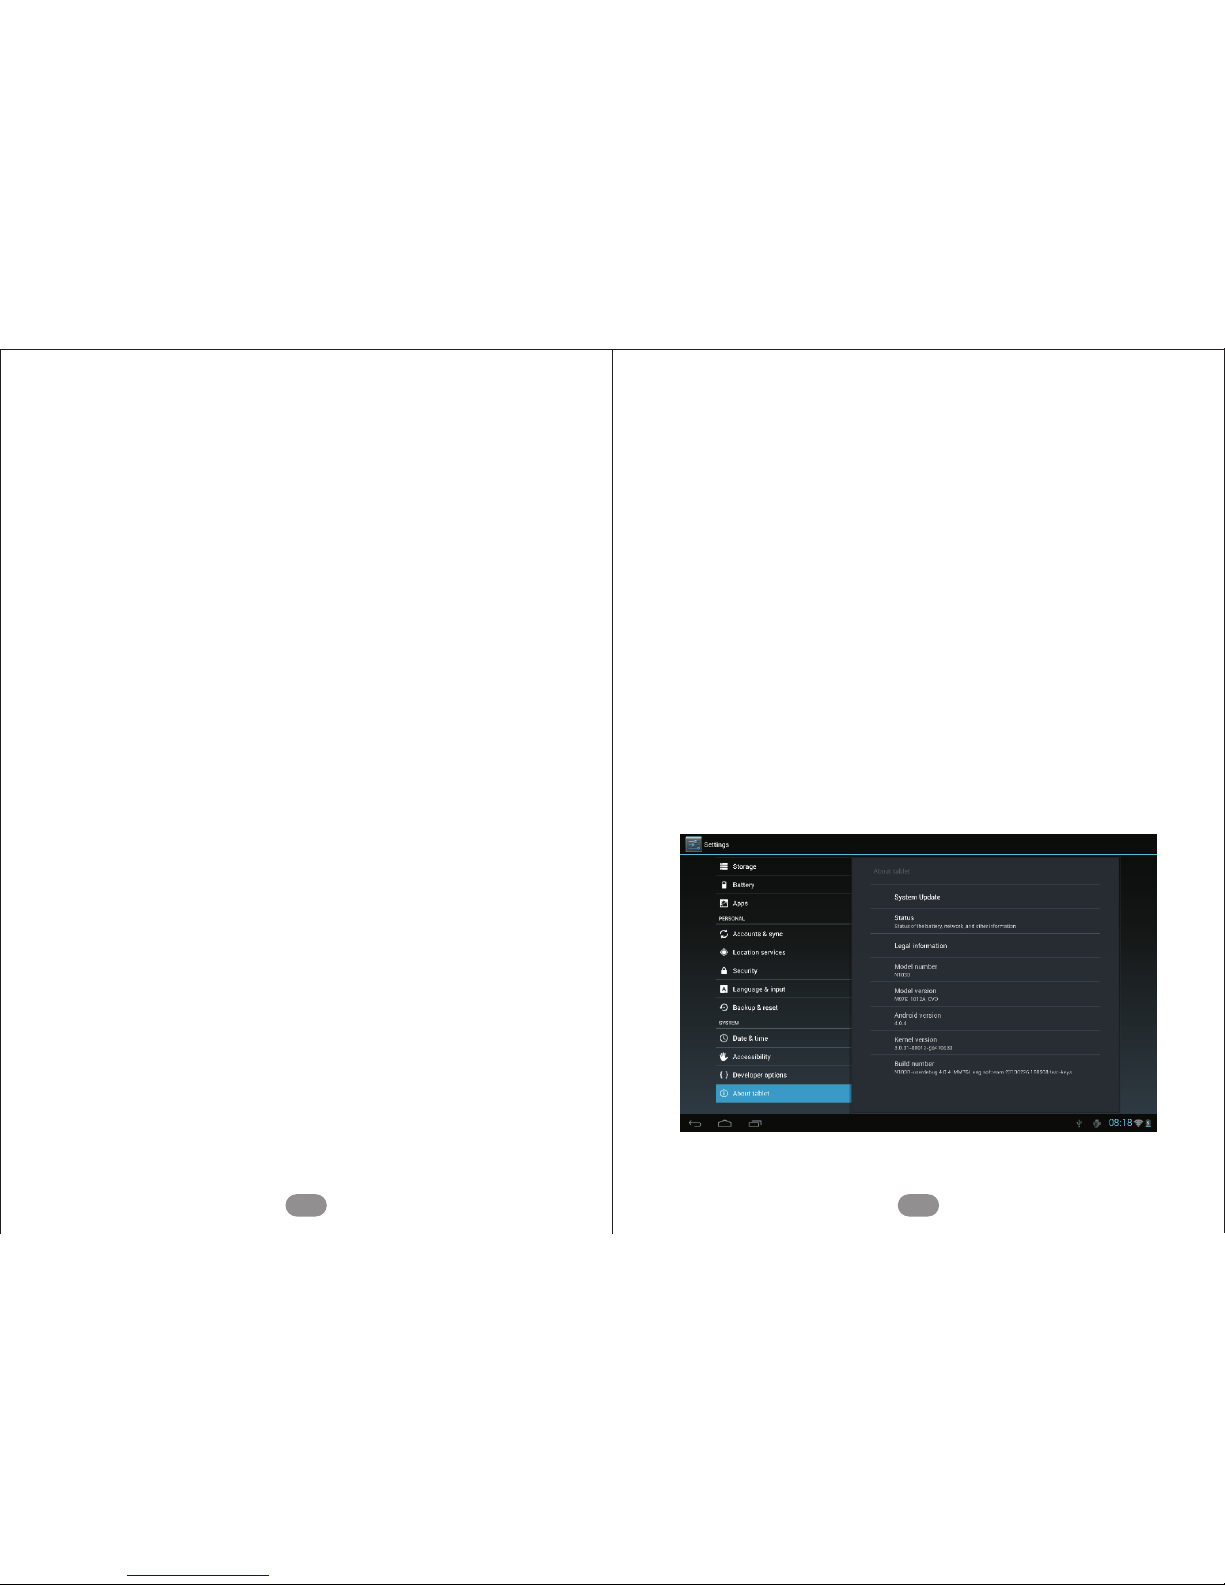
Including ge ner al information such as the status of the
device, legal information, mode l numb er, firmware
version, and other relevant information.
Date and time settings
About the tablet
30
8
3
4
5
6
7
Sound settings
Display settings
Storage settings
Application settings
Language and input method settings
Sound settings will allow you to adjust volum e, touch
tones sounds, and screen locking sounds.
Brightness, wallp ape r, screen auto-rotate, sleep mode,
and font size can be customized in the interface.
Select “Storage” w ith in “Settings” to ac ces s information
on the int ern al storage space, external and inter nal SD
storage car d capacities, and c las sif ied storage capacity,
as well as to install or uninstall external SD cards.
Access “Application settings” to view stored applications, application download progr ess , and cur ren tly
running applications. Sele ct an application to uninstall
or transfer to a TF card.
29
Page 17
FAQ
32
The device cannot be turned on
After turning on, the device displays the
main page but then powers off
There is no sound from the headphones
1.Ensure that the device has sufficient battery power.
2.Connect to the po wer adaptor and try powering on,
again.
The device is low on battery.Charge a nd tr y aga in.
1. Make sure that the volume setting is not set to “0.”
2. Check whether t he audio fil e is d ama ged by playing
a diff ere nt audio file. If the audio file is damaged, it
may produce loud noises or skips.
1. Check whether the PC and the tablet are properly
connected.
2. Check whe ther th ere is suffic ien t in ter nal storage
capacity.
3. Check whether the USB cord is damaged.
File or music cannot be copied
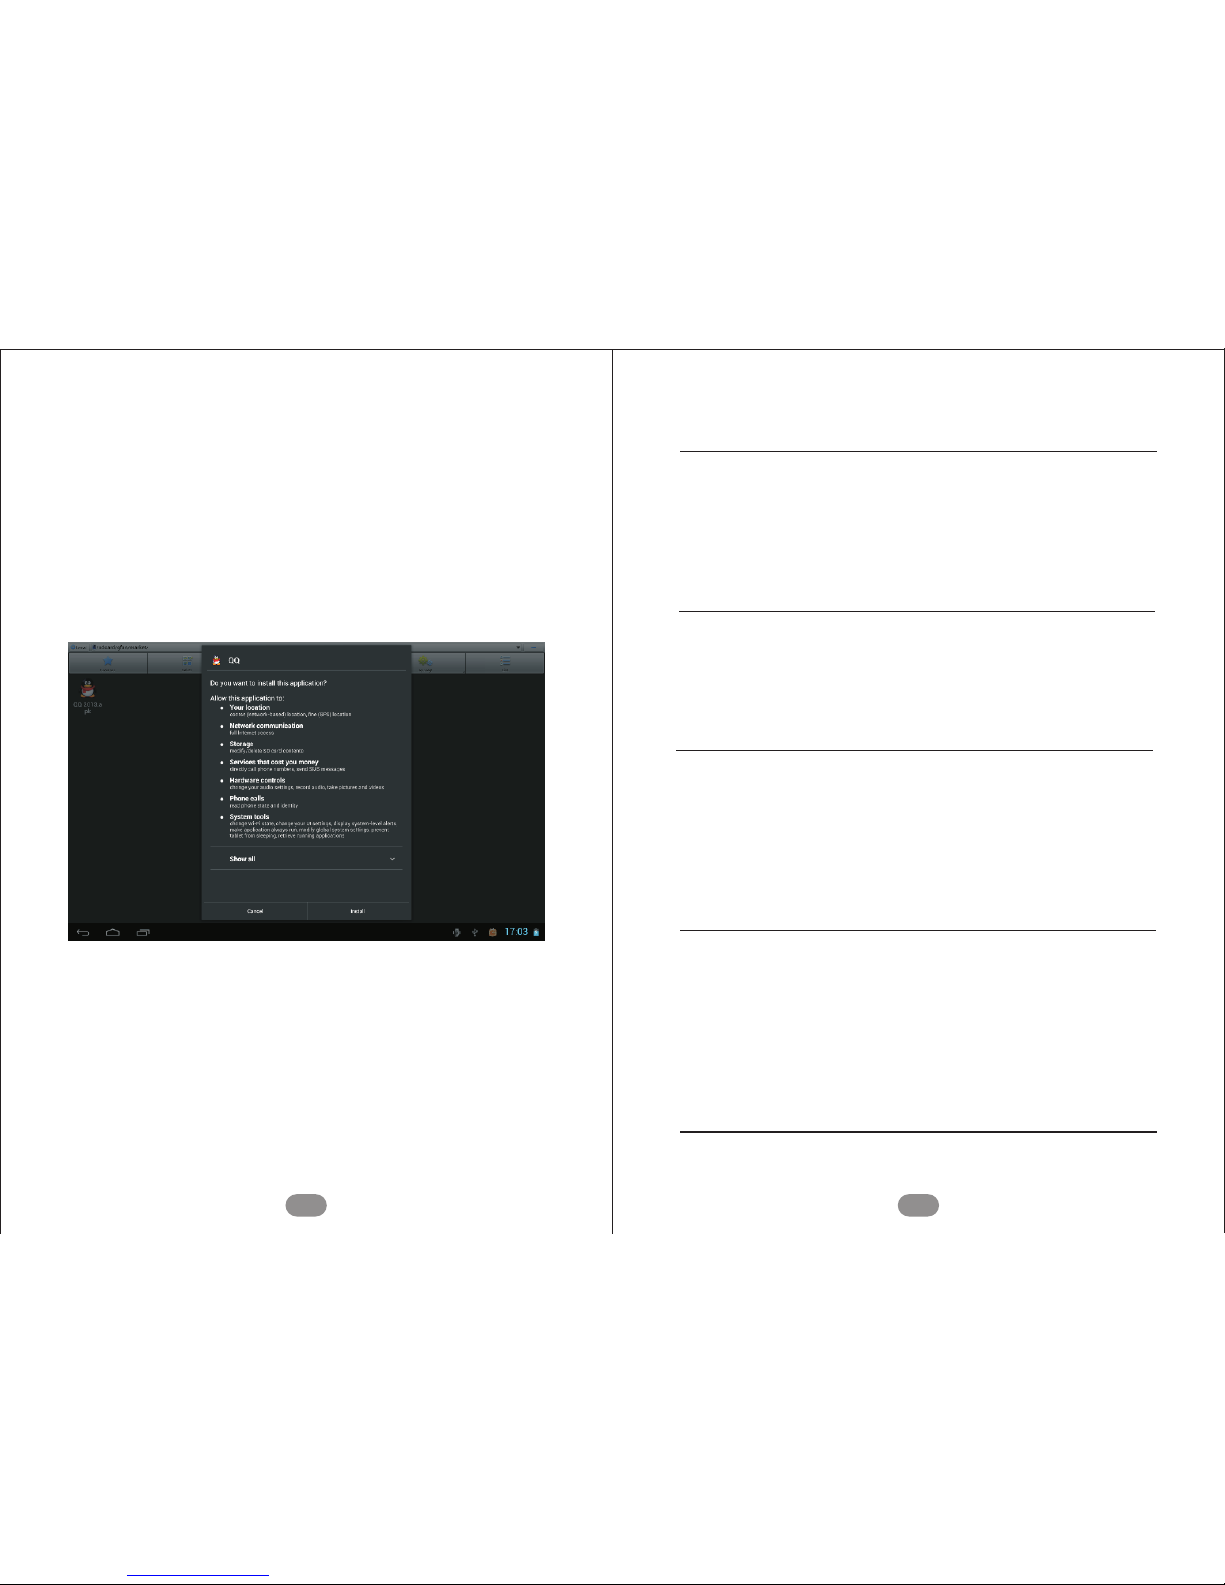
Installing applications
Installing applications
Using the “File Browser,” you can browse, transfer, copy,
cut, delete, and rename files and folders, as well as install
APK files.
31
Page 18
33
Resetting the device
Restoring default factory settings
Note:
No response when HDMI cable is plugged
into the TV
If the keys and t he scre en are frozen, hold the “RST ”
button f or 10 seconds to f orc e the device to shut down.
Press the power button to restart the device.
You can click the “restore d efa ult fa cto ry systems”
button on the “backup and reset interface.” This will
erase all current data.
( Please perform res tor ati on when phone is f ull y
charged and not connected to the power adapter.)
1. Ensure that the TV is se t to HD MI mo de.
2. The plate inserted i nto the HDM I slot must be 7mm.
If the plate is too short, data cannot be transferred.
Page 19

FCC RF Exposure Information and Statement
The SAR limit of USA (FCC) is 1.6 W/kg averaged over one gram of tissue. Device types 3D
PAD (FCC ID: 2ABCS-A6102) has also been tested against this SAR limit. The highest SAR
value reported under this standard during product certification when properly worn on the body is
0.858W/kg. This device was tested for typical body-worn operations with the back of the handset
kept 0mm from the body. To maintain compliance with FCC RF exposure requirements, use
accessories that maintain a 0mm separation distance between the user's body and the back of the
handset. The use of belt clips, holsters and similar accessories should not contain metallic
components in its assembly. The use of accessories that do not satisfy these requirements may not
comply with FCC RF exposure requirements, and should be avoided.
FCC WARNING
This device complies with Part 15 of the FCC Rules. Operation is
subject to the following two conditions:
(1) this device may not cause harmful interference, and
(2) this device must accept any interference received, including interference that may cause
undesired operation.
NOTE 1: This equipment has been tested and found to comply with the limits for a Class B digital
device, pursuant to part 15 of the FCC Rules. These limits are designed to provide reasonable
protection against harmful interference in a residential installation. This equipment generates, uses
and can radiate radio frequency energy and, if not installed and used in accordance with the
instructions, may cause harmful interference to radio communications. However, there is no
guarantee that interference will not occur in a particular installation. If this equipment does cause
harmful interference to radio or television reception, which can be determined by turning the
equipment off and on, the user is encouraged to try to correct the interference by one or more of
the following measures:
- Reorient or relocate the receiving antenna.
- Increase the separation between the equipment and receiver.
-Connect the equipment into an outlet on a circuit different from that to which the receiver is
connected.
-Consult the dealer or an experienced radio/TV technician for help.
NOTE 2: Any changes or modifications to this unit not expressly approved by the party
responsible for compliance could void the user's authority to operate the equipment.
NOTE 3:This device and its antenna(s) must not be co-located or operation in conjunction with
any other antenna or transmitter.
 Loading...