

TRUlink 89000 User Manual

USER GUIDE
1-PORT 60 GHZ WIRELESSHD KIT MODEL: 89000
BENUTZERHANDBUCH
60-GHZ-WIRELESSHD-KITMIT EINEM ANSCHLUSS MODELL: 89000
GUIDE D’UTILISATION
KIT WIRELESSHD 60GHZ A 1 PORT MODELE: 89000
MANUALE DELL’UTENTE
KIT HD WIRELESS 60GHZ A 1 PORTA MODELLO: 89000
HANDLEIDING
1-POORT 60GHZ DRAADLOZE HD-SET MODEL: 89000
GUÍA DEL USUARIO
EQUIPO HD INALÁMBRICO DE 60 GHZ DE 1 PUERTO MODELO: 89000
1

TABLE OF CONTENTS
Introduction ................................................................................................................................................. 2
Package Contents ...................................................................................................................................... 2
Device Overview ......................................................................................................................................... 3
Troubleshooting .......................................................................................................................................... 6
Technical Specifications ............................................................................................................................. 7
FCC Statement ........................................................................................................................................... 9
EU Conformity Statement ........................................................................................................................... 9
C2G™ Warranty ....................................................................................................................................... 10
Important Safety Information ..................................................................................................................... 10
1

INTRODUCTION
PACKAGE CONTENTS
Remote Control
Mounting Bracket
User Guide
Thank you for purchasing the TruLink™ 1-Port 60 GHz WirelessHD Kit. The TruLink™ 1-Port 60 GHz
WirelessHD Kit enables high definition wireless transmission between your television and your HDMI
components. Enjoy full HD 1080p signal from your computer, Blu-ray player, set-top box, gaming
console or other HDMI device to your HDMI enabled television. The 60 GHz transmission capability
means greater flexibility in your home theater setup by allowing you to place the components up to 33
feet apart or possibly more depending on the environment*.
*Although performance characteristics may exceed stated distance limitations depending on the environment they are in, the following best practices are
recommended to ensure optimal results.
The transmitter and receiver should:
Face each other within the same room.
Be located within 33 feet each other.
Be placed at the same level, i.e. the transmitter should not be placed higher than the receiver.
Be located in open spaces, i.e. not in a cabinet or enclosed shelf.
(1) 60GHz WirelessHD Transmitting Unit
(1) 60GHz WirelessHD Receiving Unit
(2) HDMI Cables
(2) Universal Power Adapters
2
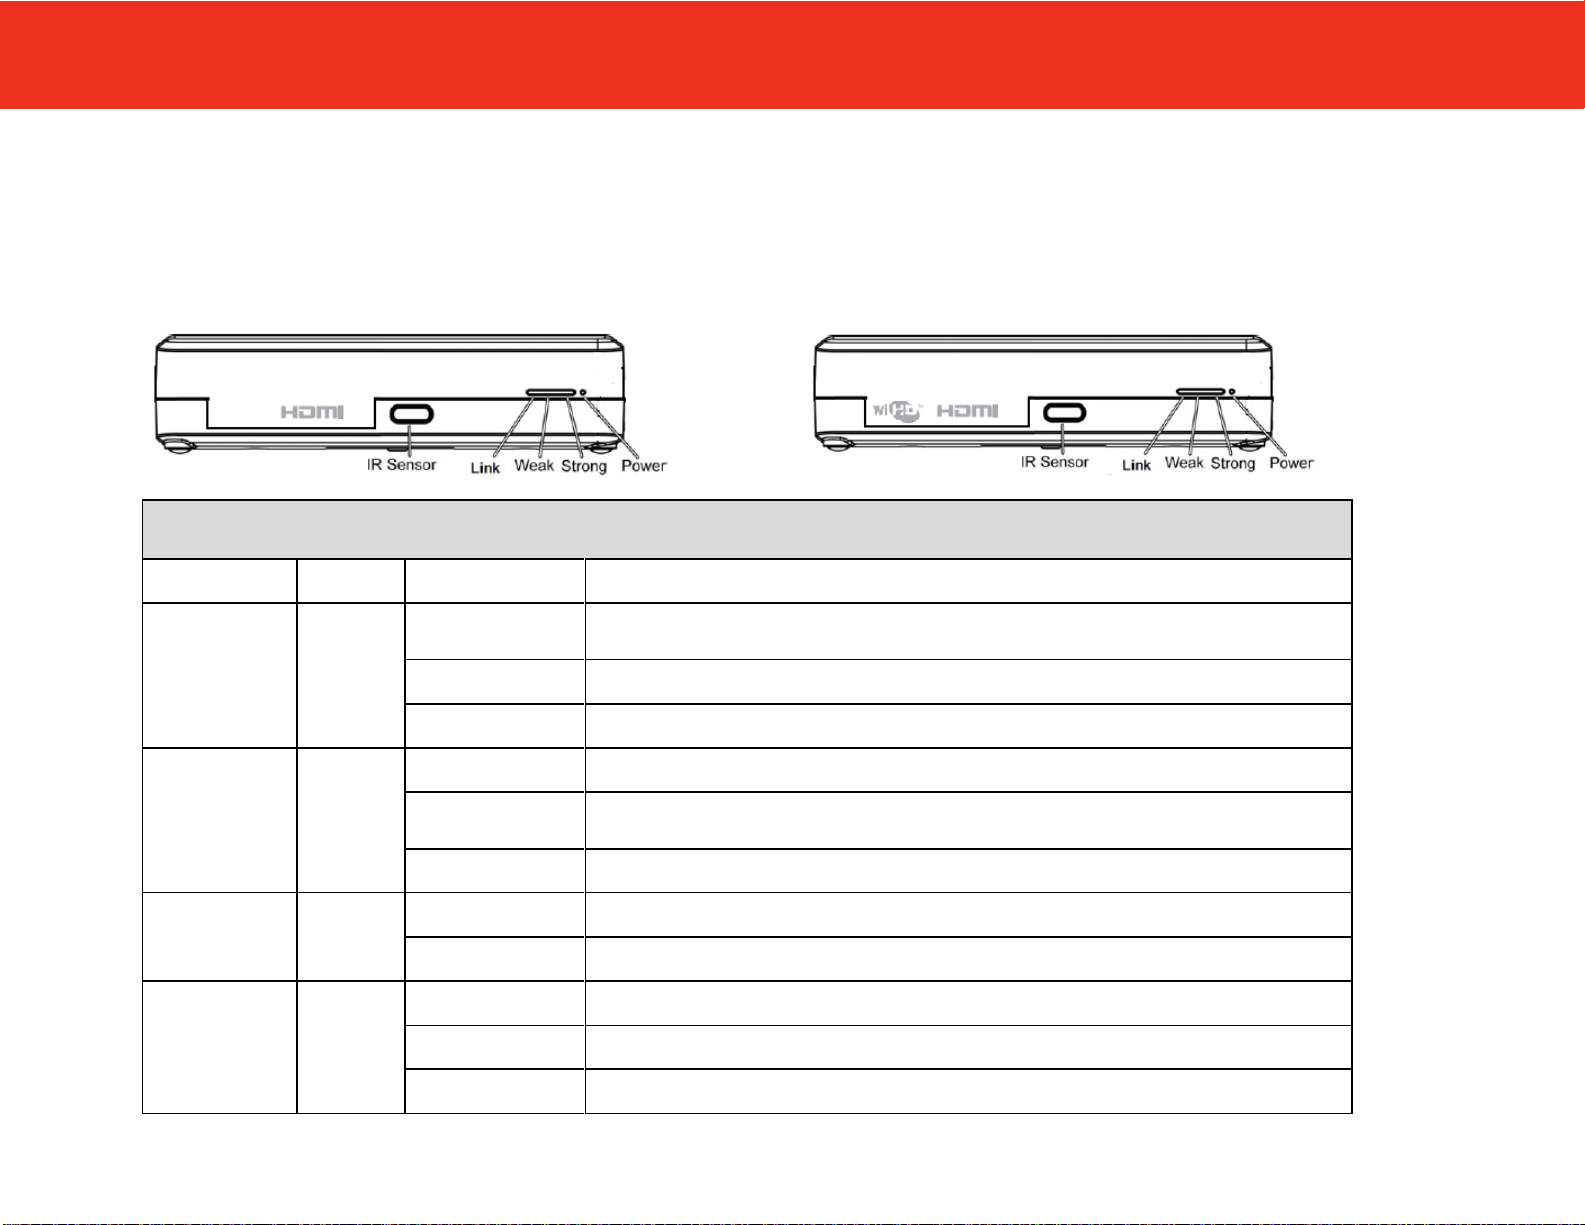
DEVICE OVERVIEW
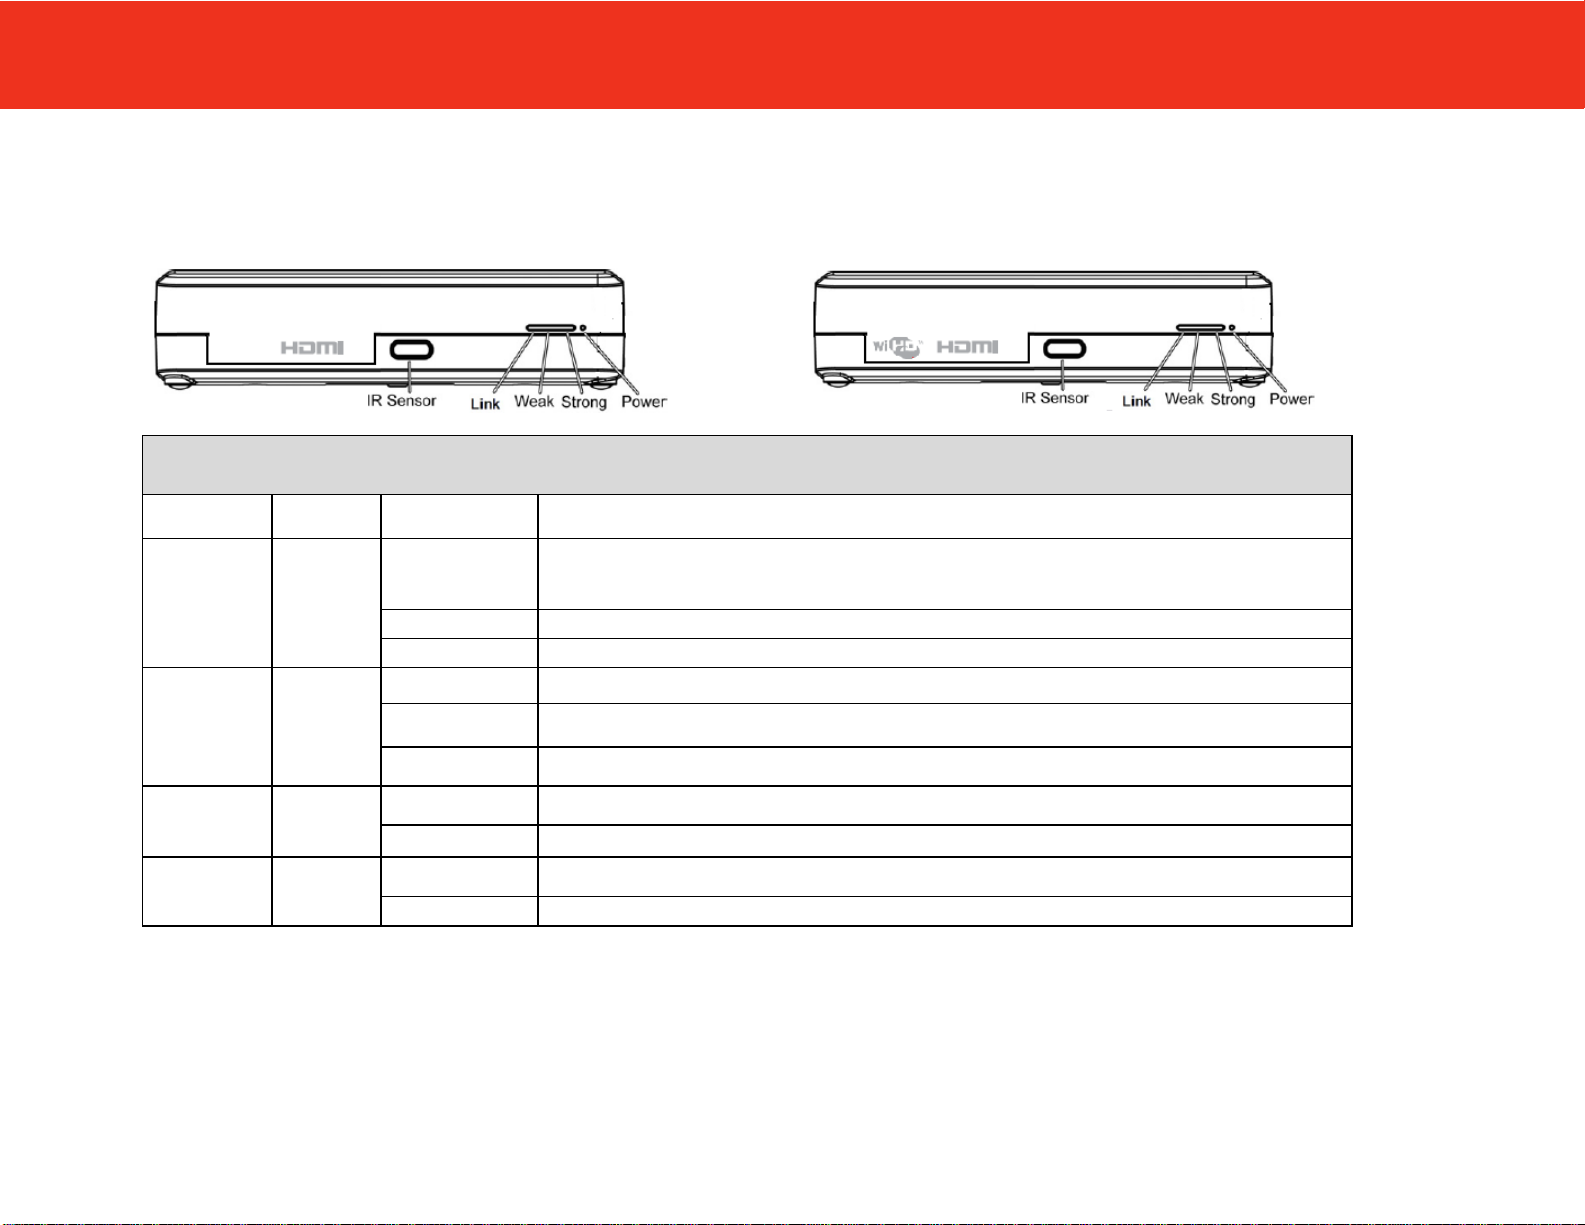
LED Indicators
LED
Color
Behavior
Indication
Power
Green
On
The LED will illuminate when the power is connected and the power
switch is turned on.
Off
The LED will be dark when the power switch is turned off.
Blinking
Unit in sleep mode.
Link
Blue
On
The LED will illuminate to indicate which RX is being selected.
Off
If the pairing LED is off, user has to reset both devices.
Blinking
Waiting for link.
Weak
Green
On
Indicates the signal is weak, the Strong LED will be off
Off
No link or no signal
Strong
Green
On
Indicates the signal is strong, the weak LED will be on
Off
Signal weak, the weak LED will be on
Transmitter
Receiver
3
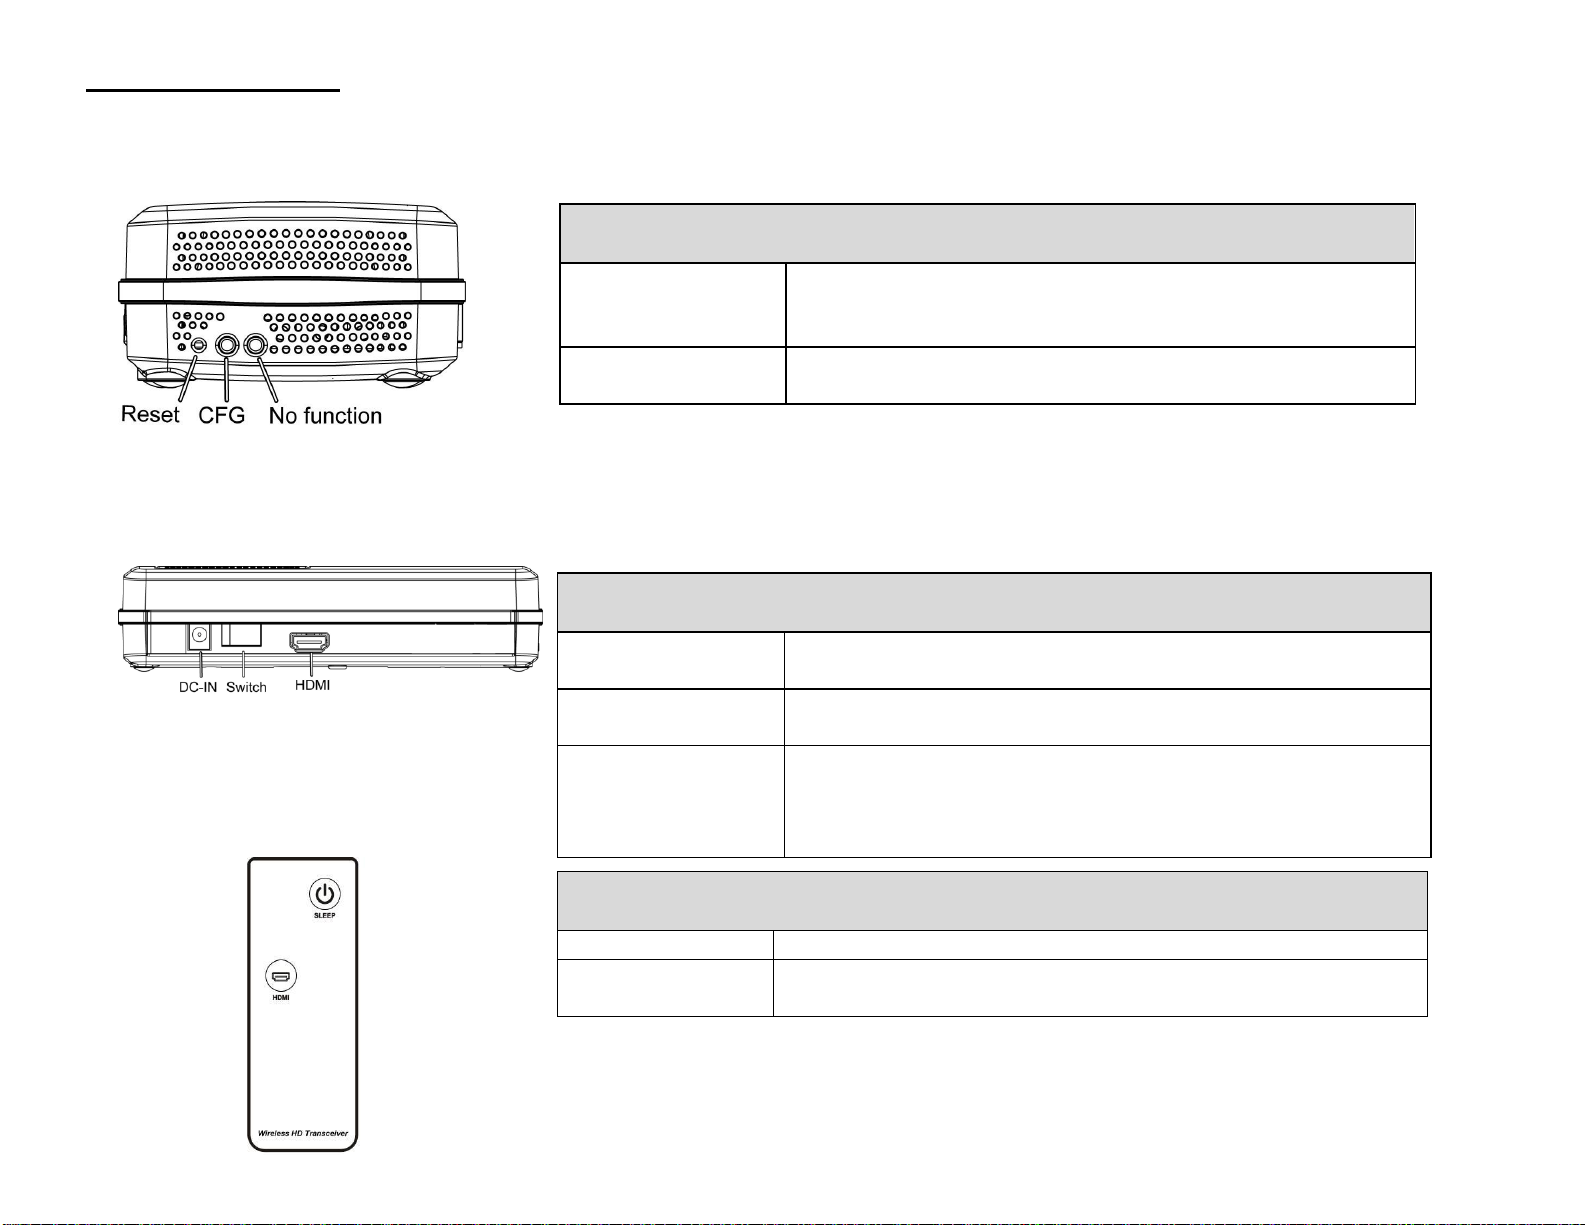
TRANSMITTER AND RECEIVER SIDE PANEL VIEW
TRANSMITTER AND RECEIVER REAR PANEL VIEW
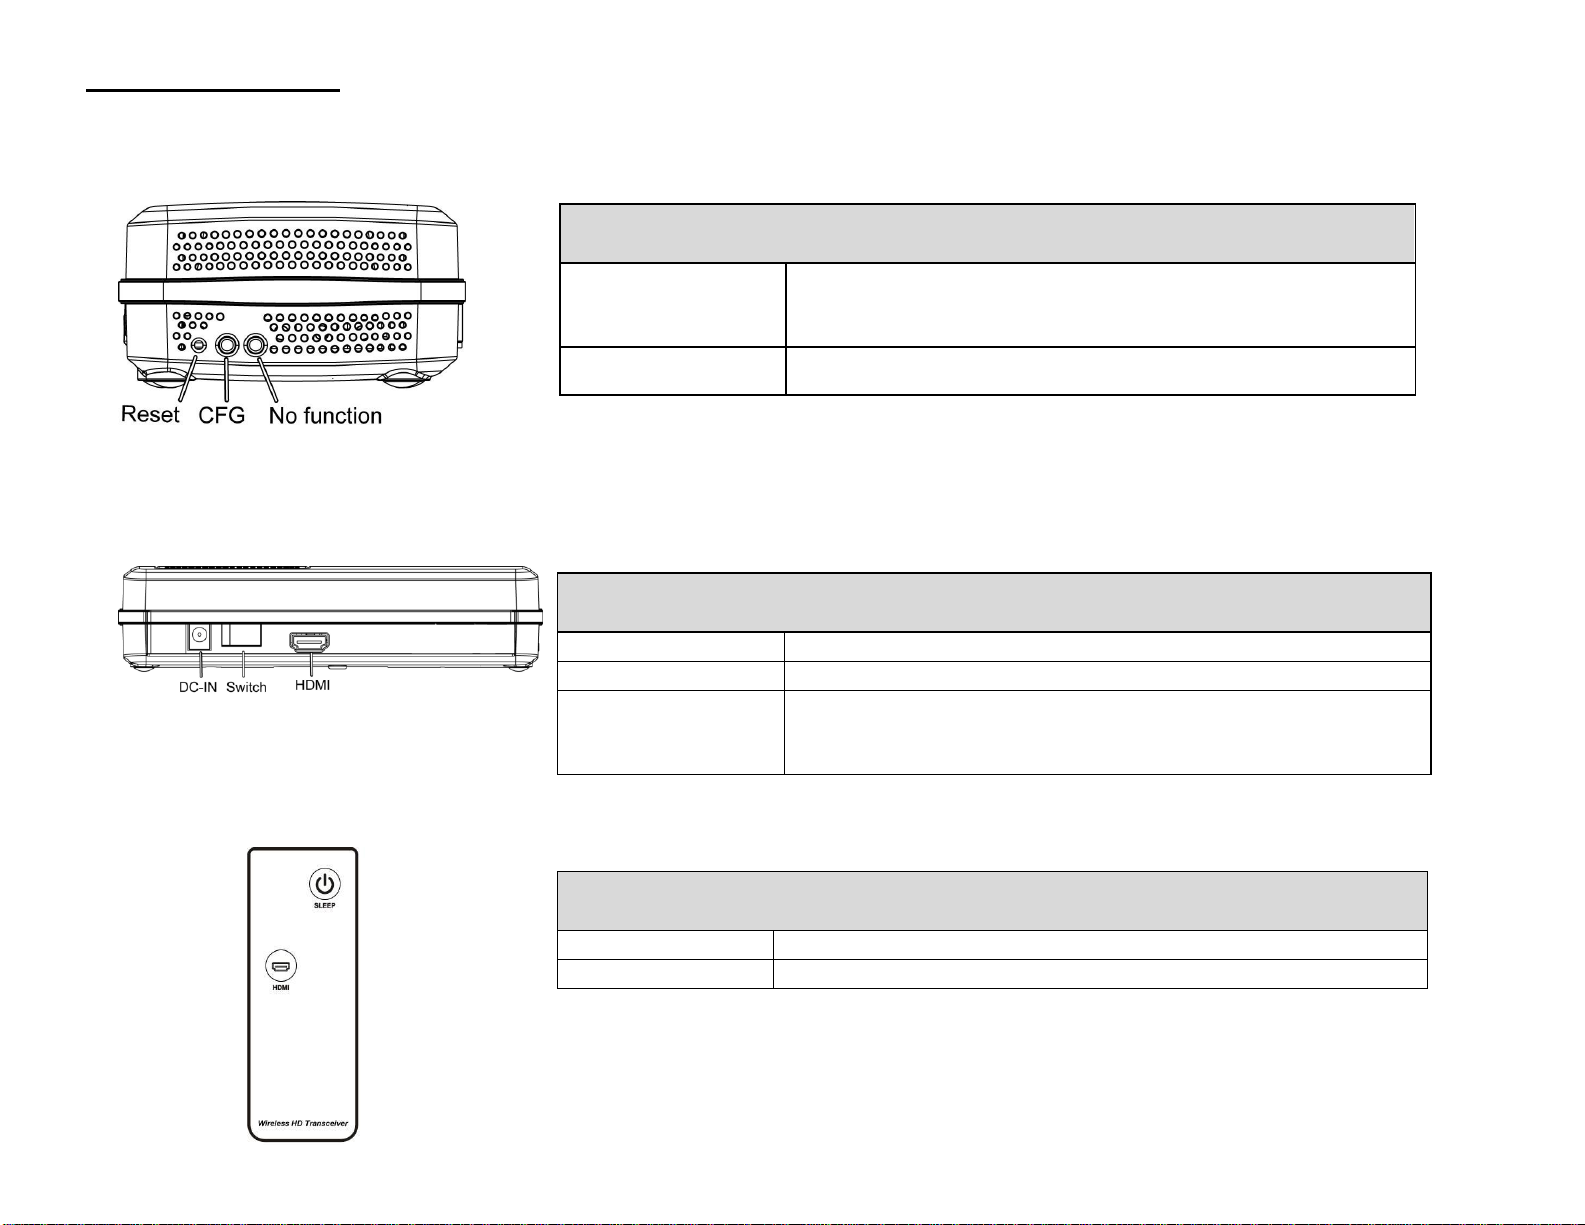
REMOTE CONTROL
NOTE: Remove the plastic film before using the remote control.
Buttons
Reset
Press the “RESET” button to reset the system, the
system will run through a full reset which takes
approximately 5 seconds.
CFG (Configure)
This button is only for manufacturer usage.
Configuration
DC-IN
Connect the power adapter to the power DC-IN port.
Switch
Switch the button to turn on or off the power supply.
HDMI
Connect HDMI cable one end to this HDMI port and the
other to the DVD player or computer HDMI port or DTV
HDMI port.
Remote Controller
Sleep
The devices will be ready while this button clicking.
HDMI
Switch HDMI port, it is only for multi-HDMI port model.
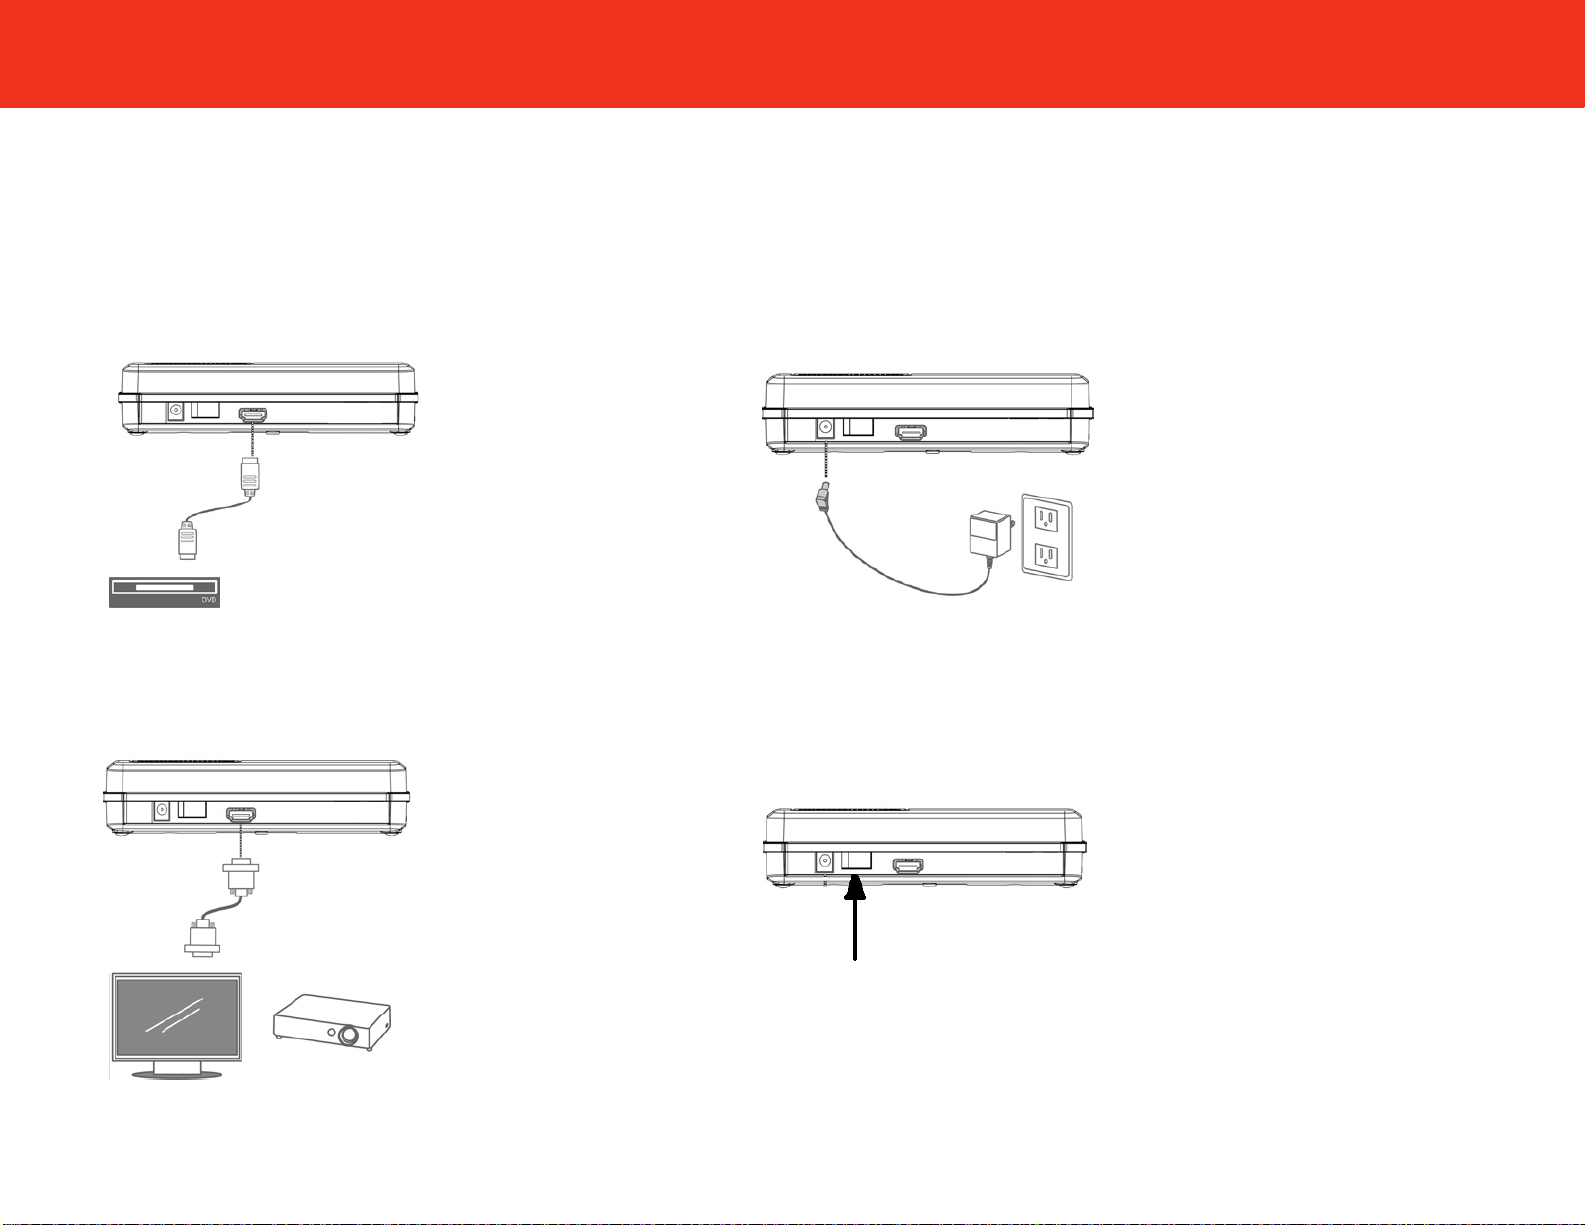
DEVICE OVERVIEW
4
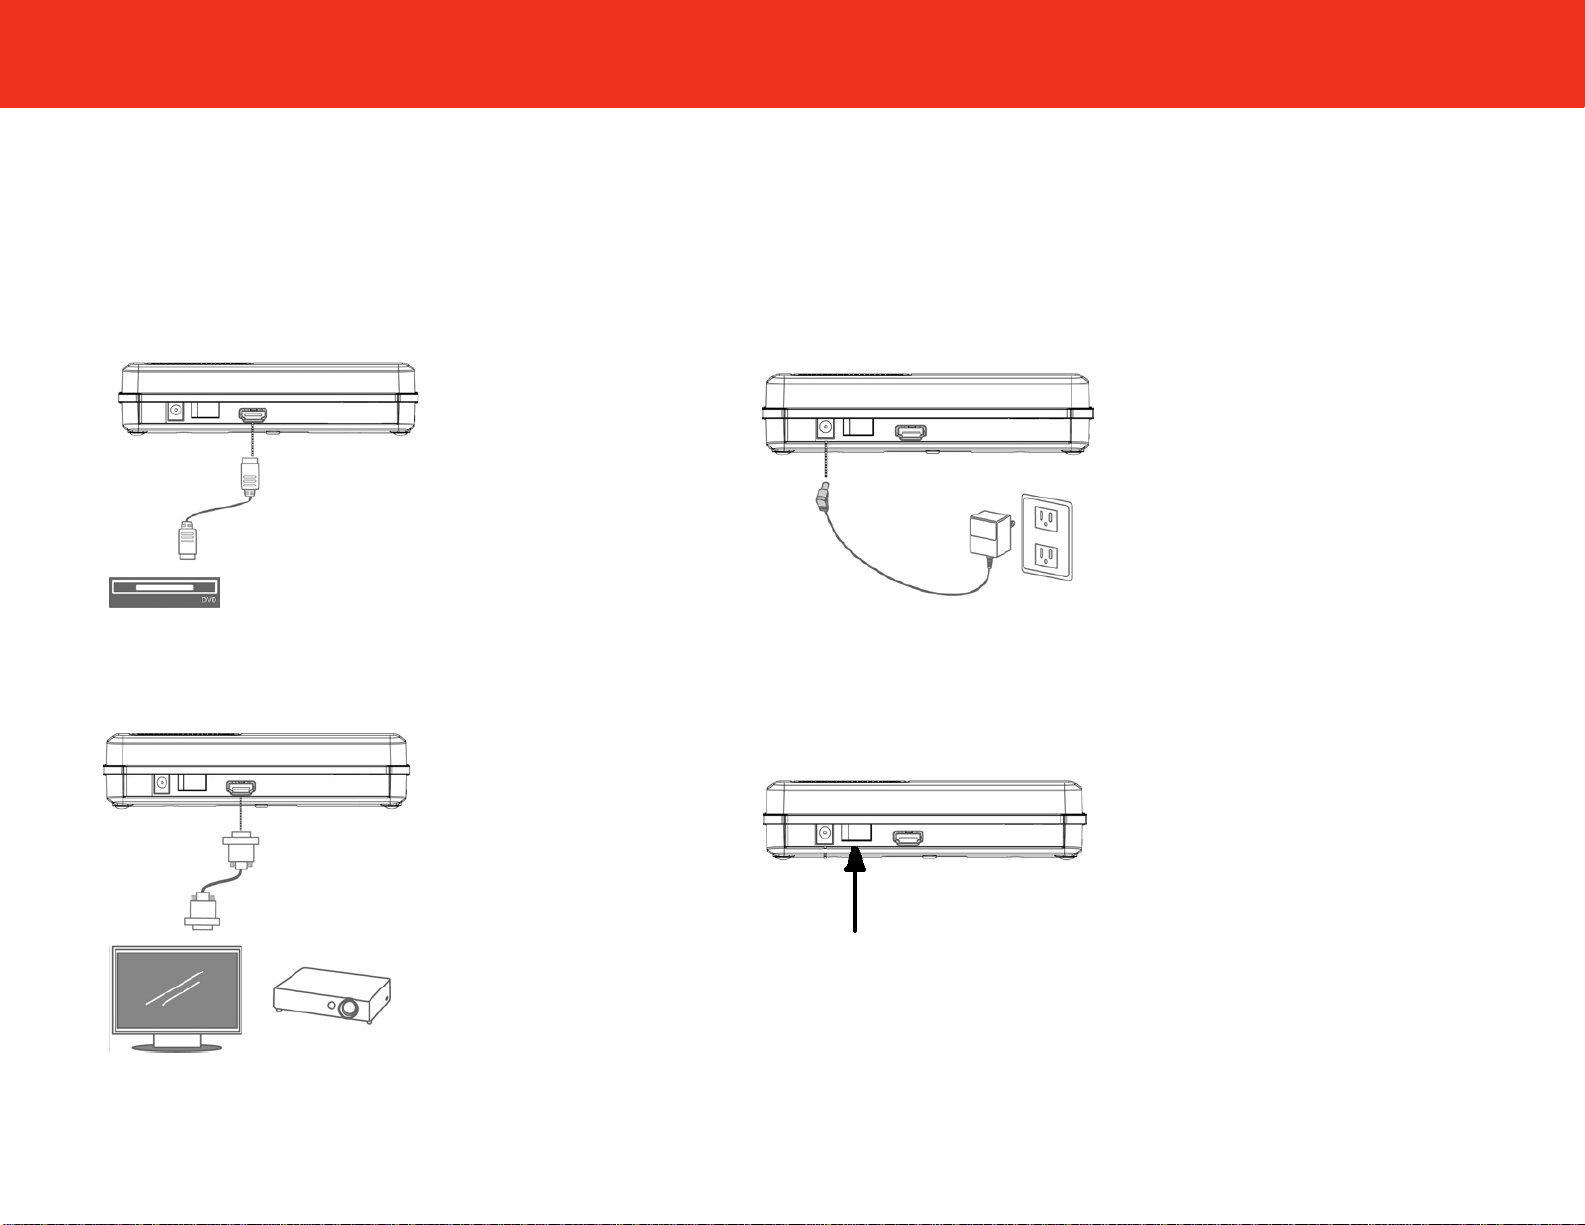
Step 1
Connect the 60GHz WirelessHD Transmitter with an HDMI
cable to an input source, such as a computer or a DVD
player.
Step 3
Connect both Universal Power Adapters of the Transmitting
and Receiving units to outlets.
Note: The Universal Power Adapter comes with two different
attachments (for UK and EU regions). Snap on the relevant attachment
for your region and plug the adapter in the outlet.
Step 2
Connect the 60GHz WirelessHD Receiver with an HDMI
cable to a display device, such as a monitor or projector.
Step 4
Turn on the power of both the Transmitter and Receiver
units.
DEVICE INSTALLATION
5
DEVICE INSTALLATION
TROUBLESHOOTING
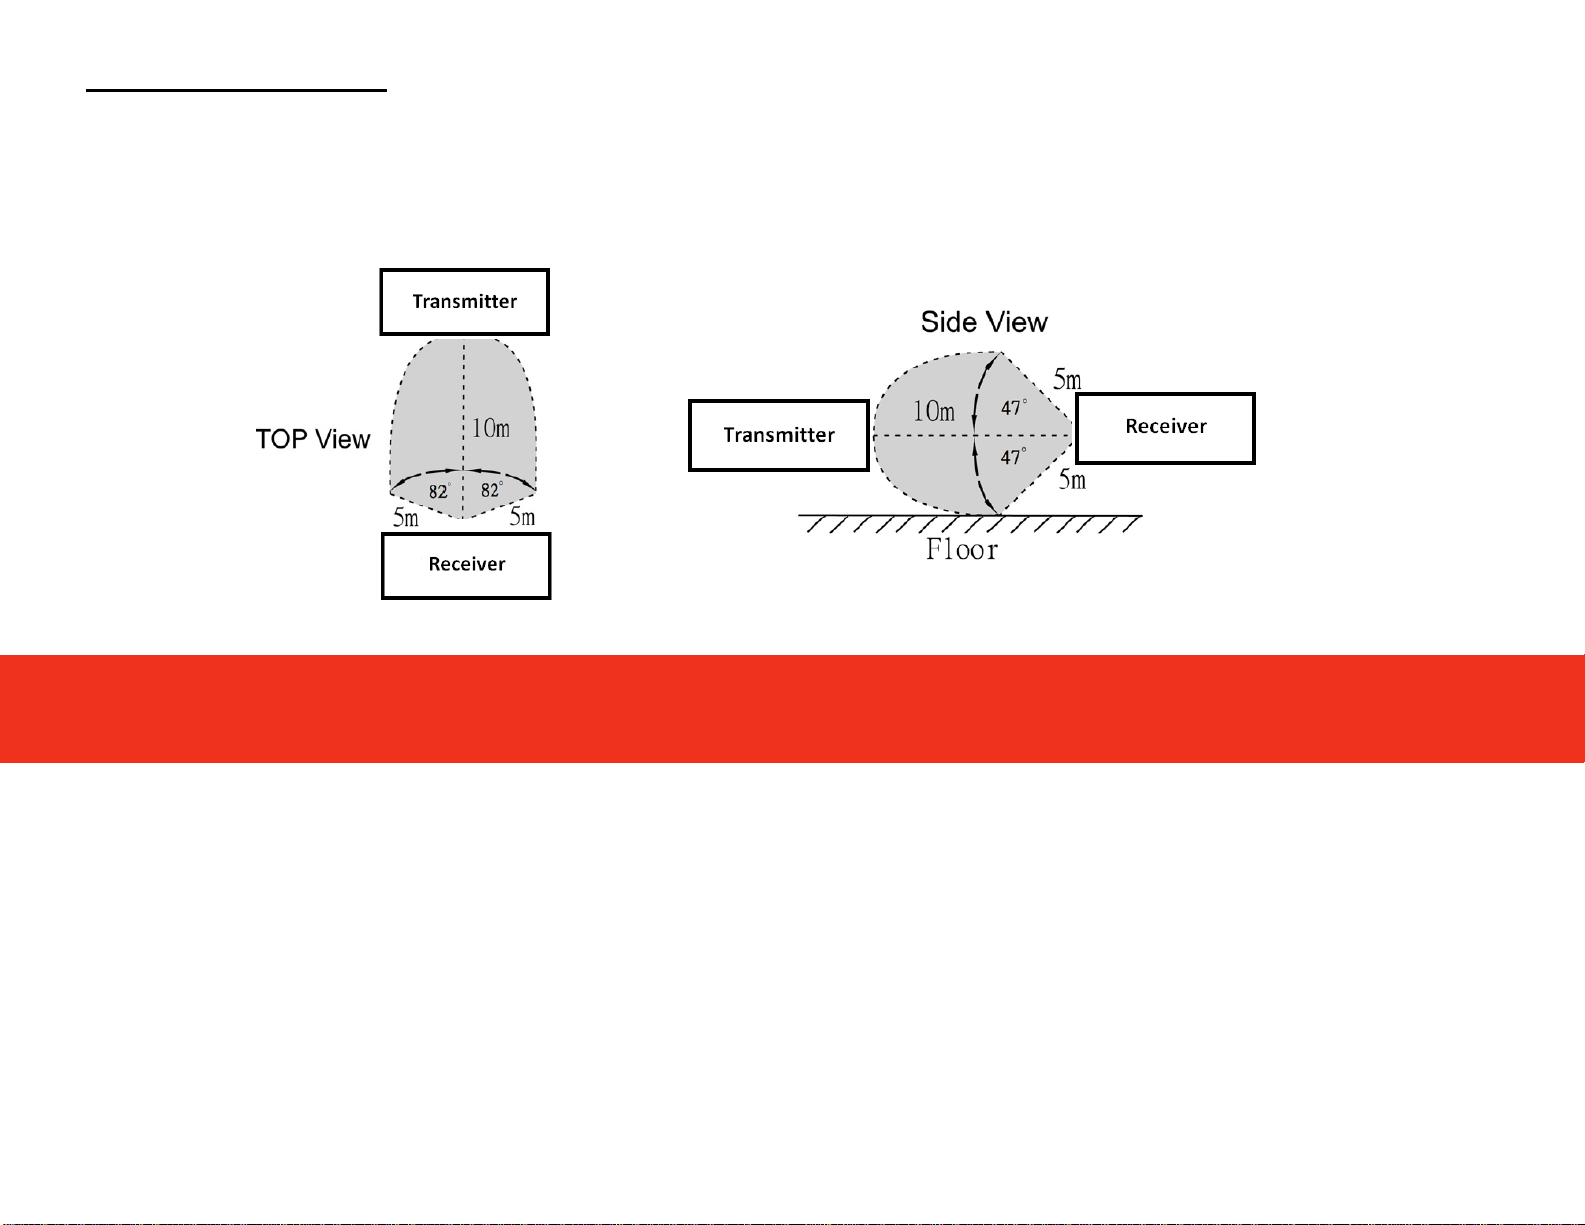
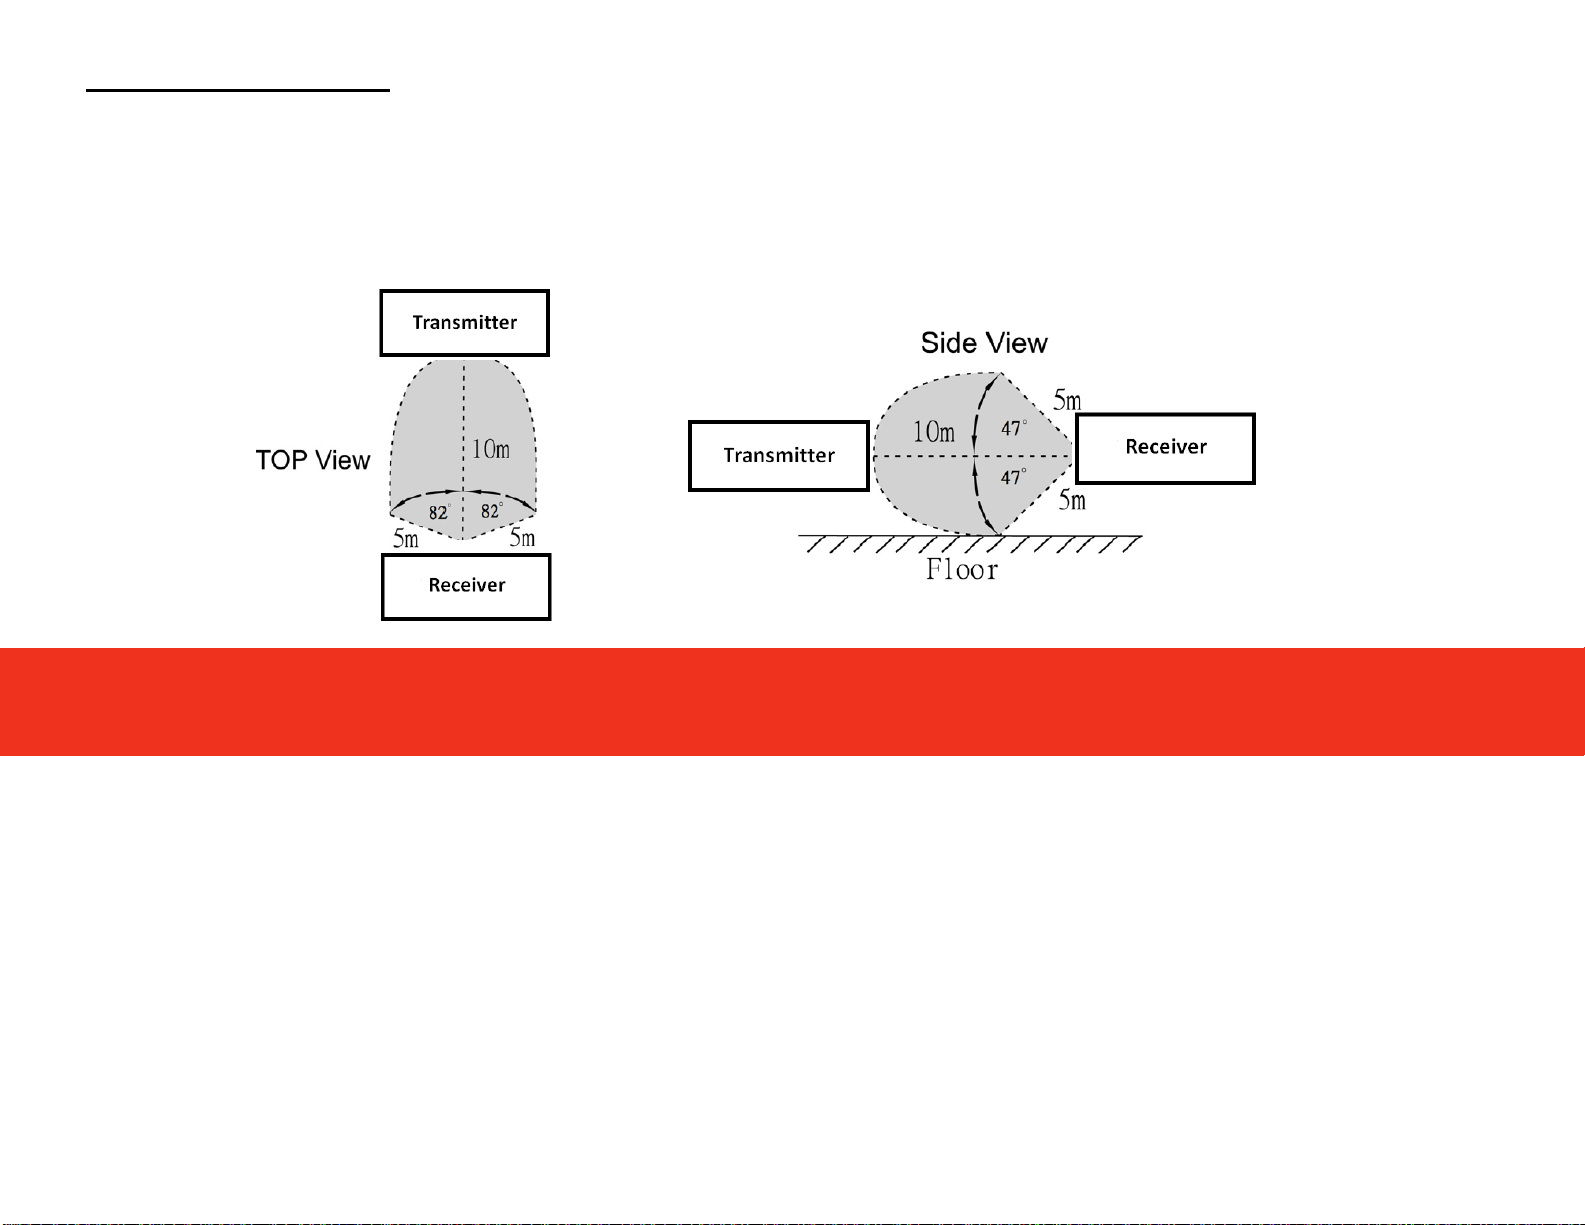
Step 5
After you have finished the above set up steps, the units will be ready to transmit media. You can power on your source
and display device and begin use.
Please note the below diagram for recommended product placement in a room set-up:
The following are some things you can try if you are not getting any or getting poor picture and sound.
Try moving the units closer together making sure they are level with and facing each other
Check all audio and video equipment and make sure correct inputs are selected and all connections are secure
Try lowering the video resolution on your source device to isolate possible bandwidth issue
Make sure you are only using the power adapters that came with the units as changing out may have different
specifications not suitable for operating the units.
Make sure the power switch on the units is in the “on” position
6

Standards
WirelessHD, HDMI(V1.3 with Deep color)
Frequency
60 GHz
Input/ Output Interface
HDMI interface
Antenna Type
36 Antenna Array (Integrate Ceramic)
Range
10 meters inroom usage,
AV Port
Transmitter : 1 Port (CEC pass through)
Receiver : 1 Port (CEC pass through)
Physical Specifications
Weight: 367g±10g
Dimension: L=187mm / W=85mm / H=44.8mm
Adapter Power
12V, 1.5A output
100-240V Power Input; 50-60Hz
LED Indicators
Transmitter: Four LEDs display, power, link indicator, signal Strength indication
Receiver : Four LEDs display, power, link indicator, signal Strength indication
Operating Environment
(Total System)
Operating Temperature: 0 ~ 40℃ ambient temperature
Storage Temperature: -30 ~ 70℃
Operating Humidity: 10% to 90% (Non-condensing)
Storage Humidity: 5% to 90% (Non-condensing)
TECHNICAL SPECIFICATIONS
7

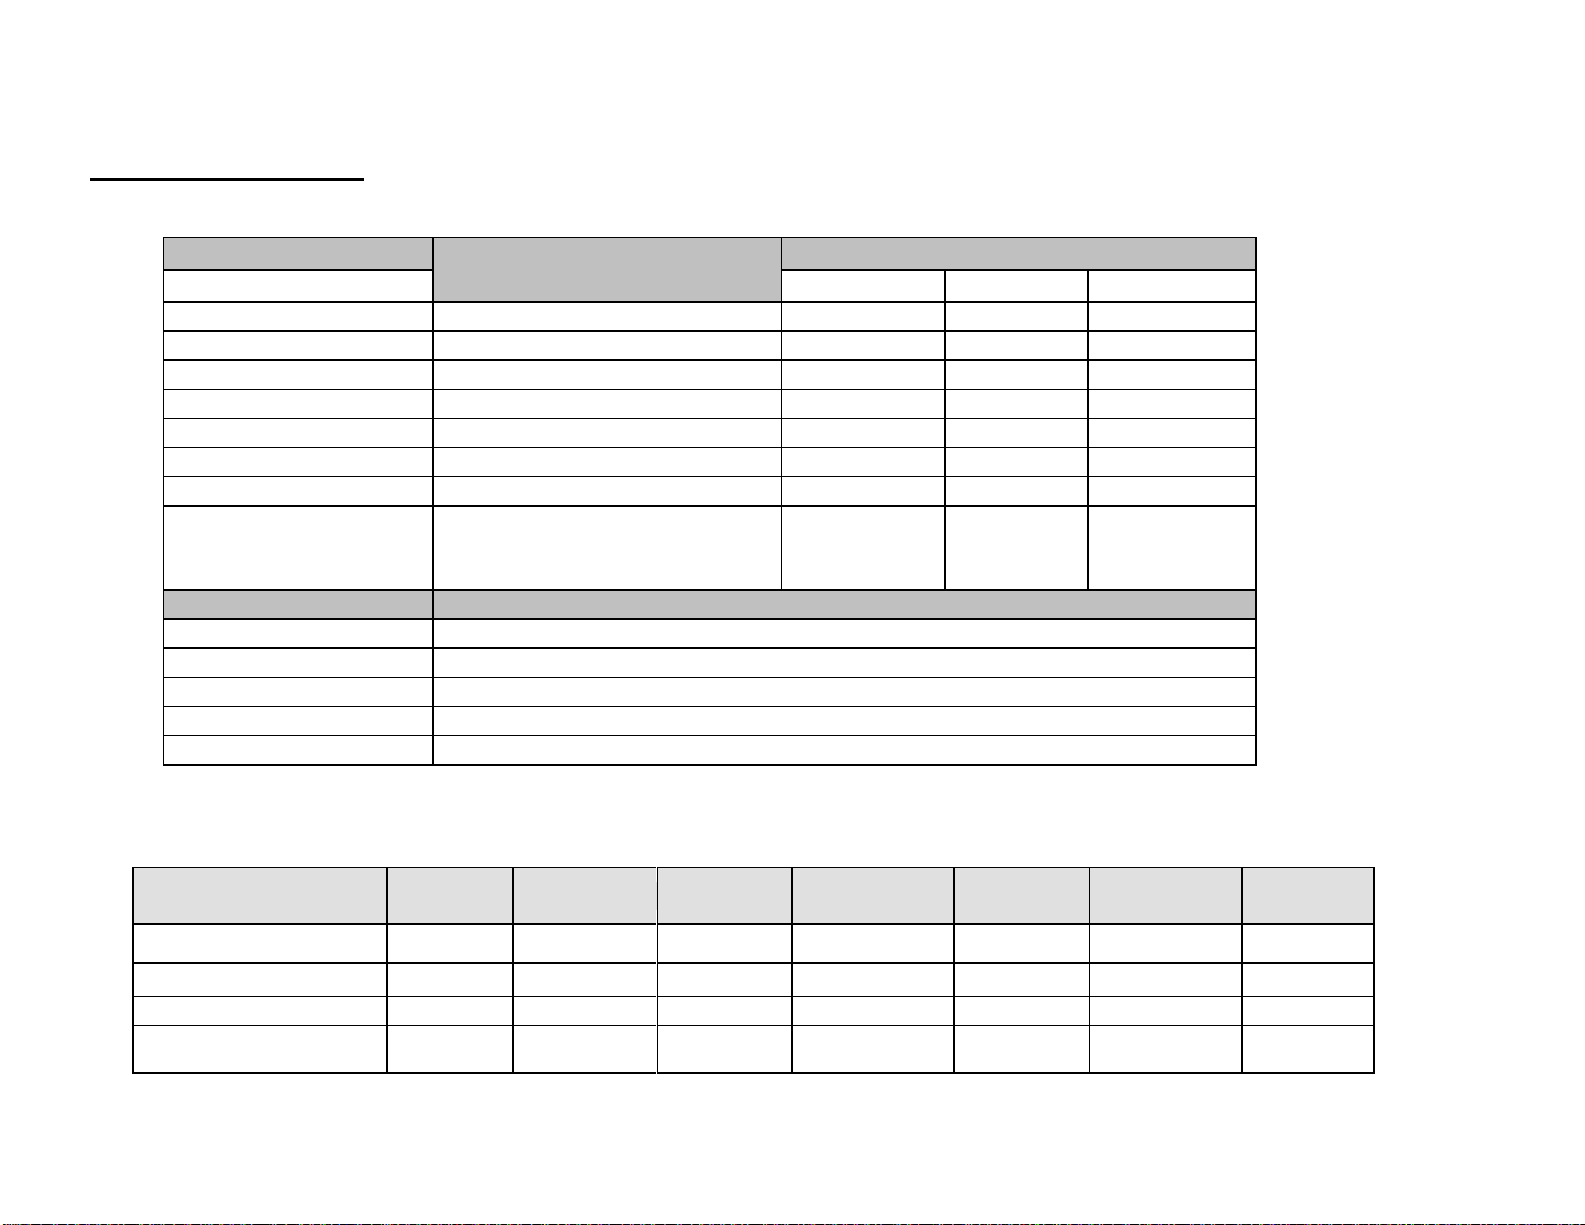
TV mode
De ep Color
Vertical Refresh Rate
Resolution
23.94 / 24 Hz
50 Hz
59.94 / 60 Hz
640X480I
● X X ● 640X480P
● X X ● 720X480P
● X X ● 720X576I
● X ● X 720X576P
● X ● X 1280X720P
● X ● ● 1920X1080I
● X ● ● 1920X1080P
Only support 12bit at 23.94 /
24 Hz
and YUV4:2:2 12bit 60Hz
● ● ●
VESA mode
Vertical Refresh Rate
Resolution
60 Hz
640 X 480
●
800 X 600
●
1024 X 768
●
1280 X 1024
●
Smple rate (256 Fs)
32 kHz
44.1 kHz
48 kHz
88.2 kHz
96 kHz
176.4 kHz
192 kHz
LPCM 2ch
● ● ● ● ● ● ●
LPCM 8ch
● ● ● ● ● X X
AC3 (Dolby) 2ch~6ch
X X ● X X X X
DTS 2ch~6ch
X X ● X X X X
VIDEO FORMAT
Auto detect 17 modes
AUDIO FORMAT
8

EU CONFORMITY STATEMENT
FCC STATEMENT
FCC RF Exposure Statement
This equipment complies with FCC radiation exposure limits set forth for an uncontrolled environment. This equipment
should be installed and operated with minimum distance 20 cm between the radiator and your body. This transmitter must
not be co-located or operating in conjunction with any other antenna.
FCC Part 15 Class B Statement
This device complies with Part 15 of the FCC Rules. Operation is subject to the following two conditions: (1) this device may
not cause harmful interference, and (2) this device must accept any interference received, including interference that may
cause undesired operation.
This equipment has been tested and found to comply with the limits for a Class B digital device, pursuant to Part 15 of the
FCC Rules. These limits are designed to provide reasonable protection against harmful interference in a residential
installation. This equipment generates uses and can radiate radio frequency energy and, if not installed and used in
accordance with the instructions, may cause harmful interference to radio communications. However, there is no guarantee
that interference will not occur in a particular installation. If this equipment does cause harmful interference to radio or
television reception, which can be determined by turning the equipment off and on, the user is encouraged to try to correct
the interference by one or more of the following measures:
Reorient or relocate the receiving antenna.
Increase the separation between the equipment and receiver.
Connect the equipment into an outlet on a circuit different from that to which the receiver is needed.
Consult the dealer or an experienced radio/TV technician for help.
Hereby, C2G™, declares that this device is in compliance with the essential requirements and other relevant provisions of
the R&TTE Directive 1999/5/EC.
LVD, EMC, EMF, Radio as attested by conformity with the following harmonized standards:
EN 60950-1:2001+A11:2004
EN 60065:2002+A1:2006
EN 301 489-1 V1.8.1 (2008-04)
EN 62311:2008
EN 302 567 V1.1.1
9

C2G™ WARRANTY STATEMENT
IMPORTANT SAFETY INFORMATION
C2G™
Road 30 Hortonwood Industrial Estate,
Telford, Shropshire TF1 7AB UK
0800.328.2916
www.c2g.com
! Do not plug the unit in any outlet that does not have enough current to allow the device to function. Refer to the
specifications in this manual for power level of the unit.
! Liquid: If this unit or its corresponding power adapter has had liquid spilled on or in it, do not attempt to use the unit.
Do not attempt to use this product in an outdoor environment as elements such as rain, snow, hail, etc. can damage the
product.
! In case of a storm, it is recommended that you unplug this device from the outlet.
! Avoid placing this product next to objects that produce heat such as portable heaters, space heaters, or heating ducts.
! THERE ARE NO USER SERVICEABLE PARTS
Do not attempt to open this product and expose the internal circuitry. If you feel that the product is defective, unplug the unit
and refer to the warranty information section of this manual.
©2010.TruLink is a trademark of C2G™.
At C2G™, we want you to be totally confident in your purchase. That is why we offer a one year warranty on this device.
If you experience problems due to workmanship or material defect for the duration of this warranty, we will repair or
replace this device. To request a Return Merchandise Authorization (RMA) number, contact customer service at
0800.328.2916 or www.c2g.com.
10

INHALTSVERZEICHNIS
Einführung ................................................................ ................................................................ ................ 12
Packungsinhalt ......................................................................................................................................... 12
Geräteübersicht ........................................................................................................................................ 14
Fehlerbehebung ....................................................................................................................................... 16
Technische Daten ................................................................................................ ..................................... 17
FCC-Erklärung .......................................................................................................................................... 19
EU-Konformitätserklärung ........................................................................................................................ 19
C2G™-Garantie ........................................................................................................................................ 20
Wichtige Sicherheitshinweise ................................................................................................................... 20
11

EINFÜHRUNG
PACKUNGSINHALT
Fernbedienung
Montagehalterung
Benutzerhandbuch
Vielen Dank, dass Sie das TruLink™ 60-GHz-WirelessHD-Kit mit einem Anschluss gekauft haben. Das
TruLink™ 60-GHz-WirelessHD-Kit mit einem Anschluss ermöglicht hochauflösende Drahtlosübertragung
zwischen Ihrem Fernsehgerät und Ihren HDMI-Komponenten. Genießen Sie das vollständige HD
1080p-Signal von Ihrem Computer, Ihrem Blu-ray-Player, Ihrer Settop-Box, Ihrer Spielkonsole oder
einem anderen HDMI-Gerät auf Ihrem HDMI-fähigen Fernsehgerät. Die 60-GHz-Übertragungsfähigkeit
bedeutet größere Flexibilität bei Ihrer Heimkinokonfiguration, da Sie die Komponenten bis zu 10 m (oder
mehr, je nach Umgebung) voneinander entfernt aufstellen können.*
*Auch wenn die Leistungseigenschaften die angegebenen Streckenbeschränkungen je nach Umgebung überschreiten können, werden
folgende Vorgehensweisen empfohlen, um optimale Ergebnisse sicherzustellen.
Der Sender und der Empfänger sollten:
Im selben Raum einander gegenüber stehen.
Sich höchstens 10 m voneinander entfernt befinden.
Auf gleicher Höhe aufgestellt sein, d.h. der Sender sollte nicht höher als der Empfänger stehen.
Offen aufgestellt sein, d.h. nicht in einem Schrank oder einem geschlossenen Regal.
(1) 60-GHz-WirelessHD-Übertragungseinheit
(1) 60-GHz-WirelessHD-Empfangseinheit
(2) HDMI-Kabel
(2) Universal-Netzadapter
12
GERÄTEÜBERSICHT
LED-Anzeigen
LED
Farbe
Verhalten
Anzeige
Betrieb
Grün
Ein
Die LED leuchtet, wenn das Gerät an den Strom angeschlossen und
der Netzschalter eingeschaltet ist.
Aus
Die LED leuchtet nicht, wenn der Netzschalter ausgeschaltet ist.
Blinken
Gerät im Ruhemodus.
Verbindung
Blau
Ein
Die LED leuchtet, um anzuzeigen, welcher RX ausgewählt ist.
Aus
Wenn die Abstimmungs-LED aus ist, muss der Benutzer beide Geräte
zurücksetzen.
Blinken
Warten auf Verbindung.
Schwach
Grün
Ein
Gibt an, dass das Signal schwach ist; die LED für stark ist aus.
Aus
Keine Verbindung oder kein Signal
Stark
Grün
Ein
Gibt an, dass das Signal stark ist; die LED für schwach ist ein.
Aus
Signal schwach; die LED für schwach ist ein.
ÜBERTRAGUNGSEINHEIT
EMPFANGSEINHEIT
13
SEITENANSICHT DES SENDERS UND EMPFÄNGERS
RÜCKANSICHT DES SENDERS UND EMPFÄNGERS
FERNBEDIENUNG
Entfernen Sie die Kunststofffolie, bevor Sie die Fernbedienung verwenden.
Tasten
Reset
Drücken Sie die RESET-Taste, um das System
zurückzusetzen. Das System führt einen vollständigen
Reset durch, der ungefähr 5 Sekunden dauert.
CFG
(Konfigurieren)
Diese Taste ist nur für die Verwendung durch den
Hersteller gedacht.
Konfiguration
DC-IN
Schließen Sie den Netzadapter an den DC-IN-Anschluss
an.
Schalter
Drücken Sie den Schalter, um die Stromversorgung einoder auszuschalten.
HDMI
Schließen Sie ein Ende des HDMI-Kabels an den HDMIAnschluss und das andere Ende an den HDMI-Anschluss
des DVD-Players oder Computers oder an den HDMIAnschluss des DTV an.
Fernbedienung
Sleep
Das Gerät ist einsatzbereit, wenn Sie diese Taste drücken.
HDMI
Zum Umschalten des HDMI-Anschlusses; wird nur für
Modelle mit mehreren HDMI-Anschlüssen verwendet.
DEVICE OVERVIEW
14
Schritt 1
Schließen Sie den 60GHz WirelessHD-Sender mit einem
HDMI-Kabel an eine Eingangsquelle an, zum Beispiel einen
Computer oder einen DVD-Player.
Schritt 3
Schließen Sie die Universal-Netzadapter der Sender- und
Empfängereinheiten an die Steckdosen an.
Hinweis: Der Universal-Netzadapter wird mit zwei verschiedenen
Zubehörteilen (für UK und die EU-Länder) geliefert. Bringen Sie das
entsprechende Zubehör für Ihre Region an und schließen Sie den
Adapter an die Steckdose an.
Schritt 2
Schließen Sie den 60GHz WirelessHD-Empfänger mit
einem HDMI-Kabel an ein Anzeigegerät an, zum Beispiel
einen Monitor oder einen Projektor.
Schritt 4
Schalten Sie die Sender- und Empfängereinheit ein.
GERÄTEINSTALLATION
15
FEHLERBEHEBUNG
GERÄTEINSTALLATION
Schritt 5
Wenn Sie die obigen Schritte abgeschlossen haben, sind die Einheiten für die Übertragung von Medien bereit. Sie können
Ihre Quelle und das Anzeigegerät einschalten und mit der Verwendung beginnen.
Bitte beachten Sie das folgende Diagramm für die empfohlene Produktpositionierung in einem Raum:
Folgendes können Sie versuchen, wenn Sie kein Bild/keinen Ton oder ein schlechtes Bild/schlechten Ton erhalten.
Versuchen Sie, die Geräte näher zueinander aufzustellen und achten Sie dabei darauf, dass sie sich auf gleicher
Ebene gegenüber stehen.
Überprüfen Sie alle Audio- und Videogeräte und vergewissern Sie sich, dass die richtigen Eingänge ausgewählt
und alle Anschlüsse fest sind.
Versuchen Sie, die Videoauflösung auf dem Quellgerät zu verringern, um mögliche Bandbreitenprobleme zu
isolieren.
Achten Sie darauf, dass Sie nur die Netzadapter verwenden, die mit den Geräten geliefert wurden, da sich die
technischen Daten unterscheiden können und andere Adapter möglicherweise nicht für den Betrieb der Geräte
geeignet sind.
Vergewissern Sie sich, dass der Netzschalter an den Geräten in der Position "Ein" ist.
16

Standards
WirelessHD, HDMI (V1.3 mit erweitertem Farbraum)
Frequenz
60 GHz
Eingangs-/Ausgangsschnittstelle
HDMI-Schnittstelle
Antennentyp
36 Antennen-Array (Integrate Ceramic)
Bereich
10 Meter bei Verwendung in einem Raum
AV-Anschluss
Sender: 1 Anschluss (CEC-Passthrough)
Empfänger: 1 Anschluss (CEC-Passthrough)
Technische Daten
Gewicht: 367 g ±10 g
Abmessungen: L = 187 mm / B = 85 mm / H = 44,8 mm
Adapterleistung
12 V, 1,5 A Ausgang
100 - 240 V Ausgangsleistung; 50 - 60 Hz
LED-Anzeigen
Sender: Vier LEDS: Anzeige, Betrieb, Verbindung, Signalstärke
Empfänger: Vier LEDs: Anzeige, Betrieb, Verbindung, Signalstärke
Betriebsumgebung:
(Gesamtsystem)
Betriebstemperatur: 0 ~ 40℃ Umgebungstemperatur
Lagertemperatur: -30 ~ 70℃
Luftfeuchtigkeit beim Betrieb: 10% bis 90% (nicht kondensierend)
Luftfeuchtigkeit bei der Lagerung: 5% bis 90% (nicht kondensierend)
TECHNISCHE DATEN
17
TV-Modus
Erweiterter Farbraum
Vertikale Bildwiederholfrequenz
Auflösung
23.94 / 24 Hz
50 Hz
59.94 / 60 Hz
640X480I
● X X ● 640X480P
● X X ● 720X480P
● X X ● 720X576I
● X ● X 720X576P
● X ● X 1280X720P
● X ● ● 1920X1080I
● X ● ● 1920X1080P
Unterstützt nur 12 Bit bei
23,94 / 24 Hz
und YUV4:2:2 12 Bit 60 Hz
● ● ●
VESA mode
Vertikale Bildwiederholfrequenz
Resolution
60 Hz
640 X 480
●
800 X 600
●
1024 X 768
●
1280 X 1024
●
Abtastfrequenz
(256 Fs)
32 kHz
44,1 kHz
48 kHz
88,2 kHz
96 kHz
176,4 kHz
192 kHz
LPCM 2ch
● ● ● ● ● ● ●
LPCM 8ch
● ● ● ● ● X X
AC3 (Dolby) 2ch~6ch
X X ● X X X X
DTS 2ch~6ch
X X ● X X X X
TECHNISCHE DATEN
Automatische Erkennung von 17 Modi
AUDIOFORMAT
18
 Loading...